Beginning Visual Basic(2012)
Chapter 5
Programming Your ASP.NET Web Pages
What You Will Learn in This Chapter:
· How to work with data types, variables, objects, and collections in a programming environment
· Different ways to make decisions in your code
· The options available for creating blocks of functionality that can easily be reused
· Different ways to write well-organized and documented code
· What object orientation is, and how you can use it in your applications
Wrox.com Code Downloads for this Chapter
You can find the wrox.com code downloads for this chapter on the Download Code tab at www.wrox.com/remtitle.cgi?isbn=1118311809. The code is in the Chapter 5 download.
In the previous four chapters, you created a number of Web Forms that contained mostly ASP.NET Server Controls and plain HTML. Only a few of the examples contained actual programming code, written in either C# or Visual Basic (VB.NET), and most of that code was pretty straightforward. However, not all of your pages will always be so simple, and the ability to read, understand, and write code is a critical asset in your web development toolkit.
This chapter teaches you the basics and beyond of programming for web applications. Just as with all the other samples in the book, this entire chapter covers both VB.NET and C#. For every concept or piece of theory introduced in this chapter, you see an example in both VB.NET and C# at the same time. Which language you prefer is entirely your decision.
Note
To get the most out of this chapter, it's recommended that you actually try out the code. You can test most of the examples with a simple ASPX page. Drag a Label and a Button on your page and double-click the Button in Design View. Then type the sample code on the open line of the code block that VS added for you and press Ctrl+F5. After the page has finished loading, click the button and the code will be executed. Some of the examples call fictitious code and won't run correctly. They only serve to illustrate the topic being discussed.
Introduction to Programming
To get started with programming, it's critical to understand a common set of terms shared by programmers in all types of languages and applications. The remainder of this chapter introduces you to a relatively large number of terms and concepts. Most of the terminology comes with code examples so you can see how they are used in real code.
It's also important to realize this is not a complete introduction to programming. Not every detail of a programming language is covered. Instead, this chapter focuses on the key concepts that you need to understand to successfully build day-to-day websites. Once you get the hang of that you'll find it's easier to deepen your knowledge about programming by learning the more exotic features of your favorite programming language.
Note
If you're interested in learning a lot more about programming in VB.NET or C#, find Beginning Visual Basic 2012 (ISBN: 978-1-1183-1181-3) or Beginning Microsoft Visual C# 2012 (ISBN: 978-1-1183-1441-8), both published by Wrox.
You add the code you write in this and coming chapters either to the Code Behind of a web page, or in a separate class file placed in the special App_Code folder. When the ASP.NET run time processes the request for a page containing code, it compiles any code it finds in the page, Code Behind, or class files first. When code is compiled, it is being transformed from a human-readable programming language (like C# or VB.NET) into Microsoft Intermediate Language (MSIL), the language that the .NET Framework run time can understand and execute. The result of the compilation process of an ASP.NET website is one or more assemblies—files with a DLL extension—in a temporary folder on your system. This compilation process takes place only the first time the page is requested after it has been created or changed. Subsequent requests to the same page result in the same DLL being reused for the request. Fortunately, in ASP.NET websites, compilation takes place behind the scenes, so you usually don't have to worry about it.
To get started with programming, the first concepts that you need to look at are data types and variables, because they are the building blocks of any programming language.
Note
The .NET Framework used by ASP.NET is huge and contains thousands of types with hundreds of thousands of members. Clearly, you cannot memorize all the types in the framework, so you need to make good use of resources like IntelliSense and the online help. Navigating the MSDN site (http://msdn.microsoft.com/en-us/library/) can sometimes be a daunting task. However, I often find that searching for something like typeName type .NET MSDN brings up exactly what I need. So, if I wanted to learn more about the string class, I'd type string class .NET MSDN in my favorite search engine. Nine out of ten times the first result is a link to the relevant page on the MSDN website, where I can learn more about the class—where it's defined and located and how to use it.
Data Types and Variables
At first when you think about data that is used in some programming environment, you may not realize that each piece of data has a data type. You may think that a computer would store the text Hello World in exactly the same way as today's date or the number 26; as a series of characters, for example. However, to be able to effectively work with data, many programming languages have different data types, and each data type is constrained to a specific type of information. Out of the box, the .NET Framework comes with a long list of data types that enable you to work with numbers (such as Int32, Int16, and Double), text strings (Char and String), dates (DateTime), true/false constructs (the Boolean), and more. A list of the most common types is supplied later in this section.
For each major type of data there is a special data type. To work with that data, you can store it in a variable that you need to declare first using the required data type. In VB.NET you use Dim myVariable As DataType, whereas in C# you use DataType myVariable to declare a variable. A valid variable name typically consists of letters, numbers, and underscores, and cannot start with a number. These rules apply to other identifiers as well, such as classes and methods, which you see later. The following example shows you how to declare two variables: an Integer (int in C#) to hold a number and a String (string in C#) to hold a piece of text:
VB.NET
’ Declare a variable of type Integer to hold medium sized whole numbers.
Dim distanceInMiles As Integer
’ Declare a variable to hold some text like a first name.
Dim firstName As String
C#
// Declare a variable of type int to hold medium sized whole numbers.
int distanceInMiles;
// Declare a variable to hold some text like a first name.
string firstName;
These two code examples also contain comments, prefixed with a tick (') in VB.NET or two forward slashes (//) in C#. You learn more about commenting your code later in this chapter.
After you have declared a variable, you can assign it a value. You can assign types like numbers and booleans directly to a variable. To assign a string to a variable you need to enclose it in double quotes:
VB.NET
Dim distanceInMiles As Integer
distanceInMiles = 437
Dim firstName As String
firstName = "Imar"
C#
int distanceInMiles;
distanceInMiles = 437;
string firstName;
firstName = "Imar";
In addition to separate declarations and assignments, you can also declare a variable and assign it a value in one fell swoop:
VB.NET
Dim distanceInMiles As Integer = 437
Dim firstName As String = "Imar"
C#
int distanceInMiles = 437;
string firstName = "Imar";
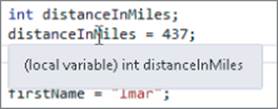
Although a variable name can be nearly anything you like, it's advised that you give each variable a meaningful name that describes its purpose. For example, a string to hold a first name could be called firstName and a variable that holds someone's age could simply be called age. In .NET it's common to write local variables in what's called camel case, which means each word starts with a capital letter except for the first. To help you find the type of the variable later in the code, VS shows a useful tooltip when you hover over a variable in the code editor, making it super easy to find a variable's type. Figure 5.1 shows that the distanceInMiles variable in the C# example is of type int.
Figure 5.1
You're advised not to prefix your variables with letters to indicate the type. For example, write firstName and not sFirstName for a String holding someone's name. This type of notation, called Hungarian Notation, is considered outdated. IDEs like Visual Studio, with their smart IntelliSense and other programming tools, don't really require this anymore. Without Hungarian Notation, your code becomes easier to read (age is more readable than iAge) and easier to maintain because you can change a variable's type without renaming it everywhere it's used.
Microsoft .NET supports a large number of different programming languages, including VB.NET, C#, and others. All these languages are able to communicate with each other. For example, you can write some code in C#, use Visual Studio Express 2012 for Windows Desktop to compile it to a.dll file (a file with reusable code that can be consumed by other .NET applications), and then use it in a web application that uses VB.NET as the primary language. Because of this interoperability, it's necessary to agree on some system that enables all .NET programming languages to understand each other. This system is called the Common Type System (CTS). It's the CTS that defines the data types that are accessible to all CTS-compliant languages. Each language is then free to define a set of primitive types, which are essentially shortcuts or aliases for the more complex type descriptions in the .NET Framework. So, even if the CTS defines a type called System.Int32, a language like C# is free to alias this type as int and VB is free to alias this type as Integer to make it easier for a developer to work with it.
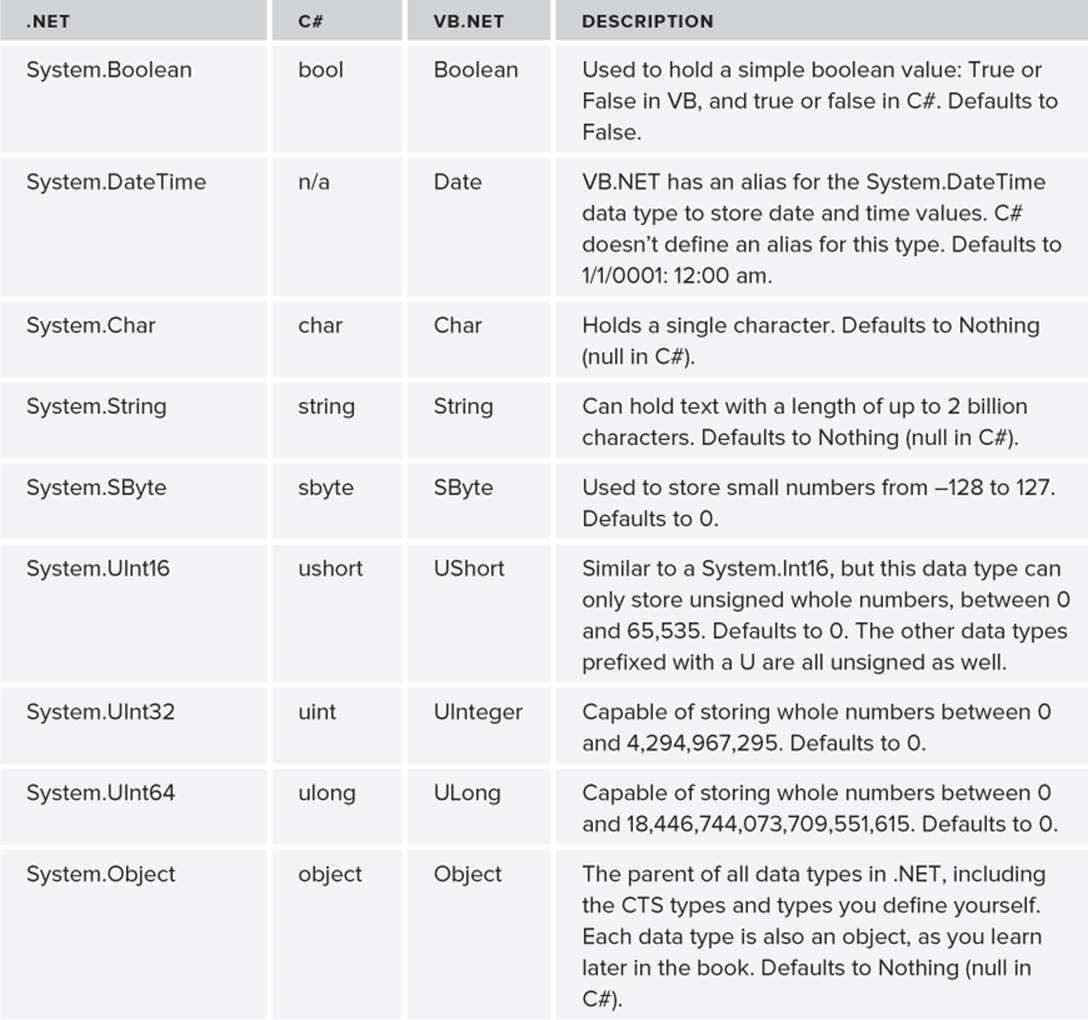
The following table lists the most common CTS types in the .NET Framework and their C# and VB.NET aliases. The table also lists the ranges of the variables and what they are used for.
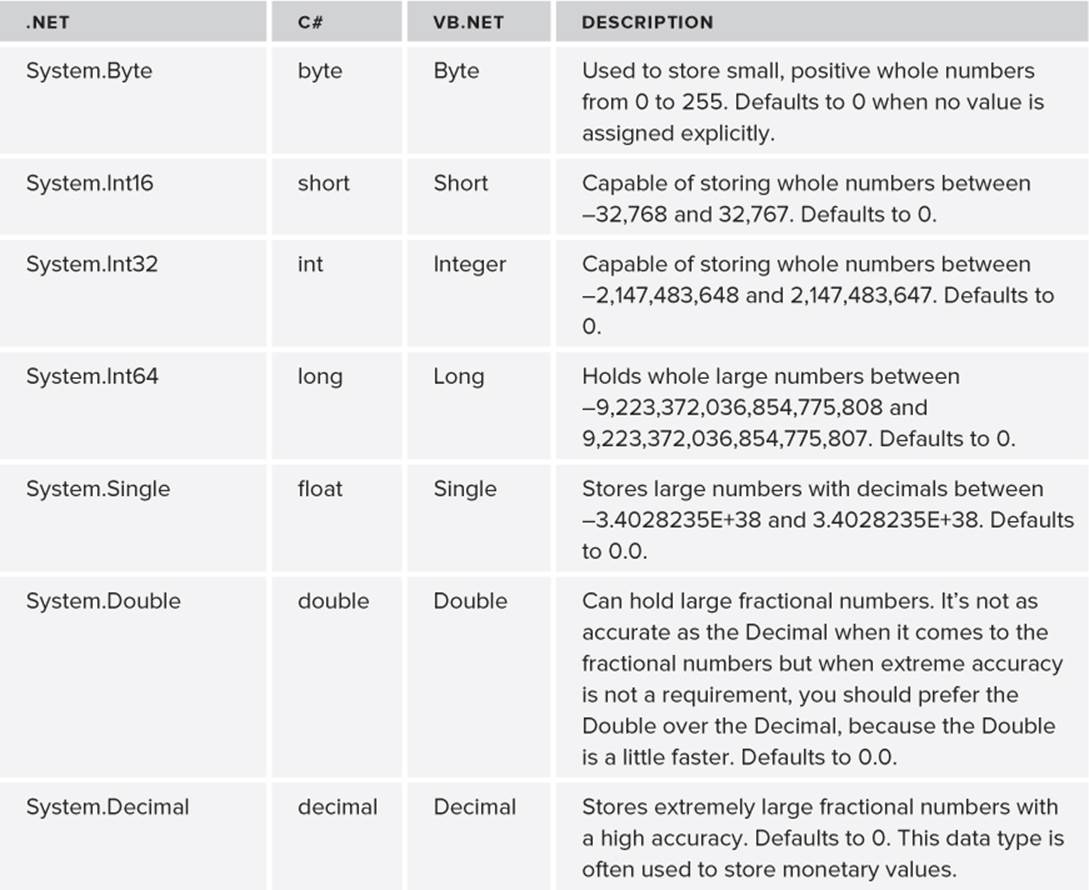
The standard .NET types are all prefixed with System followed by a period. This System part is the namespace for this data type. You learn what namespaces are and what they are used for later in this chapter.
Sometimes you need to convert data from one type to another. For example, you may have an Int32 that you need to treat as a Double. You can do this in a number of different ways.
Converting and Casting Data Types
The most common way to convert a type is converting it into a String. Web applications use string types in many places. For example, the Text returned from a TextBox is a String, and so is the SelectedValue of a DropDownList. To get a string representation of an Object, you can call itsToString() method. Every object in the .NET world supports this method, although the exact behavior may differ from object to object. For now, it's important to understand that ToString is a method—or an operation—on an object, like a String or a Double and even the parent Object itself. You learn more about methods and objects later in this chapter when object-oriented programming is discussed.
Using ToString() is easy, as the following example that outputs today's date and time on a Label control demonstrates:
VB.NET
Label1.Text = System.DateTime.Now.ToString()
C#
Label1.Text = System.DateTime.Now.ToString();
Another way to convert data types is by using the Convert class.
Note
Classes are an important concept in .NET, so they are discussed in their own section later in this chapter. For now it's important to understand that a class is like a blueprint for objects that are used in .NET. You can create your own classes, but you will also use many of the standard classes that are part of the .NET Framework.
The Convert class contains functionality to convert a number of data types into another type. The following is a simple example of converting a String containing a value that looks like a boolean into a true Boolean type:
VB.NET
Dim myBoolean1 As Boolean = Convert.ToBoolean("True") ‘ Results in True
Dim myBoolean2 As Boolean = Convert.ToBoolean("False") ‘ Results in False
C#
bool myBoolean1 = Convert.ToBoolean("True"); // Results in true
bool myBoolean2 = Convert.ToBoolean("False"); // Results in false
Besides the ToBoolean method, Convert offers you a host of other conversion methods, including ToInt32 (for integer types), ToDateTime (for dates), and ToString.
Another way to convert one type into another is by using casting. With casting you actually force one type into another, which is different from converting, in which the underlying value of a data type is transformed into a new value.
Casting only works for compatible types. You can't, for example, cast a DateTime into an Integer. You can, however, cast similar types, like a Double to an Integer or a String to an Object. The reverse of the latter example isn't always true. Earlier I said that every data type in the .NET Framework is based on the Object data type, meaning that, for example, a String is an Object. However, not every Object is also a String. When you try to cast one type into another and get a compilation or runtime error, keep this in mind. Later chapters in this book show you more examples of how to cast compatible types into each other.
To cast one type into another using VB.NET, you have a few options. First, you can use CType and DirectCast. CType is a bit more flexible in that it allows you to cast between two objects that look similar. DirectCast, on the other hand, only allows you to cast between compatible types but performs slightly faster. The following VB.NET example shows how this works:
Dim o1 As Object = 1
Dim i1 As Integer = DirectCast(o1, Integer) ‘ Works, because o1 is an Integer
Dim i2 As Integer = CType(o1, Integer) ‘ Works, because o1 is an Integer
Dim o2 As Double = 1
Dim i3 As Integer = DirectCast(o2, Integer) ‘ Does not compile, because o2 is
‘ not an Integer
Dim i4 As Integer = CType(o2, Integer) ‘ Works, because o2 looks like an
‘ Integer
In the first part of the example, an object called o1 is declared and assigned the Integer value of 1. Although o1 exposes itself to the outside world as an Object, its underlying value is still an Integer. When DirectCast is called, the cast succeeds because o1 is, under the hood, an Integer.
In the second example, o2 is declared as a Double, a numeric type that looks somewhat like an Integer, but isn't really one. Therefore, the call to DirectCast fails because a Double cannot be cast to an Integer. CType, on the other hand, works fine, because the underlying value of the variable o2looks like an Integer and can therefore be cast to one. It's important to realize that if the Double type has a decimal part, that part gets lost when casting it to an Integer.
The third option to cast in VB.NET is using the keyword TryCast, which is somewhat similar to the other two options. When an object cannot be cast correctly, TryCast returns Nothing, whereas DirectCast and CType result in a crash of the code.
In C# you have two options to cast objects. The most common way is to put the data type in parentheses in front of the expression you want to cast. This works similar to CType in VB.
object o1 = 1;
int i1 = (int)o1; // Works
double o2 = 1;
int i2 = (int)o2; // Works
Alternatively, you can use the as keyword, which works similarly to TryCast in VB.NET in that the code doesn't crash if the cast doesn't succeed. The following sample code shows that you cannot cast an Integer to an ArrayList (which you meet later in this chapter). Instead of crashing, the variable myList simply contains null to indicate that the cast operation didn't succeed.
object o1 = 1;
ArrayList myList = o1 as ArrayList; // Doesn't cast, but doesn't crash either.
You see more about casting and converting in the remaining chapters in this book.
Using Arrays and Collections
So far the data types you have seen are relatively straightforward and singular objects. For example, you store a value of True or False in a Boolean type, and you store a number like 123 in an Integer. But what if you have the need to store lots of integers? You may have the need to do so if you want to store the points of a complex shape like a polygon. Or you may have the need to store all the roles that your application supports in a single variable so you can show them on a web page in the Management section, for example. Here's where arrays and collections come to the rescue.
Defining and Working with Arrays
You can see an array as a big bag or list of the same type of things. You define the data type of the things in the array when you declare it. Each item in the array is identified by a sequential number (its so-called index) starting at 0, making arrays zero-based. When declaring and accessing an array in VB.NET you use parentheses, whereas in C# you use square brackets. After you have defined the array and populated its elements, you can access the elements by their zero-based element index (0, 1, 2, and so on).
The following code snippet defines an array called roles that can hold up to two roles at the same time:
VB.NET
Dim roles(1) As String
C#
string[] roles = new string[2];
See the difference between the VB.NET and C# examples? That's not a typo. In VB.NET you define an array's size by specifying the upper bound. The upper bound is the last element in the array that you can access. Because arrays are zero-based (that is, you address the first item in the array with an index of 0), it means that if you need room for two items, the upper bound is 1, giving you the items 0 and 1.
In C#, on the other hand, you don't define the upper bound but instead you define the size. So in C#, you simply specify 2 to get an array with two elements.
Additionally, C# requires you to use the keyword new, which instantiates a new array for you. VB.NET does that for you automatically and raises an error if you add the New keyword as in the C# example. You see the new (New in VB.NET) keyword again later in this chapter.
To enter the role names into the array you use the following syntax:
VB.NET
roles(0) = "Administrators"
roles(1) = "ContentManagers"
C#
roles[0] = "Administrators";
roles[1] = "ContentManagers";
Just as with the array's declaration, you use parentheses in VB.NET and square brackets in C# to address the elements in the array. Note that (0) and [0] refer to the first element in the array and (0) and [1] refer to the second.
By design, arrays have a fixed size. So, given the previous example that defines an array with room for two elements, the following code will throw an error:
VB.NET
roles(2) = "Members" ‘ Throws an error
C#
roles[2] = "Members"; // Throws an error
This code tries to squeeze a third role into an array that has room for only two. Obviously, that doesn't fit and you'll get an error stating that the "Index was outside the bounds of the array.” But what if you need to create more room in the array at a later stage in your code at run time? In VB.NET this is pretty easy. You can use the ReDim statement:
ReDim Preserve roles(2)
roles(2) = "Members" ‘ Works fine now
This line of code re-dimensions the array to its new size: an upper bound of two, thus creating room for a third element. The Preserve keyword is necessary to leave the current items in the array intact. Without it, the resized array will be empty.
C# has no direct keyword to re-dimension an array. However, you can leverage the Array class of the .NET Framework to resize the array as follows:
Array.Resize(ref roles, 3); // Resize the array so it can
// hold three elements
roles[2] = "Members"; // Works fine now
Don't worry about this odd-looking syntax right now; you probably won't need it very often, because the .NET Framework offers alternatives to fixed-size arrays. Since Array.Resize is available to VB.NET as well, you have two options to choose from if you're using that language.
When you start working with arrays, you find that they are quick to use at run time, but lack some useful functionality. For example, it's not so easy to add new elements or to remove existing items from the array. Fortunately, the .NET Framework offers a range of useful collections that do give you the feature set you need.
Defining and Working with Collections
Collections are similar to arrays in that they enable you to store more than one object in a single variable. The same bag analogy works for collections: You can simply drop a number of items in a bag, and it will hold them for you. What's different with collections is how they enable you to work with the data in the bag. Instead of simply accessing each item by its index, most collections expose an Add method that enables you to add an item to the collection. Similarly, they have Remove and Clear methods to remove one or all items from the collection. Just like arrays, they enable you toiterate, or loop, over them to access the items in the collection.
When collections were first introduced in the .NET Framework 1.0, the ArrayList and Hashtable became popular very quickly because they were so easy to use. The ArrayList enables you to add arbitrary objects that are then stored in the order in which you add them, whereas the Hashtableenables you to store objects referenced by a custom key. The main benefit of these collections over their array cousins is that they can grow on demand. Unlike the previous example, where you needed to resize the array to create room for the third role, the ArrayList grows dynamically when required. The following example shows you how this works:
VB.NET
Dim roles As New ArrayList() ‘ Create a new ArrayList. You don't need
‘ to set its size explicitly
roles.Add("Administrators") ‘ Add the first role
roles.Add("ContentManagers") ‘ Add the second role
roles.Add("Members") ‘ Keep adding roles and the ArrayList
‘ grows as necessary
C#
ArrayList roles = new ArrayList(); // Create a new ArrayList. You don't need
// to set its size explicitly
roles.Add("Administrators"); // Add the first role
roles.Add("ContentManagers"); // Add the second role
roles.Add("Members"); // Keep adding roles and the ArrayList
// grows as necessary
Because this code now calls a method (Add) rather than assigning an item to a predefined index in an array, you need parentheses (()) in both VB.NET and C#. The usage of methods is discussed later in this chapter.
Although collections solve some of the problems that arrays have, they introduce a few problems of their own. The biggest drawback of the ArrayList is that it isn't strongly typed. What this means is that you can add any object to the list using the Add method. This means that the ArrayListcould hold objects that are of different types at the same time. This may not seem to be a big deal at first, but as soon as you start working with an ArrayList that contains multiple types of objects, you'll quickly see why this is problematic. Take the roles example again. With the array and theArrayList versions, the code simply added a few strings containing role names. You can then use these three strings to, say, build up a drop-down list in a Web Form to enable a user to pick a role. So far, so good. But what if one of the items in the list is not a string? What if another developer accidentally wrote some code that adds a DropDownList control to the ArrayList? Because the ArrayList accepts all objects, it won't complain. However, your code will crash if it expects a String, but gets a DropDownList control instead.
With .NET 2.0, Microsoft introduced a concept called generics. Generics are still strongly present in version 4.5 of .NET, helping you overcome the problems that weakly typed collections like the ArrayList introduced.
An Introduction to Generics
Since their introduction with .NET 2.0, generics pop up in many different locations in the .NET Framework. Although they are used often in situations where collections are used, the use of generics is not limited to collections; you can also use them for singular types of objects.
Generics are to code what Microsoft Word templates are to word processing. They enable you to write a code template that can be used in different scenarios with different types. With generics, you can define a generic code template that doesn't explicitly specify a type. Only when that code is used do you define the type. The main benefit of this is that you can reuse the same template over and over again for multiple data types, without retyping and maintaining multiple versions of the code. In addition to using generics in your own code definitions, you find a host of generics-enabled objects and collections in the .NET Framework, ready to be used by your code.
To understand how you can take advantage of generics, take a look at the following example. It's essentially the same code you saw earlier where the ArrayList was used, but this time the type of the list is constrained so it accepts only strings:
VB.NET
Dim roles As New List(Of String)
roles.Add("Administrators")
roles.Add("ContentManagers")
roles.Add("Members")
C#
List<string> roles = new List<string>();
roles.Add("Administrators");
roles.Add("ContentManagers");
roles.Add("Members");
Not much code has changed to make the roles list type safe. However, with the definition of List (Of String) in VB.NET and List<string> in C# the new list is now set up to allow only strings to be added through its Add method. This compiles fine:
roles.Add("Administrators");
The following will not compile because 33 is not a String:
roles.Add(33);
Similar to a generics list of strings, you can also create lists to hold other types. For example:
VB.NET
Dim intList As New List(Of Integer) ‘ Can hold Integers only
Dim boolList As New List(Of Boolean) ‘ Can hold Booleans only
Dim buttonList As New List (Of Button) ‘ Can hold Button controls only
C#
List<int> intList = new List<int>(); // Can hold ints only
List<bool> boolList = new List<bool>(); // Can hold bools only
List<Button> buttonList = new List<Button>(); // Can hold Button controls only
Note
Because there's a lot more to generics than what is shown here, they deserve an entire book of their own. Wrox has released such a book: Professional .NET 2.0 Generics by Tod Golding (ISBN: 978-0-7645-5988-4). Although it was originally written for .NET 2.0, you'll find that all the concepts and examples introduced in that book still apply.
Though the Add method is useful to add items to a collection, it can sometimes be a bit tedious if you need to add multiple items to a collection at once. To make this easier, .NET supports collection initializers. With a collection initializer, you declare the collection and add some items in one step. You do this by adding the items in a pair of curly braces (prefixed with the keyword From in VB.NET) as shown in the following example:
VB.NET
Dim myList As New List(Of Integer) From {1, 2, 3, 4, 5}
C#
List<int> myList = new List<int>() { 1, 2, 3, 4, 5 };
Right after this line, the list is populated with the five integers.
Collection initializers are not limited to the List class or integers. You can use them with other collection types and data types as well.
The generics examples you have seen barely scratch the surface of what is possible with generics. However, when building ASP.NET websites, you often don't need all the advanced stuff that generics offer you. The List collection is so useful it had to be discussed here. Without a doubt, you'll use that collection in your own code one way or another.
Statements
To make a program or a website do something useful, you need to provide it with code statements that it can execute. Statements cover a wide range of actions, such as show this button, send this e-mail, execute this and that code when a user clicks that button, and so on. However, simply executing these actions is not enough. You often need to execute some code only when a certain condition is true. For example, if a visitor to an e-commerce website is buying more than $100 worth of merchandise at one time, she might get a discount of 10 percent. Otherwise, she'll pay the full price. Conditions or decisions are therefore very important statements in a programming language. Another important set of statements is the loops. Loops enable you to repeat a certain piece of code a number of times. For example, you can have a loop that goes from 1 to 10, performing some action on each iteration. Or you can loop through the products in a shopping cart, summing up their total price, for example.
The final important set of statements is the operators. Operators enable you to do something with your values; or, to be more exact, they enable you to operate on them. For example, you use operators to add or subtract values, concatenate (combine) them, or compare them to each other.
The following three sections dig deeper into operators, decision making, and loops.
Operators
The most important operators can be grouped logically into five different types; these types are covered in this section. Of these five types, the assignment operators are probably the easiest to understand and use.
Assignment Operators
The assignment operators are used to assign a value to a variable. This value can come from many sources: a constant value, like the number 6, the value of another variable, or the result of an expression or a function, which are discussed later. In its simplest form, an assignment looks like this, where the number 40 is assigned to the age variable:
VB.NET
Dim age As Integer = 40
C#
int age = 40;
What if the person this age variable is referring to just had his birthday? You'd need to add 1 to the age value. That's where arithmetic operators come into play.
Arithmetic Operators
Arithmetic operators enable you to perform most of the familiar calculations on variables and values, like adding, subtracting, and dividing. The following table lists the common arithmetic operators for both VB.NET and C#.
|
VB.NET |
C# |
Usage |
|
+ |
+ |
Adds two values to each other |
|
− |
− |
Subtracts one value from another |
|
* |
* |
Multiplies two values |
|
/ |
/ |
Divides two values |
|
\ |
n/a |
Divides two values but always returns a rounded integer |
|
ˆ |
n/a |
Raises one value to the power of another |
|
Mod |
% |
Divides two whole numbers and returns the remainder |
The first four operators probably look familiar, and their usage is pretty straightforward. The following code snippet shows the basic operations you can perform with these operators:
VB.NET
Dim firstNumber As Integer = 100
Dim secondNumber As Single = 23.5
Dim result As Double = 0
result = firstNumber + secondNumber ‘ Results in 123.5
result = firstNumber - secondNumber ‘ Results in 76.5
result = firstNumber * secondNumber ‘ Results in 2350
result = firstNumber / secondNumber ‘ Results in 4.25531914893617
C#
int firstNumber = 100;
float secondNumber = 23.5F;
double result = 0;
result = firstNumber + secondNumber; // Results in 123.5
result = firstNumber - secondNumber; // Results in 76.5
result = firstNumber * secondNumber; // Results in 2350
result = firstNumber / secondNumber; // Results in 4.25531914893617
Note that in the C# example you need to add the letter F to the value of 23.5. This tells the compiler you really want it to be a float rather than a double.
VB.NET also supports the \ operator, which basically performs the division and then drops the remainder from the value, effectively rounding the return value down to the nearest integer.
VB.NET
result = firstNumber \ secondNumber ‘ Results in 4
C# doesn't have a special operator for this. However, when you try to divide two integers, the result is always an integer as well. This means that 7 (stored as an int) divided by 2 (stored as an int) will be 3. It's important to realize that this rounding occurs, or you may end up with unexpected results.
The final two operators need a bit more explanation. First, the ˆ operator—for raising one number to the power of another—is available only in the VB.NET language:
VB.NET
Dim result As Double
result = 2 ˆ 3 ‘ Results in 8 (2 * 2 * 2)
result = 3 ˆ 2 ‘ Results in 9 (3 * 3)
C# doesn't support this operator, but you can easily replicate its behavior using Math.Pow, which is made available by the .NET Framework. The following code snippet is functionally equivalent to the preceding one:
C#
result = Math.Pow(2, 3); // Results in 8 (2 * 2 * 2)
result = Math.Pow(3, 2); // Results in 9 (3 * 3)
Of course Math.Pow is available to VB.NET as well, so if you're using that language, you have two options to choose from.
The final operator is called the modulus operator. It returns the remainder of the division of two numbers, like this:
VB.NET
Dim firstNumber As Integer = 17
Dim secondNumber As Integer = 3
Dim result As Integer = firstNumber Mod secondNumber ‘ Results in 2
C#
int firstNumber = 17;
int secondNumber = 3;
int result = firstNumber % secondNumber; // Results in 2
Simply put, the modulus operator tries to subtract the second number from the first as many times as possible and then returns the remainder. In the preceding example this will succeed five times, subtracting a total of 15, leaving a remainder of 2, which is then returned and stored in the result. The modulus operator is often used to determine if a number is odd or even.
When working with operators, it's important to keep their precedence in mind. To see why this is important, consider the following calculation:
2 + 10 * 4
What is the outcome of this? You may think the answer is 48 if you first add 2 and 10 together, and then multiply the result by 4. However, the right answer is 42; first the multiplication operator is applied on 10 and 4, resulting in 40. Then 2 is added, which leads to 42 as the final result. The following table shows the operator precedence for both VB.NET and C#.

To force a different operator order, you can use parentheses around expressions. The contents of the expressions are evaluated first, resulting in a different order. For example:
(2 + 10) * 4
This does result in 48 now, because the addition operator is applied before the multiplication operator.
Both languages also enable you to combine the arithmetic and assignment operators, enabling you to take the value of a variable, perform some arithmetic operation on it, and assign the result back to the variable. The following examples show how this works:
VB.NET
Dim someNumber1 As Integer = 3
Dim someNumber2 As Integer = 3
Dim someNumber3 As Integer = 3
Dim someNumber4 As Integer = 3
someNumber1 += 3 ‘ Results in someNumber1 having the value 6
someNumber2 -= 3 ‘ Results in someNumber2 having the value 0
someNumber3 *= 3 ‘ Results in someNumber3 having the value 9
someNumber4 /= 3 ‘ Results in someNumber4 having the value 1
C#
int someNumber1 = 3;
int someNumber2 = 3;
int someNumber3 = 3;
int someNumber4 = 3;
someNumber1 += 3; // Results in someNumber1 having the value 6
someNumber2 -= 3; // Results in someNumber2 having the value 0
someNumber3 *= 3; // Results in someNumber3 having the value 9
someNumber4 /= 3; // Results in someNumber4 having the value 1
C# also enables you to increase a variable's value by 1 using the ++ operator, like this:
C#
int someNumber = 3;
someNumber++; // Results in someNumber having the value 4
This construct is used often in loops, as you'll see later in the chapter.
Both languages also use arithmetic assignment operators to concatenate string values, as you'll see shortly.
Another common set of operators is the comparison operators, which enable you to compare values.
Comparison Operators
Just as with the arithmetic operators, VB.NET and C# each have their own set of comparison operators to compare one value to another. A comparison operator always compares two values or expressions and then returns a boolean value as the result. The following table lists the most common comparison operators.
|
VB.NET |
C# |
Usage |
|
= |
== |
Checks if two values are equal to each other |
|
<> |
!= |
Checks if two values are not equal |
|
< |
< |
Checks if the first value is less than the second |
|
> |
> |
Checks if the first value is greater than the second |
|
<= |
<= |
Checks if the first value is less than or equal to the second |
|
>= |
>= |
Checks if the first value is greater than or equal to the second |
|
Is |
is |
In VB.NET: Compares two objects. In C#: Checks if a variable is of a certain type |
The first thing you'll notice is that C# uses a double equals symbol (==) for the standard comparison operator. This clearly makes it different from the assignment operator. It's a common mistake in C# to use only a single equals symbol if you intend to compare two values. Consider the following example:
if (result = 4)
{
// Do something here with result
}
The intention here is to see if result equals 4. However, because the assignment operator is used instead of a proper comparison operator, you'll get the compile error that is displayed in Figure 5.2.
Figure 5.2

At first the error message may look a little strange. But if you look at the code a little closer, it starts to make more sense. First, result gets assigned a value of 4. This value is then used for the if statement. However, the if statement needs a boolean value to determine whether it should run the code inside the if block. Because you can't convert an integer value to a boolean like this, you get a compile error. The fix is easy, though; just use the proper comparison operator instead:
if (result == 4)
{
// Do something here with result
}
Similar to the simple comparison operator, you can use the other operators to compare values:
VB.NET
4 > 5 ‘ 4 is not greater than 5; evaluates to False
4 <> 5 ‘ 4 is not equal to 5; evaluates to True
5 >= 4 ‘ 5 is greater than or equal to 4; evaluates to True
C#
4 > 5 // 4 is not greater than 5; evaluates to false
4 != 5 // 4 is not equal to 5; evaluates to true
5 >= 4 // 5 is greater than or equal to 4; evaluates to true
The Is keyword in VB.NET and is in C# do something completely different. In VB.NET, Is compares two instances of objects, something you learn more about in the second half of this chapter. In C#, you use is to find out if a certain variable is compatible with a certain type. You can accomplish that in VB.NET using the TypeOf operator. The following two examples are functionally equivalent:
VB.NET
Dim myTextBox As TextBox = New TextBox()
If TypeOf myTextBox Is TextBox Then
‘ Run some code when myTextBox is a TextBox
End If
C#
TextBox myTextBox = new TextBox();
if (myTextBox is TextBox)
{
// Run some code when myTextBox is a TextBox
}
One of the arithmetic operators enables you to add two values to each other. That is, you use the plus (+) symbol to add two values together. But what if you want to combine two values, rather than add them up? That's where the concatenation operators are used.
Concatenation Operators
To concatenate two strings, you use the + in C# and the & character in VB.NET. Additionally, you can use += and &= to combine the concatenation and assignment operators. Consider this example:
VB.NET
Dim firstString As String = "Hello "
Dim secondString As String = "World"
Dim result As String
’ The following three blocks are all functionally equivalent
’ and result in the value "Hello World"
result = firstString & secondString
result = firstString
result = result & secondString
result = firstString
result &= secondString
C#
string firstString = "Hello ";
string secondString = "World";
string result;
// The following three blocks are all functionally equivalent
// and result in the value "Hello World"
result = firstString + secondString;
result = firstString;
result = result + secondString;
result = firstString;
result += secondString;
In addition to the & and &= concatenation operators in VB.NET, you could use + and += as well. However, depending on the data types of the expressions you're trying to concatenate, you may not get the result you'd expect. Take a look at this code snippet:
Dim firstNumber As String = "4"
Dim secondNumber As Integer = 5
Dim result As String = firstNumber + secondNumber
Because firstNumber is a String, you may expect the final result to be 45, a concatenation of 4 and 5. However, by default, the VB.NET compiler will silently convert the string “4” into the number 4, after which addition and not concatenation takes place, giving result a value of “9", the string representation of the addition.
To avoid this ambiguity, always use the & and &= operators to concatenate values. Additionally, you can tell VB.NET to stop converting these values for you automatically by adding the following line to the top of your code files:
Option Strict On
This forces the compiler to generate errors when an implicit conversion is about to occur, as in the previous example.
The final group of operators worth looking into is the logical operators, which are discussed in the next section.
Logical Operators
The logical operators are used to combine the results of multiple individual expressions, and to make sure that multiple conditions are true or false, for example. The following table lists the most common logical operators.
|
VB.NET |
C# |
Usage |
|
And |
& |
Returns True when both expressions result in a True value. |
|
Or |
| |
Returns True if at least one expression results in a True value. |
|
Not |
! |
Reverses the outcome of an expression. |
|
AndAlso |
&& |
Enables you to short-circuit your logical And condition checks. |
|
OrElse |
|| |
Enables you to short-circuit your logical Or condition checks. |
The And, Or, and Not operators (&, |, and ! in C#) are pretty straightforward in their usage, as demonstrated in the following code snippets:
VB.NET
Dim num1 As Integer = 3
Dim num2 As Integer = 7
If num1 = 3 And num2 = 7 Then ‘ Evaluates to True because both
‘ expressions are True
If num1 = 2 And num2 = 7 Then ‘ Evaluates to False because num1 is not 2
If num1 = 3 Or num2 = 11 Then ‘ Evaluates to True because num1 is 3
If Not num1 = 5 Then ‘ Evaluates to True because num1 is not 5
C#
int num1 = 3;
int num2 = 7;
if (num1 == 3 & num2 == 7) // Evaluates to true because both
// expressions are true
if (num1 == 2 & num2 == 7) // Evaluates to false because num1 is not 2
if (num1 == 3 | num2 == 11) // Evaluates to true because num1 is 3
if (!(num1 == 5)) // Evaluates to true because num1 is not 5
The AndAlso and OrElse operators in VB.NET and the && and || operators in C# work very similar to their And and Or counterparts (& and |) in C#. The difference is that with these operators the second expression is never evaluated when the first one already determines the outcome of the entire expression. So with a simple And operator:
If num1 = 2 And num2 = 7 Then
both expressions are checked. This means that both num1 and num2 are asked for their values to see if they equal 2 and 7, respectively. However, because num1 does not equal 2, there really isn't a point in asking num2 for its value anymore because the result of that expression will never change the final outcome of the combined expressions. This is where the AndAlso (&& in C#) operator enables you to short-circuit your logic:
VB.NET
If num1 = 2 AndAlso num2 = 7 Then
C#
if (num1 == 2 && num2 == 7)
With this code, the expression num2 = 7 (num2 == 7 in C#) is never evaluated because num1 already didn't meet the required criteria.
This may not seem like a big deal with these simple expressions, but it can be a real performance booster if one of the expressions is actually a slow and long-running operation. Consider this fictitious code:
VB.NET
If userName = "Administrator" And GetNumberOfRecordsFromDatabase() > 0 Then
C#
if (userName == "Administrator" & GetNumberOfRecordsFromDatabase() > 0)
The code for this If block executes only when the current user is called Administrator and the fictitious call to the database returns at least one record. Now, imagine that GetNumberOfRecordsFromDatabase() is a long-running operation. It would be a waste of time to execute it if the current user weren't Administrator. AndAlso (&& in C#) can fix this problem:
VB.NET
If userName = "Administrator" AndAlso GetNumberOfRecordsFromDatabase() > 0 Then
C#
if (userName == "Administrator" && GetNumberOfRecordsFromDatabase() > 0)
Now, GetNumberOfRecordsFromDatabase() will only be executed when the current user is Administrator. The code will be ignored for all other users, resulting in increased performance for them.
Most of the previous examples used an If statement to demonstrate the logical operators. The If statement itself is a very important language construct as well. The If statement and other ways to make decisions in your code are discussed next.
Making Decisions
Making decisions in an application is one of the most common things you do as a developer. For example, you need to hide a button on a Web Form when a user is not an administrator. Or you need to display the even rows in a table with a light gray background and the odd rows with a white background. You can make all these decisions with a few different logic constructs, explained in the following sections.
If, If Else, and ElseIf Constructs
The If statement (if in C#) is the simplest of all decision-making statements. The If statement contains two relevant parts: the condition being tested and the code that is executed when the condition evaluates to True (true in C#.) For example, to make a button visible only to administrators you can use code like this:
VB.NET
If User.IsInRole("Administrators") = True Then
DeleteButton.Visible = True
End If
C#
if (User.IsInRole("Administrators") == true)
{
DeleteButton.Visible = true;
}
Note that VB.NET uses the If and End If keywords, whereas C# uses if together with a pair of curly braces to indicate the code block that is being executed. Also, with C#, the parentheses around the condition being tested are required, whereas VB.NET requires you to use the keyword Thenafter the condition.
This code explicitly checks for the value True / true. However, this is not required and it's quite common to leave it out. The following example is equivalent:
If User.IsInRole("Administrators") Then
DeleteButton.Visible = True
End If
C#
if (User.IsInRole("Administrators"))
{
DeleteButton.Visible = true;
}
I'll use this succinct version in the remainder of the examples in this chapter. Often you want to perform a different action if the condition is not True. Using the negation operator Not or ! you could simply write another statement:
VB.NET
If User.IsInRole("Administrators") Then
DeleteButton.Visible = True
End If
If Not User.IsInRole("Administrators") Then
DeleteButton.Visible = False
End If
C#
if (User.IsInRole("Administrators"))
{
DeleteButton.Visible = true;
}
if (!User.IsInRole("Administrators"))
{
DeleteButton.Visible = false;
}
Clearly, this leads to messy code, because you need to repeat each expression evaluation twice: once for the True case and once for the False case. Fortunately, there is an easier solution: the Else block (else in C#):
VB.NET
If User.IsInRole("Administrators") Then
DeleteButton.Visible = True
Else
DeleteButton.Visible = False
End If
C#
if (User.IsInRole("Administrators"))
{
DeleteButton.Visible = true;
}
else
{
DeleteButton.Visible = false;
}
For simple conditions this works fine. But consider a scenario in which you have more than two options. In those scenarios you can use ElseIf in VB.NET or the else if ladder in C#.
Imagine that your site uses three different roles: administrators, content managers, and standard members. Administrators can create and delete content; content managers can only create new content, whereas members can't do either of the two. To show or hide the relevant buttons, you can use the following code:
VB.NET
If User.IsInRole("Administrators") Then
CreateNewArticleButton.Visible = True
DeleteArticleButton.Visible = True
ElseIf User.IsInRole("ContentManagers") Then
CreateNewArticleButton.Visible = True
DeleteArticleButton.Visible = False
ElseIf User.IsInRole("Members") Then
CreateNewArticleButton.Visible = False
DeleteArticleButton.Visible = False
End If
C#
if (User.IsInRole("Administrators"))
{
CreateNewArticleButton.Visible = true;
DeleteArticleButton.Visible = true;
}
else if (User.IsInRole("ContentManagers"))
{
CreateNewArticleButton.Visible = true;
DeleteArticleButton.Visible = false;
}
else if (User.IsInRole("Members"))
{
CreateNewArticleButton.Visible = false;
DeleteArticleButton.Visible = false;
}
Although this makes your code a bit more readable, you can still end up with difficult code when you have many expressions to test. If that's the case, you can use the Select Case (VB.NET) or switch (C#) statement.
Select Case/switch Constructs
Imagine you're building a website for a concert hall that has shows on Saturday. During the week, visitors can buy tickets online for Saturday's gig. To encourage visitors to buy tickets as early as possible, you decide to give them an early-bird discount. The earlier in the week they buy their tickets, the cheaper they are. Your code to calculate the discount percentage can look like this, using a Select Case/switch statement:
VB.NET
Dim today As DateTime = DateTime.Now
Dim discountPercentage As Double = 0
Select Case today.DayOfWeek
Case DayOfWeek.Monday
discountPercentage = 40
Case DayOfWeek.Tuesday
discountPercentage = 30
Case DayOfWeek.Wednesday
discountPercentage = 20
Case DayOfWeek.Thursday
discountPercentage = 10
Case Else
discountPercentage = 0
End Select
C#
DateTime today = DateTime.Now;
double discountPercentage = 0;
switch (today.DayOfWeek)
{
case DayOfWeek.Monday:
discountPercentage = 40;
break;
case DayOfWeek.Tuesday:
discountPercentage = 30;
break;
case DayOfWeek.Wednesday:
discountPercentage = 20;
break;
case DayOfWeek.Thursday:
discountPercentage = 10;
break;
default:
discountPercentage = 0;
break;
}
For each day where the discount is applicable (Monday through Thursday) there is a Case block. The differences between VB.NET and C# syntax are quite small: C# uses a lowercase c for case and requires a colon after each case label. Additionally, you need to exit each block with a breakstatement. At run time, the condition (today.DayOfWeek) is evaluated and the correct block is executed. It's important to understand that only the relevant block is executed, and nothing else. When no valid block is found (the code is executed on a day between Friday and Sunday), the code in theCase Else or default block fires. You're not required to write a Case Else or default block, although it's recommended to do so because it makes your code more explicit and easier to read. The preceding examples could have left it out, because discountPercentage already gets a default value of 0at the top of the code block.
To get a feel for the statements you have seen so far, the following Try It Out exercise shows you how to use them in a small demo application.
Try It Out: Creating a Simple Web-Based Calculator
In this exercise you create a simple calculator that is able to add, subtract, multiply, and divide values. You see how to use some of the logical and assignment operators and learn to use the If and Select Case/switch constructs.
1. Start by creating a new Web Form called CalculatorDemo.aspx in the Demos folder. Make sure you don't name the page Calculator or you'll run into trouble later in this chapter when you create a class by that name. Once again, make sure you're using the Code Behind model and select the correct programming language.
2. Switch the page to Design View, and click in the dashed rectangle to put the focus on it. Choose Table Insert Table from the main menu and add a table with three rows and three columns.
3. Merge all three cells of the first row by selecting them with the mouse (either by dragging the mouse or by clicking each cell while holding down the Ctrl key), right-clicking the selection, and choosing Modify Merge Cells from the menu that appears.
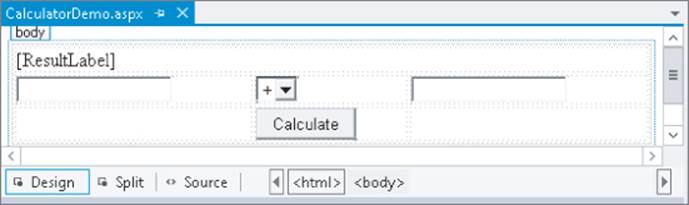
4. Add the following controls to the page, set their ID and other properties as in the following table, and arrange the controls as shown in Figure 5.3.
|
Control Type |
Control ID |
Property Settings |
|
Label |
ResultLabel |
Clear its Text property. To do this, right-click the property name in the Properties Grid and choose Reset. |
|
TextBox |
ValueBox1 |
|
|
DropDownList |
OperatorList |
Add four list items for the following arithmetic operators using the DropDownList's Smart Tasks panel. |
|
TextBox |
ValueBox2 |
|
|
Button |
CalculateButton |
Set the Text property of the button to Calculate. |
When you're done, your page should look like Figure 5.3 in Design View.
5. Double-click the Calculate button and add the following bolded code in the code placeholder that VS added for you:
VB.NET
Protected Sub CalculateButton_Click(sender As Object,
e As EventArgs) Handles CalculateButton.Click
If ValueBox1.Text.Length > 0 AndAlso ValueBox2.Text.Length > 0 Then
Dim result As Double = 0
Dim value1 As Double = Convert.ToDouble(ValueBox1.Text)
Dim value2 As Double = Convert.ToDouble(ValueBox2.Text)
Select Case OperatorList.SelectedValue
Case "+"
result = value1 + value2
Case "-"
result = value1 - value2
Case "*"
result = value1 * value2
Case "/"
result = value1 / value2
End Select
ResultLabel.Text = result.ToString()
Else
ResultLabel.Text = String.Empty
End If
End Sub
C#
protected void CalculateButton_Click(object sender, EventArgs e)
{
if (ValueBox1.Text.Length > 0 && ValueBox2.Text.Length > 0)
{
double result = 0;
double value1 = Convert.ToDouble(ValueBox1.Text);
double value2 = Convert.ToDouble(ValueBox2.Text);
switch (OperatorList.SelectedValue)
{
case "+":
result = value1 + value2;
break;
case "-":
result = value1 - value2;
break;
case "*":
result = value1 * value2;
break;
case "/":
result = value1 / value2;
break;
}
ResultLabel.Text = result.ToString();
}
else
{
ResultLabel.Text = string.Empty;
}
}
6. Save all changes and press Ctrl+F5 to open the page in the browser. If you get an error instead of seeing the page, make sure you typed the code exactly as shown here, and that you named all controls according to the table you saw earlier.
7. Enter a number in the first and second text boxes, choose an operator from the drop-down list, and click the Calculate button. The code in the Code Behind fires and then—based on the item you selected in the drop-down list—the correct calculation is performed and the label is updated with the result.
8. Go ahead and try some other numbers and operators; you'll see that the calculator carries out the right operation every time you click the Calculate button.
How It Works
When you enter two values and click the Calculate button, the following code in the Code Behind fires:
VB.NET
If ValueBox1.Text.Length > 0 AndAlso ValueBox2.Text.Length > 0 Then
C#
if (ValueBox1.Text.Length > 0 && ValueBox2.Text.Length > 0)
This code is necessary to ensure that both text boxes contain a value. The code uses a simple If statement to ensure that both fields have a value. It also uses AndAlso or && to avoid checking the Text property of the second TextBox when the first is empty. In Chapter 9 you see a much cleaner way to perform this validation. In that chapter you'll also see how to make sure users enter valid numbers, as currently the code crashes when you enter anything that cannot be converted to a Double.
The code then declares a Double to hold the result of the calculation and then gets the values from the two text box controls, converts the values to a Double using the ToDouble method of the Convert class, and then sets up a Select Case (switch in C#) block to handle the type of operator you have chosen in the drop-down list:
Figure 5.3
VB.NET
Select Case OperatorList.SelectedValue
Case "+"
result = value1 + value2
C#
switch (OperatorList.SelectedValue)
{
case "+":
result = value1 + value2;
break;
For each item in the drop-down list, there is a Case statement. When you have chosen the + operator from the list, the code in the first case block fires, and result is assigned the sum of the numbers you entered in the two text boxes. Likewise, when you choose the subtraction operator, for example, the two values are subtracted from each other.
At the end, the result is converted to a String and then displayed on the label called ResultLabel.
The Select Case/switch statements close off the discussion about making decisions in your code. There's one more group of statements left: loops that enable you to loop over code or over objects in a collection.
Loops
Loops are extremely useful in many applications, because they enable you to execute code repetitively, without the need to write that code more than once. For example, if you have a website that needs to send a newsletter by e-mail to its 20,000 subscribers, you write the code to send the newsletter once, and then use a loop that sends the newsletter to each subscriber the code finds in a database.
Loops come as a few different types, each with their own usage and advantages.
The For Loop
The For loop simply repeats its code a predefined number of times. You define the exact number of iterations when you set up the loop. The For loop takes the following format:
VB.NET
For counter [ As datatype ] = start To end [ Step stepSize ]
‘ Code that must be executed for each iteration
Next [ counter ]
C#
for (startCondition; endCondition; step definition)
{
// Code that must be executed for each iteration
}
This looks a little odd, but a concrete example makes this a lot easier to understand:
VB.NET
For loopCount As Integer = 1 To 10
Label1.Text &= loopCount.ToString() & "<br />"
Next
C#
for (int loopCount = 1; loopCount <= 10; loopCount++)
{
Label1.Text += loopCount.ToString() + "<br />";
}
Although the syntax used in both languages is quite different, both code examples perform the same action: They write out numbers from 1 to 10 on a Label control. That is, the loop is started by the assignment of 1 to the variable loopCount. Next, the value is converted to a String and assigned to the Label control. Then loopCount is increased by 1, and the loop continues. This goes on until loopCount is 10, and then the loop ends. In this example, hard-coded numbers are used. However, you can replace the start and end conditions with dynamic values from variables or other objects. For example, if you're working with the roles array you saw earlier, you can write out each role in the array like this:
VB.NET
For loopCount As Integer = 0 To roles.Length - 1
Label1.Text &= roles(loopCount) & "<br />"
Next
C#
for (int loopCount = 0; loopCount < roles.Length; loopCount++)
{
Label1.Text += roles[loopCount] + "<br />";
}
Because arrays are zero-based, you need to address the first item with roles(0) in VB.NET and roles[0] in C#. This also means that the loop needs to start at 0. The Length property of an array returns the total number of items that the array contains. So when three roles are in the array, Lengthreturns 3. Therefore, in VB.NET the code subtracts one from the Length and uses that value as the end condition of the loop, causing the loop to run from 0 to 2, accessing all three elements.
The C# example doesn't subtract 1 from the Length, though. Instead it uses the expression:
loopCount < roles.Length;
So, as long as loopCount is less than the length of the array, the loop continues. Again, this causes the loop to access all three items, from 0 to 2.
The previous examples loop by adding 1 to the loopCount variable on each iteration. To use a greater step increase, you use the keyword Step in VB.NET, whereas C# enables you to define the step size directly in the step definition:
VB.NET
For loopCount As Integer = 0 To 10 Step 2
Label1.Text &= loopCount.ToString() & "<br />"
Next
C#
for (int loopCount = 0; loopCount <= 10; loopCount = loopCount + 2)
{
Label1.Text += loopCount.ToString() + "<br />";
}
This loop assigns the even numbers between 0 and 10 to the Label control.
If you are looping over an array or a collection of data, there's another loop at your disposal that's a bit easier to read and work with: the For Each or foreach loop.
The For Each/foreach Loop
The For Each loop in VB.NET and the foreach loop in C# simply iterate over all the items in a collection. Taking the roles array as an example, you can execute the following code to print each role name on the Label control:
VB.NET
For Each role As String In roles
Label1.Text &= role & "<br />"
Next
C#
foreach (string role in roles)
{
Label1.Text += role + "<br />";
}
Because the roles variable is an array of strings, you need to set up the loop with a String as well, as is done with the role variable. You would change this variable's type if the collection contained items of a different type.
In addition to the For and the For Each loops, there is one more loop that you need to look at: the While loop.
The While Loop
As its name implies, the While loop is able to loop while a certain condition is true. Unlike the other two loops, which usually end by themselves, the While loop could loop forever if you're not careful. It could also not execute at all if its condition is never met. The following example shows how to use the While loop:
VB.NET
Dim success As Boolean = False
While Not success
success = SendEmailMessage()
End While
C#
bool success = false;
while (!success)
{
success = SendEmailMessage();
}
This code tries to send an e-mail message using the fictitious SendEmailMessage method and will do so until it succeeds—that is, as long as the variable success has the value False (false in C#). Note that Not and ! are used to reverse the value of success. The SendEmailMessage method is supposed to return True when it succeeds and False when it doesn't. If everything works out as planned, the code enters the loop and calls SendEmailMessage. If it returns True, the loop condition is no longer met, and the loop ends. However, when SendEmailMessage returns False, for example because the mail server is down, the loop continues and SendEmailMessage is called again.
To avoid endless loops with the While loop, it's often a good idea to add a condition that terminates the loop after a certain number of tries. For example, the following code helps to avoid an infinite loop if the mail server is down:
VB.NET
Dim success As Boolean = False
Dim loopCount As Integer = 0
While Not success AndAlso loopCount < 3
success = SendEmailMessage()
loopCount = loopCount + 1
End While
C#
bool success = false;
int loopCount = 0;
while (!success && loopCount < 3)
{
success = SendEmailMessage();
loopCount = loopCount + 1;
}
With this code, the variable loopCount is responsible for exiting the loop after three attempts to call SendEmailMessage. Instead of using loopCount = loopCount + 1, you can also use the combined concatenation and assignment operators, like this:
VB.NET
loopCount += 1
C#
loopCount += 1;
// Alternatively C# enables you to do this:
loopCount++;
All examples have the same result: the loopCount value is increased by one, after which the new total is assigned to loopCount again.
Besides the While loop, you have a few other alternatives, such as the Do While loop (do while in C#), which ensures that the code to be executed is always executed at least once, and the Do Until loop (not available in C#), which goes on until a certain condition is true, as opposed to loopingwhile a certain condition is true, as is the case with the While loop.
Exiting Loops Prematurely
It's common to have the need to exit a loop before it has completely finished. You can do this with Exit For in VB.NET and break in C#, like this:
VB.NET
For loopCount As Integer = 1 To 10
If loopCount = 5 Then
Exit For
End If
Label1.Text &= loopCount.ToString() & "<br />"
Next
C#
for (int loopCount = 1; loopCount <= 10; loopCount++)
{
if (loopCount == 5)
{
break;
}
Label1.Text += loopCount.ToString() + "<br />";
}
With this code, the label will only show the numbers 1 to 4, as the loop is exited as soon as loopCount has reached the value of 5. Note: This example doesn't have a lot of real-world usage as you would rewrite the code to loop four times only, but it shows the concept quite nicely.
You can use Continue For in VB and continue in C# to stop processing the current iteration and move on with the next, if available.
So far, the code you've seen has been comprised of short and simple examples that can be placed directly in the Code Behind of a web page; for example, in Page_Load or in a Button's Click handler that you have seen before. However, in real-world websites, you probably want to structure and organize your code a lot more. In the next section, you see different ways to accomplish this.
Organizing Code
When you start adding more than just a few pages to your website, you're almost certain to end up with some code that you can reuse in multiple pages. For example, you may have some code that reads settings from the Web.config file that you need in multiple files. Or you want to send an e-mail with user details from different pages. So you need to find a way to centralize your code. To accomplish this in an ASP.NET website, you can use functions and subroutines, which are discussed next. To make these functions and subroutines available to all the pages in your site, you need to create them in a special location, which is discussed afterward.
Methods: Functions and Subroutines
Functions and subroutines (subs) are very similar; both enable you to create a reusable block of code that you can call from other locations in your application. The difference between a function and a subroutine is that a function can return data, whereas a sub can't. Together, functions and subroutines are referred to as methods. You'll see that term again in the final part of this chapter that deals with object orientation.
To make functions and subs more useful, they can be parameterized. That is, you can pass in additional information that can be used inside the function or subs. Functions and subs generally take the following format:
VB.NET
’ Define a function
Public Function FunctionName ([parameterList]) As DataType
End Function
’ Define a subroutine
Public Sub SubName ([parameterList])
End Sub
C#
// Define a function
public DataType FunctionName([parameterList])
{
}
// Define a subroutine
public void SubName([parameterList])
{
}
The complete first line, starting with Public, is referred to as the method signature because it defines the look of the function, including its name and its parameters. The Public keyword (public in C#) is called an access modifier and defines to what extent other web pages or code files can see this method. This is discussed in detail later in the chapter. For now, you should realize that Public has the greatest visibility, so the method is visible to any calling code.
The name of the function is followed by parentheses, which in turn can contain an optional parameter list. The italic parts in these code examples will be replaced with real values in your code. The parts between the square brackets ([]) are optional. To make it a little more concrete, here are some examples of functions and subs:
VB.NET
Public Function Add(a As Integer, b As Integer) As Integer
Return a + b
End Function
Public Sub SendEmailMessage(emailAddress As String)
‘ Code to send an e-mail goes here
End Sub
C#
public int Add(int a, int b)
{
return a + b;
}
public void SendEmailMessage(string emailAddress)
{
// Code to send an e-mail goes here
}
In these code examples it's clear that functions return a value, and subs don't. The Add method uses the Return keyword (return in all lowercase in C#) to return the sum of a and b. The Sub in VB.NET and the void method in C# don't require the Return keyword, although you can use it to exit the method prematurely.
Finally, both the function and subroutine have a parameter list that enables you to define the name and data type of variables that are passed to the method. Inside the method you can access these variables as you would access normal variables. In the case of the Add method, you have two parameters: one for the left side of the addition and one for the right side. The SendEmailMessage method has only a single parameter: a String holding the user's e-mail address.
In earlier versions of VB.NET you would see the keyword ByVal in front of each parameter in the parameter list. This is the default type for all parameters, so VS no longer adds it for you. The opposite of ByVal is ByRef. These keywords determine the way a value is sent to the function or subroutine. When you specify ByVal, a copy of the variable is made. Any changes made to that copy inside the method are lost as soon as the method finishes. In contrast, when you specify ByRef, a reference to the variable is sent to the method. Any changes made to the incoming variable reflect on the original variable as well. The following short example demonstrates how this works:
Public Sub ByValDemo(someValue As Integer) ‘ No ByVal needed as it's the default
someValue = someValue + 20
End Sub
Public Sub ByRefDemo(ByRef someValue As Integer)
someValue = someValue + 20
End Sub
Dim x As Integer = 0
ByValDemo(x)
Label1.Text = x.ToString() ‘ Prints out 0; A copy of x is sent to ByValDemo,
‘ leaving the original value of x unmodified.
Dim y As Integer = 0
ByRefDemo(y)
Label1.Text = y.ToString() ‘ Prints out 20; A reference to y is sent
‘ to ByRefDemo so when that method modified
‘ someValue, it also changed the variable y.
C# has a similar construct using the ref keyword. The biggest difference from VB.NET is that you need to specify the ref keyword in the call to the method as well:
public void ByRefDemo(ref int someValue)
{
someValue = someValue + 20;
}
int y = 0;
ByRefDemo(ref y); // Just as in the VB example, y contains 20
// after the call to ByRefDemo
Be careful when using reference parameters like this; before you know it the method may change important variables in the calling code. This can lead to bugs that are hard to track down.
To make your sitewide methods accessible to pages in your website, you should place them in a centralized location. The App_Code folder of your website is a perfect location for your code.
The App_Code Folder
The App_Code folder is a special ASP.NET folder. It's designed specifically to hold code files, like classes that you'll use throughout the site. Code that applies only to one page (like the handler of a Button control's Click event) should remain in the page's Code Behind, as you have seen so far.
Note
The App_Code folder is specific to Web Site Projects, the project type used for the Planet Wrox sample website. Web Application Projects, on the other hand, don't use or support an App_Code folder. However, that project type enables you to create code files in pretty much any other location. When you build sites using the Web Application Project model, you're advised to create a central code folder (called Code or CodeFiles, for example) to store all your code files. To follow along with the samples in this and later chapters, it's important that you're using a Web Site Project as explained in Chapter 2.
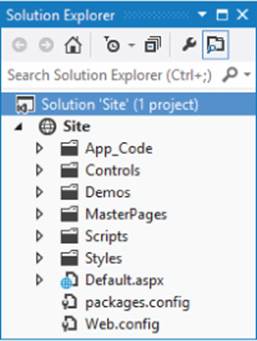
To add the App_Code folder to your site, right-click the site's name in the Solution Explorer and choose Add Add ASP.NET Folder App_Code. The folder is added to the site and gets a special icon, shown in Figure 5.4.
Figure 5.4
With the App_Code folder in place, you can start adding class files to it. Class files have an extension that matches the programming language you have chosen for the site: .cs for C# files and .vb for files containing VB.NET code. Inside these class files you can create classes that in turn contain methods (functions and subroutines) that can carry out common tasks. Classes are discussed in more detail in the final section of this chapter; for now, focus on the methods in the code file and how they are called, rather than on why you need to add the code to a class first.
The next exercise shows you how to use the App_Code folder to optimize the calculator you created in an earlier Try It Out.
Try It Out: Optimizing the Calculator
In this exercise, you create a class called Calculator that exposes four methods: Add, Subtract, Multiply, and Divide. When the class is set up and is capable of performing the necessary computing actions, you modify the CalculatorDemo.aspx file so it uses your new Calculator class. Although this is a trivial example when it comes to the amount of code you need to write and the added flexibility you gain by moving your code from the ASPX page to the App_Code folder so it can be reused by other applications, it's comprehensive enough to show you the concept, yet short enough to enable you to understand the code. For now, just focus on how the calculator works and how to call its methods. In the section on object orientation later in this chapter, you see exactly what a class is.
1. If you haven't already done so, start by adding an App_Code folder to your site by right-clicking the site and choosing Add Add ASP.NET Folder App_Code.
2. Right-click this newly created folder and choose Add Add New Item.
3. In the dialog box that follows, select the appropriate programming language, and click Class.
4. Type Calculator as the name of the file and click Add. This creates a class file that in turn contains a class called Calculator. Note that it's common practice to name classes using what's called Pascal casing, where each word starts with a capital letter.
5. Right after the line of code that defines the Calculator class, add the following four methods, replacing any code that was already present in the class:
VB.NET
Public Class Calculator
Public Function Add(a As Double, b As Double) As Double
Return a + b
End Function
Public Function Subtract(a As Double, b As Double) As Double
Return a - b
End Function
Public Function Multiply(a As Double, b As Double) As Double
Return a * b
End Function
Public Function Divide(a As Double, b As Double) As Double
Return a / b
End Function
End Class
C#
public class Calculator
{
public double Add(double a, double b)
{
return a + b;
}
public double Subtract(double a, double b)
{
return a − b;
}
public double Multiply(double a, double b)
{
return a * b;
}
public double Divide(double a, double b)
{
return a / b;
}
}
6. Next, modify the Code Behind of the CalculatorDemo.aspx page so it uses the class you just created. You need to make two changes: First you need to add a line of code that creates an instance of the Calculator class, and then you need to modify each Case block to use the relevant calculation methods in the calculator:
VB.NET
Dim myCalculator As New Calculator()
Select Case OperatorList.SelectedValue
Case "+"
result = myCalculator.Add(value1, value2)
Case "-"
result = myCalculator.Subtract(value1, value2)
Case "*"
result = myCalculator.Multiply(value1, value2)
Case "/"
result = myCalculator.Divide(value1, value2)
End Select
C#
Calculator myCalculator = new Calculator();
switch (OperatorList.SelectedValue)
{
case "+":
result = myCalculator.Add(value1, value2);
break;
case "-":
result = myCalculator.Subtract(value1, value2);
break;
case "*":
result = myCalculator.Multiply(value1, value2);
break;
case "/":
result = myCalculator.Divide(value1, value2);
break;
}
7. Save all your changes and open the page in the browser. The calculator still works as before; only this time the calculations are not carried out in the page's Code Behind file, but by the Calculator class in the App_Code folder instead.
How It Works
The file you created in the App_Code folder contains a class called Calculator. You learn more about classes in the final section of this chapter, but for now it's important to know that a class is like a definition for an object that can expose methods you can call at run time. In this case, the definition for the Calculator class contains four methods to perform arithmetic operations. These methods accept parameters for the left-hand and right-hand sides of the calculations. Each method simply carries out the requested calculation (Add, Subtract, and so on) and returns the result to the calling code.
The code in the Code Behind of the CalculatorDemo.aspx page first creates an instance of the Calculator class. That is, it creates an object in the computer's memory based on the class definition. To do this, it uses the New (new in C#) keyword to create an instance of Calculator, which is then stored in the variable myCalculator. You learn more about the New keyword later in this chapter when objects are discussed. Note that the data type of this variable is Calculator, the name of the class.
VB.NET
Dim myCalculator As New Calculator()
C#
Calculator myCalculator = new Calculator();
Once the Calculator instance is created, you can call its methods. Just as you saw earlier with other methods, the methods of the Calculator class accept parameters that are passed in by the calling code:
VB.NET
Case "+"
result = myCalculator.Add(value1, value2)
C#
case "+":
result = myCalculator.Add(value1, value2);
break;
The Add method then adds the two values and returns the result as a Double, which is stored in the variable result. Just as in the first version of the calculator, at the end the result is displayed on the page with a Label control.
Functions and subroutines are a great way to organize your web application. They enable you to create reusable blocks of code that you can easily call from other locations. Because code you need more than once is defined only once, it's much easier to maintain or extend the code. If you find a bug in a function, simply fix it in its definition in the App_Code folder, and all pages using that function automatically benefit from the change. In addition to the increased maintainability, functions and subs also make your code easier to read: Instead of wading through long lists of code in a page, you just call a single function and work with the return value (if any). This makes the code easier on your brain, minimizing the chance of bugs in your application.
Functions and subs are not the only way to organize code in your .NET projects. Another common way to organize things is to use namespaces.
Organizing Code with Namespaces
Namespaces seem to cause a lot of confusion with new developers. They think they're scary, they think way too many of them exist, or they don't see the need to use them. None of this is true, and with a short explanation of them, you'll understand and maybe even like namespaces.
Namespaces are intended to solve two major problems: to organize the enormous amount of functionality in the .NET Framework and in your own code, and to avoid name collisions, where two different types share the same name. One common misconception about namespaces is that there is a direct relation with .NET assemblies (files with a .dll extension that are loaded and used by the .NET Framework), but that's not the case. Although you typically find namespaces like System.Web.UI in a DLL called System.Web.dll, it's possible (and common) to have multiple namespaces defined in a single DLL or to have a namespace be spread out over multiple assemblies. Keep that in mind when adding references to assemblies, as explained later.
To see what a namespace looks like, open one of the Code Behind files of the ASPX pages you've created so far. You'll see something similar to this:
VB.NET
Partial Class Demos_CalculatorDemo
Inherits System.Web.UI.Page
C#
public partial class Demos_CalculatorDemo : System.Web.UI.Page
{
Note that the definition of the class name is followed by the Inherits keyword in VB and a colon in C#, which in turn are followed by System.Web.UI.Page. You see later what this Inherits keyword is used for. In this code, Page is the name of a class (a data type), which is defined in theSystem.Web.UI namespace. By placing the Page class in the System.Web.UI namespace, developers (and compilers) can see this class is about a web page. By contrast, imagine the following (fictitious) class name:
Microsoft.Word.Document.Page
This code also refers to a Page class. However, because it's placed in the Microsoft.Word.Document namespace, it's easy to see that it's referring to a page of a Word document, not a web page. This way there is no ambiguity between a web page and a Word document page. This in turn helps the compiler understand which class you are referring to.
Another benefit of namespaces is that they help you find the right data type. Instead of displaying thousands and thousands of items in the IntelliSense list, you get a few top-level namespaces. When you choose an item from that list and press the dot key (.), you get another relatively short list with types and other namespaces that live inside the chosen namespace.
Namespaces are nothing more than simple containers that you can refer to by name using the dot notation. They are used to prefix each data type that is available in your application. For example, the Double data type lives in the System namespace, thus its fully qualified name is System.Double. Likewise, the Button control you've added to your web pages lives in the System.Web.UI.WebControls namespace, thus its full name is System.Web.UI.WebControls.Button.
It's also easy to create your own namespaces. As long as they don't collide with an existing name, you can pretty much make up your own namespaces as you see fit. For example, you could wrap the Calculator class in the following namespace (in Calculator.vb or Calculator.cs in App_Code):
VB.NET
Namespace Wrox.Samples
Public Class Calculator
...
End Class
End Namespace
C#
namespace Wrox.Samples
{
public class Calculator
{
...
}
}
With the calculator wrapped in this namespace, you could create a new instance of it like this:
VB.NET
Dim myCalculator As New Wrox.Samples.Calculator()
C#
Wrox.Samples.Calculator myCalculator = new Wrox.Samples.Calculator();
Although you get some help from IntelliSense to find the Calculator class, typing these long names becomes boring after a while. Fortunately, there's a fix for that as well.
After you have created your own namespaces, or if you want to use existing ones, you need to make them available in your code. You do this with the keyword Imports (in VB.NET) or using (in C#). For example, to make your Calculator class available in the Calculator demo page without specifying its full name, you can add the following namespace to your code:
VB.NET
Imports Wrox.Samples
Partial Class Demos_CalculatorDemo
Inherits System.Web.UI.Page
C#
using Wrox.Samples;
public partial class Demos_CalculatorDemo : System.Web.UI.Page
{
With this Imports/using statement in place, you can now simply use Calculator again instead of Wrox.Samples.Calculator.
If you are using C#, you'll see a number of using statements by default in the Code Behind of an ASPX page for namespaces like System and System.Web.UI.WebControls. If you're using VB.NET, you won't see these references. Instead, with a VB.NET website, the default namespaces are included in the machine's global Web.config file under the <namespaces> element.
Quite often, you know the name of the class, but you don't know the namespace it lives in. VS makes it very easy to find the namespace and add the required Imports or using statement for you. Simply type the name of the class you want to use and then place the cursor in the class name and press Ctrl+. (Ctrl+Dot). You see a menu appear that lets you select the right namespace, as shown in Figure 5.5.
Figure 5.5
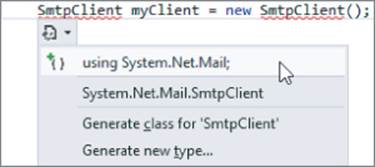
If the dialog box doesn't offer to add an Imports or using statement, the assembly that contains the class you're looking for may not be referenced by the project. If that's the case, right-click the website in the Solution Explorer and choose Add Reference. In the dialog box that follows you can choose from the many built-in .NET assemblies on the .NET tab or browse to a third-party assembly using the Browse button. Once the reference is added you should be able to add an Imports or using statement for the class you're looking for by pressing Ctrl+. again on the class name.
Once you start writing lots of code, you may quickly forget where you declared what, or what a variable or method is used for. It's therefore wholeheartedly recommended to put comments in your code.
Writing Comments
No matter how clean a coder you are, it's likely that someday you will run into code that makes you raise your eyebrows and think, “What on earth is this code supposed to do?” Over the years, the way you program will change; you'll learn new stuff, optimize your coding standards, and find ways to code more efficiently. To make it easier for you to recognize and understand your code now and two years from now, it's a good idea to comment your code. You have two main ways to add comments in your code files: inline and as XML comments.
Commenting Code Inline
Inline comments are written directly in between your code statements. You can use them to comment on existing variables, difficult loops, and so on. In VB.NET, you can comment out only one line at a time using the tick (') character, which you place in front of the text that you want to use as a comment. To comment a single line in C#, you use two slashes (//). Additionally, you can use /* and */ to comment out an entire block of code in C#. The following examples show some different uses of comments:
VB.NET
’ Usage: explains the purpose of variables, statements and so on.
’ Used to store the number of miles the user has traveled last year.
Dim distanceInMiles As Integer
’ Usage: comment out code that's not used (anymore).
’ In this example, SomeUnfinishedMethod is commented out
’ to prevent it from being executed.
’ SomeUnfinishedMethod()
’ Usage: End of line comments.
If User.IsInRole("Administrators") Then ‘ Only allow admins in this area
End If
C#
// Usage: explains the purpose of variables, statements and so on.
// Used to store the number of miles the user has traveled last year.
int distanceInMiles;
// Usage: comment out code that's not used (anymore).
// In this example, SomeUnfinishedMethod is commented out
// to prevent it from being executed.
// SomeUnfinishedMethod();
// Usage: End of line comments.
if (User.IsInRole("Administrators")) // Only allow admins in this area
{ }
/*
* This is a block of comments that is often used to add additional
* information to your code, for example to explain a difficult loop. You can
* also use this to (temporarily) comment a whole block of code.
*/
To comment out the code, simply type the code character (’ or //) at the location where you want the comment to start. To comment out a block of code, select it in the text editor and press Ctrl+K followed by Ctrl+C. Similarly, press Ctrl+K followed by Ctrl+U to uncomment a selected block of code.
Alternatively, you can choose Edit Advanced Comment Selection or Uncomment Selection from the main menu.
Inline comments are usually good for documenting small details of your code. However, it's also a good idea to provide a high-level overview of what your code does. For example, for a method called SendEmailMessage it would be good to have a short description that explains what the method does and what the parameters are used for. This is exactly what XML comments are used for.
Writing XML Comments
XML comments are comments that you add as XML elements (using angle brackets: < >) in your code to describe its purpose, parameters, return value, and more. The VS IDE helps you by writing these comments. All you need to do is position your cursor on the line just before a class or method and type ‘” (three tick characters) for VB or /// (three forward slashes) for C#. As soon as you do that, the IDE inserts XML tags for the summary and, optionally, the parameters and return type of a method. Once again, consider a SendEmailMessage method. It could have two parameters of typeString: one for the e-mail address to send the message to, and one for the mail body. With the XML comments applied, the method could look like this:
VB.NET
'" <summary>
'" Sends out an e-mail to the address specified by emailAddress.
'" </summary>
'" <param name="emailAddress">The e-mail address of the recipient.</param>
'" <param name="mailBody">The body of the mail message.</param>
'" <returns>This method returns True when the message was sent successfully;
'" and False otherwise.</returns>
'" <remarks>Attention: this method assumes a valid mail server is
'" available.</remarks>
Public Function SendEmailMessage(emailAddress As String,
mailBody As String) As Boolean
‘ Implementation goes here
End Function
C#
/// <summary>
/// Sends out an e-mail to the address specified by emailAddress.
/// </summary>
/// <param name="emailAddress">The e-mail address of the recipient.</param>
/// <param name="mailBody">The body of the mail message.</param>
/// <returns>This method returns true when the message was sent successfully;
/// and false otherwise.</returns>
/// <remarks>Attention: this method assumes a valid mail server is
/// available.</remarks>
public bool SendEmailMessage(string emailAddress, string mailBody)
{
// Implementation goes here
}
The cool thing about this type of commenting is that the comments you type here show up in IntelliSense in the code editor when you try to call the method (see Figure 5.6).
Figure 5.6
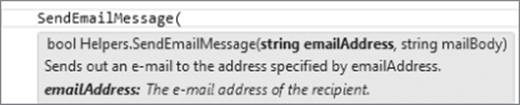
This makes it much easier for you and other developers to understand the purpose of the method and its parameters.
In addition to aiding development in the code editor, you can also use the XML comments to create good-looking, MSDN-like documentation. A number of third-party tools are available that help you with this, including Microsoft's own Sandcastle (http://msdn.microsoft.com/en-us/vstudio/bb608422.aspx) and Document! X from Innovasys (www.innovasys.com/).
Object Orientation Basics
A chapter about writing code in ASP.NET wouldn't be complete without a section on object orientation (OO). Object orientation, or object-oriented programming, is a highly popular style of programming where the software is modeled as a set of objects interacting with each other. Object orientation is at the heart of the .NET Framework. Literally everything inside the framework is an object, from simple things like integers to complex things like a DropDownList control, a connection to the database, or a data-driven control.
Because object orientation is such an important aspect of .NET, it's important to be familiar with the general concepts of object-oriented programming. At the same time, you don't have to be an expert on OO to be able to build websites with ASP.NET. This section gives you a 10,000-foot overview of the most important terms and concepts. This helps you get started with object orientation, so you can start building useful applications in the next chapter instead of keeping your nose in the books for the next three weeks.
Important OO Terminology
In object orientation, everything revolves around the concept of objects. In OO everything is, in fact, an object. But what exactly is an object? And what do classes have to do with them?
Objects
Objects are the basic building blocks of object-oriented programming languages. Just like in the real world, an object in OO-land is a thing, but stored in the computer's memory. It can be an integer holding someone's age or an open database connection to a SQL Server located on the other side of the world, but it can also be something more conceptual, like a web page. In your applications, you create a new object with the New (new in C#) keyword, as you saw with the calculator example. This process of creating new objects is called instantiating and the objects you create are called instances. You can instantiate complex or custom types like Calculator, as well as simple types like Integers and Strings:
VB.NET
Dim myCalculator As Calculator = New Calculator()
Dim age As Integer = New Integer()
C#
Calculator myCalculator = new Calculator();
int age = new int();
Because it's so common to create variables of simple types like Integer (int in C#) and String (string in C#), the compiler allows you to leave out the new keyword and the assignment. Therefore, the following code is functionally equivalent to the preceding age declaration:
VB.NET
Dim age As Integer
C#
int age;
All data types listed at the beginning of this chapter except System.Object can be created without the New keyword.
Once you have created an instance of an object, such as the myCalculator object, it's ready to be used. For example, you can access its methods and properties to do something useful with the object. But before you look at methods and properties, you need to understand classes.
Classes
Classes are the blueprints of objects. Just as you can use a single blueprint to build a bunch of similar houses, you can use a single class to create multiple instances of that class. So the class acts as the definition of the objects that you use in your application. At its most basic form, a class looks like this:
VB.NET
Public Class ClassName
End Class
C#
public class ClassName
{
}
Because this code simply defines an empty class, it cannot do anything useful. To give the class some behavior, you can give it fields, properties, methods, and constructors. In addition, you can let the class inherit from an existing class to give it a head start in terms of functionality and behavior. You'll come to understand these terms in the next couple of sections.
Fields
Fields are simple variables declared at the class level that can contain data. They are often used as backing variables for properties (as you'll see in the next section), but that doesn't have to be the case. Here's a quick example of a field in a Person class:
VB.NET
Public Class Person
Private _firstName As String
End Class
C#
public class Person
{
private string _firstName;
}
Fields are often marked as Private (private in C#), which makes them visible only in the class that defines them. If you have the need to expose fields to other classes as well, you should use properties, which are discussed next. Later in the chapter you learn more about the Private keyword and other access modifiers.
Properties
Properties of an object are the characteristics the object has. Consider a Person object. What kind of properties does a Person have? It's easy to come up with many different characteristics, but the most common are:
· First name
· Last name
· Date of birth
You define a property in a class with the Property keyword (in VB.NET) or with a property header similar to a method in C#. In both languages, you use a Get block (get in C#) and a Set block (set in C#) to define the so-called getters and setters of the property. The getter is accessed when an object is asked for the value of a specific property, and the setter is used to assign a value to the property. Properties only provide access to underlying data stored in the object; they don't contain the actual data. To store the data, you need what is called a backing variable. This is often a simple field defined in the class that is able to store the value for the external property. In the following example, the variable _firstName is the backing variable for the FirstName property:
VB.NET
Public Class Person
Private _firstName As String
Public Property FirstName() As String
Get
Return _firstName
End Get
Set(value As String)
_firstName = value
End Set
End Property
End Class
C#
public class Person
{
private string _firstName;
public string FirstName
{
get { return _firstName; }
set { _firstName = value; }
}
}
It is common to prefix the private backing variables with an underscore, followed by the first word in all lowercase, optionally followed by more words that start with a capital again. So the FirstName property has a backing variable called _firstName, LastName has one called _lastName, and so on. This way, all variables that apply to the entire class are nicely packed together in the IntelliSense list. Simply type an underscore in your code and you'll get the full list of private variables. Note that the underscore is typically not used when defining variables inside a function or a subroutine.
Just like the Public keyword you saw earlier, Private is also an access modifier. You learn more about access modifiers later in this chapter.
The main reason for a property in a class is to encapsulate data. The idea is that a property enables you to control the data that is being assigned to it. This way, you can perform validation or manipulation of the data before it's stored in the underlying backing variable. Imagine that one of the business rules of your application states that all first names must be written with the first letter as a capital. In non–object-oriented languages, the developer setting the name would have to keep this rule in mind every time a variable was filled with a first name. In an OO approach, you can make theFirstName property responsible for this rule so others don't have to worry about it anymore. You can do this type of data manipulation in the setter of the property:
VB.NET
Set(value As String)
If Not String.IsNullOrEmpty(value) Then
_firstName = value.Substring(0, 1).ToUpper() & value.Substring(1)
Else
_firstName = String.Empty
End If
End Set
C#
set
{
if (!string.IsNullOrEmpty(value))
{
_firstName = value.Substring(0, 1).ToUpper() + value.Substring(1);
}
else
{
_firstName = string.Empty;
}
}
This code demonstrates that in both VB.NET and C#, the value parameter is accessible, just as a parameter is accessible to a method. The value parameter contains the value that is being assigned to the property. In VB.NET, the value parameter is defined explicitly in the property's setter. In C# it's not specified explicitly, but you can access it nonetheless.
The code first checks if the value that is being passed is not Nothing (null in C#) and that it doesn't contain an empty string, using the handy String.IsNullOrEmpty method.
The code in the If block then takes the first letter of value, using the Substring method of the String class, to which it passes the values 0 and 1. The 0 indicates the start of the substring and the 1 indicates the length of the string that must be returned. String indexing is zero-based as well, so a start of 0 and a length of 1 effectively returns the first character of the value parameter. This character is then changed to uppercase using ToUpper(). Finally, the code takes the remainder of the value parameter using Substring again and assigns the combined name back to the backing variable. In this call to Substring, only the start index is passed, which returns the string from that position to the end.
You can now use code that sets the name with arbitrary casing. But when you try to access the name again, the first name will always begin with a proper first character:
VB.NET
Dim myPerson As Person = New Person() ‘ Create a new instance of Person
myPerson.FirstName = "imar" ‘ Accessing setter to change the value
Label1.Text = myPerson.FirstName ‘ Accessing getter that now returns Imar
C#
Person myPerson = new Person(); // Create a new instance of Person
myPerson.FirstName = "imar"; // Accessing setter to change the value
Label1.Text = myPerson.FirstName; // Accessing getter that now returns Imar
For simple properties that don't need any data manipulation or validation, you can use so-called automatic properties. With these properties, you can use a much more condensed syntax without the need for a private backing variable. When the code is compiled, the compiler creates a hidden backing variable for you, and you'll need to refer to the public property. Here's the DateOfBirth property of the Person class, written as an automatic property:
VB.NET
Public Property DateOfBirth As DateTime
C#
public DateTime DateOfBirth { get; set; }
The Visual Basic implementation of automatic properties has one advantage over the C# version: You can declare the property and give it a value in one shot. The following snippet defines a CreateDate property and assigns it with the current date and time:
VB.NET
Public Property CreateDate As DateTime = DateTime.Now
To assign a default value to an automatic property in C#, you need to set its value using constructors, which are discussed later.
If you later decide you need to write code in the getter or the setter of the property, it's easy to extend the relevant code blocks without breaking your existing applications. Until that time, you have nice, clean property definitions that don't clutter up your class.
Creating Read-Only and Write-Only Properties
At times, read-only or write-only properties make a lot of sense. For example, the ID of an object could be read-only if it is assigned by the database automatically. When the object is constructed from the database, the ID is assigned to the private backing variable. The public Id property is then made read-only to stop calling code from accidentally changing it. Likewise, you can have a write-only property for security reasons. For example, you could have a Password property on a Person object that you can only assign to if you know it, but no longer read it afterward. Internally, code within the class can still access the backing variables to work with the password value. Another good candidate for a read-only property is one that returns a combination of data. Consider a FullName property of a Person class that returns a combination of the FirstName and LastName properties. You use the setter of each individual property to assign data, but you can have a read-only property that returns the concatenated values.
Read-only or write-only properties in C# are simple: Just leave out the setter (for a read-only property) or the getter (for a write-only property). VB.NET is a bit more verbose and wants you to specify the keyword ReadOnly or WriteOnly explicitly. The following code snippet shows a read-onlyFullName property in both VB.NET and C#:
VB.NET
Public ReadOnly Property FullName() As String
Get
Return _firstName & " " & _lastName
End Get
End Property
C#
public string FullName
{
get { return _firstName + " " + _lastName; }
}
When you try to assign a value to a read-only property, you'll get a compilation error in VS.
Similar to properties, objects can also have methods.
Methods
If properties are the things that a class has (its characteristics), then methods are the things a class can do or the operations it can perform. A Car class, for example, has properties such as Brand, Model, and Color. Its methods could be Drive(), Brake(), and OpenDoors(). Methods give objects the behavior that enables them to do something.
You have already seen methods at work earlier, when this chapter discussed some ways to write organized code using subs and functions. You simply add methods to a class by writing a function or a sub between the start and end elements of the class. For example, imagine the Person class has a Save method that enables the object to persist itself in the database. The method's signature could look like this:
VB.NET
Public Class Person
Public Sub Save()
‘ Implementation goes here
End Sub
End Class
C#
public class Person
{
public void Save()
{
// Implementation goes here
}
}
If you want to call the Save method to have the Person object save itself to the database, you create an instance of it, set the relevant properties such as FirstName, and then call Save:
VB.NET
Dim myPerson As Person = New Person()
myPerson.FirstName = "Jim"
myPerson.Save()
C#
Person myPerson = new Person();
myPerson.FirstName = "Jim";
myPerson.Save();
The Save method would then know how to save the Person in the database.
Methods can also have parameters, as you saw earlier in the section on XML comments. The SendEmailMessage method accepts two parameters—one for the e-mail address and one for the message body—whose values are then accessible from within the method.
Note that a new instance of the Person class is created with the New (new in C#) keyword followed by the class name. When this code fires, it calls the object's constructor, which is used to create instances of objects.
Constructors
Constructors are special methods in a class that help you create an instance of your object. They run as soon as you try to create an instance of a class, so they are a great place to initialize your objects to some default state. Earlier you learned that you create a new instance of an object using the New(new in C#) keyword:
VB.NET
Dim myCalculator As Calculator = New Calculator()
C#
Calculator myCalculator = new Calculator();
The New keyword is followed by the object's constructor: the name of the class. By default, when you create a new class file in VS, you get a default constructor for C# but not for VB.NET. That's not really a problem, though, because the compiler generates a default constructor for you if no other constructor exists. A default constructor has no arguments and takes the name of the class in C# and the reserved keyword New in VB.NET:
VB.NET
Public Class Person
Public Sub New()
End Sub
End Class
C#
public class Person
{
public Person()
{
}
}
Although this default constructor is nice for creating standard instances of your classes, sometimes it is really useful to be able to send some information into the class up front, so it's readily available as soon as it is constructed. For example, with the Person class, it could be useful to pass in the first and last names and the date of birth to the constructor so that data is available immediately afterward. To enable this scenario, you can create a specialized constructor. To have the constructor accept the names and the date of birth, you need the following code:
VB.NET
Public Sub New(firstName As String, lastName As String, dateOfBirth As DateTime)
_firstName = firstName
_lastName = lastName
_dateOfBirth = dateOfBirth
End Sub
C#
public Person(string firstName, string lastName, DateTime dateOfBirth)
{
_firstName = firstName;
_lastName = lastName;
_dateOfBirth = dateOfBirth;
}
With this code, you can create a new Person object:
VB.NET
Dim myPerson As Person = New Person("Imar", "Spaanjaars", New DateTime(1971, 8, 9))
C#
Person myPerson = new Person("Imar", "Spaanjaars", new DateTime(1971, 8, 9));
The constructor accepts the values passed to it and assigns them to the private backing variables, so right after this line of code, the myPerson object is fully initialized.
You can have multiple constructors for the same class, as long as each one has a different method signature.
Visual Basic supports a slightly different syntax to declare and initialize an object in one fell swoop using the Dim myVariable As New ClassName syntax. The following code is equivalent to the previous instantiation of a Person instance:
Dim myPerson As New Person("Imar", "Spaanjaars", New DateTime(1971, 8, 9))
In addition to constructors, .NET offers another quick way to create an object and initialize a few properties: object initializers. With an object initializer, you provide the initial values for some of the properties at the same time you declare an instance of your objects. The following code creates aPerson object and assigns it a value for the FirstName and LastName properties:
VB.NET
Dim myPerson As New Person() With {.FirstName = "Imar", .LastName = "Spaanjaars"}
C#
Person myPerson = new Person() { FirstName = "Imar", LastName = "Spaanjaars" };
In VB.NET, you need the With keyword in front of the properties list. In addition, you need to prefix each property name with a dot (.). Other than that, the syntax is the same for both languages. Object initializers are great if you need to set a bunch of properties on an object quickly without being forced to write specialized versions of the constructors.
Although it's useful to have this Person class in your application, at times you may need specialized versions of a Person. For example, your application may require classes like Employee and Student. What should you do in this case? Create two copies of the Person class and name themEmployee and Student, respectively?
Although this approach certainly works, it has a few large drawbacks. The biggest problem is the duplication of code. If you decide to add a SocialSecurityNumber property, you now need to add it in multiple locations: in the general Person class and in the Employee and Student classes. Object inheritance, a major pillar of object orientation, is designed to solve problems of this kind.
Inheritance
Earlier you learned that System.Object is the parent of all other data types in .NET, including all the built-in types and types that you define yourself, meaning that each type in .NET (except Object itself) inherits from Object. One of the benefits of inheritance is that you can define a behavior at a high level (for example in the Object class) that is available to inheriting classes automatically without the need to duplicate that code. In the .NET Framework, the Object class defines a few members that all other objects inherit, including the ToString() method.
To let one class inherit another, you need to use the Inherits keyword in VB.NET and the colon (:) in C#, as shown in the following example that defines a Student class that inherits Person:
VB.NET
Public Class Student
Inherits Person
C#
public class Student : Person
{
}
To see how inheritance works, think again about the Person class shown in earlier examples. That class had a few properties, such as FirstName and LastName, and a Save method. But if it is inheriting from Object, does it also have a ToString() method? You bet it does. Figure 5.7 shows the relationship between the Object class and the Person class that inherits from Object.
Figure 5.7
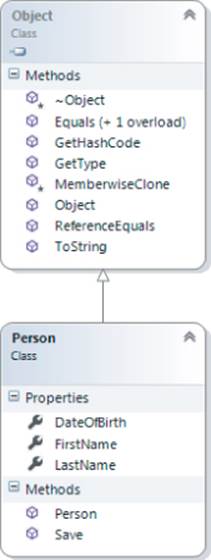
Figure 5.7 shows that Person inherits from Object (indicated by the arrow pointing in the direction of the class that is being inherited from), which in turn means that a Person instance can do whatever an Object can do. So, for example, you can call ToString() on your Person object:
Label1.Text = myPerson.ToString() ‘ Writes out Person
The default behavior of the ToString() method defined in Object is to say its own class name. In the preceding example, it means that the Person class inherits this behavior and thus says Person as its name. Usually, this default behavior is not enough, and it would be much more useful if thePerson could return the full name of the person it is representing, for example. You can easily do this by overriding the ToString() method. Overriding a method or property redefines the behavior the class inherits from its parent class. To override a method you use the keyword Overrides in VB.NET and override in C#. The following snippet redefines the behavior of ToString in the Person class:
VB.NET
Public Overrides Function ToString() As String
Return FullName & ", born at " & _dateOfBirth.ToShortDateString()
End Function
C#
public override string ToString()
{
return FullName + ", born at " + _dateOfBirth.ToShortDateString();
}
With this definition of ToString in the Person class, it no longer returns the word Person, but now returns the full name of the person it is representing:
Label1.Text = myPerson.ToString() ‘ Imar Spaanjaars, born at 8/9/1971
Notice how the code uses the read-only FullName property to avoid coding the logic of concatenating the two names again. You can't just override any method member you want to. For a method to be overridable, the parent class needs to mark the member with the keyword virtual (in C#) orOverridable (in VB.NET).
Object inheritance in .NET enables you to create a hierarchy of objects that enhance, or add functionality to, other objects. This enables you to start out with a generic base class (Object). Other classes can then inherit from this class, adding specialized behavior. If you need even more specialized classes, you can inherit again from the class that inherits from Object, thus creating a hierarchy of classes that keep getting more specialized. This principle works for many classes in the .NET Framework, including the Page class. You may not realize it, but every ASPX page you create in VS is actually a class that inherits from the class System.Web.UI.Page. This Page class in turn inherits from TemplateControl, which inherits from Control, which inherits from Object. The entire hierarchy is shown in Figure 5.8. At the bottom you see the class MyWebPage, which could be a Code Behind class of a page such as MyWebPage.aspx.
Figure 5.8
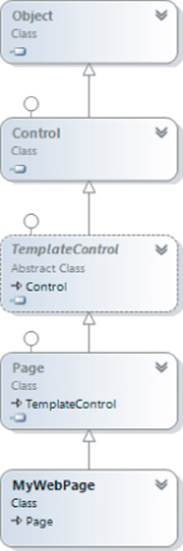
In Figure 5.8 you can see that TemplateControl is an abstract class—a class that cannot be instantiated; that is, you cannot use New (new in C#) to create a new instance of it. It serves solely as a common base class for others (like Page) that can inherit from it. The exact classes between Page andObject are not really relevant at this stage, but what's important is that your page inherits all the behavior that the Page class has. The fact that all your ASPX pages inherit from Page is more useful than you may think at first. Because it inherits from Page, you get loads of properties and methods defined in this class for free. For example, the Page class exposes a Title property that, when set, ends up as a <title> element in the page. Your page can simply set this property, and the parent Page class handles the rest for you:
VB.NET
Title = "Beginning ASP.NET 4.5 in C# and VB from Wrox"
C#
Title = "Beginning ASP.NET 4.5 in C# and VB from Wrox";
You use inheritance in the next chapter when you create a BasePage class that serves as the parent class for most of the pages you create in the Planet Wrox website.
In earlier examples, including the override for the ToString() method, you have seen the keyword Public. Additionally, when creating backing variables, you saw the keyword Private. These keywords are called access modifiers and determine the visibility of your code.
Access Modifiers
Earlier in this chapter I mentioned that a core concept of OO is encapsulation. By creating members such as functions and properties, you make an object responsible for the implementation. Other objects interacting with this object consider those methods and properties as black boxes. That is, they pass some data in and optionally expect some result back. How the method performs its work is of no interest to them; it should just work as advertised. To enable an object to shield some of its inner operations, you need a way to control access to types and members. You do this by specifying an access modifier in front of the class, property, or method name. The following table lists the available access modifiers for C# and VB.NET and explains their purpose.
|
C# |
VB.NET |
Description |
|
public |
Public |
The class or member can be accessed from everywhere, including code outside the current application. |
|
protected |
Protected |
Code with a protected access modifier is available only within the type that defines it or within types that inherit from it. For example, a protected member defined in the Page class is accessible to your ASPX page because it inherits from Page. |
|
internal |
Friend |
Limits the accessibility of your code to other code within the same assembly. An assembly is a set of one or more compiled code files (either an .exe or a .dll file) containing reusable .NET code. |
|
private |
Private |
A class or member that is accessible only within the type that defines it. For example, with the Person class, the _firstName variable is accessible only from within the Person class. Other code, like an ASPX page, cannot access this field directly, and needs to access the public FirstName property to get or set the first name of a person. |
Of these four access modifiers, only protected and internal (Protected and Friend in VB) can be combined. The other two must be used separately. By combining protected and internal, you can create members that are accessible by the current class and any class that inherits from it in the current assembly only.
Using access modifiers, you can now create properties that are read-only for external code but that can still be set from within the class by marking the getter as private.
As with some of the other OO concepts, you won't be spending half your day specifying access modifiers in your code. However, it's good to know that they exist and what they do. That way, you may have a clue as to why sometimes your classes don't show up in the IntelliSense list. There's a fair chance you forgot to specify the public access modifier (Public in VB.NET) on the class in that case. The default is internal (Friend in VB.NET), which makes the class visible to other classes in the same assembly but hides it from code outside the assembly. Adding the keyword public orPublic in front of the class definition should fix the problem.
Events
The final important topic that needs to be discussed in this chapter is events. ASP.NET is an event-driven environment, which means that code can execute based on certain events that occur in your application. Events are raised by certain objects in the application and then handled by others. Many objects in the .NET Framework are capable of raising an event, and you can even add your own events to classes that you write.
To be able to handle an event raised by an object, you need to write an event handler, which is basically a normal method with a special signature. You can wire up this event handler to the event using event wiring syntax, although VS takes care of writing that code most of the time for you. When an object, such as a control in a web page, raises an event, it may have the need to pass additional information to the event handler, to inform it about relevant data that caused or influenced the event. You can send out this information using an event arguments class, which is the classSystem.EventArgs or any class that inherits it.
To see how all these terms fit together, consider what happens when you click a button in a web page. When you click it, the client-side button in the browser causes a postback. At the server, the Button control sees it was clicked in the browser and then raises its Click event. It's as if the button says: “Oh, look, everyone. I just got clicked. In case anyone is interested, here are some details.” Usually, the code that is interested in the button's Click event is your own page, which needs to have an event handler to handle the click. You can create an event handler for the Button by double-clicking it in the designer, or you can wire it up using Markup View as you saw in Chapter 4. Alternatively, you can double-click the relevant event on the Events tab of the Properties Grid. You open this tab by clicking the button with the lightning bolt on the toolbar of the Properties Grid (seeFigure 5.9.)
Figure 5.9
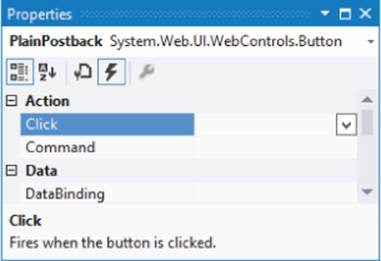
If you double-click the control in Design View or the event name in the Properties Grid, VS writes the code for the event handler for you. The following snippet shows the handler for a Button control's Click event in VB.NET and C#:
VB.NET
Protected Sub Button1_Click(sender As Object, e As EventArgs) _
Handles Button1.Click
End Sub
C#
protected void Button1_Click(object sender, EventArgs e)
{
}
In the VB.NET example, you see a standard method with some arguments, followed by Handles Button1.Click. This is the event wiring code that hooks up the Button control's Click event to the Button1_Click method. Now, whenever the button is clicked, the code inside Button1_Click is executed.
The C# version doesn't have this Handles keyword. Instead, with C# you'll find that VS has added the following bold code to the Button control in the markup of the page:
<asp:Button ID="Button1" runat="server" Text="Button" OnClick="Button1_Click" />
With this piece of markup, the compiler generates the necessary code to link up the Button1_Click method to the Click event of the button. At run time you'll see the exact sameButton1_Click is executed. Note that if you wire up an event in Markup View in VB.NET, you get the same behavior as in C#; in that case the Handles keyword is omitted from the Code Behind because there's already an On handler in Markup View.
You can also see that this Button1_Click event handler has two parameters: an Object called sender and an EventArgs class called e. This is a standard .NET naming scheme and is followed by all objects that generate events. The sender parameter contains a reference to the object that triggered the event, Button1 in this example. This enables you to find out who triggered an event in case you wired up multiple events to the same event handler.
The second parameter is an instance of the EventArgs class and supplies additional arguments to the event. With a button's click, there is no additional relevant data to submit, so the plain and empty EventArgs class is used. However, in later chapters (for example, Chapter 9, which deals with data-driven Web Forms), you see some examples of classes that fire events with richer information.
With the concepts of events, you have come to the end of the section on object orientation. This section should have familiarized you with the most important terms used in object-oriented programming. You see practical examples of these concepts in the remainder of this book.
Practical Tips on Programming
The following list presents some practical tips on programming:
· Always give your variables meaningful names. For simple loop counters you can use i, although loopCount probably describes the purpose of the variable much better. Don't prefix variables with the word var. All variables are variables, so adding var only adds noise to your code. Consider useful names such as _firstName and _categoryId as opposed to strFName, varFirstName, or catI for private fields, and names like FirstName and Person for public properties and classes, respectively.
· Experiment and experiment. Even more so than with working with controls and ASPX pages, the best way to learn how to program is by actually doing it. Just type in some code and hit Ctrl+F5 to see how the code behaves. The compiler will bark at you when something is wrong, providing you with useful hints on how to fix it. Don't be afraid to mess anything up; just keep trying variations until the code does what you want it to do. If you can't make your code work, check out Chapter 18, which deals with debugging. You'll find useful tips to locate and fix many of the errors that may occur in your code.
· When writing functions or subroutines, try to minimize the number of lines of code. Usually, methods with more than 40 or 50 lines of code are a sign of bad design. When you see such code, consider the option to move certain parts to their own routine. This makes your code much easier to understand, leading to better code with fewer bugs. Even if a method is used only once, keeping a chunk of code in a separate method can significantly increase the readability and organization of your code.
· When writing comments in your code, try to describe the general purpose of the code instead of explaining obvious statements. For example, this comment (seen many times in real code) is completely useless and only adds noise:
Dim loopCount As Integer = 0 ‘ Declare loopCount and initialize it to zero
Anyone with just a little bit of coding experience can see what this code does.
Summary
Although programming can get really complex, the bare basics that you need to understand are relatively easy to grasp. The fun thing about programming is that you don't have to be an expert to make useful programs. You can start with a simple Hello World example and work from there, each time expanding your view on code a little.
This chapter covered two main topics. First, you got an introduction to programming in .NET using either C# or VB.NET. You saw what data types and variables are and learned about operators, decision making, and loops. You also saw how to write organized code using functions, subs, and namespaces and how to add comments to your code.
The final section of this chapter dealt with object orientation. Though object orientation in itself is a very large subject, the basics are easy to pick up. In this chapter you learned about the basic elements of OO programming: classes, methods, properties, and constructors. You also learned a bit about inheritance, the driving force behind object-oriented design.
In the next chapter, which deals with creating consistent-looking web pages, you see inheritance again when you create a BasePage class that serves as the parent for most of the Code Behind classes in the Planet Wrox project.
Exercises
1. Considering the fact that the oldest person in the world lived to be 122, what's the best numeric data type to store a person's age? Bonus points if you come up with an even better alternative to store someone's age.
2. What does the following code do?
VB.NET
DeleteButton.Visible = Not DeleteButton.Visible
C#
DeleteButton.Visible = !DeleteButton.Visible;
3. Given the following class Person, what would the code look like for a new class Student that contains a string property called StudentId? Make use of inheritance to create this new class.
VB.NET
Public Class Person
Public Property Name As String
End Class
C#
public class Person
{
public string Name { get; set; }
}
You can find answers to these exercises in Appendix A.
What You Learned in this Chapter
|
Class |
A blueprint for objects in a programming language |
|
Collection |
A special data type that is capable of holding multiple objects at the same time |
|
Encapsulation |
Hiding the inner workings and data of a class from the outside world in order to better manage and protect that data |
|
Instantiating |
The process of creating a new object in memory based on a type's definition |
|
Method |
An operation on an object, like Brake() for a Car class |
|
Namespace |
A way to structure classes and other types in a hierarchical manner |
|
Object Orientation |
A popular style of programming where the software is modeled as a set of objects interacting with each other |
|
Overriding |
Redefining the behavior in a child class of a member defined in a parent class |
|
Property |
A characteristic of an object, like the first name of a person |
All materials on the site are licensed Creative Commons Attribution-Sharealike 3.0 Unported CC BY-SA 3.0 & GNU Free Documentation License (GFDL)
If you are the copyright holder of any material contained on our site and intend to remove it, please contact our site administrator for approval.
© 2016-2026 All site design rights belong to S.Y.A.