Beginning ASP.NET-4.5 in C# and VB (2013)
Chapter 13
Displaying and Updating Data
WHAT YOU WILL LEARN IN THIS CHAPTER:
- How to display, insert, edit, and delete data using controls such as
GridView, DetailsView, andSqlDataSource - How to create a rich interface that enables a user to insert and edit data while maintaining data integrity with the ASP.NET validation controls
- The best way to store your connection strings in your application so they are easily updatable
WROX.COM CODE DOWNLOADS FOR THIS CHAPTER
You can find the wrox.com code downloads for this chapter on the Download Code tab at www.wrox.com/go/begaspnet451. The code is in the Chapter 13 folder.
In this chapter you learn how to display, insert, update, and delete data using the popular data controls that ship with ASP.NET. Besides working with the visual controls that are used to display and edit data in a web page, you also learn how to work with theSqlDataSource control that acts as the bridge between the database and your ASPX pages.
The first things you need to look at are the available data controls, discussed in the next section.
DATA CONTROLSTo enable you to work efficiently with the data in your system, ASP.NET offers two sets of data-aware controls: the data-bound controls and the data source controls.
The first group contains controls that you use to display and edit data, such as the GridView, Repeater, and ListView controls in the user interface. The data source controls are used to retrieve data from a data source, like a database or an XML file, and then offer this data to the data-bound controls. Figure 13-1 shows the complete list of available data controls in the Data category of the Toolbox.
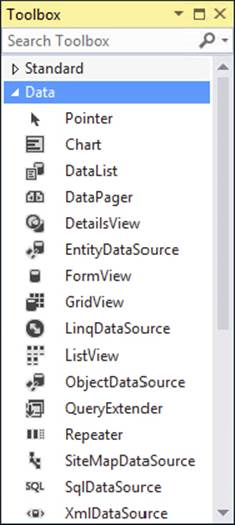
FIGURE 13-1
The following three sections provide a quick overview of all the controls in the Data category. In the remainder of this chapter you get a much more detailed look at some of these controls and how to use them.
Data-bound Controls
Seven of the controls in the Toolbox depicted in Figure 13-1 are the so-called data-bound controls. You use them to display and edit data on your web pages. The GridView, DataList, ListView, and Repeater are all able to display multiple rows at the same time. As such they are often referred to as list controls. The DetailsView and the FormView are designed to show a single row at a time. The DataPager is a helper control used to provide paging capabilities to the ListView controls.
Because ASP.NET offers multiple controls to display lists of rows, you may be wondering when to choose what control. The GridView is a very versatile control that supports automatic paging (where rows are spread out over multiple “pages”), sorting, editing, deleting, and selecting. It renders its data like a spreadsheet with rows and columns. Although many possibilities exist to style the looks of these rows and controls (you learn more about this in Chapter 15), you cannot radically change the way the data is presented. Additionally, the GridView does not allow you to insert rows in the underlying data source directly.
Figure 13-2 shows a typical GridView.

FIGURE 13-2
The DataList control enables you to present data not only in rows as with the GridView, but in columns as well, enabling you to create a matrix-like presentation of data. The control can be considered deprecated and is replaced with the ListView, which is a lot more powerful. As such, this book doesn’t discuss the DataList any further.
The Repeater gives you the greatest flexibility in terms of the HTML that you output to the browser because the control by itself does not add any HTML to the page output. As such, it’s often used for HTML ordered or unordered lists (<ol> and <ul>) and other lists where you can’t afford to have unwanted HTML mixed with your own. You define the entire client markup through the numerous templates the control exposes. However, this flexibility comes at a price: the control has no built-in capabilities to page, sort, or modify data. You see more of the Repeater control in the next chapter.
The ListView was introduced in ASP.NET 3.5 and is a best-of-all-worlds combination of the GridView, the DataList, and the Repeater. It has undergone some changes in ASP.NET 4 and 4.5 that make it even easier to work with. The control supports editing, deleting, and paging of data, similar to the GridView. It supports multi-column and multi-row layouts like the DataList offers, and it enables you to completely control the markup generated by the control, just as the Repeater does. It also supports inserting and updating data like theDetailsView or FormView controls. In the next chapter, you see a lot more of the ListView control.
In ASP.NET 4, list controls were extended with a ClientIDRowSuffix property that enables you to indicate the column whose value is used to create unique client-side IDs based on data in the database. For this to work, you need to set the ClientIDMode property that you saw in earlier chapters to Predictable.
In ASP.NET 4.5, the controls were extended again with a new property: ItemType. You see this property at work in the next chapter.
The DetailsView and FormView controls are somewhat similar in that both of them can display a single record at a time. The DetailsView uses a built-in tabular format to display the data, whereas the FormView uses templates to let you define the look and feel of your data. A simple, template-based DetailsView could look like the one shown in Figure 13-3.
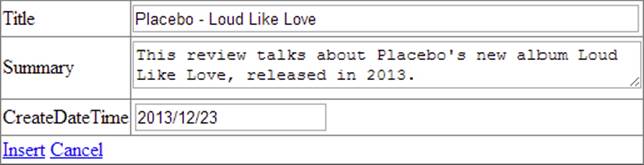
FIGURE 13-3
The FormView control (and a few of the Login controls you’ll see in Chapter 16) have a RenderOuterTable property. When you set this property to False (it defaults to True so you need to set it explicitly) the control doesn’t generate a wrapping HTML <table> element. This in turn results in less code and cleaner HTML. Both controls enable you to define the templates for different situations, such as a read-only display of data, and inserting and updating of data. You see how to customize these templates in the second half of this chapter.
Paging Controls
Another useful control is the DataPager, which enables paging on other controls. For the time being, you can only use it to extend the ListView control, but that might change with future versions of the .NET Framework. The ListView and DataPager controls are discussed in Chapter 14.
For the data-bound controls to display something useful, you need to assign them a data source. To bind this data source to the controls, two main methods are available: You can assign data to the control’s DataSource property, or you can use one of the separate data source controls. In later chapters, you see how to use the DataSource property; the different data source controls are the topic of the following section.
The Data category of the Toolbox contains six different data source controls that you can use to bind data to your data-bound controls. The XmlDataSource and SiteMapDataSource controls are used to bind hierarchical, XML-based data to these controls. You sawSiteMapDataSource at work when you created the site map in Chapter 7.
The ObjectDataSource control enables you to connect your data-bound controls to separate objects in your application. Instead of tying your data-aware controls directly to a database, you bind data from a separate layer with custom objects to them. Get yourself a copy of Wrox’s Professional ASP.NET 4.5 (ISBN 978-1-118-31182-0) if you want to find out more about the ObjectDataSource control.
The final three data source controls are the SqlDataSource, the EntityDataSource, and the LinqDataSource controls. The first is discussed in this chapter. The LinqDataSource serves as a data source for LINQ to SQL, a technology similar to the ADO.NET Entity Framework you learn more about in Chapter 14. Because Microsoft is now promoting the Entity Framework instead of LINQ to SQL, I won’t discuss the LinqDataSource control in this book. The EntityDataSource is used with older versions of the Entity Framework, and hasn’t been updated for the latest version of EF. Instead of using this control, Microsoft recommends to use a concept called Model Binding, discussed extensively in the next chapter.
The QueryExtender control acts like an add-on to the LinqDataSource and EntityDataSource controls in that it enables you to create a rich filtering interface to search for specific data without manually writing a lot of code. You can learn more about the QueryExtender in this article: http://bit.ly/92kMPQ.
The final control in the Toolbox is the Chart control. It was initially released as an add-on to Visual Studio 2008 but is now fully integrated into VS 2013. It’s designed to render chart graphics ranging from simple bar charts to 3D pie charts and fancy line diagrams. I won’t discuss this control any further, but you can find a series of articles that discuss it in detail here: http://tinyurl.com/nsnbvv.
In the next section you see how to use the SqlDataSource and the GridView to retrieve and display data from a database. Later sections and chapters dig deeper into the other data controls.
The SqlDataSource control enables you to quickly create functional, database-driven web pages. Without writing a whole lot of code, you can create web pages that enable you to perform all four operations of the CRUD acronym: Create, Read, Update, and Delete data. Although its name may seem to imply that the control can access only Microsoft’s SQL Server, that’s not the case. The control can access other databases, such as Oracle or MySQL, as well.
To give you an idea of how the SqlDataSource control works in conjunction with the data-bound controls, the next Try It Out shows you how to create a very simple data-driven web page that enables you to update and delete the musical genres that are stored in theGenre table in the database. This chapter assumes you have the PlanetWrox.mdf database with the Genre and Review tables in your App_Data folder. It’s also assumed that these tables each contain at least a few rows. If you didn’t follow the steps in the preceding chapter, use the script file Create Planet Wrox Database.sql supplied in the Resources folder of that chapter to create the necessary tables and records. You still need to create the database at C:\BegASPNET\Site\App_Data as explained in the preceding chapter. It’s also a good idea to use this script if your own copy doesn’t contain a lot of review and genre rows. This gives you a good set of sample rows to work with.
In this exercise you start building the Management section of the website that will be your main entry point to manage things such as reviews and genres in your site. For now, the pages you create in this section are accessible to all users of your site, but Chapter 16 shows you how to block access to this folder to any user that is not an administrator.
You see how to drag a table from the Server Explorer onto the page and have VS create a user interface to manage items in the database for you by automatically generating the necessary code for a GridView and a SqlDataSource. In later exercises in this book you see how to reproduce this behavior manually, giving you more control over the code.
1. Open the Planet Wrox website from its location at C:\BegASPNET\Site in Visual Studio.
2. Right-click the MasterPages folder, choose Add ⇒ Add New Item, and add a new Master Page called Management.master to the site. Make sure it uses your programming language and that it’s not based on an existing master page. Also, make sure it’s using Code Behind by checking the Place Code in Separate File option.
3. Change the HTML inside the <form> element to the following code that creates two elements (a <nav> and a <section>) floating next to each other. The first contains a simple list-based menu for the Management section, whereas the second contains the ContentPlaceHolder control that enables content pages to provide custom content:
4.<form id="form1" runat="server">
5.<div>
6.<nav style="width: 200px; float: left;">
7.<ul>
8.<li><a href="~/Management/Default.aspx" runat="server">
9.Management Home</a></li>
10.<li><a href="~/Management/Genres.aspx" runat="server">Manage Genres</a></li>
11.</ul>
12.</nav>
13.<section style="width: 750px; float: left;">
14.<asp:ContentPlaceHolder ID="cpMainContent"
15.runat="server"></asp:ContentPlaceHolder>
16.</section>
17.</div>
</form>In the next steps, you add the two files linked to from the <nav> element. Save and close the master page.
18.Add a new folder to the root of the site and call it Management. Right-click this new folder, choose Add ⇒ Add New Item, and create a new standard Web Form called Default.aspx. Don’t use your custom template, and make sure the page is based on the new Management.master file you just created by checking Select Master Page and then selecting that master page from the MasterPages folder. Add some text to the cpMainContent content block that welcomes the user to the Management section of the website:
19.<asp:Content ID="Content2" ContentPlaceHolderID="cpMainContent" runat="Server">
20.<h1>Planet Wrox Management Section</h1>
21.<p>Welcome to the Management section of this web site. Please choose an item
22.from the menu on the left to continue.</p>
</asp:Content>Give the page a title of Planet Wrox - Management - Home.
23.Create another page in the Management folder and call it Genres.aspx. Base it on the same master page and then change its title to Planet Wrox - Management - Genres and switch it into Design View.
24.Double-click the PlanetWrox.mdf file in the App_Data folder. This opens the Server Explorer. If you don’t see the Planet Wrox database listed here or you get an error, refer to the preceding chapter, which explains how to set up the database. Remember, there’s a script file in the Resources folder for the preceding chapter that creates the tables you’ll work with in case you don’t have your own.
25.Expand the PlanetWrox.mdf database, then the Tables node, and then drag the Genre table from the Server Explorer and drop it in the cpMainContent area of the Genres page in Design View. VS creates a GridView and a SqlDataSource for you automatically.
26.On the Smart Tasks panel for the GridView control that should open automatically (if it doesn’t, click the gray arrow on the upper-right corner of the control or right-click the control and choose Show Smart Tag), check all the available check boxes, shown in Figure 13-4.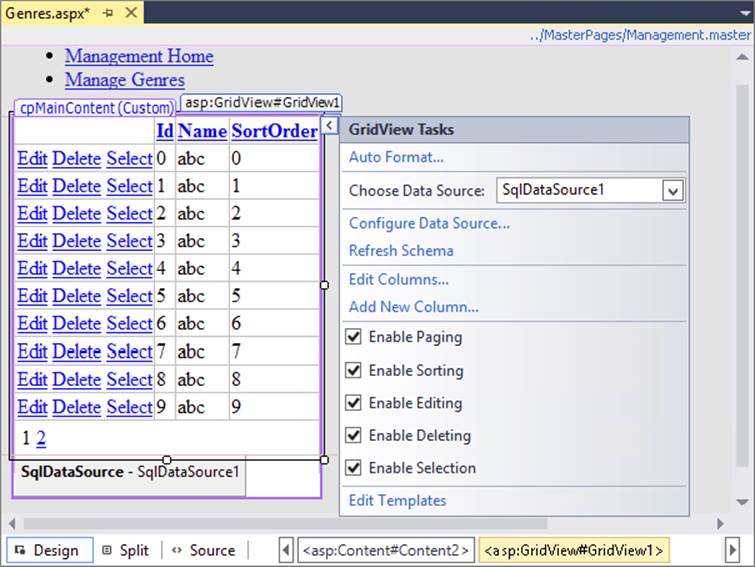
FIGURE 13-4
27.
Right-click the Management folder in the Solution Explorer and choose Add ⇒ Add New Item. Choose Web Configuration File and then click Add to add a Web.config file that applies to the Management folder only. In the file that opens, add a <pages>element under <system.web> and set the theme attribute to an empty string, effectively disabling the theme for the entire Management section of the site:
28.<configuration>
29.<system.web>
30.<pages theme="" />
31.</system.web>
</configuration>32.Save all your changes and then request Genres.aspx from the Management folder in your browser. You should see a grid with the genres from the Genre table (see Figure 13-5). The links in the left column enable you to edit, delete, and select the relevant genres. Note that you can’t delete genres that have one or more reviews attached to them. If you try, you’ll get an error instead. Chapter 15 digs much deeper into changing the user interface (UI) to disable the Delete links so users can no longer accidentally click them.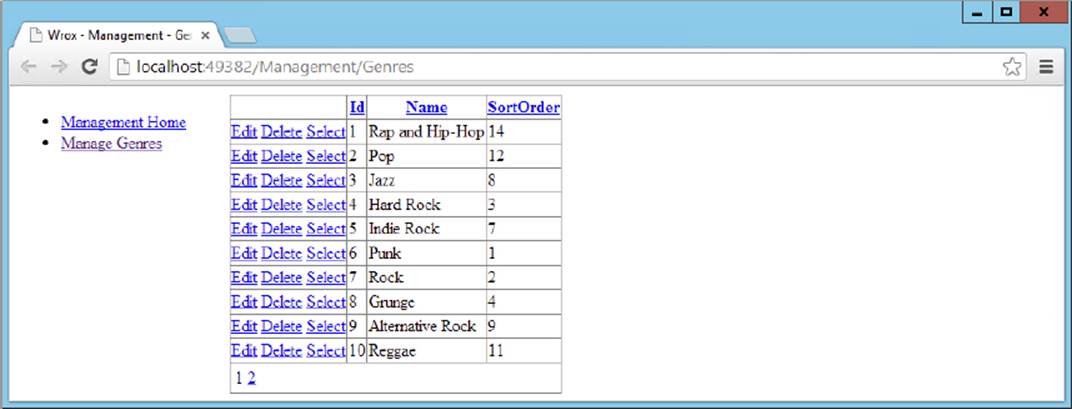
FIGURE 13-5
If the list with genres ends up below the menu on the left, you may need to make your browser window a little wider.
33.You can click the column headers, such as Name and SortOrder (visible in Figure 13-5), to sort the data in the grid on that column. If you click the same header again, the data is sorted in reverse order. You can move to another page in the grid by clicking the numbers at the bottom.
34.Click the Edit link for one of the genres, change the name in the text box that has appeared, and click the Update link. The GridView should now display the new name.
You didn’t manually write any code to interact with the database in this exercise, but you got a lot of functionality simply by dragging and dropping a database table. To see how it works, take a look at the source that VS generated. First, look at the markup for the SqlDataSource control:
<asp:SqlDataSource ID="SqlDataSource1" runat="server" ConnectionString="<%$ ConnectionStrings:PlanetWroxConnectionString1 %>" ProviderName=" <%$ ConnectionStrings:PlanetWroxConnectionString1.ProviderName %>" DeleteCommand="DELETE FROM [Genre] WHERE [Id] = @Id" InsertCommand="INSERT INTO [Genre] ([Name], [SortOrder]) VALUES (@Name, @SortOrder)" SelectCommand="SELECT [Id], [Name], [SortOrder] FROM [Genre]" UpdateCommand="UPDATE [Genre] SET [Name] = @Name, [SortOrder] = @SortOrder WHERE [Id] = @Id"> <DeleteParameters> <asp:Parameter Name="Id" Type="Int32" /> </DeleteParameters> <InsertParameters> <asp:Parameter Name="Name" Type="String" /> <asp:Parameter Name="SortOrder" Type="Int32" /> </InsertParameters> <UpdateParameters> <asp:Parameter Name="Name" Type="String" /> <asp:Parameter Name="SortOrder" Type="Int32" /> <asp:Parameter Name="Id" Type="Int32" /> </UpdateParameters></asp:SqlDataSource>I changed the order of the attributes so all the commands are placed together. In your case, you may have the ProviderName attribute in a different location. As with all ASP.NET controls, the order of attributes in the control declaration doesn’t matter.
A couple of interesting things are worth examining. First, note that the ConnectionString and ProviderName attributes point to a connection string that has been defined in the Web.config file. You see more of this in the next section, including an explanation of the <%$ %> syntax used for the attributes.
You then see four commands, each one of them containing a SQL statement that is used for one of the four operations of the CRUD acronym. The INSERT, UPDATE, and DELETE commands contain parameters, identified by the at symbol (@) prefix. At run time, when the control is asked to perform the relevant data operation, these parameters are substituted by runtime values. The SqlDataSource control keeps track of the relevant parameters in the *Parameters collections. For example, the<DeleteParameters> element contains a single parameter for the Id (the primary key) of the genre:
<DeleteParameters> <asp:Parameter Name="Id" Type="Int32" /></DeleteParameters>Note that the Name of the parameter minus the at symbol (@) lines up with the parameter in the SQL statement:
DeleteCommand="DELETE FROM [Genre] WHERE [Id] = @Id"Notice how VS has wrapped column and table names in square brackets ([]). You normally only need these if your column or table name contains a special character such as a space or the name matches a reserved word. VS is just cautious and adds them to all columns and tables. You can leave them in, but if you write your own SQL statements you don’t have to include them (although you could if you wanted to).
All by itself, the SqlDataSource control can’t do much at this stage. It needs a data-bound control that tells it what data operations to execute. In this Try It Out exercise the data-bound control is the GridView that is defined with this code:
<asp:GridView ID="GridView1" runat="server" AllowPaging="True" AllowSorting="True" AutoGenerateColumns="False" DataKeyNames="Id" DataSourceID="SqlDataSource1" EmptyDataText="There are no data records to display."> <Columns> <asp:CommandField ShowDeleteButton="True" ShowEditButton="True" ShowSelectButton="True" /> <asp:BoundField DataField="Id" HeaderText="Id" ReadOnly="True" SortExpression="Id" /> <asp:BoundField DataField="Name" HeaderText="Name" SortExpression="Name" /> <asp:BoundField DataField="SortOrder" HeaderText="SortOrder" SortExpression="SortOrder" /> </Columns></asp:GridView>The GridView contains a few important attributes. First, the DataKeyNames attribute tells the GridView what the primary key is of the row in the database. It needs this to uniquely identify rows in the grid.
The DataSourceID attribute points to the SqlDataSource control that you saw earlier, whereas AllowPaging and AllowSorting enable their associated features on the GridView.
Under the <Columns> element you see a number of fields set up. First, you see a CommandField. A CommandField is a column in the GridView that enables a user to execute one or more actions for the row to which the CommandField applies. It ends up in the browser as one or more text links or buttons. In this example, ShowDeleteButton, ShowEditButton, and ShowSelectButton have all been set to True. This gives the grid the functionality you see in Figure 13-5. When you click one of the links that have been created by the CommandField, they’ll trigger a command at the server. For example, clicking the Edit link puts the GridView in edit mode so you can edit the selected row. Notice how clicking the Select link doesn’t seem to change the GridView at all. In Chapter 15 you see how to create styles for the GridView so you can radically change the appearance of the control, including visually distinguishing a selected row from the others.
If you want the GridView to render buttons instead of links, you need to set ButtonType to Button:
<asp:CommandField ShowDeleteButton="True" ShowEditButton="True"ShowSelectButton="True"ButtonType="Button"></asp:CommandField>
The other three fields are so-called bound fields and map directly to the columns of the Genre table in the database with their DataField attribute so the GridView knows what data to display where.
The GridView and SqlDataSource controls work together closely to retrieve and modify the data in the underlying data source. To give you an idea of how this works, here’s a rundown of the events that took place when you requested the Genres page in the browser and then edited a single genre:
1. You request the page in your browser and the page begins its page life cycle.
2. The GridView knows it is set up to retrieve and display data because it has a DataSourceID attribute that points to a SqlDataSource control. It contacts this data source control and asks it for its data. The SqlDataSource in turn connects to the database and then fires its SelectCommand, the SQL statement that selects the Id, Name, and SortOrder from the Genre table in the database:
SelectCommand="SELECT [Id], [Name], [SortOrder] FROM [Genre]"3. When the SqlDataSource receives the requested rows from the database it hands them over to the GridView, which creates an HTML table out of them using the bound fields that have been set up in the <Columns> element. The GridView keeps track of the unique ID for each row that is displayed in the page by storing it in View State.
4. As soon as you click the Edit link, the page posts back. The GridView is able to see what row you clicked by looking at the associated DataKeyNames and retrieving the row’s ID from View State. It then gets the latest results from the database by asking theSqlDataSource again to fire its SelectCommand, and, finally, puts the selected row in edit mode so you can change the relevant details. When you click the Update link, the GridView collects the new values from the TextBox controls and then contacts theSqlDataSource again.
5. For each of the parameters in the <UpdateParameters> element of the SqlDataSource, the GridView supplies a value. It retrieves the Id of the genre from the selected row, and then retrieves the new Name and SortOrder values from the TextBox controls in the page.
6. Armed with the relevant data for the Id, Name, and SortOrder, the SqlDataSource then executes its UpdateCommand against the database:
7.UpdateCommand="UPDATE [Genre] SET [Name] = @Name,
[SortOrder] = @SortOrder WHERE [Id] = @Id"Each of the parameters prefixed with the at symbol (@) is filled with the values that the GridView supplied. The SQL statement that gets sent to the database ends up looking similar to this:
UPDATE [Genre] SET [Name] = 'New Name', [SortOrder] = 1 WHERE [Id] = 18. Finally, the GridView refreshes the data on the page by once again asking the SqlDataSource to execute its SelectCommand. This way, the GridView now displays the latest data with the update you made.
The other commands work in a similar way and send their own SQL commands to the database.
At the end of the exercise, you added a new Web.config file to the Management folder to reset the theme that is applied to all pages in the Management section. With the theme removed, it’s easier to focus on the functionality of the Management section, rather than be distracted by layout issues. In Chapter 15 you create a third theme specifically for the Management folder and apply that theme in the Web.config file in the Management folder. That way, your management pages will have a look and feel that’s different from the pages in the front end.
Now that you’ve seen how to display, edit, and delete data, it’s time to learn how to insert new rows in the database using the DetailsView control.
Just as displaying, updating, and deleting data with the GridView are pretty easy, so is inserting data with the DetailsView control. The DetailsView supports a number of templates that enable you to customize the look and feel of the control in different modes. For example, the control has a <HeaderTemplate>, a <FooterTemplate>, and a <PagerTemplate> element that enable you to define the look of the top and bottom parts of the control. In addition, the control has a <Fields> element that enables you to define the rows that should appear in the control, much like the <Columns> element of the GridView.
The DetailsView is able to display data in a few different modes. First of all, it can display an existing row in read-only mode. In addition, you can use the control to insert new rows and to update existing ones. You control the mode of the DetailsView with theDefaultMode property, which you can set to ReadOnly, Insert, and Edit, respectively. You see how to configure the DetailsView and set the DefaultMode property next.
In this exercise, you see how to use the DetailsView control to let your users insert new rows into the Genre table. As with the GridView example, the next exercise requires no coding from your side. All you need to do is drag and drop a few controls, set a few properties, and you’re done. Obviously, these code-free pages have limitations that make them less useful in more advanced scenarios. Therefore, later in this chapter, you see how to extend and customize these controls.
1. Go back to the Genres.aspx page in VS and make sure it’s in Design View.
2. Drag and drop a DetailsView control from the Data category of the Toolbox immediately below the GridView. If you have trouble dropping the control below the GridView but above the SqlDataSource control, you can simply drop it on the SqlDataSource; VS then adds the markup of the dropped control before the one you drop it on.
3. Open the control’s Smart Tasks panel if it didn’t open automatically and hook up the control to the existing SqlDataSource1 by selecting that name from the Choose Data Source drop-down list.
4. On the same Smart Tasks panel, select the Enable Inserting item.
5. Open the control’s Properties Grid by pressing F4 and then locate the DefaultMode property in the Behavior category. Set the DefaultMode to Insert. The code for the DetailsView should now look like this:
6.<asp:DetailsView ID="DetailsView1" runat="server" AutoGenerateRows="False"
7.DataKeyNames="Id" DataSourceID="SqlDataSource1" DefaultMode="Insert"
8.Height="50px" Width="125px">
9.<Fields>
10.<asp:BoundField DataField="Id" HeaderText="Id" InsertVisible="False"
11.ReadOnly="True" SortExpression="Id" />
12.<asp:BoundField DataField="Name" HeaderText="Name" SortExpression="Name" />
13.<asp:BoundField DataField="SortOrder" HeaderText="SortOrder"
14.SortExpression="SortOrder" />
15.<asp:CommandField ShowInsertButton="True" />
16.</Fields>
</asp:DetailsView>If you don’t see the three BoundField elements, open the Smart Task panel for the DetailsView, click Refresh schema, click No when asked to refresh the fields and keys for the GridView, but click Yes when asked the same question for the DetailsView. This leaves the GridView unmodified and then correctly adds the fields for the DetailsView.
17.Save the changes to the page, and press Ctrl+F5 to open it up in your browser. Below the GridView you should now see the controls that enable you to insert a new genre, as shown in Figure 13-6.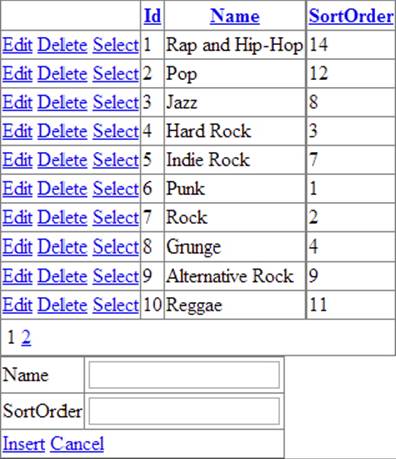
FIGURE 13-6
18.
Insert a new genre such as Disco or Dance. Make sure you enter both a name and a sort order (a number) and then click the Insert link. You may need to page to the last page of the GridView by clicking one of the numbers at the bottom of the screen in the Pager bar to see the new row.
How It Works
Identical to the other data-bound controls, you hook up the DetailsView to a data source control by setting the DataSourceID property. Because you already have a working SqlDataSource control on the page, you can simply reuse that. The DetailsViewexposes different views, for read-only, insert, and edit modes. By setting the DefaultMode to Insert, you force the control to switch to insert mode, which means you automatically get a UI for entering details for the genre, and Insert and Cancel links. TheDetailsView control is actually pretty smart. When you point it to the SqlDataSource control, it is able to figure out the DataKeyNames property, which it set to Id:
<asp:DetailsView ID="DetailsView1" runat="server" AutoGenerateRows="False"DataKeyNames="Id" DataSourceID="SqlDataSource1" ...
It also understands that the Id column is an identity column in the database, and therefore hides it in the Insert screen (shown in Figure 13-6) by setting InsertVisible to False. Because the database generates this ID automatically, there is no point in letting the user enter a value for it.
When you enter some values and click the Insert link, a process similar to updating with the GridView takes place. The DetailsView collects the relevant information from the page’s controls (the Name and the SortOrder) and forwards them to theSqlDataSource. This control in turn pushes the new values in the parameters for the INSERT statement and then sends the command off to the database, which inserts the new row in the Genre table. If you click the Insert link without entering a name or sort order, you’ll get an error. In this and later chapters you see how to modify the data-bound controls to include validation functionality.
When you dropped the Genre table on the Genres.aspx page earlier in this chapter, VS not only created a bunch of controls for you, but it also stored information about the database in your Web.config file. The next section explains how this works and why it is important.
The first time you dropped the Genre table on your page, VS created a SqlDataSource control for you. To tell this control what database to access, VS also created a connection string in the Web.config file under the <connectionStrings> element and pointed theSqlDataSource to this connection string. The setting in Web.config looks like this:
<connectionStrings> <add name="PlanetWroxConnectionString1" connectionString="Data Source= (localdb)\v11.0;AttachDbFilename=|DataDirectory|\PlanetWrox.mdf; Integrated Security=True" providerName="System.Data.SqlClient" /></connectionStrings>The SqlDataSource then accesses this connection string as follows:
<asp:SqlDataSource ID="SqlDataSource1" runat="server" ConnectionString="<%$ ConnectionStrings:PlanetWroxConnectionString1 %>"This code uses expression syntax to refer to the connection string in the Web.config. It asks the Web.config file for the connection string that listens to the name PlanetWroxConnectionString1. It also reads the providerName attribute to figure out how its internal code should talk to the database.
Storing your connection strings in Web.config is considered a very good practice. By centralizing your connection strings you make it much easier to modify them when your database changes (for example, when you switch from a development environment to a production server). Never store your connection strings directly in Code Behind files or in the markup section of the page. You’ll seriously regret that the day you have to change your connection string and have to wade through all the pages in your site looking for connection strings.
The Express LocalDB edition of SQL Server that you have used so far enables you to work with databases that are attached to SQL Server on the fly when you need them. Take a look at the actual connection string to see how this works:
Data Source=(localdb)\v11.0;AttachDbFilename=|DataDirectory|\PlanetWrox.mdf;Integrated Security=True;This connection string consists of three parts (which are all on one line in your config file). The value of the first part contains the data source to identify the SQL Server that is targeted, which in this case is a LocalDB instance of SQL Server 2012. Other valid data sources you may come across include . (just a dot, to denote the local machine), .\SqlExpress, to target a named instance version of SQL Server Express running on the local machine (where SqlExpress is the instance name), or something like MachineName orMachineName\InstanceName to target a remote machine or a named instance on a remote machine.
AttachDbFileName contains a path to your SQL Server Express database. The |DataDirectory| placeholder is expanded to the full and physical path of the App_Data folder at run time. So, when your pages load and the SqlDataSource needs to connect to the database, it will open the file PlanetWrox.mdf in C:\BegASPNET\Site\App_Data\. As an alternative to AttachDbFileName you’ll also come across Initial Catalog in other connection strings. The Initial Catalog points to a database available on the SQL Server you are using. You see more of this in Appendix B.
The last part of the connection string has to do with security. With Integrated Security, the account used by the web server is used to connect to the database. In the case of VS and IIS Express, this account is the one you use to log on to your machine. In case you’re using the full version of IIS, this account is an account named after an Application Pool in IIS, or a special account called Network Service. Chapter 19, which deals with deployment, and Appendix B, which explains how to connect to SQL Server, dig deeper into security-related issues.
So far you have seen most of the database concepts that were introduced in the previous chapter. You saw creating (with the DetailsView in insert mode), reading (with the SelectCommand and the GridView), updating (inline within the GridView and an UpdateCommand), and deleting (with the delete option in the GridView and a DeleteCommand). Moreover, you saw sorting that can be enabled in the GridView with just a single setting. What you haven’t seen is filtering, a way to limit the data that is presented in the page. In the next section you see how to create a filter that enables you to display reviews that belong to a certain genre. You create the filter in the Management section in a new page called Reviews.aspx, which will be your main entry point for managing the reviews in your website. Subsequent sections build on top of this, gradually expanding the Reviews page with more useful features.
As you learned in the previous chapter, you use a WHERE clause to filter your data. VS and ASP.NET come with a bunch of tools that make creating filters very easy. To filter data, the SqlDataSource control (and other data source controls) have a <SelectParameters>element that enables you to supply values at run time that are used for filtering. These values can come from a variety of sources, including the ones described in the following table.
|
WITH A |
THE VALUE IS RETRIEVED FROM |
|
|
A control in the page, such as a |
|
|
A cookie that is stored on the user’s computer and that is sent to the server with each request. |
|
|
A value posted in the form that has been submitted to the server. |
|
|
A variety of sources. With this parameter, you set the value through code. |
|
|
A property on the user’s profile. The ASP.NET Profile is discussed in full detail in Chapter 17. |
|
|
A query string field. |
|
|
A value that is stored in a session, which is a server-side, user-specific store of data that exists during a user’s visit to a site. |
Because these parameters all behave more or less the same, it’s easy to use them in your own code. Once you understand how to use one of them, you’ll quickly be able to use the others as well. You see the ControlParameter at work in the next exercise, where you use aDropDownList with all the genres to filter a list of reviews that belong to the chosen genre.
To make long lists of data easier to manage, it’s a good idea to offer them to the user in smaller, bite-size blocks. For example, when you need to present a list with reviews in your database, you could enable your users to filter them by genre. ADropDownList with the genres to limit the reviews in the GridView to those that belong to the selected genre would be the perfect solution for that. You see how to build this next.
1. Create a new Web Form called Reviews.aspx in the Management folder, and make sure it uses Code Behind and is based on the new Management master page. Change the Title of the page to Planet Wrox - Management - Reviews.
2. Add a link to this page in the master page for the Management section:
3.<li><a href="~/Management/Genres.aspx" runat="server">Manage Genres</a></li>
4.<li><a href="~/Management/Reviews.aspx" runat="server">Manage Reviews</a></li>
</ul>5. Go back to Reviews.aspx and switch the page into Design View. From the Standard category of the Toolbox, drag a DropDownList control into the page. On its Smart Tasks panel, select Enable AutoPostBack and click the Edit Items link. Insert an item with its Text set to Make a selection, and then clear its Value that was inserted for you automatically.
6. Once you return from the ListItem Collection Editor dialog box, the Smart Tasks panel for the drop-down list is still open. Click the Choose Data Source item and choose <New data source> from the drop-down list at the top of the screen. The Data Source Configuration Wizard, shown in Figure 13-7, appears.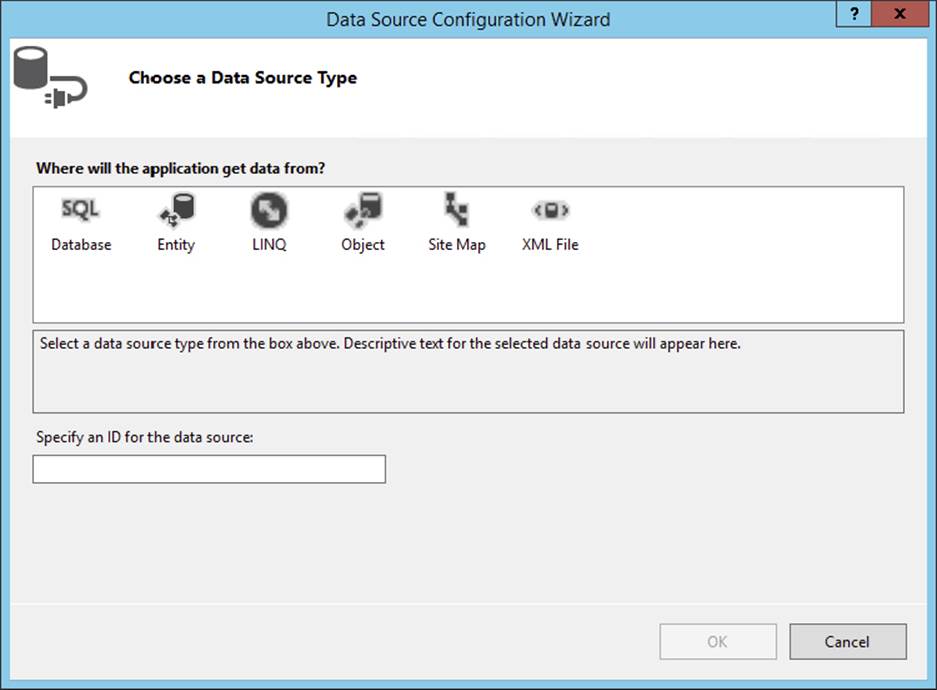
FIGURE 13-7
7.
Click Database, leave the ID set to SqlDataSource1, and click OK.
8. In the dialog box that follows, select the connection string called PlanetWroxConnectionString1 from the drop-down list and click Next.
9. Verify that the radio button for Specify Columns from a Table or View is selected. Also ensure that Genre is selected in the drop-down list with table names and then select the Id and Name columns in the Columns section. Click the ORDER BY button, choose SortOrder from the Sort By drop-down list, and click OK. When you’re done, your Configure Data Source wizard should look like Figure 13-8.
FIGURE 13-8
10.
Click Next and then Finish to have VS create the SqlDataSource for you. You return to the Data Source Configuration Wizard for the drop-down list where you can now set up a field that is displayed in the drop-down list for the genres and a field that serves as the underlying value in the list. Choose Name as the field to display and leave the second drop-down list set to Id. You should end up with the screen shown in Figure 13-9.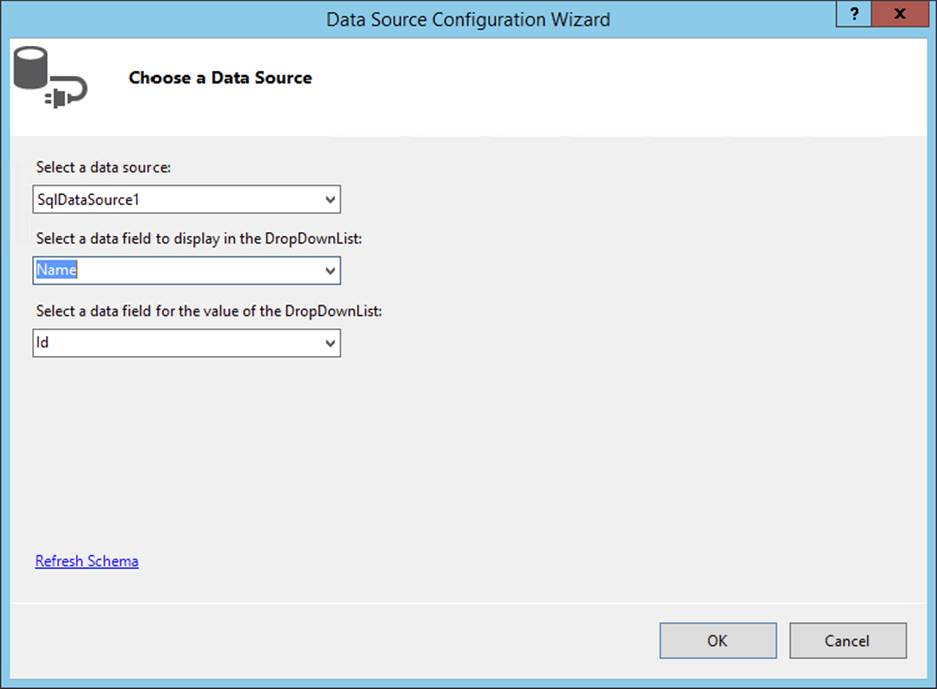
FIGURE 13-9
11.
Click OK to close the dialog box and finish setting up the data source for the drop-down list.
12.With the DropDownList control still selected in Design View, press F4 to open up its Properties Grid and set the property AppendDataBoundItems to True. Switch to Markup View, and if the static ListItem that instructs your users to select an item does not have a Value attribute, add it manually and set it to an empty string. Your final code should look like this:
13.<asp:DropDownList ID="DropDownList1" runat="server" DataSourceID="SqlDataSource1"
14.DataTextField="Name" DataValueField="Id" AppendDataBoundItems="true"
15.AutoPostBack="True">
16.<asp:ListItemValue="">Make a selection</asp:ListItem>
17.</asp:DropDownList>
18.
19.<asp:SqlDataSource ID="SqlDataSource1" runat="server"
20.ConnectionString="<%$ ConnectionStrings:PlanetWroxConnectionString1 %>"
21.SelectCommand="SELECT [Id], [Name] FROM [Genre] ORDER BY [SortOrder]">
</asp:SqlDataSource>22.Save all your changes and press Ctrl+F5 to open the page in the browser. You should now see a drop-down list with all the genres in the database ordered by their SortOrder column. Once you choose a new genre from the list, the page posts back to the server. Nothing else happens because you didn’t tie any logic to the DropDownList control, but you see how to do this in the next exercise.
At the end of this exercise you end up with code similar to what VS created automatically when you dropped a GridView on the page in an earlier exercise. You have a data-bound control (the DropDownList) that gets its data from a data source control (theSqlDataSource control). What’s different is that the way you set things up gave you a lot more flexibility with regard to the code that is generated. Instead of relying on VS to generate a SQL statement for all the columns in the database, you now choose only the two columns that you need. Additionally, because the SqlDataSource doesn’t require any updates to the data source, you only needed to provide a SelectCommand. You also used the ORDER BY button to control the order in which the items are added to the list.
With the SqlDataSource control set up, displaying the data it returns in a DropDownList control is pretty easy. You start by pointing the DropDownList to the correct data source using the DataSourceID attribute, and then set up the DataTextField andDataValueField to tell the control what columns to use for the text displayed in the control and the underlying value. By setting AppendDataBoundItems to True, you can preserve the item that you add in your code manually. With this setting turned off, the static item Make a selection would have been cleared as soon as the data-bound items were added.
With the filter control set up, the next step is to create the GridView that displays reviews for the selected genre. You see how to do this in the next exercise.
In this Try It Out you add another SqlDataSource that gets its data from the Review table. By creating a filter (the WHERE clause in the SQL statement) you can limit the number of items displayed in the grid to those that belong to a specific genre. The genre chosen in the drop-down list you created in the previous section is sent into the SqlDataSource control’s SelectParameters collection using an <asp:ControlParameter>.
1. Switch the Reviews.aspx page to Design View and drag a GridView from the Data category of the Toolbox on top of the existing SqlDataSource control. The GridView is added right above it and its Smart Tasks panel opens.
2. In the Choose Data Source drop-down list of the GridView’s Smart Tasks panel, choose <New data source>. In the Data Source Configuration Wizard, click Database (just as with the wizard for the genres that is shown in Figure 13-7) and click OK.
3. In the dialog box that follows, select the Planet Wrox connection string from the drop-down list and click Next again.
4. Select the Review table in the Name drop-down list and then make sure the asterisk (*) is checked in the Columns list to select all columns. In the preceding chapter I recommended not to use SELECT *, but it’s OK to do so for this exercise. Later in this chapter you see how to fix this.
5. Click the WHERE button, which enables you to set up a WHERE clause using the SelectParameters. In the dialog box that follows, enter the details so the screen ends up like Figure 13-10.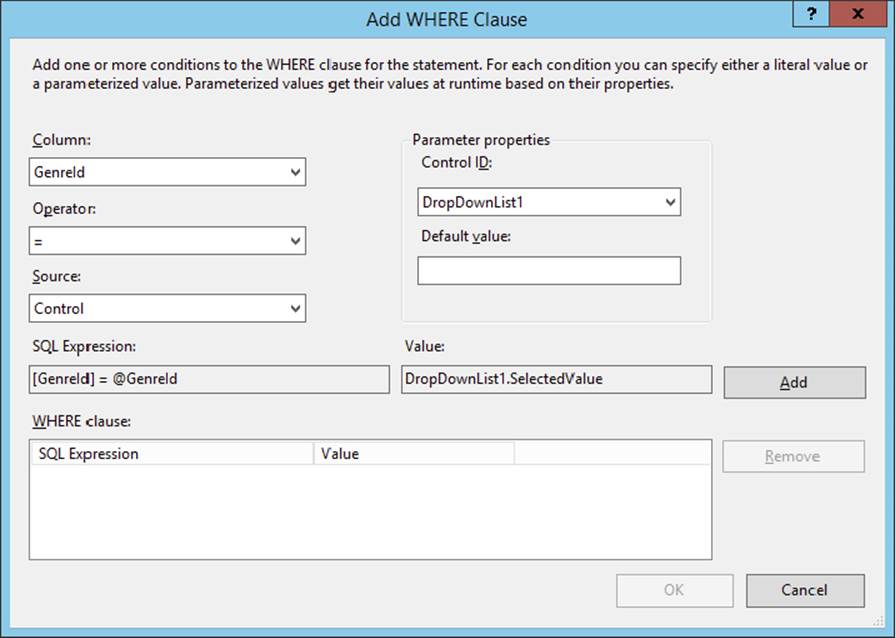
FIGURE 13-10
For some reason, each of your controls may show up twice in the Control ID drop-down list. It doesn’t matter which of the DropDownList1 options you choose.
6. Click the Add button to add the selection to the WHERE clause list at the bottom of the screen and click OK.
7. Back in the Configure Data Source wizard, click Next. To test the query, click the Test Query button. If you set up the parameter correctly, a dialog box pops up enabling you to enter a value. Enter a number that you know exists in the Genre table (such as 2) and click OK. If rows exist in the Review table for the chosen genre, they are displayed in the Test Query window. Finally, click Finish to finalize the wizard. If you get a dialog box about refreshing parameters, click Yes to have the code in Markup View updated for you.
8. Save all your changes and open Reviews.aspx in your browser.
Select a new item in the drop-down list. The page refreshes, and now shows the reviews that belong to the chosen genre. If the page doesn’t refresh, ensure that you set AutoPostBack to True in the previous exercise. At this stage the page looks rather messy because the GridView contains many columns but in the next Try It Out you see how to fix this.
How It Works
For the most part, this exercise works the same as a previous exercise where you displayed a list with the available genres. What’s different this time is the way the SqlDataSource is able to filter the rows from the Review table based on the selection you made in the drop-down list. Take a look at the code for the SqlDataSource to see how this works:
<asp:SqlDataSource ID="SqlDataSource2" runat="server" ConnectionString="<%$ ConnectionStrings:PlanetWroxConnectionString1 %>" SelectCommand="SELECT * FROM [Review] WHERE ([GenreId] = @GenreId)"><SelectParameters> <asp:ControlParameter ControlID="DropDownList1" Name="GenreId" PropertyName="SelectedValue" Type="Int32" /> </SelectParameters></asp:SqlDataSource>The SQL statement for the SelectCommand contains a parameter for the GenreId denoted by the @GenreId variable in the SELECT statement. That means that the SQL statement returns rows from the Review table only for a specific genre. At run time, the value for this parameter is retrieved from the control defined in the ControlParameter element. In this example, the code is set up to get the value from the DropDownList1 control. VS knows that in order to get the selected value from the DropDownList it should access its SelectedValue property, so it adds that as the PropertyName for the ControlParameter. If you have the need to use a different property, you can simply change it in the ControlParameter element’s declaration.
With this code set up, the GridView asks the SqlDataSource for its data. This data source in turn asks the DropDownList for the item that the user has selected in the list. This value is inserted in the SQL statement, which is sent to the database. The results that are returned from the database are sent back through the data source to the GridView, which uses them to create the HTML table in the browser.
When you choose Make a Selection from the drop-down list, you get an empty page with no rows. In this case, the DropDownList returns an empty string as its value (defined in the Value property), which is converted to null, the database equivalent of nothing. This in turn causes the query to return no rows from the Review table.
Until now, you’ve relied on the code-generation tools of VS to set up the GridView and the DetailsView. By default, VS creates a column (for the GridView) or a field (for the DetailsView) for each column that it finds in the data source. It’s smart enough to recognize some of the underlying types of the data in the data source so you get a nice CheckBoxField for boolean (bit) fields in the database, but that’s about it. To further customize the look and feel of these data controls, you need to customize their Columns and Fields collections.
By default, the GridView and DetailsView render columns or rows automatically based on the data they receive. Alternatively, you can have VS create a number of fields or columns for you when you attach the control to a data source. But, more often than not, you want to change what you see on-screen, be it fewer columns, different column headings, or different controls to display data. Fortunately, this is really easy to do with the Fields editor in VS. In the next section you see how to use this editor to create and modify the different types of built-in columns and fields. In the section that follows, you see how to customize the fields even further with user-defined templates.
Within the <Columns> or <Fields> element of the GridView and the DetailsView, you can add the types of fields shown in the following table.
|
FIELD TYPE |
DESCRIPTION |
|
|
The default field for most database types. It renders as simple text in read-only mode, and as a |
|
|
Renders as a link or a button enabling you to execute a command on the server. |
|
|
Renders as a read-only check box in read-only mode, and as an editable check box in edit mode. |
|
|
Enables you to set up various commands, including editing, inserting, updating, and deleting. |
|
|
Renders as a link (an |
|
|
Renders as an |
|
|
Enables you to define your own look and feel for various templates, like |
Clearly, each field type serves a distinct purpose so you can choose the one that best fits your needs. You see some of these field types in more detail in the next exercise.
In this exercise, you see how to do the following in the Reviews.aspx page:
- Use the Fields editor to customize the fields for the
GridViewwith reviews. - Use a
HyperLinkcolumn to create a link to a details page that enables you to manage the details of a review. - Format the output of the existing
BoundFieldcolumns. - Use a custom function in the Code Behind to have full control over the output in a
TemplateField.
A later exercise shows you how to create the details page to insert new and edit existing reviews.
1. In Reviews.aspx, open the Smart Tasks panel for the SqlDataSource2 control in Design View and click Configure Data Source. Click Next to skip the connection string screen, and then complete the screen as shown in Figure 13-11 by selecting the Id, Title, Authorized, and CreateDateTime columns from the Review table. Make sure the SQL Statement box also contains the WHERE clause filter that you set up earlier. You may have to set this up again using the steps from the previous exercise because VS sometimes seems to lose this information.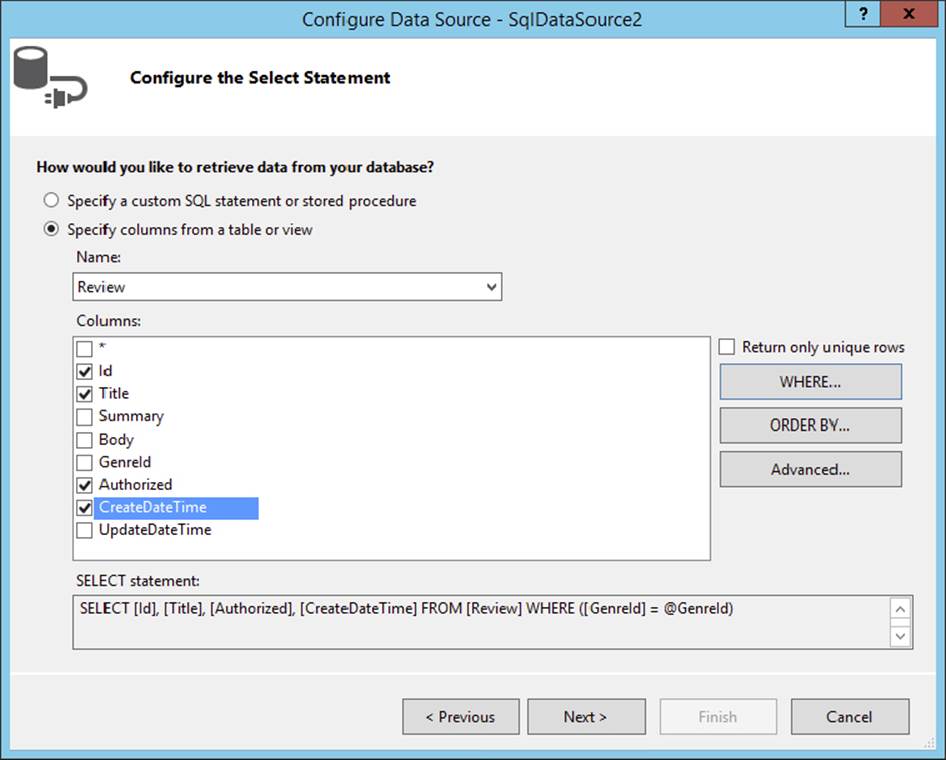
FIGURE 13-11
Click the Advanced button and have VS generate commands for the INSERT, UPDATE, and DELETE statements by checking off the first item. You can leave the Optimistic Concurrency check box — which deals with detecting changes to the row since it was last loaded from the data source — cleared. Click OK to close the Advanced SQL Generation Options dialog box, then click Next and finally Finish to update the SQL statement in the source for the page. When asked whether you want to refresh the fields and keys for the GridView, click Yes.
At this stage, VS has created columns for the GridView in Markup View. To remove those items and define your own, open the Smart Tasks panel for the GridView and click Edit Columns. This brings up the Fields dialog box. If the Selected Fields list contains items, use the Delete button (with the big X) to clear the list first.
3. In the Available Fields list, select Authorized under BoundField (not the one under CheckBoxField) and then click the Add button to copy the item to the Selected Fields list. Repeat this step for the CreateDateTime field. Your dialog box now looks likeFigure 13-12.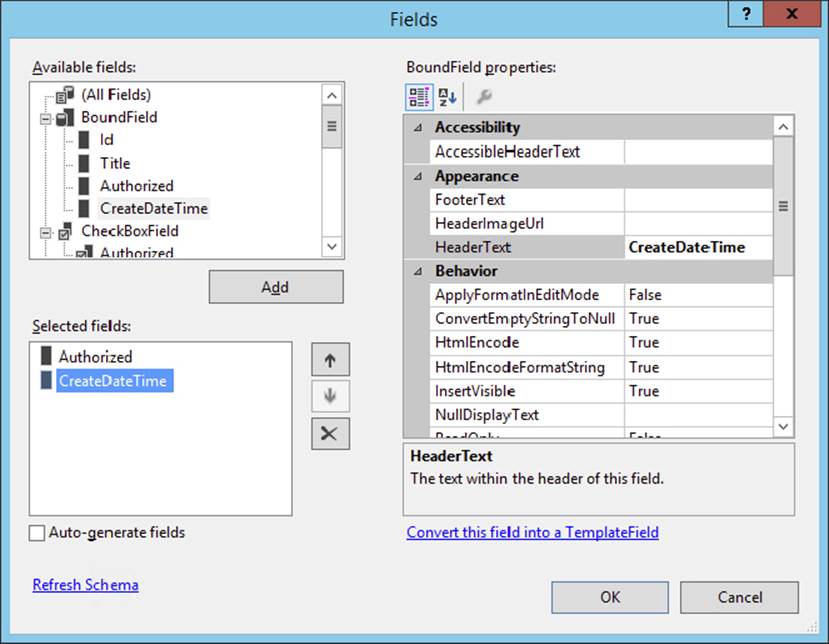
FIGURE 13-12
4.
In the Available Fields at the top of the screen, select HyperLinkField and then click the Add button to add the item to the Selected Fields list as well. Move the HyperLinkField to the top of the list by clicking the button with the up arrow twice. Then, using the Properties Grid on the right, set the following properties on the HyperLinkField:
|
PROPERTY |
SET ITS VALUE TO |
|
|
|
|
|
|
|
|
|
|
|
|
5. In the list with Available Fields, click CommandField and click the Add button again. Then set the HeaderText of the item you just inserted to Delete and ShowDeleteButton to True using the Properties Grid. This enables you to delete reviews from the database using the GridView later. The Fields dialog box should now look like Figure 13-13.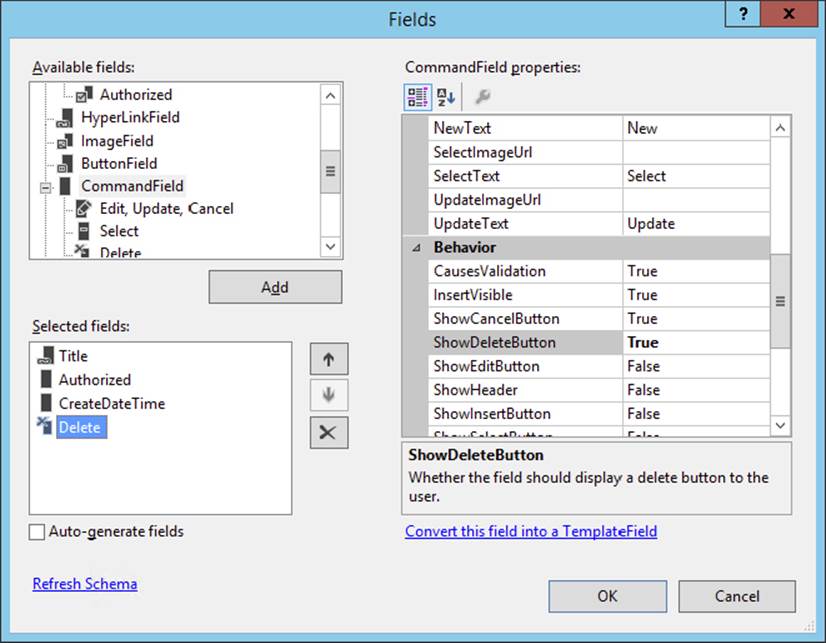
FIGURE 13-13
6.
Click the Authorized column in the Selected Fields list and then click the blue Convert This Field into a TemplateField link visible at the bottom-right of the dialog box in Figure 13-13.
7. Click the CreateDateTime column on the left and set its DataFormatString property to {0:g}.
8. Click OK to apply the changes to the source code.
9. Switch to Markup View and remove the <EditItemTemplate> for the Authorized field. The GridView displays reviews only in read-only mode, so you don’t need this template.
10.Modify the Label control in the ItemTemplate of the Authorized field so it ends up like this:
11.<asp:Label ID="AuthorizedLabel" runat="server"
Text='<%# GetBooleanText(Eval("Authorized")) %>' />12.Switch to the Code Behind of the page by pressing F7 and add the following function — which returns the text Yes or No depending on the boolean value that you pass — to the top of the class file, right after the Inherits line in VB.NET and after the opening curly brace in C#:
VB.NET
Inherits System.Web.UI.PageProtected Function GetBooleanText(booleanValue As Object) As String Dim authorized As Boolean = CType(booleanValue, Boolean) If authorized Then Return "Yes" Else Return "No" End IfEnd FunctionC#
public partial class Management_Reviews : System.Web.UI.Page{protected string GetBooleanText(object booleanValue)
{ bool authorized = (bool)booleanValue; if (authorized) { return "Yes"; } else { return "No"; } }13.Save all your changes (press Ctrl+Shift+S) and press Ctrl+F5 to open Reviews.aspx in the browser. Choose a genre from the drop-down list and you’ll see a list of reviews appear. Note that the Authorized column now shows the text Yes or No. TheCreateDateTime column shows the date and time in a short format. Figure 13-14 shows the result for the Indie Rock genre.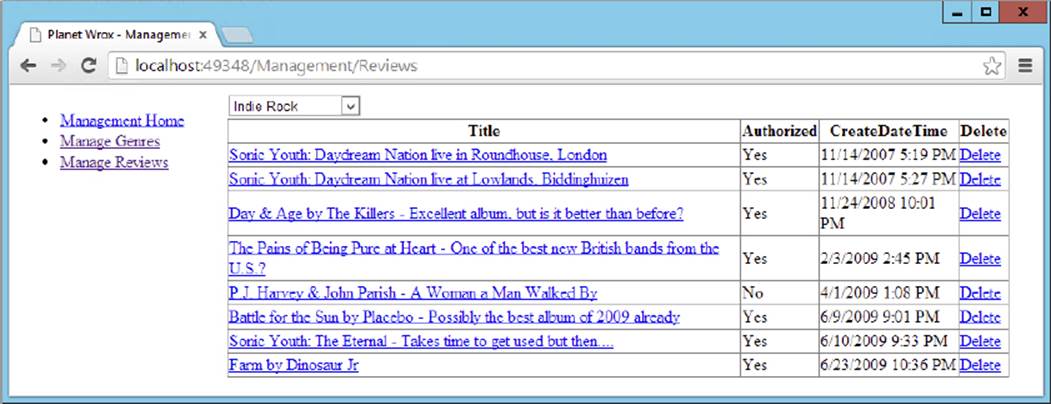
FIGURE 13-14
Note that the title in the first column of the GridView now links to a page where the ID of the review is passed in the query string field Id: http://localhost:1049/Management/AddEditReview.aspx?Id=1. You create this Add/Edit page later in this chapter. If you want, you could drop the .aspx extension from the URL because the friendly URLs you configured earlier will handle the correct URL. For back-end functionality, using friendly URLs is less important as search engines don’t have access to it and all main pages are accessible to users from the management menu.
How It Works
You started off by modifying the SelectCommand for the SqlDataSource. Instead of selecting all columns using SELECT *, the SQL statement now contains a subset of the columns, making the page load slightly faster:
<asp:SqlDataSource ID="SqlDataSource2" runat="server" ConnectionString="<%$ ConnectionStrings:PlanetWroxConnectionString1 %>" SelectCommand="SELECT [Id], [Title], [Authorized], [CreateDateTime] FROM [Review] WHERE ([GenreId] = @GenreId)"> ...</asp:SqlDataSource>You then used the Fields dialog box to modify the different fields that are displayed by the GridView. You created the Title column using a HyperLinkField:
<asp:HyperLinkField DataNavigateUrlFields="Id" DataTextField="Title" DataNavigateUrlFormatString="AddEditReview.aspx?Id={0}" HeaderText="Title"></asp:HyperLinkField>The DataNavigateUrlFields property contains a comma-separated list of fields you want to use in the DataNavigateUrlFormatString property. In this case, only one field is used. To display the value of this field you use placeholders such as {0} in theDataNavigateUrlFormatString property. For example, a review with an ID of 10 will end up with a HyperLink column having this NavigateUrl: AddEditReview.aspx?Id=10. With this setup, the {0} is replaced with the value for the first field in theDataNavigateUrlFields property. If you defined more fields separated by a comma, you would access them with {1}, {2}, and so on.
The DataTextField is set to the column Title. This tells the HyperLink to render its Text attribute with the title of the review, as shown in Figure 13-14.
You also set the DataFormatString property of the bound field for the CreateDateTime column:
<asp:BoundField DataField="CreateDateTime"DataFormatString="{0:g}"
HeaderText="CreateDateTime" SortExpression="CreateDateTime" />The DataFormatString enables you to define the format in which the underlying data is displayed. In this case, the lowercase letter g is used to display both the date and the time in short format (without seconds). You can find more information about the different format strings in the MSDN documentation at http://tinyurl.com/DateFormatters45.
You then converted the Authorized column to a template column. A template column gives you full freedom with regard to the content you are presenting. Essentially, you can add almost anything you see fit as content for the column, including HTML and ASPX controls. In this exercise, you changed the Label so that it gets its text from a custom function using the data binding expression syntax <%# %>:
<asp:Label ID="AuthorizedLabel" runat="server" Text='<%# GetBooleanText(Eval("Authorized")) %>'></asp:Label>Two things are used here to make this work. First, look at the Eval("Authorized")statement. This is called a one-way data binding expression and results in the value of the Authorized column being passed as an object to the custom GetBooleanText method. This method in turn converts the incoming value to a Boolean and then returns Yes or No, depending on the value of the Authorized column in the database. This is just a simple example to demonstrate how to call custom methods in your Code Behind during data binding. However, the principle remains the same for more complex methods: you pass one or more arguments to a Code Behind method using Eval("ColumnName"). The method in the Code Behind accepts these arguments as objects, casts them to an appropriate type, and then uses them as appropriate. In the end, the method can return a string with any text or HTML you see fit.
The HyperLink for the Title column that you set up points to a page called AddEditReview.aspx. This page enables you to create new and update existing reviews. You see how to create this page in the following section.
Earlier in this chapter I discussed how to do simple updates with the GridView and the SqlDataSource controls. Although this built-in update behavior is fine in many circumstances, it is not always extensive enough to meet all your demands.
Fortunately, controls like FormView and DetailsView enable you to tweak their look and feel, giving you a lot more flexibility in the way your end users work with their data. In the next section you see how to use the DetailsView to give the user a much easier interface to insert and edit reviews in the database.
Earlier in this chapter you learned how to set up a simple DetailsView control and fully rely on VS and the control itself to render the relevant user interface in the browser. Obviously, this default behavior is often not enough. What if you wanted to influence the controls used in the interface? For example, what if you wanted to use a DropDownList instead of a simple TextBox for the genre? And what if you wanted to add one or more validation controls that you learned about in Chapter 9? Or what if you wanted to manage some of the data being sent to the database programmatically? All of this is possible with the DetailsView control, its template-based columns, and the numerous events that the control fires at various stages in its life cycle.
First, however, you need to learn a bit more about the different events that the data-bound and data source controls fire. The following table lists some of the events that the DetailsView, the FormView, and the ListView expose and raise during their lifetime. The GridViewhas similar events, but they start with Row instead of Item. Because the DataList and Repeater controls do not natively support editing of data, they do not have any of these events.
|
EVENT |
DESCRIPTION |
|
|
Fires right before the |
|
|
Fires right after the |
|
|
Fires right before the |
|
|
Fires right after the |
|
|
Fires right before the |
|
|
Fires right after the |
These six events fire at very convenient moments in the life of the control: right before and right after the data for the operation is sent to the database. You see how to use them in the next Try It Out.
In this exercise you create the AddEditReview.aspx page that you created a link for earlier in the Reviews page. You add a DetailsView to this page, customize most of its fields by implementing template fields, and then handle some of the events of the control to change its behavior. After you’re done, you have everything you need to create, list, update, and delete reviews in your website.
1. In the Management folder, create a new Web Form and call it AddEditReview.aspx. Again, select your preferred programming language and base it on the master page for the Management section. Give it a Title of Planet Wrox - Management - Insert and Update Reviews.
2. Switch the page to Design View and drop a DetailsView control on the page. In the Smart Tasks panel that opens automatically, choose <New data source> from the Choose Data Source drop-down list. Click the Database icon and then click OK. In the dialog box that follows, choose the connection string from the drop-down list and click Next.
3. Enter the details as displayed in Figure 13-15.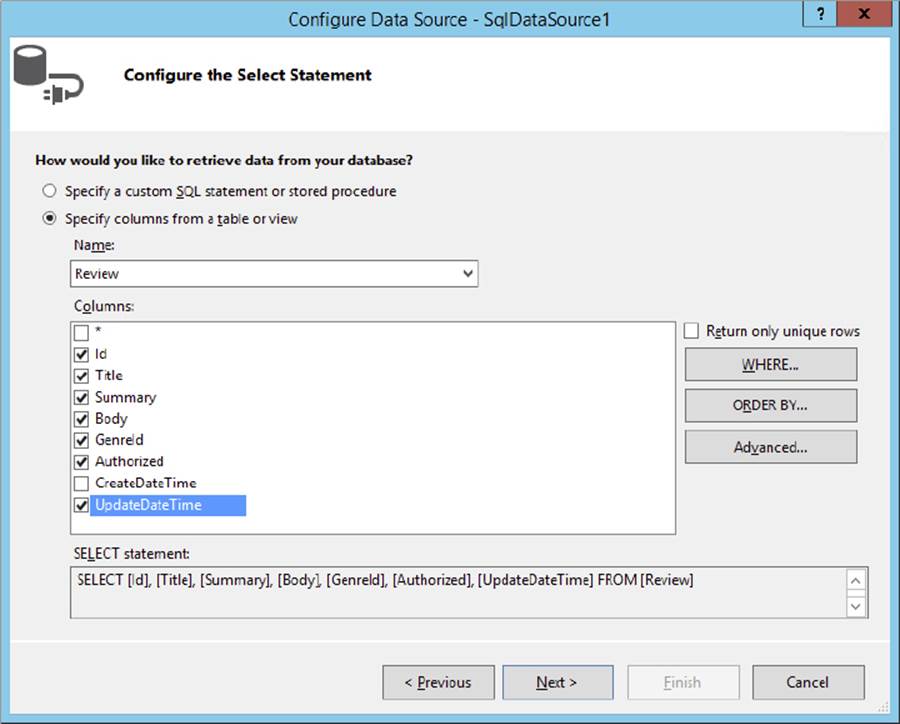
FIGURE 13-15
Note that all fields of the Review are selected explicitly, except for the CreateDateTime field.
4. Click the WHERE button to set up a SelectParameter that retrieves the review ID from the query string by completing the dialog box as shown in Figure 13-16.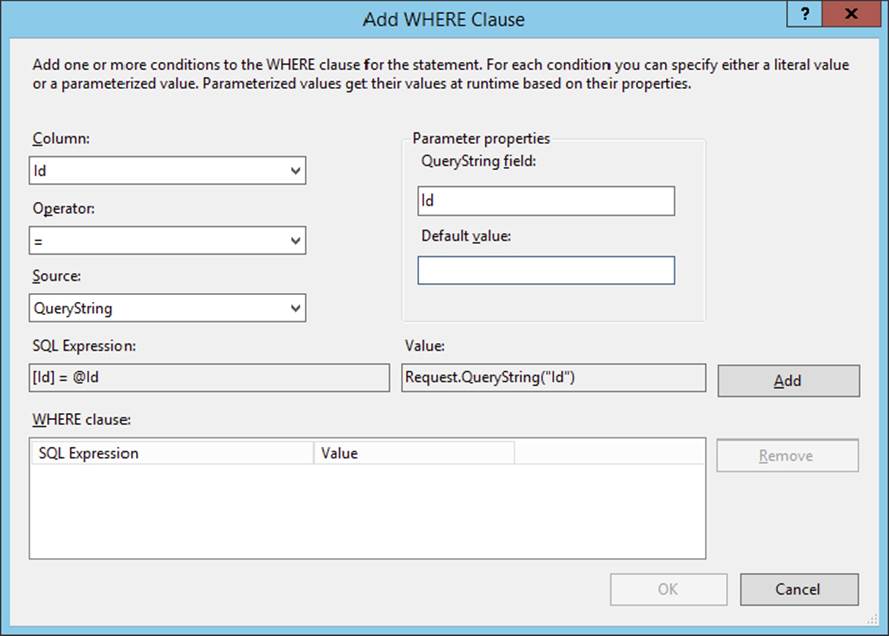
FIGURE 13-16
Don’t forget to type Id in the QueryString field text box.
5. Click the Add button to add the parameter to the WHERE Clause list at the bottom and then click OK to close the dialog box.
6. Back in the Configure Data Source wizard (shown in Figure 13-15), click the Advanced button, select the option to generate INSERT, UPDATE, and DELETE statements, and click OK to close the dialog box. Finally, click Next and then Finish to finalize the data source wizard.
7. On the Smart Tasks panel for the DetailsView, select the options for Inserting and Editing as shown in Figure 13-17.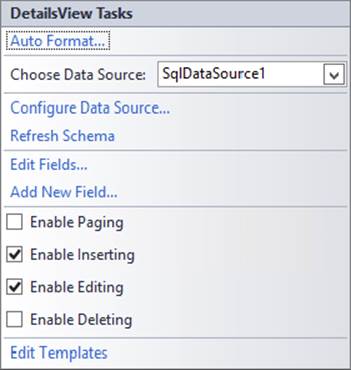
FIGURE 13-17
8.
On the Properties Grid for the DetailsView, set DefaultMode to Insert.
9. Double-click an empty spot of the page in Design View to set up a Page_Load handler and enter the following code:
VB.NET
Protected Sub Page_Load(sender As Object, e As EventArgs) Handles Me.LoadIf Request.QueryString.Get("Id") IsNot Nothing Then
DetailsView1.DefaultMode = DetailsViewMode.Edit End IfEnd SubC#
protected void Page_Load(object sender, EventArgs e){if (Request.QueryString.Get("Id") != null)
{ DetailsView1.DefaultMode = DetailsViewMode.Edit; }}10.Open the Reviews.aspx page in Design View and drag the AddEditReview.aspx page from the Solution Explorer onto the page below the GridView. This creates a link to this page so you can insert new reviews. Switch to Markup View and change the text between the <a> tags to Insert New Review:
<a href="AddEditReview.aspx">Insert New Review</a>11.Save all your changes and open AddEditReview.aspx in your browser. You should get the default layout for the control, with simple text boxes for all the columns in the data source. Fill in the fields as shown in Figure 13-18.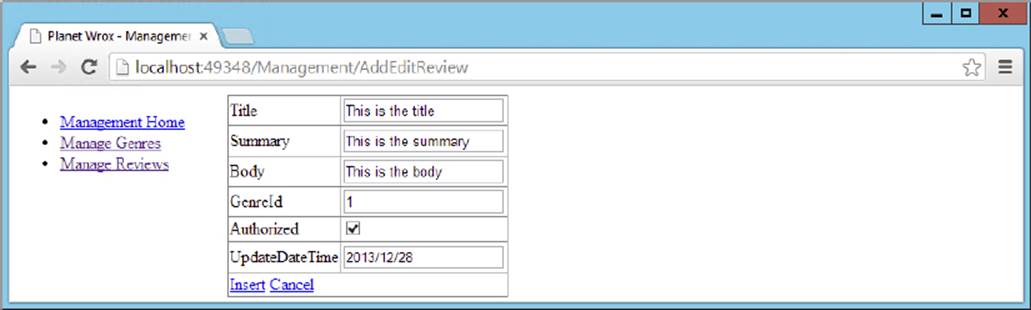
FIGURE 13-18
Click Insert to insert the item in the database. At first, not much seems to happen except that the controls are now all cleared. However, you can now locate the new review through the Reviews.aspx page by following these two steps:
· Click the Manage Reviews link in the menu on the left.
· Select the right genre from the drop-down list at the top of the page. If you used the scripts from the preceding chapter to create the data in your database, and you entered 1 for the GenreId when inserting the review, the genre is Rap and Hip-Hop.
When you have found your review, you can click its title and you’ll be taken to AddEditReview.aspx, where you can change the review’s details again.
Most of this exercise should be familiar by now. The DetailsView works the same for inserting as the DetailsView for genres you saw earlier. What’s different is how updates are handled. The code in the Code Behind looks at the query string and if it finds an Id query string parameter, it flips the DetailsView into edit mode:
VB.NET
If Request.QueryString.Get("Id") IsNot Nothing Then DetailsView1.DefaultMode = DetailsViewMode.EditEnd IfC#
if (Request.QueryString.Get("Id") != null){ DetailsView1.DefaultMode = DetailsViewMode.Edit;}When the control is in edit mode, it knows what to do. It calls the SqlDataSource and requests its data. The SqlDataSource in turn retrieves the ID of the review from the query string, accesses the database, and then returns the correct review, which is displayed on the page. When you subsequently click the Update link, the SqlDataSource fires its UpdateCommand to send the changes to the database.
This exercise provides a nice foundation for the following exercise, where you extend the DetailsView by implementing custom templates with validation controls and set up various event handlers to respond to the control’s events.
Right now, the page with the DetailsView looks quite dull. It would look a lot better and be easier to use if it had the following features:
- A text area instead of a single-line text box for the Summary and Body fields
- A drop-down list for the genre filled with the available genres from the database
- Automatic updating of the
UpdateDateTimecolumn - Validation controls to stop you from leaving required fields empty
- Automatic redirection to the
Reviews.aspxpage after an item has been inserted or updated
The next exercise shows you how to implement all of these features.
This walk-through is quite long and has a large number of steps. Remember you can always download the final version of this page from the Wrox website in case you want to compare your result with mine.
1. Make sure AddEditReview.aspx is in Design View and bring up the Fields editor for the DetailsView control by clicking Edit Fields on its Smart Tasks panel. Locate the UpdateDateTime column in the Selected Fields list and set its Visible property to False.
2. Click the Title column in the Selected Fields list and then click the blue link with the text Convert This Field into a TemplateField. Repeat this for the Summary, Body, and GenreId fields and then close the Fields dialog box by clicking OK.
3. Switch to Markup View and remove the ItemTemplate element for all fields you converted to a template. This page does not display read-only data so you don’t need this template. Then add a TextMode attribute with its value set to MultiLine for the fourTextBox controls for the Summary and Body fields. In addition, set their Width and Height properties to 500 and 100 pixels, respectively. Make sure you do this for both the EditItemTemplate and the InsertItemTemplate. You should end up with the following code that shows the Summary field, but the code for the Body field should be similar:
4.<asp:TemplateField HeaderText="Summary" SortExpression="Summary">
5.<EditItemTemplate>
6.<asp:TextBox ID="TextBox2"TextMode="MultiLine" Width="500" Height="100"
7.runat="server" Text='<%# Bind("Summary") %>'></asp:TextBox>
8.</EditItemTemplate>
9.<InsertItemTemplate>
10.<asp:TextBox ID="TextBox2"TextMode="MultiLine" Width="500" Height="100"
11.runat="server" Text='<%# Bind("Summary") %>'></asp:TextBox>
12.</InsertItemTemplate>
</asp:TemplateField>13.Add a RequiredFieldValidator in the EditItemTemplate and the InsertItemTemplate of both the Title and the Summary rows. You can drag and drop it from the Toolbox directly in Markup View or enter the required code manually. Using a code snippet makes this even easier: position your mouse on an empty, new line below the TextBox, type requiredfieldvalidator, and press Tab. VS inserts a RequiredFieldValidator for you and automatically assigns the ControlToValidate property with the ID of the previous TextBox defined in the code.
Make sure you hook up all validators to their respective TextBox controls in the template by setting the ControlToValidate property and providing a useful error message. When you’re done, the summary field should look like this:
<asp:TemplateField HeaderText="Summary" SortExpression="Summary"> <EditItemTemplate><asp:TextBoxID="TextBox2" TextMode="MultiLine" Width="500" Height="100"
runat="server" Text='<%# Bind("Summary") %>'></asp:TextBox><asp:RequiredFieldValidatorControlToValidate="TextBox2"
runat="server" ErrorMessage="Enter a summary" /> </EditItemTemplate> <InsertItemTemplate><asp:TextBoxID="TextBox2" TextMode="MultiLine" Width="500" Height="100"
runat="server" Text='<%# Bind("Summary") %>'></asp:TextBox><asp:RequiredFieldValidatorControlToValidate="TextBox2"
runat="server" ErrorMessage="Enter a summary" /> </InsertItemTemplate></asp:templatefield>The Title and Body fields should look similar to Summary. The TextBox for the Title field doesn’t have the TextMode, Width, and Height properties applied, whereas the Body field is missing the RequiredFieldValidator. Other than that, the fields should look pretty similar to the Summary field.
14.Switch to Design View and drag a new SqlDataSource control next to SqlDataSource1 that is already on the page. Open the new control’s Smart Tasks panel and click Configure Data Source. Select the Planet Wrox connection string from the drop-down list and click Next. Select the Id and Name columns from the Genre table and set up an ORDER BY clause on the SortOrder column by clicking the ORDER BY button and choosing SortOrder from the Sort By drop-down list. When you click OK, the Configure Data Source screen looks like Figure 13-19.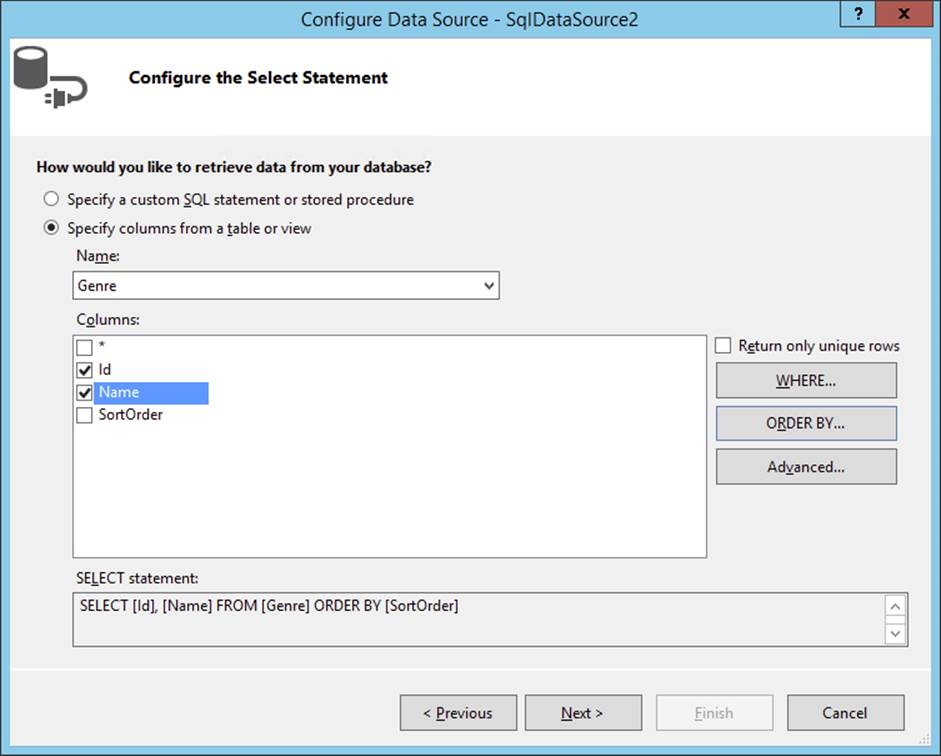
FIGURE 13-19
15.
Click Next and then Finish to finalize the Configure Data Source wizard.
16.Select the new SqlDataSource (called SqlDataSource2) in Design View and change its ID to GenresDataSource using the Properties Grid so it’s easier to recognize in the page.
17.Switch to Markup View, locate the InsertItemTemplate for the GenreId of the DetailsView, and remove its contents (the TextBox control). At the place where you removed the TextBox, add a DropDownList by dragging it from the Toolbox into Markup View. Your code looks like this:
18.<asp:TemplateField HeaderText="GenreId" SortExpression="GenreId">
19.<EditItemTemplate>
20.<asp:TextBox ID="TextBox4" runat="server"
21.Text='<%# Bind("GenreId") %>'></asp:TextBox>
22.</EditItemTemplate>
23.<InsertItemTemplate>
24.<asp:DropDownList ID="DropDownList1" runat="server">
25.</asp:DropDownList>
26.</InsertItemTemplate>
</asp:TemplateField>27.Switch to Design View, right-click the DetailsView, and choose Edit Template ⇒ Field[4] - GenreId, as shown in Figure 13-20. If you don’t see this menu item, you may need to click one of the rows with controls first — such as the summary row — to put the focus on the DetailsView correctly.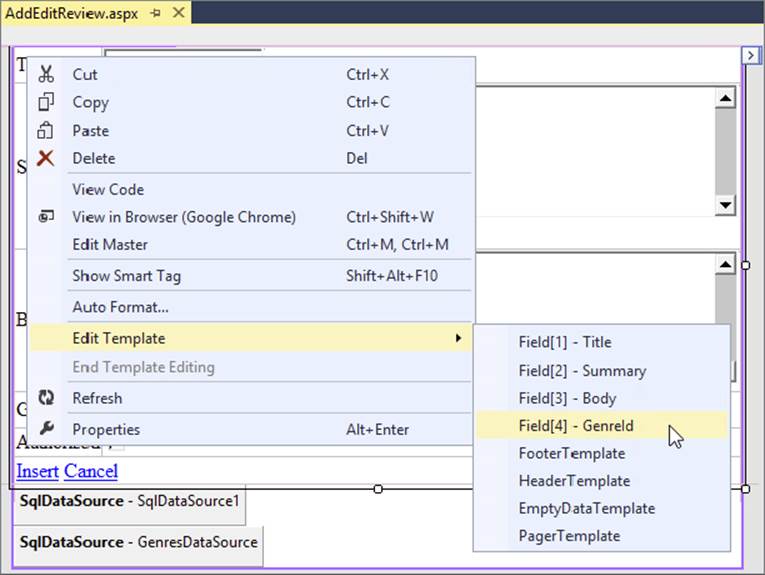
FIGURE 13-20
28.
When the control is in template editing mode, you can access the DropDownList directly. Open the Smart Tasks panel for the DropDownList and select Choose Data Source. In the Data Source Configuration Wizard, choose GenresDataSource from the data source drop-down list and Name and Id from the other two drop-down lists (see Figure 13-21). If Name and Id don’t appear in the drop-down lists, click the blue Refresh Schema link at the bottom of the screen. If you don’t see the GenreDataSource listed, but you see SqlDataSource2 instead, make sure you renamed the control correctly as described in step 7.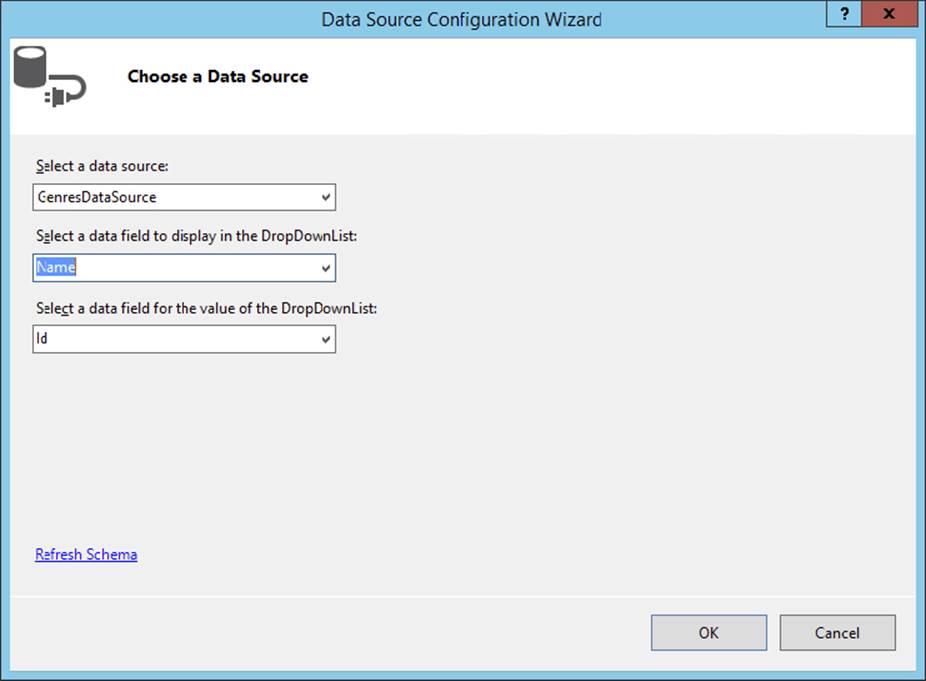
FIGURE 13-21
29.
Click OK to close the Data Source Configuration Wizard.
30.Back on the Smart Tasks panel of the DropDownList control, click Edit DataBindings. In the dialog box that follows, click SelectedValue in the list on the left and then choose GenreId from the Bound To drop-down list on the right, as shown in Figure 13-22. If you find that the Field Binding radio button at the top-right of the screen is read-only, click the Refresh Schema link. In the dialog that appears, click OK. When you return to the DataBindings dialog box the item should now be enabled.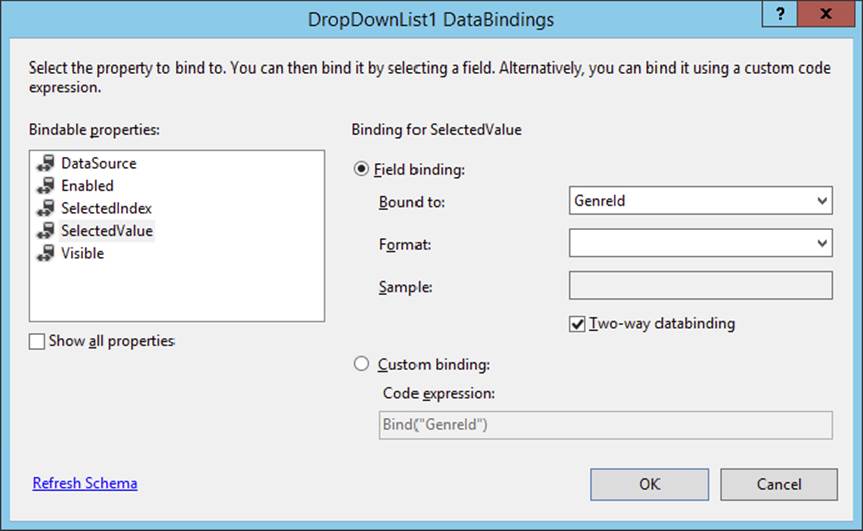
FIGURE 13-22
31.
Click OK to close the dialog box. The code for the InsertItemTemplate now looks like this in Markup View:
32.<InsertItemTemplate>
33.<asp:DropDownList ID="DropDownList1" runat="server"
34.DataSourceID="GenresDataSource" DataTextField="Name" DataValueField="Id"
35.SelectedValue='<%# Bind("GenreId") %>'>
36.</asp:DropDownList>
</InsertItemTemplate>37.Copy the contents of the InsertItemTemplate (the bolded code in the previous step) and paste it in the EditItemTemplate, overwriting the existing TextBox control. This adds the same drop-down list to the DetailsView in edit mode.
38.Switch back to Design View, click the DetailsView, and press F4 to open up the Properties Grid. Switch to the Events tab of the Properties Grid and double-click the following events. VS switches to the Code Behind file every time you double-click an event, so you need to switch back to the page (using Ctrl+Tab) to add the other events:
· ItemInserted
· ItemInserting
· ItemUpdated
· ItemUpdating
When you’re done, the event category of the Properties Grid should look like Figure 13-23.
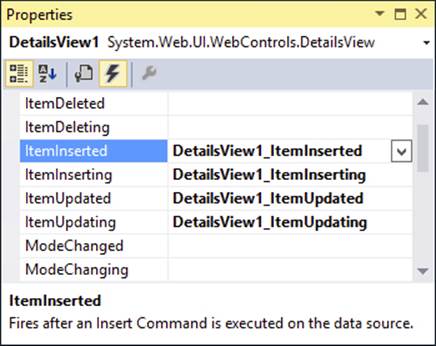
FIGURE 13-23
39.
Go into the Code Behind and modify the code as follows. Note that the ItemInserted and ItemUpdated handlers call the EndEditing method (that you also need to add to the code), whereas ItemInserting and ItemUpdating both set the UpdateDateTime value:
VB.NET
Private Sub EndEditing() Response.Redirect("Reviews.aspx")End SubProtected Sub DetailsView1_ItemInserted(sender As Object, e As DetailsViewInsertedEventArgs) Handles DetailsView1.ItemInsertedIf e.Exception Is Nothing Then
EndEditing() End IfEnd SubProtected Sub DetailsView1_ItemInserting(sender As Object, e As DetailsViewInsertEventArgs) Handles DetailsView1.ItemInsertinge.Values("UpdateDateTime") = DateTime.Now
End SubProtected Sub DetailsView1_ItemUpdated(sender As Object, e As DetailsViewUpdatedEventArgs) Handles DetailsView1.ItemUpdatedIf e.Exception Is Nothing Then
EndEditing() End IfEnd SubProtected Sub DetailsView1_ItemUpdating(sender As Object, e As DetailsViewUpdateEventArgs) Handles DetailsView1.ItemUpdatinge.NewValues("UpdateDateTime") = DateTime.Now
End SubC#
private void EndEditing(){ Response.Redirect("Reviews.aspx");}protected void DetailsView1_ItemInserted(object sender, DetailsViewInsertedEventArgs e){if (e.Exception == null)
{ EndEditing();}
}protected void DetailsView1_ItemInserting(object sender, DetailsViewInsertEventArgs e){e.Values["UpdateDateTime"] = DateTime.Now;
}protected void DetailsView1_ItemUpdated(object sender, DetailsViewUpdatedEventArgs e){if (e.Exception == null)
{ EndEditing(); }}protected void DetailsView1_ItemUpdating(object sender, DetailsViewUpdateEventArgs e){e.NewValues["UpdateDateTime"] = DateTime.Now;
}40.Finally, save all your changes and open AddEditReview.aspx in your browser. Leave all fields empty and click the Insert link. Note that the validation controls kick in, preventing you from sending empty values to the server. Next, fill in valid values and click Insert again. You’re now taken to Reviews.aspx. Locate your review by choosing its genre from the drop-down list and then click its title to edit it. The DetailsView should now display all the values you entered previously (see Figure 13-24).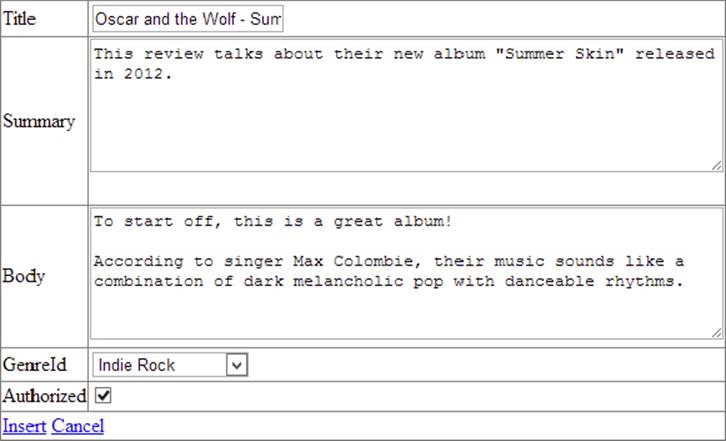
FIGURE 13-24
The DetailsView and the SqlDataSource controls take care of most of the hard work for you. You set up different templates that enable a user to insert new rows and update existing ones and then the two controls take care of the rest. When you click the Insert link, the controls are validated using JavaScript as you saw in previous chapters. The same validation is carried out at the server by the DetailsView control to ensure the submitted data meets the criteria you set. If the data is valid, the DetailsViewcontrol inserts or updates the data, depending on the mode it’s in. To see how this works, take a look at the InsertItemTemplate for the Title column first:
<InsertItemTemplate> <asp:TextBox ID="TextBox1" runat="server" Text='<%# Bind("Title") %>'> </asp:TextBox> <asp:RequiredFieldValidator ControlToValidate="TextBox1" runat="server" ErrorMessage="Enter a title"> </asp:RequiredFieldValidator></InsertItemTemplate>The most important piece of code in this snippet is the way the Text property of the TextBox is bound. Earlier you saw the one-way binding syntax using Eval that basically outputs the value of a bound column. With Bind, however, something much more powerful occurs. Basically, Bind enables you to express a data binding between a column from the SqlDataSource and a control in the page in two directions. In this example, the Title column of a review is bound to the TextBox. This means that when the control must display its data (for example, when updating an existing row), it knows that it must display the Title of a review. But more importantly, on postback, after you click the Update link, the control still understands the relationship between theTextBox control and the Title column. So, when you click Update after making changes to the review in the page, the DetailsView collects all the bound data from the form (the Title, Summary, Body, GenreId, and whether the item is authorized) and then sends it to the SqlDataSource control that has parameters set up for each of the relevant columns of the Review table:
<asp:SqlDataSource ID="SqlDataSource1" runat="server" ... <UpdateParameters> <asp:Parameter Name="Title" Type="String" /> <asp:Parameter Name="Summary" Type="String" /> <asp:Parameter Name="Body" Type="String" /> <asp:Parameter Name="GenreId" Type="Int32" /> <asp:Parameter Name="Authorized" Type="Boolean" /> <asp:Parameter Name="UpdateDateTime" Type="DateTime" /> <asp:Parameter Name="Id" Type="Int32" /> </UpdateParameters></asp:SqlDataSource>Eventually, the SqlDataSource grabs all the parameter values, injects them in the UpdateCommand, and then sends them to the database.
This works nicely for all columns of the Review table that have a form control attached to them, but what about the other columns? You may have noticed that CreateDateTime was not a part of any of the SqlDataSource commands. Because the database is set up to insert today’s date and time automatically, there’s no need to include it in the code. The UpdateDateTime column is a different story. Obviously, you don’t want your users to enter the value for this column manually. Instead, the system should keep track of it automatically. That’s why you hid the control from the user interface by setting its Visible property to False. However, because the Insert and Update commands still expect a value for this column, you need to find a different way to insert it. Here’s where the Inserting and Updating events come into play. Take a look at the ItemInserting event handler to get a general understanding of how this works:
VB.NET
Protected Sub DetailsView1_ItemInserting(sender As Object, e As DetailsViewInsertEventArgs) Handles DetailsView1.ItemInserting e.Values("UpdateDateTime") = DateTime.NowEnd SubC#
protected void DetailsView1_ItemInserting(object sender, DetailsViewInsertEventArgs e){ e.Values["UpdateDateTime"] = DateTime.Now;}As you saw earlier, ItemInserting fires right before the InsertCommand is sent to the database. This is a perfect location to supply (default) values for the columns in your table that have no corresponding control in the user interface, as is the case withUpdateDateTime. This code simply sets the UpdateDateTime value to today’s date and time. This value is then sent to the database where it is used to assign a value to the Review table’s UpdateDateTime column.
The same principle applies to the ItemUpdating command. Within that event, you need to index the NewValues collection instead of the Values collection, but the principle is the same.
You might argue that in the case of an Insert command, you don’t need to set the UpdateDateTime. After all, the database inserts a value for you automatically when you insert a new row. However, to make the distinction between inserting and updating, you need to do a lot more manual work. You have to remove the column from the InsertCommand and then remove the column from the <InsertParameters> collection as well. Although in itself this is not a lot of work, you get into trouble when you later try to modify the SQL commands for the SqlDataSource, because the Insert and Update commands are now out of sync. Simply setting the UpdateDateTime through code, as in this case, solves many of these problems.
When the SqlDataSource control is done with inserting or updating, it fires its ItemInserted or ItemUpdated events, respectively. Inside these events, the code checks if e.Exception is null/Nothing. Without this check, the user would be redirected to theReviews.aspx page regardless of whether an error occurred. With this check, the user is taken back to Reviews.aspx page by calling EndEditing() only if the database update succeeded:
VB.NET
Private Sub EndEditing() Response.Redirect("Reviews.aspx")End SubC#
private void EndEditing(){ Response.Redirect("Reviews.aspx");}
A typical reason for an error during the update might be an incorrect genre ID. If you didn’t set up the DropDownList correctly, the database would be given an invalid genre ID and the INSERT or UPDATE would fail. By not redirecting when an error occurs, the error message is displayed on-screen so you get a chance to fix it.
With the discussion of the various events that the DetailsView control fires, you have come to the end of this chapter. By now, you should have a reasonably good understanding of how to perform CRUD operations using the GridView, DetailsView, and SqlDataSourcecontrols.
Useful as the SqlDataSource control may be, many developers don’t like or use it. One of the biggest drawbacks of this control is the fact that your SQL statements end up directly in your ASPX pages. This can be really problematic if you start changing your database schema. Even if you think there’s no need to do that ever, you can be pretty sure you’ll need to change it one day. Once you do that, things are likely to break. For example, if you rename the Name column of the Genre table to Description, your application will break. However, you won’t notice that until run time because VS is not able to check the database schema against the command texts defined in the SqlDataSource controls. You have a few ways to work around this. One solution is to build strongly typed objects and work with the ObjectDataSource control instead. Details of this solution are beyond the scope of this book, but you’re invited to check out my website where I’ve published an article series demonstrating this concept: http://bit.ly/9woD7D. The concepts presented in this series are quite advanced, so you may want to postpone digging into it until you’ve finished this book.
Another alternative is to make use of the ADO.NET Entity Framework, the topic of the next chapter that also shows you how to use Model Binding and the ListView and DataPager controls to perform similar actions without the need to write embedded SQL statements in your code.
The following list provides some practical tips for displaying and updating data:
- Always store your connection strings in the
Web.configfile. Although it may seem easy to store them directly in theSqlDataSourcecontrol in a page, you’ll get in trouble when you need to make changes to your connection string later. - Always consider adding validation controls to your data entry pages. It makes it a lot easier for your users to find out what data is required, and in what format they should deliver it, while you protect your system from receiving and processing incorrect data.
- If you have long lists of data to present, always consider turning paging on for controls like the
GridView. Users tend to get lost if you present them with lists containing many items. Generally, a page size of somewhere between 10 and 20 items works best. - Consider renaming the controls in the page to something other than their default values. For example, in the previous Try It Out exercise you renamed
SqlDataSource2toGenresDataSource. This makes it much easier to see which data source is needed to get information about the genres. With only a few controls in a page this isn’t really an issue, but as soon as your page grows, it is increasingly important to choose distinguishing names for your controls. - Consider setting the
CssClassof the validation controls inAddEditReview.aspxand hook them up to a CSS class. You can create them in a style sheet in theStylesfolder in the root for now and link that file to the master page. In a later chapter you create a separate theme for the Management section.
This chapter built on the general knowledge you gained in Chapter 12 about accessing a database through SQL. It started off with a discussion of the numerous controls in the Data category of the Toolbox in Visual Studio.
These controls can be split into two groups: data-bound controls and data source controls. The first group of controls — including the GridView, the DetailsView, and the ListView — is used to display data in a web page. Most, but not all of them enable you to maintain your data as well, by exposing inserting, updating, and deleting capabilities.
The controls in the other group, the data source controls, have no visual appearance themselves. They serve as a bridge between the user interface and the database. A number of different data source controls exist, each providing access to a specific kind of data store. In this chapter you saw the SqlDataSource control, which enables you to retrieve data from many different kinds of relational databases.
1. If you need to create a user interface that enables a user to display, sort, edit, and delete data coming from a database, what is the best control to use? How do you hook up that control to the database?
2. Which control would you pick if you want to display a simple list of the genres in your database in the following format?
3.<ul>
4.<li>Punk</li>
5.<li>Hard Rock</li>
6.<li>Jazz</li>
7.<li>Techno</li>
</ul>8. What’s the difference between a BoundField and a TemplateField? When would you use either of the two?
9. What’s the best place to store your connection strings? How do you access the connection strings from that location? And why shouldn’t you store them in a page?
You can find answers to these exercises in Appendix A.
WHAT YOU LEARNED IN THIS CHAPTER
|
Connection string |
A string containing information necessary to connect to a database such as SQL Server |
|
Data source controls |
A set of ASP.NET controls that serve as a bridge between a data source (a database, an XML file, and so on) and the data-bound controls |
|
Data-binding expression syntax |
Syntax used to bind values from data sources to control properties such as labels and text boxes. Example:
|
|
Data-bound controls |
A set of ASP.NET controls that can display flat and hierarchical data |
|
Expression syntax |
A terse syntax to bind a variety of sources, including connection strings from the
|
|
|
A set of parameters used to feed data into the data source controls to support insert, update, and delete behavior |
|
Named instance |
The name of a specific SQL Server instance. Used to distinguish between multiple installations of SQL Server on the same machine |
|
|
A set of parameters that can get their data from other sources (a query string, a cookie, and so on) and that can be used in the data source controls to filter data |
All materials on the site are licensed Creative Commons Attribution-Sharealike 3.0 Unported CC BY-SA 3.0 & GNU Free Documentation License (GFDL)
If you are the copyright holder of any material contained on our site and intend to remove it, please contact our site administrator for approval.
© 2016-2025 All site design rights belong to S.Y.A.