Beginning ASP.NET-4.5 in C# and VB (2013)
Chapter 14
LINQ and the ADO.NET Entity Framework
WHAT YOU WILL LEARN IN THIS CHAPTER:
- What LINQ is and what its syntax looks like
- The different forms of LINQ that are available and when they are appropriate to use
- How to use the ADO.NET Entity Framework
- How to use Model Binding to access the ADO.NET Entity Framework
- How to use the
ListViewandDataPagercontrols
WROX.COM CODE DOWNLOADS FOR THIS CHAPTER
You can find the wrox.com code downloads for this chapter on the Download Code tab at www.wrox.com/go/begaspnet451. The code is in the Chapter 14 folder.
Language-Integrated Query (LINQ) is the query language that is tightly integrated with the programming languages used in the .NET Framework. LINQ enables you to query data from within .NET programming languages in the same way that SQL enables you to query data in a database. In fact, the LINQ syntax has been modeled partially after the SQL language, making it easier for programmers familiar with SQL to get started with LINQ.
LINQ comes in a few different implementations, enabling you to access and query a wide variety of sources, including in-memory data, XML files, .NET DataSets, and databases from your VB.NET or C# code. In the next section you get a brief overview of the main LINQ pillars. The remainder of this chapter focuses on the LINQ syntax and on the ADO.NET Entity Framework (EF), a technology that enables you to work with databases without writing a lot of code. The ADO.NET Entity Framework uses LINQ a lot under the hood, so you get a good shot at practicing your new LINQ skills.
INTRODUCING LINQLINQ enables you to query data from a wide variety of data sources, directly from your programming code. LINQ is to .NET programming what SQL is to relational databases. With straightforward, declarative syntax you can query collections for objects that match your criteria.
LINQ is not just an add-on that is part of the .NET Framework. On the contrary, LINQ has been designed and implemented as a true part of the programming languages in .NET. This means that LINQ is truly integrated into .NET, giving you a unified way to query data, regardless of where that data comes from. In addition, because it is integrated into the language and not in a certain project type, LINQ is available in all kinds of projects, including web applications, Windows Forms applications, Console applications, and so on. To help developers get familiar with LINQ, its syntax is closely modeled after SQL, the most popular query language for relational databases. This means that LINQ has keywords such as Select, From, and Where to get data from a data source.
To give you an idea of what a LINQ query looks like, here’s a quick example that shows a list of Wrox authors whose names contain the capital letter S:
VB.NET
Dim authors As String() = New String() {"Hanselman, Scott", "Evjen, Bill", "Haack, Phil", "Vieira, Robert", "Spaanjaars, Imar"}Dim result = From author In authors Where author.Contains("S") Order By author Select authorFor Each author In result Label1.Text += author + "<br />"NextC#
using System.Linq;...string[] authors = new string[] { "Hanselman, Scott", "Evjen, Bill", "Haack, Phil", "Vieira, Robert", "Spaanjaars, Imar" };var result = from author in authors where author.Contains("S") orderby author select author;foreach (var author in result){ Label1.Text += author + "<br />";}Although the syntax used in this example is probably quite easy to follow, the example itself is really powerful. Given an array of strings containing author names, you can simply select all the authors whose names contain the capital letter S and order them in ascending order. It should come as no surprise that in this example, the Label control displays my name and that of Scott Hanselman because only those two names match the Where criterion. Notice how in C# the code imports the System.Linq namespace. This is necessary to bring the LINQ functionality into scope for your application. If you’re finding that some keywords don’t show up in IntelliSense or VS gives you compilation errors on your LINQ queries, check that you have this namespace imported at the top of your code file. In a VB website, this namespace is included by default.
Of course, this example is only the beginning. The different types of LINQ discussed in the following three sections enable you to create much more powerful queries against a wide variety of data sources.
Because LINQ is so powerful and has so much potential, it has been integrated into many different areas of the .NET Framework. The following sections introduce the different LINQ implementations.
LINQ to ObjectsThis is the purest form of language integration. With LINQ to Objects, you can query collections in your .NET applications as you saw in the previous example. You’re not limited to arrays because LINQ enables you to query almost any kind of collection that exists in the .NET Framework.
LINQ to XMLLINQ to XML is the new .NET way to read and write XML. Instead of typical XML query languages like XSLT or XPath, you can now write LINQ queries that target XML directly in your application.
LINQ to ADO.NETADO.NET is the part of the .NET Framework that enables you to access data and data services like SQL Server and many other different kinds of data sources. ADO.NET is also used under the hood by the SqlDataSource control and is commonly used in “raw data access code” — code written in C# or VB.NET that connects to a database without using the declarative data controls. With LINQ to ADO.NET you can query database-related information sets, including LINQ to DataSet, LINQ to SQL, and LINQ to Entities.
LINQ to DataSet enables you to write queries against the DataSet, a class that represents an in-memory version of a database.
LINQ to SQL enables you to write object-oriented queries in your .NET projects that target Microsoft SQL Server databases. The LINQ to SQL implementation translates your queries into SQL statements, which are then sent to the database to perform typical CRUD operations. In the 3.5 version of this book, this entire chapter was devoted to LINQ to SQL. However, Microsoft has indicated that it will no longer actively develop LINQ to SQL. It will remain part of the .NET Framework and Visual Studio for the foreseeable future, but Microsoft won’t be adding new functionality to it. The reason for this is the great overlap in functionality with the Entity Framework (EF). Almost anything you can do in LINQ to SQL can be done in LINQ to Entities. However, this latter framework is a lot more powerful and offers many more features than LINQ to SQL. Because it’s more powerful, the Entity Framework is preferred over LINQ to SQL and as such it’s the main topic of this chapter.
For more information about the other types of implementations, check out the official LINQ homepage at http://bit.ly/18ypUj.
INTRODUCING THE ADO.NET ENTITY FRAMEWORKEF is an Object Relational Mapper (ORM) that supports the development of data-oriented software applications. With EF, you can take a bunch of database objects like tables and turn them into .NET objects that you can access in your code. You can then use these objects in queries or use them directly in data-binding scenarios. EF also enables you to do the reverse: design an object model first and then let EF create the necessary database structure for you.
Working with EF is pretty easy and quite flexible. Using a diagram designer, you drag and drop objects like tables from your database into your Entity model. The database objects you drop on the diagram become available as .NET objects. For example, if you drop the Review table on the diagram, you end up with a strongly typed Review class. You can create instances of this class using LINQ queries and other means, as you see later in this chapter.
When you drop more than one related database table on your diagram, the designer detects the relationships between the tables and then replicates these relationships in your object model. For example, if you had a Review instance created in code using some LINQ to Entities query (as you see later), you could access its Genre property, which in turn gives you access to properties like Name:
VB.NET
Label1.Text = myReview.Genre.NameC#
Label1.Text = myReview.Genre.Name;Similarly, you can access the associated Reviews collection for a specific genre, for example to bind it to a data-bound control:
VB.NET
Repeater1.DataSource = myGenre.ReviewsC#
Repeater1.DataSource = myGenre.Reviews;Don’t worry about the actual syntax right now. You see a lot more of it in the remainder of this chapter. What’s important to take away from this section is that EF creates a layer between your .NET application and your SQL Server database. The Entity Designer takes care of most of the work for you, providing access to a clean object model that you can use in your application.
MAPPING YOUR DATA MODEL TO AN OBJECT MODELWith EF, you map database items such as tables, columns, and relationships in the database to objects and properties in an object model in your application. VS comes with great tools to make this mapping as easy as possible, as you see in the following exercise.
In this Try It Out, you see how to add an ADO.NET Entity Data Model file to your project, add database tables to the model, and then write a simple LINQ query to access the data in the underlying tables.
1. Open the Planet Wrox project that you have been working on so far. Right-click the App_Code folder, choose Add ⇒ Add New Item, and select your programming language on the left. Then click ADO.NET Entity Data Model, type PlanetWrox as the name, and click Add to add the item to your project. If you don’t see the item in the list, check that you right-clicked App_Code and not another folder like App_Data.
2. On the dialog box that follows, make sure that Generate from Database is selected and click Next.
3. In the Choose Your Data Connection step, make sure PlanetWroxConnectionString1 is selected in the drop-down and that the check box to store the settings in Web.config is checked. Your dialog now looks like Figure 14-1.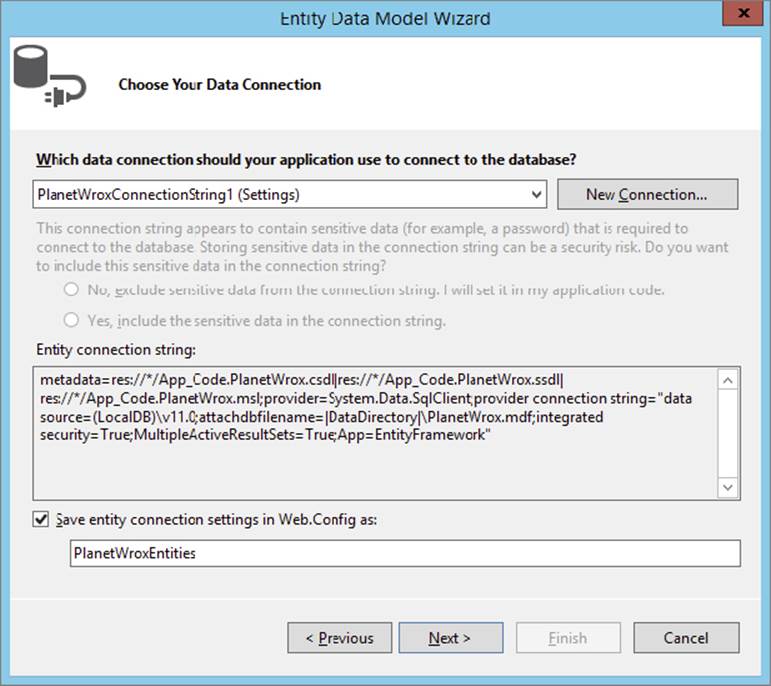
FIGURE 14-1
Click Next to go to the Choose Your Version dialog. Choose Entity Framework 6.0 and click Next.
4. On the Choose Your Database Objects and Settings dialog, expand Tables and then dbo, and then check off the Genre and Review tables. If you see a sysdiagrams table, leave it unchecked. This is a table used by SQL Server internally and you don’t need it in your Planet Wrox model. If you’re using an English version of VS, you get an option to pluralize or singularize names in the model automatically, which you should leave checked. For other languages you’ll need to do this manually, as you see next. Finally, make sure you leave the option to include foreign key columns in the model checked. You see what that option is used for later in this chapter. Click Finish to add the model to your site. If you get a security warning, click Do Not Show This Message Again and then click OK. Visual Studio uses what’s called a T4 template (with a .tt extension) to generate the code for you and by default you need to grant permissions to execute this template.
5. VS adds a file called PlanetWrox.edmx and two files with a .tt extension and then opens the Entity Designer for you in the main editor window, shown in Figure 14-2. It also installed the EntityFramework package, which resulted in an EF assembly (a.dll file) and XML documentation file in the Bin folder.
FIGURE 14-2
This Entity Designer shows you .NET classes that have been generated based on the tables in your database. VS draws a line connecting the two classes, indicating it picked up the relationship that you created between the underlying tables in Chapter 12. If you don’t see the line, or you don’t see Reviews at the bottom of the Genre class or Genre at the bottom of the Reviews class, make sure you set up your database as explained in Chapter 12.
6. If you’re using a non-English version of VS you need to pluralize the names of the entity sets and properties yourself. To do this, click the Genre class in the Designer, open its Properties Grid by pressing F4, and change the Entity Set Name from Genreto Genres. Repeat this for the Review class and change its Entity Set Name to Reviews. Finally, click the Review property on the diagram for the Genre class (located under the Navigation Properties header in Figure 14-2), press F2 to rename the item, and enter Reviews as the new name. Because a Review only belongs to a single Genre, you don’t need to pluralize the Genre property of the Review class.
7. Save and close the diagram.
8. Open All.aspx from the Reviews folder, switch it into Design View, and drag a GridView from the Toolbox onto the page. If you don’t have this page, create it now and base it on your custom template.
9. Double-click the page in the gray, read-only area to have VS set up a handler for the Page’s Load event and add the following code:
VB.NET
Protected Sub Page_Load(sender As Object, e As EventArgs) Handles Me.LoadUsing myEntities As New PlanetWroxEntities()
Dim authorizedReviews = From review In myEntities.Reviews Where review.Authorized = True Order By review.CreateDateTime Descending Select review GridView1.DataSource = authorizedReviews.ToList() GridView1.DataBind() End UsingEnd SubC#
protected void Page_Load(object sender, EventArgs e){using (PlanetWroxEntities myEntities = new PlanetWroxEntities())
{ var authorizedReviews = from review in myEntities.Reviews where review.Authorized == true orderby review.CreateDateTime descending select review; GridView1.DataSource = authorizedReviews.ToList(); GridView1.DataBind(); }}10.Save all your changes and press Ctrl+F5 to open the page. You’ll get a screen full of reviews that have been retrieved from the Review table in the database, as shown in Figure 14-3.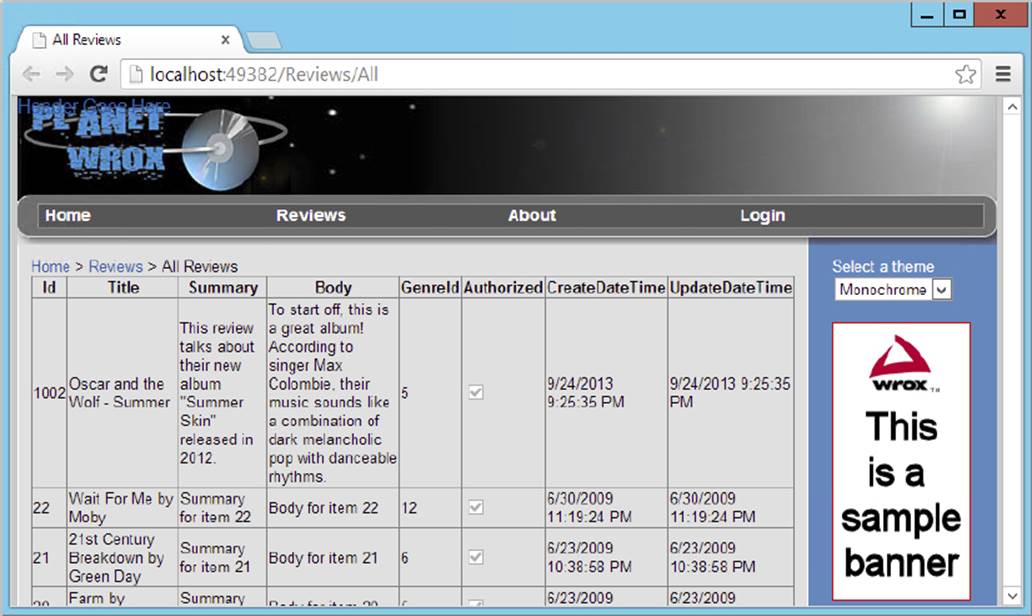
FIGURE 14-3
The page looks rather messy because of the way the data is presented in the GridView, but in later exercises you see how to improve the layout of the grid and the data.
How It Works
EF comes with an object-relational designer (accessible in VS) that enables you to create an object model that is accessible through code based on the tables in your database. By adding tables to this designer, VS generates code for you that enables you to access the underlying data in the database without writing a lot of code. The classes that are added to the designer are stored in the .edmx file and its Code Behind files.
The .tt files — which are T4 Template Files used to generate code dynamically — look at the data in the .edmx file and generate classes on the fly. If you look in the Code Behind of PlanetWrox.tt, you’ll see two classes called Genre and Review, which are generated based on the two tables from the database you added to the diagram. Likewise, the Code Behind of PlanetWrox.Context.tt contains a class that inherits from DbContext, the main object in EF that provides access to your database. In the preceding exercise, this class is called PlanetWroxEntities (named after the .edmx file) and you use it to access the data in the tables you added to the diagram.
The designer is smart enough to detect the relationships in the database and is thus able to create the necessary relationships in code as well, as you saw in Figure 14-2. The model defines two main object types, Review and Genre, both of which also have collection counterparts called Reviews and Genres, respectively. These collections are referred to as entity sets. Note that on English versions of VS the designer has correctly pluralized the names of the Review and Genre tables (Reviews and Genres, respectively), making it easier to see what is a collection (Reviews) and what is a single instance of an object (Review). For other language versions of VS, you had to apply this logic yourself using the Entity Designer.
After the model has been generated, you can execute LINQ queries against it to get data out of the underlying database. To access the data, you need an instance of the DbContext class, which is the base class for the PlanetWroxEntities class. That instance is created inside the Using block in the code. A Using block (using in C#) is used to wrap code that creates a variable that must be disposed of (cleared from memory) as soon as you’re done with it. Because the myEntities variable holds a (scarce) connection to the SQL Server database, it’s a good idea to wrap the code that uses it in a Using block, so the object is destroyed at the end of the block and the connection is released. This myEntities object then exposes your data (such as reviews and genres) that you can use in a query:
VB.NET
Using myEntities As New PlanetWroxEntities() Dim authorizedReviews = From review In myEntities.Reviews Where review.Authorized = True Order By review.CreateDateTime Descending Select review ...End UsingC#
using (PlanetWroxEntities myEntities = new PlanetWroxEntities()){ var authorizedReviews = from review in myEntities.Reviews where review.Authorized == true orderby review.CreateDateTime descending select review; ...}Note that this query looks similar to the SQL that you learned in the previous chapters. Under the hood, the run time converts this LINQ query into its SQL counterpart and executes it against the underlying database. Within this query, the variablereview in the From clause is used to refer to the review in the other parts of the query (Where, Order By, and Select), enabling you to specify the select, filter, and ordering criteria.
What’s important to realize is that EF uses a mechanism called lazy loading, which means sub objects are not loaded until you explicitly tell them to. What this means is that in the previous example the Genre properties of the Review objects you’ve queried are null in C# and Nothing in VB.NET and don’t contain any data. As soon as your code tries to access them, they are loaded by executing another query to the database. This can greatly improve performance if you don’t need these sub objects. However, if you’re sure you need them in your code beforehand, executing a separate SQL statement for each item results in a lot of overhead. In that case, you can preload the objects with the initial query. To express that you want to include these objects as well, you use the Include method for the types you want to query:
VB.NET
Dim authorizedReviews = From review In myEntities.Reviews.Include("Genre")
Where review.Authorized = True...C#
var authorizedReviews = from review in myEntities.Reviews.Include("Genre")
where review.Authorized == true...With this addition to the query, the Review objects now have their Genre property correctly filled with data. Though this may seem a little counterintuitive and counterproductive at first, it’s actually quite a nice feature. If you don’t need the extra Genreproperty in a specific page, you don’t take the performance hit of selecting and returning these objects. If you do need them, all you need to add is a single call to Include.
Besides the Reviews collection the model also contains a Genres collection. When you want to select all the genres in the database, you can use this query:
VB.NET
Dim allGenres = From genre In myEntities.Genres Order By genre.Name Select genreC#
var allGenres = from genre in myEntities.Genres orderby genre.Name select genre;In addition to these two separate objects and their collections, both objects have properties that refer to each other’s type. For example, a Review instance has a Genre property that provides additional information about the genre to which the review was assigned. A Genre instance in turn has a Reviews collection property, giving you access to all reviews posted in that genre. You see later how to make use of these properties.
From the keywords used in the first query in this Try It Out, it’s probably easy to see what the query does: It gets a list of all the reviews in the system that have been authorized and orders them in descending order on their creation date. The result of the query is then assigned to the authorizedReviews variable. Notice that in both languages you can spread out the query over multiple lines to improve readability. This is not required, but you’re encouraged to do it anyway because it makes your queries a lot easier to understand and maintain.
You may notice some strange syntax in the query. The VB.NET example doesn’t use an As clause to define the type of the variable. Similarly, the C# snippet uses the var keyword, also without a type name. Although you may not conclude it from these code snippets, in both languages the variable authorizedReviews is still strongly typed and not just a variable with an undefined type.
Because the code didn’t state the type for authorizedReviews (the example used Dim or var instead), .NET needs a different solution to determine the type. This is done by a concept called type inference, where the compiler is able to infer the type for a variable by looking at the right side of the assignment. In this case, the compiler sees that a list of Review objects will be returned from the query, and correctly types the authorizedReviews variable as a generics type IQueryable(Of Review) in VB.NET syntax or IQueryable<Review> in C#. Although this looks a little scary and incomprehensible at first, it becomes much easier to understand if you simply read it as “a bunch of Review objects that you can access in queries.” In most cases you can also explicitly specify the return type of the variable instead of using var or a Dim statement without a data type, but exceptions do exist, as you’ll see later when anonymous objects are discussed.
These Review objects are then assigned to the DataSource property of the GridView. In previous chapters you saw how to use the DataSourceID property to connect a control such as the GridView to a data source control like the SqlDataSource. By using theDataSource property instead, you can assign the actual data yourself, which the control then uses to build up the UI:
VB.NET
GridView1.DataSource = authorizedReviews.ToList()GridView1.DataBind()C#
GridView1.DataSource = authorizedReviews.ToList();GridView1.DataBind();By calling DataBind() on the GridView you instruct the control to display the individual Review objects on the page. Because the GridView control’s AutoGenerateColumns property is True by default, the control creates a column for each property it finds on theReview object. Later you see how to customize the control and the data that is being assigned to the DataSource property. Note the call to ToList at the end of the query. This causes an immediate execution of the query against the database, which results in the variable authorizedReviews pointing to all the reviews that matched the where clause. You need to do this when you bind the results of a query to a data control such as the GridView. However, in many other cases, you don’t need ToList, as you’ll see throughout this chapter.
In the following section you learn more about the LINQ query syntax, the language that drives the querying capabilities of .NET.
INTRODUCING QUERY SYNTAXThe query you saw in the previous example is quite simple; it requests all the authorized reviews from the system and returns them in a sorted order. However, the querying capabilities of LINQ are much more powerful than this. In this section you learn more about the LINQ query syntax that you use to query your object model. Remember, LINQ syntax is not invented just for the Entity Framework. Most of the LINQ concepts that follow can also be used in the other LINQ implementations, such as LINQ to Objects and LINQ to ADO.NET.
Standard Query OperatorsLINQ supports a large number of query operators — keywords that enable you to select, order, or filter data that is to be returned from the query. Although all of the examples in this chapter are discussed in the context of EF, you can easily apply them to the other LINQ implementations as well. In the following section you get an overview of the most important standard query operators, each followed by an example. Each of the examples uses the object model and the DbContext object called myEntities you created earlier as the data source to query against.
The Select keyword (select in C#) is used to retrieve objects from the source you are querying. In this example you see how to select an object of an existing type. Later in this chapter you see how to define new object shapes on the fly.
VB.NET
Dim allReviews = From r In myEntities.Reviews Select rC#
var allReviews = from r in myEntities.Reviews select r;The r variable in this example is referred to as a range variable that is only available within the current query. You typically introduce the range variable in the From clause, and then use it again in the Where and Select clauses to filter the data and to indicate the data you want to select. Although you can choose any name you like, you often see single-letter variables like the r (for Review) or you see the singular form of the collection you are querying (review instead of r in the preceding examples).
Although not considered a standard query operator — because it doesn’t operate on the data but rather points to the data — the From clause (from in C#) is an important element in a LINQ query, because it defines the collection or data source that the query must act upon. In the previous example, the From clause indicates that the query must be executed against the Reviews collection that is exposed by the myEntities object in EF.
With Order By (orderby in C#, without the space that VB.NET uses) you can sort the items in the result collection. Order By is followed by an optional Ascending or Descending (ascending and descending in C#) keyword to specify sort order. You can specify multiple criteria by separating them with a comma. The following query returns a list of genres, first sorted by SortOrder in descending order, then sorted by Name in ascending order (the default):
VB.NET
Dim allGenres = From g In myEntities.Genres Order By g.SortOrder Descending, g.Name Select gC#
var allGenres = from g in myEntities.Genres orderby g.SortOrder descending, g.Name select g;Just like the WHERE clause in SQL, the Where clause in LINQ (where in C#) enables you to filter the objects returned by the query. The following query returns all authorized reviews:
VB.NET
Dim authorizedReviews = From r In myEntities.Reviews Where r.Authorized = True Select rC#
var authorizedReviews = from r in myEntities.Reviews where r.Authorized == true select r;Note that the Where clause uses the language’s standard equality operator: a single equals sign (=) in VB.NET and two of them in C#.
These aggregation operators enable you to perform mathematical calculations on the objects in the result set. For example, to retrieve the number of reviews, you can execute this query:
VB.NET
Dim numberOfReviews = (From r In myEntities.Reviews Select r).Count()C#
var numberOfReviews = (from r in myEntities.Reviews select r).Count();Note that the Count method is applied to the entire result set. Therefore, you need to wrap the entire statement in parentheses followed by a call to Count. Without the parentheses you’ll get an error. The numberOfReviews variable in this example will be inferred as an integer and contains the number of items in the Review table.
Take and Skip enable you to make sub-selections within the result set. This is ideal for paging scenarios where only the items for the current page are retrieved. Take gets the requested number of elements from the result set and then ignores the rest, whereas Skipignores the requested number of elements and then returns the rest.
Within EF, the Take and Skip operators are translated to SQL statements as well. This means that paging takes place at the database level, and not in the ASP.NET page. This greatly enhances performance of the query, especially with large result sets, because not all elements have to be transferred from the database to the ASP.NET page.
For Skip to work in LINQ to Entities, you must add an Order By clause (orderby in C#) to your query to sort the results before the designated number of rows are skipped. Databases may return results in an unpredictable order if you don’t add an explicit ORDER BYstatement, so adding the Order By action in your LINQ to Entities query is needed to get a consistent result from the Skip method because rows are sorted first before they are skipped and taken.
The following example shows you how to retrieve the second page of rows, given a page size of 10:
VB.NET
Dim someReviews = (From r In myEntities.Reviews Order By r.Title Select r).Skip(10).Take(10)C#
var someReviews = (from r in myEntities.Reviews orderby r.Title select r).Skip(10).Take(10);Just as with the Count example, the query is wrapped in a pair of parentheses, followed by the calls to Skip and Take to get the requested rows.
The TakeWhile and SkipWhile query operators work in a similar fashion, but enable you to take or skip items while a specific condition is true. Unfortunately, they don’t work in EF, but you can usually work around that by adding a simple Where clause to your query.
The Single and SingleOrDefault operators enable you to return a single object as a strongly typed instance. This is useful if you know your query returns exactly one row; for example, when you retrieve it by its unique ID. The following example retrieves the review with an ID of 37 from the database:
VB.NET
Dim review37 = (From r In myEntities.Reviews Where r.Id = 37 Select r).Single()C#
var review37 = (from r in myEntities.Reviews where r.Id == 37 select r).Single();The Single operator raises an exception when the requested item is not found or if the query returns more than one instance. If you want the method to return null (Nothing in VB.NET) — for example, for a Review or Genre that is not found — or the default value for the relevant data type (such as a 0 for an Integer, False for a Boolean, and so on) instead, use SingleOrDefault.
Even though there is only one Review with an Id of 37 in the database, you will still get a collection of reviews (holding only one element) if you omit the call to Single. By using Single you force the result set into a single instance of the type you are querying.
These operators enable you to return the first or the last element in a specific sequence of objects. Just as with the Single method, First and Last throw an error when the collection is empty, whereas the other two operators return the default value for the relevant data types.
In contrast to Single, the First, FirstOrDefault, Last, and LastOrDefault operators don’t throw an exception when the query returns more than one item. They simply return the first item in the result set.
The Last and LastOrDefault queries are not supported in EF. However, you can easily accomplish the same behavior with First and a descending sort order. The following code snippet shows how to retrieve the oldest (the one with the lowest ID) and the most recent review from the database:
VB.NET
Dim firstReview = (From r In myEntities.Reviews Order By r.Id Select r).First()Dim lastReview = (From r In myEntities.ReviewsOrder By r.Id Descending
Select r).First()C#
var firstReview = (from r in myEntities.Reviews orderby r.Id select r).First();var lastReview = (from r in myEntities.Reviewsorderby r.Id descending
select r).First();Simply by reordering the result set in reverse order before executing First, you actually get the last row in the sequence. Note that in both cases, the type returned by the query is a true Review object, enabling you to access its properties, such as Id and Title, directly.
Besides this LINQ Query Syntax, LINQ also supports method syntax. For the differences and an example, check out this MSDN article: http://tinyurl.com/MethodVersusQuery.
Shaping Data with Anonymous TypesSo far, the queries you have seen in the previous sections returned full types. That is, the queries returned a list of Review instances (such as the Select method), a single instance of Review (Single, First, or Last), or a numeric value (such as Count and Average).
Quite often, however, you don’t need all the information from these objects. Figure 14-3 shows a GridView with all the properties from the Review object. To improve the presentation of this list, you usually want to skip properties like Body and Authorized, and instead of the genre ID you probably want to display the genre name. Although you could tell the GridView to display only the columns you want to see, it would be more efficient if you were able to limit the actual data. This is pretty easy to do with anonymous types, another language feature available in C# and VB.NET. An anonymous type is a type whose name and members you don’t define up front as you do with other types. Instead, you construct the anonymous type by selecting data and then letting the compiler infer the type for you. The anonymous type can only be accessed within the method that declared it, and as such you cannot return an anonymous type from a method.
If you don’t define the actual type and give it a name, how can you access the type and its properties? This is once again done with type inference, where the compiler can see what data is assigned to a variable and then creates a new, anonymous type on the fly.
Creating an anonymous type is easy; instead of selecting the actual object using something like Select review, you use the new keyword in C# and New With in Visual Basic, and then define the properties you want to select between a pair of curly braces:
VB.NET
Dim authorizedReviews = From myReview In myEntities.Reviews Where myReview.Authorized = True Select New With {myReview.Id, myReview.Title, myReview.Genre.Name}C#
var authorizedReviews = from review in myEntities.Reviews where review.Authorized == true select new { review.Id, review.Title, review.Genre.Name };Although the type is anonymous and cannot be accessed by name directly, the compiler is still able to infer the type, giving you full IntelliSense for the new properties that were selected in the query. Figure 14-4 shows how you access the properties of the anonymous type in the authorizedReviews variable, using the var keyword in C#.
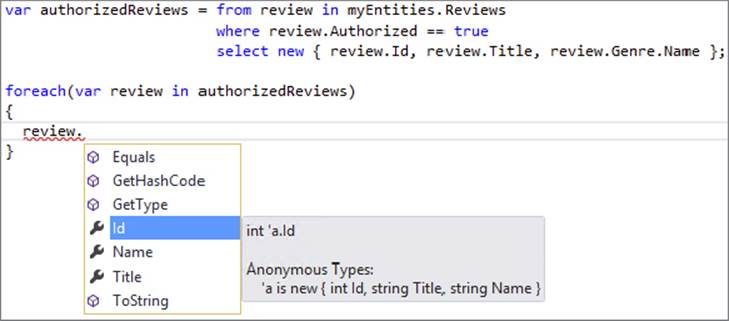
FIGURE 14-4
Note that the preceding query accessed the actual Genre property of the Review. Besides its GenreId (defined as a column in the table Review in the database), the Review class also has a strongly typed Genre property, giving you direct access to the genre’s properties, like the Name, as the previous query demonstrates.
Besides directly selecting existing properties — as shown in the query that selected the Id and Title of the Review and the Name of the Genre — you can also make up property values and give them different names as you go. For example, the following query creates a new anonymous type that renames the Id as Number, limits the Title to the first 20 characters, and contains a boolean value that determines whether the item has been updated in the database previously:
VB.NET
Dim allReviews = From myReview In myEntities.Reviews Select New With { .Number = myReview.Id, .Title = myReview.Title.Substring(0, 20), myReview.Genre.Name, .HasBeenUpdated = (myReview.UpdateDateTime > myReview.CreateDateTime) }C#
var allReviews = from myReview in myEntities.Reviews select new { Number = myReview.Id, Title = myReview.Title.Substring(0, 20), myReview.Genre.Name, HasBeenUpdated = (myReview.UpdateDateTime > myReview.CreateDateTime) };Note the difference between VB.NET and C#; in the VB.NET example, the names of the new properties (Number, Title, and HasBeenUpdated) are prefixed with a period (.). C# doesn’t have this requirement and lets you write new property names directly. If you don’t introduce a new name (as is the case with the genre name in the preceding example), the name of the property you’re selecting is used. This means that the genre name is stored in a property called Name.
The ability to select extra properties that are not present in the original object gives you great flexibility in the data you display. This example determines whether the current review has been updated by comparing the CreateDateTime and UpdateDateTime properties. The result of this comparison (a boolean with the value True or False) is then stored in the property HasBeenUpdated. You can select nearly anything you want, including the current date and time, complex calculations, substrings or combinations of properties, and so on.
In the following exercise you see how to create a new anonymous type that has a Reviews collection as a property. You use this type to create a list of all the available genres in the database, and the reviews that each genre contains.
In this Try It Out you create a page that lists all the available genres, each followed by the list of reviews that have been published in that genre. You use a Repeater control to display the list of genres and a nested BulletedList to display the inner reviews. When you’re done, you should see a list similar to the one displayed in Figure 14-5.
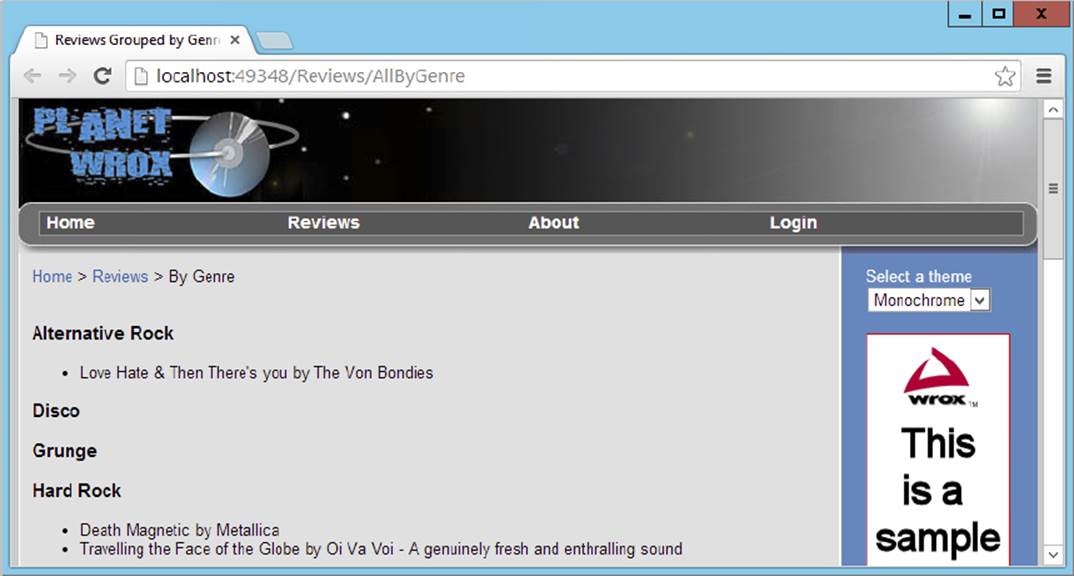
FIGURE 14-5
1.
Open the AllByGenre.aspx page from the Reviews folder. Make sure the page is in Markup View and then drag a Repeater from the Data category of the Toolbox between the opening and closing tags of the cpMainContent content placeholder.
2. Inside the Repeater create an <ItemTemplate> element that in turn contains an <h3> element that contains a Literal. You should end up with this code:
3.<asp:Repeater ID="Repeater1" runat="server">
4.<ItemTemplate>
5.<h3><asp:Literal ID="Literal1" runat="server"></asp:Literal></h3>
6.</ItemTemplate>
</asp:Repeater>7. Set the Text property of the Literal control to <%# Eval("Name") %>. Instead of double quotes, make sure you use single quotes to delimit the property’s value. You need this or otherwise the double quotes surrounding Name would prematurely close off the Text property.
8.<asp:Literal ID="Literal1" runat="server"
Text='<%# Eval("Name") %>'></asp:Literal>9. Below the <h3> element, drag and drop a BulletedList control from the Standard category and set the following properties on the control. You can either enter them directly in Markup View or use the Properties Grid.
|
PROPERTY NAME |
VALUE |
|
|
|
|
|
|
|
|
|
|
|
|
10. You should end up with the following control code:
11.<asp:BulletedList ID="ReviewList" runat="server"
12.DataSource='<%# Eval("Reviews")%>' DataTextField="Title"
13. DisplayMode="Text"></asp:BulletedList>
14.Switch to Design View and double-click the page somewhere in the read-only area defined by the master page to set up a handler for the Load event of the page. Within the handler, write the following code:
VB.NET
Protected Sub Page_Load(sender As Object, e As EventArgs) Handles Me.LoadUsing myEntities As New PlanetWroxEntities()
Dim allGenres = From genre In myEntities.Genres.Include("Reviews") Order By genre.Name Select New With {genre.Name, genre.Reviews} Repeater1.DataSource = allGenres.ToList() Repeater1.DataBind() End UsingEnd SubC#
protected void Page_Load(object sender, EventArgs e){using (PlanetWroxEntities myEntities = new PlanetWroxEntities())
{ var allGenres = from genre in myEntities.Genres.Include("Reviews") orderby genre.Name select new { genre.Name, genre.Reviews }; Repeater1.DataSource = allGenres.ToList(); Repeater1.DataBind(); }}15.Save the changes to your page and then request it in the browser. You should see a result similar to that shown in Figure 14-5, where each genre appears as a group header above the lists with reviews.
How It WorksYou have two important things to look at in this exercise. First of all, there’s the LINQ query that is used to get the genres and reviews from the database. This query (that uses Include("Reviews") to prevent lazy loading as you saw earlier) creates a new anonymous type with two properties: the Name of the Genre as a String and a collection of Review objects called Reviews. The class diagram for the new anonymous type could look like Figure 14-6.
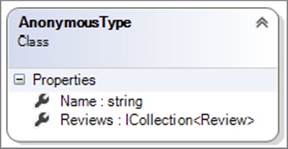
FIGURE 14-6
These Name and Reviews properties are then used in the second important part: the Repeater control with the nested bulleted list. First, take a look at the Repeater:
<asp:Repeater ID="Repeater1" runat="server"> <ItemTemplate> <h3><asp:Literal ID="Literal1" runat="server" Text='<%# Eval("Name") %>'></asp:Literal></h3> <!-- BulletedList here --> </ItemTemplate></asp:Repeater>Although you haven’t worked with the Repeater control before, it may look familiar, because it works in a manner similar to the other data controls. Within the <ItemTemplate> you define the markup that you want repeated for each item in the data source. Using Eval you can get the value of the genre’s Name property and assign it to the Literal, which is wrapped in a pair of <h3> tags. A similar construct is used for the BulletedList to feed it a DataSource:
<asp:BulletedList ID="BulletedList1" runat="server" DisplayMode="Text"DataSource='<%# Eval("Reviews")%>'DataTextField="Title" />
In addition to assigning simple properties like the Text of the Literal from the Name of the underlying data item, you can also use Eval to get complex properties. In this example, Eval(“Reviews”) is used to get the collection of Reviews for the current Genre. The BulletedList control then understands how to handle this data source and retrieves the Title from each individual Review object and then displays that in the list. The diagram in Figure 14-7 shows you how each Genre contains one or more reviews, whose titles are displayed below the name of the genre.
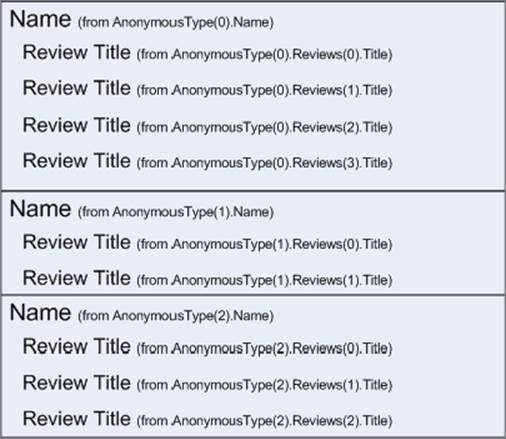
FIGURE 14-7
After you have set up the Repeater and defined the query, you need to start the data-binding process. You do this by assigning the results of the query to the DataSource property of the Repeater, followed by a call to DataBind() as shown in this C# example:
Repeater1.DataSource = allGenres.ToList(); Repeater1.DataBind();These two lines set things in motion: As soon as you call ToList(), the query is executed and the relevant genres and reviews are retrieved from the database and assigned to the DataSource property. In this example, the genres are sorted on their Name, but obviously you can order on other properties, such as SortOrder, as well. When DataBind is called, the Repeater loops through each item in the result set (this item is the anonymous type you just saw) and uses that item’s Name to fill in the <h3> element with the genre name. The Repeater then assigns the Reviews collection to the inner BulletedList control’s DataSource property. This control loops over the available Review instances, using their Title to build up the bulleted list. In this example, you see that genres without reviews are displayed in the list as well. In the “Exercises” section at the end of the chapter, you’ll find an exercise that shows you how to hide empty genres.
Although it may take you some time to fully understand the principles behind these LINQ queries and the Entity Framework, I am sure you are beginning to appreciate their power and accessibility. With just a few lines of code and a few controls, you can create powerful data presentation pages.
You can use these EF queries to display data using the ASP.NET Server Controls, as you’ll see in the next section, which deals with the ListView and the DataPager controls.
So far you have seen one way to bind the results of a LINQ query against EF to a control in your ASPX page: assign the data to the control’s DataSource property and then call DataBind. This way of getting data into the controls is a bit limited, as it does not support the editing, updating, and deleting of data directly. In order to support these operations, ASP.NET has a feature called Model Binding that supports full CRUD operations against a data source from the data-bound controls such as the GridView, ListView, and DetailsView. You see how Model Binding works in the next section.
Model Binding is a capability built into the data-bound controls to execute CRUD operations against a data source. Instead of depending on a data source control such as the SqlDataSource you’ve seen before, Model Binding relies on methods that you can define in your code to supply the data and handle changes such as an insert, an update, or a delete operation. These methods can be defined in the Code Behind of the Web Forms that contains the data-bound controls, or in other classes in your project. To point a data-bound control to methods that can retrieve or change data, you use the following four properties on the data-bound control. Note: Because not every control supports updating, deleting, and inserting of data, some controls miss some of these properties.
|
CONTROL |
DESCRIPTION |
|
|
This method is called by the control when it needs to display its data. It’s supported by the |
|
|
This method is called by the control when an insert operation is executed. It’s supported by the |
|
|
This method is called by the control when an insert operation is executed. It’s supported by the |
|
|
This method is called by the control when an insert operation is executed. It’s supported by the |
A very powerful feature of Model Binding is the ability to dynamically fill objects with data coming from the data-bound control when the insert, update, or delete methods are fired. For example, when creating a new photo album using a DetailsView control, you can let ASP.NET automatically retrieve information such as the album’s name from the data that the user supplied and assign it to a new instance of the PhotoAlbum class. This frees you from writing a lot of repetitive code that does nothing more than retrieve a value from a control and assign it to an object. You see how this works in the next exercise that uses the Entity Framework, although Model Binding is not limited to EF only.
In this Try It Out you start building the Gig Pics feature of Planet Wrox, a section of the website where users can upload photos they created during concerts of their favorite bands. You see how to let a user create a new photo album that acts as a container for the pictures that are uploaded. You see how to use the DetailsView to create a user interface that enables users to enter a name for a new photo album into the system. You also see Model Binding at work to insert the new photo album in the database using Entity Framework. In later exercises you see how to add pictures to this photo album.
1. Start by adding the following two tables to your database using SQL Server Management Studio. Refer to Chapter 12 for more details about creating tables, primary keys, and identity columns.
PhotoAlbum
|
COLUMN NAME |
DATA TYPE |
DESCRIPTION |
|
|
int |
The unique ID (identity and primary key) of the photo album |
|
|
nvarchar(100) |
The name of the photo album |
|
COLUMN NAME |
DATA TYPE |
DESCRIPTION |
|
|
int |
The unique ID (identity and primary key) of the picture |
|
|
nvarchar(300) |
A description of the picture |
|
|
nvarchar(50) |
A tooltip displayed when you hover over a picture |
|
|
nvarchar(200) |
The virtual path to the picture on disk |
|
|
int |
The ID of the photo album this picture belongs to |
For both tables, make sure that none of the columns are nullable by unchecking their Allow Nulls check boxes. Make the Id column the primary key by clicking it once and then clicking the yellow key icon on the Table Designer toolbar. Additionally, make this column the table’s Identity column by setting the (Is Identity) property on the Column Properties Grid to Yes. Refer to Chapter 12 if you’re not sure how to do this. Finally, make sure you have the casing of the table and column names right. Later code in this book assumes you wrote the table and column names as shown here.
2. On the Object Explorer, open the database diagram that you created in Chapter 12. Right-click the diagram and choose Add Table. Select the two new tables, click Add, and then click Close. Arrange the two new tables side by side if necessary. Next, drag the Id column from the PhotoAlbum table onto the PhotoAlbumId column of the Picture table. Confirm that the Primary Key Table is PhotoAlbum with Id as the selected column and that Picture is the Foreign Key Table with PhotoAlbumId as the selected column, as shown in Figure 14-8.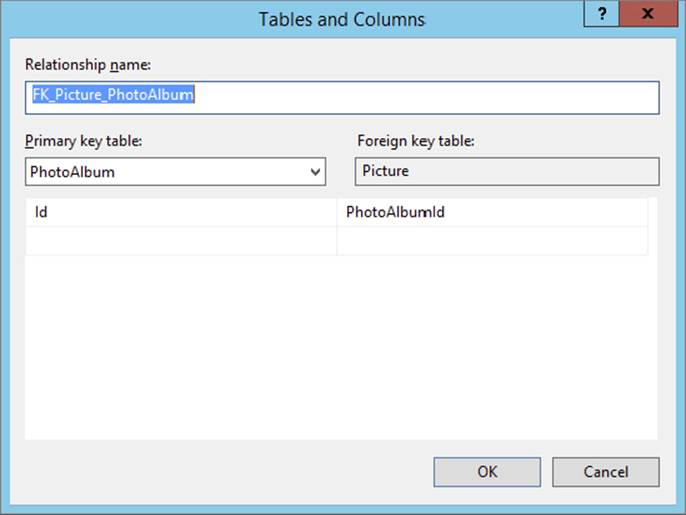
FIGURE 14-8
3.
Click OK twice to apply the changes and then save and close the diagram. Click Yes to confirm the changes made to the two tables.
4. Next, switch back to VS, and open the ADO.NET Entity Framework Model file PlanetWrox.edmx from the App_Code folder by double-clicking it. Right-click an empty spot of the diagram and choose Update Model from Database. In the wizard that appears, expand Tables, then dbo, and then check the two tables you just created: PhotoAlbum and Picture. Click Finish to have the two tables added to your model. Your diagram should end up like Figure 14-9. Note that I reorganized the diagram by dragging the entities side by side to make it easier to see them.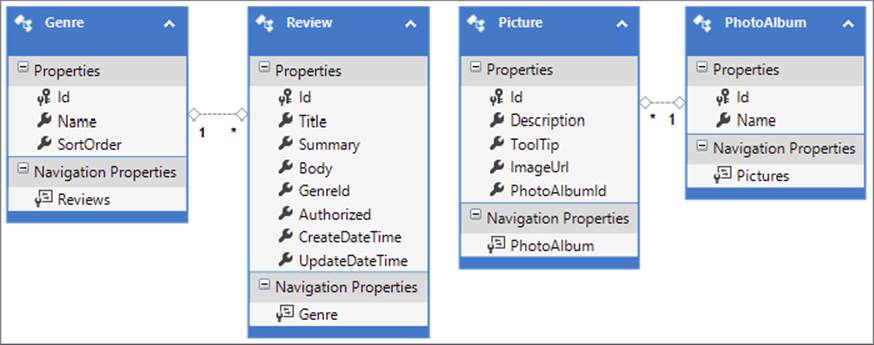
FIGURE 14-9
If you’re using a non-English version of VS, you need to pluralize the names of the entity sets and properties again. To do this, click the Picture class, open its Properties Grid by pressing F4, and change the Entity Set Name from Picture to Pictures. Repeat this for the PhotoAlbum class and change its Entity Set Name to PhotoAlbums. Finally, click the Picture property on the diagram for the PhotoAlbum class, press F2 to rename the item, and then enter Pictures as the new name.
Save all your changes and close the diagram.
5. Create a new Web Form based on your custom template in the root of the site and call it NewPhotoAlbum.aspx. Give the page a title of Create New Photo Album.
6. Make sure you’re in Markup View and then from the Data category of the Toolbox, drag a DetailsView control and drop it into the cpMainContent placeholder.
7. Modify the code for the control so it ends up like this:
8.<asp:DetailsView AutoGenerateRows="false" ID="DetailsView1"
9.DefaultMode="Insert" runat="server">
10.<Fields>
11.<asp:BoundField DataField="Name" HeaderText="Name" />
12.<asp:CommandField ShowInsertButton="True" ShowCancelButton="false" />
13.</Fields>
</asp:DetailsView>14.Next, position your cursor just before the closing angled bracket (>) of the opening tag of the DetailsView, type a space, and then type Insert. Visual Studio highlights the InsertMethod in the IntelliSense list. Press Enter to have Visual Studio complete the code for you. If the IntelliSense list doesn’t show up automatically, press Ctrl+Space and then locate the InsertMethod.
15.After the word InsertMethod, type an equals sign (=). Visual Studio inserts the equals sign and two double quotes and pops up a list that lets you create a new method, as shown in Figure 14-10.
FIGURE 14-10
16.
Select the <Create New Method> item with the keyboard and press Enter or double-click the item. Visual Studio completes the code as follows:
InsertMethod="DetailsView1_InsertItem"Besides the change in Markup View, Visual Studio also added the following method definition to the Code Behind:
VB.NET
Public Sub DetailsView1_InsertItem()End SubC#
public void DetailsView1_InsertItem(){}17.Switch to Code Behind and complete that method as follows:
VB.NET
Public Sub DetailsView1_InsertItem()Dim photoAlbum As New PhotoAlbum()
TryUpdateModel(photoAlbum) If ModelState.IsValid Then Using myEntities As New PlanetWroxEntities() myEntities.PhotoAlbums.Add(photoAlbum) myEntities.SaveChanges() End Using Response.Redirect(String.Format( "ManagePhotoAlbum?PhotoAlbumId={0}", photoAlbum.Id.ToString())) End IfEnd SubC#
public void DetailsView1_InsertItem(){PhotoAlbum photoAlbum = new PhotoAlbum();
TryUpdateModel(photoAlbum); if (ModelState.IsValid) { using (var myEntities = new PlanetWroxEntities()) {myEntities.PhotoAlbums.Add(photoAlbum);
myEntities.SaveChanges(); } Response.Redirect(string.Format( "ManagePhotoAlbum?PhotoAlbumId={0}", photoAlbum.Id.ToString())); }}18.Save all changes and then request NewPhotoAlbum.aspx in the browser.
Enter a new name for the photo album, such as Nick Cave & The Bad Seeds, and click the Insert link. You’ll get a Resource Not Found error (because you haven’t created ManagePhotoAlbum.aspx yet), but you can at least see the ID of the new photo album in the address bar of your browser:
http://localhost:9797/ManagePhotoAlbum?PhotoAlbumId=1
How It WorksYou started this exercise by adding the Picture and PhotoAlbum tables to both the database and the EF diagram. These tables are used to store data about photo albums and the pictures they contain. Each individual picture belongs to a PhotoAlbum referred to by its PhotoAlbumId that points to the Id column of the PhotoAlbum table in the database. The Picture table is designed to only hold data about the picture; the actual picture file is stored on disk, as you see later.
To enable users to create a new photo album, you added a DetailsView control to the page. To make sure the control can be used to insert new photo albums, you set the DefaultMode to Insert. This forces the control to jump into Insert mode, so when the page loads in the browser, the DetailsView renders a user interface that enables you to enter a new name for the photo album. The control renders the Insert link because of the CommandField with its ShowInsertButton set to True. By default, the CommandField also shows a Cancel link. However, in this case there isn’t a sensible cancel action, so the link was hidden by setting ShowCancelButton to False.
When you enter the name of a photo album in the browser and then click Insert, the page posts back to the server, and the DetailsView notices that an Insert command is requested and then fires the InsertMethod that you defined in code. Inside this method, the data (in this case, only the name of the photo album) is retrieved from the form, a new PhotoAlbum instance is created, this album is updated with the name from the form and added to the PhotoAlbums collection of the Entity Framework context, and the changes are saved to the database. At the end, the user is redirected to the page ManagePhotoAlbum.aspx that you’ll build later to add pictures to a photo album. To see how this all works, take another look at the code you added to the Code Behind of the Web Form:
VB.NET
Dim photoAlbum As New PhotoAlbum()TryUpdateModel(photoAlbum)If ModelState.IsValid Then Using myEntities As New PlanetWroxEntities() myEntities.PhotoAlbums.Add(photoAlbum) myEntities.SaveChanges() End Using ... Remaining code shown laterEnd IfC#
PhotoAlbum photoAlbum = new PhotoAlbum();TryUpdateModel(photoAlbum);if (ModelState.IsValid){ using (var myEntities = new PlanetWroxEntities()) { myEntities.PhotoAlbums.Add(photoAlbum); myEntities.SaveChanges(); } ... Remaining code shown later}The first line of code creates a new, empty instance of the PhotoAlbum class. This class has been created by EF automatically when you added the Picture and PhotoAlbum tables to the EF diagram.
The second line is where all the magic happens. When you call TryUpdateModel (a method that has been added to the Page class), the Model Binder tries to fill the properties of the PhotoAlbum class with values that match the incoming request. It does this by consulting various Value Providers, classes dedicated to supplying data coming from a variety of sources. ASP.NET supports a number of different value providers, including the FormValueProvider (which gets data from a form that the user has submitted), a QueryStringValueProvider (which uses the query string of the current request to find values), a CookieValueProvider (which retrieves data from cookies), a ProfileValueProvider (which retrieves data from the user’s profile, which you’ll see in Chapter 17), and more. In this example, the only property that gets updated is the Name property, which is found using the FormValueProvider. ASP.NET can find this property because it has been defined as follows in the Markup of the DetailsView:
<asp:BoundField DataField="Name" HeaderText="Name" />The Name value in the DataField attribute is important here. This links the control (a TextBox) that the BoundField generates to the Name of the PhotoAlbum so the FormValueProvider can successfully retrieve the value that the user entered after the postback.
At this point, the instance of the PhotoAlbum class (held in the photoAlbum variable) has been updated, and its Name property contains the value that you entered in the form in the browser.
Once TryUpdateModel has been called, you can check if the binding process succeeded by calling ModelState.IsValid. This property returns false when the binding process encounters an error. This could happen when you try to supply a non-numeric value for a numeric property on your object, for example. In other, more advanced scenarios, the model state could also be invalid if the supplied data doesn’t match your business rules, such as a required field that is left blank.
If the model state is valid, the code continues and creates a new instance of the PlanetWroxEntities context. It then calls Add on its PhotoAlbum collection, which adds the album to the internal collection of photo albums. When SaveChanges is then called, the Entity Framework sees that this is a new photo album and will insert it into the SQL Server database by executing an INSERT statement. It also retrieves the automatically generated ID of the new album and assigns that to the Id property of the PhotoAlbuminstance.
This ID is then used to redirect the user to a new page where you can add pictures to the photo album. This redirect is accomplished with the following code:
VB.NET
Response.Redirect(String.Format("ManagePhotoAlbum?PhotoAlbumId={0}", photoAlbum.Id.ToString()))C#
Response.Redirect(String.Format("ManagePhotoAlbum?PhotoAlbumId={0}", photoAlbum.Id.ToString()));Note that you get an error when you leave the name field empty and click Insert because Name is a required column in the PhotoAlbum table. The previous chapter showed you how to modify the DetailsView to insert validation controls to its templates.
Now that you can insert new photo albums, the next logical step is to add pictures to the photo album. In the next exercise you see how to create a user interface with the ListView control that enables a user to upload new pictures in the photo album.
Up until now, you have seen a few data-bound controls at work. You saw the GridView, which is quite powerful because it supports updates, deletes, sorting, and paging of data, but lacks inserting and generates a lot of HTML markup. You also saw the Repeater control that gives you precise control over the generated HTML, but lacks most advanced features that the other data controls have, such as update and delete behavior and sorting and filtering capabilities. And finally, you saw the DetailsView that enables you to insert or update one row at a time.
The ListView is a “best of all worlds” control, combining the rich feature set of the GridView with the control over the markup that the Repeater gives you and adding the insert behavior of the DetailsView. The ListView enables you to display data in a variety of formats, including a grid (rows and columns like the GridView), as a bulleted list (similar to how you set up the Repeater earlier in this chapter), and in Flow format, where all the items are placed in the HTML after each other, leaving it up to you to write some CSS to format the data.
The ListView displays and manages its data through templates that enable you to control many of the different views that the ListView gives you on its underlying data. The following table describes all the available templates that you can add as direct children of theListView control in the markup of the page:
|
TEMPLATE |
DESCRIPTION |
|
|
Serves as a container. It enables you to define a location where the individual data items are placed. The data items, presented through the |
|
|
Define the read-only mode for the control. When used together, they enable you to create a “zebra effect,” where odd and even rows have a different appearance (usually a different background color). |
|
|
Enables you to define the look and feel of the currently active, or selected, item. |
|
|
These two templates enable you to define the user interface for inserting and updating items in the list. You typically place controls like text boxes, drop-down lists, and other server controls in these templates and bind them to the underlying data source. |
|
|
Defines the markup that is placed between the items in the list. Useful if you want to add a line, an image, or any other markup between the items. |
|
|
Displayed when the control has no data to display. You can add text or other markup and controls to it to tell your users there’s no data to display. |
|
|
Used in advanced presentation scenarios where data can be presented in different groups. |
Although this long list of templates seems to suggest you need to write a lot of code to work with the ListView, this is not always the case. You don’t always need all templates, which enables you to minimize the code for the control.
Besides the numerous templates, the control has the following properties that you typically set to influence its 'border-collapse:collapse;border:currentcolor;border-spacing: 2px; display:table;font-style:inherit;font-variant:inherit;font-weight:inherit; line-height:inherit;outline: 0px'>
PROPERTY
DESCRIPTION
ItemPlaceholderID
The ID of a server-side control placed within the LayoutTemplate. The control referred to by this property is replaced by all the repeated data items when the control is displayed on-screen. It can be a true server control like an <asp:PlaceHolder> or a simple HTML element with a valid ID and its runat attribute set to server (for example, <ul runat="server" id="MainList"></ul>). If you don’t set this property, ASP.NET tries to find a control with an ID of itemPlaceholder and uses that control instead.
DataSourceID
The ID of a data source control on the page, such as a SqlDataSource control
InsertItemPosition
The enumeration for this property contains three values — None, FirstItem, and LastItem — to determine the position of the InsertItemTemplate: either at the beginning or end of the list, or not visible at all.
Just like the other data-bound controls, the ListView has a number of events that fire at specific moments during the control’s lifetime. For example, it has ItemInserting and ItemInserted events that fire right before and after an item has been inserted in the underlying data source. Similarly, it has events that trigger right before and after you update or delete data. You see more about handling these kinds of events in the next chapter.
Besides the templates, properties, and events you just saw, the ListView has more to offer. For a detailed explanation of the ListView control and all of its members and behavior, check out the MSDN documentation at http://bit.ly/dCAooK.
The next exercise shows you how to put all of this information together. You see how to define the various templates and set the relevant properties to control the look and feel of the ListView control.
Inserting items with the ListView can be just as easy as with the DetailsView: You add the control to the page, define one or more templates (for example, one to display an item in read-only mode and another that lets you edit an item), and then use Model Binding to get data from the database and send updates back. In this exercise you see how to use the ListView to add pictures to an album and how to delete those pictures again. For now, you’ll only be able to insert some dummy data into the Picture table, but in a later exercise you learn how to upload actual pictures, save them on disk, and associate them with the data in the database.
1. In the root of the website, create a new Web Form based on your custom template. Call it ManagePhotoAlbum.aspx, set its Title to Manage Photo Album, and make sure you are in Markup View.
2. From the Data category of the Toolbox, drag a ListView control onto the page in the cpMainContent placeholder.
3. Modify the code for the ListView as follows:
4.<asp:ListView ID="ListView1" runat="server" DataKeyNames="Id"
5.InsertItemPosition="LastItem">
6.<InsertItemTemplate>
7.<li>
8.Description: <asp:TextBox ID="Description" runat="server"
9.TextMode="MultiLine" Text='<%# Bind("Description") %>' /><br />
10.ToolTip: <asp:TextBox ID="ToolTip" runat="server"
11.Text='<%# Bind("ToolTip") %>' /><br />
12.ImageUrl: <asp:TextBox ID="ImageUrl" runat="server"
13.Text='<%# Bind("ImageUrl") %>' /><br />
14.<asp:Button ID="InsertButton" runat="server" Text="Insert" CommandName="Insert" />
15.</li>
16.</InsertItemTemplate>
17.<ItemTemplate>
18.<li>
19.Description: <asp:Label ID="Description" runat="server"
20.Text='<%# Eval("Description") %>' /><br />
21.ToolTip: <asp:Label ID="ToolTip" runat="server"
22.Text='<%# Eval("ToolTip") %>' /><br />
23.ImageUrl: <asp:Label ID="ImageUrl" runat="server"
24.Text='<%# Eval("ImageUrl") %>' /><br />
25.<asp:Button ID="DeleteButton" runat="server" CommandName="Delete"
26.Text="Delete" CausesValidation="False" />
27.</li>
28.</ItemTemplate>
29.<LayoutTemplate>
30.<ul class="ItemContainer">
31.<li runat="server" id="itemPlaceholder" />
32.</ul>
33.</LayoutTemplate>
</asp:ListView>This is quite a bit of code type manually, so make good use of the Toolbox and Visual Studio’s IntelliSense to make it as easy as possible to create this code. When you’re done, compare your code with mine to make sure you haven’t made any typos.
34.Position your cursor before the closing angled bracket of the opening tag of the ListView, type Select, pick SelectMethod from the IntelliSense list, type an equals sign, and choose Create New Method to have Visual Studio complete the markup for you and add an empty select method to the Code Behind of the file.
35.Repeat this process, but now add methods for the InsertMethod and DeleteMethod. Your ListView control should now look like this:
36.<asp:ListView ID="ListView1" DataKeyNames="Id" runat="server"
37.InsertItemPosition="LastItem" SelectMethod="ListView1_GetData"
InsertMethod="ListView1_InsertItem" DeleteMethod="ListView1_DeleteItem">The Code Behind should now contain the following method definitions. I left out the comments that Visual Studio added to the code as well:
VB.NET
Public Function ListView1_GetData() As IQueryable Return NothingEnd FunctionPublic Sub ListView1_InsertItem()End Sub Public Sub ListView1_DeleteItem(ByVal id As Integer)End SubC#
public IQueryable ListView1_GetData(){ return null;}public void ListView1_InsertItem(){}public void ListView1_DeleteItem(int id){}38.The next step is to implement the SelectMethod, which is called when the ListView needs to display data. Because the photo album page should display pictures only for the current photo album (as identified by the PhotoAlbumId query string parameter), you need to find a way to filter the correct pictures from the database using a LINQ query. Fortunately, you can use Model Binding again to let ASP.NET find and retrieve the ID of the photo album and make it available in the ListView1_GetDatamethod. You can then use that ID in the Where clause of a LINQ query. To implement this functionality, modify that method as follows. Note that you need to add a using/Imports statement for the namespace System.Web.ModelBinding to bring theQueryString attribute into scope. You can either type in this namespace manually at the top of the code file, or you can press Ctrl+. (Ctrl+dot) on the word QueryString in the method definition and pick the namespace from the list that appears.
VB.NET
Public Function ListView1_GetData(<QueryString("PhotoAlbumId")> photoAlbumId As Integer) As IQueryable Dim myEntities As New PlanetWroxEntities() Return From p In myEntities.Pictures Where p.PhotoAlbumId = photoAlbumId Select pEnd FunctionC#
public IQueryable ListView1_GetData([QueryString("PhotoAlbumId")] int photoAlbumId){ var myEntities = new PlanetWroxEntities(); return from p in myEntities.Pictures where p.PhotoAlbumId == photoAlbumId select p;}Notice the QueryString attribute applied to the photoAlbumId parameter of the GetData method. This attribute signals the ASP.NET run time to populate that parameter with the value from the associated PhotoAlbumId query string parameter.
39.The next step is to implement the method that lets you insert new pictures; this is done with the following code in the same Code Behind file:
VB.NET
Public Sub ListView1_InsertItem(<QueryString("PhotoAlbumId")> photoAlbumId As Integer) Dim picture As New Picture() TryUpdateModel(picture) If ModelState.IsValid Then Using myEntities As New PlanetWroxEntities() picture.PhotoAlbumId = photoAlbumId myEntities.Pictures.Add(picture) myEntities.SaveChanges() End Using End IfEnd SubC#
public void ListView1_InsertItem([QueryString("PhotoAlbumId")] int photoAlbumId){ Picture picture = new Picture(); TryUpdateModel(picture); if (ModelState.IsValid) { using (var myEntities = new PlanetWroxEntities()) { picture.PhotoAlbumId = photoAlbumId; myEntities.Pictures.Add(picture); myEntities.SaveChanges(); } }}This code is very similar to the code you saw earlier to create a new photo album. The difference here is the photoAlbumId parameter, which is assigned the ID of the current photo album through the QueryString attribute. This ID is then assigned to thePhotoAlbumId property of the picture, which eventually links the picture with the photo album in the database.
40.To display images side by side instead of stacked below each other, add the following CSS code to Monochrome.css in the Monochrome theme’s folder and save the file:
41..ItemContainer
42.{
43.width: 600px;
44.list-style-type: none;
45.clear: both;
46.}
47.
48..ItemContainer li
49.{
50.height: 300px;
51.width: 200px;
52.float: left;
53.}
54.
55..ItemContainer li img
56.{
57.width: 180px;
58.margin: 10px 20px 10px 0;
}59.Add the same code to DarkGrey.css in the DarkGrey theme’s folder, but this time set the width of the ItemContainer class to 400px like this:
60..ItemContainer
61.{
62.width: 400px;
63.list-style-type: none;
64.clear: both;
}65.To test out the functionality you have so far, save all your changes, close all open files, and then request NewPhotoAlbum.aspx in your browser. Make sure you don’t accidentally open ManagePhotoAlbum.aspx, because it requires a query string that is sent byNewPhotoAlbum.aspx. Enter a new name for the photo album and click Insert. You’re taken to ManagePhotoAlbum.aspx, where you can enter new pictures. For now, all you can do is enter the description of the picture, the tooltip, and a fake URL of the image (just enter some text); you see later how to modify this and let a user upload real pictures to the website. Once you click the Insert button, a new item appears in the list, next to the insert controls. If the new item appears above the insert controls, you may need to refresh the page by pressing Ctrl+F5 to force an update of the style sheet. This may insert the same item again, which is no problem for this exercise. Add a few more items and you’ll notice that the insert controls move to a row below the others, as shown in Figure 14-11, which shows the page in Internet Explorer.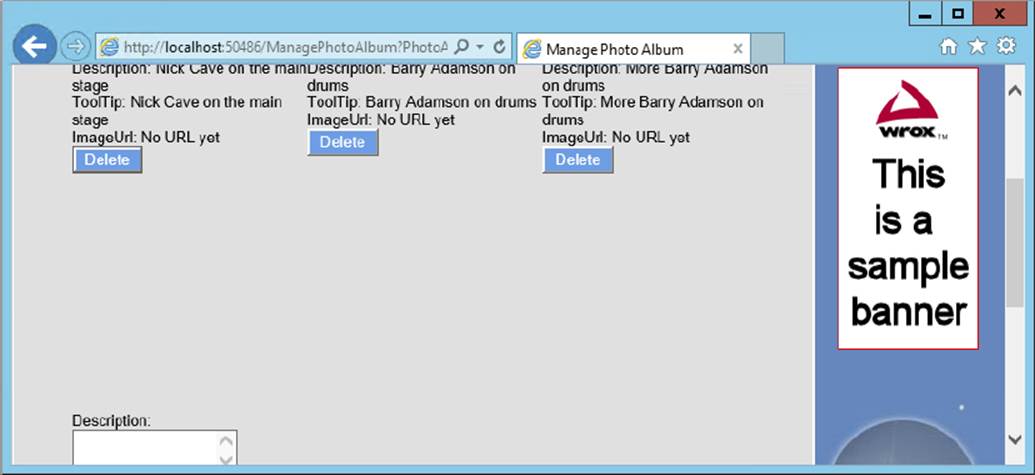
FIGURE 14-11
66.
To make it possible to delete pictures from an album, switch back to VS and implement the delete method as follows:
VB.NET
Public Sub ListView1_DeleteItem(ByVal id As Integer) Using myEntities As New PlanetWroxEntities() Dim picture = (From p In myEntities.Pictures Where p.Id = id Select p).Single() myEntities.Pictures.Remove(picture) myEntities.SaveChanges() End UsingEnd SubC#
public void ListView1_DeleteItem(int id){ using (var myEntities = new PlanetWroxEntities()) { var picture = (from p in myEntities.Pictures where p.Id == id select p).Single(); myEntities.Pictures.Remove(picture); myEntities.SaveChanges(); }}This method receives the ID from the picture in the database through the id parameter. It then uses a LINQ query to find that item in the database, and then calls Remove in the Pictures collection.
67.Save all your changes, close all open files, and then request NewPhotoAlbum.aspx again in your browser. Make sure you don’t accidentally open ManagePhotoAlbum.aspx. Create a new album, and insert a few pictures. Click the Delete button for an item and see how the item is removed from the list automatically.
68.If you’re currently viewing the site in the Monochrome theme, use the drop-down list to switch to DarkGrey. Notice that this theme shows only two images per row instead of the three displayed by the Monochrome theme shown in Figure 14-11.
How It WorksIn order to understand how this works, I’ll dissect the ListView control and its templates first, followed by a discussion in the various Model Binding methods you defined in the Code Behind.
The LayoutTemplate you added to the ListView serves as the container for the other templates. In between its tags you define the markup that contains the individual items (the pictures for the current album, as well as the user interface to insert new pictures):
<LayoutTemplate> <ul class="ItemContainer"> <li ID="itemPlaceholder" runat="server" /> </ul></LayoutTemplate>Note that this <li> has its ID set to itemPlaceholder. This tells the ListView control where to add the individual pictures. At run time, this element will be replaced by the actual items from the templates, like ItemTemplate.
When the ListView control needs to display its data (you see later how the control retrieves the data), it creates an item based on the ItemTemplate for each data item in the data source. In this example, each data item is a strongly typed Picture object, which provides access to properties such as ToolTip and Description:
<ItemTemplate> <li> ... ToolTip: <asp:Label ID="ToolTip" runat="server" Text='<%# Eval("ToolTip") %>' /> ... <asp:Button ID="DeleteButton" runat="server" CommandName="Delete" Text="Delete" CausesValidation="False" /> </li></ItemTemplate>With this code in place, each item in the data source is presented as a series of labels that display relevant properties of the picture. Eval(PropertyName) is used to retrieve the requested value from the object, which is then displayed as the Label control’s text. Note that at this stage, the ItemTemplate only displays data about the picture. You see how to upload and display real pictures later.
Note the CommandName of the Button control in the ItemTemplate. It’s set to Delete, which turns this button into a true Delete button. You see how deleting pictures works when the various methods in the Code Behind are discussed.
The first time the page loads after you create a new photo album, there won’t be any pictures. However, as soon as you start adding items using the InsertItemTemplate of the ListView control, you’ll see them appear in the list.
In contrast to many of the other data-bound controls, the ListView also supports inserting by defining an InsertItemTemplate that contains one or more controls that are bound to properties in the underlying object. For example, the Description property of the picture is bound like this:
<InsertItemTemplate> <li> Description: <asp:TextBox ID="Description" runat="server" Text='<%# Bind("Description") %>' /><br /> ...</InsertItemTemplate>Instead of Eval(PropertyName), this code uses Bind(PropertyName) to set up a two-way binding mechanism. This ensures that the ASP.NET run time is able to figure out the relationship between the Description property of a Picture and the text box calledDescription, even after a postback. So when you enter some details and click the special Insert button (with its CommandName set to Insert), the control executes the method defined in its InsertMethod property, as you’ll see shortly.
Now that you’ve seen the various templates that make up the UI of the control, it’s time to look at the various Code Behind methods that interact with the Entity Framework and the database. When the ListView needs to display its data, it calls theSelectMethod, which is defined as follows:
VB.NET
Public Sub ListView1_InsertItem(<QueryString("PhotoAlbumId")> photoAlbumId As Integer) Dim myEntities As New PlanetWroxEntities() Return From p In myEntities.Pictures Where p.PhotoAlbumId = photoAlbumId Select pEnd FunctionC#
public IQueryable ListView1_GetData([QueryString("PhotoAlbumId")] int photoAlbumId){ var myEntities = new PlanetWroxEntities(); return from p in myEntities.Pictures where p.PhotoAlbumId == photoAlbumId select p;}A very important piece of the puzzle is the QueryString attribute that is applied to the photoAlbumId parameter of the method. This tells the ASP.NET run time to populate this parameter with the value of the PhotoAlbumId query string parameter (which was sent by the NewPhotoAlbum.aspx page). The method then uses that ID to query all pictures for that album from the database using a simple LINQ query. The first time the page loads, this list will be empty, but once you start adding images using theInsertItemTemplate of the ListView, they show up on the page.
When you enter the details of a picture and click Insert, the ListView calls the InsertMethod, defined as follows:
VB.NET
Public Sub ListView1_InsertItem(<QueryString("PhotoAlbumId")> photoAlbumId As Integer) Dim picture As New Picture() TryUpdateModel(picture) If ModelState.IsValid Then Using myEntities As New PlanetWroxEntities() picture.PhotoAlbumId = photoAlbumId myEntities.Pictures.Add(picture) myEntities.SaveChanges() End Using End IfEnd SubC#
public void ListView1_InsertItem([QueryString("PhotoAlbumId")] int photoAlbumId){ Picture picture = new Picture(); TryUpdateModel(picture); if (ModelState.IsValid) { using (var myEntities = new PlanetWroxEntities()) { picture.PhotoAlbumId = photoAlbumId; myEntities.Pictures.Add(picture); myEntities.SaveChanges(); } }}This is almost the same code as that used to create a new photo album. The difference here is another QueryString attribute that is populated with the ID of the photo album. The Include Foreign Key Columns option in Entity Framework you enabled earlier in this chapter has given you a PhotoAlbumId property on the Picture class that enables you to directly set the ID of the PhotoAlbum (which you retrieved from the query string). This in turn relates the picture in the database to a specific photo album in the PhotoAlbum table. If you hadn’t enabled that option, the property wouldn’t have been there, and you would have had to assign a PhotoAlbum instance to the PhotoAlbum property of the picture by querying the photo album from the database based on its ID. Using the Foreign Key Columns option makes this process a lot easier because you can simply assign the ID of the album you want to add this picture to.
When you click the Delete button for a picture, the ListView fires the DeleteMethod that looks as follows:
VB.NET
Public Sub ListView1_DeleteItem(ByVal id As Integer) Using myEntities As New PlanetWroxEntities() Dim picture = (From p In myEntities.Pictures Where p.Id = id Select p).Single() myEntities.Pictures.Remove(picture) myEntities.SaveChanges() End UsingEnd SubC#
public void ListView1_DeleteItem(int id){ using (var myEntities = new PlanetWroxEntities()) { var picture = (from p in myEntities.Pictures where p.Id == id select p).Single(); myEntities.Pictures.Remove(picture); myEntities.SaveChanges(); }}This method creates a new PlanetWroxEntities instance and then uses a LINQ query to find the correct picture. It then calls the Remove method on the Pictures collection and sends it the picture. EF then knows which record to delete from the database when you call SaveChanges. But how does the ListView know how to populate the id parameter of this method? The answer is in the DataKeyNames attribute defined on the ListView:
<asp:ListView ID="ListView1" runat="server"DataKeyNames="Id"...
The ListView stores the ID of each individual item in ViewState. Then when you click the Delete button, it’s able to extract the correct ID for the picture you want to delete, which it then sends to the DeleteItem method in the Code Behind.
The final part of this exercise you need to take a look at is the CSS code you added to the theme’s CSS files to display the items in an organized way. By setting the class attribute of the <ul> control to ItemContainer, the following CSS is applied to that list:
.ItemContainer{ width: 600px; list-style-type: none; clear: both;}The first property sets the entire width of the list to 600 pixels and the second declaration removes the bullet from the items in the list. Each item in the list is then displayed within a <li> element, to which the following CSS is applied:
.ItemContainer li{ height: 300px; width: 200px; float: left;}Each item gets a forced width of 200 pixels. The float property tells the <li> elements to float next to each other. Within the parent area of 600 pixels you can fit three <li> elements of 200 pixels each, causing the fourth and further elements to be placed on their own line. This is a great alternative to presenting data with HTML tables, which generally needs a lot more markup to achieve the same effect.
Finally, each image within the <li> element gets a forced width of 180 pixels and 10 pixels of margin at the top and bottom, 20 pixels on the right (to create some room between the images), and none at the left side:
.ItemContainer li img{ width: 180px; margin: 10px 20px 10px 0;}In the DarkGrey theme, the width of the ItemContainer is set to only 400 pixels. This way, the <div> is just wide enough to display two images side by side.
The code in the ListView uses Eval and Bind statements to get data in and out of the Picture objects that you’re assigning to the controls. ASP.NET 4.5 introduced a new way to set up these bindings. You see how to use these bindings next.
When you added the code for the ListView, you used Bind and Eval statements like this:
<asp:TextBox ID="ToolTip" runat="server" Text='<%# Bind("ToolTip") %>' />...<asp:Label ID="ToolTip" runat="server" Text='<%# Eval("ToolTip") %>' />As you learned in the “How It Works” section of the preceding exercise, Bind is for two-way data binding (for insert and edit scenarios) and Eval is for read-only scenarios. Notice how the name of the property (ToolTip in this example) is a literal string placed between quotes. Using string literals makes your code more prone to errors. First of all, it’s easy to misspell the name. Because a string cannot be checked by VS at development time, you won’t notice this error until you view the page in the browser. Secondly, if you rename a property, the change is not picked up by the string literal.
Fortunately, ASP.NET has a solution to deal with this problem. The data-bound controls (such as the ListView, the Repeater, the GridView, the DetailsView, and the FormView) have been turned into strongly typed data-bound controls. They have been extended with anItemType property that you can point to the type of object you’re assigning to its data source. In the preceding example, this type would have been Picture. Once you’ve set this property, the data-bound control gets two new properties, Item and BindItem, that are of the type you assigned to the ItemType property. The first one serves as a replacement for Eval and the second one replaces Bind. By setting the ItemType property and using Item and BindItem, you get the following benefits:
- IntelliSense now helps you find the correct property of the object you’re working with, as shown in Figure 14-12.
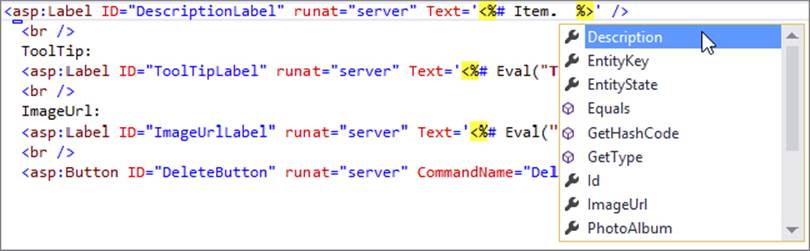
FIGURE 14-12
- When you misspell the name of a property, or rename it later, you now get an error in the Error List, giving you the chance to fix the problem before the page is viewed in the browser.
- External tools (available for the full versions of Visual Studio) will correctly rename the item in the markup when you rename a property on your object.
Although this is an excellent new feature that will help you write better code, you can only use this solution when working with a strongly typed object such as Picture from an EF model, or from other classes you or third-party developers create. It won’t work in situations such as the following:
- When using the
SqlDataSourcecontrol. This control uses an object under the hood that doesn’t expose strongly typed properties that map to columns (such asToolTiporDescription), and as such you cannot access these columns or properties through theItemandBindItemproperties. - When using anonymous objects. Because the anonymous object doesn’t have a name, you cannot assign its name to the
ItemTypeproperty.
In the following short exercise, you see how to make use of this new strongly typed data-binding capability.
In this exercise you modify the ListView control in ManagePhotoAlbum.aspx by making it strongly typed. You see how to set the ItemType property and how to replace Bind and Eval with their strongly typed counterparts. When you’re done, the page will work exactly as before, but will now be easier to maintain in the future.
1. Start by opening ManagePhotoAlbum.aspx in Markup View in VS.
2. Locate the opening tag of the ListView and add an ItemType property with its value set to Picture. Notice how IntelliSense helps you find the correct item by showing a list with all the types that can be used as the ItemType, as shown in Figure 14-13.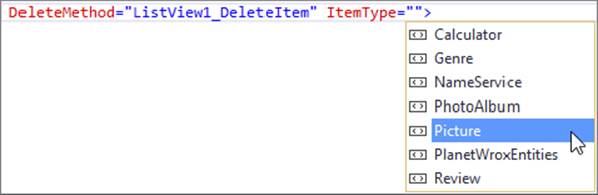
FIGURE 14-13
3.
Inside the InsertItemTemplate template of the ListView, locate the Bind statement for the Description TextBox, and change it from Bind("Description") to BindItem.Description. Notice how IntelliSense helps you type the Description property. You should end up with this code:
<asp:TextBox ID="Description" runat="server" Text='<%# BindItem.Description %>' />4. Repeat the previous step for the ToolTip TextBox. The ImageUrl gets special treatment later in this chapter, so there’s no point in changing it now.
5. Inside the ItemTemplate template of the ListView, locate the Eval statement for the Description Label and change it from Eval("Description") to Item.Description. You should end up with this code:
<asp:Label ID="Description" runat="server" Text='<%# Item.Description %>' />6. Repeat step 5 for the ToolTip Label. Again, the ImageUrl gets special treatment later in this chapter, so there’s no point in changing it now.
7. Save your changes and request NewPhotoAlbum.aspx in the browser. Insert a new album and then add a few pictures by entering a description and tooltip and uploading an image file. Notice how the code still behaves as before.
You didn’t have to change a lot to make the ListView strongly typed and get access to IntelliSense and compile-time checking of your code. All you had to do was add an ItemType property to the ListView and replace the calls to Bind and Eval with theirBindItem and Item counterparts. With these changes in place, the control behaves exactly as before. At run time, the control looks at the value of the assigned properties and displays them in the browser. When you submit data back to the server, the reverse takes place: The values you entered in the controls are retrieved by the Model Binder and assigned to the properties of an instance of the Picture object, which is then saved in the database by the Entity Framework. It’s recommended to use the strongly typed binding capabilities whenever you can, because they’ll help you spot errors much sooner and make it easier to type your code.
Right now, users need to type in a URL for an image manually. Obviously, this isn’t very user friendly. It would be much easier for them if they could pick an image from their local computer and upload it to the server. You see how to accomplish this in the next exercise.
The templates for the ListView control that you added in an earlier exercise are enough only in the most trivial situations. Usually, you need much more control. For example, in the ItemTemplate you may want to display an actual Image control instead of the plain ImageUrl property as text. Likewise, in the InsertItemTemplate you may want to display a file upload control instead of a simple text box. In this exercise, you see how to change these templates so you can incorporate both features. Additionally, you see how to update the InsertMethod to save the uploaded file to disk, and update the database with the URL of the image.
For this example to work, the account used by the web server (the account you use to log on to your machine if you are using IIS Express) needs read and write permissions to the GigPics folder that you create in this exercise. The account should already have these permissions on your machine, but if you run into problems with this exercise, refer to the section “Understanding Security in IIS” in Chapter 19.
1. Create a new folder in the root of the website called GigPics. This folder will contain concert pictures uploaded by users.
2. Open the ManagePhotoAlbum.aspx page in Markup View and locate the <ItemTemplate> element. Remove the Label that displays the ImageUrl and replace it with an Image control, with its ImageUrl set to the ImageUrl of the picture object.
<asp:Image ID="ImageUrl" runat="server" ImageUrl='<%# Item.ImageUrl %>' />Remove the text ImageUrl: that appears right above the image.
3. To enable users to upload images, you need to replace the TextBox for the ImageUrl property with a FileUpload control. You also need to remove the text ImageUrl: again. You do this in the InsertItemTemplate:
4.<asp:TextBox ID="ToolTip" runat="server"
5.Text='<%# BindItem.ToolTip %>' /><br />
6.<asp:FileUpload ID="FileUpload1" runat="server" />
7.<br />
<asp:Button ID="InsertButton" runat="server" CommandName="Insert" Text="Insert" />Note that you don’t need to bind the property to the control here. Because the uploaded image needs special treatment, you’ll write some code in the Code Behind of the page instead of relying on the built-in data-binding capabilities.
8. In Markup View, add three validation controls to the InsertItemTemplate: two RequiredFieldValidator controls hooked up to the text boxes for the Description and ToolTip, and one CustomValidator with its ErrorMessage set to Select a valid .jpg file. Give the RequiredFieldValidator controls an ID such as reqDesc and reqToolTip and assign the CustomValidator an ID of cusValImage. Finally, set the TextMode property of the text box for the Description to MultiLine and enter a line break (a <br />) before the Insert button.
You should end up with the following code:
Description:<asp:RequiredFieldValidator ID="reqDesc" ControlToValidate="Description" runat="server" ErrorMessage="Enter a description." /><asp:TextBox ID="Description" runat="server"TextMode="MultiLine"
Text='<%# BindItem.Description %>' /><br />ToolTip:<asp:RequiredFieldValidator ID="reqToolTip" ControlToValidate="ToolTip" runat="server" ErrorMessage="Enter a tool tip." /><asp:TextBox ID="ToolTip" runat="server" Text='<%# BindItem.ToolTip %>' /><br /><asp:FileUpload ID="FileUpload1" runat="server" /><br /><asp:CustomValidator ID="cusValImage" runat="server" ErrorMessage="Select a valid .jpg file." /><br /><asp:Button ID="InsertButton" runat="server" CommandName="Insert" Text="Insert" />9. Switch to Code Behind and extend the ListView1_InsertItem method with the following code:
VB.NET
TryUpdateModel(picture)Dim FileUpload1 As FileUpload = CType(ListView1.InsertItem.FindControl("FileUpload1"), FileUpload)If Not FileUpload1.HasFile OrElse Not FileUpload1.FileName.ToLower().EndsWith(".jpg") Then Dim cusValImage As CustomValidator = CType(ListView1.InsertItem.FindControl("cusValImage"), CustomValidator) cusValImage.IsValid = False ModelState.AddModelError("Invalid", cusValImage.ErrorMessage)End IfIf ModelState.IsValid AndAlso Page.IsValid ThenC#
TryUpdateModel(picture);FileUpload FileUpload1 = (FileUpload)ListView1.InsertItem.FindControl("FileUpload1");if (!FileUpload1.HasFile || !FileUpload1.FileName.ToLower().EndsWith(".jpg")){ CustomValidator cusValImage = (CustomValidator)ListView1.InsertItem.FindControl("cusValImage"); cusValImage.IsValid = false; ModelState.AddModelError("Invalid", cusValImage.ErrorMessage);}if (ModelState.IsValid && Page.IsValid)Notice that the line with the call to ModelState.IsValid has been expanded with a call to Page.IsValid.
10.Near the bottom of the method, after the picture instance has been assigned the ID of the photo album, add the following code, which saves the file to disk and then updates the ImageUrl property of the Picture instance with its new location:
VB.NET
picture.PhotoAlbumId = photoAlbumIdDim virtualFolder As String = "~/GigPics/"Dim physicalFolder As String = Server.MapPath(virtualFolder)Dim fileName As String = Guid.NewGuid().ToString()Dim extension As String = System.IO.Path.GetExtension(FileUpload1.FileName)FileUpload1.SaveAs(System.IO.Path.Combine(physicalFolder, fileName + extension))picture.ImageUrl = virtualFolder + fileName + extensionmyEntities.Pictures.Add(picture)C#
picture.PhotoAlbumId = photoAlbumId;string virtualFolder = "~/GigPics/";string physicalFolder = Server.MapPath(virtualFolder);string fileName = Guid.NewGuid().ToString();string extension = System.IO.Path.GetExtension(FileUpload1.FileName);FileUpload1.SaveAs(System.IO.Path.Combine(physicalFolder, fileName + extension));picture.ImageUrl = virtualFolder + fileName + extension;myEntities.Pictures.Add(picture);11.Save all your changes, and then request NewPhotoAlbum.aspx in your browser (don’t accidentally request the ManagePhotoAlbum.aspx page that you just worked on). Enter a new name for the photo album and click the Insert link. Insert a few pictures by entering a description and a tooltip, selecting a .jpg picture from your hard drive, and clicking the Insert button. If you get an error message similar to the following:
12.Could not find a part of the path 'C:\BegASPNET\Site\GigPics\
7b26dde2-82f5-4942-ac80-6a438ae4d062.jpg'.make sure you created the GigPics folder as a sub folder of your site.
Enter the description and tooltip of another image, but leave the file upload box empty. When you click Insert, you get an error message indicating that you didn’t upload a valid .jpg file, as shown in Figure 14-14.
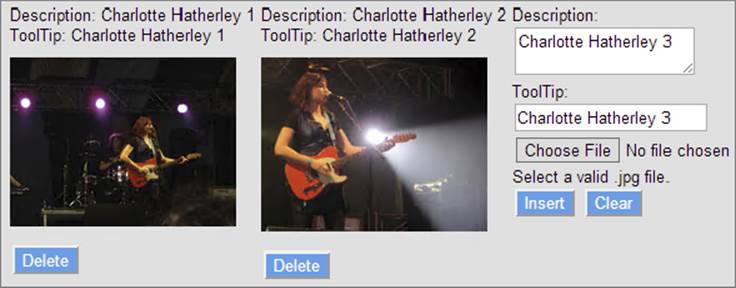
FIGURE 14-14
13.
Click the Browse button of the file upload box, browse for a valid .jpg file, and click the Insert button once more. The file now gets uploaded successfully.
How It Works
You haven’t changed much in the actual process of inserting the Picture into the database. The ListView control still collects all the relevant data from the page and then calls the InsertMethod, which then inserts the item in the Picture table in the database through EF. What is different is the way you set up the templates and the code in the method that inserts the picture. Look at the templates first. Inside the ItemTemplate you added an <asp:Image> to take the place of the plain text label. As you can see inFigure 14-14, this displays the actual image, rather than just its URL.
To enable a user to upload the images, you replaced the TextBox control in the InsertItemTemplate with a FileUpload control. Additionally, you added a few validation controls to force the user to enter the required fields. As soon as you click the Insert button, the page posts back and the ListView control calls the InsertMethod. Inside this method you added some code that “finds” the upload control in the InsertItem template. Because you can potentially have multiple controls with the same name (for example, a FileUpload control in the InsertItemTemplate and one in the EditItemTemplate), you cannot access FileUpload1 directly. Instead, you need to use FindControl on the InsertItem object to search for the control:
VB.NET
Dim FileUpload1 As FileUpload = CType(ListView1.InsertItem.FindControl("FileUpload1"), FileUpload)C#
FileUpload FileUpload1 = (FileUpload)ListView1.InsertItem.FindControl("FileUpload1");When you have a reference to the FileUpload control, you can check its HasFile property to see if a file has been uploaded. Additionally, you can check FileUpload1.FileName.ToLower().EndsWith(".jpg") to see if a file with a .jpg extension has been uploaded. To ensure that this test is carried out only when the user has uploaded a file, the code uses OrElse in VB and || in C# to short-circuit the logic in the If statement, as explained in Chapter 5.
If the user doesn’t upload a valid file, the code in the If block runs. It uses FindControl again to find the CustomValidator control and sets its IsValid property to False (false in C#). This tells the control to display its ErrorMessage property when the page renders. It also adds an error to the ModelState using AddModelError. This is needed to tell the ModelBinder that validation failed, which in turn tells the ListView to stay in Insert mode and display the data that the user already added along with the error message from the CustomValidator control.
The other validation controls to make sure a title and description are entered work in the same way as you saw in Chapter 9.
If the user uploaded a valid .jpg file, the code continues. It then executes the following code to determine the physical and virtual folder for the file, its name, and its extension:
VB.NET
Dim virtualFolder As String = "~/GigPics/"Dim physicalFolder As String = Server.MapPath(virtualFolder)Dim fileName As String = Guid.NewGuid().ToString()Dim extension As String = System.IO.Path.GetExtension(FileUpload1.FileName)C#
string virtualFolder = "~/GigPics/";string physicalFolder = Server.MapPath(virtualFolder);string fileName = Guid.NewGuid().ToString();string extension = System.IO.Path.GetExtension(FileUpload1.FileName);The variable virtualFolder holds the virtual location — starting off the root of the website — of the folder where the uploaded images are stored. Using Server.MapPath you can turn this into a physical folder. Assuming you have your project in its default location of C:\BegASPNET\Site, the physicalFolder variable now contains C:\BegASPNET\Site\GigPics.
Next, a new, random filename is generated using Guid.NewGuid(). The Guid class is able to generate more or less random filenames that are guaranteed to be unique across time and space. This code assigns the variable fileName something like f6d8ed05-2dbe-4aed-868a-de045f9462e3, which guarantees a unique filename. Finally, the extension of the file is retrieved using the static GetExtension method of the Path class in the System.IO namespace.
At this stage, you have all the required information to store the file on disk, and then update the database. Storing the file on disk is easy using the SaveAs method of the FileUpload control:
VB.NET
FileUpload1.SaveAs(System.IO.Path.Combine(physicalFolder, fileName + extension))C#
FileUpload1.SaveAs(System.IO.Path.Combine(physicalFolder, fileName + extension));This code takes the physical folder, the filename, and the extension and passes them to the Combine method of the Path class that builds up the full path. This path is then sent to the SaveAs method, which saves the file at the requested location.
Finally, the Picture instance is updated with the new ImageUrl:
VB.NET
picture.ImageUrl = virtualFolder + fileName + extensionC#
picture.ImageUrl = virtualFolder + fileName + extension;This assigns something like ~/GigPics/f6d8ed05-2dbe-4aed-868a-de045f9462e3.jpg to the ImageUrl property, which is the new virtual location of the uploaded image. Right after you insert the new image, the ListView is updated and now shows the new image, using the Image control with its ImageUrl set to the image you just uploaded.
You can imagine that if you upload a large number of images for a single photo album, the page becomes more difficult to manage. This is especially true at the front end, where users may be accessing your site over a slow network connection. Instead of presenting them all the images in the photo album on a single page, you can split up the photo album into multiple pages, enabling users to go from page to page. You see how to do this in the next section, which discusses the DataPager control.
The DataPager is a separate control that you can use to extend another data-bound control. Currently, the .NET Framework lets you use the DataPager only to provide paging capabilities to the ListView control, but the developer community has been active writing implementations for other controls, like the GridView, as well.
You can hook up the DataPager to the ListView control in two ways: You can either define it within the LayoutTemplate of the ListView control or you can define it entirely outside the ListView. In the first case, the DataPager knows to what control it should provide paging capabilities automatically. In the latter case, you need to set the PagedControlID property of the DataPager to the ID of a valid ListView control. You see how to configure and use the DataPager in conjunction with a ListView next. Being able to define the DataPager outside of the ListView control is useful if you want to place it at a different location on the page, such as in the Footer or Sidebar area.
In this Try It Out you create the front-end page of the Gig Pics feature. Users of your site can choose one of the available photo albums from a drop-down list and then view all the available pictures in a pageable list that is created by a ListView and aDataPager control. Figure 14-16 shows the final result of this exercise.
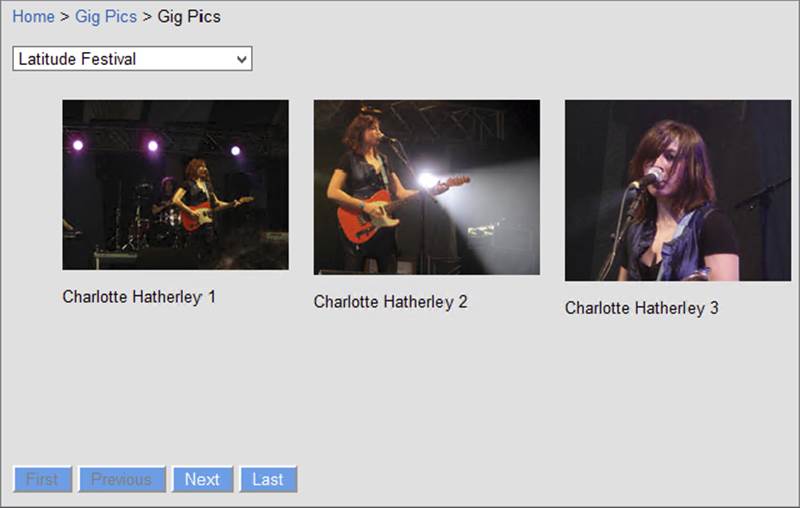
FIGURE 14-16
1.
In the root of your site, create a new folder called PhotoAlbums. Inside this folder create a new Web Form based on your custom page template and call it Default.aspx. Set the Title of the page to All Photo Albums.
2. Switch to Design View and drop a DropDownList control on the page. On the control’s Smart Tasks panel, enable AutoPostBack and then, using the Properties Grid, set the control’s ID to PhotoAlbumList, DataTextField to Name, DataValueField to Id, andSelectMethod to PhotoAlbumList_GetData, as shown in Figure 14-15.
FIGURE 14-15
The DataTextField will display the name of the photo album in the DropDownList, while the DataValueField is used as the underlying ID of the photo album. This ID is then used later to display the pictures that are part of the selected photo album. You need to manually assign the SelectMethod and add the associated method to the Code Behind, as the control does not support generating the method automatically as the ListView does.
3. Switch to the Events category of the Properties Grid and double-click the SelectedIndexChanged event to set up a handler for that event in the Code Behind. Your final control now looks like this in Markup View (in VB you won’t see the handler for theSelectedIndexChanged event):
4.<asp:DropDownList ID="PhotoAlbumList" runat="server" AutoPostBack="True"
5.DataTextField="Name" DataValueField="Id" SelectMethod="PhotoAlbumList_GetData"
6.OnSelectedIndexChanged="PhotoAlbumList_SelectedIndexChanged">
</asp:DropDownList>7. If necessary, switch to the Code Behind. At the top of the class, directly after the class definition, add the following line of code that instantiates a new PlanetWroxEntities instance:
VB.NET
Partial Class PhotoAlbums_Default Inherits BasePageDim entities As New PlanetWroxEntities()
C#
public partial class PhotoAlbums_Default : BasePage{PlanetWroxEntities entities = new PlanetWroxEntities();
Because multiple methods in this class need access to the PlanetWroxEntities, it makes sense to create a single class-scope instance once that can be reused by all methods instead of creating a new one inside each method.
8. Next, create a method called PhotoAlbumList_GetData and implement it as follows:
VB.NET
Public Function PhotoAlbumList_GetData() As IEnumerable(Of PhotoAlbum) Return From p in entities.PhotoAlbums Order By p.Id Select pEnd FunctionC#
public IEnumerable<PhotoAlbum> PhotoAlbumList_GetData(){ return from p in entities.PhotoAlbums orderby p.Id select p;}This method queries all PhotoAlbum instances and returns them ordered by the ID. The return type of this method is an IEnumerable of PhotoAlbum, which means this collection can only be used to enumerate over. This means that the collection itself is read-only, which is exactly what is needed for this exercise as the PhotoAlbum instances are only displayed in the DropDownList. You’ll add code to the SelectedIndexChanged handler later.
9. Switch back to Markup View and immediately below the DropDownList insert the following code for a ListView control, letting Visual Studio create the name and the method in the Code Behind for the SelectMethod for you:
10.<asp:ListView ID="ListView1" runat="server" DataKeyNames="Id"
11.ItemType="Picture" SelectMethod="ListView1_GetData">
12.<EmptyDataTemplate>
13.No pictures found for this photo album.
14.</EmptyDataTemplate>
15.<ItemTemplate>
16.<li>
17.<asp:Image ID="Image1" runat="server" ImageUrl='<%# Item.ImageUrl %>'
18.ToolTip='<%# Item.ToolTip %>' />
19.<asp:Label ID="Description" runat="server" Text='<%# Item.Description %>' />
20.</li>
21.</ItemTemplate>
22.<LayoutTemplate>
23.<ul class="ItemContainer">
24.<li id="itemPlaceholder" runat="server" />
25.</ul>
26.<!-- Todo add DataPager here -->
27.</LayoutTemplate>
</asp:ListView>This creates an Image control with its ImageUrl and ToolTip properties bound to the corresponding properties of the Picture object that you’re going to bind to. The ToolTip appears when you hover your mouse over the image in the browser. Below the image, a simple Label control displays the Description of the image.
28.Below the <ul> element, replace the Todo placeholder text with the following code for a DataPager. You can type in the code manually, or drag the control from the Data category of the Toolbox in Markup View.
29.<div style="clear: both;">
30.<asp:DataPager ID="DataPager1" runat="server" PageSize="3">
31.<Fields>
32.<asp:NextPreviousPagerField ButtonType="Button"
33.ShowFirstPageButton="True" ShowLastPageButton="True" />
34.</Fields>
35.</asp:DataPager>
</div>36.Next, wrap the entire code in the cpMainContent content block in an UpdatePanel with a ContentTemplate element to avoid page flicker when paging the list of pictures, or when choosing a new photo album from the list.
37.<asp:Content ID="Content2" ContentPlaceHolderID="cpMainContent" runat="Server">
38.<asp:UpdatePanel ID="UpdatePanel1" runat="server">
39.<ContentTemplate>
40....
41.</ContentTemplate>
42.</asp:UpdatePanel>
</asp:Content>43.Switch to the Code Behind and implement the ListView1_GetData method as follows:
VB.NET
Public Function ListView1_GetData() As IQueryable(Of Picture) Dim photoAlbumId As Integer = Convert.ToInt32(PhotoAlbumList.SelectedValue) Return From p in entities.Pictures where p.PhotoAlbumId = photoAlbumId Order By p.Id select pEnd FunctionC#
public IQueryable<Picture> ListView1_GetData(){ int photoAlbumId = Convert.ToInt32(PhotoAlbumList.SelectedValue); return from p in entities.Pictures where p.PhotoAlbumId == photoAlbumId orderby p.Id select p;}44.Still in the Code Behind, add the following highlighted line to the PhotoAlbumList_SelectedIndexChanged method that Visual Studio added there in step 3:
VB.NET
Public Sub PhotoAlbumList_SelectedIndexChanged(sender As Object, e As EventArgs) _ Handles PhotoAlbumList.SelectedIndexChangedListView1.DataBind()
End SubC#
protected void PhotoAlbumList_SelectedIndexChanged(object sender, EventArgs e){ListView1.DataBind();
}45.Open the Web.sitemap file for the site and add a main menu and two submenu items for the Gig Pics section, between the Reviews and About sections:
46.</siteMapNode>
47.<siteMapNode url="~/PhotoAlbums/" title="Gig Pics" description="All Gig Pics">
48.<siteMapNode url="~/PhotoAlbums/Default" title="Gig Pics"
49.description="All Gig Pics" />
50.<siteMapNode url="~/NewPhotoAlbum" title="New Album"
51.description="Create a new Photo Album with Gig Pics" />
52.</siteMapNode>
53.<siteMapNode url="~/About/Default" title="About"
description="About this site">54.Because you added another menu item, you need to change the width of each item in the menu for the Monochrome theme. To do this, open up Monochrome.css and change the width for the .MainMenu ul li selector from 200 to 160 pixels:
55..MainMenu ul li
56.{
57.width: 160px;
}58.Save all your changes and then request Default.aspx from the PhotoAlbums folder in your browser. Choose a photo album from the drop-down list and the page reloads, showing you the relevant pictures in the photo album.
How It Works
Most of what you have seen in this exercise should be familiar. You connected a DropDownList to a SelectMethod similar to the way you set up the SelectMethod in ManagePhotoAlbum.aspx. Because the DropDownList will only display a read-only list of the photo albums and doesn’t do any sorting or paging itself, the return value of the method is an IEnumerable of Picture. An IEnumerable is the lightest way to retrieve data from EF, as it carries no overhead to support other operations like alterations of the collection, sorting, and so on. The ListView is also similar to what is discussed earlier in this chapter. However, instead of retrieving the ID of the photo album with a QueryString attribute, the code retrieves the ID from the DropDownList:
VB.NET
Dim photoAlbumId As Integer = Convert.ToInt32(PhotoAlbumList.SelectedValue)C#
int photoAlbumId = Convert.ToInt32(PhotoAlbumList.SelectedValue);Instead of retrieving the ID from the control directly, you could also add a parameter to the method and mark it with the Control attribute to automatically retrieve the value from the DropDownList. However, I found that when you apply that attribute, the method for the ListView is called before the method for the DropDownList. This in turn means the DropDownList has no data yet when the page loads the first time. With the current implementation, photoAlbumId will always contain the ID of the selected item in the DropDownList.
The biggest difference from previous examples is the addition of the DataPager. As demonstrated in this exercise, paging is handled for you automatically. All you need to do is embed a DataPager control somewhere in the LayoutTemplate of the ListView and the rest is taken care of automatically. Because the GetData method for the ListView returns an IQueryable of Picture, the ListView and the DataPager are able to further query the set of pictures. This means that paging (selecting only the subset of records that are needed for the current page) is done through EF, which in turn means that only the rows that are displayed are retrieved from the database. This results in the query being executed as efficiently and as fast as possible.
If you place the DataPager outside the ListView, don’t forget to hook it up to the ListView by setting the PagedControlID property. If you prefer links or images over buttons, you can set the ButtonType property of the NextPreviousPagerField element to Link orImage, respectively. If you prefer a numeric pager, replace the NextPreviousPagerField item with a NumericPagerField:
<asp:NumericPagerField NextPageText="..." PreviousPageText="..." />In this exercise you set the PageSize to 3 so it’s easier to fill more than one page and see the pager at work. In real-world applications the PageSize is usually a bit higher, such as 10 or 20. Because the layout uses a three-column layout for the Monochrome theme and a two-column layout for the DarkGrey theme, you may want to select a value that’s dividable by both, such as 18.
Notice in Figure 14-16 that some buttons are disabled when they are unusable. This is done with the <disabled> attribute. When a button with that attribute set also has its <color> property set (as is the case with all button controls in the Monochrome theme because of the <Button.skin> file), you can’t tell whether the button is disabled or not. Fortunately, ASP.NET also renders an <aspNetDisabled> class on the button which you can target with CSS to give the button a disabled look. In <Monochrome.css>you’ll find a CSS selector targeting the <aspNetDisabled> class that sets the color to grey.
A Note about Performance
The preceding exercise has a known performance problem that you should be aware of. Although the ItemTemplate of the ListView resizes the images to 180 pixels in the browser by setting their widths through CSS, the actual images are left unmodified. This means that if you upload a large image, the entire image is still downloaded, only to display as a small thumbnail image. It would be better to create a true thumbnail image at the server, and send that to the browser instead. The chapter entitled “Greeting Cards” in my bookASP.NET 2.0 Instant Results (ISBN: 978-0-471-74951-6) has a number of examples of resizing images on the server.
PRACTICAL LINQ AND ADO.NET ENTITY FRAMEWORK TIPS
Here are some practical LINQ and ADO.NET Entity Framework tips:
- In this chapter you saw how to create anonymous types to shape the data you want to return from your queries. The compiler and IntelliSense are invaluable tools in determining what data you can return and what properties you have available. Spend some time playing around with the anonymous types, looking at the different options that the IntelliSense lists give you.
- Just as with other data access methods, like the
SqlDataSourcecontrol you saw in the previous chapter, try to filter your data as much as possible. If you know you only need reviews in the Jazz genre, be explicit and incorporate aWhereclause in your code that limits the list of reviews at the database level. This speeds up your queries and data retrieval, improving the overall speed of the application. - Make use of anonymous types to decrease the memory consumption of your LINQ queries. For example, instead of retrieving the entire
Reviewobject, use theNew(newin C#) keyword to create a new anonymous type on the fly. Because this new object contains only the properties you really need, you save yourself the overhead of bringing in the full object.
SUMMARY
LINQ is a compelling and exciting technology that ships with .NET. LINQ is an important plumbing technique in many data access scenarios, including database access in ASP.NET web applications using the ADO.NET Entity Framework.
Because LINQ is so important, it has been integrated in many different places in .NET. LINQ is available for objects, enabling you to query in-memory collections. Additionally, LINQ is available for XML, ADO.NET, and DataSets, each type providing access to a different data store, but with the same unified querying language. LINQ is also used as the query language for the ADO.NET Entity Framework.
To work with EF in your ASP.NET web applications you have a couple of different options. First, you can write queries in the Code Behind of a page and then bind the results to a data-bound control using the DataSource property and DataBind method of the control. Alternatively, you can use Model Binding with the data-bound controls to get data from EF. Combined with the ListView and DataPager controls, this enables you to create fully functional CRUD pages.
Until now, the database-driven pages you have seen look quite dull. You haven’t applied a lot of styling or provided any conditional formatting, where data is presented differently based on its values. You can do this through control styles and the many events of the data-bound and data source controls. The next chapter shows you how to make use of these styles and events.
1. Imagine you have a page in the Reviews folder called MostRecent.aspx. This page should show the 10 most recently added reviews. What would your LINQ query look like if you only wanted to show the review’s Title property and the name of the genre it belongs to? You should use the Take method to limit the result set to 10. If you’re having trouble writing the code to get the last reviews, look at the section titled “First, FirstOrDefault, Last, and LastOrDefault,” which shows you how to get the last review in the database.
2. What is the major benefit of the ListView control over other data controls like GridView and Repeater?
3. Currently the Default.aspx page from the PhotoAlbums folder just shows the thumbnails of the pictures. What would you need to do to display the full-size picture on its own page using a LINQ query?
4. When you delete a picture from the ListView on the Photo Album page, only the database row is deleted, but the image on disk is left untouched. Make use of the static System.IO.File.Delete method to delete the item from disk when the picture gets deleted.
5. Currently, the AllByGenre.aspx page displays the title of the genre, regardless of whether it has any reviews attached to it. How can you hide genres that don’t have any reviews? Make use of the Count method on the Reviews collection to solve this question.
You can find answers to these exercises in Appendix A.
WHAT YOU LEARNED IN THIS CHAPTER
|
Ado.Net Entity Data Model file |
The file that contains the information necessary to map your object model to the tables in your database |
|
Anonymous types |
Types that are created on the fly without defining them explicitly |
|
Entity Framework |
A technology to create a strongly typed object model with an underlying database that enables you to interact with the data in your database |
|
Entity set |
A collection of objects in your entity model; for example, a |
|
Lazy loading |
A technique in which data is not loaded from the database until it is accessed at run time |
|
LINQ |
Language-Integrated Query; the part of .NET Framework programming languages that provides querying support against all kinds of data collections, including objects, XML, and databases |
|
Model Binding |
A mechanism by which ASP.NET can populate objects for you with data coming from a variety of sources. The various methods that can be called from the data-bound controls make heavy use of this process. |
|
Range variable |
A variable defined in your LINQ query that is subsequently used in the |
|
Strong typing |
A programming concept in which the type of a variable is explicitly defined when the variable is declared |
|
Type inference |
A technique in which the compiler determines the type of a variable based on the data it gets assigned; this enables you to create strongly typed variables without explicitly defining the variable’s type first. |
All materials on the site are licensed Creative Commons Attribution-Sharealike 3.0 Unported CC BY-SA 3.0 & GNU Free Documentation License (GFDL)
If you are the copyright holder of any material contained on our site and intend to remove it, please contact our site administrator for approval.
© 2016-2025 All site design rights belong to S.Y.A.