Beginning ASP.NET-4.5 in C# and VB (2013)
Chapter 2
Building an ASP.NET Website
WHAT YOU WILL LEARN IN THIS CHAPTER:
- The different project types you can choose from as a starting point for your ASP.NET websites
- The different project templates that are available to jump-start your site development
- The numerous file types available in ASP.NET and what they are used for
- Ways to create structured websites that are easy to manage, now and in the future
- How to use the designer tools to create formatted web pages
WROX.COM CODE DOWNLOADS FOR THIS CHAPTER
You can find the wrox.com code downloads for this chapter on the Download Code tab at www.wrox.com/go/begaspnet451. The code is in the Chapter 2 folder.
To create good-looking, functional, and successful websites, you have to understand a number of important technologies and languages, including HyperText Markup Language (HTML), ASP.NET, cascading style sheets (CSS), a server-side programming language such as C# or VB, and a client-side language such as JavaScript. This and upcoming chapters provide a solid foundation in these technologies, so you should be comfortable with the most important concepts once you’ve finished this book.
Besides these technologies, you also have to understand the Visual Studio IDE that was introduced in the previous chapter. You need to know how to create sites, add pages, and manage all the toolbars and windows that Visual Studio (VS) offers you. In addition, you need to know how to build and design web pages in VS with HTML and server controls.
This chapter shows you, in detail, how to create and manage your websites. It also shows you how to create your ASP.NET web pages and add markup to them, enabling you to create useful web pages that can present information to users and react to their responses.
Although you already created your first ASP.NET website in the previous chapter, this chapter starts off with another in-depth look at creating a new website. Because you have many choices to make when you start a new site, it’s important to understand all the different options and pick the right one for your scenario.
CREATING WEBSITES WITH VISUAL STUDIO 2013The preceding chapter gave you a quick overview of creating a website in VS. You simply chose New Web Site from the File menu, selected a language, selected the standard ASP.NET Web Forms Site template, and clicked OK. However, there’s more to the New Web Site dialog box than you saw in the previous chapter. You may have noticed that you can choose among a number of different templates that enable you to create different kinds of sites. But before looking at the different templates on which you can base your new website, you need to know a little more about the different project types that are available in VS.
Different Project TypesIn Visual Studio 2013 you can choose between two types of projects for creating ASP.NET Web Forms websites: Web Application Projects and Web Site Projects.
Web Application ProjectsWeb Application Projects make it easier for developers who work in teams or who need more control over the contents of the site and their compilation and deployment processes to build websites with VS. The whole website is managed as a project, with a single project file that keeps track of all the content of the website.
In VS, you create a new Web Application Project through the File ⇒ New Project dialog box. The Web category contains a single template — ASP.NET Web Application— that lets you create a web application that can contain various ASP.NET-related technologies such as Web Forms, ASP.NET MVC, and Web API. This is part of Microsoft’s “One ASP.NET” initiative that aims to bring the various web technologies closer together in Visual Studio. For more information about these technologies, visit www.asp.net and click the Learn menu item.
Web Site Projects
Web Site Projects represent a project in VS for a website. You create a new Web Site Project by choosing File ⇒ New Web Site or File ⇒ New ⇒ Web Site from Visual Studio’s main menu.
A Web Site Project site is simply a Windows folder with a bunch of files and subfolders in it. There is no collective file (known as the project file with a .vbproj or .csproj extension) that keeps track of all the individual files in the website. You just point VS to a folder, and it instantly opens it as a website. This makes it very easy to create copies of the site, move them, and share them with others, because no dependencies exist with files on your local system. Because of the lack of a central project file, Web Site Projects are usually simply referred to as websites, which is the term I use in the remainder of this book.
Choosing between Web Site Projects and Web Application Projects
Because you have two options to choose from, you may be wondering which project type you should pick. In general, the Web Site Project is a bit easier to work with. Because it’s just a folder, it’s easier to copy the files to a different location, such as another development workstation or a production server. Also, changes to the code files are picked up by the web server and applied automatically without a formal deployment process. The Web Application Project, on the other hand, works better if you work with a team of developers on the same site, because it dictates a more formal development and deployment process and has better support for working with Source Control versioning systems, such as Microsoft’s Team Foundation Server. In addition, it supports other technologies such as ASP.NET MVC and Web API.
This book uses the Web Site Project model because it’s easier to work with if you’re new to ASP.NET. However, you’ll find that sites built using the Web Application Project model have a lot in common with Web Site Projects, which means you can use the knowledge you gain from this book to build sites with the Web Application Project model as well. You must use the Web Site Project model if you want to follow along with this book. When not referring to a specific project type, I’ll use the terms website and web application interchangeably throughout this book when referring to websites in general.
Now that you know about the different project models, the next thing to consider is the different website templates and their options.
Choosing the Right Website Template
The New Web Site dialog box in VS contains different website templates, each one serving a distinct purpose.
Figure 2-1 shows the New Web Site dialog box in VS. You can open this dialog box by choosing File ⇒ New Web Site or File ⇒ New ⇒ Web Site, depending on your version of VS. If your dialog box doesn’t look like Figure 2-1, make sure you chose File ⇒ New Web Site and not File ⇒ New Project.
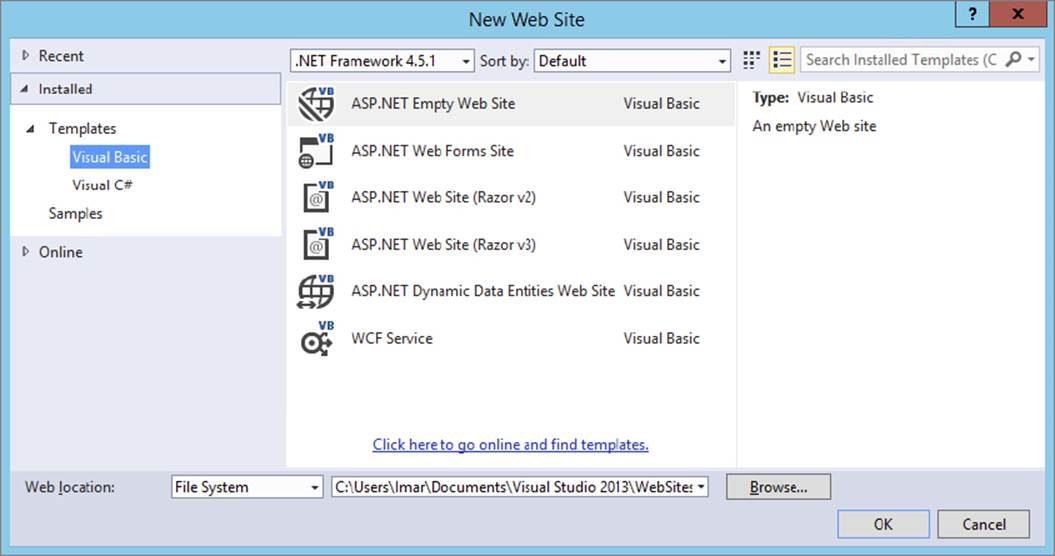
FIGURE 2-1
Above the list of templates, you can select the .NET Framework version you want to use. For all exercises in this book, make sure you always choose .NET Framework 4.5.1. The ASP.NET Empty Web Site template is used throughout this book for the Planet Wrox website. The others are described briefly in the following sections so you know how they can be used. The exact list of installed templates on your system depends on the version of Visual Studio and the installed components. Don’t worry if you have other templates as long as you have the ASP.NET Web Forms Site and the ASP.NET Empty Web Site items.
ASP.NET Web Forms SiteThis template enables you to set up a basic ASP.NET website. It contains a number of files and folders to jump-start the development of your site. The different file types are all discussed later in this chapter. The special App_Data folder and the functionality of the pages in the Account folder are discussed later in this book. This template uses an external framework called Bootstrap, a front-end framework that helps you to build websites that look great on multiple devices such as desktops, tables and phones. Unfortunately, a number of the controls that ship with ASP.NET (such as the Menu control you’ll see in Chapter 7) don’t render properly when using Bootstrap. That’s why I decided not to use this framework in this book, but instead to focus on all the functionality that ships with ASP.NET. For your own projects, you could use this Visual Studio template with Bootstrap, but you’ll need to implement alternatives for controls like the Menu. You can learn more about Bootstrap at http://getbootstrap.com.
ASP.NET Web Site (Razor v2 / Razor v3)
You use these templates to create sites using Microsoft’s Web Pages framework. You can learn more about Web Pages in my book Beginning ASP.NET Web Pages with WebMatrix (Wrox, 2011, ISBN: 978-1-118-05048-4).
ASP.NET Empty Web Site
The ASP.NET Empty Web Site template gives you nothing but two configuration files (Web.config and Web.Debug.config). The ASP.NET Empty Web Site template is useful if you have a bunch of existing files you want to use to create a new website or when you want to create your site from scratch. You use this template as the basis for the sample website you build in the book and add files and folders as you progress through the book.
ASP.NET Dynamic Data Entities Web Site
This template enables you to create a flexible yet powerful website to manage data in a database without a lot of manual code. This template is not discussed in this book, but you learn more about the Microsoft ADO.NET Entity Framework that is used by the template in Chapter 14.
WCF Service
This template enables you to create a website containing one or more Windows Communication Foundation (WCF) Services. A WCF Service is somewhat similar to a web service in that it enables you to create methods that are callable over a network. However, WCF Services go much further than simple web services and offer you a lot more flexibility. You see how to create and consume a web service from a browser in Chapter 10.
Although it seems you have to make a clear choice up front for the right website template, this isn’t really the case. Because an ASP.NET website in VS is essentially just a reference to a folder, it’s easy to add types from one template to another. For example, it’s perfectly acceptable (and very common) to add a WCF service file to a standard ASP.NET Web Forms Site or an ASP.NET Empty Web Site, as you see in Chapter 10.
Creating and Opening a New Website
You have a number of different ways to create new and open existing websites. The choices you have here are largely influenced by the way you access the website (either on your local machine with Visual Studio on it or on a remote machine), and whether you want to use IIS Express (the built-in web server that ships with VS) or the full version of IIS — the web server that comes with Windows.
All the examples in this book assume that you open sites from your local hard drive and that you use IIS Express, a trimmed down version of IIS, because it’s very convenient to develop sites with it. However, Chapter 19 shows you how to use and configure the full version of Internet Information Services, or IIS for short. This advanced web server comes with most editions of Windows and is mostly used for production hosting of your websites on the server editions of Windows, because it’s capable of serving web pages in high-traffic scenarios.
Creating New WebsitesThe next Try It Out section guides you through creating the Planet Wrox website, which is the project you work on in this book. All exercises in the remainder of the book assume you have this website open in VS, except where stated otherwise. The exercise instructs you to store your website in a folder called C:\BegASPNET\Site. Take note of this folder name, because it’s used throughout this book. If you decide to use a different folder, be sure to use your own location whenever you see this folder name in the book. Make sure you don’t use special characters like the hash (#) or insert a space in the folder name because you’ll run into trouble when developing your site. Finally, make sure you don’t create this folder under your Windows Documents folder (typically at C:\Users\UserName\Documents), because you’ll run into problems later when accounts other than your own need access to your site.
1. Start by creating a folder called BegASPNET in the root of your C drive using File Explorer (Windows Explorer on older versions of Windows). Inside the folder, create another folder called Site. You should end up with a folder called C:\BegASPNET\Site. If you followed the instructions from the “Introduction” section of this book and unpacked the source for this book, you already have the BegASPNET folder, which in turn contains the Source and Resources folders. You still need to create the Site folder, though. If you want to follow along with VB.NET and C# at the same time, you can create two folders, BegASPNETVB and BegASPNETCS, and use two instances of Visual Studio.
2. Start Visual Studio and choose File ⇒ New Web Site or File ⇒ New ⇒ Web Site, depending on your version of VS.
In the target framework drop-down list at the top of the screen, select .NET Framework 4.5.1.
4. In the Installed Templates area on the left, choose between Visual Basic and Visual C#. All the examples in this book are shown in both programming languages, so you can choose the one you like best.
5. In the area in the middle select ASP.NET Empty Web Site.
6. In the Web Location drop-down list, make sure that File System is selected. The other two options (HTTP and FTP) enable you to open a site running on IIS (either on your local machine or on a remote server using the so-called Microsoft FrontPage Server Extensions) and open a site from an FTP server, respectively.
7. Click the Browse button next to the location text box, browse to C:\BegASPNET\Site (the folder you created in the first step of this exercise), and click Open.
Your final screen should look like the one in Figure 2-2, except that you may have chosen Visual C# instead of Visual Basic.
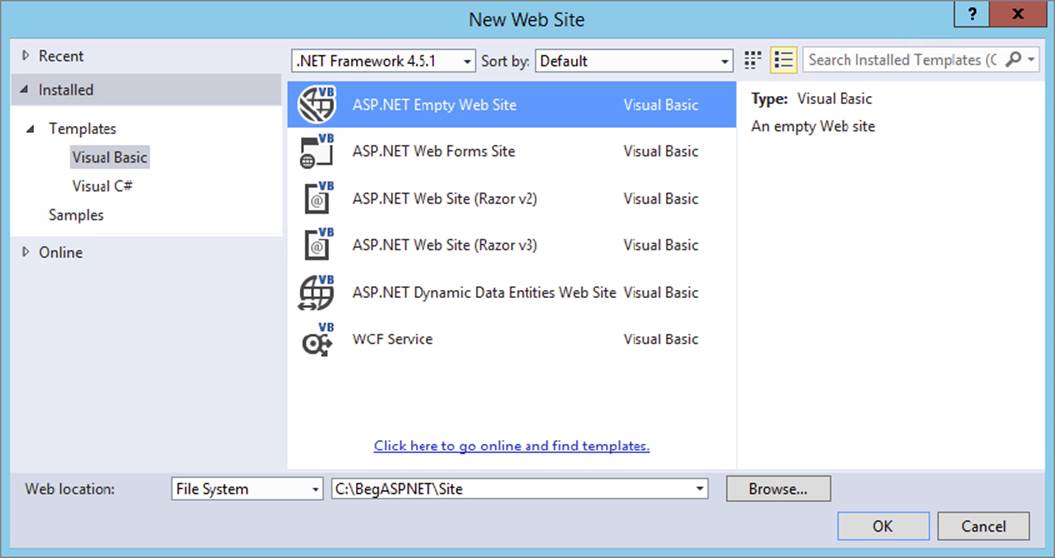
FIGURE 2-2
8.
How It Works
As soon as you click OK, VS creates a new, empty website for you. This new website contains nothing but two configuration files (called Web.config and Web.Debug.config). In the Solution Explorer, your website now looks like Figure 2-3 (note that I expanded the Web.config file). If you don’t see the top-level Solution node, choose Tools ⇒ Options in VS, and in the Projects and Solutions category select Always Show Solution.
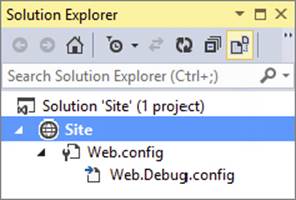
FIGURE 2-3
C:\BegASPNET\Site.
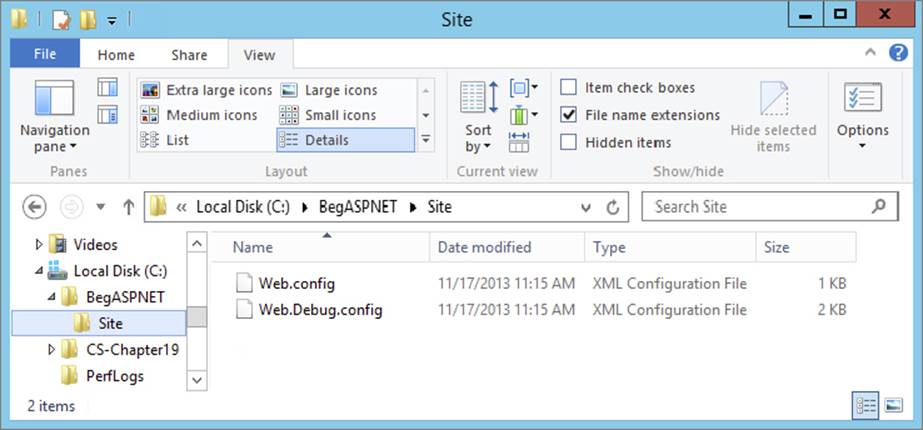
FIGURE 2-4
If you don’t see the .config extension of the web file, don’t worry. You see how to view file extensions in a later exercise.
As you progress through this book, you’ll add new files and folders to the site. These additional files and folders show up in the Solution Explorer and will appear in the Windows folder at C:\BegASPNET\Site as well.
Opening websites based on the Web Site Project template is very similar to creating new ones. In the next section, you get a quick overview of opening existing sites in VS.
Opening Existing WebsitesJust as with creating new sites, opening an existing site in VS gives you a few options with regard to the source location of the website. You can choose to open a site from the local filesystem, from a local IIS web server, from a remote server using FTP, from a remote site using the Microsoft FrontPage Server Extensions, or from a central Source Control system such as Microsoft’s Team Foundation Server. Figure 2-5 shows the Open Web Site dialog box in VS.
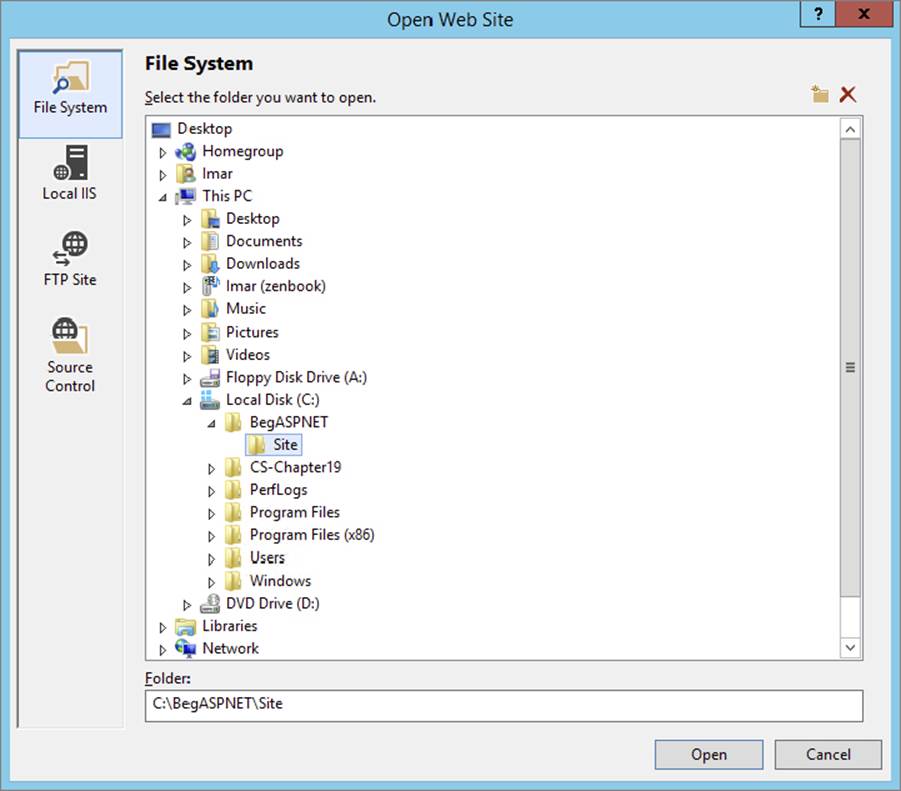
FIGURE 2-5
To get to this dialog box, choose File ⇒ Open Web Site in VS (don’t accidentally choose File ⇒ Open Project because that menu item is used to open Web Application Projects instead). All the examples in the book assume that you always open the Planet Wrox website from the local filesystem, using the File System button, which is the first button in the left column of the window. Then in the right pane, locate your website (C:\BegASPNET\Site in this example) and click the Open button.
The site you created in the previous Try It Out is a very bare-bones site. To make it more useful, you need to add files to it. The many file types you have at your disposal and the way they are added to the site are the next topics of discussion.
WORKING WITH FILES IN YOUR WEBSITEAn ASP.NET Web Forms Site consists of at least a single Web Form (a file with an .aspx extension), but usually it consists of a larger number of files. Many different file types are available in VS, each offering a distinct functionality. In the next section, you see the most important file types that are used in VS. In addition, you learn a few different ways to add these files to your site.
To give you an idea of how many different files you can use in ASP.NET, Figure 2-6 shows the dialog box that enables you to add new files to the site (accessible by right-clicking your website in the Solution Explorer and choosing Add ⇒ Add New Item or by choosing Website ⇒ Add New Item from the main menu).
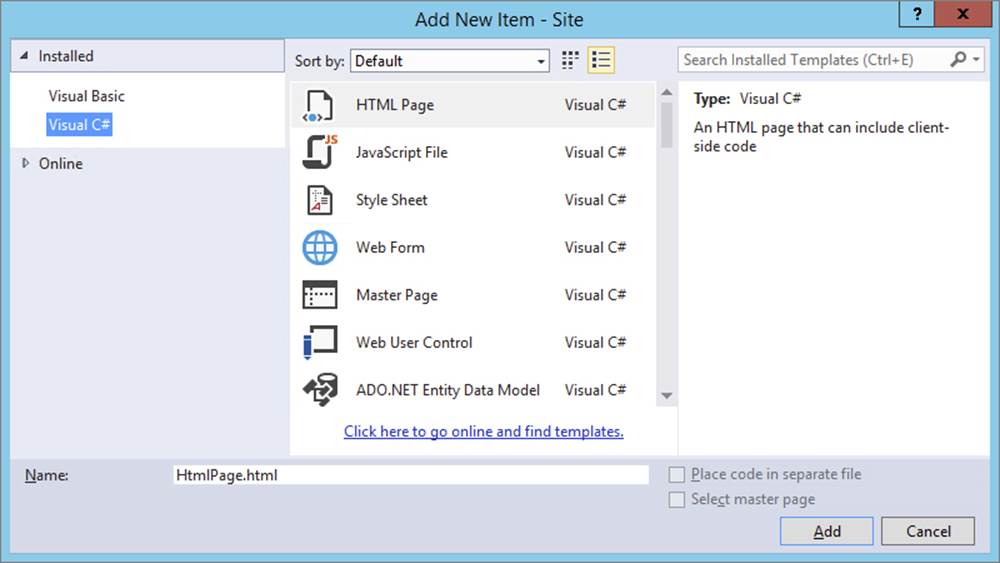
FIGURE 2-6
To make it easier to find the type of file you’re looking for, you can use the search box at the top-right corner of the dialog box. Simply enter a few letters of the type you’re looking for and hit Enter. VS filters the list of files to those matching your search phrase.
The files you can add to a site can be grouped in a few different categories. The most important files — the ones you use throughout the examples in this book — are discussed next.
Web FilesWeb files are specific to web applications and can either be requested by a browser directly, or are used to build up part of the web page that is requested in the browser. The following table lists the various web files you typically use in an ASP.NET Web Forms website and their extensions, and describes how each file is used.
|
FILE TYPE |
EXTENSION |
DESCRIPTION |
|
Web Form |
|
The workhorse of any ASP.NET Web Forms website; represents the pages that your users view in their browsers. |
|
Master Page |
|
Enables you to define the global structure and the look and feel of a website. You see how it can be used in Chapter 6. |
|
Web User Control |
|
Contains page fragments that can be reused in multiple pages in your site. Chapter 8 is entirely devoted to user controls. |
|
HTML Page |
|
Can be used to display static HTML in your website. |
|
Style Sheet |
|
Contains CSS code that enables you to style and format your website. You learn more about CSS in Chapter 3. |
|
Web Configuration File |
|
Contains global configuration information that is used throughout the site. You see how to use the |
|
Site Map |
|
Contains a hierarchical representation of files in your site in an XML format. The site map is used for navigation and is discussed in Chapter 7. |
|
JavaScript File |
|
Contains JavaScript that can be executed in the client’s browser. |
|
Skin File |
|
Contains design information for controls in your website. Skins are discussed in Chapter 6. |
The next Try It Out exercise shows you how to add a new master page to the site, which is used throughout the book.
1. If it is not still open, open the Planet Wrox website you created earlier by choosing File ⇒ Open Web Site. Make sure that you open the site from the filesystem, locate the folder that contains your site (C:\BegASPNET\Site), and click the Open button.
2. In the Solution Explorer, right-click your site and choose Add ⇒ New Folder.
Type MasterPages as the name of the folder and press Enter. Then right-click this new folder and choose Add ⇒ Add New Item. Alternatively, you can choose File ⇒ New File or Website ⇒ Add New Item from Visual Studio’s main menu, or you can click the new folder in the Solution Explorer once to put the focus on it and then press Ctrl+Shift+A.
4. In the dialog box that appears, click Master Page and type Frontend as the name. VS automatically adds the .master extension for you when you add the file. Verify that under Installed Templates you have selected the language you want to use for this site and that Place Code in Separate File in the bottom-right corner is checked. Finally, click the Add button. The master page is added to the site, and is opened automatically for you in the Document Window.
This simple exercise showed you how to add a new item to your website. Although at this stage the site isn’t very exciting yet, the file you added forms the basis for the rest of the book. The next sections briefly look at the remainder of the file types.
Code FilesAdding code files to the site is identical to how you add web files. The following table describes the various types of code files.
|
FILE TYPE |
EXTENSION |
DESCRIPTION |
|
WCF Service |
|
Can be called by other systems, including browsers, and can contain code that can be executed on your server. WCF services are covered in Chapter 10. |
|
Class |
|
Can contain code to program your website. Note that Code Behind files (discussed later) also have this extension because they are essentially class files. C# uses files with the |
|
Global Application Class |
|
Can contain code that is fired in response to interesting things that happen in your site, such as the start of the application or when an error occurs somewhere in the site. You see how to use this file in Chapter 7 and later. |
Besides the Code Files category, there is one more group of files worth looking into: Data Files.
Data FilesData files are used to store data that can be used in your site and in other applications. The group consists of the XML files, database files, and files related to working with data.
|
FILE TYPE |
EXTENSION |
DESCRIPTION |
|
XML File |
|
Used to store data in XML format. In addition to plain XML files, ASP.NET supports a few more XML-based files, two of which you briefly saw before: |
|
SQL Server Database |
|
Files with an |
|
ADO.NET Entity Data Model |
|
Used to access databases declaratively, without the need to write a lot of repetitive code. Technically, this is not a data file, because it does not contain the actual data. However, because it is tied to the database so closely, it makes sense to group it under this header. You learn more about the ADO.NET Entity Framework in Chapter 14. |
As you saw in the previous Try It Out, adding a new file of any of these types is really easy. It’s just as easy to add existing files to the site.
Adding Existing FilesNot every file you create in your website has to be brand new. In some cases it makes sense to reuse files from other projects. For example, you may want to reuse a logo or a CSS file across multiple sites. You can easily add existing files by right-clicking the website in the Solution Explorer and choosing Add ⇒ Add Existing Item. In the dialog box that appears, you can browse for the files, and optionally select multiple files by holding down the Ctrl key. Finally, when you click Add, the files are added to the website. You can also use copy and paste to copy files from a folder on your local disk to a website in VS. Simply highlight the files in File Explorer, press Ctrl+C to copy the files, switch to VS, click the website in the Solution Explorer (or on a subfolder of your site), and press Ctrl+V. The files are then copied into your website’s folder.
However, there is an even easier way to add files to the site, which can be a great time saver when you need to add multiple existing files and folders to your site: drag and drop. The following Try It Out shows you how this works.
1. In Windows, minimize all open applications, right-click your desktop, and choose New ⇒ Text Document. If you don’t see this option, simply create a new text document using Notepad and save it on your desktop.
2. Rename the file Styles.css. Make sure the .txt extension is replaced by .css. If you don’t see the initial .txt extension and the icon of the file doesn’t change from a text file to a CSS file (by default this is the same icon as a text file with a gear symbol on top of it, but you may have software installed that changed the icon for CSS files), Windows is configured to hide extensions for known file types. If that’s the case, open up Windows Explorer in Windows 7, click the Organize button, and then choose Folder and Search Options. Switch to the View tab and deselect the option labeled Hide Extensions for Known File Types. For Windows 8 you find the option called File Name Extensions on the View tab of the Ribbon bar of the File Explorer, shown in Figure 2-4. You now may need to change the name of the file from Styles.css.txt to Styles.css.
When you change the file extension from .txt to .css, Windows may give you a warning that the file becomes unusable if you proceed. You can safely answer Yes to this question to continue.
3. Rearrange VS so you can see part of the desktop with the CSS file as well. You can use the Restore Down button next to the Close button on the Windows title bar of VS to get it out of full screen mode.
4. Click the CSS file on the desktop and, while holding down the mouse button, drag the file into the Solution Explorer. Make sure you drag the file into the Solution Explorer and not into other parts of VS, or the file won’t be added. For example, when you drag it into the Document Window, VS simply opens the file for you, but doesn’t add it to the site.
5. When you release the mouse while over the website node or an existing file in the Solution Explorer, the CSS file is added to your site.
How It WorksAlthough this seems to be a simple exercise that uses basic Windows skills, it serves to show that VS creates a copy of the file when it adds it to the site. So, the original Styles.css file on the desktop is not affected when you make changes to the copy in VS. This way, it’s easy to drag and drop files from existing websites into your new one without affecting the originals. The same applies to files you add using the Add Existing Item dialog box in VS.
If you have added files to your website’s folder outside of VS, they may not show up right away. You can get a fresh copy of the file list by clicking the Refresh button on the Solution Explorer’s toolbar.
Organizing Your Site
Because of the many files that make up your site, it’s often a good idea to group them by function in separate folders. For example, all style sheet files could go in a folder called Styles, .js files containing JavaScript could go in Scripts, user controls could go in aControls folder, and master pages could be stored in a folder called MasterPages. This is a matter of personal preference, but structured and well-organized sites are easier to manage and understand. The next Try It Out explains how you can move files around into new folders to organize your site.
1. Right-click the Planet Wrox site in the Solution Explorer and choose Add ⇒ New Folder.
2. Type Styles as the new folder name and press Enter.
3. Create another folder, called Controls. These two folders are used in the remainder of this book.
4. Drag the Styles.css file that you added earlier and drop it into the Styles folder.
If everything went well, your Solution Explorer should look like Figure 2-7.
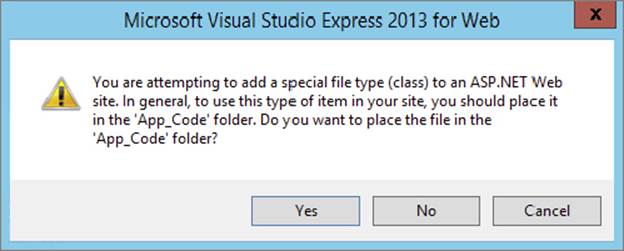
FIGURE 2-7
If your Solution Explorer looks different from the one shown in Figure 2-7, follow this Try It Out again until your site looks exactly the same, with the same folder structure and files in it. Future Try It Out exercises in this book assume you have the correct folders and files in your website.
How It Works
Structure and organization are important to keep your sites manageable. Although you may be tempted to add all of your files to the root of your project, it’s better not to do this. With a very small site, you may not notice any difference, but as soon as your site begins to grow, you’ll find it becomes a lot harder to manage when it lacks structure. Placing related files in separate folders is the first step to an organized site. Storing files of the same type in a single folder is only one way to optimize your site. In later chapters, you see that separate folders are also used to group files with similar functionality. For example, all files that are accessible only by an administrator of the site are grouped in a folder called Management.
The drag-and-drop features of VS make it easy to reorganize your site. Simply pick up one file or multiple files and drop them in their new location. If you continue to apply these kinds of organization practices while expanding your site, you’ll find that tomorrow or six months from now, you won’t have any problems locating the right file when you need it.
Special File TypesSome of the files listed in the previous section require that you put them in a special folder instead of the proposed optional organizational folder structure. The IDE warns you when you try to add a file outside of its special folder, and offers to create the folder and put the file there. For example, when you try to add a class file (with a .vb or .cs extension), you get the warning shown in Figure 2-8.
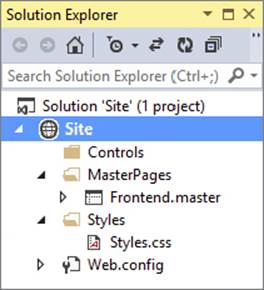
FIGURE 2-8
When you get this dialog box, always click Yes. Otherwise, your file won’t function correctly. You get similar dialog boxes for other file types, including skin and database files.
Now that you have a good understanding of the different types of files that make up your website, it’s time to look at one of them in much more detail: .aspx files, also known as Web Forms.
Web Forms, represented by .aspx files, are the core of any ASP.NET Web Forms website. They are the actual pages that users see in their browsers when they visit your site.
As you learned in the previous chapter, Web Forms can contain a mix of HTML, ASP.NET Server Controls, client-side JavaScript, CSS, and programming logic. To make it easier to see how all this code ends up in the browser, VS offers a number of different views on your pages.
The Different Views on Web FormsVS enables you to look at your Web Form from a few different angles. When you have a file with markup — like a Web Form or master page — open in the Document Window, you see three buttons at the bottom-left corner of the window. With these buttons, visible in Figure 2-9, you can switch between the different views. This figure shows a master page, which you’ll learn more about in Chapter 6.
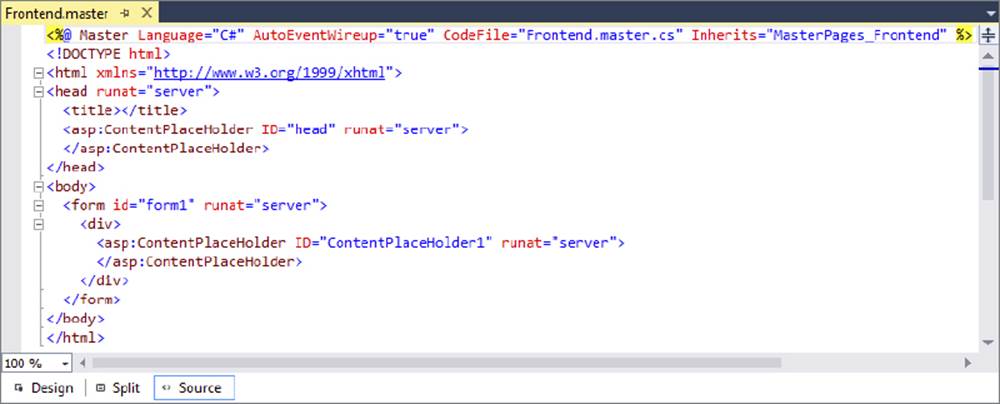
FIGURE 2-9
Source View is the default view when you open a page. It shows you the raw HTML and other markup for the page, and is very useful if you want to tweak the contents of a page and you have a good idea of what you want to change and where. As I explained in the previous chapter, I use the term Markup View rather than Source View to refer to the markup of ASPX and HTML pages.
The Design button enables you to switch the Document Window into Design View, which gives you an idea of how the page will end up. When in Design View, you can use the Visual Aids and Formatting Marks submenus from the main View menu to control visual markers like line breaks, borders, and spaces. Both submenus offer a menu item called Show that enables you to turn all the visual aids on or off at once. Turning both off is useful if you want to have an idea of how the page ends up in the browser. You should, however, use Design View only to get an idea of how the page will end up. Although VS has a great rendering engine that renders the page in Design View pretty well, you should always check your pages in different browsers as well, because what you see in VS is the markup for the page before it gets processed. Server controls on the page may emit HTML that changes the look of the page in the browser. Therefore, it’s recommended to view the page in the browser as often as possible so you can check if it’s going to look the way you want it. It’s also recommended to test your site in as many different browsers as you can get your hands on, because there may be small differences between them in the way they render a web page. The Planet Wrox website has been developed and tested against recent versions of Microsoft Internet Explorer, Firefox, Google Chrome, Safari, and Opera. You’ll see screenshots of these browsers at various places in the book. In Chapter 18 you’ll be introduced to Browser Link, which makes cross-browser testing a lot easier.
The Split button enables you to look at Design View and Markup View at the same time, as you can see in Figure 2-10.
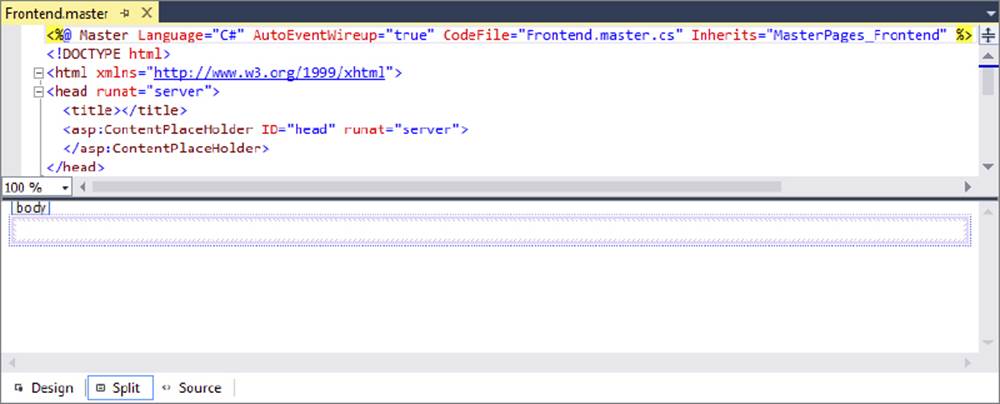
FIGURE 2-10
Split View is great if you want to see the code that VS generates when you add controls to the Design View of your page. The other way around is very useful too: When you make changes to the markup of the page in Markup View, you can see how it ends up in Design View. Sometimes Design View becomes out of sync with Markup View. If that’s the case, a message appears at the top of Design View. Simply clicking the message or saving the entire page is enough to update the Design window.
You can cycle through the three different modes using the Ctrl+Page Up and Ctrl+Page Down keys.
If you want your pages to open in a different view than Markup View, choose Tools ⇒ Options. Then expand HTML Designer, and in the General category, set your preferred view. Alternatively, enter HTML Designer General in the Quick Launch text box (which you can access by pressing Ctrl+Q) at the top-right of VS and then click the item in the list that appears.
In addition to the HTML and other markup you see in the Markup View window, a Web Form can also contain code in either C# or Visual Basic .NET. Where this code is placed depends on the type of Web Form you create. The next section explains the two options you have in more detail.
Choosing between Code Behind and Pages with Inline Code
Web Forms come in two flavors: either as an .aspx file with a Code Behind file (a file named after the Web Form with an additional .vb or .cs extension) or as .aspx files that have their code embedded, often referred to as Web Forms with inline code. Although you won’t see much code until Chapter 5, it’s important to understand the difference between these types of Web Forms. At first, Web Forms with inline code seem a little easier to understand. Because the code needed to program your website is part of the very same Web Form, you can clearly see how the code relates to the file. However, as your page gets larger and you add more functionality to it, it’s often easier if you have the code in a separate file. That way, it’s completely separate from the markup, enabling you to focus on the task at hand.
In the next exercise, you add two files that demonstrate the difference between Code Behind and inline code.
The files you add in this exercise aren’t needed for the final application. To avoid cluttering up the project, you should put them in a separate Demos folder.
1. In the Solution Explorer, right-click your website and choose Add ⇒ New Folder. Name the folder Demos and press Enter.
2. Right-click the Demos folder and choose Add ⇒ Add New Item. In the dialog box that appears, choose your programming language on the left, click the Web Form template, and name the file CodeBehind.aspx. Make sure that the check box for Place Code in Separate File is selected. Finally, click the Add button. The page should open in Markup View so you can see the HTML for the page.
3. At the bottom of the Document Window, click the Design button to switch the page from Markup View into Design View. The page you see has a white background with a small, dashed rectangle at the top of it. The dashed rectangle represents the<div> element you saw in Markup View.
4. From the Toolbox, drag a Label control from the Standard category and drop it in the dashed area of the page. Remember, you can open the Toolbox with the shortcut Ctrl+Alt+X if it isn’t open yet. In Design View, your screen should now look likeFigure 2-11.
FIGURE 2-11
5.
Double-click somewhere in the white area below the dashed line of the <div> element. VS switches from Design View into the Code Behind of the file and adds code that fires when the page loads in the browser:
VB.NET
Protected Sub Page_Load(sender As Object, e As EventArgs) Handles Me.LoadEnd SubC#
protected void Page_Load(object sender, EventArgs e){}Although this odd syntax may look a little scary at this point, don’t worry about it too much now. In most cases, VS adds it for you automatically, as you just saw. In later chapters, you see exactly how this code works, but for now it’s important to realize that the code you’re going to place between the lines that start with Protected Sub and End Sub in Visual Basic and between the curly braces in C# will be run when the page is requested in the browser.
All code examples you see from now on include a Visual Basic (VB.NET) and a C# version, so always pick the one that matches your programming language.
6. Place your cursor in the open line in the code that VS created and add the bolded line of code that assigns today’s date and time to the label, which will eventually show up in the browser:
VB.NET
Protected Sub Page_Load(sender As Object, e As EventArgs) Handles Me.LoadLabel1.Text = "Hello World; the time is now " & DateTime.Now.ToString()
End SubC#
protected void Page_Load(object sender, EventArgs e){Label1.Text = "Hello World; the time is now " + DateTime.Now.ToString();
}Note that as soon as you type the L for Label1, you get a list with options to choose from. This is part of Visual Studio’s IntelliSense, a great tool that helps you rapidly write code. Instead of typing the whole word Label1, you simply type the letter L or the letters La and then you pick the appropriate item from the list, visible in Figure 2-12.
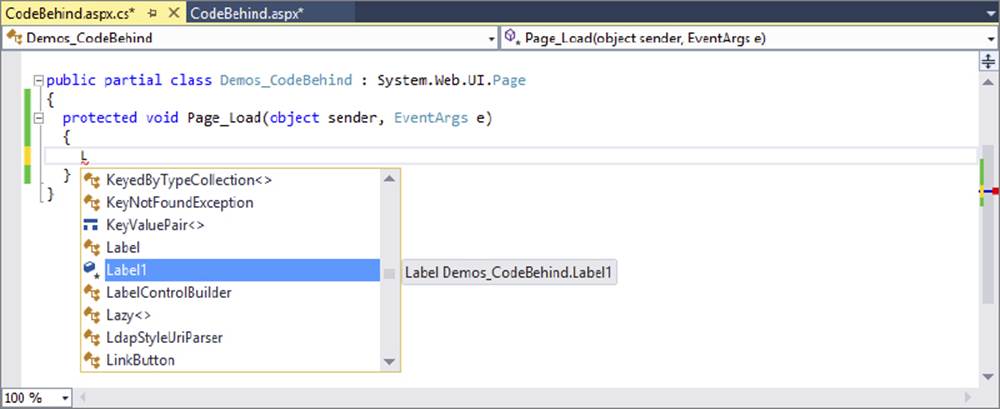
FIGURE 2-12
To complete the selected word, you can press Enter or Tab or even the period. In the latter case, you immediately get another list that enables you to pick the word Text simply by typing the first few letters, completing the word by pressing the Tab or Enter key. This feature is a real productivity tool because you can write code with a minimum of keystrokes. IntelliSense is available in many other file types as well, including ASPX, HTML, CSS, JavaScript, and XML. In many cases, the list with options pops up automatically if you begin typing. If it doesn’t, press Ctrl+Spacebar to invoke it. If the list covers some of your code in the code window, press and hold the Ctrl key to make the window transparent.
7. Right-click the CodeBehind.aspx page in the Solution Explorer and choose View in Browser (Internet Explorer). Depending on the default browser you’ve configured for your computer, the browser name in the parentheses may be different. I’ll simply refer to this menu item as View in Browser from now on.
8. Click Yes if you get a dialog box that asks if you want to save the changes, and then the page will appear in the browser, similar to the browser window you see in Figure 2-13.
FIGURE 2-13
If you don’t see the message with the date and time appear or you get an error on the page in the browser, make sure you saved the changes to all open pages. To save all pages at once, press Ctrl+Shift+S or click the Save All button on the toolbar (the one with the multiple floppy disk symbols). Additionally, make sure you typed the code for the right language. When you created this new page, you chose a programming language that applies to the entire page. You can’t mix languages on a single page, so if you started with a Visual C# page, make sure you entered the C# code snippet in step 6.
9. Setting up a page with inline code is very similar. Start by adding a new Web Form to the Demos folder. Call it CodeInline.aspx and make sure you uncheck the Place Code in Separate File option.
10.Just as you did in steps 3, 4, and 5, switch the page into Design View, drag a label inside the <div> element, and double-click the page somewhere outside the <div> that now contains the label. Instead of opening a Code Behind file, VS now switches your page into Markup View and adds the Page_Load code directly in the page.
11.On the empty line in the code block that VS inserted, type the bolded line you see in step 6 of this exercise. Make sure you use the correct programming language. You should end up with the following code at the top of your .aspx file:
VB.NET
<script runat="server"> Protected Sub Page_Load(sender As Object, e As EventArgs)Label1.Text = "Hello World; the time is now " & DateTime.Now.ToString()
End Sub</script>C#
<script runat="server"> protected void Page_Load(object sender, EventArgs e) {Label1.Text = "Hello World; the time is now " + DateTime.Now.ToString();
}</script>12.Right-click the page in the Solution Explorer and choose View in Browser. Alternatively, press Ctrl+F5 to open the page in your browser. You should see a page similar to the one you got in step 8.
How It WorksAt run time, pages with inline code behave the same as pages that use Code Behind. In both cases, the ASP.NET run time sees the Page_Load code and executes any code it finds in it. In the Try It Out, this meant setting the Text of Label1 to a welcome message and today’s date and time. The biggest difference between the two options is where the code is stored. With pages with inline code, all code and markup is stored in the same file on disk. When using Code Behind, the VB or C# code you write is stored in a separate file named after the Web Form.
Because pages with Code Behind are easier to manage, I’ll use them exclusively for the Planet Wrox website.
In this example, the C# code looks very similar to the VB.NET code. The code that sets the Label’s text is almost identical in the two languages. One difference is that VB.NET uses an ampersand (&) to glue two pieces of text together, but C# uses the plus (+) character. You can also use the plus character in VB.NET to concatenate strings together, but with a few caveats, as you’ll learn in Chapter 5. The other difference is that in C# code lines must be terminated with a semicolon (;) to indicate the end of a unit of code, but Visual Basic uses the line break. If you want to split a long line of code over multiple lines in Visual Basic, you can use the underscore (_) character. In earlier versions, VB.NET required the underscore in a lot of different places. However, in recent versions of Visual Basic, the designers of the language have greatly reduced the number of places where you must use an underscore.
One place where you do need the underscore if you want to split code over multiple lines is right before the Handles keyword that you saw earlier:
Protected Sub Page_Load(sender As Object, e As EventArgs) _ Handles Me.Load Label1.Text = "Hello World; the time is now " & DateTime.Now.ToString()End SubNote that in your pages you don’t have to use the underscore to break a long line. However, I’ll add it to some of the examples in this book because the book’s pages are not wide enough to show the entire code statement on a single line. You’ll see more of these underscores in other Visual Basic examples in the remainder of this book. If you decide to manually type the underscore to make your own code more readable, don’t forget to type a space before the underscore or your code won’t work.
In C#, you don’t need this character because the language itself allows you to break long lines simply by pressing Enter. This is because C# uses a semicolon to denote the end of a line instead of a line break in the source.
You opened the page in your browser using the right-click View in Browser option or by pressing Ctrl+F5. With the View in Browser option, you always open the page you right-click. With the Ctrl+F5 shortcut, you open the page that is currently the active document in the Document Window, the page that is currently selected in the Solution Explorer, or the file that has been set as the Start Page for the website. Additionally, all open files are saved automatically, and the site is checked for errors before the requested page is opened in the browser.
You can assign a page as the Start Page by right-clicking it in the Solution Explorer and choosing Set As Start Page. If you want to control this behavior at a later stage, right-click the website in the Solution Explorer and choose Property Pages. In the Start Options category, you can indicate that you want the currently active page to open, or you can assign a specific page, as shown in Figure 2-14.
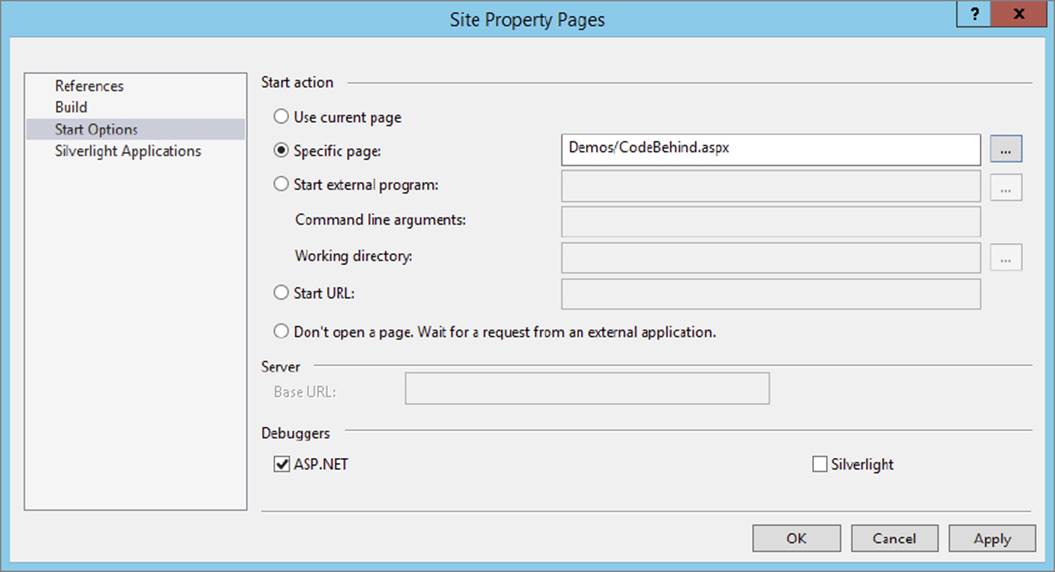
FIGURE 2-14
In the previous exercise, you learned how to add a page that contains a simple Label control. Additionally, you saw how to write some code that updates the label with today’s date and time. You can ignore this code for now; it only served to demonstrate the differences between Code Behind and inline code. In Chapter 5, you learn more about programming in Visual Basic and C#.
To make compelling pages, you obviously need a lot more content than just a simple Label control that shows today’s date and time. The next section shows you how to add content and HTML to your pages and how to style and format it.
You have a number of ways to add HTML and other markup to your pages. First of all, you can simply type it in the Markup View window. However, this isn’t always the best option, because it forces you to type a lot of code by hand. To make it easier to insert new HTML in the page and to apply formatting to it, the Design View window offers a number of helpful tools. These tools include the Formatting toolbar and the menu items Format and Table. For these tools to be active, you need to have the document in Design View. If you’re working in Split View mode, you have to make sure that the Design View part has the focus, or you’ll find that most of the tools are not available.
Inserting and Formatting TextYou can type text in both Design View and in Markup View. Simply place the cursor at the desired location and start typing. When you switch to Design View, the Formatting toolbar becomes available, with the options shown in Figure 2-15.
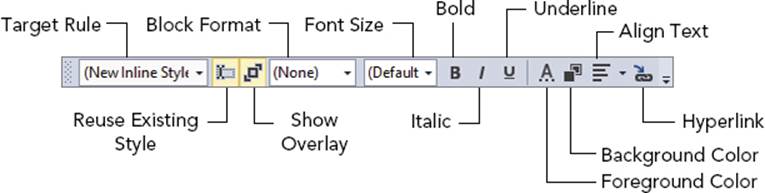
FIGURE 2-15
Many of the buttons on the toolbar function exactly the same as in other editing environments. For example, the B button formats your text with a bold font. Similarly, the I and the U buttons italicize and underline your text, respectively. The drop-down list labeled Block Format enables you to insert HTML elements like <p> for paragraphs, <h1> through <h6> for headings, and <ul>, <ol>, and <li> for lists. You can choose an item from the drop-down list directly to have it inserted in your page, or you can select some text first and choose the appropriate block element from the list to wrap the selected text inside the tags.
In the next Try It Out, you see how to work with these tools to create the homepage of the Planet Wrox website.
In this Try It Out, you create a Web Form called Default.aspx and add some basic content to it.
1. Add a new Web Form with the Add New Item dialog box to the root of the site and call it Default.aspx. Make sure you check off the Place Code in Separate File option and click Add. Switch to Design View using the Design button at the bottom of the Document Window.
2. Click inside the dashed rectangle until you see the glyph showing that the <div> element is currently active. At the same time, the tag navigator at the bottom of the code window should highlight the last block with the text <div> on it, as shown inFigure 2-16.
FIGURE 2-16
3.
Type Hi there visitor and welcome to Planet Wrox and highlight the text using the mouse. From the Block Format drop-down list (visible in Figure 2-15) choose Heading 1 <h1>. Note that a small glyph with the text h1 appears right above the text, to indicate that VS created a heading for you automatically. Figure 2-17 shows the Design View with the <h1> element.
FIGURE 2-17
4.
Position your cursor at the end of the heading after the word Wrox and press Enter. A new paragraph (indicated by a small glyph with the letter p on it) is inserted for you so you can directly start typing.
5. Type the text shown in Figure 2-18 (or make up your own) to welcome the visitor to Planet Wrox. Notice how the text www.PlanetWrox.com turns blue as soon as you type the comma to indicate VS has recognized it as a web address and has turned it into a link. You can press Enter to start a new paragraph. Select the text “paying a visit,” click the Foreground Color button on the Formatting toolbar, and select a different color in the dialog box that appears. Then select some other text, such as “reviews and concert pictures,” and click the Bold button. When you’re done, your Design View should show something similar to Figure 2-18.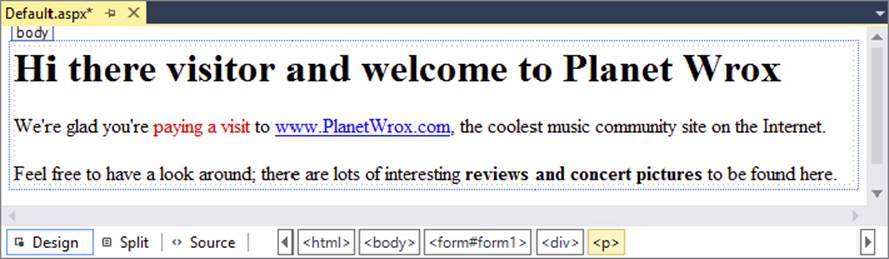
FIGURE 2-18
The code for the homepage should now look more or less similar to the following (the code has been reformatted a bit to fit the space in the book):
<div> <h1>Hi there visitor and welcome to Planet Wrox</h1> <p> We're glad you're <span class="auto-style1">paying a visit</span> to <a href="http://www.PlanetWrox.com">www.PlanetWrox.com</a>, the coolest music community site on the Internet. </p> <p> Feel free to have a look around; there are lots of interesting <strong>reviews and concert pictures</strong> to be found here. </p></div>At the top of the file you should also see a <style> element, which is discussed next.
6. Open the page in your browser by pressing Ctrl+F5, or by right-clicking the page in the Solution Explorer and choosing View in Browser.
How It WorksWhen you use the various Formatting toolbar buttons, like Foreground Color, VS inserts the appropriate HTML and CSS code for you. For example, when you click the B button, VS inserts a pair of <strong> tags around the selected text. When you click the I button, VS adds a pair of <em> tags to italicize the text. In this exercise, VS also inserted a class attribute (shown in the previous code example) that points to a class called auto-style1 when you changed the text color. The code for this style has been added to the top of your file and looks similar to this:
<style type="text/css"> .auto-style1 { color: #FF0000; }</style>Your code may look slightly different if you chose a different color. The code you see here is explained in the next chapter. For now, just remember that this code sets the color of the text it is applied to as red. If the opening curly bracket is on the same line as the class, choose Tools ⇒ Options ⇒ Text Editor ⇒ CSS ⇒ Advanced and set Brace Positions to Expanded. This is just a matter of preference and doesn’t change the effect of the code.
Note that VS replaced the apostrophe character (’) in “we’re” in the welcome message with its HTML-compatible variant: '. Using this kind of code enables you to insert characters in your page that a browser may have trouble displaying, or that have special meaning within HTML itself, like the ampersand character (&), which is written as &. When you type text in Design View, VS automatically inserts the coded equivalents of relevant characters for you; however, if you type in Markup View directly, you’ll have to do this yourself.
Don’t worry if your code looks different from what is shown here. Many settings in VS influence the code that is generated for you.
So far, the exercises have been concerned with adding and styling text in your page. However, VS enables you to insert other HTML elements as well, like tables and bullets. The next section shows you how this works.
Adding Tables and Other MarkupHTML tables are great if you need to present structured or repeating data, like a list of products in a shopping cart, photos in a photo album, or input controls in a form. There is a lot of debate on the Internet about whether you should use tables to lay out your page as well. For example, if your page contains a header with a logo, a main content area, and a footer at the bottom, you could use a table with three rows to accomplish this. In general, it’s considered bad practice to use tables for this purpose because they add a lot of extraneous markup to the page and are often difficult to maintain. Besides, quite often the same result can be accomplished using CSS, which you learn about in the next chapter. Despite the disadvantages that tables may bring, they are still an invaluable asset in your HTML toolbox when it comes to displaying tabular or otherwise structured information.
In this exercise, you learn how to add tables to your page using the Table menu and how to add rows and columns. Additionally, you learn how to add other structured elements, such as bulleted lists.
1. In the Demos folder, create a new Web Form called TableDemo.aspx. Make sure it uses Code Behind by checking the Place Code in Separate File option.
2. Switch the page to Design View, click inside the dashed rectangle that represents the standard <div> tag in the page, and choose Table ⇒ Insert Table. The Insert Table dialog box appears, as shown in Figure 2-19.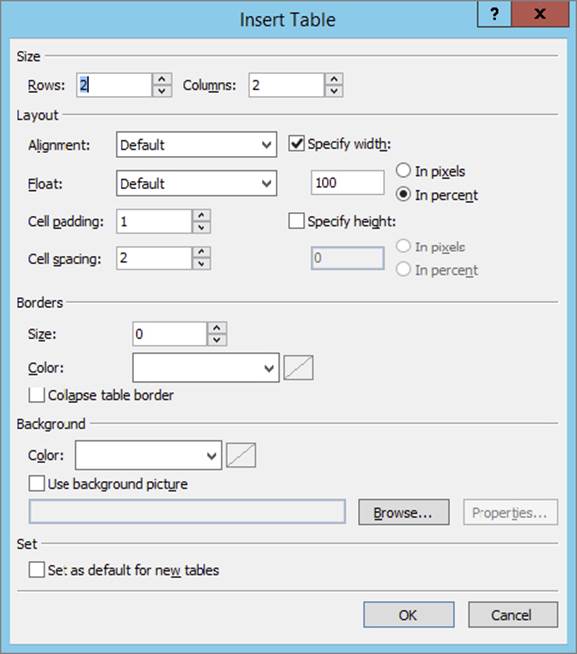
FIGURE 2-19
3.
Set Rows to 3 and leave Columns set to 2. Leave all other settings at their defaults and click OK. The table gets inserted in the page.
4. If you see only a single table cell, and not the entire table with three rows and two columns, you need to enable Visual Aid for tables. To do this, choose View ⇒ Visual Aids ⇒ Visible Borders from the main menu to turn the borders on. Your Design View should now look like Figure 2-20.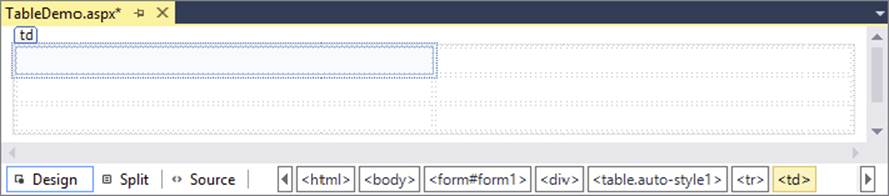
FIGURE 2-20
5.
Drag the right border of the very first cell in the table to the left. You’ll see a visual indicator showing the width of the cell. Keep dragging it to the left until it has a width of 200 pixels, as in Figure 2-21.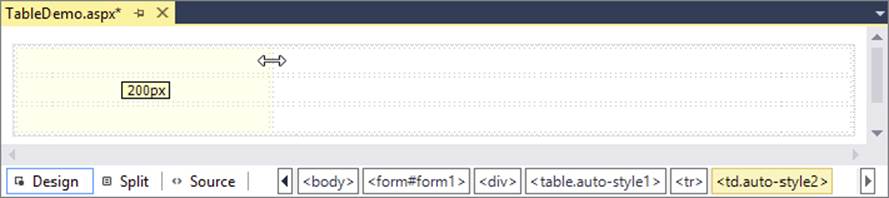
FIGURE 2-21
6.
To add more rows or columns to the table, you can right-click an existing cell. From the pop-up menu that appears, choose Insert to add additional rows or columns at different locations. Similarly, you can use the Delete, Modify, and Select options to delete rows or columns, merge cells, and make selections. For this exercise, you don’t need to add additional rows or columns, although it’s okay if you have already done so.
7. Place your cursor in the first cell of the first row and type the words Bulleted List.
8. Place your cursor in the second cell using the mouse. Alternatively, you can press Tab to move the cursor to the next cell. From the Format menu, choose Bullets and Numbering.
9. Switch to the Plain Bullets tab, click the picture with the round, solid bullets (see Figure 2-22), and click OK.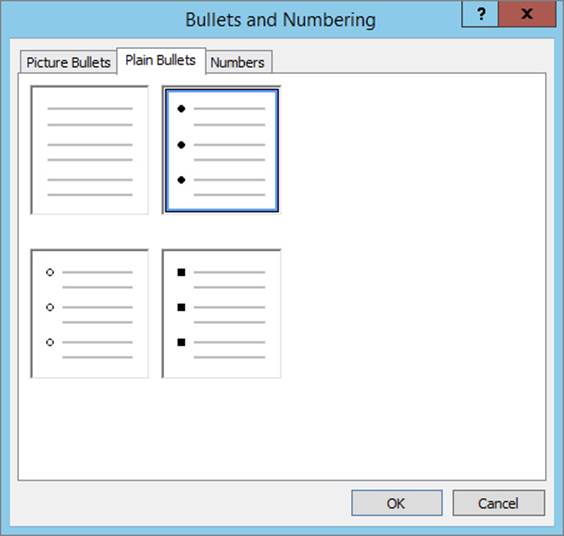
FIGURE 2-22
10.
Type some text, like your favorite musical genre (Punk, Rock, Techno, and so on), and press Enter. VS inserts a new bullet for you automatically, so you can continue to add new items to the list. Add two more genres, so you end up with three bullets.
11.Repeat steps 7 through 10, but now create a numbered list. First, type Numbered List in the first cell of the second row, then position your cursor in the second cell of the same row, and choose Format ⇒ Bullets and Numbering. Switch to the Numbers tab (visible in Figure 2-22 behind the Plain Bullets tab) and click the second picture in the first row, which shows a standard numbered list, and click OK. Type a few items for the list, pressing Enter after each item.
12.Open the page in the browser by pressing Ctrl+F5. You should see a screen similar to Figure 2-23.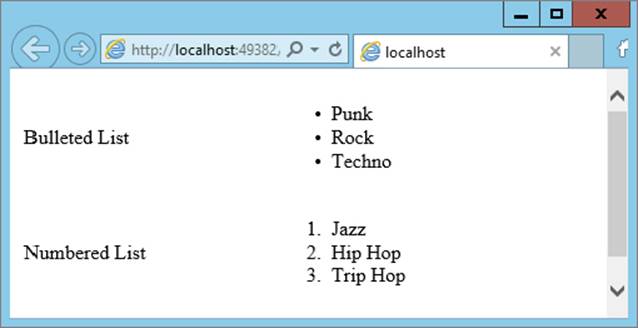
FIGURE 2-23
When you visually insert page elements like tables or lists through the available menus, VS inserts the required markup for you in Markup View. When you insert a table, VS adds a <table> element and a number of <tr> and <td> elements to define rows and cells, respectively. It also applies a class attribute pointing to a CSS style that defines the table’s width. It created another style for the <td> elements when you dragged the column width to be 200 pixels. Similarly, when you insert a list, VS inserts an<ol> element for numbered or ordered lists and a <ul> element for bulleted or unordered lists. Within these elements, <li> elements are used to define each item in the list.
Besides the HTML tags you have seen thus far, there is another important tag you need to look at: the <a> tag, which is used to create links between pages.
Connecting Pages
An important part of any website is the links that connect the pages in your site. Links enable your visitors to go from one page to another, in the same site or to a completely different site on the Internet. You have a few ways to create links between pages, including:
- The HTML
<a>element, explained in this chapter. - Using the
<asp:HyperLink>control, discussed in Chapter 7. - Programmatically through code. This is discussed later in the book.
The following exercise shows you how easy it is to link from one page to another.
In this Try It Out, you modify the TableDemo.aspx page you created earlier by adding text that links to another page. Once you run the page in the browser and click that link, the new page replaces the old one.
1. Open the TableDemo.aspx page from the Demos folder.
2. If necessary, switch to Design View.
3. In the first cell of the third row, type the text Link.
4. In the second cell of the same row, type the text Go to the homepage of Planet Wrox and highlight it with your mouse.
5. On the Formatting toolbar, click the Convert to HyperLink button. It’s located near the end of the toolbar and has a link icon and a small arrow on it.
6. In the dialog box that appears, click the Browse button, select Default.aspx page in the root of your site, and click OK. Next, click OK again to close the Hyperlink dialog box. The Design View of your page should look similar to the one displayed inFigure 2-24.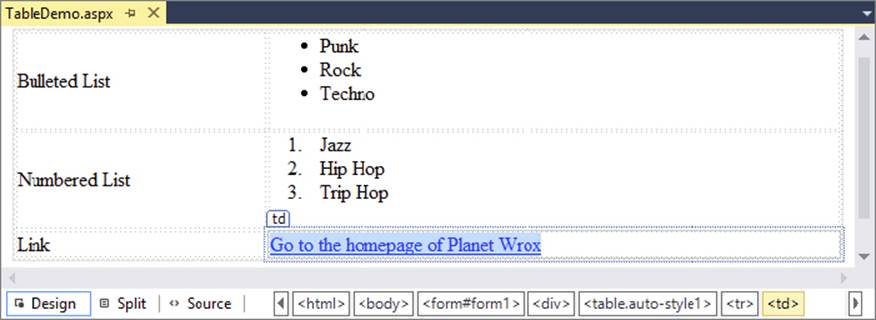
FIGURE 2-24
7.
Switch to Markup View and notice how the HTML for the link has been inserted:
<a href="../Default.aspx">Go to the homepage of Planet Wrox</a>Note that the href attribute points to the page you want to link to.
8. If you want to change the page being linked to from Markup View, click somewhere between the opening and closing quotes of the href attribute and press Ctrl+Spacebar. A dialog box pops up that enables you to select another page within your site. Alternatively, you can click the Pick URL option and browse for the new page somewhere in your site.
9. Right-click the TableDemo.aspx page in the Solution Explorer and choose View in Browser. When the page has finished loading, click the Go to the homepage of Planet Wrox link. The request is sent to the web server and, as a response, you now get the homepage of the website.
Links between pages are likely one of the most important elements in a web page, because they enable you to create a connection between a page in your site and another page, whether that page lives in your own site or on a completely different server somewhere on the Internet. For simple links that should appear somewhere in your page, the HTML <a> tag with an href attribute set is the easiest to set up. When the user clicks such a link, the browser requests the new page from the server and displays it. The double dots (..) in the href’s value are a way to refer to the parent directory. The full href attribute means “go up one level in the folder hierarchy and then select the file Default.aspx.” You see a lot more about links and how they work in Chapter 7.
You’re not limited to linking to pages in your own site. If you want to link to external pages instead, simply replace the href attribute value with the full address of the page, as shown in the following example:
<a href="http://www.wrox.com">Go to the Wrox homepage</a>For external links, it’s important to include the http:// prefix; otherwise, the browser goes out looking for a file or folder called www.wrox.com on your own website.
You’ll use the things you learned in this chapter about page creation and formatting in the next chapter, which deals with designing your web pages using CSS.
Besides the visual tools, like the Formatting toolbar and the Table menu, Visual Studio has another great way to quickly insert code in your pages: code snippets. Code snippets enable you to insert large chunks of code with just a few keystrokes. You see code snippets at work in the next chapter.
PRACTICAL TIPS ON WORKING WITH WEB FORMSHere are some tips for working with Web Forms:
- Favor Web Forms with Code Behind over those with inline code. Although at first you may not notice a big difference in working with them, as your site and pages start to grow, you’ll find that it’s easier to work with a page where the code is separated from the markup.
- Spend some time familiarizing yourself with the different menu items of the Format and Table menus. Most of them generate HTML elements that are inserted into your page. Take a look at the HTML elements and attributes that have been generated for you, and try to change them directly in the code, and through the menus and toolbars. This way, you get a good feel for the various tags available and how they behave.
- Experiment with links to connect pages in your site. Notice how VS creates different links depending on the location of the page you are linking to. Chapter 7 deals with linking and the various ways to address pages in your site in much more detail.
This chapter introduced you to some important topics that help you build maintainable and structured ASP.NET websites. Understanding the differences between the various project types and templates enables you to kick-start a web project with just the files you need.
The same applies to the different file types you can add to your site. Because each file type serves a specific purpose, it’s important to realize what that purpose is and how you can use the file.
One common activity that you’ll perform when building ASP.NET web pages is adding markup to the page. As you saw in this and the previous chapter, markup comes in a few flavors, including plain HTML and ASP.NET Server Controls. Knowing how to add this markup to your page using the numerous menu options and toolbars that VS offers is critical in building good-looking web pages.
Now that you have a solid understanding of creating and modifying Web Forms, it’s time to look at how you can turn those dull black-and-white pages with a few controls into attractive web pages. The next chapter shows you how to work with the many CSS tools found in VS to create the desired effect.
1. Name three important files in the Web Files category that you can add to your site. Describe the purpose of each file.
2. What do you need to do to make a piece of text both bold and italicized in your web page? What will the resulting HTML look like?
3. Name three different ways to add existing files to an ASP.NET website in VS.
4. What are the different views that VS offers you for your ASPX pages? Does VS offer other views as well?
You can find answers to these exercises in Appendix A.
WHAT YOU LEARNED IN THIS CHAPTER
|
Code Behind |
A page model where server-side code is stored in a separate code file |
|
Design View |
Gives you a graphical representation of your page |
|
File Types |
ASP.NET supports many different file types, including Web Forms ( |
|
Inline Code |
A page model where server-side code is stored in the same file as the markup |
|
Markup View |
Enables you to look at the markup of your page |
|
Project Templates |
Jump-start your web development by setting up a site targeting a specific scenario |
|
Project Types |
Visual Studio offers two project types: Web Application Projects and Web Site Projects |
|
Split View |
Enables you to look at Markup View and Design View at the same time |
|
Web Form |
Presents the user interface of your website at the client |
All materials on the site are licensed Creative Commons Attribution-Sharealike 3.0 Unported CC BY-SA 3.0 & GNU Free Documentation License (GFDL)
If you are the copyright holder of any material contained on our site and intend to remove it, please contact our site administrator for approval.
© 2016-2026 All site design rights belong to S.Y.A.