Beginning ASP.NET-4.5 in C# and VB (2013)
Appendix B
Configuring SQL Server 2012
So far, the exercises in the book assume that you are using Microsoft SQL Express 2012 LocalDB Edition 11.0 as the database for the Planet Wrox project. SQL Express LocalDB Edition 11.0 is great for development because it’s free, lightweight, and easy to use. However, it’s not designed to be used in a production environment and is limited in terms of processor and memory usage and database size. In cases where the LocalDB edition is not enough, you need to look at its bigger brothers: SQL Server 2012 Express edition or the commercial versions of SQL Server 2012, such as the Standard or Enterprise Editions. In this appendix you learn more about SQL Server 2012, its security model, how to enable your SQL Server 2012 database and ASP.NET 4.5.1 website to work together, and how to use SQL Server Management Studio Express, a free tool from Microsoft that lets you manage your database.
Although this appendix doesn’t discuss earlier versions of SQL Server, you’ll find that most of the concepts apply to these older versions as well. In fact, you can also use SQL Server 2012 Management Studio Express to manage older SQL Server 2005 and 2008 databases. This appendix uses SQL Server Express edition because it’s a free download, but the same principles apply to the commercial versions of SQL Server.
CONFIGURING SQL SERVER 2012Before you can configure your database, you need to be aware of the various security concepts that are inevitably associated with databases and web applications. In Chapter 19 you learned how the account used by the web server plays a big role when configuring security settings for the filesystem, and that’s no different when connecting to SQL Server. In the following section, you get a quick primer on the different ways to connect to SQL Server. In the section that follows you see how to attach your .mdf database files to SQL Server, followed by a discussion of configuring your application and database so they can talk to each other.
When you connect to a SQL Server database, SQL Server needs to know who you are so it can enforce the correct access policies on the objects, like tables in the database. SQL Server supports two different authentication mechanisms: SQL Server Authentication and Windows Authentication (often called Integrated Security). Both come with a few advantages of their own and require you to write different connection strings to connect to SQL Server. In the following section you see the two most common connection strings, but you’re advised to visit www.connectionstrings.com for an extensive list of possible connection strings.
SQL Server AuthenticationWith SQL Server Authentication, SQL Server takes care of user management. You manage the users for your SQL Server database with Microsoft SQL Server Management Studio, either the Express edition (which you see how to use a little later in this appendix) or the full versions that ship with the commercial versions of SQL Server. SQL Server uses a login that handles authentication. You define this login at the server level by providing a login name and a password. A login can then be mapped to a database user to grant access to a specific database.
To connect your web application to a SQL Server installation that requires you to use SQL Server Authentication, you need to pass a username and password in the connection string of your application. A typical connection string looks like this:
Data Source=ServerName;Initial Catalog=DatabaseName;
User Id=UserName;Password=Password;
In this case the Data Source points to an unnamed instance of SQL Server: the SQL server is addressed by its machine name alone. It’s also possible to install SQL Server as a named instance. With a named instance, the name of the server is followed by a back slash (\) and the name of a particular SQL Server instance. For example:
Data Source=ServerName\InstanceName;Initial Catalog=DatabaseName;
User Id=UserName;Password=Password;
SQL Server Authentication is often used when you need to connect to a remote SQL Server over the Internet because Windows Authentication, discussed next, is not supported in that scenario.
Windows AuthenticationWith Windows Authentication, the Windows OS takes care of user management. All interaction with the database is done in the context of the calling user so the database knows who’s accessing the system. You still need to map a Windows login to a SQL Server database user so SQL Server can determine whether the account has sufficient permissions. I show you how to do this later.
A typical connection string using Windows Authentication looks like this:
Data Source=ServerName;Initial Catalog=DatabaseName;Trusted_Connection=True
Instead of specifying a username and password, you add Trusted_Connection=True to the connection string to indicate you want to connect to the server with the user context of the calling user. You may also come across the setting Integrated Security=True, which has the same effect.
Because both authentication methods eventually do the same thing (they enable you to connect to SQL Server), you may wonder which one of the two you should use.
Choosing between Windows and Server AuthenticationIn general, it’s recommended to use Windows Authentication when possible. The fact that you don’t need to use a password in the connection string means your application will be a bit safer. You don’t need to send the password over the wire, and it’s also not stored in a configuration file for your application.
However, SQL Server Authentication is a bit easier to set up. Because you specify the username and password explicitly, you don’t need to know the final user account that your application runs under.
Later in this appendix you see how to use both authentication mechanisms to connect to your database. However, you need to look at something else first: the tools used to manage SQL Server.
Using SQL Server Management StudioYou use SQL Server Management Studio to manage your SQL server and databases. It enables you to attach and detach databases to and from your SQL Server; create new database objects like tables in existing databases; select, create, edit, and delete data; and much more.
So far, you’ve been using the LocalDB version of SQL Server, the developer-friendly version. In addition to LocalDB, Microsoft has another free version of SQL Server called SQL Server Express. The following sections of this appendix show you how to work with this free SQL Server Express edition, because it’s very similar in use to its commercial and production-ready databases. If you only installed LocalDB, you need to download and install SQL Server Express along with the free SQL Server Management Studio Express. The section “Installing SQL Server 2012 Express” in Chapter 12 explains how to acquire SQL Server 2012 Express Edition as well as its Management Studio component.
If you are already using a commercial version of SQL Server, you already have access to the full version of SQL Server Management Studio, because it comes bundled with the database engine.
If you are having trouble connecting to a remote SQL Server (for example, an instance of SQL Server that is not on the same physical server as the one on which you’re running Management Studio), you may need to enable remote connections for that SQL Server first. This is discussed next.
Enabling Remote Connections in SQL ServerWhen working with SQL Server, you may receive an error stating that the server was not found, not accessible, or that remote connections may not be configured properly.
Although you may get this error when the database server is down, you also get this error when SQL Server is not configured for remote connections. In a default installation, SQL Server allows only local applications to connect and blocks remote connections automatically. To resolve this, and grant remote systems access to the server as well, follow these steps:
1. Open the SQL Server Configuration Manager from the Start menu or Start screen. Depending on the version of SQL Server you’re using, this item may be located under the Microsoft SQL Server 2012/Configuration Tools submenu.
2. In the window that appears, expand SQL Server Network Configuration, and click the Protocols for SQLEXPRESS option to display the list with available protocols (the named instance SQLEXPRESS could be different on your machine). If you’re running a 64-bit version of Windows, you see an additional node with this name, followed by (32-bit). In that case, find the one that contains the Protocols for SQLEXPRESS node. Figure B-1 shows the list for a SQL Server instance called SQLEXPRESS on a 64-bit machine.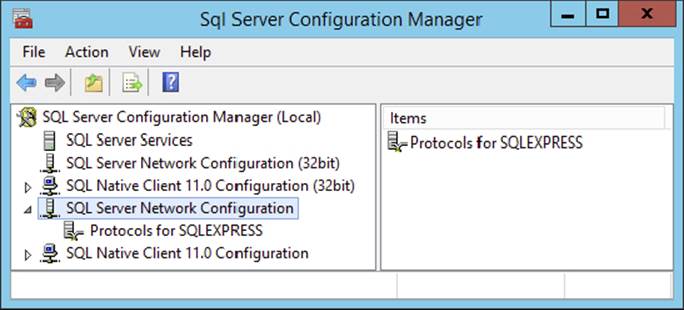
FIGURE B-1
3.
In the list with protocols on the right, right-click Named Pipes and choose Enable if its status is currently set to Disabled. Click OK to the message that explains you need to restart SQL Server to apply the changes.
4. Repeat the previous step, but now enable TCP/IP.
5. Restart SQL Server. To do this, click SQL Server Services in the SQL Server Configuration Manager (shown in Figure B-1), then right-click your server and choose Restart. If you get an error about security permissions, you may need to reboot your computer instead.
SQL Server now allows incoming connections from remote machines. However, before you can actually use your databases, you need to attach them to SQL Server first. This is described in the following section.
Attaching Databases to SQL Server
SQL Server Express enables you to work with database files in two ways: You can either attach them at run time using a special attribute in the connection string, or you can attach them using tools such as Management Studio before you start using the database.
You’ve been using the first option in all database-related chapters so far using the LocalDB version of SQL Server. The Planet Wrox connection string you used looks like this:
<add name="PlanetWroxConnectionString1" connectionString="Data Source=(localdb)\v11.0; AttachDbFilename=|DataDirectory|\PlanetWrox.mdf;Trusted_Connection=True;" providerName="System.Data.SqlClient" />This connection string points to a database called PlanetWrox.mdf located in the website’s App_Data folder (determined by |DataDirectory|). The connection string instructs SQL Server to attach this database file to SQL Server LocalDB on the fly when it’s used. When the database is no longer needed, it is detached again. You can use the same connection string to target SQL Server Express by changing the data source to .\SqlExpress.
This is a great solution for local development because it enables you to easily create and use SQL Server databases and move them around from project to project. However, with a production database this option isn’t good enough and you need to attach the database to SQL Server first. The following steps explain how to attach the PlanetWrox.mdf database to an instance of SQL Server in case you have the need. You can follow the exact same steps if you want to use SQL Server Management Studio to perform maintenance tasks on a SQL Server database that you cannot do in Visual Studio (managing users and roles, for example).
1. Create a folder that will hold your new database, such as C:\Data\SqlServer.
2. Move the PlanetWrox.mdf file and its associated .ldf file from the website’s App_Data folder at C:\BegASPNET\Release to this new folder.
3. Enable Modify permissions on the folder where the database resides (C:\Data\SqlServer) for the account used by SQL Server (which is the Network Service account by default) and for your own account. Chapter 19 explains how to set these permissions.
4. Open SQL Server Management Studio and log in to your SQL Server instance to which you want to attach the database. Depending on your security settings, you may have to run this process as an administrator. To do this for Windows 7 or Server 2008, right-click the Management Studio Start menu item and choose Run as Administrator. For Windows 8 or Server 2012, right-click the item in the Start screen and then choose Run as Administrator from the Options bar that has appeared.
5. Right-click the Databases node and choose Attach.
6. In the dialog box that follows, click the Add button and then select the PlanetWrox.mdf file you moved to C:\Data\SqlServer in step 2.
7. Click the value in the Attach As column to make it editable and type PlanetWrox as the new name that will be given to the database. Once you’re done, your dialog box should look like Figure B-2.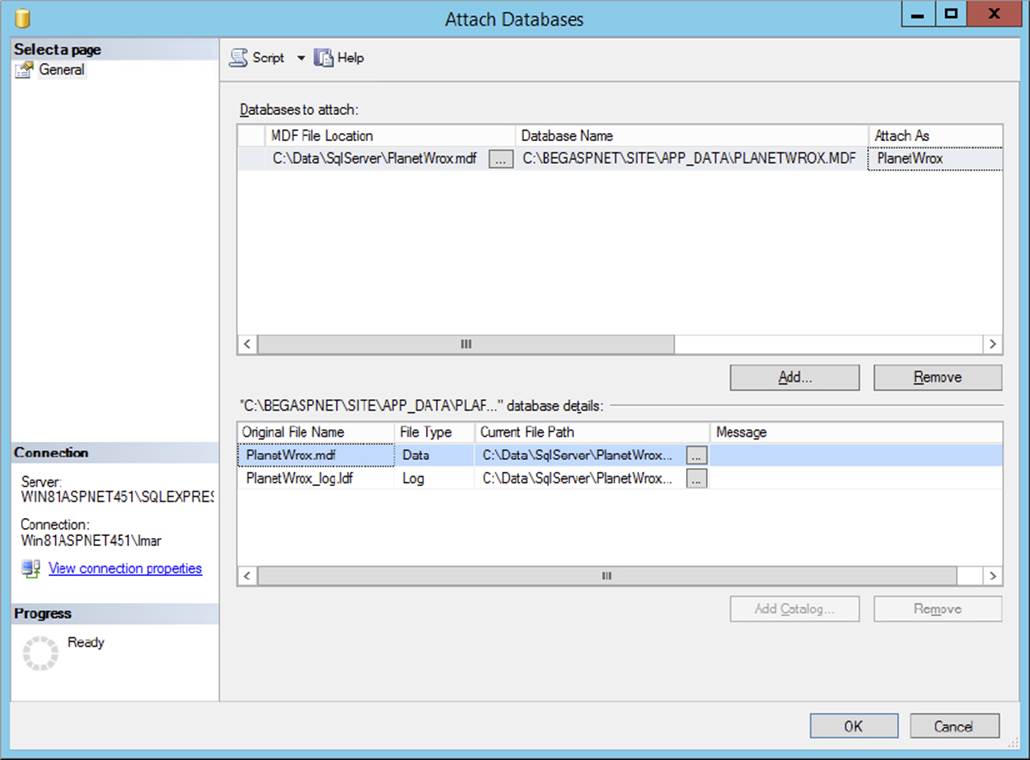
FIGURE B-2
8.
C:\Data\SqlServer folder and the .mdf files this folder contains. Also, try running SQL Server Management Studio as an administrator as explained in step 4.
9. Your database is now accessible under the Databases node of Management Studio’s Object Explorer. If you expand the Databases element and then look into your database, you should see familiar items like tables that you also saw in the Server Explorer in Visual Studio earlier in the book. Figure B-3 shows the attached database and its tables.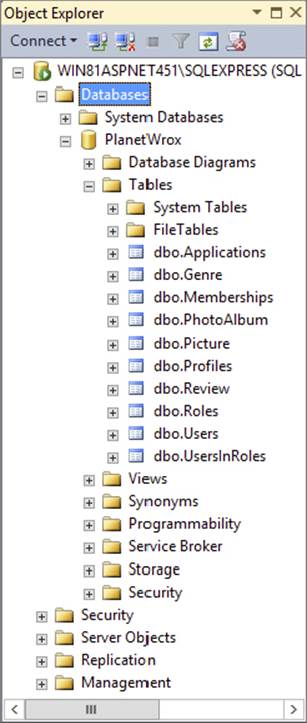
FIGURE B-3
Connecting Your Application to SQL Server 2012
In the following section, I show you how to connect to SQL Server from two different but common scenarios: using SQL Server Authentication and using Windows Authentication when IIS and SQL Server are on the same server. For both scenarios, you see how to configure SQL Server, the Planet Wrox website, and if necessary, your Windows accounts.
You’re likely to use the first scenario when dealing with an external hosting company that hosts your site. When web hosts offer SQL Server, they often use SQL Server Authentication and, as such, require you to pass a username and password to the database server.
The second scenario is useful if you host the site yourself and have both SQL Server 2012 and IIS on the same machine.
More advanced scenarios, such as using Windows Authentication with IIS and SQL Server on two different machines, are beyond the scope of this appendix. For more information about configuring and securing SQL Server, get yourself a copy of Professional Microsoft SQL Server 2012 Administration by Adam Jorgensen, Steven Wort, Ross LoForte, and Brian Knight, 2012 (Wrox, ISBN: 978-1-1181-0688-4).
Scenario 1 — Using SQL Server AuthenticationFrom a configuration point of view, this is probably the easiest scenario to configure: All you need to do is make sure that your SQL Server installation supports SQL Server Authentication, create a user in SQL Server, and then use that account in the connection string of the Planet Wrox website. To do this, follow these steps:
1. In SQL Server Management Studio, right-click the server name in the Object Explorer shown in Figure B-3, choose Properties, and switch to the Security category. The dialog box shown in Figure B-4 appears.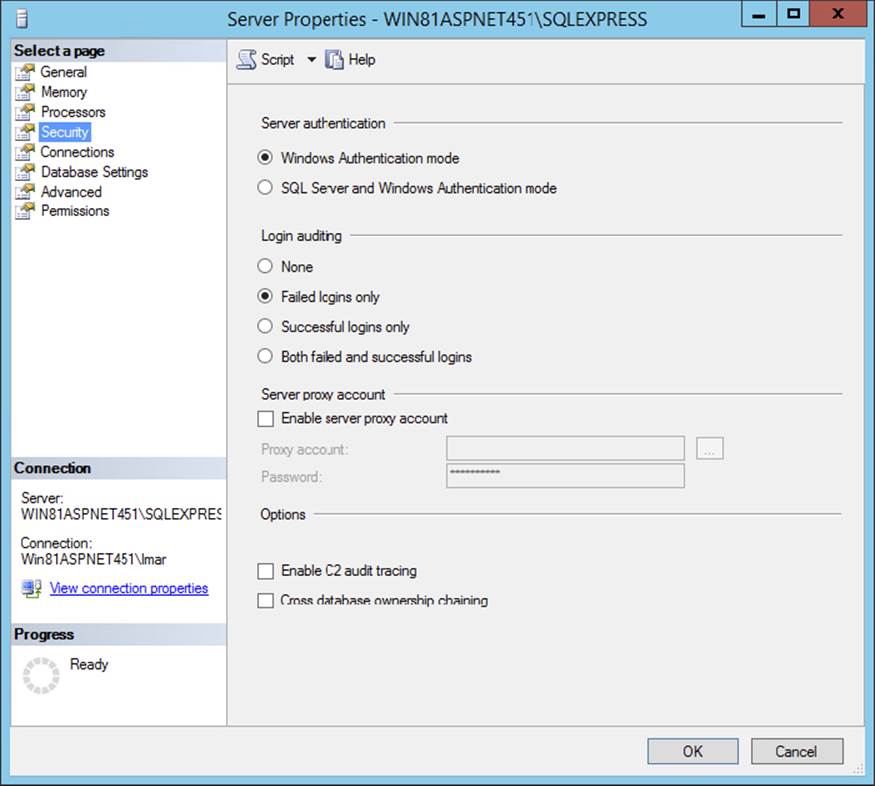
FIGURE B-4
2.
3. If you changed the server authentication, restart SQL Server. You can do this by right-clicking the server in the Object Explorer and choosing Restart. If you get an error about security permissions, you may need to reboot your computer instead.
4. Back in SQL Server Management Studio’s Object Explorer, expand the server’s Security node visible at the bottom of Figure B-3. Make sure you choose the one under your server name, and not the one belonging to a specific database. Right-click Logins and choose New Login.
5. Type a login name, then select the SQL Server Authentication option and type a password (twice). In this and the following examples, I’ll use PlanetWroxUser as the username, and Pa$$w0rD (with a zero instead of the letter o) as the password.
6. Clear the Enforce Password Expiration option. This also disables User Must Change Password at Next Login. Your dialog box should end up looking like the one in Figure B-5.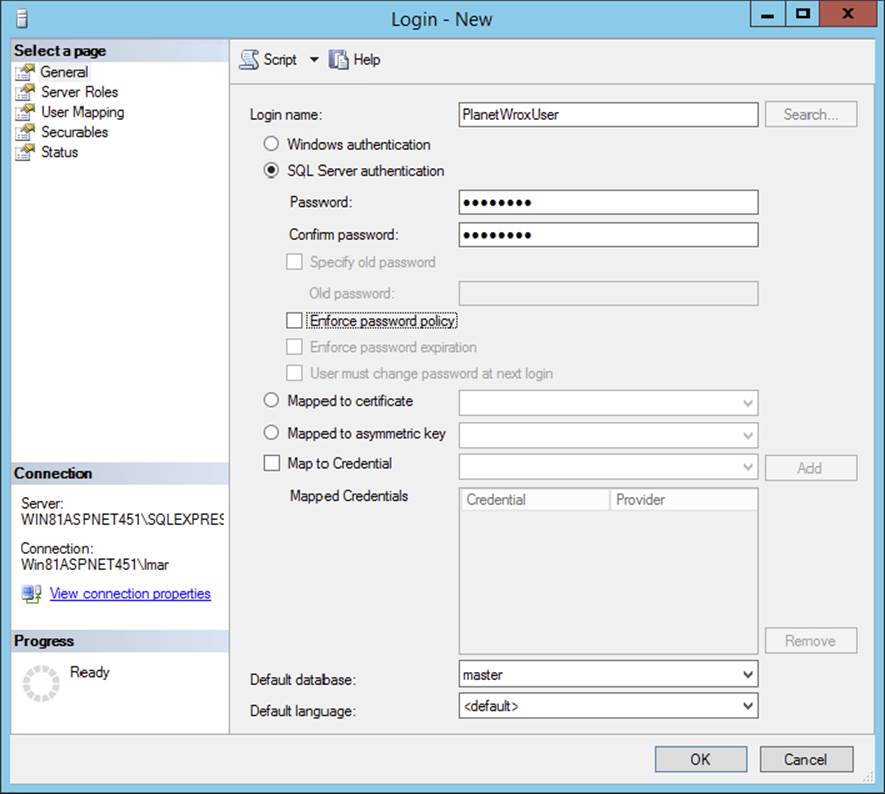
FIGURE B-5
7. Click OK to create the new account.
With the account created, the next step is to give this new account the proper permissions to your database:
1. On the Object Explorer, expand Databases, then the PlanetWrox database, followed by the Security node. Finally, right-click the Users node and choose New User.
2. In the User Type drop-down, choose SQL User with Login (this option doesn’t exist in earlier versions of Management Studio). In the User Name text box, type PlanetWroxUser.
3. In the Login Name text box, type PlanetWroxUser again. Alternatively, click the ellipsis button, then click Browse, and select the user from the list that has appeared.
4. Click Membership in the list on the left and you see a box labeled Database Role Membership (in earlier versions of SQL Server Management Studio this box is on the same page where you enter the username.) In this box, you can choose a number of roles that you can grant to your new user. The rule here is: Give users as few permissions as possible. A good choice is db_datareader and db_datawriter, which allows the account to both read from and write to tables in the database, so check these two options, visible inFigure B-6.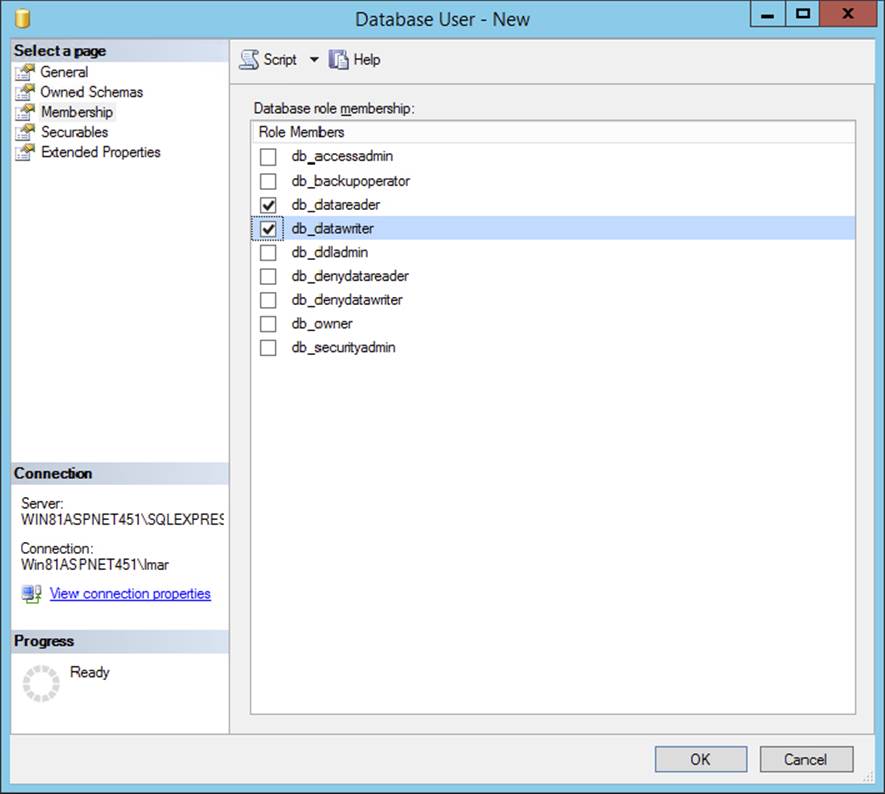
FIGURE B-6
6. Finally, click OK to create the PlanetWroxUser account and to assign it to the db_datareader and db_datawriter roles.
7. You can close SQL Server Management Studio because you’re done with it for now.
Now that SQL Server and your user accounts are configured correctly, the final phase is to configure the website to use this new user account.
1. Open the Web.config file of the deployed Planet Wrox application from the C:\BegASPNET\Release folder.
2. Modify the <connectionStrings> element as follows:
3.<connectionStrings>
4.<add name="PlanetWroxConnectionString1"connectionString="Data Source=ServerName;
5.Initial Catalog=PlanetWrox;User ID=PlanetWroxUser;password=Pa$$w0rD"
6.providerName="System.Data.SqlClient"
7./>
8.<add name="PlanetWroxEntities" connectionString="
9.metadata=res://*/App_Code.PlanetWrox.csdl|res://*/App_Code.PlanetWrox.ssdl|res
10.://*/App_Code.PlanetWrox.msl;provider=System.Data.SqlClient;provider connection
11.string="Data Source=ServerName;Initial Catalog=PlanetWrox;
12.User ID=PlanetWroxUser;password=Pa$$w0rD;MultipleActiveResultSets=True""
13.providerName="System.Data.EntityClient"
14./>
</connectionStrings>In your configuration file, each connection string should be on a single line. Don’t forget to replace the value ServerName in the Data Source attributes with a valid server name. Depending on your server and configuration, this could be as simple as (local) or.\SqlExpress to point to a SQL Server on the local machine, DatabaseServer to point to a server called DatabaseServer on the network, or something like DatabaseServer\Sql2012 that points to a named instance called Sql2012 on a machine called DatabaseServer.
15.Save the changes and then open the site by starting your browser and going to http://localhost. Everything should still work, but the site no longer uses the database in the App_Data folder; it uses the SQL Server you defined in your connection strings instead.
16.To make sure this new connection string remains available in future updates of the site, you should also add it to the file Web.To local disk.config in the website in Visual Studio.
If you get an error when browsing to the site on your local host, you may need to turn off custom errors in Web.config (for security reasons, set it to RemoteOnly instead of to Off) to see the actual error message. Possible reasons for an error include an incorrect username, password, or server name in the connection string, and an incorrectly configured database role membership for the PlanetWroxUser account.
Scenario 2 — Using Windows Authentication with IIS and the Database on the Same Machine
This is a common scenario, especially when you’re running your site on a local machine that you control yourself. Both the web server (either IIS or the built-in development web server) and SQL Server run on the same physical machine. This scenario makes it easy to use Windows Authentication because both the web server and SQL Server can use the same Windows account. To configure your server for this scenario, follow these steps:
1. Determine the account used by your web server. Refer to Chapter 19 for precise details on how to do this, but you’re likely to need the ApplicationPoolIdentity account (called IIS AppPool\.NET v4.5 by default). I am using the account IIS AppPool\.NET v4.5 in the remainder of this section.
2. Next, you need to map this Windows account to a SQL Server login. To do this, open SQL Server Management Studio and log in to your SQL Server instance. Expand the Security node for the server (and not of an individual database), as shown at the bottom ofFigure B-3. Then right-click Logins and choose New Login.
3. In the Login Name box, enter IIS AppPool\.NET v4.5 and click OK to add the new login.
With the login created, the next step is to map this login to a database user that has the proper permissions to your database:
1. Open the Security node of the PlanetWrox database, right-click the Users node, and choose New User.
2. In the User Type drop-down, choose SQL User with Login (this option doesn’t exist in earlier versions of Management Studio). In the User Name text box, type .NET v4.5.
3. For the Login Name text box, click the ellipsis button and then click Browse so you can select a username. Choose the account you configured earlier (called IIS AppPool\.NET 4.5) and click OK twice.
4. Click Membership in the list on the left and you see a box labeled Database Role Membership (in earlier versions of SQL Server Management Studio this box is on the same page where you enter the username). In this box, you can choose a number of roles that you can grant to your new user. The rule here is: Give users as few permissions as possible. A good choice is db_datareader and db_datawriter, which allows the account to both read from and write to tables in the database, so check these two options, shown earlier in Figure B-6.
If you want to set fine-grained security options for your database objects, click the Securables option visible in Figure B-6. This dialog box enables you to determine permissions for the user account on objects in your database like tables, views, and stored procedures. For the Planet Wrox website, you don’t need to make any changes in this dialog box.
6. Finally, click OK to create the database user and assign it to the db_datareader and db_datawriter roles.
Now that SQL Server and your user accounts are configured correctly, the final step is to configure the website to use this new user account.
1. Open the Web.config file of the Planet Wrox application from the C:\BegASPNET\Release folder.
2. Modify the <connectionStrings> element so it ends up like this:
3.<connectionStrings>
4.<add name="PlanetWroxConnectionString1"connectionString="Data Source=ServerName;
5.Initial Catalog=PlanetWrox;Trusted_Connection=True"
6.providerName="System.Data.SqlClient"
7./>
8.<add name="PlanetWroxEntities" connectionString="
9.metadata=res://*/App_Code.PlanetWrox.csdl|res://*/App_Code.PlanetWrox.ssdl|res
10.://*/App_Code.PlanetWrox.msl;provider=System.Data.SqlClient;provider connection
11.string="Data Source=ServerName;Initial Catalog=PlanetWrox;
12.Trusted_Connection=True;MultipleActiveResultSets=True""
13.providerName="System.Data.EntityClient"
14./>
</connectionStrings>In your configuration file, each connection string should be on a single line. Don’t forget to replace the value ServerName in the Data Source attributes with a valid server name. Depending on your server and configuration, this could be as simple as (local) or.\SqlExpress to point to a SQL Server on the local machine, DatabaseServer to point to a server on the network called DatabaseServer, or something like DatabaseServer\Sql2012 that points to a named instance called Sql2012 on a machine called DatabaseServer.
15.Save the changes and then open the site by starting your browser and going to http://localhost. Everything should still work as expected, but the site no longer uses the database in the App_Data folder; it uses the SQL Server defined in your connection strings instead through Windows Authentication, as identified by the Trusted_Connection=True attribute in the connection string.
16.To make sure this new connection string remains available in future updates of the site, you should also add it to the file Web.To local disk.config in the website in Visual Studio.
If you get an error when browsing to the site, you may need to turn off custom errors in the Web.config file (or set it to RemoteOnly) to see the actual error message. Possible reasons for the error are an incorrect server name in the connection string and an incorrectly configured database role membership for the configured account.
Once you find out the correct account and have configured SQL Server correctly, using Windows Authentication isn’t that hard. In fact, your connection string now becomes a little easier and more secure, because you don’t need to store a username and password in it anymore.
CONFIGURING APPLICATION SERVICES
Earlier in this book you learned that the ASP.NET application services make use of a SQL Server database. You also saw how to make sure your own website and the application services use the same database.
If you chose not to merge your database and the one used by the application services, your site now uses two databases: your own and one called aspnetdb.mdf. However, you can still merge them later if you want. In earlier versions of ASP.NET, this involved quite a bit of work, including changes to the Web.config file and running command-line tools. However, with the updated providers this is now pretty simple. Follow these steps to let the application services use your own database:
1. First, make sure the application services point to a connection string you want to use. To do this, you need to set the connectionStringName to a connection string defined in your config file. The following example shows how to do this for the Membership section, but the other services follow a similar pattern:
2.<membership defaultProvider="DefaultMembershipProvider">
3.<providers>
4.<add name="DefaultMembershipProvider"
5.type="System.Web.Providers.DefaultMembershipProvider,
6.System.Web.Providers, Version=1.0.0.0, Culture=neutral,
7.PublicKeyToken=31bf3856ad364e35"
8.connectionStringName="PlanetWroxConnectionString1"
9.enablePasswordRetrieval="false" enablePasswordReset="true"
10.requiresQuestionAndAnswer="false" requiresUniqueEmail="false"
11.maxInvalidPasswordAttempts="5" minRequiredPasswordLength="7"
12.minRequiredNonalphanumericCharacters="1" passwordAttemptWindow="10"
13.applicationName="/"
14./> </providers>
</membership>Notice how connectionStringName points to the connection string called PlanetWroxConnectionString1, defined elsewhere in the config file.
15.Make sure the account used by the web server has permissions to alter the database schema. You can accomplish this by adding the account to the db_ddladmin group, shown in Figure B-6. This grants the account the permissions to execute Data Definition Language statements, which means it can create and alter tables and other objects in the database.
16.Restart IIS. To do this, start the IIS Server Manager (type inetmgr in the Start menu or Start screen), click your server name, and then click Restart in the Actions panel on the right. To minimize impact on the server, you could also recycle just the application pool used by the site by right-clicking it and choosing Recycle.
17.Browse to your site and request the Login page. Try to log in with a fake username and password. At this stage, the .NET run time will modify the database and add the necessary tables to it. If you look in the database defined in the connection string used by the membership services, you’ll notice it now contains the tables that are used by Membership, Roles, and Profile.
18.For security reasons, you should now remove the account from the db_ddladmin group because using Membership at run time does not require these permissions.
All materials on the site are licensed Creative Commons Attribution-Sharealike 3.0 Unported CC BY-SA 3.0 & GNU Free Documentation License (GFDL)
If you are the copyright holder of any material contained on our site and intend to remove it, please contact our site administrator for approval.
© 2016-2026 All site design rights belong to S.Y.A.