Beginning ASP.NET-4.5 in C# and VB (2013)
Chapter 6
Creating Consistent Looking Websites
WHAT YOU WILL LEARN IN THIS CHAPTER:
- How to use master and content pages that enable you to define the global look and feel of a web page
- How to work with a centralized base page that enables you to define common behavior for all pages in your site
- How to create themes to define the look and feel of your site with an option for the user to choose a theme at run time
- How to create skins to make site-wide changes to control layout
- What the ASP.NET page life cycle is and why it’s important
WROX.COM CODE DOWNLOADS FOR THIS CHAPTER
You can find the wrox.com code downloads for this chapter on the Download Code tab at www.wrox.com/go/begaspnet451. The code is in the Chapter 6 folder.
When you’re building a website you should strive to make the layout and behavior as consistent as possible. Consistency gives your site a professional appearance and it helps your visitors to find their way around the site. Fortunately, ASP.NET 4.5.1 and Visual Studio 2013 offer a number of great features and tools to implement a consistent design, helping you to create great-looking pages in no time.
In previous chapters you learned how to work with VS, HTML5, CSS, and server controls to create your web pages visually. Chapter 5 introduced you to programming in ASP.NET. This chapter is the first that combines these concepts, by showing you — among many other things — how to use programming code to change the appearance of the site.
The first section shows you how to create a master page that defines the general look and feel of a page. The ASPX pages in your site can then use this master page without the need to repeat the general layout. The remaining sections of this chapter build on top of this master page.
CONSISTENT PAGE LAYOUT WITH MASTER PAGESWith most websites, only part of the page changes when you go from one page to another. The parts that don’t change usually include common regions like the header, a menu, and the footer. To create web pages with a consistent layout, you need a way to define these relatively static regions in a single template file. Versions of ASP.NET prior to 2.0 did not have a template solution, so you were forced to duplicate your page layout on every single page in the website, or resort to weird programming tricks. Fortunately, this is no longer the case due to master pages. The biggest benefit of master pages is that they enable you to define the look and feel of all the pages in your site in a single location. This means that if you want to change the layout of your site — for instance, if you want to move the menu from the left to the right — you need to modify only the master page, and the pages based on this master pick up the changes automatically.
When master pages were introduced in ASP.NET 2.0, they were quickly embraced by the developer community as the template solution for ASP.NET pages because they are very easy to use. Even better, VS has great design-time support, because it enables you to create and view your pages at design time during development, rather than only in the browser at run time.
To some extent, a master page looks like a normal ASPX page. It contains static HTML such as the <html>, <head>, and <body> elements, and it can also contain other HTML and ASP.NET Server Controls. Inside the master page, you set up the markup that you want to repeat on every page, like the general structure of the page and the menu.
However, a master page is not a true ASPX page and cannot be requested in the browser directly; it only serves as the template on which real web pages — called content pages — are based.
Instead of the @Page directive that you saw in Chapter 4, a master page uses an @Master directive that identifies the file as a master page:
VB.NET
<%@ Master Language="VB" %>C#
<%@ Master Language="C#" %>Just like a normal ASPX page, a master page can have a Code Behind file, identified by its CodeFile and Inherits attributes:
VB.NET
<%@ Master Language="VB" CodeFile="Frontend.master.vb" Inherits="MasterPages_Frontend" %>C#
<%@ Master Language="C#" AutoEventWireup="true" CodeFile="Frontend.master.cs" Inherits="MasterPages_Frontend" %>To create regions that content pages can fill in, you define ContentPlaceHolder controls in your page like this:
<asp:ContentPlaceHolder ID="ContentPlaceHolder1" runat="server"></asp:ContentPlaceHolder>You can create as many placeholders as you like, although you usually need only a few to create a flexible page layout.
The content pages, which are essentially normal ASPX files, without the code that they’re going to take from the master page, are connected to a master page using the MasterPageFile attribute of the Page directive:
VB.NET
<%@ Page Title="" Language="VB"MasterPageFile="~/MasterPages/Frontend.master"
AutoEventWireup="false" CodeFile="Default.aspx.vb" Inherits="_Default">C#
<%@ Page Title="" Language="C#"MasterPageFile="~/MasterPages/Frontend.master"
AutoEventWireup="true" CodeFile="Default.aspx.cs" Inherits="_Default">The page-specific content is then put inside a Content control that points to the relevant ContentPlaceHolder:
<asp:Content ID="Content1"ContentPlaceHolderID="ContentPlaceHolder1"
runat="Server"></asp:Content>Note that the ContentPlaceHolderID attribute of the Content control points to the ContentPlaceHolder that is defined in the master page. Right now it points to the default name of ContentPlaceHolder1, but in a later exercise you see how to change this.
At run time, when the page is requested, the markup from the master page and the content page are merged, processed, and sent to the browser. Figure 6-1 shows a diagram of the master page with just one ContentPlaceHolder and the content page that results in the final page that is sent to the browser.
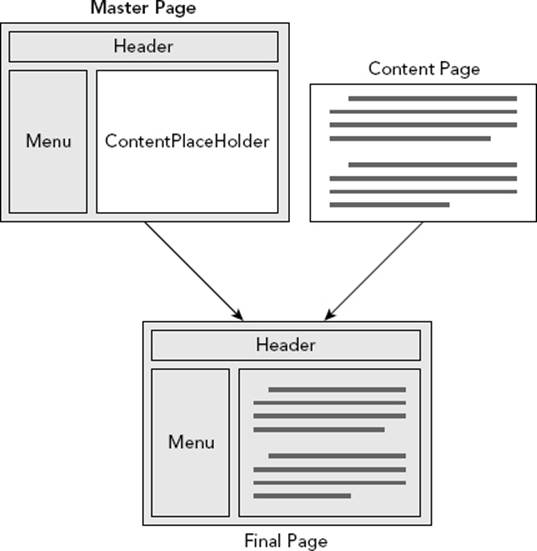
FIGURE 6-1
To see this process in action, the following sections guide you through creating master and content pages.
Creating Master Pages
You can add master pages to the site using the Add New Item dialog box. You can place them in any custom folder in the site, including the root folder, but from an organizational point of view, it’s often easier to store them in a separate folder. Just like normal ASPX pages, they support the inline code model as well as the Code Behind model. The master pages used in the Planet Wrox project use the Code Behind model exclusively. In the following exercise, you learn how to create a simple master page and add some HTML to it to define the general structure of the pages in your website.
1. Open the Planet Wrox project in Visual Studio if it is not open already.
2. In Chapter 2 you created a folder called MasterPages to hold your master pages and then added a single master page to that folder. If you didn’t carry out that exercise, add the master page now. To do this, create the MasterPages folder in the root of the site, right-click the new folder, choose Add ⇒ Add New Item, and select the Master Page item. Make sure that the master page uses Code Behind and that it is using the programming language you selected for the site. Name the master pageFrontend.master. Finally, click Add.
3. Add the following highlighted code between the <form> tags of the master page, replacing the <div> tags and the ContentPlaceHolder that VS added for you when you created the master page. Note that this is almost the same code you added toDefault.aspx in Chapter 3, except for the <asp:ContentPlaceHolder> element and the <a> element within the Header <div>. The <a> element takes the user back to the homepage, and will be styled later.
4.<form id="form1" runat="server">
5.<div id="PageWrapper">
6.<header><a href="/">Header Goes Here</a></header>
7.<nav>Menu Goes Here</nav>
8.<section id="MainContent">
9.<asp:ContentPlaceHolder ID="cpMainContent" runat="server">
10.</asp:ContentPlaceHolder>
11.</section>
12.<aside id="Sidebar">Sidebar Goes Here</aside>
13.<footer>Footer Goes Here</footer>
14.</div>
</form>Make sure that you have the ContentPlaceHolder within the MainContent <section> tags. You can drag one from the Toolbox onto the page or enter the code directly, using IntelliSense’s helpful hints. In both cases you should give the control an ID ofcpMainContent.
15.Next, switch the master page into Design View and then drag Styles.css from the Styles folder in the Solution Explorer onto the master page. As soon as you drop the file, VS updates the Design View and shows the layout for the site that you created in Chapter 3. If the design doesn’t change, switch to Markup View and ensure there’s a <link> tag in the head of the page pointing to your CSS file:
16.<asp:ContentPlaceHolder ID="head" runat="server">
17.</asp:ContentPlaceHolder>
18.<link href="../Styles/Styles.css" rel="stylesheet" type="text/css" />
</head>The page should now look like Figure 6-2 in Design View.
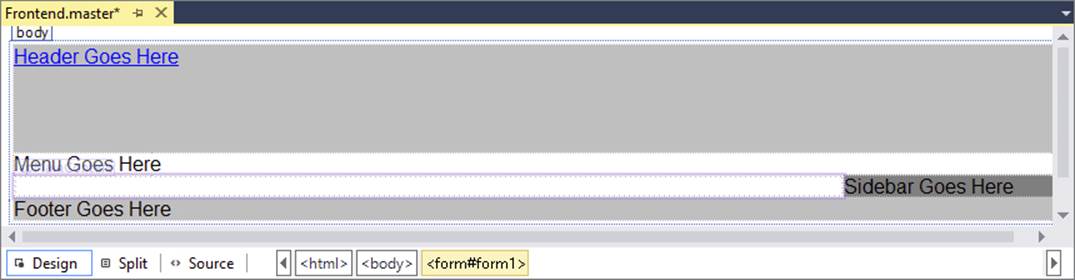
FIGURE 6-2
Note the area with the purple border around it between the menu and the footer region in your Design View. This is the ContentPlaceHolder control that is used by the content pages. You see how to use it in the next exercise.
19.In Markup View, drag the file modernizr-2.7.1.js from the Scripts folder into the <head> section of the Master Page below the CSS file. Then manually remove the two leading periods from the src attribute, like this:
<script src="/Scripts/modernizr-2.7.1.js"></script>20.You can save and close the master page because you’re done with it for now.
How It WorksWithin VS, master pages behave like normal pages. You can add HTML and server controls to them, and you can manage the page both in Markup and Design View. The big difference is, of course, that a master page isn’t a true page itself; it only serves as a template for other pages in your site. You needed to change the path to the script file by removing the two leading periods. This causes the browser to download the file from the Scripts folder in the root of the site, no matter where the page that uses this master page is located. ASP.NET manages this for CSS files automatically, but not for script files. In the next chapter you learn more about how file paths are handled.
In the next section you see how to use this master page as the template for a content page.
Creating Content PagesA master page is useless without a content page that uses it. Generally, you’ll have only a few master pages, whereas you can have many content pages in your site. To base a content page on a master page, check the Select Master Page option at the bottom right of the Add New Item dialog box when you add a new Web Form to your site. Alternatively, you can set the MasterPageFile attribute on the page directly in the Markup View of the page. You saw this @ Page directive earlier in this chapter when master and content pages were introduced.
Content pages can only directly contain Content controls that each map to a ContentPlaceHolder control in the master page. These content controls in turn can contain standard markup like HTML and server control declarations. Because the entire markup in a content page needs to be wrapped by <asp:Content> tags, it’s not easy to turn an existing ASPX page into a content page. Usually the easiest thing to do is copy the content you want to keep to the clipboard, delete the old page, and then add a new page based on the master page to the website. Once the page is added, you can paste the markup within the <asp:Content> tags. You see how this works in the following exercise.
In this Try It Out you see how to add a content page to the site that is based on the master page you created earlier. Once the page is added, you add content to the <asp:Content> regions.
1. In previous exercises you added standard ASPX pages to your project, which should now be “upgraded” to make use of the new master page. If you want to keep the welcome text you added to Default.aspx earlier, copy all the HTML between theMainContent <section> tags to the clipboard (that is, the <h1> and the two <p> elements that you created earlier) and then delete the Default.aspx page from the Solution Explorer. Next, right-click the website in the Solution Explorer and choose Add ⇒ Add New Item. Select the correct programming language, click Web Form, name the page Default.aspx, and then, at the bottom of the dialog box, select the check boxes for Place Code in Separate File and Select Master Page, as shown in Figure 6-3.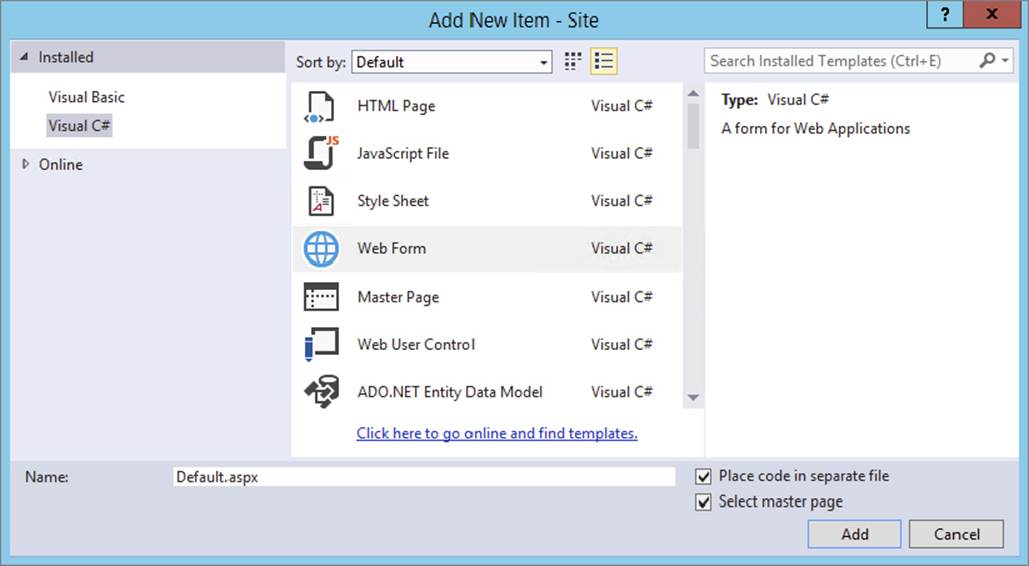
FIGURE 6-3
Finally, click the Add button.
2. In the Select a Master Page dialog box (see Figure 6-4), click the MasterPages folder in the left-hand pane, and then in the area at the right, click Frontend.master.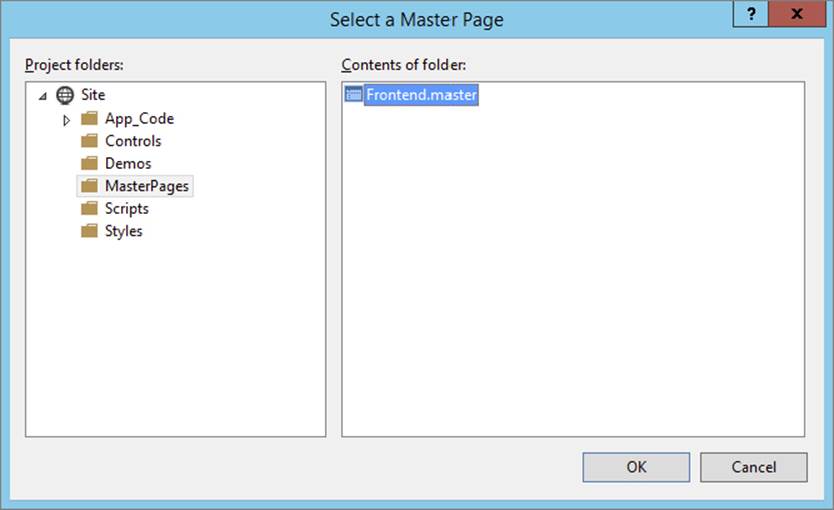
FIGURE 6-4
Click OK to add the page to your website.
Instead of getting a full page with HTML as you got with standard ASPX pages, you now only get two <asp:Content> placeholders as shown in this VB.NET example:
<%@ Page Title="" Language="VB" MasterPageFile="~/MasterPages/Frontend.master" AutoEventWireup="false" CodeFile="Default.aspx.vb" Inherits="_Default" %><asp:Content ID="Content1" ContentPlaceHolderID="head" runat="Server"></asp:Content><asp:Content ID="Content2" ContentPlaceHolderID="cpMainContent" runat="Server"></asp:Content>3. Switch to Design View and note that everything is grayed out and read-only, except for the <asp:Content> region for cpMainContent. Figure 6-5 shows you how the page should look.
FIGURE 6-5
Also note that VS conveniently lists the master page that this page is based on in the top-right corner of Design View, visible in Figure 6-5. Clicking the name opens the master page in the editor.
4. If you still have the old markup from the Default.aspx on the clipboard, click once inside the cpMainContent placeholder and press Ctrl+V. (Note: you can do this both in Design View and in Markup View). This adds the markup to the page, right between the <asp:Content> tags.
5. Save your changes by pressing Ctrl+S and press Ctrl+F5 to open the page in your browser. The browser should display the page very closely to what you saw in Design View (see Figure 6-5).
6. Now take a look at the HTML for the page in the browser. You can do this by right-clicking the page and choosing View Source or View Page Source. Note that the source of the final page in the browser is a combination of the source of the master page and the content page:
7.<div id="PageWrapper">
8.<header><a href="/">Header Goes Here</a></header>
9.<nav>Menu Goes Here</nav>
10.<section id="MainContent">
11.<h1>Hi there visitor and welcome to Planet Wrox</h1>
12.<p class="Introduction">
13.We're glad you're paying a visit to <a
14.href="http://www.PlanetWrox.com">
15.www.PlanetWrox.com</a>, the coolest music community site on the Internet.
16.</p>
...The first four lines come from the master page and the bolded lines of HTML code come from the content page.
17.Switch back to VS and create a new page called Login.aspx in the root of the site based on the master page. Notice how VS remembered your last settings with regard to the master page and Code Behind (make sure both are checked in case you unchecked them earlier). Switch to Markup View and create an <h1> element inside the cpMainContent placeholder with the text Log in to Planet Wrox. There’s no need to add any other controls to this page just yet, but it serves as the basis for the login functionality you create in Chapter 16. Without any content in the MainContent element, the Sidebar will be moved to the left of the page.
18.Go back to Default.aspx and switch to Design View. Beneath the welcome text with the header and two <p> elements, create a new paragraph (press Enter in Design View) and type some text (for example, You can log in here). Notice how this new paragraph has a class attribute called Introduction because VS applies the previous class to new paragraphs automatically. Remove this class using the Clear Styles option of the Apply Styles window, or manually remove it from the code in Markup View.
19.Highlight the words “log in” in Design View and choose Format ⇒ Convert to Hyperlink from the main menu. In the dialog box that follows, click the Browse button and select the Login.aspx page that you just created. Click OK twice.
20.Save all changes and press Ctrl+F5 again to view Default.aspx in the browser. Then click the link you created in the preceding step. You should now be taken to Login.aspx. Note that the general layout, like the header and the sidebar, is maintained. The only thing that changes when you go from page to page is the content in the main content area.
When a page based on a master page is requested in the browser, the server reads in both the content page and the master page, merges the two, processes them, and then sends the final result to the browser. In step 6 of this exercise you saw that the HTML in the browser for the requested page contained the markup from both files.
Master pages will save you a lot of work when it comes to updating or radically changing the looks of your site. Because the entire design and layout of your site is defined in the master page, you only need to touch that single file when you want to make any changes. All content pages will pick up the changes automatically.
A Closer Look at Master PagesSo far you’ve seen a master page with a content placeholder for the main content. But if you look at the master page in Markup View, you’ll find another content placeholder in the head section of the page:
<head runat="server"> <title></title><asp:ContentPlaceHolder id="head" runat="server">
</asp:ContentPlaceHolder> ...</head>This placeholder is added for you automatically to each new master page you create. You can use it in content pages to add page-specific content that belongs between the <head> tags of a page, such as CSS (both embedded and external style sheets) and JavaScript. You learn more about JavaScript in Chapters 10 and 11. You need to add content to this placeholder in Markup View, because it’s not visible in Design View.
The ContentPlaceHolder called cpMainContent in the master page currently does not contain any markup itself. However, it doesn’t have to be like this. You can easily add your own content there that will serve as the default in your content pages as long as it’s not overridden by the content page. For example, you can have the following ContentPlaceHolder in a master page:
<asp:ContentPlaceHolder ID="cpMainContent" runat="server"> This is default text that shows up in content pages that don't explicitly override it.</asp:ContentPlaceHolder>When you base a new page on this master page, you won’t see this default at first in Markup View. However, you can open the Content control’s Smart Tasks panel, shown in Figure 6-6, and choose Default to Master’s Content.

FIGURE 6-6
When you click Yes when asked if you want to default to the master page content, VS removes the entire Content control from the Markup View of the page. However, when you request the page in the browser you will still see the default content from the master page. In Design View, the content is still visible, now presented as a read-only area on the design surface. A master page with default content can be useful if you add a new ContentPlaceHolder to the master page at a later stage. Existing pages can simply display the default content, without the need for you to touch all these pages. New pages can define their own content. If you don’t have default content in the ContentPlaceHolder control in the master page and the content page doesn’t have a Content control for the ContentPlaceHolder, no output is sent to the browser.
Once you have defaulted to the master page’s content, you can create custom content again by opening the Smart Tasks panel and choosing Create Custom Content. This copies the default contents into a new Content control that you can then modify.
It is also possible to nest master pages. A nested master page is a master that is based on another master page. Content pages can then be based on the nested master page. This is useful if you have a website that targets different areas that still need to share a common look and feel. For example, you can have a corporate website that is separated by departments. The outer master page defines the global look and feel of the site, including corporate logo and other branding elements. You can then have different nested master pages for different departments. For example, the sales department’s section could be based on a different master than the marketing department’s, enabling each to add their own identity to their section of the site. VS 2013 has excellent Design View support for nested master pages, giving you a good look at how the final page will end up.
Creating a nested master page is easy: check the Select Master Page check box when you add a master page just as you do when you add a normal content page to the site. Then add markup and ContentPlaceHolder controls to the Content controls at locations that you want to override in the content pages. Finally, you choose your nested master page as the master for new content pages you create. Inside the content page, you only see the ContentPlaceHolder controls from the nested master page, not from its parent.
Although master pages are great and can save you a lot of work, you need to be aware of some caveats.
For starters, the ASP.NET run time changes the client ID of your controls in the page. This is the id attribute that is used in client script to access controls from JavaScript in the browser and with CSS ID selectors. With normal ASPX pages, the server-side ID of a control is usually inserted one-on-one in the final HTML. For example, a Button control with a server-side ID of Button1 in a normal ASPX page defined with this code,
<asp:Button ID="Button1" runat="server" Text="Click Me" />ends up with a client-side ID like this in the final HTML:
<input type="submit" name="Button1" value="Click Me" id="Button1" />However, the same button inside an <asp:Content> control ends up like this:
<input type="submit" name="ctl00$cpMainContent$Button1" value="Click Me" id="cpMainContent_Button1" />The name attribute has been prefixed with the auto-generated ID of the master page (ctl00) and both the name and the id attributes contain the ID of the ContentPlaceHolder control (cpMainContent).
This means that any client-side code that previously referred to Button1 should now refer to cpMainContent_Button1.
Note that this is not just a master page problem. You’ll also run into this behavior in other situations; for example, when working with user controls (discussed in Chapter 8) and data-bound controls (discussed in Chapter 13 and onward).
The second caveat is related to the first. Because the name and id of the HTML elements are changed, they add considerably to the size of the page. This may not be problematic for a single control, but once you have pages with lots of controls, this could impact the performance of your site. The problem gets worse with nested master pages, where both content controls are appended to the ID. The same button inside a nested master page can end up like this:
<input type="submit" name="ctl00$ctl00$cpMainContent$ContentPlaceHolder1$Button1" value="Click Me" id="cpMainContent_ContentPlaceHolder1_Button1" />To mitigate the problem, you should keep the IDs of your ContentPlaceHolder and Content controls as short as possible. To improve readability, this book uses longer names, like cpMainContent. However, in your own sites, you could reduce this to MC or cpMC to save some bandwidth on every request.
Master pages enable you to define the general look and feel of your site in a single location, thus improving the consistency and maintainability of your site. However, there is another way to improve consistency: centralize the behavior of the pages in your website. You can do this with a so-called base page, which is discussed next.
USING A CENTRALIZED BASE PAGE
In Chapter 5 you learned that, by default, all ASPX pages derive from a class called System.Web.UI.Page. This means all of your pages have at least the behavior defined in this class.
However, in some circumstances this behavior is not enough and you need to add your own stuff to the mix. For example, you may have the need to add some behavior that applies to all the pages in your site. Instead of adding this behavior to each and every individual page, you can create a common base page. All the pages in your site can then inherit from this intermediate page instead of from the standard Page class. The left half of Figure 6-7 shows how an ASPX page called MyWebPage inherits from the Page class directly. The right half shows a situation where the ASPX page inherits from a class called BasePage, which in turn inherits from Page.
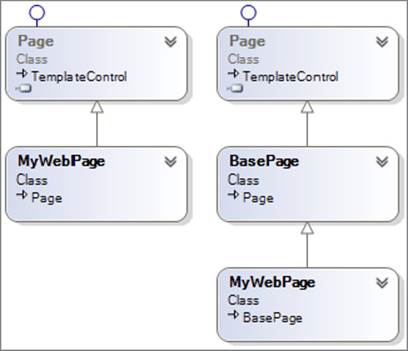
FIGURE 6-7
To have your pages inherit from this base page, you need to do two things:
- Create a class that inherits from
System.Web.UI.Pagein theApp_Codefolder of your website. - Make the web pages in your site inherit from this base page instead of the standard
Pageclass.
In an upcoming exercise you create a new base page class inside the App_Code folder. For now, the sole purpose of this class is to check the Title of the page at run time to stop pages with an empty title or a meaningless title like “Untitled Page” making it to the browser. Giving your pages a unique and helpful title helps the major search engines to index them, so it’s recommended to always include a title in your web pages. Checking the title programmatically is relatively easy to do, which enables you to focus on the concept of inheritance rather than on the actual code. In the section that discusses themes later in this chapter, you modify the base page once more, this time to retrieve the user’s preference for a theme.
Before you can implement the base class, you need to know more about the ASP.NET page life cycle, an important concept that describes the process a web page goes through when requested by a browser.
An Introduction to the ASP.NET Page Life Cycle
When you think about how a page is served by a web server to the browser and think of this process as the life cycle of a page, you can probably come up with a few important moments in the page’s life. For example, the initial request by the browser is the starting point for the page’s “life.” Similarly, when the page has sent its entire HTML to the browser, its life may seem to end. However, more interesting events are going on in the page’s life cycle. The following table describes eight broad phases the page goes through. Within each phase, at least one event is raised that enables a page developer to hook into the page’s life cycle and perform actions at the right moment. You see an example of this in the next exercise.
|
PHASE |
DESCRIPTION |
|
Page request |
A request to an ASPX page starts the life cycle of that page. When the web server is able and allowed to return a cached copy of the page, the entire life cycle is not executed. In all other situations, the page enters the start phase. |
|
Start |
In this phase, the page gets access to properties like |
|
Page initialization |
During this phase, the controls you have set up in your page or added programmatically become available. Additionally, the |
|
Load |
During this phase, the control properties are loaded from View State and Control State during a postback. For example, when you change the selected item in a |
|
Validation |
In the validation phase, the Validation controls used to validate user input are processed. You learn about validators in Chapter 9. |
|
Postback event handling |
During this phase, the controls in your page may raise their own events. For example, the |
|
Rendering |
Rendering is the phase where the controls (and the page itself) output their HTML to the browser. |
|
Unload |
The unload phase is really a clean-up phase. This is the moment where the page and controls can release resources they were holding on to. During this phase, the |
One thing that’s important to realize is that all these events fire at the server, not at the client. So, even if you change, say, the text of a text box at the client, the TextChanged event of the TextBox control will fire at the server after you have posted back the page.
Now you may wonder why you need to know all of this. The biggest reason to have some understanding of the page life cycle is that certain actions can be performed only at specific stages in the page life cycle. For example, dynamically changing the theme has to take place in PreInit, as you’ll see later. To really understand the ASP.NET page life cycle, you need to know a little more about controls, state, events, and so on. Therefore, you’ll revisit the page life cycle again in Chapter 15 where you get a good look at all the different events that fire, and in what order.
In the next exercise, you use the PreRender event of the Page class to check the title. Because a developer could set the page’s title programmatically during many events, checking for a correct title should be done as late as possible in the page’s life cycle, which is whyPreRender is the best event for this.
Implementing a base page is pretty easy: all you need to do is add a class file to your App_Code folder, add some code to it, and you’re done. What’s often a bit more difficult is to make sure each page in your site inherits from this new base page instead of from the standard System.Web.UI.Page class. Unfortunately, there is no way to configure the application to do this for you automatically when using Code Behind, so you need to modify each page manually. Visual Studio makes it a little easier for you by enabling you to export a page template that already contains this code. In the next exercise you add a base page to the site and in a later exercise you see how to export a web form to a template so you can add files that use the base page in no time.
1. Right-click the App_Code folder in the Solution Explorer and choose Add ⇒ Add New Item. Select Class in the Templates list and name the file BasePage. You could choose another name if you like but BasePage clearly describes the purpose of the class, making it easier to understand what it does.
2. Clear the contents of the file, and then add the following code:
VB.NET
Public Class BasePage Inherits System.Web.UI.Page Private Sub Page_PreRender(sender As Object, e As EventArgs) Handles Me.PreRender If String.IsNullOrEmpty(Me.Title) OrElse Me.Title.Equals("Untitled Page", StringComparison.CurrentCultureIgnoreCase) Then Throw New Exception( "Page title cannot be ""Untitled Page"" or an empty string.") End If End SubEnd ClassC#
using System;public class BasePage : System.Web.UI.Page{ private void Page_PreRender(object sender, EventArgs e) { if (string.IsNullOrEmpty(this.Title) || this.Title.Equals("Untitled Page", StringComparison.CurrentCultureIgnoreCase)) { throw new Exception( "Page title cannot be \"Untitled Page\" or an empty string."); } } public BasePage() { this.PreRender += Page_PreRender; }}3. Save the file and close it, and then open the Login.aspx page that you created earlier. Open its Code Behind file and change the Inherits code (the colon [:] in C#) so the login page inherits from the BasePage class you created earlier:
VB.NET
Partial Class LoginInherits BasePage
...End ClassC#
public partial class Login :BasePage
{ ...}4. Save the page and then request it in the browser by pressing Ctrl+F5. If you haven’t changed the title of the page earlier, you should be greeted by the error shown in Figure 6-8 in your browser.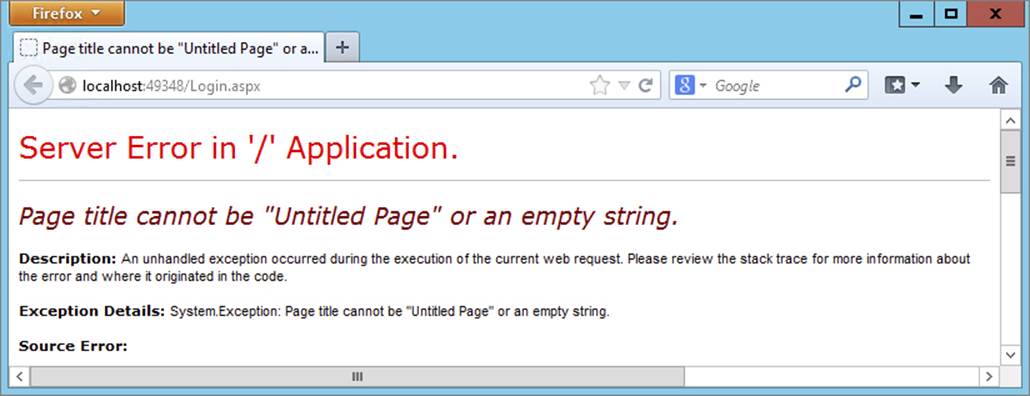
FIGURE 6-8
5.
Go back to VS and open the login page in Markup View. Locate the Title attribute in the @ Page directive (or add one if it isn’t there) and set its value to Log in to Planet Wrox. The following snippet shows the VB.NET version of the @ Page directive but the C# version is almost identical:
6.<%@ PageTitle="Log in to Planet Wrox"Language="VB"
7.MasterPageFile="~/MasterPages/Frontend.master" AutoEventWireup="false"
CodeFile="Login.aspx.vb" Inherits="Login" %>8. Repeat steps 3 and 5 for all the pages in your site. To make this a bit quicker, you can use Find and Replace to quickly replace all the occurrences of System.Web.UI.Page with BasePage. Make sure you don’t accidentally replace it in the BasePage file in theApp_Code folder itself. To prevent this from happening, make sure you search only in Code Behind files, like this:
· Open the Replace in Files dialog box (press Ctrl+Shift+H or select Edit ⇒ Find and Replace ⇒ Replace in Files).
· In the Find What box, enter System.Web.UI.Page. In the Replace With text box, enter BasePage.
· Under the Look In dropdown, make sure that Entire Solution is selected.
· Expand the Find Options section and in the Look at These File Types text box, enter *.aspx.vb or *.aspx.cs depending on the language you use. This leaves the BasePage file, which has a single extension of .vb or .cs, alone.
· Click Replace All and then click Yes to confirm the Replace operation.
9. Save the changes you made to any open page and then browse to Login.aspx again. If everything worked out as planned, the error should be gone and you now see the login page.
Remember, though, that all other pages in your site now throw an error when you try to access them. The fix is easy; just give them all a valid Title. For pages without a Title attribute in their page directive, you need to do this manually. For other pages, with an empty Title="" attribute, you can quickly do this by searching the site for Title="" and replacing it with something like Title="Planet Wrox". (Don’t forget to reset Look at These File Types back to *.*). For pages other than the demo pages you’ve created so far, you’re better off giving each page a unique title, clearly describing the content it contains.
By default, all pages in your website inherit from the Page class defined in the System.Web.UI namespace. This gives them the behavior required to make them act as web pages that can be requested by the browser and processed by the server. Because the inheritance model in .NET enables you to create a chain of classes that inherit from each other, you can easily insert your own base page class between a web page and the standard Page class. You do this by changing the Inherits statement (in VB) and the colon (in C#) to your new BasePage:
VB.NET
Partial Class Login Inherits BasePageC#
public partial class Login : BasePageInside this new BasePage class you add an event handler that is called when the class fires its PreRender event. As you learned earlier, this event is raised quite late in the page’s life cycle, when the entire page has been set up and is ready to be rendered to the client:
VB.NET
Private Sub Page_PreRender(sender As Object, e As EventArgs) Handles Me.PreRender ' Implementation hereEnd SubC#
private void Page_PreRender(object sender, EventArgs e){ // Implementation here}Note that Visual Basic uses the Handles keyword to tell the compiler that the Page_PreRender method will be used to handle the event. In C#, you need to hook up this handler manually. A good place to do this is in the class’s constructor:
public BasePage(){this.PreRender += Page_PreRender;
}This highlighted line of code serves the same purpose as the Handles keyword in VB.NET: it tells the compiler what method to run when the page raises its PreRender event.
Inside the event handler, the code checks the current page title. If the page title is still an empty string (the default for any new page you add to your web project) or Untitled Page it throws an exception.
VB.NET
If String.IsNullOrEmpty(Me.Title) OrElse Me.Title.Equals("Untitled Page", StringComparison.CurrentCultureIgnoreCase) Then Throw New Exception( "Page title cannot be ""Untitled Page"" or an empty string.")End IfC#
if (string.IsNullOrEmpty(this.Title) || this.Title.Equals("Untitled Page", StringComparison.CurrentCultureIgnoreCase)){ throw new Exception( "Page title cannot be \"Untitled Page\" or an empty string.");}This code uses the handy IsNullOrEmpty method of the String class to check if a value is null (Nothing in VB) or an empty string. It also uses the Equals method to check if the page title is equal to Untitled Page. It usesStringComparison.CurrentCultureIgnoreCase to do a case-insensitive comparison, so untitled page or Untitled Page would both match.
Notice how the keywords Me (in VB.NET) and this (in C#) are used. These keywords are context-sensitive and always refer to the instance of the class where they are used. In this example, Me and this refer to the current instance of the BasePage class. ThisBasePage instance has a Title property (which it inherits from Page) that can be checked for unwanted values. If it still contains the default title (an empty string) or the text “Untitled Page,” the code raises (or throws) an exception. This immediately stops execution of the page so you as a page developer can fix the problem by providing a valid title before the page ends up in public. In Chapter 18 you learn more about exceptions and how to prevent and handle them.
To display a double quote (") in the error message, both languages use a different format. In Visual Basic, you need to double the quotes. In C#, you need to prefix the double quote with a backslash (\) to escape the double quote. In both cases, a double quote character ends up in the error message.
Because every new page you add to the site should now inherit from this new base page, you should create a page template that already has the correct code in its Code Behind and markup, making it easy to add the correct page to the site right from the start. This is discussed next.
Creating Reusable Page TemplatesVisual Studio comes with a great tool to export templates for a number of different file types including ASPX pages, class files, and even CSS files. By creating a custom template, you define the code or markup that you need in every file once and then create new files based on this template, giving you a jump start with the file and minimizing the code you need to type. The next exercise shows you how to create your own templates.
In this exercise you see how to create a template file for all new ASPX pages you add to your site. To avoid conflicts with existing pages in your current site, you create a new temporary page and use that for the template. Afterward, you can delete the temporary file.
1. Add a new Web Form to the root of the site and call it Temporary.aspx. Make sure it uses Code Behind, uses your programming language, and is based on the master page in the MasterPages folder.
2. Open the Code Behind of this new page (by pressing F7) and change the Inherits line (the colon in C#) so the page inherits from BasePage instead of from System.Web.UI.Page. Also rename the class from Temporary to $relurlnamespace$_$safeitemname$:
VB.NET
Partial Class $relurlnamespace$_$safeitemname$ Inherits BasePage End ClassC#
public partial class $relurlnamespace$_$safeitemname$ : BasePage{ ...}Make sure you don’t remove any of the existing code, like the using statements or the Page_Load method in the C# version.
Don’t worry about any compile errors you may get about unexpected characters like $. Once you start adding pages based on this template, $relurlnamespace$_$safeitemname$ will be replaced by the name of the page you’re adding.
3. Switch to Markup View, and change the Inherits attribute from Temporary to $relurlnamespace$_$safeitemname$ as shown in this C# example:
4.<%@ Page Title="" Language="C#" MasterPageFile="~/MasterPages/Frontend.master"
5.AutoEventWireup="true" CodeFile="Temporary.aspx.cs"
Inherits="$relurlnamespace$_$safeitemname$"%>
You must leave the CodeFile attribute alone; VS will change it to the right Code Behind file automatically whenever you add a new page to the site.
6. Optionally, add other code you want to add to your pages by default, like a comment block with a copyright notice.
7. Save all changes and then choose File ⇒ Export Template. In the dialog box that follows, select Item Template and choose your programming language from the drop-down list at the bottom of the screen, shown in Figure 6-9.
FIGURE 6-9
8.
Click Next and place a check mark in front of Temporary.aspx, which you find near the bottom of the list. Click Next again to go to the Select Item References dialog box.
9. There is no need to set anything in the Select Item References dialog box now. If you had a web page referencing specific assemblies (.dll files) you could pick them here, so VS adds the references for you automatically next time you add a file based on this template. Click Next again to go to the Select Template Options screen. Type MyBasePage as the new template name, and optionally type a short note describing the purpose of the template. Make sure the Automatically Import the Template into Visual Studio option is checked. Figure 6-10 shows the final dialog box.
FIGURE 6-10
10.
Click Finish to create the template. VS opens a File Explorer (Windows Explorer in Windows 7) showing a copy of the new template as a zip file. You can close that window, because you don’t need it.
If you want to carry out this exercise for both VB.NET and C#, be sure to rename the resulting zip file first before you make an export for the second language; otherwise the zip file gets overwritten. To rename the file, open File Explorer, go to your Documents folder and then browse to Visual Studio 2013\Templates\ItemTemplates. You’ll find a file called MyBasePage.zip, which you can rename to something like MyBasePageCS.zip. Note that the file’s location is different from the one you see in Figure 6-10; the output location contains just a copy of the exported template that you can use as a backup.
11.Back in VS, delete the temporary file Temporary.aspx you created. Then right-click the website in the Solution Explorer and choose Add ⇒ Add New Item. Note that your custom template now shows up in the list of templates, shown in Figure 6-11. If you click it, VS shows you the description you gave it earlier. Note: you may have to restart VS and reopen your website for the template to appear.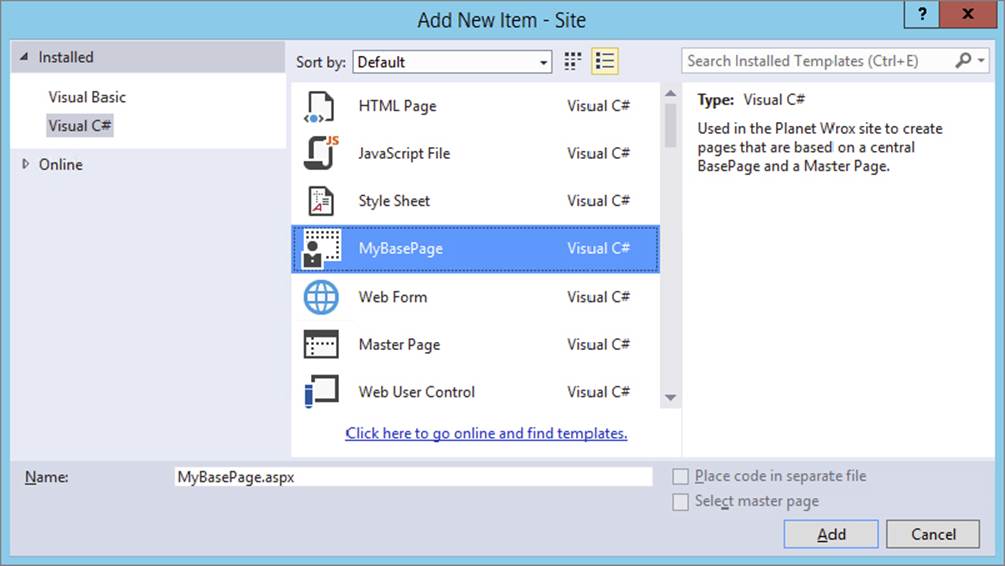
FIGURE 6-11
12.
Type a new name for the page, such as TestPage.aspx, and click Add to add it to your site. Look at the markup and the Code Behind of the file and verify that $relurlnamespace$_$safeitemname$ has been renamed to _TestPage to reflect the new name of the page. If everything looks OK, you can delete TestPage.aspx because it’s not used in the Planet Wrox website.
How It Works
When you export the template, Visual Studio creates a zip file with the necessary files — an ASPX file and a Code Behind file in this exercise. This zip file is then stored in the ItemTemplates subfolder of the Visual Studio 2013 folder under your Documents folder. Some of the files in the zip file contain the placeholders $relurlnamespace$ and $safeitemname$. When you add a new file to the site that is based on your template using the Add New Item dialog box, VS replaces $relurlnamespace$ with the name of the folder (nothing, in the case of a file added to the root of the site) and $safeitemname$ with the actual name of the page. In this exercise, you typed TestPage.aspx as the new name for the page, so you ended up with a class in the Code Behind called_TestPage, which in turn inherits from the global BasePage. The underscore (_) is hard-coded between the two placeholders and is really only needed when adding a Web Form based on this template to a subfolder. However, it’s a valid start of a class identifier so you can safely leave it in for pages at the root of your website. If you add a file to a subfolder, such as the Demos folder, the class name is prefixed with the name of the folder so you end up with a class called Demos_TestPage. In addition to$relurlnamespace$ and $safeitemname$, you can use a few other placeholders. Search the MSDN site at http://msdn.microsoft.com for the term $safeitemname$ to find the other template parameters.
If you need to make a change to the exported template, either redo the entire export process, or manually edit the files in the zip file.
With this exported template you now have a very quick way to add pages to your site that inherit from the BasePage class. You don’t need to manually change the Code Behind of the class file or the markup of the page anymore.
In addition to master pages and the central BasePage class, you have more options to create consistent-looking websites. One of them is themes.
So far you’ve seen how to create a master page to define the global look and feel of the pages in your site. You also saw how to centralize the behavior of your pages by using a central base page. However, you have more ways to influence the look and feel of your site: themes and skins. Skins are dealt with later in the chapter because they are an optional part of themes, which need to be discussed first.
A theme is a collection of files that defines the look of a page. A theme typically includes skin files, CSS files, and images. You define themes in the special App_Themes folder in the root of your website. Within this folder you create one or more subfolders that define the actual themes. Inside each subfolder, you can have a number of files that make up the theme. Figure 6-12 shows the Solution Explorer for a website that defines two themes: Monochrome and DarkGrey.
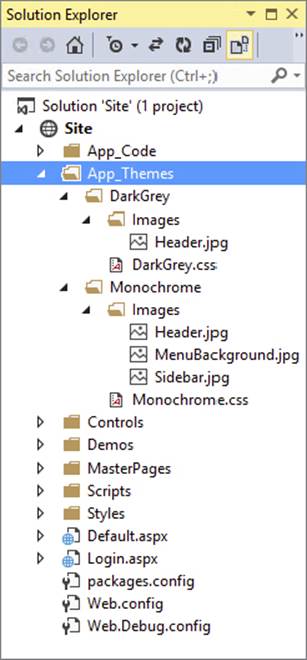
FIGURE 6-12
A link to each CSS file in the theme folder is added to your page’s <head> section automatically whenever the theme is active. You see how this works later. The images in the theme folder can be referenced from the CSS files. You can use them to change common elements of the website, such as background images, or images used in bulleted lists or navigation lists.
To create a theme, you need to do the following:
- Create the special
App_Themesfolder if it isn’t already present in your site. - For each theme you want to create, create a subfolder with the theme’s name, like Monochrome or DarkGrey in Figure 6-12.
- Optionally, create one or more CSS files that will be part of the theme. Although naming the CSS files after the theme helps in identifying the right files, this is not a requirement. Any CSS file you add to the theme’s folder is added to the page at run time automatically.
- Optionally, add one or more images to the theme folder. The CSS files should refer to these images with a relative path as explained later.
- Optionally, add one or more skin files to the theme folder. Skins enable you to define individual properties (such as
ForeColorandCssClass) for a specific control that are then applied at run time.
After you have followed these steps, you can configure your site or an individual web page to make use of this theme. To be able to set up the correct theme, you should be aware that two types of themes exist.
Different Types of ThemesAn ASP.NET page has two different properties that enable you to set a theme: the Theme property and the StyleSheetTheme property. Both of these properties use the themes that you define in the App_Themes folder. Both of these properties take their default value from the Web.config file as you’ll see later. Although at first they seem very similar, it’s their runtime behavior that makes the difference. The StyleSheetTheme is applied very early in the page’s life cycle, shortly after the page instance has been created. This means that an individual page can override the settings from the theme by applying inline attributes on the controls. So, for example, a theme with a skin file that sets the BackColor of a button to blue can be overridden by the following control declaration in the markup of the page:
<asp:Button ID="Button1" runat="server" Text="Button" BackColor="Red" />The theme in the Theme property, on the other hand, is applied late in the page’s life cycle, effectively overriding any customization you may have for individual controls.
Because properties of the StyleSheetTheme can be overridden by the page, and the Theme in turn can override these properties again, both serve a distinct purpose. You should set the StyleSheetTheme if you want to supply default settings for your controls. That is, theStyleSheetTheme can supply defaults for your controls, which can then be overridden at the page level. You should use the Theme property instead if you want to enforce the look and feel of your controls. Because the settings from the Theme cannot be overridden anymore and effectively overwrite any customizations, you can be assured that your controls look the way you defined them in the theme. There is one exception: by setting EnableTheming on the control to False you can disable theming for that control. You see this property and its effect toward the end of the chapter. The Planet Wrox sample site in this book uses the Theme property.
To apply a theme to your website, you have three different options: at the page level in the Page directive, at the site level by modifying the Web.config file, and programmatically.
- Setting the theme at the page level. Setting the
ThemeorStyleSheetThemeproperty at the page level is easy, just set the relevant attribute in thePagedirective of the page:
·<%@ Page Language="VB" AutoEventWireup="false" CodeFile="Default.aspx.vb"
Inherits="_Default"Theme="DarkGrey"%>
Replace Theme with StyleSheetTheme to apply a theme whose settings can be overridden by the individual controls. Figure 6-13 shows that as soon as you type Theme=, VS pops up with a list with all the themes it finds in the App_Themes folder.

FIGURE 6-13
Setting the theme at the site level. To enforce a theme throughout the entire website, you can set the theme in the Web.config file by adding a theme or styleSheetTheme attribute to the <pages> element inside the <system.web> element:
·<pages theme="DarkGrey" styleSheetTheme="DarkGrey">
·...
</pages>Make sure you type these attributes exactly as shown here because the XML in the Web.config file is case sensitive. The attributes you set here are then applied to the Theme and StyleSheetTheme properties of the Page class, as you see later.
- Setting themes programmatically. The third and final way to set a theme is programmatically through code. You see how this works in a later exercise.
The next Try It Out exercise shows you how themes work. You create a theme, add the necessary CSS, and then configure the application to use the new theme.
In this exercise you create two themes: Monochrome and DarkGrey. For each theme, you add the CSS layout, which is applied to the site automatically. You configure the application to use one of the themes and then switch to the other to see the differences.
1. Add the special App_Themes folder to your website. To do this, right-click the website in the Solution Explorer and choose Add ⇒ Add ASP.NET Folder ⇒ Theme. This not only creates the App_Themes folder, but immediately creates a subfolder for the theme called Theme1 by default. Type Monochrome as the new name instead. Your Solution Explorer should now look like Figure 6-14.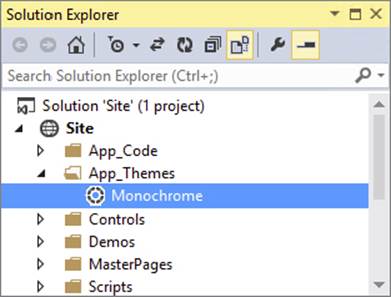
FIGURE 6-14
2.
From the Styles folder, move the Styles.css file into this new Monochrome folder. You can either drag it directly into the new folder or use Ctrl+X to cut the file, click the Monochrome folder, and press Ctrl+V to paste it again. You can leave the empty Stylesfolder because it’s used again later.
3. To make it clear later where your CSS is coming from, rename the file from Styles.css to Monochrome.css. You can rename it by selecting it and pressing F2 or by right-clicking it and choosing Rename.
4. Because the main layout is now going to be controlled by the theme, you no longer need the <link> element in the <head> section of the master page pointing to the old CSS file, so you can remove it. To this end, open the master page, switch to Markup View, and remove the following highlighted line from the code:
5.<head runat="server">
6.<title></title>
7.<asp:ContentPlaceHolder ID="head" runat="server">
8.</asp:ContentPlaceHolder>
<link href="../Styles/Styles.css" rel="stylesheet" type="text/css" />
9. The next step is to apply the theme to the entire website. Open the Web.config file from the root of the site and directly inside the <system.web> element, create a <pages> element with a theme attribute pointing to the Monochrome theme. There’s no support for themes in IntelliSense in the Web.config file so you need to type the name yourself.
10.<system.web>
11.<pagestheme="Monochrome"/>
...12.To test the theme, save all your changes and then request the Default.aspx page in your browser. The design of the site should be identical to how it was.
Instead of linking to the CSS file from the master page, the CSS is now included in the page source through the theme set in the Web.config file. To see how this works, open the HTML source of the page in the browser. At the top you should see the following code (I altered the layout for better readability):
<!DOCTYPE html><html xmlns="http://www.w3.org/1999/xhtml"><head> <title>Welcome to Planet Wrox</title> <script src="/Scripts/modernizr-2.7.1.js"></script><link href="App_Themes/Monochrome/Monochrome.css"
type="text/css" rel="stylesheet" /></head><body>Note that a link to the style sheet from the Monochrome theme folder is injected in the <head> of the page. The ASP.NET run time does this for every CSS file it finds in the currently active theme folder (in alphabetical order), so be sure to keep your theme folder clean to avoid unnecessary files from being included and downloaded by the browser. Also note that the <link> is added just right before the closing </head> tag. This ensures that the theme file is included after all other files you may have added yourself (through the master page, for example). This is in contrast to how the styleSheetTheme attribute works. Because this type of theme allows its settings to be overridden, it’s imported at the top of the file, giving room for other CSS files that follow it to change the look and feel of the page.
13.Return to Visual Studio and open the master page file in Design View. Notice how all the design is gone and VS now shows the basic layout of the page again. Unfortunately, VS does not display the theme you’ve set using the theme attribute. However, you can overcome this limitation by setting the styleSheetTheme instead. To do this, open the Web.config file again, locate the <pages> element you created earlier, and add the following attribute:
<pages theme="Monochrome"styleSheetTheme="Monochrome"... />
14.Save the changes to Web.config, close and reopen the master page, and switch to Design View. You’ll see that VS now applies the correct styling information to your pages.
15.To add another theme to the site, create a new folder under App_Themes and call it DarkGrey. Next, open the folder where you extracted the downloaded code that comes with this book. If you followed the instructions in the introduction of this book, this folder is located at C:\BegASPNET\Resources. If you don’t have these files yet, they are available at www.wrox.com/go/begaspnet451. Open the Chapter 06 folder and then the DarkGrey folder. Position the File Explorer and VS side by side and then drag the file DarkGrey.css from File Explorer into the DarkGrey theme folder in VS. If dragging doesn’t work for you, you can use Ctrl+C in File Explorer to copy the file, and then use Ctrl+V in VS to paste the file in the right folder. Your Solution Explorer should now resemble Figure 6-15.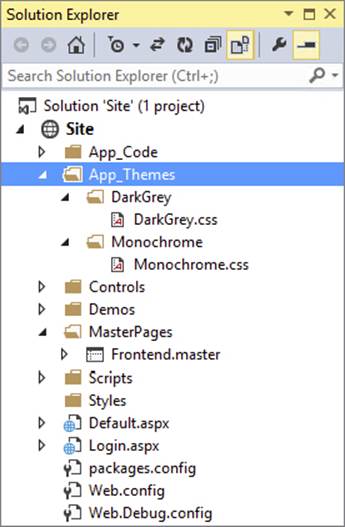
FIGURE 6-15
You add the images that the CSS file refers to in a later exercise.
16.Open the Web.config file once more and change both occurrences of Monochrome to DarkGrey in the <pages> element. Save the changes again and press Ctrl+F5. Instead of the blue Monochrome theme, you’ll now see the site with the DarkGrey theme applied as is visible in Figure 6-16. If you don’t see the menu placeholder, the main content, and the sidebar all next to each other, make sure your browser window is wide enough to display all content.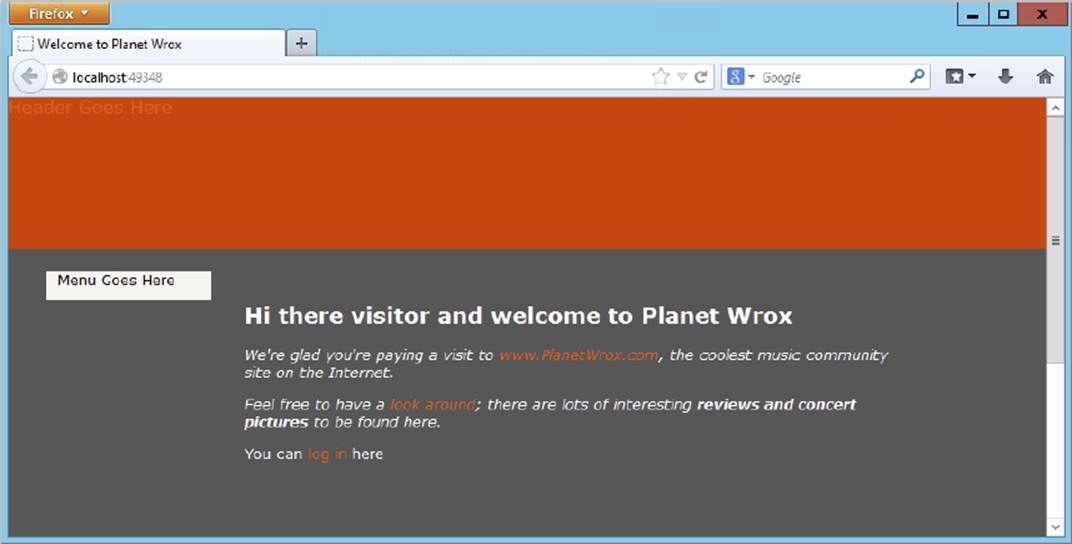
FIGURE 6-16
If you don’t see the new theme appear, close all open browsers, ensure you changed Web.config correctly, and open Default.aspx again. If you still don’t see the theme, press Ctrl+F5 or Ctrl+R in your browser to force it to get a fresh copy from the server.
How It Works
In this exercise you first applied the Monochrome theme by changing the <pages> element in the Web.config file. When the run time sees that a theme is active, it scans the associated theme folder for .css files and includes a link to all those files in the page’s <head> section in alphabetical order. In the case of the Monochrome theme it finds the file Monochrome.css and adds it to the <head> section automatically. An identical process took place when you changed the theme to DarkGrey. The linked style sheet then influences the way the page is displayed in the browser by changing the layout and colors used in the page.
To enable design-time support in Visual Studio, you need to change the styleSheetTheme in the Web.config file as well. The only downside of this is that the relevant CSS file is now included twice: once for the Theme and once for the StyleSheetTheme. Because the exact same file is included twice, it doesn’t affect the layout of the site. All the selectors in the second file simply overrule those in the first. However, if you feel this duplication is a waste of CPU cycles, you should delete the styleSheetTheme attribute from the Web.config file when you go live with the application.
The layout of the page is changed radically because of the CSS in the DarkGrey.css file. If you want to know what CSS the file contains and what elements of the page it changes, open it up in VS. It has lots of comments describing each selector in detail.
ASP.NET themes are not limited to just CSS files. As you learn next, themes can also contain images and skin files.
Extending ThemesIn addition to CSS files and skins (discussed toward the end of this chapter), a theme can also contain images. The most common use of theme images is referring to them from your CSS. To put this to good use it’s important to understand how CSS refers to images.
By design, an image referred to by a CSS selector will be searched for relative to the location of the CSS file, unless you give it a path that starts with a forward slash (/) to indicate the root of the site. Consider, for example, the App_Themes folder depicted in Figure 6-17.
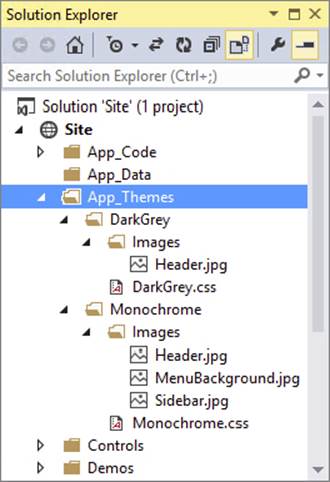
FIGURE 6-17
To refer to the MenuBackground.jpg file in the Images folder of the Monochrome theme, you can add the following CSS to Monochrome.css:
nav{ background-image: url(Images/MenuBackground.jpg);}If you wanted to refer to an image in the Images folder in the root of the site, you would use this CSS:
background-image: url(/Images/MenuBackground.jpg);Note the leading forward slash in front of the image path to indicate the root of the site. This latter syntax is useful if you want to share images between different themes. Simply put them in a folder outside a specific theme, like an Images folder at the root, and then use this root-based syntax to refer to them. The next chapter digs a lot deeper into the different forms a URL can take to refer to a resource like an image.
In this Try It Out you add the images and CSS files to the site to complete both themes. You overwrite the file Monochrome.css in the Monochrome theme, so if you made any customizations you would like to keep, create a backup of it first.
1. Open File Explorer and navigate to the files you extracted from the zip file for this chapter (at C:\BegASPNET\Resources). Open the Chapter 06 folder and then the Monochrome folder. Select the Images folder and the Monochrome.css file.
2. Drag (or copy and paste) the selected folder and files from File Explorer into the Monochrome theme folder in VS. Click Yes when you’re asked to overwrite Monochrome.css.
3. Repeat steps 1 and 2, but this time drag (or copy and paste) only the Images folder from the File Explorer’s DarkGrey folder into the DarkGrey theme folder in VS. Your Solution Explorer now looks like Figure 6-17.
4. Open up the master page from the MasterPages folder, and remove the text Header Goes Here from the <header> element. Make sure you don’t accidentally remove the <a> element, which should now be empty.
5. Request Default.aspx in your browser by right-clicking it and choosing View in Browser. You should now see the web page with images from the DarkGrey theme, shown in Figure 6-18, that displays the page in Apple’s Safari.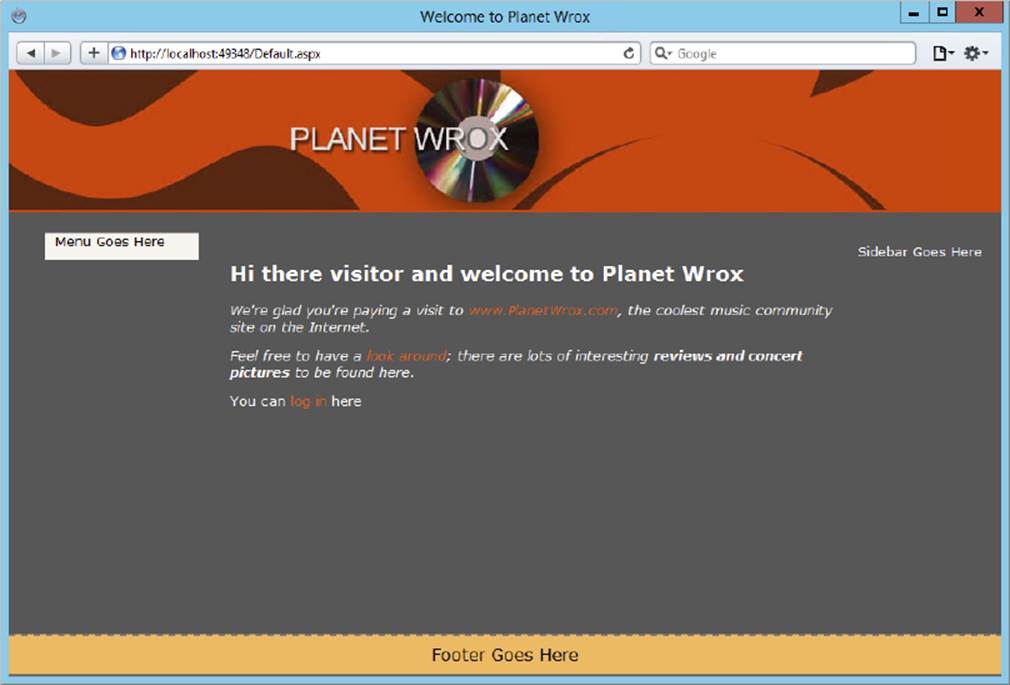
FIGURE 6-18
6.
Go back to VS, open the Web.config file, and switch the two theme attributes of the <pages> element from DarkGrey to Monochrome again. Open Default.aspx in your browser and you’ll see the page with the new theme and images as shown in Figure 6-19that displays the page in Google Chrome. If you still see the old page, press Ctrl+F5 to cause a hard refresh. If you find that the page in the browser is showing a combination of the two themes, go back to VS, open Web.config, and remove thestyleSheetTheme attribute from the <pages> element.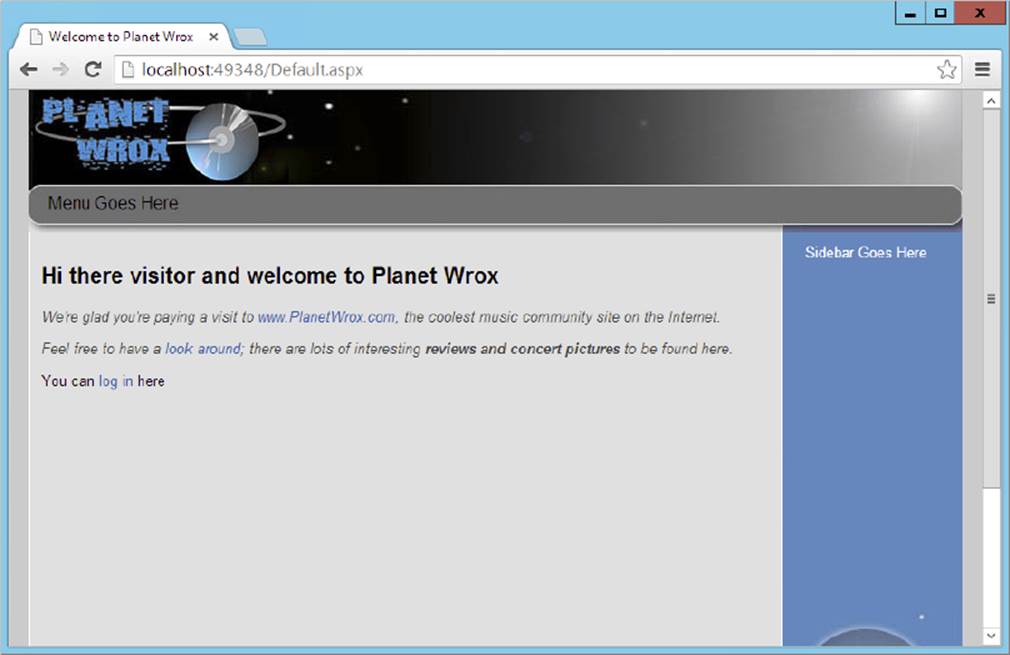
FIGURE 6-19
From a theme point of view, nothing has changed in this exercise. Just as you saw before, the theme’s style sheet is added to the head of the page. However, this time the style sheet points to images located in the theme folder. The browser reads the CSS file, follows the link to the images, downloads them, and then displays them at the right location as dictated by the various CSS selectors in the code file.
The CSS files you added for both themes contain a lot of comments, so if you want to know what the CSS does, check out the files in the two theme folders.
Useful as themes may be to enable you, the page developer, to quickly change the appearance and even the layout of the site, they become even more useful if you let your users switch them at run time. This way, users can customize the site to their liking. The next section shows you how to accomplish this.
Dynamically Switching Themes
Switching themes at run time has a few benefits. For example, you can please your users by enabling them to choose a theme with the colors and layout they like. Not everyone appreciates a dark background with white text, so the option to change that at run time is something that many people like. However, you can also deploy themes to help visually impaired users. By creating a theme that has a high-contrast color scheme and a large font size, you make it much easier for people to see your site. The themes in the Planet Wrox website only change screen elements like colors and layout, but it’s easy to create a copy of one of those themes and then change the font size and the color scheme.
Because of the way themes are applied to a page at run time, you need to set the theme early on in the page’s life cycle, in the PreInit event to be precise. The base page of the website is once again the ideal location to do this, because every page in the site inherits from this class.
To enable users to change the theme, you can offer them a drop-down menu that automatically posts back to the server when they change the active option in the list. At the server, you get the chosen theme from the list, apply it to the page, and then store the selection in a cookie so it can be retrieved on subsequent visits to the website.
Cookies are little pieces of text that you can store on the user’s computer. The data you store in a cookie is sent only to the server that set it in the first place, so other sites can’t read the cookie from yours. However, because cookies are stored on the user’s computer as plaintext, you should never use them to store any sensitive data, such as a password. Storing harmless data like the preferred theme is an excellent use of cookies, though.
To create a cookie so it’s stored on the user’s computer, you use the Cookies collection on the Response object. This way, the cookie is sent to the browser along with the response. Here’s a quick example:
VB.NET
Dim myCookie As HttpCookie = New HttpCookie("CookieName")myCookie.Expires = DateTime.Now.AddMonths(3)myCookie.Value = "Cookie value"Response.Cookies.Add(myCookie)C#
HttpCookie myCookie = new HttpCookie("CookieName");myCookie.Expires = DateTime.Now.AddMonths(3);myCookie.Value = "Cookie value";Response.Cookies.Add(myCookie);This code sends the cookie to the browser where it will be stored until it expires, which in this example is three months from the day the cookie is set. For each request to a page, the browser sends this cookie back to the server where you can read it again using theCookies collection of the Request object, like this:
VB.NET
Dim myCookie As HttpCookie = Request.Cookies.Get("CookieName")If myCookie IsNot Nothing Then Label1.Text = myCookie.Value ' Would display "Cookie value"End IfC#
HttpCookie myCookie = Request.Cookies.Get("CookieName");if (myCookie != null){ Label1.Text = myCookie.Value; // Would display "Cookie value"}In the following two exercises you see how to implement the functionality to switch themes dynamically. The first exercise guides you through modifying the master page to enable the user to select a theme. This exercise only retrieves the name of the theme the user selects and stores it in a cookie. The second exercise then shows you how to apply that theme at run time to every page that inherits from BasePage.
With the ability to let a user select a theme in place, the next step is to apply the chosen theme.
As you learned previously, the theme needs to be set in the PreInit event, which takes place early in the page’s life cycle. Inside this event, you can see if the cookie with the selected theme exists. If it does, you can use its value to set the right theme.
In this exercise, you modify the base page and add some code for the PreInit event to set the user’s theme.
1. Open the base page file from the App_Code folder and add the following code that sets the selected theme during the PreInit event. You can add this code before or after the method that checks the page title.
VB.NET
Private Sub Page_PreInit(sender As Object, e As EventArgs) Handles Me.PreInit Dim preferredTheme As HttpCookie = Request.Cookies.Get("PreferredTheme") If preferredTheme IsNot Nothing Then Dim folder As String = Server.MapPath("~/App_Themes/" & preferredTheme.Value) If System.IO.Directory.Exists(folder) Then Page.Theme = preferredTheme.Value End If End IfEnd SubC#
private void Page_PreInit(object sender, EventArgs e){ HttpCookie preferredTheme = Request.Cookies.Get("PreferredTheme"); if (preferredTheme != null) { string folder = Server.MapPath("~/App_Themes/" + preferredTheme.Value); if (System.IO.Directory.Exists(folder)) { Page.Theme = preferredTheme.Value; } }}For the C# example, you need to include a using statement at the top of the file to bring the Request class into scope, like this:
using System.Web;2. If you’re working with C#, you also need to set up an event handler in the class’s constructor for the PreInit event, just as you did with the PreRender event handler in an earlier exercise. This tells the ASP.NET run time which method will handle thePreInit event:
3.public BasePage()
4.{
5.this.PreRender += Page_PreRender;
6.this.PreInit += Page_PreInit;
}7. Save changes to all open documents and then request Default.aspx in the browser. The page should load with the theme you chose last in the drop-down list in the previous exercise.
8. Choose a new item from the list. The page should reload and should now show the other theme.
If you find that the page in the browser is showing a combination of the two themes, go back to VS, open Web.config, and remove the styleSheetTheme attribute from the <pages> element, leaving the theme attribute in place because it serves as the default for new visitors. If you don’t see the theme applied, make sure your page is inheriting the BasePage class in the Code Behind.
With the hard work of getting the user’s favorite theme and storing it in a cookie already done, applying the theme is now very easy. The code in the PreInit event handler first verifies whether there is a cookie called PreferredTheme. It does this by comparing the return value of the Get method to Nothing (null in C#).
VB.NET
Dim preferredTheme As HttpCookie = Request.Cookies.Get("PreferredTheme")If preferredTheme IsNot Nothing ThenC#
HttpCookie preferredTheme = Request.Cookies.Get("PreferredTheme");if (preferredTheme != null)This code uses Request.Cookies to read from the cookies that the user’s browser sent together with the request. If the cookie exists, its Value property is used to set the correct theme:
VB.NET
Page.Theme = preferredTheme.ValueC#
Page.Theme = preferredTheme.Value;Because the theme is set early in the page’s life cycle, this setting is applied throughout the page, effectively giving the page the look and feel defined in it. To ensure that the code doesn’t try to apply a theme that (no longer) exists, it uses Directory.Existsthat returns true or false depending on the presence of the folder on disk. To get at the full path of the theme folder on disk, it uses Server.MapPath to translate a virtual path into its physical counterpart. You learn more about virtual paths in the next chapter, while Server.MapPath is discussed further in Chapter 9.
With the capability to set the theme programmatically, you’re offering your users a quick and easy way to change the page to their liking. The theme affects colors and layout throughout each page in the entire website. Combined with master pages, this gives you a flexible way to influence the look and feel of an entire page. It could also be useful if you were able to change certain controls on a page. For example, you may have the need to give each button in your site the exact same look. This is where the ASP.NET skins come into play.
SKINSSkins are simple text files that contain markup that enables you to define the look and feel of one or more server controls from a central location. Placed in a theme’s folder, they are an integral part of the ASP.NET themes feature. A skin file (with a .skin extension) contains the server-side presentational elements of a control. These settings are then applied to all the controls to which the skin applies. To see how this works, consider the following example that defines the skin — or appearance — of a Button control:
<asp:Button BackColor="#cccccc" ForeColor="#308462" runat="server" />With this skin definition, the buttons in your site will get a BackColor of #cccccc and a ForeColor of #308462. All you need to do is create a skin file under your theme’s folder, add this markup to it, and that’s it. From then on, all the buttons will be changed automatically. Just as with setting the properties on the controls directly as you saw earlier, these properties, like BackColor and ForeColor, are transformed into client-side HTML and CSS.
Note that this skin markup is similar to the markup of a button. A few differences exist, though. First of all, the control in the skin file cannot have an ID attribute. The ID is used to uniquely identify a control in a page, and because the skin is applied to all controls, there’s no point in giving it an ID. Another difference is the number of attributes you can set in the markup. Not all properties of a control are skinnable. For example, you can’t set the Enabled property of the Button through a skin. Microsoft’s MSDN documentation lists for each property whether or not they can be skinned. Another way to find out if you can skin a certain property is by simply trying it: just set the property in the skin and if you’re not allowed to set it, you’ll get an error at run time.
Generally speaking, properties that influence the appearance (BackColor, ForeColor, BorderColor, and so on) can be skinned and properties that influence behavior (Enabled, EnableViewState, and more) cannot be set.
When you create a new skin file using the Add New Item dialog box, you get a bunch of text wrapped in a server-side comment block. You can safely remove these comments because they only give you a short example of how skins work. You can define multiple controls in a single skin file. However, from a maintainability point of view, it’s often easier to name each skin file after the control it represents. For example, you would have a file called Button.skin for buttons, Label.skin for labels, and so on.
Instead of applying formatting elements directly to the control’s properties in the skin and thus to the final markup in the page, it’s often better to use the CssClass property to point to a CSS class in one of your CSS files. That way, it’s even easier to make sitewide changes and you avoid bloating the final HTML. Given the previous example, a file with the following skin definition and a class in the theme’s CSS file would give the same effect:
<asp:Button CssClass="MyButton" runat="server" />.MyButton{ color: #308462; background-color: #cccccc;}Skin files must be created in the theme’s folder directly. You can’t store them in a subfolder like you do with the theme’s images. In the following exercise you see how to create a simple skin file to change the look and feel of all button controls in the website. Later chapters in this book build on this knowledge by defining more complex skins for other controls like the GridView.
When you start typing in a skin file, you’ll notice that the familiar IntelliSense doesn’t kick in. This makes it slightly difficult to define your controls and their attributes. However, there is a simple workaround:
1. Open Visual Studio’s Options dialog box by choosing Tools ⇒ Options.
2. Expand the Text Editor category and click File Extension.
3. In the Extension box, type skin and then from the Editor drop-down list, choose User Control Editor.
4. Click the Add button and then click the OK button to dismiss the Options dialog box.
From now on, you’ll get IntelliSense in skin files (you may need to reopen existing skin files first if you already created one). With this setting on, you may get a warning in the Error List about build providers when you have a skin file open. You can safely ignore this warning, because skins work fine at run time even with these settings in VS.
To effectively use skins, you should strive to use CssClass attributes as much as possible instead of applying inline attributes that all end up in the final HTML of the page, increasing its size and load time. However, to show you how it works in case you do have a special need to add inline attributes, this exercise shows you how to apply both.
1. In the Monochrome theme folder, add a new skin file and call it Button.skin. You add the file by right-clicking the Monochrome folder and choosing Add ⇒ Skin File. In the dialog box that follows, type Button as the filename and click OK.
2. Delete the entire contents from the file and type the following code:
<asp:Button CssClass="MyButton" BackColor="#509EE7" runat="server" />Note that this markup uses a combination of inline attributes for styling (the BackColor) and the CssClass to point to a selector in your CSS file. Also note that this control does not have an ID attribute. As explained earlier, you can ignore the warning about missing build providers because your skin files will work fine at run time. As soon as you close the skin file, the warning goes away.
3. Open the Monochrome.css file from the theme folder and add this CSS selector at the end of the file:
4..MyButton
5.{
6.color: White;
}7. Create a new Web Form in the Demos folder and call it SkinsDemo.aspx. Make sure you base it on the exported MyBasePage template you created earlier. Give the page a Title of Skins Demo and then add a Button by dragging it from the Toolbox into thecpMainContent area of the page. You end up with this code:
8.<asp:Content ID="Content2" ContentPlaceHolderID="cpMainContent" runat="Server">
9.<asp:Button ID="Button1" runat="server" Text="Button" />
</asp:Content>10.Save all changes and then request SkinsDemo.aspx in the browser. If necessary, switch to the Monochrome theme. The button you added in step 4 should now have a blue background with white text on it. If the changed colors don’t show up, make sure you selected the right theme in the drop-down list and that you added the MyButton CSS class to the CSS file of the Monochrome theme. If you still don’t see the changes, press Ctrl+F5 or Ctrl+R to force a fresh copy of the CSS file from the server.
To see how it works, you should take a look at the HTML for the page in the browser. The Button control has been transformed in the following HTML:
<input type="submit" name="ctl00$cpMainContent$Button1" value="Button" id="cpMainContent_Button1" class="MyButton" style="background-color:#509EE7;" />Both the CssClass and the BackColor attributes in the skin have been added to the HTML. The former ended up as a class attribute on the button, and the latter has been transformed into a style attribute. The MyButton class in the CSS file gives the button its white text and the inline style determines the background color of the button. If you choose the DarkGrey theme in the drop-down list and then look at the HTML again, you’ll notice it has no class and style attributes, giving the button its default look.
As you can see, skins are extremely easy to use and enable you to radically change the look of specific controls in your site. But what if you don’t want all your buttons to change to blue and white at the same time? What if you need one special button that has a red background? You can do this with named skins.
Named SkinsNamed skins are identical to normal skins with one exception: they have a SkinID set that enables you to refer to that skin by name. Controls in your ASPX pages can then use that SkinID to apply that specific skin to the control. The next exercise shows you how this works.
The easiest way to create a named skin is by copying the code for an existing one and then adding a SkinID attribute. Be aware that if you copy and paste a skin definition, VS automatically adds an ID attribute (that is, if you connected skin files to the User Control Editor as described earlier). This ID is not allowed, so you need to remove it.
1. Open Button.skin, copy all the code, and paste it below the existing markup.
2. If VS added an ID attribute, remove it, together with its value (that is, remove ID=”Button1”).
3. Remove the CssClass attribute and its value, change the BackColor of the button to Red, and set the ForeColor to Black.
4. Add a SkinID attribute of RedButton. You should end up with this code:
5.<asp:Button CssClass="MyButton" BackColor="#509EE7" runat="server" />
<asp:Button BackColor="Red" ForeColor="Black" SkinID="RedButton" runat="server" />6. Save and close the skin file.
7. Open SkinsDemo.aspx and add a second button. Set the SkinID of this button to RedButton. Notice how IntelliSense helps you pick the right SkinID. The code for the two buttons should now look like this:
8.<asp:Button ID="Button1" runat="server" Text="Button" />
<asp:Button ID="Button2" runat="server" Text="Button" SkinID="RedButton" />9. Open SkinsDemo.aspx in the browser. You should now see two buttons; the blue one you added earlier and the new black-on-red one. If you don’t see the different colors, ensure you have selected the Monochrome theme in the browser.
Named skins work almost exactly the same as normal skins. However, with a named skin a control can point to a specific skin in one of the skin files. In the SkinsDemo.aspx page, the first button gets its settings from the default, unnamed skin, and the other now gets its settings from the skin with its SkinID set to RedButton. If you assign a nonexistent SkinID to a control, ASP.NET will simply ignore it and not raise an error.
With named skins, you have a very flexible solution at your disposal. With the normal skins, you can quickly change the appearance of all controls in your site. You can then use a named skin to override this behavior for a few controls that you want to look different.
Disable Theming for Specific ControlsIf for some reason you don’t want to apply a skin to a specific control, you can disable the skin by setting the EnableTheming property of the control, like this:
<asp:Button ID="Button1" runat="server"EnableTheming="False"Text="Button" />
With EnableTheming set to False, the skin is not applied to the control. CSS settings from the theme’s CSS file are still applied, though.
The following list provides some practical tips on creating consistent pages:
- When you create a new website, always start by adding a master page that you base all other pages on. Even if you think you have a site with only a few pages, a master page will help you ensure a consistent look across the entire site. Adding a master page at a later stage to the site means making a lot of manual changes to existing pages.
- As soon as you find yourself adding styling information to complex controls like the
TreeViewandMenu(discussed in the next chapter) or data-aware controls like theGridView(discussed in Chapter 13), consider creating a skin for them. The fact that you can control the layout of all similar controls from a single location makes it a lot easier to update your site. If you want to override the layout for a few controls, you can always use named skins with aSkinIDor disable the skin entirely by settingEnableThemingtoFalse. - When creating skins or setting style properties directly on a control, consider using the
CssClassproperty instead, and then moving all styling-related properties to the CSS for the site or theme. This decreases the page’s size and makes it easier to make changes to the layout afterward. - The Export Template feature of Visual Studio is a great time saver. You can use it not only to create a template for an ASPX page and its Code Behind, but also for other files like classes and CSS files, and even a complete website. This enables you to jump-start the creation of new files, saving you from typing the same stuff over and over again.
The consistent look and feel of all pages in your site is important to give your site a professional and attractive look. This in turn helps your visitors in finding the right information in your site, increasing the chances that they might visit your site again. ASP.NET 4.5.1 offers a number of great tools to aid you in creating a consistent looking website.
ASP.NET master pages and content pages help you create a layout that is repeated in every page that is based on that master.
Whereas master pages define a centralized look and feel, you use a base page to centralize behavior such as checking the page for invalid titles.
Themes are used to change the look and feel of the pages in your site and the controls they contain. Because themes can contain CSS files, images, and skins, you can change colors, fonts, positioning, and images simply by applying a theme. By making good use of techniques like named skins and the EnableTheming attribute, you can create a design that applies to your entire site, while you maintain the flexibility to overrule the design on a control-by-control basis.
The Planet Wrox website is now starting to grow. This means it becomes more difficult for you and your visitors to find the right pages. The next chapter shows you a number of different ways for your users to navigate your site so they won’t have any problems finding the page they are looking for.
1. What’s the difference between a ContentPlaceHolder and a Content control? In what type of page do you use which one?
2. How do you hook up a Content control in a content page to the ContentPlaceHolder in the master page?
3. Imagine you have created a skin that gets applied to all buttons in your site with the following skin definition:
<asp:Button runat="server" CssClass="MyButton" />The imaginary CSS class MyButton sets the background color of the button to black and the foreground color to white. To draw attention to a specific button in a page, you decide to give it a red background instead. Which options do you have to control the look of this single button?
4. Explain the differences between setting the Theme property and the StyleSheetTheme property for a page.
5. Name three different ways to set the Theme property for a page and explain the differences between the options.
6. What’s the main reason for implementing a base page in your website?
You can find answers to these exercises in Appendix A.
WHAT YOU LEARNED IN THIS CHAPTER
|
Base Page |
A class inheriting from the ASP.NET |
|
Content Page |
An ASPX Web Form that uses a master page to build up its global appearance and layout |
|
Cookies |
Little pieces of text that you can store on the user’s computer and access again from the server |
|
Master Page |
A central page that defines the look and feel of content pages that use the master page |
|
Named Skin |
An ASP.NET skin with an explicit |
|
Page Life Cycle |
The series of events that an ASPX page goes through when requested by a browser |
|
Skin |
A collection of presentational settings to influence the appearance of controls in the browser |
|
Theme |
A collection of CSS styles, skins, and images to change the appearance of pages in your site |
All materials on the site are licensed Creative Commons Attribution-Sharealike 3.0 Unported CC BY-SA 3.0 & GNU Free Documentation License (GFDL)
If you are the copyright holder of any material contained on our site and intend to remove it, please contact our site administrator for approval.
© 2016-2026 All site design rights belong to S.Y.A.