Beginning ASP.NET-4.5 in C# and VB (2013)
Chapter 7
Navigation
WHAT YOU WILL LEARN IN THIS CHAPTER:
- How to move around in your site using server controls and plain HTML
- How to address pages and other resources like images
- How to use the ASP.NET
Menu, TreeView, andSiteMapPathnavigation controls - How to use ASP.NET’s routing capabilities
- How to send users from one page to another programmatically
WROX.COM CODE DOWNLOADS FOR THIS CHAPTER
You can find the wrox.com code downloads for this chapter on the Download Code tab at www.wrox.com/go/begaspnet451. The code is in the Chapter 7 folder.
When your site contains more than a handful of pages, it’s important to have a solid and clear navigation structure that enables users to find their way around your site. If you implement a good navigation system, all the disconnected web pages in your project form a complete and coherent website.
When you think about important parts of a navigation system, the first thing that you may come up with is a menu. Menus come in all sorts and sizes, ranging from simple and static HTML links to complex, fold-out menus driven by CSS or JavaScript. But there’s more to navigation than menus alone. ASP.NET comes with a number of useful navigation controls that enable you to set up a navigation system in no time. These controls include the Menu, TreeView, and SiteMapPath, which you learn about in this chapter.
Besides visual controls like Menu, navigation is also about structure. A well-organized site is easy for your users to navigate. The Web.sitemap file that is used by the navigation controls helps you define the logical structure of your site.
Another important part of navigation takes place at the server. Sending a user from one page to another in Code Behind based on some condition is a very common scenario. For example, imagine an administrator entering a new CD or concert review in the Management section of the website. When the review is completed, you may want to show the administrator the full details by redirecting her to a new page.
In this chapter, you learn how to use the different navigation options at your disposal. Before you look at the built-in navigation controls, however, you need to understand the different options you have to address the resources in your site, such as ASPX pages and images.
DIFFERENT WAYS TO MOVE AROUND YOUR SITEThe most common way to let a user move from one page to another is by using the <a> element. This element has an href attribute that enables you to define the address of a page or other resource you want to link to. Between the tags you can place the content you want to link, such as text, an image, or other HTML. The following snippet shows a simple example of the <a> element:
<a href="Login.aspx">You can log in here</a>With this code in a web page, after users click the text “You can log in here,” they are taken to the Login.aspx page, which should be in the same folder as the page that contains the link.
The <a> element has a server-side counterpart called the HyperLink. It eventually ends up as an <a> element in the page. The NavigateUrl property of this control maps directly to the href attribute of the <a> element. For example, a server-side HyperLink in a content page such as this:
<asp:HyperLink runat="server" id="LoginLink" NavigateUrl="Login.aspx"> You can log in here</asp:HyperLink>produces the following HTML in the browser:
<a id="LoginLink" href="Login.aspx">You can log in here</a>Other than the id attribute that is assigned by the ASP.NET run time, this code is identical to the earlier example. In both cases, the href attribute points to the Login.aspx page using a relative URL. The next topic describes the differences between relative and absolute URLs.
Key to working with links in your site is a good understanding of the different forms a uniform resource locator (URL) to a resource inside or outside your website can take. A URL is used to uniquely identify a resource in your or another website. These URLs are used in different places, including the href attribute of a hyperlink or a <link> element to point to a CSS file, the src attribute pointing to an image or a JavaScript source file, and the url() value of a CSS property. A URL can be expressed as a relative URL or anabsolute URL. Both have advantages and disadvantages that you should be aware of.
In the previous examples you saw a relative URL that points to another resource relative to the location where the URL is used. This means that the page containing the <a> element and the Login.aspx page should both be placed in the same folder in your site. To refer to resources in other folders you can use the following URLs. All the examples are based on a site structure shown in Figure 7-1.
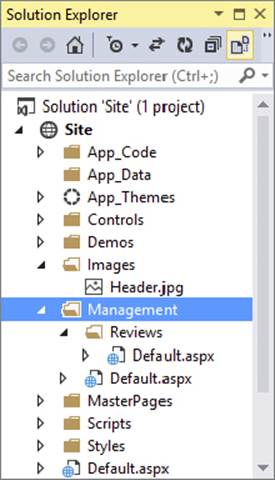
FIGURE 7-1
To link from Login.aspx in the root to Default.aspx in the Management folder, you can use this URL:
<a href="Management/Default.aspx">Management</a>To refer to the image Header.jpg from Default.aspx in the Management folder, you can use this URL:
<img src="../Images/Header.jpg" />The two leading periods “navigate” one folder up to the root, and then the path goes back in the Images folder to point to Header.jpg.
For a deeper folder hierarchy, you can use multiple double periods, one for each folder you want to go upward in the site hierarchy, like the following <img> element. You can use it to refer to the same image from pages in the Reviews folder, which is located under theManagement folder:
<img src="../../Images/Header.jpg" />One benefit of relative URLs is that you can move a set of files to another directory at the same level without breaking their internal links. However, at the same time, they make it more difficult to move files to a different level in the site hierarchy. For example, if you moved the Login.aspx page to a separate folder like Members, the link to the Management folder would break. The new Members folder doesn’t have Management as its subfolder, so Management/Default.aspx is no longer a valid link.
To overcome this problem, you can use root-based relative URLs.
Root-Based Relative URLsRoot-based relative URLs always start with a leading forward slash to indicate the root of the site. If you take the link to the Management folder again, its root-based version looks like this:
<a href="/Management/Default.aspx">Management</a>Note the leading forward slash in front of the Management folder to indicate the root of the website. This link is unambiguous. It always points to the Default.aspx file in the Management folder in the root. With this link, moving the Login.aspx page to a subfolder doesn’t break it; it still points to the exact same file.
With ASP.NET Server Controls, you have another option at your disposal to refer to resources in your website: You can use the tilde (~) character to point to the current root of the site. This is especially useful when you run your website as a separate application folder under the main website. This would be the case if your main site ran under www.PlanetWrox.com/Site rather than under www.PlanetWrox.com, for example. To see what that means, consider this image that uses the tilde in its ImageUrl:
<asp:Image ID="Image1" runat="server" ImageUrl="~/Images/Header.jpg" />When you use an application folder such as Site, the image is searched for at /Site/Images/Header.jpg. If you reconfigure the site to run without an application folder, the image is looked for at /Images/Header.jpg without requiring you to change any code.
You can also use the ~ syntax on regular HTML elements, provided you add the runat attribute. This way, the path is processed at the server and then returned to the client. The following example shows a plain HTML link that links to a page in the Management folder:
<a href="~/Management/Default.aspx" runat="server">Management</a>IIS Express, the web server that ships with VS 2013, will always start a new site at the root directory. That means it will use a URL similar to http://localhost:59898/ and not http://localhost:59898/Site/. Therefore, root-based URLs will work as expected.
Absolute URLsIn contrast to relative URLs that refer to a resource from a document or site root perspective, you can also use absolute URLs that refer to a resource by its full path. So instead of directly referring to an image and optionally specifying a folder, you include the full name of the domain and protocol information (the http:// prefix). Here’s an example that refers to the Wrox logo at the Wrox Programmer to Programmer site (http://p2p.wrox.com), where you go for questions about this and other Wrox books or for general questions regarding programming:
<img src="http://p2p.wrox.com/images/header/wrox_logo.gif" />Absolute URLs are required if you want to refer to a resource outside your own website. With such a URL, the http:// prefix is important. If you leave it out, the browser will look for a folder called p2p.wrox.com inside your own website.
Absolute URLs are unambiguous. They always refer to a fixed location, which helps you to make sure you’re always referring to the exact same resource, no matter where the source document is located. This may make you think that they are ideal to use everywhere — including references to resources within your own site — but that’s not the case. The extra protocol and domain information adds to the size of the page in the browser, making it unnecessarily slower to download. But more important, it creates difficulties if you’re changing your domain name, or if you want to reuse some functionality in a different website. For example, if you previously had your site running on www.mydomain.com but you’re moving it to www.someotherdomain.com, you will need to update all the absolute URLs in the entire website.
You will also have trouble with absolute URLs during development. Quite often, you test your website on a URL such as http://localhost. If you were to point all your images to that URL, they would all break as soon as you put your site on a production domain likewww.PlanetWrox.com.
In short, use absolute URLs with caution. You always need them when referring to resources outside your website, but you should give preference to relative URLs within your own projects wherever possible.
Understanding Default DocumentsIn the context of URLs you should also know about default documents. When you browse to a site like www.domainname.com you magically see a page appear. How does this work? Each web server has so-called default documents, a list of document names that can be served to a browser when no explicit document name is supplied. So, when you browse to www.domainname.com, the web server scans the directory requested (the root folder in this example) and processes the first file from its default documents list it finds on disk. In most ASP.NET scenarios, the web server is set up to use Default.aspx as the default document. So, when you browse to www.domainname.com on an ASP.NET web server, you are actually served the page www.domainname.com/Default.aspx.
In the links you create, you should generally leave out Default.aspx when it isn’t needed. It decreases the page size, but more important, it makes it easier for your users to type the address.
Now that you have seen how you can use URLs to point to documents and other files, it’s time to look at some higher-level controls that make use of these URLs: the ASP.NET navigation controls.
USING THE NAVIGATION CONTROLSASP.NET 4.5.1 offers three useful navigation tools: SiteMapPath, TreeView, and Menu. Figure 7-2 shows basic examples of the three navigation controls, without any styling applied.
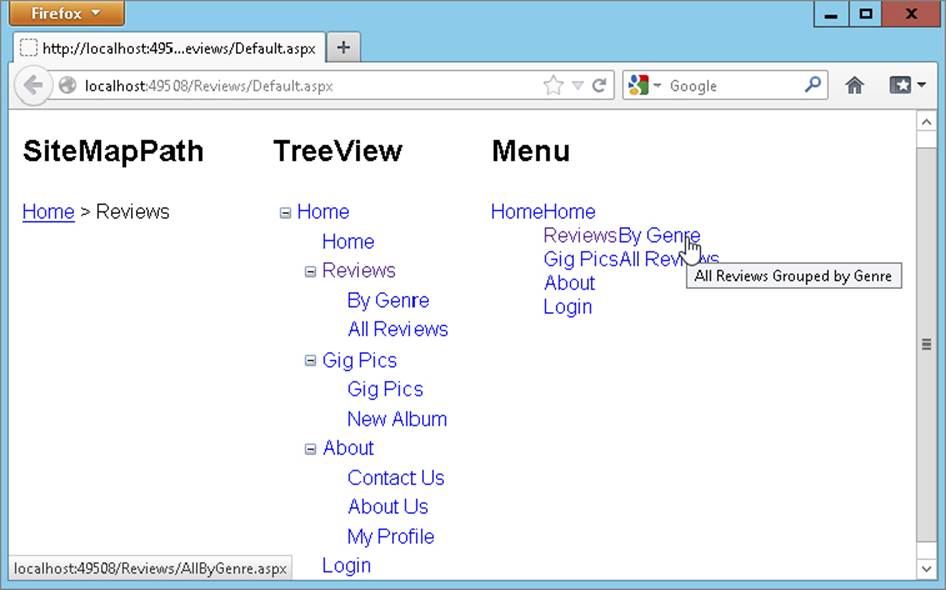
FIGURE 7-2
The SiteMapPath on the left shows the user the path to the current page. This helps if users want to go up one or more levels in the site hierarchy. It also helps them to understand where they are. The TreeView can display the structure of your site and enables you to expand and collapse the different nodes; in Figure 7-2 the entire tree is expanded. The Menu control on the right initially only displays the Home menu item. However, as soon as you move the mouse over the menu item, a submenu appears. In Figure 7-2 one of these child elements is the Reviews item, which in turn has child elements itself.
Although quite different in behavior and appearance, these three navigation controls have part of their design in common.
Architecture of the Navigation Controls
To make it easy to show relevant pages in your site using a Menu, a TreeView, or a SiteMapPath, ASP.NET uses an XML-based file that describes the logical structure of your website. By default, this file is called Web.sitemap. This file is then used by the navigation controls in your site to present relevant links in an organized way. Simply by hooking up one of the navigation controls to the Web.sitemap file, you can create complex user interface elements like fold-out menus or a tree view.
Examining the Web.sitemap File
By default, you should call the site map file Web.sitemap. This enables the controls to find the right file automatically. For more advanced scenarios you can have multiple site map files with different names, with a configuration setting in the Web.config file that exposes these additional files to the system. In most cases, a single site map file is sufficient. A basic version of the site map file can look like this:
<?xml version="1.0" encoding="utf-8" ?><siteMap xmlns="http://schemas.microsoft.com/AspNet/SiteMap-File-1.0"> <siteMapNode url="~/" title="Home.aspx" description="Go to the homepage"> <siteMapNode url="~/Reviews.aspx" title="Reviews" description="Reviews published on this site" /> <siteMapNode url="~/About.aspx" title="About" description="About this site" /> </siteMapNode></siteMap>The site map file contains siteMapNode elements that together form the logical structure of your site. In this example, there is a single root node called Home, which in turn contains two child elements, Reviews and About.
Each siteMapNode can have many child nodes (but there can only be one siteMapNode directly under the siteMap element), enabling you to create a site structure that can be both wide and deep. The siteMapNode elements in this example have three of their attributes set:url, title, and description. The url attribute should point to a valid page in your website. You can use the ~ syntax you saw in the previous section to refer to application-root-based URLs. The ASP.NET run time doesn’t allow you to specify the same URL more than once, but you can work around that by making the URL unique by adding a query string. For example, ~/Login.aspx and ~/Login.aspx?type=Admin will be seen as two different pages. You see more of the query string later in this chapter.
The title attribute is used in the navigation controls to display the name of the page. You see more about this later when you work with the Menu, TreeView, and SiteMapPath controls. The description attribute is used as a tooltip for the navigation elements. Figure 7-2shows a tooltip for the By Genre item.
The navigation controls work together with the ASP.NET security mechanism. That is, you can automatically hide elements from controls like the Menu that users don’t have access to. Security is described in more detail in Chapter 16.
The SiteMapPath control that displays a breadcrumb (discussed later in this chapter) is able to find the Web.sitemap file itself. For the other two navigation controls, you need to specify a SiteMapDataSource control (which you can find under the Data category of the Toolbox) explicitly as an intermediate layer to the Web.sitemap file.
To create a Web.sitemap file, you need to add one to your site and then manually add the necessary siteMapNode elements to it. There is no automated way in Visual Studio to create a site map file based on the current site’s structure, although third-party solutions exist that help you with this.
In this exercise you add a new Web.sitemap file to the site and add a bunch of siteMapNode elements to it. This site map serves as the basis for the navigation controls in the site.
1. Right-click the website in the Solution Explorer, choose Add ⇒ Add New Item, and click Site Map. Leave the default name set to Web.sitemap and click Add. You end up with one root element containing two child nodes in the Web.sitemap file.
2. Modify the Web.sitemap so it contains this code:
3.<?xml version="1.0" encoding="utf-8" ?>
4.<siteMap xmlns="http://schemas.microsoft.com/AspNet/SiteMap-File-1.0">
5.<siteMapNode url="~/" title="Home" description="Home">
6.<siteMapNode url="~/Default.aspx." title="Home"
7.description="Go to the homepage" />
8.<siteMapNode url="~/Reviews/Default.aspx." title="Reviews"
9.description="Reviews published on this site">
10.<siteMapNode url="~/Reviews/AllByGenre.aspx." title="By Genre"
11.description="All Reviews Grouped by Genre" />
12.<siteMapNode url="~/Reviews/All.aspx." title="All Reviews"
13.description="All Reviews" />
14.</siteMapNode>
15.<siteMapNode url="~/About/Default.aspx." title="About"
16.description="About this Site">
17.<siteMapNode url="~/About/Contact.aspx." title="Contact Us"
18.description="Contact Us" />
19.<siteMapNode url="~/About/AboutUs.aspx." title="About Us"
20.description="About Us" />
21.</siteMapNode>
22.<siteMapNode url="~/Login.aspx." title="Login"
23.description="Log in to this web site" />
24.</siteMapNode>
</siteMap>Remember, you don’t have to type all this code yourself. You can find a copy of the file in the Source folder (not in the Resources folder) for this chapter’s download that you can find on the Wrox website. Note that none of the files in that sitemap file have the .aspx extension because the site uses the FriendlyUrls package you’ll see later in this chapter.
3. Save the file; you’re done with it for now.
How It WorksAlthough you didn’t add any spectacular code in the Web.sitemap file, a few things are worth discussing. First of all, note that the site map only contains a single root node called Home. This is enforced by the Web.sitemap file, which doesn’t allow more than one root element. The downside of this is that this single root element will also be the root item of your Menu and TreeView controls. In Figure 7-2 you can see how all submenus of the TreeView fall under the Home node. In most websites, however, it’s much more common to have the Home item at the same level as the others. Therefore, in this exercise you added an additional Home node directly under the parent node to align it with the Reviews, About, and Login items. In a later exercise you see how to hide the root element from the controls, enabling you to only show the “first children” of the root node and their children. To overcome the problem that URLs in the siteMapNode elements need to be unique, you set one to ~/ and the other to ~/Default.aspx. Because of the way web servers handle default documents, this eventually points to the same file.
A Web.sitemap file all by itself isn’t very useful. You need to add navigation controls to your site to make use of the site map. In the next section you see how to use the Menu control. Later sections dig into the TreeView and SiteMapPath controls.
Using the Menu Control
The Menu control is very easy to use and tweak. To create a basic menu, all you need to do is add one to your page, hook it up to a SiteMapDataSource control, and you’re done. But at the same time, the control is quite flexible and has around 80 public properties (including the ones shared by all controls) that enable you to tweak every visual aspect of the control. The following table lists the most common properties used with the menu. Refer to the MSDN online help for a complete description of this control.
|
PROPERTY |
DESCRIPTION |
|
|
Enables you to set a CSS class attribute that applies to the entire control. |
|
|
A boolean that determines whether images are used to indicate submenus on the top-level menu items. |
|
|
A boolean that determines whether images are used to indicate submenus on submenu items. |
|
|
Determines the time in milliseconds that menu items will remain visible after you move your mouse away from them. |
|
|
Determines the number of levels of submenu items that the control can display. Useful with very large site maps to limit the number of items being sent to the browser. |
|
|
The ID of a |
|
|
Determines whether to use a horizontal menu with drop-out submenus, or a vertical menu with fold-out submenus. |
|
|
Introduced in ASP.NET 4, this property determines whether the control presents itself using tables and inline styles or unordered lists and CSS styles. |
|
|
Introduced in ASP.NET 4, this property gives you full control (and responsibility) in styling the control. When set to |
The Menu control also has a few properties that start with Static or Dynamic, two of which were shown in the preceding table. The Static properties are used to control the main menu items that appear when the page loads. Because they don’t change or get hidden when you hover over them, they are considered static. The submenus are dynamic, because they appear only when you activate the relevant main menu items.
In addition to these properties, the Menu control also has a number of style properties that enable you to change the look and feel of the different parts of the menu.
Earlier versions of the Menu control were criticized because of the HTML they generated. In ASP.NET 2.0 and 3.5, the Menu control generated bloated HTML using tables and inline styles. Besides increasing the size of the page unnecessarily, this also meant that theMenu was much harder to style using your own CSS. Fortunately, this was fixed in ASP.NET 4 with the introduction of the RenderingMode property on the control. By default in new ASP.NET 4.5.1 sites, this property ensures the control renders itself as an unordered list using <ul> and <li> elements. You can override this behavior by setting the RenderingMode property to Table instead.
You see the Menu control and the HTML it generates in the next exercise.
To see how the Menu control operates, you’re best off creating a very basic version first. Once you understand how it works and how it operates under the hood, you can style the menu to your liking so it blends in with the design of the rest of your site.
In this exercise, you see how to add a Menu control to the master page that uses the Web.sitemap file to build up the menu. The Menu is added to the <nav> element in the master page and presents the menu items horizontally. Because of this orientation, thisMenu is suitable only for the Monochrome theme. Later you add a TreeView to represent the pages in the site, and write some code that shows the Menu for the Monochrome theme and the TreeView for the DarkGrey theme.
1. Open the master page in Markup View and locate the <nav> element. Remove the placeholder text Menu Goes Here.
2. From the Navigation category of the Toolbox, drag a Menu and drop it between the <nav> tags. Set the CssClass of the Menu control to MainMenu:
3.<nav>
4.<asp:Menu ID="Menu1" runat="server" CssClass="MainMenu"></asp:Menu>
</nav>5. Switch to Design View. You may notice that the Design View doesn’t look like the final page anymore. That’s because you may have removed the styleSheetTheme attribute from the <pages> element in Web.config. You can leave it like this for now. With much of the styling already done, this isn’t so important. You can still see how the content inside the cpMainContent placeholder is going to end up in the browser. If your Design View does look much closer to the final page, open the Web.config file and remove the styleSheetTheme attribute from the <pages> element.
6. Click the Menu control’s gray arrow to open its Smart Tasks panel.
7. From the Choose Data Source drop-down list select <New data source>. In the dialog box that appears, click the Site Map icon. Figure 7-3 shows the Data Source Configuration Wizard.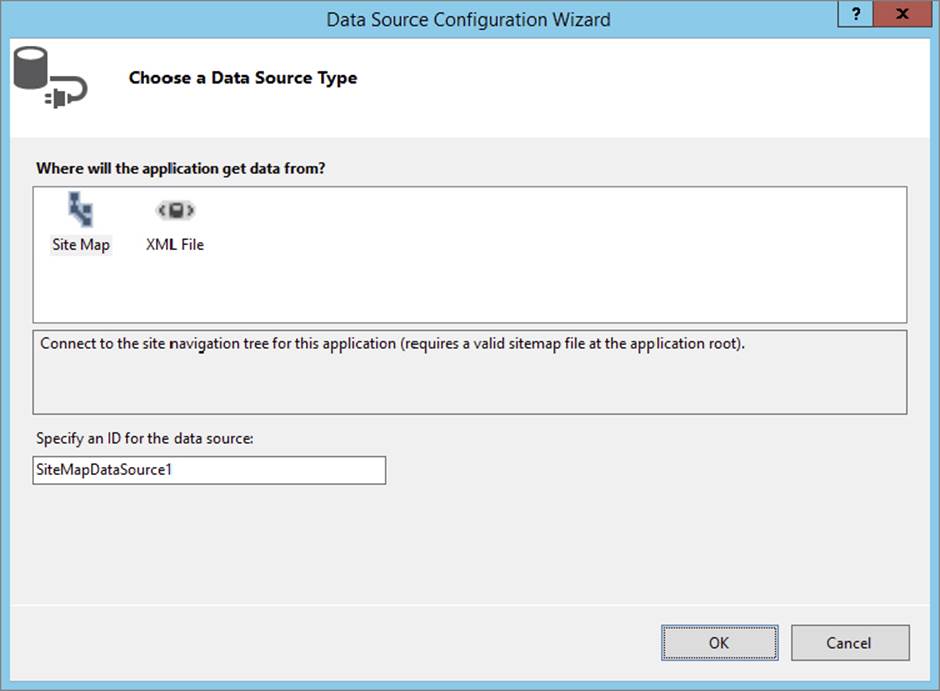
FIGURE 7-3
8.
Click OK to close the dialog box.
9. When you return to the page, the Menu control now shows the top-level element, Home (see Figure 7-4).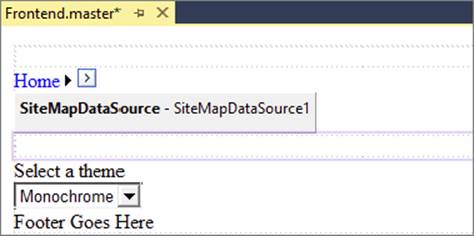
FIGURE 7-4
10.
Click the SiteMapDataSource control once and then press F4 to open or activate the Properties Grid. Change the ShowStartingNode property from True to False. Note that as soon as you do this, the Menu control in the designer is updated and shows all direct child menus under the root element: Home, Reviews, About, and Login. Figure 7-5 shows how your Menu control should look now.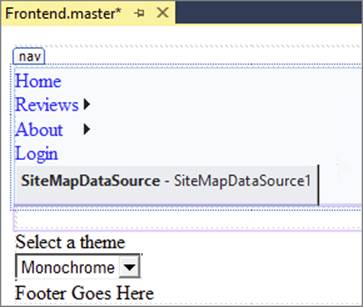
FIGURE 7-5
11.
Click the Menu control once to select it and then make the following changes to the properties of the control using the Properties Grid. Because the Menu control has so many properties, you may find it easier to find them if you sort the list of properties alphabetically in the Properties Grid. You can do that by clicking the second button on the toolbar with an A, a Z, and an arrow on it.
|
PROPERTY |
VALUE |
|
|
|
|
|
|
12. When you’re ready, the code for your Menu should look like this:
13.<asp:Menu ID="Menu1" runat="server" CssClass="MainMenu" Orientation="Horizontal"
14.DataSourceID="SiteMapDataSource1" StaticEnableDefaultPopOutImage="False">
15. </asp:Menu>
16.Save the changes to the master page and then request Default.aspx in your browser. If necessary, use the Theme drop-down list to make Monochrome the active theme. You should now see the menu in the horizontal menu area. Hover your mouse over the items, and you’ll see sub items appear as in Figure 7-6, which shows the page in Google’s Chrome browser.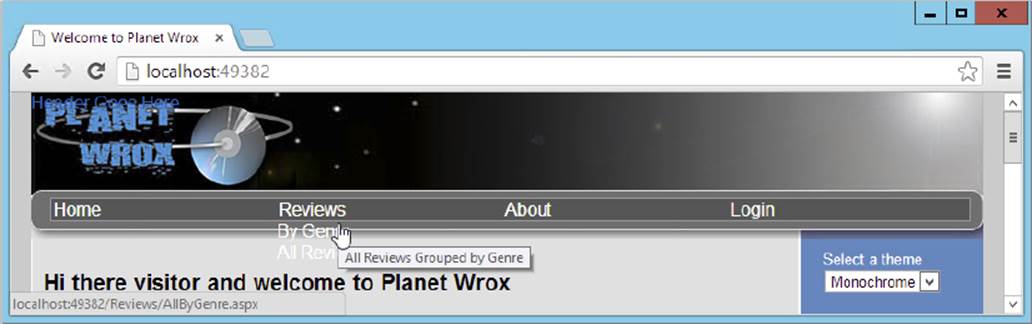
FIGURE 7-6
Note that the text on the sub items is hard to read. That’s because the CSS from the Monochrome theme has changed the text of all anchors in the menu area to white and no explicit background color has been set. After you’ve seen how the Menu control works, you get a chance to fix its styling.
Don’t worry if the menu doesn’t look good in the DarkGrey theme. You see how to implement a different navigation control for that theme later in this chapter.
How It WorksWhen a page with the menu is sent to the browser, the Menu control asks the SiteMapDataSource, defined in the same master page, for data. This data source control in turn reads the Web.sitemap file and then hands over the data to the Menu control. Based on the hierarchical XML, the Menu is able to generate the necessary HTML and JavaScript. It generates a <ul> element for the top menu items with nested subelements, each containing one or more menu items. The Menu control initially hides the submenus. When you hover your mouse over one of the main menu items, the submenu becomes visible. This is done by some JavaScript.
If you search the source of the page for the JavaScript code that hides or shows the menu, you won’t find it. So where is the JavaScript that is used to show and hide the relevant menu items? The answer is in the cryptic <script> tag in the page that looks similar to this:
<script src="/WebResource.axd?d=vxurWY7jjhneEhwNQbmdBEdPSXwLRytjgBhME9lyLoo1 &t=633925206143355520" type="text/javascript">This <script> tag references a special ASP.NET handler called WebResource.axd. The seemingly random characters in the query string (the part of the URL after the question mark) tell the ASP.NET run time to fetch a JavaScript file that contains the functionality for the menu. The file doesn’t exist on your disk, but is returned by the WebResource.axd handler on the fly based on the query string. If you’re brave, you can look at the file by requesting it in your browser, copying the value of the srcattribute and pasting it right after the port number of your website in the browser (for example, http://localhost:50404). You can safely ignore the file, because you don’t need to make any changes to it for the menu to function correctly. TheWebResource.axd syntax is also used by other controls, like the TreeView that uses it to retrieve the images used in the TreeView.
In addition to the JavaScript, you also find a CSS <style> block at the top of your page, which sets the default layout for your menu items. Among other things, it removes the default bullet that <ul> elements display and removes underlining from the <a>elements in the menus.
To better integrate the Menu control with the existing design of the Monochrome theme, you can style it using CSS.
The Menu control exposes a number of complex style properties that enable you to change the look of items such as the main and submenu items. You can also define how these items look when they are active (selected) or when you hover your mouse over them. Each of these style properties has a number of subproperties for visual aspects, such as font, color, and spacing. Figure 7-7 shows the Properties Grid for the StaticMenuItemStyle property, which defines the look of the main menu items that are visible when the page first loads.
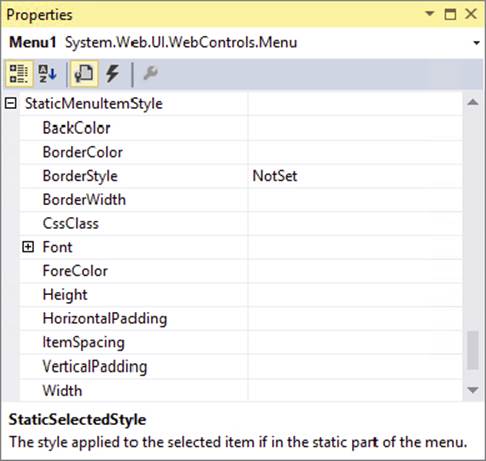
FIGURE 7-7
Most of the properties, like BackColor, ForeColor, and Font, are added to the <style> block at the top of the page that contains the Menu control. This makes it difficult to reuse the design in other pages or with other themes, so it’s much better to use CSS instead. You see how this works next.
In this exercise you add some CSS rules to the Monochrome.css file to influence the way the Menu control is styled. By default, the Menu control adds CSS classes to the menu items, such as level1 and level2, which makes it easy to apply styling at various levels in the menu.
1. Open Monochrome.css from the Monochrome theme folder and add the following CSS rules. You can leave out the comments placed between /* and */, because they only serve to describe the purpose of the selectors. If you don’t feel like typing all this CSS, remember you can also get a copy of this file from the code download that comes with this book and copy it from that file into yours. You can find the Monochrome.css file in the Monochrome theme folder for this chapter. Remember, CSS is case sensitive, so type the selectors exactly as shown here:
2.
3.ul.level1
4.{
5./* Defines the appearance of main menu items. */
6.font-size: 14px;
7.font-weight: bold;
8.height: 19px;
9.line-height: 19px;
10.}
11.
12.ul.level1 .selected
13.{
14./* Defines the appearance of active menu items. */
15.background-color: #509EE7;
16.}
17.
18.a.level1
19.{
20./* Adds some white space to the left of the main menu item text.
21.!important is used to overrule the in-line CSS that the menu generates */
22.padding-left: 5px !important;
23.}
24.
25.a.level2
26.{
27./* Defines the appearance of the sub menu items. */
28.background-color: #555555;
29.padding-left: 8px;
30.}
31.
32.a.level1:hover, a.level2:hover
33.{
34./* Defines the hover style for the main and sub items. */
35.background-color: #509EE7;
}36.Save and close the file.
37.Next, create the following folders and Web Forms that you’ll use in this and later chapters. Use the MyBasePage template to create the new files. Also, in Markup View, give each page a meaningful title to avoid errors later.
|
FOLDER |
FILENAME |
TITLE |
|
|
|
|
|
|
|
|
|
|
|
|
|
|
|
|
|
|
|
|
|
|
|
|
38.Save all changes and open the Default.aspx page from the root in your browser. Your site menu now looks a lot better and more in line with the rest of the Monochrome theme. When you hover the mouse over a main menu, the submenus appear, showing the text on a light gray background. When you hover over a submenu, its background color changes again. Figure 7-8 shows the expanded Reviews menu with the hover style applied to the By Genre menu item in Opera.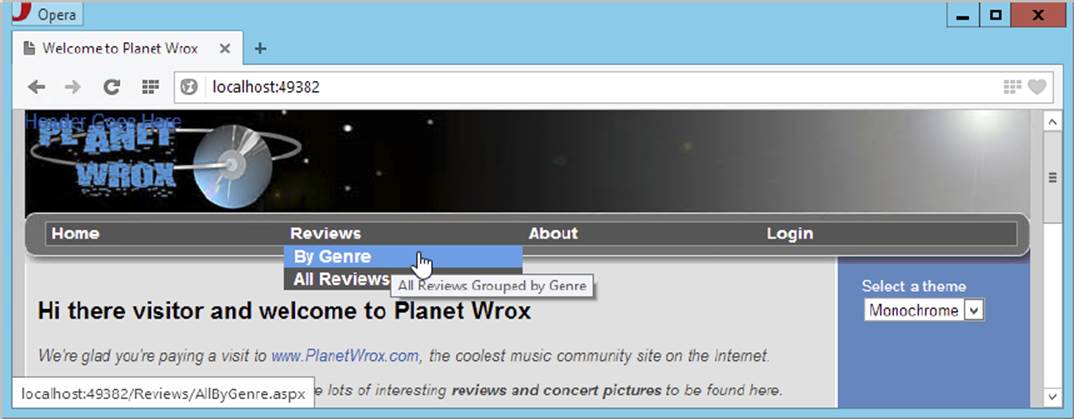
FIGURE 7-8
The Menu control renders itself as a series of <ul> and <li> elements. The menu items themselves are simple <a> elements with a class attribute to indicate at what level they are. If you look in the HTML for the page in the browser you see something like this:
<ul class="level1"> <li><a title="Go to the homepage" class="level1" href="/Default.aspx">Home</a></li> <li><a title="Reviews published on this site" class="level1" href="/Reviews/Default.aspx">Reviews</a> <ul class="level2"> <li><a title="All Reviews Grouped by Genre" class="level2" href="/Reviews/AllByGenre.aspx">By Genre</a></li> <li><a title="All Reviews" class="level2" href="/Reviews/All.aspx">All Reviews</a> </li> </ul> </li> ... <!-- Other menu items go here --></ul>Because this code is pure HTML with a few class attributes applied, it’s easy to style this information using the CSS techniques you learned in earlier chapters. The code you added in step 1 uses a number of selectors to style individual elements of the menu. For example, the main menu items are styled as follows:
ul.level1{ font-size: 14px; font-weight: bold; height: 19px; line-height: 19px;}This code is applied to all <ul> elements with a CSS class of level1, which means it’s applied to all main menu items such as Home, Reviews, and About. Take a look at the first <a> element in the HTML of the menu, which represents the selected Home item. Notice how it has a second class called selected applied:
<a title="Go to the homepage"class="level1 selected"
href="/Site/Default.aspx">Home</a>Selected items are then given a different color using this CSS selector:
ul.level1 .selected{ background-color: #BCD1FE;}The same principle is used for the other selectors, including the pseudo :hover selector that applies to <a> elements when you hover your mouse over them:
a.level1:hover, a.level2:hover{ background-color: #BCD1FE;}To override some of the CSS that the Menu control adds to the top of the page, the CSS rule for the static menu items looks like this:
a.level1{ padding-left: 5px !important;}The inclusion of !important marks this property as more important than the inline style targeting the same menu item. Without !important, your menu item has only a tiny bit of padding on the left.
The Menu control in horizontal mode is ideal for the Monochrome theme, because it features a horizontal navigation bar. For the DarkGrey theme you can use the same Menu and set its Orientation to Vertical. This creates a vertical menu with the main items stacked on top of each other, whereas the submenus will fold out to the right of the main menus. But instead of the Menu control, you can also use a TreeView control to display a hierarchical overview of the site map. This control is discussed next.
Using the TreeView Control
A TreeView is capable of displaying a hierarchical list of items, similar to how the tree in Windows Explorer looks. Items can be expanded and collapsed with the small plus and minus icons in front of items that contain child elements. This makes the TreeView an ideal tool to display the site map of the website as a means to navigate the site (although you can also use it for non-navigation purposes, such as displaying hierarchical data and allowing multiple items to be selected). The data used by the TreeView control is not limited to the Web.sitemap file, however. You can also bind it to regular XML files and even create a TreeView or its items (called nodes) programmatically.
The following table lists the most common properties of the TreeView. Again, the MSDN online help is a good place to get a detailed overview of all the available properties and their descriptions.
|
PROPERTY |
DESCRIPTION |
|
|
Enables you to set a CSS |
|
|
The image that collapses a part of the tree when clicked. The default is an icon with a minus symbol on it. |
|
|
The image that expands a part of the tree when clicked. The default is an icon with a plus symbol on it. |
|
|
The tooltip that is shown when a user hovers over a collapsible menu item. |
|
|
The tooltip that is shown when a user hovers over an expandable menu item. |
|
|
Determines whether the items in the |
|
|
Determines whether lines are used to connect the individual items in the tree. |
|
|
Determines the level at which items in the tree are expanded when the page first loads. The default setting is |
The TreeView control has a number of style properties that enable you to change the look and feel of the different parts of the tree. To tell the TreeView which items to show, you bind it to a SiteMapDataSource control, which is demonstrated next.
In this exercise, you add a TreeView control to the <nav> element, right below the Menu you created earlier, and then bind the TreeView to the same data source as the Menu. Next, you write some code that shows either the Menu or the TreeView, depending on the active theme.
1. Open the master page in Markup View and just below the Menu control, add a TreeView control by dragging it from the Toolbox.
2. Between the opening and closing tags of the control, add the following <LevelStyles> element:
3.<LevelStyles>
4.<asp:TreeNodeStyle CssClass="FirstLevelMenuItems" />
</LevelStyles>The FirstLevelMenuItems class selector is defined in the file DarkGrey.css that you added in the preceding chapter and is used to create some room above each tree item at the first level.
5. Switch to Design View, click the TreeView once, and click the small arrow to open the Smart Tasks panel. From the Choose Data Source drop-down, select SiteMapDataSource1, the data source control you created for the Menu control (see Figure 7-9).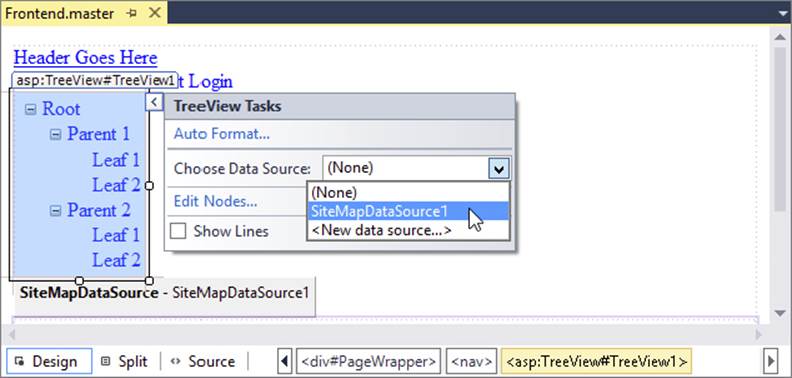
FIGURE 7-9
As soon as you select the data source, the TreeView is updated in Design View; it now shows the correct menu items from the site map file.
6. Open the Properties Grid for the TreeView control and set the ShowExpandCollapse property to False.
7. Click somewhere in the document to put the focus on it, and then press F7 to open the Code Behind of the master page file and locate the Page_Load event that you used earlier to preselect the theme in the Theme list. Right below that code, and before the end of the method, add the following bold code that shows or hides the TreeView and Menu controls based on the currently active theme:
VB.NET
item.Selected = True End If End If End IfSelect Case Page.Theme.ToLower()
Case "darkgrey" Menu1.Visible = False TreeView1.Visible = True Case Else Menu1.Visible = True TreeView1.Visible = False End SelectEnd SubC#
item.Selected = true; } } }switch (Page.Theme.ToLower())
{ case "darkgrey": Menu1.Visible = false; TreeView1.Visible = true; break; default: Menu1.Visible = true; TreeView1.Visible = false; break; }}8. Save all changes and open Default.aspx in the browser. Depending on your currently active theme, you should see either the Menu or the TreeView control. Select a different theme from the list and the page will reload, now showing the other control as the navigation system of the website (see Figure 7-10).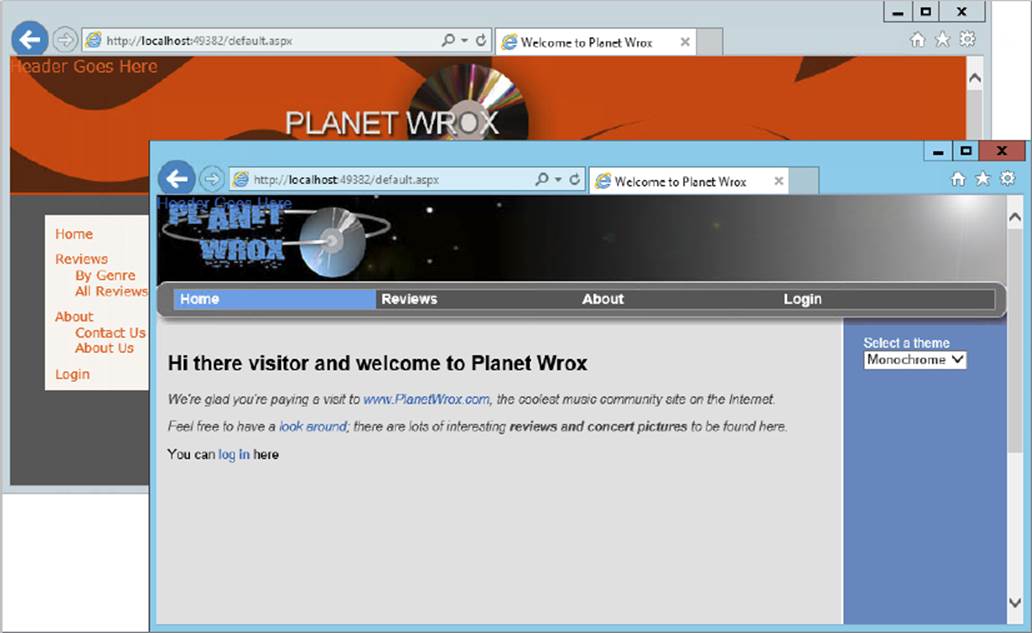
FIGURE 7-10
Just like the Menu control, the TreeView control can get its data from a SiteMapDataSource control, which in turn gets its information from the Web.sitemap file. By default, the TreeView shows plus and minus signs to indicate that items can be collapsed and expanded. For a site menu this may not make much sense, so by setting ShowExpandCollapse to False, you effectively hide the images. The TreeView enables you to set a number of style properties, including the NodeStyle, RootNodeStyle, and LevelStyles that influence the appearance of individual items in the tree. In this exercise, you used LevelStyles to apply a class called FirstLevelMenuItems that adds some room above each item at the top level, such as Home and Reviews.
The code in the Code Behind of the master page looks at the current theme by investigating the Theme property of the Page. When DarkGrey is the current theme, the code hides the Menu and then displays the TreeView. In the Case Else / default block the reverse is true. This means that for the Monochrome theme and all future themes you may add, the TreeView is hidden and the Menu is used instead as the navigation system.
The TreeView still suffers from the same problems as the Menu control in previous versions of ASP.NET in that it generates a lot of bloated HTML. Unfortunately, this control has no RenderingMode property, so if you’re using the TreeView you’re stuck with the table-based HTML.
With two of the three navigation controls discussed, the final control you need to look at is the SiteMapPath control.
Using the SiteMapPath Control
The SiteMapPath control shows you where you are in the site’s structure. It presents itself as a series of links, often referred to as a breadcrumb. It’s a pretty simple yet powerful control with more than 50 public properties you can set through the Properties Grid to influence the way it looks. Just like the Menu and TreeView, it has a number of style properties you use to change the look of elements like the current node, a normal node, and the path separator.
The following table lists a few of the most common properties of the SiteMapPath control.
|
PROPERTY |
DESCRIPTION |
|
|
Supports two values: |
|
|
Defines the symbol or text to show between the different elements of the path. The default is the “greater than” symbol (>), but you can change it to something like the pipe character (|). |
|
|
Determines whether the last element of the path (the current page) is rendered as a text link or as plaintext. The default is |
|
|
Determines whether the control displays tooltips (retrieved from the description attribute of the |
Depending on your personal preferences, you usually don’t need to define any of the styles of the SiteMapPath control. In the final page in the browser, the SiteMapPath consists of mainly anchor tags (<a>) and plaintext. If you have set up a specific selector for anchors in your CSS file, the SiteMapPath automatically shows itself in line with the other links in the page.
A good location for the SiteMapPath is in the global master page of the site. That way it becomes visible in all your pages automatically.
1. Open the master page in Markup View and locate the MainContent <section> element. Right after its opening tag, and before the <asp:ContentPlaceHolder> tag, press Enter to create some room and drag a SiteMapPath from the Toolbox. Right after theSiteMapPath add two line breaks (<br />). You should end up with code like this:
2.<section id="MainContent">
3.<asp:SiteMapPath ID="SiteMapPath1" runat="server"></asp:SiteMapPath><br /><br />
<asp:ContentPlaceHolder ID="cpMainContent" runat="server">4. Save the changes and then request Default.aspx in the browser. Note that the page now shows the path from the root of the site (identified by the Home text) to the current page. Click a few of the items in the Menu or TreeView control to navigate around the site and you’ll see the breadcrumb change for each page. Figure 7-11 shows the breadcrumb for the All Reviews page in Firefox. The All Reviews page is a subelement of Reviews, which in turn falls under the Home root element.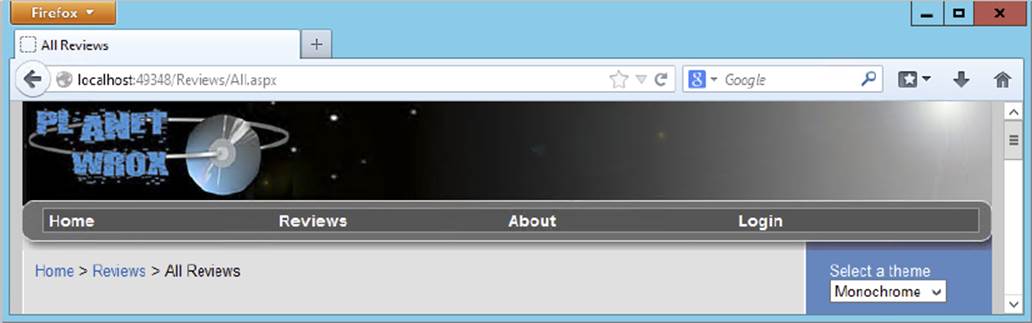
FIGURE 7-11
When you navigate to one of the subpages, you can click the elements of the path to go up one or more levels. Clicking Reviews in the page shown in Figure 7-11 takes you back to the main Reviews page, and clicking Home takes you back to the root of the site.
5. Using the Theme selector, switch to the other theme. Note that the SiteMapPath looks pretty much the same, except for the color of the links, which are defined in the CSS file of each theme.
The SiteMapPath renders as a series of <span> elements that contain either a link or plaintext. Here’s a part of the HTML code for the SiteMapPath from Figure 7-11:
<span><a title="Home" href="/">Home</a></span><span> > </span><span><a title="Reviews published on this site" href="/Reviews/Default.aspx">Reviews</a></span><span> > </span><span>All Reviews</span>The first two menu items (Home and Reviews) are represented by a link (<a>) to enable you to navigate to the pages defined in their href properties. The final menu item — All Reviews — is just plaintext. In between the elements you see a <span> with the character you set in the PathSeparator property. Because this separator character (>) has a special meaning in HTML, its value is encoded to > (greater than) to ensure it ends up as a plaintext character in the browser.
If you look at the HTML for the page in your browser, you also see an <a> element that enables you to skip links. The <a> contains a small image with its left property set to a large negative value, so it is outside of the visible browser window and you don’t see it. This is useful for vision-impaired users with screen readers because it enables them to skip the navigation and go directly to the content of the page. The TreeView and Menu controls use an identical approach to prevent a screen reader from reading the entire site structure out loud every time the page loads.
The three navigation controls give you a great feature set for a navigation system in your website from the client side. Both the Menu and the TreeView controls enable you to quickly display the entire structure of the site so users can easily find their way. SiteMapPathhelps users understand where they are in the site and gives them an easy way to navigate to pages higher up in the site hierarchy.
Until now, the pages you have viewed in the browser all end with a .aspx extension. However, to make it easier for users to type in an address directly, and to please search engines, it would be nice if you could drop the .aspx extension from the URL, so a page like/Contact.aspx would be accessible as simple /Contact. You see how to do this next with ASP.NET Routing.
Traditionally, ASP.NET Web Forms has used a file-based mechanism, where a page you request in the browser (for example, /Contact.aspx) needs to exist on disk in order to be served. However, this is not always desirable. Search engines tend to prefer extension-less URLs and also for users URLs without an extension are easier to look at, type in and remember. To address this issue, Microsoft has created a solution called FriendlyUrls that you can install into your website. Once installed and configured, all requests for pages that have the .aspx extension are automatically redirected to their extension-less counterpart. What’s great about this solution is that it’s easy to set up and requires no further changes to your pages (other than dropping the .aspx extension from existing links). In the next section you see how to configure your site for extension-less URLs.
Setting up Extension-less URLs
In order to enable extension-less URLs, you need to install a NuGet package using the Package Manager Console. Once the package is added, you need to write a route configuration class in the App_Code folder and call a method from the website’s Global.asax file. TheGlobal.asax file is a special ASP.NET file that you add to the root of the site. Inside this file you can write code that responds to global events that happen within your application. These events work the same as other events you’ve seen so far, such as the Button’s Clickevent. The biggest difference is that these events fire for the entire application (your website) and not for a single control or page. For example, when your ASP.NET application starts up, the Application_Start event is fired, enabling you to execute your own code. Other events that fire include BeginRequest, which fires for each request to the site and Application_Error, which fires when an unhandled exception in your site occurs. You make use of this last event in Chapter 18, which deals with debugging and exception handling.
In this exercise you add the Microsoft.AspNet.FriendlyUrls.Core package to the site using the Package Manager Console window. You then write some custom code to enable the friendly URLs. In the end you’ll test the website to ensure everything still functions as before.
1. Start by opening the Package Manager Console using Tools ⇒ Library Package Manager ⇒ Package Manager Console.
2. At the command prompt that appears, type the following command:
Install-Package Microsoft.AspNet.FriendlyUrls.Coreand press Enter.
3. Add a new class file called RouteConfig to the App_Code folder and replace its contents with the following code:
VB.NET
Imports System.Web.RoutingImports Microsoft.AspNet.FriendlyUrlsPublic Module RouteConfig Public Sub RegisterRoutes(routes As RouteCollection) Dim settings = New FriendlyUrlSettings() settings.AutoRedirectMode = RedirectMode.Permanent routes.EnableFriendlyUrls(settings) End SubEnd ModuleC#
using System.Web.Routing;using Microsoft.AspNet.FriendlyUrls;public static class RouteConfig{ public static void RegisterRoutes(RouteCollection routes) { var settings = new FriendlyUrlSettings(); settings.AutoRedirectMode = RedirectMode.Permanent; routes.EnableFriendlyUrls(settings); }}You haven’t seen a Module in VB yet, but it’s essentially a class whose methods you can call without instantiating an instance of it. C# doesn’t need this as it has built-in support for static classes.
3. Right-click the website in the Solution Explorer, and choose Add ⇒ Add New Item. Locate the Global Application Class item. You don’t have to enter a name because the default of Global.asax is the only allowed name for this file.
4. Add the following bolded code to the Application_Start method that is already part of the code template of the Global.asax file:
VB.NET
Sub Application_Start(ByVal sender As Object, ByVal e As EventArgs) ' Code that runs on application startupRouteConfig.RegisterRoutes(System.Web.Routing.RouteTable.Routes)
End SubC#
void Application_Start(object sender, EventArgs e) { // Code that runs on application startupRouteConfig.RegisterRoutes(System.Web.Routing.RouteTable.Routes);
}5. Save all your changes and request the page Default.aspx in the browser by right-clicking it and choosing View in Browser.
Rather than seeing an address such as http://localhost:49348/Default.aspx, you should see that the file extension has been dropped from the URL, giving you an address such as http://localhost:49348/Default.
6. Browse around the site by requesting pages from the Menu or TreeView. Notice that none of the pages have an .aspx extension anymore.
When the application starts up the first time it fires its Application_Start event. The code in Global.asax handles that event and calls RegisterRoutes on the RouteConfig class (a module in VB) that you created and sends itSystem.Web.Routing.RouteTable.Routes, a collection of routes that can be used to determine how to redirect a user based on the incoming request. At this point, the collection is still empty, but the RegisterRoutes method in RouteConfig adds a route that tells ASP.NET how to handle extension-less URLs. This is all the code you need to configure friendly URLs. From now on, whenever a request for a URL that ends with .aspx comes in, ASP.NET redirects the browser to its extension-less counterpart.
Considerations for Extension-less URLs
When ASP.NET encounters a request for a URL with the .aspx extension, it instructs the browser to fetch a new page without the extension. This means that the browser is requesting two pages, only to be shown the final, extension-less page. Clearly, this is a waste of resources, so once you’ve configured the friendly URLs you should no longer link to pages with an extension. To optimize the current site, you should remove all .aspx extensions in links. If you’ve followed along with all exercises in the book so far, you’ll find two links in Default.aspx in the root, and one in the file TableDemo.aspx in the Demos folder. All you need to do is remove the .aspx extension so a link like this:
You can <a href="Login.aspx">log in</a> here</p>ends up like this:
You can <a href="Login">log in</a> here</p>Furthermore, you should remove the extension from the URLs in Web.sitemap that drives the Menu, TreeView, and SiteMapPath controls. Here’s an example of the Reviews page:
<siteMapNode url="~/Reviews/Default" title="Reviews" description="Reviews published on this site">For more information about routing, check out the following article by Scott Hanselman from the ASP.NET team: http://bit.ly/RLzjeT.
In addition to navigating from the client browser as you’ve seen so far, it’s also very common to navigate a user to a different page from the server side using code. How this works is discussed in the next section.
PROGRAMMATIC REDIRECTION
Programmatic redirection is very useful and common in ASP.NET pages. For example, imagine a page that enables a user to enter a review into the database. As soon as the user clicks the Save button, the review is saved and the user is taken to another page where she can see the entire review.
ASP.NET supports three major ways to redirect users to a new page programmatically. The first two, Response.Redirect and Response.RedirectPermanent (which was introduced in ASP.NET 4), send an instruction to the browser to fetch a new page. The third option,Server.Transfer, executes at the server. Because there’s quite a difference in client- and server-side redirection, the following sections describe them in more detail.
Within each ASPX page you have access to a property called Response, which you saw earlier when saving the cookie for the selected theme. The Response object gives you access to useful properties and methods that are all related to the response from the server to the user’s browser. Two of these methods are the Redirect and RedirectPermanent methods. These methods send an instruction to the browser to request a new page. This is useful if you want to redirect your user to another page in your site or to a completely different website.
The difference between Redirect and RedirectPermanent mainly has to do with search engine optimization. Using Redirect tells the client that the page has moved temporarily. You often use this to redirect a user to a new page based on some action. For example, after filling in a contact form, you may want to send the user to ThankYou.aspx; that displays a message.
RedirectPermanent tells the client the page has moved permanently. This is useful if you want to tell a search engine to stop looking at an old page, and index the new one instead. For example, imagine your site has a page called Index.aspx that you no longer use. Search engines may keep requesting this page. If you add the following code to the Code Behind of Index.aspx, clients (including search engines) are sent to Default.aspx. Moreover, search engines keep note of the permanency of the redirect and will stop requestingIndex.aspx and focus on Default.aspx instead.
VB.NET
Protected Sub Page_Load(sender As Object, e As EventArgs) Handles Me.Load Response.RedirectPermanent("Default")End SubC#
protected void Page_Load(object sender, EventArgs e){Response.RedirectPermanent("Default");
}The two methods each have a second version (called an overload) that accepts an additional boolean parameter called endResponse, which enables you to execute any remaining code after the redirect action when you pass False (false in C#) for that parameter. This is usually not necessary, so you’re better off calling the first version, which ends the response by default.
Quite often, when you want to send the user to a different page, you want to send some additional information. You can do that by passing it in the query string, the part of the address that comes after the page name, separated by a question mark. Consider the following URL:
http://localhost:49246/Demos/Target?CategoryId=10&From=Home
The entire bold part (after the question mark) is considered the query string. It consists of name-value pairs, each separated from another by an ampersand (&). In this case, you have two pairs: CategoryId with a value of 10 and From with a value of the word Home. The page, Target.aspx (without an extension) in this example, is able to read these values using Request.QueryString. You see how to use the query string in the next exercise.
To give you a closer look at how it works, this exercise shows you how to create a page that redirects from one page to another using Response.Redirect. The example uses a temporary redirect (the initial page remains accessible after the redirect), so the code uses Response.Redirect instead of Response.RedirectPermanent.
1. In the Demos folder, create two new Web Forms based on your custom MyBasePage template. Call them Source.aspx and Target.aspx. Set their Title to Source and Target, respectively.
2. Open Source.aspx in Design View and double-click somewhere in the gray, read-only area of the page outside the ContentPlaceHolder to set up a Page_Load handler. Inside this handler, write the following code that redirects the user to the Target.aspxpage. To show you how to pass additional data through the query string and how to read that information in the target page, the code passes a query string field called Test with SomeValue as the value:
VB.NET
Protected Sub Page_Load(sender As Object, e As EventArgs) Handles Me.LoadResponse.Redirect("Target?Test=SomeValue")
End SubC#
protected void Page_Load(object sender, EventArgs e){Response.Redirect("Target?Test=SomeValue");
}3. Open Target.aspx, switch to Design View, and add a Label control to the cpMainContent Content control. Leave its ID set to Label1. Set up a Page_Load handler similar to the one you created in the previous step by double-clicking the gray, read-only area of the page, and then add the following code:
VB.NET
Protected Sub Page_Load(sender As Object, e As EventArgs) Handles Me.LoadLabel1.Text = Request.QueryString.ToString()
End SubC#
protected void Page_Load(object sender, EventArgs e){Label1.Text = Request.QueryString.ToString();
}4. Save all your changes, go back to Source.aspx, and press Ctrl+F5 to open it in the browser. Instead of seeing Source.aspx, you now see the page depicted in Figure 7-12.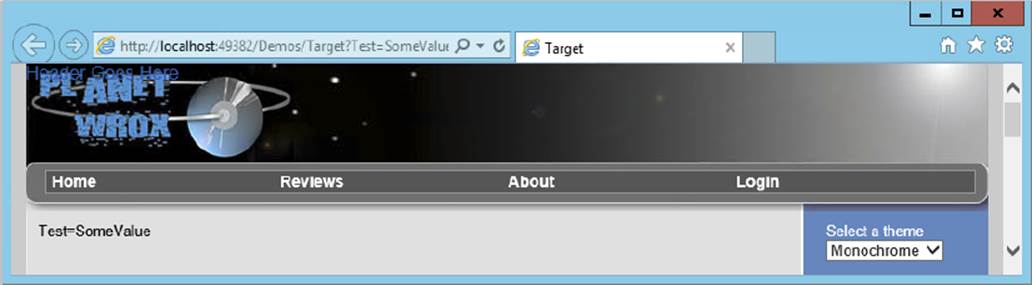
FIGURE 7-12
Target?Test=SomeValue, the page you redirected to in the Page_Load event handler of the source page. The Label in the target page shows the query string that is passed to this page. Notice that QueryString.ToString()contains only Test=SomeValue. The address and the question mark are not a part of the query string for the page.
How It Works
When you use Response.Redirect, ASP.NET sends an instruction to the browser to tell it to fetch a new page. In technical terms, it sends a “302” HTTP status code to indicate the page has moved temporarily. With this instruction it also sends the new URL, so the browser understands what page to fetch next. In this exercise, the new page was Target.aspx?Test=SomeValue, which contains both the page name and a query string. The Target.aspx page is then requested by the browser, the Page_Load event fires, and the query string is displayed on the label in the page. Because of this client redirect, the new page name and query string are fully exposed to the client. If you use Response.RedirectPermanent, ASP.NET sends out a “301 Moved Permanently” instruction. For some browsers, this means that if the original page has previously been cached by the browser, you’re taken automatically to the new page if you request the original page. Once the browser cache is cleared, a request is made again for the original page. Other browsers may continue to request the original page. Search engines interpret the 301 redirect as “don’t bother fetching this page again” and the page will no longer be indexed.
Redirects follow the same naming scheme for URLs as those used in server controls, so you can redirect to a page like ~/Default.aspx to redirect the user to the file Default.aspx in the website’s root.
In contrast to Response.Redirect and Response.RedirectPermanent, there is also Server.Transfer, which redirects to another page at the server.
Server-Side Redirects
Server-side redirects are great if you want to send out a different page without modifying the client’s address bar. This enables you to hide details of page names and query strings, which may lead to cleaner URLs from a user’s point of view. This is often used in so-called URL-rewrite scenarios that are used to create pretty URLs. For example, a user may request a page like this:
http://www.domain.com/Cars/Volvo/850/T5/
Under the hood the server might transfer to:
http://www.domain.com/Cars/ShowCar.aspx?Make=643&Model=984&Type=7345
Clearly, the first URL is a lot easier to understand and type in a browser. It also enables a user to guess other URLs that match the same pattern. For example, there’s a fair chance you can request a page like this:
http://www.domain.com/Cars/Volvo/V70/R/
and end up with the right page showing you the Volvo V70 R.
In addition to being easier to understand, server-side transfers may also speed up your site a little. Instead of sending a response to the browser to tell it to fetch a new page, which results in a new request for a page, you can transfer the user directly to a new page, saving you some network overhead.
Server-side transfers are carried out with the Server object. Just as the Request and Response objects you saw earlier give you information about the request and the response, so does the Server object provide you with information about the server the page is running on. You can use it to get information about the server name, its IP address, and so on. One of its methods is Transfer, which performs a server-side transfer.
You can use Server.Transfer only to redirect to other pages within your site. You cannot use it to send the user to pages on different domains. If you try to do so, the ASP.NET run time throws an error.
To see the difference between Response.Redirect and Server.Transfer, the following exercise shows you how to change the page Source.aspx to perform a Server.Transfer operation.
It’s easy to change the redirect code so it transfers the user to another page. All you need to do is replace Response.Redirect with Server.Transfer as demonstrated in this exercise.
1. Open the Code Behind of Source.aspx and replace the line with Response.Redirect with the following line:
VB.NET
Protected Sub Page_Load(sender As Object, e As EventArgs) Handles Me.LoadServer.Transfer("Target.aspx?Test=SomeValue")
End SubC#
protected void Page_Load(object sender, EventArgs e){Server.Transfer("Target.aspx?Test=SomeValue");
}Note that with server side redirects, you must specify the .aspx extension, as a server-side redirect bypasses the routing mechanism.
2. Save the changes and then press Ctrl+F5 to open Source.aspx in the browser (see Figure 7-13).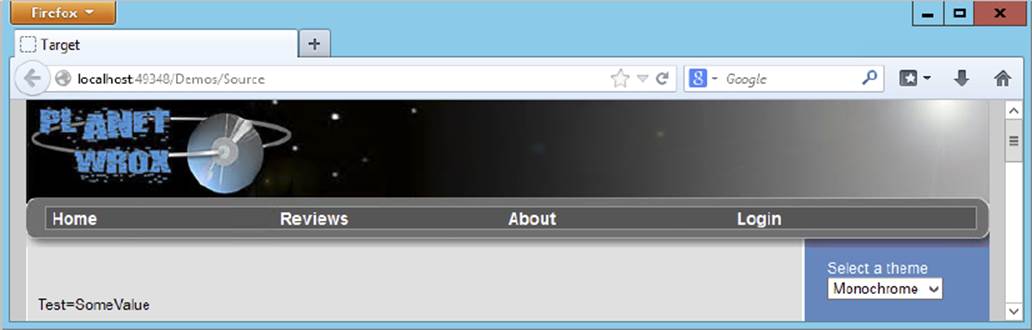
FIGURE 7-13
The Label control displays the query string values that were sent from Source.aspx to Target.aspx, demonstrating the fact that you are really viewing the output of the Target.aspx page. However, the browser’s address bar is left unmodified and still shows Source, hiding the new page name and query string values from the user.
How It Works
Instead of instructing the browser to fetch a new page, Server.Transfer takes place completely at the server. The output of the old page is discarded and a new page life cycle is started for the page that is being transferred to. This page then generates its content and sends it back to the browser, while leaving the browser’s address bar unmodified.
If you look at the emitted HTML in the browser, you see that the form action is set to the new page so any postback that occurs is executed against that page, which in turn changes the address in the address bar:
<form method="post"action="Target.aspx?Test=SomeValue"id="form1">
...</form>With programmatic ways to send a user to another page, you have come to the end of this chapter on navigation. With the concepts shown in this chapter, you have all the knowledge you need to create a highly effective navigation system in your site, from both the client’s browser and your own server-side code.
PRACTICAL TIPS ON NAVIGATIONThe following list presents some practical tips on navigation:
- When you start building a website that you think will grow in the future, create a logical structure right away. Don’t place all files in the root of your website, but group logically related files in the same folder. Such logical grouping makes it easier for you to manage the site and for your users to find the pages they want. Although it’s easy to move a page in a
MenuorTreeViewusing theWeb.sitemapfile, it’s more difficult if you are also using programmatic redirects or transfers, because you also need to update the server-side code to reflect the new site structure. To create a solid page structure, you can draw it out on paper before you start with the site, or use site map diagramming tools like Microsoft Visio. - Try to limit the number of main and sub items that you display in your
MenuorTreeViewcontrols. Users tend to get lost or confused when they are presented with long lists of options to choose from. - When creating folders to store your pages in, give them short and logical names. It’s much more intuitive to navigate to a page using www.PlanetWrox.com/Reviews than it is to navigate to a folder with a long name including abbreviations and numbers.
This chapter familiarized you with navigation in an ASP.NET website. Users don’t just type in the address of a web page directly, so it’s important to offer them a clear and straightforward navigation system.
A critical foundation for a good navigation system is a good understanding of how URLs work. URLs come in two types: relative URLs and absolute URLs. Relative URLs are used to point to resources within your own site. Absolute URLs enable you to point to resources by their complete location, including protocol and domain information. Absolute URLs are mostly useful if you want to point to resources outside your own website.
ASP.NET offers three navigation controls used in the user interface of a website. These controls enable your users to visit the different pages in your site. The Menu control displays either as a vertical or a horizontal menu, with submenus folding or dropping out. TheTreeView control can show the complete structure of the site in a hierarchical way. The SiteMapPath control displays a breadcrumb trail to give users a visual cue as to where they are in the site.
Using the ASP.NET Friendly URLs you can easily convert URLs that end in .aspx to their extension-less counterpart. In order to enable friendly URLs, you need to install the FriendlyUrls package and then add some configuration code to your website.
In addition to the built-in navigation controls, you can also send the user to a different page programmatically. ASP.NET supports two major ways to do this: client side using Response.Redirect and Response.RedirectPermanent and server side using Server.Transfer. The redirect methods instruct the browser to fetch a new page from the server, whereas the transfer method is executed at the server.
In the next chapter you learn more about ASP.NET user controls, which enable you to reuse specific code and user interface elements in different pages in your website.
1. The TreeView control exposes a number of style properties that enable you to change items in the tree. Which property do you need to change if you want to influence the background color of each item in the tree? What’s the best way to change the background color?
2. What options do you have to redirect a user to another page programmatically? What’s the difference between them?
3. You can use the TreeView controls in two different ways: either as a list with items and sub items that can be collapsed and expanded by clicking them, or as a static list showing all the items, with no way to collapse or expand. What property do you need to set on the control to prevent users from expanding or collapsing items in the tree?
You can find answers to these exercises in Appendix A.
WHAT YOU LEARNED IN THIS CHAPTER
|
FriendlyUrls |
A Microsoft package that you can add to your site to get rid of the |
|
|
A navigation control that is able to display data, including data coming from the |
|
Permanent redirect |
A mechanism to inform a client, such as a search engine, that a page has moved permanently, telling the client to stop requesting the old resource |
|
Server-side transfer |
A redirect to another page that takes place at the server without informing the client browser |
|
|
The bridge between the |
|
|
A navigation control that displays a breadcrumb from the root of the site to the current page, enabling users to move back up in the hierarchy of a site |
|
Temporary redirect |
A mechanism to redirect a client to a new, temporary location |
|
|
A navigation control that is able to display data, including data coming from the |
|
|
The XML-based file that contains the logical structure of your site. This file drives the other navigation controls |
All materials on the site are licensed Creative Commons Attribution-Sharealike 3.0 Unported CC BY-SA 3.0 & GNU Free Documentation License (GFDL)
If you are the copyright holder of any material contained on our site and intend to remove it, please contact our site administrator for approval.
© 2016-2026 All site design rights belong to S.Y.A.