Beginning ASP.NET-4.5 in C# and VB (2013)
Chapter 8
User Controls
WHAT YOU WILL LEARN IN THIS CHAPTER:
- What user controls are, how they look, and why they are useful
- How to create user controls
- How to consume (or use) user controls in your pages
- How you can improve the usefulness of user controls by adding coding logic to them
WROX.COM CODE DOWNLOADS FOR THIS CHAPTER
You can find the wrox.com code downloads for this chapter on the Download Code tab at www.wrox.com/go/begaspnet451. The code is in the Chapter 8 folder.
In addition to the master pages, themes, and skins discussed in Chapter 6, ASP.NET has another feature that enables you to create reusable and thus consistent blocks of information: user controls.
User controls enable you to group logically related content and controls together so they can be treated as a single unit in content pages, master pages, and inside other user controls. A user control is actually a sort of mini-ASPX page in that it has a markup section and, optionally, a Code Behind file in which you can write code for the control. Working with a user control is very similar to working with normal ASPX pages, with a few minor differences.
You typically use a User Control for content that gets used in a few pages in your site. For example, you can build a user control that displays a banner that is shown on some, but not all pages, as you’ll see in this chapter.
By the end of this chapter, you’ll have a firm understanding of what user controls are and how they work, enabling you to create functional, reusable blocks of content.
INTRODUCTION TO USER CONTROLSUser controls are great for encapsulating markup, controls, and code that you need repeatedly throughout your site. To some extent, they look a bit like server controls in that they can contain programming logic and presentation that you can reuse in your pages. However, rather than dragging existing ones from the VS Toolbox, you need to create your own user controls and then add them to your ASPX pages, as you learn how to do later in this chapter.
Though master pages enable you to create content that is displayed in all pages in your site, it’s common to have content that should appear only on some, but not all, pages. For example, you may want to display a banner on a few popular pages, but not on the homepage or other common pages. Without user controls, you would add the code for the banner (an image, a link, and so on) to each page that needs it. When you want to update the banner (if you want to use a new image or link), you need to make changes to all pages that use it. If you move the banner to a user control and use that control in your content pages instead, all you need to change is the user control and the pages that use it pick up the change automatically. This gives you a flexible way to create reusable content.
User controls have the following similarities to normal ASPX pages:
- They have a markup section where you can add standard markup, server controls, and plain HTML.
- They can be created and designed with Visual Studio in Markup, Design, and Split View.
- They can contain programming logic, either inline or with a Code Behind file.
- They give you access to page-based information like
Request.QueryString. - They raise some (but not all) of the events that the
Pageclass raises, includingInit, Load, andPreRender.
You should also be aware of a few differences. User controls have an .ascx extension instead of the regular .aspx extension. In addition, user controls cannot be requested in the browser directly. Therefore, you can’t link to them. The only way to use a user control in your site is by adding it to a content or master page or another user control (which eventually should be added to a page).
In the remainder of this chapter, you see how to create a user control that is capable of displaying banners. The user control can present itself as a horizontal or vertical banner to accommodate for differently sized regions in your pages. In the next section, you see how to create a user control. The sections that follow show you how to use that control in an ASPX page.
Creating User ControlsYou add user controls to the site like any other content type: through the Add New Item dialog box. Similar to pages, you get the option to choose the programming language and whether you want to place the code in a separate Code Behind file. Figure 8-1 shows the Add New Item dialog box for a user control.
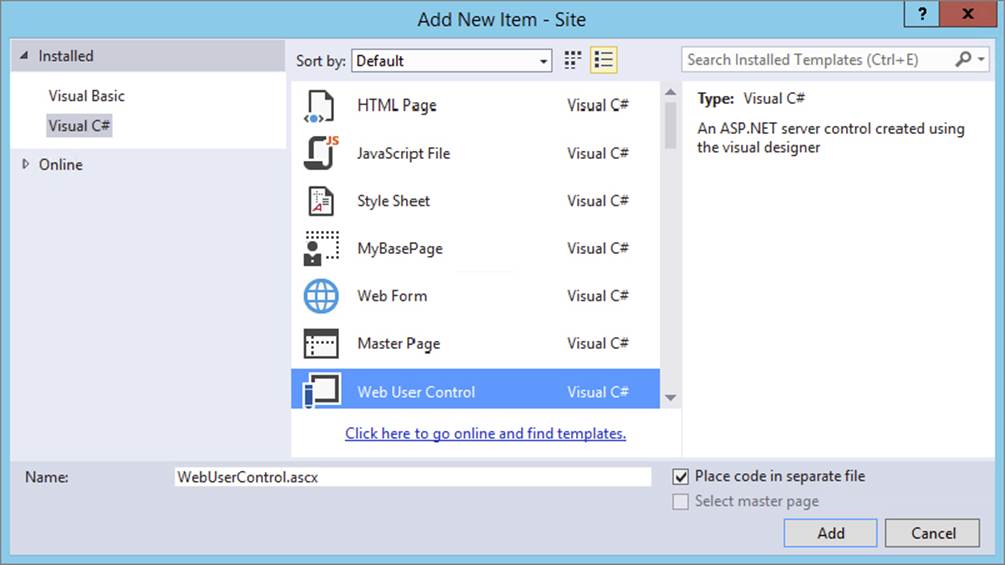
FIGURE 8-1
Once you add a user control to the site, it is opened in the Document Window automatically. The first thing you may notice is that a user control doesn’t have an @ Page directive, but rather an @ Control directive, as shown in this example that uses Code Behind:
<%@ Control Language="C#" AutoEventWireup="true" CodeFile="WebUserControl.ascx.cs" Inherits="WebUserControl" %>This marks the file as a user control, so the ASP.NET run time knows how to deal with it. Other than that, the directive is similar to a standard ASPX page that doesn’t use a master page.
With the user control open in the VS Document Window, you can use all the tools you have used in the previous seven chapters to create pages. You can use the Toolbox to drag controls in Markup and Design View, the CSS windows to change the look and feel and content of the user control, and the Properties Grid to change the properties of controls in your user controls. You can also write code that reacts to the events that the control raises.
To try this out yourself, the next exercise shows you how to create your first user control. In a later exercise, you see how to use the control in ASPX pages in your site.
In this exercise, you create a basic user control that displays a single vertical banner using an Image control. In later exercises, you see how to use this control in your pages and how to add another (horizontal) image.
For this exercise, you need two images that represent banners — one in portrait mode with dimensions of roughly 120 x 240 pixels, and one in landscape mode with a size of around 486 x 60 pixels. The Resources folder for this chapter’s code download that comes with this book has these two images, but you could also create your own. Don’t worry about the exact size of the images; as long as they are close to these dimensions, you should be fine.
1. Open the Planet Wrox site in VS.
2. If you haven’t done so already, create a new folder called Controls in the root of the site. Although user controls can be placed anywhere in the site hierarchy, placing them in a separate folder makes them easier to find and manage.
3. Create another folder called Images at the root of the site.
4. Using File Explorer (Windows Explorer on Windows 7), open up the Resources folder for this chapter (at C:\BegASPNET\Resources\Chapter 08 if you followed the instructions in the introduction of this book). If you haven’t done so already, you can download the necessary resources from www.wrox.com. Drag (or copy and paste) the files Banner120x240.gif and Banner486x60.gif from File Explorer into the Images folder you created in step 3. If you’re using your own images, drag them into theImages folder and give them the same names.
5. Right-click the Controls folder and choose Add ⇒ Add New Item. In the dialog box that follows, choose your programming language, click Web User Control, and make sure that Place Code in Separate File is checked, as shown in Figure 8-1. Name the file Banner and then click Add to add the control to the site. Notice how VS adds the extension of .ascx for you automatically if you don’t type it in. VS does this for all file types you add through the Add New Item dialog box so you don’t need to type the extension yourself. Your Solution Explorer should now look like Figure 8-2.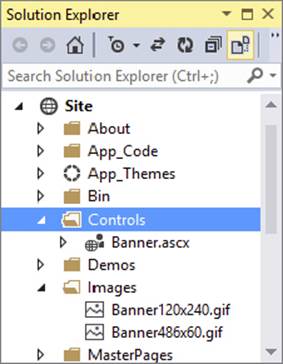
FIGURE 8-2
6.
Switch the user control to Design View and drag a Panel from the Standard category of the Toolbox onto the design surface. Using the Properties Grid, change the ID of the Panel to VerticalPanel.
7. From the Toolbox, drag an Image control into the Panel. Select the Image and then open the Properties Grid. Locate the ImageUrl property and click its ellipsis button, shown in Figure 8-3.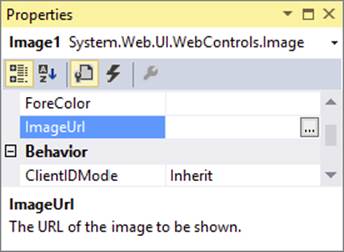
FIGURE 8-3
Browse to the Images folder, select the Banner120x240.gif image, and click OK to add it to the user control. Your Design View now looks like Figure 8-4.
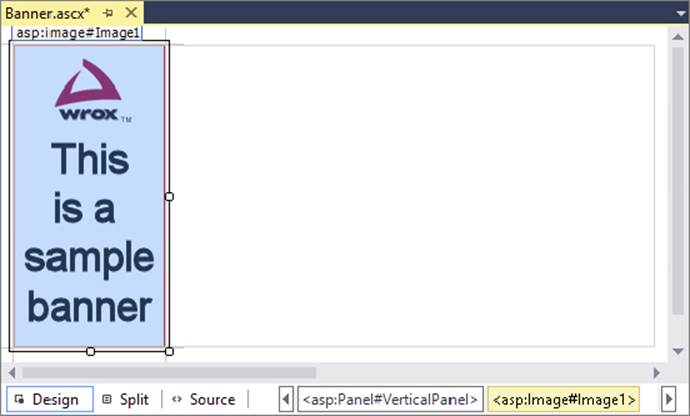
FIGURE 8-4
8.
Using the same Properties Grid, locate the AlternateText property and type This is a sample banner. Most browsers display the alternate text (rendered as a client-side alt attribute) only when the image cannot be displayed correctly. Some older browsers show the alternate text as the tooltip for the image when you hover your mouse over it.
9. Wrap the Image in a standard <a> element and set its href attribute to http://p2p.wrox.com. If you want, you can use the a code snippet to insert the bare link for you. To do this, type the letter a and then press Tab. VS inserts a link for you and enables you to type in the href value directly. When you then press Tab again, the content of the link is selected, which you can delete by pressing Del (the Image control will be the contents of the link). Finally, cut the closing </a> tag and move it to after the image.
10.Set the target of the anchor tag (<a>) to _blank to force the browser to open up the page in a new window when the image is clicked. When you’re done, the code for the entire user control should look like the following code, except for the Languageattribute that you may have set to VB and the AutoEventWireup that is False by default in VB.NET:
11.<%@ Control Language="C#" AutoEventWireup="true" CodeFile="Banner.ascx.cs"
12.Inherits="Controls_Banner" %>
13.<asp:Panel ID="VerticalPanel" runat="server">
14.<a href="http://p2p.wrox.com" target="_blank">
15.<asp:Image ID="Image1" runat="server" AlternateText="This is a sample banner"
16.ImageUrl="~/Images/Banner120x240.gif" />
17.</a>
</asp:Panel>18.Save the changes by pressing Ctrl+S and then close the user control file by pressing Ctrl+F4.
How It WorksThe design experience of user controls in the Visual Studio IDE is identical to that of pages. You can use drag and drop; the Toolbox; the Markup, Split, and Design Views; and so on. This makes it easy to work with user controls because you can use all the familiar tools you also use for page development.
The control you just created displays a single image wrapped in an anchor element. In the next section, you see how to add the user control to the master page so it will be displayed in the Sidebar <aside> element of every page in the site. Later sections in this chapter show you how to add the other image that you can use to display a horizontal banner in individual content pages.
To use a user control in a content or master page or in another user control, you need to perform two steps. First, you need to register the control by adding an @ Register directive to the page or control where you want the user control to appear. The second step involves adding the tags for the user control to the page and optionally setting some attributes on it.
A typical @ Register directive for a user control looks like this:
<%@ Register Src="ControlName.ascx" TagName="ControlName" TagPrefix="uc1" %>
The directive contains three important attributes, described in the following table:
|
ATTRIBUTE |
DESCRIPTION |
|
|
Points to the user control you want to use. To make it easier to move pages at a later stage, you can also use the tilde ( |
|
|
The name for the tag that is used in the control declaration in the page. You’re free to make up this name, but usually it is the same as the name of the control. |
|
|
Holds the prefix of the |
Considering the user control you created in the preceding exercise, your @ Register directive could look like this:
<%@ Register Src="~/Controls/Banner.ascx" TagName="Banner" TagPrefix="uc1" %>When the control is registered, you can add it to the page using the TagPrefix:TagName construct, similar to the way you add standard server controls to a page. Given the @ Register directive for the banner control, you need the following markup to add the control to your page:
<uc1:Banner ID="Banner1" runat="server" />This is the minimum code needed for a user control in a page. Note that the control is defined by a combination of the TagPrefix and the TagName. The other two attributes — ID and runat — are standard attributes that most controls in an ASP.NET page have.
Fortunately, in most cases, you don’t have to type all this code yourself. When you drag a user control from the Solution Explorer into a page in Design View, VS adds the required code for you automatically. The following exercise demonstrates how this works.
In this exercise, you add the user control Banner.ascx to the master page, so it displays a banner on each page in the site in the sidebar area.
1. Open up Frontend.master from the MasterPages folder and switch it into Design View.
2. Locate the drop-down list that enables you to select a theme, position your cursor right after the drop-down list, and press Enter three times to create some room.
3. From the Solution Explorer, drag the Banner.ascx file from the Controls folder into the empty spot you just created. Design View is updated and now looks like Figure 8-5.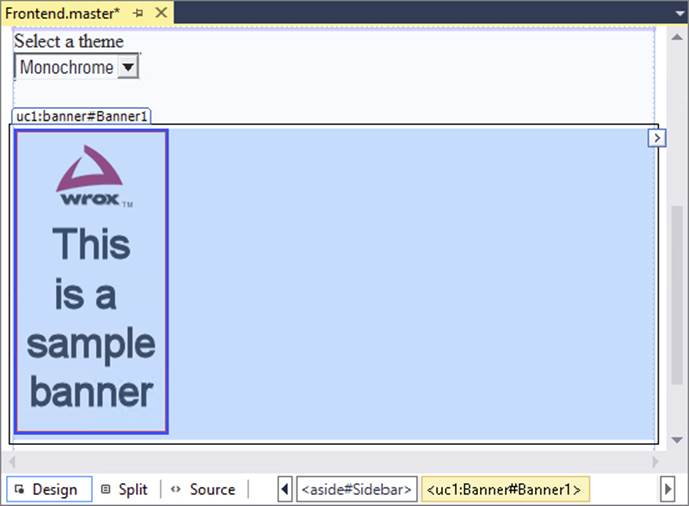
FIGURE 8-5
Switch to Markup View and locate the @ Register directive at the top of the file. If the Src attribute starts with two dots, change them to a tilde (~):
<%@ Register Src="~/Controls/Banner.ascx" TagName="Banner" TagPrefix="uc1" %>5. Save the changes to the master page and close it.
6. Some browsers automatically draw a border around an image when it’s placed within a hyperlink tag. To remove that border, add the following code to both themes’ CSS files:
7.img
8.{
9.border: 0;
}10.Save all your changes, right-click Default.aspx in the root of your site in the Solution Explorer, and choose View in Browser.
11.The banner is now displayed below the drop-down list. Switch to the other theme and you’ll see the same banner appear. When you click the banner, a new window is opened that takes you to the site you linked to in the previous exercise. If you don’t see the banner appear at all, check to see if you’re running ad-blocking software on Windows or in your browser. For example, Firefox has an add-on called Adblock Plus that may block the banner in your web page based on its dimensions.
How It WorksWhen you dragged the user control onto the design surface of the master page, VS performed two tasks: first it added the @ Register directive to tell the page where to look for the user control. It then added the control declaration right below the drop-down list.
When the page loads, the ASP.NET run time sees the control declaration and injects the output of the control at the specified location. In this example, the Panel, the <a> element, and the Image are inserted in the sidebar region of the page. If you look at the HTML for the page in the browser, you see the following code:
<div id="Banner1_VerticalPanel"> <a href="http://p2p.wrox.com" target="_blank"> <img id="Banner1_Image1" src="Images/Banner120x240.gif" alt="This is a sample banner" /> </a></div>The Panel control has been transformed into an HTML <div> element and the Image control into an <img> element. The AlternateText property has been changed to an alt attribute. Because the anchor element (<a>) was defined with plain HTML in the user control, it ends up exactly as you wrote it.
Notice how the id of the panel has been changed from VerticalPanel to the client id Banner1_VerticalPanel. This is necessary to give the <div> tag a unique client-side id attribute that is used in client-side scripting. The same has happened to the id of the<img> element. You see more about this in a later section of this chapter.
When you add a user control to a page, VS usually refers to the control using a relative path. In this exercise, this path first contained two dots (..) to indicate the parent folder, followed by the Controls folder, and finally by the name of the control:
<%@ Register Src="../Controls/Banner.ascx" TagName="Banner" TagPrefix="uc1" %>By changing the two dots to the tilde symbol, it becomes easier to move your pages around in your site because the Src attribute now always points to the Controls folder at the application’s root, no matter where the page that consumes the control is located. If your Src attribute already contained the tilde, you don’t have to change anything.
Though the tilde syntax makes your pages with user controls a little easier to manage, there is an even easier way to register your user controls sitewide.
Sitewide Registration of User ControlsIf you have a control that you expect to use quite often on separate content pages in your site, like the banner in the previous examples, you can register the control globally in the Web.config file. This way it becomes available throughout the entire site, without the need to register it on every page. The following exercise shows how to do this.
In this exercise, you register the Banner.ascx user control in the Web.config file. You can then remove the @ Register directive from the master page because it isn’t needed anymore. After you have changed the Web.config file, adding the same user control to other pages will no longer add the @ Register directive to the page.
1. Open the Web.config file from the root of the site. If you’re familiar with versions of ASP.NET prior to .NET 4, you may find the Web.config worryingly empty. But don’t worry; the functionality it included has not been removed from .NET. The configuration information placed in the website’s Web.config file has now been moved to the central Web.config and Machine.config files that apply to the entire machine instead. This gives you a much cleaner configuration file, making it easy to focus on your own stuff that you put in there.
2. Locate the <pages/> element that you used in Chapter 6 to apply the theme, and within its tags add the following bolded code that contains a <controls> element with a child <add/> element. Note: you may need to change the self-closing tag of the<pages> element to a full closing tag.
3.<pages theme="Monochrome">
4.<controls>
5.<add tagPrefix="Wrox" tagName="Banner" src="~/Controls/Banner.ascx" />
6.</controls>
</pages>7. Save the changes and close the file.
8. Open the master page again in Markup View and locate the Banner control in the sidebar area. Change uc1 to Wrox:
<Wrox:Banner ID="Banner1" runat="server" />If the declaration for your user control has its own closing tag, VS updates the closing tag for you automatically:
<Wrox:Banner ID="Banner1" runat="server"></Wrox:Banner>9. Scroll all the way up in the master page file and remove the entire line with the @ Register directive.
10.Save and close the master page.
11.Open Default.aspx again in your browser. Note that the banner is still present in the sidebar area.
Without the @ Register directive in the master page, the ASP.NET run time scans the Web.config file for controls that have been registered there. It then finds the registration of the Wrox:Banner control so it is able to successfully find the file using the srcattribute and add its contents to the page hierarchy.
With the control registration added to the Web.config file, it’s much easier to move or rename the control. Instead of finding and replacing the @ Register directive in all pages that use it, the only thing you need to change is the registration in theWeb.config file. When you make a change there, all pages using the control will automatically find the new location or name of the user control.
Useful as user controls are, they have a few caveats that you need to be aware of.
User Control Caveats
Earlier you saw that the ID of the Panel control you added to the page was modified by the ASP.NET run time. Instead of getting a <div> element with its id set to VerticalPanel, you got the following id:
<div id="Banner1_VerticalPanel"> ...</div>In many cases, this isn’t problematic because you often don’t need the client id. However, if you need to access this control from client-side JavaScript or CSS, it’s important to understand why this id is modified.
By design, all elements in an HTML page need to be unique. Giving them an id attribute is not required, but if you do so, you have to make sure they are unique. To avoid conflicts in the final HTML code of the page, ASP.NET ensures that each server-side element gets a unique client id by prefixing them with the name of their naming container. Within a naming container all elements should have unique IDs. VS warns you when you try to add a control that doesn’t have a unique server ID. For example, you get an error when you try to add a second panel with an id of VerticalPanel to the user control. But what if you place two Banner controls in the same page, or one in the master page and another in a content page? Potentially, you could end up with two client <div> elements with an ID ofVerticalPanel. To avoid this problem, ASP.NET prefixes each element with the ID of its nearest naming container. For the Panel inside the user control it means it’s prefixed with Banner1, the server-side ID of the user control in the master page.
You can use the ClientID of a control to get its full client-side id. The following snippet shows how to display the ClientID of the Panel control on a fictitious Label control within the Banner.ascx user control:
VB.NET
Label1.Text = VerticalPanel.ClientIDC#
Label1.Text = VerticalPanel.ClientID;With this code, the Label control’s Text property will contain Banner1_VerticalPanel, the client-side id of the Panel. You see a more practical example of using ClientID in the next chapter.
With an explicit ID, it’s easier to predict the final id of a client-side HTML element, which in turn makes it easier to reference those elements in JavaScript or CSS.
ASP.NET 4 introduced a new option to influence the client ID: the ClientIDMode.
Introducing ClientIDMode
Starting with ASP.NET 4, each web control now has a ClientIDMode property that enables you to determine the way the client ID is made up. You can set the ClientIDMode to any of these four values:
|
VALUE |
DESCRIPTION |
|
|
Generates the ID as it did in previous versions of ASP.NET. |
|
|
With this setting the control inherits its |
|
|
This value is mostly used for data-bound controls (discussed in Chapter 13 and later) and enables you to create predictable client IDs for repeating elements. The client ID of a control is generated by concatenating the client ID of the parent control and the server ID of the control itself. The ID can optionally be extended with a unique value for each element using the |
|
|
With this value the client ID will be exactly the same as the server ID that you set. This enables you to set the client ID explicitly, giving you greater control. However, it doesn’t prevent you from assigning the same value twice, which may result in duplicate IDs in the client’s HTML. Use with care! |
The default value of ClientIDMode for the Page class is Predictable and the default value for a control is Inherit. This in turn means that the default ID generation mode for controls is effectively Predictable, as they inherit that setting from Page. If you use Visual Studio to convert a Web project to ASP.NET 4.5.1 from an earlier version, Visual Studio automatically sets the site default to AutoID in the <pages> element in the Web.config file to maintain backwards compatibility like this:
<pages controlRenderingCompatibilityVersion="3.5"clientIDMode="AutoID"/>
Currently, the Planet Wrox website doesn’t benefit a whole lot from changing the client IDs for any of the existing controls, so there’s no need to change any of them right now. However, in later chapters, you use the ClientIDMode property again to create cleaner client IDs.
Although the current banner user control makes it easy to display a banner at various locations in your site, it isn’t very smart yet. All it can do is display a linked image and that’s it. To improve its usability, you can add behavior to the control so it can behave differently on different pages in your site.
ADDING LOGIC TO YOUR USER CONTROLSAlthough using controls for repeating content is already quite useful, they become even more useful when you add custom logic to them. By adding public properties or methods to a user control, you can influence its behavior at run time. When you add a property to a user control, it becomes available automatically in IntelliSense and in the Properties Grid for the control in the page you’re working with, making it easy to change the behavior from another file like a page.
To add properties or methods to a user control, you add them to the Code Behind of the control. The properties you add can take various forms. In its simplest form, a property looks exactly like the properties you saw in Chapter 5. For more advanced scenarios you need to add View State properties, which are able to maintain their state across postbacks. In the next two exercises you see how to create both types of properties.
Creating Your Own Data Types for PropertiesTo make the banner control more useful, you can add a second image to it that displays a horizontal banner. You could also add a property to the control that determines whether to display the vertical or horizontal image. You could do this by creating a numeric property of type System.Byte. Then 0 would be vertical and 1 would be horizontal, for example. However, this makes it hard to remember what each number represents. You can make it a bit easier by creating a String property that accepts the values Horizontal andVertical. However, strings cannot be checked at compile time, so you may end up with a spelling mistake, resulting in an error or in the incorrect banner being displayed. The .NET Framework supplies a nice way to solve this by enabling you to create your own data type in the form of an enumeration. With an enumeration, or enum for short, you assign numbers to human-friendly text strings. Developers then use this readable text, while under the hood the numeric value is used. The following snippet shows a basic example of an enum (notice how the VB example doesn’t use commas, whereas they are required in C#):
VB.NET
Public Enum Direction Horizontal VerticalEnd EnumC#
public enum Direction{ Horizontal, Vertical}With these enums, the compiler assigns numeric values to the Horizontal and Vertical members automatically, starting with 0 and counting upward. You can also define numeric values explicitly if you want:
VB.NET
Public Enum Direction Horizontal = 0 Vertical = 1End EnumC#
public enum Direction{ Horizontal = 0, Vertical = 1}The cool thing about enums is that you will get IntelliSense in code files, in the Properties Grid, and even in the code editor for your user controls. Figure 8-6 shows how IntelliSense kicks in for a VB.NET code file.

FIGURE 8-6
In Figure 8-7 you see the same list with values from the enum in the Properties Grid.
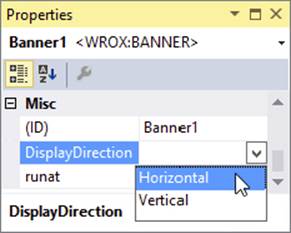
FIGURE 8-7
And in Figure 8-8 you see the same list appear for a property of a user control in Markup View.

FIGURE 8-8
Just as with other code files like classes, you should put your enums in a file under the App_Code folder. If you have more than one of them, you can store them all in the same file or create a separate file for each enum.
Enums are great for simple and short lists. They help you find the right item quickly without memorizing “magic numbers” like 0 or 1, but enable you to use human-readable text strings instead.
In the next exercise, you see how to create an enum and use it in your Banner user control.
In this exercise, you add a second banner to the user control. This banner displays as a horizontal image inside its own panel. To avoid the two banners showing up at the same time, you add a property that determines which banner to display. Pages that use the control can then define the correct banner.
1. Start by creating an enumeration that contains two members for the different directions: vertical and horizontal. To do this, right-click the App_Code folder and choose Add ⇒ Add New Item. Choose your programming language and add a class file called Direction.
2. Once the file opens, clear its contents and add the following code to it:
VB.NET
Public Enum Direction Horizontal VerticalEnd EnumC#
public enum Direction{ Horizontal, Vertical}3. Save and close the file.
4. Open the Code Behind for the user control Banner.ascx and add the following property. To help you create properties, VS comes with a handy code snippet. To activate the snippet in C#, type prop and then press Tab twice. VS adds the code structure for an automatic property for you. For VB.NET, you can type Property and then press Tab. However, this creates a full property rather than an automatic property (which is what is used in this exercise), so you’re better off typing in the code manually in this case. Once the code is inserted, you can press Tab again to move from field to field, each time typing the right data type or property name. Complete the code so it looks like this:
VB.NET
Public Property DisplayDirection As DirectionC#
public Direction DisplayDirection { get; set; }
Note that the name of the property is DisplayDirection and its data type is Direction, the enum you defined earlier.
5. Open the Markup View of Banner.ascx, copy the entire <asp:Panel>, and paste it right below the existing Panel. Name the control HorizontalPanel and set the ImageUrl of the image to ~/Images/Banner486x60.gif. If you want to browse for the image instead of typing its path directly, position your cursor in Markup View after the opening quote of the ImageUrl attribute’s value and press Ctrl+Space. Choosing Pick URL in the menu that appears enables you to browse for a file. Your code should now look like this:
6.<asp:Panel ID="HorizontalPanel" runat="server">
7.<a href="http://p2p.wrox.com" target="_blank">
8.<asp:Image ID="Image2" runat="server" AlternateText="This is a sample banner"
9.ImageUrl="~/Images/Banner486x60.gif" />
10.</a>
</asp:Panel>11.Switch back to the Code Behind of the control and add the following bolded code to the Page_Load handler. In C#, the handler should already be there. In Visual Basic, you can choose (Page Events) from the left drop-down list at the top of the Document Window and Load from the right drop-down list to set up the handler, or you can double-click the user control in Design View.
VB.NET
Protected Sub Page_Load(sender As Object, e As EventArgs) Handles Me.LoadSelect Case DisplayDirection
Case Direction.Horizontal HorizontalPanel.Visible = True VerticalPanel.Visible = False Case Direction.Vertical VerticalPanel.Visible = True HorizontalPanel.Visible = False End SelectEnd SubC#
protected void Page_Load(object sender, EventArgs e){switch (DisplayDirection)
{ case Direction.Horizontal: HorizontalPanel.Visible = true; VerticalPanel.Visible = false; break; case Direction.Vertical: VerticalPanel.Visible = true; HorizontalPanel.Visible = false; break; }}12.Save and close the two files that make up the user control because you’re done with them for now.
13.Open up the master page file once more in Markup View and locate the user control declaration. Right after the runat="server" attribute, add the following DisplayDirection attribute that sets the correct image type:
<Wrox:Banner ID="Banner1" runat="server" DisplayDirection="Horizontal" />IntelliSense will help you pick the right DisplayDirection from the list. If you don’t get IntelliSense, wait a few seconds until VS has caught up with all the changes. Alternatively, save and close all open files (or restart VS), open the master page, and try again.
14.Save all changes and request Default.aspx in the browser. Note that the right sidebar area now contains the horizontal image, breaking the layout a little because the image is too wide for the sidebar. If you don’t see the banner appear at all, check your system for ad-blocking software that may stop the banner image from appearing.
15.Switch back to the master page and change the DisplayDirection from Horizontal to Vertical. Save your changes and refresh the page in the browser. The sidebar should now display the vertical banner, as shown in Figure 8-9.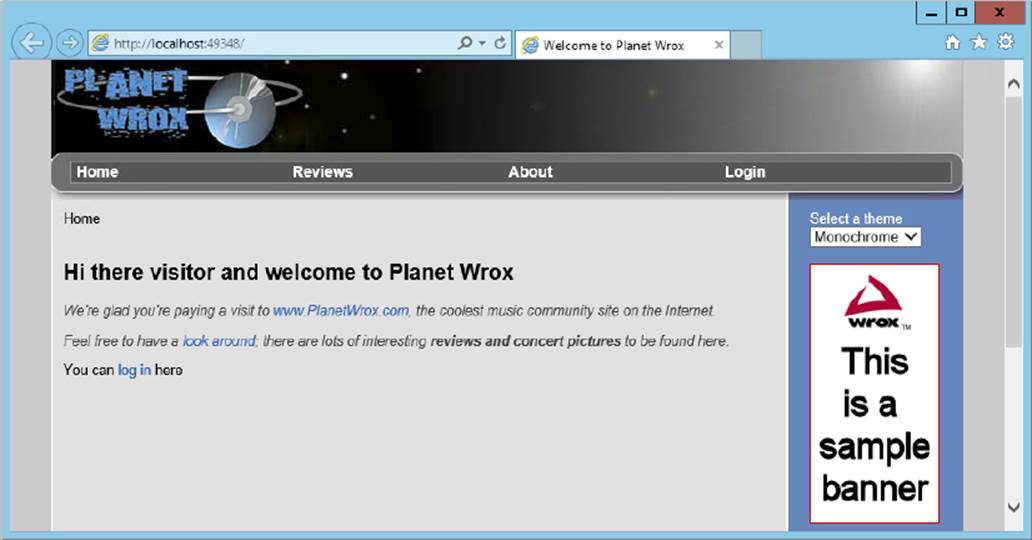
FIGURE 8-9
16.
Open the AboutUs.aspx page from the About folder in Markup View. If you don’t have that file, create it first. In the cpMainContent Content block, add some text describing you or your organization and the reason you created the site. Switch to Design View and drop the Banner.ascx control from the Solution Explorer onto the design surface, right below the text you just added. VS detects the user control in the master page called Banner1 and assigns the ID of Banner2 to the user control you just dropped. Notice how you see four banners in Design View; two come from the Banner control in the master page and the other two come from the Banner control in the About Us page itself. At run time, two of them will be hidden.
17.Select the user control you just added in Design View, open its Properties Grid, and set the DisplayDirection to Horizontal.
18.Save all your changes and then press Ctrl+F5 to open the About Us page in your browser. In addition to the banner in the right sidebar, you should now also see the horizontal banner appear in the content area.
How It WorksThe property called DisplayDirection gives your user control some extra behavior. Pages using the control should now set the DisplayDirection like this:
<Wrox:Banner ID="Banner1" runat="server" DisplayDirection="Horizontal" />When the control instance is created by the ASP.NET run time, the value you set in the control declaration is assigned to the property DisplayDirection. If you don’t assign a value, the default will be Horizontal for the current definition of the Directionenum, as that’s the first item in the list and has an implicit value of zero.
When the page loads, this code in the user control is executed:
VB.NET
Select Case DisplayDirection Case Direction.Horizontal HorizontalPanel.Visible = True VerticalPanel.Visible = False Case Direction.Vertical VerticalPanel.Visible = True HorizontalPanel.Visible = FalseEnd SelectC#
switch (DisplayDirection){ case Direction.Horizontal: HorizontalPanel.Visible = true; VerticalPanel.Visible = false; break; case Direction.Vertical: VerticalPanel.Visible = true; HorizontalPanel.Visible = false; break;}This code uses a Select Case/switch block to determine which image to show. When the DisplayDirection equals Horizontal, the Visible property of HorizontalPanel is set to True and the other control is hidden. The same principle is applied to the Verticalsetting.
In addition to the DisplayDirection, another useful property for the user control would be the URL that the banner links to. In the next section, you see how to implement this and learn how to create a View State property called NavigateUrl that is able to survive postbacks.
To be able to set the URL that a user is taken to programmatically, you need to be able to access the anchor tag that is defined in the control’s markup. To do this, you need to give it an id and a runat="server" attribute. To be able to programmatically set the new NavigateUrl property that you’ll add to the Banner control and to ensure that this property survives postbacks, you need to implement a View State property. To show you why you need a View State property, the first three steps of this exercise have you modify the About Us page so it sets the DisplayDirection of the Banner control programmatically. You’ll then cause a postback so you can see that the value for the direction gets lost because it doesn’t maintain its state in View State. The second part of the exercise then shows you how to implement the NavigateUrl property that is able to maintain its state.
1. Open the Code Behind of AboutUs.aspx and add the following bolded code to the Page_Load event handler. If the handler isn’t there yet, switch to Design View and double-click somewhere on the gray area of the page.
VB.NET
Protected Sub Page_Load(sender As Object, e As EventArgs) Handles Me.LoadIf Not Page.IsPostBack Then
Banner2.DisplayDirection = Direction.Vertical End IfEnd SubC#
protected void Page_Load(object sender, EventArgs e){if (!Page.IsPostBack)
{ Banner2.DisplayDirection = Direction.Vertical; }}Verify that the Banner user control has an ID of Banner2 in the Markup View of the page, or update your code accordingly.
2. Switch to Design View and add a Button control by dragging it from the Standard category of the Toolbox on top of the Banner.ascx control that is placed inside the page (not the one that’s defined in the master page). There’s no need to write any code for the Button control’s Click event.
3. Save the page and open it in your browser. Because of the code in Page_Load, the first time the page loads, the banner at the bottom of the screen displays the vertical banner. Now click the button so the page will reload. This time, the page displays the horizontal image. Because the DisplayDirection of the Banner control is set in Page_Load only when Page.IsPostBack is False, that setting is lost when you post back, causing the banner to revert to its default setting of Horizontal.
4. To avoid this problem with the NavigateUrl, you need to implement it as a View State property where the ViewState collection is used as the backing store to store the underlying value. That way, the value is sent to the browser and back to the server with every request. To implement the property, add the following code to the Code Behind of the Banner.ascx user control, right below the DisplayDirection property you created earlier.
Remember, you don’t have to type all this code manually because the download that comes with this book contains all the code shown.
VB.NET
Public Property NavigateUrl() As String Get Dim _navigateUrl As Object = ViewState("NavigateUrl") If _navigateUrl IsNot Nothing Then Return CType(_navigateUrl, String) Else Return "http://p2p.wrox.com" ' Return a default value End If End Get Set(Value As String) ViewState("NavigateUrl") = Value End SetEnd PropertyC#
public string NavigateUrl{ get { object _navigateUrl = ViewState["NavigateUrl"]; if (_navigateUrl != null) { return (string)_navigateUrl; } else { return "http://p2p.wrox.com"; // Return a default value } } set { ViewState["NavigateUrl"] = value; }}5. Switch to Markup View of the user control and add runat="server" attributes to both links. Give the link in the vertical panel an id of VerticalLink and the other an id of HorizontalLink. They should end up looking like this:
6.<a href="http://p2p.wrox.com" target="_blank"runat="server" id="VerticalLink">
7....
<a href="http://p2p.wrox.com" target="_blank"runat="server" id="HorizontalLink">
8. Switch back to the Code Behind of the user control (press F7) and modify the Page_Load handler of the user control so it also sets the HRef property of the anchor element:
VB.NET
Case Direction.Horizontal HorizontalPanel.Visible = True VerticalPanel.Visible = FalseHorizontalLink.HRef = NavigateUrl
Case Direction.Vertical VerticalPanel.Visible = True HorizontalPanel.Visible = FalseVerticalLink.HRef = NavigateUrl
C#
case Direction.Horizontal: HorizontalPanel.Visible = true; VerticalPanel.Visible = false;HorizontalLink.HRef = NavigateUrl;
break;case Direction.Vertical: VerticalPanel.Visible = true; HorizontalPanel.Visible = false;VerticalLink.HRef = NavigateUrl;
break;9. Save the changes and go back to the Code Behind of AboutUs.aspx. Modify the code so it sets the NavigateUrl property of the Banner control to a different URL. You should overwrite the code that sets the DisplayDirection.
VB.NET
Protected Sub Page_Load(sender As Object, e As EventArgs) Handles Me.Load If Not Page.IsPostBack ThenBanner2.NavigateUrl = "http://imar.spaanjaars.com"
End IfEnd SubC#
protected void Page_Load(object sender, EventArgs e){ if (!Page.IsPostBack) {Banner2.NavigateUrl = "http://imar.spaanjaars.com";
}}10.Save all your changes and then request the AboutUs.aspx page in your browser by pressing Ctrl+F5.
Click the horizontal banner at the left side of the page. A new window pops up, showing the URL you set in the previous step.
11.Close this new window and click the button you added to AboutUs.aspx earlier to cause the page to post back to the server. Once the page is reloaded, click the banner image again. You are taken to the same site as in step 8. This illustrates the point that the NavigateUrl property is now able to maintain its value across postbacks, unlike the DisplayDirection property you added to the user control earlier.
In the first three steps, you witnessed the behavior of non-View State properties. You started off by writing some code in the Page_Load event handler that sets the DisplayDirection programmatically:
VB.NET
If Not Page.IsPostBack Then Banner2.DisplayDirection = Direction.VerticalEnd IfC#
if (!Page.IsPostBack){ Banner2.DisplayDirection = Direction.Vertical;}Because of the check for Page.IsPostBack, this code only fires when the page loads the first time. It doesn’t fire when the page is reloaded due to a postback. When it fires, it sets the DisplayDirection property of the Banner control so the banner displays the correct image. However, as soon as the page is posted back, this value is lost and the control reverts to its default direction of Horizontal. One way to overcome this problem is to make sure the code fires both the first time and on subsequent postbacks. Removing the check for Page.IsPostBack is enough to accomplish this. However, this is not always a desired solution. Imagine you’re getting the correct display direction from a database. Because fetching data from a database is a costly operation, you want to minimize the number of times you hit the database. In such scenarios, developers are likely to fetch the data only when the page loads the first time and expect it to stay around on subsequent postbacks. That is exactly what the NavigateUrlproperty does. You set its value once and it stays available, even if you post the page back to the server. This is accomplished with a View State property.
To see how this works, take a look at the setter of that property first:
VB.NET
Public Property NavigateUrl() As String ... Set(Value As String) ViewState("NavigateUrl") = Value End SetEnd PropertyC#
public string NavigateUrl{ ... set { ViewState["NavigateUrl"] = value; }}When you assign a value to the NavigateUrl property, its value is stored in the ViewState collection. You can see the ViewState collection as a bag that enables you to store data that you can retrieve again after a postback. You identify values in View State using a unique key. In the example the key equals the name of the property so it’s easy to see they belong together. Once you assign a value to a View State property, it’s stored in the page in the hidden __VIEWSTATE field that you learned about in Chapter 4. This means it gets sent to the browser when the page loads and it is sent back to the server when the page is posted back again.
When the postback occurs, the code in Page_Load in the user control fires again. Just as with the initial request, the code accesses the NavigateUrl property in the Select Case/switch block:
VB.NET
Case Direction.Horizontal ... HorizontalLink.HRef = NavigateUrl ...C#
case Direction.Horizontal: ... HorizontalLink.HRef = NavigateUrl; ...The value for NavigateUrl is returned by the getter of the property:
VB.NET
Public Property NavigateUrl() As String Get Dim _navigateUrl As Object = ViewState("NavigateUrl") If _navigateUrl IsNot Nothing Then Return CType(_navigateUrl, String) Else Return "http://p2p.wrox.com" ' Return a default value End If End Get ...End PropertyC#
public string NavigateUrl{ get { object _navigateUrl = ViewState["NavigateUrl"]; if (_navigateUrl != null) { return (string)_navigateUrl; } else { return "http://p2p.wrox.com"; // Return a default value } } ...}This code first tries to get the value from View State using ViewState("NavigateUrl") in VB.NET or ViewState["NavigateUrl"] in C#, which uses square brackets to access items in a collection. If the value that is returned is Nothing or null, the getter returns the default value for the property: http://p2p.wrox.com.
However, if the value is not Nothing, it is cast to a string using CType in VB.NET and (string) in C# and eventually returned to the calling code. At the end, the NavigateUrl returned from the View State property is assigned to the HRef property of the anchor tag again, which is then used as the URL users are taken to when they click the image.
Although View State is designed to overcome the problems of maintaining state as outlined in the previous exercise, you should carefully consider whether or not you use it. The values you store in View State are sent to the browser and back to the server on everyrequest. When you store many or large values in View State, this increases the size of the page and thus negatively impacts performance. Never store large objects like database records in View State; it’s often quicker to get the data fresh from the database on each request than to pass it along in the hidden View State field if the amount of data that needs to be stored is large. Also, because the View State is stored within the page and is thus transferred over the wire, you shouldn’t use it to store sensitive values such as passwords.
PRACTICAL TIPS ON USER CONTROLSThe following list provides some practical tips on working with user controls:
- Don’t overuse user controls. User controls are great for encapsulating repeating content, but they also make it a little harder to manage your site because code and logic is contained in multiple files. If you’re not sure if some content will be reused in another part of the site, start by embedding it directly in the page. You can always move it to a separate user control later if the need arises.
- Keep user controls focused on a single task. Don’t create a user control that is able to display five different types of unrelated content with a property that determines what to display. This makes the control difficult to maintain and use. Instead, create five lightweight controls and use them appropriately.
- When you create user controls that contain styled markup, don’t hardcode style information like the
CssClassfor the server controls contained in the user control. Instead, consider creating separateCssClassproperties on the user control, which are then used to set theCssClassof your server controls. This improves the reusability of your user control, making it easier to incorporate the control in different designs.
User controls can greatly improve the maintainability of your site. Instead of repeating the same markup and code on many different pages in your site, you encapsulate the code in a single control, which you can then use in different areas of your site.
To improve the usefulness of your controls, you can add behavior to them. It’s common to create controls with properties you can set in consuming pages, enabling you to change the behavior of the control at run time. Although View State properties can solve some of the state issues you may come across, you should carefully consider whether you really need them. Because these properties add to the size of the page, they can have a negative impact on your site’s performance.
You can further improve the Banner control by keeping track of the number of times each image has been clicked. The Planet Wrox site doesn’t implement this, but with the knowledge you gain in the chapters about database interaction, this is easy to implement yourself.
In the next chapter you create another user control that serves as a contact form. By building the form as a user control, it’s easy to ask your users for feedback from different locations in the site.
1. In this chapter you saw how to create a standard property and a View State property. What is the main difference between the two? And what are the disadvantages of each of them?
2. Currently, the DisplayDirection property of the Banner control doesn’t maintain its state across postbacks. Change the code for the property so it is able to maintain its state using the ViewState collection, similar to how NavigateUrl maintains its value.
3. What are the two main benefits of using a custom enumeration like Direction over built-in types like System.Byte or String?
You can find answers to these exercises in Appendix A.
WHAT YOU LEARNED IN THIS CHAPTER
|
|
A set of instructions that marks a file as a User Control and define its behavior. |
|
|
Used to register user controls and point to their source inside pages, master pages, and other user controls. |
|
|
The property that enables you to set the |
|
|
The central .NET configuration file that applies to your entire system and provides defaults for your website’s settings. |
|
|
A block of content (stored in a file with an |
|
|
Properties at the page, master page, or user control level that store their values in View State so they can survive postbacks. |
|
|
The |
All materials on the site are licensed Creative Commons Attribution-Sharealike 3.0 Unported CC BY-SA 3.0 & GNU Free Documentation License (GFDL)
If you are the copyright holder of any material contained on our site and intend to remove it, please contact our site administrator for approval.
© 2016-2026 All site design rights belong to S.Y.A.