21st Century C (2015)
Part I. The Environment
Chapter 3. Packaging Your Project
Everything is building and it appears
That you’re all architects and engineers.
Fugazi, “Ex-spectator”
If you’ve read this far, then you have met the tools that solve the core problems for dealing with C code, like debugging and documenting it. If you’re eager to get going with C code itself, then feel free to skip ahead to Part II. This chapter and the next will cover some heavy-duty tools intended for collaboration and distribution to others: package-building tools and a revision-control system. Along the way, there will be many digressions about how you can use these tools to write better even when working solo.
I mentioned it in the introduction, but nobody reads introductions, and it bears repeating: the C community holds itself to a very high standard of interoperability. Yes, if you look around your office or coffee shop, everybody is using a homogeneous set of tools, but there is great diversity outside of any local area. Personally, I get emails reasonably often from people using my code on systems that I’ve never seen in person; I think this is amazing, and am always gratified that I strove for interoperability over the easier path of writing code that runs fine on my platform.
In the present day, Autotools, a system for autogenerating the perfect makefile for a given system, is central to how code is distributed. You’ve already met it in “Using Libraries from Source”, where you used it to quickly install the GNU Scientific Library. Even if you’ve never dealt with it directly, it is probably how the people who maintain your package-management system produced just the right build for your computer.
But you’ll have trouble following what Autotools is doing unless you have a good idea of how a makefile works, so we need to cover those in a little more detail first. But to a first approximation, makefiles are organized sets of shell commands, so you’ll need to get to know the various facilities the shell offers for automating your work. The path is long, but at the end you will be able to:
§ Use the shell to automate work.
§ Use makefiles to organize all those tasks you have the shell doing.
§ Use Autotools to let users autogenerate makefiles on any system.
The Shell
A POSIX-standard shell will have the following:
§ Abundant macro facilities, in which your text is replaced with new text—i.e., an expansion syntax
§ A Turing-complete programming language
§ An interactive frontend—the command prompt—which might include lots of user-friendly features
§ A system for recording and reusing everything you typed: history
§ Lots of other things I won’t mention here, such as job control and many built-in utilities
There is a lot of shell scripting syntax, so this section covers only a few pieces of low-hanging syntactic fruit for these categories. There are many shells to be had (and later, a sidebar will suggest trying a different one from the default), but unless otherwise noted, this section will stick to the POSIX standard.
I won’t spend much time on the interactive features, but I have to mention one that isn’t even POSIX-standard: tab completion. In bash, if you type part of a filename and hit the Tab key, the name will be autocompleted if there’s only one option, and if not, hit Tab again to see a list of options. If you want to know how many commands you can type on the command line, hit Tab twice on a blank line and bash will give you the whole list. Other shells go much further than bash: after typing make, hit Tab in the Z shell and it will read your makefile for the possible targets. The Friendly Interactive shell (fish) will check the manual pages for the summary lines, so when you type man Tab it will give you a one-line summary of every command beginning with L, which could save you the trouble of actually pulling up any manpage at all.
There are two types of shell users: those who didn’t know about this tab-completion thing, and those who use it all the time on every single line. If you were one of those people in that first group, you’re going to love being in the second.
Replacing Shell Commands with Their Outputs
A shell largely behaves like a macro language, wherein certain blobs of text get replaced with other blobs of text. These are called expansions in the shell world, and there are many types: this section touches on variable substitution, command substitution, a smattering of history substitution, and will give examples of tilde expansion and arithmetic substitution for quick desk calculator math. I leave you to read your shell’s manual on alias expansion, brace expansion, parameter expansion, word splitting, pathname expansion, and glob expansion.
Variables are a simple expansion. If you set a variable like
onething="another thing"
on the command line, then when you later type:
echo $onething
then another thing will print to screen.
Your shell will require that there be no spaces on either side of the =, which will annoy you at some point.
When one program starts a new program (in POSIX C, when the fork() system call is used), a copy of all environment variables is sent to the child program. Of course, this is how your shell works: when you enter a command, the shell forks a new process and sends all the environment variables to the child.
Environment variables, however, are a subset of the shell variables. When you make an assignment like the previous one, you have set a variable for the shell to use; when you:
export onething="another thing"
then that variable is available for use in the shell, and its export attribute is set. Once the export attribute is set, you can still change the variable’s value.
For our next expansion, how about the backtick, `, which is not the more vertical-looking single tick '.
NOTE
The vertical tick (', not the backtick) indicates that you don’t want expansions done. The sequence:
onething="another thing"
echo "$onething"
echo '$onething'
will print:
another thing
$onething
The backtick replaces the command you give with its output, doing so macro-style, where the command text is replaced in place with the output text.
Example 3-1 presents a script that counts lines of C code by how many lines have a ;, ), or } on them. Given that lines of source code is a lousy metric for most purposes anyway, this is as good a means as any, and has the bonus of being one line of shell code.
Example 3-1. Counting lines using shell variables and POSIX utilities (linecount.sh)
# Count lines with a ;, ), or }, and let that count be named Lines.
Lines=`grep '[;)}]' *.c | wc -l`
# Now count how many lines there are in a directory listing; name it Files.
Files=`ls *.c |wc -l`
echo files=$Files and lines=$Lines
# Arithmetic expansion is a double-paren.
# In bash, the remainder is truncated; more on this later.
echo lines/file = $(($Lines/$Files))
# Or, use those variables in a here script.
# By setting scale=3, answers are printed to 3 decimal places.
# (Or use bc -l (ell), which sets scale=20)
bc << ---
scale=3
$Lines/$Files
---
You can run the shell script via . linecount.sh. The dot is the POSIX-standard command to source a script. Your shell probably also lets you do this via the nonstandard but much more comprehensible source linecount.sh.
NOTE
On the command line, the backtick is largely equivalent to $(). For example: echo `date` and echo $(date). However, make uses $() for its own purposes, so the backtick is easier to use in makefiles.
Use the Shell’s for Loops to Operate on a Set of Files
Let’s get to some proper programming, with if statements and for loops.
But first, some caveats and annoyances about shell scripting:
§ Scope is awkward—pretty much everything is global.
§ It’s effectively a macro language, so all those text interactions that they warned you about when you write a few lines of C preprocessor code (see “Cultivate Robust and Flourishing Macros”) are largely relevant for every line of your shell script.
§ There isn’t really a debugger that can execute the level-jumping basics from “Using a Debugger”, though modern shells will provide some facilities to trace errors or verbosely run scripts.
§ You’ll have to get used to the little tricks that will easily catch you, like how you can’t have spaces around the = in onething=another, but you must have spaces around the [ and ] in if [ -e ff ] (because they’re keywords that just happen to not have any letters in them).
Some people don’t see these details as much of an issue, and ♥ the shell. Me, I write shell scripts to automate what I would type at the command line, and once things get complex enough that there are functions calling other functions, I take the time to switch to Perl, Python, awk, or whatever is appropriate.
Having a programming language that you can type directly onto the command line makes it easy to run the same command on several files. Let’s back up every .c file the old fashioned way, by copying it to a new file with a name ending in .bkup:
for file in *.c;
do
cp $file ${file}.bkup;
done
You see where the semicolon is: at the end of the list of files the loop will use, on the same line as the for statement. I’m pointing this out because when cramming this onto one line, as in:
for file in *.c; do cp $file ${file}.bkup; done
I always forget that the order is ; do and not do ;.
The for loop is useful for dealing with a sequence of n runs of a program. By way of a simple example, benford.sh searches C code for numbers beginning with a certain digit (i.e., the head of the line or a nondigit followed by the digit we are looking for), and writes each line that has the given number to a file, as shown in Example 3-2:
Example 3-2. For each digit i, search for the (nondigit)i sequence in the text; count those lines (benford.sh)
for i in 0 1 2 3 4 5 6 7 8 9; do grep -E '(^|[^0-9.])'$i *.c > lines_with_${i}; done
wc -l lines_with* #A rough histogram of your digit usage.
Testing against Benford’s law is left as an exercise for the reader.
The curly braces in ${i} are there to distinguish what is the variable name and what is subsequent text; you don’t need it here, but you would if you wanted a filename like ${i}lines.
You probably have the seq command installed on your machine—it’s BSD/GNU-standard but not POSIX-standard. Then we can use backticks to generate a sequence:
for i in `seq 0 9`; do grep -E '(^|[^0-9.])'$i *.c > lines_with_${i}; done
Using this form, running your program a thousand times is trivial:
for i in `seq 1 1000`; do ./run_program > ${i}.out; done
#or append all output to a single file:
for i in `seq 1 1000`; do
echo output for run $i: >> run_outputs
./run_program >> run_outputs
done
Test for Files
Now let’s say that your program relies on a data set that has to be read in from a text file to a database. You only want to do the read-in once, or in pseudocode: if (database exists) then (do nothing), else (generate database from text).
On the command line, you would use test, a versatile command typically built into the shell. To try it, run a quick ls, get a filename you know is there, and use test to check that the file exists like this:
test -e a_file_i_know
echo $?
By itself, test outputs nothing, but because you’re a C programmer, you know that every program has a main function that returns an integer, and we will use only that return value here. It’s customary to read the return value as a problem number, so 0==no problem, and in this case 1==file does not exist (which is why, as will be discussed in “Don’t Bother Explicitly Returning from main”, the default is that main returns zero). The shell doesn’t print the return value to the screen, but stores it in a variable, $?, which you can print via echo.
Caution
The echo command itself has a return value, and $? will be set to that value after you run echo $?. If you want to use the value of $? for a specific command more than once, assign it to a variable, such as returnval=$?.
Example 3-3 uses test in an if statement to act only if a file does not exist. As in C, ! means not.
Example 3-3. An if/then statement built around test—run it several times (. iftest.sh; . iftest.sh; . iftest.sh) to watch the test file come in and out of existence (iftest.sh)
if test ! -e a_test_file; then
echo test file had not existed
touch a_test_file
else
echo test file existed
rm a_test_file
fi
Notice that, as with the for loop, the semicolon is in what I consider an awkward position, and we have the super-cute rule that we end if blocks with fi. By the way, else if is not valid syntax; use the elif keyword.
To make it easier for you to run this repeatedly, let’s cram it onto one margin-busting line. The keywords [ and ] are equivalent to test, so when you see this form in other people’s scripts and want to know what’s going on, the answer is in man test.
if [ ! -e a_test_file ]; then echo test file had not existed; ↩
touch a_test_file; else echo test file existed; rm a_test_file; fi
Because so many programs follow the custom that zero==OK and nonzero==problem, we can use if statements without test to express the clause if the program ran OK, then.... For example, it’s common enough to use tar to archive a directory into a single .tgz file, then delete the directory. It would be a disaster if the tar file somehow didn’t get created but the directory contents were deleted anyway, so we should have some sort of test that the tar command completed successfully before deleting everything:
#generate a test file:
mkdir a_test_dir
echo testing ... testing > a_test_dir/tt
#Compress it, and remove only if the compression succeeded.
if tar cz a_test_dir > archived.tgz; then
echo Compression went OK. Removing directory.
rm -r a_test_dir
else
echo Compression failed. Doing nothing.
fi
If you want to see this fail after running once, try chmod 000 archived.tgz to make the destination archive unwritable, then rerun.
Bear in mind that the above forms are about the return value of the program, be it test or some other program. Now and then you may want to use the actual output, which brings us back to the backtick. For example, cat yourfile | wc -l will produce a single number giving the line count of yourfile (assuming you have already established that it exists), so it is appropriate for embedding into a test:
if [ `cat yourfile | wc -l` -eq 0 ] ; then echo empty file.; fi
TRY A MULTIPLEXER
I always have two terminals open when coding: one with the code in an editor, and one for compiling and running the program (probably in a debugger). Add another source file or two, and being able to deftly jump among terminals becomes essential.
There are two major terminal multiplexers to choose from, on either side of the great GNU-BSD rivalry: GNU Screen and tmux. Your package manager will probably install either or both of them.
Both work via a single command key. GNU Screen defaults to Ctrl-A. Tmux defaults to Ctrl-B, but the consensus seems to be that everybody remaps that to use Ctrl-A instead, by adding:
unbind C-b
set -g prefix C-a
bind a send-prefix
to .tmux_conf in their home directories. The manuals will list dozens of other things that you can add to your configuration files. When searching for tips and documentation, by the way, notice that GNU Screen is the name to type into your Internet search engine, because Screen by itself will get you nowhere.
Having set Ctrl-A as the command key, Ctrl-A Ctrl-A jumps between two windows, and you can read the manual for the Ctrl-A (other key) combinations that let you step forward or backward in the window list, or display the full list of windows so you can just pick from the list.
So both multiplexers solve the multiwindow problem. But they do so very much more:
§ Ctrl-A-D will detach the session, meaning that your terminal no longer displays the various virtual terminals under the multiplexer’s control. But they’re still running in the background.
§ At the end of a long day with GNU Screen/Tmux, detach. Later, reattach from home or at work tomorrow using screen -r or tmux attach, and pick up exactly where you left off. The ability to keep going after a disconnect is also nice when working via a spotty connection to a server in Belize or Ukraine.
§ The multiplexer leaves the programs in its virtual terminals running after you’ve detached, which is useful for long processes that have to run overnight.
§ There’s a cut/paste feature.
§ Once in copy mode, you can mouselessly page through what’s passed through the terminal lately, highlight a section, and copy it to the multiplexer’s internal clipboard, then paste the copied text onto the command line.
§ While you’re browsing for things to cut, you can scroll through the history and search for specific strings.
These multiplexers really take that last step from the terminal being a place to work to being a fun place to work.
fc
fc is a (POSIX-standard) command for turning your noodling on the shell into a repeatable script. Try:
fc -l # The l is for list and is important.
You now have on the screen a numbered list of your last few commands. Your shell might let you type history to get the same effect.
The -n flag suppresses the line numbers, so you can write history items 100 through 200 to a file via:
fc -l -n 100 200 > a_script
then remove all the lines that were experiments that didn’t work, and you’ve converted your futzing on the command line into a clean shell script.
If you omit the -l flag, then fc becomes a more immediate and volatile tool. It pulls up an editor (which means if you redirect with >, you’re basically hung), doesn’t display line numbers, and when you quit your editor, whatever is in that file gets executed immediately. This is great for a quick repetition of the last few lines, but can be disastrous if you’re not careful. If you realize that you forgot the -l or are otherwise surprised to see yourself in the editor, delete everything on the screen to prevent unintended lines from getting executed.
But to end on a positive note, fc stands for fix command, and that is its simplest usage. With no options, it edits the prior line only, so it’s nice for when you need to make elaborate corrections to a command.
TRY A NEW SHELL
There are a lot of shells in the world beyond the shell your operating system vendor chose as the default. Here, I’ll sample from the interesting things that the Z shell can do, to give you a hint of what switching from bash can get you.
Z shell’s feature and variable lists go for dozens of pages, so there goes parsimony—but why bother being Spartan with interactive conveniences? (If you have Spartan æsthetics, then you still want to switch out of bash; try ash.) Set variables in ~/.zshrc (or just type them onto the command line to try them out); here is the one you’ll need for the following examples:
setopt INTERACTIVE_COMMENTS
#now comments like this won’t give an error
Expansion of globs, like replacing file.* with file.c file.o file.h is the responsibility of the shell. The most useful way in which Zsh extends this is that **/ tells the shell to recurse the directory tree when doing the expansion. A POSIX-standard shell reads ~ to be your home directory, so if you want every .c file anywhere in your purview, try ls ~/**/*.c.
Let’s back up every last one of our .c files:
# This line may create a lot of files all over your home directory.
for ff in ~/**/*.c; do cp $ff ${ff}.bkup; done
Remember how bash only gives you arithmetic expansion on integers, so $((3/2)) is 1? Zsh and Ksh (and others) are C-like in giving you a real (more than integer) answer if you cast the numerator or denominator to float:
echo $((3/2.)) #works for zsh, syntax error for bash
#repeating the line-count example from earlier:
Files=`ls *.c |wc -l`
Lines=`grep '[)};]' *.c | wc -l`
echo lines/file = $(($Lines/($Files+0.0))) #Add 0.0 to cast to float
Spaces in filenames can break things in bash, because spaces separate list elements. Zsh has an array syntax that doesn’t depend on using spaces as an element delimiter.
# Generate two files, one of which has spaces in the name.
echo t1 > "test_file_1"
echo t2 > "test file 2"
# This fails in bash, is OK in Zsh.
for f in test* ; do cat $f; done
If you decide to switch shells, there are two ways to do it: you can use chsh to make the change official in the login system (/etc/passwd gets modified), or if that’s somehow a problem, you can add exec -l /usr/bin/zsh (or whatever shell you like) as the last line of your .bashrc, so bash will replace itself with your preferred shell every time it starts.
If you want your makefile to use a nonstandard shell, add:
SHELL=command -v zsh
(or whatever shell you prefer) to your makefile. The POSIX-standard command -v prints the full path to a command, so you don’t have to look it up yourself. SHELL is an odd variable in that it has to be in the makefile or set as an argument to make, because make ignores the environment variable named SHELL.
Makefiles vs. Shell Scripts
You probably have a lot of little procedures associated with a project floating around (word count, spell check, run tests, write to revision control, push revision control out to a remote, back up), all of which could be automated by a shell script. But rather than producing a new one- or two-line script for every little task you have for your project, you can put them all into a makefile.
Makefiles were first covered in “Using Makefiles”, but now that we’ve covered the shell in more detail, we have more that we can put into a makefile. Here’s one more example target from my daily life, which uses the if/then shell syntax and test. I use Git, but there are three Subversion repositories I have to deal with, and I never remember the procedures. As in Example 3-4, I now have a makefile to remember for me.
Example 3-4. Folding an if/then and a test into a makefile (make_bit)
push:
@if [ "x$(MSG)" = 'x' ] ; then \ ![]()
echo "Usage: MSG='your message here.' make push"; fi
@test "x$(MSG)" != 'x' ![]()
git commit -a -m "$(MSG)"
git svn fetch
git svn rebase
git svn dcommit
pull:
git svn fetch
git svn rebase
![]()
I need a message for each commit, so I do that via an environment variable set on the command line, via: MSG="This is a commit." make push. This line is an if-then statement that prints a reminder if I forget this.
![]()
Test to ensure that "x$(MSG)" expands to something besides just "x", meaning that $(MSG) is not empty. Adding the x to both sides of the test adds protection for the case where $(MSG) is empty. If the test fails, make does not continue.
The commands executed in a makefile are in some ways just what you would type on the command line, and in some ways drastically different:
§ Every line runs independently, in a separate shell. If you write this into your makefile:
§ clean:
§ cd junkdir
rm -f * # Do not put this in a makefile.
then you will be a sad puppy. The two lines in the script are equivalent to C code like this:
system("cd junkdir");
system("rm -f *");
Or, because system("cmd") is equivalent to sh -c "cmd", our make script is also equivalent to:
sh -c "cd junkdir"
sh -c "rm -f *"
And for the shell geeks, (cmd) runs cmd in a subshell, so the make snippet is also equivalent to typing this at the shell prompt:
(cd junkdir)
(rm -f *)
In all cases, the second subshell knows nothing of what happened in the first subshell. make will first spawn a shell that changes into the directory you are emptying, then make is done with that subshell. Then it starts a new subshell from the directory you started in and calls rm -f *.
On the plus side, make will delete the erroneous makefile for you. If you want to express the thought in this form, do it like this:
cd junkdir && rm -f *
where the && runs commands in short-circuit sequence just like in C (i.e., if the first command fails, don’t bother running the second). Or use a backslash to join two lines into one:
cd junkdir&& \
rm -f *
Though for a case like this, I wouldn’t trust just a backslash. In real life, you’re better off just using rm -f junkdir/* anyway.
§ make replaces instances of $x (for one-letter or one-symbol variable names) or $(xx) (for multiletter variable names) with the appropriate values.
§ If you want the shell, not make, to do the substitution, then drop the parens and double your $$s. For example, to use the shell’s variable mangling to name backups from a makefile: for i in *.c; do cp $$i $${i%%.c}.bkup; done.
§ Recall from “Using Makefiles” that you can set an environment variable just before a command, e.g., CFLAGS=-O3 gcc test.c. That can come in handy now that each shell survives for a single line. Don’t forget that the assignment has to come just before a command and not a shell keyword like if or while.
§ An @ at the head of a line means run the command but don’t echo anything to the screen as it happens.
§ A - at the head of a line means that if the command returns a nonzero value, keep going anyway. Otherwise, the script halts on the first nonzero return.
For simpler projects and most of your day-to-day annoyances, a makefile using all those features from the shell will get you very far. You know the quirks of the computer you use every day, and the makefile will let you write them down in one place and stop thinking about them.
Will your makefile work for a colleague? If your program is a common set of .c files and any necessary libraries are installed, and the CFLAGS and LDLIBS in your makefile are right for your recipient’s system, then perhaps it will all work fine, and at worst will require an email or two clarifying things. If you are generating a shared library, then forget about it—the procedure for generating a shared library is very different for Mac, Linux, Windows, Solaris, or different versions of each. When distributing to the public at large, everything needs to be as automated as possible, because it’s hard to trade emails about setting flags with dozens or hundreds of people, and most people don’t want to put that much effort into making a stranger’s code work anyway. For all these reasons, we need to add another layer for publicly distributed packages.
Packaging Your Code with Autotools
The Autotools are what make it possible for you to download a library or program, and run:
./configure
make
sudo make install
(and nothing else) to set it up. Please recognize what a miracle of modern science this is: the developer has no idea what sort of computer you have, where you keep your programs and libraries (/usr/bin? /sw? /cygdrive/c/bin?), and who knows what other quirks your machine demonstrates, and yet configure sorted everything out so that make could run seamlessly. And so Autotools is central to how code gets distributed in the modern day. If you want anybody who is not on a first-name basis with you to use your code (or if you want a Linux distro to include your program in their package manager), then having Autotools generate the build for you will significantly raise your odds.
It is easy to find packages that depend on some existing framework for installation, such as Scheme, Python ≥2.4 but <3.0, Red Hat Package Manager (RPM), and so on. The framework makes it easy for users to install the package—right after they install the framework. Especially for users without root privileges, such requirements can be a showstopper. The Autotools stand out in requiring only that the user have a computer with rudimentary POSIX compliance.
Using the Autotools can get complex, but the basics are simple. By the end of this, we will have written six lines of packaging text and run four commands, and will have a complete (albeit rudimentary) package ready for distribution.
The actual history of Autoconf, Automake, and Libtool is somewhat involved: these are distinct packages, each of which evolved independently of the others. But here’s how I like to imagine it all happening.
Meno: I love make. It’s so nice that I can write down all the little steps to building my project in one place.
Socrates: Yes, automation is great. Everything should be automated, all the time.
Meno: I have lots of targets in my makefile, so users can type make to produce the program, make install to install, make check to run tests, and so on. It’s a lot of work to write all those makefile targets, but so smooth when it’s all assembled.
Socrates: OK, I shall write a system—it will be called Automake—that will automatically generate makefiles with all the usual targets from a very short pre-makefile.
Meno: That’s great. Producing shared libraries is especially annoying, because every system has a different procedure.
Socrates: It is annoying. Given the system information, I shall write a program for generating the scripts needed to produce shared libraries from source code, and then put those into automade makefiles.
Meno: Wow, so all I have to do is tell you my operating system, and whether my compiler is named cc or clang or gcc or whatever, and you’ll drop in the right code for the system I’m on?
Socrates: That’s error-prone. I will write a system called Autoconf that will be aware of every system out there and that will produce a report of everything Automake and your program needs to know about the system. Then Autoconf will run Automake, which will use the list of variables in my report to produce a makefile.
Meno: I am flabbergasted—you’ve automated the process of autogenerating makefiles. But it sounds like we’ve just changed the work I have to do from inspecting the various platforms to writing configuration files for Autoconf and makefile templates for Automake.
Socrates: You’re right. I shall write a tool, Autoscan, that will scan the Makefile.am you wrote for Automake, and autogenerate Autoconf’s configure.ac for you.
Meno: Now all you have to do is autogenerate Makefile.am.
Socrates: Yeah, whatever. RTFM and do it yourself.
Each step in the story adds a little more automation to the step that came before it: Automake uses a simple script to generate makefiles (which already go far in automating compilation over manual command-typing); Autoconf tests the environment and uses that information to run Automake; Autoscan checks your code for what you need to make Autoconf run. Libtool works in the background to assist Automake.
An Autotools Demo
Example 3-5 presents a script that gets Autotools to take care of Hello, World. It is in the form of a shell script you can copy and paste onto your command line (as long as you make sure there are no spaces after the backslashes). Of course, it won’t run until you ask your package manager to install the Autotools: Autoconf, Automake, and Libtool.
Example 3-5. Packaging Hello, World. (auto.conf)
if [ -e autodemo ]; then rm -r autodemo; fi
mkdir -p autodemo ![]()
cd autodemo
cat > hello.c <<\
"--------------"
#include <stdio.h>
int main(){ printf("Hi.\n"); }
--------------
cat > Makefile.am <<\ ![]()
"--------------"
bin_PROGRAMS=hello
hello_SOURCES=hello.c
--------------
autoscan ![]()
sed -e 's/FULL-PACKAGE-NAME/hello/' \ ![]()
-e 's/VERSION/1/' \
-e 's|BUG-REPORT-ADDRESS|/dev/null|' \
-e '10i\
AM_INIT_AUTOMAKE' \
< configure.scan > configure.ac
touch NEWS README AUTHORS ChangeLog ![]()
autoreconf -iv ![]()
./configure
make distcheck
![]()
Create a directory and use a here document to write hello.c to it.
![]()
We need to hand-write Makefile.am, which is two lines long. Even the hello_SOURCES line is optional, because Automake can guess that hello will be built from a source file named hello.c.
![]()
autoscan produces configure.scan.
![]()
Edit configure.scan to give the specs of your project (name, version, contact email), and add the line AM_INIT_AUTOMAKE to initialize Automake. (Yes, this is annoying, especially given that Autoscan used Automake’s Makefile.am to gather info, so it is well aware that we want to use Automake.) You could do this by hand; I used sed to directly stream the customized version to configure.ac.
![]()
These four files are required by the GNU coding standards, and so GNU Autotools won’t proceed without them. I cheat by creating blank versions using the POSIX-standard touch command; yours should have actual content.
![]()
Given configure.ac, run autoreconf to generate all the files to ship out (notably, configure). The -i flag will produce extra boilerplate files needed by the system.
How much do all these macros do? The hello.c program itself is a leisurely three lines and Makefile.am is two lines, for five lines of user-written text. Your results may differ a little, but when I run wc -l * in the post-script directory, I find 11,000 lines of text, including a 4,700-lineconfigure script.
It’s so bloated because it’s so portable: your recipients probably don’t have Autotools installed, and who knows what else they’re missing, so this script depends only on rudimentary POSIX compliance.
I count 73 targets in the 600-line makefile.
§ The default target, when you just type make on the command line, produces the executable.
§ sudo make install would install this program if you so desire; run sudo make uninstall to clear it out.
§ There is even the mind-blowing option to make Makefile (which actually comes in handy if you tweak Makefile.am and want to quickly regenerate the makefile).
§ As the author of the package, you will be interested in make distcheck, which generates a tar file with everything a user would need to unpack and run the usual ./configure && make && sudo make install (without the aid of the Autotools system that you have on your development box), and verifies that the distribution is OK, such as running any tests you may have specified.
Figure 3-1 summarizes the story as a flow diagram.
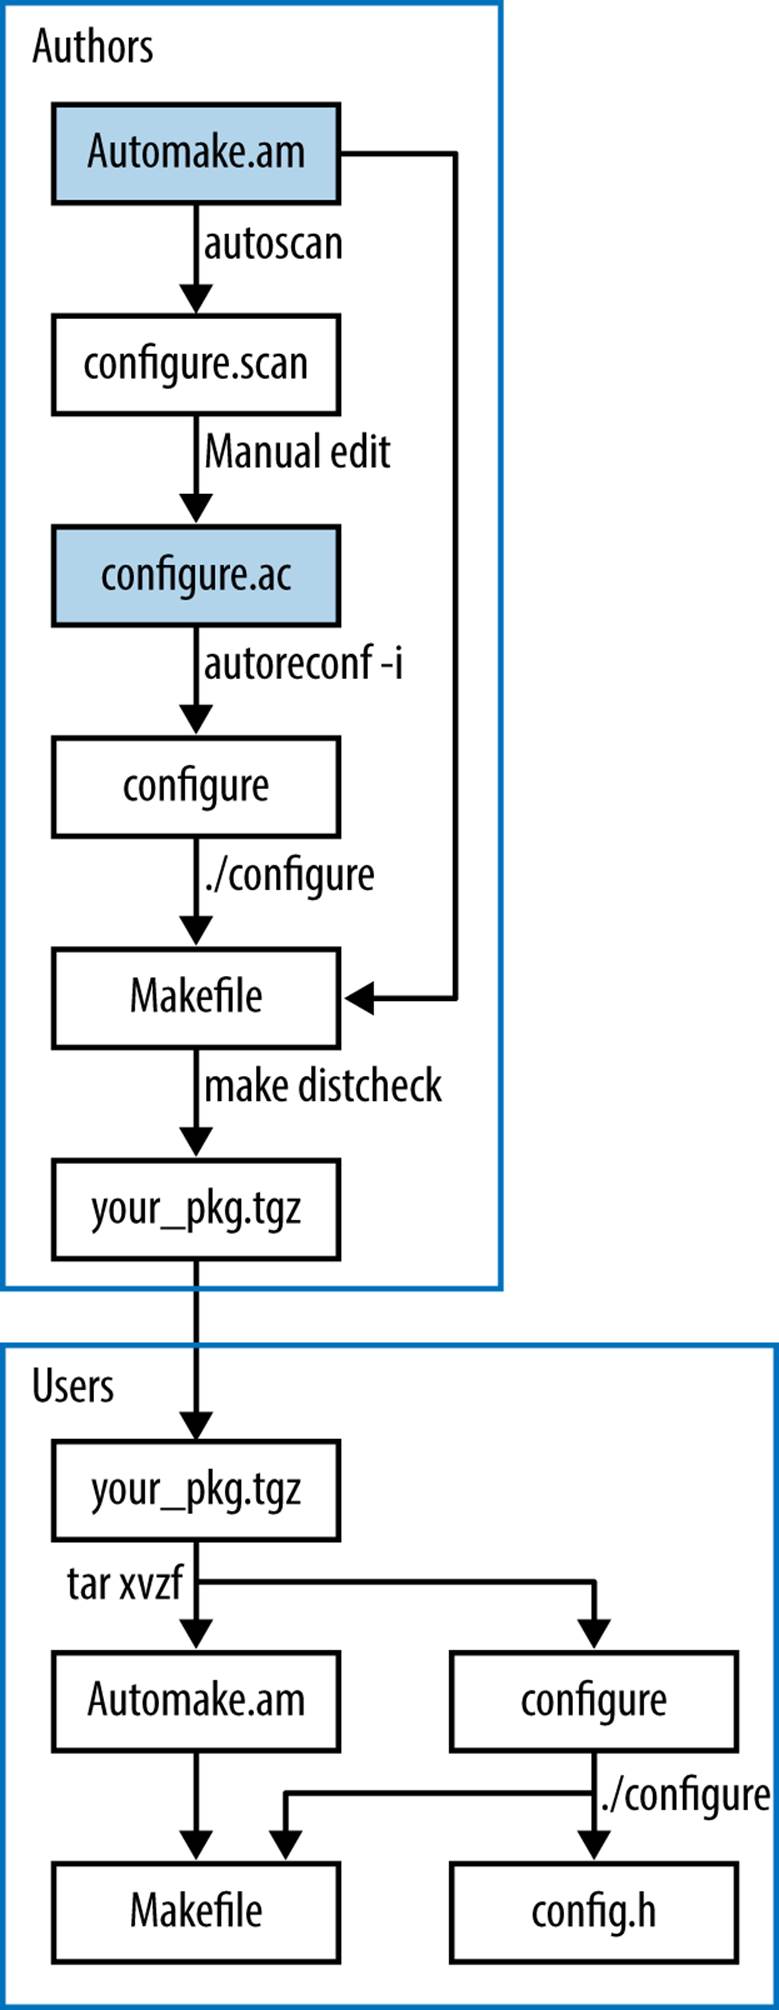
Figure 3-1. An Autotools flowchart: you will only be writing two of these files (the shaded ones); everything else is autogenerated by the given command
You will only be writing two of these files (the shaded ones); everything else is autogenerated by the given command. Let’s start from the bottom portion: the user gets your package as a tarball, and untars it via tar xvzf your_pkg.tgz, which produces a directory with your code,Makefile.am, configure, and a host of other auxiliary files that aren’t worth discussing here. The user types ./configure, and that produces configure.h and the Makefile. Now everything is in place for the user to type make; sudo make install.
As an author, your goal is to produce that tarball, with a high-quality configure and Makefile.am, so the user can run his or her part without a hitch. Start by writing Makefile.am yourself. Run autoscan to get a preliminary configure.scan, which you will manually edit to configure.ac. (Not shown: the four files required by the GNU coding standards: NEWS, README, AUTHORS, and ChangeLog.) Then run autoreconf -iv to generate the configure script (plus many other auxiliary files). Given the configure script, you can now run it to produce the makefile; given the makefile, you can run make distcheck to generate the tarball to ship out.
Notice that there is some overlap: you will be using the same configure and Makefile as the user does, though your purpose is to produce a package, and the user’s purpose is to install the package. That means you have the facilities to install and test the code without fully packaging it, and users have the facility to repackage the code if somehow so inclined.
Describing the Makefile with Makefile.am
A typical makefile is half about the structure of what parts of your project depend on what other parts, and half about the specific variables and procedures to execute. Your Makefile.am will focus on the structure of what needs to be compiled and what it depends on, and the specifics will be filled in by Autoconf and Automake’s built-in knowledge of compilation on different platforms.
Makefile.am will consist of two types of entry, which I will refer to as form variables and content variables.
Form variables
A file that has to be handled by the makefile may have any of a number of intents, each of which Automake annotates by a short string.
bin
Install to wherever programs go on the system, e.g., /usr/bin or /usr/local/bin.
include
Install to wherever headers go, e.g., /usr/local/include.
lib
Install to wherever libraries go, e.g., /usr/local/lib.
pkgbin
If your project is named project, install to a subdirectory of the main program directory, e.g., /usr/local/bin/project/ (the same goes for pkginclude or pkglib).
check
Use for testing the program, when the user types make check.
noinst
Don’t install; just keep the file around for use by another target.
Automake generates boilerplate make scripts, and it’s got different boilerplate for:
PROGRAMS
HEADERS
LIBRARIES static libraries
LTLIBRARIES shared libraries generated via Libtool
DIST items to be distributed with the package, such as data files that didn’t go elsewhere
An intent plus a boilerplate format equals a form variable. For example:
bin_PROGRAMS programs to build and install
check_PROGRAMS programs to build for testing
include_HEADERS headers to install in the system-wide include directory
lib_LTLIBRARIES dynamic and shared libraries, via Libtool
noinst_LIBRARIES static library (no Libtool), to keep on hand for later
noinst_DIST distribute with the package, but that's all
python_PYTHON Python code, to byte-compile and install where Python packages go
Now that you have the form down, you can use these to specify how each file gets handled. In the Hello, World example earlier, there was only one file that had to be dealt with:
bin_PROGRAMS = hello
To give another example, noinst_DIST is where I put data that is needed for the postcompilation tests but is not worth installing. Put as many items on each line as you’d like. For example:
pkginclude_HEADERS = firstpart.h secondpart.h
noinst_DIST = sample1.csv sample2.csv \
sample3.csv sample4.csv
Content variables
Items under noinst_DIST just get copied into the distribution package, and HEADERS just get copied to the destination directory and have their permissions set appropriately. So those are basically settled.
For the compilation steps such as …_PROGRAMS and …_LDLIBRARIES, Automake needs to know more details about how the compilation works. At the very least, it needs to know what source files are being compiled. Thus, for every item on the right side of an equals sign of a form variable about compilation, we need a variable specifying the sources. For example, with these two programs we need two SOURCES lines:
bin_PROGRAMS= weather wxpredict
weather_SOURCES= temp.c barometer.c
wxpredict_SOURCES=rng.c tarotdeck.c
This may be all you need for a basic package.
WARNING
Here we have another failure of the principle that things that do different things should look different: the content variables have the same lower_UPPER look as the form variables shown earlier, but they are formed from entirely different parts and serve entirely different purposes.
Recall from the discussion about plain old makefiles that there are certain default rules built into make, which use variables like CFLAGS to tweak the details of what gets done. Automake’s form variables effectively define more default rules, and they each have their own set of associated variables.
For example, the rule for linking together object files to form an executable might look something like:
$(CC) $(LDFLAGS) temp.o barometer.o $(LDADD) -o weather
WARNING
GNU Make uses LDLIBS for the library variable at the second half of the link command, and GNU Automake uses LDADD for the second half of the link command.
It’s not all that hard to use your favorite Internet search engine to find the documentation that explains how a given form variable blows up into a set of targets in the final makefile, but I’ve found that the fastest way to find out what Automake does is to just run it and look at the output makefile in a text editor.
You can set all of these variables on a per-program or per-library basis, such as weather_CFLAGS=-O1. Or, use AM_VARIABLE to set a variable for all compilations or linkings. Here are my favorite compiler flags, which you met in the section “Using Makefiles”:
AM_CFLAGS=-g -Wall -O3
I didn’t include -std=gnu99 to get gcc to use a less obsolete standard, because this is a compiler-specific flag. If I put AC_PROG_CC_C99 in configure.ac, then Autoconf will set the CC variable to gcc -std=gnu99 for me. Autoscan isn’t (yet) smart enough to put this into theconfigure.scan that it generates for you, so you will probably have to put it into configure.ac yourself. (As of this writing, there isn’t yet an AC_PROG_CC_C11 macro.)
Specific rules override AM_-based rules, so if you want to keep the general rules and add on an override for one flag, you would need a form like:
AM_CFLAGS=-g -Wall -O3
hello_CFLAGS = $(AM_CFLAGS) -O0
Adding testing
I haven’t yet presented to you the dictionary library (which is covered in “Extending Structures and Dictionaries”), but I have shown you the test harness for it, in “Unit Testing”. When Autotools pushes out the library, it makes sense to run the tests again. The agenda is now to build:
§ A library, based on dict.c and keyval.c. It has headers, dict.h and keyval.h, which will need to ship out with the library.
§ A testing program, which Automake needs to be aware is for testing, not for installation.
§ The program, dict_use, that makes use of the library.
Example 3-6 expresses this agenda. The library gets built first, so that it can be used to generate the program and the test harness. The TESTS variable specifies which programs or scripts get run when the user types make check.
Example 3-6. An Automake file that handles testing (dict.automake)
AM_CFLAGS=`pkg-config --cflags glib-2.0` -g -O3 -Wall ![]()
lib_LTLIBRARIES=libdict.la ![]()
libdict_la_SOURCES=dict.c keyval.c ![]()
include_HEADERS=keyval.h dict.h
bin_PROGRAMS=dict_use
dict_use_SOURCES=dict_use.c
dict_use_LDADD=libdict.la ![]()
TESTS=$(check_PROGRAMS) ![]()
check_PROGRAMS=dict_test
dict_test_LDADD=libdict.la
![]()
Here, I cheated, because other users might not have pkg-config installed. If we can’t assume pkg-config, the best we can do is check for the library via Autoconf’s AC_CHECK_HEADER and AC_CHECK_LIB, and if something is not found, ask the user to modify the CFLAGS orLDFLAGS environment variables to specify the right -I or -L flags. Because we haven’t gotten to the discussion of configure.ac, I just use pkg-config.
![]()
The first course of business is generating the shared library (via Libtool, and thus the LT in LTLIBRARIES).
![]()
When writing a content variable from a filename, change anything that is not a letter, number, or @ sign into an underscore, as with libdict.la → libdict_la.
![]()
Now that we’ve specified how to generate a shared library, we can use the shared library for assembling the program and tests.
![]()
The TESTS variable specifies the tests that run when users type make check. Because these are often shell scripts that need no compilation, it is a distinct variable from check_PROGRAMS, which specifies programs intended for checking that have to be compiled. In our case, the two are identical, so we set one to the other.
Adding makefile bits
If you’ve done the research and found that Automake can’t handle some odd target, then you can write it into Makefile.am as you would to the usual makefile. Just write a target and its associated actions as in:
target: deps
script
anywhere in your Makefile.am, and Automake will copy it into the final makefile verbatim. For example, the Makefile.am in “Python Host” explicitly specifies how to compile a Python package, because Automake by itself doesn’t know how (it just knows how to byte-compile standalone .pyfiles).
Variables outside of Automake’s formats also get added verbatim. This will especially be useful in conjunction with Autoconf, because if Makefile.am has variable assignments such as:
TEMP=@autotemp@
HUMIDITY=@autohum@
and your configure.ac has:
#configure is a plain shell script; these are plain shell variables
autotemp=40
autohum=.8
AC_SUBST(autotemp)
AC_SUBST(autohum)
then the final makefile will have text reading:
TEMP=40
HUMIDITY=.8
So you have an easy conduit from the shell script that Autoconf spits out to the final makefile.
The configure Script
The configure.ac shell script produces two outputs: a makefile (with the help of Automake), and a header file named config.h.
If you’ve opened one of the sample configure.ac files produced so far, you might have noticed that it looks nothing at all like a shell script. This is because it makes heavy use of a set of macros (in the m4 macro language) that are predefined by Autoconf. Rest assured that every one of them will blow up into familiar-looking lines of shell script. That is, configure.ac isn’t a recipe or specification to generate the configure shell script, it is configure, just compressed by some very impressive macros.
The m4 language doesn’t have all that much syntax. Every macro is function-like, with parens after the macro name listing the comma-separated arguments (if any; else the parens are typically dropped). Where most languages write 'literal text', m4-via-Autoconf writes [literal text], and to prevent surprises where m4 parses your inputs a little too aggressively, wraps all of your macro inputs in those square brackets.
The first line that Autoscan generated is a good example:
AC_INIT([FULL-PACKAGE-NAME], [VERSION], [BUG-REPORT-ADDRESS])
We know that this is going to generate a few hundred lines of shell code, and somewhere in there, the given elements will be set. Change the values in square brackets to whatever is relevant. You can often omit elements, so something like:
AC_INIT([hello], [1.0])
is valid if you don’t want to hear from your users. At the extreme, one might give zero arguments to a macro like AC_OUTPUT, in which case you don’t need to bother with the parentheses.
WARNING
The current custom in m4 documentation is to mark optional arguments with—I am not making this up—square brackets. So bear in mind that in m4 macros for Autoconf, square brackets mean literal not-for-expansion text, and in m4 macro documentation it means an optional argument.
Recall that the shell allows you to write if test ...; as if [ ... ];. Because configure.ac is just a compressed shell script, it can include shell code like this. But you will need to use the if test ...; form, because square brackets will be eaten by m4.
What macros do we need for a functional Autoconf file? In order of appearance:
§ AC_INIT(…), already shown.
§ AM_INIT_AUTOMAKE, to have Automake generate the makefile.
§ LT_INIT sets up Libtool, which you need if and only if you are installing a shared library.
§ AC_CONFIG_FILES([Makefile subdir/Makefile]), which tells Autoconf to go through those files listed and replace variables like @cc@ with their appropriate value. If you have several makefiles (typically in subdirectories), then list them here.
§ AC_OUTPUT to ship out.
So we have the specification for a functional build package for any POSIX system anywhere in four or five lines, three of which Autoscan probably wrote for you.
But the real art that takes configure.ac from functional to intelligent is in predicting problems some users might have and finding the Autoconf macro that detects the problem (and, where possible, fixes it). You saw one example earlier: I recommended adding AC_PROG_CC_C99 toconfigure.ac to check for a C99 compiler. The POSIX standard requires that one be present via the command name c99, but just because POSIX says so doesn’t mean that every system will have one, so it is exactly the sort of thing that a good configure script checks for.
Having libraries on hand is the star example of a prerequisite that has to be checked. Getting back to Autoconf’s outputs for a moment, config.h is a standard C header consisting of a series of #define statements. For example, if Autoconf verified the presence of the GSL, you would find:
#define HAVE_LIBGSL 1
in config.h. You can then put #ifdefs into your C code to behave appropriately under appropriate circumstances.
Autoconf’s check doesn’t just find the library based on some naming scheme and hope that it actually works. It writes a do-nothing program using any one function somewhere in the library, then tries linking the program with the library. If the link step succeeds, then the linker was able to find and use the library as expected. So Autoscan can’t autogenerate a check for the library, because it doesn’t know what functions are to be found in it. The macro to check for a library is a one-liner, to which you provide the library name and a function that can be used for the check. For example:
AC_CHECK_LIB([glib-2.0],[g_free])
AC_CHECK_LIB([gsl],[gsl_blas_dgemm])
Add one line to configure.ac for every library you use that is not 100% guaranteed by the C standard, and those one-liners will blossom into the appropriate shell script snippets in configure.
You may recall how package managers always split libraries into the binary shared object package and the devel package with the headers. Users of your library might not remember (or even know) to install the header package, so check for it with, for example:
AC_CHECK_HEADER([gsl/gsl_matrix.h], , [AC_MSG_ERROR(
[Couldn’t find the GSL header files (I searched for \
<gsl/gsl_matrix.h> on the include path). If you are \
using a package manager, don’t forget to install the \
libgsl-devel package, as well as libgsl itself.])])
Notice the two commas: the arguments to the macro are header to check, action if found, and action if not found, and we are leaving the second blank.
What else could go wrong in a compilation? It’s hard to become an authority on all the glitches of all the world’s computers, given that we each have only a couple of machines at our disposal. Autoscan will give you some good suggestions, and you might find that running autoreconf also spits out some further warnings about elements to add to configure.ac. It gives good advice—follow its suggestions. But the best reference I have seen—a veritable litany of close readings of the POSIX standard, implementation failures, and practical advice—is the Autoconf manual itself. Some of it catalogs the glitches that Autoconf takes care of and are thus (thankfully) irrelevant nitpicking for the rest of us,7 some of it is good advice for your code-writing, and some of the descriptions of system quirks are followed by the name of an Autoconf macro to include in your project’s configure.ac should it be relevant to your situation.
VPATH BUILDS
Say you have a source package in ~/pkgsrc; the typical way to compile it is from that directory: cd ~/pkgsrc; ./configure. But you can compile it from anywhere:
mkdir tempbuild
cd tempbuild
~/pkgsrc/configure
This is referred to as a vpath build, and can be convenient when pkgsrc is a shared or read-only directory, or when building multiple variants of the same package.
To facilitate vpath builds, Autoconf defines a srcdir environment variable, which you can refer to
§ in shell snippets in configure.ac as $srcdir
§ in the automade makefile as $(srcdir)
§ in files listed in the AC_CONFIG_FILES of configure.ac, via @srcdir@, which Autoconf will rewrite to the correct path.
It is worth testing that your project can be built in a different directory now and then. If a file is not found (I always have this problem with data files for tests), then you probably need to use one of the above forms to specify the location of the file.
More Bits of Shell
Because configure.ac is a compressed version of the configure script the user will run, you can throw in any arbitrary shell code you’d like. Before you do, double-check that what you want to do isn’t yet handled by any macros—is your situation really so unique that it never happened to any Autotools users before?
If you don’t find it in the Autoconf package itself, you can check the GNU Autoconf macro archive for additional macros, which you can save to an m4 subdirectory in your project directory, where Autoconf will be able to find and use them. See also (Calcote, 2010), an invaluable overview of the hairy details of Autotools.
A banner notifying users that they’ve made it through the configure process might be nice, and there’s no need for a macro, because all you need is echo. Here’s a sample banner:
echo \
"-----------------------------------------------------------
Thank you for installing ${PACKAGE_NAME} version ${PACKAGE_VERSION}.
Installation directory prefix: '${prefix}'.
Compilation command: '${CC} ${CFLAGS} ${CPPFLAGS}'
Now type 'make&& sudo make install' to generate the program
and install it to your system.
------------------------------------------------------------"
The banner uses several variables defined by Autoconf. There’s documentation about what shell variables the system defines for you to use, but you can also find the defined variables by skimming configure itself.
There’s one more extended example of Autotools at work, linking to a Python library in “Python Host”.
7 For example, “Solaris 10 dtksh and the UnixWare 7.1.1 Posix shell … mishandle braced variable expansion that crosses a 1024- or 4096-byte buffer boundary within a here-document.”
All materials on the site are licensed Creative Commons Attribution-Sharealike 3.0 Unported CC BY-SA 3.0 & GNU Free Documentation License (GFDL)
If you are the copyright holder of any material contained on our site and intend to remove it, please contact our site administrator for approval.
© 2016-2026 All site design rights belong to S.Y.A.