C++ All-in-One For Dummies (2009)
Book II
Understanding Objects and Classes
Chapter 5: Modeling Your Programs with UML
In This Chapter
Using some UML extras, such as packages, notes, and tags
Taking advantage of the freedom UML gives you
Creating C++ enumerations in UML
Using static members in UML
Notating templates with UML
In this chapter, we give you some miscellaneous details about using UML. After you understand how to use the diagrams and have a feel for a methodology or process, read this chapter for interesting details about UML. For example, you can use several symbols in any of your diagrams to make them more descriptive; we discuss those here. We also talk about how to show various C++ features in UML.
Using UML Goodies
The UML specification is huge. We’re talking big. So in this section we give you some additional information you can use when creating UML diagrams.
Packaging your symbols
In computer programming, a common term is namespace. When you have functions and classes and variables, you can put them into their own namespace, which is nothing more than just a grouping. When you do so, the names of the functions, classes, and variables must be unique within the namespace. But if you create another namespace, you can reuse any of the names from the other namespace. In technical terms, identifiers must be unique within a namespace.
To make this clear, let us show you a C++ example. In C++, you can create a namespace by using none other than the namespace keyword. Have a gander at Listing 5-1 — and bear in mind that using namespace std; line you see in each of these programs, too.
Listing 5-1: Using the Namespace Keyword to Create a Namespace in C++
#include <iostream>
using namespace std;
namespace Work
{
int FavoriteNumber;
class Info
{
public:
string CompanyName;
string Position;
};
void DoStuff()
{
cout << “Doing some work!” << endl;
}
}
namespace Play
{
int FavoriteNumber;
class Info
{
public:
string FullName;
string Hobby;
};
void DoStuff()
{
cout << “Having fun!” << endl;
}
}
int main()
{
// Work stuff
Work::FavoriteNumber = 7;
Work::Info WorkInformation;
WorkInformation.CompanyName = “Spaceley Sprockets”;
WorkInformation.Position = “Worker”;
Work::DoStuff();
// Play stuff
Play::FavoriteNumber = 13;
Play::Info PlayInformation;
PlayInformation.FullName = “George Jetson”;
PlayInformation.Hobby = “Playing with the dog”;
Play::DoStuff();
return 0;
}
In Listing 5-1, we created two different namespaces, one called Work and one called Play. Just to prove the point, we created a global variable, a class name, and a function inside each namespace, and they are each named the same as in the other namespace. To make use of these items, down in main we precede them with the namespace name and two colons. So you can see we have two separate global variables:
Work::FavoriteNumber = 7;
Play::FavoriteNumber = 13;
And we created instances of two separate classes:
Work::Info WorkInformation;
Play::Info PlayInformation;
These are completely separate classes and variables; they just happen to have the same name. But they’re inside their own namespaces, so this is perfectly legal. And you can see that we also called the function in each namespace. Again, we put the namespace name, two colons, and then the function name. As before, these are each separate functions; they just happen to share the same name.
 Think of a namespace as a grouping mechanism. You can group related items, and it frees you from having to worry about whether the name you came up with is unique.
 To keep everything neat and tidy, the designers of C++ have put all their own features, such as cout, in their own namespace. This namespace is called std, which is short for standard. To make use of cout and other standard features, you need to use the std namespace. This means you would normally type std::cout to access cout. However, having a lot of cout entries in your code can be cumbersome. To simplify access to the std namespace, then, you can just put using namespace std; near the start of your code. Then each time the compiler comes across an identifier it doesn’t recognize, it follows up by checking the std namespace. Thus you can have cout without the std::cout before it. The compiler at first won’t recognize cout, but then the compiler will check the std namespace, thus locatingcout.
And now on to UML. In UML, you can show namespaces in your diagrams by using packages. In UML, a package is equivalent to a namespace in C++ and other languages. A package looks like a file folder. (Not the kind in your computer, but the kind in those wondrous and archaic things past generations of the late twentieth century called file cabinets.)
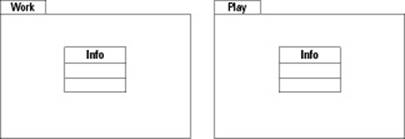
Figure 5-1 shows an example of a package. You can see that it’s a file-folder-looking thing, and the classes are inside it. We put two packages in this diagram, one called Work and one called Play, to match the classes in Listing 5-1.
Figure 5-1: A package looks like a file folder.
Different Computer-Aided Software Engineering (CASE) tools and diagramming software do packages differently. If you are using Microsoft Visio to do your diagrams, for example, its built-in UML tool does not let you draw your classes inside the package symbol. Instead, when you create a package symbol, you get a new blank page on which you put your symbols.
In UML, by default, a namespace already exists. It’s called topLevel. If you don’t explicitly put your data inside a namespace, they automatically go in the topLevel package.
Notating your diagrams
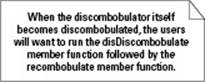
UML has a handy little symbol called a note whose only purpose is to provide comments on a UML diagram. A note is much like a comment in C++ code: It has no bearing on the actual diagrams but is rather there for the benefit of us humans and other creatures with highly evolved brains to read.
Figure 5-2 shows an example of a note. The note symbol is a sheet of paper with a folded corner, like an actual note.
Figure 5-2: A note contains a comment.
Tagging your symbols
Sometimes, you want to add some extra information, such as a class diagram, directly to a symbol. Although you could put a note symbol on the page, another possibility is to put the information right into the symbol itself through a tag (or sometimes called a tagged property). A tag gets a name and a value. For example, you might want to put a date on a symbol, such as Date = January 1, 2010. You can notate this through a tag. Figure 5-3 shows two tags added to a class symbol and a single tag added to a component symbol.
Figure 5-3: You can add tags to your symbols.
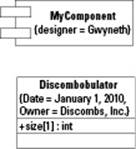
The tags in Figure 5-3 are of the format name = value, and they are surrounded by curly brackets.
 To have tags show up in some CASE tools, you have to make them visible for the symbol. For example, some CASE tools have an option called ShowProperties. Using this allows the tags to show up in the symbol.
Free to Be UML
One of the great things about UML is that it gives you a great deal of freedom. For example, if you find a diagram you don’t care to use, you don’t have to use it; you can still move though an entire software development process or methodology. For example, some people prefer to use sequence diagrams while staying away from collaboration diagrams. And some people don’t use state diagrams and activity diagrams. Now some purists might complain about this, but as a software engineer, you need to do what works best for you and your team.
Further, UML is not intended to be used just for software engineering. The creators of UML designed it to be a general-purpose language for modeling, and it can be used for all sorts of projects. For example, in one book, every chapter started out with a UML activity diagram showing the flow of sections in the book.
Of course, most people are going to use UML for software engineering, primarily because many people outside the software field have simply never heard of UML.
Another area where UML allows freedom is in the methodology you choose. Although this book focuses on the Unified Method, UML contains a rich set of diagrams and symbols that work with nearly any methodology.
Thanks to stereotypes, you can even add symbols to UML; so if you’re using a methodology with its own symbols, you are not trapped with those built into UML. A stereotype is a way of creating a new symbol. Normally, you take an existing symbol and from it derive a new symbol that has similar but more specialized features. You put the name in the funny angle brackets, as in <<MyStereotype>>. However, there’s an alternative: Instead of putting the name inside those things (called guillemots), you can use your own custom icon. In Figure 5-4, for example, we used a scroll symbol.
Figure 5-4: You can use custom icons for stereotypes.
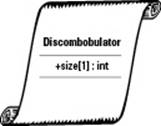
In Figure 5-4, the scroll symbol is a stereotype based on a class diagram. Because a stereotype creates a new type of symbol derived from another symbol, this is still a class, but a class used for certain purposes. In our case, we defined this as a class that’s stored as a document. From now on, every time we create a new class, we use this symbol to mean a type of class that can be stored. When we finally implement this class, we will probably derive it from a base class called something like Storable. That means, then, that instead of creating a stereotype, we could recognize how this stereotype will be used when we ultimately code it in C++, and instead just draw our diagram as a base class, Storable, and then derive a new class, Discombobulator, as shown in Figure 5-5. Either is fine.
However, stereotypes go beyond just classes. Remember that stereotypes in UML give you the opportunity to extend UML. That is, stereotypes let you add new symbols with their own new meanings. In the case of our scroll symbol, we extended the class symbol and still ultimately have a class. But we can stereotype other symbols, and that gives them a totally different (or slightly related) meaning from the original symbol.
For example, we may have a special association in our program that specifically means that one class (the composite) holds instances of the other class (the parts) in the form of a sorted list. We can do this in one of two ways: We can stereotype it, or we can create a tagged property. Figure 5-6 shows the relationship as a stereotype.
Figure 5-5: You can get around using stereotyped classes by using abstract classes.
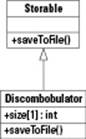
Figure 5-6: You can use a stereotype to specify a type of association.
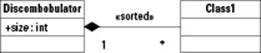
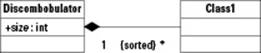
Figure 5-7, in turn, shows the relationship with a tagged property. Notice that, with the tagged property, the tag is in curly brackets.
Figure 5-7: You can also use tagged properties to specify a type of association.
Not all CASE tools support all the features of UML. If you find a feature is missing, you can typically get around it by using related features. Most UML tools, however, support both stereotypes and tagged properties.
C++ and UML
When you study UML, you may come across various items that you know are present but you can’t find in UML. Here we direct you toward some smaller parts of UML that have a direct connection to something in C++. Specifically we talk about enumerated types, static members, and templates.
Drawing enumerations
If you want to show an enumeration in UML, you can use a symbol similar to a class symbol. Remember that in C++, an enumeration is a type. In UML, symbols for types are called classifiers. Thus, in UML you use a special classifier to show an enumeration. (However, note that this classifier is really a class diagram that has been stereotyped. This is a good example of how you can use stereotypes!)
Figure 5-8 shows an example of an enumeration in UML. At the top is the stereotype name, <<enumeration>>. Under the name is the type, in this case Color. In the compartment following are the enumerations themselves.
Figure 5-8:UML includes a special classifier for enume-rations.
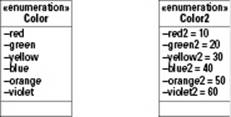
In Figure 5-8, we gave two enumerations. The first one, called Color, simply lists the symbols for the enumeration. The second one, called Color2, includes values for each enumeration. In C++, these two enumerations would look like this:
enum Color {red, green, yellow, blue, orange, violet};
enum Color2 {red2 = 10, green2 = 20, yellow2 = 30, blue2 = 40,
orange2 = 50, violet2 = 60};
Including static members
In C++, you can include static members in a class. Static members are those members that are part of the class but shared among all instances of the class. Normally, instances of a class all get their own member variables. But if a member variable is static, there is only one copy of the variable for all the instances to share. For this reason, people associate such variables as being part of the class itself, not part of the instances. In UML language, these variables have a class scope. Regular member variables have an instance scope.
Member functions can also have a class scope. Such functions do not operate on an individual instance (and therefore can’t access the member variables that are of the instance scope).
A common use of class-scoped members is to maintain a count of the number of instances. Here, you would have a class-scoped member variable called, for example, instanceCount. This would be an integer. In the constructor you would increment instanceCount, and in the destructor you would decrement it. Because there’s only one copy of the instanceCount member, each time you create an instance, you would increment this single copy. Thus, you would have a count of the number of instances.
Figure 5-9 shows an example in UML of a class with two class-scoped members. The class-scoped members are underlined. In this case, the class is called MessedUpWebSite. We suppose the idea is that every time you visit a crummy Web site, you would create a new instance of this class and save its Web address in the instance. This has two class-scoped members, siteCount, which is a private integer, and getSiteCount, which is a public function that returns the value of siteCount. (We made siteCount private so other objects can’t change it.) And although we didn’t show it, you would increment and decrement siteCount in the constructor and destructor, respectively.
Figure 5-9: You can show static members in UML by using a class scope.
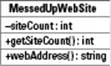
In C++, the class in Figure 5-9 looks like the following lines of code:
class MessedUpWebSite
{
private:
static int siteCount;
public:
static int getSiteCount();
string webAddress();
MessedUpWebSite() { siteCount++; }
~MessedUpWebSite() { siteCount--; }
};
int MessedUpWebSite::getSiteCount()
{
return siteCount;
}
int MessedUpWebSite::siteCount = 0;
Parameterizing classes with templates
UML includes a notation that you can use along with C++ templates. (We discuss templates in Minibook IV, Chapter 5.) In UML terms, a template is a parameterized class. If you think about how a template works in C++, you can see that this makes sense, because a template takes several parameters that are used by the compiler to build the class.
When you add the template parameters, the UML standard states that if the parameter is of type class, you can leave the parameter type blank. That’s what we did in Figure 5-10. Note that the parameter called MyType has no type after it; thus, its type is class.
Figure 5-10: To show templates in UML, use a para-meterized class.
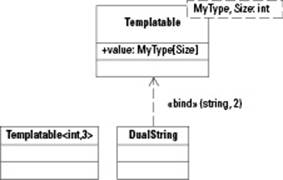
Figure 5-10 shows a UML parameterized class. It looks just like a regular old class symbol, except that it has a nifty little dashed rectangle in the upper-right corner. This dashed rectangle contains the template parameters.
Note in Figure 5-10 that we then declared two classes that use the template type. The first one is unnamed and simply specifies the parameters. The second is named and shows an association back to the template class. A stereotype name called <<bind>> appears next to the association arrow. After the stereotype name come the two parameters for the template.
Here is the C++ equivalent of this UML diagram. Notice the MyType parameter is of type class:
template <class MyType, int Size> class Templatable
{
public:
MyType value[Size];
};
And here is some sample code that uses this template. In this code we also use the two classes based on the template. Note that, to get the named template instantiation, we use a typedef:
Templatable<int,3> inst;
inst.value[0] = 10;
inst.value[1] = 20;
inst.value[2] = 30;
cout << inst.value[2] << endl;
typedef Templatable<string,2> DualString;
DualString inst2;
inst2.value[0] = “abc”;
inst2.value[1] = “def”;
cout << inst2.value[1] << endl;
All materials on the site are licensed Creative Commons Attribution-Sharealike 3.0 Unported CC BY-SA 3.0 & GNU Free Documentation License (GFDL)
If you are the copyright holder of any material contained on our site and intend to remove it, please contact our site administrator for approval.
© 2016-2025 All site design rights belong to S.Y.A.