Introduction to Game Design, Prototyping, and Development (2015)
Part III: Game Prototype Examples and Tutorials
Chapter 35. Prototype 8: Omega Mage
Omega Mage is a game prototype that mixes the dungeon exploration of The Legend of Zelda or Rogue with element-based spell-casting and an interface that works for either mouse or touchscreen (Android, iOS, and so on).
This is the last prototype of the book and therefore the most complex. At the end, you’ll have a nice skeleton for an action-adventure game.
Getting Started: Omega Mage Prototype
The unitypackage for this project includes a number of assets, materials, and scripts. Because you already have experience with building objects in Unity out of simple shapes (as you did in the SHMUP prototype), I do not ask you to do so in this chapter. Instead, you import a series of prefabs that will serve as the artwork in this game.
Game Overview
Omega Mage is a dungeon crawler in the vein of classics like The Legend of Zelda and Rogue. However, in this game, the main character is a magic user who can call upon the four elements to defeat her enemies.
Figure 35.1 shows what Omega Mage will look like at the end of the prototype. The _MainCamera on the left 3/4 of the screen shows the action from a top-down camera angle, and the right 1/4 of the screen contains a simple inventory for selecting elements.
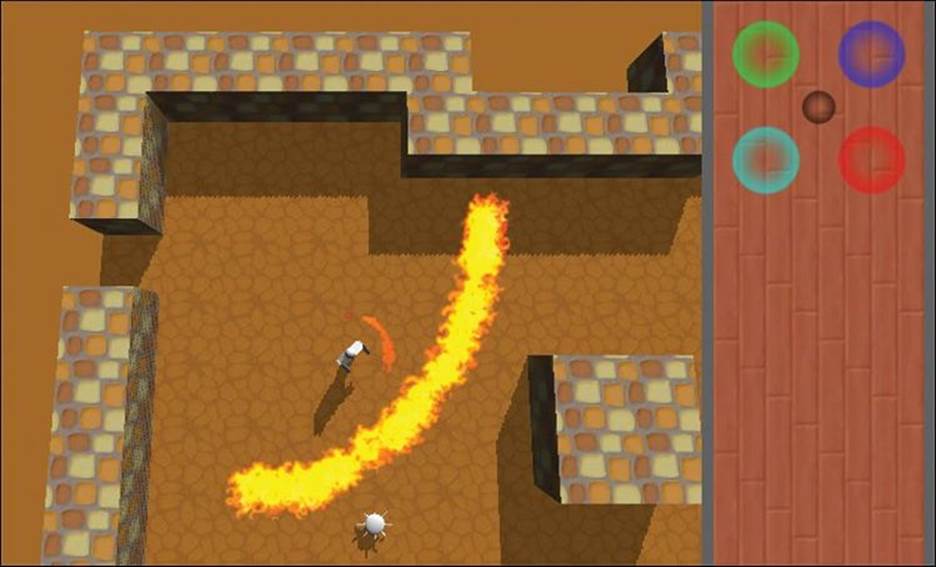
Figure 35.1 An example of what Omega Mage will look like
Omega Mage was designed with touch-based tablets like the iPad and Android in mind, so the interactions will work equally well through either mouse or touch interface.
The player will click or tap on the ground in the main area to cause her character to walk to the tapped point. Tapping on one of the four elements in the inventory area will select it (and the player will see it orbiting around the Mage). Tapping the black “none” element in the middle of the others clears the element selection.
Clicking and dragging with no element selected causes the Mage to continuously move toward the player’s cursor (or touch) until she releases the mouse or lifts her finger, at which point, the Mage will stop. If she has an element selected, clicking and dragging on the ground will cast a ground spell (like the fire spell shown in Figure 35.1).
Tapping on an enemy will attack it. If the player has an element selected, the Mage will cast a spell of that element type. If she has no element selected, the tap will push the enemy away slightly.
Changes to ProtoTools in the Unitypackage
For this prototype, I’ve added a couple of new scripts to the ProtoTools directory:
![]() PT_MonoBehaviour: This simple script just adds some shortcuts to nested fields that we change often, including position, localPosition, rotation, scale, material, and color. If your scripts extend this instead of MonoBehaviour, they’ll gain this small added functionality.
PT_MonoBehaviour: This simple script just adds some shortcuts to nested fields that we change often, including position, localPosition, rotation, scale, material, and color. If your scripts extend this instead of MonoBehaviour, they’ll gain this small added functionality.
![]() PT_Mover: This more complex script allows an object to move in a time-based way using Bézier curves that affect position, rotation, scale, and color of the primary material. This is a child of PT_MonoBehaviour, so if your scripts extend this, they will gain both the PT_MonoBehaviour and PT_Mover functionalities.
PT_Mover: This more complex script allows an object to move in a time-based way using Bézier curves that affect position, rotation, scale, and color of the primary material. This is a child of PT_MonoBehaviour, so if your scripts extend this, they will gain both the PT_MonoBehaviour and PT_Mover functionalities.
Set Up the Project for this Chapter
Following the standard project setup procedure, create a new project in Unity. If you need a refresher on the standard project setup procedure, see Appendix A, “Standard Project Setup Procedure.” When you are creating the project, you will be asked if you want to set up defaults for 2D or 3D. Choose 3D for this project.
![]() Project name: OmegaMage
Project name: OmegaMage
![]() Download and import package: Find Chapter 35 at http://book.prototools.net
Download and import package: Find Chapter 35 at http://book.prototools.net
![]() Scene name: __OmegaMage_Scene_0
Scene name: __OmegaMage_Scene_0
![]() Project folders: These are all imported from the unitypackage
Project folders: These are all imported from the unitypackage
![]() C# script names: Just the imported scripts in the ProtoTools folder
C# script names: Just the imported scripts in the ProtoTools folder
![]() Remember: Change the name of Main Camera to _MainCamer
Remember: Change the name of Main Camera to _MainCamer
The texture images for the ground and wall blocks that are in the _Textures & Materials/cartoon6r.free.fr folder were created by Philippe Cizaire and are used and included in the unitypackage with his permission. To see more of his work, check out his website at http://cartoon6r.free.fr.
Building the Scene
Unlike the previous prototype, this game uses Extensible Markup Language (XML) and a series of 3D tiles to build the game environment. Double-click the Rooms.xml file inside the Resources folder to see what I mean. The layout of these rooms using text was inspired by the classic adventure game Rogue, which became one of the first “graphical” games by displaying the player, enemies, and dungeons as ASCII art that looked much like the text in the Rooms.xml file.
In this prototype, we need to read the XML data from Rooms.xml and the parse that into information to build a room from 3D tiles (using TilePrefab in the _Prefabs folder). This will be accomplished by a LayoutTiles script on _MainCamera in concert with a small Tile script on the TilePrefab. The textures for the tiles will be defined using fields in the _MainCamera:LayoutTiles Inspector.
To start, create a new C# script in the __Scripts folder named Tile and attach it to TilePrefab in the Prefabs folder. Open the Tile script in MonoDevelop and enter the following code:
using UnityEngine;
using System.Collections;
public class Tile : PT_MonoBehaviour {
// public fields
public string type;
// Hidden private fields
private string _tex;
private int _height = 0;
private Vector3 _pos;
// Properties with get{} and set{}
// height moves the Tile up or down. Walls have height=1
public int height {
get { return( _height ); }
set {
_height = value;
AdjustHeight();
}
}
// Sets the texture of the Tile based on a string
// It requires LayoutTiles, so it's commented out for now
/* // 1
public string tex {
get {
return( _tex );
}
set {
_tex = value;
name = "TilePrefab_"+_tex; // Sets the name of this GameObject
Texture2D t2D = LayoutTiles.S.GetTileTex(_tex);
if (t2D == null) {
Utils.tr("ERROR","Tile.type{set}=",value,
"No matching Texture2D in LayoutTiles.S.tileTextures!");
} else {
renderer.material.mainTexture = t2D;
}
}
}
*/ // 2
// Uses the "new" keyword to replace the pos inherited from PT_MonoBehaviour
// Without the "new" keyword, the two properties would conflict
new public Vector3 pos {
get { return( _pos ); }
set {
_pos = value;
AdjustHeight();
}
}
// Methods
public void AdjustHeight() {
// Moves the block up or down based on _height
Vector3 vertOffset = Vector3.back*(_height-0.5f);
// The -0.5f shifts the Tile down 0.5 units so that it's top surface is
// at z=0 when pos.z=0 and height=0
transform.position = _pos+vertOffset;
}
}
1. This is the beginning of a multiline comment that hides the property tex from the compiler for now.
2. This is the end of the multiline comment that hides tex.
You’ll notice that the tex property is commented out. This is because it requires the LayoutTiles script to be in place to compile properly. After you have entered the preceding code and made sure that it all compiles, create a new script named LayoutTiles in the __Scripts folder and attach it to _MainCamera. Then, remove the multiline comments (/* and */) from before and after the tex property. Unity will throw a compiler error (Assets/__Scripts/Tile.cs(31,53): error CS0117: ‘LayoutTiles’ does not contain a definition for ‘S’), but we’ll rectify that now by writing the LayoutTiles script. Open LayoutTiles in MonoBehaviour and add the following code:
using UnityEngine;
using System.Collections;
using System.Collections.Generic;
[System.Serializable]
public class TileTex {
// This class enables us to define various textures for tiles
public string str;
public Texture2D tex;
}
public class LayoutTiles : MonoBehaviour {
static public LayoutTiles S;
public TextAsset roomsText; // The Rooms.xml file
public string roomNumber = "0"; // Current room # as a string
// ^ roomNumber as string allows encoding in the XML & rooms 0-F
public GameObject tilePrefab; // Prefab for all Tiles
public TileTex[] tileTextures; // A list of named textures for Tiles
public bool ________________;
public PT_XMLReader roomsXMLR;
public PT_XMLHashList roomsXML;
public Tile[,] tiles;
public Transform tileAnchor;
void Awake() {
S = this; // Set the Singleton for LayoutTiles
// Make a new GameObject to be the TileAnchor (the parent transform of
// all Tiles). This keeps Tiles tidy in the Hierarchy pane.
GameObject tAnc = new GameObject("TileAnchor");
tileAnchor = tAnc.transform;
// Read the XML
roomsXMLR = new PT_XMLReader(); // Create a PT_XMLReader
roomsXMLR.Parse(roomsText.text); // Parse the Rooms.xml file
roomsXML = roomsXMLR.xml["xml"][0]["room"]; // Pull all the <room>s
// Build the 0th Room
BuildRoom(roomNumber);
}
// This is the GetTileTex() method that Tile uses
public Texture2D GetTileTex(string tStr) {
// Search through all the tileTextures for the proper string
foreach (TileTex tTex in tileTextures) {
if (tTex.str == tStr) {
return(tTex.tex);
}
}
// Return null if nothing was found
return(null);
}
// Build a room from an XML <room> entry
public void BuildRoom(PT_XMLHashtable room) {
// Get the texture names for the floors and walls from <room> attributes
string floorTexStr = room.att("floor");
string wallTexStr = room.att("wall");
// Split the room into rows of tiles based on carriage returns in the
// Rooms.xml file
string[] roomRows = room.text.Split('\n');
// Trim tabs from the beginnings of lines. However, we're leaving spaces
// and underscores to allow for non-rectangular rooms.
for (int i=0; i<roomRows.Length; i++) {
roomRows[i] = roomRows[i].Trim('\t');
}
// Clear the tiles Array
tiles = new Tile[ 100, 100 ]; // Arbitrary max room size is 100x100
// Declare a number of local fields that we'll use later
Tile ti;
string type, rawType, tileTexStr;
GameObject go;
int height;
float maxY = roomRows.Length-1;
// These loops scan through each tile of each row of the room
for (int y=0; y<roomRows.Length; y++) {
for (int x=0; x<roomRows[y].Length; x++) {
// Set defaults
height = 0;
tileTexStr = floorTexStr;
// Get the character representing the tile
type = rawType = roomRows[y][x].ToString();
switch (rawType) {
case " ": // empty space
case "_": // empty space
// Just skip over empty space
continue;
case ".": // default floor
// Keep type="."
break;
case "|": // default wall
height = 1;
break;
default:
// Anything else will be interpreted as floor
type = ".";
break;
}
// Set the texture for floor or wall based on <room> attributes
if (type == ".") {
tileTexStr = floorTexStr;
} else if (type == "|") {
tileTexStr = wallTexStr;
}
// Instantiate a new TilePrefab
go = Instantiate(tilePrefab) as GameObject;
ti = go.GetComponent<Tile>();
// Set the parent Transform to tileAnchor
ti.transform.parent = tileAnchor;
// Set the position of the tile
ti.pos = new Vector3( x, maxY-y, 0 );
tiles[x,y] = ti; // Add ti to the tiles 2D Array
// Set the type, height, and texture of the Tile
ti.type = type;
ti.height = height;
ti.tex = tileTexStr;
// More to come here...
}
}
}
}
This should all compile fine (and now you’ll no longer have the error from Tile), but you need to add some things in the _MainCamera:LayoutTiles Inspector before it will actually work. Click _MainCamera in the Hierarchy and enter the data shown in Figure 35.2.
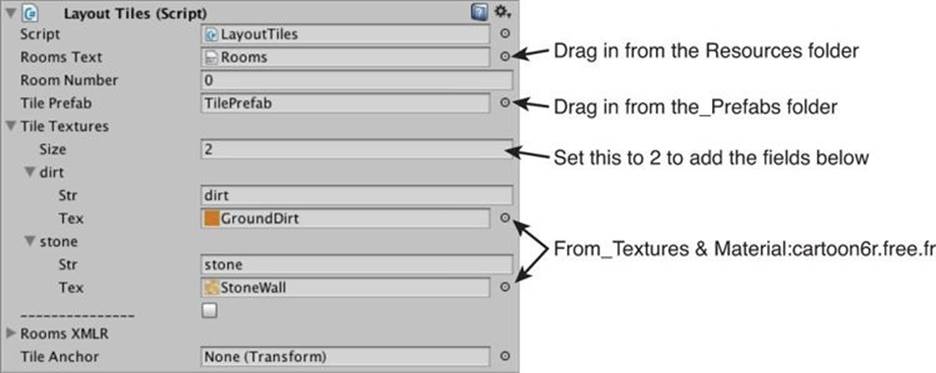
Figure 35.2 Inspector settings _MainCamera:LayoutTiles
After you have done this, press Play, and a room will be built for you. If you like, you can stop, change _MainCamera:LayoutTiles.roomNumber in the Inspector to another valid number (0-8), and press Play again to see other rooms in the dungeon. Be sure to stop playback and setroomNumber back to 0 when you’re done looking around.
You’ll notice that the room is pretty dark now, but that’s okay; our Mage character will carry a torch.
Oh, and save your scene. Always remember to save your scene!
The Mage Character
Drag _Mage from the _Prefabs folder into the Hierarchy pane. This is the GameObject for the player character in Omega Mage. You can see that _Mage comes complete with a Rigidbody and Capsule Collider as well as a placeholder human model and an overhead spotlight.
Create a new C# script in the __Scripts folder named Mage and attach it to _Mage in the Hierarchy. Open the Mage script in MonoDevelop and enter the following code:
using UnityEngine;
using System.Collections;
using System.Collections.Generic; // Enables List<>s
using System.Linq; // Enables LINQ queries
// Mage is a subclass of PT_MonoBehaviour
public class Mage : PT_MonoBehaviour {
static public Mage S;
void Awake() {
S = this; // Set the Mage Singleton
}
}
Of course, we’ll add a lot more to this later, but for now, we need to properly position _Mage in the room. Open LayoutTiles in MonoBehaviour and add the following bold code to the BuildRoom() method just above where it currently has "// More to come here...":
public class LayoutTiles : MonoBehaviour {
...
// Build a room from an XML <room> entry
public void BuildRoom(PT_XMLHashtable room) {
...
// These loops scan through each tile of each row of the room
for (int y=0; y<roomRows.Length; y++) {
for (int x=0; x<roomRows[y].Length; x++) {
...
ti.tex = tileTexStr;
// If the type is still rawType, continue to the next iteration
if (rawType == type) continue;
// Check for specific entities in the room
switch (rawType) { // 1
case "X": // Starting position for the Mage
Mage.S.pos = ti.pos; // Uses the Mage Singleton
break;
}
// More to come here...
}
}
}
}
1. In the previous version of this code listing, it would treat any rawType char it didn’t recognize as a ‘ . ’ (ground). Here, the code checks to see if that unrecognized rawType char was an ‘X’ (the char for the start position of the Mage).
This will properly position the _Mage where the X is in Room 0 of the Rooms.xml file. Now, it’s time to make _MainCamera follow _Mage. Create a new C# script in the __Scripts folder named CameraFollow and attach it to _MainCamera. Open CameraFollow in MonoDevelop and enter the following code:
using UnityEngine;
using System.Collections;
public class CameraFollow : PT_MonoBehaviour {
public static CameraFollow S;
public Transform targetTransform;
public float camEasing = 0.1f;
public Vector3 followOffset = new Vector3(0,0,-2);
void Awake() {
S = this;
}
void FixedUpdate() {
Vector3 pos1 = targetTransform.position+followOffset;
pos = Vector3.Lerp(pos, pos1, camEasing);
}
}
Now, return to Unity and select _MainCamera in the Inspector. You need to set targetTransform in the _MainCamera:CameraFollow Inspector. Click the disclosure triangle next to _Mage in the Hierarchy; then open the disclosure triangle next to CharacterTrans. You’ll see that Spotlight is a child of CharacterTrans. Drag Spotlight into the targetTransform field in the _MainCamera:CameraFollow Inspector. This will cause the _MainCamera to be slightly ahead of _Mage because Spotlight is always positioned slightly ahead of where the _Mage is looking. Press Play, and you should see this result. If you select _Mage in the Hierarchy while the scene is playing and adjust the transform.rotation.z value in the _Mage Inspector, you should see the camera follow the pool of light that is just in front of the _Mage.
Mouse Interaction
Because we want this game to be playable on either a computer or touch-based mobile device, all of the interactions are going to be based on simple mouse gestures. This works for tablets because Unity automatically converts single touches on a tablet into mouse gestures.
The mouse interaction code will be added to the Mage script, and it’s going to take a decent amount of coding to get the initial pieces working. Add the following to the Mage script:
using UnityEngine;
using System.Collections;
using System.Collections.Generic; // Enables List<>s
using System.Linq; // Enables LINQ queries
// The MPhase enum is used to track the phase of mouse interaction
public enum MPhase {
idle,
down,
drag
}
// MouseInfo stores information about the mouse in each frame of interaction
[System.Serializable]
public class MouseInfo {
public Vector3 loc; // 3D loc of the mouse near z=0
public Vector3 screenLoc; // Screen position of the mouse
public Ray ray; // Ray from the mouse into 3D space
public float time; // Time this mouseInfo was recorded
public RaycastHit hitInfo; // Info about what was hit by the ray
public bool hit; // Whether the mouse was over any collider
// These methods see if the mouseRay hits anything
public RaycastHit Raycast() {
hit = Physics.Raycast(ray, out hitInfo);
return(hitInfo);
}
public RaycastHit Raycast(int mask) {
hit = Physics.Raycast(ray, out hitInfo, mask);
return(hitInfo);
}
}
// Mage is a subclass of PT_MonoBehaviour
public class Mage : PT_MonoBehaviour {
static public Mage S;
static public bool DEBUG = true;
public float mTapTime = 0.1f; // How long is considered a tap
public float mDragDist = 5; // Min dist in pixels to be a drag
public float activeScreenWidth = 1; // % of the screen to use
public bool ________________;
public MPhase mPhase = MPhase.idle;
public List<MouseInfo> mouseInfos = new List<MouseInfo>();
void Awake() {
S = this; // Set the Mage Singleton
mPhase = MPhase.idle;
}
void Update() {
// Find whether the mouse button 0 was pressed or released this frame
bool b0Down = Input.GetMouseButtonDown(0);
bool b0Up = Input.GetMouseButtonUp(0);
// Handle all input here (except for Inventory buttons)
/*
There are only a few possible actions: // 1
1. Tap on the ground to move to that point
2. Drag on the ground with no spell selected to move to the Mage
3. Drag on the ground with spell to cast along the ground
4. Tap on an enemy to attack (or force-push away without an element)
*/
// An example of using < to return a bool value
bool inActiveArea = (float) Input.mousePosition.x / Screen.width < activeScreenWidth;
// This is handled as an if statement instead of switch because a tap
// can sometimes happen within a single frame
if (mPhase == MPhase.idle) { // If the mouse is idle
if (b0Down && inActiveArea) {
mouseInfos.Clear(); // Clear the mouseInfos
AddMouseInfo(); // And add a first MouseInfo
// If the mouse was clicked on something, it's a valid MouseDown
if (mouseInfos[0].hit) { // Something was hit!
MouseDown(); // Call MouseDown()
mPhase = MPhase.down; // and set the mPhase
}
}
}
if (mPhase == MPhase.down) { // if the mouse is down
AddMouseInfo(); // Add a MouseInfo for this frame
if (b0Up) { // The mouse button was released
MouseTap(); // This was a tap
mPhase = MPhase.idle;
} else if (Time.time - mouseInfos[0].time > mTapTime) {
// If it's been down longer than a tap, this may be a drag, but
// to be a drag, it must also have moved a certain number of
// pixels on screen.
float dragDist = (lastMouseInfo.screenLoc -
mouseInfos[0].screenLoc).magnitude;
if (dragDist >= mDragDist) {
mPhase = MPhase.drag;
}
}
}
if (mPhase == MPhase.drag) { // if the mouse is being drug
AddMouseInfo();
if (b0Up) {
// The mouse button was released
MouseDragUp();
mPhase = MPhase.idle;
} else {
MouseDrag(); // Still dragging
}
}
}
// Pulls info about the Mouse, adds it to mouseInfos, and returns it
MouseInfo AddMouseInfo() {
MouseInfo mInfo = new MouseInfo();
mInfo.screenLoc = Input.mousePosition;
mInfo.loc = Utils.mouseLoc; // Gets the position of the mouse at z=0
mInfo.ray = Utils.mouseRay; // Gets the ray from the Main Camera through
// the mouse pointer
mInfo.time = Time.time;
mInfo.Raycast(); // Default is to raycast with no mask
if (mouseInfos.Count == 0) {
// If this is the first mouseInfo
mouseInfos.Add(mInfo); // Add mInfo to mouseInfos
} else {
float lastTime = mouseInfos[mouseInfos.Count-1].time;
if (mInfo.time != lastTime) {
// if time has passed since the last mouseInfo
mouseInfos.Add(mInfo); // Add mInfo to mouseInfos
}
// This time test is necessary because AddMouseInfo() could be
// called twice in one frame
}
return(mInfo); // Return mInfo as well
}
public MouseInfo lastMouseInfo {
// Access to the latest MouseInfo
get {
if (mouseInfos.Count == 0) return( null );
return( mouseInfos[mouseInfos.Count-1] );
}
}
void MouseDown() {
// The mouse was pressed on something (it could be a drag or tap)
if (DEBUG) print("Mage.MouseDown()");
}
void MouseTap() {
// Something was tapped like a button
if (DEBUG) print("Mage.MouseTap()");
}
void MouseDrag() {
// The mouse is being drug across something
if (DEBUG) print("Mage.MouseDrag()");
}
void MouseDragUp() {
// The mouse is released after being drug
if (DEBUG) print("Mage.MouseDragUp()");
}
}
1. As you can see in the multiline comment, only a few different kinds of possible mouse interactions are possible:
1. Tap on the ground to move to that point.
2. Drag on the ground with no spell selected to move to the Mage.
3. Drag on the ground with a spell selected to cast along the ground.
4. Tap on an enemy to attack (or force-push away without an element).
After you have added this code, you can press Play and see the results. If you click the mouse on nothing (the background), nothing happens. Clicking any object will produce a “Mage.MouseTap()” message in the Console window. Clicking and holding (or dragging) will produce “Mage.MouseDrag()” messages followed by a “Mage.MouseDragUp()” message when you release the button.
The if (DEBUG) print(); statements will only print if the static Mage.DEBUG bool is set to true. That way, you can easily turn these comments off when you no longer need them.
Of the four mouse interactions listed in note // 1, we’ll handle the two types of movement first.
Movement
When the player taps on the ground, the Mage should move there. First we’ll add code to control the Mage movement using the Rigidbody (which will make collision happen properly). Add the following bold code to the Mage class. This will allow a tap to move the _Mage:
public class Mage : PT_MonoBehaviour {
...
public float activeScreenWidth = 1; // % of the screen to use
public float speed = 2; // The speed at which _Mage walks
public bool ________________;
public MPhase mPhase = MPhase.idle;
public List<MouseInfo> mouseInfos = new List<MouseInfo>();
public bool walking = false;
public Vector3 walkTarget;
public Transform characterTrans;
void Awake() {
S = this; // Set the Mage Singleton
mPhase = MPhase.idle;
// Find the characterTrans to rotate with Face()
characterTrans = transform.Find("CharacterTrans");
}
...
void MouseTap() {
// Something was tapped like a button
if (DEBUG) print("Mage.MouseTap()");
WalkTo(lastMouseInfo.loc); // Walk to the latest mouseInfo pos
}
void MouseDragUp() {
// The mouse is released after being dragged
print("Mage.MouseDragUp()");
}
// Walk to a specific position. The position.z is always 0
public void WalkTo(Vector3 xTarget) {
walkTarget = xTarget; // Set the point to walk to
walkTarget.z = 0; // Force z=0
walking = true; // Now the Mage is walking
Face(walkTarget); // Look in the direction of the walkTarget
}
public void Face(Vector3 poi) { // Face toward a point of interest
Vector3 delta = poi-pos; // Find vector to the point of interest
// Use Atan2 to get the rotation around Z that points the X-axis of
// _Mage:CharacterTrans toward poi
float rZ = Mathf.Rad2Deg * Mathf.Atan2(delta.y, delta.x);
// Set the rotation of characterTrans (doesn't actually rotate _Mage)
characterTrans.rotation = Quaternion.Euler(0,0,rZ);
}
public void StopWalking() { // Stops the _Mage from walking
walking = false;
rigidbody.velocity = Vector3.zero;
}
void FixedUpdate () { // Happens every physics step (i.e., 50 times/second)
if (walking) { // If Mage is walking
if ( (walkTarget-pos).magnitude < speed*Time.fixedDeltaTime ) {
// If Mage is very close to walkTarget, just stop there
pos = walkTarget;
StopWalking();
} else {
// Otherwise, move toward walkTarget
rigidbody.velocity = (walkTarget-pos).normalized * speed;
}
} else {
// If not walking, velocity should be zero
rigidbody.velocity = Vector3.zero;
}
}
void OnCollisionEnter( Collision coll ) {
GameObject otherGO = coll.gameObject;
// Colliding with a wall can also stop walking
Tile ti = otherGO.GetComponent<Tile>();
if (ti != null) {
if (ti.height > 0) { // If ti.height is > 0
// Then this ti is a wall, and Mage should stop
StopWalking();
}
}
}
}
Now, when you press Play, your Mage will walk to a point on the ground that you click. However, it would be nice to give the player a little more feedback about the tap.
Adding a Tap Indicator
Create a new C# script in the __Scripts folder named TapIndicator and drag it onto the TapIndicator in the _Prefabs folder. Then open the TapIndicator script in MonoDevelop and enter this code:
using UnityEngine;
using System.Collections;
using System.Collections.Generic;
/*
TapIndicator makes use of the PT_Mover class from ProtoTools. This allows it to
use a Bezier curve to alter position, rotation, scale, etc.
You'll also notice that this adds several public fields to the Inspector.
*/
public class TapIndicator : PT_Mover {
public float lifeTime = 0.4f; // How long will it last
public float[] scales; // The scales it interpolates
public Color[] colors; // The colors it interpolates
void Awake() {
scale = Vector3.zero; // This initially hides the indicator
}
void Start () {
// PT_Mover works based on the PT_Loc class, which contains information
// about position, rotation, and scale. It's similar to a Transform but
// simpler (and Unity won't let us create Transforms at will).
PT_Loc pLoc;
List<PT_Loc> locs = new List<PT_Loc>();
// The position is always the same and always at z=-0.1f
Vector3 tPos = pos;
tPos.z = -0.1f;
// You must have an equal number of scales and colors in the Inspector
for (int i=0; i<scales.Length; i++) {
pLoc = new PT_Loc();
pLoc.scale = Vector3.one * scales[i]; // Each scale
pLoc.pos = tPos;
pLoc.color = colors[i]; // and each color
locs.Add(pLoc); // is added to locs
}
// callback is a function delegate that can call a void function() when
// the move is done
callback = CallbackMethod; // Call CallbackMethod() when finished
// Initiate the move by passing in a series of PT_Locs and duration for
// the Bézier curve.
PT_StartMove(locs, lifeTime);
}
void CallbackMethod() {
Destroy(gameObject); // When the move is done, Destroy(gameObject)
}
}
As you can see from the code, this creates a fire-and-forget object. It is instantiated, sets up a Bézier curve to interpolate both scale and color (we’ll set the values for this in the Inspector next), and when the PT_Mover is done, it calls the CallbackMethod() and destroys its own GameObject.
Click on TapIndicator in the _Prefab folder of the Project pane and enter the values shown in Figure 35.3 into the Inspector.
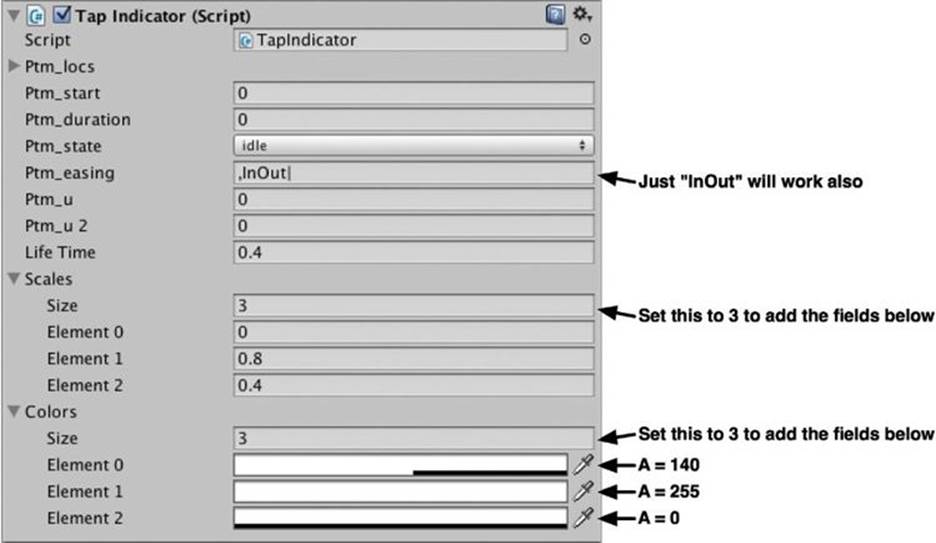
Figure 35.3 Inspector settings TapIndicator:TapIndicator
Now, open Mage in MonoDevelop and add the following code to instantiate the TapIndicator:
public class Mage : PT_MonoBehaviour {
...
public float mTapTime = 0.1f; // How long is considered a tap
public GameObject tapIndicatorPrefab; // Prefab of the tap indicator
...
void MouseTap() {
// Something was tapped like a button
if (DEBUG) print("Mage.MouseTap()");
WalkTo(lastMouseInfo.loc); // Walk to the latest mouseInfo pos
ShowTap(lastMouseInfo.loc); // Show where the player tapped
}
...
void OnCollisionEnter( Collision coll ) {
...
}
// Show where the player tapped
public void ShowTap(Vector3 loc) {
GameObject go = Instantiate(tapIndicatorPrefab) as GameObject;
go.transform.position = loc;
}
}
The last step in implementing the TapIndicator is to set the tapIndicatorPrefab field in the _Mage:Mage Inspector. Drag TapIndicator from the _Prefabs folder into the tapIndicatorPrefab field on _Mage:Mage, and then press Play. You should now see an indicator whenever you tap, as shown in Figure 35.4.
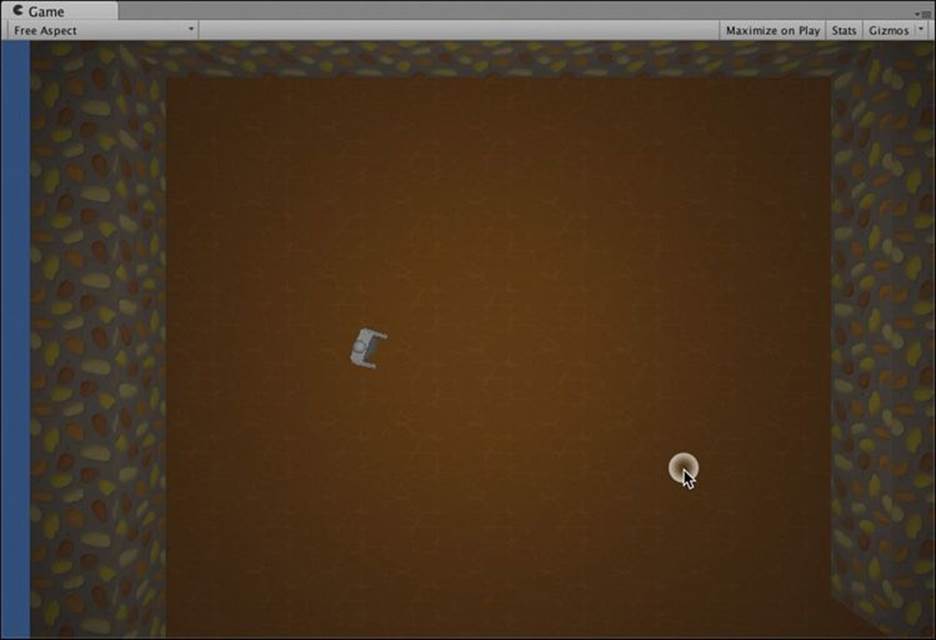
Figure 35.4 The Game pane showing current progress on Omega Mage
Moving When Dragging
The second type of mouse interaction previously listed was “Drag on the ground with no spell selected to move to the Mage.” This should also be easy to add. All we need to do is to call WalkTo() with a new location whenever the player is dragging the mouse. We also need to tell the Mage to StopWalking() when MouseDragUp() is called. Otherwise, the Mage will continue moving toward the last location of the players mouse, which doesn’t feel right following the continuous motion of leading the Mage with the drag. Add the following bolded code to Mage in MonoDevelop:
public class Mage : PT_MonoBehaviour {
...
void MouseDrag() {
// The mouse is being drug across something
if (DEBUG) print("Mage.MouseDrag()");
// Continuously walk toward the current mouseInfo pos
WalkTo(mouseInfos[mouseInfos.Count-1].loc);
}
void MouseDragUp() {
// The mouse is released after being dragged
if (DEBUG) print("Mage.MouseDragUp()");
// Stop walking when the drag is stopped
StopWalking();
}
...
}
This mouse interaction was easy, but the remaining two are a little more difficult because they have to do with casting spells. For casting spells, we need an inventory.
The Inventory and Selecting Elements
In Figure 35.1 (at the beginning of the chapter), you saw that the right 1/4 of the screen contains an interface for selecting elements. It’s time to build that interface.
Start by adding an ElementType enum to the top of the Mage script between enum MPhase and class MouseInfo. This will allow us to refer to elements by name or number. (You can convert from an enum to an int with a typecast, as you’ll see in the next script.)
using UnityEngine;
using System.Collections;
using System.Collections.Generic; // Enables List<>s
using System.Linq; // Enables LINQ queries
// The MPhase enum is used to track the phase of Mouse interaction
public enum MPhase {
...
}
// The ElementType enum
public enum ElementType {
earth,
water,
air,
fire,
aether,
none
}
// MouseInfo stores information about the mouse in each frame of interaction
[System.Serializable]
public class MouseInfo {
...
}
// Mage is a subclass of PT_MonoBehaviour
public class Mage : PT_MonoBehaviour {
...
}
Create a new C# script in the __Scripts folder named ElementInventoryButton. Open it in MonoDevelop and enter the following code:
using UnityEngine;
using System.Collections;
public class ElementInventoryButton : MonoBehaviour {
public ElementType type;
void Awake() {
// Parse the first character of the name of this GameObject into an int
char c = gameObject.name[0];
string s = c.ToString();
int typeNum = int.Parse(s);
// typecast that int to an ElementType
type = (ElementType) typeNum;
}
void OnMouseUpAsButton() {
// Tell the Mage to add this element type
//Mage.S.SelectElement(type);
}
}
Once that is saved and compiles properly, switch back to Unity and drag _InventoryCamera from the _Prefabs folder into the Hierarchy. It should situate itself at P:[-100,0,0] R:[0,0,0] S:[1,1,1].
Open the disclosure triangle next to _InventoryCamera in the Hierarchy, and then attach the ElementInventoryButton script to the child GameObjects 0_Earth, 1_Water, 2_Air, 3_Fire, and 5_None. When you press Play, you should see that the ElementInventoryBytton.type of each of these buttons assigns itself due to the Awake() method. You could assign these yourself in the Inspector, of course, but I felt that it was important for you to know that it is possible to convert from stringes to chars to integers to enums.
Adjusting the Two Cameras
As you can see, the _InventoryCamera includes a camera that covers the right 1/4 of the screen and is rendered above the image from _MainCamera. This is controlled by the Viewport Rect and Depth fields in the _InventoryCamera.Camera Inspector. You can see the Inspectors for both _MainCamera and _InventoryCamera in Figure 35.5. _InventoryCamera has a depth of 0, which is greater than the default _MainCamera depth of -1, so the _MainCamera is rendered in the background. However, _MainCamera is still centered in the middle of the screen with 1/4 of its image hidden by _InventoryCamera. Change the Viewport Rect settings of _MainCamera to those shown in Figure 35.5, and _MainCamera will now only attempt to fill the left 3/4 of the screen. This would also be a good time to choose a different background color for _MainCamera. (I recommend [R:48, G:64, B:48] in the color picker; the alpha setting for a background color is ignored by Unity.)
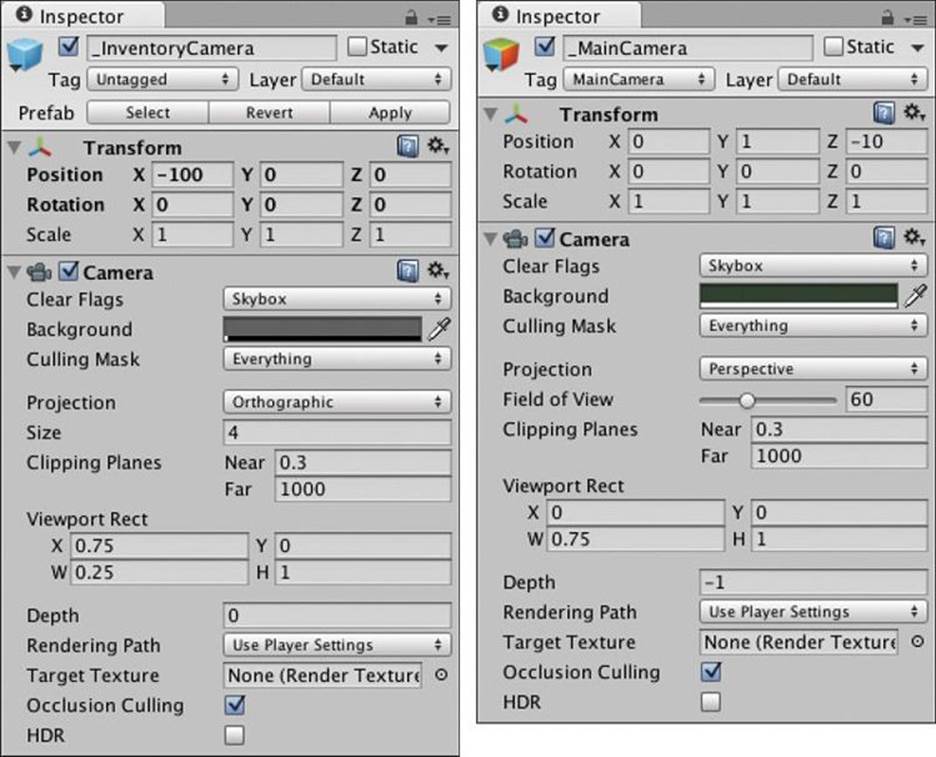
Figure 35.5 Camera Inspectors for _InventoryCamera and _MainCamera
Because this prototype is designed with an iPad in mind, the main screen is meant to be viewed at a 4x3 aspect ratio (the original iPad resolution was 1024x768, while the iPad Air and iPad Mini Retina both have a screen resolution of 2048x1536). To see what this will look like in Unity, choose 4:3 from the aspect ratio pop-up menu in the top-left corner of the Game pane. (If you choose something like 16:9, you will see gray bars on either side of the wooden inventory background.)
The final adjustment you need to do to is to make Mage ignore any clicks or taps in the right 1/4 of the screen. Select Mage in the Hierarchy and set the activeScreenWidth field of the Mage (Script) Inspector to 0.75.
Selecting Elements
As you could see in the code for ElementInventoryButton, we need to add a SelectElement() method to Mage that will choose an element and cause it to circle the Mage’s head. However, before doing that, we need to make the Element class and prepare the Element_Sphere GameObject prefabs that will circle the Mage. Create a new C# script in the __Scripts folder named Element and enter this code:
using UnityEngine;
using System.Collections;
public class Element : PT_MonoBehaviour {
public ElementType type;
}
As you can see, there’s not much to it, but it does extend the PT_MonoBehaviour class, which gives us access to several shortcuts for modifying Element.gameObjects, and it attaches an ElementType field named type to each prefab.
Now, in Unity’s Project pane, find the four Element_Spheres in the _Prefabs folder. Click Element_Sphere_Air and then Shift-click Element_Sphere_Water so that they’re all four selected. From the menu bar, choose Component > Scripts > Element. This will simultaneously add the Element script to all four prefabs. Now, individually select each prefab and choose the appropriate Element.type in the Inspector pane for that prefab (for example, set the type of Element_Sphere_Air to air).
In further iterations of this game (beyond the scope of this book), multiple elements can be selected simultaneously to create different mixed spells as is done in the game Magicka by Paradox Interactive—and the code you’re about to add to Mage will reflect that possible expansion—but for now, we will only allow the selection of a single element at a time. Add the following bolded code to Mage to implement element selection:
public class Mage : PT_MonoBehaviour {
...
public float speed = 2; // The speed at which _Mage walks
public GameObject[] elementPrefabs; // The Element_Sphere Prefabs
public float elementRotDist = 0.5f; // Radius of rotation
public float elementRotSpeed = 0.5f; // Period of rotation
public int maxNumSelectedElements = 1;
public bool ________________;
...
public Transform characterTrans;
public List<Element> selectedElements = new List<Element>();
...
void Update() {
...
if (mPhase == MPhase.down) { // if the mouse is down
AddMouseInfo(); // Add a MouseInfo for this frame
if (b0Up) {
...
} else if (Time.time - mouseInfos[0].time > mTapTime) {
...
if (dragDist >= mDragDist) {
mPhase = MPhase.drag;
}
// However, drag will immediately start after mTapTime if there
// are no elements selected.
if (selectedElements.Count == 0) {
mPhase = MPhase.drag;
}
}
}
if (mPhase == MPhase.drag) {
...
}
OrbitSelectedElements();
}
...
// Show where the player tapped
public void ShowTap(Vector3 loc) {
GameObject go = Instantiate(tapIndicatorPrefab) as GameObject;
go.transform.position = loc;
}
// Chooses an Element_Sphere of elType and adds it to selectedElements
public void SelectElement(ElementType elType) {
if (elType == ElementType.none) { // If it's the none element...
ClearElements(); // then clear all Elements
return; // and return
}
if (maxNumSelectedElements == 1) {
// If only one can be selected, clear the existing one...
ClearElements(); // ...so it can be replaced
}
// Can't select more than maxNumSelectedElements simultaneously
if (selectedElements.Count >= maxNumSelectedElements) return;
// It's okay to add this element
GameObject go = Instantiate(elementPrefabs[(int) elType]) as GameObject;
// ^ Note the typecast from ElementType to int in the line above
Element el = go.GetComponent<Element>();
el.transform.parent = this.transform;
selectedElements.Add(el); // Add el to the list of selectedElements
}
// Clears all elements from selectedElements and destroys their GameObjects
public void ClearElements() {
foreach (Element el in selectedElements) {
// Destroy each GameObject in the list
Destroy(el.gameObject);
}
selectedElements.Clear(); // and clear the list
}
// Called every Update() to orbit the elements around
void OrbitSelectedElements() {
// If there are none selected, just return
if (selectedElements.Count == 0) return;
Element el;
Vector3 vec;
float theta0, theta;
float tau = Mathf.PI*2; // tau is 360° in radians (i.e. 6.283...)
// Divide the circle into the number of elements that are orbiting
float rotPerElement = tau / selectedElements.Count;
// The base rotation angle (theta0) is set based on time
theta0 = elementRotSpeed * Time.time * tau;
for (int i=0; i<selectedElements.Count; i++) {
// Determine the rotation angle for each element
theta = theta0 + i*rotPerElement;
el = selectedElements[i];
// Use simple trigonometry to turn the angle into a unit vector
vec = new Vector3(Mathf.Cos(tvheta),Mathf.Sin(theta),0);
// Multiply that unit vector by the elementRotDist
vec *= elementRotDist;
// Raise the element to waist height.
vec.z = -0.5f;
el.lPos = vec; // Set the position of the Element_Sphere
}
}
}
Once this has been saved and compiled, return to Unity and select _Mage in the Hierarchy. You will see that the new fields have been added to the Mage (Script) Inspector. Open the disclosure triangle next to the elementPrefabs field and set its Size to 4. Then drag each of theElement_Sphere prefabs into the elementPrefabs array in the same order as the enum: Earth, Water, Air, and Fire. When finished, your _Mage.Mage (Script) Inspector should look like that in Figure 35.6.
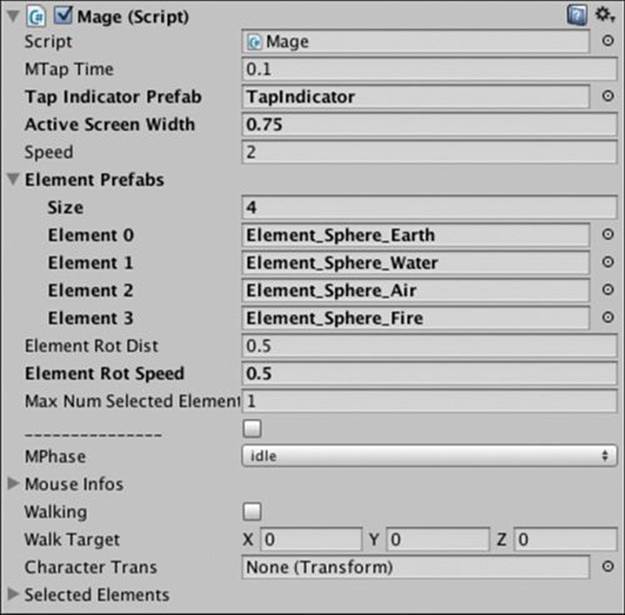
Figure 35.6 Mage (Script) Inspector for _Mage showing elementPrefabs
Open the ElementInventoryButton script in MonoDevelop and remove the comment (//) on the line that calls Mage.S.SelectElement():
void OnMouseUpAsButton() {
// Tell the Mage to add this element type
Mage.S.SelectElement(type);
}
Now, when you press Play, you can select a single element, and that element will orbit around the Mage. Clicking the black none element will clear your selection. If you want, you can set maxNumSelectedElements in the Mage (Script) Inspector to a higher number (like 4) to see how multiple Element_Spheres would orbit the Mage, but for the purposes of this chapter, set maxNumSelectedElements back to 1 when you’re done checking that out.
Now that you can select elements, let’s do something with them. The game is designed to be able to handle two kinds of spells:
![]() Ground spells are cast on the ground itself and are used for area-of-effect damage to or protection from enemies.
Ground spells are cast on the ground itself and are used for area-of-effect damage to or protection from enemies.
![]() Attack spells are cast directly at a single enemy.
Attack spells are cast directly at a single enemy.
In this chapter, you will be building the fire ground spell.
Casting the Fire Ground Spell
The spell we’ll be creating is the fire ground spell. To cast this spell, the player will select a single element and then draw a colored path on the ground that the spell will follow, sprouting a line of flame to discourage enemies.
For this to work, we need more information about where the player initially started the mouse interaction or touch: Was it over the ground, an enemy, or the Mage? This information will change how the rest of the mouse gesture is interpreted. This will be accomplished by adding tags to various GameObjects (including the Mage, the TilePrefab, and various enemies) and then using the Utils.FindTaggedParent() function from the SHMUP prototype. However, because Utils.FindTaggedParent() will return null if nothing in the parent Hierarchy is tagged, that case needs to be handled as well.
Add the bolded code to the Mage C# script:
public class Mage : PT_MonoBehaviour {
...
public MPhase mPhase = MPhase.idle;
public List<MouseInfo> mouseInfos = new List<MouseInfo>();
public string actionStartTag; // ["Mage", "Ground", "Enemy"]
public bool walking = false;
...
void MouseDown() {
// The mouse was pressed on something (it could be a drag or tap)
if (DEBUG) print("Mage.MouseDown()");
GameObject clickedGO = mouseInfos[0].hitInfo.collider.gameObject;
// ^ If the mouse wasn't clicked on anything, this would throw an error
// because hitInfo would be null. However, we know that MouseDown()
// is only called when the mouse WAS clicking on something, so
// hitInfo is guaranteed to be defined.
GameObject taggedParent = Utils.FindTaggedParent(clickedGO);
if (taggedParent == null) {
actionStartTag = "";
} else {
actionStartTag = taggedParent.tag;
// ^ this should be either "Ground", "Mage", or "Enemy"
}
}
void MouseTap() {
// Something was tapped like a button
if (DEBUG) print("Mage.MouseTap()");
// Now this cares what was tapped
switch (actionStartTag) {
case "Mage":
// Do nothing
break;
case "Ground":
// Move to tapped point @ z=0 whether or not an element is selected
WalkTo(lastMouseInfo.loc); // Walk to the first mouseInfo pos
ShowTap(lastMouseInfo.loc); // Show where the player tapped
break;
}
}
void MouseDrag() {
// The mouse is being drug across something
if (DEBUG) print("Mage.MouseDrag()");
// Drag is meaningless unless the mouse started on the ground
if (actionStartTag != "Ground") return;
// If there is no element selected, the player should follow the mouse
if (selectedElements.Count == 0) {
// Continuously walk toward the current mouseInfo pos
WalkTo(mouseInfos[mouseInfos.Count-1].loc);
}
}
void MouseDragUp() {
// The mouse is released after being drug
if (DEBUG) print("Mage.MouseDragUp()");
// Drag is meaningless unless the mouse started on the ground
if (actionStartTag != "Ground") return;
// If there is no element selected, stop walking now
if (selectedElements.Count == 0) {
// Stop walking when the drag is stopped
StopWalking();
}
}
...
}
Once this code is done, the tags need to be added to a couple of objects. Because of the Utils.FindTaggedParent() method, only the topmost parent needs to have the tag, which will help a lot with complex objects—like the Mage—that have several colliders on them.
Select _Mage in the Hierarchy and choose Add Tag from the Tag pop-up menu at the top of the _Mage Inspector. In the Tags array, add tags for Mage, Ground, and Enemy. Once this is complete, select _Mage in the Hierarchy again and set its tag to Mage. Select TilePrefab in the _Prefabs folder of the Project pane and set its tag to Ground. Now save your scene and press Play.
You should see now that tapping on _Mage or dragging from _Mage to anywhere else doesn’t do anything. Tapping on the ground still moves _Mage like normal, and dragging on the ground causes _Mage to follow only if no elements are selected.
Using a LineRenderer to Cast a Ground Spell
When an element is selected, we want to draw a line on the ground in the color of that element and then cast an elemental ground spell (in this case, a fire spell). The line can be drawn through the use of a LineRenderer, which is the same standard Unity component that is used for the built-in TrailRenderer. However, the LineRenderer is a little bit lower level and more controllable.
Only one line needs to be drawn at a time, so we only need a single LineRenderer component. Select _Mage in the Hierarchy and from the menu bar select Component > Effects > Line Renderer. You’ll see that there is now an ugly pink line segment near your _Mage. We’ll soon make it look much nicer.
You’ll also notice that there is now a LineRenderer component in the _Mage Inspector. Open the disclosure triangle next to Materials in the LineRenderer Inspector and click the little circle to the right of Element 0. This will bring up a list of all the materials in the project. ChooseDefault-Particle from the end of the list (it’s one of the few default materials included in every Unity project). This material works particularly well for lines, trails, and simple particles. The line should now look a lot nicer.
Uncheck the boxes next to Cast Shadows and Receive Shadows in the LineRenderer Inspector. Open the disclosure triangle next to Parameters and set both Start Width and End Width to 0.2. Finally, now that the LineRenderer is ready, uncheck the box next to LineRenderer to disable it. (We’ll enable it through code when needed.) When finished, your LineRenderer settings should look like those in the left image of Figure 35.7.
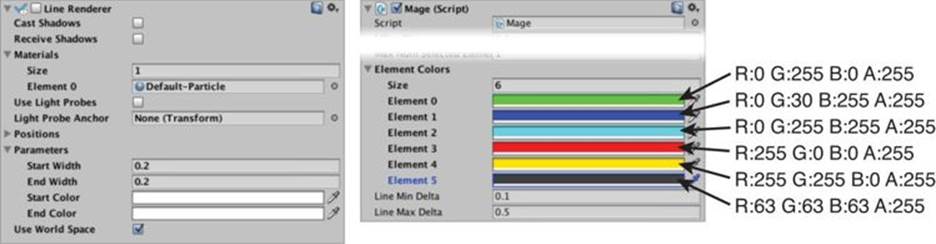
Figure 35.7 _Mage:LineRenderer settings and _Mage:Mage.ElementColor settings
Open the Mage script in MonoDevelop and add the bolded code that follows to implement the line renderer:
public class Mage : PT_MonoBehaviour {
...
public int maxNumSelectedElements = 1;
public Color[] elementColors;
public bool ________________;
public List<Vector3> linePts; // Points to be shown in the line
protected LineRenderer liner; // Ref to the LineRenderer Component
protected float lineZ = -0.1f; // Z depth of the line
// ^ protected variables are between public and private.
// public variables can be seen by everyone
// private variables can only be seen by this class
// protected variables can be seen by this class or any subclasses
// only public variables appear in the Inspector
// (or those with [SerializeField] in the preceding line)
public MPhase mPhase = MPhase.idle;
...
void Awake() {
S = this; // Set the Mage Singleton
mPhase = MPhase.idle;
// Find the characterTrans to rotate with Face()
characterTrans = transform.Find("CharacterTrans");
// Get the LineRenderer component and disable it
liner = GetComponent<LineRenderer>();
liner.enabled = false;
}
...
void MouseDrag() {
...
// If there is no element selected, the player should follow the mouse
if (selectedElements.Count == 0) {
// Continuously walk towards the current mouseInfo pos
WalkTo(mouseInfos[mouseInfos.Count-1].loc);
} else {
// This is a ground spell, so we need to draw a line
AddPointToLiner( mouseInfos[mouseInfos.Count-1].loc );
// ^ add the most recent MouseInfo.loc to liner
}
}
void MouseDragUp() {
...
// If there is no element selected, stop walking now
if (selectedElements.Count == 0) {
// Stop walking when the drag is stopped
StopWalking();
} else {
//TODO: Cast the Spell
// Clear the liner
ClearLiner();
}
}
...
void OrbitSelectedElements() {
...
}
//---------------- LineRenderer Code ----------------//
// Add a new point to the line.
void AddPointToLiner(Vector3 pt) {
pt.z = lineZ; // Set the z of the pt to lineZ to elevate it slightly
// above the ground
linePts.Add(pt);
UpdateLiner();
}
// Update the LineRenderer with the new points
public void UpdateLiner() {
// Get the type of the selectedElement
int el = (int) selectedElements[0].type;
// Set the line color based on that type
liner.SetColors(elementColors[el],elementColors[el]);
// Update the representation of the ground spell about to be cast
liner.SetVertexCount(linePts.Count); // Set the number of vertices
for (int i=0; i<linePts.Count; i++) {
liner.SetPosition(i, linePts[i]); // Set each vertex
}
liner.enabled = true; // Enable the LineRenderer
}
public void ClearLiner() {
liner.enabled = false; // Disable the LineRenderer
linePts.Clear(); // and clear all linePts
}
}
Once you save and compile this, you’re going to need to set up the elementColors array in the _Mage:Mage (Script) Inspector. Fill the 6 elements of elementColors with the colors shown in the right image of Figure 35.7. Save your scene and press Play. Now, when you select an element and drag on the ground, a line shows where the spell will be cast. However, the line probably looks a little glitchy now. This is because some points in the line are too close together, and others are too far apart. The following changes to the Mage class code will improve this. It will also add a maximum total line length, after which point, the line will no longer draw. This will prevent players from casting ridiculously long spells.
public class Mage : PT_MonoBehaviour {
...
public Color[] elementColors;
// These set the min and max distance between two line points
public float lineMinDelta = 0.1f;
public float lineMaxDelta = 0.5f;
public float lineMaxLength = 8f;
public bool ________________;
public float totalLineLength;
public List<Vector3> linePts; // Points to be shown in the line
...
//---------------- LineRenderer Code ----------------//
// Add a new point to the line. This ignores the point if it's too close to
// existing ones and adds extra points if it's too far away
void AddPointToLiner(Vector3 pt) {
pt.z = lineZ; // Set the z of the pt to lineZ to elevate it slightly
// above the ground
//linePts.Add(pt); // COMMENT OUT OR DELETE THESE TWO LINES!!!
//UpdateLiner(); // COMMENT OUT OR DELETE THESE TWO LINES!!!
// Always add the point if linePts is empty...
if (linePts.Count == 0) {
linePts.Add (pt);
totalLineLength = 0;
return; // ...but wait for a second point to enable the LineRenderer
}
// If the line is too long already, return
if (totalLineLength > lineMaxLength) return;
// If there is a previous point (pt0), then find how far pt is from it
Vector3 pt0 = linePts[linePts.Count-1]; // Get the last point in linePts
Vector3 dir = pt-pt0;
float delta = dir.magnitude;
dir.Normalize();
totalLineLength += delta;
// If it's less than the min distance
if ( delta < lineMinDelta ) {
// ...then it's too close; don't add it
return;
}
// If it's further than the max distance then extra points...
if (delta > lineMaxDelta) {
// ...then add extra points in between
float numToAdd = Mathf.Ceil(delta/lineMaxDelta);
float midDelta = delta/numToAdd;
Vector3 ptMid;
for (int i=1; i<numToAdd; i++) {
ptMid = pt0+(dir*midDelta*i);
linePts.Add(ptMid);
}
}
linePts.Add(pt); // Add the point
UpdateLiner(); // And finally update the line
}
...
}
Now the line should display much more smoothly, and it should stop drawing at the point that it’s about 8 meters long (that is, 8 Unity units long).
The Fire Spell
Now that we can see the line where the spell will go, it’s time to cast a spell. Drag FireGroundSpellPrefab from the _Prefabs folder of the Project pane into the scene, and you can get a preview of what the spell will look like. You can also take this time to examine its Particle Systemcomponent, which is generating all of the fire particles. Once you’re done exploring it, delete the instance from the Hierarchy (though not from the Project pane, of course).
Open the Mage script and add the following code:
public class Mage : PT_MonoBehaviour {
...
public GameObject fireGroundSpellPrefab;
public bool ________________;
protected Transform spellAnchor; // The parent transform for all spells
...
void Awake() {
...
liner.enabled = false;
GameObject saGO = new GameObject("Spell Anchor");
// ^ Create an empty GameObject named "Spell Anchor". When you create a
// new GameObject this way, it's at P:[0,0,0] R:[0,0,0] S:[1,1,1]
spellAnchor = saGO.transform; // Get its transform
}
...
void MouseDragUp() {
...
// If there is no element selected, stop walking now
if (selectedElements.Count == 0) {
// Stop walking when the drag is stopped
StopWalking();
} else {
CastGroundSpell();
// Clear the liner
ClearLiner();
}
}
void CastGroundSpell() {
// There is not a no-element ground spell, so return
if (selectedElements.Count == 0) return;
// Because this version of the prototype only allows a single element to
// be selected, we can use that 0th element to pick the spell.
switch (selectedElements[0].type) {
case ElementType.fire:
GameObject fireGO;
foreach( Vector3 pt in linePts ) { // For each Vector3 in linePts...
// ...create an instance of fireGroundSpellPrefab
fireGO = Instantiate(fireGroundSpellPrefab) as GameObject;
fireGO.transform.parent = spellAnchor;
fireGO.transform.position = pt;
}
break;
//TODO: Add other elements types later
}
// Clear the selectedElements; they're consumed by the spell
ClearElements();
}
...
}
Save the Mage script and return to Unity. You will now see a fireGroundSpellPrefab field on the _Mage.Mage (Script) Inspector. Drag the FireGroundSpellPrefab from the _Prefabs folder of the Project pane into this field and save your scene. Now, when you play the scene, you can choose a fire element and cast a fire spell on the ground. However, that spell lasts forever right now.
Fire-and-Forget Spells
One of the aspects of the way this game is designed is that spells should be able to be cast by the Mage script and then forgotten. Rather than the Mage script managing the duration, damage, and behavior of the spell, the individual spell prefabs can manage themselves. To accomplish this for the fire ground spell, create a new C# script in the __Scripts folder named FireGroundSpell and attach it to the FireGroundSpellPrefab in the _Prefabs folder. Open the script in MonoDevelop and enter this code:
using UnityEngine;
using System.Collections;
// Extends PT_MonoBehaviour
public class FireGroundSpell : PT_MonoBehaviour {
public float duration = 4; // Lifetime of this GameObject
public float durationVariance = 0.5f;
// ^ This allows the duration to range from 3.5 to 4.5
public float fadeTime = 1f; // Length of time to fade
public float timeStart; // Birth time of this GameObject
// Use this for initialization
void Start () {
timeStart = Time.time;
duration = Random.Range(duration-durationVariance,
duration+durationVariance);
// ^ Set the duration to a number between 3.5 and 4.5 (defaults)
}
// Update is called once per frame
void Update () {
// Determine a number [0..1] (between 0 and 1) that stores the
// percentage of duration that has passed
float u = (Time.time-timeStart)/duration;
// At what u value should this start fading
float fadePercent = 1-(fadeTime/duration);
if (u>fadePercent) { // If it's after the time to start fading...
// ...then sink into the ground
float u2 = (u-fadePercent)/(1-fadePercent);
// ^ u2 is a number [0..1] for just the fadeTime
Vector3 loc = pos;
loc.z = u2*2; // move lower over time
pos = loc;
}
if (u>1) { // If this has lived longer than duration...
Destroy(gameObject); // ...destroy it
}
}
void OnTriggerEnter(Collider other) {
// Announce when another object enters the collider
GameObject go = Utils.FindTaggedParent(other.gameObject);
if (go == null) {
go = other.gameObject;
}
Utils.tr("Flame hit",go.name);
}
//TODO: Actually damage the other object
}
Now, when you play the scene, you will see that after you cast the fire ground spell, each spurt of fire lasts for about 4 seconds and dies out. In addition, if you make the Mage walk through the fire, the “Flame hit” announcement will appear in the Console. The Mage’s spells won’t damage her of course, so let’s give her a way to look for some enemies that she can damage.
Changing Rooms
As a kindness to our Mage, the first room doesn’t have any monsters in it, but there will certainly be some throughout the dungeon. The Mage needs a way to move from room to room. This will be accomplished with the PortalPrefab in the _Prefabs folder and some scripting. If you inspect the PortalPrefab, note that it is in the Ignore Raycast layer. Unity automatically includes this layer in every project, and we’re using it here to ensure that the Physics.Raycast() done by MouseInfo ignores the PortalPrefab and falls through to the Tile beyond it.
Create a new C# script named Portal and place it in the __Scripts folder. Then, attach it to the PortalPrefab prefab in the _Prefabs folder. Open the Portal script in MonoDevelop and enter the following code:
using UnityEngine;
using System.Collections;
public class Portal : PT_MonoBehaviour {
public string toRoom;
public bool justArrived = false;
// ^ true if _Mage has just teleported here
void OnTriggerEnter(Collider other) {
if (justArrived) return;
// ^ Since the Mage has just arrived, don't teleport her back
// Get the GameObject of the collider
GameObject go = other.gameObject;
// Search up for a tagged parent
GameObject goP = Utils.FindTaggedParent(go);
if (goP != null) go = goP;
// If this isn't the _Mage, return
if (go.tag != "Mage") return;
// Go ahead and build the next room
LayoutTiles.S.BuildRoom(toRoom);
}
void OnTriggerExit(Collider other) {
// Once the Mage leaves this Portal, set justArrived to false
if (other.gameObject.tag == "Mage") {
justArrived = false;
}
}
}
The justArrived bool is important because it keeps the Mage from immediately being teleported back to the previous room. If justArrived wasn’t there, the Mage appearing in the new room (above the Portal) would invoke OnTriggerEnter() and be sent back to the previous room.
Now, we need to make several changes to the LayoutTiles script to allow it to build rooms more than once (and to allow it to destroy the old room Tiles that are being replaced). Open LayoutTiles and edit the code as shown in bold here:
public class LayoutTiles : MonoBehaviour {
...
public TileTex[] tileTextures; // A list of named textures for Tiles
public GameObject portalPrefab; // Prefab for the portals between rooms
public bool ________________;
private bool firstRoom = true; // Is this the first room built?
public PT_XMLReader roomsXMLR;
...
public Texture2D GetTileTex(string tStr) {
...
}
// Build a room based on room number. This is an alternative version of
// BuildRoom that grabs roomXML based on <room> num.
public void BuildRoom(string rNumStr) {
PT_XMLHashtable roomHT = null;
for (int i=0; i<roomsXML.Count; i++) {
PT_XMLHashtable ht = roomsXML[i];
if (ht.att("num") == rNumStr) {
roomHT = ht;
break;
}
}
if (roomHT == null) {
Utils.tr("ERROR","LayoutTiles.BuildRoom()",
"Room not found: "+rNumStr);
return;
}
BuildRoom(roomHT);
}
// Build a room from an XML <room> entry
public void BuildRoom(PT_XMLHashtable room) {
// Destroy any old Tiles
foreach (Transform t in tileAnchor) { // Clear out old tiles
// ^ You can iterate over a Transform to get its children
Destroy(t.gameObject);
}
// Move the Mage out of the way
Mage.S.pos = Vector3.left * 1000;
// ^ This keeps the Mage from accidentally triggering OnTriggerExit() on
// a Portal. In my testing, I found that OnTriggerExit was being called
// at strange times.
Mage.S.ClearInput(); // Cancel any active mouse input and drags
string rNumStr = room.att("num");
// Get the texture names for the floors and walls from <room> attributes
...
float maxY = roomRows.Length-1;
List<Portal> portals = new List<Portal>();
// These loops scan through each tile of each row of the room
for (int y=0; y<roomRows.Length; y++) {
for (int x=0; x<roomRows[y].Length; x++) {
...
ti.tex = tileTexStr;
// Check for specific entities in the room
switch (rawType) {
case "X": // Starting position for the Mage
// Mage.S.pos = ti.pos; // COMMENT OUT THIS LINE!
if (firstRoom) {
Mage.S.pos = ti.pos; // Uses the Mage Singleton
roomNumber = rNumStr;
// ^ Setting roomNumber now keeps any portals from
// moving the Mage to them in this first room.
firstRoom = false;
}
break;
case "0": // Numbers are room portals (up to F in hexadecimal)
case "1": // This allows portals to be placed in the Rooms.xml file
case "2":
case "3":
case "4":
case "5":
case "6":
case "7":
case "8":
case "9":
case "A":
case "B":
case "C":
case "D":
case "E":
case "F":
// Instantiate a Portal
GameObject pGO = Instantiate(portalPrefab) as GameObject;
Portal p = pGO.GetComponent<Portal>();
p.pos = ti.pos;
p.transform.parent = tileAnchor;
// ^ Attaching this to the tileAnchor means that the Portal
// will be Destroyed when a new room is built
p.toRoom = rawType;
portals.Add(p);
break;
}
// More to come here...
}
}
// Position the Mage
foreach (Portal p in portals) {
// If p.toRoom is the same as the room number the Mage just exited,
// then the Mage should enter this room through this Portal
// Alternatively, if firstRoom == true and there was no X in the
// room (as a default Mage starting point), move the Mage to this
// Portal as a backup measure (if, for instance, you want to just
// load room number "5")
if (p.toRoom == roomNumber || firstRoom) {
// ^ If there's an X in the room, firstRoom will be set to false
// by the time the code gets here
Mage.S.StopWalking(); // Stop any Mage movement
Mage.S.pos = p.pos; // Move _Mage to this Portal location
// _Mage maintains her facing from the previous room, so there
// is no need to rotate her in order for her to enter this room
// facing the right direction.
p.justArrived = true;
// ^ Tell the Portal that Mage has just arrived.
firstRoom = false;
// ^ Stops a 2nd Portal in this room from moving the Mage to it
}
}
// Finally assign the roomNumber
roomNumber = rNumStr;
}
}
For this code to compile properly, you need to add a few lines to Mage as well. Open Mage in MonoDevelop and add the ClearInput() method to the end of the Mage class:
public class Mage : PT_MonoBehaviour {
...
public void ClearLiner() {
liner.enabled = false; // Disable the LineRenderer
linePts.Clear(); // and clear all linePts
}
// Stop any active drag or other mouse input
public void ClearInput() {
mPhase = MPhase.idle;
}
}
Save and switch back to Unity. Select _MainCamera in the Hierarchy and find the _MainCamera.LayoutTiles (Script) Inspector. Drag PortalPrefab from the _Prefabs folder in the Project pane into the portalPrefab field of the LayoutTiles (Script) Inspector. Now is a good time to also make sure that the roomNumber field is set to 0 so that your Mage starts in the correct room.
Save your scene, press Play, and you’ll see that the Mage can now walk from room to room by walking into portals. Try exploring the entire dungeon if you like. Now that the Mage can explore, it’s time to give her some enemies.
Spawning Enemies
In addition to storing information about the Tile layout of the room, the Rooms.xml file also includes information about two different kinds of enemies: bugs and spikers. These are represented in the Rooms.xml file by a b for the bug and a ^, v, {, or } for the spikers (because the spikers need to have an initial direction set for them). Note that the < and > angle brackets couldn’t be used because they are special reserved characters in XML files.
All Enemies
All enemies in the game will share certain traits. Each will have some sort of simple movement. Most will be damaged by spells. Each will damage the Mage if they collide with her. Each will have a collider of some sort that is used to determine what it is colliding with.
Because so many aspects of all enemies are shared, it makes sense to handle them in some sort of hierarchical, object-oriented way. In the SHMUP prototype, we implemented an Enemy superclass with several subclasses. For this prototype—to demonstrate something different—we’ll implement an interface instead. Look at the “Interfaces” section in Appendix B, “Useful Concepts,” for an introduction to the concept.
Briefly, an interface declares methods or properties that will later be implemented by a class. Any class that implements the interface can then be referred to in code as that interface type rather than as the specific class. This differs from subclassing in several ways, one of the most interesting of which is that a class may implement several different interfaces simultaneously, whereas a class can only extend a single superclass.
We will also create a factory to instantiate the various enemy types for us. This will be an adaptation of the classic Factory Pattern described in the book Design Patterns by the “Gang of Four.”1 When the LayoutTiles.BuildRoom() method encounters a character that it doesn’t understand (like the b, ^, v, {, or }), it will pass it to the EnemyFactory.Instantiate() method to see whether an enemy should be created. A diagram of this concept is shown in Figure 35.8. EnemyFactory.Instantiate() is a “factory” because it can create any number of different classes and return them to LayoutTiles as long as they all implement the Enemy interface. For more information about other design patterns, see the “Software Design Patterns” section of Appendix B.
1 Erich Gamma, Richard Helm, Ralph Johnson, and John Vissides. Design Patterns: Elements of Reusable Object-Oriented Software. Reading, MA: Addison-Wesley, 1994. The Factory Pattern is one of many described in the book. Others include the Singleton Pattern that has been used in many of the tutorials in this book.
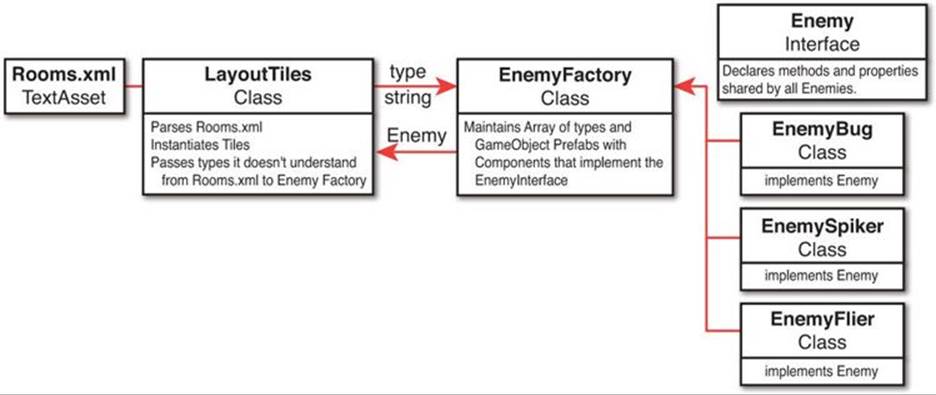
Figure 35.8 Conceptual structure of EnemyFactory
There are two ways to approach designing something like this. One is to think really hard about it ahead of time and try to foresee all the possible parts of each Enemy type’s behavior that you want to abstract into the interface. The other is to just build a couple of enemies, see what methods they have in common, and then add those to the interface. The second method is much more akin to the iterative process of design that is used throughout this book, though it can lead to less flexibility and extensibility. Most of the time, I do a mixture of the two methods with a weighting toward the second. I try to just start coding something with both the knowledge that I will have to refactor some of the code later and a weather eye toward things that I will want to abstract into an interface or superclass later. With that in mind, let’s make the EnemyBug work.
EnemyBug
Bugs are a very basic kind of enemy. They will simply move toward the Mage if she’s in the same room with them. Bugs have no knowledge of walls or the layout of the room and will therefore happily walk into a wall rather than navigating around to get to the player. (If you want to make them more intelligent later, you can add A* pathfinding (pronounced “A-star”) or use Unity’s navigation mesh.) Bugs are damaged by—but unafraid of—fire and will damage the Mage if they touch her.
Let’s start by making the EnemyBug chase after the player. Create a new C# script named EnemyBug, and place it in the __Scripts folder. Then drag it on to EnemyBug in the _Prefabs folder.
Next, drag an instance of EnemyBug from the _Prefabs folder into the Hierarchy. Ensure that its position is P:[8,4,0], which will place it in the same room with the player once LayoutTiles has built the 0th room (but still keep it far enough away that you have lots of time to cast a spell on it before it reaches you). If you explore EnemyBug in the Hierarchy, you can see that it is constructed very much like _Mage, with a top-level GameObject (EnemyBug) that contains a Rigidbody and CapsuleCollider. EnemyBug parents a child named CharacterTrans that is used to parent and rotate a child named View_Bug that actually has the model of the Bug seen by the player. As with View_Character, View_Bug also has individual colliders on each of its body parts. This is more important with View_Bug than View_Character because View_Bug’s legs stick out farther than the boundary of the CapsuleCollider on EnemyBug.
Open the EnemyBug script and enter the following code. As you can see, it’s almost entirely cut and pasted from Mage. In general, when you’re coding large systems, you don’t want to cut and paste code like this. However, when prototyping, it’s very useful to copy and paste at first and then—once you know exactly what you want—you can abstract the code later.
using UnityEngine;
using System.Collections;
using System.Collections.Generic;
public class EnemyBug : PT_MonoBehaviour {
public float speed = 0.5f;
public bool ________________;
public Vector3 walkTarget;
public bool walking;
public Transform characterTrans;
void Awake() {
characterTrans = transform.Find("CharacterTrans");
}
void Update() {
WalkTo (Mage.S.pos);
}
// ---------------- Walking Code ----------------
// All of this walking code is copied directly from Mage
// Walk to a specific position. The position.z is always 0
public void WalkTo(Vector3 xTarget) {
walkTarget = xTarget; // Set the point to walk to
walkTarget.z = 0; // Force z=0
walking = true; // Now the EnemyBug is walking
Face(walkTarget); // Look in the direction of the walkTarget
}
public void Face(Vector3 poi) { // Face towards a point of interest
Vector3 delta = poi-pos; // Find vector to the point of interest
// Use Atan2 to get the rotation around Z that points the X-axis of
// EnemyBug:CharacterTrans towards poi
float rZ = Mathf.Rad2Deg * Mathf.Atan2(delta.y, delta.x);
// Set the rotation of characterTrans (doesn't actually rotate Enemy)
characterTrans.rotation = Quaternion.Euler(0,0,rZ);
}
public void StopWalking() { // Stops the EnemyBug from walking
walking = false;
rigidbody.velocity = Vector3.zero;
}
void FixedUpdate () { // Happens every physics step (i.e., 50 times/second)
if (walking) { // If EnemyBug is walking
if ( (walkTarget-pos).magnitude < speed*Time.fixedDeltaTime ) {
// If EnemyBug is very close to walkTarget, just stop there
pos = walkTarget;
StopWalking();
} else {
// Otherwise, move towards walkTarget
rigidbody.velocity = (walkTarget-pos).normalized * speed;
}
} else {
// If not walking, velocity should be zero
rigidbody.velocity = Vector3.zero;
}
}
}
Press Play, and you’ll see that your Mage will now be chased by an EnemyBug. If you cast a fire spell on the ground and the bug walks through it. You will also get a message about it in the Console pane. However, the fire doesn’t actually hurt the bug yet.
Damaging the EnemyBug
We need to add a function that allows the bug to be hurt. Add the following code to EnemyBug:
public class EnemyBug : PT_MonoBehaviour {
public float speed = 0.5f;
public float health = 10;
public bool ________________;
private float _maxHealth;
public Vector3 walkTarget;
public bool walking;
public Transform characterTrans;
void Awake() {
characterTrans = transform.Find("CharacterTrans");
_maxHealth = health; // Used to put a top cap on healing
}
...
void FixedUpdate () { // Happens every physics step (i.e., 50 times/second)
...
}
// Damage this instance. By default, the damage is instant, but it can also
// be treated as damage over time, where the amt value would be the amount
// of damage done every second.
// NOTE: This same code can be used to heal the instance
public void Damage(float amt, bool damageOverTime=false) {
// If it's DOT, then only damage the fractional amount for this frame
if (damageOverTime) {
amt *= Time.deltaTime;
}
health -= amt;
health = Mathf.Min(_maxHealth, health); // Limit health if healing
if (health <= 0) {
Die();
}
}
// Making Die() a separate function allows us to add things later like
// different death animations, dropping something for the player, etc.
public void Die() {
Destroy(gameObject);
}
}
Now that the EnemyBug has the ability to be damaged, it’s time to make the FireGroundSpell do so. Open FireGroundSpell and enter the following code:
public class FireGroundSpell : PT_MonoBehaviour {
...
public float timeStart; // Birth time of this GameObject
public float damagePerSecond = 10;
...
void OnTriggerEnter(Collider other) {
...
}
void OnTriggerStay(Collider other) {
// Actually damage the other
// Get a reference to the EnemyBug script component of the other
EnemyBug recipient = other.GetComponent<EnemyBug>();
// If there is an EnemyBug component, dmage it with fire
if (recipient != null) {
recipient.Damage(damagePerSecond, true);
}
}
}
Save, press Play, and cast a fire spell on the ground between _Mage and EnemyBug. You’ll see that the bug disappears shortly after touching the fire. However, if you pay attention, you’ll notice that the bug actually dies too quickly. The fire spell does 10 damage/second, and the EnemyBug has 10 health, so it should take 1 second to die, but it’s happening faster than that. This is because the bug is touching multiple individual FireGroundSpellPrefab instances, and each one is damaging it individually. The way that damage is done to the EnemyBug needs to be modified so that the bug doesn’t take compound damage from multiple instances of the same spell. We need to modify the Damage() method of EnemyBug so that it also takes information on the type of damage that is done and treats different types of damage differently. First, replace therecipient.Damage() line you just added to the end of FireGroundSpell with this one:
// If there is an EnemyBug component, damage it with fire
if (recipient != null) {
recipient.Damage(damagePerSecond, ElementType.fire, true);
}
Then, edit EnemyBug as shown in the following code. Note that you’ll be replacing most of the Damage() method:
public class EnemyBug : PT_MonoBehaviour {
...
public Transform characterTrans;
// Stores damage for each element each frame
public Dictionary<ElementType,float> damageDict;
// ^ NOTE: Dictionaries do not appear in the Unity Inspector
void Awake() {
characterTrans = transform.Find("CharacterTrans");
_maxHealth = health; // Always starts with max health
ResetDamageDict();
}
// Resets the values for the damageDict
void ResetDamageDict() {
if (damageDict == null) {
damageDict = new Dictionary<ElementType, float>();
}
damageDict.Clear();
damageDict.Add(ElementType.earth, 0);
damageDict.Add(ElementType.water, 0);
damageDict.Add(ElementType.air, 0);
damageDict.Add(ElementType.fire, 0);
damageDict.Add(ElementType.aether,0);
damageDict.Add(ElementType.none, 0);
}
...
// Damage this instance. By default, the damage is instant, but it can also
// be treated as damage over time, where the amt value would be the amount
// of damage done every second.
// NOTE: This same code can be used to heal the instance
public void Damage(float amt, ElementType eT, bool damageOverTime=false) {
// If it's DOT, then only damage the fractional amount for this frame
if (damageOverTime) {
amt *= Time.deltaTime;
}
// Treat different damage types differently (most are default)
switch (eT) {
case ElementType.fire:
// Only the max damage from one fire source affects this instance
damageDict[eT] = Mathf.Max ( amt, damageDict[eT] );
break;
case ElementType.air:
// air doesn't damage EnemyBugs, so do nothing
break;
default:
// By default, damage is added to the other damage by same element
damageDict[eT] += amt;
break;
}
}
// LateUpdate() is automatically called by Unity every frame. Once all the
// Updates() on all instances have been called, then LateUpdate() is called
// on all instances.
void LateUpdate() {
// Apply damage from the different element types
// Iteration through a Dictionary uses a KeyValuePair
// entry.Key is the ElementType, while entry.Value is the float
float dmg = 0;
foreach ( KeyValuePair<ElementType,float> entry in damageDict ) {
dmg += entry.Value;
}
health -= dmg;
health = Mathf.Min(_maxHealth, health); // Limit health if healing
ResetDamageDict(); // Prepare for next frame
if (health <= 0) {
Die();
}
}
...
}
Now, it takes a full second of fire damage for the bug to die. If you want to double-check that the timing works properly, you can increase the bug’s damage to 100 and see that it does indeed take 10 seconds for it to die.
Showing Damage
Right now, there is no indication to the player that the bug is actually being damaged until it dies. Many games flash something red when it’s damaged (we did this in the SHMUP prototype), but color already has a lot of meaning in this game, so we should alter something other than color when a character is damaged. Instead of flashing red, we’ll scale the model slightly using the CharacterTrans. Add the following code to EnemyBug to do so:
public class EnemyBug : PT_MonoBehaviour {
public float speed = 0.5f;
public float health = 10;
public float damageScale = 0.8f;
public float damageScaleDuration = 0.25f;
public bool ________________;
private float damageScaleStartTime;
...
void LateUpdate() {
// Apply damage from the different element types
// Iteration through a Dictionary uses a KeyValuePair
// entry.Key is the ElementType, while entry.Value is the float
float dmg = 0;
foreach ( KeyValuePair<ElementType,float> entry in damageDict ) {
dmg += entry.Value;
}
if (dmg > 0) { // If this took damage...
// and if it is at full scale now (& not already damage scaling)...
if (characterTrans.localScale == Vector3.one) {
// start the damage scale animation
damageScaleStartTime = Time.time;
}
}
// The damage scale animation
float damU = (Time.time - damageScaleStartTime)/damageScaleDuration;
damU = Mathf.Min(1, damU); // Limit the max localScale to 1
float scl = (1-damU)*damageScale + damU*1;
characterTrans.localScale = scl * Vector3.one;
health -= dmg;
health = Mathf.Min(_maxHealth, health); // Limit health if healing
ResetDamageDict(); // Prepare for next frame
if (health <= 0) {
Die();
}
}
...
}
Now, when the EnemyBug takes damage, it will pop to a smaller size (80% its original scale) and then interpolate back up to 100% over 0.25 seconds. Save your scene, press Play, and test it with the fire spell.
Damaging the Mage
The last thing for the EnemyBug to do is damage the Mage on contact. Contact with any enemy will cause the Mage to jump backward, lose some health, and blink for 1 second of invincibility. This will be done by switching the Mage into a different mode for 1 second that controls all of these factors. Open the Mage script and edit the code as shown:
public class Mage : PT_MonoBehaviour {
...
public GameObject fireGroundSpellPrefab;
public float health = 4; // Total mage health
public float damageTime = -100;
// ^ Time that damage occurred. It's set to -100 so that the Mage doesn't
// act damaged immediately when the scene starts
public float knockbackDist = 1; // Distance to move backward
public float knockbackDur = 0.5f; // Seconds to move backward
public float invincibleDur = 0.5f; // Seconds to be invincible
public int invTimesToBlink = 4; // # blinks while invincible
public bool ________________;
private bool invincibleBool = false; // Is Mage invincible?
private bool knockbackBool = false; // Mage being knocked back?
private Vector3 knockbackDir; // Direction of knockback
private Transform viewCharacterTrans;
protected Transform spellAnchor; // The parent transform for all spells
...
void Awake() {
...
// Find the characterTrans to rotate with Face()
characterTrans = transform.Find("CharacterTrans");
viewCharacterTrans = characterTrans.Find("View_Character");
...
}
...
void FixedUpdate () { // Happens every physics step (i.e., 50 times/second)
if (invincibleBool) {
// Get number [0..1]
float blinkU = (Time.time - damageTime)/invincibleDur;
blinkU *= invTimesToBlink; // Multiply by times to blink
blinkU %= 1.0f;
// ^ Modulo 1.0 gives us the decimal remainder left when dividing ?blinkU
// by 1.0. For example: 3.85f % 1.0f is 0.85f
bool visible = (blinkU > 0.5f);
if (Time.time - damageTime > invincibleDur) {
invincibleBool = false;
visible = true; // Just to be sure
}
// Making the GameObject inactive makes it invisible
viewCharacterTrans.gameObject.SetActive(visible);
}
if (knockbackBool) {
if (Time.time - damageTime > knockbackDur) {
knockbackBool = false;
}
float knockbackSpeed = knockbackDist/knockbackDur;
vel = knockbackDir * knockbackSpeed;
return; // Returns to avoid walking code below
}
if (walking) { // If Mage is walking
...
}
}
void OnCollisionEnter( Collision coll ) {
GameObject otherGO = coll.gameObject;
// Colliding with a wall can also stop walking
Tile ti = otherGO.GetComponent<Tile>();
if (ti != null) {
if (ti.height > 0) { // If ti.height is > 0
// Then this ti is a wall, and Mage should stop
StopWalking();
}
}
// See if it's an EnemyBug
EnemyBug bug = coll.gameObject.GetComponent<EnemyBug>();
// If otherGO is an EnemyBug, pass otherGO to CollisionDamage()
if (bug != null) CollisionDamage(otherGO);
}
void CollisionDamage(GameObject enemy) {
// Don't take damage if you're already invincible
if (invincibleBool) return;
// The Mage has been hit by an enemy
StopWalking();
ClearInput();
health -= 1; // Take 1 point of damage (for now)
if (health <= 0) {
Die();
return;
}
damageTime = Time.time;
knockbackBool = true;
knockbackDir = (pos - enemy.transform.position).normalized;
invincibleBool = true;
}
// The Mage dies
void Die() {
Application.LoadLevel(0); // Reload the level
// ^ Eventually, you'll want to do something more elegant
}
// Show where the player tapped
...
}
That’s it for the EnemyBug at this point. Make sure that all your work gets passed to the version of EnemyBug in the _Prefabs folder by clicking the Apply button to the right of Prefab in the top section of the EnemyBug Inspector. This applies all the changes you’ve made back to the EnemyBug Prefab. Just to be sure everything worked properly:
1. Save your scene.
2. Delete EnemyBug from the Hierarchy.
3. Drag a new instance of EnemyBug into the Hierarchy from the _Prefabs folder.
4. Make sure that it works the same way.
If everything works fine, you can delete the new EnemyBug instance from the Hierarchy and save the scene. If anything went wrong, you can revert back to the saved version of the scene and try applying the changes again. If for some reason this still doesn’t work, drag the working version of EnemyBug from the Hierarchy into the _Prafabs folder. This will make a new prefab named EnemyBug 1. Then delete the old EnemyBug prefab and rename EnemyBug 1 to EnemyBug.
EnemySpiker
The next kind of enemy we’ll implement is the EnemySpiker. The spiker moves back and forth patrolling a line. It’s not affected by any spells, and it damages the Mage on contact.
Create a new C# script named EnemySpiker and place it in the __Scripts folder. Attach this script to the EnemySpiker prefab in the _Prefabs folder. Open the EnemySpiker script and enter the following code:
using UnityEngine;
using System.Collections;
using System.Collections.Generic;
public class EnemySpiker : PT_MonoBehaviour {
public float speed = 5f;
public string roomXMLString = "{";
public bool ________________;
public Vector3 moveDir;
public Transform characterTrans;
void Awake() {
characterTrans = transform.Find("CharacterTrans");
}
void Start() {
// Set the move direction based on the character in Rooms.xml
switch (roomXMLString) {
case "^":
moveDir = Vector3.up;
break;
case "v":
moveDir = Vector3.down;
break;
case "{":
moveDir = Vector3.left;
break;
case "}":
moveDir = Vector3.right;
break;
}
}
void FixedUpdate () { // Happens every physics step (i.e., 50 times/second)
rigidbody.velocity = moveDir * speed;
}
// This has the same structure as the Damage Method in EnemyBug
public void Damage(float amt, ElementType eT, bool damageOverTime=false) {
// Nothing damages the EnemySpiker
}
void OnTriggerEnter(Collider other) {
// Check to see if a wall was hit
GameObject go = Utils.FindTaggedParent(other.gameObject);
if (go == null) return; // In case nothing is tagged
if (go.tag == "Ground") {
// Make sure that the ground tile is in the direction we're moving.
// A dot product will help us with this (see the Useful Concepts
// Reference).
float dot = Vector3.Dot(moveDir, go.transform.position - pos);
if (dot > 0) { // If Spiker is moving towards the block it hit
moveDir *= -1; // Reverse direction
}
}
}
}
Making EnemySpiker Hurt Mage
The EnemySpiker uses a trigger (instead of a normal collider) so that collisions with other objects don’t cause the spiker to go off course due to collisions. However, this also means that it currently passes harmlessly through the Mage. Make the following code edits to Mage to make EnemySpiker able to hurt her:
public class Mage : PT_MonoBehaviour {
...
void OnCollisionEnter( Collision coll ) {
...
}
void OnTriggerEnter(Collider other) {
EnemySpiker spiker = other.GetComponent<EnemySpiker>();
if (spiker != null) {
CollisionDamage(other.gameObject);
}
}
void CollisionDamage(GameObject enemy) {
...
}
...
}
To test the new EnemySpiker, complete the following steps:
1. Drag an EnemySpiker from the Project pane to the Hierarchy pane to add an instance of EnemySpiker to the scene. Be sure to position it somewhere that it will be about 1 meter (1 Unity unit) above the floor and between some walls.
2. Save the scene.
3. Play the scene to test everything and see the EnemySpiker behavior.
4. If everything seems to be working fine, delete the EnemySpiker instance from the Hierarchy and save your scene again.
Now we have two different kinds of enemies in the game that have their own behaviors and can each damage the Mage; however, if we wanted them to do different amounts of damage to the Mage—for example: if we wanted the EnemySpiker to only remove 0.5 health from the Mage instead of the 1 health that’s removed by the bug—there’s not a way to do that right now because then even if each of the enemies had a touchDamage field, there is no elegant way to pass it into the CollisionDamage method (which only takes a GameObject as input). It’s times like these when an interface can help.
Abstracting the Enemy Interface
As mentioned earlier, an interface is a great way to abstract out the commonalities of two different classes. For EnemyBug and EnemySpiker to both properly interact with the Mage when they touch her, we really only need to know two things about them:
1. Where the enemy is located so the Mage can get knocked back
2. The amount of damage the enemy does to the Mage when she touches it
As you will read in the “Interfaces” section of Appendix B, an interface is like a promise that any class that implements the interface will implement specific methods and properties. Although interfaces cannot contain information about fields, that functionality can easily be handled by properties.
Create a new C# script named Enemy and put it in the __Scripts folder. Open it and enter this code:
using UnityEngine;
using System.Collections;
public interface Enemy {
// These are declarations of properties that will be implemented by all
// Classes that implement the Enemy interface
Vector3 pos { get; set; } // The Enemy's transform.position
float touchDamage { get; set; } // Damage done by touching the Enemy
}
Interfaces are usually very short because they only declare methods and properties that will be implemented later. Now it’s time to make use of the Enemy interface. Make the following changes to the beginning of the EnemyBug script:
public class EnemyBug : PT_MonoBehaviour, Enemy {
[SerializeField]
private float _touchDamage = 1;
public float touchDamage {
get { return( _touchDamage ); }
set { _touchDamage = value; }
}
// The pos Property is already implemented in PT_MonoBehaviour
public float speed = 0.5f;
...
}
The EnemyBug : PT_MonoBehaviour, Enemy tells C# that EnemyBug extends the PT_MonoBehaviour class and implements the Enemy interface. If there is more than one interface implemented or if there is a class and one or more interfaces, they are separated by a comma. This change to EnemyBug implements the promised touchDamage property, while the promised pos property is already implemented by PT_MonoBehaviour. The [SerializeField] attribute causes the private field _touchDamage to appear in the Inspector (even though it’s private).
Now, add similar code to the beginning of EnemySpiker:
public class EnemySpiker : PT_MonoBehaviour, Enemy {
[SerializeField]
private float _touchDamage = 0.5f;
public float touchDamage {
get { return( _touchDamage ); }
set { _touchDamage = value; }
}
// The pos Property is already implemented in PT_MonoBehaviour
public float speed = 5f;
...
}
Now, both EnemyBug and EnemySpiker class instances can be treated as instances of the Enemy interface. Make the following changes to Mage to see how this works:
public class Mage : PT_MonoBehaviour {
...
void OnCollisionEnter( Collision coll ) {
...
// See if it's an EnemyBug
EnemyBug bug = coll.gameObject.GetComponent<EnemyBug>();
// If otherGO is an EnemyBug, pass bug to CollisionDamage(), which will
// interpret it as an Enemy
if (bug != null) CollisionDamage(bug);
// if (bug != null) CollisionDamage(otherGO); // COMMENT OUT THIS LINE!
}
void OnTriggerEnter(Collider other) {
EnemySpiker spiker = other.GetComponent<EnemySpiker>();
if (spiker != null) {
// CollisionDamage() will see spiker as an Enemy
CollisionDamage(spiker);
// CollisionDamage(other.gameObject); // COMMENT OUT THIS LINE!
}
}
void CollisionDamage(Enemy enemy) {
// Don't take damage if you're already invincible
if (invincibleBool) return;
// The Mage has been hit by an enemy
StopWalking();
ClearInput();
health -= enemy.touchDamage; // Take damage based on Enemy
if (health <= 0) {
Die();
return;
}
damageTime = Time.time;
knockbackBool = true;
knockbackDir = (pos - enemy.pos).normalized;
invincibleBool = true;
}
...
}
Even though EnemyBug and EnemySpiker share very little code, they can both be handled by the CollisionDamage() method because they both implement the Enemy interface. It’s important to note that even though EnemyBug and EnemySpiker share a lot of fields (for example, gameObject, transform, and so on); as far as CollisionDamage() is concerned it can only access the two properties pos and touchDamage that are declared in the Enemy interface.
Making an EnemyFactory
The abstraction of the two enemies into the Enemy interface also gives us the ability to make a factory that can be used to generate enemies if passed the string representation from Rooms.xml. As described earlier in the chapter, a factory is a class or method that can create instances of different classes that all implement the same interface. It will be useful for us in this game because after it’s implemented, adding new enemies to the factory will be as simple as editing an array in the _MainCamera.LayoutTiles Inspector.
First, you need to add a few more lines to the Enemy interface. Open Enemy in MonoDevelop and edit it as follows:
public interface Enemy {
// These are declarations of properties that will be implemented by all
// Classes that implement the Enemy interface
Vector3 pos { get; set; } // The Enemy's transform.position
float touchDamage { get; set; } // Damage done by touching the Enemy
string typeString { get; set; } // The type string from Rooms.xml
// The following are already implemented by all MonoBehaviour subclasses
GameObject gameObject { get; }
Transform transform { get; }
}
Make these changes to the EnemyBug script:
public class EnemyBug : PT_MonoBehaviour, Enemy {
[SerializeField]
private float _touchDamage = 1;
public float touchDamage {
get { return( _touchDamage ); }
set { _touchDamage = value; }
}
// The pos Property is already implemented in PT_MonoBehaviour
public string typeString {
get { return( roomXMLString ); }
set { roomXMLString = value; }
}
public string roomXMLString;
public float speed = 0.5f;
...
}
And these changes to the EnemySpiker script:
public class EnemySpiker : PT_MonoBehaviour, Enemy {
[SerializeField]
private float _touchDamage = 0.5f;
public float touchDamage {
get { return( _touchDamage ); }
set { _touchDamage = value; }
}
// The pos Property is already implemented in PT_MonoBehaviour
public string typeString {
get { return( roomXMLString ); }
set { roomXMLString = value; }
}
public float speed = 5f;
public string roomXMLString = "{";
public bool ________________;
...
}
Now, open the LayoutTiles script in MonoDevelop and make the following code changes:
[System.Serializable]
public class TileTex {
...
}
[System.Serializable]
public class EnemyDef {
// This class enables us to define various enemies
public string str;
public GameObject go;
}
public class LayoutTiles : MonoBehaviour {
...
public GameObject portalPrefab; // Prefab for the portals between rooms
public EnemyDef[] enemyDefinitions; // Prefabs for Enemies
public bool ________________;
...
public void BuildRoom(PT_XMLHashtable room) {
...
// These loops scan through each tile of each row of the room
for (int y=0; y<roomRows.Length; y++) {
for (int x=0; x<roomRows[y].Length; x++) {
...
// Check for specific entities in the room
switch (rawType) {
...
case "F":
...
portals.Add(p);
break;
default:
// Try to see if there's an Enemy for that letter
Enemy en = EnemyFactory(rawType);
if (en == null) break; // If there's not one, break out
// Set up the new Enemy
en.pos = ti.pos;
// Make en a child of tileAnchor so it's deleted when the
// next room is loaded.
en.transform.parent = tileAnchor;
en.typeString = rawType;
break;
}
}
}
...
}
public Enemy EnemyFactory(string sType) {
// See if there's an EnemyDef with that sType
GameObject prefab = null;
foreach (EnemyDef ed in enemyDefinitions) {
if (ed.str == sType) {
prefab = ed.go;
break;
}
}
if (prefab == null) {
Utils.tr("LayoutTiles.EnemyFactory()","No EnemyDef for: "+sType);
return(null);
}
GameObject go = Instantiate(prefab) as GameObject;
// The generic form of GetComponent (with the <>) won't work for
// interfaces like Enemy, so we must use this form instead.
Enemy en = (Enemy) go.GetComponent(typeof(Enemy));
return(en);
}
}
All that’s left to do is add the different EnemyDefs to _MainCamera.LayoutTiles. Select _MainCamera in the Hierarchy. Open the disclosure next to enemyDefinitions in the LayoutTiles (Script) Inspector and set its length to 5. Set the five Str fields to b, ^, v, {, and }. Drag EnemyBug from the _Prefabs folder into the first Go field and EnemySpiker into the remaining four. When you’re done, it should look like Figure 35.9.
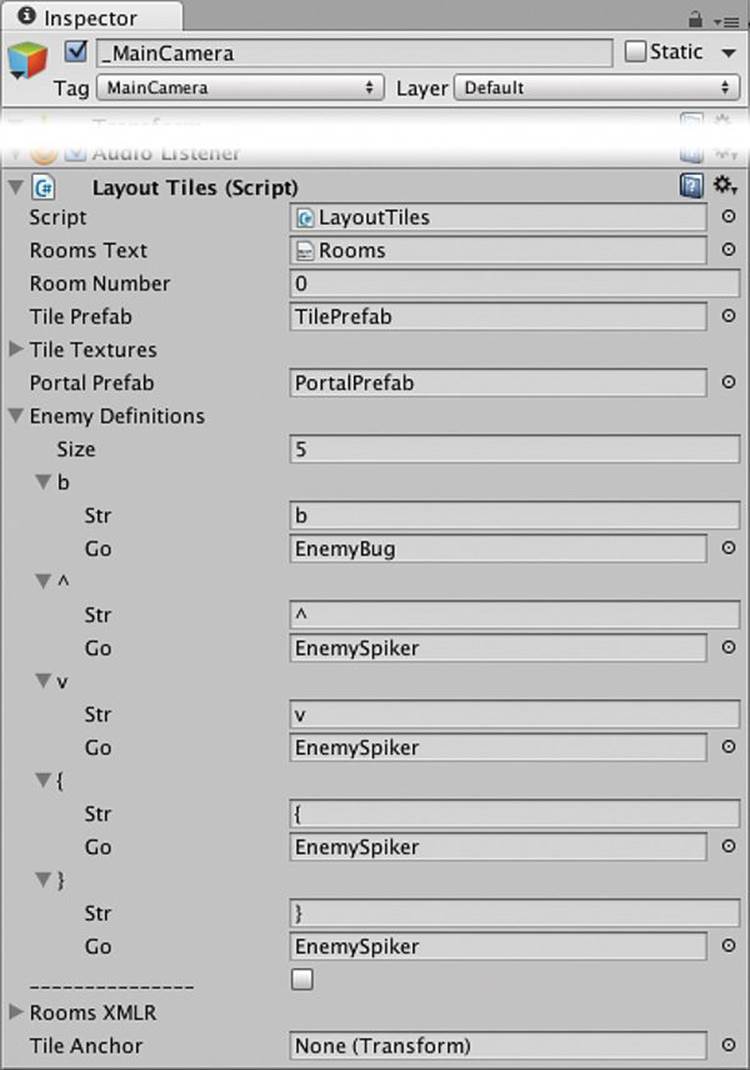
Figure 35.9 Settings for _MainCamera:LayoutTiles.enemyDefinitions
Now, as you walk through the dungeon, you will encounter both kinds of enemies. Because of the four different characters for an EnemySpiker, the spikers will be initialized facing the proper direction.
Summary
That’s it for the final tutorial. This prototype introduced you to a lot of new concepts like interfaces and the Factory Pattern. I’m personally going to continue working on this prototype and see where it goes as a game. I invite you to do the same or, just like any of these, use it as the foundation on which to build your own fantastic game.
Next Steps
If you do continue with this project, here are some additional things you can add to make it a more interesting game:
1. Add direct spells. These would be cast by choosing an element and then tapping on an enemy.
2. Make more enemies. There is a prefab in the _Prefabs folder for an EnemyFlier that could hover around and then swoop to attack, but there wasn’t room in the chapter for the code.
3. Add spells for each element and also a direct spell for when no element is selected. (As discussed earlier in the chapter, this could push the enemy back.)
4. Make the elements a resource. Maybe there are fountains around the dungeon where the Mage can restore her supply of elements. Maybe killing enemies releases elements. In the inventory on the right, the element buttons could show how many of that element the Mage has collected. You’d also want a top limit on how many elements of each type she could carry.
5. Add more interesting ground and wall tiles. If you don’t let the player walk off a cliff, you could make a dropoff tile that was lower than the others but still had a collider up where the Mage would collide with it, and it would look a little more interesting but still act just like a wall tile.
6. Use physics layers to more specifically manage your collisions.
7. Following in the footsteps of Rogue, make a procedurally generated dungeon so that you had a new, never-before-seen dungeon every time you played.
Thanks!
Thank you again for reading this book. I sincerely hope that it helps you to achieve your dreams.