Unity in Action: Multiplatform game development in C# with Unity 5 (2015)
Part 3. Strong finish
Chapter 10. Playing audio: sound effects and music
This chapter covers
· Importing and playing audio clips for various sound effects
· Using 2D sounds for the UI and 3D sounds in the scene
· Modulating the volume of all sounds when they play
· Playing background music while the game is going on
· Fading in and out between different background tunes
Although graphics get most of the attention when it comes to content in video games, audio is crucial, too. Most games play background music and have sound effects. Accordingly, Unity has audio functionality so that you can put sound effects and music into your games. Unity can import and play a variety of audio file formats, adjust the volume of sounds, and even handle sounds playing from a specific position within the scene.
This chapter starts with sound effects rather than music. Sound effects are short clips that play along with actions in the game (such as a gunshot that plays when the player fires), whereas the sound clips for music are longer (often running into minutes) and playback isn’t directly tied to events in the game. Ultimately, both boil down to the same kind of audio files and playback code, but the simple fact that the sound files for music are usually much larger than the short clips used for sound effects (indeed, files for music are often the largest files in the game!) merits covering them in a separate section.
The complete roadmap for this chapter will be to take a game without sound and do the following:
1. Import audio files for sound effects.
2. Play sound effects for the enemy and for shooting.
3. Program an audio manager to control volume.
4. Optimize the loading of music.
5. Control music volume separately from sound effects, including cross-fading tracks.
Note
This chapter is largely independent of the project you build; it simply adds audio capabilities on top of an existing game demo. All of the examples in this chapter are built on top of the FPS created in chapter 3 and you could download that sample project, but you’re free to use whatever game demo you’d like.
Once you have an existing game demo copied to use for this chapter, you can tackle the first step: importing sound effects.
10.1. Importing sound effects
Before you can play any sounds, you obviously need to import the sound files into your Unity project. First you’ll collect sound clips in the desired file format, and then you’ll bring the files into Unity and adjust them for your purposes.
10.1.1. Supported file formats
Much as you saw with art assets in chapter 4, Unity supports a variety of audio formats with different pros and cons. Table 10.1 lists the audio file formats that Unity supports.
Table 10.1. Audio file formats supported by Unity
|
File type |
Pros and cons |
|
WAV |
Default audio format on Windows. Uncompressed sound file. |
|
AIF |
Default audio format on Mac. Uncompressed sound file. |
|
MP3 |
Compressed sound file; sacrifices a bit of quality for much smaller files. |
|
OGG |
Compressed sound file; sacrifices a bit of quality for much smaller files. |
|
MOD |
Music tracker file format. A specialized kind of efficient digital music. |
|
XM |
Music tracker file format. A specialized kind of efficient digital music. |
The primary consideration differentiating audio files is the compression applied. Compression reduces the file’s size but accomplishes that by throwing out a bit of information in the file. Audio compression is clever about only throwing out the least important information so that the compressed sound still sounds good. Nevertheless, it’s a small loss of quality, so you should choose uncompressed audio when the sound clip is short and thus wouldn’t be a large file. Longer sound clips (especially music) should use compressed audio, because the audio clip would be prohibitively large otherwise.
Unity adds a small wrinkle to this decision, though...
Tip
Although music should be compressed in the final game, Unity can compress the audio after you’ve imported the file. Thus, when developing a game in Unity you usually want to use uncompressed file formats even for lengthy music, as opposed to importing compressed audio.
How digital audio works
In general, audio files store the waveform that’ll be created in the speakers when the sound plays. Sound is a series of waves that travel through the air, and different sounds are made with different sizes and frequencies of sound waves. Audio files record these waves by sampling the wave repeatedly at short time intervals and saving the state of the wave at each sample.
Recordings that sample the wave more frequently get a more accurate recording of the wave changing over time—there’s less gap between changes. But more frequent samples mean more data to save, resulting in a larger file. Compressed sound files reduce the file size through a number of tricks, including tossing out data at sound frequencies that aren’t noticeable to listeners.
Music trackers are a special type of sequencer software used to create music. Whereas traditional audio files store the raw waveform for the sound, sequencers store something more akin to sheet music: the tracker file is a sequence of notes, with information like intensity and pitch stored with each note. These “notes” consist of little waveforms, but the total amount of data stored is reduced because the same note is used repeatedly throughout the sequence. Music composed this way can be efficient, but this is a fairly specialized sort of audio.
Because Unity will compress the audio after it’s been imported, you should always choose either WAV or AIF file format. You’ll probably need to adjust the import settings differently for short sound effects and longer music (in particular, to tell Unity when to apply compression), but the original files should always be uncompressed.
There are various ways to create sound files (for example, appendix B mentions tools like Audacity that can record sounds from a microphone), but for our purposes we’ll download some sounds from one of the many free sound websites. We’re going to use a number of clips downloaded from www.freesound.org and get the clips in WAV file format.
Warning
“Free” sounds are offered under a variety of licensing schemes, so always make sure that you’re allowed to use the sound clip in the way you intend. For example, many free sounds are for noncommercial use only.
The sample project uses the following public domain sound effects (of course, you can choose to download your own sounds; look for a 0 license listed on the side):
· “thump” by hy96
· “ding” by Daphne_in_Wonderland
· “swish bamboo pole” by ra_gun
· “fireplace” by leosalom
Once you have the sound files to use in your game, the next step is to import the sounds into Unity.
10.1.2. Importing audio files
After gathering together some audio files, you need to bring them into Unity. Just as you did with art assets in chapter 4, you have to import audio assets into the project before they can be used in the game.
The actual mechanics of importing files are simple and are the same as with other assets: drag the files from their location on the computer to the Project view within Unity (create a folder called Sound FX to drag the files into). Well, that was easy! But just like other assets, there are import settings (shown in figure 10.1) to adjust in the Inspector.
Figure 10.1. Import settings for audio files
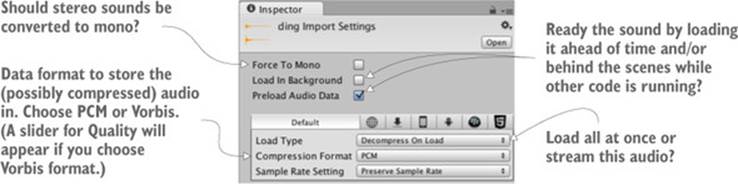
Leave Force To Mono unchecked. That refers to mono versus stereo sound; often sounds are recorded in stereo, where there are actually two waveforms in the file, one each for the left and right ears/speakers. To save on file size, you might want to halve the audio information so that the same waveform is sent to both speakers rather than separate waves sent to the left and right speakers.
Next are check boxes for Load In Background and Preload Audio Data. The preload setting relates to balancing playback performance and memory usage; preloading audio will consume memory while the sound waits to be used but will avoid having to wait to load. Loading audio in the background of the program will allow the program to keep running while the audio is loading; this is generally a good idea for long music clips so that the program won’t freeze. But this means the audio won’t start playing right away; usually you want to keep this setting off for short sound clips to ensure that they load completely before they play. Because the imported clips are short sound effects, you should leave Load In Background off.
Finally, the most important settings are Load Type and Compression Format. Compression Format controls the formatting of the audio data that’s stored. As discussed in the previous section, music should be compressed; choose Vorbis (it’s the name of a compressed audio format) in that case. Short sound clips don’t need to be compressed, so choose PCM (Pulse Code Modulation, the technical term for the raw, sampled sound wave) for these clips. The third setting, ADPCM, is a variation on PCM and occasionally results in slightly better sound quality.
Load Type controls how the data from the file will be loaded by the computer. Because computers have limited memory and audio files can be large, sometimes you want the audio to play while it’s streaming into memory, saving the computer from needing to have the entire file loaded at once. But there’s a bit of computing overhead when streaming audio like this, so audio plays fastest when it’s loaded into memory first. Even then you can choose whether the loaded audio data will be in compressed form or if it will be decompressed for faster playback. Because these sound clips are short, they don’t need to stream and can be set to Decompress On Load.
At this point, the sound effects are all imported and ready to use.
10.2. Playing sound effects
Now that you have some sound files added to the project, you naturally want to play the sounds. The code for triggering sound effects isn’t terribly hard to understand, but the audio system in Unity does have a number of different parts that must work in concert.
10.2.1. Explaining what’s involved: audio clip vs. source vs. listener
Although you might expect that playing a sound is simply a matter of telling Unity which clip to play, it turns out that you must define three different parts in order to play sounds in Unity: AudioClip, AudioSource, and AudioListener. The reason for breaking apart the sound system into multiple components has to do with Unity’s support for 3D sounds: the different components tell Unity positional information that it uses for manipulating 3D sounds.
2D vs. 3D sound
Sounds in games can be either 2D or 3D. 2D sounds are what you’re already familiar with: standard audio that plays normally. The moniker “2D sound” mostly means “not 3D sound.”
3D sounds are specific to 3D simulations and may not already be familiar to you; these are sounds that have a specific location within the simulation. Their volume and pitch are influenced by the movement of the listener. For example, a sound effect triggered in the distance will sound very faint.
Unity supports both kinds of audio, and you decide if an audio source should play audio as 2D sounds or 3D sounds. Things like music should be 2D sounds, but using 3D sounds for most sound effects will create immersive audio in the scene.
As an analogy, imagine a room in the real world. The room has a stereo playing a CD. If a man comes into the room, he hears it clearly. When he leaves the room he hears it more quietly, and eventually not at all. Similarly, if we move the stereo around the room, he’ll hear the music changing volume as it moves. As figure 10.2 illustrates, in this analogy the CD is an AudioClip, the stereo is an AudioSource, and the man is the AudioListener.
Figure 10.2. Diagram of the three things you control in Unity’s audio system
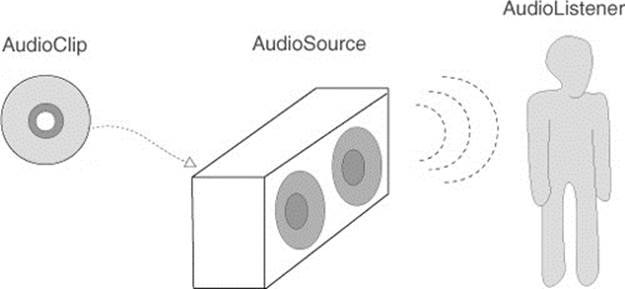
The first of the three different parts is an Audio Clip. That refers to the actual sound file that we imported in the last section. This raw waveform data is the foundation for everything else the audio system does, but audio clips don’t do anything by themselves.
The next kind of object is an Audio Source. This is the object that plays audio clips. This is an abstraction over what the audio system is actually doing, but it’s a useful abstraction that makes 3D sounds easier to understand. A 3D sound played from a specific audio source is located at the position of that audio source; 2D sounds also must be played from an audio source, but the location doesn’t matter.
The third kind of object involved in Unity’s audio system is an Audio Listener. As the name implies, this is the object that hears sounds projected from audio sources. This is another abstraction on top of what the audio system is doing (obviously the actual listener is the player of the game!), but—much like how the position of the audio source gives the position that the sound is projected from—the position of the audio listener gives the position that the sound is heard from.
Advanced sound control using Audio Mixers
Audio Mixers are a new feature added in Unity 5. Rather than playing audio clips directly, audio mixers enable you to process audio signals and apply various effects to your clips. Learn more about AudioMixer in Unity’s documentation; for example, watch this tutorial video:https://unity3d.com/learn/tutorials/modules/beginner/5-pre-order-beta/audiomixer-and-audiomixer-groups
Although both audio clips and AudioSource components have to be assigned, an AudioListener component is already on the default camera when you create a new scene. Typically you want 3D sounds to react to the position of the viewer.
10.2.2. Assigning a looping sound
All right, now let’s set our first sound in Unity! The audio clips were already imported, and the default camera has an AudioListener component, so we only need to assign an AudioSource component. We’re going to put a crackling fire sound on the Enemy prefab, the enemy character that wanders around.
Note
Because the enemy will sound like it’s on fire, you might want to give it a particle system so that it looks like it’s on fire. You can copy over the particle system created in chapter 4 by making the particle object into a prefab and then choosing Export Package from the Asset menu. Alternatively, you could redo the steps from chapter 4 here to create a new particle object from scratch (drag the Enemy prefab into the scene to edit it and then choose GameObject > Apply Changes To Prefab).
Usually you need to drag a prefab into the scene in order to edit it, but you can edit the prefab asset directly when you’re just adding a component onto the object. Select the Enemy prefab so that its properties appear in the Inspector. Now add a new component; choose Audio > Audio Source. An AudioSource component will appear in the Inspector.
Tell the audio source what sound clip to play. Drag an audio file from the Project view up to the Audio Clip slot in the Inspector; we’re going to use the “fireplace” sound effect for this example (refer to figure 10.3).
Figure 10.3. Settings for the AudioSource component
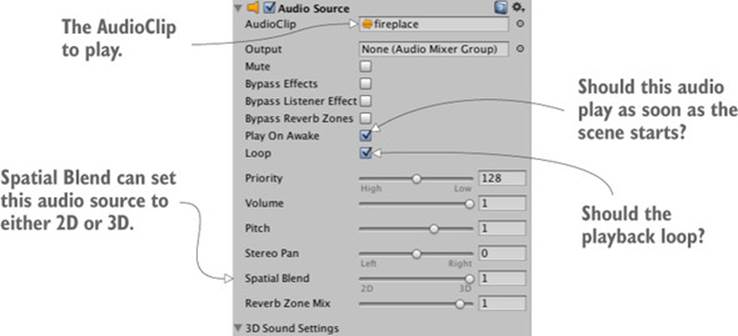
Skip down a bit in the settings and select both Play On Awake and Looping (of course, make sure that Mute isn’t checked). Play On Awake tells the audio source to begin playing as soon as the scene starts (in the next section you’ll learn how to trigger sounds manually while the scene is running). Looping tells the audio source to keep playing continuously, repeating the audio clip when playback is over.
You want this audio source to project 3D sounds. As explained earlier, 3D sounds have a distinct position within the scene. That aspect of the audio source is adjusted using the Spatial Blend setting. That setting is a slider between 2D and 3D; set it to 3D for this audio source.
Now play the game and make sure your speakers are turned on. You can hear a crackling fire coming from the enemy, and the sound becomes faint if you move away because you used a 3D audio source.
10.2.3. Triggering sound effects from code
Setting the AudioSource component to play automatically is handy for some looping sounds, but for the majority of sound effects you’ll want to trigger the sound with code commands. That approach still requires an AudioSource component, but now the audio source will only play sound clips when told to by the program, instead of automatically all the time.
Add an AudioSource component to the player object (not the camera object). You don’t have to link in a specific audio clip because the audio clips will be defined in code. You can turn off Play On Awake because sounds from this source will be triggered in code. Also, adjust Spatial Blend to 3D because this sound is located in the scene.
Now make the additions shown in the next listing to RayShooter, the script that handles shooting.
Listing 10.1. Sound effects added in the RayShooter script
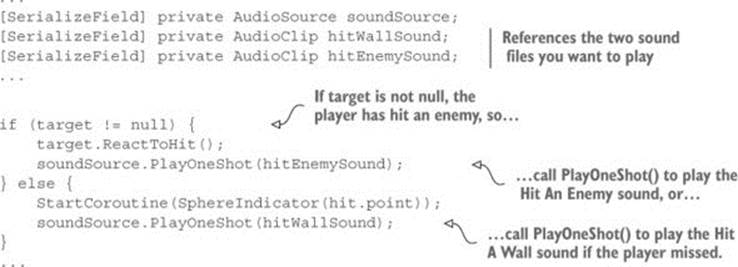
The new code includes several new serialized variables at the top of the script. Drag the player object (the object with an AudioSource component) to the soundSource slot in the Inspector. Then drag the audio clips to play onto the sound slots; “swish” is for hitting the wall and “ding” is for hitting the enemy.
The other two lines added are PlayOneShot() methods. That method causes an audio source to play a given audio clip. Add those methods inside the target conditional in order to play sounds when different objects are hit.
Note
You could set the clip in the AudioSource and call Play() to play the clip. Multiple sounds would cut each other off, though, so we used Play-OneShot() instead. Replace PlayOneShot() with this code and shoot a bunch rapidly to see (er, hear) the problem:
soundSource.clip=hitEnemySound; soundSource.Play();
All right, play the game and shoot around. You now have several different sound effects in the game. These same basic steps can be used to add all sorts of sound effects. A robust sound system in a game requires a lot more than just a bunch of disconnected sounds, though; at a minimum, all games should offer volume control. You’ll implement that control next through a central audio module.
10.3. Audio control interface
Continuing the code architecture established in previous chapters, you’re going to create an AudioManager. Recall that the Managers object has a master list of various code modules used by the game, such as a manager for the player’s inventory. This time you’ll create an audio manager to stick into the list. This central audio module will allow you to modulate the volume of audio in the game and even mute it. Initially you’ll only worry about sound effects, but in later sections you’ll extend the AudioManager to handle music as well.
10.3.1. Setting up the central AudioManager
The first step in setting up AudioManager is to put in place the Managers code framework. From the chapter 9 project, copy over IGameManager, ManagerStatus, and NetworkService; we won’t change them. (Remember that IGameManager is the interface that all managers must implement, whereas ManagerStatus is an enum that IGameManager uses. NetworkService provides calls to the internet and won’t be used in this chapter.)
Note
Unity will probably issue a warning because NetworkService is assigned but not used. You can just ignore Unity’s warning; we want to enable the code framework to access the internet, even though we don’t use that functionality in this chapter.
Also copy over the Managers file, which will be adjusted for the new AudioManager. Leave it be for now (or comment out the erroneous sections if the sight of compiler errors drives you crazy!). Create a new script called AudioManager that the Managers code can refer to (see the following listing).
Listing 10.2. Skeleton code for AudioManager
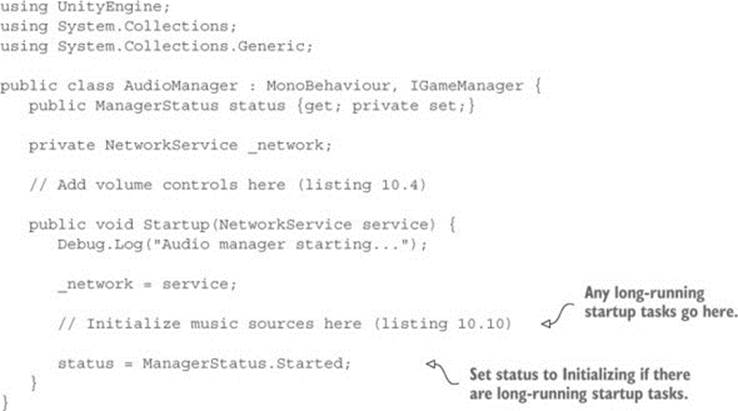
This initial code looks just like managers from previous chapters; this is the minimum amount that IGameManager requires that the class implements. The Managers script can now be adjusted with the new manager (see the next listing).
Listing 10.3. Managers script adjusted with AudioManager
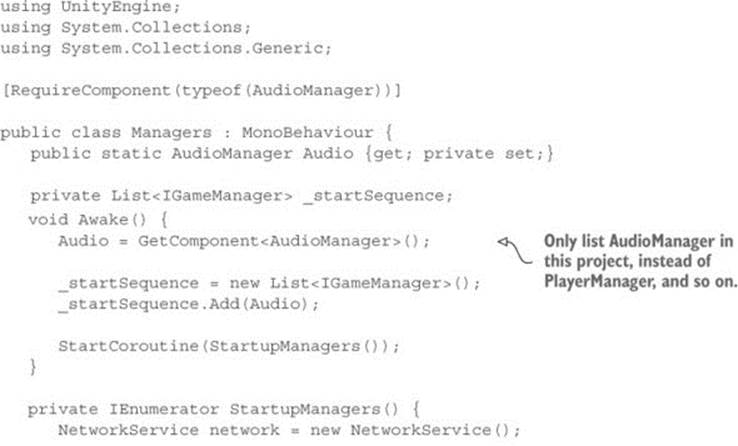
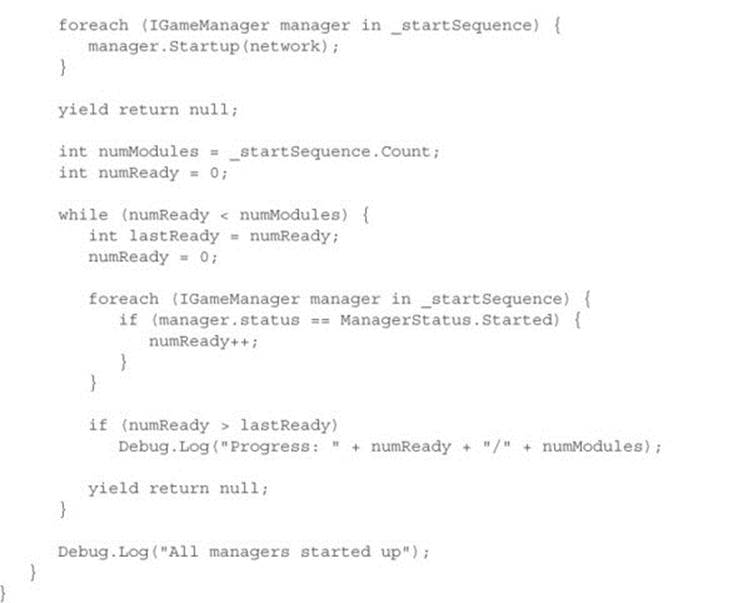
As you have in previous chapters, create the Game Managers object in the scene and then attach both Managers and AudioManager to the empty object. Playing the game will show the managers startup messages in the console, but the audio manager doesn’t do anything yet.
10.3.2. Volume control UI
With the bare-bones AudioManager set up, it’s time to give it volume control functionality. These volume control methods will then be used by UI displays in order to mute the sound effects or adjust the volume.
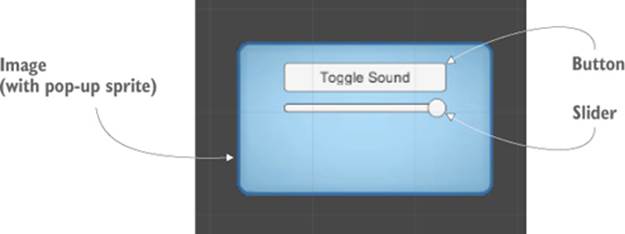
You’ll use the new UI tools that were the focus of chapter 6. Specifically, you’re going to create a pop-up window with a button and a slider to control volume settings (see figure 10.4). I’ll list the steps involved without going into detail; if you need a refresher, refer back to chapter 6:
Figure 10.4. UI display for mute and volume control
1. Import popup.png as a sprite (set Texture Type to Sprite).
2. In Sprite Editor, set a 12-pixel border on all sides (remember to apply changes).
3. Create a canvas in the scene (GameObject > UI > Canvas).
4. Turn on the Pixel Perfect setting for the canvas.
5. (Optional) Name the object HUD Canvas and switch to 2D view mode.
6. Create an image connected to that canvas (GameObject > UI > Image).
7. Name the new object Settings Popup.
8. Assign the popup sprite to the image’s Source Image.
9. Set Image Type to Sliced and turn on Fill Center.
10. Position the pop-up image at 0, 0 to center it.
11. Scale the pop-up to 250 width and 150 height.
12. Create a button (GameObject > UI > Button).
13. Parent the button to the pop-up (that is, drag it in the Hierarchy).
14. Position the button at 0, 40.
15. Expand the button’s hierarchy in order to select its text label.
16. Change the text to say Toggle Sound.
17. Create a slider (GameObject > UI > Slider).
18. Parent the slider to the pop-up and position at 0, 15.
Those were all the steps to create the settings pop-up! Now that the pop-up has been created, let’s write code that it’ll work with. This will involve both a script on the pop-up object itself, as well as volume control functionality that the pop-up script calls. First adjust the code in AudioManager according to the next listing.
Listing 10.4. Volume control added to AudioManager
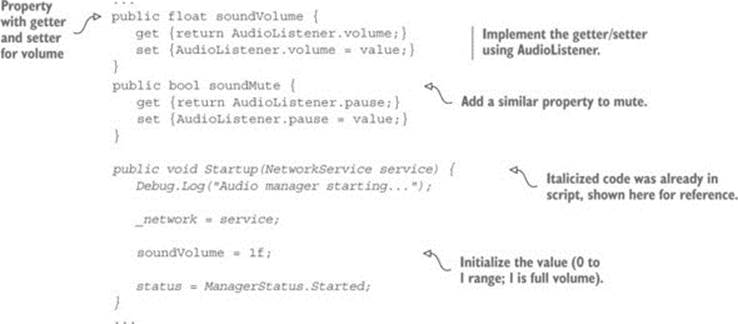
Properties for soundVolume and soundMute were added to AudioManager. For both properties, the get and set functions were implemented using global values on Audio-Listener. The AudioListener class can modulate the volume of all sounds received by all AudioListenerinstances. Setting AudioManager’s soundVolume property has the same effect as setting the volume on AudioListener. The advantage here is encapsulation: everything having to do with audio is being handled in a single manager, without code outside the manager needing to know the details of the implementation.
With those methods added to AudioManager, you can now write a script for the pop-up. Create a script called SettingsPopup and add the contents of the following listing.
Listing 10.5. SettingsPopup script with controls for adjusting the volume
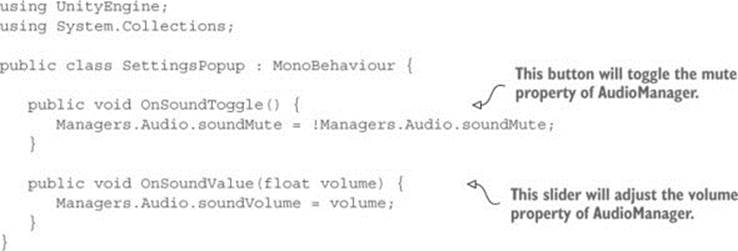
This script has two methods that affect the properties of AudioManager: OnSound-Toggle() sets the soundMute property, and OnSoundValue() sets the soundVolume property. As usual, link in the SettingsPopup script by dragging it onto the Settings Popup object in the UI.
Then, in order to call the functions from the button and slider, link the pop-up object to interaction events in those controls. In the Inspector for the button, look for the panel labeled OnClick. Click the + button to add a new entry to this event. Drag Settings Popup to the object slot in the new entry and then look for SettingsPopup in the menu; select OnSoundToggle() to make the button call that function.
The method used to link the function applies to the slider as well. First look for the interaction event in a panel of the slider’s settings; in this case, the panel is called OnValueChanged. Click the + button to add a new entry and then drag Settings Popup to the object slot. In the function menu find the SettingsPopup script and then choose OnSoundVolume() under Dynamic Float.
Warning
Remember to choose the function under Dynamic Float and not Static Parameter! Although the method appears in both sections of the list, in the latter case it will only receive a single value typed in ahead of time.
The settings controls are now working, but there’s one more script we need to address the fact that the pop-up is currently always covering up the screen. A simple fix is to make the pop-up only open when you hit the M key. Create a new script called UIController, link that script to the Controller object in the scene, and write the code shown in the next listing.
Listing 10.6. UIController that toggles the settings pop-up
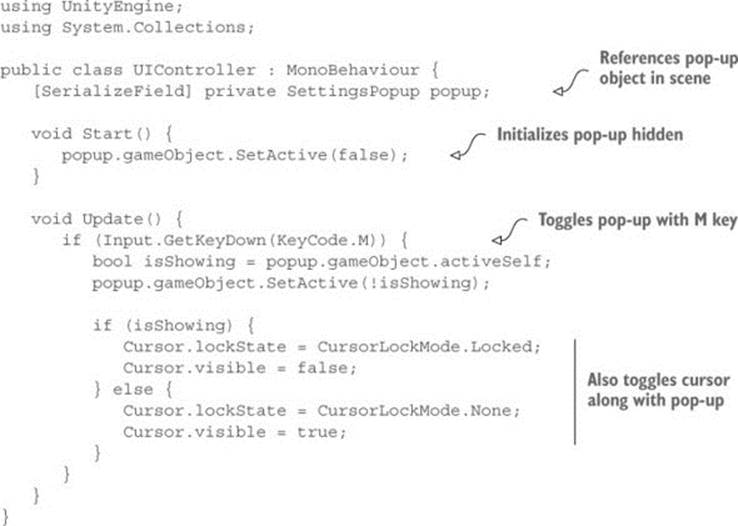
To wire up this object reference, drag the settings pop-up to the slot on this script. Play now and try changing the slider (remember to activate the UI by hitting M) while shooting around to hear the sound effects; you’ll hear the sound effects change volume according to the slider.
10.3.3. Playing UI sounds
You’re going to make another addition to AudioManager now to allow the UI to play sounds when buttons are clicked. This task is more involved than it seems at first, owing to Unity’s need for an AudioSource. When sound effects issued from objects in the scene, it was fairly obvious where to attach the AudioSource. But UI sound effects aren’t part of the scene, so you’ll set up a special AudioSource just for AudioManager to use when there isn’t any other audio source.
Create a new empty GameObject and parent it to the main Game Managers object; this new object is going to have an AudioSource used by AudioManager, so call the new object Audio. Add an AudioSource component to this object (leave the Spatial Blend setting at 2D this time, because the UI doesn’t have any specific position in the scene) and then add the code shown in the next listing to use this source in AudioManager.
Listing 10.7. Play sound effects in AudioManager

A new variable slot will appear in the Inspector; drag the Audio object onto this slot. Now add the UI sound effect to the pop-up script (see the following listing).
Listing 10.8. Adding sound effects to SettingsPopup

Drag the UI sound effect onto the variable slot; I used the 2D sound “thump.” When you press the UI button, that sound effect plays at the same time (well, when the sound isn’t muted, of course!). Even though the UI doesn’t have any audio source itself, AudioManager has an audio source that plays the sound effect.
Great, we’ve set up all our sound effects! Now let’s turn our attention to music.
10.4. Background music
You’re going to add some background music to the game, and you’ll do that by adding music to AudioManager. As explained in the chapter introduction, music clips aren’t fundamentally different from sound effects. The way digital audio functions through waveforms is the same, and the commands for playing the audio are largely the same. The main difference is the length of the audio, but that difference cascades out into a number of consequences.
For starters, music tracks tend to consume a large amount of memory on the computer, and that memory consumption must be optimized. You must watch out for two areas of memory issues: having the music loaded into memory before it’s needed, and consuming too much memory when loaded.
Optimizing when music loads is done using the Resources.Load() command introduced in chapter 8. As you learned, this command allows you to load assets by name; though that’s certainly one handy feature, that’s not the only reason to load assets from the Resources folder. Another key consideration is delaying loading; normally Unity loads all assets in a scene as soon as the scene loads, but assets from Resources aren’t loaded until the code manually fetches them. In this case, we want to lazy-load the audio clips for music. Otherwise, the music could consume a lot of memory while it isn’t even being used.
Definition
Lazy-loading is when a file isn’t loaded ahead of time but rather is delayed until it’s needed. Typically data responds faster (for example, the sound plays immediately) if it’s loaded in advance of use, but lazy-loading can save a lot of memory when responsiveness doesn’t matter as much.
The second memory consideration is dealt with by streaming music off the disc. As explained in section 10.1.2, streaming the audio saves the computer from ever needing to have the entire file loaded at once. The style of loading was a setting in the Inspector of the imported audio clip.
Ultimately there are several steps to go through for playing background music, including steps to cover these memory optimizations.
10.4.1. Playing music loops
The process of playing music involves the same series of steps as UI sound effects did (background music is also 2D sound without a source within the scene), so we’re going to go through all the steps again:
1. Import audio clips.
2. Set up an AudioSource for AudioManager to use.
3. Write code to play the audio clips in AudioManager.
4. Add music controls to the UI.
Each step will be modified slightly to work with music instead of sound effects. Let’s look at the first step.
Step 1: Import audio clips
Obtain some music by downloading or recording tracks. For the sample project I went to www.freesound.org and downloaded the following public domain music loops:
· “loop” by Xythe/Ville Nousiainen
· “Intro Synth” by noirenex
Drag the files into Unity to import them and then adjust their import settings in the Inspector. As explained earlier, audio clips for music generally have different settings than audio clips for sound effects. First, the audio format should be set to Vorbis, for compressed audio. Remember, compressed audio will have a significantly smaller file size. Compression also degrades the audio quality slightly, but that slight degradation is an acceptable trade-off for long music clips; set Quality to 50% in the slider that appears.
The next import setting to adjust is Load Type. Again, music should stream from the disc rather than being loaded completely. Choose Streaming from the Load Type menu. Similarly, turn on Load In Background so that the game won’t pause or slow down while music is loading.
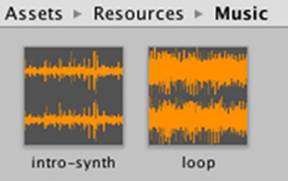
Even after you adjust all the import settings, the asset files must be moved to the correct location in order to load correctly. Remember that the Resources.Load() command requires that the assets be in the Resources folder. Create a new folder called Resources, create a folder within that called Music, and drag the audio files into the Music folder (see figure 10.5).
Figure 10.5. Music audio clips placed inside the Resources folder
That took care of step number 1.
Step 2: Set up an AudioSource for AudioManager to use
Step 2 is to create a new AudioSource for music playback. Create another empty GameObject, name this object Music 1 (instead of just Music because we’ll add Music 2 later in the chapter), and parent it to the Audio object.
Add an AudioSource component to Music 1 and then adjust the settings in the component. Deselect Play On Awake but turn on the Loop option this time; whereas sound effects usually only play once, music plays over and over in a loop. Leave the Spatial Blend setting at 2D, because music doesn’t have any specific position in the scene.
You may want to reduce the Priority value, too. For sound effects, this value didn’t matter, so we left the value at the default 128. But for music you probably want to lower this value, so I set the music source to 60. This value tells Unity which sounds are most important when layering multiple sounds; somewhat counterintuitively, lower values are higher priority. When too many sounds are playing simultaneously, the audio system will start discarding sounds; by making music higher priority than sound effects, you ensure the music will keep playing when too many sound effects trigger at the same time.
Step 3: Write code to play the audio clips in AudioManager
The Music audio source has been set up, so add the code shown in the next listing to AudioManager.
Listing 10.9. Playing music in AudioManager
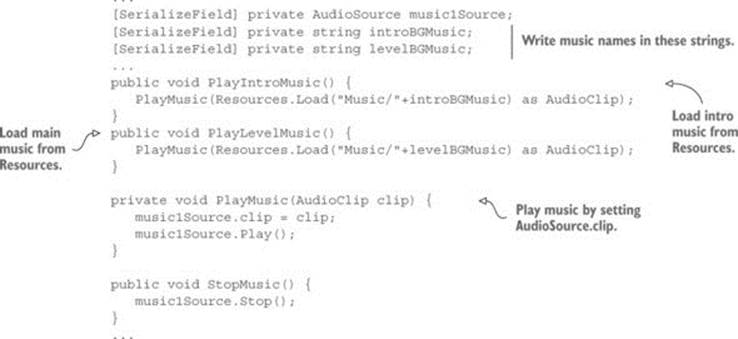
As usual, the new serialized variables will be visible in the Inspector when you select the object Game Managers. Drag Music 1 into the audio source slot. Then type in the names of the music files in the two string variables: intro-synth and loop.
The remainder of the added code calls commands for loading and playing music (or, in the last added method, stopping the music). The Resources.Load() command loads the named asset from the Resources folder (taking into account that the files are placed in the Music subfolder within Resources). A generic object is returned by that command, but the object can be converted to a more specific type (in this case, an AudioClip) using the as keyword.
The loaded audio clip is then passed into the PlayMusic() method. This function sets the clip in the AudioSource and then calls Play(). As I explained earlier, sound effects are better implemented using PlayOneShot(), but setting the clip in the AudioSource is a more robust approach for music, allowing you to stop or pause the playing music.
Step 4: Add music controls to the UI
The new music playback methods in AudioManager won’t do anything unless they’re called from elsewhere. Let’s add more buttons to the audio UI that will play different music when pressed. Here again are the steps enumerated with little explanation (refer back to chapter 6 if needed):
1. Change the pop-up’s width to 350 (to fit more buttons).
2. Create a new UI button and parent it to the pop-up.
3. Set the button’s width to 100 and position to 0, -20.
4. Expand the button’s hierarchy to select the text label and set that to Level Music.
5. Repeat these steps twice more to create two additional buttons.
6. Position one at -105, -20 and the other at 105, -20 (so they appear on either side).
7. Change the first text label to Intro Music and the last text label to No Music.
Now the pop-up has three buttons for playing different music. Write a method (shown in the following listing) in SettingsPopup that will be linked to each button.
Listing 10.10. Adding music controls to SettingsPopup
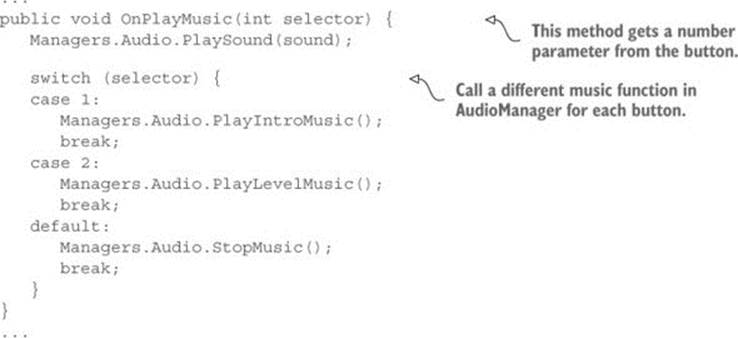
Note that the function takes an int parameter this time; normally button methods don’t have a parameter and are simply triggered by the button. In this case, we need to distinguish between the three buttons, so the buttons will each send a different number.
Go through the typical steps to connect a button to this code: add an entry to the OnClick panel in the Inspector, drag the pop-up to the object slot, and choose the appropriate function from the menu. This time, there will be a text box for typing in a number, because OnPlayMusic() takes a number for a parameter. Type 1 for Intro Music, 2 for Level Music, and anything else for No Music (I went with 0). The switch statement in OnMusic() plays intro music or level music depending on the number, or stops the music as a default if the number isn’t 1 or 2.
When you press the music buttons while the game is playing, you’ll hear the music. Great! The code is loading the audio clips from the Resources folder. Music plays efficiently, although there are still two bits of polish we’ll add: separate music volume control and cross-fading when changing the music.
10.4.2. Controlling music volume separately
The game already has volume control, and currently that affects the music, too. Most games have separate volume controls for sound effects and music, though, so let’s tackle that now.
The first step is to tell the music AudioSources to ignore settings on AudioListener. We want volume and mute on the global AudioListener to continue to affect all sound effects, but we don’t want this volume to apply to music. Listing 10.10 includes code to tell the music source to ignore the volume on AudioListener. The code in the following listing also adds volume control and mute for music, so add it to AudioManager.
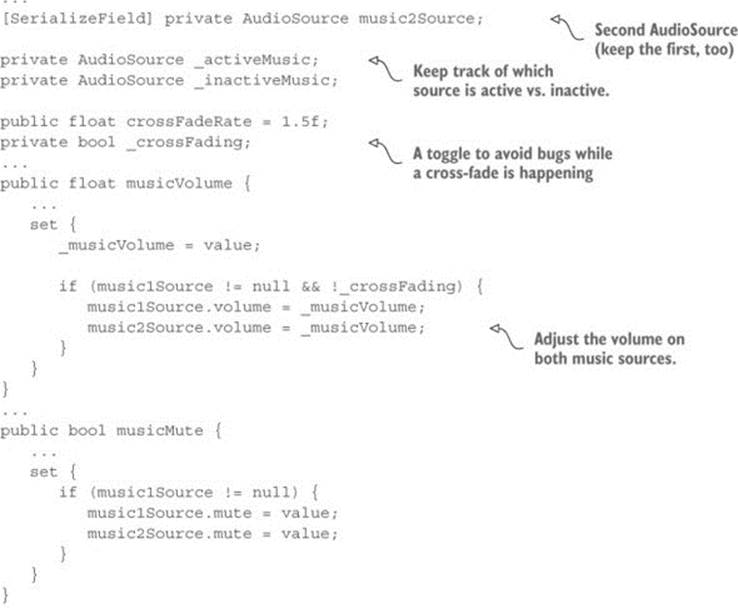
Listing 10.11. Controlling music volume separately in AudioManager

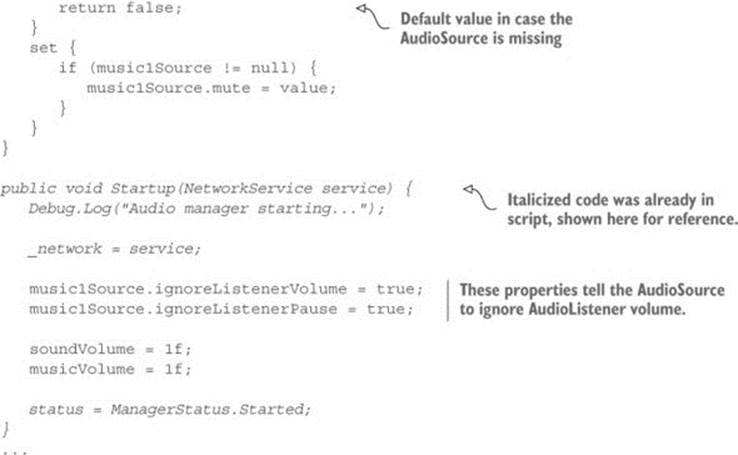
The key to this code is realizing you can adjust the volume of an AudioSource directly, even though that audio source is ignoring the global volume defined in Audio-Listener. There are properties for both volume and mute that manipulate the individual music source.
The Startup() method initializes the music source with both ignoreListener-Volume and ignoreListenerPause turned on. As the names suggest, those properties cause the audio source to ignore the global volume setting on AudioListener.
You can hit Play now to verify that the music is no longer affected by the existing volume control. Now let’s add a second UI control for the music volume; start by adjusting SettingsPopup according to the next listing.
Listing 10.12. Music volume controls in SettingsPopup
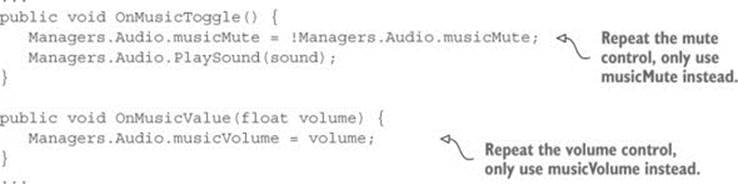
There’s not a lot to explain about this code—it’s mostly repeating the sound volume controls. Obviously the AudioManager properties used have changed from soundMute/soundVolume to musicMute/musicVolume.
In the editor, create a button and slider just as you did before. Here are those steps again:
1. Change the pop-up’s height to 225 (to fit more controls).
2. Create a UI button.
3. Parent the button to the pop-up.
4. Position the button at 0, -60.
5. Expand the button’s hierarchy in order to select its text label.
6. Change the text to Toggle Music.
7. Create a slider (from the same UI menu).
8. Parent the slider to the pop-up and position at 0, -85.
Link up these UI controls to the code in SettingsPopup. Find the OnClick/OnValueChanged panel in the UI element’s settings, click the + button to add an entry, drag the pop-up object to the object slot, and select the function from the menu. The functions you need to pick areOnMusicToggle() and OnMusicValue() from the Dynamic Float section of the menu.
Now run this code and you’ll see that the controls affect sound effects and music separately. This is getting pretty sophisticated, but there’s one more bit of polish remaining: cross-fade between music tracks.
10.4.3. Fading between songs
As a final bit of polish, let’s make AudioManager fade in and out between different background tunes. Currently the switch between different music tracks is pretty jarring, with the sound suddenly cutting off and changing to the new track. We can smooth out that transition by having the volume of the previous track quickly dwindle away while the volume quickly rises from 0 on the new track. This is a simple but clever bit of code that combines both the volume control methods you just saw, along with a coroutine to change the volume incrementally over time.
Listing 10.13 adds a lot of bits to AudioManager, but most revolve around a simple concept: now that we’ll have two separate audio sources, play separate music tracks on separate audio sources, and incrementally increase the volume of one source while simultaneously decreasing the volume of the other (as usual, italicized code was already in the script and is shown here for reference).
Listing 10.13. Cross-fade between music in AudioManager
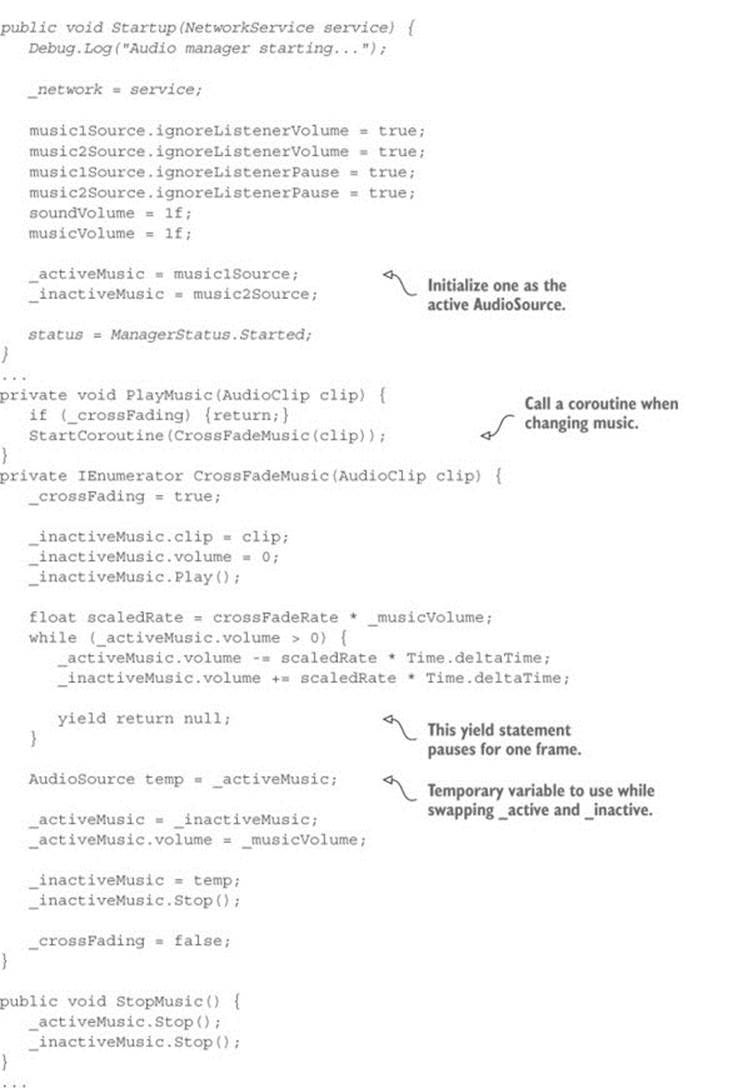
The first addition is a variable for the second music source. While keeping the first AudioSource object, duplicate that object (make sure the settings are the same—select Loop) and then drag the new object into this Inspector slot. The code also defines AudioSource variables active andinactive but those are private variables used within the code and not exposed in the Inspector. Specifically, those variables define which of the two audio sources is considered “active” or “inactive” at any given time.
The code now calls a coroutine when playing new music. This coroutine sets the new music playing on one AudioSource while the old music keeps playing on the old audio source. Then the coroutine incrementally increases the volume of the new music while incrementally decreasing the volume of the old music. Once the cross-fading is complete (that is, the volumes have completely exchanged places), the function swaps which audio source is considered “active” and “inactive.”
Great! We’ve completed the background music for our game’s audio system.
FMOD: a tool for game audio
The audio system in Unity is powered by FMOD, a popular audio programming library. The library is available at www.fmod.org, but it’s already integrated into Unity. Unity has many features of FMOD integrated, although it lacks the library’s most advanced features (you can visit their website to learn about those features).
Such advanced audio features are offered through FMOD Studio (a plug-in that adds more functionality to Unity), but the examples in this chapter will stick to the functionality built into Unity. That core functionality comprises the most important features for a game’s audio system. Most game developers have their audio needs served quite well by this core functionality, but the plug-in is useful for those wishing to get even more intricate with their game’s audio.
10.5. Summary
In this chapter you’ve learned that
· Sound effects should be uncompressed audio and music should be compressed, but use the WAV format for both because Unity applies compression to imported audio.
· Audio clips can be 2D sounds that always play the same or 3D sounds that react to the listener’s position.
· The volume of sound effects is easily adjusted globally using Unity’s Audio-Listener.
· You can set volume on individual audio sources that play music.
· You can fade background music in and out by setting the volume on individual audio sources.
All materials on the site are licensed Creative Commons Attribution-Sharealike 3.0 Unported CC BY-SA 3.0 & GNU Free Documentation License (GFDL)
If you are the copyright holder of any material contained on our site and intend to remove it, please contact our site administrator for approval.
© 2016-2026 All site design rights belong to S.Y.A.