10 Lessons About C++(2015)
Chapter 3: Getting Started with the Boost Libraries
3.1 Introduction
Boost is a powerful set of libraries that can be applied to a wide range of tasks and application domains. If you are seeking to accomplish a C++ programming task in a robust and generic way, there is a strong chance that a Boost library already exists for this purpose. They range from threads and file processing to numerical analysis and graph algorithms. A comprehensive description of any more than a small number of these libraries is beyond the scope of this ebook. The Boost homepage contains extensive documentation on all of the individual components and there are some good books available on the subject.
What we will focus on here is how to really get started. Knowing how to get Boost installed and ready on your chosen development environment and getting a feel for how these libraries are used is often tricky for those who are unfamiliar. It does not help that some of the available documentation can be sketchy.
So this chapter is an in-depth guide to setting up Boost in a number of common Integrated Development Environments (IDEs) including some usage examples.
3.2 Pre-requisites
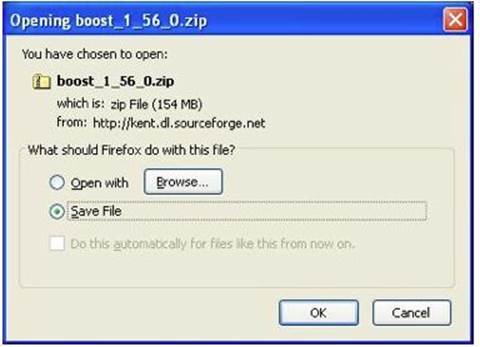
Before getting to grips with using Boost, first make sure you have the necessary pre-requisites described in this chapter. If you do not already have Boost, download and extract the Boost zip file to a destination of your choice. Official releases of Boost may be obtained fromhttp://www.boost.org/users/download/
Generating compiled libraries.
As stated on the ‘Getting Started on Windows’ Boost web page, most Boost libraries are of the header-based type. In other words, once they are installed to your computer they require no further compilation or intervention to make them work. To use such libraries, you need only add the correct includes like this:
#include <boost/lambda/lambda.hpp>
There exist other Boost libraries that require additional compilation to use them, such as threads, file systems, regular expressions and the unit test framework. The following sections describe how to generate compiled libraries for the following Windows-based C++ compiler environments: Visual C++, MinGW and CygWin. Follow the instructions that are appropriate to your environment.
Generating compiled libraries for Visual Studio
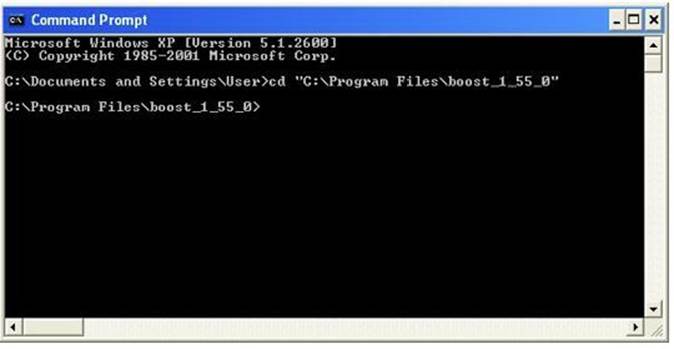
Open a command prompt and navigate to the location of your boost root folder. Enclose the path in quotation marks if it contains white spaces:
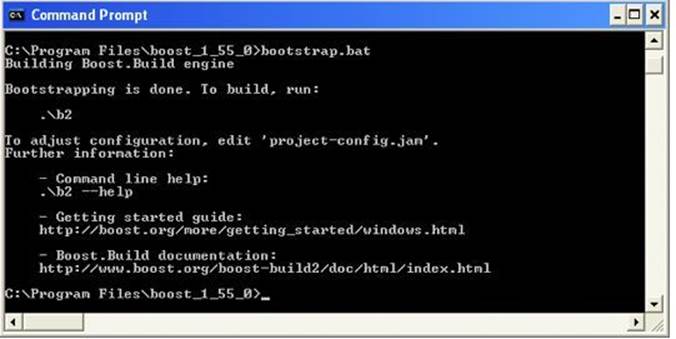
From the command prompt run the bootstrap command bootstrap.bat:
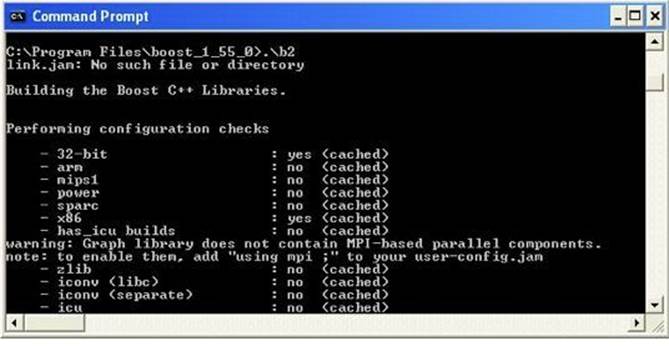
Run .\b2 from the command prompt. This can take quite some time to finish:
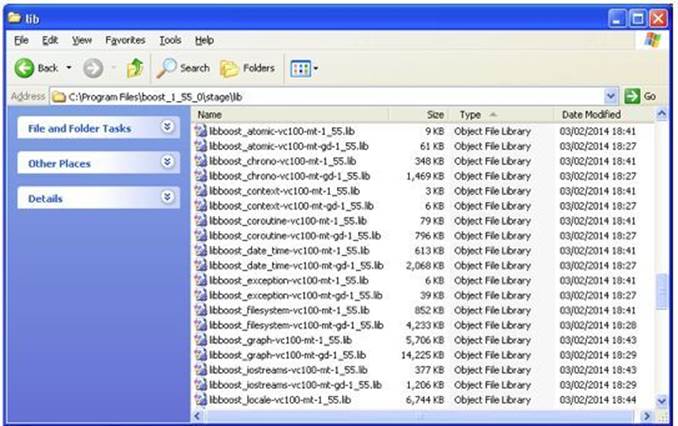
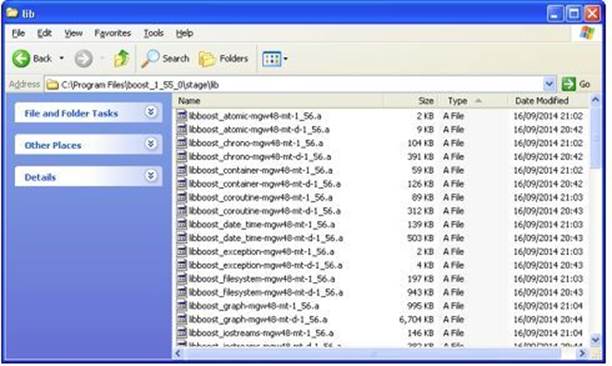
And that's all there is to it. The compiled libraries that Visual Studio uses get installed to the <root>/stage/lib directory:
Generating compiled libraries for MinGW
MinGW (Minimalist GNU for Windows) is a free and open source alternative for developing Microsoft Windows applications. It contains the GNU Compiler Collection (GCC) and various Windows header files and static libraries to enable the use of the Windows API.
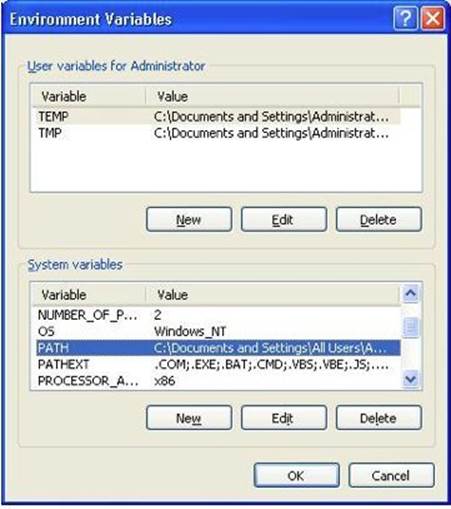
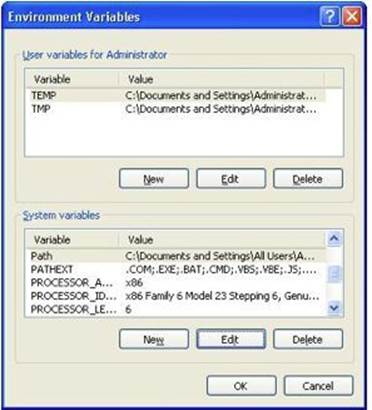
Get started by setting the PATH environment variable by right-clicking My Computer and selecting Properties, followed by the Advanced tab, followed by the Environment Variables button. In the System Variables section select the PATH environment variable and then select the Edit button:
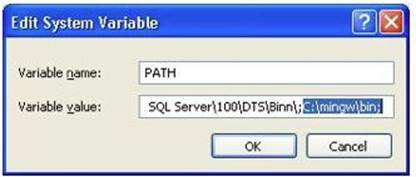
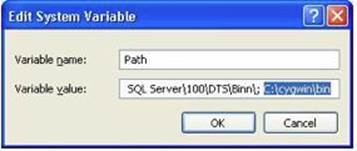
In the Edit control that appears, include the setting for including MinGW by appending “C:\mingw\bin” followed by a semi-colon as shown:
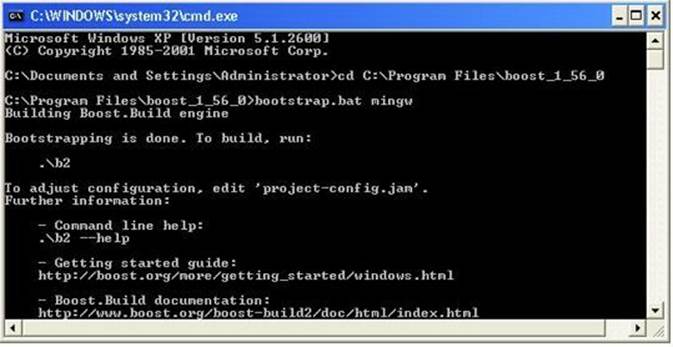
To generate the Boost compiled libraries using MinGW, open a command prompt, navigate to the Boost root directory and run the command bootstrap.bat mingw:
This will generate the two executables needed to compile the Boost libraries, b2.exe and bjam.exe. Once done execute the command b2.exe toolset=gcc
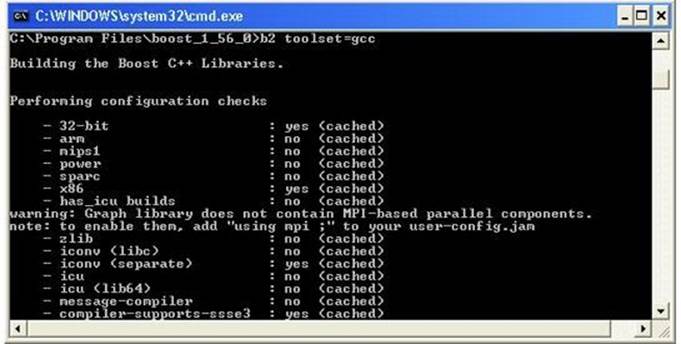
Then the compiled libraries to be used by MinGW are generated as shown:
Generating compiled libraries for CygWin
The advantage of using Cygwin is that makes available many UNIX tools lacking in the Windows operating system. If Cygwin is your choice of compiler, set the Environment Variables so that your IDE can access the Cygwin tool collection. From the Start button, right-click ‘My Computer’ and select ‘Properties’. Select the ‘Advanced’ tab and then ‘Environment Variables’. Select the ‘Path’ in the ‘System Variables’ section and then select the ‘Edit’ button:
And then set the location of the Cygwin tool set:
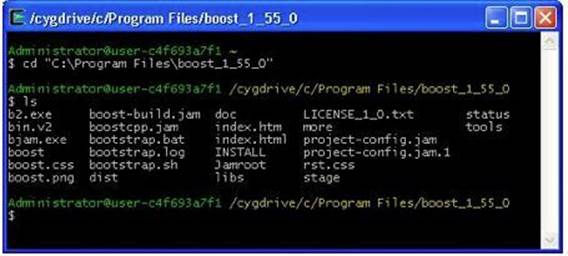
To configure Boost to work with Cygwin, open the Cygwin terminal and navigate to the location where your Boost libraries have been installed. For Windows directories with white spaces enclose it in quotes like this:
$ cd "C:\Program Files\boost_1_55_0"
Check to see that the boost/ folder exists at this location using the ls command:
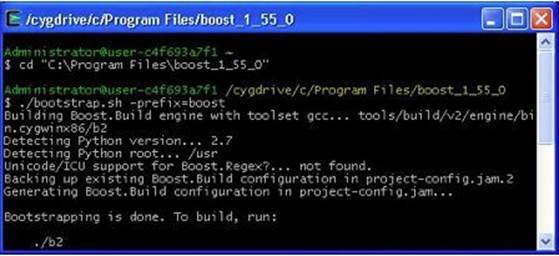
If the boost directory is present, run the bootstrap command:
$ ./bootstrap.sh -prefix=boost/
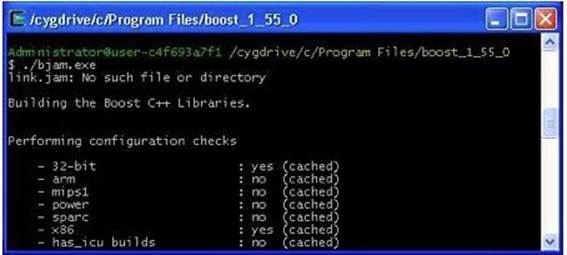
Then run the $ ./bjam.exe command (this can take a while):
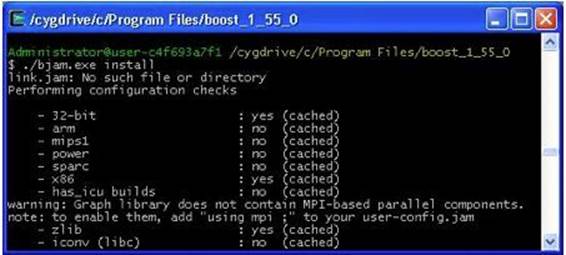
Now run the $ ./bjam install command (this can take a very long time):
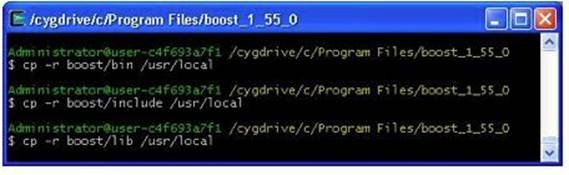
Once this stage has been completed you will find that three additional folders have been created within the boost/ folder, namely bin, include and lib.
Lastly, recursively copy the folders to the /usr/local/ destination:
$ cp -r boost/bin /usr/local/
$ cp -r boost/include /usr/local/
$ cp -r boost/lib /usr/local/
3.3 Configuring Boost in Microsoft Visual Studio
Header-only library example: Boost Format
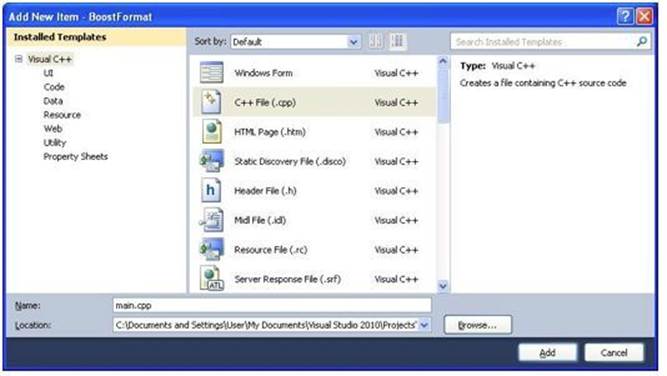
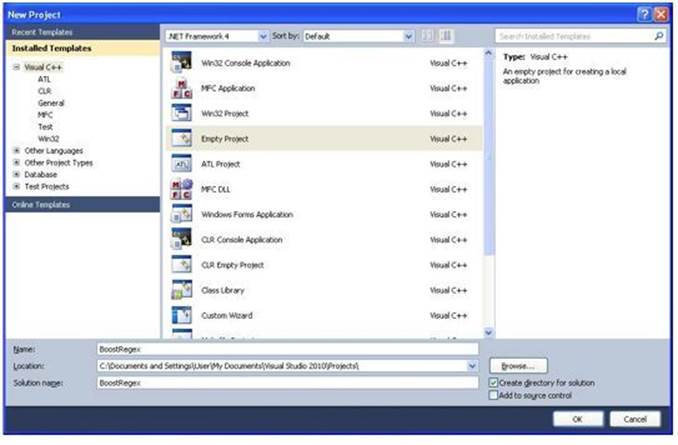
To get a feel for using Boost in Visual Studio let’s start with a library requiring no separate compilation: Boost Format, a type-safe utility for formatting arguments according to a format string. Create an empty project by selecting File > New > Project.
Set the ‘Create directory for solution’ checkbox and name your project:

Add the code by right-clicking the project folder and selecting Add > New Item. Select C++ File and name it as ‘main.cpp’:
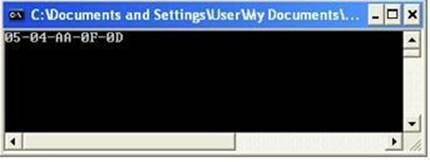
Insert this code snippet into main.cpp as an example of how to format and output an array of hexadecimal values:
#include <iostream>
#include <boost/format.hpp>
int main()
{
unsigned int arr[ 5 ] = { 0x05, 0x04, 0xAA, 0x0F, 0x0D };
std::cout << boost::format("%02X-%02X-%02X-%02X-%02X")
% arr[0]
% arr[1]
% arr[2]
% arr[3]
% arr[4]
<< endl;
}
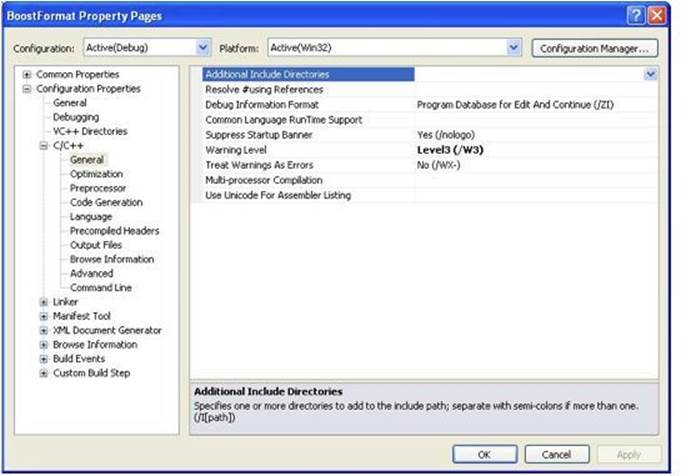
Notice that build errors will occur if we try to compile the project without having first specified the additional includes required to use the Boost libraries:
fatal error C1083: Cannot open include file: 'boost/format.hpp': No such file or directory
Right-click your project folder and select ‘Properties’. In the C++ > General tab edit the Additional Include Directories section:
Tell Visual Studio where your Boost include files reside:
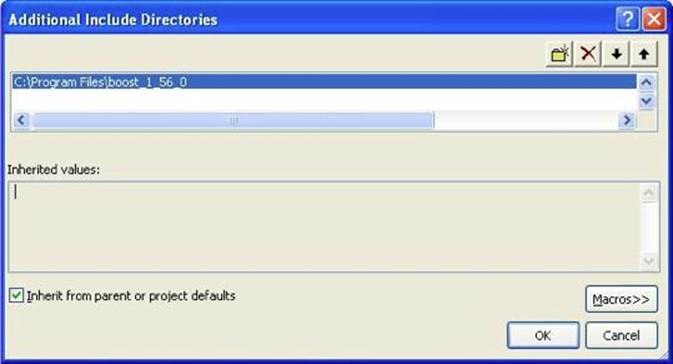
And that’s all you need to do to use non-compiled Boost libraries. Your program should now successfully compile.
Running the program generates the hexadecimal output:
Compiled library example: Boost Regex
A Boost library requiring separate compilation is Boost Regex, a C++ implementation of regular expressions, which are a form of pattern matching often used in text processing.
Select File > New > Project > Visual C++ > Empty Project.
Call it BoostRegex:
Select New > File > C++ File and name it main.cpp.
Into main.cpp copy the following code:
#include <boost/regex.hpp>
#include <iostream>
#include <string>
#include <sstream>
int main()
{
// Regex to match YYYY-MM-DD dates
static const boost::regex date_regex("([0-9][0-9][0-9][0-9])-([1-9]|0[1-9]|1[012])-([1-9]|[0-2][1-9]|3[01])");
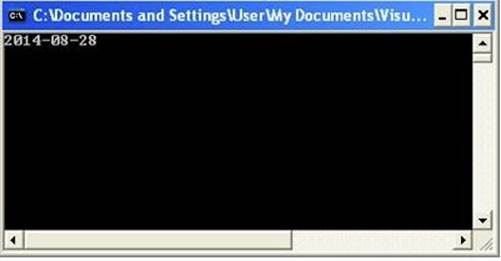
std::string input = "2014-08-28";
boost::smatch char_matches;
if ( boost::regex_match( input, char_matches, date_regex ) )
{
std::stringstream ss_match;
ss_match << char_matches[1]
<< "-"
<< char_matches[2]
<< "-"
<< char_matches[3];
std::cout << ss_match.str();
}
else
{
std::cout << "First example should have matched the regex.\n";
}
}
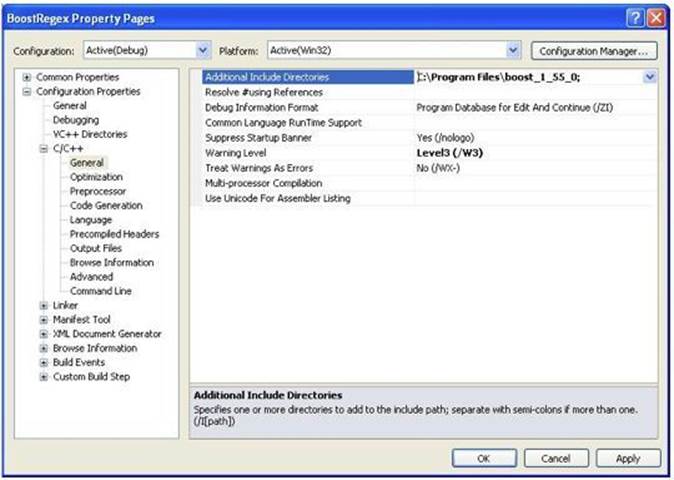
Set the include directory for Boost Regex. Failing to do this will generate the following compilation error:
fatal error C1083: Cannot open include file: 'boost/regex.hpp': No such file or directory
Right-click your project folder and select Properties. In the C/C++ > General tab set the Additional Include Directories field:
Failing to set the location of the additional library directories will generate the following link error when you try to compile your project:
LINK : fatal error LNK1104: cannot open file 'libboost_regex-vc100-mt-gd-1_55.lib'
Right-click your project folder and select Properties.
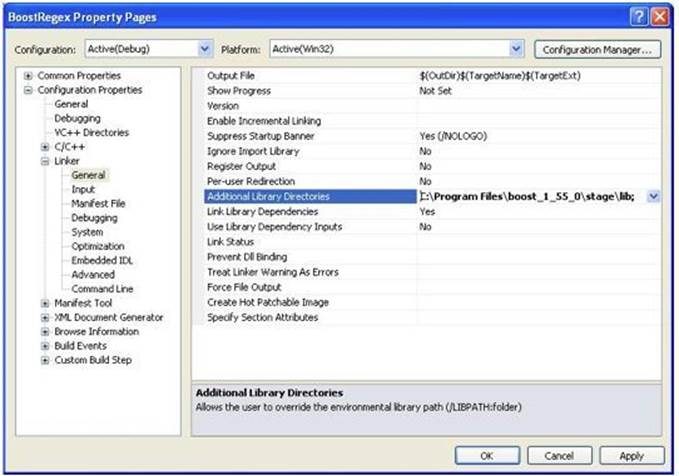
In the Linker > General tab, set the Additional Library Directories field to tell Visual Studio where to obtain the required library files:
And that’s it. Your Boost Regex Visual Studio project should now compile and allow you to run the above example:

3.4 Configuring Boost in Eclipse
Header-only library example: Boost Date Time
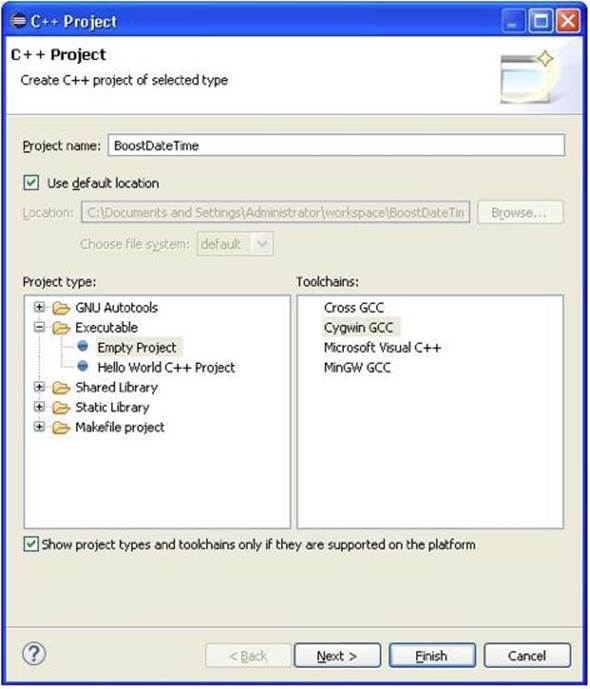
Boost Date Time is a highly customizable library for programming with dates and times. Open Eclipse and select New > C++ Project. In the ‘C++ Project’ dialog that appears, select Empty Project, give the project a name such as ‘BoostDateTime’, and select the desired toolchain (such as Cygwin):
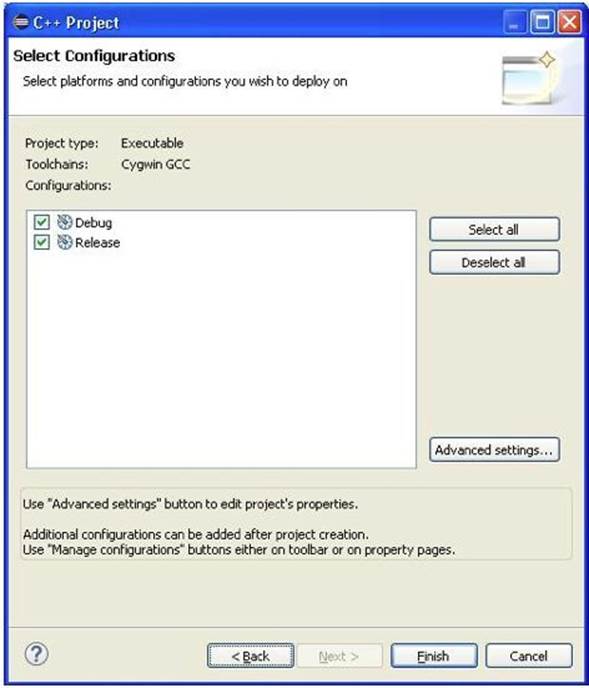
Click Next and make sure the Release and Debug checkboxes are set:
Click Finish.
Now that we have created the project, right click on the ‘BoostDateTime’ project folder and select New > Source File.
Fill in the fields according to your preferences, and then click Finish:

Overwrite the main.cpp file that gets created with the following code so that we may use this example of a header-only example of Boost Date Time:
#include <boost/format.hpp>
#include <boost/date_time.hpp>
#include <iostream>
int main()
{
const boost::posix_time::ptime now =
boost::posix_time::second_clock::local_time();
const boost::wformat f = boost::wformat( L"%02d.%02d.%s %02d:%02d" )
% now.date().year_month_day().day.as_number()
% now.date().year_month_day().month.as_number()
% now.date().year_month_day().year
% now.time_of_day().hours()
% now.time_of_day().minutes();
std::wcout << f.str() << std::endl;
}
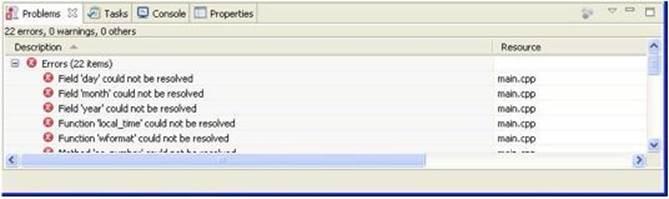
Note that when inserting this code, the Problems tab is populated with error messages signifying a number of unresolved dependencies. This is because we have yet to configure our project to work with Boost.
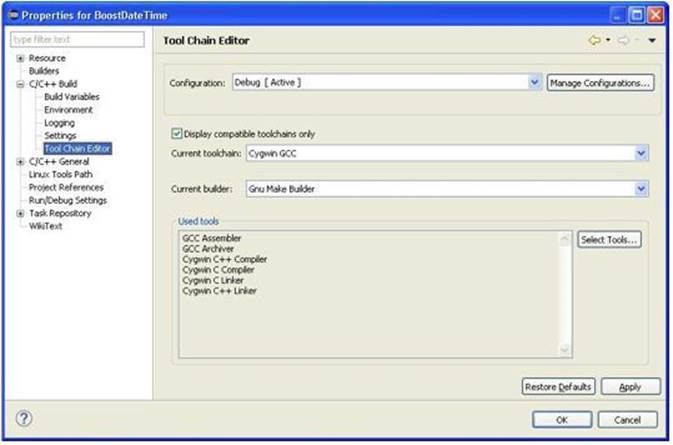
Right-click the project folder and select Properties. In the C/C++ Build section, verify that you have a toolchain selected, such as Cygwin GCC:
Select the C/C++ General section. In the Paths and Symbols section select the Includes tab and the ‘GNU C++’ language.
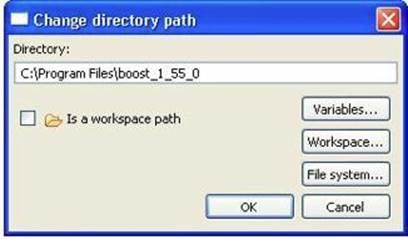
Now we need to tell Eclipse where to find the Boost library folder we extracted. Select the Add button and when the Add directory path’ dialog is launched, select the ‘File system…’ button to set the Boost folder directory:

Click OK and the click Apply when you are returned to the project Properties dialog:
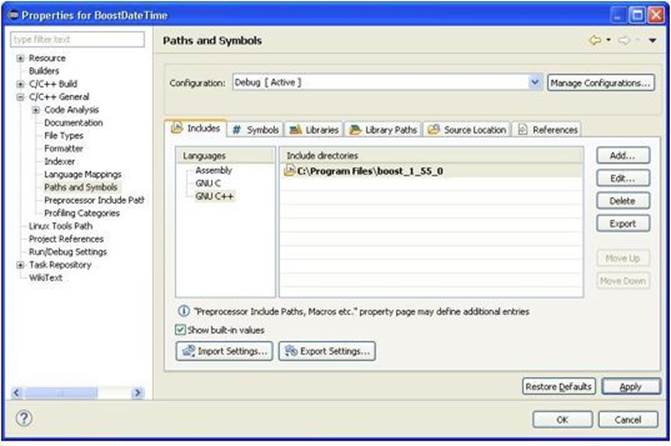 

Repeat by adding the same path for the ‘GNU C’ language. From the menu, select Select Project > Clean , making sure to check the BoostDateTime checkbox:
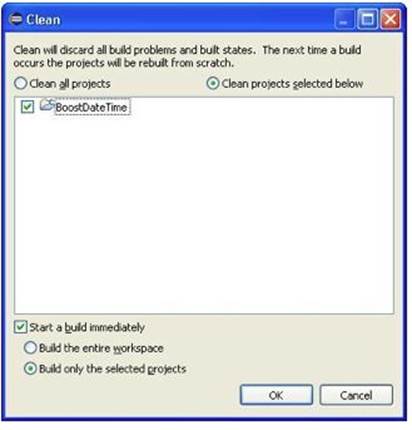 

Press OK to clean and build the project. To start debugging your Eclipse project, right-click the left-side of the code window and select ‘Toggle breakpoint’:
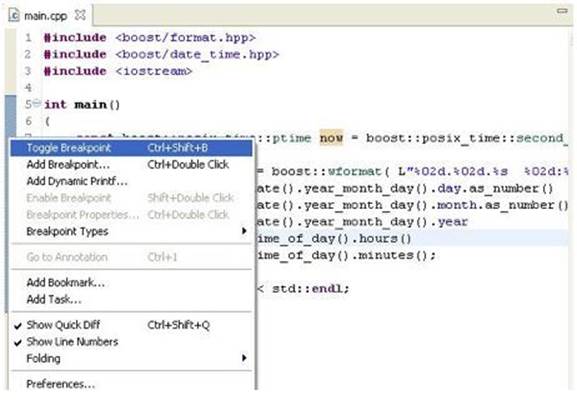 

A small button should appear at the point at where you chose the breakpoint. To start debugging, select Run > Debug from the main menu. Once the debugging process starts you will get directed to the Debug perspective. Press F6 to step through each line of code, and view the results in the Console tab:
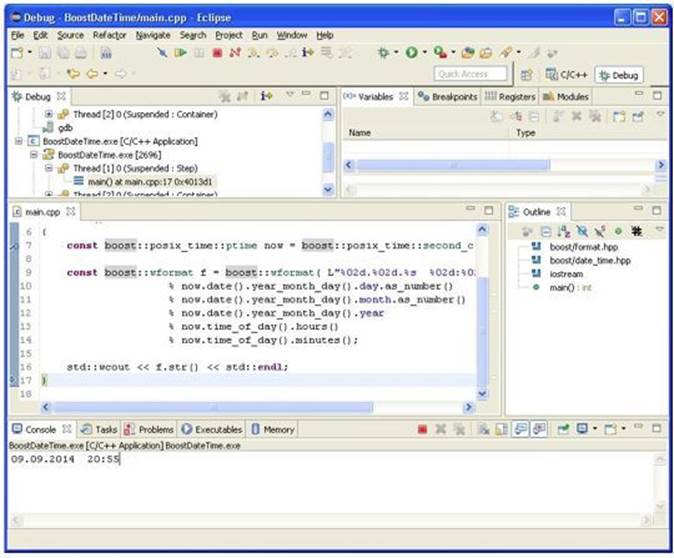 

This gives us the desired output via Boost Format and that's all you need to do to use Boost non-Compiled libraries in Eclipse.
Compiled library example: Boost Serialization
Using the compiled Boost libraries in Eclipse involves a few additional steps to the ones described for header-only libraries.
For this example, we will demonstrate the use of Boost Serialization, which is a means of converting C++ objects into a format that can be saved and restored at a later date.
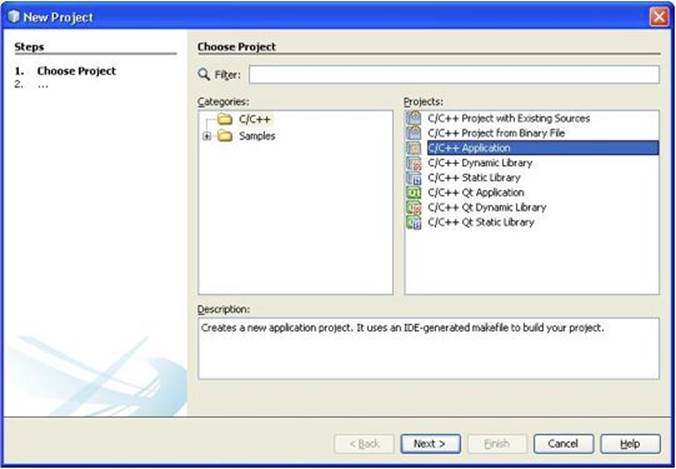
As before, select New > C/C++ Project.

Click next and ensure the Debug and Release checkboxes are set as before.
Click Finish.
As with the non-compiled example, right-click the project and select New > Source File.
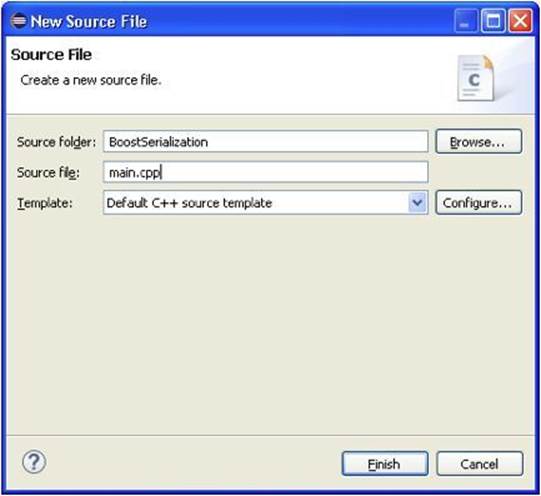 

Then right click the src folder just created and select New > Source File. We will call it main.cpp. Click Finish and copy in the following code, an example usage of Boost Serialization:
#include <vector>
#include <fstream>
#include "boost/serialization/vector.hpp"
#include "boost/archive/text_oarchive.hpp"
#include "boost/archive/text_iarchive.hpp"
class Info
{
private:
// Allow serialization to access non-public data members.
friend class boost::serialization::access;
// Serialize the std::vector member of Info
template<class Archive>
void serialize(Archive & ar, const unsigned int version)
{
ar & filenames;
}
std::vector<std::string> filenames;
public:
void AddFilename( const std::string& filename );
void Print() const;
};
void Info::Print() const
{
std::copy(filenames.begin(),
filenames.end(),
std::ostream_iterator<std::string>(std::cout, "\n"));
}
void Info::AddFilename( const std::string& filename )
{
filenames.push_back( filename );
}
int main(int argc, char** argv)
{
Info info;
info.AddFilename( "ThisFile.txt" );
info.AddFilename( "ThatFile.txt" );
info.AddFilename( "OtherFile.txt" );
// Save filename data contained in Info object
{
// Create an output archive
std::ofstream ofs( "store.dat" );
boost::archive::text_oarchive ar(ofs);
// Save the data
ar & info;
}
// Restore from saved data and print to verify contents
Info restored_info;
{
// Create and input archive
std::ifstream ifs( "store.dat" );
boost::archive::text_iarchive ar(ifs);
// Load the data
ar & restored_info;
}
restored_info.Print();
return 0;
}
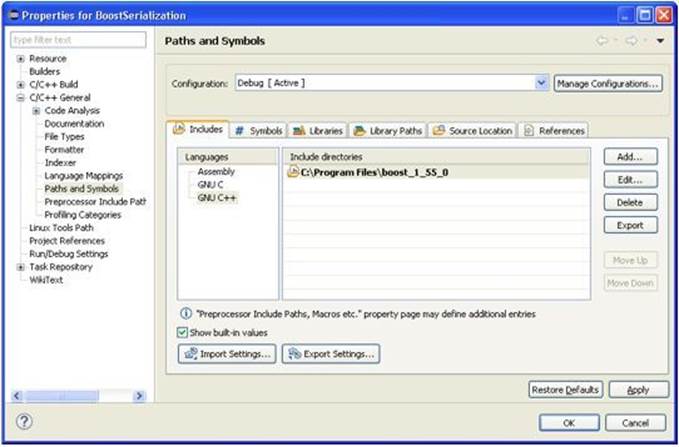
As with the header-only example, we need to set the include directory for this project:
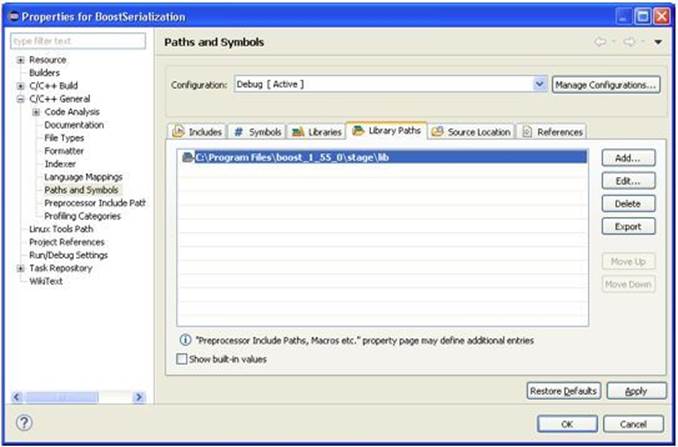
For our compiled library example we also need to set the location of the library path. In the Properties dialog, select the ‘Library Paths’ tab, click the ‘Add’ button. In the ‘Add’ dialog that appears, set the library path location:
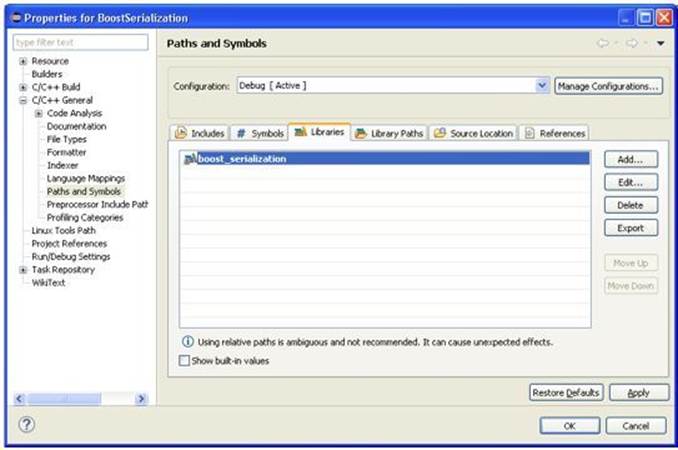
In the Libraries tab, add the ‘boost_serialization’ library:

There remains one final task for our example to work: copying the following dlls from the C:\Cygwin/bin folder into the Debug/Release folder where our executable is located:
cyggcc_s-1.dll
cygstdc++-6.dll
cygwin1.dll
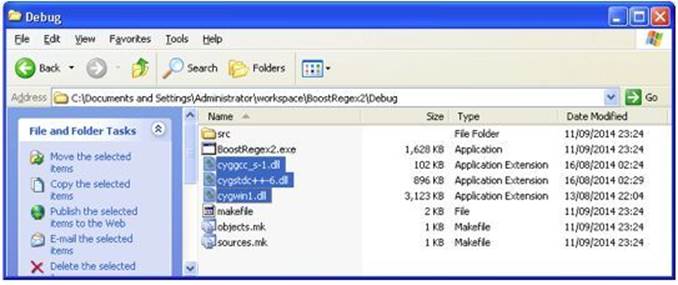 

That's because directories on the Environment Variables PATH are not always searched (in my experience), so we put the DLLs in our application directory to be safe and enable us to build and run each application.
3.5 Configuring Boost in NetBeans
Header-only library example: Boost Lexical Cast
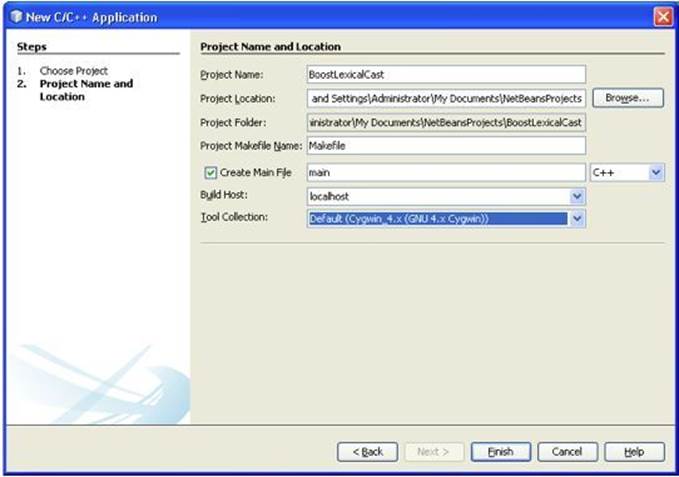
For our NetBeans header-only example we will demonstrate the use of Boost Lexical Case, a safe means of converting arbitrary data types such as integers into literal text forms, and vice versa. In NetBeans select File > New Project > C/C++ Application:

Click Next and give your project a name and click Finish.
Notice how NetBeans recognizes the Tools collection installed as being Cygwin if installed.

Locate the main.cpp source file in the Projects tab and replace it with the following code example that implements Boost Lexical Cast .
#include <boost/lexical_cast.hpp>
int main()
{
try
{
std::cout << boost::lexical_cast<double>("3.141592") << "\n";
}
catch( boost::bad_lexical_cast const& e )
{
std::cout << "Error: " << e.what() << "\n";
}
return 0;
}
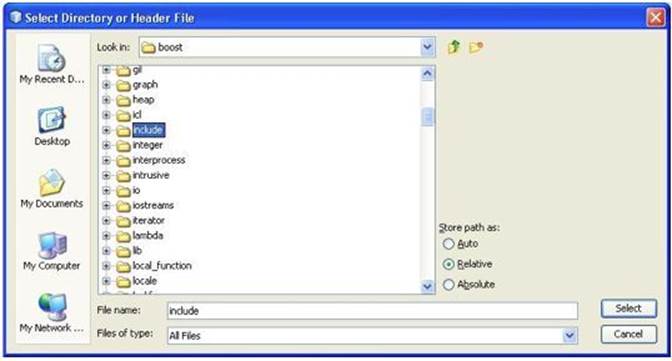
Given that Boost Lexical Cast is a header-only library, we need only set the additional include directories in our NetBeans project. Right-click your project folder and select Properties. In the Build > C++ Compiler category, edit the ‘Include Directories’ section to set where the boost include files are located. You can use absolute paths or relative paths:

The Include directories will look like this:

We are now done with configuring Netbeans to work with a Boost header-only library. All that remains is to build the program which gives us the following output:
30.08.2014 21:34
RUN SUCCESSFUL (total time: 219ms)
Compiled library example: Boost Filesystem
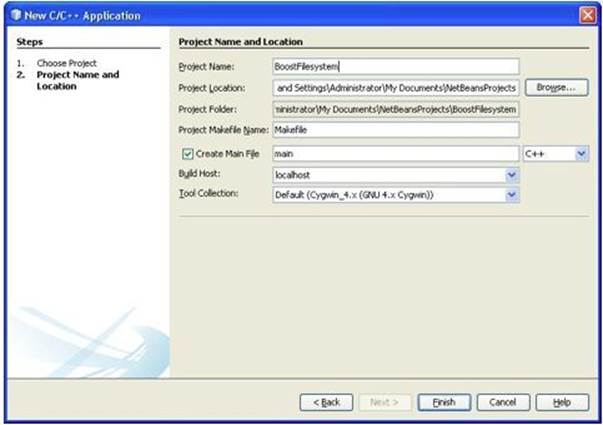
The Boost Filesystem library is an interface for identifying and manipulating files and directories, and is another example of a Boost library requiring separate compilation. Create a new C++ Application as per the previous Netbeans example:

In main.cpp copy this example of using Boost Filesystem to iterate over and print the names of files in a directory:
#include <boost/filesystem.hpp>
#include <boost/foreach.hpp>
int main()
{
boost::filesystem::path targetDir( "C:\\MyStuff" );
boost::filesystem::directory_iterator it( targetDir ), eod;
BOOST_FOREACH(boost::filesystem::path const &p, std::make_pair( it, eod ) )
{
if( is_regular_file( p ) ) {
std::string filename = p.filename().string();
std::cout << filename << std::endl;
}
}
return 0;
}
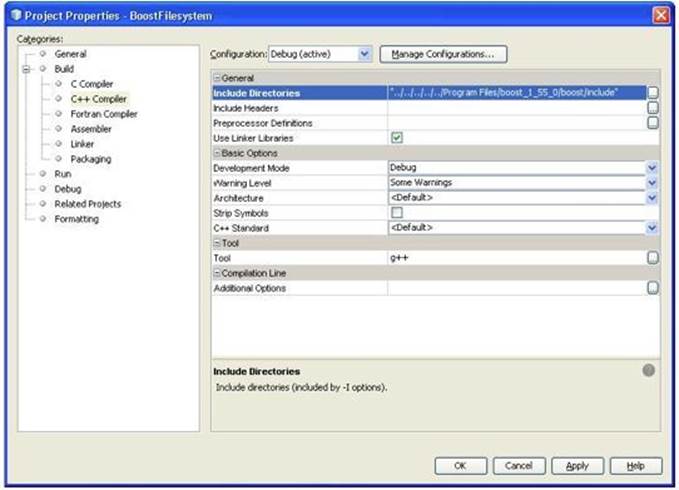
To get this project to properly build, first the set the Boost include directory as before:
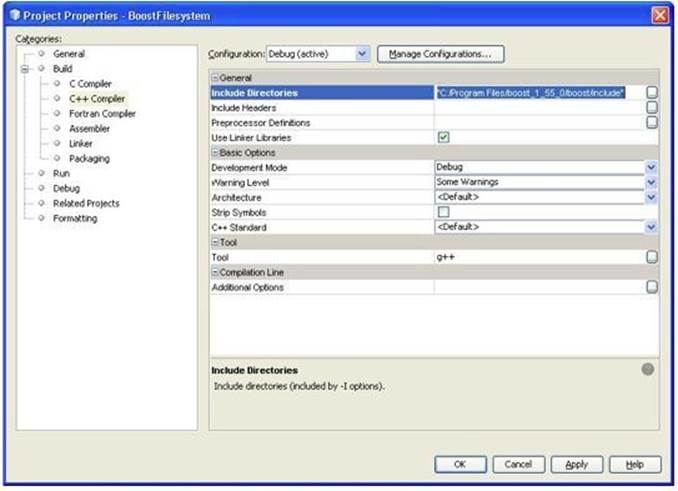 

And because this is using a compiled library, we need to set the Linker options, where the library directories reside and what additional command line options are to be used. In the Linker section, select ‘Additional Library Directories’:
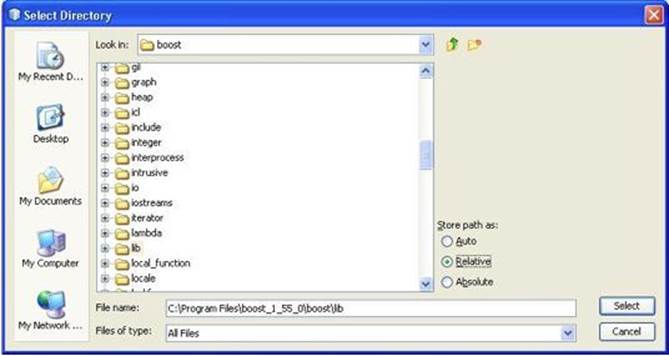 

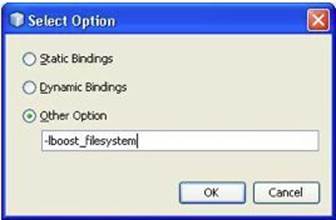
When setting additional include libraries, I prefer using relative paths as the full absolute file path is not needed. Then go to the Libraries section, and select the ‘Add Option…’ button. Check the ‘Other Option’ radio button and type -lboost_filesystem and click OK.

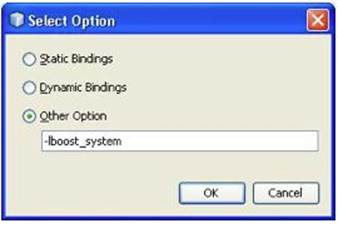
When using Boost Filesystem you will need to include -lboost_system as well, so repeat for this option:
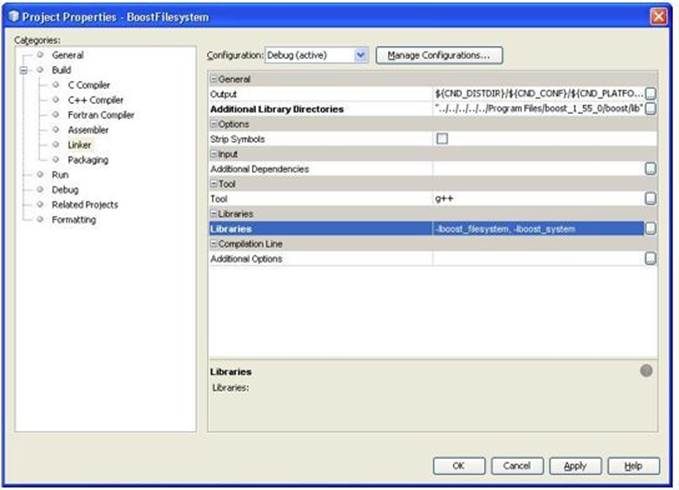
When done the Linker property page will look like this:

This example usage of Boost Filesystem should now compile and run:
ABC.txt
RUN SUCCESSFUL (total time: 282ms)
Chapter Summary
To summarize this latest master lesson, you are now able to:
·Configure the Boost libraries, both header-only and compiled, for use in commonly-used Integrated Development environments including Microsoft Visual Studio, Eclipse and NetBeans.
·Create and use the compiled libraries required by commonly-used compiler environments such as Visual C++, MinGW and Cygwin.
·Apply the Boost libraries in your applications including those that implement file systems, dates and times, regular expressions, serialization and output formatting.
All materials on the site are licensed Creative Commons Attribution-Sharealike 3.0 Unported CC BY-SA 3.0 & GNU Free Documentation License (GFDL)
If you are the copyright holder of any material contained on our site and intend to remove it, please contact our site administrator for approval.
© 2016-2026 All site design rights belong to S.Y.A.