MCSD Certification Toolkit (Exam 70-483): Programming in C# (2013)
Chapter 5
Creating and Implementing Class Hierarchies
What You Will Learn in This Chapter
· Deriving one class from another
· Calling base class constructors
· Defining and implementing interfaces
· Using important interfaces such as IComparable, IEquatable, and IEnumerable
· Managing resources by implementing IDisposable and providing destructors
WROX.COM CODE DOWNLOADS FOR THIS CHAPTER
You can find the code downloads for this chapter at www.wrox.com/remtitle.cgi?isbn=1118612094 on the Download Code tab. The code is in the chapter05 download and individually named according to the names throughout the chapter.
Chapter 4, “Using Types,” explains how you can convert data between various data types. Some of the conversions are between primitive types such as converting a float value into an int or converting a DateTime value into a string.
Some of the most interesting type conversions, however, are between one object type and another. For example, if the Employee class inherits from the Person class, you can convert a reference to an Employee into a reference to a Person because an Employee is a kind of Person.
This chapter explains how you can build hierarchies of classes such as the Person-Employee hierarchy. It also explains how to create and use interfaces, which provide another form of inheritance. Finally, this chapter explains how to manage an object’s resources when the object is destroyed.
Table 5-1 introduces you to the exam objectives covered in this chapter.
Table 5-1: 70-483 Exam Objectives Covered in This Chapter
|
Objective |
Content Covered |
|
Create and implement a class hierarchy |
Inherit from a base class. This includes invoking constructors from a derived class’s or the same class’s constructors. |
|
Manage the Object Lifecycle |
Implementing IDisposable. This includes working with managed and unmanaged resouirces, providing destructors, and using the using statement. |
Inheriting from a Base Class
The section “Creating Reference Types” in Chapter 3, “Working with the Type System,” explains how to create classes. The following code shows the definition of a simple Person class and should be familiar to you:
public class Person
{
public string FirstName { get; set; }
public string LastName { get; set; }
public Person(string firstName, string lastName)
{
// Validate the first and last names.
if ((firstName == null) || (firstName.Length < 1))
throw new ArgumentOutOfRangeException(
"firstName", firstName,
"FirstName must not be null or blank.");
if ((lastName == null) || (lastName.Length < 1))
throw new ArgumentOutOfRangeException(
"lastName", lastName,
"LastName must not be null or blank.");
// Save the first and last names.
FirstName = firstName;
LastName = lastName;
}
}
The Person class contains two auto-implemented string properties: FirstName and LastName. (A class used by a real application would probably have a lot more properties to hold information such as postal address, phone numbers, and e-mail addresses.) Its constructor takes first and last names as parameters, performs some validation, and saves the values in the FirstName and LastName properties.
Now suppose you want to create an Employee class that has FirstName, LastName, and DepartmentName properties. You could build this class from scratch, but it needs the same properties as the Person class and would need the same validations, so building it from scratch would require you to repeat all of that code.
A better solution is to derive the Employee class from the Person class so that it inherits that class’s fields, properties, methods, and events. That makes sense logically, too. An employee is a kind of person, so it makes sense that an Employee should be a kind of Person. If an Employee is a kind ofPerson, there’s no reason why the same code inside the Person class that works for Person objects shouldn’t also work for Employee objects.
Class Terminology
There is a lot of terminology surrounding class hierarchies.
When you derive one class from another class, the new class inherits all the code included in the original class. In this case, the original class is called the parent class, base class, or superclass. The new class is called the derived class, child class, or subclass. Deriving one class from another is called subclassing.
Some of the terminology of family trees also applies to inheritance hierarchies. For example, a parent class’s children, their children, and so on are the parent class’s descendants. Similarly a class’s parent, the parent’s parent, and so on are the class’s ancestors. You can even define sibling classes to be classes that have a common parent.
To derive a class from another class, simply follow the class’s name with a colon and then the name of the parent class. The following code shows an Employee class that is derived from the Person class.
public class Employee : Person
{
public string DepartmentName { get; set; }
}
In this example, the Employee class inherits any fields, properties, methods, and events defined by the Person class. It also adds a new property, DepartmentName. Although a child class inherits most of the code in its parent class, it doesn’t inherit the class’s constructor.
At this point, a program could use the following code to create an Employee object without initializing its FirstName and LastName properties:
Employee employee = new Employee();
Because this code doesn’t initialize the Employee’s FirstName and LastName properties, they have the values null, which defeats the purpose of the Person class’s constructor. The solution is to give the child class constructors that call the parent class’s constructors.
Calling Parent Class Constructors
To ensure that the Person class’s constructor is called so it can validate the Employee’s first and last names, you need to give the Employee class a constructor, so you begin by creating a constructor for the Employee class. Then you follow the constructor’s argument list with a colon, the keywordbase, and any parameters that you want to pass to the base class’s constructor.
In this example, the Employee constructor should pass the first and last names that it receives to the Person class’s constructor. The highlighted code shows where the constructor calls the base class’s constructor.
public class Employee : Person
{
public string DepartmentName { get; set; }
public Employee(string firstName, string lastName,
string departmentName)
: base(firstName, lastName)
{
// Validate the department name.
if ((departmentName == null) || (departmentName.Length < 1))
throw new ArgumentOutOfRangeException(
"departmentName", departmentName,
"DepartmentName must not be null or blank.");
// Save the department name.
DepartmentName = departmentName;
}
}
If the base class has multiple constructors, the child class can use the base keyword to invoke any of them. The program uses the arguments that follow the base keyword to figure out which constructor to use.
NOTE When a constructor uses the base keyword to invoke a base class constructor, the base class’s constructor executes before the body of the child class’s constructor executes.
If both the parent and child class have constructors, the child class’s constructor must invoke one of the parent class’s constructors. That means the highlighted base statement in the previous code snippet is required. If you remove that code, Visual Studio displays the error message “PersonHierarchy.Person Does Not Contain a Constructor That Takes 0 Arguments.” (Here, PersonHierarchy is the namespace that contains the Person class.) The Employee class’s constructor is implicitly trying to access a Person constructor that takes no parameters and it can’t find one.
One oddity to this system is that you can make an Employee class with no constructors even though that allows the program to create an instance of the Employee class without invoking a Person class constructor. That means the following definition for the Employee class is legal:
public class Employee : Person
{
public string DepartmentName { get; set; }
}
If you want to prevent the program from circumventing the parent class’s constructors, you should give the child class at least one constructor.
Calling Same Class Constructors
Often, it’s convenient to give a class multiple constructors to perform different kinds of initialization depending on what parameters are passed into the constructor. In that case, multiple constructors may need to perform the same tasks.
For example, suppose the Person class has FirstName and LastName properties, and you want to allow the program to create a Person object by specifying either first name only or both first and last names. The following code shows one way you could write the class with two constructors to handle these two options:
class Person
{
public string FirstName { get; set; }
public string LastName { get; set; }
// Constructor with first name.
public Person(string firstName)
{
FirstName = firstName;
}
// Constructor with first and last name.
public Person(string firstName, string lastName)
{
FirstName = firstName;
LastName = lastName;
}
}
The first constructor takes a first name as a parameter and stores it in the FirstName property. The second constructor takes both first and last names as parameters and saves their values in the FirstName and LastName properties.
In this code, the second constructor begins by performing the same work that the first constructor does when it saves the first name. In this simple example, that’s no big deal. In a more complicated scenario in which the constructors perform more difficult tasks, this repetition of code would be a problem. It would mean multiple copies of the same code for you to implement, debug, and maintain over time.
One way to avoid this duplication of code is to make one constructor call another. In this case you could rewrite the second constructor to make it call the first constructor so that it can handle the first name parameter.
You make one constructor invoke a second constructor much as you invoke a base class constructor except you use the this keyword instead of the base keyword. The following code shows how the Person class’s second constructor can invoke its first constructor. The code that invokes the first constructor is highlighted.
// Constructor with first and last name.
public Person(string firstName, string lastName)
: this(firstName)
{
LastName = lastName;
}
NOTE When a constructor uses the this keyword to invoke a second constructor in the same class, the second constructor executes before the body of the first constructor executes.
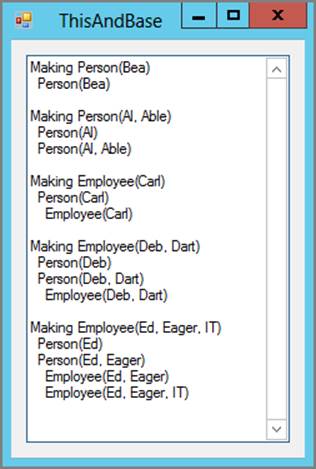
Figure 5-1: The ThisAndBase example program demonstrates constructors that invoke other constructors.
To take things one step farther, suppose you derive the Employee class from the Person class and the Employee class adds a DepartmentName property. You might want different Employee constructors that can take as parameters a first name, first and last names, or first and last name and department name.
Those constructors can use the same technique shown in this version of the Person class to make more complicated constructors invoke simpler ones. The Employee constructors can also use the base keyword described in the previous section to invoke the Person class constructors.
For example, the Employee(firstName, lastName, departmentName) constructor can use this to invoke the Employee(firstName, lastName) constructor and that constructor can use base to invoke the Person(firstName, lastName) constructor.
Figure 5-1 shows the ThisAndBase example program, which is available for download on the book’s website. This program creates several Person and Employee objects and displays messages indicating when various constructors execute.
The following code shows the main form’s Load event handler, which creates the Person and Employee objects.
Code Lab: Demonstrating Constructors That Invoke Other Constructors [ThisAndBase]
public static string Results = "";
private void Form1_Load(object sender, EventArgs e)
{
// Make some Persons.
Results += "Making Person(Bea)" + Environment.NewLine;
Person bea = new Person("Bea");
Results += Environment.NewLine;
Results += "Making Person(Al, Able)" + Environment.NewLine;
Person al = new Person("Al", "Able");
Results += Environment.NewLine;
// Make some Employees.
Results += "Making Employee(Carl)" + Environment.NewLine;
Person carl = new Employee("Carl");
Results += Environment.NewLine;
Results += "Making Employee(Deb, Dart)" + Environment.NewLine;
Person deb = new Employee("Deb", "Dart");
Results += Environment.NewLine;
Results += "Making Employee(Ed, Eager, IT)" + Environment.NewLine;
Person ed = new Employee("Ed", "Eager", "IT");
Results += Environment.NewLine;
// Display the results.
resultsTextBox.Text = Results;
resultsTextBox.Select(0, 0);
}
Code Lab Analysis
This code first defines a static string named Results that other parts of the program can write into to keep a log of what is happening. The event handler then creates a series of Person and Employee objects to demonstrate the classes’ constructors. It adds a message to the Results string explaining what it is doing before it creates each object. After it finishes creating the objects, the code displays the Results string in the form’s TextBox.
The following code shows the ThisAndBase program’s Person class:
class Person
{
public string FirstName { get; set; }
public string LastName { get; set; }
// Constructor with first name.
public Person(string firstName)
{
Form1.Results += " Person(" + firstName + ")" +
Environment.NewLine;
FirstName = firstName;
}
// Constructor with first and last name.
public Person(string firstName, string lastName)
: this(firstName)
{
Form1.Results += " Person(" + firstName + ", " +
lastName + ")" + Environment.NewLine;
LastName = lastName;
}
}
This class first defines FirstName and LastName properties. Its first constructor adds a message to Form1.Results to keep track of what’s happening. The second constructor uses the this keyword to invoke the first constructor and then adds its own message to Form1.Results.
The following code shows the program’s Employee class:
class Employee : Person
{
public string DepartmentName { get; set; }
// Constructor with first name.
public Employee(string firstName)
: base(firstName)
{
Form1.Results += " Employee(" + firstName + ")" +
Environment.NewLine;
}
// Constructor with first and last name.
public Employee(string firstName, string lastName)
: base(firstName, lastName)
{
Form1.Results += " Employee(" + firstName + ", " +
lastName + ")" + Environment.NewLine;
}
// Constructor with first name, last name, and department name.
public Employee(string firstName, string lastName,
string departmentName)
: this(firstName, lastName)
{
Form1.Results += " Employee(" + firstName + ", " +
lastName + ", " + departmentName + ")" + Environment.NewLine;
DepartmentName = departmentName;
}
}
The class’s first and second constructors take the same parameters used by Person class constructors, so they simply use the base keyword to invoke the corresponding Person constructors and they do nothing else (other than recording messages). The third constructor uses the this keyword to invoke the Employee constructor that takes first and last names as parameters and then saves the DepartmentName value.
If you look closely at Figure 5-1, you see that an invoked constructor executes before the constructor that invokes it. You can also follow the chain of invocation for each object’s creation. For example, when the program creates the Employee Ed Eager, the sequence of constructor calls is:
1. Employee(Ed, Eager, IT-12a) uses this to invoke.
2. Employee(Ed, Eager) uses base to invoke.
3. Person(Ed, Eager) uses this to invoke.
4. Person(Ed).
A constructor can directly invoke only one base class constructor or one same class constructor. However, a different same class constructor must invoke a base class constructor, so when you use this to invoke a same class constructor, you’re indirectly invoking a base class constructor anyway. For example, the Employee(firstName, lastName) constructor invokes the Person(firstName, lastName) constructor.
BEST PRACTICES: Creative Constructors
If you want to invoke multiple constructors, you can move their code into separate methods and invoke those instead. For example, suppose you want the Customer class to have the constructors Customer(email), Customer(address), and Customer(email, address) where the emailparameter is a string and the address parameter is an Address structure holding address information. In that case you might like to build the constructors using code similar to the following:
public Customer(string email)
{
// Store the email address.
...
}
public Customer(Address address)
{
// Store the postal address.
...
}
public Customer(string email, Address address)
: this(email), this(address)
{
}
The prohibition against invoking multiple constructors prevents this. Fortunately, you can work around it by moving the interesting code into methods and then calling them instead:
public Customer(string email)
{
StoreEmail(email);
}
public Customer(Address address)
{
StoreAddress(address);
}
public Customer(string email, Address address)
{
StoreEmail(email);
StoreAddress(address);
}
// Store the email address.
private void StoreEmail(string email)
{
...
}
// Store the postal address.
private void StoreAddress(Address address)
{
...
}
REAL-WORLD CASE SCENARIO: Ellipses and Circles
Make an Ellipse class that represents an ellipse. It should store the ellipse’s size and position in a Location property of type RectangleF (defined in the System.Drawing namespace). Give it two constructors: one that takes a RectangleF as a parameter and one that takes X position, Y position, width, and height as parameters. Make the second constructor invoke the first, and make the constructors throw an exception if width or height is less than or equal to 0.
Then make a Circle class that inherits from Ellipse. Make its constructors invoke the appropriate base class constructors, and make them verify that width = height. (Hint: You should need to verify only height = width in one place.)
Don’t worry about any other code that the classes would provide in an actual program such as methods to draw ellipses and circles.
Solution
The following Ellipse and Circle classes work:
class Ellipse
{
public RectangleF Location { get; set; }
// Constructor that takes a RectangleF as a parameter.
public Ellipse(RectangleF rect)
{
// Validate width and height.
if (rect.Width <= 0)
throw new ArgumentOutOfRangeException(
"width",
"Ellipse width must be greater than 0.");
if (rect.Height <= 0)
throw new ArgumentOutOfRangeException(
"height",
"Ellipse height must be greater than 0.");
// Save the location.
Location = rect;
}
// Constructor that takes x, y, width, and height as parameters.
public Ellipse(float x, float y, float width, float height)
: this(new RectangleF(x, y, width, height))
{
}
}
class Circle : Ellipse
{
// Constructor that takes a RectangleF as a parameter.
public Circle(RectangleF rect)
: base(rect)
{
// Validate width and height.
if (rect.Width != rect.Height)
throw new ArgumentOutOfRangeException(
"width and height",
"Circle width and height must be the same.");
}
// Constructor that takes x, y, width, and height as parameters.
public Circle(float x, float y, float width, float height)
: this(new RectangleF(x, y, width, height))
{
}
}
Designing and Implementing Interfaces
Now that you know how to derive a child class from a parent class, you can build diagrams that use arrows to show the relationships among different classes. C# enables a class to have at most one parent class, so the result is a tree-like hierarchy. For example, Figure 5-2 shows a small hierarchy designed to model airline customers and personnel.
Figure 5-2: By deriving classes from each other, you can build class hierarchies.
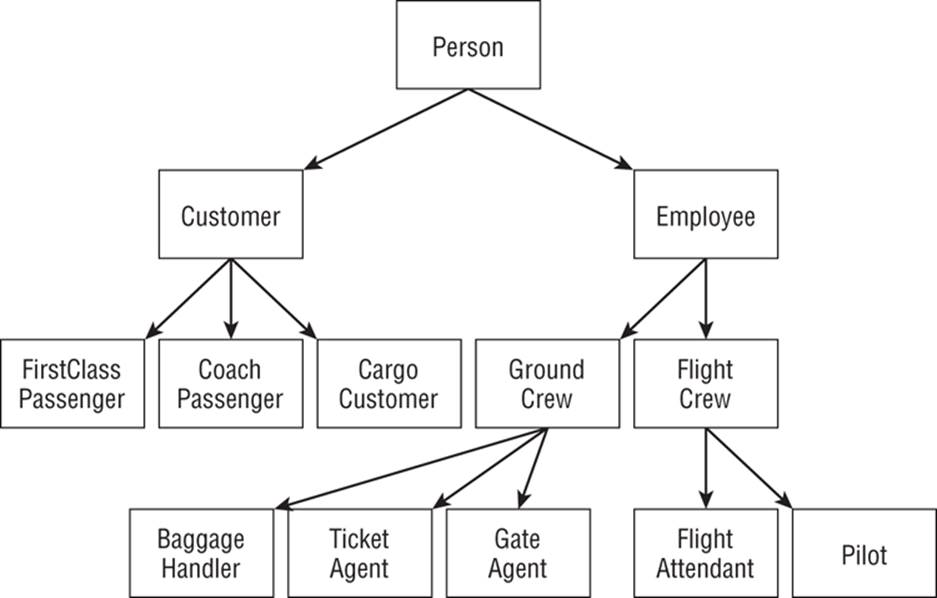
Figure 5-3: C# does not enable a class such as TeachingAssistant to inherit from more than one parent class.
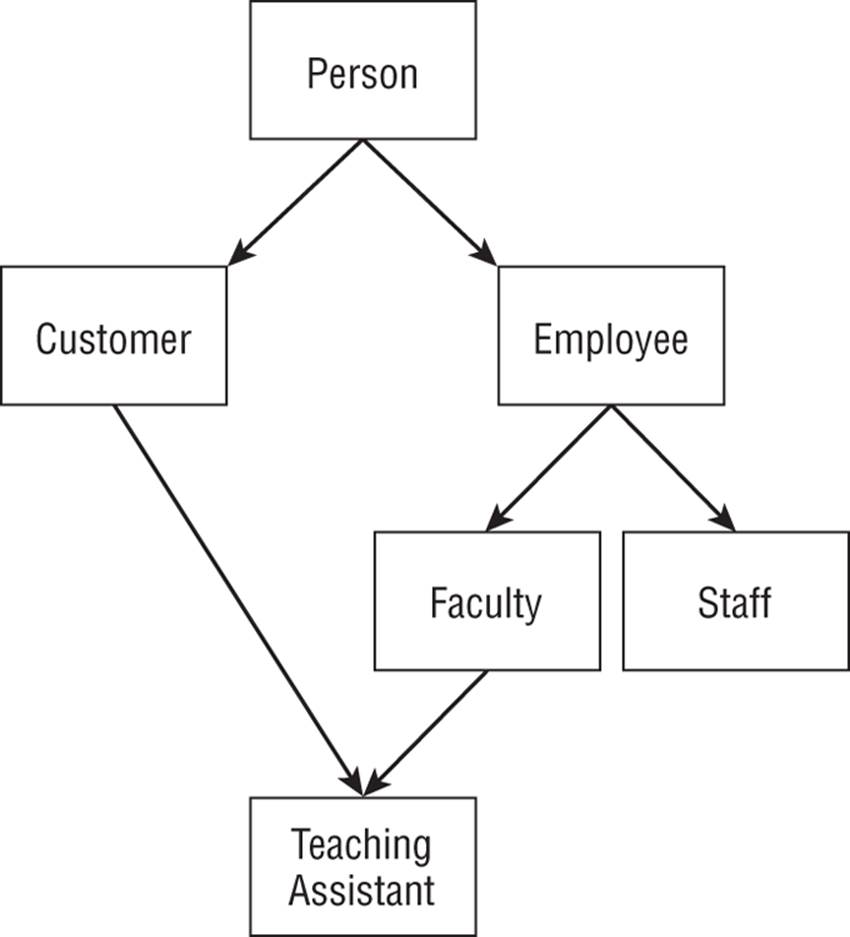
Class hierarchies are sufficient for a wide variety of modeling problems, but occasionally it would be convenient to allow a class to inherit from multiple parent classes. For example, suppose you’re writing an application to manage a university’s students and personnel. Two important classes areStudent, which represents people who take classes, and Faculty, which represents people who teach classes.
The problem arises when you try to add a TeachingAssistant class to represent teaching assistants who are students who also teach classes. Ideally, you would like to use multiple inheritance, where a class has more than one parent class, to make this class inherit from both the Student andFaculty classes, so it can take advantage of their code as shown in Figure 5-3. Unfortunately, C# does not allow multiple inheritance, so this isn’t possible.
Although you can’t use multiple inheritance in C#, you can use interfaces to simulate multiple inheritance, as described next.
NOTE An interface requires a class to provide certain features much as a parent class does, except the interface doesn’t provide an implementation. Because this is somewhat similar to inheritance without the implementation, it is sometimes called interface inheritance. A class can inherit from at most one parent class, but it can implement any number of interfaces.
Defining Interfaces
An interface is similar to a class that specifies properties, methods, and events, but it doesn’t provide any code to implement them. It forms a contract specifying features that other classes can implement.
If a class implements an interface, it agrees to provide the features defined by the interface. That tells other parts of the program that the class has those features, so the code can invoke them.
This provides a kind of polymorphism that is similar to the way classes let a program treat an object as if it were of another class. For example, suppose the Employee class inherits from the Person class and implements the ICloneable interface. In that case a program could treat an Employee object as if it were an Employee, Person, or ICloneable object.
This may all seem a bit abstract, but an example should make it easier to understand. The following code shows a simple interface named IStudent that defines the features of a student:
public interface IStudent
{
// The student's list of current courses.
List<string> Courses { get; set; }
// Print the student's current grades.
void PrintGrades();
}
This interface defines a property named Courses that is of type List<string> and a method named PrintGrades. (In a real application, the interface would probably be more complicated and define many other features.)
NOTE By convention, interface names begin with a capital letter I as in IStudent, IComparable, and ICloneable.
The following code shows the Student class:
public class Student : Person, IStudent
{
// Implement IStudent.Courses.
// The student's list of current courses.
public List<string> Courses { get; set; }
// Implement IStudent.PrintGrades.
// Print the student's current grades.
public void PrintGrades()
{
// Do whatever is necessary...
}
}
This class inherits from the Person class, which provides the FirstName and LastName properties. It also implements the IStudent interface. The code inside the Student class must provide implementations for the features defined by the IStudent interface. In this example, it provides the Coursesproperty as an auto-implemented property, and it includes code (which isn’t shown here) to implement the PrintGrades method.
The following code shows the TeachingAssistant class. (Assume for now that the other classes shown in Figure 5-3 such as Employee, Faculty, and Staff have been defined.)
public class TeachingAssistant : Faculty, IStudent
{
// Implement IStudent.Courses.
// The student's list of current courses.
public List<string> Courses { get; set; }
// Implement IStudent.PrintGrades.
// Print the student's current grades.
public void PrintGrades()
{
// Do whatever is necessary...
}
}
This class inherits from the Faculty class and implements the IStudent interface. Now the program can create a TeachingAssistant object and treat it as either a Faculty object or an object that implements IStudent.
Implementing Interfaces
Sometimes writing all the methods defined by an interface can be a lot of work. Unless the interface is well documented, even figuring out what properties, methods, and events are necessary can be hard.
Fortunately, Visual Studio provides a tool that creates code to implement an interface for you. To use the tool, write the class’s declaration and specify the interface:
public class TeachingAssistant : Faculty, IStudent
{
}
At this point, Visual Studio knows you have not implemented the interface. Right-click the interface’s declaration to display a context menu (in this example, IStudent in the class statement). Open the Implement Interface item, and select either Implement Interface or Implement Interface Explicitly to make Visual Studio insert code stubs that satisfy the interface.
The following code shows the result produced by this tool for the TeachingAssistant class if you pick the Implement Interface Explicitly item:
// Explicit implementation.
public class TeachingAssistant : Faculty, IStudent
{
List<string> IStudent.Courses
{
get
{
throw new NotImplementedException();
}
set
{
throw new NotImplementedException();
}
}
void IStudent.PrintGrades()
{
throw new NotImplementedException();
}
}
If you select Implement Interface, the code doesn’t include the IStudent. parts, shown highlighted in the previous code.
The new pieces of code simply throw exceptions when they are called. You need to edit the code to replace the default code with code that provides the needed features.
Aside from the difference in syntax, there is a functional difference between implicit and explicit interface implementation. If a class implements an interface explicitly, the program cannot access the interface’s members through a class instance. Instead it must use an instance of the interface.
For example, suppose the TeachingAssistant implements the IStudent interface explicitly. Then the following code shows incorrect and correct way to call the PrintGrades method:
TeachingAssistant ta = new TeachingAssistant();
// The following causes a design time error.
ta.PrintGrades();
// The following code works.
IStudent student = ta;
student.PrintGrades();
If a class implements an interface implicitly, the program can access the interface members through either a class instance or an interface instance.
Delegating Interfaces
The Student and TeachingAssistant classes shown earlier both implement the IStudent interface, so they both include code to provide the interface’s features.
BEST PRACTICES: Avoiding Dangerous Duplication
Seeing that duplicated code should have given you a bad feeling because it’s never a good idea for a program to contain duplicated pieces of code. Duplicated code means you need to write and debug the code twice. Even worse, it means that you need to maintain the code in parallel over time. If you update the code in one place but forget to update it in another, you could hide bugs and the program may produce inconsistent results depending on which piece of code is executed.
You can avoid duplicating this code by delegating the work of implementing the interface to a Student object inside the TeachingAssistant class. Simply place a Student object inside the TeachingAssistant class. Whenever the TeachingAssistant object needs to perform some task specified by the IStudent interface, it makes its Student object do the work.
The following code shows the TeachingAssistant class delegating to a Student object:
// Delegate IStudent to a Student object.
public class TeachingAssistant : Faculty, IStudent
{
// A Student object to handle IStudent.
private Student MyStudent = new Student();
public List<string> Courses
{
get
{
return MyStudent.Courses;
}
set
{
MyStudent.Courses = value;
}
}
public void PrintGrades()
{
MyStudent.PrintGrades();
}
}
The class defines a private instance of the Student class named MyStudent. To implement the Courses property, the class uses the MyStudent object’s Courses property. To implement the PrintGrades method, the class calls the MyStudent object’s PrintGrades method.
This may seem like extra work, but it lets you keep all the code to implement the interface in the Student class. Now if you need to change the code, you can do it in that one place.
Implementing Common Interfaces
The .NET Framework includes many interfaces that help Framework classes do their jobs. For example, if one of your classes implements the IComparable interface, the Array.Sort method can sort an array of that class.
The following sections explain how you can implement some of the most useful interfaces defined by the .NET Framework.
NOTE The IDisposable interface is another useful interface defined by the .NET Framework. It is described in the section “Implementing the IDisposable Interface.”
IComparable
If a class implements IComparable, it provides a CompareTo method that enables a program to compare two instances of the class and determine which belongs before the other in sorted order. For example, suppose you want to make a Car class to keep track of your favorite cars and you want to sortCar objects by their names. In that case you can make the Car class implement the IComparable interface, and then use Array.Sort to sort an array of Car objects.
The IComparable interface comes in two versions: a plain version and a generic version.
If you use the plain version, the CompareTo method takes two nonspecific objects as parameters, and the code must convert them into Car objects before comparing their names. The following code shows the Car class with this type of CompareTo method:
class Car : IComparable
{
public string Name { get; set; }
public int MaxMph { get; set; }
public int Horsepower { get; set; }
public decimal Price { get; set; }
// Compare Cars alphabetically by Name.
public int CompareTo(object obj)
{
if (!(obj is Car))
throw new ArgumentException("Object is not a Car");
Car other = obj as Car;
return Name.CompareTo(other.Name);
}
}
The CompareTo method first checks whether the obj parameter is a Car object and throws an exception if it is not. If obj is a Car, the method creates a Car variable to work with it and then compares the current object’s Name property to the other Car’s Name property.
The following code shows the Car class implementing the generic version of the IComparable interface:
class Car : IComparable<Car>
{
public string Name { get; set; }
public int MaxMph { get; set; }
public int Horsepower { get; set; }
public decimal Price { get; set; }
// Compare Cars alphabetically by Name.
public int CompareTo(Car other)
{
return this.Name.CompareTo(other.Name);
}
}
In this version, the interface name is followed by a generic parameter telling the kind of object to which the class can compare itself, in this case Car. The CompareTo method’s parameter is an object of that type, so CompareTo doesn’t need to verify that the object is a Car and it doesn’t need to convert the object into a Car.
COMMON MISTAKES: The Generic Version of IComparable
The generic version of IComparable is simpler than the nongeneric version and provides strong type checking, so you should use it. The nongeneric version is provided for compatibility with older versions of the .NET Framework. The strong type checking provided by the generic version prevents you from making the mistake of trying to compare objects of the wrong type. If you use the generic version, Visual Studio will flag the error at design time.
The IComparableCars example program, which is available for download on the book’s website, uses this version of the Car class to display an array of Cars. The program uses the following code to display the array of Cars twice, first unsorted and then sorted:
Code Lab: Comparing Cars [IComparableCars]
private void Form1_Load(object sender, EventArgs e)
{
// Make some data.
Car[] cars =
{
new Car() { Name="SSC Ultimate Aero", MaxMph=257,
Horsepower=1183, Price=654400m},
new Car() { Name="Bugatti Veyron", MaxMph=253,
Horsepower=1001, Price=1700000m},
...
};
// Display the cars unsorted.
DisplayCars(cars, unsortedListView);
// Sort the array of cars.
Array.Sort(cars);
// Display the cars sorted.
DisplayCars(cars, sortedListView);
}
Code Lab Analysis
After creating the cars array, the code calls the DisplayCars method, described shortly, to display the Cars in the ListView control named unsortedListView. It then calls Array.Sort to sort the cars array and calls DisplayCars again to display the sorted arrayin the ListView control namedsortedListView.
The following code shows the DisplayCars method:
// Display the cars in the ListView control.
private void DisplayCars(Car[] cars, ListView listView)
{
listView.Items.Clear();
foreach (Car car in cars)
{
ListViewItem item = listView.Items.Add(car.Name);
item.SubItems.Add(car.MaxMph.ToString());
item.SubItems.Add(car.Horsepower.ToString());
item.SubItems.Add(car.Price.ToString("C"));
}
foreach (ColumnHeader header in listView.Columns)
{
header.Width = -2;
}
}
This method clears the items in the ListView control and then loops through the cars array. For each Car object, the code creates a ListViewItem displaying the Car’s Name property. It then gives that item subitems that display the Car’s MaxMph, Horsepower, and Price properties.
The method finishes by setting each ListView column’s Width property to -2, which makes it size itself to fit its data.
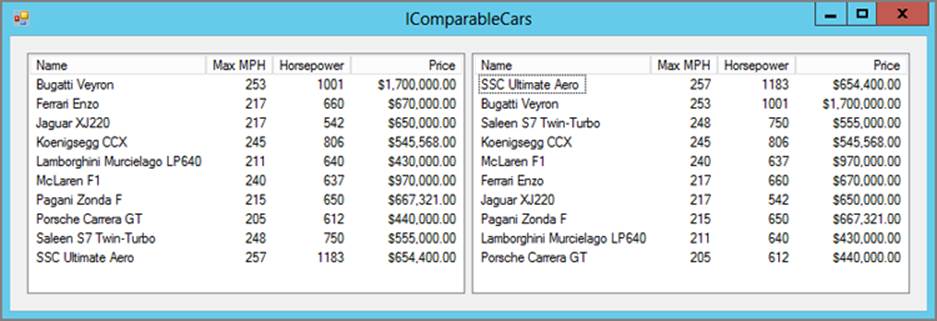
Figure 5-4 shows the IComparableCars example program displaying its unsorted and sorted lists of cars.
Figure 5-4: The IComparableCars example program displays a list of Car objects unsorted on the left and sorted on the right.
IComparer
The IComparableCars example program described in the previous section used a Car class that implements IComparable, so it can sort an array of Car objects by their names, but what if you want to sort the Cars by maximum speed, horsepower, or price? The CompareTo method can sort on only one field at a time, so there isn’t a good way to make the Car class sort on different properties.
The IComparer interface provides a solution. A class that implements the IComparer interface must provide a Compare method that compares two objects. For example, you could create a CarPriceComparer class that implements IComparer and that has a Compare method that compares Car objects by Price. You could then pass a CarPriceComparer object to the Array.Sort method, and it can use that object to sort an array of Car objects.
ADVICE FROM THE EXPERTS: Using the Generic Version of IComparer
Like the IComparable interface, IComparer has generic and nongeneric versions. The generic version is simpler and provides strong type checking so you should use it.
The CarPriceComparer class takes care of sorting by Price but still leaves the problem of sorting by maximum speed or other Car properties. You could make multiple Car comparer classes but there’s an easier solution.
Make a single CarComparer class and give it a field that the program can set to tell it which Car field to use when comparing Car objects. The following code shows a CarComparer class that demonstrates this approach:
class CarComparer : IComparer<Car>
{
// The field to compare.
public enum CompareField
{
Name,
MaxMph,
Horsepower,
Price,
}
public CompareField SortBy = CompareField.Name;
public int Compare(Car x, Car y)
{
switch (SortBy)
{
case CompareField.Name:
return x.Name.CompareTo(y.Name);
case CompareField.MaxMph:
return x.MaxMph.CompareTo(y.MaxMph);
case CompareField.Horsepower:
return x.Horsepower.CompareTo(y.Horsepower);
case CompareField.Price:
return x.Price.CompareTo(y.Price);
}
return x.Name.CompareTo(y.Name);
}
}
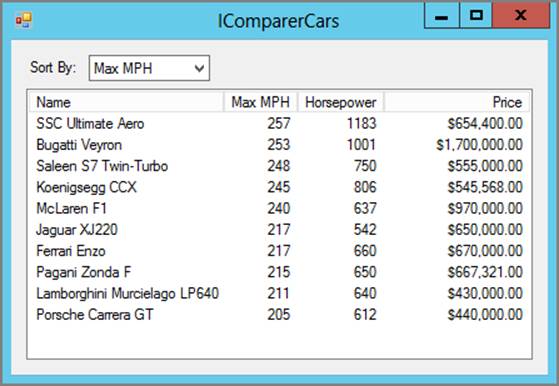
Figure 5-5: The IComparerCars example program displays a list of Car objects sorted by Name, MaxMph, Horsepower, or Price.
The class begins with an enumeration that defines the kinds of sorting that this class can provide. Its SortBy field indicates the Car field that the class should use when sorting.
The Compare method examines the SortBy value and compares two Car objects appropriately.
The IComparerCars example program, which is shown in Figure 5-5 and available for download on the book’s website, uses this CarComparer class to sort Car objects by Name, MaxMph, Horsepower, or Price.
The IComparerCars example program uses the following code to display its Car objects:
// Display the cars in the ListView control.
private void DisplayCars()
{
if (Cars == null) return;
// Make the appropriate comparer.
CarComparer comparer = new CarComparer();
if (sortByComboBox.Text == "Name")
comparer.SortBy = CarComparer.CompareField.Name;
else if (sortByComboBox.Text == "Max MPH")
comparer.SortBy = CarComparer.CompareField.MaxMph;
else if (sortByComboBox.Text == "Horsepower")
comparer.SortBy = CarComparer.CompareField.Horsepower;
else
comparer.SortBy = CarComparer.CompareField.Price;
// Sort.
Array.Sort(Cars, comparer);
// If we're not sorting by name, reverse the array.
if (sortByComboBox.Text != "Name") Array.Reverse(Cars);
carListView.Items.Clear();
foreach (Car car in Cars)
{
ListViewItem item = carListView.Items.Add(car.Name);
item.SubItems.Add(car.MaxMph.ToString());
item.SubItems.Add(car.Horsepower.ToString());
item.SubItems.Add(car.Price.ToString("C"));
}
foreach (ColumnHeader header in carListView.Columns)
{
header.Width = -2;
}
}
This method creates a CarComparer object and sets its SortBy value according to the value selected in the program’s sortByComboBox control. It then calls Array.Sort passing it the array of Car objects and the CarComparer. To display the numeric Car values (MaxMph, Horsepower, and Price) in descending order, the program calls Array.Reverse if it is sorting by one of those values. Finally, the method displays the sorted Car data in a ListView control much as the previous example did.
IEquatable
If a class implements the IComparable interface, it provides a CompareTo method that enables you to determine how two objects should be ordered. Sometimes, you may not need to know how two objects should be ordered, but you need to know instead whether the objects are equal. TheIEquatable interface provides that capability by requiring a class to provide an Equals method.
For example, the IEquatablePerson example program, which is available for download on the book’s website, enables you to build a list of Person objects. If you try to create a Person with the same first and last name as a previously created Person, the program displays an error message.
The following code shows the program’s Person class:
class Person : IEquatable<Person>
{
public string FirstName { get; set; }
public string LastName { get; set; }
public bool Equals(Person other)
{
return ((FirstName == other.FirstName) &&
(LastName == other.LastName));
}
}
This class has two properties, FirstName and LastName, and a simple Equals method that returns true if the two Person objects have the same names.
The following code shows how the program adds a new Person to its list when you enter a first and last name in the TextBoxes and then click Add:
// The List of Persons.
private List<Person> People = new List<Person>();
// Add a Person to the List.
private void btnAdd_Click(object sender, EventArgs e)
{
// Make the new Person.
Person person = new Person()
{
FirstName = firstNameTextBox.Text,
LastName = lastNameTextBox.Text
};
if (People.Contains(person))
{
MessageBox.Show("The list already contains this person.");
}
else
{
People.Add(person);
firstNameTextBox.Clear();
lastNameTextBox.Clear();
firstNameTextBox.Focus();
}
}
The btnAdd_Click event handler uses the value entered in the TextBoxes to create a new Person object. It then uses the list’s Contains method to see if the Person is already in the list. If the Person is already in the list, the program displays a message. If the Person is not in the list, the program adds it.
The list’s Contains method uses the fact that the Person class implements IEquatable to decide whether two objects are the same. If you comment out the : IEquatable part of the Person class’s declaration, the class no longer implements IEquatable, so the list treats two different objects as different even if they happen to have the same first and last name values. (You don’t even need to remove the Equals method from the Person class. If the class doesn’t implement IEquatable, the Contains method won’t use Equals.)
BEST PRACTICES: Provide Equatable
Generic collection classes such as List, Dictionary, Stack, and Queue provide Contains and other methods that compare objects for equality. Microsoft recommends that any class that you are likely to place in one of these generic collections should implement IEquatable.
ICloneable
A class that implements the ICloneable interface must provide a Clone method that returns a copy of the object for which it is called. For example, the following code shows a simple, cloneable Person class:
class Person : ICloneable
{
public string FirstName { get; set; }
public string LastName { get; set; }
public Person Manager { get; set; }
// Return a clone of this person.
public object Clone()
{
Person person = new Person();
person.FirstName = FirstName;
person.LastName = LastName;
person.Manager = Manager;
return person;
}
}
This class’s Clone method simply creates a new Person object with the same FirstName, LastName, and Manager properties as the original and then returns the new object. Notice that the Clone method returns a nonspecific object, not a Person, so the calling code must cast the result into a Person.
The following code shows how the ICloneablePerson example program, which is available for download on the book’s website, creates two Person objects and then clones one of them:
Person ann = new Person()
{
FirstName = "Ann",
LastName = "Archer",
Manager = null
};
Person bob = new Person()
{
FirstName = "Bob",
LastName = "Baker",
Manager = ann
};
Person bob2 = (Person)bob.Clone();
This code creates a Person named Ann Archer and another named Bob Baker. It then clones the Bob Baker Person to make a third Person object.
Clever Clones
There are two kinds of clones: shallow clones and deep clones.
In a shallow clone, any reference values in the copy refer to the same objects as those in the original object. The Person.Clone method class described in this section is a shallow clone because it sets the clone’s Manager property equal to the Manager property of the original object.
In a deep clone, the new object’s reference values are set to new objects. The following code shows how the Person class could provide deep clones:
public object Clone()
{
Person person = new Person();
person.FirstName = FirstName;
person.LastName = LastName;
person.Manager = Manager;
if (Manager != null)
person.Manager = (Person)Manager.Clone();
return person;
}
The ICloneable interface doesn’t specify whether the Clone method should return a shallow or deep clone, so you must do what makes the most sense for your application. If you like, you can also make a second Clone method that takes as a parameter a boolean value that indicates whether the copy should be a deep clone.
IEnumerable
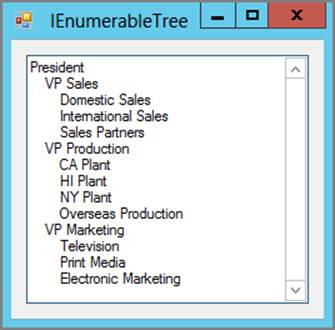
Figure 5-6: The IEnumerableTree example program enumerates over the nodes in a tree.
A class that implements the IEnumerable interface provides a method for a program to enumerate the items that the class contains. Its GetEnumerator method returns an object that implements IEnumerator.
The IEnumerator object provides a Current property that returns the current object in the enumeration. It also provides a MoveNext method that moves the enumerator to the next object in the enumeration and a Reset method that resets the enumerator to just before the beginning of the enumeration. Finally, the enumerator provides a Dispose method that lets it clean up any resources it is using when it is no longer needed.
The IEnumerableTree example program, which is shown in Figure 5-6 and available for download on the book’s website, builds a tree and then enumerates over the nodes it contains.
The following code shows the TreeNode class that holds information for a node in a tree.
CODE LAB Enumerating Tree Nodes [IEnumerableTree]
class TreeNode : IEnumerable<TreeNode>
{
public int Depth = 0;
public string Text = "";
public List<TreeNode> Children = new List<TreeNode>();
public TreeNode(string text)
{
Text = text;
}
// Add and create children.
public TreeNode AddChild(string text)
{
TreeNode child = new TreeNode(text);
child.Depth = Depth + 1;
Children.Add(child);
return child;
}
// Return the tree's nodes in an preorder traversal.
public List<TreeNode> Preorder()
{
// Make the result list.
List<TreeNode> nodes = new List<TreeNode>();
// Traverse this node's subtree.
TraversePreorder(nodes);
// Return the result.
return nodes;
}
private void TraversePreorder(List<TreeNode> nodes)
{
// Traverse this node.
nodes.Add(this);
// Traverse the children.
foreach (TreeNode child in Children)
child.TraversePreorder(nodes);
}
public IEnumerator<TreeNode> GetEnumerator()
{
return new TreeEnumerator(this);
}
IEnumerator IEnumerable.GetEnumerator()
{
return new TreeEnumerator(this);
}
}
Code Lab Analysis
The class begins by defining the node’s Depth in the tree and the Text value that the node holds. The Children field holds a list of the TreeNode objects that are the node’s children in the tree. The class provides a single constructor that initializes the node’s text.
To make building a tree easier, the AddChild method adds a new child to the node’s Children list and returns the new child.
The Preorder method returns the tree’s nodes in a preorder traversal. In a preorder traversal, each node displays before its children. The Preorder method builds a list of TreeNode objects to hold the traversal and then calls the TraversePreorder method to perform the actual traversal. TheTraversePreorder method adds the current node to the list of nodes and then recursively calls each of the child nodes’ TraversePreorder methods, so they can add themselves to the list. Figure 5-6 shows the preorder traversal for the tree built by the example program.
The rest of the TreeNode class’s code is part of the IEnumerable interface. The two GetEnumerator methods, both of which are required, return an enumerator object. In this program, the object is of the type TreeEnumerator, a class that is described next.
The TreeEnumerator class defines objects that can enumerate over a tree made of TreeNode objects:
class TreeEnumerator : IEnumerator<TreeNode>
{
// The tree's nodes in their proper order.
private List<TreeNode> Nodes;
// The index of the current node.
private int CurrentIndex;
// Constructor.
public TreeEnumerator(TreeNode root)
{
Nodes = root.Preorder();
Reset();
}
public TreeNode Current
{
get { return GetCurrent(); }
}
object IEnumerator.Current
{
get { return GetCurrent(); }
}
private TreeNode GetCurrent()
{
if (CurrentIndex < 0)
throw new InvalidOperationException();
if (CurrentIndex >= Nodes.Count)
throw new InvalidOperationException();
return Nodes[CurrentIndex];
}
public bool MoveNext()
{
CurrentIndex++;
return (CurrentIndex < Nodes.Count);
}
public void Reset()
{
CurrentIndex = -1;
}
public void Dispose()
{
}
}
The class begins with a list that holds the nodes in the traversal over which the TreeEnumerator can enumerate. The CurrentIndex field keeps track of the index of current TreeNode in the traversal.
The TreeEnumerator’s constructor takes a TreeNode as a parameter, uses its Preorder method to get a traversal of the tree rooted at the TreeNode, and saves the result in the Nodes list. It then calls Reset (described shortly) to reset the enumerator to the beginning of the traversal.
The two Current methods return a reference to the current TreeNode object in the enumeration. Both of these methods call the GetCurrent method to get the object in position CurrentIndex in the list of TreeNode objects.
The MoveNext method simply adds 1 to CurrentIndex. If the new value of CurrentIndex is within the range of the Nodes list, MoveNext returns true to indicate that the current item exists and the enumerator hasn’t finished enumerating all the items.
The Reset method sets CurrentIndex to -1. By convention the enumeration should begin (and reset to) one position before the first item, so the program must call MoveNext before using the first item.
The class finishes with the Dispose method. In this example, method doesn’t need to do anything. See the section “Implementing the IDisposable Interface” for more information on the Dispose method and the IDisposable interface.
With the TreeNode class implementing IEnumerable and the TreeEnumerator class implementing IEnumerator, the main program can create and use enumerators to enumerate over a TreeNode’s tree. The following code shows how the main example program builds and displays its tree:
// Build and display a tree.
private void Form1_Load(object sender, EventArgs e)
{
// Build the tree.
TreeNode president = new TreeNode("President");
TreeNode sales = president.AddChild("VP Sales");
sales.AddChild("Domestic Sales");
sales.AddChild("International Sales");
// Other tree-building code omitted.
...
// Display the tree.
string text = "";
IEnumerator<TreeNode> enumerator = president.GetEnumerator();
while (enumerator.MoveNext())
text += new string(' ', 4 * enumerator.Current.Depth) +
enumerator.Current.Text +
Environment.NewLine;
text = text.Substring(0, text.Length - Environment.NewLine.Length);
treeTextBox.Text = text;
treeTextBox.Select(0, 0);
}
The code starts by building a tree. It then uses the root node’s GetEnumerator method to get an enumerator.
The code then enters a while loop that executes as long as the enumerator’s MoveNext method returns true to indicate that there is a valid current record. Inside the loop, the code gets the enumerator’s current TreeNode object and uses its Depth and Text fields to add the object to the text the program is building.
After the loop finishes, the code removes the new line at the end of the text and displays the result in a TextBox.
BEST PRACTICES: Making Enumerations Easy
Implementing the IEnumerable interface is a lot of work, requiring you to implement several methods plus making an IEnumerator helper class. If all the program wants to do is loop over a series of objects, there’s an easier approach.
Give the class a method that returns an object of type IEnumerable<class> where class is the class you’re working with. Have the method find the objects that should be in the enumeration and call yield return to place each in the enumeration. Make the method return or call yield breakwhen it finishes building the enumeration.
The following code shows how the TreeNode class creates an enumeration in the TreeEnumerator example program, which is available for download on the book’s website:
// Return an enumerator.
public IEnumerable<TreeNode> GetTraversal()
{
// Get the preorder traversal.
List<TreeNode> traversal = Preorder();
// Yield the nodes in the traversal.
foreach (TreeNode node in traversal) yield return node;
yield break;
}
The code calls the Preorder method described earlier to get a list containing the tree’s nodes. It then loops over the nodes in the list calling yield return to add each to the enumeration. It finishes the enumeration by calling yield break.
The following code shows how the main program uses the enumeration:
string text = "";
foreach (TreeNode node in president.GetTraversal())
{
text += new string(' ', 4 * node.Depth) +
node.Text +
Environment.NewLine;
}
This code loops over the enumeration returned by the GetTraversal method to build a result string in the same way the previous version of the program did.
If you just want to use foreach to iterate over some items, using the yield keyword is a lot easier than implementing IEnumerable.
Managing Object Life Cycle
When a C# program instantiates a class, it creates an object. The program manipulates the object for a while, and at some point the object may no longer be needed. When the program loses its last reference to the object, either because all the references to it have been set to null or have gone out of scope, that object is no longer accessible to the program and becomes a candidate for garbage collection (the process of running the garbage collector to reclaim memory that is no longer accessible to the program).
At some later point, the garbage collector (GC) may decide the program is running low on memory and decide to start garbage collection. The GC marks all the memory that has been used by the program as currently unreachable. It then goes through all the references accessible to the program and marks the memory to which they refer as reachable. If a reference refers to an object that has its own references, the GC follows those references until it has visited every object that the program can reach.
When it finishes checking references, the GC examines any objects still marked as unreachable. If an object has a Finalize method (described in greater detail in the section “Providing Destructors” later in this chapter), the GC calls it to let the object perform any necessary cleanup chores. After calling Finalize, the GC at long last recycles the object’s memory and makes it available for future use.
The process of calling an object’s Finalize method is called finalization. Because you can’t tell when the GC will call an object’s Finalize method, this process is called nondeterministic finalization.
This process is reasonably straightforward for simple objects, but can become more complicated when an object has access to a resource that must be cleaned up somehow. For example, suppose a program creates an object that locks a file for writing, perhaps to log events. When the object goes out of scope, the object is a candidate for finalization, but you can’t tell when the GC will get around to finalizing it. Meanwhile the file remains locked, possibly for a long time. Actually, if the program doesn’t use too much memory, the GC might not run at all while the program executes, so it might not release the file until the program ends.
You can take two steps to help objects free their resources: implementing the IDisposable interface and providing destructors.
Implementing the IDisposable Interface
A class that implements the IDisposable interface must provide a Dispose method that cleans up any resources used by the class. The program should call the Dispose method (or use the using statement described in the section “Using the using Statement” later in this chapter) when an object is no longer needed so it can perform this cleanup.
The Dispose method’s main purpose is to clean up unmanaged resources, but it can also clean up managed resources. If an object uses references to other objects that implement the IDisposable interface, it can call those objects’ Dispose methods.
NOTE Managed resources are those under the control of the Common Language Runtime (CLR), the runtime environment that executes C# programs.
Unmanaged resources are those outside of the control of the CLR. Unmanaged resources include such things as handles to windows, files, pens, brushes, and other objects the program is manipulating through API calls.
For example, suppose a Shape object represents a drawn shape and has properties that are references to Brush and Pen objects. The Brush and Pen classes are managed classes, and they implement IDisposable, so the Shape class’s Dispose method should call their Dispose methods to free their resources.
For another example, suppose the ImageTransformer class uses unmanaged code to manipulate bitmaps. It uses API calls to get a handle to a bitmap (HBITMAP) and other API calls to get a device context (DC) and to manipulate the bitmap. Because these handles were obtained by using API calls, they represent unmanaged resources. If an ImageTransformer object is destroyed without using other API calls to free those handles, their memory is lost. The ImageTransformer class’s Dispose method should use the appropriate API calls to free those resources when they are no longer needed.
BEST PRACTICES: Reusing Objects
Microsoft recommends that a class provide Close and Open methods if a program might want to later reopen the object’s resources. In contrast the Dispose method should be called only if the object will not be needed again later. Trying to use an object after its Dispose method has been called usually causes an exception.
By convention it should be safe to call an object’s Dispose method more than once. You can give the class a boolean variable to indicate whether the method has been called before and make the method do nothing if it has already executed.
Unfortunately IDisposable is only half of the story. Before you see code for a class that implements IDisposable, you should learn about the rest of the solution for freeing resources: destructors.
Providing Destructors
The Dispose method frees resources if the program calls it, but if the program doesn’t call Dispose, the resources are not freed. When the GC eventually gets around to destroying the object, it frees any managed resources, but unmanaged resources are not freed and are lost to the program. To handle this situation, you can give the class a destructor to free resources when the object is destroyed.
A destructor is a method with no return type and a name that includes the class’s name prefixed by ~. The GC executes an object’s destructor before permanently destroying it.
For example, the following code shows an empty destructor for the class named DisposableClass:
~DisposableClass()
{
}
Several rules apply to destructors that do not apply to other methods. The following list summarizes these rules:
· Destructors can be defined in classes only, not structures.
· A class can have at most one destructor.
· Destructors cannot be inherited or overloaded.
· Destructors cannot be called directly.
· Destructors cannot have modifiers or parameters.
Destructor to Finalizer
The GC actually calls an object’s finalizer, not its destructor. The destructor is converted into an override version of the Finalize method that executes the destructor’s code and then calls the base class’s Finalize method. For example, suppose the Person class includes the following destructor:
~Person()
{
// Free unmanaged resources here.
...
}
This destructor is converted into the following Finalize method:
protected override void Finalize()
{
try
{
// Free unmanaged resources here.
...
}
finally
{
base.Finalize();
}
}
You cannot explicitly override the Finalize method in C# code. That’s just as well because your code cannot call the base class’s Finalize method directly. (See the preceding list of destructor rules.)
The GC calls the destructor before it permanently destroys the object so you have one last chance to clean up the object’s mess.
When the destructor executes, the GC is probably in the process of destroying other objects, so the destructor’s code cannot depend on other objects existing. For example, suppose the Person class contains a reference to a Company object. The Person class’s destructor cannot assume that itsCompany object exists because it may have already been destroyed by the GC. That means the Person class’s destructor cannot call the Company object’s Dispose method (if it has one).
There’s one final twist to the resource management saga. If an object has a destructor, it must pass through a finalization queue (a queue of objects that are ready to be finalized) before it is destroyed, and that takes extra time. If the Dispose method has already freed all the object’s resources, there’s no need to run the object’s destructor. In that case, the Dispose method can call GC.SuppressFinalize to tell the GC not to call the object’s finalizer (destructor) and to let the object skip the finalization queue.
The following list summarizes the resource management rules and concepts:
· If a class contains no managed resources and no unmanaged resources, it doesn’t need to implement IDisposable or have a destructor.
· If the class has only managed resources, it should implement IDisposable but it doesn’t need a destructor. (When the destructor executes, you can’t be sure managed objects still exist, so you can’t call their Dispose methods anyway.)
· If the class has only unmanaged resources, it needs to implement IDisposable and needs a destructor in case the program doesn’t call Dispose.
· The Dispose method must be safe to run more than once. You can achieve that by using a variable to keep track of whether it has been run before.
· The Dispose method should free both managed and unmanaged resources.
· The destructor should free only unmanaged resources. (When the destructor executes, you can’t be sure managed objects still exist, so you can’t call their Dispose methods anyway.)
· After freeing resources, the destructor should call GC.SuppressFinalize, so the object can skip the finalization queue.
COMMON MISTAKES: Using Managed Versus Unmanaged Resources
To avoid confusion, a class should ideally not include both managed and unmanaged resources. If the class has unmanaged resources, it should manage only one resource.
The IDisposableClass example program, which is available for download, uses the following class to demonstrate the IDisposable interface and destructors:
class DisposableClass : IDisposable
{
// A name to keep track of the object.
public string Name = "";
// Free managed and unmanaged resources.
public void Dispose()
{
FreeResources(true);
}
// Destructor to clean up unmanaged resources
// but not managed resources.
~DisposableClass()
{
FreeResources(false);
}
// Keep track if whether resources are already freed.
private bool ResourcesAreFreed = false;
// Free resources.
private void FreeResources(bool freeManagedResources)
{
Console.WriteLine(Name + ": FreeResources");
if (!ResourcesAreFreed)
{
// Dispose of managed resources if appropriate.
if (freeManagedResources)
{
// Dispose of managed resources here.
Console.WriteLine(Name + ": Dispose of managed resources");
}
// Dispose of unmanaged resources here.
Console.WriteLine(Name + ": Dispose of unmanaged resources");
// Remember that we have disposed of resources.
ResourcesAreFreed = true;
// We don't need the destructor because
// our resources are already freed.
GC.SuppressFinalize(this);
}
}
}
The class starts by defining a string property called Name. The example program uses Name to keep track of the objects that it creates. (You probably won’t need this field in your classes.)
The Dispose method calls the FreeResources method described shortly to do all the work. It passes the method the value true to indicate that FreeResources should free managed resources.
The destructor also calls FreeResources to do the interesting work. It passes that method the value false to indicate that FreeResources should not free managed resources. Remember that managed objects may have already been destroyed when the destructor executes, so the FreeResourcesmethod should not try to do anything with them.
Next, the class declares the variable ResourcesAreFreed and sets it to false to indicate that the resources have not yet been freed.
The FreeResources method first writes a message in the Console window and then checks the variable ResourcesAreFreed to see if the resources have already been freed. If the resources have been freed, the method does nothing.
If the resources have not yet been freed, the FreeResources method checks its freeManagedResources parameter to see if it should free managed resources. If freeManagedResources is true, the method frees its managed resources. (In this example, the code simply writes a message to the Console window, so you can see what’s happening.)
Next, the FreeResources method frees the object’s unmanaged resources. (In this example, the code writes another message to the Console window, so you can see what’s happening.)
The code then sets ResourcesAreFreed to true so it knows the resources have been freed. That way if the program calls Dispose again later, the method doesn’t do anything, so it’s safe to call Dispose more than once.
Finally, the method calls GC.SuppressFinalize to let the object skip the finalization queue when it is destroyed.
The IDisposableClass example program has three buttons: one labeled Create & Dispose, a second labeled Create, and a third labeled Collect Garbage.
When you click the first button, the following code executes:
// Used to give objects different names.
private int ObjectNumber = 1;
// Create an object and dispose of it.
private void createAndDisposeButton_Click(object sender, EventArgs e)
{
// Make an object.
DisposableClass obj = new DisposableClass();
obj.Name = "CreateAndDispose " + ObjectNumber.ToString();
ObjectNumber++;
// Dispose of the object.
obj.Dispose();
}
This code creates a DisposableClass object, sets its Name property, and increments the variable ObjectNumber used to give the objects different names. It then calls the object’s Dispose method to free its resources. In this example, the Dispose method merely displays messages in the Console window.
If you click the Create button, the following code executes:
// Create an object and do not dispose of it.
private void createButton_Click(object sender, EventArgs e)
{
// Make an object.
DisposableClass obj = new DisposableClass();
obj.Name = "Create " + ObjectNumber.ToString();
ObjectNumber++;
}
This is similar to the other button’s code except it doesn’t call the object’s Dispose method.
You can use these two buttons to see when the objects you have created free their resources. For example, suppose you click the buttons in the following sequence and then close the program:
1. Create & Dispose
2. Create
3. Create
4. Create & Dispose
When you first click Create & Dispose, you see the following messages in the Console window:
CreateAndDispose 1: FreeResources
CreateAndDispose 1: Dispose of managed resources
CreateAndDispose 1: Dispose of unmanaged resources
When you then click Create twice, you do not see any new messages in the Console window because those objects have not been destroyed yet. The variables that refer to them are out of scope, so the objects are eligible for finalization but the GC has not destroyed them.
When you click Create & Dispose again, you see the following messages in the Console window as the program creates and disposes of another object:
CreateAndDispose 4: FreeResources
CreateAndDispose 4: Dispose of managed resources
CreateAndDispose 4: Dispose of unmanaged resources
Finally, when you close the program, you see the following messages in the Console window:
Create 3: FreeResources
Create 3: Dispose of unmanaged resources
Create 2: FreeResources
Create 2: Dispose of unmanaged resources
Notice that the final two objects aren’t destroyed until the program ends and that their destructors are called in reverse order. In general you cannot assume that one object will be destroyed before another one.
Notice also that FreeResources was not called again for the first and fourth objects. Their Dispose methods were already called, so the call to GC.SuppressFinalize prevented their destructors from being called.
If you click the IDisposableClass program’s Collect Garbage button, the following code forces the GC to immediately perform garbage collection:
// Force garbage collection.
private void collectGarbageButton_Click(object sender, EventArgs e)
{
GC.Collect();
}
You can use the GC.Collect statement to test garbage collection and destructors, but you should not use it in the final program because it interferes with the GC’s normal scheduling algorithm and may decrease performance.
Using the using Statement
If an object has a Dispose method, a program using it should call it when it is done using the object to free its resources. This is important but easy to forget. To make it easier to ensure that the Dispose method is called, C# provides the using statement.
The using statement begins a block of code that is tied to an object that implements IDisposable. When the block ends, the program automatically calls the object’s Dispose method for you.
For example, the following code shows how the IDisposableClass example program described in the previous section could use using to allocate and dispose of an object:
using (DisposableClass obj = new DisposableClass())
{
obj.Name = "CreateAndDispose " + ObjectNumber.ToString();
ObjectNumber++;
}
The using block calls Dispose when it ends, even if the code inside it throws an exception. That makes the previous code equivalent to the following:
{
DisposableClass obj = new DisposableClass();
try
{
obj.Name = "CreateAndDispose " + ObjectNumber.ToString();
ObjectNumber++;
}
finally
{
if (obj != null) obj.Dispose();
}
}
The using statement has three syntactic forms:
// Version 1.
using (DisposableClass obj1 = new DisposableClass())
{
}
// Version 2.
DisposableClass obj2 = new DisposableClass();
using (obj2)
{
}
// Version 3.
DisposableClass obj3;
using (obj3 = new DisposableClass())
{
}
In the first version, the object that the using block disposes is declared and initialized inside parentheses after the using keyword. This method is preferred because it keeps the variable declaration and assignment together, and because it restricts the variable’s scope to the using block.
The second and third methods both declare their variable outside of the using block, so the variable has scope that extends beyond the block. After the using block ends, however, the variable has already been disposed, so it probably can’t be used unless it is reinitialized to another object.
REAL-WORLD CASE SCENARIO: Shape Resources
Suppose the Shape class has the properties FillBrush (of type Brush) and OutlinePen (of type Pen). The Brush and Pen classes are defined in the System.Drawing namespace and are managed classes. How would you manage the Shape class’s FillBrush and OutlinePen resources? (Don’t worry about any other code that the class should provide, such as methods to draw a shape.)
Solution
Because the FillBrush and OutlinePen properties are managed resources, the Shape class should implement IDisposable and not have a destructor. The following Shape class works:
class Shape : IDisposable, IComparable<Shape>
{
// The FillBrush and OutlinePen properties.
public Brush FillBrush { get; set; }
public Pen OutlinePen { get; set; }
// Remember whether we've already run Dispose.
private bool IsDisposed = false;
// Clean up managed resources.
public void Dispose()
{
// If we've already run Dispose, do nothing.
if (IsDisposed) return;
// Dispose of FillBrush and OutlinePen.
FillBrush.Dispose();
OutlinePen.Dispose();
// Remember that we ran Dispose.
IsDisposed = true;
}
}
The class implements the IDisposable interface. Its Dispose method calls the Dispose methods for its two managed resources, FillBrush and OutlinePen. It also sets the boolean variable IsDisposed to true, so it knows that the Dispose method has executed.
This class does not need a destructor because it has no unmanaged resources. It doesn’t need to call GC.SuppressFinalize because it has no destructor and therefore won’t be put in the finalization queue anyway.
Summary
This chapter explained how to work with classes and interfaces. It explained how to derive one class from another and how to define and implement interfaces.
It also explained how to implement some of the most useful interfaces defined by the .NET Framework: IComparable, IComparer, IEquatable, ICloneable, and IEnumerable. It explained how to use the yield return statement to make enumerations more easily than you can with the IEnumerableinterface.
Finally, this chapter explained garbage collection and how to manage resources as objects that are created and destroyed. It explained how to use the IDisposable interface to free managed and unmanaged resources, and it explained how to use destructors to free unmanaged resources.
An interface specifies properties, methods, and events that a class must provide to implement the interface. A delegate is a bit like an interface in the sense that it specifies the characteristics of a method. It specifies the parameters that a method takes and the type of result it returns, if any. The next chapter explains delegates. It also explains events, which use delegates, and exceptions, which are useful in any program.
Test Questions
Read each question carefully and select the answer or answers that represent the best solution to the problem. You can find the answers in Appendix A, “Answers to Chapter Test Questions.”
1. Which the following statements about the base keyword is false?
a. A constructor can use at most one base statement.
b. A constructor cannot use both a base statement and a this statement.
c. The base keyword lets a constructor invoke a different constructor in the same class.
d. If a constructor uses a base statement, its code is executed after the invoked constructor is executed.
2. Which the following statements about the this keyword is false?
a. A constructor can use at most one this statement.
b. A constructor can use a this statement and a base statement if the base statement comes first.
c. The this keyword lets a constructor invoke a different constructor in the same class.
d. If a constructor uses a this statement, its code is executed after the invoked constructor is executed.
3. Suppose you have defined the House and Boat classes and you want to make a HouseBoat class that inherits from both House and Boat. Which of the following approaches would not work?
a. Make HouseBoat inherit from both House and Boat.
b. Make HouseBoat inherit from House and implement an IBoat interface.
c. Make HouseBoat inherit from Boat and implement an IHouse interface.
d. Make HouseBoat implement both IHouse and IBoat interfaces.
4. Suppose the HouseBoat class implements the IHouse interface implicitly and the IBoat interface explicitly. Which of the following statements is false?
a. The code can use a HouseBoat object to access its IHouse members.
b. The code can use a HouseBoat object to access its IBoat members.
c. The code can treat a HouseBoat object as an IHouse to access its IHouse members.
d. The code can treat a HouseBoat object as an IBoat to access its IBoat members.
5. Which of the following is not a good use of interfaces?
a. To simulate multiple inheritance.
b. To allow the code to treat objects that implement the interface polymorphically as if they were of the interface’s “class.”
c. To allow the program to treat objects from unrelated classes in a uniform way.
d. To reuse the code defined by the interface.
6. Suppose you want to make a Recipe class to store cooking recipes and you want to sort the Recipes by the MainIngredient property. In that case, which of the following interfaces would probably be most useful?
a. IDisposable
b. IComparable
c. IComparer
d. ISortable
7. Suppose you want to sort the Recipe class in question 6 by any of the properties MainIngredient, TotalTime, or CostPerPerson. In that case, which of the following interfaces would probably be most useful?
a. IDisposable
b. IComparable
c. IComparer
d. ISortable
8. Which of the following statements is true?
a. A class can inherit from at most one class and implement at most one interface.
b. A class can inherit from any number classes and implement any number of interfaces.
c. A class can inherit from at most one class and implement any number of interfaces.
d. A class can inherit from any number of classes and implement at most one interface.
9. A program can use the IEnumerable and IEnumerator interfaces to do which of the following?
a. Use MoveNext and Reset to move through a list of objects.
b. Use foreach to move through a list of objects.
c. Move through a list of objects by index.
d. Use the yield return statement to make a list of objects for iteration.
10. Which of the following statements about garbage collection is false?
a. In general, you can’t tell when the GC will perform garbage collection.
b. It is possible for a program to run without ever performing garbage collection.
c. An object’s Dispose method can call GC.SuppressFinalize to prevent the GC from calling the object’s destructor.
d. Before destroying an object, the GC calls its Dispose method.
11. Which of the following statements about destructors is false?
a. Destructors are called automatically.
b. Destructors cannot assume that other managed objects exist while they are executing.
c. Destructors are inherited.
d. Destructors cannot be overloaded.
12. If a class implements IDisposable, its Dispose method should do which of the following?
a. Free managed resources.
b. Free unmanaged resources.
c. Call GC.SuppressFinalize.
d. All of the above.
13. If a class has managed resources and no unmanaged resources, it should do which of the following?
a. Implement IDisposable and provide a destructor.
b. Implement IDisposable and not provide a destructor.
c. Not implement IDisposable and provide a destructor.
d. Not implement IDisposable and not provide a destructor.
14. If a class has unmanaged resources and no managed resources, it should do which of the following?
a. Implement IDisposable and provide a destructor.
b. Implement IDisposable and not provide a destructor.
c. Not implement IDisposable and provide a destructor.
d. Not implement IDisposable and not provide a destructor.
Additional Reading and Resources
Here are some additional useful resources to help you understand the topics presented in this chapter:
IEnumerable Interface http://msdn.microsoft.com/en-us/library/system.collections.ienumerable.aspx
Using IEnumerator and IEnumerable in the .NET Framework http://www.codeproject.com/Articles/4074/Using-IEnumerator-and-IEnumerable-in-the-NET-Frame
yield (C# Reference) http://msdn.microsoft.com/library/vstudio/9k7k7cf0.aspx
Garbage Collector Basics and Performance Hints http://msdn.microsoft.com/library/ms973837.aspx
Garbage Collection: Automatic Memory Management in the Microsoft .NET Framework http://msdn.microsoft.com/magazine/bb985010.aspx
Finalize Methods and Destructors http://msdn.microsoft.com/library/0s71x931.aspx
Cheat Sheet
This cheat sheet is designed as a way for you to quickly study the key points of this chapter.
Inheritance
· C# does not enable multiple inheritance.
· Use the base keyword to make a constructor invoke a parent class constructor as in the following code:
· public class Employee : Person
· {
· public Employee(string firstName, string lastName)
· : base(firstName, lastName)
· {
· ...
· }
}
· Use the this keyword to make a constructor invoke another constructor in the same class as in the following code:
· public class Person
· {
· public string FirstName { get; set; }
· public string LastName { get; set; }
·
· public Person(string firstName)
· {
· FirstName = firstName;
· }
·
· public Person(string firstName, string lastName)
· : this(firstName)
· {
· LastName = lastName;
· }
}
· A constructor can invoke at most one base class constructor or one same class constructor.
· If a parent class has constructors, a child class’s constructors must invoke them directly or indirectly.
Interfaces
· By convention, interface names begin with I as in IComparable.
· A class can inherit from at most one parent class but can implement any number of interfaces.
· Implementing an interface is sometimes called interface inheritance.
· If a class implements an interface explicitly, the code cannot use an object reference to access the interface’s members. Instead it must use an interface instance.
· If a class implements an interface implicitly, the code can use a class instance or an interface instance to access the interface’s members.
· An IComparable class provides a CompareTo method that determines the order of objects.
· An IComparer class provides a Compare method that compares two objects and determines their ordering.
· An IEquatable class provides an Equals method that determines whether an object is equal to another object.
· An ICloneable class provides a Clone method that returns a copy of an object.
· An IEnumerable class provides a GetEnumerator method that returns an IEnumerator object that has MoveNext and Reset methods for moving through a list of objects.
· A method can use the yield return statement to add objects to an IEnumerator result.
Destructors
· Destructors can be defined in classes only, not structures.
· A class can have at most one destructor.
· Destructors cannot be inherited or overloaded.
· Destructors cannot be called directly.
· Destructors cannot have modifiers or parameters.
· The destructor is converted into an override version of the Finalize method. You cannot override Finalize or call it directly.
Resource Management
· If a class contains no managed resources and no unmanaged resources, it doesn’t need to implement IDisposable or have a destructor.
· If the class has only managed resources, it should implement IDisposable but it doesn’t need a destructor. (When the destructor executes, you can’t be sure managed objects still exist, so you can’t call their Dispose methods anyway.)
· If the class has only unmanaged resources, it needs to implement IDisposable and it needs a destructor in case the program doesn’t call Dispose.
· The Dispose method must be safe to run more than once. You can achieve that by keeping track of whether it has been run before.
· The Dispose method should free managed and unmanaged resources.
· The destructor should free only unmanaged resources. (When the destructor executes, you can’t be sure managed objects still exist, so you can’t call their Dispose methods anyway.)
· After freeing resources, the Dispose method should call GC.SuppressFinalize to prevent the GC from running the object’s destructor and to keep the object out of the finalization queue.
· The using statement lets a program automatically call an object’s Dispose method, so you can’t forget to do it. If you declare and initialize the object in the using statement, this also limits the object’s scope to the using block.
Review of Key Terms
ancestor class A class’s parent, the parent’s parent, and so on.
base class A class from which another class is derived through inheritance. Also known as a parent class or superclass.
child class A class derived from a parent class.
Common Language Runtime (CLR) A virtual machine that manages execution of C# (and other .NET) programs.
deep clone A copy of an object where reference fields refer to new instances of objects, not to the same objects referred to by the original object’s fields.
derive To create one class based on another through inheritance.
derived class A child class derived from a parent class through inheritance.
descendant class A class’s child classes, their child classes, and so on.
destructor A method with no return type and a name that includes the class’s name prefixed by ~. The destructor is converted into a Finalize method that the GC executes before permanently destroying the object.
finalization The process of the GC calling an object’s Finalize method.
finalization queue A queue through which objects with finalizers must pass before being destroyed. This takes some time, so you should not give a class a finalizer (destructor) unless it needs one.
garbage collection The process of running the GC to reclaim memory that is no longer accessible to the program.
garbage collector (GC) A process that executes periodically to reclaim memory that is no longer accessible to the program.
inherit A derived class inherits the properties, methods, events, and other code of its base class.
interface inheritance Using an interface to require a class to provide certain features much as inheritance does (except the interface doesn’t provide an implementation).
managed resources Resources that are under the control of the CLR.
multiple inheritance Allowing a child class to have more than one parent class. C# does not allow multiple inheritance.
nondeterministic finalization Because you can’t tell when the GC will call an object’s Finalize method, the process is called nondeterministic finalization.
parent class A base class. Also known as a superclass.
reachable During garbage collection, an object is reachable if the program has a path of references that let it access the object.
shallow clone A copy of an object where reference fields refer to the same objects as the original object’s fields.
sibling classes Classes that have the same parent class.
subclass A derived class.
subclassing The process of deriving a subclass from a base class through inheritance.
superclass A base class. Also known as a parent class.
unmanaged resources Resources that are not under the control of the CLR.
unreachable During garbage collection, an object is unreachable if the program has no path of references that let it access the object.
Exam Tips and Tricks
The Review of Key Terms and the Cheat Sheet for this chapter can be printed off to help you study. You can find these files in the ZIP file for this chapter at www.wrox.com/remtitle.cgi?isbn=1118612094 on the Download Code tab.
All materials on the site are licensed Creative Commons Attribution-Sharealike 3.0 Unported CC BY-SA 3.0 & GNU Free Documentation License (GFDL)
If you are the copyright holder of any material contained on our site and intend to remove it, please contact our site administrator for approval.
© 2016-2026 All site design rights belong to S.Y.A.