C# 6.0 and the .NET 4.6 Framework (2015)
PART VI
Introducing the .NET Base Class Libraries
CHAPTER 21
ADO.NET Part I: The Connected Layer
The .NET platform defines a number of namespaces that allow you to interact with relational database systems. Collectively speaking, these namespaces are known as ADO.NET. In this chapter, you’ll learn about the overall role of ADO.NET and the core types and namespaces, and then you’ll move on to the topic of ADO.NET data providers. The .NET platform supports numerous data providers (both provided as part of the .NET Framework and available from third-party sources), each of which is optimized to communicate with a specific database management system (e.g., Microsoft SQL Server, Oracle, and MySQL).
After you understand the common functionality provided by various data providers, you will then look at the data provider factory pattern. As you will see, using types within the System.Data.Common namespace (and a related App.config file), you can build a single code base that can dynamically pick and choose the underlying data provider without the need to recompile or redeploy the application’s code base.
Perhaps most importantly, this chapter will give you the chance to build a custom data access library assembly (AutoLotDAL.dll) that encapsulates various database operations performed on a custom database named AutoLot. Finally, you will wrap things up by examining the topic of database transactions.
![]() Note You will expand the capabilities of this library in Chapter 22 and then create it from scratch using Entity Framework (EF) in Chapter 23. Why create it twice? Even though object-relational mapping frameworks (ORMs) like Entity Framework make it much simpler (and faster) to create data access code, ORMs still use ADO.NET as the core data access technology. A solid understanding of how ADO.NET works is vital when troubleshooting an issue with your data access, especially when it was created by a framework and not written by you. Also, you will encounter scenarios that aren’t solved by EF (such as executing a SQL BulkCopy), and you will need to know ADO.NET to solve those issues.
Note You will expand the capabilities of this library in Chapter 22 and then create it from scratch using Entity Framework (EF) in Chapter 23. Why create it twice? Even though object-relational mapping frameworks (ORMs) like Entity Framework make it much simpler (and faster) to create data access code, ORMs still use ADO.NET as the core data access technology. A solid understanding of how ADO.NET works is vital when troubleshooting an issue with your data access, especially when it was created by a framework and not written by you. Also, you will encounter scenarios that aren’t solved by EF (such as executing a SQL BulkCopy), and you will need to know ADO.NET to solve those issues.
A High-Level Definition of ADO.NET
If you have a background in Microsoft’s previous COM-based data access model (Active Data Objects [ADO]) and are just starting to work with the .NET platform, you need to understand that ADO.NET has little to do with ADO beyond the letters A, D, and O. While it is true that there is some relationship between the two systems (e.g., each has the concept of connection and command objects), some familiar ADO types (e.g., the Recordset) no longer exist. Furthermore, you can find many new ADO.NET types that have no direct equivalent under classic ADO (e.g., the data adapter).
ADO.NET was built with the disconnected world in mind. Prior to the wider adoption of ORMs, this was typically accomplished using DataSets. DataSets represent a local copy of any number of related data tables, each of which contains a collection of rows and column. Using aDataSet, the calling assembly (such as a web page or desktop executable) is able to manipulate and update a DataSet’s contents while disconnected from the data source and send any modified data back for processing using a related data adapter.
![]() Note ORMs don’t use DataSets but rather lists of plain old C# objects (also called POCOs). This chapter and the next detail how ADO.NET works. This foundation is important, even if you plan on moving straight to an ORM such as Entity Framework. EF, NHibernate, and the other ORMS in the .NET world are built in top of ADO.NET, so if you need to work through an issue where your code doesn’t seem to be working the way you expect it to, knowing how ADO.NET works is a significant plus. The subsequent chapters use a data access library developed using EF.
Note ORMs don’t use DataSets but rather lists of plain old C# objects (also called POCOs). This chapter and the next detail how ADO.NET works. This foundation is important, even if you plan on moving straight to an ORM such as Entity Framework. EF, NHibernate, and the other ORMS in the .NET world are built in top of ADO.NET, so if you need to work through an issue where your code doesn’t seem to be working the way you expect it to, knowing how ADO.NET works is a significant plus. The subsequent chapters use a data access library developed using EF.
From a programmatic point of view, the bulk of ADO.NET is represented by a core assembly named System.Data.dll. Within this binary, you find a good number of namespaces (see Figure 21-1), many of which represent the types of a particular ADO.NET data provider (defined momentarily).
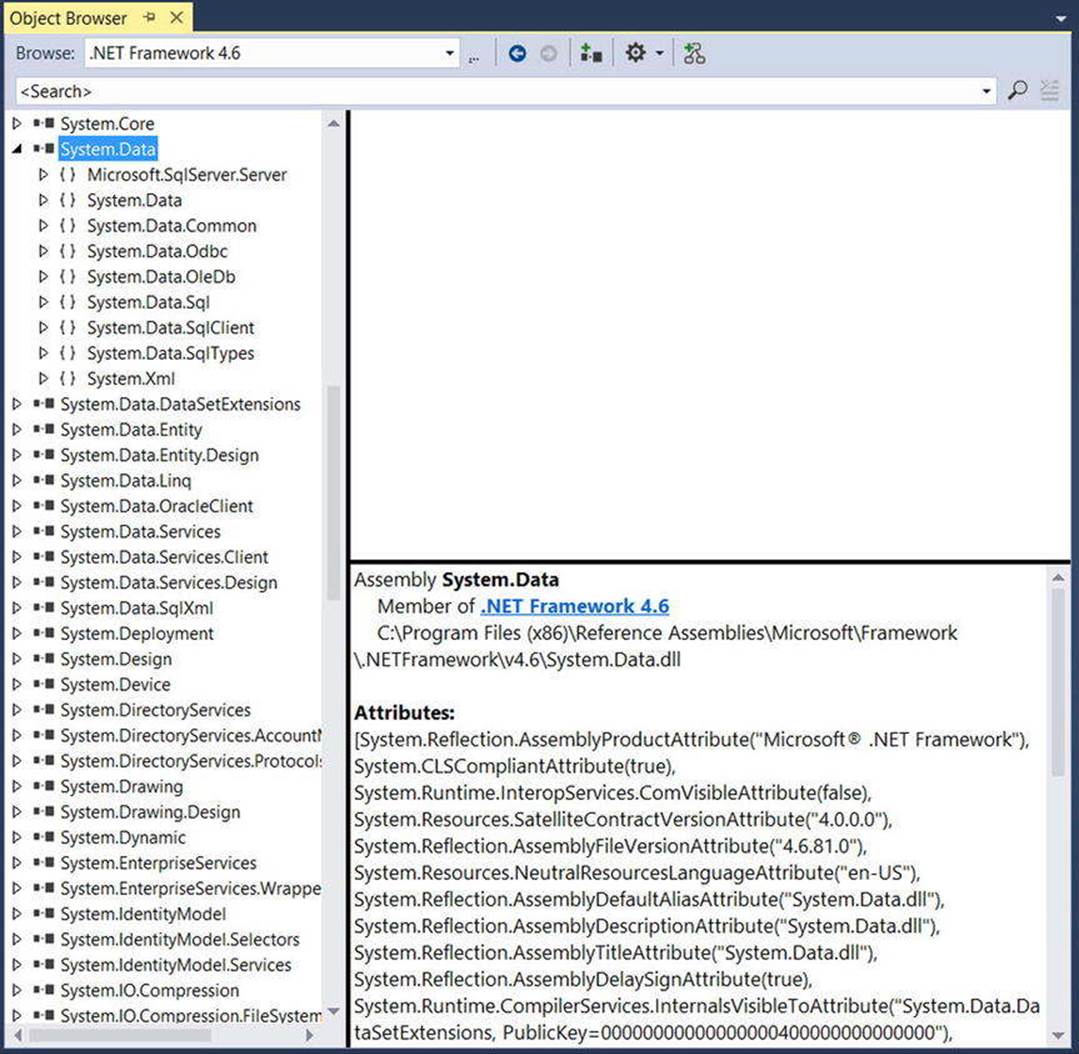
Figure 21-1. System.Data.dll is the core ADO.NET assembly
It turns out most Visual Studio project templates automatically reference this key data access assembly. You should also understand that there are other ADO.NET-centric assemblies beyond System.Data.dll, which you might need to reference manually in your current project using the Add Reference dialog box.
The Three Faces of ADO.NET
You can use the ADO.NET libraries in three conceptually unique manners: connected, disconnected, or through an ORM, such as Entity Framework. When you use the connected layer (the subject of this chapter), your code base explicitly connects to and disconnects from the underlying data store. When you use ADO.NET in this manner, you typically interact with the data store using connection objects, command objects, and data reader objects.
The disconnected layer (you will learn more about this in Chapter 22) allows you to manipulate a set of DataTable objects (contained within a DataSet) that functions as a client-side copy of the external data. When you obtain a DataSet using a related data adapter object, the connection is automatically opened and closed on your behalf. As you would guess, this approach helps free up connections for other callers quickly and goes a long way toward increasing the scalability of your systems.
After a caller receives a DataSet, it is able to traverse and manipulate the contents without incurring the cost of network traffic. Also, if the caller wants to submit the changes back to the data store, the data adapter (in conjunction with a set of SQL statements) is used to update the data source; at this point the connection is reopened for the database updates to occur and then closed again immediately.
Finally, in Chapter 23, you will be introduced to a data access API termed the Entity Framework (EF). Using EF, you are able to interact with a relational database using client-side objects that encapsulate a number of low-level database specifics from view. As well, the EF programming model allows you to interact with relational databases using strongly typed LINQ queries, using the grammar of LINQ to Entities.
Understanding ADO.NET Data Providers
ADO.NET does not provide a single set of objects that communicate with multiple database management systems (DBMSs). Rather, ADO.NET supports multiple data providers, each of which is optimized to interact with a specific DBMS. The first benefit of this approach is that you can program a specific data provider to access any unique features of a particular DBMS. The second benefit is that a specific data provider can connect directly to the underlying engine of the DBMS in question without an intermediate mapping layer standing between the tiers.
Simply put, a data provider is a set of types defined in a given namespace that understand how to communicate with a specific type of data source. Regardless of which data provider you use, each defines a set of class types that provide core functionality. Table 21-1 documents some of the core common types, their base class (all defined in the System.Data.Common namespace), and the key interfaces (each is defined in the System.Data namespace) they implement.
Table 21-1. The Core Objects of an ADO.NET Data Provider
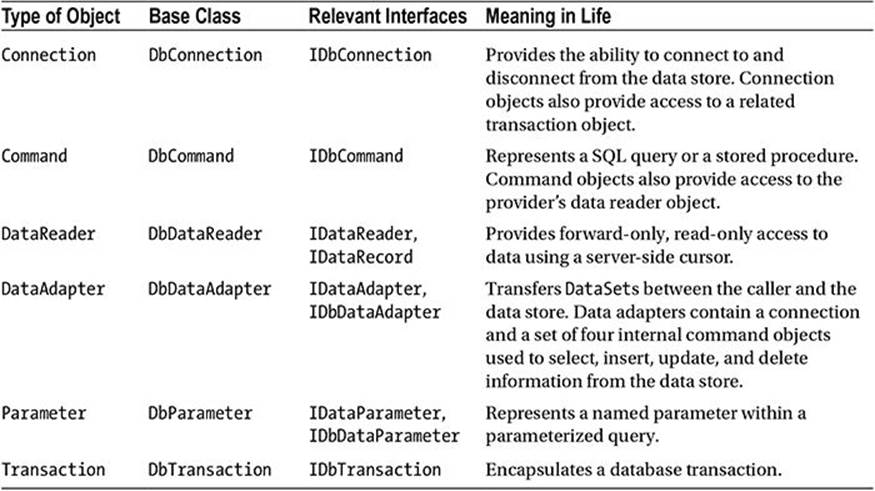
Although the specific names of these core classes will differ among data providers (e.g., SqlConnection versus OdbcConnection), each class derives from the same base class (DbConnection, in the case of connection objects) that implements identical interfaces (e.g.,IDbConnection). Given this, you would be correct to assume that after you learn how to work with one data provider, the remaining providers prove quite straightforward.
![]() Note When you refer to a connection object under ADO.NET, you’re actually referring to a specific DbConnection-derived type; there is no class literally named Connection. The same idea holds true for a command object, data adapter object, and so forth. As a naming convention, the objects in a specific data provider are prefixed with the name of the related DBMS (e.g., SqlConnection, SqlConnection, and SqlDataReader).
Note When you refer to a connection object under ADO.NET, you’re actually referring to a specific DbConnection-derived type; there is no class literally named Connection. The same idea holds true for a command object, data adapter object, and so forth. As a naming convention, the objects in a specific data provider are prefixed with the name of the related DBMS (e.g., SqlConnection, SqlConnection, and SqlDataReader).
Figure 21-2 shows the big picture behind ADO.NET data providers. Note how the diagram illustrates that the Client Assembly can literally be any type of .NET application: console program, Windows Forms application, WPF application, ASP.NET web page, WCF service, Web API service, .NET code library, and so on.
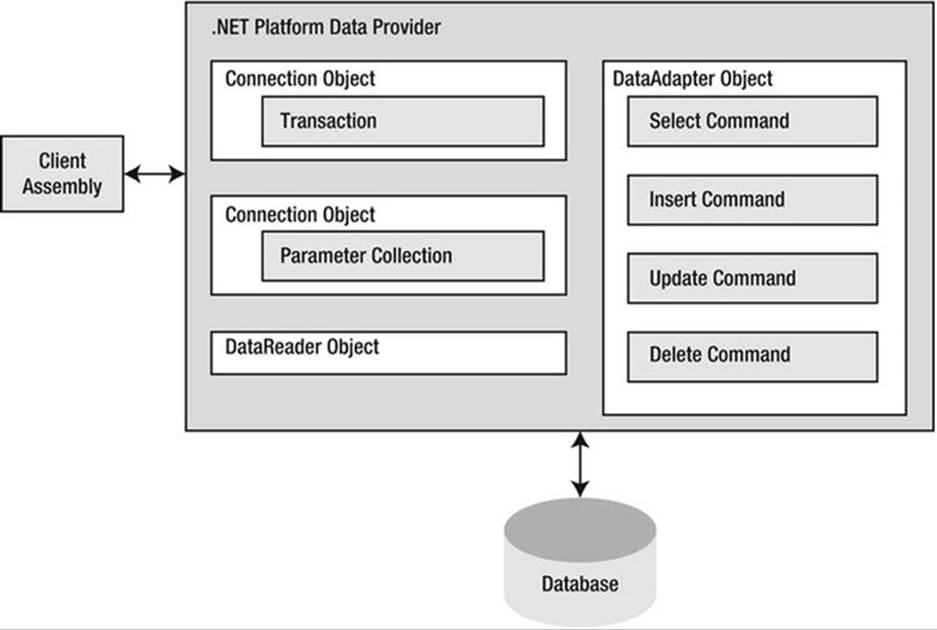
Figure 21-2. ADO.NET data providers provide access to a given DBMS
A data provider will supply you with other types beyond the objects shown in Figure 21-2; however, these core objects define a common baseline across all data providers.
The Microsoft-Supplied ADO.NET Data Providers
Microsoft’s .NET distribution ships with numerous data providers, including a provider for Oracle, SQL Server, and OLE DB/ODBC-style connectivity. Table 21-2 documents the namespace and containing assembly for each Microsoft ADO.NET data provider.
Table 21-2. Microsoft ADO.NET Data Providers
|
Data Provider |
Namespace |
Assembly |
|
OLE DB |
System.Data.OleDb |
System.Data.dll |
|
Microsoft SQL Server LocalDb |
System.Data.SqlClient |
System.Data.dll |
|
ODBC |
System.Data.Odbc |
System.Data.dll |
![]() Note While an Oracle provider is still being shipped with the .NET Framework, the recommendation is to use the Oracle-supplied Oracle Developer Tools for Visual Studio. In fact, if you open Server Explorer and select New Connection and then Oracle Database, Visual Studio will tell you to use the Oracle Data Tools and provide a link where they can be downloaded.
Note While an Oracle provider is still being shipped with the .NET Framework, the recommendation is to use the Oracle-supplied Oracle Developer Tools for Visual Studio. In fact, if you open Server Explorer and select New Connection and then Oracle Database, Visual Studio will tell you to use the Oracle Data Tools and provide a link where they can be downloaded.
There is no specific data provider that maps directly to the Jet engine (and, therefore, Microsoft Access). If you want to interact with an Access data file, you can do so using the OLE DB or ODBC data provider.
The OLE DB data provider, which is composed of the types defined in the System.Data.OleDb namespace, allows you to access data located in any data store that supports the classic COM-based OLE DB protocol. You can use this provider to communicate with any OLE DB–compliant database simply by tweaking the Provider segment of your connection string.
However, the OLE DB provider interacts with various COM objects behind the scenes, which can affect the performance of your application. By and large, the OLE DB data provider is useful only if you interact with a DBMS that does not define a specific .NET data provider. However, given that these days any DBMS worth its salt should have a custom ADO.NET data provider for download, you should consider System.Data.OleDb a legacy namespace that has little use in the .NET 4.6 world. (This is even more the case with the advent of the data provider factory model introduced under .NET 2.0, which you will learn about shortly.)
![]() Note There is one case in which using the types of System.Data.OleDb is necessary: when you need to communicate with Microsoft SQL Server version 6.5 or earlier. The System.Data.SqlClient namespace can communicate only with Microsoft SQL Server version 7.0 or higher.
Note There is one case in which using the types of System.Data.OleDb is necessary: when you need to communicate with Microsoft SQL Server version 6.5 or earlier. The System.Data.SqlClient namespace can communicate only with Microsoft SQL Server version 7.0 or higher.
The Microsoft SQL Server data provider offers direct access to Microsoft SQL Server data stores— and only SQL Server data stores (version 7.0 and greater). The System.Data.SqlClient namespace contains the types used by the SQL Server provider and offers the same basic functionality as the OLE DB provider. The key difference is that the SQL Server provider bypasses the OLE DB layer and gives numerous performance benefits. The Microsoft SQL Server data provider also allows you to gain access to the unique features of this particular DBMS.
The remaining Microsoft-supplied provider (System.Data.Odbc) provides access to ODBC connections. The ODBC types defined within the System.Data.Odbc namespace are typically useful only if you need to communicate with a given DBMS for which there is no custom .NET data provider. This is true because ODBC is a widespread model that provides access to a number of data stores.
A Word Regarding System.Data.OracleClient.dll
Earlier versions of the .NET platform shipped with an assembly named System.Data.OracleClient.dll, which, as the name suggests, offered a data provider to communicate with Oracle databases. As of .NET 4.0, however, this assembly has been marked as obsolete and will eventually be deprecated. The Oracle client is still included in .NET 4.6, but it would be wise to not expect it to be included forever.
At first glance, this might cause you to fear that ADO.NET is slowly becoming focused squarely on Microsoft-centric data stores; however, this is not the case. Oracle provides its own custom .NET assembly, which follows the same overall design guidelines as the data providers provided by Microsoft. If you need to obtain this .NET assembly, you can visit following web site:
http://www.oracle.com/technetwork/topics/dotnet/index-085163.html
Obtaining Third-Party ADO.NET Data Providers
In addition to the data providers that ship from Microsoft (as well as Oracle’s custom .NET library), numerous third-party data providers exist for various open source and commercial databases. While you will most likely be able to obtain an ADO.NET data provider directly from the database vendor, you should be aware of the following site:
https://msdn.microsoft.com/en-us/library/dd363565.aspx
This web site is one of many sites that document each known ADO.NET data provider and provide links for more information and downloads. Here, you will find numerous ADO.NET providers, including SQLite, IBM DB2, MySQL, Postgres, Sybase, and many others.
Given the large number of ADO.NET data providers, the examples in this book will use the Microsoft SQL Server data provider (System.Data.SqlClient.dll). Recall that this provider allows you to communicate with Microsoft SQL Server version 7.0 and higher, including SQL Server Express Edition and LocalDb. If you intend to use ADO.NET to interact with another DBMS, you should have no problem doing so once you understand the material presented in the pages that follow.
Additional ADO.NET Namespaces
In addition to the .NET namespaces that define the types of a specific data provider, the .NET base class libraries provide a number of additional ADO.NET-centric namespaces, some of which you can see in Table 21-3 (again, Chapter 23 will address the assemblies and namespaces specific to Entity Framework).
Table 21-3. Select Additional ADO.NET-Centric Namespaces
|
Namespace |
Meaning in Life |
|
Microsoft.SqlServer.Server |
This namespace provides types that facilitate CLR and SQL Server 2005 and later integration services. |
|
System.Data |
This namespace defines the core ADO.NET types used by all data providers, including common interfaces and numerous types that represent the disconnected layer (e.g., DataSet and DataTable). |
|
System.Data.Common |
This namespace contains types shared between all ADO.NET data providers, including the common abstract base classes. |
|
System.Data.Sql |
This namespace contains types that allow you to discover Microsoft SQL Server instances installed on the current local network. |
|
System.Data.SqlTypes |
This namespace contains native data types used by Microsoft SQL Server. You can always use the corresponding CLR data types, but the SqlTypes are optimized to work with SQL Server (e.g., if your SQL Server database contains an integer value, you can represent it using either int or SqlTypes.SqlInt32). |
Note that this chapter does not examine every type within every ADO.NET namespace (that task would require a large book all by itself); however, it is quite important that you understand the types within the System.Data namespace.
The Types of the System.Data Namespace
Of all the ADO.NET namespaces, System.Data is the lowest common denominator. You cannot build ADO.NET applications without specifying this namespace in your data access applications. This namespace contains types that are shared among all ADO.NET data providers, regardless of the underlying data store. In addition to a number of database-centric exceptions (e.g., NoNullAllowedException, RowNotInTableException, and MissingPrimaryKeyException), System.Data contains types that represent various database primitives (e.g., tables, rows, columns, and constraints), as well as the common interfaces implemented by data provider objects. Table 21-4 lists some of the core types you should be aware of.
Table 21-4. Core Members of the System.Data Namespace
|
Type |
Meaning in Life |
|
Constraint |
Represents a constraint for a given DataColumn object |
|
DataColumn |
Represents a single column within a DataTable object |
|
DataRelation |
Represents a parent-child relationship between two DataTable objects |
|
DataRow |
Represents a single row within a DataTable object |
|
DataSet |
Represents an in-memory cache of data consisting of any number of interrelated DataTable objects |
|
DataTable |
Represents a tabular block of in-memory data |
|
DataTableReader |
Allows you to treat a DataTable as a fire-hose cursor (forward only, read- only data access) |
|
DataView |
Represents a customized view of a DataTable for sorting, filtering, searching, editing, and navigation |
|
IDataAdapter |
Defines the core behavior of a data adapter object |
|
IDataParameter |
Defines the core behavior of a parameter object |
|
IDataReader |
Defines the core behavior of a data reader object |
|
IDbCommand |
Defines the core behavior of a command object |
|
IDbDataAdapter |
Extends IDataAdapter to provide additional functionality of a data adapter object |
|
IDbTransaction |
Defines the core behavior of a transaction object |
You use the vast majority of the classes within System.Data when programming against the disconnected layer of ADO.NET. In the next chapter, you will get to know the details of the DataSet and its related cohorts (e.g., DataTable, DataRelation, and DataRow) and how to use them (and a related data adapter) to represent and manipulate client-side copies of remote data.
However, your next task is to examine the core interfaces of System.Data at a high level; this can help you understand the common functionality offered by any data provider. You will also learn specific details throughout this chapter; however, for now it’s best to focus on the overall behavior of each interface type.
The Role of the IDbConnection Interface
The IDbConnection type is implemented by a data provider’s connection object. This interface defines a set of members used to configure a connection to a specific data store. It also allows you to obtain the data provider’s transaction object. Here is the formal definition ofIDbConnection:
public interface IDbConnection : IDisposable
{
string ConnectionString { get; set; }
int ConnectionTimeout { get; }
string Database { get; }
ConnectionState State { get; }
IDbTransaction BeginTransaction();
IDbTransaction BeginTransaction(IsolationLevel il);
void ChangeDatabase(string databaseName);
void Close();
IDbCommand CreateCommand();
void Open();
}
![]() Note Like many other types in the .NET base class libraries, the Close() method is functionally equivalent to calling the Dispose() method directly or indirectly within C# by using scope (see Chapter 13).
Note Like many other types in the .NET base class libraries, the Close() method is functionally equivalent to calling the Dispose() method directly or indirectly within C# by using scope (see Chapter 13).
The Role of the IDbTransaction Interface
The overloaded BeginTransaction() method defined by IDbConnection provides access to the provider’s transaction object. You can use the members defined by IDbTransaction to interact programmatically with a transactional session and the underlying data store.
public interface IDbTransaction : IDisposable
{
IDbConnection Connection { get; }
IsolationLevel IsolationLevel { get; }
void Commit();
void Rollback();
}
The Role of the IDbCommand Interface
Next up is the IDbCommand interface, which will be implemented by a data provider’s command object. Like other data access object models, command objects allow programmatic manipulation of SQL statements, stored procedures, and parameterized queries. Command objects also provide access to the data provider’s data reader type through the overloaded ExecuteReader() method.
public interface IDbCommand : IDisposable
{
IDbConnection Connection { get; set; }
IDbTransaction Transaction { get; set; }
string CommandText { get; set; }
int CommandTimeout { get; set; }
CommandType CommandType { get; set; }
IDataParameterCollection Parameters { get; }
UpdateRowSource UpdatedRowSource { get; set; }
void Prepare();
void Cancel();
IDbDataParameter CreateParameter();
int ExecuteNonQuery();
IDataReader ExecuteReader();
IDataReader ExecuteReader(CommandBehavior behavior);
object ExecuteScalar();
}
The Role of the IDbDataParameter and IDataParameter Interfaces
Notice that the Parameters property of IDbCommand returns a strongly typed collection that implements IDataParameterCollection. This interface provides access to a set of IDbDataParameter-compliant class types (e.g., parameter objects).
public interface IDbDataParameter : IDataParameter
{
byte Precision { get; set; }
byte Scale { get; set; }
int Size { get; set; }
}
IDbDataParameter extends the IDataParameter interface to obtain the following additional behaviors:
public interface IDataParameter
{
DbType DbType { get; set; }
ParameterDirection Direction { get; set; }
bool IsNullable { get; }
string ParameterName { get; set; }
string SourceColumn { get; set; }
DataRowVersion SourceVersion { get; set; }
object Value { get; set; }
}
As you will see, the functionality of the IDbDataParameter and IDataParameter interfaces allows you to represent parameters within a SQL command (including stored procedures) through specific ADO.NET parameter objects, rather than through hard-coded string literals.
The Role of the IDbDataAdapter and IDataAdapter Interfaces
You use data adapters to push and pull DataSets to and from a given data store. The IDbDataAdapter interface defines the following set of properties that you can use to maintain the SQL statements for the related select, insert, update, and delete operations:
public interface IDbDataAdapter : IDataAdapter
{
IDbCommand SelectCommand { get; set; }
IDbCommand InsertCommand { get; set; }
IDbCommand UpdateCommand { get; set; }
IDbCommand DeleteCommand { get; set; }
}
In addition to these four properties, an ADO.NET data adapter also picks up the behavior defined in the base interface, IDataAdapter. This interface defines the key function of a data adapter type: the ability to transfer DataSets between the caller and underlying data store using theFill() and Update() methods. The IDataAdapter interface also allows you to map database column names to more user-friendly display names with the TableMappings property.
public interface IDataAdapter
{
MissingMappingAction MissingMappingAction { get; set; }
MissingSchemaAction MissingSchemaAction { get; set; }
ITableMappingCollection TableMappings { get; }
DataTable[] FillSchema(DataSet dataSet, SchemaType schemaType);
int Fill(DataSet dataSet);
IDataParameter[] GetFillParameters();
int Update(DataSet dataSet);
}
The Role of the IDataReader and IDataRecord Interfaces
The next key interface to be aware of is IDataReader, which represents the common behaviors supported by a given data reader object. When you obtain an IDataReader-compatible type from an ADO.NET data provider, you can iterate over the result set in a forward-only, read-only manner.
public interface IDataReader : IDisposable, IDataRecord
{
int Depth { get; }
bool IsClosed { get; }
int RecordsAffected { get; }
void Close();
DataTable GetSchemaTable();
bool NextResult();
bool Read();
}
Finally, IDataReader extends IDataRecord, which defines many members that allow you to extract a strongly typed value from the stream, rather than casting the generic System.Object retrieved from the data reader’s overloaded indexer method. Here is the IDataRecord interface definition:
public interface IDataRecord
{
int FieldCount { get; }
object this[ int i ] { get; }
object this[ string name ] { get; }
string GetName(int i);
string GetDataTypeName(int i);
Type GetFieldType(int i);
object GetValue(int i);
int GetValues(object[] values);
int GetOrdinal(string name);
bool GetBoolean(int i);
byte GetByte(int i);
long GetBytes(int i, long fieldOffset, byte[] buffer, int bufferoffset, int length);
char GetChar(int i);
long GetChars(int i, long fieldoffset, char[] buffer, int bufferoffset, int length);
Guid GetGuid(int i);
short GetInt16(int i);
int GetInt32(int i);
long GetInt64(int i);
float GetFloat(int i);
double GetDouble(int i);
string GetString(int i);
Decimal GetDecimal(int i);
DateTime GetDateTime(int i);
IDataReader GetData(int i);
bool IsDBNull(int i);
}
![]() Note You can use the IDataReader.IsDBNull() method to discover programmatically whether a specified field is set to null before obtaining a value from the data reader (to avoid triggering a runtime exception). Also recall that C# supports nullable data types (see Chapter 4), which are ideal for interacting with data columns that could be null in the database table.
Note You can use the IDataReader.IsDBNull() method to discover programmatically whether a specified field is set to null before obtaining a value from the data reader (to avoid triggering a runtime exception). Also recall that C# supports nullable data types (see Chapter 4), which are ideal for interacting with data columns that could be null in the database table.
Abstracting Data Providers Using Interfaces
At this point, you should have a better idea of the common functionality found among all .NET data providers. Recall that even though the exact names of the implementing types will differ among data providers, you can program against these types in a similar manner—that’s the beauty of interface- based polymorphism. For example, if you define a method that takes an IDbConnection parameter, you can pass in any ADO.NET connection object, like so:
public static void OpenConnection(IDbConnection cn)
{
// Open the incoming connection for the caller.
connection.Open();
}
![]() Note Interfaces are not strictly required; you can achieve the same level of abstraction using abstract base classes (such as DbConnection) as parameters or return values.
Note Interfaces are not strictly required; you can achieve the same level of abstraction using abstract base classes (such as DbConnection) as parameters or return values.
The same holds true for member return values. For example, consider the following simple C# Console Application project (named MyConnectionFactory), which allows you to obtain a specific connection object based on the value of a custom enumeration. For diagnostic purposes, you simply print the underlying connection object using reflection services and then enter the following code:
using System;
using static System.Console;
// Need these to get definitions of common interfaces,
// and various connection objects for our test.
using System.Data;
using System.Data.SqlClient;
using System.Data.Odbc;
using System.Data.OleDb;
namespace MyConnectionFactory
{
// A list of possible providers.
enum DataProvider
{ SqlServer, OleDb, Odbc, None }
class Program
{
static void Main(string[] args)
{
WriteLine("**** Very Simple Connection Factory *****\n");
// Get a specific connection.
IDbConnection myConnection = GetConnection(DataProvider.SqlServer);
WriteLine($"Your connection is a {myConnection.GetType().Name}");
// Open, use and close connection...
ReadLine();
}
// This method returns a specific connection object
// based on the value of a DataProvider enum.
static IDbConnection GetConnection(DataProvider dataProvider)
{
IDbConnection connection = null;
switch (dataProvider)
{
case DataProvider.SqlServer:
connection = new SqlConnection();
break;
case DataProvider.OleDb:
connection = new OleDbConnection();
break;
case DataProvider.Odbc:
connection = new OdbcConnection();
break;
}
return connection;
}
}
}
![]() Note Visual Studio 2015 introduces use static. By adding use static System.Console; to your other using statements, you can simply write WriteLine("some text") instead of Console.WriteLine("some text"). For all the console projects in this and subsequent chapters, I will be using the shorter version by adding using static System.Console; to the top of my files.
Note Visual Studio 2015 introduces use static. By adding use static System.Console; to your other using statements, you can simply write WriteLine("some text") instead of Console.WriteLine("some text"). For all the console projects in this and subsequent chapters, I will be using the shorter version by adding using static System.Console; to the top of my files.
The benefit of working with the general interfaces of System.Data (or, for that matter, the abstract base classes of System.Data.Common) is that you have a much better chance of building a flexible code base that can evolve over time. For example, today you might be building an application that targets Microsoft SQL Server; however, it’s possible your company could switch to a different database months down the road. If you build a solution that hard-codes the Microsoft SQL Server–specific types of System.Data.SqlClient, you would obviously need to edit, recompile, and redeploy the assembly should the back-end database management system change.
Increasing Flexibility Using Application Configuration Files
To increase the flexibility of your ADO.NET applications, you could incorporate a client-side *.config file that uses custom key-value pairs within the <appSettings> element. Recall from Chapter 14 that you can obtain the custom data stored within a *.config file programmatically by using types within the System.Configuration namespace. For example, assume you have specified a data provider value within a configuration file, as in this example:
<configuration>
<appSettings>
<!-- This key value maps to one of our enum values. -->
<add key="provider" value="SqlServer"/>
</appSettings>
<startup>
<supportedRuntime version="v4.0" sku=".NETFramework,Version=v4.6"/>
</startup>
</configuration>
With this, you could update Main() to obtain the underlying data provider programmatically. Doing this essentially builds a connection object factory that allows you to change the provider but without requiring you to recompile your code base (you simply change the *.config file). Here are the relevant updates to Main():
static void Main(string[] args)
{
WriteLine("**** Very Simple Connection Factory *****\n");
// Read the provider key.
string dataProviderString = ConfigurationManager.AppSettings["provider"];
// Transform string to enum.
DataProvider dataProvider = DataProvider.None;
if (Enum.IsDefined(typeof (DataProvider), dataProviderString))
{
dataProvider = (DataProvider) Enum.Parse(typeof (DataProvider), dataProviderString);
}
else
{
WriteLine("Sorry, no provider exists!");
ReadLine();
return;
}
// Get a specific connection.
IDbConnection myConnection = GetConnection(dataProvider);
WriteLine($"Your connection is a {myConnection?.GetType().Name ?? "unrecognized type"}");
// Open, use and close connection...
ReadLine();
}
![]() Note To use the ConfigurationManager type, be sure to set a reference to the System.Configuration.dll assembly and import the System.Configuration namespace.
Note To use the ConfigurationManager type, be sure to set a reference to the System.Configuration.dll assembly and import the System.Configuration namespace.
At this point, you have authored some ADO.NET code that allows you to specify the underlying connection dynamically. One obvious problem, however, is that this abstraction is used only within the MyConnectionFactory.exe application. If you were to rework this example within a .NET code library (e.g., MyConnectionFactory.dll), you would be able to build any number of clients that could obtain various connection objects using layers of abstraction.
However, obtaining a connection object is only one aspect of working with ADO.NET. To make a worthwhile data provider factory library, you would also have to account for command objects, data readers, data adapters, transaction objects, and other data-centric types. Building such a code library would not necessarily be difficult, but it would require a considerable amount of code and time.
Since the release of .NET 2.0, the kind folks in Redmond have built this exact functionality directly into the .NET base class libraries. You will examine this formal API in just a moment; however, first you need to create a custom database to use throughout this chapter (and for many chapters to come).
![]() Source Code You can find the MyConnectionFactory project in the Chapter 21 subdirectory.
Source Code You can find the MyConnectionFactory project in the Chapter 21 subdirectory.
Creating the AutoLot Database
As you work through this chapter, you will execute queries against a simple SQL Server test database named AutoLot. In keeping with the automotive theme used throughout this book, this database will contain three interrelated tables (Inventory, Orders, and Customers) that contain various bits of data representing order information for a fictional automobile sales company.
The assumption in this book is that you have a copy of Microsoft SQL Server (7.0 or higher) or a copy of Microsoft SQL Server Express Edition. The examples in this book will be using SQL Server 2014 Express. If you do not have either of these, please go here to download a copy:
http://www.microsoft.com/en-us/server-cloud/products/sql-server-editions/overview.aspx
This lightweight database server is perfect for your needs in this book: it is free, it provides a GUI front end (the SQL Server Management Tool) to create and administer your databases, and it integrates with Visual Studio/Visual Community Edition. To illustrate the last point, the remainder of this section will walk you through the construction of the AutoLot database using Visual Studio.
![]() Note You will use the AutoLot database throughout the rest of this book.
Note You will use the AutoLot database throughout the rest of this book.
Creating the Inventory Table
To begin building your testing database, launch Visual Studio and open the Server Explorer using the View menu of the IDE. Next, right-click the Data Connections node and select the Create New SQL Server Database menu option (see Figure 21-3).
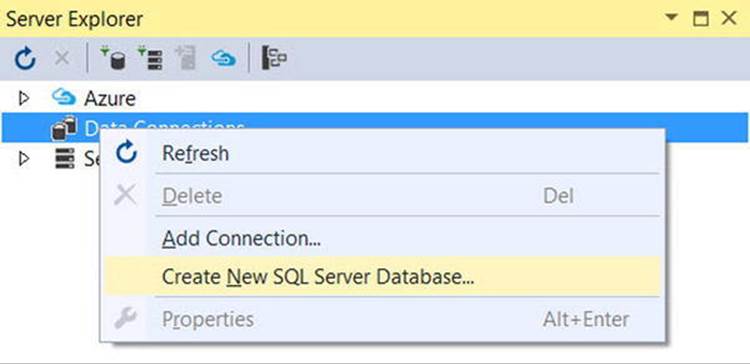
Figure 21-3. Creating a new SQL Server database within Visual Studio
In the resulting dialog box, you will need to enter a value into the “Server name” text area, which represents the machine where the database will be created. The server name consists of the machine identifier and the instance name. If you have installed Microsoft SQL Server (either the full version or Express) on your machine, enter (local)—including the parentheses—or a period followed by a backslash and the instance name (or blank if using the default instance). For example, on my machine, I need to enter .\SQLEXPRESS2014.
Name your new database AutoLot (Windows Authentication should be fine; see Figure 21-4).
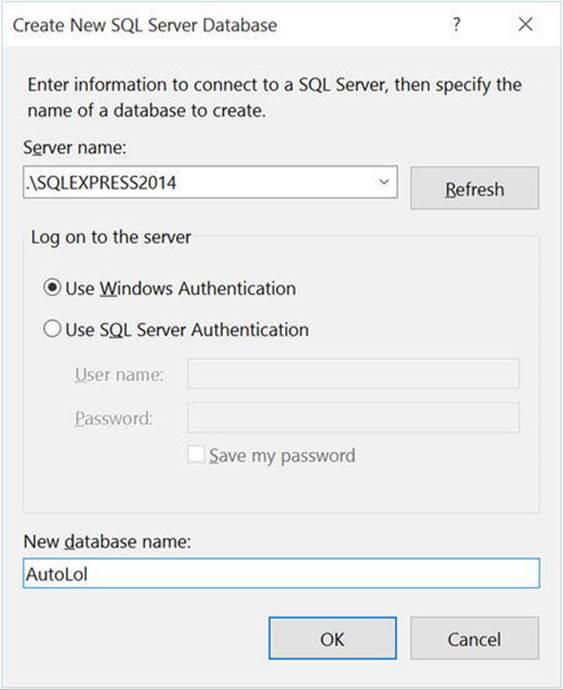
Figure 21-4. Creating a new SQL Server Express database with Visual Studio
At this point, the AutoLot database is empty of any database objects (e.g., tables, stored procedures, and so on). To insert a new database table, right-click the Tables node and select Add New Table (see Figure 21-5).
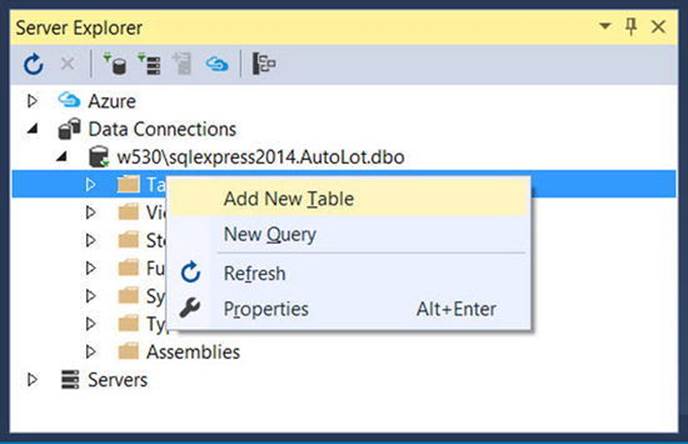
Figure 21-5. Adding the Inventory table
Use the table editor to add four columns (CarId, Make, Color, and PetName). Set CarId as type int and the other properties as type nvarchar(50). Ensure that the CarId column has been set to the primary key (do this by right-clicking the CarId row and selecting Set Primary Key) and as an identity specification (changed in the Properties tab by adding IDENTITY to the SQL or by adding the Identity column into the table designer, as shown in Figure 21-6). Also, notice that all columns but CarId can be assigned null values. Figure 21-6 shows the final table settings.
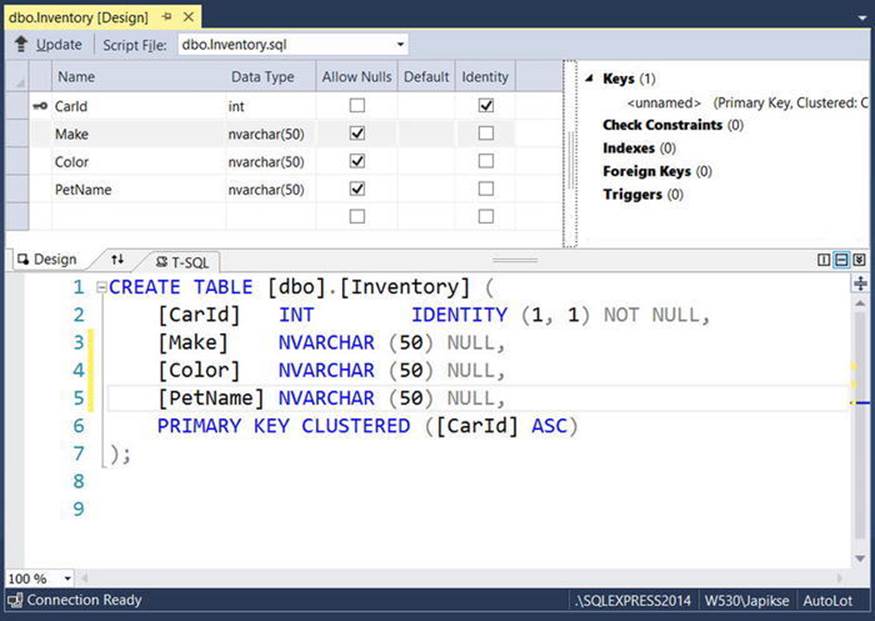
Figure 21-6. Designing the Inventory table
After you have created the table schema, name the table Inventory in the T-SQL window then save your work by clicking the Update button (as shown in Figure 21-6). On the next screen (Figure 21-7), click Update Database to commit the action.
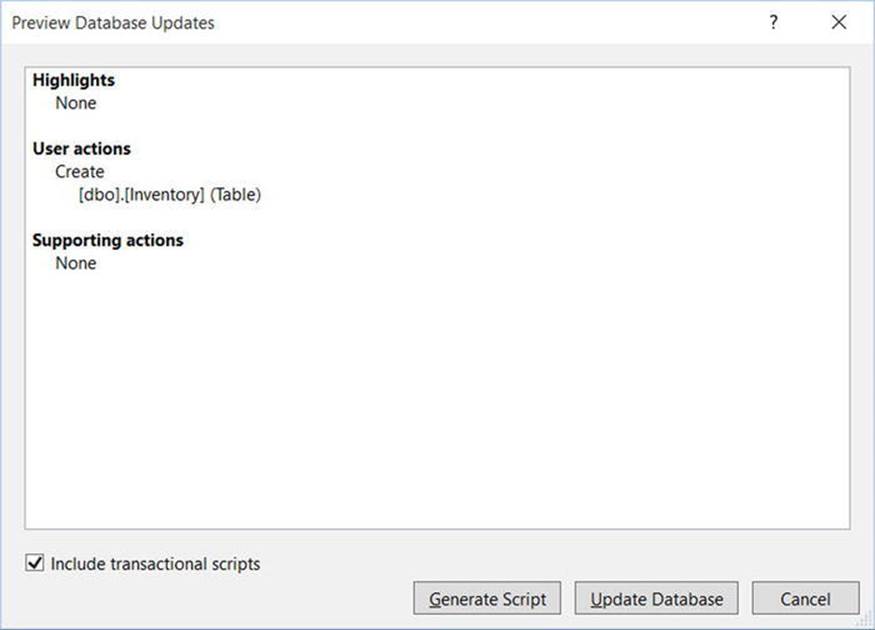
Figure 21-7. Committing the Inventory table to the database
Adding Test Records to the Inventory Table
To add records to your first table, right-click the Inventory table icon and select Show Table Data. Note: If you don’t see the Inventory table, right-click the Tables folder and click Refresh. Enter a handful of new automobiles of your choosing (to make it interesting, be sure to include some cars that have identical colors and makes). Remember that the CarId field is an identity column, so the database takes care of creating a unique value for you. Figure 21-8 shows one possible list of inventory.
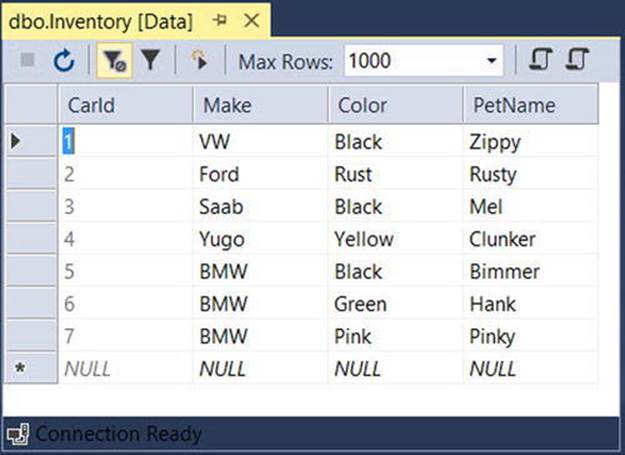
Figure 21-8. Populating the Inventory table
Authoring the GetPetName() Stored Procedure
Later in this chapter, you will learn how to use ADO.NET to invoke stored procedures. As you might already know, stored procedures are routines stored within a particular database that operate often on table data to yield a return value. You will add a single stored procedure that will return an automobile’s pet name, based on the supplied CarId value. To do so, right-click the Stored Procedures node of the AutoLot database within the Server Explorer and select Add New Stored Procedure. Enter the following in the editor that pops up:
CREATE PROCEDURE GetPetName
@carID int,
@petName char(10) output
AS
SELECT @petName = PetName from Inventory where CarId = @carID
![]() Note Stored procedures do not have to return data using output parameters, as shown here; however, doing things this way sets the stage for talking about the Direction property of the SqlParameter, which I will cover later in this chapter.
Note Stored procedures do not have to return data using output parameters, as shown here; however, doing things this way sets the stage for talking about the Direction property of the SqlParameter, which I will cover later in this chapter.
When you click Update to save your procedure, it will automatically be named GetPetName, based on your CREATE PROCEDURE statement. After you do this, you should see your new stored procedure within the Server Explorer (see Figure 21-9).
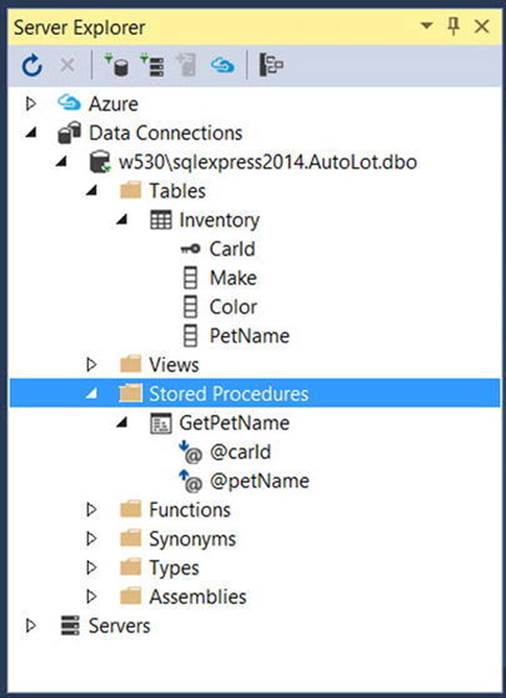
Figure 21-9. The GetPetName stored procedure
Creating the Customers and Orders Tables
The AutoLot database will have two additional tables: Customers and Orders. The Customers table (as the name suggests) will contain a list of customers and will be represented by three columns: CustId (which should be set as the primary key), FirstName, and LastName. You can create the Customers table by following the same steps you used to create the Inventory table; be sure to create the Customers table using the schema shown in Figure 21-10.
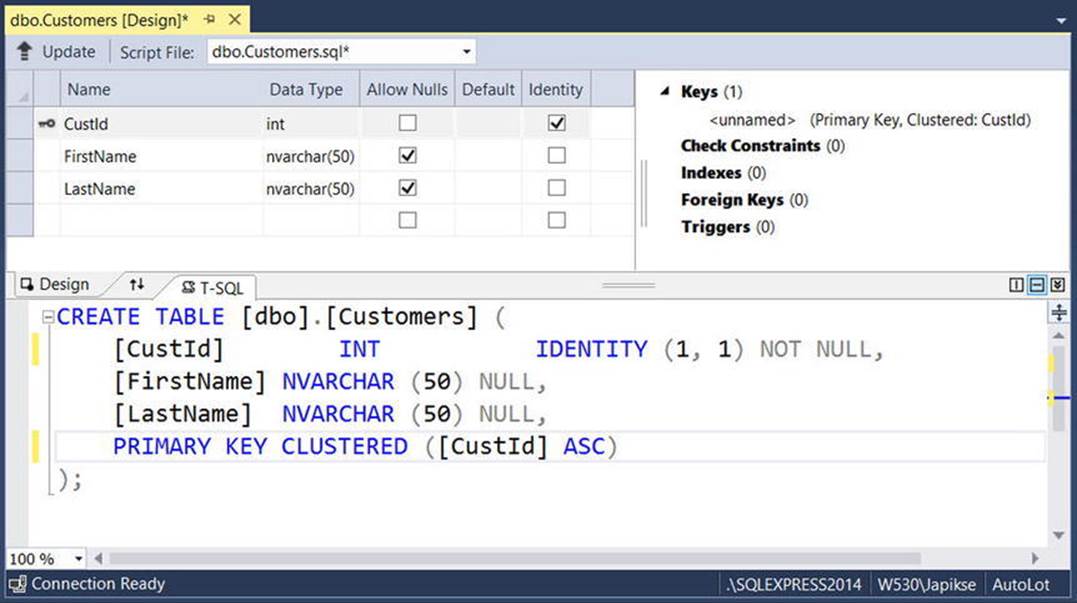
Figure 21-10. Designing the Customers table
After you save and name your table, add a handful of customer records (see Figure 21-11).
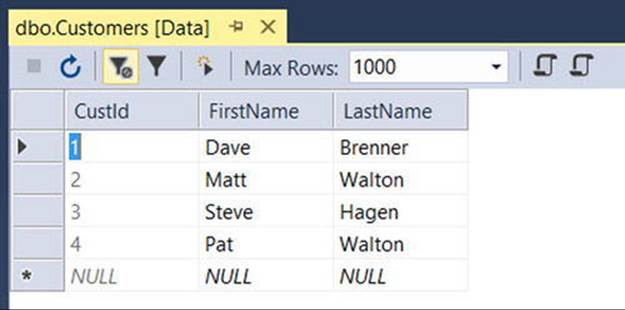
Figure 21-11. Populating the Customers table
You will use your final table, Orders, to represent the automobile a given customer is interested in purchasing. Do this by mapping OrderId values to CarId/CustId values. Figure 21-12 shows the structure of your final table (again, note that OrderId is the primary key).
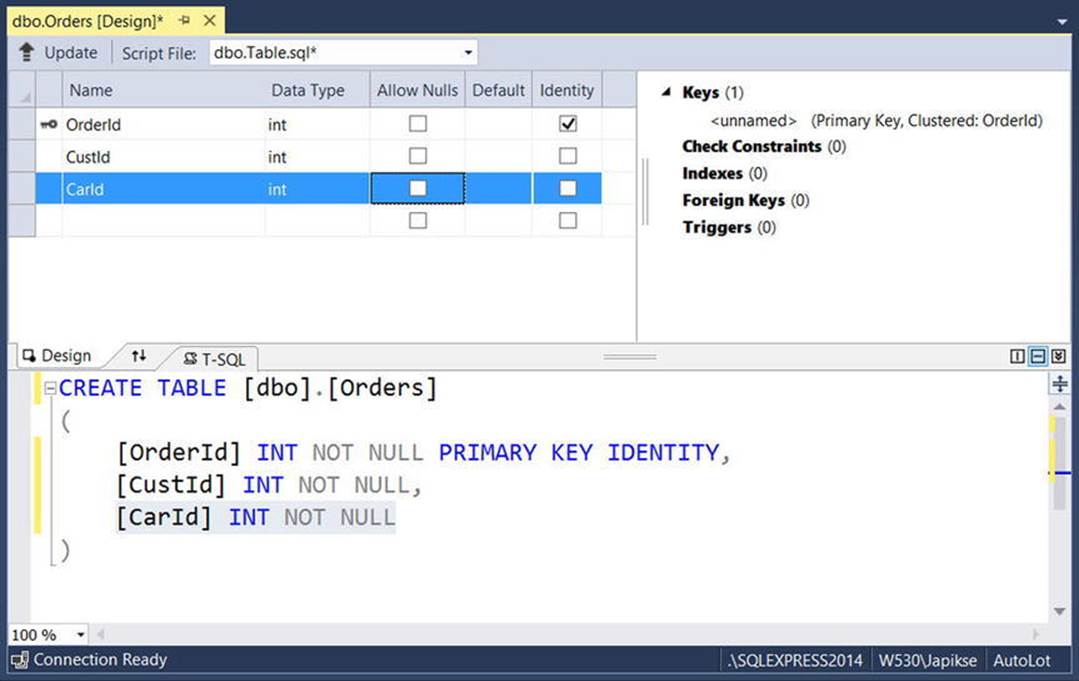
Figure 21-12. Designing the Orders table
Now add data to your Orders table. You haven’t created any table relationships yet, so you will have to manually make sure that you enter values that exist in each table. Select a unique CarId for each CustId value (see Figure 21-13 for entries based on the previously shown sample data).

Figure 21-13. Populating the Orders table
For example, the entries used in this text indicate that Dave Brenner (CustId = 1) is interested in the black BMW (CarId = 5), while Pat Walton (CustId = 4) has her eye on the pink BMW (CarId = 7).
Creating Table Relationships in Visual Studio
The final task is to establish parent-child table relationships between the Customers, Orders, and Inventory tables. Right-click the Orders table and select Open Table Definition. To the right of the columns grid, right-click Foreign Keys and select Add New Foreign Key, as in Figure 21-14.
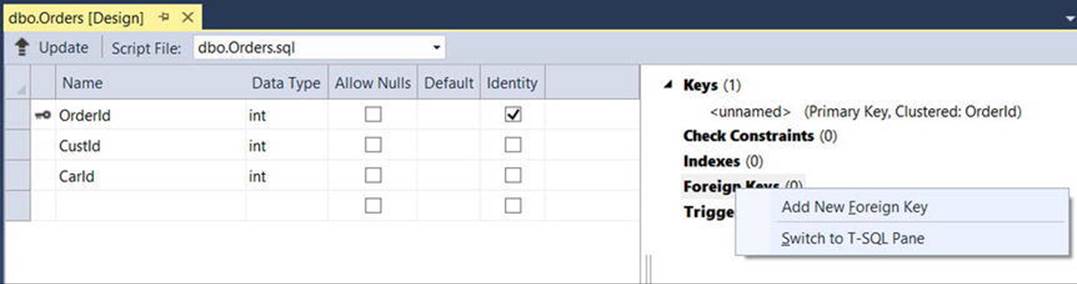
Figure 21-14. Creating a new foreign key
The default name for the foreign key is FK_<CurrentTable>_ToTable. In this case, it enters FK_Orders_ToTable. Replace ToTable with Inventory. At the time of this writing, there is an issue with the Properties grid for foreign keys, so you have to update the SQL manually. In the T-SQL Editor Window, update the following line:
CONSTRAINT [FK_Orders_Inventory] FOREIGN KEY ([Column]) REFERENCES [ToTable]([ToTableColumn])
to the following:
CONSTRAINT [FK_Orders_Inventory] FOREIGN KEY ([CarId]) REFERENCES [Inventory]([CarId]),
Copy the Constraint to a new line in the T-SQL Editor window, and update it to match the following (make sure the inventory constraint is followed by a comma):
CONSTRAINT [FK_Orders_Customers] FOREIGN KEY ([CustId]) REFERENCES [dbo].[Customers] ([CustId]),
The complete SQL for the table looks like should look like this (there might be some minor differences based on the version of SQL Server that you are using):
CREATE TABLE [dbo].[Orders] (
[OrderId] INT IDENTITY (1, 1) NOT NULL,
[CustId] INT NOT NULL,
[CarId] INT NOT NULL,
PRIMARY KEY CLUSTERED ([OrderId] ASC),
CONSTRAINT [FK_Orders_Inventory] FOREIGN KEY ([CarId])
REFERENCES [Inventory]([CarId]),
CONSTRAINT [FK_Orders_Customers] FOREIGN KEY ([CustId])
REFERENCES [Customers]([CustId]),
);
Click Update in the designer and then Update in the following dialog, and the relationships are added to the AutoLot database. If you encounter an error while updating the database, it means that the data you entered into the orders table isn’t correct. For example, you entered a CustId into Orders that doesn’t exist in the Customers table. Correct the data and update the database again.
With this, the AutoLot database is complete! Of course, this is a far cry from a real-world corporate database, but it will serve your needs over the remainder of this book. Now that you have a database to test with, you can dive into the details of the ADO.NET data provider factory model.
The ADO.NET Data Provider Factory Model
The .NET data provider factory pattern allows you to build a single code base using generalized data access types. Furthermore, using application configuration files (and the <connectionStrings> subelement), you can obtain providers and connection strings declaratively, without the need to recompile or redeploy the assembly that uses the ADO.NET APIs.
To understand the data provider factory implementation, recall from Table 21-1 that the classes within a data provider each derive from the same base classes defined within the System.Data.Common namespace.
· DbCommand: The abstract base class for all command classes
· DbConnection: The abstract base class for all connection classes
· DbDataAdapter: The abstract base class for all data adapter classes
· DbDataReader: The abstract base class for all data reader classes
· DbParameter: The abstract base class for all parameter classes
· DbTransaction: The abstract base class for all transaction classes
Each of the Microsoft-supplied data providers contains a class type that derives from System.Data.Common.DbProviderFactory. This base class defines several methods that retrieve provider- specific data objects. Here are the members of DbProviderFactory:
public abstract class DbProviderFactory
{
..public virtual bool CanCreateDataSourceEnumerator { get;};
public virtual DbCommand CreateCommand();
public virtual DbCommandBuilder CreateCommandBuilder();
public virtual DbConnection CreateConnection();
public virtual DbConnectionStringBuilder CreateConnectionStringBuilder();
public virtual DbDataAdapter CreateDataAdapter();
public virtual DbParameter CreateParameter();
public virtual CodeAccessPermission CreatePermission(PermissionState state);
public virtual DbDataSourceEnumerator CreateDataSourceEnumerator();
}
To obtain the DbProviderFactory-derived type for your data provider, the System.Data.Common namespace provides a class type named DbProviderFactories (note the plural in this type’s name). You can use the static GetFactory() method to obtain the specificDbProviderFactory object of the specified data provider; do this by specifying a string name that represents the .NET namespace containing the provider’s functionality, like so:
static void Main(string[] args)
{
// Get the factory for the SQL data provider.
DbProviderFactory sqlFactory =
DbProviderFactories.GetFactory("System.Data.SqlClient");
...
}
Of course, rather than obtaining a factory using a hard-coded string literal, you could instead read in this information from a client-side *.config file (much like the earlier MyConnectionFactory example). You will learn how to do this shortly; for the moment, you can obtain the associated provider-specific data objects (e.g., connections, commands, and data readers) once you have obtained the factory for your data provider.
![]() Note For all practical purposes, you can regard the argument sent to DbProviderFactories.GetFactory() as the name of the data provider’s .NET namespace. In reality, the machine.config value uses this string value to load the correct library dynamically from the Global Assembly Cache.
Note For all practical purposes, you can regard the argument sent to DbProviderFactories.GetFactory() as the name of the data provider’s .NET namespace. In reality, the machine.config value uses this string value to load the correct library dynamically from the Global Assembly Cache.
A Complete Data Provider Factory Example
For a complete example, you can create a new C# Console Application (named DataProviderFactory) that prints out the automobile inventory of the AutoLot database. For this initial example, you will hard- code the data access logic directly within the DataProviderFactory.exeassembly (to keep things simple for the time being). However, when you begin to dig into the details of the ADO.NET programming model, you will isolate your data logic to a specific .NET code library that you will use for the remainder of this book.
Begin by adding a reference to the System.Configuration.dll assembly and importing the System.Configuration namespace. Next, update the App.config file to include an empty <appSettings> element. Add a new key-named provider that maps to the namespace name of the data provider you want to obtain (System.Data.SqlClient). Also, define a connection string that represents a connection to the AutoLot database (on the local instance of SQL Server Express).
<?xml version="1.0" encoding="utf-8" ?>
<configuration>
<appSettings>
<!-- Which provider? -->
<add key="provider" value="System.Data.SqlClient" />
<!-- Which connection string? -->
<add key="connectionString" value= "Data Source=(local)\SQLEXPRESS2014;
Initial Catalog=AutoLot;Integrated Security=True"/>
</appSettings>
<startup>
<supportedRuntime version="v4.0" sku=".NETFramework,Version=v4.6"/>
</startup>
</configuration>
![]() Note You will learn about connection strings in more detail momentarily; however, if you select your AutoLot database icon within the Server Explorer, you can copy and paste the correct connection string from the Connection String property of the Visual Studio Properties window.
Note You will learn about connection strings in more detail momentarily; however, if you select your AutoLot database icon within the Server Explorer, you can copy and paste the correct connection string from the Connection String property of the Visual Studio Properties window.
Now that you have a proper *.config file, you can read in the provider and connectionString values using the ConfigurationManager.AppSettings indexer. The provider value will be passed to DbProviderFactories.GetFactory() to obtain the data provider–specific factory type. You will use the connectionString value to set the ConnectionString property of the DbConnection-derived type.
Assuming you have imported the System.Data, System.Data.Common, and static System .Console namespaces, you can update your Main() method like this:
static void Main(string[] args)
{
WriteLine("***** Fun with Data Provider Factories *****\n");
// Get Connection string/provider from *.config.
string dataProvider =
ConfigurationManager.AppSettings["provider"];
string connectionString =
ConfigurationManager.AppSettings["connectionString"];
// Get the factory provider.
DbProviderFactory factory = DbProviderFactories.GetFactory(dataProvider);
// Now get the connection object.
using (DbConnection connection = factory.CreateConnection())
{
if (connection == null)
{
ShowError("Connection");
return;
}
WriteLine($"Your connection object is a: {connection.GetType().Name}");
connection.ConnectionString = connectionString;
connection.Open();
// Make command object.
DbCommand command = factory.CreateCommand();
if (command == null)
{
ShowError("Command");
return;
}
WriteLine($"Your command object is a: {command.GetType().Name}");
command.Connection = connection;
command.CommandText = "Select * From Inventory";
// Print out data with data reader.
using (DbDataReader dataReader = command.ExecuteReader())
{
WriteLine($"Your data reader object is a: {dataReader.GetType().Name}");
WriteLine("\n***** Current Inventory *****");
while (dataReader.Read())
WriteLine($"-> Car #{dataReader["CarId"]} is a {dataReader["Make"]}.");
}
}
ReadLine();
}
private static void ShowError(string objectName)
{
WriteLine($"There was an issue creating the {objectName}");
ReadLine();
}
Notice that, for diagnostic purposes, you use reflection services to print the name of the underlying connection, command, and data reader. If you run this application, you will find the following current data in the Inventory table of the AutoLot database printed to the console:
***** Fun with Data Provider Factories *****
Your connection object is a: SqlConnection
Your command object is a: SqlCommand
Your data reader object is a: SqlDataReader
***** Current Inventory *****
-> Car #1 is a VW.
-> Car #2 is a Ford.
-> Car #3 is a Saab.
-> Car #4 is a Yugo.
-> Car #5 is a BMW.
-> Car #6 is a BMW.
-> Car #7 is a BMW.
Now change the *.config file to specify System.Data.OleDb as the data provider (and update your connection string with a Provider segment and change the Integrated Security value from true to SSPI), like so:
<configuration>
<appSettings>
<!-- Which provider? -->
<add key="provider" value="System.Data.OleDb" />
<!-- Which connection string? -->
<add key="cnStr" value=
"Provider=SQLOLEDB;Data Source=(local)\SQLEXPRESS2014;
Integrated Security=SSPI;Initial Catalog=AutoLot"/>
</appSettings>
<startup>
<supportedRuntime version="v4.0" sku=".NETFramework,Version=v4.6"/>
</startup>
</configuration>
Doing this indicates that the System.Data.OleDb types are used behind the scenes and gives the following output:
***** Fun with Data Provider Factories *****
Your connection object is a: OleDbConnection
Your command object is a: OleDbCommand
Your data reader object is a: OleDbDataReader
***** Current Inventory *****
-> Car #1 is a VW.
-> Car #2 is a Ford.
-> Car #3 is a Saab.
-> Car #4 is a Yugo.
-> Car #5 is a BMW.
-> Car #6 is a BMW.
-> Car #7 is a BMW.
Of course, based on your experience with ADO.NET, you might be a bit unsure exactly what the connection, command, and data reader objects actually do. Don’t sweat the details for the time being (quite a few pages remain in this chapter, after all!). At this point, it’s enough to know that you can use the ADO.NET data provider factory model to build a single code base that can consume various data providers in a declarative manner.
A Potential Drawback with the Data Provider Factory Model
Although this is a powerful model, you must make sure that the code base uses only types and methods common to all providers through the members of the abstract base classes. Therefore, when authoring your code base, you are limited to the members exposed by DbConnection,DbCommand, and the other types of the System.Data.Common namespace.
Given this, you might find that this generalized approach prevents you from directly accessing some of the bells and whistles of a particular DBMS. If you must be able to invoke specific members of the underlying provider (e.g., SqlConnection), you can do so using an explicit cast, as in this example:
using (DbConnection connection = factory.CreateConnection())
{
if (connection == null)
{
ShowError("Connection");
return;
}
WriteLine($"Your connection object is a: {connection.GetType().Name}");
connection.ConnectionString = connectionString;
connection.Open();
var sqlConnection = connection as SqlConnection;
if (sqlConnection != null)
{
// Print out which version of SQL Server is used.
WriteLine(sqlConnection.ServerVersion);
}
//Remainder removed for brevity
}
When doing this, however, your code base becomes a bit harder to maintain (and less flexible) because you must add a number of runtime checks. Nevertheless, if you need to build data access libraries in the most flexible way possible, the data provider factory model provides a great mechanism for doing so.
The <connectionStrings> Element
Currently, your connection string data is in the <appSettings> element of your *.config file. Application configuration files can define an element named <connectionStrings>. Within this element, you can define any number of name-value pairs that can be programmatically read into memory using the ConfigurationManager.ConnectionStrings indexer. One advantage of this approach (as opposed to using the <appSettings> element and the ConfigurationManager.AppSettings indexer) is that you can define multiple connection strings for a single application in a consistent manner.
To see this in action, update your current App.config file as follows (note that each connection string is documented using the name and connectionString attributes rather than the key and value attributes you find in <appSettings>):
<configuration>
<appSettings>
<!-- Which provider? -->
<add key="provider" value="System.Data.SqlClient" />
</appSettings>
<!-- Here are the connection strings. -->
<connectionStrings>
<add name ="AutoLotSqlProvider" connectionString =
"Data Source=(local)\SQLEXPRESS2014;
Integrated Security=SSPI;Initial Catalog=AutoLot"/>
<add name ="AutoLotOleDbProvider" connectionString =
"Provider=SQLOLEDB;Data Source=(local)\SQLEXPRESS2014;
Integrated Security=SSPI;Initial Catalog=AutoLot"/>
</connectionStrings>
<startup>
<supportedRuntime version="v4.0" sku=".NETFramework,Version=v4.6"/>
</startup>
</configuration>
You can now update your Main() method as follows:
static void Main(string[] args)
{
WriteLine("***** Fun with Data Provider Factories *****\n");
string dataProvider =
ConfigurationManager.AppSettings["provider"];
string connectionString =
ConfigurationManager.ConnectionStrings["AutoLotSqlProvider"].ConnectionString;
...
}
At this point, you have an application that can display the results of the Inventory table of the AutoLot database using a neutral code base. Offloading the provider name and connection string to an external *.config file means that the data provider factory model can dynamically load the correct provider in the background. With this first example behind you, you can now dive into the details of working with the connected layer of ADO.NET.
![]() Note Now that you understand the role of ADO.NET data provider factories, the remaining examples in this book will focus on the task at hand by explicitly using the types within the System.Data.SqlClient namespace. If you use a different database management system (such as Oracle), you would need to update your code base accordingly.
Note Now that you understand the role of ADO.NET data provider factories, the remaining examples in this book will focus on the task at hand by explicitly using the types within the System.Data.SqlClient namespace. If you use a different database management system (such as Oracle), you would need to update your code base accordingly.
![]() Source Code You can find the DataProviderFactory project in the Chapter 21 subdirectory.
Source Code You can find the DataProviderFactory project in the Chapter 21 subdirectory.
Understanding the Connected Layer of ADO.NET
Recall that the connected layer of ADO.NET allows you to interact with a database using the connection, command, and data reader objects of your data provider. You have already used these objects in the previous DataProviderFactory application, and now you’ll walk through the process again, this time using an expanded example. You need to perform the following steps when you want to connect to a database and read the records using a data reader object:
1. Allocate, configure, and open your connection object.
2. Allocate and configure a command object, specifying the connection object as a constructor argument or with the Connection property.
3. Call ExecuteReader() on the configured command class.
4. Process each record using the Read() method of the data reader.
To get the ball rolling, create a new Console Application project named AutoLotDataReader and import the System.Data and System.Data.SqlClient namespaces. Here is the complete code within Main() (analysis will follow):
class Program
{
static void Main(string[] args)
{
WriteLine("***** Fun with Data Readers *****\n");
// Create and open a connection.
using (SqlConnection connection = new SqlConnection())
{
connection.ConnectionString =
@"Data Source=(local)\SQLEXPRESS2014;Integrated Security=SSPI;" +
"Initial Catalog=AutoLot";
connection.Open();
// Create a SQL command object.
string sql = "Select * From Inventory";
SqlCommand myCommand = new SqlCommand(sql, connection);
// Obtain a data reader a la ExecuteReader().
using (SqlDataReader myDataReader = myCommand.ExecuteReader())
{
// Loop over the results.
while (myDataReader.Read())
{
WriteLine($"-> Make: {myDataReader["Make"]}, PetName: {myDataReader["PetName"]}, Color: {myDataReader["Color"]}.");
}
}
}
ReadLine();
}
}
Working with Connection Objects
The first step to take when working with a data provider is to establish a session with the data source using the connection object (which, as you recall, derives from DbConnection). .NET connection objects are provided with a formatted connection string; this string contains a number of name-value pairs, separated by semicolons. You use this information to identify the name of the machine you want to connect to, required security settings, the name of the database on that machine, and other data provider–specific information.
As you can infer from the preceding code, the Initial Catalog name refers to the database you want to establish a session with. The Data Source name identifies the name of the machine that maintains the database. Here, (local) allows you to define a single token to specify the current local machine (regardless of the literal name of said machine), while the \SQLEXPRESS2014 token informs the SQL Server provider that you are connecting to a SQL Server Express edition with the named instance of SQLEXPRESS2014. If you created AutoLot on a Microsoft SQL Server set up as the default instance on your local computer, specify Data Source=(local)).
![]() Note There is another mechanism that uses (LocalDb) for the server name. This stores the database with the project/solution. You can still access the database through Server Explorer by using (LocalDb)\MSSQLLocalDB as the server name (or (LocalDb)\v11.0, depending on your version of the starter templates with Visual Studio).
Note There is another mechanism that uses (LocalDb) for the server name. This stores the database with the project/solution. You can still access the database through Server Explorer by using (LocalDb)\MSSQLLocalDB as the server name (or (LocalDb)\v11.0, depending on your version of the starter templates with Visual Studio).
Beyond this, you can supply any number of tokens that represent security credentials. Here, you set the Integrated Security to SSPI (equivalent to true for SQL Server connection strings), which uses the current Windows account credentials for user authentication.
![]() Note Look up the ConnectionString property of your data provider’s connection object in the .NET Framework 4.6 SDK documentation to learn more about each name-value pair for your specific DBMS.
Note Look up the ConnectionString property of your data provider’s connection object in the .NET Framework 4.6 SDK documentation to learn more about each name-value pair for your specific DBMS.
After you establish your connection string, you can use a call to Open() to establish a connection with the DBMS. In addition to the ConnectionString, Open(), and Close() members, a connection object provides a number of members that let you configure additional settings regarding your connection, such as timeout settings and transactional information. Table 21-5 lists some (but not all) members of the DbConnection base class.
Table 21-5. Members of the DbConnection Type
|
Member |
Meaning in Life |
|
BeginTransaction() |
You use this method to begin a database transaction. |
|
ChangeDatabase() |
You use this method to change the database on an open connection. |
|
ConnectionTimeout |
This read-only property returns the amount of time to wait while establishing a connection before terminating and generating an error (the default value is 15 seconds). If you would like to change the default, specify a Connect Timeout segment in the connection string (e.g., Connect Timeout=30). |
|
Database |
This read-only property gets the name of the database maintained by the connection object. |
|
DataSource |
This read-only property gets the location of the database maintained by the connection object. |
|
GetSchema() |
This method returns a DataTable object that contains schema information from the data source. |
|
State |
This read-only property gets the current state of the connection, which is represented by the ConnectionState enumeration. |
The properties of the DbConnection type are typically read-only in nature and are useful only when you want to obtain the characteristics of a connection at runtime. When you need to override default settings, you must alter the construction string itself. For example, the following connection string sets the connection timeout setting from 15 seconds to 30 seconds:
static void Main(string[] args)
{
WriteLine("***** Fun with Data Readers *****\n");
using(SqlConnection connection = new SqlConnection())
{
connection.ConnectionString =
@"Data Source=(local)\SQLEXPRESS2014;" +
"Integrated Security=SSPI;Initial Catalog=AutoLot;Connect Timeout=30";
connection.Open();
// New helper function (see below).
ShowConnectionStatus(connection);
...
}
In the preceding code, you pass your connection object as a parameter to a new static helper method in the Program class named ShowConnectionStatus(), which you implement as follows:
static void ShowConnectionStatus(SqlConnection connection)
{
// Show various stats about current connection object.
WriteLine("***** Info about your connection *****");
WriteLine($"Database location: {connection.DataSource}");
WriteLine($"Database name: {connection.Database}");
WriteLine($"Timeout: {connection.ConnectionTimeout}");
WriteLine($"Connection state: {connection.State}\n");
}
While most of these properties are self-explanatory, the State property is worth special mention. You can assign this property any value of the ConnectionState enumeration, as shown here:
public enum ConnectionState
{
Broken, Closed,
Connecting, Executing,
Fetching, Open
}
However, the only valid ConnectionState values are ConnectionState.Open, ConnectionState.Connecting, and ConnectionState.Closed (the remaining members of this enum are reserved for future use). Also, it is always safe to close a connection where connection state is currently ConnectionState.Closed.
Working with ConnectionStringBuilder Objects
Working with connection strings programmatically can be cumbersome because they are often represented as string literals, which are difficult to maintain and error-prone at best. The Microsoft- supplied ADO.NET data providers support connection string builder objects, which allow you to establish the name-value pairs using strongly typed properties. Consider the following update to the current Main() method:
static void Main(string[] args)
{
WriteLine("***** Fun with Data Readers *****\n");
// Create a connection string via the builder object.
var cnStringBuilder = new SqlConnectionStringBuilder
{
InitialCatalog = "AutoLot",
DataSource = @"(local)\SQLEXPRESS2014",
ConnectTimeout = 30,
IntegratedSecurity = true
};
using(SqlConnection connection = new SqlConnection())
{
connection.ConnectionString = cnStringBuilder.ConnectionString;
connection.Open();
ShowConnectionStatus(connection);
...
}
ReadLine();
}
In this iteration, you create an instance of SqlConnectionStringBuilder, set the properties accordingly, and obtain the internal string using the ConnectionString property. Also note that you use the default constructor of the type. If you so choose, you can also create an instance of your data provider’s connection string builder object by passing in an existing connection string as a starting point (this can be helpful when you read these values dynamically from an App.config file). Once you have hydrated the object with the initial string data, you can change specific name-value pairs using the related properties, as in this example:
static void Main(string[] args)
{
WriteLine("***** Fun with Data Readers *****\n");
// Assume you really obtained the connectionString value from a *.config file.
string connectionString = @"Data Source=(local)\SQLEXPRESS;" +
"Integrated Security=SSPI;Initial Catalog=AutoLot";
SqlConnectionStringBuilder cnStringBuilder =
new SqlConnectionStringBuilder(connectionString);
// Change timeout value.
cnStringBuilder.ConnectTimeout = 5;
...
}
Working with Command Objects
Now that you understand better the role of the connection object, the next order of business is to check out how to submit SQL queries to the database in question. The SqlCommand type (which derives from DbCommand) is an OO representation of a SQL query, table name, or stored procedure. You specify the type of command using the CommandType property, which can take any value from the CommandType enum, as shown here:
public enum CommandType
{
StoredProcedure,
TableDirect,
Text // Default value.
}
When you create a command object, you can establish the SQL query as a constructor parameter or directly by using the CommandText property. Also when you create a command object, you need to specify the connection you want to use. Again, you can do so as a constructor parameter or by using the Connection property. Consider this code snippet:
// Create command object via ctor args.
string sql = "Select * From Inventory";
SqlCommand myCommand = new SqlCommand(sql, connection);
// Create another command object via properties.
SqlCommand testCommand = new SqlCommand();
testCommand.Connection = connection;
testCommand.CommandText = sql;
Realize that, at this point, you have not literally submitted the SQL query to the AutoLot database but instead prepared the state of the command object for future use. Table 21-6 highlights some additional members of the DbCommand type.
Table 21-6. Members of the DbCommand Type
|
Member |
Meaning in Life |
|
CommandTimeout |
Gets or sets the time to wait while executing the command before terminating the attempt and generating an error. The default is 30 seconds. |
|
Connection |
Gets or sets the DbConnection used by this instance of the DbCommand. |
|
Parameters |
Gets the collection of DbParameter objects used for a parameterized query. |
|
Cancel() |
Cancels the execution of a command. |
|
ExecuteReader() |
Executes a SQL query and returns the data provider’s DbDataReader object, which provides forward-only, read-only access for the result of the query. |
|
ExecuteNonQuery() |
Executes a SQL nonquery (e.g., an insert, update, delete, or create table). |
|
ExecuteScalar() |
A lightweight version of the ExecuteReader() method that was designed specifically for singleton queries (e.g., obtaining a record count). |
|
Prepare() |
Creates a prepared (or compiled) version of the command on the data source. As you might know, a prepared query executes slightly faster and is useful when you need to execute the same query multiple times (typically with different parameters each time). |
Working with Data Readers
After you establish the active connection and SQL command, the next step is to submit the query to the data source. As you might guess, you have a number of ways to do this. The DbDataReader type (which implements IDataReader) is the simplest and fastest way to obtain information from a data store. Recall that data readers represent a read-only, forward-only stream of data returned one record at a time. Given this, data readers are useful only when submitting SQL selection statements to the underlying data store.
Data readers are useful when you need to iterate over large amounts of data quickly and you do not need to maintain an in-memory representation. For example, if you request 20,000 records from a table to store in a text file, it would be rather memory-intensive to hold this information in a DataSet (because a DataSet holds the entire result of the query in memory at the same time).
A better approach is to create a data reader that spins over each record as rapidly as possible. Be aware, however, that data reader objects (unlike data adapter objects, which you’ll examine later) maintain an open connection to their data source until you explicitly close the connection.
You obtain data reader objects from the command object using a call to ExecuteReader().The data reader represents the current record it has read from the database. The data reader has an indexer method (e.g, [] syntax in C#) that allows you to access a column in the current record. You can access the column either by name or by zero-based integer.
The following use of the data reader leverages the Read() method to determine when you have reached the end of your records (using a false return value). For each incoming record that you read from the database, you use the type indexer to print out the make, pet name, and color of each automobile. Also note that you call Close() as soon as you finish processing the records, which frees up the connection object.
static void Main(string[] args)
{
...
// Obtain a data reader via ExecuteReader().
using(SqlDataReader myDataReader = myCommand.ExecuteReader())
{
// Loop over the results.
while (myDataReader.Read())
{
WriteLine($"-> Make: { myDataReader["Make"]}, PetName: { myDataReader["PetName"]}, Color: { myDataReader["Color"]}.");
}
}
ReadLine();
}
In the preceding snippet, you overload the indexer of a data reader object to take either a string (representing the name of the column) or an int (representing the column’s ordinal position). Thus, you can clean up the current reader logic (and avoid hard-coded string names) with the following update (note the use of the FieldCount property):
while (myDataReader.Read())
{
WriteLine("***** Record *****");
for (int i = 0; i < myDataReader.FieldCount; i++)
{
WriteLine($"{myDataReader.GetName(i)} = { myDataReader.GetValue(i)} ");
}
WriteLine();
}
If you compile and run your project at this point, you should see a list of all automobiles in the Inventory table of the AutoLot database. The following output shows the initial few records from my own version of AutoLot:
***** Fun with Data Readers *****
***** Info about your connection *****
Database location: (local)\SQLEXPRESS2014
Database name: AutoLot
Timeout: 30
Connection state: Open
***** Record *****
CarId = 1
Make = VW
Color = Black
PetName = Zippy
***** Record *****
CarId = 2
Make = Ford
Color = Rust
PetName = Rusty
Obtaining Multiple Result Sets Using a Data Reader
Data reader objects can obtain multiple result sets using a single command object. For example, if you want to obtain all rows from the Inventory table, as well as all rows from the Customers table, you can specify both SQL Select statements using a semicolon delimiter, like so:
string sql = "Select * From Inventory;Select * from Customers";
After you obtain the data reader, you can iterate over each result set using the NextResult() method. Note that you are always returned the first result set automatically. Thus, if you want to read over the rows of each table, you can build the following iteration construct:
do
{
while (myDataReader.Read())
{
WriteLine("***** Record *****");
for (int i = 0; i < myDataReader.FieldCount; i++)
{
WriteLine($"{myDataReader.GetName(i)} = {myDataReader.GetValue(i)}");
}
WriteLine();
}
} while (myDataReader.NextResult());
At this point, you should be more aware of the functionality data reader objects bring to the table. Always remember that a data reader can process only SQL Select statements; you cannot use them to modify an existing database table using Insert, Update, or Delete requests. Modifying an existing database requires additional investigation of command objects.
![]() Source Code You can find the AutoLotDataReader project in the Chapter 21 subdirectory.
Source Code You can find the AutoLotDataReader project in the Chapter 21 subdirectory.
Building a Reusable Data Access Library
The ExecuteReader() method extracts a data reader object that allows you to examine the results of a SQL Select statement using a forward-only, read-only flow of information. However, when you want to submit SQL statements that result in the modification of a given table (or any other nonquery SQL statement, such as creating tables or granting permissions), you call the ExecuteNonQuery() method of your command object. This single method performs inserts, updates, and deletes based on the format of your command text.
![]() Note Technically speaking, a nonquery is a SQL statement that does not return a result set. Thus, Select statements are queries, while Insert, Update, and Delete statements are not. Given this, ExecuteNonQuery() returns an int that represents the number of rows affected, not a new set of records.
Note Technically speaking, a nonquery is a SQL statement that does not return a result set. Thus, Select statements are queries, while Insert, Update, and Delete statements are not. Given this, ExecuteNonQuery() returns an int that represents the number of rows affected, not a new set of records.
Next, you will learn how to modify an existing database using nothing more than a call to ExecuteNonQuery(); your next goal is to build a custom data access library that can encapsulate the process of operating upon the AutoLot database. In a production-level environment, your ADO.NET logic will almost always be isolated to a .NET *.dll assembly for one simple reason: code reuse! The first examples of this chapter have not done this, simply so you can keep focused on the task at hand; however, it would be a waste of time to author the same connection logic, the same data reading logic, and the same command logic for every application that needs to interact with the AutoLot database.
Isolating data access logic to a .NET code library means that multiple applications using any sort of front end (e.g., console based, desktop based, or web based) can reference the library at hand in a language-independent manner. Thus, if you author your data library using C#, other developers can build a UI in the .NET language of their choice.
In this chapter, your data library (AutoLotDAL.dll) will contain a single namespace (AutoLotConnectedLayer) that interacts with AutoLot using the connected types of ADO.NET. In the next chapter, you will add a new namespace (AutoLotDisconnectionLayer) to this same *.dll that contains types to communicate with AutoLot using the disconnected layer. In Chapter 23, you will create a complete data access layer using Entity Framework. Multiple applications will take advantage of this library throughout the remainder of this book.
Begin by creating a new C# Class Library project named AutoLotDAL (short for AutoLot Data Access Layer) and delete the default class file. Add a new folder using the Project ![]() New Folder menu option (make sure you have the Project selected in Solution Explorer), and name this folder ConnectedLayer. In this new folder, add a new class named InventoryDAL.cs, and change the class to public. This class will define various members to interact with the Inventory table of the AutoLot database. Finally, import the following .NET namespaces:
New Folder menu option (make sure you have the Project selected in Solution Explorer), and name this folder ConnectedLayer. In this new folder, add a new class named InventoryDAL.cs, and change the class to public. This class will define various members to interact with the Inventory table of the AutoLot database. Finally, import the following .NET namespaces:
using System;
// You will use the SQL server
// provider; however, it would also be
// permissible to use the ADO.NET
// factory pattern for greater flexibility.
using System.Data;
using System.Data.SqlClient;
using System.Collections.Generic;
namespace AutoLotDAL.ConnectedLayer
{
public class InventoryDAL
{
}
}
![]() Note You might recall from Chapter 13 that when objects use types that manage raw resources (e.g., a database connection), it is a good practice to implement IDisposable and author a proper finalizer. In a production environment, classes such as InventoryDAL would do the same; however, you won’t do that here, so you can stay focused on the particulars of ADO.NET.
Note You might recall from Chapter 13 that when objects use types that manage raw resources (e.g., a database connection), it is a good practice to implement IDisposable and author a proper finalizer. In a production environment, classes such as InventoryDAL would do the same; however, you won’t do that here, so you can stay focused on the particulars of ADO.NET.
Adding the Connection Logic
The first task you must attend to is to define some methods that allow the caller to connect to and disconnect from the data source using a valid connection string. You will hard-code your AutoLotDAL.dll assembly to use the types of System.Data.SqlClient, so you need to define a private member variable of SqlConnection that is allocated at the time the InventoryDAL object is created. Also, define a method named OpenConnection() and another named CloseConnection() to interact with this member variable.
public class InventoryDAL
{
// This member will be used by all methods.
private SqlConnection _sqlConnection = null;
public void OpenConnection(string connectionString)
{
_sqlConnection = new SqlConnection {ConnectionString = connectionString};
_sqlConnection.Open();
}
public void CloseConnection()
{
_sqlConnection.Close();
}
}
For the sake of brevity, your InventoryDAL type will not test for possible exceptions, nor will it throw custom exceptions under various circumstances (e.g., a malformed connection string). If you were to build an industrial-strength data access library, you would absolutely want to use structured exception handling techniques to account for any runtime anomalies.
Adding the Insertion Logic
Inserting a new record into the Inventory table is as simple as formatting the SQL Insert statement (based on user input) and calling the ExecuteNonQuery() using your command object. You can see this in action by adding a public method to your InventoryDAL type namedInsertAuto() that takes four parameters that map to the four columns of the Inventory table (CarId, Color, Make, and PetName). You use these arguments to format a string type to insert the new record. Finally, use your SqlConnection object to execute the SQL statement.
public void InsertAuto(int id, string color, string make, string petName)
{
// Format and execute SQL statement.
string sql = "Insert Into Inventory" +
$"(Make, Color, PetName) Values ('{make}', '{color}', '{petName}')";
// Execute using our connection.
using (SqlCommand command = new SqlCommand(sql, _sqlConnection))
{
command.ExecuteNonQuery();
}
}
This method is syntactically fine, but you could supply an overloaded version that allows the caller to pass in a strongly typed class that represents the data for the new row. Add a new folder to your project named Models, and add a new public class named NewCar. Define the following new NewCar class, which represents a new row in the Inventory table:
public class NewCar
{
public int CarId { get; set; }
public string Color { get; set; }
public string Make { get; set; }
public string PetName { get; set; }
}
Now add the following version of InsertAuto() to your InventoryDAL class (add a using for AutoLotDAL.Models to the top of the class):
public void InsertAuto(NewCar car)
{
// Format and execute SQL statement.
string sql = "Insert Into Inventory" +
"( Make, Color, PetName) Values" +
$"('{car.Make}', '{car.Color}', '{car.PetName}')";
// Execute using our connection.
using (SqlCommand command = new SqlCommand(sql, _sqlConnection))
{
command.ExecuteNonQuery();
}
}
Defining classes that represent records in a relational database is a common way to build a data access library. In fact, as you will see in Chapter 23, the ADO.NET Entity Framework can automatically generate strongly typed classes that allow you to interact with database data. On a related note, the disconnected layer of ADO.NET (see Chapter 22) generates strongly typed DataSet objects to represent data from a given table in a relational database.
![]() Note As you might know, building a SQL statement using string concatenation can be risky from a security point of view (think: SQL injection attacks). The preferred way to build command text is to use a parameterized query, which you will learn about shortly.
Note As you might know, building a SQL statement using string concatenation can be risky from a security point of view (think: SQL injection attacks). The preferred way to build command text is to use a parameterized query, which you will learn about shortly.
Adding the Deletion Logic
Deleting an existing record is as simple as inserting a new record. Unlike when you created the code for InsertAuto(), this time you will learn about an important try/catch scope that handles the possibility of attempting to delete a car that is currently on order for an individual in theCustomers table. Add the following method to the InventoryDAL class type:
public void DeleteCar(int id)
{
// Delete the car with the specified CarId
string sql = $"Delete from Inventory where CarId = '{id}'";
using(SqlCommand command = new SqlCommand(sql, _sqlConnection))
{
try
{
command.ExecuteNonQuery();
}
catch(SqlException ex)
{
Exception error = new Exception("Sorry! That car is on order!", ex);
throw error;
}
}
}
Adding the Update Logic
When it comes to the act of updating an existing record in the Inventory table, the first thing you must decide is what you want to allow the caller to change, whether it’s the car’s color, the pet name, the make, or all of the above. One way to give the caller complete flexibility is to define a method that takes a string type to represent any sort of SQL statement, but that is risky at best.
Ideally, you want to have a set of methods that allow the caller to update a record in a variety of ways. However, for this simple data access library, you will define a single method that allows the caller to update the pet name of a given automobile, like so:
public void UpdateCarPetName(int id, string newPetName)
{
// Update the PetName of the car with the specified CarId.
string sql = $"Update Inventory Set PetName = '{newPetName}' Where CarId = '{id}'";
using (SqlCommand command = new SqlCommand(sql, _sqlConnection))
{
command.ExecuteNonQuery();
}
}
Adding the Selection Logic
Next, you need to add a selection method. As you saw earlier in this chapter, a data provider’s data reader object allows for a selection of records using a read-only, forward-only server-side cursor. As you call the Read() method, you can process each record in a fitting manner. While this is all well and good, you need to contend with the issue of how to return these records to the calling tier of your application.
One approach would be to populate and return a multidimensional array (or other such return value, such as a generic List<NewCar> object) with the data obtained by the Read() method. Here is a second way to obtain data from the Inventory table that uses the latter approach:
public List<NewCar> GetAllInventoryAsList()
{
// This will hold the records.
List<NewCar> inv = new List<NewCar>();
// Prep command object.
string sql = "Select * From Inventory";
using (SqlCommand command = new SqlCommand(sql, _sqlConnection))
{
SqlDataReader dataReader = command.ExecuteReader();
while (dataReader.Read())
{
inv.Add(new NewCar
{
CarId = (int)dataReader["CarId"],
Color = (string)dataReader["Color"],
Make = (string)dataReader["Make"],
PetName = (string)dataReader["PetName"]
});
}
dataReader.Close();
}
return inv;
}
Still another approach is to return a System.Data.DataTable object, which is actually part of the disconnected layer of ADO.NET. You will find complete coverage of the disconnected layer in the next chapter; however, for the time being, you should understand that a DataTableis a class type that represents a tabular block of data (e.g., a grid on a spreadsheet).
Internally, the DataTable class represents data as a collection of rows and columns. While you can fill these collections programmatically, the DataTable type provides a method named Load() that automatically populates these collections using a data reader object! Consider the following methods, which return data from Inventory as a DataTable:
public DataTable GetAllInventoryAsDataTable()
{
// This will hold the records.
DataTable dataTable = new DataTable();
// Prep command object.
string sql = "Select * From Inventory";
using (SqlCommand cmd = new SqlCommand(sql, _sqlConnection))
{
SqlDataReader dataReader = cmd.ExecuteReader();
// Fill the DataTable with data from the reader and clean up.
dataTable.Load(dataReader);
dataReader.Close();
}
return dataTable;
}
Working with Parameterized Command Objects
Currently, the insert, update, and delete logic for the InventoryDAL type uses hard-coded string literals for each SQL query. As you might know, you can use a parameterized query to treat SQL parameters as objects, rather than as a simple blob of text. Treating SQL queries in a more object-oriented manner helps reduce the number of typos (given strongly typed properties); plus, parameterized queries typically execute much faster than a literal SQL string because they are parsed exactly once (rather than each time the SQL string is assigned to the CommandTextproperty). Parameterized queries also help protect against SQL injection attacks (a well-known data access security issue).
To support parameterized queries, ADO.NET command objects maintain a collection of individual parameter objects. By default, this collection is empty, but you can insert any number of parameter objects that map to a placeholder parameter in the SQL query. When you want to associate a parameter within a SQL query to a member in the command object’s parameters collection, you can prefix the SQL text parameter with the @ symbol (at least when using Microsoft SQL Server; not all DBMSs support this notation).
Specifying Parameters Using the DbParameter Type
Before you build a parameterized query, you need to familiarize yourself with the DbParameter type (which is the base class to a provider’s specific parameter object). This class maintains a number of properties that allow you to configure the name, size, and data type of the parameter, as well as other characteristics, including the parameter’s direction of travel. Table 21-7 describes some key properties of the DbParameter type.
Table 21-7. Key Members of the DbParameter Type
|
Property |
Meaning in Life |
|
DbType |
Gets or sets the native data type of the parameter, represented as a CLR data type |
|
Direction |
Gets or sets whether the parameter is input-only, output-only, bidirectional, or a return value parameter |
|
IsNullable |
Gets or sets whether the parameter accepts null values |
|
ParameterName |
Gets or sets the name of the DbParameter |
|
Size |
Gets or sets the maximum parameter size of the data in bytes; this is useful only for textual data |
|
Value |
Gets or sets the value of the parameter |
Now let’s look at how to populate a command object’s collection of DBParameter-compatible objects by reworking the following version of the InsertAuto() method to leverage parameter objects (you could perform a similar reworking for your remaining methods; however, that’s not necessary for this example):
public void InsertAuto(int id, string color, string make, string petName)
{
// Note the "placeholders" in the SQL query.
string sql = "Insert Into Inventory" +
"(Make, Color, PetName) Values" +
"(@Make, @Color, @PetName)";
// This command will have internal parameters.
using (SqlCommand command = new SqlCommand(sql, _sqlConnection))
{
// Fill params collection.
SqlParameter parameter = new SqlParameter
{
ParameterName = "@Make",
Value = make,
SqlDbType = SqlDbType.Char,
Size = 10
};
command.Parameters.Add(parameter);
parameter = new SqlParameter
{
ParameterName = "@Color",
Value = color,
SqlDbType = SqlDbType.Char,
Size = 10
};
command.Parameters.Add(parameter);
parameter = new SqlParameter
{
ParameterName = "@PetName",
Value = petName,
SqlDbType = SqlDbType.Char,
Size = 10
};
command.Parameters.Add(parameter);
command.ExecuteNonQuery();
}
}
Again, notice that your SQL query consists of four embedded placeholder symbols, each of which is prefixed with the @ token. You can use the SqlParameter type to map each placeholder using the ParameterName property and specify various details (e.g., its value, data type, and size) in a strongly typed matter. After each parameter object is hydrated, it is added to the command object’s collection through a call to Add().
![]() Note This example uses various properties to establish a parameter object. Note, however, that parameter objects support a number of overloaded constructors that allow you to set the values of various properties (which will result in a more compact code base). Also be aware that Visual Studio provides many graphical designers that will generate a good deal of this grungy parameter-centric code on your behalf (see Chapters 22 and 23).
Note This example uses various properties to establish a parameter object. Note, however, that parameter objects support a number of overloaded constructors that allow you to set the values of various properties (which will result in a more compact code base). Also be aware that Visual Studio provides many graphical designers that will generate a good deal of this grungy parameter-centric code on your behalf (see Chapters 22 and 23).
While building a parameterized query often requires more code, the end result is a more convenient way to tweak SQL statements programmatically, as well as to achieve better overall performance. While you are free to use this technique whenever a SQL query is involved, parameterized queries prove most helpful when you want to trigger a stored procedure.
Executing a Stored Procedure
Recall that a stored procedure is a named block of SQL code stored in the database. You can construct stored procedures so they return a set of rows or scalar data types or do anything else that makes sense (e.g., insert, update, or delete); you can also have them take any number of optional parameters. The end result is a unit of work that behaves like a typical function, except that it is located on a data store rather than a binary business object. Currently, your AutoLot database defines a single stored procedure named GetPetName, which you formatted as follows:
GetPetName
@carID int,
@petName char(10) output
AS
SELECT @petName = PetName from Inventory where CarId = @carID
Now consider the following final method of the InventoryDAL type, which invokes your stored procedure:
public string LookUpPetName(int carID)
{
string carPetName;
// Establish name of stored proc.
using (SqlCommand command = new SqlCommand("GetPetName", _sqlConnection))
{
command.CommandType = CommandType.StoredProcedure;
// Input param.
SqlParameter param = new SqlParameter
{
ParameterName = "@carID",
SqlDbType = SqlDbType.Int,
Value = carID,
Direction = ParameterDirection.Input
};
command.Parameters.Add(param);
// Output param.
param = new SqlParameter
{
ParameterName = "@petName",
SqlDbType = SqlDbType.Char,
Size = 10,
Direction = ParameterDirection.Output
};
command.Parameters.Add(param);
// Execute the stored proc.
command.ExecuteNonQuery();
// Return output param.
carPetName = (string)command.Parameters["@petName"].Value;
}
return carPetName;
}
One important aspect of invoking a stored procedure is to keep in mind that a command object can represent a SQL statement (the default) or the name of a stored procedure. When you want to inform a command object that it will be invoking a stored procedure, you pass in the name of the procedure (as a constructor argument or by using the CommandText property) and must set the CommandType property to the value CommandType.StoredProcedure. (If you fail to do this, you will receive a runtime exception because the command object is expecting a SQL statement by default.)
SqlCommand command = new SqlCommand("GetPetName", _sqlConnection);
command.CommandType = CommandType.StoredProcedure;
Next, notice that the Direction property of a parameter object allows you to specify the direction of travel for each parameter passed to the stored procedure (e.g., input parameter, output parameter, in/out parameter, or return value). As before, you add each parameter object to the command object’s parameters collection.
// Input param.
SqlParameter param = new SqlParameter
{
ParameterName = "@carID",
SqlDbType = SqlDbType.Int,
Value = carID,
Direction = ParameterDirection.Input
};
command.Parameters.Add(param);
After the stored procedure completes with a call to ExecuteNonQuery(), you can obtain the value of the output parameter by investigating the command object’s parameter collection and casting accordingly.
// Return output param.
carPetName = (string)command.Parameters["@petName"].Value;
At this point, your initial iteration of the AutoLotDAL.dll data access library is complete! You can use this assembly to build any sort of front end to display and edit your data (e.g., console based, desktop GUI, or an HTML-based web application). You have not yet examined how to build graphical user interfaces, so next you will test your data library from a new console application.
![]() Source Code You can find the AutoLotDAL project in the Chapter 21 subdirectory.
Source Code You can find the AutoLotDAL project in the Chapter 21 subdirectory.
Creating a Console UI–Based Front End
Create a new Console Application project named AutoLotCUIClient. After you create your new project, be sure to add a reference to your AutoLotDAL.dll assembly, as well as System.Configuration.dll. If you are using the sample code supplied with the book, you can reference the AutoLotDAL project from the Chapter 21 subdirectory. If you are creating new solutions for each sample, navigate to your AutoLotDAL solution, and locate the AutoLotDAL.dll file in the build directory. Next, add the following using statements to your C# code file:
using AutoLotDAL.ConnectedLayer;
using AutoLotDAL.Models;
using System.Configuration;
using System.Data;
using static System.Console;
Open the App.config file in your project (or add a new one if one doesn’t already exist) and add the <connectionStrings> element, which you will use to connect to your instance of the AutoLot database, as in this example:
<configuration>
<connectionStrings>
<add name ="AutoLotSqlProvider" connectionString =
"Data Source=(local)\SQLEXPRESS2014;
Integrated Security=SSPI;Initial Catalog=AutoLot"/>
</connectionStrings>
<startup>
<supportedRuntime version="v4.0" sku=".NETFramework,Version=v4.6" />
</startup>
</configuration>
Implementing the Main() Method
The Main() method is responsible for prompting the user for a specific course of action and executing that request using a switch statement. This program allows the user to enter the following commands:
· I: Inserts a new record into the Inventory table
· U: Updates an existing record in the Inventory table
· D: Deletes an existing record from the Inventory table
· L: Displays the current inventory using a data reader
· S: Shows these options to the user
· P: Looks up pet name from carID
· Q: Quits the program
Each possible option is handled by a unique static method within the Program class. The next snippet shows the complete implementation of Main(). Notice that each method invoked from the do/while loop (with the exception of the ShowInstructions() method) takes anInventoryDAL object as its sole parameter.
static void Main(string[] args)
{
WriteLine("***** The AutoLot Console UI *****\n");
// Get connection string from App.config.
string connectionString =
ConfigurationManager.ConnectionStrings["AutoLotSqlProvider"].ConnectionString;
bool userDone = false;
string userCommand = "";
// Create our InventoryDAL object.
InventoryDAL invDAL = new InventoryDAL();
invDAL.OpenConnection(connectionString);
// Keep asking for input until user presses the Q key.
try
{
ShowInstructions();
do
{
Write("\nPlease enter your command: ");
userCommand = ReadLine();
WriteLine();
switch (userCommand?.ToUpper()??"")
{
case "I":
InsertNewCar(invDAL);
break;
case "U":
UpdateCarPetName(invDAL);
break;
case "D":
DeleteCar(invDAL);
break;
case "L":
ListInventory(invDAL);
break;
case "S":
ShowInstructions();
break;
case "P":
LookUpPetName(invDAL);
break;
case "Q":
userDone = true;
break;
default:
WriteLine("Bad data! Try again");
break;
}
} while (!userDone);
}
catch (Exception ex)
{
WriteLine(ex.Message);
}
finally
{
invDAL.CloseConnection();
}
}
Implementing the ShowInstructions( ) Method
The ShowInstructions() method does what you would expect, as shown here:
private static void ShowInstructions()
{
WriteLine("I: Inserts a new car.");
WriteLine("U: Updates an existing car.");
WriteLine("D: Deletes an existing car.");
WriteLine("L: Lists current inventory.");
WriteLine("S: Shows these instructions.");
WriteLine("P: Looks up pet name.");
WriteLine("Q: Quits program.");
}
Implementing the ListInventory( ) Method
You could implement the ListInventory() method in either of two ways, based on how you constructed your data access library. Recall that the GetAllInventoryAsDataTable() method of InventoryDAL returns a DataTable object. You could implement this approach like this:
private static void ListInventory(InventoryDAL invDAL)
{
// Get the list of inventory.
DataTable dt = invDAL.GetAllInventoryAsDataTable();
// Pass DataTable to helper function to display.
DisplayTable(dt);
}
The DisplayTable() helper method displays the table data using the Rows and Columns properties of the incoming DataTable (again, you will learn the full details of the DataTable object the next chapter, so don’t fret over the details).
private static void DisplayTable(DataTable dt)
{
// Print out the column names.
for (int curCol = 0; curCol < dt.Columns.Count; curCol++)
{
Write($"{dt.Columns[curCol].ColumnName}\t");
}
WriteLine("\n----------------------------------");
// Print the DataTable.
for (int curRow = 0; curRow < dt.Rows.Count; curRow++)
{
for (int curCol = 0; curCol < dt.Columns.Count; curCol++)
{
Write($"{dt.Rows[curRow][curCol]}\t");
}
WriteLine();
}
}
If you would prefer to call the GetAllInventoryAsList() method of InventoryDAL, you could implement a method named ListInventoryViaList(), like so (you will need to add a using for AutoLotDAL.Models):
private static void ListInventoryViaList(InventoryDAL invDAL)
{
// Get the list of inventory.
List<NewCar> record = invDAL.GetAllInventoryAsList();
WriteLine("CarId:\tMake:\tColor:\tPetName:");
foreach (NewCar c in record)
{
WriteLine($"{c.CarId}\t{c.Make}\t{c.Color}\t{c.PetName}");
}
}
Implementing the DeleteCar() Method
Deleting an existing automobile is as simple as asking the user for the ID of the car and passing this to the DeleteCar() method of the InventoryDAL type, as shown here:
private static void DeleteCar(InventoryDAL invDAL)
{
// Get ID of car to delete.
Write("Enter ID of Car to delete: ");
int id = int.Parse(ReadLine()??"0");
// Just in case you have a referential integrity violation!
try
{
invDAL.DeleteCar(id);
}
catch(Exception ex)
{
WriteLine(ex.Message);
}
}
Implementing the InsertNewCar() Method
Inserting a new record into the Inventory table is a simple matter of asking the user for the new bits of data (using ReadLine() calls) and passing this data into the InsertAuto() method of InventoryDAL, like so:
private static void InsertNewCar(InventoryDAL invDAL)
{
Write("Enter Car ID: ");
var newCarId = int.Parse(ReadLine()??"0");
Write("Enter Car Color: ");
var newCarColor = ReadLine();
Write("Enter Car Make: ");
var newCarMake = ReadLine();
Write("Enter Pet Name: ");
var newCarPetName = ReadLine();
// Now pass to data access library.
invDAL.InsertAuto(newCarId, newCarColor, newCarMake, newCarPetName);
}
Recall that you overloaded InsertAuto() to take a NewCar object, rather than a set of independent arguments. Thus, you could have implemented InsertNewCar() like this:
private static void InsertNewCar(InventoryDAL invDAL)
{
// First get the user data.
..//omitted for brevity
// Now pass to data access library.
var c = new NewCar
{
CarId = newCarId,
Color = newCarColor,
Make = newCarMake,
PetName = newCarPetName
};
invDAL.InsertAuto(c);
}
Implementing the UpdateCarPetName() Method
The following implementation of UpdateCarPetName() looks similar:
private static void UpdateCarPetName(InventoryDAL invDAL)
{
// First get the user data.
Write("Enter Car ID: ");
var carID = int.Parse(ReadLine()??"0");
Write("Enter New Pet Name: ");
var newCarPetName = ReadLine();
// Now pass to data access library.
invDAL.UpdateCarPetName(carID, newCarPetName);
}
Implementing LookUpPetName()
Obtaining the pet name of a given automobile works similarly to the previous methods; this is because the data access library encapsulates all the lower-level ADO.NET calls.
private static void LookUpPetName(InventoryDAL invDAL)
{
// Get ID of car to look up.
Write("Enter ID of Car to look up: ");
int id = int.Parse(ReadLine()??"0");
WriteLine($"Petname of {id} is {invDAL.LookUpPetName(id).TrimEnd()}.");
}
With this, your console-based front end is finished! It’s time to run your program and test each method. Here is some partial output that tests the L, P, and Q commands:
***** The AutoLot Console UI *****
I: Inserts a new car.
U: Updates an existing car.
D: Deletes an existing car.
L: Lists current inventory.
S: Shows these instructions.
P: Looks up pet name.
Q: Quits program.
Please enter your command: L
CarId: Make: Color: PetName:
1 VW Black Zippy
2 Ford Rust Rusty
3 Saab Black Mel
4 Yugo Yellow Cluncker
5 BMW Black Bimmer
6 BMW Green Hank
7 BMW Pink Pinkey
Please enter your command: P
Enter ID of Car to look up: 6
Petname of 6 is Hank.
Please enter your command: Q
Press any key to continue . . .
![]() Source Code You can find the AutoLotCUIClient application in the Chapter 21 subdirectory.
Source Code You can find the AutoLotCUIClient application in the Chapter 21 subdirectory.
Understanding Database Transactions
Let’s wrap up this examination of the connected layer of ADO.NET by taking a look at the concept of a database transaction. Simply put, a transaction is a set of database operations that must either all work or all fail as a collective unit. As you might imagine, transactions are quite important to ensure that table data is safe, valid, and consistent.
Transactions are important when a database operation involves interacting with multiple tables or multiple stored procedures (or a combination of database atoms). The classic transaction example involves the process of transferring monetary funds between two bank accounts. For example, if you were to transfer $500 from your savings account into your checking account, the following steps should occur in a transactional manner:
1. The bank should remove $500 from your savings account.
2. The bank should add $500 to your checking account.
It would be an extremely bad thing if the money were removed from the savings account but not transferred to the checking account (because of some error on the bank’s part) because then you would be out $500! However, if these steps are wrapped up into a database transaction, the DBMS ensures that all related steps occur as a single unit. If any part of the transaction fails, the entire operation is rolled back to the original state. On the other hand, if all steps succeed, the transaction is committed.
![]() Note You might be familiar with the acronym ACID from looking at transactional literature. This represents the four key properties of a prim-and-proper transaction: Atomic (all or nothing), Consistent (data remains stable throughout the transaction), Isolated (transactions do not step on each other’s feet), and Durable (transactions are saved and logged).
Note You might be familiar with the acronym ACID from looking at transactional literature. This represents the four key properties of a prim-and-proper transaction: Atomic (all or nothing), Consistent (data remains stable throughout the transaction), Isolated (transactions do not step on each other’s feet), and Durable (transactions are saved and logged).
It turns out that the .NET platform supports transactions in a variety of ways. This chapter will look at the transaction object of your ADO.NET data provider (SqlTransaction, in the case of System.Data.SqlClient). The .NET base class libraries also provide transactional support within numerous APIs, including the following:
· System.EnterpriseServices: This namespace (located in the System.EnterpriseServices.dll assembly) provides types that allow you to integrate with the COM+ runtime layer, including its support for distributed transactions.
· System.Transactions: This namespace (located in the System.Transactions.dll assembly) contains classes that allow you to write your own transactional applications and resource managers for a variety of services (e.g., MSMQ, ADO.NET, and COM+).
· Windows Communication Foundation: The WCF API provides services to facilitate transactions with various distributed binding classes.
· Windows Workflow Foundations: The WF API provides transactional support for workflow activities.
In addition to the baked-in transactional support within the .NET base class libraries, it is possible to use the SQL language of your database management system. For example, you could author a stored procedure that uses the BEGIN TRANSACTION, ROLLBACK, and COMMITstatements.
Key Members of an ADO.NET Transaction Object
While transactional-aware types exist throughout the base class libraries, you will focus on transaction objects found within an ADO.NET data provider, all of which derive from DBTransaction and implement the IDbTransaction interface. Recall from the beginning of this chapter that IDbTransaction defines a handful of members as follows:
public interface IDbTransaction : IDisposable
{
IDbConnection Connection { get; }
IsolationLevel IsolationLevel { get; }
void Commit();
void Rollback();
}
Notice the Connection property, which returns a reference to the connection object that initiated the current transaction (as you’ll see, you obtain a transaction object from a given connection object). You call the Commit() method when each of your database operations have succeeded. Doing this causes each of the pending changes to be persisted in the data store. Conversely, you can call the Rollback() method in the event of a runtime exception, which informs the DMBS to disregard any pending changes, leaving the original data intact.
![]() Note The IsolationLevel property of a transaction object allows you to specify how aggressively a transaction should be guarded against the activities of other parallel transactions. By default, transactions are isolated completely until committed. Consult the .NET Framework 4.6 SDK documentation for full details regarding the values of the IsolationLevel enumeration.
Note The IsolationLevel property of a transaction object allows you to specify how aggressively a transaction should be guarded against the activities of other parallel transactions. By default, transactions are isolated completely until committed. Consult the .NET Framework 4.6 SDK documentation for full details regarding the values of the IsolationLevel enumeration.
Beyond the members defined by the IDbTransaction interface, the SqlTransaction type defines an additional member named Save(), which allows you to define save points. This concept allows you to roll back a failed transaction up until a named point, rather than rolling back the entire transaction. Essentially, when you call Save() using a SqlTransaction object, you can specify a friendly string moniker. When you call Rollback(), you can specify this same moniker as an argument to perform an effective partial rollback. Calling Rollback()with no arguments causes all the pending changes to be rolled back.
Adding a CreditRisks Table to the AutoLot Database
Now let’s look at how you use ADO.NET transactions. Begin by using the Server Explorer of Visual Studio to add a new table named CreditRisks to the AutoLot database, which has the same columns as the Customers table you created earlier in this chapter: CustId, which is the primary key; FirstName; and LastName. As its name suggests, CreditRisks is where you banish the undesirable customers who fail a credit check (see Figure 21-15).
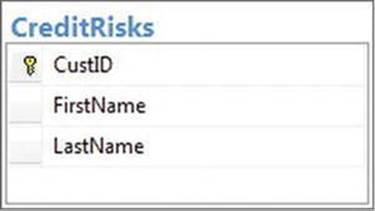
Figure 21-15. The interconnected Orders, Inventory, and Customers tables
Like the earlier savings-to-checking money transfer example, this example, where you move a risky customer from the Customers table into the CreditRisks table, should occur under the watchful eye of a transactional scope (after all, you will want to remember the names of those who are not creditworthy). Specifically, you need to ensure that either that you successfully delete the current credit risks from the Customers table and add them to the CreditRisks table or that neither of these database operations occurs.
![]() Note In a production environment, you would not need to build a whole new database table to capture high-risk customers; instead, you could add a Boolean column named IsCreditRisk to the existing Customers table. However, this new table lets you play with a simple transaction.
Note In a production environment, you would not need to build a whole new database table to capture high-risk customers; instead, you could add a Boolean column named IsCreditRisk to the existing Customers table. However, this new table lets you play with a simple transaction.
Adding a Transaction Method to InventoryDAL
Now let’s look at how you work with ADO.NET transactions programmatically. Begin by opening the AutoLotDAL code library project you created earlier and add a new public method named ProcessCreditRisk() to the InventoryDAL class to deal with perceived a credit risks. (Note that this example avoids using a parameterized query to keep the implementation simple; however, you’d want use such a query for a production-level method.)
// A new member of the InventoryDAL class.
public void ProcessCreditRisk(bool throwEx, int custID)
{
// First, look up current name based on customer ID.
string fName;
string lName;
var cmdSelect =
new SqlCommand($"Select * from Customers where CustId = {custID}",
_sqlConnection);
using (var dataReader = cmdSelect.ExecuteReader())
{
if (dataReader.HasRows)
{
dataReader.Read();
fName = (string) dataReader["FirstName"];
lName = (string) dataReader["LastName"];
}
else
{
return;
}
}
// Create command objects that represent each step of the operation.
var cmdRemove =
new SqlCommand($"Delete from Customers where CustId = {custID}",
_sqlConnection);
var cmdInsert =
new SqlCommand("Insert Into CreditRisks" +
$"(FirstName, LastName) Values('{fName}', '{lName}')",
_sqlConnection);
// We will get this from the connection object.
SqlTransaction tx = null;
try
{
tx = _sqlConnection.BeginTransaction();
// Enlist the commands into this transaction.
cmdInsert.Transaction = tx;
cmdRemove.Transaction = tx;
// Execute the commands.
cmdInsert.ExecuteNonQuery();
cmdRemove.ExecuteNonQuery();
// Simulate error.
if (throwEx)
{
throw new Exception("Sorry! Database error! Tx failed...");
}
// Commit it!
tx.Commit();
}
catch (Exception ex)
{
WriteLine(ex.Message);
// Any error will roll back transaction.
// Using the new conditional access operator to check for null.
tx?.Rollback();
}
}
Here, you use an incoming bool parameter to represent whether you will throw an arbitrary exception when you attempt to process the offending customer. This allows you to simulate an unforeseen circumstance that will cause the database transaction to fail. Obviously, you do this here only for illustrative purposes; a true database transaction method would not want to allow the caller to force the logic to fail on a whim!
Note that you use two SqlCommand objects to represent each step in the transaction you will kick off. After you obtain the customer’s first and last names based on the incoming custID parameter, you can obtain a valid SqlTransaction object from the connection object usingBeginTransaction(). Next, and most importantly, you must enlist each command object by assigning the Transaction property to the transaction object you have just obtained. If you fail to do so, the Insert/Delete logic will not be under a transactional context.
After you call ExecuteNonQuery() on each command, you throw an exception if (and only if) the value of the bool parameter is true. In this case, all pending database operations are rolled back. If you do not throw an exception, both steps will be committed to the database tables once you call Commit(). Now compile your modified AutoLotDAL project to ensure you do not have any typos.
Testing Your Database Transaction
You could update your previous AutoLotCUIClient application with a new option to invoke the ProcessCreditRisk() method; instead, however, you will create a new Console Application project named AdoNetTransaction to accomplish this. Set a reference to yourAutoLotDAL.dll assembly and import the AutoLotDAL.ConnectedLayer, AutoLotDAL.Models, and static System.Console namespaces.
Next, open your Customers table for data entry by right-clicking the table icon from the Server Explorer and selecting Show Table Data. Now add the following new customer who will be the victim of a low credit score (make a note of the assigned Id for the new record):
· FirstName: Homer
· LastName: Simpson
Finally, update your Main() method as follows:
static void Main(string[] args)
{
WriteLine("***** Simple Transaction Example *****\n");
// A simple way to allow the tx to succeed or not.
bool throwEx = true;
Write("Do you want to throw an exception (Y or N): ");
var userAnswer = ReadLine();
if (userAnswer?.ToLower() == "n")
{
throwEx = false;
}
var dal = new InventoryDAL();
dal.OpenConnection(@"Data Source=(local)\SQLEXPRESS2014;Integrated Security=SSPI;" +
"Initial Catalog=AutoLot");
// Process customer 5 – enter the id for Homer Simpson in the next line.
dal.ProcessCreditRisk(throwEx, 5);
WriteLine("Check CreditRisk table for results");
ReadLine();
}
If you were to run your program and elect to throw an exception, you would find that Homer is not removed from the Customers table because the entire transaction has been rolled back. However, if you did not throw an exception, you would find that Customer ID 5 is no longer in theCustomers table and has been placed in the CreditRisks table instead.
![]() Source Code You can find the AdoNetTransaction project in the Chapter 21 subdirectory.
Source Code You can find the AdoNetTransaction project in the Chapter 21 subdirectory.
Summary
ADO.NET is the native data access technology of the .NET platform, and you can use it in three distinct manners: connected, disconnected, or through the Entity Framework. In this chapter, you examined the connected layer and learned the role of data providers, which are essentially concrete implementations of several abstract base classes (in the System.Data.Common namespace) and interface types (in the System.Data namespace). You also saw that it is possible to build a provider-neutral code base using the ADO.NET data provider factory model.
You also learned that you can use connection objects, transaction objects, command objects, and data reader objects of the connected layer to select, update, insert, and delete records. Also, recall that command objects support an internal parameter collection, which you can use to add some type safety to your SQL queries; these also prove quite helpful when triggering stored procedures.
All materials on the site are licensed Creative Commons Attribution-Sharealike 3.0 Unported CC BY-SA 3.0 & GNU Free Documentation License (GFDL)
If you are the copyright holder of any material contained on our site and intend to remove it, please contact our site administrator for approval.
© 2016-2026 All site design rights belong to S.Y.A.