Beginning Object-Oriented Programming with C# (2012)
Part III
Writing Your Own Classes
Chapter 9: Designing Classes
Chapter 10: Designing and Writing Custom Classes
Chapter 11: Exception Handling and Debugging
Chapter 12: Generics
Chapter 9
Designing Classes
What you will learn in this chapter:
· What elements constitute good class design
· Scope
· The static storage class
· Access specifiers
· Class properties and methods
· Class components and writing style
· UML Light
· General versus helper methods
· User interfaces
wrox.com code downloads for this chapter
You can find the wrox.com code downloads for this chapter at www.wrox.com/remtitle.cgi?isbn=9781118336922 on the Download Code tab. The code in the Chapter09 folder is individually named according to the names throughout the chapter.
Chapter 2 stated that classes are like cookie cutters, and that Visual Studio provides you with a room full of cookie cutters hanging on the wall that you can use. You have used many of those cookie cutters in the sample programs, including labels, textboxes, buttons, listboxes, and listview objects, all of which are extensions of the basic Windows Forms class. Up to this point, you've been writing code that uses those objects in a single class consistently named frmMain. It used this name because all the programs used a single class containing the Main() method that marks the starting point for all C# programs.
Well, it's time to cut the apron strings.
In this chapter, you learn how to make your own cookie cutters to hang on the wall. This chapter concentrates on the design considerations you need to think about to write “good” code for your own classes. A well-designed class becomes another cookie cutter that you can hang on the wall and use over and over in other programs. Poorly designed classes tend to become use-once-and-throw-away cookie cutters. Given that one of the major advantages of OOP is code reuse, you need to think about class design anytime the opportunity presents itself.
The next two chapters are probably the two most important chapters in this book because these two chapters reveal two of the major benefits to be derived from OOP: data encapsulation and code reuse.
Class Design
This chapter creates a clsDates class as a reference point for learning about class design. You can add two methods to this class: a leap year method that's a little different from the method offered by the DateTime class and a getEaster()method to determine the date on which Easter falls. (Easter falls on a Sunday in either March or April, depending on the state of the lunar calendar.)
The first thing you need to do is create a project that serves as a test platform for the discussion of class design. As always, you begin by following the steps outlined in Chapter 2. This initial class is still called frmMain because it contains the Main() method that marks where program execution begins. The project name is ClassDesign. Figure 9.1 shows the user interface for the project.
Figure 9.1 User interface for clsDates example
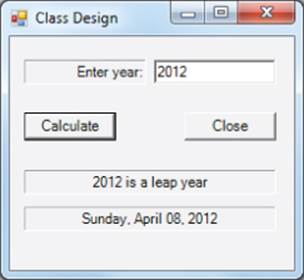
The user enters the year of interest, and your program informs the user if it is a leap year and the date on which Easter falls. There are two labels below the buttons to display the output, lblLeapYearResult and lblEasterResult.
Next, let's walk through the steps necessary to add a class to a program. Although similar to adding a new form to a project, adding a class does not have a design element to it, which does make it a little different. Also, while I tend to treat a new class like any other object (i.e., lowercase for the first three letters), many programmers prefer to use an uppercase letter for the first letter of a class name. It's your choice, but again, use your choice consistently.
Try It Out: Adding a Class to a Project (Chapter09ProgramClassDesign.zip)
Now create a project that uses a new class.
1. Create a new project called ClassDesign in the usual manner.
2. Use the Project → Add Class menu sequence (or Shift+Alt+C) and name the new class clsDates. (Visual Studio adds .cs for the second part of the filename.) See Figure 9.2.
Figure 9.2 Adding a class to a project
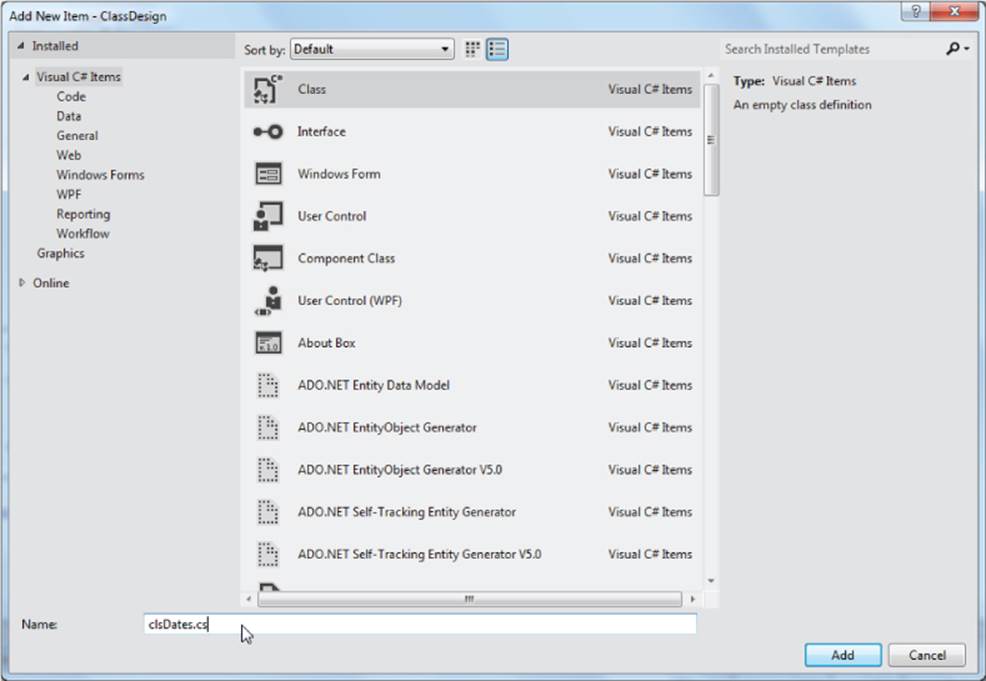
Note how the Class template is selected and the new class name is filled in at the bottom of the form. Now click the Add button to add this new class to your project. Your Solution Explorer window should look like Figure 9.3.
Figure 9.3 Solution Explorer window with new class
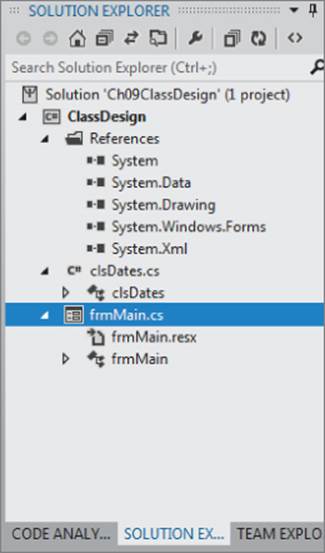
There are several things to notice in Figure 9.3. First, the icon to the left of clsDates in the Solution Explorer window is different. Although class frmMain has a Windows form icon, clsDates uses an icon that looks like the C# logo. This is to reinforce that you just added a class to the project, not a new Windows form. Second, you can see that Visual Studio added two new references (System.XML and System.Data) to the project while you weren't looking. Although you won't explicitly use these references, you can simply ignore them for now.
How It Works
The project can be run at it stands, but it doesn't do anything. Although you could blindly add the code at this point and then consider how the program works, you need to take an important detour before moving to a discussion of how the program works. Although this detour is a deviation from normal sequencing, it makes sense to do so.
Scope
If you look in the Source window, you can see the following code for the new class:
using System;
using System.Collections.Generic;
using System.Text;
namespace ClassDesign
{
class clsDates
{
}
}
This code stub was automatically generated by Visual Studio when you created clsDates. For purposes of discussion, the code for clsDates is expanded. Do not make the code changes shown in Listing 9-1. The code changes shown are done only to help you understand the concept of scope.
Listing 9-1: Hypothetical clsDates source
using System;
using System.Collections.Generic;
using System.Text;
namespace ClassDesign
{
class clsDates // Namespace scope
{
int scopeClass; // Class scope
public int MyFunction()
{
int scopeLocal; // Local scope
// Block scope
for (int scopeBlock = 0; scopeBlock < 20; scopeBlock++)
{
// for statement block
} // End block scope
} // End local scope
} // End class scope
} // End namespace scope
The code in Listing 9-1 is not “real” code you are going to use. However, you can use Listing 9-1 to understand an important concept called scope. Earlier chapters mentioned scope a few times, but scope was never fully explained. That's about to change.
Simply stated, scope refers to the visibility and lifetime of a variable. As long as a variable is in scope, you have access to it and can use it in your code. If a variable is out of scope, it's as though the variable doesn't exist; you cannot use it in your program. Now investigate the concept of scope in greater detail starting from the “inside” of Listing 9-1.
Block Scope
Consider the definition of the variable scopeBlock in the following code:
// Block scope
for (int scopeBlock = 0; scopeBlock < 20; scopeBlock++)
{
// for statement block
} // End block scope
When program control reaches the for loop shown in the preceding code, expression1 of the for loop defines a variable named scopeBlock. At the moment of its definition, scopeBlock becomes available for use in the program. This means that scopeBlock is now in scope and can be used in your code. Stated another way, scopeBlock has begun its lifetime.
Now assume that the for loop has made 20 passes through the for loop statement block and program control is ready to execute whatever statement follows the closing brace of the for loop. Now here's the interesting part: When program control reaches the closing curly brace of the for loop, the variable scopeBlock ceases to exist in the program. Because the closing curly brace marks the end of the for loop and scopeBlock is defined within that for loop, scopeBlock is no longer available for use in the program. When the closing curly brace of the for loop is reached, scopeBlock goes out of scope and cannot be used.
Note
The scope of a variable extends from its point of definition to the closing curly brace of the code block in which it is defined.
It follows, then, that block scope extends from the point of definition of the variable to the closing curly brace of the statement block in which the variable is defined. If you'd like to prove the concept of block scope, make the following code changes in the Main() method in frmMain of your ClassDates program. The code changes are shown in Listing 9-2.
Listing 9-2: Code fragment illustrating block scope
public static void Main()
{
int j = 1;
frmMain main = new frmMain();
Application.Run(main);
if (j == 1)
{
int i; // defined with block scope
i = 10;
// pretend more code here manipulates i in some way…
} // End of if statement block
j = i; // Error will occur here
}
Now try to compile the program. You can see the following error message:
The name 'i' does not exist in the current context
The code fails at the statement wherein the code attempts to assign variable i into j. The reason is that variable i has block scope. Variable i is defined within the if statement block, so its scope and lifetime extend from its point of definition within the if statement block to the closing brace of the if statement block. Because the assignment statement is outside the if statement block, variable i is no longer in scope and cannot be used, so Visual Studio must issue an error message.
Local Scope
Now move up the food chain and examine local scope. Local scope variables are defined within a method block, but outside a statement block. (Some programmers may refer to local scope as method scope.) Therefore, local scope extends from the variable's point of definition to the closing curly brace of the method in which the variable is defined. Variable j in Listing 9-2 is an example of a local scope variable. Variable j comes into scope at its point of definition within the method named Main(). Variable j goes out of scope and ceases to exist when program control reaches the closing brace for the Main() method in Listing 9-2.
You should see that variable scopeLocal in Listing 9-1 has local scope. When program control reaches the closing brace in Listing 9-1, variable scopeLocal is no longer in scope and can no longer be used in the program:
} // End local scope
Local scope variables can be used within a statement block, but the reverse is not true. That is, block scope variables cannot be used outside of the statement block in which they are defined, but local scope variables can be used within any statement blocks that are within the same method.
Class Scope
You have probably figured this out already, but plow through it anyway. Variables with class scope are those that are defined within a class, but outside of a method. (Some programmers refer to class scope as module scope.) Class scope makes the variable accessible at all points in the class. Variable scopeClass in Listing 9-1 is an example of a class scope variable. Class scope subsumes both method and statement block scope. This means that a variable with class scope can be used at both the method and statement block levels of scope. If you think about it, variables with class scope are the properties of the class. Methods in the class always have class scope.
Namespace Scope
Namespace scope applies to any variable defined within the current namespace. Near the top of Listing 9-1 you can find the following statement:
namespace ClassDesign
{
You can tell from this statement that the current project under development is named ClassDesign. Because the project is named ClassDesign, it also means that, if you want to do so, you can reference the program's entry point as the following:
ClassDesign.frmMain.Main();
Every program you have written thus far has a frmMain.Main() method. Think how confusing it would be to invoke the correct frmMain.Main() method if you didn't know which project you were referencing. One of the primary reasons for namespace scope is to prevent name collisions for classes and methods that exist within multiple namespaces. If two programs both have a clsDatabase class in them, you can apply the correct namespace to use the correct class from the project you want to use. That means you can have JonesProject.clsDatabase.ReadOneRecord() andSmithsProject.clsDatabase.ReadOneRecord(), and the two ReadOneRecord() methods will remain distinct from one another even though they share the same class name. Namespace scope subsumes all program elements (such as variables, classes, and methods) within the current project and makes it possible to distinguish program elements that may share a common name.
Visualizing Scope
If you're into imagery, try to imagine a tall ladder that spans several platforms, like the one shown in Figure 9.4. Place yourself and several friends on the ground at the bottom of the ladder. The only weird thing is that none of you can look up higher than eye level. This is block scope. You can see and interact with your friends provided you are all defined within the same statement block. In the figure, data items with block scope have a field of vision (FOV) that includes only those items with block scope.
Figure 9.4 Visualizing scope

Now, climb up the ladder to the second platform. You look around to see some more of your friends on the local scope platform. You can go to the edge of the platform, look down, and see your friends below you as well as those on the same platform. The only difference is that your friends below you can no longer see or interact with you because they can't look up. Because you are now at a higher scope level, you can interact with them only if you climb down the ladder to join them at their statement block scope level. That is, any statement that involves you and has local scope must occur within the statement block that defines the statement block variable. For example, if you are variable x with local scope and you have a friend named i with block scope, the statement
x = i;
can occur only if you climb back down the ladder to interact with variable i in his statement block. This means the statement must occur within the statement block where i lives. Otherwise, the statement cannot occur because i can exist only within its own statement block. In terms of Listing 9-2, you can interact with variable i only if you place the assignment statement within the if statement block. Therefore, variables with local scope have a field of vision that includes data items with both local and block scope but can interact with block scope items only within those items' statement block.
Now climb even higher to the class scope platform. Again, you have friends at this scope level with whom you can interact directly. Looking below you, you can see both your local and statement block friends, but to interact with them, you must climb down the ladder to their levels. That is, for you to interact with local variables, any statement involving you must take place within the method in which your local block friend is defined, or the statement block within which your block scope friend is defined. Notice how the FOV for class scope includes data items defined with both local and block scope.
Finally, climb up to the highest platform. Again you can see some new friends at this level (such as global data items), but looking down you can see everything! All data items in the program are visible to you. To interact with them, however, still means you must climb down to their levels because they cannot look up and see you. Suppose you are a variable with namespace scope. To interact with variable i in Listing 9-2, you must climb all the way down the ladder to make yourself present within the if statement block where variable i exists.
Why Does C# Support Scope?
Most modern (and all OOP) languages support the concept of scope. This support is an attempt to minimize the unwanted interaction effects that can occur among data items in a program. Consider what might happen if you were using a language that didn't support scope. In such languages, all variables behave like namespace variables. Suppose a variable named x starts behaving badly and has a value it shouldn't have. Without scope, where do you start looking for the cause of the weird value for x? The entire program is the playing field because x is visible everywhere throughout the program. Any element of the program could be messing around with x, and you don't have a clue where it is being contaminated. Debugging such a problem becomes a hit-or-miss proposition, and it's only by chance that you finally locate the bug. Systematic debugging under such circumstances goes out the window and finding and correcting the bug becomes more an issue of luck, incantations, and eye of newt.
With data items that are scoped, the magnitude of the problem shrinks immensely. If x is a variable defined with block scope, clearly something is messing around with x in the statement block where it is defined. After all, x cannot live outside the block in which it's defined when it has block scope. In a large program with 3,000 lines of code, you can immediately eliminate almost all 3,000 lines and concentrate on the relatively few lines of code that form x's statement block.
If x is defined with local scope, you can still eliminate thousands of lines of code because only the code within the method in which x is defined comes into play. Although a local scope variable is likely in scope for a larger number of code lines than a block scope variable, it's still a lot better than no scope at all.
As you climb the scope ladder in Figure 9.4, more lines of code come into play, offering more places for x to get messed up. (This is because of the widening FOV.) Because more lines must be considered as a variable's scope widens, debugging becomes more difficult. For that reason, your program design should try to work with data at the narrowest scope level possible that still makes sense for the task at hand. The process to isolate the data in a program is called encapsulation, one of the cornerstones of object-oriented programming. Although it may be easier to slap a program design together with little or no thought about scope or encapsulation, you'll pay for it in the long run with more debugging and maintenance time.
Think Before You Write
The lesson to learn: Take the time to think about program design before you start writing. I cannot begin to tell you how many times he's given an in-class programming assignment only to have the students immediately start banging on the keyboards and dragging-and-dropping objects onto a form. As I watch the students, there's usually one or two who sit in their seats either doodling something on a piece of scratch paper, or perhaps they just stare at the ceiling. In a few minutes, they eventually start writing their programs. The great thing is that these doodlers and ceiling-watchers almost always finish their programs before the rest of the class and generally have better program solutions. The reason? The time they spend doodling or ceiling-watching is actually spent creating a program design.
Many students confuse simple movement with problem solving. That is, they think that because they are dragging and dropping textbox and label objects onto a form that they are working toward the program solution. However, as they get into the problem, it's not uncommon to see them remove the objects they originally thought they needed and replace them with something else—lots of movement, but no useful work. Such students would be miles ahead if they had just taken a few minutes to think through the problem and come up with a design first, before they did anything else.
So…how do you design a program? This is exactly what you want to examine in the rest of this chapter.
Designing a Program
Perhaps the most difficult task a new programmer faces is knowing where to start when designing a program. Every program is a little different, so each design must be a little different. Given that, where's the best place to start?
Although it is true that programs are different, you already know that all programs have at least one thing in common: the Five Program Steps. With that in mind, return to the clsDates program that you started at the beginning of the chapter. The goal of the program is to write a class that can determine the date of Easter and tell you whether the year in question is a leap year. Now see how you can use the Five Program Steps as a starting point for your design.
The Five Program Steps
Assume that the user interface shown in Figure 9.1 is good enough for the program. Under that assumption, examine the Five Program Steps from a design-perspective.
Initialization Step
For this program, about the only thing the Initialization step needs to do is properly initialize the objects you've placed on the frmMain form and display that form on the screen. Listing 9-3 shows the frmMain code as it currently exists after you've followed the instructions at the beginning of the chapter.
Listing 9-3: The clsDates test code. (frmMain.cs)
using System;
using System.Windows.Forms;
public class frmMain : Form
{
private TextBox txtYear;
private Button btnCalc;
private Button btnClose;
private Label lblLeapYearResult;
private Label lblEasterResult;
private Label label1;
#region Windows code
private void InitializeComponent()
{
// Windows initialization code for frmMain form
}
#endregion
public frmMain() // Constructor
{
InitializeComponent();
}
public static void Main()
{
frmMain main = new frmMain(); // Programs starts here
Application.Run(main);
}
}
When the program starts executing, you already know that the origin for its execution is with the method named Main(). Within Main(), the statement
frmMain main = new frmMain(); // Programs starts here
says that the first thing the program does is create an instance of an object of the frmMain class and name it main. To create the object named main, the program must first call the method named frmMain(). As you learned in Chapter 5, any method that shares the same name as the class in which it is defined is the constructor for that class. If you look at the frmMain() constructor in Listing 9-3, you can see that it calls a method named InitializeComponent(). Actually, you have been using these exact code lines for every program you've written, beginning with your first program in Chapter 1.
The purpose of the InitializeComponent() method is to enable Windows to re-create the form that you built while you were dragging and dropping objects onto the empty form. The only difference is that Windows is now rebuilding that form in memory so that it can launch your program. If you look at the code that hides between the #region and #endregion directives, you can see the details about how your form is rebuilt each time you run the program.
After that form is built in memory, control eventually returns to Main() and executes the following statement:
Application.Run(main);
When the Run() method is executed, Windows displays the form image for the frmMain class as it is currently stored in memory, and the screen now looks like Figure 9.1. At this point the Initialization step is complete, and the program waits for the user to do something.
Input Step
Only two inputs are needed from the user running the program: The year and a click of the Calculate button. Assume that the user types in 2012 for the year and clicks the Calculate button. At that point, program control enters the btnCalc_Click() event method. After program control enters that method, the program needs to convert the textual data for the year into a numeric data type and assign its value into a variable. Because the program needs only the year entered by the user and a click of the Calculate button, the Input step is simple.
Process Step
If all goes well, the program now needs to call another method that takes the value for the year entered by the user and determines the date for Easter. Having done that, the program needs to call yet another method to determine if that year is a leap year. You can assume that the date for Easter is returned to you as a string and that the leap year value is returned as an int.
Display Step
The display requirements are simple: Fill in the Text property of the two label objects on the form with the information from the Process step.
Termination Step
Because the program hasn't done anything tricky or used any special resources that you need to clean up after, you can simply call the Close() method to end the program.
You can diagram the state of your current design, as shown in Figure 9.5.
Figure 9.5 Current program design
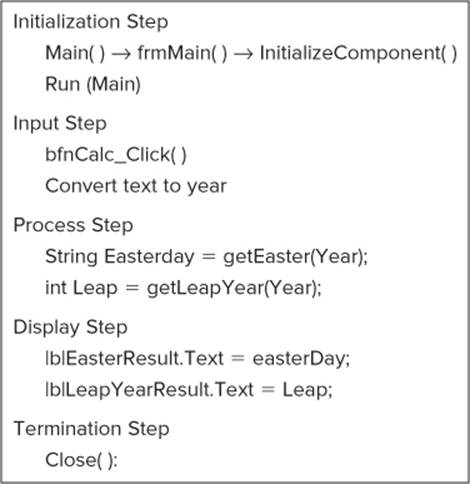
If you examine Figure 9.5, it should be clear that everything you've done can be placed within the confines of the frmMain class. That is, the Initialization step sets up the way you want the form to look, the Input step uses the form to collect the input(s) from the user, the Process step converts the data into the wanted answers, the Display step shows the results to the user, and the Termination step simply ends the program. Now, think about the steps shown in Figure 9.5 and how they work.
Look at the Forest, Not Just the Trees
In a sense, all the steps are tied to the frmMain class, except the Processing step. That is, all the steps except the Processing step interact with visual components represented on the form frmMain. Only the Processing step has nothing that relates directly to the visual representation or objects of thefrmMain form. This means that, if you want to, you can totally isolate the Process step from the visual state of the form. All the Process step needs to function properly is a variable that stores the year. Given that fact, you should ask yourself, “Will I ever, in my programming lifetime, need to reuse a method that can figure out the date for Easter in a given year or whether that year is a leap year?” If you think this answer might be yes, you should consider writing the code for the Process step as a method in a separate class. Why?
One of the driving forces behind OOP is code reuse. If you can write the code once and use it many times in the future, why reinvent the wheel each time you need to accomplish the same task? Although it may take a tiny bit more effort in the short run, the benefits can be huge in the long run. You need to view writing a new class as an investment in the future. Invest a little work time now to get more free time down the road. A side benefit is that debugging programs that are class-based is often easier than if all the code is crammed into frmMain.
Think about how some of those 4,000 cookie cutters that Microsoft wrote have simplified things for you so far. How much more difficult would the programming examples in this book have been if you had to personally rewrite the code that creates a textbox, a label, and button objects for every program? You'd still be back in Chapter 2! Having the ability to use those objects without writing their code has saved you countless hours of typing and debugging time.
Because you just may want to reuse the Easter and leap year methods at some point in the future, you implement those methods as part of a new class named clsDates.
UML Light
The Unified Modeling Language (UML) is a standardized specification language for modeling objects. It evolved from a joint effort by James Rumbaugh, Grady Booch, and Ivar Jacobson in the 1990s. Entire volumes have been written on UML, and there is no way that to do justice to it here. Still, you can make use of a small subset of UML called a UML class diagram. This is a visual representation of the parts that comprise a class. Rather than use all the features of UML class diagrams, you use only a small subset, hence the term UML Light. (Don't bother Googling “UML Light”…the author made up the term a long time ago.)
Figure 9.6 shows the general format for a UML class diagram.
Figure 9.6 Using UML Light
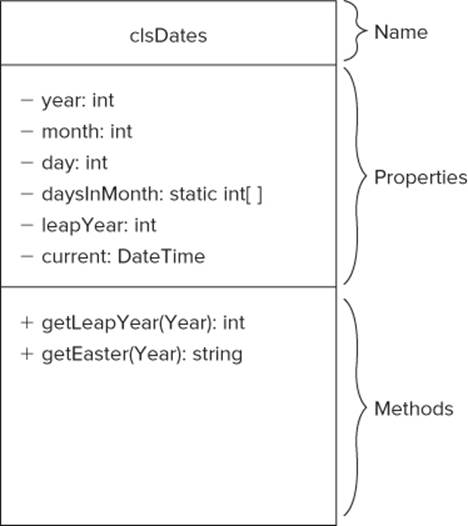
A UML class diagram may be viewed as three stacked boxes. The top box holds the name of the class (in this case clsDates). This is the name you see on the cookie cutter when it's hanging on the wall. Below the class name box is a box that describes the properties of the class. (Other OOP languages might refer to these properties as class members or class attributes.) The third box describes the methods that this particular class supports. (The latest version of UML supports a fourth box that describes how the class is persisted, or permanently stored, in a disk data file or a database. The light version ignores this fourth box.)
Access Specifiers
The first line in the properties box contains the following line:
- year : int
The minus sign at the beginning of the line is used as a symbol to represent the access specifier for this particular property. Only two possible access specifiers are discussed here: private and public. Both of these access specifiers are keywords in C#. The keyword private means that this property can be accessed only from outside the class by using its property methods. (The discussion of an object's property methods is deferred until Chapter 10.) The minus sign in Figure 9.6 is a UML symbol for the keyword private in C#.
You can also define a property using the public keyword. The keyword public means that the property is directly accessible without the need to use the object's property methods. The UML symbol for the public keyword is the plus sign.
The minus sign appears at the beginning of the line before the word year. The word year is the name you want to give to this particular class property. Following the property name is a colon (:). The colon simply serves to separate the property name from the type specifier for the property. In this case, the type specifier is int. This means that year is an int data type. The entire line tells you quite a bit about the property. That is, year is an integer property of the clsDates class and uses the private access specifier.
In Figure 9.6, you can see that all the properties use the private access specifier. There are good reasons for using this specifier, as you see shortly. For now, simply think of the private access specifier as affording more protection for the properties than does the public access specifier. In a sense, the private access specifier encapsulates a variable within its class and protects it from contamination by the outside world.
Access Specifiers and Scope
The properties of a class have class scope by default. This means that the class property variables are visible at all points within the class from their points of definition to the closing brace of the class code. The default access specifier for class properties is private. Class scope also means that class property variables do not have namespace scope. For example, if you define the property year according to the specification shown in Figure 9.6, it appears in clsDates as the following statement:
int year;
Because the private access specifier is the default storage class, what you are writing is
private int year;
Now suppose you create an object named myDate of clsDates in frmMain. As things currently stand, you might try this statement:
myDate.year = 2008;
Visual Studio gets upset and tells you:
ClassDesign.clsDates.year' is inaccessible due to its protection level
This is Visual Studio's way to tell you that year is not in scope. In other words, the private access specifier you gave to year in the clsDates class affords it some level of protection from the evil forces that lurk in the outside world. Again, the private access specifier means the variable year is only visible in clsDates, not frmMain.
Now change the definition of year in clsDates to
public int year;
and try to compile the program. Visual Studio no longer gets upset. The reason is that you have done away with the data protection afforded by the private keyword. Now anyone with a clsDates object is free to change year to any value she wants, and there's nothing you can do about it. Not good.
By defining the class property data with the private access specifier, you are acting like the smart medieval king who locks his valuable possessions (data) in the castle keep. Because you have the key to the tower, you control who has access to the possessions and they must play by your rules. On the other hand, if you define class properties with the public access specifier, you might as well make a thousand copies of the key and leave them hanging on the gate next to the moat. Outsiders no longer have to play by your rules and can change things as they see fit…also not good.
In summary, the private access specifier reinforces the OOP design goal to encapsulate data. Although there may be some technical reasons to argue for using the public access specifier, those reasons are few and far between. As a general rule, use the private access specifier for all property data.
The static Keyword
What does the line
- daysInMonth : static int[]
mean? The word static is a C# keyword that conveys information about how something is stored in computer memory. In this case, you can verbalize the line like this: “daysInMonth is a private integer array that uses the static storage class.” The brackets after the int keyword tell you thatdaysInMonth is an integer array. The keyword static means several things, but the most important is that, regardless of how many instances of this class you create in a program, storage is reserved by the Windows Memory Manager for only one array named daysInMonth.
For example, suppose you write a program that, for some reason, needs a million objects of the clsDates type. Each one of those objects gets its own copy of the year, month, day, leapYear, and current properties shown in Figure 9.6. However, all the million objects share a single instance of thedaysInMonth array. Why only one copy? Well…are you really going to redefine how many days there are in a month? I don't think so. Because there is no good reason to have more than one instance of the array, you can save several million bytes of storage by defining it only once and letting all the other instances share its data.
As you see later in the chapter, the daysInMonth array stores a count of how many days each month has in it, as in 31, 28, 31, 30, and so on. Because these monthly counts aren't likely to change anytime soon, there's no reason to create multiple copies of the array. Such an array is just a read-only array because there is no conceivable reason to change these values. Therefore, because no object ever has a need to change the content of the array, there's no reason to duplicate it. The needs of the program for the content of the array are such that each class object can share this data.
Another thing about static data items: They are created the moment the program is loaded. You may not have noticed that the method Main() uses the static storage class. This means that a copy of that method exists the moment the program is loaded into memory. If you think about it, this makes sense. After all, if the program didn't immediately create a copy of the Main() method when it loaded, how would you ever get the program to start executing? You need the Main() method to get the program running.
As a general design rule, you should use the static keyword with any data that can safely be shared between instances of the class, or any data that must be present the moment the program is ready to start executing. You can apply the static access specifier to methods with the same effect.
UML Methods
The interpretation of the UML class method entries is similar to that of its properties. Consider this entry:
+ getLeapYear(year) : int
It states that the getLeapYear() method is a public method (+) that is passed one argument named year and that returns an int data type value. The interpretation for getEaster() is similar, except that it returns a string value to the caller.
Design Intent and Access Specifiers for Methods
Like class properties, class methods may use either public (+) or private (-) access specifiers. The interpretation of public methods is similar to that for public properties. However, the intent of a public access specifier for a method is different from that for a class property. Class properties are data and, as a general rule, you want to hide the class data as much as possible. Again, data hiding is the basis for encapsulation and one of the real benefits of OOP. Class methods, however, are different.
public Methods
Most class methods are designed to perform one specific task on one or more pieces of data. (A common fault of beginning students is to write methods that are the equivalent of a Swiss Army knife. Methods are not multitaskers. They should be designed to perform one task and do that task well.) Quite often, those pieces of data come from the class properties. Given that class methods are used to manipulate the class data, it seems reasonable to assume that the programmer using the class wants access to that newly transformed data. For example, in a few moments you are going to write a class method that returns the value 1 if a year is a leap year or 0 if it is not. You are writing the method so that whoever calls that method knows whether the year he passed to the method is a leap year. Clearly, you want to make that result known outside the class. Therefore, you would write thegetLeapYear() method using the public access specifier.
All elements of a class that you give the public access specifier become part of the user (or public) interface for the class. That is, you purposely are designing properties and methods using the public access specifier specifically because you want the outside world to have access to them. As mentioned earlier, I take a dim view of public properties. However, I am thrilled about public methods. The reason for the disparity is that you want to hide the data (that is, the properties) but make the class useful via the public class methods and the functionality those class methods bring to the party.
Sometimes you hear the term class API. This refers to the class Application Programming Interface. Therefore, a class API refers to all the elements of the class that use the public access specifier. This makes sense if you think about it because the only way the outside world can interact with a class is through its public properties and methods.
private (Helper) Methods
Just as a class can have public methods, it can also use private class methods. By definition, private class methods cannot be part of the class API. If the method is private, it has class scope and is not visible outside the class in which it is defined.
You're probably asking, “If private class methods cannot be accessed outside the class itself, what use are they?” Good question, and it's best answered with an example.
Suppose you collect personal data about people for use in an electronic phone book application you're writing. You decide to collect each person's home phone number as well as his cell and work phone numbers. You know that people often make mistakes when entering numbers, so you want to verify that the numbers they entered for each phone number uses a valid format. Now you have a design choice. You can duplicate your validation code three times, once for each phone number type, or you can write a single method named validatePhoneNumber() and call it when it is needed. Hmmm…which is a better decision? Write three times as much code and then test and debug it three times, or write the code once and test and debug just that version once? Seems like a no-brainer.
The validatePhoneNumber() method exists in the class to make your job of verifying phone numbers easier. Any class method that simply makes your job easier and that you do not want to make part of the class API should be defined using the private access specifier. Quite often, such privateclass methods are called Helper methods because they are in the class to make your work as a programmer easier and do not form part of the class API that you expose to the outside world.
Class Property and Method Names
When you design a class, you have a lot of freedom for what you name your properties and methods. Obviously, you cannot use C# keywords for names, but just about everything else is fair game. (The rules for naming classes are the same as for naming variables.) Given that freedom, does it matter what names you give to your properties and methods? Obviously, the names you use within a class do matter or you wouldn't need this section of the chapter. Consider the following class-naming conventions as you design your classes.
Use Lowercase Letters for Property Names
First, start the names of your properties with lowercase letters. The full explanation for this decision is deferred until Chapter 10. The brief explanation is that using lowercase letters enables you to implement a naming convention that is common to many C# programmers.
Note
Microsoft has naming conventions and style that are different than that presented here. While I have my reasons for the style presented here, you can review Microsoft's conventions at http://msdn.microsoft.com/en-us/library/x2dbyw72%28v=vs.71%29.aspx.
Hint as to Their Functions
Second, select names for your API methods that give a hint as to what their functions are. For example, the method name SortData() seems like a good choice, until you realize that the class contains more than one piece of data. A better name might be SortZipCodes() because that name gives a better idea of what's about to happen. If you need to sort all the class data based upon the ZIP codes, you might name that method SortAllDataByZip(). Using functional names makes it easier to recall what each method does when IntelliSense presents you with a list of the method names available in a class.
Use Action Names for API Methods
Third, because most API class methods interact with the class data, method names often imply an action of some kind and hence are verb-based. For example, SortZipCodes() implies an active change in the ZIP code data from its current state to a sorted state. CalculateSaleTaxDue() might be a method in a company sales package that changes the salesTaxDue property of the class. By contrast, an API method Name() doesn't provide any clue about what the method does, only that it likely has something to do with the names data. A better choice would be getClientName() because that suggests what the method does.
API Method Names Should Be Implementation-Neutral
Fourth, the API class methods should not reflect how the functionality of the methods is implemented. I have seen code in which two API methods were named SearchLeftTreeNode() and SearchRightTreeNode(). It doesn't take much imagination to figure out that the programmer who wrote the class is probably using a binary tree to search for something. Now suppose that some bright propeller-head somewhere develops a new, superfast searching algorithm and you want to implement it in your code. Do you change the API class names to reflect the new algorithm, or do you leave them as they are? If you change the API method names, older versions of the code will break because those methods are no longer in the class. If you don't change the names, you're sort of lying about what the methods do to anyone who uses your class. This is a dilemma: two choices, both bad. The solution is to never use an implementation-based name.
Programmers search binary trees because they want to find something, and the API method name should reflect that fact. For example, if the binary tree search is performed using the client's ID number to find the client's demographic data, a better API method name would be getClientData(). This API method name says nothing about how you accomplish a task. To the outside world, your API class methods should appear to be black boxes: The user doesn't need to know the specific type of magic that produces a result, only that the magic works. Implementation-neutral method names enable you to change the way you accomplish a task without making you feel guilty the next morning. This lack of guilt is the result of the method name being implementation-neutral and making no promises about how things are done within the method.
Think Like a User
One more aspect of class design is to think like the user who ultimately uses the properties and methods of your class. (The user in this sense is a programmer, not someone who runs the program.) For example, in a few moments you see the code for the clsDates class. One of the properties in that class is defined as follows:
private static int[] daysInMonth = { 0, 31, 28, 31, 30, 31, 30, 31,
31, 30, 31, 30, 31};
If you look at the initialization data for the daysInMonth array, it's obvious that the values reflect the number of days in each month. However, closer inspection shows that the first element of the array is 0. Why?
The reason is the way people think, as was mentioned in Chapter 8. If you ask people how many days there are in month one (that is, January) of a year, few are going to say 28. That is the answer you get, however, if the user of the class passes you the value 1 in a method that is supposed to return the number of days in a given month. True, you can always recall the N - 1 Rule and adjust the value users pass to you when you index into the array. But you too are a “people,” and you probably think the same way your user thinks. Debugging a method is easier if the data is organized to match the way you think about the data. Yes … you wasted 4 bytes. Big deal. When each computer now comes with a mega-munch of memory, frittering away 4 bytes is not going to make or break the application. Also, the time you save working with logically organized data pays for itself in reduced testing and debugging time.
The lesson is simple: Organize your data in a way that makes sense to you (and to any others who may have to support your code).
The clsDates Design
Now use some of your design ideas to implement the design for clsDates. The code for clsDates is shown in Listing 9-4.
Listing 9-4: clsDates source code (clsDates.cs)
using System;
using System.Collections.Generic;
using System.Text;
public class clsDates
{
// =============== symbolic constants ==================
// =============== static members ======================
private static int[] daysInMonth = { 0, 31, 28, 31, 30, 31, 30, 31,
31, 30, 31, 30, 31};
// =============== instance members (Properties) =====================
private int day;
private int month;
private int year;
private int leapYear;
private DateTime current;
// =============== constructor(s) ======================
public clsDates()
{
current = DateTime.Now; // Sets DateTime to right now
}
// =============== property methods =====================
// =============== helper methods =======================
// =============== general methods ======================
/*****
* Purpose: To determine if the year is a leap year. Algorithm
* taken from C Programmer's Toolkit, Purdum, Que Corp.,
* 1993, p. 258.
*
* Parameter list:
* int year the year under consideration
*
* Return value:
* int 1 if a leap year, 0 otherwise
*****/
public int getLeapYear(int year)
{
if (year % 4 == 0 && year % 100 != 0 || year % 400 == 0)
return 1; // It is a leap year
else
return 0; // Nope.
}
/*****
* Purpose: To determine the date for Easter given a year. Algorithm
* taken from C Programmer's Toolkit, Purdum, Que Corp.,
* 1993, p. 267.
*
* Parameter list:
* int year the year under consideration
*
* Return value:
* string the date in MM/DD/YYYY format
*****/
public string getEaster(int year)
{
int offset;
int leap;
int day;
int temp1;
int temp2;
int total;
offset = year % 19;
leap = year % 4;
day = year % 7;
temp1 = (19 * offset + 24) % 30;
temp2 = (2 * leap + 4 * day + 6 * temp1 + 5) % 7;
total = (22 + temp1 + temp2);
if (total > 31)
{
month = 4; // Easter is in April…
day = total - 31; // …on this day
}
else
{
month = 3; // Easter is in March…
day = total; // …on this day
}
DateTime myDT = new DateTime(year, month, day);
return myDT.ToLongDateString();
}
}
namespace Modifier
If you look closely at Listing 9-4, you'll notice that I removed the following (default) statements from the clsDates code:
namespace ClassDesign
{
}
Why? The reason is that you want your clsDates class to be usable in other programs you might develop, without your having to use the project's namespace as part of the class hierarchy. For example, if you leave the namespace lines in and you want to create an object named myDate, you must define it with the following statement if the class is from a different namespace:
ClassDesign.clsDates myDate = new ClassDesign.clsDates();
This syntax seems a little cumbersome. By removing the namespace statements in clsDates, you can define the object with this statement:
clsDates myDate = new clsDates();
This syntax structure is more commonly employed even though there might be a small risk of namespace collision with another class that might use clsDates as a class name. If you want to leave the namespace in as part of the class definition, that's fine. Just remember to supply the complete hierarchy when you define an object of the class.
Class Organization
In Listing 9-4 you can see how I've added comments to section off various parts of the class. Those parts are (from top to bottom):
· Symbolic constants
· static members of the class
· Instance members
· Constructors
· Property methods
· Helper methods
· General methods
There is nothing etched in stone about this organization for a class. It is, however, an organizational structure that has worked for me in my writing of commercial applications over the years. A few comments about the organization are warranted.
static Data Versus Instance Members
Notice the division of the properties into those that are static and those that are not. As mentioned earlier in this chapter, static data are created at program load time. This means that, even if the program never gets to a point in which it defines a clsDates object, the daysInMonth array always exists in memory. Also recall that no matter how many objects of clsDates are created, they all share the same daysInMonth array. For those two reasons, place static data in its own category.
Instance members is the common term for all the non-static properties of the class. Instance members are those class properties that are created for each object instantiated from the class. Simply stated, each instance of the class gets its own set of the (non-static) class properties, hence the terminstance members.
Property and Helper Methods
Set these methods off by themselves for reasons explained more completely in Chapter 10. Also, keep the code in the current example simple.
General Methods
The general methods are those methods that become part of your API for the class. As such, all general methods are written using the public access specifier.
General Method Headers
For nontrivial general methods, usually supply a header for the method using the following style, as was shown in Listing 9-4:
/*****
* Purpose: To determine if the year is a leap year. Algorithm
* taken from C Programmer's Toolkit, Purdum, Que Corp.,
* 1993, p. 258.
*
* Parameter list:
* int year the year under consideration
*
* Return value:
* int 1 if a leap year, 0 otherwise
*****/
public string getEaster(int year)
{
The header for a method simply states the purpose of the method, the parameter list of data that is passed to it (if any), and the return data type (if any). If the method uses code based on some special algorithm and you think you may want to refer back to it, place that reference in the method header. Note that I use multiple-line comment characters to block off the header.
If you enforce this structure in your programming team's code, you can use it to create class documentation on-the-fly. That is, you can write a program that examines the source code files looking for the sequence /*****. You can then copy the text that follows that sequence into a disk data file, ending the copy process when you read one additional line after the sequence *****/. The additional line is copied to get the signature for the method. When you finish reading all the program source code, you end up with a file that you can print, documenting each method in the source code. In the following Try It Out you see how all the parts fit together by writing a program that exercises the clsDates code.
Try It Out: The clsDates Programs
Now that you've written the code for the clsDates class, write the code for a form that can test the class. A sample run was shown earlier in Figure 9.1. Also, you have already created the project and added the necessary class file to the project. So all that you need at this point is a more detailed explanation of how the code works.
How It Works
The code for the frmMain class is shown in Listing 9-5.
Listing 9-5: Test program for clsDates. (frmMain.cs)
using System;
using System.Windows.Forms;
public class frmMain : Form
{
private TextBox txtYear;
private Button btnCalc;
private Button btnClose;
private Label lblLeapYearResult;
private Label lblEasterResult;
private Label label1;
#region Windows code
public frmMain()
{
InitializeComponent();
}
public static void Main()
{
frmMain main = new frmMain();
Application.Run(main);
}
private void btnCalc_Click(object sender, EventArgs e)
{
bool flag;
int year;
int leap;
clsDates myDate = new clsDates();
// Convert validate integer
flag = int.TryParse(txtYear.Text, out year);
if (flag == false)
{
MessageBox.Show("Digit characters only in YYYY format.",
"Input Error");
txtYear.Focus();
return;
}
leap = myDate.getLeapYear(year);
lblLeapYearResult.Text = year.ToString() + " is " +
((leap == 1)? "":"not ") + "a leap year";
lblEasterResult.Text = myDate.getEaster(year);
}
private void btnClose_Click(object sender, EventArgs e)
{
Close();
}
}
There isn't much in Listing 9-5 that you haven't seen before. Notice the definition of myDate:
clsDates myDate = new clsDates();
Because you removed the namespace attribute from the clsDates code, you can instantiate the myDate object by simply using the class name. The TryParse() and if statement block converts the text stored in the Text property of the txtYear object into an integer and assigns it into a variable named year. The statement
leap = myDate.getLeapYear(year);
calls the general method named getLeapYear() in the clsDates class, returns either 1 (a leap year) or 0 (not a leap year), and assigns this value into leap.
Why didn't I write getLeapYear() to return a bool that returns true for a leap year and false otherwise? After all, that's the way Microsoft wrote the code and those guys are smart. So, why the difference? As mentioned before, the reason is that programmers frequently use a leap year calculation to determine the number of days in February for a given year. This enables you to write code like this:
int februaryDays = 28;
// Some code. . .
februaryDays += myDate.getLeapYear(year);
If you make the code return a bool, you cannot use this kind of statement. Returning 1 or 0 better suits the way programmers frequently use leap year calculations. (The nice thing about writing the class yourself is that you can change the code if you want.) If you type in
leap = myDate.
IntelliSense is smart enough to present you with a list of methods defined in the clsDates class. (Note the trailing dot operator. In the next chapter, you learn how to have the properties appear in the list as well.)
The next statement is used to build a message string stating whether the year is a leap year:
lblLeapYearResult.Text = year.ToString() + " is " +
((leap == 1)? "":"not ") + "a leap year";
That message string is then assigned into the Text property of the lblLeapYearResult label object. Quite honestly, this statement is an example of SOC, or Show-Off Code. It uses the ternary operator to determine how the message string is built. If you study the code for a moment, you should figure out how it works. However, you could also use an if statement and accomplish the same thing. (You didn't study the code, did you? If not, go back and study it…now!)
The last statement in the click event simply calls getEaster() and writes the string that is returned from the call into the Text property of the lblEasterResult object. Note how easy it was to create this string in the getEaster()code in clsDates:
DateTime myDT = new DateTime(year, month, day);
return myDT.ToLongDateString();
Just two lines of code and you have a perfectly formatted date string for Easter. The reason this works the way it does is that you used an overloaded constructor to pass in the month and day as calculated by the Easter algorithm, along with the year supplied by the user. The DateTimemethod named ToLongDateString() builds the date string shown in Figure 9.7. The lesson to be learned here is that life is often easier when you take the time to explore the properties and methods of the class you are using.
User Interfaces Versus User Interfaces
You need to be a little careful when you talk about user interfaces. Care is needed because the terms can be used in multiple contexts. First, most people think of a user interface as being that part of a program with which the end user interacts. This type of user interface has visual objects presented on a form, such as frmMain has always used. The user then interacts with textbox, button, listbox, and a host of other types of objects on the form. The user interface, in this instance, serves as the primary means to get input from and display results to the end user.
The second type of user interface does not require a visual representation. For example, all the properties and methods that have the public access specifier comprise the user interface for a class. In this case, the user is actually a programmer. The public properties and methods of the class form the API for that class and thus define how the programmer interfaces with it. For these reasons, this type of user interface is also referred to as the public interface whereby the programmer interfaces with the class.
When you speak about the user interface in the context of a class, the “user” is a programmer working through the API to interact with the class. When you speak about the user interface in the context of a Windows form that has visual objects on it (such as textboxes and buttons), the “user” is the end user who actually runs the program. If you try to make a concerted effort not to confuse the two, casual conversations with other people will be less confusing. The rule of thumb to follow: If you're unclear which user interface is under discussion, ask.
Summary
This chapter discussed the fundamental design factors you need to consider when you start to create your own classes. Hopefully, you understand the benefits of doing a program design before you start and have an idea of when you might consider writing your own class from a program.
Additional details about writing and using classes continue in the next chapter.
Exercises
You can find the answers to the following exercises in Appendix A.
1. Suppose you are adding the following data items as properties to a class. How would you write them in the class?
a. A person's last name
b. A ZIP code
c. The days of the week
2. Suppose you want to add a general method to the clsDates class that returns the number of days in a given month. How would you write the code?
3. Give a good example of where you would use the public access specifier to define a class property.
4. Modify the following SOC code to use an if statement instead:
lblLeapYearResult.Text = year.ToString() + " is " +
((leap == 1)? "":"not ") + "a leap year";
Which form would you use in your own code and why?
5. Suppose you overload the clsDates constructor so that the following constructor is available. Would you modify your getLeapYear() method and, if so, how?
public clsDates(int yr)
{
year = yr;
}
What You Learned in This Chapter
|
TOPIC |
KEY POINTS |
|
Class design |
When you should use a class in a program |
|
Scope |
How different scope levels affect the way data may be used in a program |
|
Access specifiers |
How public and private access specifiers are used |
|
Class properties |
What class properties are and how they should be used |
|
Class methods |
What class methods are and how they can be used to form a user interface for the class |
|
UML Light |
How to visualize the elements of a class |
|
User interfaces |
How the user of the class uses the API for the class |
|
static storage class |
How static data differs from other storage classes |