C++ Recipes: A Problem-Solution Approach (2015)
CHAPTER 3
Working with Text
Working with text will be one of the most regular tasks a C++ programmer will have to deal with. You are likely to need to read in user input, write out messages to the user or writing logging functionality for other programmers to more easily debug running programs. Unfortunately working with text is not an easy or straight-forward task. All too often programmers rush into the job and make fundamental errors with their text handling which become major issues later into their projects. The worst of these is not properly accounting for localized versions of text strings. Working with English character sets is generally easy as all English characters and punctuation fit into the ASCII character set. This is convenient as every character needed to represent the English language can fit into a single 8-bit char variable. Things become unstuck as soon as you are required to support foreign languages with your programs. Every character which you need to support will no longer fit into a single 8-bit value. C++ can handle non-English languages in a number of ways which I will cover in this chapter.
Recipe 3-1. Representing Strings in Code Using Literals
Problem
It’s is often useful to supply output text when debugging programs. To do this C++ allows you to embed strings directly into your code.
Solution
C++ programs have a concept known as a string table and all string literals in your program are included in the program’s executable.
How It Works
A standard C++ string literal is easy to work with. Listing 3-1 shows code which creates a string literal.
Listing 3-1. A string literal
#include <iostream>
#include <string>
using namespace std;
namespace
{
const std::string STRING{ "This is a string"s };
}
int main()
{
cout << STRING << endl;
return 0;
}
The string literal in this example is the sentence which is included inside the quote marks and followed by the letter s. The compiler will create a table of strings during compilation and place them all together. You can see this string inside the exe file created from the source in Figure 3-1.
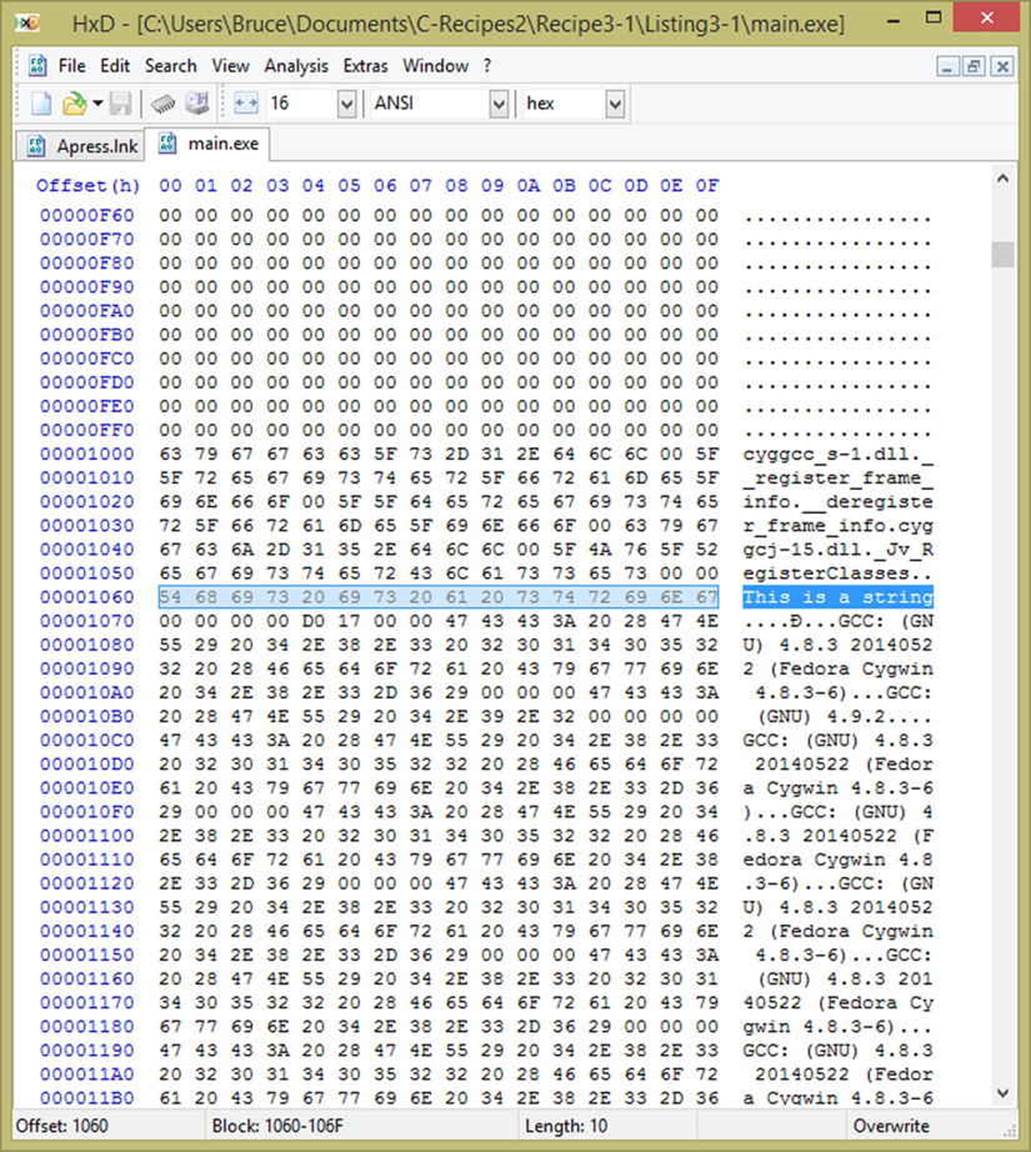
Figure 3-1. A screenshot fromHxD showing the string literal embedded into an executable
You can use string literals to initialize STL string objects. The compiler will find all of the strings in your program and use the address from the string table to initialize your string. You can see this in Listing 3-1 where the pointer STRING is initialized using the string literal, in effect this code is actually telling the compiler to add the literal to the string table and get the address of this specific string from the table to pass it to the string constructor.
The string literal in Listing 3-1 is a C++14 style string literal. Older style string literals must be used with care as they come with a few caveats. The first is that you should never try to alter the contents of a string literal. Consider the code in Listing 3-2.
Listing 3-2. Editing a string literal
#include <iostream>
using namespace std;
namespace
{
const char* const STRING{ "This is a string" };
char* EDIT_STRING{ "Attempt to Edit" };
}
int main()
{
cout << STRING << endl;
cout << EDIT_STRING << endl;
EDIT_STRING[0] = 'a';
cout << EDIT_STRING << endl;
return 0;
}
Listing 3-2 adds a new string literal which is assigned to a non-const pointer. The main function also has code which tries to edit the first character in the string to be a lower case a. This code will compile without error, however you should receive a warning from a C++11/C++14 compiler, as it is perfectly valid to attempt to alter strings using the array operator. However it is a runtime exception to try to alter data contained within string literals. Trying to run this program results in the error shown in Figure 3-2.
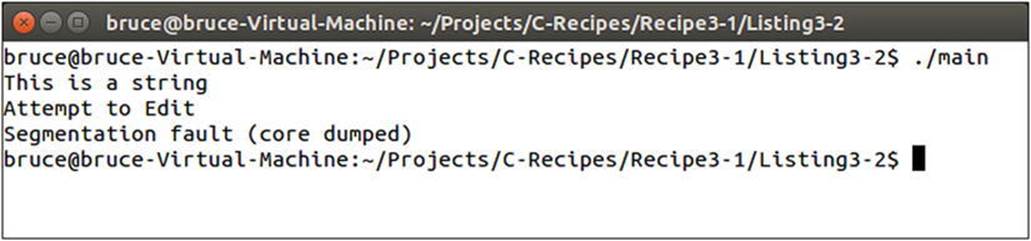
Figure 3-2. Runtime error generated when attempting to alter string literals
You can catch these errors at compile time rather than runtime by following a very simple piece of advice. Always assign old-style string literals to variables of type const char* const. You can use the makefile from Listing 3-3 if you want to enforce this in a very straight forward fashion.
Listing 3-3. Compiling with warnings as errors
main: main.cpp
clang++ -Werror -std=c++1y main.cpp -o main
Compiling your program with the makefile in Listing 3-3 will ensure that the compiler fails to build your application with non-const string literals. An example of the output you can expect can be seen in Figure 3-3.
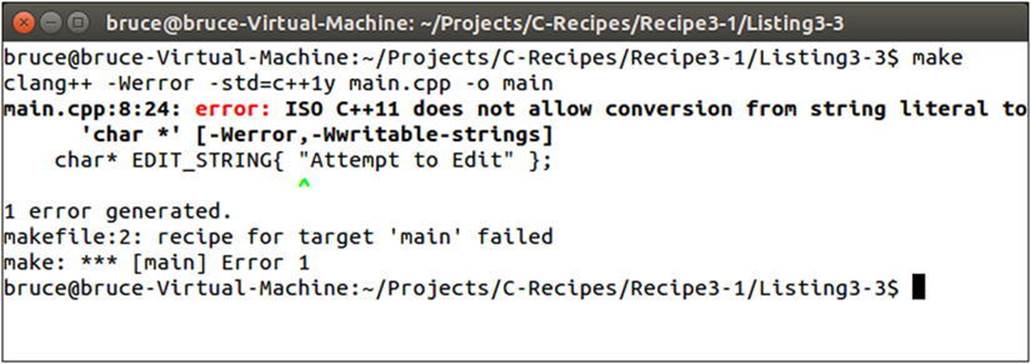
Figure 3-3. Error Output When Compiling with –Werror and Writiable String Literals
The second problem caused by string literals is that they increase the size of your program. In a digital world, reducing the download size of your programs is a key target to help increase the number of installs of your software. Removing unnecessary string literals is one thing you can do to reduce the size of your executable. Listing 3-4 shows how this can be achieved using the preprocessor.
Listing 3-4. Removing debug string literals from builds
#include <iostream>
#include <string>
using namespace std;
#define DEBUG_STRING_LITERALS !NDEBUG
namespace
{
#if DEBUG_STRING_LITERALS
using StringLiteral = string;
#endif
StringLiteral STRING{ "This is a String!"s };
}
int main()
{
cout << STRING << endl;
return 0;
}
Listing 3-4 creates a preprocessor symbol DEBUG_STRING_LITERALS using the NDEBUG symbol. The NDEBUG preprocessor symbol stands for not debug and therefore we can use it to determine whether we would like to have debug string literals included in our program or not. The definition of the type alias StringLiteral is then wrapped in a #if...#endif block which ensures that StringLiteral only exists when building debug builds. The NDEBUG symbol is commonly used in IDEs when building release builds of your program. As the samples that accompany this book are built using make you will have to manually define this in your makefile. An example makefile is shown in Listing 3-5.
Listing 3-5. A makefile that Defines NDEBUG
main: main.cpp
clang++ -D NDEBUG -O2 -Werror -std=c++1y main.cpp -o main
At that point you will also need to wrap any code which creates or uses any variables of the StringLiteral type. You should see a problem at this point, using this define means that you cannot have any string literals in your program. A better solution is shown in Listing 3-6.
Listing 3-6. Separating debug and non-debug string literals
#include <iostream>
#include <string>
using namespace std;
#define DEBUG_STRING_LITERALS !NDEBUG
namespace
{
#if DEBUG_STRING_LITERALS
using DebugStringLiteral = string;
#endif
#if DEBUG_STRING_LITERALS
DebugStringLiteral STRING{ "This is a String!"s };
#endif
}
int main()
{
#if DEBUG_STRING_LITERALS
cout << STRING << endl;
#endif
return 0;
}
Using the debug literals for diagnostic code, as in Listing 3-6, that the end user should never see allows you to remove strings and code and in turn reduces the size of your executable and increases execution speed.
Recipe 3-2. Localizing User Facing Text
Problem
You never know when you might need to support a language other than your own native tongue. Ensure that any strings the user can see come from a localized source.
Solution
Build a string manager class which returns strings from a self-created table and only ever reference strings using IDs.
How It Works
You could legitimately code your entire project by communicating with the user using strings that you define in your source as string literals. This has a few major drawbacks. First is that it’s difficult to switch out languages on the fly. Today it’s very likely that your software will be distributed via the internet. It’s exceptionally unlikely that your program will not be used by people who speak a different language to yourself. On large development teams there is a possibility that people on the development team have a different first language. Building the ability to localize text into your programs from the beginning will save you many headaches further down the track. This is achieved by loading in the string data for your program from a file. You can then include multiple different languages in your data by writing your strings in your native tongue and having friends or a translation service translate the strings into other languages for you.
You will need to create a class to handle the localized string content for your game. Listing 3-7 shows the class definition for the Localization Manager.
Listing 3-7. The Localization Manager
#pragma once
#include <array>
#include <cinttypes>
#include <string>
#include <unordered_map>
namespace Localization
{
using StringID = int32_t;
enum class Languages
{
EN_US,
EN_GB,
Number
};
const StringID STRING_COLOR{ 0 };
class Manager
{
private:
using Strings = std::unordered_map<StringID, std::string>;
using StringPacks =
std::array<Strings, static_cast<size_t>(Languages::Number)>;
StringPacks m_StringPacks;
Strings* m_CurrentStringPack{ nullptr };
uint32_t m_LanguageIndex;
public:
Manager();
void SetLanguage(Languages language);
std::string GetString(StringID stringId) const;
};
}
There are a number of things being done in the Listing 3-7. The first aspect of the source to pay attention to is the namespace. You’ll find it easier to manage your code if you keep different classes in namespaces that have names which make sense. For the localization module I’ve used the name Localization. This will help make it clear in your code when you are using classes and objects from this module.
There is a type alias being created to act as an identifier for different strings. Once again a type alias is useful here as you may decide to change the type of your string ids at some point in the future. There is an enum class which determines the languages the Localization Manager supports. The StringID STRING_COLOR is defined as being 0. This is the only StringID in this example as it is all we need to illustrate how the Localization Manager operates.
The Manager itself defines some private type aliases to make the code clear. There is an alias defined to allow us to create an unordered_map of StringID to std::string pairs and another that allows the creation of an array of these string maps. There is also a variable declared to instantiate an array of string maps as well as a pointer to the current string map in use. The class has a constructor and two other methods, SetLanguage and GetString. Listing 3-8 shows the source for the constructor.
Listing 3-8. Localization::Manager Constructor
Manager::Manager()
{
static const uint32_t INDEX_EN_US{ static_cast<uint32_t>(Languages::EN_US) };
m_StringPacks[INDEX_EN_US][STRING_COLOR] = "COLOR"s;
static const uint32_t INDEX_EN_GB{ static_cast<uint32_t>(Languages::EN_GB) };
m_StringPacks[INDEX_EN_GB][STRING_COLOR] = "COLOUR"s;
SetLanguage(Languages::EN_US);
}
This basic constructor is initializing two string maps, one for the US English language and one for British English. You can see the different spellings of the word color being passed into each map. The last line of the source sets the default language to US English. The SetLanguagemethod is shown in Listing 3-9.
Listing 3-9. Localization::Manager::SetLanguage
void Manager::SetLanguage(Languages language)
{
m_CurrentStringPack = &(m_StringPacks[static_cast<uint32_t>(language)]);
}
This method is straight forward. It simply sets the m_CurrentStringPack variable to store the address of the string map for the selected language. You must static_cast the enum type variable as C++’s STL array will not allow you to use an index which is not a numeric type. You can see the static_cast in action converting the language parameter to a uint32_t.
The last method in the Manager class is the GetString method which you can see in Listing 3-10.
Listing 3-10. Localization::Manager::GetString
std::string Manager::GetString(StringID stringId) const
{
stringstream resultStream;
resultStream << "!!!"s;
resultStream << stringId;
resultStream << "!!!"s;
string result{ resultStream.str() };
auto iter = m_CurrentStringPack->find(stringId);
if (iter != m_CurrentStringPack->end())
{
result = iter->second;
}
return result;
}
The GetString method begins by building a default string to return from the function. This will allow you to print out any missing string ids in your program to help with localization testing efforts. The unordered_map::find method is then used to search for the string id in the map. You know if the find call was successful if it returns a valid iterator. It will return the end iterator if the search fails to find a match. The if statement is checking to see whether the string id was found in the map. If it was found the string for the given id is stored in theresult variable and passed back to the method caller.
![]() Note You could make the default missing string happen only for non-final builds. This would save the execution cost of building this string on your end user’s computers. They should hopefully never see missing strings in their programs.
Note You could make the default missing string happen only for non-final builds. This would save the execution cost of building this string on your end user’s computers. They should hopefully never see missing strings in their programs.
Listing 3-11 lists an updated main function which shows how this Manager can be used in your code.
Listing 3-11. Using the Localization::Manager class
#include <iostream>
#include "LocalizationManager.h"
using namespace std;
int main()
{
Localization::Manager localizationManager;
string color{ localizationManager.GetString(Localization::STRING_COLOR) };
cout << "EN_US Localized string: " << color.c_str() << endl;
localizationManager.SetLanguage(Localization::Languages::EN_GB);
color = localizationManager.GetString(Localization::STRING_COLOR);
cout << "EN_GB Localized string: " << color.c_str() << endl;
color = localizationManager.GetString(1);
cout << color.c_str() << endl;
return 0;
}
The main function now creates an instance of the Localization::Manager class. You can see an example of how to retrieve a string from the manager and use it to output using cout. The language is then switched to British English and the string is retrieved and printed a second time. For completeness sake the last example shows what happens when you request a string id which does not exist. Figure 3-4 contains the output from the program.
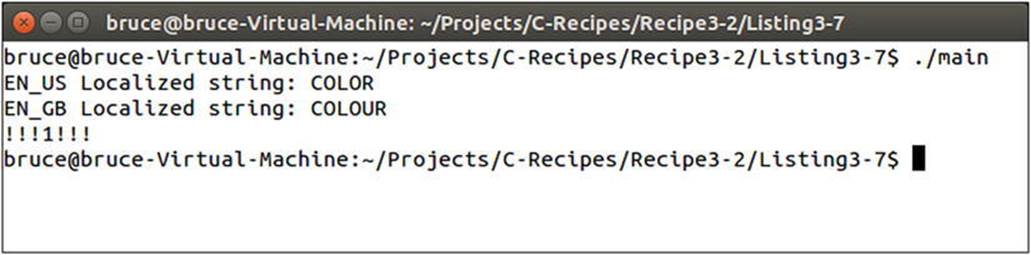
Figure 3-4. The output from the Localization Manager’s strings
This figure shows output as you would expect. The US English spelling of color appears first, followed by the British English spelling and finally the missing id is output with triple exclamation points at the beginning and end. This should help to have missing string identifiers stand out in your program.
Recipe 3-3. Reading Strings from a File
Problem
Embedding user facing text in your source code makes future text updates and localization difficult to manage.
Solution
You can load your localized string data from a data file.
How It Works
I’m going to show you how to load string data into your program from a Comma Separated Values (.csv) file. Before you can load such a file you will need to create one. Figure 3-5 shows the data I entered into Excel for export as a .csv file.

Figure 3-5. The strings.csv file in Excel 2013
I have used Excel to create a very basic .csv file. You can see the Color and Colour values I used in the last section as well as the US and UK spellings of flavor. Figure 3-6 shows how this file appears in a basic text editor.
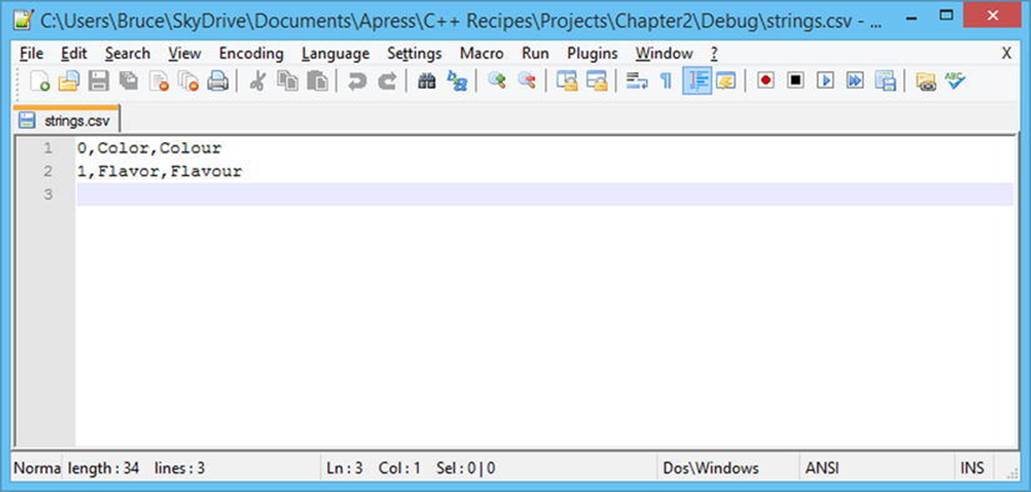
Figure 3-6. The strings.csv file open in Notepad++
Each row from the Excel document has been placed into its own line in the csv file and each column has been separated by a comma. This is from where the csv derives its name. Now that we have a csv file we can load the data in the Localization::Manager’s constructor. Listing 3-12 contains code which can be used to load and parse the string csv file.
Listing 3-12. Loading strings from a csv
Manager::Manager()
{
ifstream csvStringFile{ "strings.csv"s };
assert(csvStringFile);
if (csvStringFile)
{
while (!csvStringFile.eof())
{
string line;
getline(csvStringFile, line);
if (line.size() > 0)
{
// Create a stringstream for the line
stringstream lineStream{ line };
// Use the line stream to read in the string id
string stringIdText;
getline(lineStream, stringIdText, ',');
stringstream idStream{ stringIdText };
uint32_t stringId;
idStream >> stringId;
// Loop over the line and read in each string
uint32_t languageId = 0;
string stringText;
while (getline(lineStream, stringText, ','))
{
m_StringPacks[languageId++][stringId] = stringText;
}
}
}
}
SetLanguage(Languages::EN_US);
}
The code to read in the strings.csv file isn’t overly complicated. The first step is to open the file for reading and the code achieves this using an ifstream object. The ifstream class is provided by C++ to read data in from files and provides methods to achieve this. The first method we use is the overloaded pointer operator. This is called when we use assert or if to determine whether the file passed into the ifstream was valid and was opened. This is followed by a while loop which will run until the end of file or eof method returns true. This is ideal because we do not wish to stop reading data until all of our strings are loaded.
The ifstream class provides a getline method which can be used with C-style string arrays. It’s generally better and less error prone to use std::string rather than raw C strings so in Listing 3-12 you can see a use of the std::getline method which takes a reference to any type of stream. The first use of getline retrieves a whole line of text from the csv file into a std::string object. This line contains data about a single string starting with its id, followed by each of the localized versions of the text.
The std::getline method has a very useful third parameter. By default the method retrieves text from a file until it reaches a newline character however we can pass in a different character as a third parameter and the function will stop gathering text when this character is encountered. Listing 3-11 makes use of this feature by passing in a comma as the delimiter. This allows us to pull out the values from each of the cells in the Excel document.
The getline function requires a stream object to be passed to it however the line was read into a std::string. You can see that this problem is solved by creating a stringstream object and passing the line variable to the constructor. Once the stringstream has been created the getline method is used to retrieve the string id using a stringstream object.
![]() Note C++ provides several methods to convert strings into values. These include stoi to convert to integers and stof to convert to floats as well as others. These are all defined in the string header file. You’ll also find a function there named to_string which can be used to convert several different types into a string. These aren’t always supplied by the implementation of the STL that you may be using. The version of libstdc++ currently available in Cygwin for example does not provide these functions therefore the code samples have not used them.
Note C++ provides several methods to convert strings into values. These include stoi to convert to integers and stof to convert to floats as well as others. These are all defined in the string header file. You’ll also find a function there named to_string which can be used to convert several different types into a string. These aren’t always supplied by the implementation of the STL that you may be using. The version of libstdc++ currently available in Cygwin for example does not provide these functions therefore the code samples have not used them.
After the method has retrieved the id it loops over the rest of the line and reads out the string data for each language. This relies on the Languages enum class definition having the languages in the same order as the columns in the csv file.
Recipe 3-4. Reading the Data from an XML File
Problem
Whilst CSV files are a very simple format and great for some applications they have a major flaw; separating strings by comma means that you cannot use commas in your string data because the loading code would interpret those as the end of the string. If this happens the code can crash as it tries to read in too many strings and overrun the array.
Solution
Save the string file as an XML document and use a parser to load the data.
How It Works
The RapidXML library is an open source XML solution which can be used with your C++ applications. It is supplied as a header file which can be included into any source file you need to have XML handling capabilities. You can download the latest version of RapidXML from the following location http://rapidxml.sourceforge.net/. I saved my Excel document using the XML Spreadsheet 2003 file type. The code shown in this section is capable of loading this type of XML file. Listing 3-13 shows the entire file which contains our string data.
Listing 3-13. The XML Spreadsheet file
<?xml version="1.0"?>
<?Excel.Sheet"?>
<Workbook xmlns="urn:schemas-microsoft-com:office:spreadsheet"
xmlns:o="urn:schemas-microsoft-com:office:office"
xmlns:x="urn:schemas-microsoft-com:office:excel"
xmlns:ss="urn:schemas-microsoft-com:office:spreadsheet"
xmlns:html="http://www.w3.org/TR/REC-html40">
<DocumentProperties xmlns="urn:schemas-microsoft-com:office:office">
272103_1_EnBruce Sutherland</Author>
<LastAuthor>Bruce</LastAuthor>
<Created>2014-06-13T06:29:44Z</Created>
<Version>15.00</Version>
</DocumentProperties>
<OfficeDocumentSettings xmlns="urn:schemas-microsoft-com:office:office">
<AllowPNG/>
</OfficeDocumentSettings>
<ExcelWorkbook xmlns="urn:schemas-microsoft-com:office:excel">
<WindowHeight>12450</WindowHeight>
<WindowWidth>28800</WindowWidth>
<WindowTopX>0</WindowTopX>
<WindowTopY>0</WindowTopY>
<ProtectStructure>False</ProtectStructure>
<ProtectWindows>False</ProtectWindows>
</ExcelWorkbook>
<Styles>
<Style ss:ID="Default" ss:Name="Normal">
<Alignment ss:Vertical="Bottom"/>
<Borders/>
<Font ss:FontName="Calibri" x:Family="Swiss" ss:Size="11" ss:Color="#000000"/>
<Interior/>
<NumberFormat/>
<Protection/>
</Style>
</Styles>
<Worksheet ss:Name="strings">
<Table ss:ExpandedColumnCount="3" ss:ExpandedRowCount="2" x:FullColumns="1"
x:FullRows="1" ss:DefaultColumnWidth="54" ss:DefaultRowHeight="14.25">
<Row>
<Cell><Data ss:Type="Number">0</Data></Cell>
<Cell><Data ss:Type="String">Color</Data></Cell>
<Cell><Data ss:Type="String">Colour</Data></Cell>
</Row>
<Row>
<Cell><Data ss:Type="Number">1</Data></Cell>
<Cell><Data ss:Type="String">Flavor</Data></Cell>
<Cell><Data ss:Type="String">Flavour</Data></Cell>
</Row>
</Table>
<WorksheetOptions xmlns="urn:schemas-microsoft-com:office:excel">
<PageSetup>
<Header x:Margin="0.3"/>
<Footer x:Margin="0.3"/>
<PageMargins x:Bottom="0.75" x:Left="0.7" x:Right="0.7" x:Top="0.75"/>
</PageSetup>
<Selected/>
<ProtectObjects>False</ProtectObjects>
<ProtectScenarios>False</ProtectScenarios>
</WorksheetOptions>
</Worksheet>
</Workbook>
You might be able to tell from this file listing that our parsing code is going to be required to ignore an awful lot of data. From the document root we will access the string data through the Workbook node then the Worksheet, Table, Row, Cell and finally Data nodes.
![]() Note This XML data format is very verbose and a bit heavy on unnecessary data. You would be better served by writing your own lightweight exporter using Excel’s Visual Basic for Applications macro support but that topic is out with the scope of this book.
Note This XML data format is very verbose and a bit heavy on unnecessary data. You would be better served by writing your own lightweight exporter using Excel’s Visual Basic for Applications macro support but that topic is out with the scope of this book.
Listing 3-14 covers the code necessary to use RapidXML to load your string data.
Listing 3-14. Using RapidXML to load the strings
Manager::Manager()
{
ifstream xmlStringFile{ "strings.xml"s };
xmlStringFile.seekg(0, ios::end);
uint32_t size{ static_cast<uint32_t>(xmlStringFile.tellg()) + 1 };
char* buffer{ new char[size]{} };
xmlStringFile.seekg(0, ios::beg);
xmlStringFile.read(buffer, size);
xmlStringFile.close();
rapidxml::xml_document<> document;
document.parse<0>(buffer);
rapidxml::xml_node<>* workbook{ document.first_node("Workbook") };
if (workbook != nullptr)
{
rapidxml::xml_node<>* worksheet{ workbook->first_node("Worksheet") };
if (worksheet != nullptr)
{
rapidxml::xml_node<>* table{ worksheet->first_node("Table") };
if (table != nullptr)
{
rapidxml::xml_node<>* row{ table->first_node("Row") };
while (row != nullptr)
{
uint32_t stringId{ UINT32_MAX };
rapidxml::xml_node<>* cell{ row->first_node("Cell") };
if (cell != nullptr)
{
rapidxml::xml_node<>* data{ cell->first_node("Data") };
if (data != nullptr)
{
stringId = static_cast<uint32_t>(atoi(data->value()));
}
}
if (stringId != UINT32_MAX)
{
uint32_t languageIndex{ 0 };
cell = cell->next_sibling("Cell");
while (cell != nullptr)
{
rapidxml::xml_node<>* data = cell->first_node("Data");
if (data != nullptr)
{
m_StringPacks[languageIndex++][stringId] = data->value();
}
cell = cell->next_sibling("Cell");
}
}
row = row->next_sibling("Row");
}
}
}
}
This listing has a lot going on so I will break it down section by section. The first step involves using the following code to load the entire contents of the XML file into memory.
ifstream xmlStringFile{ "strings.xml"s };
xmlStringFile.seekg(0, ios::end);
uint32_t size{ static_cast<uint32_t>(xmlStringFile.tellg()) + 1 };
char* buffer{ new char[size]{} };
xmlStringFile.seekg(0, ios::beg);
xmlStringFile.read(buffer, size);
xmlStringFile.close();
You need the entire file to be stored in a memory buffer which is null terminated and this is why the file is opened using ifstream and then seekg is used to move to the end of the stream. Once at the end the tellg method can be used to work out how big the file is. There is a 1 added to the value from tellg to ensure that there is enough memory allocated to allow for a null terminating character as RapidXML requires. Dynamic memory allocation is used to create the buffer in memory and memset clears the entire buffer to contain zeroes. The seekg method is used to move the file stream location to the beginning of the file before read is used to obtain the entire contents of the file into the allocated buffer. The last step is to close the file stream as soon as the code is finished with the file.
These two lines are responsible for initializing the XML data structure from the contents of the file.
rapidxml::xml_document<> document;
document.parse<0>(buffer);
This code creates an XML document object which contains a parse method. The 0 passed as a template parameter can be used to set different flags on the parser but this example has no need for any of these. Now that the code has created a parsed representation of the XML document it can begin to access the nodes it contains. The next few lines retrieve pointers to the Workbook, Worksheet, Table and Row nodes.
rapidxml::xml_node<>* workbook{ document.first_node("Workbook") };
if (workbook != nullptr)
{
rapidxml::xml_node<>* worksheet{ workbook->first_node("Worksheet") };
if (worksheet != nullptr)
{
rapidxml::xml_node<>* table{ worksheet->first_node("Table") };
if (table != nullptr)
{
rapidxml::xml_node<>* row{ table->first_node("Row") };
while (row != nullptr)
{
These lines are all straight forward. There is only a single Workbook, Worksheet and Table in a simple Excel XML document so we can simply ask each node for its first child of that name. Once the code gets to the row elements there is a while loop. This will allow us to go over each line from the spreadsheet and load our strings into the appropriate maps. The entire row while loop is as follows.
rapidxml::xml_node<>* row{ table->first_node("Row") };
while (row != nullptr)
{
uint32_t stringId{ UINT32_MAX };
rapidxml::xml_node<>* cell{ row->first_node("Cell") };
if (cell != nullptr)
{
rapidxml::xml_node<>* data{ cell->first_node("Data") };
if (data != nullptr)
{
stringId = static_cast<uint32_t>(atoi(data->value()));
}
}
if (stringId != UINT32_MAX)
{
uint32_t languageIndex{ 0 };
cell = cell->next_sibling("Cell");
while (cell != nullptr)
{
rapidxml::xml_node<>* data = cell->first_node("Data");
if (data != nullptr)
{
m_StringPacks[languageIndex++][stringId] = data->value();
}
cell = cell->next_sibling("Cell");
}
}
row = row->next_sibling("Row");
}
The while loop starts by getting the stringId from the first Cell and Data nodes. The atoi function is used to turn the C-style string into an integer that must be cast to an unsigned int. The following if checks whether a valid string id was obtained, if it was then the code enters another while loop. This loop grabs each string from the subsequent Cell and Data nodes and places them into the correct map. It does this by setting the language index to 0 initially and post-incrementing the index after each string is entered. This, again, requires that the localized strings be entered into the spreadsheet in the correct order.
That is all you need to be able to load string data in from XML files. You should be able to come up with a better way to generate these files which don’t consume so much data. You might also reach a point where having all of your text loaded consumes too much system RAM. At that point you should consider splitting each language into a separate file and only loading the languages when you need them. It will be unlikely for a user to need every translated language which you choose to support.
Recipe 3-5. Inserting Runtime Data into Strings
Problem
Occasionally you will be required to enter runtime data such as numbers or the user’s name into your strings. While C++ supports the older C functions for formatting C-style strings these do not work with STL’s string class.
Solution
The boost library provides extensive library support for C++ which includes methods and function for formatting data held in STL strings.
How It Works
To begin you should add a new row to your spreadsheet with the following data; 2, %1% %2%, %2% %1%. You should place each element that comes after a comma in a new cell. Listing 3-15 has updated the main function to utilize this new string.
Listing 3-15. Using boost::format
#include <iostream>
#include "LocalizationManager.h"
#include "boost/format.hpp"
using namespace std;
int main()
{
Localization::Manager localizationManager;
std::string color{ localizationManager.GetString(Localization::STRING_COLOR) };
std::cout << "EN_US Localized string: " << color.c_str() << std::endl;
std::string flavor{ localizationManager.GetString(Localization::STRING_FLAVOR) };
std::cout << "EN_US Localized string: " << flavor.c_str() << std::endl;
localizationManager.SetLanguage(Localization::Languages::EN_GB);
color = localizationManager.GetString(Localization::STRING_COLOR);
std::cout << "EN_GB Localized string: " << color.c_str() << std::endl;
flavor = localizationManager.GetString(Localization::STRING_FLAVOR);
std::cout << "EN_GB Localized string: " << flavor.c_str() << std::endl;
color = localizationManager.GetString(3);
std::cout << color.c_str() << std::endl;
std::cout << "Enter your first name: " << std::endl;
std::string firstName;
std::cin >> firstName;
std::cout << "Enter your surname: " << std::endl;
std::string surname;
std::cin >> surname;
localizationManager.SetLanguage(Localization::Languages::EN_US);
std::string formattedName{ localizationManager.GetString(Localization::STRING_NAME) };
formattedName = str( boost::format(formattedName) % firstName % surname );
std::cout << "You said your name is: " << formattedName << std::endl;
localizationManager.SetLanguage(Localization::Languages::EN_GB);
formattedName = localizationManager.GetString(Localization::STRING_NAME);
formattedName = str(boost::format(formattedName) % firstName % surname);
std::cout << "You said your name is: " << formattedName << std::endl;
return 0;
}
You can see that the additions to main added in Listing 3-15 ask the user to enter their own name. The call to cin will stall program execution until the user has entered their first name then surname. Once the program has stored the user’s name it changes the language to EN_US and gets the string from the Localization Manager. The next line uses the boost::format function to replace the symbols in the string with the firstName and surname values. Our new string contained the symbols %1% and %2%. This is used to decide which variables are replaced into the string. The call to format is followed by a % operator then the firstName string. Because firstName is the first parameter passed to the % operator it will replace the %1% in our string. Similarly the surname will be used to replace the %2% because it is the second parameter passed using %.
This all works because the format function is setting up an object which is returned from the format function. This object is then passed to its % operator which stores the value in firstName. This first call to operator % returns a reference to the boost format object which is passed to the second call to the operator %. The symbols in the source string aren’t actually resolved until the format object is passed into the str function. Boost declares the str function in the global namespace therefore it does not need a namespace scope operator. The str method takes the format object and constructs a new string with the parameters replaced into the appropriate positions. When you entered the source strings into the spreadsheet the EN_GB string had the names switched. You can see the results of the code in Figure 3-7.
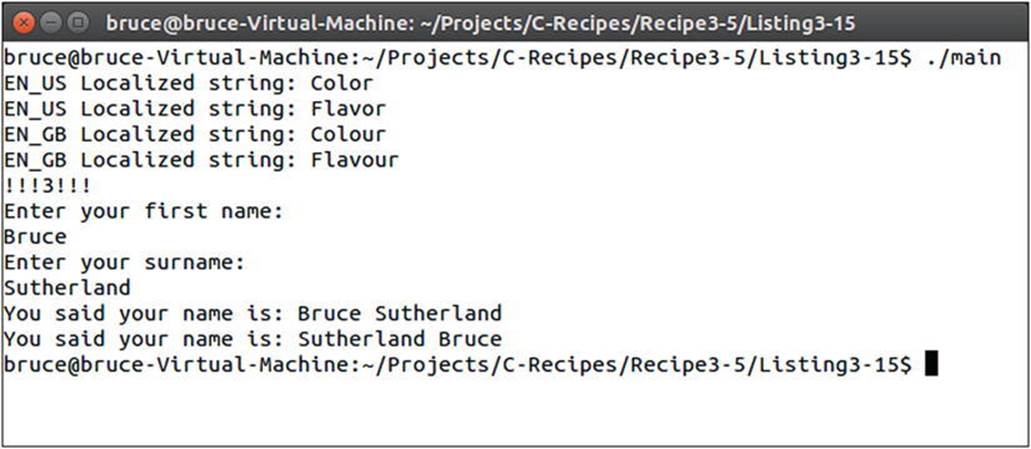
Figure 3-7. The output from boost::format
You can use boost::format to replace all sorts of data into strings. Unfortunately boost does not follow the same conventions as the standard C printf functions therefore you will be required to use different strings to standard C programs. A full list of the formatting options provided by boost can be found at http://www.boost.org/doc/libs/1_55_0/libs/format/doc/format.html.
The makefile needed to include the boost/format.hpp header in your program is relatively straight forward. You can see it in Listing 3-16.
Listing 3-16. Including the Boost Library
main: main.cpp LocalizationManager.cpp
clang++ -g -std=c++1y -Iboost_1_55_0 main.cpp LocalizationManager.cpp -o main
You can see from this makefile that I was using the 1.55 version of the Boost library and that I placed the folder in the same folder as my makefile. The convention for including Boost headers is to name the Boost folder in the include directive therefore the –I switch in the clang++ command simply tells the compiler to look inside the boost_1_55_0 folder. The boost folder sits inside this folder.
All materials on the site are licensed Creative Commons Attribution-Sharealike 3.0 Unported CC BY-SA 3.0 & GNU Free Documentation License (GFDL)
If you are the copyright holder of any material contained on our site and intend to remove it, please contact our site administrator for approval.
© 2016-2026 All site design rights belong to S.Y.A.