Microsoft® Visual C#® 2012 Step by Step (2012)
Chapter 12. Working with Inheritance
After completing this chapter, you will be able to
§ Create a derived class that inherits features from a base class.
§ Control method hiding and overriding by using the new, virtual, and override keywords.
§ Limit accessibility within an inheritance hierarchy by using the protected keyword.
§ Define extension methods as an alternative mechanism to using inheritance.
Inheritance is a key concept in the world of object orientation. You can use inheritance as a tool to avoid repetition when defining different classes that have a number of features in common and are quite clearly related to each other. Perhaps they are different classes of the same type, each with its own distinguishing feature—for example, managers, manual workers, and all employees of a factory. If you were writing an application to simulate the factory, how would you specify that managers and manual workers have a number of features that are the same but also have other features that are different? For example, they all have an employee reference number, but managers have different responsibilities and perform different tasks than manual workers.
This is where inheritance proves useful.
What Is Inheritance?
If you ask several experienced programmers the meaning of the term inheritance, you will typically get different and conflicting answers. Part of the confusion stems from the fact that the word inheritance itself has several subtly different meanings. If someone bequeaths something to you in a will, you are said to inherit it. Similarly, we say that you inherit half of your genes from your mother and half of your genes from your father. Both of these uses of the word inheritance have very little to do with inheritance in programming.
Inheritance in programming is all about classification—it’s a relationship between classes. For example, when you were at school, you probably learned about mammals, and you learned that horses and whales are examples of mammals. Each has every attribute that a mammal does (it breathes air, it suckles its young, it is warm-blooded, and so on), but each also has its own special features (a horse has hooves, but a whale has flippers and a fluke).
How can you model a horse and a whale in a program? One way would be to create two distinct classes named Horse and Whale. Each class can implement the behaviors that are unique to that type of mammal, such as Trot (for a horse) or Swim (for a whale), in its own way. But how do you handle behaviors that are common to a horse and a whale, such as Breathe or SuckleYoung? You can add duplicate methods with these names to both classes, but this situation becomes a maintenance nightmare, especially if you also decide to start modeling other types of mammals, such asHuman and Aardvark.
In C#, you can use class inheritance to address these issues. A horse, a whale, a human, and an aardvark are all types of mammals, so you can create a class named Mammal that provides the common functionality exhibited by these types. You can then declare that the Horse, Whale, Human, and Aardvark classes all inherit from Mammal. These classes then automatically include the functionality of the Mammal class (Breathe, SuckleYoung, and so on), but you can also augment each class with the functionality peculiar to a particular type of mammal to the corresponding class—the Trot method for the Horse class and the Swim method for the Whale class. If you need to modify the way in which a common method such as Breathe works, you need to change it in only one place, the Mammal class.
Using Inheritance
You declare that a class inherits from another class by using the following syntax:
class DerivedClass : BaseClass
{
...
}
The derived class inherits from the base class, and the methods in the base class become part of the derived class. In C#, a class is allowed to derive from, at most, one base class; a class is not allowed to derive from two or more classes. However, unless DerivedClass is declared as sealed, you can create further derived classes that inherit from DerivedClass using the same syntax. (You will learn about sealed classes in Chapter 13)
class DerivedSubClass : DerivedClass
{
...
}
In the example described earlier, you could declare the Mammal class as shown here. The methods Breathe and SuckleYoung are common to all mammals.
class Mammal
{
public void Breathe()
{
...
}
public void SuckleYoung()
{
...
}
...
}
You could then define classes for each different type of mammal, adding more methods as necessary. For example:
class Horse : Mammal
{
...
public void Trot()
{
...
}
}
class Whale : Mammal
{
...
public void Swim()
{
...
}
}
NOTE
C++ programmers should notice that you do not and cannot explicitly specify whether the inheritance is public, private, or protected. C# inheritance is always implicitly public. Java programmers should note the use of the colon and that there is no extends keyword.
If you create a Horse object in your application, you can call the Trot, Breathe, and SuckleYoung methods:
Horse myHorse = new Horse();
myHorse.Trot();
myHorse.Breathe();
myHorse.SuckleYoung();
Similarly, you can create a Whale object, but this time you can call the Swim, Breathe, and SuckleYoung methods; Trot is not available as it is only defined in the Horse class.
IMPORTANT
Inheritance applies only to classes, not structures. You cannot define your own inheritance hierarchy with structures, and you cannot define a structure that derives from a class or another structure.
All structures actually inherit from an abstract class called System.ValueType. (You will learn about abstract classes in Chapter 13.) This is purely an implementation detail of the way in which the Microsoft .NET Framework defines the common behavior for stack-based value types; you are unlikely to make direct use of ValueType in your own applications.
The System.Object Class Revisited
The System.Object class is the root class of all classes. All classes implicitly derive from System.Object. Consequently, the C# compiler silently rewrites the Mammal class as the following code (which you can write explicitly if you really want to):
class Mammal : System.Object
{
...
}
Any methods in the System.Object class are automatically passed down the chain of inheritance to classes that derive from Mammal, such as Horse and Whale. What this means in practical terms is that all classes that you define automatically inherit all the features of the System.Object class. This includes methods such as ToString (first discussed in Chapter 2), which is used to convert an object to a string, typically for display purposes.
Calling Base Class Constructors
In addition to the methods that it inherits, a derived class automatically contains all the fields from the base class. These fields usually require initialization when an object is created. You typically perform this kind of initialization in a constructor. Remember that all classes have at least one constructor. (If you don’t provide one, the compiler generates a default constructor for you.)
It is good practice for a constructor in a derived class to call the constructor for its base class as part of the initialization, which enables the base class constructor to perform any additional initialization that it requires. You can specify the base keyword to call a base class constructor when you define a constructor for an inheriting class, as shown in this example:
class Mammal // base class
{
public Mammal(string name) // constructor for base class
{
...
}
...
}
class Horse : Mammal // derived class
{
public Horse(string name)
: base(name) // calls Mammal(name)
{
...
}
...
}
If you don’t explicitly call a base class constructor in a derived class constructor, the compiler attempts to silently insert a call to the base class’s default constructor before executing the code in the derived class constructor. Taking the earlier example, the compiler rewrites this:
class Horse : Mammal
{
public Horse(string name)
{
...
}
...
}
as this:
class Horse : Mammal
{
public Horse(string name)
: base()
{
...
}
...
}
This works if Mammal has a public default constructor. However, not all classes have a public default constructor (for example, remember that the compiler generates only a default constructor if you don’t write any nondefault constructors), in which case forgetting to call the correct base class constructor results in a compile-time error.
Assigning Classes
In previous examples in this book, you have seen how to declare a variable by using a class type, and then how to use the new keyword to create an object. You have also seen how the type-checking rules of C# prevent you from assigning an object of one type to a variable declared as a different type. For example, given the definitions of the Mammal, Horse, and Whale classes shown here, the code that follows these definitions is illegal:
class Mammal
{
...
}
class Horse : Mammal
{
...
}
class Whale : Mammal
{
...
}
...
Horse myHorse = new Horse(...);
Whale myWhale = myHorse; // error - different types
However, it is possible to refer to an object from a variable of a different type as long as the type used is a class that is higher up the inheritance hierarchy. So the following statements are legal:
Horse myHorse = new Horse(...);
Mammal myMammal = myHorse; // legal, Mammal is the base class of Horse
If you think about it in logical terms, all Horses are Mammals, so you can safely assign an object of type Horse to a variable of type Mammal. The inheritance hierarchy means that you can think of a Horse simply as a special type of Mammal; it has everything that a Mammal has with a few extra bits defined by any methods and fields you added to the Horse class. You can also make a Mammal variable refer to a Whale object. There is one significant limitation, however—when referring to a Horse or Whale object by using a Mammal variable, you can access only methods and fields that are defined by the Mammal class. Any additional methods defined by the Horse or Whale class are not visible through the Mammal class:
Horse myHorse = new Horse(...);
Mammal myMammal = myHorse;
myMammal.Breathe(); // OK - Breathe is part of the Mammal class
myMammal.Trot(); // error - Trot is not part of the Mammal class
NOTE
The preceding discussion explains why you can assign almost anything to an object variable. Remember that object is an alias for System.Object, and all classes inherit from System.Object either directly or indirectly.
Be warned that the converse situation is not true. You cannot unreservedly assign a Mammal object to a Horse variable:
Mammal myMammal = new Mammal(...);
Horse myHorse = myMammal; // error
This looks like a strange restriction, but remember that not all Mammal objects are Horses—some might be Whales. You can assign a Mammal object to a Horse variable as long as you check that the Mammal is really a Horse first, by using the as or is operator, or by using a cast (you learned about the is and as operators and casts in Chapter 7). The following code example uses the as operator to check that myMammal refers to a Horse, and if it does, the assignment to myHorseAgain results in myHorseAgain referring to the same Horse object. If myMammal refers to some other type of Mammal, the as operator returns null instead.
Horse myHorse = new Horse(...);
Mammal myMammal = myHorse; // myMammal refers to a Horse
...
Horse myHorseAgain = myMammal as Horse; // OK - myMammal was a Horse
...
Whale myWhale = new Whale(...);
myMammal = myWhale;
...
myHorseAgain = myMammal as Horse; // returns null - myMammal was a Whale
Declaring new Methods
One of the hardest tasks in the realm of computer programming is thinking up unique and meaningful names for identifiers. If you are defining a method for a class and that class is part of an inheritance hierarchy, sooner or later you are going to try to reuse a name that is already in use by one of the classes higher up the hierarchy. If a base class and a derived class happen to declare two methods that have the same signature, you will receive a warning when you compile the application.
NOTE
The method signature refers to the name of the method and the number and types of its parameters, but not its return type. Two methods that have the same name and that take the same list of parameters have the same signature, even if they return different types.
A method in a derived class masks (or hides) a method in a base class that has the same signature. For example, if you compile the following code, the compiler generates a warning message telling you that Horse.Talk hides the inherited method Mammal.Talk:
class Mammal
{
...
public void Talk() // assume that all mammals can talk
{
...
}
}
class Horse : Mammal
{
...
public void Talk() // horses talk in a different way from other mammals!
{
...
}
}
Although your code will compile and run, you should take this warning seriously. If another class derives from Horse and calls the Talk method, it might be expecting the method implemented in the Mammal class to be called. However, the Talk method in the Horse class hides the Talkmethod in the Mammal class, and the Horse.Talk method will be called instead. Most of the time, such a coincidence is at best a source of confusion, and you should consider renaming methods to avoid clashes. However, if you’re sure that you want the two methods to have the same signature, thus hiding the Mammal.Talk method, you can silence the warning by using the new keyword as follows:
class Mammal
{
...
public void Talk()
{
...
}
}
class Horse : Mammal
{
...
new public void Talk()
{
...
}
}
Using the new keyword like this does not change the fact that the two methods are completely unrelated and that hiding still occurs. It just turns the warning off. In effect, the new keyword says, “I know what I’m doing, so stop showing me these warnings.”
Declaring virtual Methods
Sometimes you do want to hide the way in which a method is implemented in a base class. As an example, consider the ToString method in System.Object. The purpose of ToString is to convert an object to its string representation. Because this method is very useful, it is a member of theSystem.Object class, thereby automatically providing all classes with a ToString method. However, how does the version of ToString implemented by System.Object know how to convert an instance of a derived class to a string? A derived class might contain any number of fields with interesting values that should be part of the string. The answer is that the implementation of ToString in System.Object is actually a bit simplistic. All it can do is convert an object to a string that contains the name of its type, such as “Mammal” or “Horse.” This is not very useful after all. So why provide a method that is so useless? The answer to this second question requires a bit of detailed thought.
Obviously, ToString is a fine idea in concept, and all classes should provide a method that can be used to convert objects to strings for display or debugging purposes. It is only the implementation that requires attention. In fact, you are not expected to call the ToString method defined bySystem.Object—it is simply a placeholder. Instead, you may find it more useful to provide your own version of the ToString method in each class you define, overriding the default implementation in System.Object. The version in System.Object is there only as a safety net, in case a class does not implement or require its own specific version of the ToString method.
A method that is intended to be overridden is called a virtual method. You should be clear on the difference between overriding a method and hiding a method. Overriding a method is a mechanism for providing different implementations of the same method—the methods are all related because they are intended to perform the same task, but in a class-specific manner. Hiding a method is a means of replacing one method with another—the methods are usually unrelated and might perform totally different tasks. Overriding a method is a useful programming concept; hiding a method is often an error.
You can mark a method as a virtual method by using the virtual keyword. For example, the ToString method in the System.Object class is defined like this:
namespace System
{
class Object
{
public virtual string ToString()
{
...
}
...
}
...
}
NOTE
Java developers should note that C# methods are not virtual by default.
Declaring override Methods
If a base class declares that a method is virtual, a derived class can use the override keyword to declare another implementation of that method. For example:
class Horse : Mammal
{
...
public override string ToString()
{
...
}
}
The new implementation of the method in the derived class can call the original implementation of the method in the base class by using the base keyword, like this:
public override string ToString()
{
base.ToString();
...
}
There are some important rules you must follow when declaring polymorphic methods (as discussed in the following sidebar, Virtual Methods and Polymorphism) by using the virtual and override keywords:
§ A virtual method cannot be private; it is intended to be exposed to other classes through inheritance. Similarly, override methods cannot be private because a class cannot change the protection level of a method that it inherits. However, override methods can have a special form of privacy known as protected access, as you will find out in the next section.
§ The signatures of the virtual and override methods must be identical; they must have the same name, number, and types of parameters. In addition, both methods must return the same type.
§ You can only override a virtual method. If the base class method is not virtual and you try to override it, you’ll get a compile-time error. This is sensible; it should be up to the designer of the base class to decide whether its methods can be overridden.
§ If the derived class does not declare the method by using the override keyword, it does not override the base class method—it hides the method. In other words, it becomes an implementation of a completely different method that happens to have the same name. As before, this will cause a compile-time hiding warning, which you can silence by using the new keyword as previously described.
§ An override method is implicitly virtual and can itself be overridden in a further derived class. However, you are not allowed to explicitly declare that an override method is virtual by using the virtual keyword.
VIRTUAL METHODS AND POLYMORPHISM
Virtual methods enable you to call different versions of the same method, based on the type of the object determined dynamically at run time. Consider the following example classes that define a variation on the Mammal hierarchy described earlier:
class Mammal
{
...
public virtual string GetTypeName()
{
return "This is a mammal";
}
}
class Horse : Mammal
{
...
public override string GetTypeName()
{
return "This is a horse";
}
}
class Whale : Mammal
{
...
public override string GetTypeName ()
{
return "This is a whale";
}
}
class Aardvark : Mammal
{
...
}
Notice two things: first, the override keyword used by the GetTypeName method in the Horse and Whale classes, and second, the fact that the Aardvark class does not have a GetTypeName method.
Now examine the following block of code:
Mammal myMammal;
Horse myHorse = new Horse(...);
Whale myWhale = new Whale(...);
Aardvark myAardvark = new Aardvark(...);
myMammal = myHorse;
Console.WriteLine(myMammal.GetTypeName()); // Horse
myMammal = myWhale;
Console.WriteLine(myMammal.GetTypeName()); // Whale
myMammal = myAardvark;
Console.WriteLine(myMammal.GetTypeName()); // Aardvark
What will be output by the three different Console.WriteLine statements? At first glance, you would expect them all to print “This is a mammal,” because each statement calls the GetTypeName method on the myMammal variable, which is a Mammal. However, in the first case, you can see that myMammal is actually a reference to a Horse. (Remember, you are allowed to assign a Horse to aMammal variable because the Horse class inherits from the Mammal class.) Because the GetTypeName method is defined as virtual, the runtime works out that it should call the Horse.GetTypeName method, so the statement actually prints the message “This is a horse.” The same logic applies to the second Console.WriteLine statement, which outputs the message “This is a whale.” The third statement calls Console.WriteLine on an Aardvark object. However, the Aardvark class does not have a GetTypeName method, so the default method in the Mammal class is called, returning the string “This is a mammal.”
This phenomenon of the same statement invoking a different method depending on its context is called polymorphism, which literally means “many forms.”
Understanding protected Access
The public and private access keywords create two extremes of accessibility: public fields and methods of a class are accessible to everyone, whereas private fields and methods of a class are accessible to only the class itself.
These two extremes are sufficient when considering classes in isolation. However, as all experienced object-oriented programmers know, isolated classes cannot solve complex problems. Inheritance is a powerful way of connecting classes, and there is clearly a special and close relationship between a derived class and its base class. Frequently, it is useful for a base class to allow derived classes to access some of its members while hiding these same members from classes that are not part of the inheritance hierarchy. In this situation, you can mark members with the protectedkeyword. It works like this:
§ If a class A is derived from another class B, it can access the protected class members of class B. In other words, inside the derived class A, a protected member of class B is effectively public.
§ If a class A is not derived from another class B, it cannot access any protected members of class B. So, within class A, a protected member of class B is effectively private.
C# gives programmers complete freedom to declare methods and fields as protected. However, most object-oriented programming guidelines recommend keeping your fields strictly private whenever possible, and only relax these restrictions when absolutely necessary. Public fields violate encapsulation because all users of the class have direct, unrestricted access to the fields. Protected fields maintain encapsulation for users of a class, for whom the protected fields are inaccessible. However, protected fields still allow encapsulation to be violated by other classes that inherit from the base class.
NOTE
You can access a protected base class member not only in a derived class but also in classes derived from the derived class. A protected base class member retains its protected accessibility in a derived class and is accessible to further derived classes.
In the following exercise, you will define a simple class hierarchy for modeling different types of vehicles. You will define a base class named Vehicle and derived classes named Airplane and Car. You will define common methods named StartEngine and StopEngine in the Vehicle class, and you will add some methods to both of the derived classes that are specific to those classes. Finally, you will add a virtual method named Drive to the Vehicle class and override the default implementation of this method in both of the derived classes.
Create a hierarchy of classes
1. Start Microsoft Visual Studio 2012 if it is not already running.
2. Open the Vehicles project, located in the \Microsoft Press\Visual CSharp Step By Step\Chapter 12\Windows X\Vehicles folder in your Documents folder.
The Vehicles project contains the file Program.cs, which defines the Program class with the Main and doWork methods that you have seen in previous exercises.
3. In Solution Explorer, right-click the Vehicles project, point to Add, and then click Class.
The Add New Item—Vehicles dialog box appears.
4. In the Add New Item—Vehicles dialog box, verify that the Class template is highlighted in the middle pane, type Vehicle.cs in the Name text box, and then click Add.
The file Vehicle.cs is created and added to the project and appears in the Code and Text Editor window. The file contains the definition of an empty class named Vehicle.
5. Add the StartEngine and StopEngine methods to the Vehicle class as shown next in bold:
6. class Vehicle
7. {
8. public void StartEngine(string noiseToMakeWhenStarting)
9. {
10. Console.WriteLine("Starting engine: {0}", noiseToMakeWhenStarting);
11. }
12.
13. public void StopEngine(string noiseToMakeWhenStopping)
14. {
15. Console.WriteLine("Stopping engine: {0}", noiseToMakeWhenStopping);
16. }
}
All classes that derive from the Vehicle class will inherit these methods. The values for the noiseToMakeWhenStarting and noiseToMakeWhenStopping parameters will be different for each different type of vehicle and will help you to identify which vehicle is being started and stopped later.
17.On the PROJECT menu, click Add Class.
The Add New Item—Vehicles dialog box appears again.
18.Type Airplane.cs in the Name text box, and then click Add.
A new file containing a class named Airplane is added to the project and appears in the Code and Text Editor window.
19.In the Code and Text Editor window, modify the definition of the Airplane class so that it inherits from the Vehicle class, as shown in bold here:
20.class Airplane : Vehicle
21.{
}
22.Add the TakeOff and Land methods to the Airplane class, as shown in bold here:
23.class Airplane : Vehicle
24.{
25. public void TakeOff()
26. {
27. Console.WriteLine("Taking off");
28. }
29.
30. public void Land()
31. {
32. Console.WriteLine("Landing");
33. }
}
34.On the PROJECT menu, click Add Class.
The Add New Item—Vehicles dialog box appears again.
35.Type Car.cs in the Name text box, and then click Add.
A new file containing a class named Car is added to the project and appears in the Code and Text Editor window.
36.In the Code and Text Editor window, modify the definition of the Car class so that it derives from the Vehicle class, as shown here in bold:
37.class Car : Vehicle
38.{
}
39.Add the Accelerate and Brake methods to the Car class, as shown in bold here:
40.class Car : Vehicle
41.{
42. public void Accelerate()
43. {
44. Console.WriteLine("Accelerating");
45. }
46.
47. public void Brake()
48. {
49. Console.WriteLine("Braking");
50. }
}
51.Display the Vehicle.cs file in the Code and Text Editor window.
52.Add the virtual Drive method to the Vehicle class, as shown here in bold:
53.class Vehicle
54.{
55. ...
56. public virtual void Drive()
57. {
58. Console.WriteLine("Default implementation of the Drive method");
59. }
}
60.Display the Program.cs file in the Code and Text Editor window.
61.In the doWork method, delete the // TODO: comment and add code to create an instance of the Airplane class and test its methods by simulating a quick journey by airplane, as follows:
62.static void doWork()
63.{
64. Console.WriteLine("Journey by airplane:");
65. Airplane myPlane = new Airplane();
66. myPlane.StartEngine("Contact");
67. myPlane.TakeOff();
68. myPlane.Drive();
69. myPlane.Land();
70. myPlane.StopEngine("Whirr");
}
71.Add the following statements shown in bold to the doWork method after the code you have just written. These statements create an instance of the Car class and test its methods.
72.static void doWork()
73.{
74. ...
75. Console.WriteLine("\nJourney by car:");
76. Car myCar = new Car();
77. myCar.StartEngine("Brm brm");
78. myCar.Accelerate();
79. myCar.Drive();
80. myCar.Brake();
81. myCar.StopEngine("Phut phut");
}
82.On the DEBUG menu, click Start Without Debugging.
In the console window, verify that the program outputs messages simulating the different stages of performing a journey by airplane and by car, as shown in the following image:
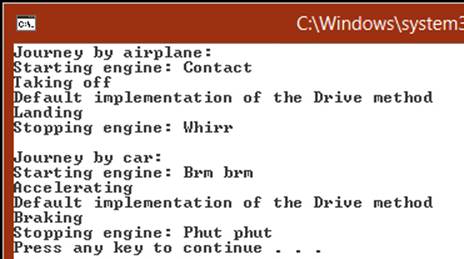
Notice that both modes of transport invoke the default implementation of the virtual Drive method because neither class currently overrides this method.
83.Press Enter to close the application and return to Visual Studio 2012.
84.Display the Airplane class in the Code and Text Editor window. Override the Drive method in the Airplane class, as follows in bold:
85.class Airplane : Vehicle
86.{
87. ...
88. public override void Drive()
89. {
90. Console.WriteLine("Flying");
91. }
}
NOTE
IntelliSense displays a list of available virtual methods. If you select the Drive method from the IntelliSense list, Visual Studio automatically inserts into your code a statement that calls the base.Drive method. If this happens, delete the statement, as this exercise does not require it.
92.Display the Car class in the Code and Text Editor window. Override the Drive method in the Car class as follows in bold:
93.class Car : Vehicle
94.{
95. ...
96. public override void Drive()
97. {
98. Console.WriteLine("Motoring");
99. }
}
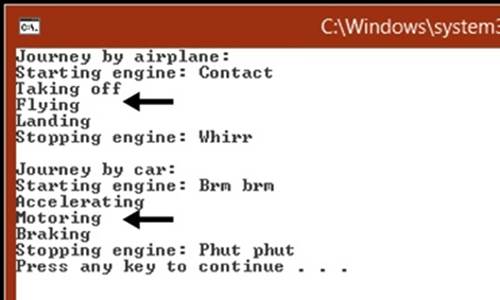
100. On the DEBUG menu, click Start Without Debugging.
In the console window, notice that the Airplane object now displays the message Flying when the application calls the Drive method, and the Car object displays the message Motoring:
101. Press Enter to close the application and return to Visual Studio 2012.
102. Display the Program.cs file in the Code and Text Editor window.
103. Add the statements shown here in bold to the end of the doWork method:
104. static void doWork()
105. {
106. ...
107. Console.WriteLine("\nTesting polymorphism");
108. Vehicle v = myCar;
109. v.Drive();
110. v = myPlane;
111. v.Drive();
}
This code tests the polymorphism provided by the virtual Drive method. The code creates a reference to the Car object using a Vehicle variable (which is safe, because all Car objects are Vehicle objects) and then calls the Drive method using this Vehicle variable. The final two statements refer the Vehicle variable to the Airplane object and call what seems to be the same Drive method again.
112. On the DEBUG menu, click Start Without Debugging.
In the console window, verify that the same messages appear as before, followed by this text:
Testing polymorphism
Motoring
Flying
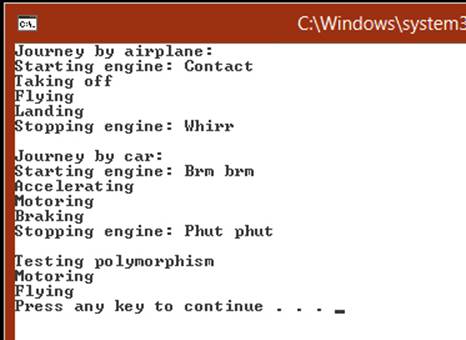
The Drive method is virtual, so the runtime (not the compiler) works out which version of the Drive method to call when invoking it through a Vehicle variable based on the real type of the object referenced by this variable. In the first case, the Vehicle object refers to a Car, so the application calls the Car.Drive method. In the second case, the Vehicle object refers to an Airplane, so the application calls the Airplane.Drive method.
113. Press Enter to close the application and return to Visual Studio 2012.
Understanding Extension Methods
Inheritance is a powerful feature, enabling you to extend the functionality of a class by creating a new class that derives from it. However, sometimes using inheritance is not the most appropriate mechanism for adding new behaviors, especially if you need to quickly extend a type without affecting existing code.
For example, suppose you want to add a new feature to the int type, such as a method named Negate that returns the negative equivalent value that an integer currently contains. (I know that you could simply use the unary minus operator [-] to perform the same task, but bear with me.) One way to achieve this is to define a new type named NegInt32 that inherits from System.Int32 (int is an alias for System.Int32) and that adds the Negate method:
class NegInt32 : System.Int32 // don't try this!
{
public int Negate()
{
...
}
}
The theory is that NegInt32 will inherit all the functionality associated with the System.Int32 type in addition to the Negate method. There are two reasons why you might not want to follow this approach:
§ This method applies only to the NegInt32 type, and if you want to use it with existing int variables in your code, you have to change the definition of every int variable to the NegInt32 type.
§ The System.Int32 type is actually a structure, not a class, and you cannot use inheritance with structures.
This is where extension methods become very useful.
An extension method enables you to extend an existing type (a class or a structure) with additional static methods. These static methods become immediately available to your code in any statements that reference data of the type being extended.
You define an extension method in a static class and specify the type that the method applies to as the first parameter to the method, along with the this keyword. Here’s an example showing how you can implement the Negate extension method for the int type:
static class Util
{
public static int Negate(this int i)
{
return -i;
}
}
The syntax looks a little odd, but it is the this keyword prefixing the parameter to Negate that identifies it as an extension method, and the fact that the parameter that this prefixes is an int means that you are extending the int type.
To use the extension method, bring the Util class into scope. (If necessary, add a using statement specifying the namespace to which the Util class belongs.) Then you can simply use dot notation (.) to reference the method, like this:
int x = 591;
Console.WriteLine("x.Negate {0}", x.Negate());
Notice that you do not need to reference the Util class anywhere in the statement that calls the Negate method. The C# compiler automatically detects all extension methods for a given type from all the static classes that are in scope. You can also invoke the Util.Negate method passing an intas the parameter, using the regular syntax you have seen before, although this use obviates the purpose of defining the method as an extension method:
int x = 591;
Console.WriteLine("x.Negate {0}", Util.Negate(x));
In the following exercise, you will add an extension method to the int type. This extension method enables you to convert the value an int variable contains from base 10 to a representation of that value in a different number base.
Create an extension method
1. In Visual Studio 2012, open the ExtensionMethod project, located in the \Microsoft Press\Visual CSharp Step By Step\Chapter 12\Windows X\ExtensionMethod folder in your Documents folder.
2. Display the Util.cs file in the Code and Text Editor window.
This file contains a static class named Util in a namespace named Extensions. Remember that you must define extension methods inside a static class. The class is empty apart from the // TODO: comment.
3. Delete the comment and declare a public static method in the Util class, named ConvertToBase. The method should take two parameters: an int parameter named i, prefixed with the this keyword to indicate that the method is an extension method for the int type, and another ordinaryint parameter named baseToConvertTo. The method will convert the value in i to the base indicated by baseToConvertTo. The method should return an int containing the converted value.
The ConvertToBase method should look like this:
static class Util
{
public static int ConvertToBase(this int i, int baseToConvertTo)
{
}
}
4. Add an if statement to the ConvertToBase method that checks that the value of the baseToConvertTo parameter is between 2 and 10. The algorithm used by this exercise does not work reliably outside this range of values. Throw an ArgumentException exception with a suitable message if the value of baseToConvertTo is outside this range.
The ConvertToBase method should look like this:
public static int ConvertToBase(this int i, int baseToConvertTo)
{
if (baseToConvertTo < 2 || baseToConvertTo > 10)
{
throw new ArgumentException("Value cannot be converted to base " +
baseToConvertTo.ToString());
}
}
5. Add the following statements shown in bold to the ConvertToBase method, after the statement that throws the ArgumentException exception. This code implements a well-known algorithm that converts a number from base 10 to a different number base. (You saw a version of this algorithm for converting a decimal number to octal in Chapter 5)
6. public static int ConvertToBase(this int i, int baseToConvertTo)
7. {
8. ...
9. int result = 0;
10. int iterations = 0;
11. do
12. {
13. int nextDigit = i % baseToConvertTo;
14. i /= baseToConvertTo;
15. result += nextDigit * (int)Math.Pow(10, iterations);
16. iterations++;
17. }
18. while (i != 0);
19.
20. return result;
}
21.Display the Program.cs file in the Code and Text Editor window.
22.Add the following using directive after the using System; directive at the top of the file:
using Extensions;
This statement brings the namespace containing the Util class into scope. The ConvertToBase extension method will not be visible in the Program.cs file if you do not perform this task.
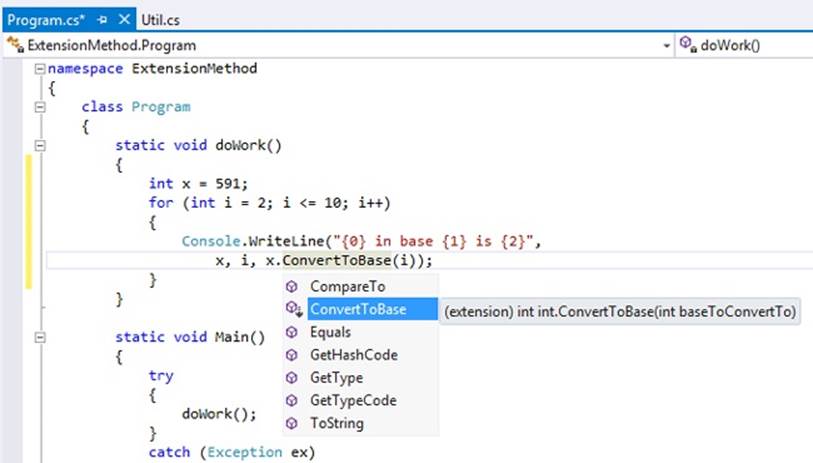
23.Add the following statements shown in bold to the doWork method of the Program class, replacing the // TODO: comment:
24.static void doWork()
25.{
26. int x = 591;
27. for (int i = 2; i <= 10; i++)
28. {
29. Console.WriteLine("{0} in base {1} is {2}",
30. x, i, x.ConvertToBase(i));
31. }
}
This code creates an int named x and sets it to the value 591. (You can pick any integer value you want.) The code then uses a loop to print out the value 591 in all number bases between 2 and 10. Notice that ConvertToBase appears as an extension method in IntelliSense when you type the period (.) after x in the Console.WriteLine statement.
32.On the DEBUG menu, click Start Without Debugging. Confirm that the program displays messages showing the value 591 in the different number bases to the console, like this:
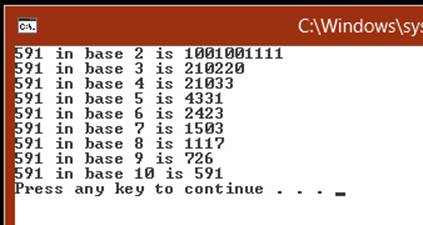
33.Press Enter to close the program and return to Visual Studio 2012.
Summary
In this chapter, you learned how to use inheritance to define a hierarchy of classes, and you should now understand how to override inherited methods and implement virtual methods. You also learned how to add an extension method to an existing type.
§ If you want to continue to the next chapter
Keep Visual Studio 2012 running, and turn to Chapter 13.
§ If you want to exit Visual Studio 2012 now
On the FILE menu, click Exit. If you see a Save dialog box, click Yes and save the project.
Chapter 12 Quick Reference
|
To |
Do this |
|
Create a derived class from a base class |
Declare the new class name followed by a colon and the name of the base class. For example: class Derived : Base { ... } |
|
Call a base class constructor as part of the constructor for an inheriting class |
Supply a constructor parameter list before the body of the derived class constructor. For example: class Derived : Base { ... public Derived(int x) : Base(x) { ... } ... } |
|
Declare a virtual method |
Use the virtual keyword when declaring the method. For example: class Mammal { public virtual void Breathe() { ... } ... } |
|
Implement a method in a derived class that overrides an inherited virtual method |
Use the override keyword when declaring the method in the derived class. For example: class Whale : Mammal { public override void Breathe() { ... } ... } |
|
Define an extension method for a type |
Add a static public method to a static class. The first parameter must be of the type being extended, preceded by the this keyword. For example: static class Util { public static int Negate(this int i) { return -i; } } |
All materials on the site are licensed Creative Commons Attribution-Sharealike 3.0 Unported CC BY-SA 3.0 & GNU Free Documentation License (GFDL)
If you are the copyright holder of any material contained on our site and intend to remove it, please contact our site administrator for approval.
© 2016-2025 All site design rights belong to S.Y.A.