Programming Windows Store Apps with C# (2014)
Chapter 1. Making the Transition from .NET (Part 1)
In this chapter and the next we’re going to start looking at the work that we have to do to move our .NET skills over to WinRT and start building Windows Store apps. Unlike the other chapters in this book, which focus on a particular API feature area, this chapter and the next are more mixed and intermingled, mainly because the changes that we have to make in order to achieve a transition are also mixed and intermingled.
Given Microsoft’s history with .NET, you might have expected WinRT to be a direct evolution. In fact, it’s not. WinRT represents a major shift in strategy from the team within Microsoft that “owns” the Windows API. It’s coming to market at a time when considerable changes are happening within the broader world of software engineering. This is the “post-PC” age. Microsoft rose to dominance in the microcomputer/PC age.
Why WinRT?
WinRT has emerged at the same time as Microsoft’s “reimagining” of Windows into two new operating systems—Windows 8 and Windows RT—although the timing that brings the launch of the new OSes and a new API model together is more luck than judgment. WinRT is about fixing the fundamental limitations of writing software natively for Windows. Native applications in Windows are written using the Win32 API, which is a very old, non−object-oriented API. Alongside Win32 we also have COM, an object-oriented subsystem that allows for components to be plugged in and out of Windows. If you’re a relative newcomer to writing software for Windows, there’s a good chance you’ve never used either of these, or you’ve used .NET. If you’re slightly longer in the tooth, there is a chance that you did use these technologies once, but—especially if you’ve selected this book—the likelihood is that over the past n years you’ve been using .NET to write software that targets Windows OSes.
.NET is very different from Win32 or COM. .NET is a Java-inspired framework library and execution environment designed to make it easier to write software for Windows. We call .NET a “managed code” environment because the runtime takes over a lot of the “management” of the code execution. Conversely, Win32 apps are “unmanaged.” In its initial incarnation, .NET was built to let developers build websites in ASP.NET, or native applications with Windows Forms. (We’ll ignore console applications or Windows services for the time being, as I want to talk about user interface technologies.) Both of these user interface technology tracks have evolved and changed over time, but regardless the more important thing about .NET was that it allowed developers to be more expressive. The Base Class Library (BCL) within .NET provided easy, object-oriented access either into Windows operating system features (e.g., System.IO.FileStream) or classes designed to save the developer time and effort (e.g., System.Collections.Generic.List). (The former set is relevant here, as a great deal of the BCL simply thunks down into Win32, which is how it provides access to OS functions.) In addition to the BCL, the CLR provides features like garbage collection so that under regular operations, developers don’t need to worry about the mechanics of working with memory management and other important bits and pieces.
Philosophical Differences
Where this starts to get untidy is that WinRT and .NET are philosophically very different. .NET is inspired by Java, and the big compromise with a system where memory is managed by garbage collection is that you inevitably cede control to the framework. If you’re building an operating system (like the Windows Division—aka WinDiv—team within Microsoft), or building a major software product like Office, you wouldn’t start with Java. Java, and by extension .NET, is too abstract, too “magical” for building that sort of software. But most of us don’t build “that sort of software”; what most of us do is work within very small budgets to build relatively small-scale applications where the compromise of working within an execution environment like the CLR is much less keenly felt.
As .NET developers, we have to learn to play nicely within this philosophical difference imposed by a shift to WinRT, and therein lies the challenge. It should be said, though, that the general premise of this is, in my opinion, a bit broken. While the rationale for moving away from .NET and back to COM is understood, it’s not necessarily a good idea. It would have been better in many ways if Windows Store apps had been built more squarely on .NET, and the oddities that come into play because Windows Store apps are fundamentally COM-based were negated. However, we are where we are.
In terms of the assumptions that I’m going to make, I’m assuming that the readers of this book are on the spectrum of “reasonably familiar” with .NET up to “very familiar” with .NET. I’ll also assume that most of the modern .NET concepts up to and including .NET Framework v3.5 are understood—we’re going to be seeing a lot of generics. We’ll be seeing a bit of Linq (but I will go through that). I’ll assume no knowledge of the Task Parallel Library (TPL)—which we’ll be using a lot. As long as you can put together production-quality code in .NET, you’ll be covered.
Most .NET developers will have been working on ASP.NET applications, so again I’m assuming that this is the user interface technology of choice for most readers of this book. For our Windows Store apps we’re going to be using the XAML user interface track (more later). XAML is aligned with Silverlight and Windows Presentation Foundation (WPF), although I’m going to be assuming most readers of this book have little or no Silverlight/WPF/XAML experience.
Objectives
In the next two chapters, our objective is to get a Windows Store app built, with a user interface, and some business logic that can call up to the server. We’re also going to prove that we can build a unit test library to run alongside the application. Specifically:
§ We’ll build a new Windows Store app project in Visual Studio 2012. The purpose of this is to learn about the new project templates, and understand the difference in emitted outputs between the new-style Windows Store app projects and old-style .NET projects.
§ Within that project, we’ll build a new page in XAML, and from there we’ll look at building in the infrastructure to support Model/View/View-Model (MVVM). (I’ll explain what this is shortly.) We’ll also look at building support for inversion of control. (Again, if you don’t know what “inversion of control” is, you will find an explanation later.) The code will look to call up to a publicly accessible server. In the first instance, we’ll fake this call and simulate the server.
§ We’ll take the view-model that we built and wrap a unit test around it, just so that we know that we can.
§ Once we know we can test the model, we’ll build the real implementation of our server communication. We can then test our app end-to-end and know that it’s working.
The New Project Templates
The first thing to get a handle on is that the version of .NET used in Windows Store apps is a cut-down, limited version of .NET referenced internally as .NETCore. There’s precedent for Microsoft creating subsets of .NET; one example is the .NET Compact Framework used in Windows CE. Another is the Client Profiles introduced in v3.5 that are “optimized” for client applications. Likewise, the toolset for Windows Phone 8 is a cut-down version of the Silverlight libraries, which in turn is a cut-down version of WPF.
The motivation behind all of these “cutting down” operations is to limit what developers can do. There are a few reasons Microsoft might want to do this. One argument is that the Microsoft engineers might want to make a given API set more secure by removing exploit vectors. However, another important reason why Microsoft engineers will do this sort of thing is to “create a better experience.” What this actually means is that Microsoft’s engineers will control the API such that you as a developer can’t do things that make Windows 8 look bad.
A good example of this is battery life. When you’re using Windows 8 on a tablet, battery life is very important. The longer the battery lasts, the happier the user will be. If Microsoft designs the API so that it’s hard for you as a developer to do things that use a relatively high amount of battery power, the battery life as the user perceives it will be better, and hence the user will perceive Windows 8 as being a good tablet operating system.
NOTE
You can see this idea exemplified in background tasks, which we’ll look at in Chapter 14.
So we can only access the bits of the framework that happen to be in .NETCore. You should note that even if you could violate this rule, you probably wouldn’t want to, as the app would not pass certification for inclusion in the Windows Store—something we’ll talk about in Chapter 15.
WinRT Metadata
A standout excellent feature of .NET available from introduction was the level of detail included within its metadata system. (Metadata at its most basic in this context is simply a description of how all the types and members within them are structured.) Each .NET assembly could describe itself to a hitherto unrealized level of detail. Conversely, normal Windows DLLs had very little metadata—essentially just an EXPORTS table of functions that could be called. COM sat somewhere in the middle by being mostly self-descriptive using IDL, but the level of detail was nothing like the .NET metadata. (Plus, consuming COM metadata was a chore, whereas consuming .NET metadata was a breeze.)
WinRT is, under the hood, COM with knobs on—COM++, if you will. (Although don’t call it that because you will get looked at peculiarly.) Microsoft borrowed .NET’s metadata subsystem for use within WinRT. Thus, when you compile a WinRT DLL you get a .winmd file that contains both the metadata and the binary executable code. The format of the metadata within that .winmd file happens to be compatible with .NET’s.
NOTE
The .NET behavior is unchanged—compile a .NET assembly, and the metadata gets embedded within as before.
What all this means is that the interoperability story between these two worlds is rather good. Because both parties understand each other well thanks to the shared metadata, Microsoft’s job in getting actual calls going between the two is straightforward.
As most of you are likely familiar with the structure of .NET assemblies, I’ll take you through the structure of the new assemblies using Reflector and we’ll see how a Windows Store application references the central WinRT components. (If you don’t know what Reflector is, we’ll look at that in a short while.)
To begin with, we can create projects within Visual Studio in the usual way. Figure 1-1 illustrates adding a new C# Windows Store “Blank App” project to an existing solution. Notice how the Windows Store projects have their own entry in the tree away from the .NET projects that you’re used to creating normally.
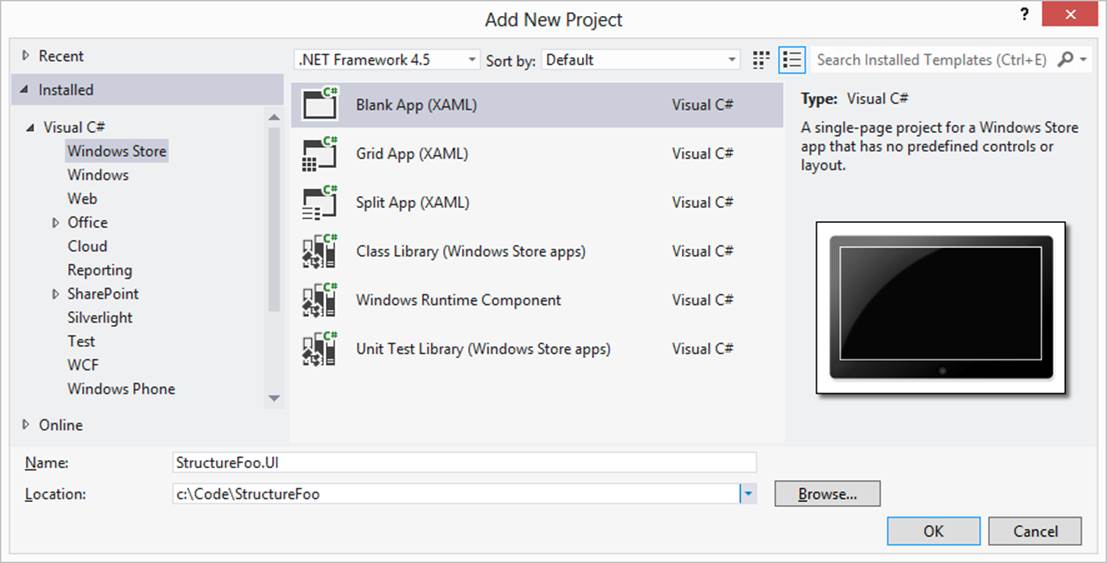
Figure 1-1. Options for a new Windows Store app project
If we create a new project—I’ll create a Blank App type for this illustration—we can look under References in Solution Explorer and see something like Figure 1-2.
This looks quite different from the References view of a normal .NET project; what we’re actually seeing here are placeholder references to the actual libraries and assemblies that the project will compile against. Specifically, these are references to the .NETCore assembly set and the core Windows WinRT libraries.
NOTE
Because the rules are set in stone as far as what you have to reference in order to be a proper Windows Store app that gets through store certification, you can’t change these references.
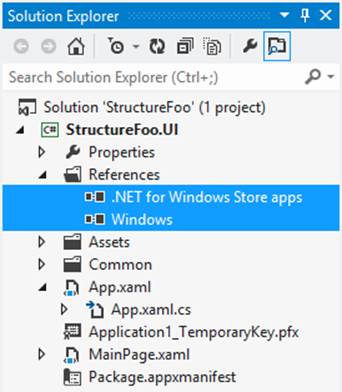
Figure 1-2. Placeholders for the .NETCore assembly and Windows WinRT libraries
What Visual Studio is doing here is representing bundles of referenced assemblies/libraries as single items. In the normal .NET world, these would be a discrete set of explicit assemblies. We can use Reflector to get a better view of what’s going on.
NOTE
For the uninitiated, Reflector is a popular .NET tool that allows you to see the structure of types and members within an assembly, and also decompile it. See the Reflector website.
If you want to follow along, download a trial copy of Reflector if you don’t have a licensed copy. If we point Reflector at the output assembly—which happens to be called StructureFoo.UI.exe in my example—we’ll see something like Figure 1-3. What this is showing us is a bunch of regular .NET assemblies that make up .NETCore (System.Collections, etc.) and a reference to Windows. (Looking back at Figure 1-1, we see something different. Visual Studio just showed us one item, “.NET for Windows Store apps.” Reflector is showing us the actual references.)
The Windows reference isn’t an assembly—it’s a reference to the WinRT metadata file. With the information in that file, the runtime is able to bind through to the unmanaged, native code components that contain the implementations. When we get going, you’ll see that under the hood this thunking[1] down to WinRT happens a lot, but you wouldn’t even know it was happening unless you looked really hard.
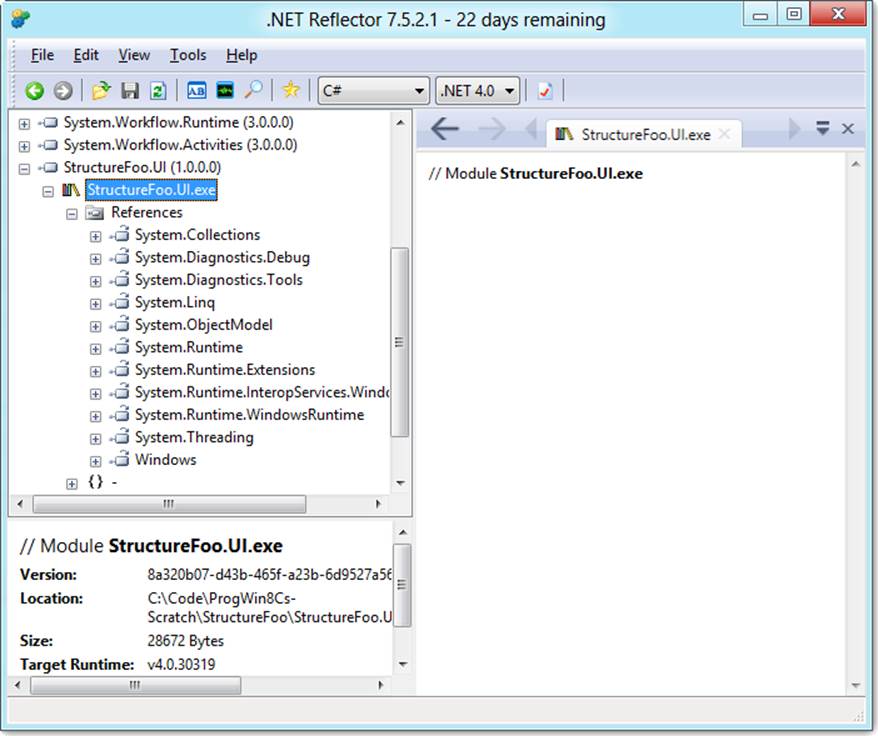
Figure 1-3. The actual references in the output assembly
If you select the Windows entry in Reflector, you’ll see something like Figure 1-4. (The version of Reflector that I’m using at the moment cannot automatically reference the metadata.) Notice the version number of 255.255.255.255—this is a good hint that we are referencing WinRT metadata and not a .NET assembly.
The metadata file that it’s looking for is stored in C:\Program Files (x86)\WindowsKits\8.0\References\CommonConfiguration\Neutral\Windows.winmd. That folder tree happens to be the WinRT development kit.
If we go into Reflector and tell it where to find Windows.winmd, we’d find something like Figure 1-5.
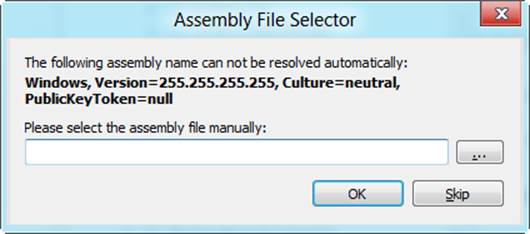
Figure 1-4. Prompting for the Windows metadata
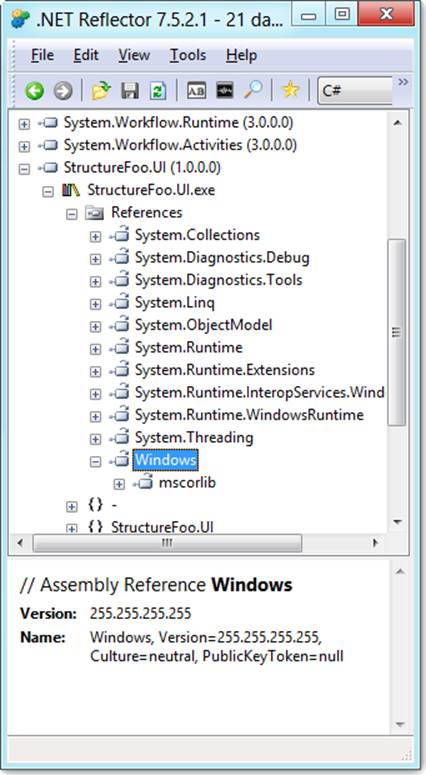
Figure 1-5. Linking through to the Windows WinRT library reference
You’ll notice a reference to mscorlib, implying a reference back to .NET from WinRT. Ignore that—it’s a red herring. It’s an artifact of the metadata system being a .NET thing that’s been repurposed for WinRT.
What I’ve tried to show here is how the worlds of .NET and WinRT interoperate. What we’ve done is created a more or less standard .NET executable assembly, and referenced a collection of normal .NET assemblies and also the WinRT libraries.
To close this loop, let’s go back into Visual Studio and look at the project settings and adding references.
Project Settings and Adding References
The first point of interest is that if we open up the properties for our project, you’ll notice that we can’t change the target framework. In a normal .NET project, we would be able to change the target framework and this option would not be greyed out. (Although obviously this is how it is at the time of writing, I’m actually expecting this to change as I assume that ultimately multiple framework versions will be supported on the various devices.) You’ll also notice that the output types are different—we can create a Windows Store App, a Class Library, or a Windows Runtime Component. Figure 1-6 illustrates.
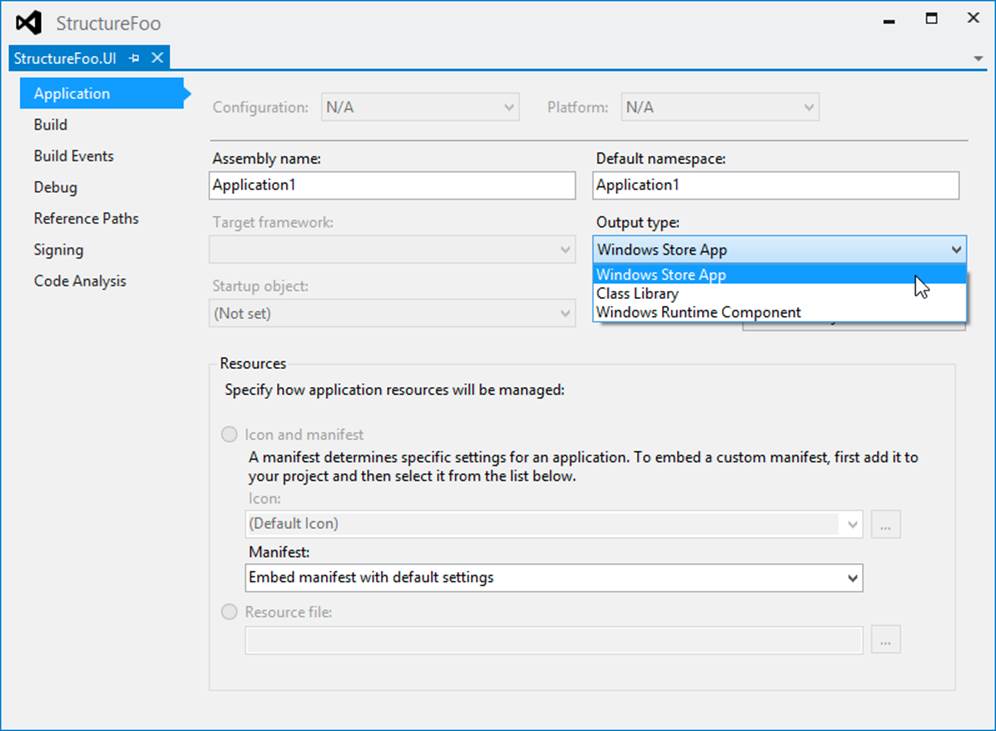
Figure 1-6. Disabled target framework and selectable project types

Figure 1-7. With .NETCore selected, we can’t choose any other assemblies in the way we usually can with normal .NET projects
The Windows Store App is a normal, deployable-and-runnable executable. The Class Library is a .NET assembly that can be consumed from managed code. The WinMD File is used in scenarios where you want to consume the assembly/library from JavaScript or C++/CX. That latter case is out of scope for this book, although we will touch on it in Chapter 14 when we look at background tasks. Generally, in the work we do in this book we’re going to create one executable and a support library to go along with it. Let’s turn our attention now to references.
NOTE
In Visual Studio 2012, the dialog has changed for adding references. Thankfully, we now have a search option!
If you right-click on the project in Solution Explorer and select Add Reference, you’ll see something like Figure 1-7. Note how we cannot add any Framework references. In Metro style we are given .NETCore, and that’s all we’re allowed to have. We can’t add or remove any part of those references. Notice also at the top that it reads “Targeting: .NET for Windows Store apps.”
Likewise, although I haven’t included a screenshot of this, if you select Windows from the tree (i.e., “WinRT libraries”), you’ll see a similar story.
The Solution option lists the projects in the solution. This works in the way that you would expect: simply select the projects whose output you want to reference, and you should be good to go. Use some caution, however, as there’s nothing to stop you doing things such as adding a normal, full .NET class library project and trying to reference it. You’ll get an error if you do this, but it’s not a particularly descriptive error—it just reads “Unable to add a reference to project <projectName>.”
WARNING
You can use the Browse option to add any assemblies that you fancy, although your mileage will vary. I, for example, added a reference to a normal .NET 2.0 assembly. The reference went in fine, but it complained about classes missing from mscorlib. This makes sense if you consider that things will be missing from .NETCore.
Building a Basic User Interface
Now that we’ve explored how the Windows Store projects are put together, we can look at how we build the user interface.
UI Tracks
You can build Windows Store apps using one of three user interface tracks, which are a combination of a display technology and a coding language.
In this book, I’m going to be basing the work we do on XAML, and I’ll talk about this in much more detail in a moment.
NOTE
I’ve excluded DirectX/C++ from this book for the reason that it’s more aimed at developing games, and this book isn’t about building games.
HTML
The HTML5/CSS3/JavaScript track is actually more interesting and in many ways hugely appropriate to developers looking to target Windows 8 and Windows RT. In the HTML5 scenario you build a self-contained, locally executing web application that runs inside of IE on the device. It’s packaged up just like a normal Windows Store application. (We’ll talk about application packaging in Chapter 15.) The language you use to build the application is JavaScript. Just for clarity, you don’t get any backend, server-side execution (à la ASP.NET) with this—it’s all done with JavaScript, although in this new world you have WinJS, which can get into the full WinRT library. (The prevailing wisdom is that it’s this capability to thunk down from WinJS into WinRT that caused Microsoft’s engineers to eschew basing Windows Store apps entirely on .NET.)
You might also be interested to know that the standard Mail, Calendar, and People apps in Windows 8 are based on the HTML5 track rather than the XAML track. However, that seems to be unusual. My informal analysis of the store at various points during the later half of 2012 shows that XAML tends to be much more popular, with about 70% of apps released into the Store being XAML-based. Moreover, there’s a skew toward apps that repackage web content being more likely to be HTML5-based.
On paper, the ability to build apps using HTML5 is incredibly appealing and very sensible. With the market consolidation that’s going on at the time of writing (early 2013), it’s hard for people investing in software to know where to put their money. Targeting a platform-neutral technology like HTML5 seems like a winning plan because any investment you do make can be taken to other platforms in a way that follows profit without dramatically increasing complexity.
However, what that doesn’t account for is that in the post-PC world, the user experience (UX) argument tends to be very strong, and it’s typically the case that users demand apps that have a high degree of “slickness.” It’s counterintuitive to suggest that a platform that is inherently a compromise (i.e., HTML and the Web) can offer this slick user experience. (I tend to call this sort of approach “near native” as it tends to be good enough to be operational, but not classifiable as “native.”) The iPad is a popular device because the apps are so good, and those apps tend to be based on the native toolset provided by Apple. Even though cross-platform technologies are available for iPad (in particular, Apache Cordova née PhoneGap), their adoption tends to be low, as developers understand that compromising UX is typically a move that harms the proposition in the post-PC world.
NOTE
There are other incidental problems with using HTML5 to gain cross-platform advantage with a Windows tablet strategy, the main one being that the UI metaphors used in the modern UI design aesthetic tend to be horizontally biased, whereas the Web itself is vertically biased. You have to wonder how much you really gain from going down an HTML5 route.
Better experience
When we think about our UI track for Windows Store apps, it follows that the native experience should offer a better UX. This means using the XAML track, not the HTML5 track, given that the XAML track is the native UI technology for Metro style, as opposed to HTML5, which is the cross-platform, “near native” choice. You may choose to read the word compromise where I have written choice in that last sentence.
There are two ancillary considerations here. First, we know Microsoft can execute on native UI technologies better than it can execute on web technologies. The second argument is that Silverlight developers are likely to migrate to Metro-style development before other types of developers, and they will likely gravitate toward the XAML track because there’s a natural evolution there. This will likely increase the volume and quality of community-created content around the XAML track. Working with technology where there is greater community involvement tends to be easier. You should note that it appears that building Windows Store apps in HTML5 seems to be more difficult than building the equivalent apps in XAML, although this statement in particular is relatively subjective.
But what actually is the XAML track?
During the development of Longhorn—the codename for what would eventually be called Vista—Microsoft had a new vision for replacing the subsystem that composed the user interface within Windows. This new vision was called Windows Presentation Foundation, or WPF. At the time, the existing Windows UI composition engine, GDI, was extremely old and old-fashioned. WPF was to be a new engine based on a declarative model rather than a programmatic model. (In GDI you have to write code to specifically place UI elements on the screen.) A declarative model would look much more like HTML, which was popular for obvious reasons. Thus, eXtensible Application Markup Language (XAML) was born. WPF was bundled into .NET 3.0 and happens to use DirectX to physically arrange pixels on the screen.
Internally within Microsoft, WPF did not get (and has not gotten) much traction, mainly because it was based on .NET. We’ve already spoken about how the Windows Division and the Office/Business Division don’t like managed code—WPF is entirely a managed code proposition. In hindsight, that core division was never going to use it.
After WPF was released, Microsoft decided that it wanted to compete with Adobe Flash and created a new product called Silverlight to do just that. The idea of Silverlight was that it would run inside a web browser (the Microsoft engineers’ vision of this was that it would run as an ActiveX control within IE). At this time, most of the interest in .NET was around line-of-business (LOB) applications that were either built as web applications (ASP.NET) or as desktop applications using Windows Forms; this happens to be a wrapper over GDI. Without internal adoption within Microsoft, or really much need to use it as a replacement for Windows Forms, Silverlight became a common delivery vector for WPF.
As a Flash competitor, Silverlight didn’t gain much ground. The timing was off—by this time, Flash was looking past its best and HTML5 was getting much better. Some developers started to adopt Silverlight for internal LOB applications deployed as Silverlight applications running “out of browser” (OOB). What actually happened, though, in the end, was that by the time Silverlight and WPF were effectively deprecated, Silverlight’s use as a foundation technology for private LOB apps was quite well established.
Now let’s look at what happened with Windows Phone. When Microsoft junked Windows Mobile and moved over to Windows Phone, it needed a UI platform and chose Silverlight. More accurately, it chose Silverlight and cut it down as previously discussed. “Silverlight for Windows Phone” is the only game in town for building nongame apps on Windows Phone.
So if you loop that in, you have native WPF being used hardly anywhere, Silverlight having no traction on the Web, Silverlight having some traction in private OOB applications, and Silverlight being the only option for Windows Phone.
The next thing is that we have Microsoft wanting to “reboot” the way that we build Windows applications, and to do this it takes WinRT and also takes WPF and divorces it from .NET. As part of this process, Microsoft dumps the WPF name and goes with XAML. XAML then becomesunmanaged—that is, native implementation built using WinRT components housed in WinRT libraries. This is why XAML is not called “WPF” in WinRT—the former is unmanaged and the latter is managed.
Importantly, the API remains roughly compatible. For example, in WPF there is a class called System.Windows.Controls.Button that represents a button on a page. It so happens that this class has a Content property available that can be used for setting the text, and a Click event available that is raised when the user clicks it. This is a managed code housed in the System.Windows.dll assembly. Over in WinRT/XAML, our button representing class is called Windows.UI.Xaml.Controls.Button. This is an unmanaged implementation of the same control—it supports Content, Click, and other members—but this time it’s unmanaged and implemented via a WinRT control referenced through the Windows.winmd metadata. (You will find some rough edges to this model, but this “compatible API” approach is the general shape of the solution.)
XAML Parsing Basics
The killer problem with coming to XAML cold is that if you’re used to HTML, it’s easy to look at it and wonder why on earth Microsoft didn’t just use HTML. To understand why XAML exists, you need to understand the difference between it and HTML.
HTML is a document markup language. The original vision was that you start with some text and annotate it such that areas of the document appear different (e.g., bold, italics) or behave differently (e.g., link to another document). Over time, as a developer community using many different types of technology, we’ve taken that foundation and turned it into a way of declaring a user interface.
XAML is the other way around. It starts from the basis that you’re not trying to describe a document, you’re trying to describe a user interface. As it was born to support Windows, what you’re actually looking to do is describe windows and user interface elements within. HTML is a document that needs to be parsed and interpreted. XAML is just an object graph expressed as XML.
The following is some sort of XAML. I’ve removed some of the attributes to make it easier to understand, so this code won’t actually work:
<Page>
<StackPanel>
<Button Content="Foo" />
<Button Content="Bar" />
</StackPanel>
</Page>
The XAML parser works on a fairly simple basis. It walks the XML Document Object Model (DOM), creating instances of classes as it goes. Starting with the Page, the first element that it reaches is called StackPanel. The XAML parser will find a type with that name (given that it has a list of candidate namespaces to try, which is one of the things I’ve taken out of the XML in order to make it simpler), create an instance from it, and add it to the Content property of the current UI element under consideration—in this case, the page. This continues; the next element is aButton, which is added to the Children property of the panel. At this point we are looking at an element that has attributes, and the values in the attributes are set to properties found on the control. (This is as per ASP.NET’s parsing behavior, incidentally.) The next element is anotherButton, and so on.
In many ways, this is how an HTML parser works in terms of creating its own internal HTML DOM representation, but seeing as HTML doesn’t have to be valid XML, the XAML parser’s job is much easier. (And there’s very little ancillary information about scripts, alternate views, styles, and so forth like you get with HTML.)
NOTE
In this book, it’s not my intention to tell you how to build beautiful and wondrous apps using XAML. That would involve going into too much detail on the construction of the user interfaces, whereas my goal is to show you how to get things happening, functionally. Therefore, I’ll focus on pointing you to various helpful controls and looking at how to implement common constructs.
Building a Basic Page
We’ll now start building a basic user interface. Specifically we’re going to build a registration form that will capture a username, email address, and password, and have a button. It’ll look something like Figure 1-8.
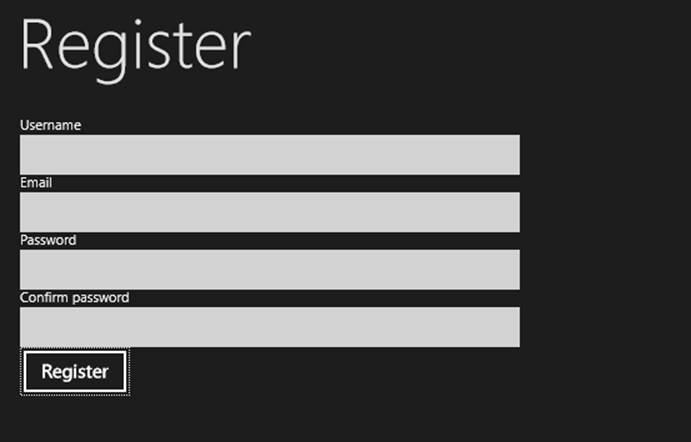
Figure 1-8. The intended layout of our registration form
APP BARS
You should note that the Register button in Figure 1-8 is probably in the wrong place if we consider Windows 8 UX guidelines. The button should be positioned more properly on the app bar, which is the little panel that winds up from the bottom of the screen when you want to access more options. (You do this either by swiping up or down from the edge of the screen, or using the right mouse button.)
However, the situation is slightly complicated by the fact that if the action relates to the primary purpose of the form, you can put it on the main view. Oftentimes apps don’t do this—they leave the button on the app bar but show the app bar rather than asking the user to show it.
This situation is complicated further by some apps—notably the built-in Mail app, which shows the New button, for example, in the top-right of the page.
We don’t get into building app bars until Chapter 4. For now, we’ll leave the button here. In Chapter 4 we’ll discuss proper placement and grouping more fully.
Throughout this book, we’re going to be using a publicly accessible service that I’ve created and hosted on AppHarbor. (If you’re unfamiliar with AppHarbor, it’s a .NET platform-as-a-service provider that I heartily recommend. You can find it at AppHarbor’s website.) The business problem that the service solves was discussed in the preface—to recap, the idea that individuals can report problems in their local environment. For example, the individual might spot some graffiti or litter and wish to have it removed. My reason for choosing this “problem domain” is that it contains all of the common components of mobile apps—specifically, working with accounts, taking and uploading photos, reviewing historical data, and capturing location. What we’ll implement in this next part of our work is the account registration. We’ll capture the new user’s details and send it up to the server, whereupon the user can perform other functions such as creating new issues. I’ll be referring to the application as StreetFoo.
To get started, we need a new solution and project within Visual Studio. As a rule, I like to create a blank solution first, and then add projects into that solution. (I find this creates the most logical and natural folder structure on disk.) However you do it, create a new Visual C# by navigating to Windows Store→Blank App project and call it StreetFoo.Client.UI. Figure 1-9 illustrates.
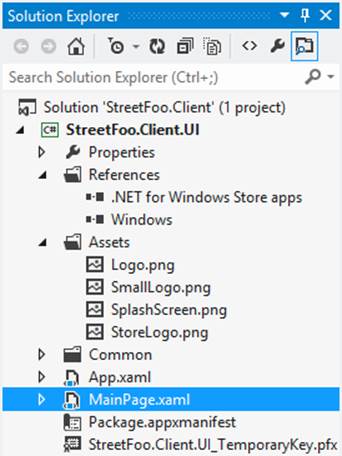
Figure 1-9. The structure of a newly created Windows Store→Blank App project
In Figure 1-9, the assets are relatively obvious—these are the various graphics that we need to drive the application. (We’ll look at these later.) We already discussed the References node earlier in this chapter. Properties and its attendant AssemblyInfo.cs are unchanged from .NET.
App.xaml is a cross between the Global.asax file in ASP.NET and the void static main method used to boot Windows Forms and console application executables. The boilerplate code in here responds to the Launched event and creates the first page to view. (We’ll learn more about application lifecycle events in Chapter 14.)
MainPage.xaml is the default page that gets created. We’ll delete this and replace it with RegisterPage.xml shortly.
Package.appxmanifest contains metadata about the application that affects how the application is deployed (i.e., installed) and what it can do. (If you happen to have done Android development, it’s analogous to how manifests work on that platform.) We’ll see various facets of this as we go, but for now we don’t need to worry about it. Likewise, we also don’t need to worry about the .pfx file down at the bottom. This is used for signing, but we’ll talk more about that in Chapter 15.
Out of the box, a standard project template doesn’t really do much—all you get is an app that will install and show a blank page. However, there is a sort of “subproject” that we can trigger, and when we do that we get a whole load of additional templates and functionality. This additional functionality does things like adding a set of default styles, creating a page layout that has a default header, and creating pages that supports even the smallest window size for this type of application. (We talk about this more in Chapter 12.)
To access this extra functionality, first delete MainPage.xaml and then add a new item to the project of type Basic Page and call it RegisterPage.xaml. Visual Studio will prompt you to add the missing files.
When we do this, the Windows Store app project template will add a new folder called Common to the project, and this folder contains a whole bunch of new stuff that supports the special templates. The readme file in this folder offers a stark warning that developers are not supposed to change the contents of the files in this folder, as it’ll break the VS project template. You can take this with a grain of salt; like all these things, you have to tread relatively carefully, but it’s hard to do any real damage.
I mentioned that the code in App.xaml was responsible for starting the application. The code that was created on project inception contains a reference to the MainPage class. However, we deleted the MainPage class from the project when we deleted MainPage.xaml. We need to replace the reference with a reference to RegisterPage.
Open up App.xaml and change the OnLaunched method to use RegisterPage:
protected override void OnLaunched(LaunchActivatedEventArgs e)
{
#if DEBUG
if (System.Diagnostics.Debugger.IsAttached)
{
this.DebugSettings.EnableFrameRateCounter = true;
}
#endif
Frame rootFrame = Window.Current.Content as Frame;
// Do not repeat app initialization when the Window already
// has content, just ensure that the window is active
if (rootFrame == null)
{
// Create a Frame to act as the navigation context and navigate
// to the first page
rootFrame = new Frame();
if (e.PreviousExecutionState ==
ApplicationExecutionState.Terminated)
{
//TODO: Load state from previously suspended application
}
// Place the frame in the current Window
Window.Current.Content = rootFrame;
}
if (rootFrame.Content == null)
{
// When the navigation stack isn't restored navigate to the
// first page, configuring the new page by passing required
// information as a navigation parameter
if (!rootFrame.Navigate(typeof(RegisterPage), e.Arguments))
{
throw new Exception("Failed to create initial page");
}
}
// Ensure the current window is active
Window.Current.Activate();
}
If you run the project, you should see something like Figure 1-10.
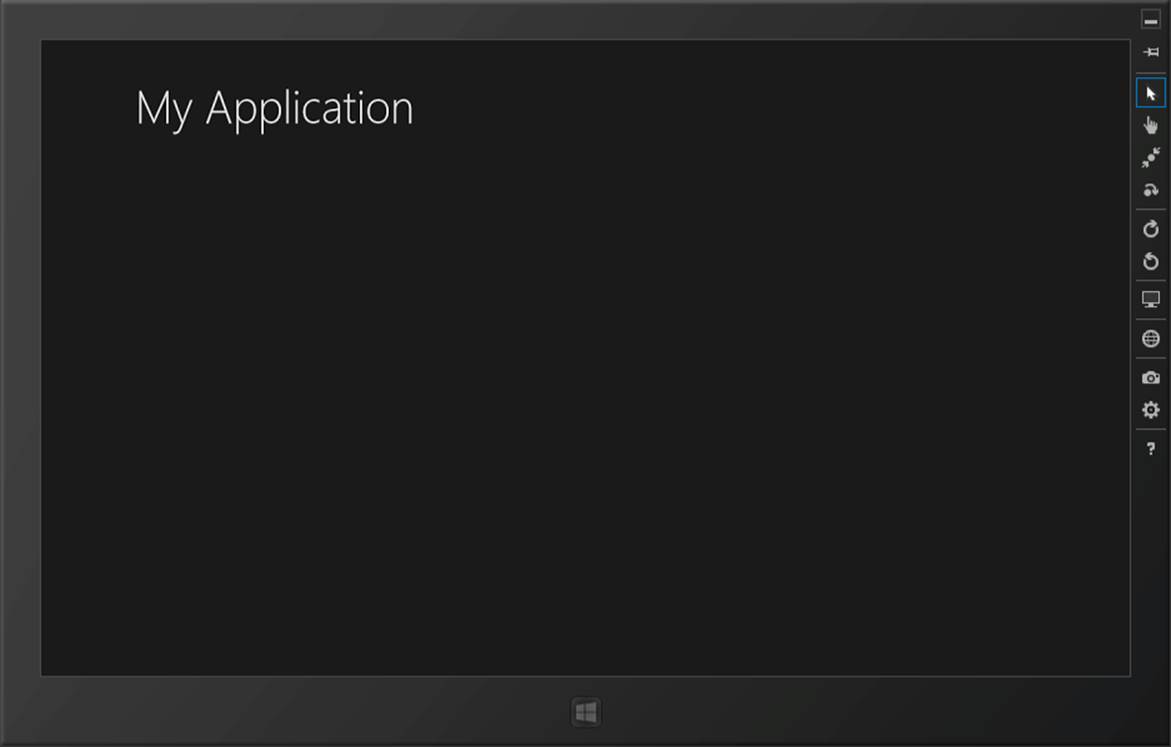
Figure 1-10. Preview of our newly created page
The XAML for that page is quite verbose, so I won’t reproduce it all here. However, here’s an important part of the layout that we need to consider:
<Grid>
<Grid.RowDefinitions>
<RowDefinition Height="140"/>
<RowDefinition Height="*"/>
</Grid.RowDefinitions>
<!-- Back button and page title -->
<Grid>
<Grid.ColumnDefinitions>
<ColumnDefinition Width="120"/>
<ColumnDefinition Width="*"/>
</Grid.ColumnDefinitions>
<AppBarButton x:Name="backButton" Icon="Back" Height="95"
Margin="10,46,10,0"
Command="{Binding NavigationHelper.GoBackCommand,
ElementName=pageRoot}"
Visibility="{Binding IsEnabled, Converter=
{StaticResource BooleanToVisibilityConverter},
RelativeSource={RelativeSource Mode=Self}}"
AutomationProperties.Name="Back"
AutomationProperties.AutomationId="BackButton"
AutomationProperties.ItemType="Navigation Button"/>
<TextBlock x:Name="pageTitle" Text="{StaticResource AppName}"
Style="{StaticResource HeaderTextBlockStyle}"
Grid.Column="1"
IsHitTestVisible="false" TextWrapping="NoWrap"
VerticalAlignment="Bottom" Margin="0,0,30,40"/>
</Grid>
<!-- deleted for brevity... -->
</Grid>
This is where we can start to see the divergence between XAML and HTML. Back in the day we would have laid out this HTML using TABLE controls, and if you look at that XAML from that perspective we don’t have any TR or TD elements to help us. (Of course, now we’re supposed to do that sort of layout using DIV elements and attendant CSS declarations, but I digress.) What we have instead is one Grid control inside of another. We also have some magic going on where we define RowDefinition values to lay out the rows, and ColumnDefinition values to lay out the columns. You’ll also notice that we can put elements inside of grid cells by using Grid.Column attributes on the controls. HTML and CSS, this is not.
UNDERSTANDING XAML
What XAML is trying to do for us is deal with a world where we want a very explicitly laid out user interface (much as we would have done with very old technologies such as raw Win16/Win32 calls, MFC, VB, etc.) but with certain flexibilities, such as making it easier to deal with views that resize, and also offering some advantages that you generally get from declarative user interfaces. Windows Forms introduced some of these ideas through standard Dock and Anchor properties on the controls. XAML is an extension of that kind of approach, as opposed to what HTML has evolved into. XAML is very much “windows”-based (lowercase w), whereas HTML is still based on documents. Importantly, XAML is much more precise. In the first row definition, we’re specifying a specific pixel value. This is not a minimum value, or some value that gets changed depending on other content, unlike HTML and CSS. If we say “140” pixels, we’re going to get 140 pixels regardless.
Before we go on to create the form, we want to change the header. At the moment, the header is defined in a TextBlock control, with a Text value that refers to a StaticResource.
Here’s a portion of the XAML markup that was created when RegisterPage.xaml was created:
<!-- Back button and page title -->
<Grid>
<Grid.ColumnDefinitions>
<ColumnDefinition Width="120"/>
<ColumnDefinition Width="*"/>
</Grid.ColumnDefinitions>
<AppBarButton x:Name="backButton" Icon="Back" Height="95"
Margin="10,46,10,0"
Command="{Binding NavigationHelper.GoBackCommand,
ElementName=pageRoot}"
Visibility="{Binding IsEnabled, Converter=
{StaticResource BooleanToVisibilityConverter},
RelativeSource={RelativeSource Mode=Self}}"
AutomationProperties.Name="Back"
AutomationProperties.AutomationId="BackButton"
AutomationProperties.ItemType="Navigation Button"/>
<TextBlock x:Name="pageTitle" Text="{StaticResource AppName}"
Style="{StaticResource HeaderTextBlockStyle}"
Grid.Column="1"
IsHitTestVisible="false" TextWrapping="NoWrap"
VerticalAlignment="Bottom" Margin="0,0,30,40"/>
</Grid>
When attribute values are surrounded by braces in that way, this tells the XAML parser that regular processing needs to stop and something else needs to happen. These are called markup extensions. StaticResource is one type of extension. In the next section, we’ll meet Binding. (There’s one of these references in the Button control in that snippet that happens to show or hide the default back button depending on whether the page is at the top of the stack or not.) For now, replace the Text value with Register. Here’s the code:
<!-- Back button and page title -->
<Grid>
<Grid.ColumnDefinitions>
<ColumnDefinition Width="120"/>
<ColumnDefinition Width="*"/>
</Grid.ColumnDefinitions>
<AppBarButton x:Name="backButton" Icon="Back" Height="95"
Margin="10,46,10,0"
Command="{Binding NavigationHelper.GoBackCommand,
ElementName=pageRoot}"
Visibility="{Binding IsEnabled, Converter=
{StaticResource BooleanToVisibilityConverter},
RelativeSource={RelativeSource Mode=Self}}"
AutomationProperties.Name="Back"
AutomationProperties.AutomationId="BackButton"
AutomationProperties.ItemType="Navigation Button"/>
<TextBlock x:Name="pageTitle" Text="Register" Style="{StaticResource
HeaderTextBlockStyle}" Grid.Column="1"
IsHitTestVisible="false" TextWrapping="NoWrap"
VerticalAlignment="Bottom" Margin="0,0,30,40"/>
</Grid>
NOTE
You’ll see the WYSIWYG preview update as you make this change.
Next we’ll restructure the page so that we have a single Grid control that occupies the whole page. The default layout is designed for views that scroll off the right side of the page. What we want for our form is just a place to enter some values underneath the caption. Therefore, if we redefine the grid with a row at the top 140 pixels high and a column on the left 120 pixels wide, we can put the back button in the top-left cell, the label in the top-right, and the form in the bottom-right. (We need the back button, as ultimately when we start the app we’ll present the logon page and have a button that takes us into the registration page.)
This is now where we can use the StackPanel control. This is a very useful control for laying our controls vertically (the default) or horizontally. We’ll also use TextBlock controls (which are labels), TextBox, PasswordBox, and Button controls. Here’s the modified markup for our form. Figure 1-11 shows what we’re aiming for.
<local:StreetFooPage
x:Name="pageRoot"
x:Class="StreetFoo.Client.UI.RegisterPage"
xmlns="http://schemas.microsoft.com/winfx/2006/xaml/presentation"
xmlns:x="http://schemas.microsoft.com/winfx/2006/xaml"
xmlns:local="using:StreetFoo.Client.UI"
xmlns:common="using:StreetFoo.Client.UI.Common"
xmlns:d="http://schemas.microsoft.com/expression/blend/2008"
xmlns:mc="http://schemas.openxmlformats.org/markup-compatibility/2006"
mc:Ignorable="d">
<Grid>
<Grid.RowDefinitions>
<RowDefinition Height="140"/>
<RowDefinition Height="*"/>
</Grid.RowDefinitions>
<Grid.ColumnDefinitions>
<ColumnDefinition Width="120"/>
<ColumnDefinition Width="*"/>
</Grid.ColumnDefinitions>
<!-- Back button and page title -->
<AppBarButton x:Name="backButton" Icon="Back" Height="95"
Margin="10,46,10,0"
Command="{Binding NavigationHelper.GoBackCommand,
ElementName=pageRoot}"
Visibility="{Binding IsEnabled, Converter={StaticResource
BooleanToVisibilityConverter}, RelativeSource=
{RelativeSource Mode=Self}}"
AutomationProperties.Name="Back"
AutomationProperties.AutomationId="BackButton"
AutomationProperties.ItemType="Navigation Button"/>
<TextBlock x:Name="pageTitle" Text="Register" Style="{StaticResource
HeaderTextBlockStyle}" Grid.Column="1"
IsHitTestVisible="false" TextWrapping="NoWrap"
VerticalAlignment="Bottom" Margin="0,0,30,40"/>
<!-- Registration form -->
<StackPanel Grid.Row="1" Grid.Column="1">
<TextBlock Text="Username"></TextBlock>
<TextBox HorizontalAlignment="Left" Width="400" Text="{Binding
Username, Mode=TwoWay}"/>
<TextBlock Text="Email"></TextBlock>
<TextBox HorizontalAlignment="Left" Width="400" Text="{Binding
Email, Mode=TwoWay}"/>
<TextBlock Text="Password"></TextBlock>
<PasswordBox HorizontalAlignment="Left" Width="400" Password="
{Binding Password, Mode=TwoWay}"/>
<TextBlock Text="Confirm password"></TextBlock>
<PasswordBox HorizontalAlignment="Left" Width="400" Password="
{Binding Confirm, Mode=TwoWay}"/>
<Button Content="Register"></Button>
</StackPanel>
<!-- VisualStateManager element deleted for clarity ... -->
</Grid>
</local:StreetFooPage>
There are two things that are worth calling out in this code. We’ve used Binding extensions to supply values for the Text and Password properties of the edit controls. (An important part here is the specification of Mode=TwoWay. This pushes the data back from the UI into the view-model when it changes.) We’ll come to that. Likewise we’ll also cover how to make something happen when that button is clicked via commands.
Run the project now and you’ll see the registration page appear. Figure 1-11 illustrates.

Figure 1-11. Our registration form
Now that we have the markup for our page, let’s turn our attention to making it do something.
Implementing MVVM
In this book, we’re going to implement our user interface using the Model/View/View-Model (MVVM) pattern. The intention of MVVM is to create a separation of concerns between the data your application needs to manipulate and the view that’s presented to the user.
The simplest way to build a user interface is not to introduce any separation of concerns at all. Imagine you have a database containing customer information and you have a form that allows you to edit a single customer. Without any separation of concerns, you can build one enormous and spaghettified class that has logic to load the data from the database, logic to display it on the screen, the ability to listen for a “save” button click, logic to validate the data, and logic to save the changes back, all mashed up together. This approach of lumping everything together is not clever for a number of reasons, not least of all because it doesn’t promote reuse of the database and validation logic, and it doesn’t support (straightforward) unit testing. By splitting up the capability into separate classes—such as one that knows how to get data in and out of the database, and one that knows how to drive the user interface—you get better reuse and more straightforward unit testing.
NOTE
Just in case it’s not clear, don’t mash together code without separation of concerns—it’s almost always a really bad idea.
The first place you end up when you try to formalize an architecture to separate data persistence concerns and the user interface is a pattern called Model-View-Controller, or MVC. In MVC you have the persistent data part represented in the model. You then have the physical view. Finally you have the controller whose job it is to tie the model and view together. (For example, the controller might trigger the action “when this button is clicked, pull the input off of the UI, run this validation routine, and then update the model.”) Figure 1-12 illustrates the structure. This diagram is simplified—usually you would have interfaces between the controller and the page class to abstract away the page’s implementation.
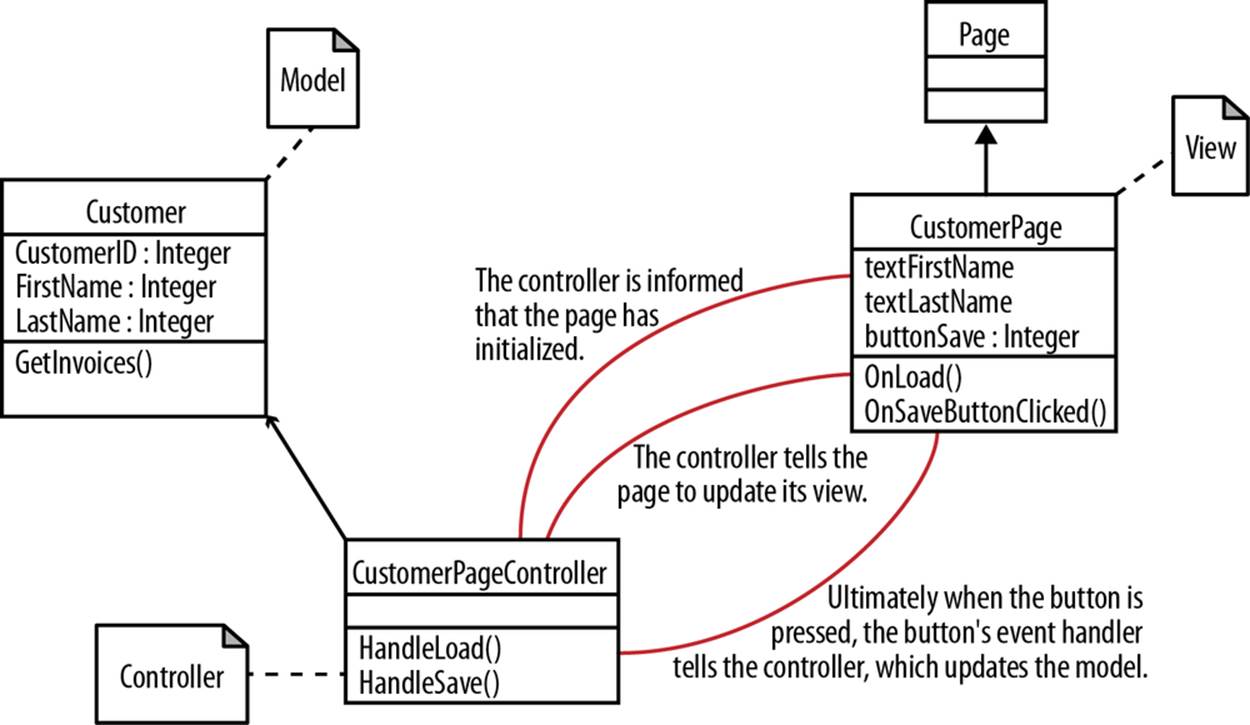
Figure 1-12. Structure of the Model-View-Controller pattern
Earlier I said that the model “knows how to get the data in and out of the database.” Really the model is the in-memory representation of the persistent data that we’re trying to manage. In an (old-fashioned) data-centric approach, the model would know how to drive the database. In a (more modern) object-orientated approach, the model is—as the name implies—a set of classes that “models” the application-specific problem domain. For example, if we need to represent a customer, we’ll have a class called Customer. If a customer has orders, they’ll be a method in theCustomer class with the capability to return a collection of Order objects.
WPF and Silverlight
With WPF, the various Silverlight implementations, and now XAML, Microsoft’s recommendation is that we use MVVM. In fact, the Windows Store app community almost always follows this recommendation, and it’s my recommendation, too.
The model part remains as it is in MVC—that is, a representation of the data that we’re trying to manipulate. The view also remains as it is—that is, a representation of the UI elements that make up the display. The view-model is different. This is an amalgam of the controller functionality and a specialized façade on the model. In our basic “single page to edit a customer” example, it’s likely our specialized façade will be a one-to-one mapping with a Customer instance, but it doesn’t have to be. It could be that we need to invent an entirely new set of classes to represent a view’s data by bundling and aggregating a number of pieces of data drawn from the model. (Incidentally, the view-model’s data doesn’t necessarily have to map to the persistent application data—in fact, in the first instance of looking at this, it won’t, because we’re going to use it to capture the registration details for our new account and that’s something that won’t exist in the local persistent dataset at all.)
A key motivation for introducing MVVM with WPF/Silverlight was to get around one of the really tedious aspects of programming user interfaces—namely, getting data out of the model and onto the controls on the screen. If you’re trying to build a form, continually writing code liketextFirstName.Content = Customer.FirstName and its reverse (Customer.FirstName = textFirstName.Content) is seriously boring. What we can do in WPF/Silverlight—more importantly, what we can do in WinRT’s XAML implementation—is create bindings and allow the framework to do that for us. By setting the Content property of a TextBox control in XAML to {Binding Customer.FirstName}, we don’t have to write the tedious code to shuttle the data in and out of the view-model. This process is called data binding, and it’s been around since the very first versions of Visual Basic. You mark up your UI with instructions as to where specific pieces of data come from and allow your framework to do the heavy lifting.
What any form of separation gives us in addition to this is the ability to do unit testing, which we’ll talk about now.
A PRELIMINARY DISCUSSION ABOUT UNIT TESTING
We’ve mentioned unit testing a lot, and I’m going to assume that readers of this book know what it is.
In this book, we’re going to actually do some unit testing in the next chapter, but this isn’t a “test-driven” book. When we do other work, we will be working in a non-test-driven way (i.e., just hacking code together until it works).
In the real world, my recommendation is that you always, always use unit testing in your work and get as close as possible to a fully test-driven development (TDD) mode of operation. In fact, I’d go further than that and say if you’re not unit testing, you’re not really writing software at all. If you haven’t yet gone over to the “dark side” and really felt the benefits of unit testing, take some time out to do so as part of your professional learning.
In a book, however, unit testing is a pain because, as an author, you end up focusing more on taking the reader through building the unit tests than getting things working. (Unit testing isn’t great for proof-of-concept work, and books are really about presenting a decent collection of interlinked proofs of concept.) Thus, I don’t use unit testing when presenting development activities in a book. That said, it’s important that whatever we do is unit testable, which is why in the next chapter we’ll actually build some unit tests—as a proof of concept, as it were.
MVVM Structure and Inversion of Control
In this section, we’ll go through the process of building a basic pattern that we can reuse throughout our work whenever we need to implement a view.
The view itself will always be a XAML page. We’ll always create our view classes by inheriting from the special LayoutPage implementation that Visual Studio gave us when we first created our RegisterPage.xaml. We’ve already built our RegisterPage, so that will represent the V in our MVVM implementation.
In each example of using this pattern in the book, the model will be different. In our specific RegisterPage case, we don’t really have a model. What we’re trying to do is collect a set of values that we can pass up to our server via an HTTPS call—specifically, we need to capture the username, email address, and password, and confirm password values as per the user interface shown previously in Figure 1-10. Thus—and hopefully not in a way that’s confusing—our first MVVM implementation won’t have a specific M. We’ll assume the data stored in the view-model will be good enough. Properly, any model should map down to a persistent data store, but we won’t see persistent data until Chapter 3.
Our view-model then will reside in its own class. The convention we’ll use throughout is *ViewClass*ViewModel, so in this instance we’ll create a class called RegisterPageViewModel. This is the VM in our MVVM.
But there’s more. Because I want to demonstrate how we can unit test our registration logic and attendant UI, I want to demonstrate a more complex and production-appropriate architecture.
Ideally, we want to create not just separation but isolation between the view and the view-model. The view should not really care what class it’s driving. Likewise, the view-model should not care what view is driving it. This last point is particularly important because what we’re actually going to do ultimately is build a unit test that fakes the view in order to exercise the function of the view-model. To achieve this, we’ll design our architecture so that we have an IRegisterPageViewModel interface and insist that everything works with the interface rather than working with the concrete view-model instance directly. Because we’re being all “enterprise architect” about it, we’ll create ViewModel and IViewModel types—it’s always helpful to have abstract base classes to help cement semantic understanding. (In fact, we are actually going to bake some important functionality into base types as we go forward.)
Another thing we’ll need is a way to poke backward from the view-model into the view. For this reason we’ll create an IViewModelHost interface. The view-model will be given an object that implements this interface on instantiation.
NOTE
This is slightly against the “rules” of MVVM (as it breaks some of the abstraction), but we’ll talk more about this when we get there. This bending of the rules makes life much more straightforward.
Altogether, we’ll have a basic structure that looks like Figure 1-13. I’ve intentionally left attributes and operations out of this UML sketch, as we’ve yet to discuss details on behavior. What this diagram shows you are the basic pieces that we need to build.
There are two things to note about this diagram. First, there’s no model—the left side shows the view-model, the right side the view. As RegisterPage doesn’t need persistent on-disk storage, there is no model. Second, there appears to be a big disconnect between the view-model and the view. This is because the communication between these two components is done with XAML data binding magic, and this is not shown.
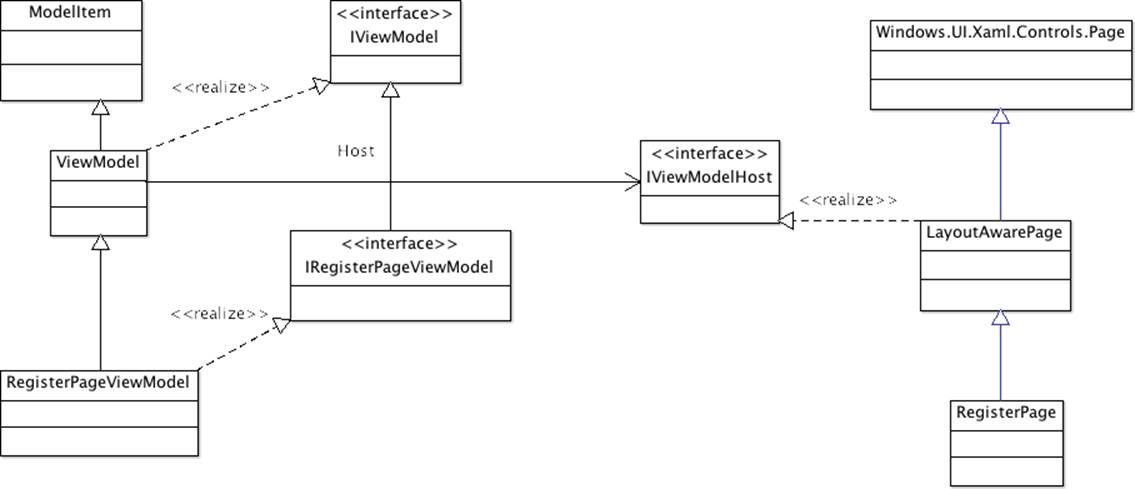
Figure 1-13. Static structure sketch of the view, view-model, and associated base types
NOTE
Throughout this book, whenever I present UML it’s never intended to be complete. UML is always presented as a sketch with details omitted.
Next, we’ll properly flesh out the RegisterPageViewModel class.
RegisterPageViewModel
The most basic thing any of the view-model classes are going to do is store data. The most basic way for a class to store data is in an instance variable—in .NET parlance, this is, as we know, a field.
XAML’s data binding subsystem is built on the idea that we should implement an interface on any object involved in data binding, the purpose of which is to provide a conduit through which the data binding subsystem can be notified of changes. This interface is calledINotifyPropertyChanged and it contains a single member, which happens to be an event called PropertyChanged.
INotifyPropertyChanged means that you don’t need to handle any of this yourself manually. So, one way to build a view-model is to do this:
// This code is just for illustration, you won't find it in the
// samples code...
public class FooViewModel : INotifyPropertyChanged
{
// hold a value...
private string _bar;
// event for the change...
public event PropertyChangedEventHandler PropertyChanged;
// property...
public string Bar
{
get
{
return _bar;
}
set
{
_bar = value;
this.OnPropertyChanged(new PropertyChangedEventArgs("Bar"));
}
}
public virtual void OnPropertyChanged(PropertyChangedEventArgs e)
{
if (this.PropertyChanged != null)
this.PropertyChanged(this, e);
}
}
The problem with this approach is that it’s immensely tedious—unless you’re using code generation, you’re going to spend half your working day manually building properties and wiring up the event raising code.
A better approach—and the one we’re going to use—is to create a base class with a Dictionary<string, object> instance to hold a “bucket” of values, and a generic way of handling the storage and the event so that we don’t have to do all the tedious work involved in raising change notifications. In the view-model, we’ll extend this base class and specialize it by adding properties to get and set the specific model implementation’s data.
NOTE
In fact, what we’ll end up doing is building a class called ModelItem that will contain this basic functionality and then extending that into ViewModel. We’ll also use ModelItem at various other times in the book.
A really clever .NET capability we can use here is the CallerMemberNameAttribute class.
NOTE
As we go, I generally won’t call out namespaces; it makes the discussion overly long. (As it happens, CallerMemberNameAttribute can be found in System.Runtime.CompilerServices.) If you’re keying in the code in the book and can’t find a reference, right-click on it and select Resolve from the context menu, and Visual Studio will tell you the namespace where it can be found.
This will automatically set the value of any optional parameter that it is decorated with to the member name of the caller. In the following contrived example, the value of the magicArgument argument passed to ShowMeTheCallerName will be set to the string value"MagicCallingProperty":
private void ShowMeTheCallerName([CallerMemberName] string magicArgument = null)
{
Debug.WriteLine(magicArgument);
}
private string MagicCallingProperty
{
set
{
ShowMeTheCallerName();
}
}
That’s a silly example; a better one is to use CallerMemberNameAttribute to automatically generate keys into a dictionary of values. By adding helper methods to our ViewModel class that use CallerMemberNameAttribute, we can automatically generate keys that can be used to access the dictionary based on the names of properties that call those helper methods.
One thing we want to do is put all of our application logic in a separate “UI agnostic” assembly that we link into our main app project. I wanted to show how you could do this mainly so that you knew you could, but also so that we have an increased separation when we come to look at the unit testing.
First off, within the solution create a new Windows Store→Class Library project called StreetFoo.Client. Then, right-click on the StreetFoo.Client.UI project, choose Add Reference, navigate to the Solution “tab,” and add a reference back to StreetFoo.Client. (This process is exactly how you always would have done it with normal .NET projects, but it’s important to choose Windows Store→Class Library as the project type.)
First off, remember how we designed our architecture to have an IViewModel interface? This will need some mechanism by which it can initialize the view-model, which we’ll achieve using an Initialize method. Here’s the implementation that also happens to extendINotifyPropertyChanged:
public interface IViewModel : INotifyPropertyChanged
{
void Initialize(IViewModelHost host);
}
ViewModel is going to need to be able to understand IViewModelHost. We’re going to add to this now and again as we work through the book, but for now the implementation can be empty:
public interface IViewModelHost
{
}
We’re now at the part where we can create our base class that’s able to handle ad hoc data storage and raise notification changes through INotifyPropertyChanged. We’ll call this class ModelItem. Don’t worry about the naming for now—it will become apparent why it has that name later:
// base class for holding ad hoc data and issuing notification changes...
public abstract class ModelItem : INotifyPropertyChanged
{
private Dictionary<string, object> Values { get; set; }
protected ModelItem()
{
this.Values = new Dictionary<string, object>();
}
public event PropertyChangedEventHandler PropertyChanged;
protected T GetValue<T>([CallerMemberName] string name = null)
{
if (this.Values.ContainsKey(name))
return (T)this.Values[name];
else
return default(T);
}
protected void SetValue(object value, [CallerMemberName] string name
= null)
{
// set...
this.Values[name] = value;
// notify...
this.OnPropertyChanged(new PropertyChangedEventArgs(name));
}
protected void OnPropertyChanged([CallerMemberName] string name = null)
{
this.OnPropertyChanged(new PropertyChangedEventArgs(name));
}
protected virtual void OnPropertyChanged(PropertyChangedEventArgs e)
{
if (this.PropertyChanged != null)
this.PropertyChanged(this, e);
}
}
Here’s the first draft implementation of ViewModel. This extends ModelItem, but also maintains a reference back to the view-model host:
public abstract class ViewModel : ModelItem, IViewModel
{
// somewhere to hold the host...
protected IViewModelHost Host { get; private set; }
public ViewModel()
{
}
public void Initialize(IViewModelHost host)
{
this.Host = host;
}
}
This will make more sense if we build RegisterPageViewModel, so here that is; then, I’ll go through all three classes:
public class RegisterPageViewModel : ViewModel, IRegisterPageViewModel
{
public RegisterPageViewModel()
{
}
public string Username
{
get
{
// the magic CallerMemberNameAttribute automatically maps this
// to a hash key of "Username"...
return this.GetValue<string>();
}
set
{
// likewise, CallerMemberNameAttribute works here too...
this.SetValue(value);
}
}
public string Email
{
get
{
return this.GetValue<string>();
}
set
{
this.SetValue(value);
}
}
public string Password
{
get
{
return this.GetValue<string>();
}
set
{
this.SetValue(value);
}
}
public string Confirm
{
get
{
return this.GetValue<string>();
}
set
{
this.SetValue(value);
}
}
}
}
Hopefully from that you can see the simplicity of this approach. The properties don’t have to concern themselves with wiring themselves into the base ModelItem class’s storage mechanism; .NET is doing that for us. When we call any of the SetValue methods, the dictionary key is inferred from the name; this is used in the first instance to set the value in the wrapped Values instance, and in the second instance it’s used in the event signaling. GetValue is implemented such that it doesn’t care whether the value is in the dictionary and will return a default value if the item is missing.
In the next chapter, we’re going to start being clever about how we hook the view-model and the view together. (In this chapter, for simplicity we’re just going to “new up” a RegisterPageViewModel and give it to the view to use.) Essentially we want a loose coupling between the view-model and the view. For this reason, we’ll always create a companion interface for every view-model that we’ll build—in this case, IRegisterPageViewModel. The rule with these interfaces is that they contain just a “map” of the public properties used in the binding operations. We’ve got four properties used for binding: Username, Email, Password, and Confirm. Such interfaces also need to extend IViewModel. Therefore, our interface has just those properties, specifically:
public interface IRegisterPageViewModel : IViewModel
{
string Username
{
get;
set;
}
string Email
{
get;
set;
}
string Password
{
get;
set;
}
string Confirm
{
get;
set;
}
}
Now that we’ve put that together, let’s have a go at running some data through it.
Handling errors
In this section we’re going to build a helper class that will assist us in moving error messages around the system so that we can do something with them. In terms of what we actually do with errors when they occur, in this book we’re typically just going to render them on the screen.
This particular functionality is reasonably contrived, as there are most likely better ways to do this in production applications; however, this is one of those things where we have to compromise in order to fit our work into a book. Be aware, then, that this is probably one of the rougher bits if you’re looking to bring this work into production.
In the first go-through of this class we’re going to use it to gather a collection of error strings. In the next chapter we’re going to also use it to store an exception.
The class itself is simple:
public class ErrorBucket
{
private List<string> Errors { get; set; }
public ErrorBucket()
{
this.Errors = new List<string>();
}
public void AddError(string error)
{
this.Errors.Add(error);
}
public bool HasErrors
{
get
{
return this.Errors.Any();
}
}
}
How might we use this? Well, in relation to our RegisterPageViewModel we’re going to use it as part of the validation. Here’s the Validation method that needs to be part of the view-model:
// add method to RegisterPageViewModel...
private void Validate(ErrorBucket errors)
{
// do basic data presence validation...
if (string.IsNullOrEmpty(Username))
errors.AddError("Username is required.");
if (string.IsNullOrEmpty(Email))
errors.AddError("Email is required.");
if (string.IsNullOrEmpty(Password))
errors.AddError("Password is required.");
if (string.IsNullOrEmpty(Confirm))
errors.AddError("Confirm password is required.");
// check the passwords...
if (!(string.IsNullOrEmpty(Password)) &&
this.Password != this.Confirm)
errors.AddError("The passwords do not match.");
}
The functionality there is straightforward—as we find errors, we ask the ErrorBucket instance to store them for us.
Of course, storing the errors is no good unless we can show them to the user, so let’s look at that now.
Basic alerts
In the remainder of this chapter, all we’re going to do is display a success message on the screen, or show the validation errors. The part where we actually make the call up to the server will be in the next chapter.
The Windows Store analog of a normal Windows message box is accessed via the MessageDialog class. Its basic usage is easy enough. However, to make it easier to access this method, I’m proposing creating extension methods in the base XAML Page class. These will then be accessible from any class that extends Page, including LayoutAwarePage, the base class for our pages. We’ll call the class that contains these extension methods PageExtender.
NOTE
Personally, I’m a huge fan of extension methods—they can really help you to build out standard framework functionality into your own specialized way of working. We’ll be using them quite a bit in the work we do in this book.
One difference to consider between the MessageDialog class’s behavior and a regular Windows message box is that the display operation is asynchronous. Typically we’re used to these blocking so that execution of our program’s code doesn’t continue until the pop up is dismissed. This isn’t the case with MessageDialog. We’re about to go into a much deeper discussion about asynchronous calls, so don’t worry about this behavior for now—just be aware of it.
In PageExtender we’re going to build two overloads of the ShowAlertAsync method. One will take a string, and the other will take an ErrorBucket instance. Shortly we’ll build a method in ErrorBucket that will return a string for display. Here’s the code:
internal static class PageExtender
{
internal static Task ShowAlertAsync(this IViewModelHost page,
ErrorBucket errors)
{
return ShowAlertAsync(page, errors.GetErrorsAsString());
}
internal static Task ShowAlertAsync(this IViewModelHost page,
string message)
{
// show...
MessageDialog dialog = new MessageDialog(message != null ? message :
string.Empty);
return dialog.ShowAsync().AsTask();
}
}
The GetErrorsAsString method in ErrorBucket looks like this:
// add method to ErrorBucket...
public string GetErrorsAsString()
{
StringBuilder builder = new StringBuilder();
foreach (string error in this.Errors)
{
if (builder.Length > 0)
builder.Append("\r\n");
builder.Append(error);
}
return builder.ToString();
}
Now that we can in theory get something on the screen, let’s pull all of the loose ends together and actually get something on the screen.
Creating the View-Model and Running the App
The first loose end we have to tie up is the part that responds to the button click and then physically invokes a method in RegisterPageViewModel called DoRegistration. This will validate the data that’s been keyed in by the user, and then display a message on the screen either showing the errors or confirming success. In the next chapter we’re actually going to make the call to the server. In this chapter, we’re going to fake the call.
The way that all of this is tied together using MVVM is via commands. The idea of commands is that rather than physically linking the view and the view-model together, you bind command objects that are invoked by user interface controls.
Somewhere on your view-model you will have a collection of private methods that actually do things. (Remember, the point of MVVM is to isolate code so that we’re not using codebehind-style code in the pages.) As a foundation to building comments, WinRT defines an interface calledICommand with a method in it called Execute. Through some plumbing that I’ll explain in a moment, you can rig your XAML such that when a button is clicked, that Execute method is called. You then defer down to your private methods, whereupon the magic happens.
For example, and with much code omitted for brevity, this code shows how we can create something called a DelegateCommand, which contains an anonymous method that refers to our concrete DoRegistration method. Ultimately, were we to actually run this example, something would invoke RegisterCommand from outside the view-model:
public class RegisterPageViewModel : ViewModel, IRegisterPageViewModel
{
public ICommand RegisterCommand { get; private set; }
public RegisterPageViewModel(IViewModelHost host)
: base(host)
{
this.RegisterCommand = new DelegateCommand((args) =>
DoRegistration());
}
// code omitted...
private void DoRegistration()
{
// magic happens...
}
}
We’ll build DelegateCommand in a moment, but the idea of it is that it’s a vanilla implementation of ICommand whose only function is to defer to our proper method.
In our XAML, we can use regular data binding operations like those we’ve already seen in order to associate the Command property of the button up to that RegisterCommand instance exposed by the view-model, like so:
<!-- Registration form -->
<StackPanel Grid.Row="1" Grid.Column="1">
<TextBlock Text="Username"></TextBlock>
<TextBox HorizontalAlignment="Left" Width="400" Text="{Binding
Username, Mode=TwoWay}"/>
<TextBlock Text="Email"></TextBlock>
<TextBox HorizontalAlignment="Left" Width="400" Text="{Binding
Email, Mode=TwoWay}"/>
<TextBlock Text="Password"></TextBlock>
<PasswordBox HorizontalAlignment="Left" Width="400"
Password="{Binding Password, Mode=TwoWay}"/>
<TextBlock Text="Confirm password"></TextBlock>
<PasswordBox HorizontalAlignment="Left" Width="400"
Password="{Binding Confirm, Mode=TwoWay}"/>
<Button Content="Register" Command="{Binding RegisterCommand}">
</Button>
</StackPanel>
For reasons that will become clearer when we get to unit testing, it’s important that our interface keeps in step with our XAML, so we need to add RegisterCommand to the interface:
public interface IRegisterPageViewModel
{
string Username
{
get;
set;
}
string Email
{
get;
set;
}
string Password
{
get;
set;
}
string Confirm
{
get;
set;
}
ICommand RegisterCommand
{
get;
}
}
So all of that would work if we had an implementation of DelegateCommand. Let’s do that now.
The main capability of ICommand lies in the Execute method, but there is an ancillary capability in the CanExecute method. On more sophisticated UIs, this can be used to enable or disable UI elements depending on the state of the model. We’re not going to worry about that—we’re just going to implement the basics. Here it is:
public class DelegateCommand : ICommand
{
private Action<object> Handler { get; set; }
public event EventHandler CanExecuteChanged = null;
public DelegateCommand(Action<object> handler)
{
this.Handler = handler;
}
public bool CanExecute(object parameter)
{
return true;
}
public void Execute(object parameter)
{
Handler(parameter);
}
}
NOTE
This code will compile with a warning—don’t worry about that. In the version of the code you can download, I’ve smoothed out all the warnings. I’ve left that code out of the book for clarity, however.
And that’s it. All we have to do now is get to a point where we can call our method.
IViewModelHost
The important thing in MVVM is to work at keeping a separation between the view-model and the view. (Keeping a separation between the model and the view-model is also important.) Moreover, we need to ensure that the view-model doesn’t actually become dependent on any user interface technology—it needs to instruct the application’s view from time to time, but it can’t have any direct control. (In a way, you can think about this as the view-model hinting that something needs to happen, but allowing the view architecture to decide what to actually do.) A prime motivation for this is that the view-models need to be fully unit testable and you have absolutely no user interface when running in a unit test container, but we’ll get to that in the next chapter.
NOTE
There are some who may not like this approach of being able to get back from the view-model to the view container. Admittedly, from a purist’s perspective it’s not ideal. The reason I chose to continue down this route was that pragmatically it felt appropriate.
In our architecture discussion we mooted the idea of using IViewModelHost. (We also accept one of these in the constructor for the abstract ViewModel class.) The first purpose of this will be to display a message box. Here’s the interface; you’ll notice that it maps onto the methods of ourPageExtender class, which is intentional:
public interface IViewModelHost
{
Task ShowAlertAsync(ErrorBucket errors);
Task ShowAlertAsync(string message);
}
We’ll implement this interface in our StreetFooPage class, as we’ll need this throughout our work. However, because we implemented our alert methods as extension methods, we’ll need to implement the methods of IViewModelHost explicitly, as follows. (The problem here is that the compiler can’t see the methods resolve through cleanly, even though they do. We need to shim it.)
// add methods to StreetFooPage...
Task IViewModelHost.ShowAlertAsync(ErrorBucket errors)
{
return this.ShowAlertAsync(errors);
}
Task IViewModelHost.ShowAlertAsync(string message)
{
return this.ShowAlertAsync(message);
}
Building out the DoRegistration method
In this chapter, DoRegistration in our RegisterPageViewModel won’t do that much. It’ll create an ErrorBucket instance and call the validation at first. If the validation is OK, it’ll fake the call to the server, and then ask the host to display a message containing the ID of the newly created account. If errors occur during the validation process, we’ll ask the host to display the errors. For clarity, I’ve reproduced the Validate method:
// add methods to RegisterPageViewModel...
private void DoRegistration()
{
// validate...
ErrorBucket errors = new ErrorBucket();
Validate(errors);
// ok?
if (!(errors.HasErrors))
{
// the real call to the server will return an ID here—we'll
//fake it for now...
string userId = Guid.NewGuid().ToString();
// call the success handler...
this.Host.ShowAlertAsync(string.Format("Created user: {0}",
userId));
}
// errors?
if(errors.HasErrors)
this.Host.ShowAlertAsync(errors);
}
private void Validate(ErrorBucket errors)
{
// do basic data presence validation...
if (string.IsNullOrEmpty(Username))
errors.AddError("Username is required.");
if (string.IsNullOrEmpty(Email))
errors.AddError("Email is required.");
if (string.IsNullOrEmpty(Password))
errors.AddError("Password is required.");
if (string.IsNullOrEmpty(Confirm))
errors.AddError("Confirm password is required.");
// check the passwords...
if (!(string.IsNullOrEmpty(Password)) &&
this.Password != this.Confirm)
errors.AddError("The passwords do not match.");
}
One small point on that: note how at the end of DoRegistration we check the errors instance again and display a message. Another way to build that would be to use an else after the first check. What I want to do, however, is introduce a pattern whereby we can continue to build up errors in the if block, but at the moment the code in the if block can’t possibly create more errors. If that’s not clear, don’t worry; you’ll see this again in a while.
Running the application
The only thing that’s missing from this is a way of creating the view-model and hooking it and the view up together. In the next chapter we’re going to look at using an inversion-of-control (IoC) container to do this more properly. In this chapter we’re just going to “new up” aRegisterPageViewModel instance and tell the view to use it.
As each view will need a way of setting up its view-model, I’m proposing that we create another extension method in Page that will take a view-model instance and bind it up to the view. The actual binding process is very easy—all we have to do is set the DataContext property of the page to be the view-model. This action will wire up all of the configured data binding, and in fact that’s all we need to do in order to configure the two objects.
As I’ve mentioned a few times, in this chapter all we’re going to do is create a new instance of the view-model. In the next chapter we’re going to use an IoC container to do this more dynamically.
Here’s the InitializeViewModel method that needs to be created in PageExtender. This will just “new up” a view-model instance and then use a (slightly dirty) hack to take our IViewModelHost instance and turn it into a Page instance so that we can access the DataContextproperty:
// Add method to PageExtender...
internal static void InitializeViewModel(this IViewModelHost page,
IViewModel model = null)
{
// create the model; ultimately we'll replace this with an
// IoC container...
model = new RegisterPageViewModel();
model.Initialize(page);
// set the data context...
((Page)page).DataContext = model;
}
Here’s the new property and the change to the constructor that’s needed in RegisterPage:
public sealed partial class RegisterPage : StreetFooPage
public RegisterPage()
{
this.InitializeComponent();
// initialize the model...
this.InitializeViewModel();
}
// code omitted for brevity...
}
At this point, everything should run. Run the app, and you’ll see something like Figure 1-14.
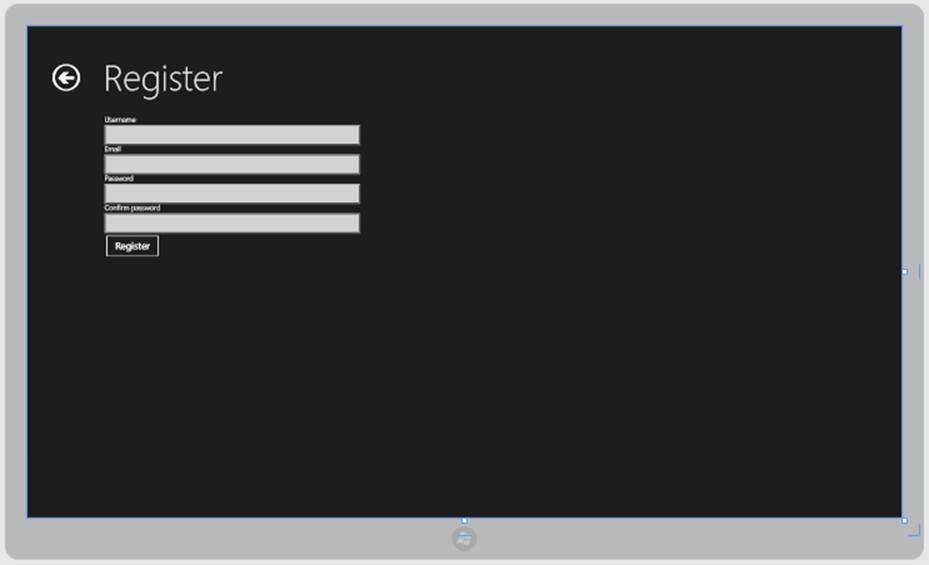
Figure 1-14. The running application
NOTE
Figure 1-14 shows the device simulator view. If you run the project using the standard options, your Windows Store app will run directly within your home environment. To change to the simulator, change the drop-down on the toolbar from Local Machine to Simulator.
To properly understand this part, I’d recommend setting a breakpoint in DoRegistration. Hit the Register button and use the call stack to confirm that the call has been routed through the command. If you step through, you’ll see the validation collect errors because the fields are blank. Keep stepping, and you’ll work your way back out of the view-model and into the view. Ultimately you’ll see the message reporting the errors appear, as shown in Figure 1-15.

Figure 1-15. Alert being used to show error messages in an ErrorBucket instance
The next important thing to validate is that the binding is pushing the data back into the view-model. If you fill out some of the fields and break into DoRegistration, you should see the properties reporting back the values you keyed in. If the values pass validation, you’ll see a successful result, as shown in Figure 1-16.
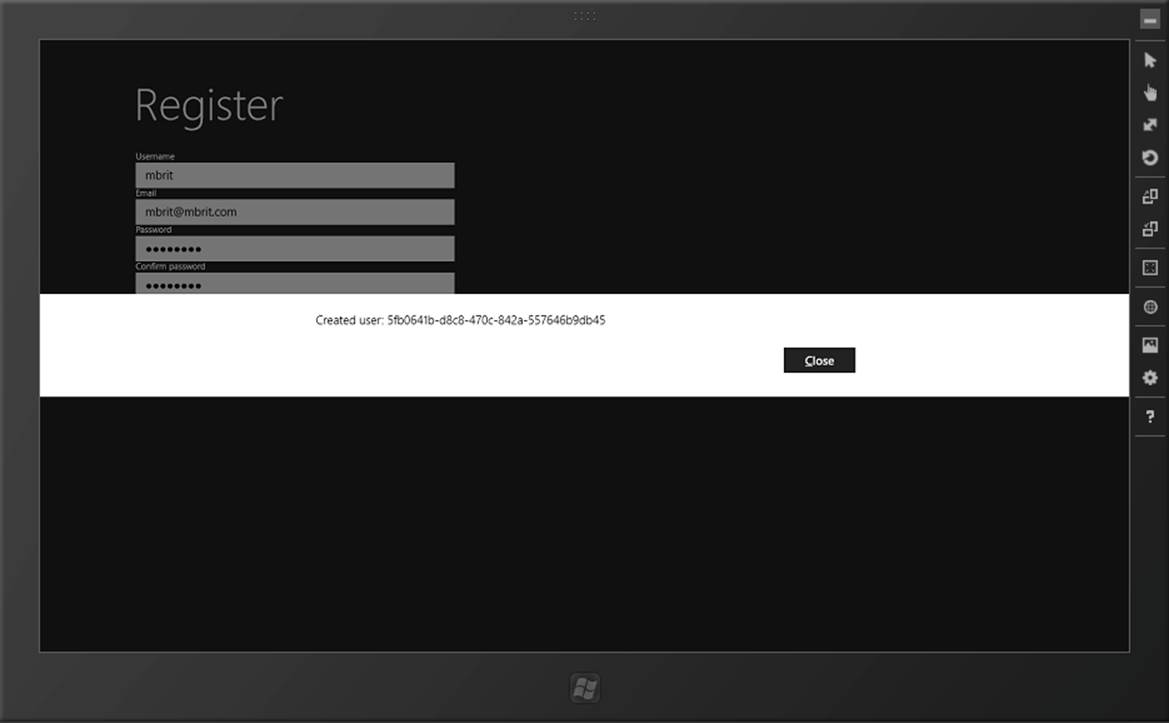
Figure 1-16. A successful result
[1] Thunking is the process of making calls across system boundaries. In this context, it refers to making calls from the “managed code” world of .NET to the unmanaged world of WinRT.
All materials on the site are licensed Creative Commons Attribution-Sharealike 3.0 Unported CC BY-SA 3.0 & GNU Free Documentation License (GFDL)
If you are the copyright holder of any material contained on our site and intend to remove it, please contact our site administrator for approval.
© 2016-2025 All site design rights belong to S.Y.A.