Programming Windows Store Apps with C# (2014)
Chapter 10. Location
In all geo-capable apps, regardless of platform, there are three things you as a developer typically want to do. You want to determine where an asset is, present the user with some sort of visualization of location, or tag an activity to a point in space (and usually along with it a point in time). In this chapter, we’re going to look primarily at the latter two. Although we’ll also look briefly at getting a device’s location, I’m keeping that discussion short because it’s fairly straightforward and applies only in limited cases. However, we’ll focus on mapping because a) it’s helpful, and b) it’s actually pretty cool! (My advice, if you want to sell a prototype project to your boss, is to put a map in it.)
We’ll achieve the presentation of the actual maps by integrating Bing Maps. You will need a developer key to do this, but I’ll go through that when we get to it. Before we do all that, though, we have to modify the app so that we actually have somewhere to present a map.
Creating a Singleton View
To start the work that we need to do in this chapter, we need a page that we can put a map on. We’ll create a singleton view that will display a single report from the local database. From a UI perspective we’ll design this in classic Windows 8 style: a viewport that scrolls horizontally, presenting a “panorama” across the presentation. This will require us to use a ScrollViewer and a Grid.
In XAML, a ScrollViewer is—as its name implies—a control that implements scrolling. We can apply a standard style called HorizontalScrollViewerStyle to implement this in the standard way to achieve the required Windows 8 experience (i.e., swiping from side to side with a finger, and using the mouse wheel).
Figure 10-1 shows us what we’re ultimately looking to achieve. Let’s get started.
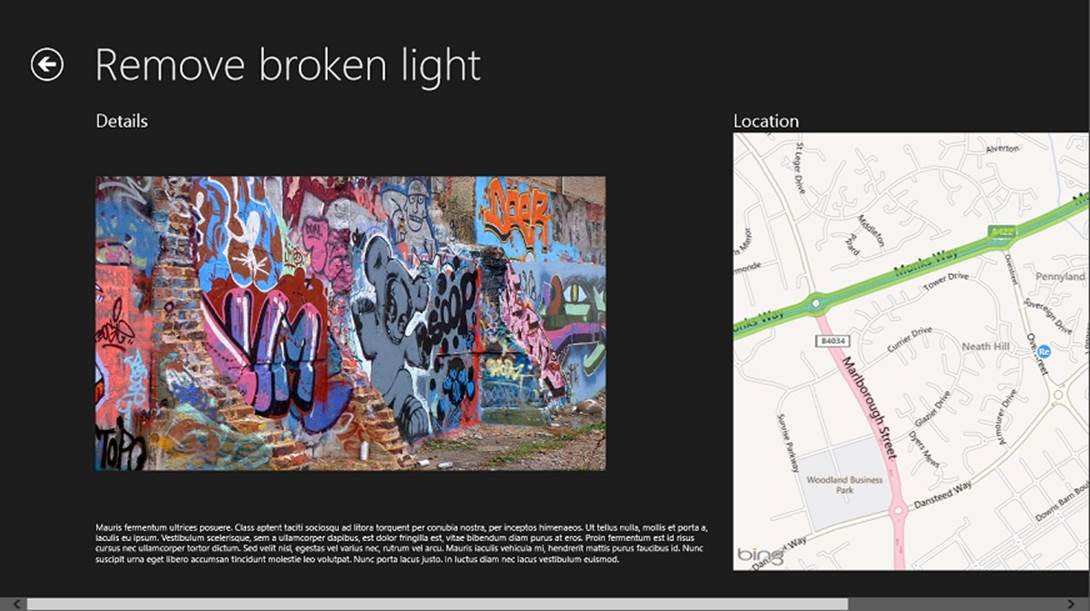
Figure 10-1. Our objective: a singleton view showing the report details and a map
Creating the View-Model
Whether you’re using MVVM or not, there are three common UI metaphors that you’ll tend to see. You are usually either looking at a view that shows a list of related items, a view that’s mainly displaying information about an item, or a view that falls into neither of this categories. At this point we’ve seen a view implementation that falls into the list model (the list of reports), and a view that falls into neither (the register page, settings page, etc.). What we’re going to do in this section is look at how to create a base view-model when we want to create a singleton presentation of a piece of domain data.
To do this, we’ll create a ViewModelSingleton<T> class that will expose a property called Item of type T. The advantage of this approach is that it gives us a common way of representing items on views such as this. It also creates a place to put common setup and error-handling code. If you’re of a mind to, it can also act as a place to pin roll-your-own framework functionality.
Although I won’t cover how to do so in these pages, we can do something similar with ViewModelList<T>, which we could use as a base for the view-model that we’ve created for the Reports page and the search results page.
Figure 10-2 shows a UML sketch of the implementation—although, to reiterate, we’re only going to build the singleton view now. I’ve also omitted the interfaces from the sketch, but we’ll have IViewModel, IViewModelSingleton<T>, and IViewModelList<T>.

Figure 10-2. UML static structure sketch showing ViewModelSingleton<T> and others
Here’s the code for IViewModelSingleton<T>. Note the type constraint indicating the T must be of type ModelItem:
public interface IViewModelSingleton<T> : IViewModel
where T : ModelItem
{
T Item { get; }
}
When we come to use one of these view-models, we’ll need to give it the item to display. In the basic way in which XAML is used, outside of any MVVM cleverness we put in, we can pass an optional argument. In Chapter 8 we used this to pass around the search query that the user entered. In our case now, we can use that to pass in the item that we want to display. Related to this, we need to defend against not being passed an item or being passed an item of the wrong type. We’ll also implement an ItemChanged method that we can override in order to set up the item when the view-model is activated. Here’s the code:
public abstract class ViewModelSingleton<T> : ViewModel,
IViewModelSingleton<T>
where T : ModelItem
{
// holds the base item that we're mapped to...
private T _item;
protected ViewModelSingleton(IViewModelHost host)
: base(host)
{
}
public T Item
{
get
{
return _item;
}
set
{
_item = value;
this.OnPropertyChanged();
// reload...
this.ItemChanged();
}
}
protected virtual void ItemChanged()
{
// no-op...
}
public override void Activated(object args)
{
base.Activated(args);
// check...
if (args == null)
throw new InvalidOperationException(
"An item was not supplied.");
if(!(typeof(T).GetTypeInfo().IsAssignableFrom(args.GetType()
.GetTypeInfo())))
{
throw new InvalidOperationException(string.Format(
"An item of type '{0}' was supplied, but an item of type
'{1}' was required.",
args.GetType(), typeof(T)));
}
// are our arguments initializing our item?
this.Item = (T)args;
}
}
At this point, we don’t need to do much with the new ReportPageViewModel. We do need to add an OpenMapCommand, which we’ll use in the last section to open Bing Maps from within our application. Therefore, IReportPageViewModel just looks like this:
public interface IReportPageViewModel : IViewModelSingleton<ReportViewItem>
{
ICommand OpenMapCommand { get; }
}
The actual ReportPageViewModel has some additional complexity in that we have to initialize the ImageUri property exposed by ReportViewItem. Here’s the code—note how it reuses the ReportImageCacheManager that we first saw in Chapter 4.
public class ReportPageViewModel : ViewModelSingleton<ReportViewItem>,
IReportPageViewModel
{
public ReportPageViewModel(IViewModelHost host)
: base(host)
{
}
protected override async void ItemChanged()
{
// set up our image...
var manager = new ReportImageCacheManager();
await this.Item.InitializeAsync(manager);
}
}
Now that we have the view-model logic built, we can turn our attention to creating the view.
Creating the View
A key part of the Windows 8 experience is wide views that the user pans across left to right to reveal information. From a design perspective, the idea here is that the user is not fiddling around with panels and tabs to reveal information. It’s all there, just not within the current viewport. When working with touch, grabbing anywhere and swiping is easier than zeroing in on and successfully hitting a target. For our report singleton view, we want to display some basic details about the report, and then display a map. We build such a view by creating a Grid control with the different panels on it, and then wrapping it using a ScrollViewer that provides the scrolling functionality.
What I’m proposing is that we create two panels—one for the image and description, and another for a map. To get started, create a new Basic Page called ReportPage. As usual, this page will have a header with a back button. We need to create our ScrollViewer so that it goes in the second row of the grid that we were given by Visual Studio when the page was created. When we create our grid to go into the ScrollViewer, we create a thin column on the left that’s the same width as the column used to accommodate the back button on the caption row. This aligns the left side of the first real panel with the left side of the caption text. In a moment, we’ll build a new style called PanoramaPanel that adjusts the spacing. You should note that the really important part of the ScrollViewer definition is to include the HorizontalScrollViewerStyle, which we need in order to get the Windows 8 experience. The base behavior of ScrollViewer is to act like a Win32 autoscroll control.
In terms of the data binding, we’re going to use multipart expressions that use dot notation. For example, {Binding Item.ImageUri} can be used on the Image control. The DataContext for the page is our ReportPageViewModel. We know that this has an Item property exposed byViewModelSingleton<ReportViewItem>; from there, it’s obvious that ImageUri is the already defined property on ReportViewItem.
We’re also going to use the MarkupViewer control that we built in Chapter 9. Although we won’t gain any direct benefit from using it here, I wanted to include it to underscore how such a thing can be used in regular data display. (In Chapter 9, I signaled that we can use the control for that, as opposed to it just rendering help text.)
We’re going to use a XAML control called ScrollViewer to present the list. This needs to be configured with a style that tells it to scroll horizontally, rather than the Windows default of vertically. Add this style to StandardStyles.xaml to achieve this:
<!-- Add to StandardStyles.xaml -->
<Style x:Key="HorizontalScrollViewerStyle" TargetType="ScrollViewer">
<Setter Property="HorizontalScrollBarVisibility" Value="Auto"/>
<Setter Property="VerticalScrollBarVisibility" Value="Disabled"/>
<Setter Property="ScrollViewer.HorizontalScrollMode" Value="Enabled" />
<Setter Property="ScrollViewer.VerticalScrollMode" Value="Disabled" />
<Setter Property="ScrollViewer.ZoomMode" Value="Disabled" />
</Style>
Here’s the XAML that needs to be added to ReportPage:
<!-- Add to ReportPage -->
<ScrollViewer Style="{StaticResource HorizontalScrollViewerStyle}"
Grid.Row="1">
<Grid>
<Grid.ColumnDefinitions>
<ColumnDefinition Width="120"></ColumnDefinition>
<ColumnDefinition Width="800"></ColumnDefinition>
<ColumnDefinition Width="800"></ColumnDefinition>
</Grid.ColumnDefinitions>
<ContentControl Grid.Column="1" Style="{StaticResource
PanoramaPanel}">
<StackPanel>
<TextBlock Style="{StaticResource HeadingTextBlock}">
Details</TextBlock>
<Image Source="{Binding Item.ImageUri}"
HorizontalAlignment="Left" Width="640" Height="480" Stretch="Uniform"
Margin="0,0,0,10"></Image>
<local:MarkupViewer Markup="{Binding Item.Description}">
</local:MarkupViewer>
</StackPanel>
</ContentControl>
<ContentControl Grid.Column="2" Style="{StaticResource
PanoramaPanel}">
<StackPanel>
<TextBlock Style="{StaticResource HeadingTextBlock}">
Location</TextBlock>
<Button Content="We'll put a map in here eventually...">
</Button>
</StackPanel>
</ContentControl>
</Grid>
</ScrollViewer>
Another detail is that we need to change the caption to bind to the title of the report, as opposed to being the static “My Application” text. Here’s that change:
<!-- Back button and page title -->
<Grid>
<Grid.ColumnDefinitions>
<ColumnDefinition Width="Auto"/>
<ColumnDefinition Width="*"/>
</Grid.ColumnDefinitions>
<Button x:Name="backButton" Click="GoBack" IsEnabled="{Binding Frame.
CanGoBack, ElementName=pageRoot}"
Style="{StaticResource BackButtonStyle}"/>
<TextBlock x:Name="pageTitle" Grid.Column="1" Text="{Binding
Item.Title}" Style="{StaticResource PageHeaderTextStyle}"/>
</Grid>
To make this work, we just have to build the PanoramaPanel style. All that we’re doing with this is adding some space between the panels. We need to add this to the StandardStyles.xaml file.
<!-- Add to StandardStyles.xaml -->
<Style x:Key="PanoramaPanel" TargetType="ContentControl">
<Setter Property="Margin" Value="0,0,20,0"></Setter>
</Style>
We can’t run that yet—well, we can, but we can’t actually reach that view through the frontend. Figure 10-3 shows what the designer looks like so that you know it’s working. Note that the extent of the grid goes over the edge of the viewport. This is the effect that we want in order to create the panoramic scrolling.
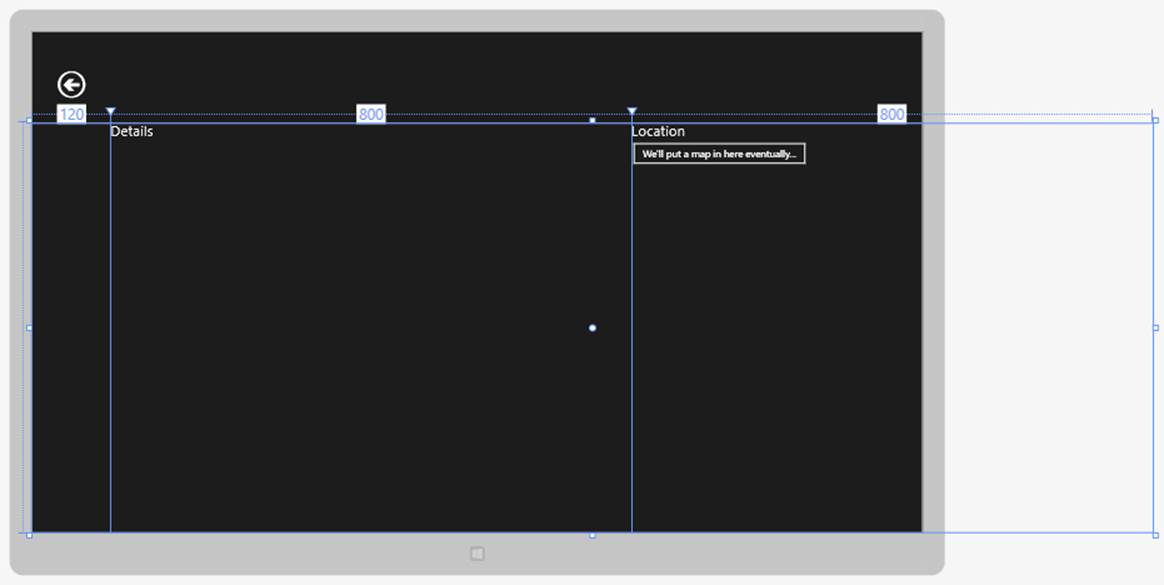
Figure 10-3. Designer view of ReportPage
We’ll need to add an app bar to this page so that we have somewhere to put the command that will open up Bing Maps. Here’s the markup for the app bar:
<!-- Add markup to ReportPage.xaml -->
<Page.BottomAppBar>
<AppBar>
<StackPanel HorizontalAlignment="Right" Orientation="Horizontal"
Grid.Column="2">
<Button Style="{StaticResource EditAppBarButtonStyle}" Command=
"{Binding EditCommand}" />
<Button Style="{StaticResource OpenMapAppBarButtonStyle}"
Command="{Binding OpenMapCommand}" />
</StackPanel>
</AppBar>
</Page.BottomAppBar>
Finally, to round off the code, we’ll need to actually wire up the view-model. This is the same as we’ve done a few times now; the actual logic required in the pages is very light.
Here’s the code:
public sealed partial class ReportPage : StreetFooPage
{
private IReportPageViewModel ViewModel { get; set; }
public ReportPage()
{
this.InitializeComponent();
// set up the model...
this.ViewModel = ViewModelFactory.Current.GetHandler
<IReportPageViewModel>(this);
this.InitializeModel(this.ViewModel);
}
// code omitted...
}
Navigating to the View
Now we need to get to a point where we can actually see our new view!
There are three routes into the view given the current state of the app: the current Reports page, the search results page, and the search recommendations view. (Recall in Chapter 8 that we were able to present a single report item on the actual search charm; this was a search recommendation.)
At the moment, the behavior of the Reports page is that when we touch on items, the selection changes. This has been fine up to now to demonstrate functionality, but more properly within the Windows 8 experience, when you touch on items they should open. You can see this behavior in the built-in apps.
Again, recall when we implemented search in Chapter 8, we built the view so that when you select an item it displays a message box. We did this by using the IsItemClickEnabled and ItemClickedCommand properties in MyGridView. All we have to do on ReportsPage is enableIsItemClickEnabled and bind SelectionCommand through to ItemClickedCommand. This will result in the raising of the SelectionCommand command when the user touches an item on the view. Here’s the change:
<!-- Modify ReportsPage.xaml -->
<local:MyGridView
x:Name="itemGridView"
AutomationProperties.AutomationId="ItemsGridView"
AutomationProperties.Name="Items"
TabIndex="1"
Margin="0,0,0,-4"
Padding="116,0,116,46"
ItemsSource="{Binding Source={StaticResource itemsViewSource}}"
ItemTemplate="{StaticResource ReportItem250x250Template}"
IsItemClickEnabled="true"
ItemClickedCommand="{Binding SelectionCommand}"
Grid.Row="1"
/>
We’ve already built a base type for commands called NavigateCommand that will automatically rattle a navigation request through to XAML. To make it work on ReportsPageViewModel, we just need to change the constructor to use it, as opposed to using DelegateCommand with a lambda expression. Here’s that change:
// Modify constructor in ReportsPageViewModel...
public ReportsPageViewModel(IViewModelHost host)
: base(host)
{
// commands...
this.RefreshCommand = new DelegateCommand(async (e) =>
{
this.Host.HideAppBar();
await this.DoRefresh(true);
// toast...
string message = "I found 1 report.";
if (this.Items.Count != 1)
message = string.Format("I found {0} reports.",
this.Items.Count);
var toast = new ToastNotificationBuilder(new string[] {
"Reports refreshed.", message });
toast.ImageUri = "ms-appx:///Assets/Toast.jpg";
toast.Update();
});
// open the singleton report view...
this.SelectionCommand = new NavigateCommand<IReportPageViewModel>
(this.Host);
}
Although we still have to cover the navigation behavior on the search operations, you can run the project at this point to gain the satisfaction of seeing it working. Figure 10-4 illustrates.
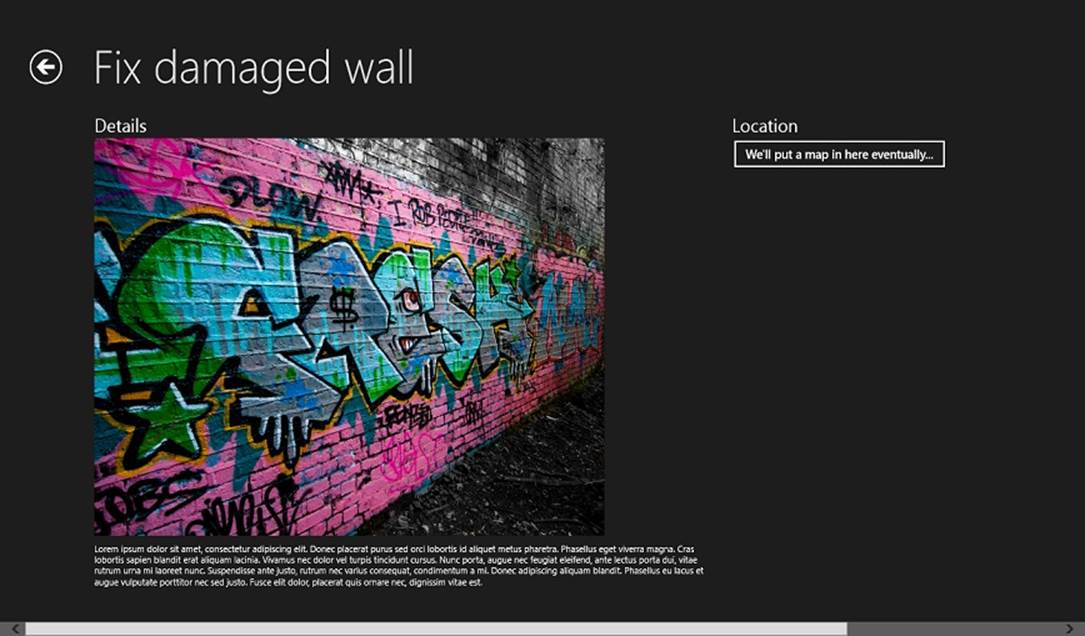
Figure 10-4. The operational report singleton view
We’ll quickly round off the two search operations before we start looking at location functionality proper.
The SearchResultsPageViewModel is the same trick as before. We just need to use NavigateCommand on the SelectionCommand. Here’s the code:
// Modify constructor in SearchResultsPageViewModel...
public SearchResultsPageViewModel(IViewModelHost host)
: base(host)
{
this.MasterItems = new List<ReportViewItem>();
this.Results = new ObservableCollection<ReportViewItem>();
this.Filters = new ObservableCollection<SearchFilter>();
// command...
this.SelectionCommand = new NavigateCommand<IReportPageViewModel>
(this.Host);
}
The selection wiring on both the ReportsPageViewModel and SearchResultsPageViewModel implementations is easy: we have a ReportViewItem, and all we have to do is pass it through the navigation. The search recommendation handler is a little trickier. In Chapter 8 when we did this, we wrote this code to respond to the user selecting the recommendation:
async void search_ResultSuggestionChosen(SearchPane sender,
SearchPaneResultSuggestionChosenEventArgs args)
{
var dialog = new MessageDialog("Chosen: " + args.Tag);
await dialog.ShowAsync();
}
The Tag was set to the ID of the ReportItem in the local cache. What we need to do is query it from SQLite and then navigate to the page. The method to get an object by ID from the cache is just a matter of adding a new method to ReportItem and using sqlite-net. Here’s the code:
// Add method to ReportItem...
public static async Task<ReportItem> GetByIdAsync(int id)
{
var conn = StreetFooRuntime.GetUserDatabase();
var query = conn.Table<ReportItem>().Where(v => v.Id == id);
// return...
return (await query.ToListAsync()).FirstOrDefault();
}
Run the code, and you’ll now be able to access the report singleton page from search results.
NOTE
In Chapter 7, when we looked at sharing we added the share functionality to the Reports page. Because we can’t select an item on the Reports page anymore, in the code download you’ll find that I’ve moved the share functionality to the report singleton page.
Now that we have somewhere to put the options, we can finally look at the location APIs!
Retrieving a Current Location
We need to add an option to the app bar on the Reports page to get and display the current location. Luckily we can use an icon from Segoe UI Symbol to do this. We’ll also need a button that shells out to the built-in Bing Maps app.
Here are the two styles that we need for our buttons. These need to be added to StandardStyles.xaml.
<!-- Add to StandardStyles.xaml -->
<Style x:Key="ShowLocationAppBarButtonStyle" TargetType="Button" BasedOn=
"{StaticResource AppBarButtonStyle}">
<Setter Property="AutomationProperties.AutomationId" Value=
"ShowLocationAppBarButton"/>
<Setter Property="AutomationProperties.Name" Value="Show Location"/>
<Setter Property="Content" Value=""/>
</Style>
<Style x:Key="OpenMapAppBarButtonStyle" TargetType="Button" BasedOn=
"{StaticResource AppBarButtonStyle}">
<Setter Property="AutomationProperties.AutomationId" Value=
"OpenMapAppBarButton"/>
<Setter Property="AutomationProperties.Name" Value="Open Map"/>
<Setter Property="Content" Value=""/>
</Style>
We can then create and add a new button to the app bar in the usual way, as we did in Chapter 4. (We’ll build the command on the view-model in a moment.)
<!-- Modify ReportsPage.xaml -->
<Page.BottomAppBar>
<AppBar>
<Grid>
<Grid.ColumnDefinitions>
<ColumnDefinition Width="50*"/>
<ColumnDefinition Width="50*"/>
</Grid.ColumnDefinitions>
<StackPanel Orientation="Horizontal" Visibility="{Binding
HasSelectedItems, Converter={StaticResource VisibilityConverter}}">
</StackPanel>
<StackPanel HorizontalAlignment="Right" Orientation="Horizontal"
Grid.Column="2">
<Button Style="{StaticResource ShowLocationAppBarButtonStyle}"
Command="{Binding ShowLocationCommand}" />
<Button Style="{StaticResource RefreshAppBarButtonStyle}"
Command="{Binding RefreshCommand}" />
<Button Style="{StaticResource LogoutAppBarButtonStyle}"
Command="{Binding LogoutCommand}" />
</StackPanel>
</Grid>
</AppBar>
</Page.BottomAppBar>
We also need to add the commands to our IReportsPageViewModel. Here’s the code:
public interface IReportsPageViewModel : IViewModelList<ReportViewItem>
{
ICommand RefreshCommand { get; }
ICommand SelectionCommand { get; }
ICommand ShowLocationCommand { get; }
}
NOTE
This listing reflects the change made in the code download to use IViewModelList<T>. That’s not a change that we’ve made in the book, but it should be obvious to see what it does from the code.
When we actually want to get a location, we have to contend with two issues. First, the user may have turned location tracking off. In order to get any location capability at all, we need to indicate in our manifest that we intend to ask for it as part of the app’s operation. When we try to get the location, Windows will display a pop up asking the user if she is sure she wants us to do that. If she says “no,” we’ll get an UnauthorizedAccessException. If she says “yes,” it may work. (I’ll get to that in a moment.) However, if at one point she says “yes,” she can still go into the permissions charm at a later date and turn it back off. Thus, each time we have to be careful to capture situations where location has been disallowed.
So, I said that location “may work.” There are many reasons why it won’t—for example, we might not have a GPS, or it may take too long to come back with a location fix. Similarly, then, we have to make sure we track those errors.
My proposal here is that we wrap the API that retrieves the location. (As we’ll see, this happens to be done using Windows.Devices.Geolocation.Geolocator.) We’ll create a LocationHelper class with a GetCurrentLocationAsync method. This will return a LocationResultcontaining the location in a Geolocation instance together with a LocationResultCode value that will tell us what happened.
LocationResultCode looks like this:
public enum LocationResultCode
{
Ok = 0,
AccessDenied = 1,
UnknownError = 2
}
When we come to work with coordinates, there’s a little bit of inconsistency in the APIs here. Geolocator returns instances of type Geocoordinate. The Bing Maps component we’ll use later also used Geocoordinate. However, in Windows 8.1 there’s a note against Geocoordinate that it’s being deprecated. Because this deprecation is not complete—i.e., other things in the Framework still use it, I’ve stuck with using the Geocoordinate class. Then, LocationResult looks like this:
public class LocationResult
{
public LocationResultCode Code { get; private set; }
public Geoposition Location { get; private set; }
internal LocationResult(LocationResultCode code)
{
this.Code = code;
}
internal LocationResult(Geoposition location)
: this(LocationResultCode.Ok)
{
this.Location = location;
}
}
Finally, we can call down to the method to get the location. There isn’t much to this—it’s just deferring to a method that goes away and gets the location. Here’s the code:
public static class LocationHelper
{
public static async Task<LocationResult> GetCurrentLocationAsync()
{
try
{
var locator = new Geolocator();
var position = await locator.GetGeopositionAsync();
// return...
return new LocationResult(position);
}
catch (UnauthorizedAccessException ex)
{
Debug.WriteLine("Geolocation access denied: " + ex.ToString());
return new LocationResult(LocationResultCode.AccessDenied);
}
catch (Exception ex)
{
Debug.WriteLine("Geolocation failure: " + ex.ToString());
return new LocationResult(LocationResultCode.UnknownError);
}
}
}
To call that, we need to add a command to our ReportsPageViewModel. We’ll need to add both commands, but we only need to implement one. Here’s the change (I’ve omitted quite a bit of code for brevity):
public class ReportsPageViewModel : ViewModelList<ReportViewItem>,
IReportsPageViewModel
{
public ICommand RefreshCommand {
get { return this.GetValue<ICommand>(); }
private set { this.SetValue(value); } }
public ICommand SelectionCommand {
get { return this.GetValue<ICommand>(); }
private set { this.SetValue(value); } }
public ICommand ShowLocationCommand { get { return this.GetValue
<ICommand>(); } private set { this.SetValue(value); } }
public ReportsPageViewModel(IViewModelHost host)
: base(host)
{
// commands...
this.RefreshCommand = new DelegateCommand(async (e) =>
{
this.Host.HideAppBar();
await this.DoRefresh(true);
// toast...
string message = "I found 1 report.";
if (this.Items.Count != 1)
message = string.Format("I found {0} reports.",
this.Items.Count);
var toast = new ToastNotificationBuilder(new string[] {
"Reports refreshed.", message });
toast.ImageUri = "ms-appx:///Assets/Toast.jpg";
toast.Update();
});
// open the singleton report view...
this.SelectionCommand = new NavigateCommand<IReportPageViewModel>
(this.Host);
// show the location...
this.ShowLocationCommand = new DelegateCommand(async (e) =>
{
// get the location...
var result = await LocationHelper.GetCurrentLocationAsync();
if (result.Code == LocationResultCode.Ok)
{
await this.Host.ShowAlertAsync(string.Format("Lat: {0},
Long: {1}, Accuracy: {2}",
result.Location.Coordinate.Latitude,
result.Location.Coordinate.Longitude,
result.Location.Coordinate.Accuracy));
}
else
await this.Host.ShowAlertAsync("Failed to get location: " +
result.Code.ToString());
});
}
// code omitted...
}
NOTE
As per IReportsPageViewModel, this snippet contains the behind-the-scenes change to ViewModelList<T> that’s in the code download but not in the book.
As mentioned, we can’t get access to the location at all unless we modify the manifest. Figure 10-5 shows the Location capability in the manifest editor. You’ll need to make this change if you want to get the location.
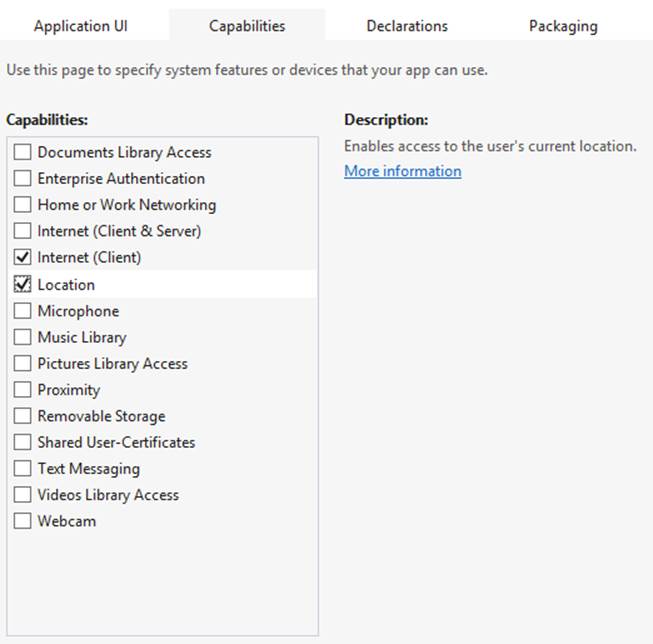
Figure 10-5. Setting Location capability in the manifest
To test this, you don’t need a device with GPS. Windows will have a go at getting the location back from your network connection on devices without GPS. The simulator can also be rigged to return a specific location. (We’ll see this in the next section.) Either way, run the app and select the Show Location option. You’ll first see a prompt, as per Figure 10-6. You’ll then (hopefully) see the location, as per Figure 10-7.

Figure 10-6. Windows asking the user to confirm location access

Figure 10-7. The determined location
NOTE
If you want to confirm a value result from the location, access Google Maps and key in the latitude/longitude separated with a comma. The accuracy figure mentioned in Figure 10-7 is in meters and is unlikely to be very accurate without a GPS chip in the device.
Using the Simulator with Location
Testing GPS functions is easier if you can feed test locations in, rather than relying on a physical GPS fix from where you are. If you’re using the simulator, you can specify a location explicitly. On the simulator toolbar, click the globe option to do this. Figure 10-8 illustrates.
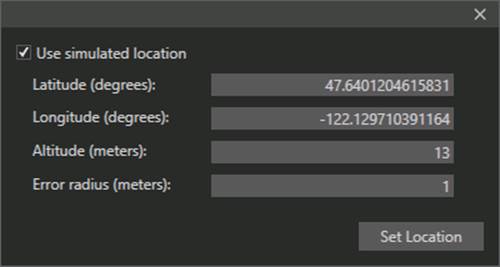
Figure 10-8. Setting a location in the simulator
Of course, a more practicable way to do this is to mock or fake the input into the classes that handle location. I talk more about unit testing in Appendix B.
Integrating Maps
In the second half of this book, we’ll look at integrating maps into our application. We’ll discuss getting a map on the screen, and shelling out to the built-in Maps apps to get driving directions.
REGISTERING WITH BING MAPS
Before we can integrate maps into our application, we need to register for Bing Maps. I’m not going to go near pricing advice for using the Bing Maps API—you should take steps to ensure that you understand how the pricing structure works before you use it in your own applications. However, a test account is available for our use.
You can access the Bing Maps developer portal at the Bing Maps site, or by running an online search for “bing maps developer.” You’re looking to create a new “trial” key, but obviously you may need to feel your way through the site.
The code download and these pages reference my key. You’ll need to put your own key into your code, as there’s no guarantee that my key will continue to work.
To display a map, we need to install the Bing Maps Visual Studio extension (VSIX). As of the time of writing, you can find this at the Visual Studio gallery, or by searching online for “bing maps for windows store apps extension.” Find, download, and install the VSIX.
When the VSIX is installed, you can add it to the StreetFoo.Client.UI project by right-clicking in Solution Explorer, selecting Add Reference, and opening up Windows→Extensions. You’ll need to reference both Bing Maps for C#, C++, or Visual Basic (RP) and the Microsoft Visual C++ Runtime Package. (The latter is required to support the former.) Figure 10-9 illustrates.
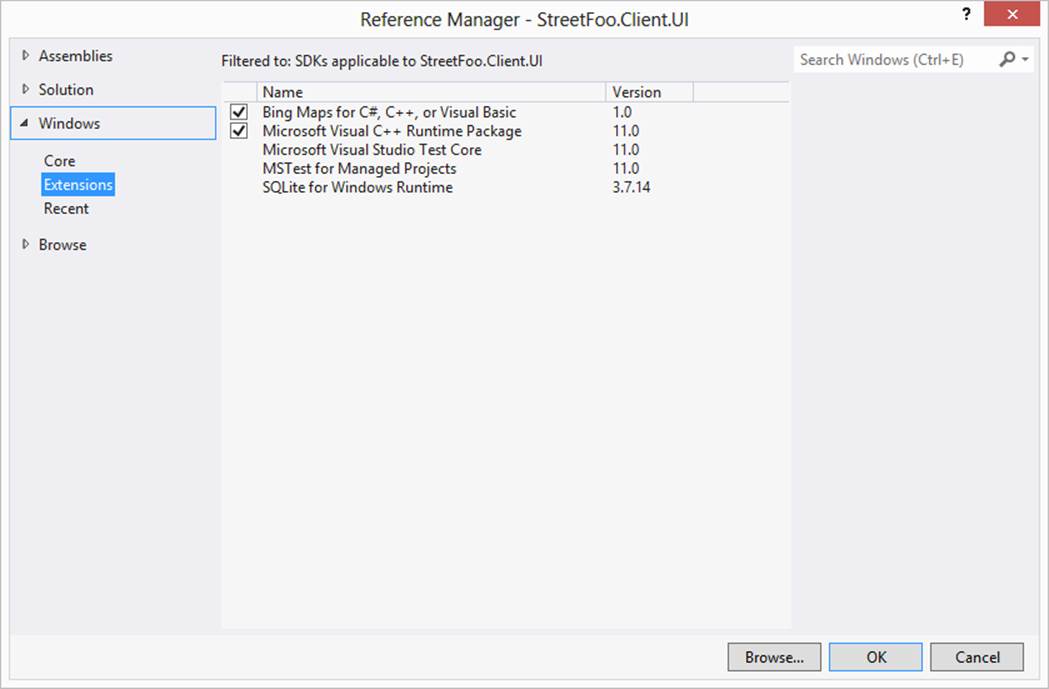
Figure 10-9. Adding the Bing Maps extension
Adding the Bing Maps Control
We achieve integration by adding the Map control supplied with the library to the project. You can do this by editing the XAML in our code and adding a reference first to Bing.Maps and then to the control. The control is slightly fiddly in that by default it will take up all the space on the page, so we’ll need to manually adjust the width and height.
As we do our work, we’re going to want to extend the Map control to add functionality that binds in with our MVVM pattern. However, Map is sealed and thus we can’t extend it directly. (You’ll find this sort of thing happens a lot because of restrictions in WinRT’s design.) Therefore, we’ll create a new class called MyMap. This will extend ContentControl and containerize a map instance. This will also give us a way in which we can set the API key on the control centrally.
When we build this control, we need to override the ArrangeOverride method. This will tell us when our size within the container has been adjusted. We can react to this and adjust the dimensions of our containerized Map instance. Here’s the code:
public class MyMap : ContentControl
{
// containerized map...
private Map InnerMap { get; set; }
private const string BingMapsApiKey =
"AhzHhvjTrVlqP1bs9D53ZWcLv5RsHkh_3BEFtTSfVoTjPxDl
_PfkpbyfIh0a_H0a";
// defines a standard zoom into street level...
private const int StandardZoom = 15;
public MyMap()
{
this.InnerMap = new Map();
this.InnerMap.Credentials = BingMapsApiKey;
// show it...
this.Content = this.InnerMap;
}
protected override Windows.Foundation.Size ArrangeOverride
(Windows.Foundation.Size finalSize)
{
this.InnerMap.Width = finalSize.Width;
this.InnerMap.Height = finalSize.Height;
return base.ArrangeOverride(finalSize);
}
}
We can now put that new map on the page. This needs to replace the button that we added earlier as a placeholder. Here’s the code:
<ContentControl Grid.Column="2" Style=
"{StaticResource PanoramaPanel}">
<StackPanel>
<TextBlock Style="{StaticResource HeadingTextBlock}">
Location</TextBlock>
<local:MyMap Width="780" Height="550"></local:MyMap>
</StackPanel>
</ContentControl>
That’s actually all you have to do in order to add the map. If you run the project now, you’ll be able to go in and see the operational map, albeit at the default position and zoom. Figure 10-10 illustrates.
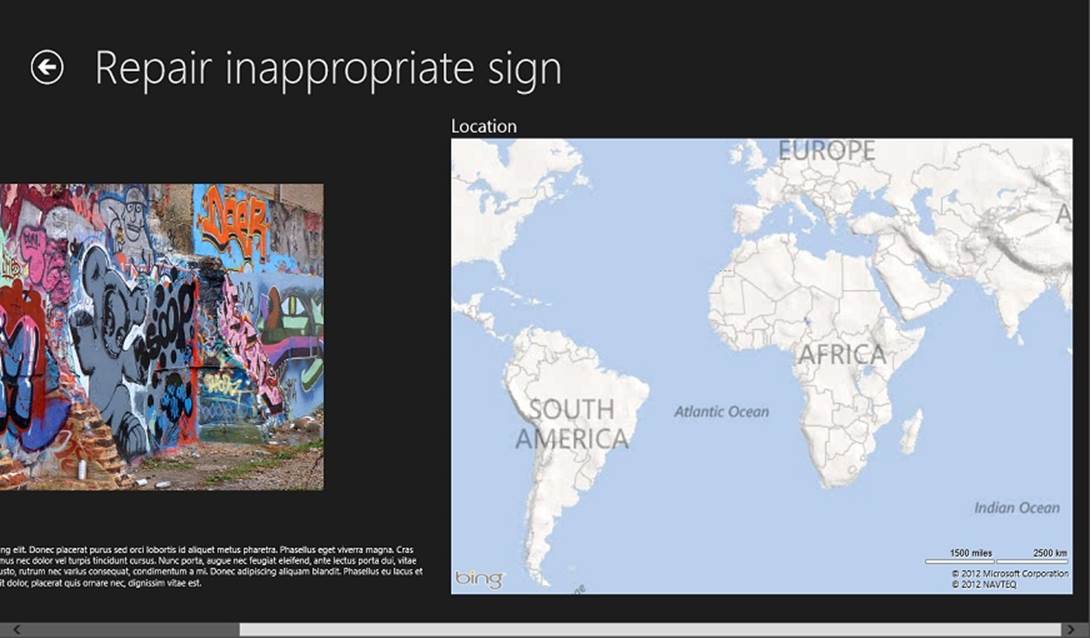
Figure 10-10. The default map embedded within ReportPage
What we need to do next is zoom in and position the map on the item.
Handling Input with the View
You’ll have noticed that by default the map control will pick up mouse-wheel and mouse-button events, and will also sense your touching the control with your finger as you try to swipe the view from side to side.
This control has been designed to run full screen, so setting it as a thumbnail view is a little out of scope for how it’s been constructed as of the time of writing. However, getting it to work as you might expect is a little fiddly. You can capture and override the mouse and pointer events to stop the scrolling, but then you need to capture and feed back those events to the container. As a specific example, pressing on the control with your finger and moving left or right shouldn’t do nothing—it should scroll the container.
Moreover, there is a question as to whether you want to do this. If you look at how Google handles this on the normal search “application,” you’ll see it displays a map in the search results that you can’t do anything with other than click, whereupon you end up at maps.google.com. If you want to do that, you can, and there are instructions at the end of this chapter about how to shell out to Bing Maps to do that. Alternatively, you may decide that it’s actually helpful to be able to explore the map from within the app itself.
Packaging Points for Display
Way back in Chapter 3, when we first downloaded reports from the server, we included a latitude and longitude for each item. These are in our SQLite database, but we haven’t used them until now.
What we’re going to do in this section is put a Bing.Maps.Pushpin control on the view and zoom it in. Specifically, we’ll modify our MyMap control so that we can give it a named point to display. In a real implementation, it’s more helpful to be able to provide a list of named points. However, this does make the problem more complex, so I’ll show you how to add support for one via a property called PushpinPoint. When we set this property, we’ll create a new Bing.Maps.Pushpin control and put it onto the map.
I’m proposing that we define a new class called MappablePoint and a new interface called IMappablePoint to do this. Implementation-wise, we already have two ways of representing points: Windows.Devices.Geolocation.Geocoordinate in WinRT, andBing.Maps.Location in the Bing Maps library. These two are obviously implementation-specific, hence my proposal to create a new class that can cut across all of the platforms that we may want to implement against.
Generally, when you work with geolocation it’s helpful to abstract everything out so that you’re working with interfaces. (This isn’t necessarily about mapping per se, but more about handling geodata in mobility scenarios.) This is why I’ve created IMappablePoint. We’ll hit some wrinkles in terms of using interfaces with data binding in XAML, but I’ll cover that.
IMappablePoint will have a lat/long pair, and a tag that we’ll call Name. I’ve ignored the idea of altitude, as generally most business cases care only how to touch and manage things that are actually at a fixed and relatively close distance from the surface of the planet. Here’s the code:
public interface IMappablePoint
{
decimal Latitude { get; }
decimal Longitude { get; }
string Name { get; }
}
We’re also going to need an AdHocMappablePoint. This will only really be used by the MyMap control, as there’s an oddity in XAML whereby you can’t create dependency properties that are based on interfaces. We have to use a concrete type, and we’ll use AdHocMappablePoint to do that. ReportView and ReportViewItem will both support IMappablePoint, and we’ll have to convert their geodata over to AdHocMappablePoint instances to get them onto the map.
Here’s AdHocMappablePoint:
public class AdHocMappablePoint : IMappablePoint
{
public decimal Latitude { get; private set; }
public decimal Longitude { get; private set; }
public string Name { get; private set; }
public AdHocMappablePoint(IMappablePoint point)
: this(point.Latitude, point.Longitude, point.Name)
{
}
public AdHocMappablePoint(decimal latitude, decimal longitude,
string name)
{
this.Latitude = latitude;
this.Longitude = longitude;
this.Name = name;
}
}
NOTE
I decided to clone the supplied geodata in the first overload because I wanted to take an immutable approach with that data for no other reason than that I didn’t want to deal with some dangling object instance’s data.
I mentioned that ReportView would support IMappablePoint. This class already has compatible Latitude and Longitude properties. We do need explicit support for IMappablePoint.Name, however. Here’s that change; I’ve removed a lot of code for brevity.
public class ReportItem : ModelItem, IMappablePoint
{
// key field...
[AutoIncrement, PrimaryKey]
public int Id { get { return GetValue<int>(); }
set { SetValue(value); } }
// other fields...
[Unique, JsonMapping("_id")]
public string NativeId { get { return GetValue<string>(); }
set { SetValue(value); } }
public string Title { get { return GetValue<string>(); }
set { SetValue(value); } }
public string Description { get { return GetValue<string>(); }
set { SetValue(value); } }
public decimal Latitude { get { return GetValue<decimal>(); }
set { SetValue(value); } }
public decimal Longitude { get { return GetValue<decimal>(); }
set { SetValue(value); } }
public ReportItem()
{
}
// code omitted...
string IMappablePoint.Name
{
get
{
return this.Title;
}
}
}
But, as we know, we don’t show ReportItem instances in our presentation. We show ReportViewItem, so this also has to support IMappablePoint. This also needs to bring forward the geoproperties. Here’s the code (again, I’ve omitted much of it):
public class ReportViewItem : WrappingModelItem<ReportItem>, IMappablePoint
{
public ReportViewItem(ReportItem item)
: base(item)
{
}
public string NativeId { get { return this.InnerItem.NativeId; } }
public string Title { get { return this.InnerItem.Title; } }
public string Description { get { return this.InnerItem.Description; } }
public decimal Latitude { get { return this.InnerItem.Latitude; } }
public decimal Longitude { get { return this.InnerItem.Longitude; } }
// code omitted...
string IMappablePoint.Name
{
get
{
return ((IMappablePoint)this.InnerItem).Name;
}
}
}
To recap, then, we’re going to change MyMap so that it can support one point through a property called PushpinPoint. This property will be of type AdHocMappablePoint because, as I mentioned before, dependency properties cannot be of interface types.
The first thing we need to do is to create a custom data-binding converter that will take an “object” and work out how to transform it into an AdHocMappablePoint. Here’s the code for IMappablePointConverter:
public class IMappablePointConverter : IValueConverter
{
public object Convert(object value, Type targetType, object parameter,
string language)
{
if(value == null)
return null;
if (value is AdHocMappablePoint)
return (AdHocMappablePoint)value;
else if (value is IMappablePoint)
return new AdHocMappablePoint((IMappablePoint)value);
else
throw new NotSupportedException(string.Format("Cannot handle
'{0}'.", value.GetType()));
}
public object ConvertBack(object value, Type targetType, object
parameter, string language)
{
throw new NotImplementedException();
}
}
As you’ve done before, you’ll need to go into App.xaml and globally enable that converter. Here’s the change:
<!-- Modify App.xaml -->
<Application
x:Class="StreetFoo.Client.UI.App"
xmlns="http://schemas.microsoft.com/winfx/2006/xaml/presentation"
xmlns:x="http://schemas.microsoft.com/winfx/2006/xaml"
xmlns:local="using:StreetFoo.Client.UI"
xmlns:common="using:StreetFoo.Client.UI.Common"
>
<Application.Resources>
<ResourceDictionary>
<common:BooleanToVisibilityConverter x:Key="VisibilityConverter" />
<common:BooleanNegationConverter x:Key="NegationConverter" />
<common:BooleanToVisibilityNegationConverter x:Key=
"BooleanToVisibilityNegationConverter"/>
<common:IMappablePointConverter x:Key="IMappablePointConverter" />
<ResourceDictionary.MergedDictionaries>
<ResourceDictionary Source="Common/StandardStyles.xaml"/>
</ResourceDictionary.MergedDictionaries>
</ResourceDictionary>
</Application.Resources>
</Application>
Accepting that we’ve yet to build the PushpinPoint property on MyMap, here’s the change to the XAML to bind up the property to the Item property exposed by the view-model, via our new converter:
<ContentControl Grid.Column="2" Style="{StaticResource
PanoramaPanel}">
<StackPanel>
<TextBlock Style="{StaticResource HeadingTextBlock}">
Location</TextBlock>
<local:MyMap Width="780" Height="550"
PushpinPoint="{Binding Item, Converter=
{StaticResource IMappablePointConverter}}">
</local:MyMap>
</StackPanel>
</ContentControl>
The final background bit that we need to do is provide a way for converting IMappablePoint instances into Bing.Maps.Location instances. I’m going to propose something that’s a little overkill, but I want to illustrate a technique.
If we create an extension method in IMappablePoint within the Windows Store app project (as opposed to the UI-agnostic project) called ToLocation, we can use this to create Location instances. It’s overkill because we only have to do it once, but it is a helpful technique.IMappablePoint doesn’t know anything about Bing Maps or Windows 8 apps, but we can extend it fluidly without much heartache through extension methods. Here’s the code:
public static class IMappablePointExtender
{
public static Location ToLocation(this IMappablePoint point)
{
return new Location((double)point.Latitude, (double)point.Longitude);
}
}
We can now finally write code to add the pushpin!
Showing Points on the Map
Adding controls to the map surface is a little weird. The Bing Maps control will let you render any control on its surface. This makes it fantastically powerful. You’re not limited to little icons and special things Microsoft happens to give you. Anything that inherits from DependencyObject(i.e., basically everything in XAML) you can render on a map.
The API is a little strange, however. You have to call a static method on MapLayer, passing in the object that you want to display and the location. You then add the object to the Children collection of the Map much as you normally would. Here’s the code:
// Add method to MyMap...
public Pushpin AddPushpin(IMappablePoint point)
{
// create a pin and set its position...
var pin = new Pushpin();
pin.Text = point.Name;
MapLayer.SetPosition(pin, point.ToLocation());
// ...then add it...
this.InnerMap.Children.Add(pin);
// return...
return pin;
}
However, if this is all we do, we’ll just get a map showing the whole world with a tiny dot over the location. What we need to do is zoom the map in.
Normally, you would zoom the map in by giving it bounds of a lat/long square that you want to show in the viewport. This is easy enough to do if you have multiple points, but I’d say it is harder to do if you have only a single point. The reason I raise this is that the “zoom level” value that we need to supply when zooming doesn’t have meaning in the real world. You have to fiddle with values until you find one that does what you want. (The zoom level is an internal value that has more to do with structuring and rendering the view than being something necessarily consumable from outside.) Back when we first defined MyMap, I added a constant called StandardZoom that was set to 15. This “felt” like the right value for what I was trying to do.
Here’s the AddPushpinAndCenterAndZoom method:
// Add method to MyMap...
public void AddPushpinAndCenterAndZoom(IMappablePoint point, bool
animate = true)
{
var pin = this.AddPushpin(point);
// show...
var duration = MapAnimationDuration.Default;
if (!(animate))
duration = MapAnimationDuration.None;
// show...
this.InnerMap.SetView(point.ToLocation(), StandardZoom, duration);
}
That method allows you to turn off the animation through the animate parameter. Animation is actually really helpful when rendering maps, as it clearly clues people into where things are in terms of their relative position in space. However, when we initialize the view it’s distracting, so we’ll turn animations off when we set PushpinPoint.
Finally, here’s MyMap showing the dependency property implementation and the helper method that creates the pin:
// Add members to MyMap...
public class MyMap : ContentControl
{
// containerized map...
private Map InnerMap { get; set; }
// dependency properties...
public static readonly DependencyProperty PushpinPointProperty =
DependencyProperty.Register("PushpinPoint",
typeof(AdHocMappablePoint), typeof(MyMap),
new PropertyMetadata(null, (d, e) => ((MyMap)d).SetPushpinPoint
((AdHocMappablePoint)e.NewValue)));
// credentials...
private const string BingMapsApiKey =
"AhzHhvjTrVlqP1bs9D53ZWcLv5RsHkh_3BEFtTSfVoTjPxDl_PfkpbyfIh0a_H0a";
// defines a standard zoom into street level...
private const int StandardZoom = 15;
// code omitted...
public AdHocMappablePoint PushpinPoint
{
get { return (AdHocMappablePoint)GetValue(PushpinPointProperty); }
set { SetValue(PushpinPointProperty, value); }
}
private void SetPushpinPoint(IMappablePoint point)
{
// set...
this.ClearPushpins();
// set...
if (point != null)
this.AddPushpinAndCenterAndZoom(point, false);
}
private void ClearPushpins()
{
this.InnerMap.Children.Clear();
}
}
Run the code now, and a pushpin will be created and the map centered and zoomed in around it. Figure 10-11 illustrates.
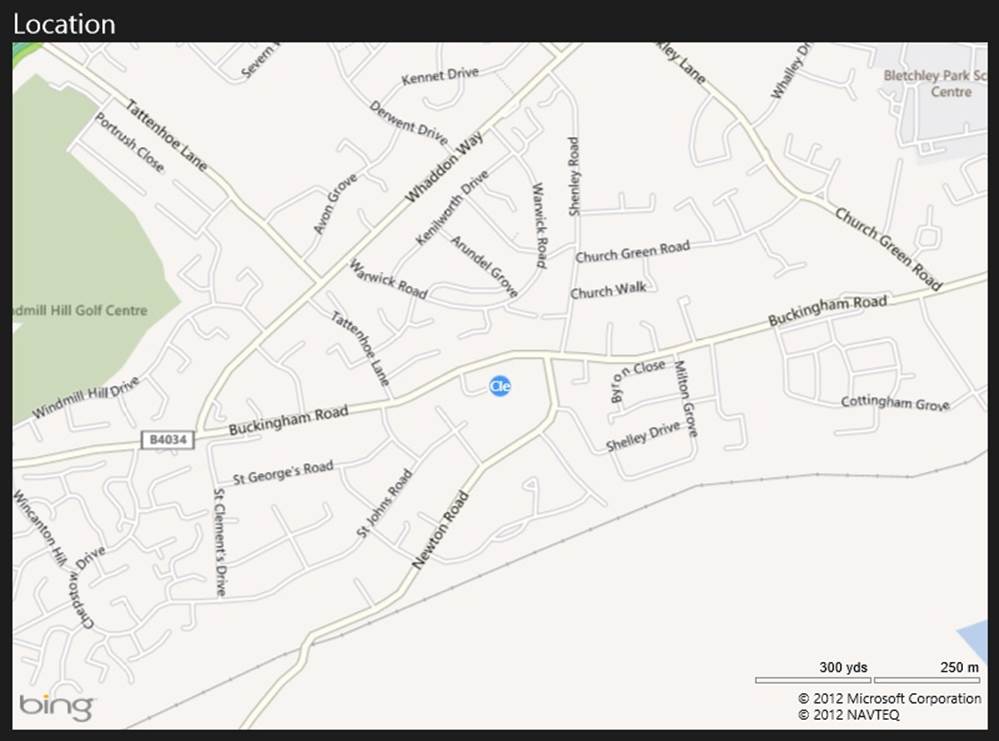
Figure 10-11. The map and pushpin successfully rendered
Shelling to the Maps App
We’re going to round off this discussion by having a look at how we can shell out of our app and into the built-in Bing Maps app.
A lot of apps that include mapping try to reproduce all possible mapping functionality within the app. My view is that this is a mistake, as it’s often impractical to do as good a job of navigation as the built-in app on the device. (This happens regardless of device platform—this isn’t a Windows-only thing.) Compare, for example, the number of apps that shell out to a browser to display a web page, as opposed to hosting a browser internally.
It is possible to get our app to open the Bing Maps app, and we can even have it plot driving directions for us by asking the app to open a URI with the bingmaps protocol. The Bing Maps app registers this protocol precisely for this sort of integration.
As of this writing, there aren’t APIs within the Bing Maps library to do this, so we’ll have to construct the URIs manually. However, I’ve heard this will be coming in later versions. So two things: first, watch out to see if there is an easier way to do this when you come to do it in production, and second, your mileage may vary with these URLs as this interface isn’t documented.
One wrinkle we have, though, is that through this method—as it stands—you can’t put pins on the map. Thus, if we use it just to zoom in to one of the report locations, it’s not that helpful because all we’ll see is a map; it’s devoid of context and confusing. (If you see it, you have no sense as to why you opened the map to that location.) To make this work in a half-decent way, we’ll actually ask for driving directions.
However, whereas in a normal app you’re likely to be somewhere close to where these sample locations actually are, in this app you’ll likely live in another country. So these illustrations get driving directions from a fixed point in the UK that happens to be close to all of the locations in the sample data. As I say, in a production app you’ll want to use the result from Geolocator.GetGeolocationAsync.
We already have an app bar button defined that we can use to shell into Bing Maps. We just need to define the protocol.
The most straightforward thing to do is to ask for a point to be centered on the viewport. If we want to do that, we can issue a URI like this:
bingmaps://open/?cp=51.99437~-0.7322&lvl=15&trfc=1
That URL provides the point, a zoom level (15, again), and an indication as to whether we want to see traffic info (we do). The only real weirdness there is that the lat/long pair is split by a tilde (~), whereas you’d normally use a comma.
Without the ability to put a pushpin on the map, the only way to give context as to why we’ve shown the map is with driving directions. It so happens that all of the sample points in the database are near the geek-friendly Bletchley Park in the UK, so we’ll get driving directions from there. The coordinates of Hut 1 at Bletchley Park are 51.9972, −0.7422.
To do that, we’ll need a URL like this:
bingmaps://open/?rtp=pos.51.99720_-0.74220~pos.51.99437_-0.72629&trfc=1
We’ll create a method called OpenMapsAppAsync to LocationHelper that will construct that URI and then issue it. Here’s the code:
// Add method to LocationHelper...
internal static async Task OpenMapsAppAsync(IMappablePoint from,
IMappablePoint to, bool showTraffic = true)
{
string trafficFlag = "0";
if (showTraffic)
trafficFlag = "1";
// create the URI...
var uri = string.Format
("bingmaps://open/?rtp=pos.{0:n5}_{1:n5}~pos.{2:n5}_{3:n5}&trfc={4}",
from.Latitude, from.Longitude,
to.Latitude, to.Longitude, trafficFlag);
Debug.WriteLine("Navigating: {0}", uri);
// open...
await Launcher.LaunchUriAsync(new Uri(uri));
}
All that we have to do then is rig it into the ReportPageViewModel class. We’ve already got a command for it defined, and we’ve already bound up the app bar on the report page to the command. Thus, this change is all we have to do, and we’re golden:
// Modify constructor in ReportPageViewModel...
public ReportPageViewModel(IViewModelHost host)
: base(host)
{
this.OpenMapCommand = new DelegateCommand(async (args) => {
var from = new AdHocMappablePoint(51.9972M, −0.7422M,
"Bletchley");
await LocationHelper.OpenMapsAppAsync(from, this.Item);
});
}
Run the code now and open a report. Open the app bar and press the Open Map button. You’ll see something like Figure 10-12.
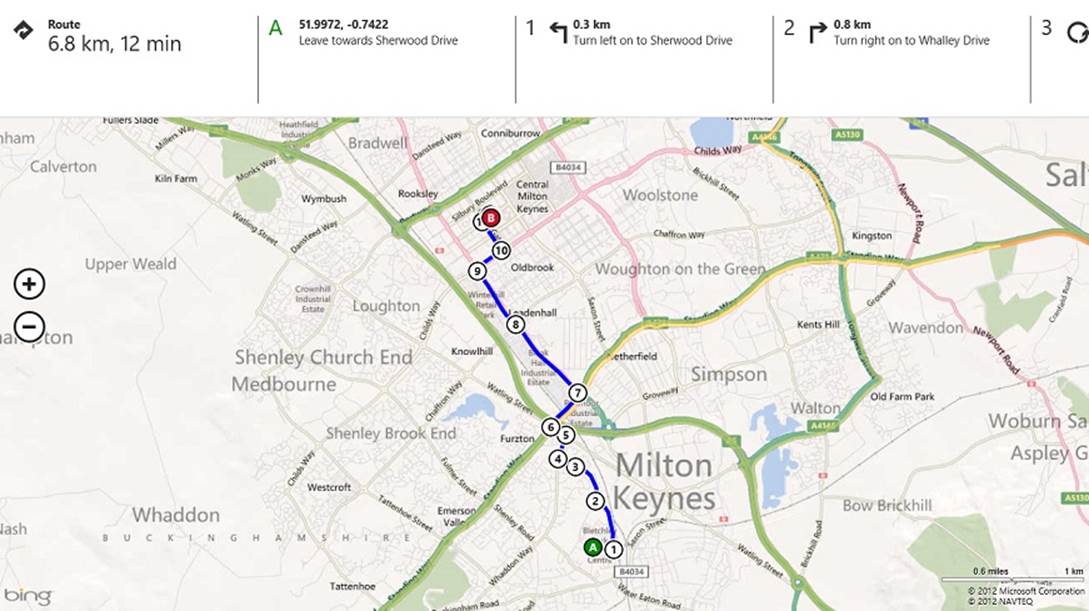
Figure 10-12. Driving directions in the launched Bing Maps
And that’s it. As I said, it’s likely there will be some refinements to the way that we integrate with Bing Maps down the line, but we can at least integrate proper mapping into our applications.
All materials on the site are licensed Creative Commons Attribution-Sharealike 3.0 Unported CC BY-SA 3.0 & GNU Free Documentation License (GFDL)
If you are the copyright holder of any material contained on our site and intend to remove it, please contact our site administrator for approval.
© 2016-2026 All site design rights belong to S.Y.A.