Programming Windows Store Apps with C# (2014)
Chapter 2. Making the Transition from .NET (Part 2)
We got most of the structural basics pinned down in Chapter 1. In this chapter, we’re going to look at building up the functionality of the app in order to make it do something more than just putting a message on the screen.
Specifically, we’re going to do the following:
§ Introduce a basic inversion-of-control (IoC) container. The idea here is that rather than explicitly creating view-model instances as we did in Chapter 1, we’ll ask an IoC container to pick one for us based on an interface that we provide.
§ We’ll build a set of classes that can call up to the service to register the user. This will use the HttpClient class available in WinRT to actually issue the call. We’ll use the IoC container here, too, again to create a loose coupling between the service proxy interfaces and their concrete implementations.
Inversion of Control
The idea of inversion of control is that rather than having “direct control” over object creation—as we did in Chapter 1 when we created concrete view-models for our view-model interfaces—you have some code that is structured so that if you ask it to create an object of type X in order to provide some service it’ll choose the most appropriate concrete type for you. IoC “inverts control” by saying, “hey, give me an object that can do type X things, but I don’t care what you give me,” as opposed to direct control where you say, “give me an instance of object X.”
Implementation-wise, the basic idea of IoC is you have a register of classes and interfaces. You ask for the handler of a given interface and get the appropriate class back in return. From there, you can swap out the underlying handler class without the requestor needing to know anything about the change. (This is the actual “inversion of control” bit.) The main benefit of this loose coupling is to create a clearer separation of concerns—and, in many cases, this is more of a process with mental benefits than tangible ones. A very common use is to—as I hinted at—replace real implementations with mocked, fake, or other implementations that support unit testing.
In Chapter 1, we welded the RegisterPage view to the RegisterPageViewModel by the expedient of having the view simply “new up” a view-model via the new keyword (e.g., this.Model = new RegisterPageViewModel), although we built IRegisterPageViewModel as a step in the right direction of an architecture with looser coupling.
The particular form of IoC we want to use is dependency injection, which will replace a call like this.Model = new RegisterPageViewModel(this) with a call like this.Model = SomeRegistryClass.SomeFactoryMethod<IRegisterPageViewModel>(this).
NOTE
This is the first point in the book where we’re going to use an external library. While I’m keen to see the use of external libraries in production code, they come with a danger. It’s easy for developers to become dependent on using libraries, but unable to build them themselves. The problem here is that unless as a developer you know how to build, for example, an IoC container from scratch, you’ll find it hard to make qualified judgments when it comes to selecting the library of your choice for use in a real application.
That’s by the by—it’s a little piece of advice that I think is really important for developers.
Installing TinyIoC
In this book, we’re going to use a lightweight IoC container called TinyIoC. You can find it on GitHub.
We can install TinyIoC using NuGet. If you’ve never used NuGet before, it’s pretty cool. The idea is that developers put packages up in the cloud that you can integrate into your product using a simple interface. NuGet is a package manager, an idea that’s been around in other operating systems for some time. Windows is slightly odd in that it doesn’t support such a thing.
NOTE
If you’re interested in that sort of thing, you can also get Chocolatey, which—as opposed to NuGet, which only works with development libraries that you can link or compile into your projects—will install packages onto servers. (By the way, it’s NuGet→“Nougat”→Chocolatey. Get it?)
Steve Robbins, the developer who wrote TinyIoC, was kind enough to develop a WinRT version of the TinyIoC NuGet package so that I (and by extension, you) could use it in this book.
To get going, within Visual Studio right-click on the StreetFoo.Client project (what we’ll typically call the “UI-agnostic” project going forward) and select Manage NuGet Packages. Under Online, look for TinyIoC. You will find one specifically called TinyIoC.WinRT. Select this one and install it. Figure 2-1 illustrates.

Figure 2-1. Selecting the TinyIoC.WinRT package
The installation process will create two C# files in the project. (Not all NuGet packages work this way; it’s more typical that they will dynamically link rather than put source files into the project, although sqlite-net—which we’ll use in the next chapter—installs source files in this way.) These files make up the TinyIoC container.
Initializing IoC Defaults
The first thing we need to do is create a way of setting up the default mappings used by TinyIoC.
To that end we’re going to build a class called StreetFooRuntime that will be responsible for “booting” the application. Its first job will be to ask TinyIoC to automatically configure itself. We’ll add more functionality to StreetFooRuntime as we go.
One thing we’re going to do is to pass in the name of a module. This is a pattern I’ve used for some time—the idea is that when you start the app, you provide some indication of why the app boots up. To be honest, this makes more sense when you’re not building Windows Store apps like this. For example, you might have some code shared by an ASP.NET website and a Windows Service application. Each needs to boot, but, for example, when you want to log information it’s useful to know which module boots it; by writing the module name into the log, you know. I’ve decided to continue this approach here because it’s a good illustration of the idea, even though it won’t be much used.
NOTE
This also can be helpful when you’re running background tasks (see Chapter 14), as these run in a separate process; thus, you can use the module name to indicate if logging information came from the main app process or from the background task service process.
From time to time, we will also use this class for storing global constants—ServiceUrlBase is an example of this, and we’ll use that when we build up the service proxies. We’ll also add some specific constants here ahead of time so that we don’t have to worry about going back and doing this later.
Regardless, the important thing is to start up TinyIoC. We do so using the AutoRegister function on the singleton instance of TinyIoCContainer. (The result here is that TinyIoC will scan all of the types available within the code and look for things that look like pairings between interfaces and concrete types, and we can take advantage of that later.) Here’s the code:
public static class StreetFooRuntime
{
// holds a reference to how we started...
public static string Module { get; private set; }
// gets the base URL of our services...
internal const string ServiceUrlBase =
"https://streetfoo.apphb.com/handlers/";
// starts the application/sets up state...
public static void Start(string module)
{
Module = module;
// initialize TinyIoC...
TinyIoCContainer.Current.AutoRegister();
}
}
The next move is to actually make the call into Start and boot up the application. We can do this from within the App.xaml implementation in the StreetFoo.UI.Client project. (If you remember, we modified this file in Chapter 1 when we had to change the page that was shown on startup from the default to RegisterPage.) Here’s the change to OnLaunched:
// Modify OnLaunched in App.xaml...
protected override void OnLaunched(LaunchActivatedEventArgs args)
{
if (args.PreviousExecutionState ==
ApplicationExecutionState.Terminated)
{
}
// start...
StreetFooRuntime.Start("Client");
// Create a Frame to act navigation context and navigate
to the first page
var rootFrame = new Frame();
rootFrame.Navigate(typeof(RegisterPage));
// Place the frame in the current Window and ensure it is active
Window.Current.Content = rootFrame;
Window.Current.Activate();
}
The value we pass in for the module is arbitrary—I’ve chosen "Client" as the string. Now we can actually use the TinyIoC container.
One of the things we’ll need to do is enable the UI-agnostic view-models to call into the IViewModelHost-enabled containers and ask them to change the view. As I mentioned in Chapter 1, some people don’t like the lack of purity involved in this approach of back-linking the view-models into the view implementations, as they would rather have complete separation. However, I think “muddying” the implementation in this way is pragmatic. Say we’re on the logon page and we want to access the register page. How can the logon page ever direct the app to show the register page without saying something like “please show the register page”? Somewhere the coupling has to be such that that can happen.
The easiest way to do this is through attribute decoration. Our intention is to decorate the views such that there is a declarative understanding within the code as to the relationship between the view and the interface that describes their view-model. (It’s important that this is a relationship between a view class and a view-model interface because we still want indirection and loose coupling between the view class and the view-model class.) The easiest way to achieve this is to create an attribute called ViewModelAttribute that we use to decorate the view classes.
Here’s the definition of ViewModelAttribute. All it does is allow the developer to specify the type of the related view-model interface.
[AttributeUsage(AttributeTargets.Class)]
public sealed class ViewModelAttribute : Attribute
{
public Type ViewModelInterfaceType { get; private set; }
public ViewModelAttribute(Type viewModelInterfaceType)
{
this.ViewModelInterfaceType = viewModelInterfaceType;
}
}
From there, we can decorate the actual view class like this:
[ViewModel(typeof(IRegisterPageViewModel))]
public sealed partial class RegisterPage : StreetFooPage
{
public RegisterPage()
{
this.InitializeComponent();
// obtain a real instance of a model...
// now done by dependency injection...
this.InitializeViewModel();
}
}
You’ll note that the view class calls InitializeViewModel in its constructor. In Chapter 1 all this method did was create a concrete RegisterPageViewModel and assume that was the view-model. We can now change this method so that it uses TinyIoC to dereference a concrete class to use from the interface defined on the view class’s attribute.
What I’m also proposing is that we make this a little more flexible by allowing the caller to pass in the view-model to use, as opposed to dereferencing one from the attribute. We won’t actually use this in the book, but it’s worth showing the approach. If we have to dereference it, the call to TinyIoC is easy and obvious enough. You’ll recall that previously we called the AutoRegister method on application start. What this would have done is looked at all the types in the code and noted that RegisterPageViewModel happened to implement the interfaceIRegisterPageViewModel. Now if we ask TinyIoC to return a type for IRegisterPageViewModel, it just looks at that mapping and returns back an instance of RegisterPageViewModel. This is pretty easy stuff. Once we have the view-model, we call Initialize on it like we did in Chapter 1. Here’s the new code:
// Modify method in PageExtender...
internal static void InitializeViewModel(this IViewModelHost host, IViewModel
model = null)
{
// if we don't get given a model?
if (model == null)
{
var attr = (ViewModelAttribute)host.GetType().GetTypeInfo().
GetCustomAttribute<ViewModelAttribute>();
if (attr != null)
model = (IViewModel)TinyIoCContainer.Current.Resolve
(attr.ViewModelInterfaceType);
else
throw new InvalidOperationException(
string.Format("Page '{0}' is not decorated with ViewModelAttribute."));
}
// setup...
model.Initialize((IViewModelHost)host);
((Page)host).DataContext = model;
}
Run the project now, and you should see nothing different from what you had before. However, this time you’re using loose coupling and an IoC container to manage instantiation and initialization of the view-model. Figure 2-2 illustrates.
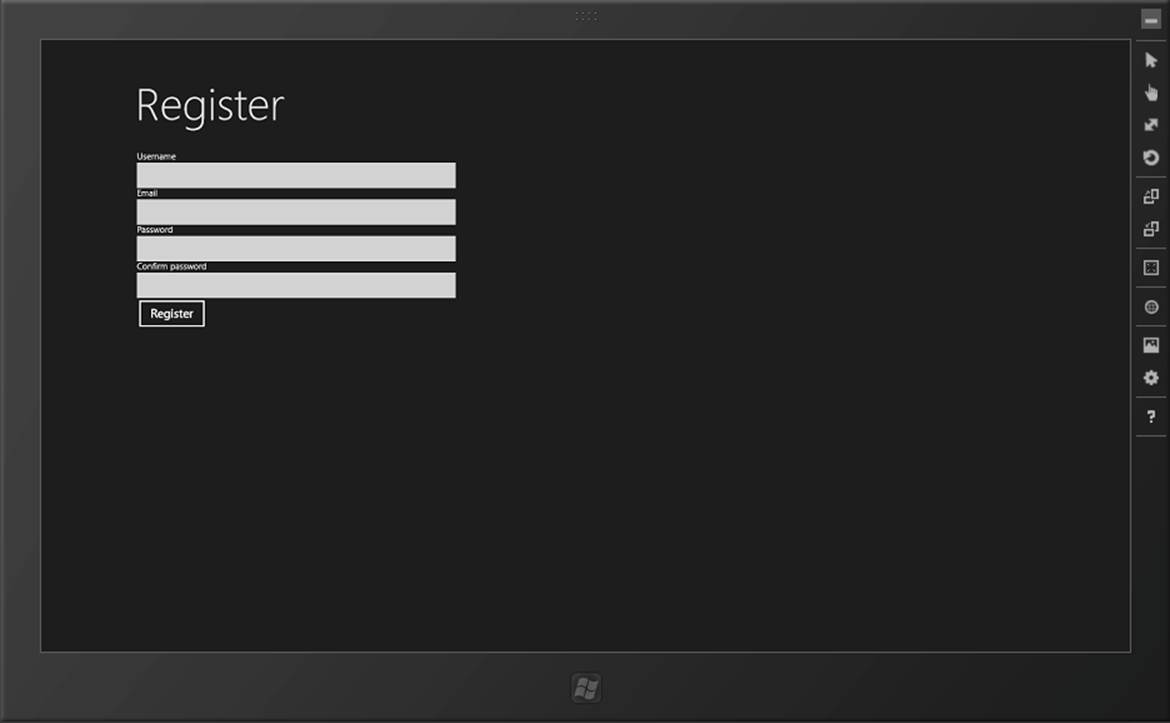
Figure 2-2. The register page, as it was before, but initialized via the IoC container
Understanding Asynchrony
If you learn only one thing from this book, make sure it’s this section on asynchrony. This is the thing to understand in order to be productive building Windows Store apps. Asynchrony is the way that programming practice in general is going, over and above direct control of threading. The general principles behind how asynchrony works apply to other development platforms and will only get more important as processors scale up their number of cores.
When working with XAML/C# Windows Store apps, you achieve asynchrony using the Task Parallel Library (TPL), which is a feature of .NET Framework 4.
Asynchrony is very hard to get your head around unless you experience it directly. The general principle behind it is that it tries to reframe how we developers think about threads and parallelism. In a normal approach, the OS will create a process, and one initial thread. As a developer you can create additional threads that do work in the background. In interactive applications—such as a Windows Store app, WPF app, or even a Java app—the developer is able to spin up separate threads, the advantage of which is that the main UI thread is responsive while other work is being done.
From a developer’s point of view, having to manage separate threads is a pain. From an operating system design perspective, threads don’t necessarily make the best use of system resources. This is especially true on constrained devices (think ARM-based tablets and smartphones), although in reality it applies to any device operating at any scale. Each thread requires RAM to store its state. Switching between different threads to perform processing is expensive (a problem known as context switching). Keep adding threads, and your program will become less responsive, not more.
Asynchronous programming is not in itself new. It has featured in a basic form from time to time in .NET since v1.0. For example, in HttpWebRequest you had both a GetResponse method that would not spin up a thread and block the calling thread, and a BeginGetResponse method that would use the .NET thread pool to service the request and not block the caller. As an aside, JavaScript in particular makes heavy use of asynchronous programming methods.
What’s relevant about an asynchrony-based approach is that in neither case are you, the developer, responsible for doing anything proactive or intentional to manage the thread. The environment that is running your code manages the threads for you.
With WinRT, Microsoft’s developers have gone all out on asynchrony. To keep the UI responsive, anything that could possibly block a calling thread for 50ms or more has been replaced by a version that is accessible only asynchronously. The whole API has been designed so that you can never, ever block a thread. (Actually, you can block a thread, but only by introducing a bug that deadlocks the whole app entirely—but that’s a different thing.)
Continuing this idea, there are things that you simply cannot do in WinRT with threads. One of them is that you cannot create new threads. Similarly, you cannot control the lifetimes of existing threads—for example, you can’t terminate a running thread. You still have threads, you just don’t see them.
As we go through this book, you’ll discover numerous places where restrictions in the API are designed to lodge control over the user experience with Microsoft rather than with you. This area of asynchrony is one of them, and probably the most important one. On the one hand, creating too many threads on constrained devices will “gum it up” and make it unusable. Microsoft’s solution here is to stop you from creating too many threads. On the other hand, making calls that block the main UI thread makes apps unresponsive, leading the user to believe that the device is broken. Microsoft’s solution here is to stop you from blocking.
But, as I alluded to, asynchrony does have benefits in that it’s notionally a better way of putting applications together than using “old school” threads for every type of application—interactive desktop, web apps, and headless services.
How Asynchrony Works in WinRT
Philosophically, the idea behind the asynchrony implementation in WinRT is tricky to explain. I’ve also failed in the past year and a half to find a decent diagram that explains it; hence, there are no figures in this section to explain the concept.
Imagine you have some code that calls a server, like so:
public void DoMagic()
{
// build a request up...
var request = (HttpWebRequest)WebRequest.Create("http://www.google.com/");
// make the request - it'll block at this point...
var response = request.GetResponse();
// we'll only get here once the call is completed...
Debug.WriteLine("Done!");
}
In theory, we’re being wasteful when we make that GetResponse call. The calling thread at some point during that process won’t be doing anything—it will have passed the request over the network and be waiting for a response to come back, and the thread that made the call will be blocking. Ideally, we want to be able to run other code during that blocking period. Ultimately, regardless of what asynchrony model we use, that’s what we want to achieve—allowing something else to take advantage of processor cycles that we can’t use because we’re waiting.
NOTE
To add a little more complication to this, we won’t be using the old-fashioned HttpWebRequest class in this book at all, other than in this illustration. We’ll actually be using the more modern HttpClient class. I’ve left it in here, though, as statistically more of you will be familiar with HttpWebRequest than HttpClient.
The basic idea behind the way that asynchrony is implemented in WinRT is that we can “poke holes” in what is otherwise a synchronous procedure. Consider the code sample that we just saw. In the part where we call GetResponse, we don’t actually need the thread, and if we wanted we could just “surrender” it up for use by other code that needed it. Specifically, we do this in WinRT by using Task instances. A Task is (sort of) like a token you hold that represents something that runs in the background. How it actually runs in the background (if indeed it does, because Windows can decide not to let it if it thinks it’ll run in the foreground quickly enough) is something you’ll never know.
The C# compiler now has specific and specialized support for working with Task instances. In a moment we’ll meet the new async and await C# keywords—it’s these two that make the asynchrony magic in WinRT happen.
NOTE
I’ve actually oversimplified this a little. The asynchrony model in WinRT can actually work with anything that implements IAsyncResult, and Task implements this. However, what’s happened over the development of WinRT is that Microsoft’s engineers have tried to consolidate their API designs to use Task instances rather than IAsyncResult. I digress, but for now, just think in terms of Task instances.
In WinRT, HttpWebRequest does not have GetResponse because it would block. It instead has GetResponseAsync, which returns a value of type Task<WebResponse>. This won’t block, as all you’re getting back is some token that references a background task. (This convention of suffixing with Async is very consistent within WinRT, and you’ll notice that we’ll do this too with our own code as we go through the book.)
It’s at this point that things get clever. If you now consider the code we had before, we can in theory get the Task instance and wait. (However, you would never, ever do it like this, but I’ll get to that.)
public void DoMagic()
{
// build a request up...
var request = (HttpWebRequest)WebRequest.Create("http://www.google.com/");
// now we can get a Task back...
var responseTask = request.GetResponseAsync();
responseTask.Wait(); // but don't ever do this!
// we'll only get here once the call is completed...
Debug.WriteLine("Done!");
}
That code when it runs will make the call, get a Task instance, and then block. In fact, you don’t ever, ever want to call Wait like this, or do any form of coding with intent to control the lifetime of tasks. (You’ll find a specific note on this later.)
The proper way to use asynchrony in Windows Store apps is more subtle than this. What we actually do is get the C# compiler to do the heavy lifting for us by way of the new await and async keywords that I mentioned earlier. The await keyword is used to indicate that the compiler should pause the procedure and do something else while the Task is reaching a successful or failed completion state. The async keyword is used to indicate that a method contains the await keyword. Here’s the proper way to write our method:
public async void DoMagic()
{
// build a request up...
var request = (HttpWebRequest)WebRequest.Create("http://www.google.com/");
// make the request - it'll block at this point...
var response = await request.GetResponseAsync();
// we'll only get here once the call is completed...
Debug.WriteLine("Done!");
}
It’s through this approach that we can “poke holes” in our procedure. When we reach the await call, the system knows that something else can use the processor cycles available on that thread to do something else.
It’s at this point that things, conceptually, get a little weird.
State machines
You can, if you like, just take how it works as read and skip this next explanation as to what is actually happening. Some of you, however, might like to know what’s happening when the compiler reaches a method marked as async.
The general idea here is to restructure at compile time the overall program flow so that threads are not, in principle, needed.
What the C# compiler does instead is rewrite the code into a state machine using the async and await keywords as clues. When the method is called, rather than it just hitting the method directly, the compiler would have rewritten the code such that a separate object instance that represents the method along with all its state as fields is created, and a method on that new “hidden” class is called instead.
The individual portions of the methods are broken up based on where the await-marked calls are. So it’ll run the first part immediately, hit the first await, and then revert to the calling method. If the async method returns void, the calling method won’t wait for it to finish—this can cause major headaches if you are expecting it to finish. (We’ll talk about that in the next section.) If the async method returns a Task instance, the calling method would have had to invoke the called method using await, and thus the calling method would have to be async too. (If this seems hard, it actually isn’t unless you make it so, which I’ll also get to shortly. All you have to do is “rattle” the async markers up the calling tree.)
It’s the “reverting to the calling method” that makes this work, and this is the “hole” that gets punched into the procedure. Nothing blocks because any await marked call simply results in the method returning. When the Task completes, either successfully or with a raised exception, the state machine is revived and resumes where it left off. So, in our case with our HttpWebRequest, GetResponseAsync returns an instance of type Task<WebResponse>; when the state machine resumes on a successful call, the Task is asked for its Result value (which happens to be of typeWebResponse in this case), and off you go.
But, as I implied at the beginning of this section, you don’t actually have to worry about how this works at all.
Returning “void”
So far, we have our method returning void. Having a void method marked as async is usually bad because you have no way of controlling the lifetime. Say you have this code:
private int _magicNumber;
private async void SetupStateAsync()
{
// some async stuff that sets up _magicNumber in the background...
}
private void DoSomeMagic()
{
SetupStateAsync();
// any code that uses _magicNumber may be unreliable...
Debug.WriteLine(_magicNumber);
}
The problem with that code is that it contains a race condition. SetupState may not actually finish setting up the state before DoSomeMagic wants to use it. The way to get around this is to make SetupStateAsync return a Task. Interestingly, the compiler doesn’t require you to return aTask instance. You can drop out of the end of the method without a return statement and the compiler just assumes you meant to return a task. (If you want to return a specific type, however, you can’t do this—but I’ll get to that.)
However, if we do this, we have to declare await when we call SetupState, we have to make DoSomeMagic async, we have to make that return a Task, and we have to change the method name in order to be consistent. Here are the changes:
private int _magicNumber;
private async Task SetupStateAsync()
{
// some async stuff that sets up _magicNumber in the background...
}
private async Task DoSomeMagicAsync()
{
await SetupStateAsync();
// any code that uses _magicNumber will now be reliable...
Debug.WriteLine(_magicNumber);
}
You’ll notice from that code that Task return declarations tend to propagate up through your object models, as I alluded to before. This is certainly the case, and is something that you’re going to have to get used to. It feels slightly wrong, but in practice is very workable, as you tend to always start operations from some user-driven event, such as a touch or click.
The exception to returning Task instances back is when you’re programming event handlers. Event handlers already have a definition that in most cases is declared void. In these instances, if you wish to use await you have to simply return async void back. This is generally desirable, as the caller doesn’t really know whether it needs to wait for you or not, or how much work you need to do in response. (And this principle in event-driven programming is as old as event-driven programming itself.)
Finally, you can return real values back by using Task<T>. If you actually use await in this sort of method, you can just return an object back—the compiler will wrap it in a Task instance for you:
private async Task<bool> DoYetMoreMagicAsync()
{
await DoMoreMagicAsync();
// the compiler will wrap this for us...
return true;
}
The trick of asynchrony
The one thing I’m very clear to impress on people when they’re trying to understand asynchrony is this: don’t fight it. Don’t try to do anything clever with controlling the lifetime of operations or doing anything other than using the async and await keywords.
This can be a particular challenge to experienced developers who are used to being allowed to control the way in which operations run. With Windows Store apps, Microsoft has essentially taken the position that allowing you to have this level of control is a bad thing. To control the user experience presented by Windows, Microsoft wants Windows to be able to control background operations entirely and by itself. If you go around this rule, whatever you build will be more difficult to build, and is much less likely to be stable.
To reiterate, then, the best way to keep your head when working with asynchrony is to trust what it’s doing and only use async and await. Although you can do clever things with Task instances—such as chaining on continuation handlers and blocking until completion—when it comes to Windows Store apps, doing so generally leads to problems.
Calling the Server
With the background in asynchrony now covered, let’s look at using it for the practical purpose of calling a server.
There’s going to be quite a bit of work in this section, broken into two parts:
1. We’re going to create an abstract base ServiceProxy class that knows how to call up to a function on the server. We’ll specialize this class into other classes that understand discrete server functions (e.g., RegisterServiceProxy will know how to call the Register method). The way the server is designed is that every function the server can perform is accessed through a specific URL. The server accepts a request in JSON format, and returns data as JSON.
2. When the registration method completes successfully, we’ll want to change the view to a logon page, so we’ll have to build that mechanism. (The work to implement this mechanism was started when we built the attribute to associate a view class with a view-model interface.)
Building the Service Proxies
When we looked at IoC/dependency injection in the first section of this chapter, we used the TinyIoC isolation-of-control container to decouple the view and view-model. We’re going to use it again to decouple the service interfaces. This will be helpful if you want to add unit testing to your apps, which I strongly recommend (see Appendix B).
Firstly, let’s create our IServiceProxy interface. This is just a stub/marker implementation for now—it doesn’t have any actual members:
public interface IServiceProxy
{
}
When we built the UI for registering a user in the last chapter, we added four fields: username, email, password, and confirm password. The Register method on the server takes values for all four of those fields. (In this example I’ve removed the need to have client-side validation. Obviously, in a production app you could validate that the passwords match to save the effort, bandwidth, and time of asking the server.)
Here’s the definition of IRegisterServiceProxy:
public interface IRegisterServiceProxy : IServiceProxy
{
Task Register(string username, string email, string password,
string confirm);
}
As I mentioned before, the service proxy calls work by shuttling appropriately organized JSON-formatted data to and from the server.
We’re going to do JSON in two ways in this book. In this first instance we’re going to manually build up a JSON representation using WinRT’s JsonObject class. In the next chapter, we’re going to use the popular JSON.NET library. In a production application, you’d likely use JSON.NET for both parts; I just wanted to show you the JsonObject implementation in WinRT, although it’s worth remembering that WinRT’s built-in implementation is far inferior to the JSON.NET implementation.
We’ve had JSON support in ASP.NET since the introduction of JavaScriptSerializer. JsonObject is having another bite of that cherry, but the implementation is very different. JavaScriptSerializer worked by inspecting a received object—typically a Dictionary—and then emitting JSON (or vice versa). JsonObject is a Dictionary in and of itself, together with the attendant members you’d expect to see on a Dictionary.
JsonObject has keys of type string and values of type IJsonValue. This is where the implementation gets a bit weird, but interestingly this is the first place we’ve seen where you can actually “feel” a difference between the Windows DevDiv team (who build .NET and Visual Studio) and the WinDiv team (the ones that build Windows itself). This difference in approach—one team very good at building developer tools, the other team not very good at building developer tools but good at building Windows—is one of the reasons why I wanted to take you throughJsonObject. It explains a certain amount of the stranger design decisions that you find in WinRT, JsonObject’s inferiority compared to the popular JSON.NET project being one of them.
With JsonObject you can’t just add a string, you have to issue a call like this:
json.Add(key, JsonValue.CreateStringValue(value));
That is, you need to call that CreateStringValue factory method to get something you can add to the object.
Creating overloads of the method that took primitive types and deferred to the static helper methods would have been a better design. To get around this limitation, we’ll build an extension method class that will add the desired overloads into JsonObject. Here it is:
public static class JsonObjectExtender
{
// extension method that adds a primitive value...
public static void Add(this JsonObject json, string key, string value)
{
json.Add(key, JsonValue.CreateStringValue(value));
}
public static void Add(this JsonObject json, string key, bool value)
{
json.Add(key, JsonValue.CreateBooleanValue(value));
}
public static void Add(this JsonObject json, string key, double value)
{
json.Add(key, JsonValue.CreateNumberValue(value));
}
}
NOTE
Extension methods are one of my absolute favorite features of C#. All I need now are extension properties, and I’d be an extremely happy man.
Server protocol
The StreetFoo server protocol is straightforward: you send up some JSON, and you receive back some JSON. For basic interactions—such as registering a user or logging on—all that you need to send up is the name/value pairs captured in the view-model, plus an API key. (I’ll get to the API key in a moment.) You then get back a similarly straightforward set of name/values.
Considering the request (“input”) values first, as I just mentioned the only other thing you have to pass up is an API key. You can obtain an API key from the StreetFoo service’s website. It’s important when you use the downloadable code that you get your own API key to use. Figure 2-3illustrates where you can find your new API key.
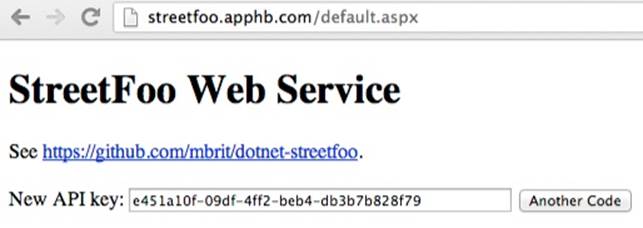
Figure 2-3. Getting an API key
Here’s an example of the JSON that the server needs to see to register a new user:
{
"username":"mbrit",
"email":"mbrit@mbrit.com",
"password":"password",
"confirm":"password",
"apiKey":"4f41463a-dfc7-45dd-8d95-bf339f040933"
}
The server will signal the state of the request using the isOk value. This will be true or false depending on whether you passed in appropriate values or not. If it’s false, you’ll get back a value called error that contains more details. Here’s an example of a successful response to the registration operation:
{
"userId":"4fa973c1e7044a6fe4735119",
"isOk":true
}
To round this off, if we were to encounter an error, we’d get an error back:
{
"error":"Username already in use.",
"isOk":false
}
NOTE
While I’m aware that we have WCF and WebAPI on the Microsoft stack, my StreetFoo service deliberately avoids using these so that we can prove we can make a call that’s not dependent on having Microsoft’s stuff at both ends. Otherwise, this book just becomes about using WCF at both ends of the problem, which I don’t feel is necessarily representative of the real world.
Building the Register Method
Each server method will have a distinct proxy object on the client. In this first instance, we’ll build a specialized RegisterServiceProxy and a base ServiceProxy class. In addition, so that we can have a level of indirection as we did with the MVVM implementation that we’ve already discussed, we’ll create IRegisterServiceProxy and IServiceProxy interfaces.
In all cases, a specific method will exist in IRegisterServiceProxy that takes the values required for the server call (username, email, password), packages it up, and then passes it to the base class for basic processing. The specialized version will then do specific processing.
As discussed previously, we need to pass up the API key with every call. The base ServiceProxy class will need to do this, and also need to form the URL of the service endpoint. Here’s the code:
public abstract class ServiceProxy : IServiceProxy
{
// the URL that the proxy connects to...
private string Url { get; set; }
// API key available from https://streetfoo.apphb.com/
// *** YOU MUST CHANGE THIS FOR USE IN YOUR OWN APPS ***
private const string ApiKey = "4f41463a-dfc7-45dd-8d95-bf339f040933";
protected ServiceProxy(string handler)
{
this.Url = StreetFooRuntime.ServiceUrlBase + "Handle" + handler +
".ashx";
}
protected void ConfigureInputArgs(JsonObject data)
{
// all the requests need an API key...
data.Add("apiKey", ApiKey);
}
}
All this magic will happen when we call a method we’ll build called ExecuteAsync. This method will take a JsonObject instance, add the API key, transform it into a JSON string, and then send it to the server. It’ll wait for a response (using await), and then process the result. In the case of a success or failure (determined by checking the isOk value returned from the server), Execute will return a ServiceExecuteResult object. We’ll build this ServiceExecuteResult object first.
The idea of ServiceExecuteResult is to containerize the JSON that we returned from the server, together with an error message if there was one. We can reuse the ErrorBucket object that we built class in Chapter 1. Here’s the code:
public class ServiceExecuteResult : ErrorBucket
{
public JsonObject Output { get; private set; }
internal ServiceExecuteResult(JsonObject output)
{
this.Output = output;
}
internal ServiceExecuteResult(JsonObject output, string error)
: this(output)
{
this.AddError(error);
}
}
The ExecuteAsync method itself will be very simple, as the HttpClient object provided by .NET 4.5 does all the heavy lifting for us. If you’re used to using HttpWebRequest, HttpClient is much easier. It’s document-centric, meaning you give it a document containing the content to send, and it’ll return back a document containing the response.
This is really the first time that we’ve used asynchrony, and there are a couple of things to point out. First, note how this code is essentially just procedural. The two await directives “poke holes” into the procedural code to make it behave in a multithreaded, asynchronous fashion. Second, the method returns Task<ServiceExecuteResult> and is marked with the async keyword. Again, this tells the compiler that we’re expecting that, when the whole thing is done and dusted, we’ll be returning a ServiceExecuteResult instance back to the (a)waiting caller.
Here’s the code:
// Add method to ServiceProxy...
public async Task<ServiceExecuteResult> ExecuteAsync(JsonObject input)
{
// set the API key...
ConfigureInputArgs(input);
// package it us as json...
var json = input.Stringify();
var content = new StringContent(json);
// client...
var client = new HttpClient();
var response = await client.PostAsync(this.Url, content);
// load it up...
var outputJson = await response.Content.ReadAsStringAsync();
JsonObject output = JsonObject.Parse(outputJson);
// did the server return an error?
bool isOk = output.GetNamedBoolean("isOk");
if (isOk)
return new ServiceExecuteResult(output);
else
{
// we have an error returned from the server, so return that...
string error = output.GetNamedString("error");
return new ServiceExecuteResult(output, error);
}
}
We can now go ahead and create our specialized RegisterServiceProxy class. The first thing we need is the RegisterResult class. This will come about only as a result of a successful call to the server and will hold the user ID that the server provides. (Recall from earlier the examples showing what the JSON coming back from the server would look like for both a successful and an unsuccessful result.)
public class RegisterResult : ErrorBucket
{
public string UserId { get; private set; }
public RegisterResult(string userId)
{
this.UserId = userId;
}
internal RegisterResult(ErrorBucket bucket)
: base(bucket)
{
}
}
}
For the actual RegisterServiceProxy class, all we need to do is define the values that need to be placed into the JSON that goes up to the server via the base ServiceProxy class. We’ll also need to interpret the results. The steps in the interpretation are limited to dredging the user ID out of the server response, creating a RegisterResult instance, and calling the success callback.
One last thing to note is that the specialized proxy needs to know what function on the server it’s calling—you’ll recall that when we build ServiceProxy we build up a URL in the constructor. In this case, the server method name happens to be Register.
Once we’ve done that, we can create a new JsonObject and put in the values that we want. We can defer to the ExecuteAsync method to call the server, and then process the results:
public class RegisterServiceProxy : ServiceProxy, IRegisterServiceProxy
{
public RegisterServiceProxy()
: base("Register")
{
}
public async Task<RegisterResult> RegisterAsync(string username,
string email, string password, string confirm)
{
// package up the request...
JsonObject input = new JsonObject();
input.Add("username", username);
input.Add("email", email);
input.Add("password", password);
input.Add("confirm", confirm);
// call...
var executeResult = await this.ExecuteAsync(input);
// get the user ID from the server result...
if (!(executeResult.HasErrors))
{
string userId = executeResult.Output.GetNamedString("userId");
return new RegisterResult(userId);
}
else
return new RegisterResult(executeResult);
}
}
That’s all we have to do to make the call to the server. Now we can look at how to get it wired up into the UI.
Finishing the UI to Call the Register Server Function
This is where the various bits that we’ve done thus far come together. All we have to do is go back into our RegistrationPageViewModel class and change DoRegistration so that rather than faking the call to the server and displaying a message box, it actually makes the call to the server.
We’re going to reuse the TinyIoC container to get a reference to the service proxy. This container doesn’t care that there’s a difference between view-models and service proxies, so the work we did to initialize the container in Chapter 1 will automatically work here, and we can use it in the same way to find service proxies as we did to find view-models.
Here’s the revised implementation of DoRegistration. If registration succeeds, all we’ll do in the first instance is display the ID of the user that was returned from the server:
// Modify method in RegisterPageViewModel...
private async void DoRegistration(CommandExecutionContext context)
{
// if we don't have a context, create one...
if (context == null)
context = new CommandExecutionContext();
// validate...
ErrorBucket errors = new ErrorBucket();
Validate(errors);
// ok?
if (!(errors.HasErrors))
{
// get a handler...
var proxy = TinyIoCContainer.Current.Resolve
<IRegisterServiceProxy>();
// call the server...
var result = await proxy.RegisterAsync(this.Username,
this.Email, this.Password, this.Confirm);
// ok?
if (!(result.HasErrors))
{
// show a message to say that a user has been created...
(this isn't a helpful message,
// included for illustration...)
await this.Host.ShowAlertAsync(string.Format("The new user
has been created.\r\n\r\nUser ID: {0}", result.UserId));
}
else
errors.CopyFrom(result);
}
// errors?
if(errors.HasErrors)
await this.Host.ShowAlertAsync(errors);
}
I’d suggest what happens there is pretty obvious. When you run it, and you pass in valid parameters, you should see the result shown in Figure 2-4.
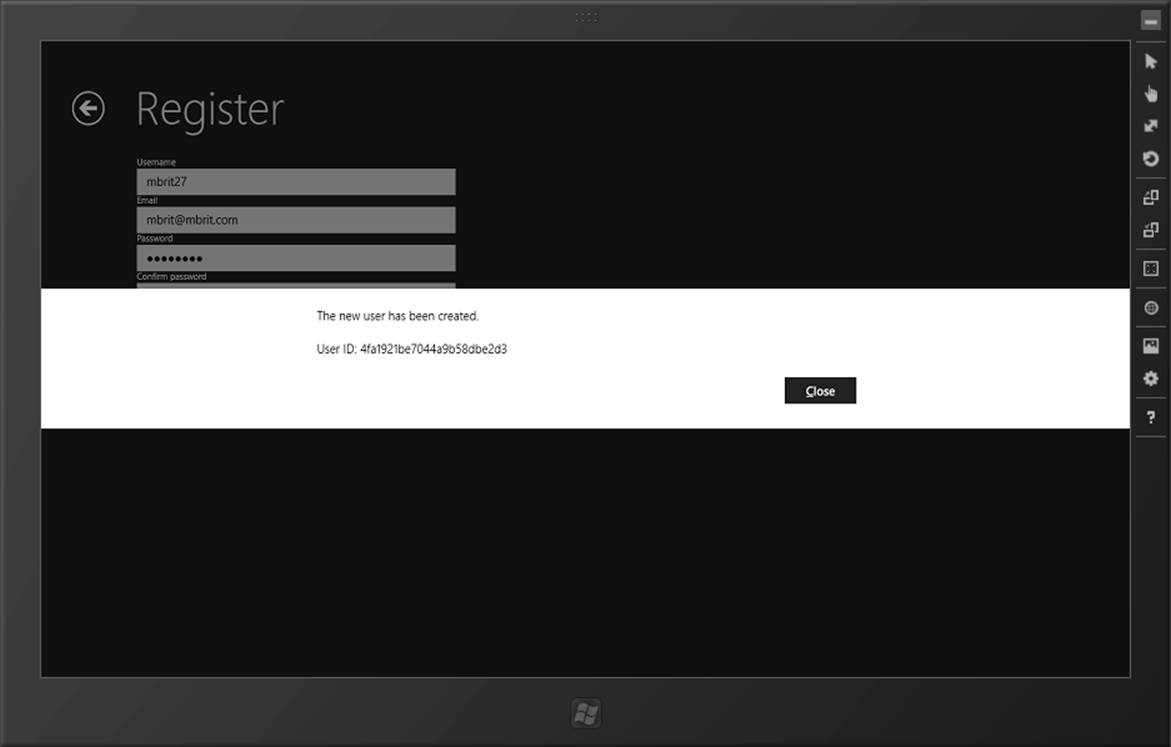
Figure 2-4. A successful call to the Register function on the server
That’s it! We’ve now gone end-to-end through an entity example of an MVVM implementation, complete with inversion of control, pulling data back out of the UI with data binding, and then calling up to a server.
Logon
In the final part of this chapter, I want to show you how to build the logon page—or rather, what I really want to show is how you can move between pages in the app. Another thing we’ll cover in this section is how to display a progress indicator on the screen to show that the application is busy. (Specifically, we’ll use the little “bumping dots” animation that’s come from the original design work on Windows Phone over to Windows 8/Windows RT, which I personally think is rather cool.)
Building LogonServiceProxy
Calling the server for a logon operation is very much like calling the server for a register operation. I’ll go through this part quite quickly, as we’ve just done something similar.
Like the register operation, we’ll need a class to capture the result of a logon call. Here’s the code:
public class LogonResult : ErrorBucket
{
public string Token { get; private set; }
public LogonResult(string token)
{
this.Token = token;
}
internal LogonResult(ErrorBucket bucket)
: base(bucket)
{
}
}
Then, here’s the interface for the call. This will just take the username and password:
public interface ILogonServiceProxy : IServiceProxy
{
Task<LogonResult> LogonAsync(string username, string password);
}
Finally, we arrive at the actual implementation. How the server works is that we’ll be returned a token that we have to pass up to the server each time we want data. We won’t actually use the token until the next chapter; for now, we’ll just display the token if logging on was successful, which we’ll do in the next section. Here’s the code:
public class LogonServiceProxy : ServiceProxy, ILogonServiceProxy
{
public LogonServiceProxy()
: base("Logon")
{
}
public async Task<LogonResult> LogonAsync(string username,
string password)
{
// input..
JsonObject input = new JsonObject();
input.Add("username", username);
input.Add("password", password);
// call...
var executeResult = await this.ExecuteAsync(input);
// get the user ID from the server result...
if (!(executeResult.HasErrors))
{
string token = executeResult.Output.GetNamedString("token");
// return...
return new LogonResult(token);
}
else
return new LogonResult(executeResult);
}
}
Building the Logon Page
A lot of the work relating to building the logon form is basic copy and paste of the registration page and view-model, and I don’t want to reproduce work we’ve already done in detail—I’d rather use the pages for something more interesting. As a result, we’re going to go through some parts of this section quite quickly. Remember that you can refer to the downloadable code if you need to.
The initial problem that we need to solve is that XAML doesn’t know anything about our view-model architecture, but when we want to change the page we have to give XAML the .NET type of the actual page implementation to which we want to navigate.
Specifically, we have to tell XAML “show typeof(LogonPage)” from within the RegisterPageViewModel, but RegisterPageViewModel can’t see LogonPage.
Luckily, we’ve already done most of the work for this. Remember that at the beginning of this chapter, we built ViewModelAttribute so that we could create view-models automatically from a page. We can basically just flip that on its head so that we can say “find me the Page-derived type that has an attribute referencing the view-model type that we want.” Thanks to .NET’s reflection APIs, this is very simple. Here’s the method to add to StreetFooPage; this just gets all the types that are in the assembly and walks each one, looking for an appropriate attribute:
// Add to StreetFooPage...
// shows a view from a given view-model...
public void ShowView(Type viewModelType)
{
foreach (var type in this.GetType().GetTypeInfo().Assembly
.GetTypes())
{
var attr = (ViewModelAttribute)type.GetCustomAttribute
<ViewModelAttribute>();
if (attr != null && viewModelType.IsAssignableFrom
(attr.ViewModelInterfaceType))
{
// show...
this.Frame.Navigate(type);
}
}
}
We’ll need this on IViewModelHost, as we’ll need to call it from the view-models. Here’s the code:
// provides a route back from a view-model to a view...
public interface IViewModelHost
{
// show messages...
Task ShowAlertAsync(ErrorBucket errors);
Task ShowAlertAsync(string message);
// shows a view from a given view-model...
void ShowView(Type viewModelInterfaceType);
}
Of course, to make any of this work, you’ll actually need a logon page. This should be called LogonPage and added to the StreetFoo.Client.UI project. I won’t go through again how to actually build the page or show the XAML—just make it look like Figure 2-5.
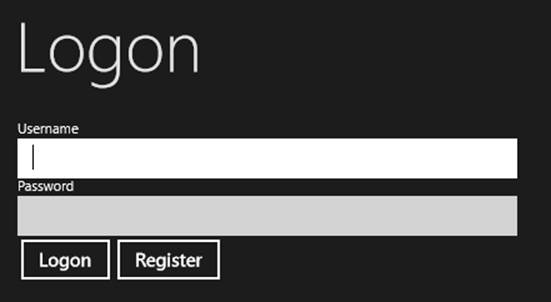
Figure 2-5. The logon page layout
We’ve been trying to reach the point of being able to do very “light lifting” on new pages, pushing as much logic as possible into the view-model and using chunks of (hopefully) clever code to link it all together without having to think very hard about what’s going on.
Thus, in terms of the code we have to add to LogonPage, all we have to do is add a couple of lines that look very much like the two lines we added to RegisterPage:
[ViewModel(typeof(ILogonPageViewModel))]
public sealed partial class LogonPage : StreetFooPage
{
public LogonPage()
{
this.InitializeComponent();
// obtain a real instance of a model...
this.InitializeViewModel();
}
In terms of a view-model, the ILogonPageViewModel has properties for the username and password, and commands for Logon and Register. Here’s the code:
// exposes the map of public binding properties on LogonPage's view-model...
public interface ILogonPageViewModel : IViewModel
{
string Username
{
get;
set;
}
string Password
{
get;
set;
}
ICommand LogonCommand
{
get;
}
ICommand RegisterCommand
{
get;
}
}
ILogonPageViewModel will need an implementation. Here it is; I’ve omitted a lot of it for brevity. (You’ll see how RegisterCommand is using a new NavigateCommand class. We’ll build that in a moment.)
// concrete implementation of the LogonPage's view-model...
public class LogonPageViewModel : ViewModel, ILogonPageViewModel
{
// commands...
public ICommand LogonCommand { get; private set; }
public ICommand RegisterCommand { get; private set; }
public LogonPageViewModel(IViewModelHost host)
: base(host)
{
// set RegisterCommand to defer to the DoRegistration method...
this.LogonCommand = new DelegateCommand((args) => DoLogon(args as
CommandExecutionContext));
this.RegisterCommand = new NavigateCommand<IRegisterPageViewModel>
(host);
}
// Username and Password properties ommitted for brevity...
private void DoLogon(CommandExecutionContext context)
{
// validate...
ErrorBucket errors = new ErrorBucket();
Validate(errors);
// ok?
if (!(errors.HasErrors))
{
// get a handler...
var proxy = TinyIoCContainer.Current.
Resolve<ILogonServiceProxy>();
// call...
var result = await proxy.LogonAsync(this.Username, this.Password);
if (!(result.HasErrors))
{
await this.Host.ShowAlertAsync("Logon OK!");
}
else
errors.CopyFrom(result);
}
// errors?
if (errors.HasErrors)
await this.Host.ShowAlertAsync(errors);
}
}
From time to time, it’d be helpful to have a command whose sole job it was to navigate to another view. For this reason, we’ll build NavigateCommand. We’ve just seen an example of how this will be used in the immediately preceding listing—note how we pass through the type of the view-model to navigate to as a generic type argument, but our ShowView method takes a type as a parameter.
Our ShowView method could have taken a type argument, but this causes “problems” on interfaces with regards to method overloading. If you put both versions of the method on the interface (the one that takes a type argument and the one that takes a type parameter), any implementer has to implement both methods. (This is the same argument that you limit virtual methods to the most complex version of an overload.) As type arguments are hard to pass dynamically, it’s better to have the type-less method defined on the interface and then use extension methods to create typed overloads, like this:
public static class IViewModeHostExtender
{
public static void ShowView<T>(this IViewModelHost host,
object parameter = null)
where T : IViewModel
{
host.ShowView(typeof(T), parameter);
}
}
This approach allows you to build more complex interface implementations, reduces the amount of work that anyone implementing the interface has to do, and also provides an easier life for developers calling against your code. In this instance specifically, it helps make more defensive code because of the compile-time type checking that the value for <T> does indeed implement IViewModel.
Back to the main flow of the work: the NavigateCommand class is pretty straightforward, and all we need is a reference to the host and a reference to the type of interface to pass into ShowView. Here’s the code:
public class NavigateCommand<T> : ICommand
where T : IViewModel
{
private IViewModelHost Host { get; set; }
public event EventHandler CanExecuteChanged;
public NavigateCommand(IViewModelHost host)
{
this.Host = host;
}
public bool CanExecute(object parameter)
{
return true;
}
public void Execute(object parameter)
{
this.Host.ShowView<T>();
}
}
Before we look at the process of making the logon operation work, we’ll dip back into App.xaml and change it so that the logon page is the one that’s displayed first, as opposed to the register page. Here’s the change:
// Modify OnLaunched in
protected override void OnLaunched(LaunchActivatedEventArgs args)
{
if (args.PreviousExecutionState ==
ApplicationExecutionState.Terminated)
{
}
// start...
StreetFooRuntime.Start("Client");
// Create a Frame to act as navigation context and navigate
// to the first page...
var rootFrame = new Frame();
rootFrame.Navigate(typeof(LogonPage));
// Place the frame in the current Window and ensure that it is active
Window.Current.Content = rootFrame;
Window.Current.Activate();
}
Now if you run the app, it should all hang together. The logon page should display first, and the Register button should take you to the register page. You can use the automatically provided “back” button to go back to logon. Although we didn’t do this in the book, in the code that you can download for this chapter, a successful registration will return you to the logon page.
Busy Indicators
Windows Phone introduced a novel and space-efficient way of indicating that a background operation was in progress—namely, a collection of dots right at the top of the screen that moves from left to right in a standing wave. That same progress indicator is available in WinRT, and in this section we’re going to add it to our app.
NOTE
As background, that indicator is known as an “indeterminate” indicator. There is also a “not indeterminate” (“determinate”?) indicator, which works like a normal progress bar. There is also a spinning wheel indicator that we’re not going to look at in this chapter, but if you want to use it, it’s implemented in the Windows.UI.Xaml.Controls.ProgressRing control and works in roughly the same way.
Positioning the Indicator
The first thing to do is position the indicator on the display. If you’re not familiar with XAML, this is actually much easier than it looks and a good example of just how different XAML and HTML are.
The document-centric nature of HTML implies that when new elements are positioned on the page, everything else gets pushed out of the way to accommodate it. However, in XAML, the layout is more explicit; and because it’s not document-centric, if you happen to put controls on top of other controls, things just work. So, to put a progress indicator at the top of each page we can just add in the declaration of a control, and set it to render within the first row of the (existing) grid and span the two available columns. Here’s the ProgressBar declaration for LogonPage; I’ve omitted the rest of the page for brevity. (For the time being, don’t worry about the Visibility property—we’re about to get to that.)
<Grid Background="{StaticResource ApplicationPageBackgroundBrush}">
<Grid.RowDefinitions>
<RowDefinition Height="140"/>
<RowDefinition Height="*"/>
</Grid.RowDefinitions>
<Grid.ColumnDefinitions>
<ColumnDefinition Width="120"/>
<ColumnDefinition Width="*"/>
</Grid.ColumnDefinitions>
<ProgressBar Grid.ColumnSpan="2" VerticalAlignment="Top"
IsIndeterminate="true"
Visibility="{Binding IsBusy, Converter={StaticResource
VisibilityConverter}}"></ProgressBar>
<!-- Back button and page title -->
<AppBarButton x:Name="backButton" Icon="Back" Height="95"
Margin="10,46,10,0"
Command="{Binding NavigationHelper.GoBackCommand,
ElementName=pageRoot}"
Visibility="{Binding IsEnabled, Converter=
{StaticResource BooleanToVisibilityConverter},
RelativeSource={RelativeSource Mode=Self}}"
AutomationProperties.Name="Back"
AutomationProperties.AutomationId="BackButton"
AutomationProperties.ItemType="Navigation Button"/>
<TextBlock x:Name="pageTitle" Grid.Column="1" Text="Logon" Style=
"{StaticResource HeaderTextBlockStyle}"/>
I haven’t provided a screenshot, as there’s nothing to see until it runs! You’ll need to go into the App.xaml and add the reference to BooleanToVisibilityConverter. This class is created by Visual Studio, but it’s not referred where we need it.
Here’s the change:
<!-- Modify App.xaml… -->
<Application
x:Class="StreetFoo.Client.UI.App"
xmlns="http://schemas.microsoft.com/winfx/2006/xaml/presentation"
xmlns:x="http://schemas.microsoft.com/winfx/2006/xaml"
xmlns:local="using:StreetFoo.Client.UI">
<Application.Resources>
<ResourceDictionary>
<!-- TODO: Delete this line if the key AppName is declared
in App.xaml -->
<local:BooleanToVisibilityConverter x:Key=
"BooleanToVisibilityConverter"/>
</ResourceDictionary>
</Application.Resources>
</Application>
Showing the Indicator
The design we want to end up with is one where we don’t necessarily have to worry about making the indicator visible or invisible explicitly. Another related feature is that we want any buttons on the page that may create additional background activities to disable themselves automatically. We can achieve both of these things by allowing the view-model to put itself into a “busy” state. The view can then decide what to do when the view-model goes into a busy state.
Implementing the busy state is actually pretty easy. All we need to do is create a property on the view-model called IsBusy and then configure bindings in the markup to display the progress indicator and disable the buttons when this is true. (I hinted at this earlier where the ProgressBarcontrol has its Visibility property set to a binding.)
There’s a deeper (and well understood) problem with an IsBusy flag in that if you have a collection of recursive methods that are all trying to control that flag (i.e., by setting it on before something happens and off when it’s finished), a simple Boolean value won’t cut it because the last one wins and the whole thing gets confused. What we need to do is have a counter incremented and decremented by calls to the methods EnterBusy and ExitBusy, respectively.
We then face a design decision. If you were designing this cold, you would create a field with a counter and then have the IsBusy property simply return _busyCounter > 0 when queried; however, to integrate with the binding subsystem we need it such that when IsBusy changes, thePropertyChanged event must also be raised. For this reason, I’m proposing having IsBusy as a normal view-model field (i.e., one that uses the GetValue<T> and SetValue methods and the underlying Dictionary) and explicitly setting that property in EnterBusy and ExitBusy. This is less sophisticated, but it means we don’t have to make a specific effort to raise the property change notification.
As a final design point, all of the view-models are going to want to do this, so we’ll change IViewModel and ViewModel to support it.
The first change is to IViewModel to add the IsBusy property:
// base class for view-model implementations...
public interface IViewModel : INotifyPropertyChanged
{
// shared busy flag...
bool IsBusy { get; }
}
Next, we can actually implement it. A neat pattern to use here is one that leverages the C# using keyword. If we create a method called EnterBusy, and have that method return something that returns IDisposable, we don’t have to explicitly remember to undo the busy state when we’re finished. For example, we can write something like this:
public void DoMagic()
{
using(this.EnterBusy())
{
// busy flag is turned on here by "EnterBusy"...
}
// busy flag is "magically" turned off by the time we get here...
}
Here’s the code change to ViewModel. I’ve omitted a lot of the code for brevity:
// base class for view-model implementations…
public abstract class ViewModel : IViewModel
{
// somewhere to hold the host...
protected IViewModelHost Host { get; private set; }
// somewhere to hold the values...
private Dictionary<string, object> Values { get; set; }
// support field for IsBusy flag...
private int BusyCounter { get; set; }
// event for the change...
public event PropertyChangedEventHandler PropertyChanged;
public ViewModel(IViewModelHost host)
{
this.Host = host;
this.Values = new Dictionary<string, object>();
}
// code ommitted...
public IDisposable EnterBusy()
{
this.BusyCount++;
// trigger a UI change?
if (this.BusyCount == 1)
this.IsBusy = true;
// return an object we can use to roll this back...
return new BusyExiter(this);
}
public void ExitBusy()
{
this.BusyCount--;
// trigger a UI change?
if (this.BusyCount == 0)
this.IsBusy = false;
}
private class BusyExiter : IDisposable
{
private ViewModel Owner { get; set; }
internal BusyExiter(ViewModel owner)
{
this.Owner = owner;
}
public void Dispose()
{
this.Owner.ExitBusy();
}
}
}
It’s neater with this pattern to return a vanilla IDisposable rather than returning a special object. (It makes it less likely that you’ll force a breaking change if you have to refactor later.) The only behavior that you require in BusyExiter is the ability to let the compiler wire up a call toDispose.
Going back to the actual implementation, the properties that we want to use this flag with to set properties on the XAML controls are as follows:
§ On the ProgressBar we need to set the Visibility property to Visible when IsBusy is true, and Collapsed when IsBusy is false.
§ On the buttons, we need to set IsEnabled to be the opposite of IsBusy.
XAML provides a mechanism for converting values when used with binding. In the last chapter, I called some of these out—specifically, Visual Studio will create a few converters for us when it creates the project. The ones we need to use here are BooleanToVisibilityConverter andBooleanNegationConverter. Although these are built for us, you have to wire them up manually in order to use them.
There are two ways to do this: you can put them into each page where you need them, or you can define them globally within the App.xaml file. They are not in the App.xaml file by default because it affects the application startup speed. However, it’s a lot more convenient to map them in there because you only have to do it once.
Here’s the App.xaml markup with the mappings defined:
<Application
x:Class="StreetFoo.Client.UI.App"
xmlns="http://schemas.microsoft.com/winfx/2006/xaml/presentation"
xmlns:x="http://schemas.microsoft.com/winfx/2006/xaml"
xmlns:local="using:StreetFoo.Client.UI"
xmlns:common="using:StreetFoo.Client.UI.Common"
>
<Application.Resources>
<ResourceDictionary>
<local:BooleanToVisibilityConverter x:Key=
"BooleanToVisibilityConverter" />
<local:BooleanNegationConverter x:Key="BooleanNegationConverter" />
<ResourceDictionary.MergedDictionaries>
<ResourceDictionary Source="Common/StandardStyles.xaml"/>
</ResourceDictionary.MergedDictionaries>
</ResourceDictionary>
</Application.Resources>
</Application>
Next we can actually use them. Here’s the markup for the new progress bar and the modification of the buttons to enable/disable them depending on the busy state (I’ve omitted other parts of the markup for brevity):
<local:StreetFooPage> <!-- attributes omitted... -->
<Grid Background="{StaticResource ApplicationPageBackgroundBrush}">
<Grid.RowDefinitions>
<RowDefinition Height="140"/>
<RowDefinition Height="*"/>
</Grid.RowDefinitions>
<Grid.ColumnDefinitions>
<ColumnDefinition Width="120"/>
<ColumnDefinition Width="*"/>
</Grid.ColumnDefinitions>
<ProgressBar Grid.ColumnSpan="2" VerticalAlignment="Top"
IsIndeterminate="true"
Visibility="{Binding IsBusy, Converter={StaticResource
BooleanToVisibilityConverter}}"></ProgressBar>
<!-- Back button and page title -->
<Button x:Name="backButton" Click="GoBack" IsEnabled="{Binding
Frame.CanGoBack, ElementName=pageRoot}"
Style="{StaticResource BackButtonStyle}"/>
<TextBlock x:Name="pageTitle" Grid.Column="1" Text="Logon" Style=
"{StaticResource PageHeaderTextStyle}"/>
<!-- Registration form -->
<StackPanel Grid.Row="1" Grid.Column="1">
<TextBlock Text="Username"></TextBlock>
<TextBox HorizontalAlignment="Left" Width="400" Text="
{Binding Username, Mode=TwoWay}"/>
<TextBlock Text="Password"></TextBlock>
<PasswordBox HorizontalAlignment="Left" Width="400"
Password="{Binding Password, Mode=TwoWay}"/>
<StackPanel Orientation="Horizontal">
<Button Content="Logon" Command="{Binding LogonCommand}"
IsEnabled="{Binding IsBusy, Converter={StaticResource
NegationConverter}}"></Button>
<Button Content="Register" Command="{Binding RegisterCommand}"
IsEnabled="{Binding IsBusy, Converter={StaticResource
NegationConverter}}"></Button>
</StackPanel>
</StackPanel>
<!-- remainder of page omitted... -->
</local:StreetFooPage>
At this point, though, we still can’t see anything different. However, it’s a simple change to DoLogon in LogonPageViewModel to actually use it. Here’s the code:
// Modify method in LogonPageViewModel...
private async void DoLogon(CommandExecutionContext context)
{
// validate...
ErrorBucket errors = new ErrorBucket();
Validate(errors);
// ok?
if (!(errors.HasErrors))
{
// get a handler...
var proxy = TinyIoCContainer.Current.
Resolve<ILogonServiceProxy>();
// call...
using (this.EnterBusy())
{
var result = await proxy.LogonAsync(this.Username,
this.Password);
if (!(result.HasErrors))
await this.Host.ShowAlertAsync("Logon OK!");
else
errors.CopyFrom(result);
}
}
// errors?
if (errors.HasErrors)
await this.Host.ShowAlertAsync(errors);
}
Now if you run the code, you’ll see the progress indicator appear when the logon request is being processed.
All materials on the site are licensed Creative Commons Attribution-Sharealike 3.0 Unported CC BY-SA 3.0 & GNU Free Documentation License (GFDL)
If you are the copyright holder of any material contained on our site and intend to remove it, please contact our site administrator for approval.
© 2016-2025 All site design rights belong to S.Y.A.