Programming Windows Store Apps with C# (2014)
Chapter 3. Local Persistent Data
One topic I was keen to get deep into early on in this book was the subject of local databases. Every app that you will ever build will need some form of local storage, and if you need to store a decent amount of structured data, a database is the only way to go.
Back in the days of Windows Mobile (the version before Windows Phone), the local database story was actually really good. Because these devices were targeted at enterprises, Microsoft’s approach was to put a cut-down version of SQL Server on the devices and build a synchronization framework that would let an enterprise’s SQL Server push and pull data to the devices.
In Windows Phone, Microsoft got rid of all that, and the new device platform launched with no database support at all. You could write data to the filesystem, but that was about it. This strategy, however, is working fine because Windows Phone is a consumer play and not an enterprise play. Windows 8/Windows RT follows the same approach as Windows Phone—there is no built-in database that we can just use. We’re going to use SQLite, a popular open source database that is used on all of the other mobile platforms.
We’ll use the database in two different ways common to Windows Store apps:
§ We’re going to create a database table to store system settings. (An example of a setting that we’ll build is the user’s last logon username so that we can persist that between sessions.) This will be a simple name/value store that will store string values exclusively.
§ We’re going to create a database table for holding problem reports downloaded from the server. (To remind you, the idea behind the StreetFoo service is to store problems with a user’s local environment—for example, graffiti, broken paving slabs, or dumped garbage. Each instance of a problem report is called simply a report.)
The more complex usage scenario is the problem reports, and my objective is to illustrate the following concepts:
§ Most application sponsors will likely commission the application so that it is able to support “sometimes offline” capability. (This is a fancy way of saying that your Internet connection is likely to be a bit flaky, but your application still needs to more or less work when no network connection is available.) The way that we’ll do this is by binding the frontend to a local cache of data that we update when we are able. In this chapter, we’re not going to be handling updating the server—at the moment, this is a read-only cache.
§ The StreetFoo service uses JSON as its data format, and so we’re going to need some way of mapping between a .NET object (in this context, a plain ol’ CLR object, or POCO) and some JSON data. We’re going to use the popular JSON.NET library to handle these transformations.
To start, let’s look at the libraries that we’ll need to use to support SQLite.
SQLite and sqlite-net
SQLite is a well-established, public-domain-licensed, tiny, high-performance, and generally wonderful embedded database. Apple bakes it into iOS, Google bakes it into Android, and RIM bakes it into BlackBerry. The only vendor that doesn’t bake it into anything is Microsoft.
Luckily, though, the organization that maintains SQLite—SQLite.org—wants to make sure that developers targeting Windows 8/Windows RT can use SQLite, and hence there is a version of it available that works in Windows Store apps.
In Windows Store apps, you use SQLite via the open source sqlite-net library. This library is maintained by Frank Krueger, is licensed under the MIT license, and is available on GitHub. When we come to use the library in our project, we’re going to use NuGet to install it into our project.
In addition to the sqlite-net code, you will need the SQLite engine itself. SQLite.org provides a version of the library that works with Windows Store apps. This is made available as a Visual Studio extension, which you can download from the maintainer’s site.
As of the time of writing, you’re looking for the version called Precompiled Libraries for Windows Runtime. When you install this, you’ll see something like Figure 3-1.
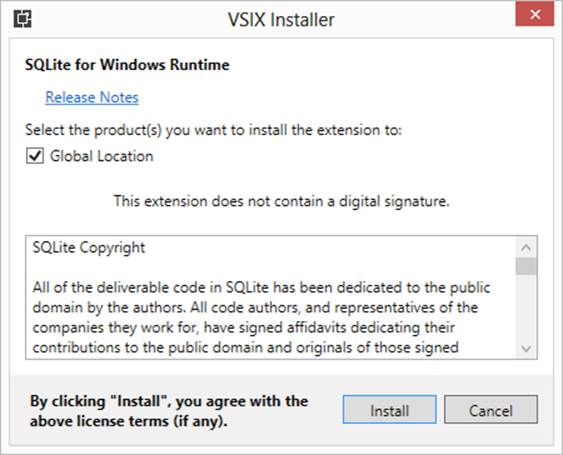
Figure 3-1. Installing the SQLite extension for Windows Store apps
NOTE
At the time of writing, the version of this library for Windows 8.1 was not finalized and was still in beta. The Windows 8 version will not work with Visual Studio 2013 and Windows 8.1. Make sure you get the latest and greatest.
Working with SQLite
SQLite is a relational database like any other, but it includes some clever features for working with relational databases in a “looser” way. One example is that you have this extension to regular ANSI-92 SQL syntax for creating a table, but only if it doesn’t exist. (In actual fact, when we do create tables we’ll ask sqlite-net to do it for us, and it will be responsible for formulating the SQL—but we’ll get to that.)
CREATE TABLE IF NOT EXISTS Customers (...)
NOTE
In this chapter, I assume that you know your way around basic SQL syntax. It’s not going to get any more complicated than the preceding example!
This means that when using SQLite we don’t need to check that a table does or does not exist before issuing a create call. Remember that the usage of SQLite is predicated on lightweight, on-demand, embedded use as opposed to structured and managed, enterprise-type use.
Another place where SQLite is different is that the data typing is very loose. In the first instance, data types are associated with a value, not with the actual column definition; so, we could store string values in numeric fields if we wanted. (The column “definition” is actually more of a column “recommendation.”) In addition, there are only five types of data types that are supported: null, text, integer, real, and blob.
NOTE
We’re not going to hit any issues with data typing here, and it’s unlikely that you will either, given how SQLite is typically used.
As I alluded to, we’re going to be using sqlite-net almost exclusively to retrieve, store, and change data in the database. sqlite-net has a micro-ORM (object relational mapping) that is used to do this.
I’ll present a brief primer on object-relational mapping in the next section. If you’re familiar with ORM, skip this bit and meet us back at Using the Micro-ORM in sqlite-net.
A Primer on Object-Relational Mapping
I’ve always been something of a fan of ORM, but as of the time of writing, there’s a trend where it’s regarded as less relevant than it once was, and perhaps quite “old hat.”
Most of you have heard of ORM, but just to frame the discussion the general idea is that you have classes in your code that map one to one with tables in your database. If you have a Customers table with FirstName and LastName fields, you might have a Customer class withFirstName and LastName properties.
Once we have the model you can then perform CRUD operations: create, retrieve, update, and delete. If you want to insert a customer you create a new Customer, set the properties, and then hand it over to the ORM, which then translates the object’s state into an INSERT statement. Likewise, you can ask the ORM to return a collection of Customer instances. You do so by issuing a SELECT statement to the database, the results table of which is then used to construct a new set of actual Customer instances, with the properties of each populated with the data persisted in the database.
Once you have objects returned from the database, you can ask the ORM to issue UPDATE and DELETE statements on your behalf. The advantage in ORM is that you’re not having to faff around building SQL statements.
There are all sorts of reasons why ORM is not attractive to use, the most common of these being that you likely don’t want to model your domain in the same way that you might store data in a normalized fashion in a relational database, and it’s really this point where in complex systems it struggles. What ORM is great for, though, is simply and cheaply persisting data. Whether or not ORM is appropriate in enterprise applications is (thankfully) beyond the scope of this book. We need to locally cache data so that we’re not dependent on an Internet connection, and some form of ORM solution is a good fit for that scenario.
Part of the greater discussion around ORM has been the idea of a micro-ORM, which is designed to be a more lightweight way of working with ORM frameworks. Most ORM frameworks insist on a relatively high level of investment from the developer in terms of spinning up the framework, using specific base classes, and structuring code in a certain way. With a micro-ORM the only assumption is that you’re expected to build classes and use public read/write properties.
A famous micro-ORM in the .NET world is Dapper. This is used by Stack Overflow as part of its technology stack. While it’s a decent micro-ORM, it uses ADO.NET, which is not supported in WinRT, and hence we can’t use it. What we can use instead is a micro-ORM not dependent on ADO.NET, and the one I’ve chosen to use in this book is sqlite-net.
sqlite-net has all the features you’d expect from a micro-ORM. You build your domain objects, decorate them with attributes, and use various methods in the sqlite-net classes to run CRUD operations. Now that you know the background, let’s look at how we can use them.
Using the Micro-ORM in sqlite-net
Here’s an example of a class that models a customer setup for use with sqlite-net:
public class Customer
{
[AutoIncrement, PrimaryKey]
public int Id { get; set; }
public string FirstName { get; set; }
public string LastName { get; set; }
public string Email { get; set; }
}
NOTE
We won’t be storing “customers” in our database—this is just an example.
When using sqlite-net, you will find two versions of the API. One is designed to be used synchronously and the other is designed to be used asynchronously. We’ll be using the asynchronous API.
When the application first runs, there likely won’t be a database file on the disk. SQLite will create database files for you; all you’ll need to do is tell it which tables you need, which you can do by using the sqlite-net CreateTableAsync method. You can call CreateTableAsync even if the table does already exist—unlike most SQL implementations SQLite is able to ignore instructions to create tables that do already exist. (We spoke about this special feature of SQLite earlier in this chapter.) As a bonus, if sqlite-net detects that new columns have been added to the table, it’ll add these in for you. The upshot of this is that there’s zero complexity in terms of synchronizing schemas in the store database even as you release new versions of the app.
Here’s an example of using CreateTableAsync:
var conn = new SQLiteAsyncConnection("foobar.db");
await conn.CreateTableAsync<Customer>();
Once you’ve created the table, you can use InsertAsync, UpdateAsync, and DeleteAsync. For example, this code shows how we can create a new database, create a table within it, and then insert a new customer:
var conn = new SQLiteAsyncConnection("foobar.db");
await conn.CreateTableAsync<Customer>();
// create a customer...
Customer customer = new Customer()
{
FirstName = "foo",
LastName = "bar",
Email = "foobar@mbrit.com"
};
// insert..
await conn.InsertAsync(customer);
// log...
Debug.WriteLine(string.Format("Created customer #{0}", customer.Id));
The final thing you need to understand when using sqlite-net is how to query data. You can do this using the Table<T> method.
The Table<T> method doesn’t actually access the database (which is why it’s not called TableAsync<T>). What it does is build up a query, which you can then access using ToListAsync, FirstAsync, or FirstOrDefaultAsync—these methods are inspired by the Linq extension methods that you’re likely familiar with from traditional .NET work and, as their name suggests, do use asynchrony.
For example, here’s how to select a list of customers:
var conn = new SQLiteAsyncConnection("foobar.db");
await conn.CreateTableAsync<Customer>();
// create a query...
var query = conn.Table<Customer>().Where(v => v.LastName.StartsWith("A",
StringComparison.CurrentCultureIgnoreCase));
// run...
var list = await query.ToListAsync();
// log...
Debug.WriteLine(string.Format("List contains {0} elements(s)", list.Count));
Those are the basics of how sqlite-net works. The examples are all a little artificial, as each one calls CreateTableAsync at the top. In reality, it is better practice to get all of the tables set up when the application starts; that way, you’ll know you have the database in the correct format when you need to use it and you can take that off of your radar. We’ll see an example of how to do this shortly.
Storing Settings
A typical usage pattern for using SQLite in mobile applications is to have one database for system data (such as global settings) and n databases for user data. The specific implementation we’re going to see here will use the logged-on user’s username as part of the filename of the user database. (The rationale for doing this is straightforward: if you have multiple people logging on to the same device, you want their data siloed off from other users. This is a quick and dirty way of solving that problem. Of course, if they are logged on to the device with a distinct account, their user data would be isolated anyway.)
In this first section we’re going to look at how to store settings in a user-agnostic system database. Specifically, we’ll store the last used logon name, and we’ll tweak the operation of LogonPageViewModel to save and load this as appropriate.
The SettingItem Class
The approach we’ll use is a name/value pair table. I’m going to assume this is a fairly obvious pattern, but essentially what we’re trying to do is use a relational database table to hold a list of values keyed off of a name. Specifically, we’ll use the name LastUsername to store the value of the last used username.
As well as fields for name and value, we’ll need a field to hold an integer ID. This is just my personal preference for building database tables—I always have a single integer primary key for everything, even though in this case keying the table off of the Name column is appropriate.
We can give sqlite-net instructions on how to create indexes using IndexedAttribute and UniqueAttribute. We’ll use UniqueAttribute here. Here’s the code:
public class SettingItem
{
// key field...
[AutoIncrement, PrimaryKey]
public int Id { get; set; }
// other fields...
[Unique]
public string Name { get; set; }
public string Value { get; set; }
}
sqlite-net takes the name of a database by way of a connection string. It will detect when compiled against WinRT and will automatically put the database file in the correct location. Specifically, the path it will use is referenced via a call toWindows.Storage.ApplicationData.Current.LocalFolder.Path. (We’ll talk more about filesystem access in Chapter 6.)
“Connection string” in sqlite-net terms is probably a bit strong— it is simply the name of the database file. We can add a constant for storing this name, and a method for returning a connection based on it, to StreetFooRuntime. As we’ll also need a “user connection string,” I’m proposing creating a property and helper method for this too. Here’s the code; I’ve omitted a good deal of code from StreetFooRuntime for brevity.
// add members to StreetFooRuntime...
public static class StreetFooRuntime
{
// fields omitted...
// holds references to the database connections...
internal const string SystemDatabaseConnectionString =
"StreetFoo-system.db";
internal static string UserDatabaseConnectionString = null;
// defines the base URL of our services...
internal const string ServiceUrlBase =
"http://streetfoo.apphb.com/handlers/";
// starts the application/sets up state...
public static async void Start(string module)
{
// omitted...
}
internal static SQLiteAsyncConnection GetSystemDatabase()
{
return new SQLiteAsyncConnection(SystemDatabaseConnectionString);
}
internal static SQLiteAsyncConnection GetUserDatabase()
{
return new SQLiteAsyncConnection(UserDatabaseConnectionString);
}
}
At this point, though, this won’t compile because we haven’t compiled in the sqlite-net classes. (Even if it did compile, it wouldn’t run because we haven’t included the SQLite reference.) Let’s do this now.
Linking in sqlite-net
Unlike most libraries, sqlite-net is intended to be compiled into your application as opposed to being referenced through an assembly or DLL. (Although you can do either of those if you wish. Personally, I like these small open source libraries that you can compile into your project directly; the self-contained nature of them is a big win. That said, complex libraries that require frequent updating don’t lend themselves well to this model.)
To install the sqlite-net library, right-click on the UI-agnostic StreetFoo.Client project in Solution Explorer and select Manage NuGet Packages. Search the NuGet official package source for sqlite-net. You’ll see something like Figure 3-2.
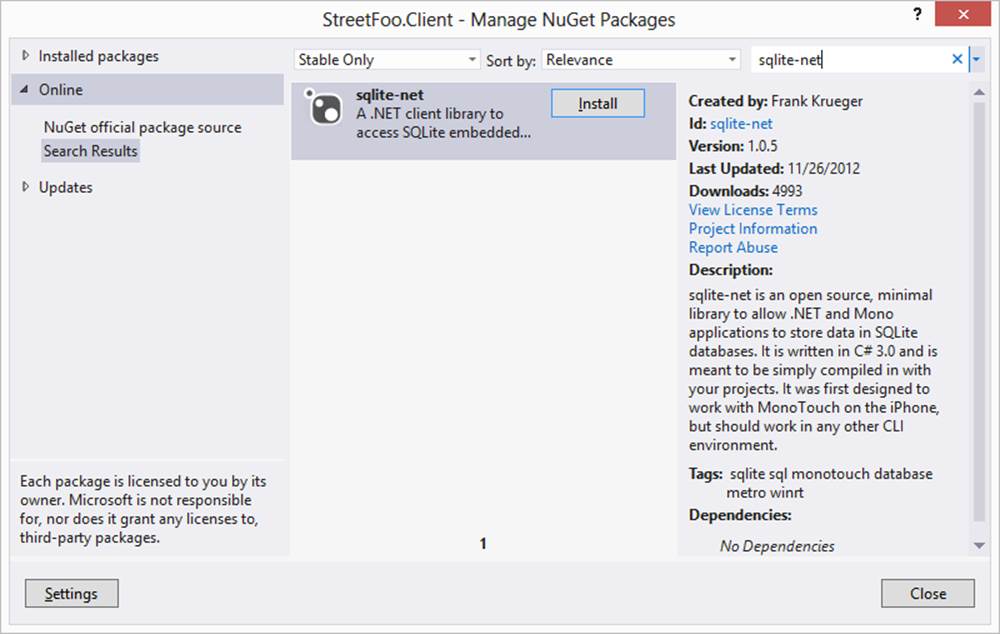
Figure 3-2. Finding the sqlite-net package
Click Install to install the library. Two files will be added to the project, as shown in Figure 3-3.
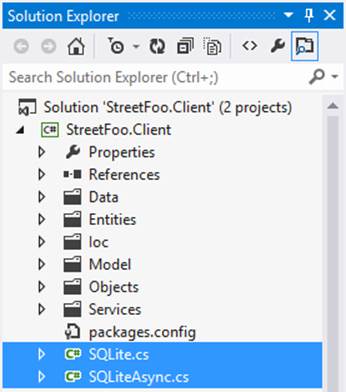
Figure 3-3. The two sqlite-net files in situ within the project
NOTE
The sqlite-net library is slightly unusual in that it doesn’t install binary references in the project—it actually adds source code files.
To clarify, at this point we still don’t have the SQLite engine—all we have is a client that’s able to talk to SQLite. What we need to do now is add a reference to that engine. SQLite is implemented in C, and it’s compiled into native code.
This creates some complications. Back when .NET was originally designed, the objective was to build something that was processor-agnostic in a similar way to how Java was. This is why .NET assemblies compile to Microsoft Intermediate Language (MSIL). When .NET code is actually executed, it is “just in time” compiled to native code. This works well in practical terms in the .NET world as you can create one assembly that runs on x86- and x64-based systems. You do so by setting the build configuration to Any CPU, which happens to be the default option.
In the Windows Store apps world, we still have Any CPU, but the meaning here is different. In Windows Store apps, Any CPU means x86, or x64, or ARM. However, because SQLite is native code, you have to indicate which processor you want it to run on. This doesn’t really have any impact, apart from making packaging the app a little more complicated. If you have an “Any CPU” app, you can upload one package to the Windows Store and it’ll work for everyone. If you can’t use Any CPU, you’ll need to create packages for each processor that you want to support. (I’ll talk in a moment about why selecting x86 and ignoring x64 is likely good enough.) We talk more about packaging for the Store in Chapter 15. If you’re wondering why the native core Windows Runtime components work with Any CPU, it’s because Windows is handling that part of the problem on your behalf.
Recall that previously you installed the Visual Studio extension that provided SQLite capability. You can now add a reference to the SQLite engine using the Add Reference dialog within Visual Studio. However, you need to select the Windows option from the list on the left, and the Extensions suboption within that. You then need to select both the SQLite for Windows Runtime option and the Microsoft Visual C++ Runtime Package option. (SQLite depends on that Visual C++ package—it’s analogous to the Visual C++ Redistributables package from previous platform architectures.) Figure 3-4 illustrates.
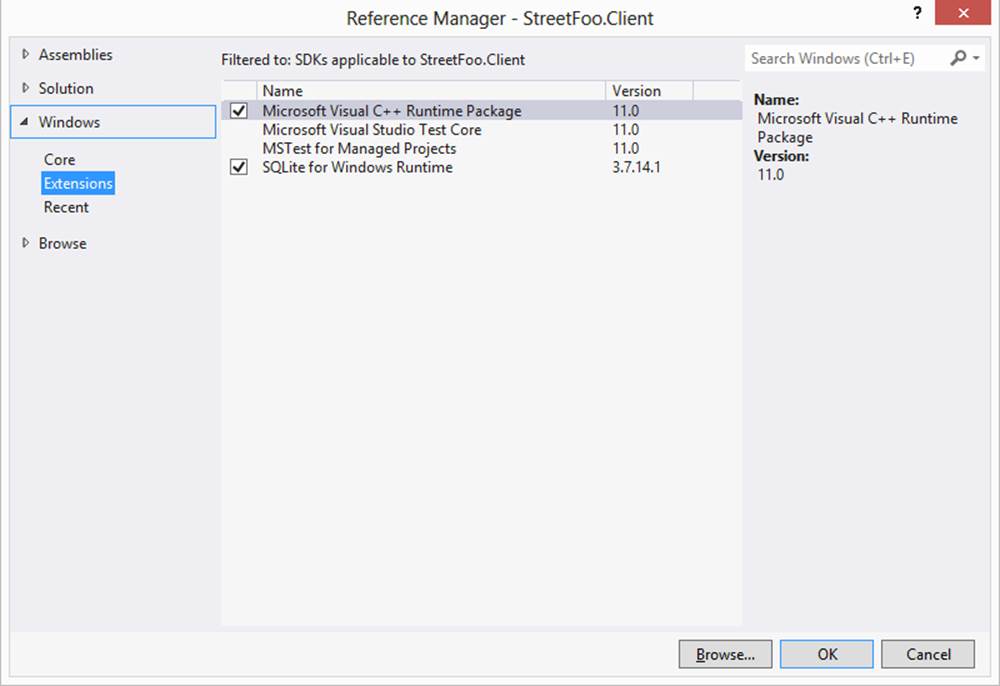
Figure 3-4. Adding the SQLite reference
If you accept those changes and compile, you’ll see errors like this:
1>------ Build started: Project: StreetFoo.Client, Configuration: Debug Any CPU
------1>C:\Windows\Microsoft.NET\Framework\v4.0.30319\Microsoft.Common.targets
(1701,5): error MSB3779: The processor architecture of the project being built
"Any CPU" is not supported by the referenced SDK "Microsoft.VCLibs,
Version=11.0". Please consider changing the targeted processor architecture of
your project (in visual studio this can be done through the Configuration
Manager) to one of the architectures supported by the SDK: "x86, x64, ARM".
1>C:\Windows\Microsoft.NET\Framework\v4.0.30319\Microsoft.Common.targets
(1701,5): error MSB3779: The processor architecture of the project being built
"Any CPU" is not supported by the referenced SDK "SQLite.WinRT,
Version=3.7.14.1". Please consider changing the targeted processor architecture
of your project (in visual studio this can be done through the Configuration
Manager) to one of the architectures supported by the SDK: "x86, x64, ARM".
2>------ Build started: Project: StreetFoo.Client.UI, Configuration: Debug Any
CPU ------
2>CSC : error CS0006: Metadata file 'C:\BookCode\Chapter04\StreetFoo.Client\
StreetFoo.Client\bin\Debug\StreetFoo.
Client.dll' could not be found
========== Build: 0 succeeded, 2 failed, 0 up-to-date, 0 skipped ==========
This is telling us that we need to be explicit about our choice of processors.
It’s very important when you change this that you use the Configuration Manager option within Visual Studio and not just go into the per-project properties and change options in there. Right-click on the solution in Solution Explorer and choose Configuration Manager. Set the “Active solution platform” to x86. Figure 3-5 illustrates.
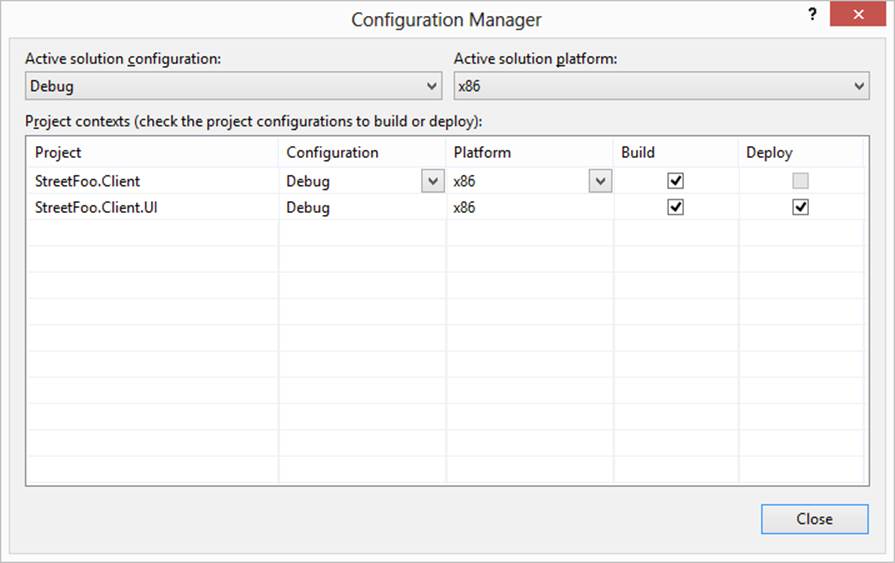
Figure 3-5. Setting the solution platform to x86
Confirm that this mostly works by compiling the project. You won’t be able to test the ability to reference sqlite3.dll without running it, which you can’t do yet because we haven’t written the code to call it.
A QUICK WORD ABOUT X64 SUPPORT
Try to avoid the temptation to think that you need to support x86 and x64 packages explicitly. You most likely do not need to do this. We tend to think of x64 as being “better,” but it’s actually only better if you need to support great gobs of data and need the address space. Most normal apps (especially those running on low-end hardware, like tablets) can’t take advantage of 64-bit, and there’s no practical difference between running an x86 app on an x64 system and a native x64 app running on an x64 system.
By way of illustration, consider that Microsoft produces 64-bit versions of SQL Server and Exchange Server, but Visual Studio only comes in an x86 variety and there are no plans to produce an x64 version. If you need to split up your packages, you’ll only really need to produce x86 and ARM versions to cover the entire platform.
Creating the Database Table for SettingItem
We already have a place for setting up our application on boot—it’s the Start method of StreetFooRuntime. This would seem a good place to set up our system database.
One wrinkle is that if we want to access the database from that method, we’ll need to make it async so that we can await the CreateTableAsync<T> call. This will involve rattling back through the methods that call Start to flow through the asynchronous nature of the call.
First, then, here’s the modification to the Start method that will create our SettingItem table. Note the change to the method declaration to include async and an adjustment of the return type from void to Task:
// starts the application/sets up state...
public static async Task Start(string module)
{
Module = module;
// initialize TinyIoC...
TinyIoCContainer.Current.AutoRegister();
// initialize the system database...
// a rare move to do this synchronously as we're booting up...
var conn = GetSystemDatabase();
await conn.CreateTableAsync<SettingItem>();
}
Oddly, the compile won’t raise a warning that the preexisting call to Start was not awaited. (The preexisting call happens to be within the OnLaunched method in App.xaml.) We should fix that, as we want things to happen in a predictable order—specifically, we don’t want our logon form displayed before the application has started. I won’t show the code because it’s just a simple change in a larger method, but you should find OnLaunched, declare it to be async, and add an await declaration to the call.
At this point you can run the application, although you won’t see much. That said, having it not crash is a good enough indicator that the various bits are in the right place.
Reading and Writing Values
Now that we have a database table that we can use, we can turn our attention to methods that read and write values to it. We’ll start with SetValueAsync.
SetValueAsync
The operation here is that given a key, we need to find an item with that key and create it if it does not exist. Either way, we need to set the value.
SetValueAsync will use the same convention used previously with regards to the three callbacks to business-tier methods (success, failure, and complete). Here’s the code:
public class SettingItem
{
// key field...
[AutoIncrement(), PrimaryKey()]
public int Id { get; set; }
// other fields...
[Unique]
public string Name { get; set; }
public string Value { get; set; }
internal static async Task SetValueAsync(string name, string value)
{
var conn = StreetFooRuntime.GetSystemDatabase();
// load an existing value...
var setting = await conn.Table<SettingItem>().Where(v => v.Name
== name).FirstOrDefaultAsync();
if (setting != null)
{
// change and update...
setting.Value = value;
await conn.UpdateAsync(setting);
}
else
{
setting = new SettingItem()
{
Name = name,
Value = value
};
// save...
await conn.InsertAsync(setting);
}
}
It should be fairly obvious what we’re doing there. After we have a connection, we’re querying the table to find out whether we have an item with that name already. If we do, we update it; if we don’t, we create it.
GetValueAsync
GetValueAsync will do the reverse. If we have it, it’ll return it; otherwise, we’ll return null. Here’s the code:
// add method to SettingItem...
internal static async Task<string> GetValueAsync(string name)
{
var conn = StreetFooRuntime.GetSystemDatabase();
// load any existing value...
var setting = (await conn.Table<SettingItem>().Where(v => v.Name
== name).ToListAsync()).FirstOrDefault();
if (setting != null)
return setting.Value;
else
return null;
}
Now that we can get and set values, we can use these operations on LogonPageViewModel.
Modifying LogonPageViewModel
Implementing this is very easy, as it should be because all we’re doing is handling persistent settings values. If we’ve ended up making this difficult, we’ve mucked something up with the approach.
The only thing that’s missing is that at this point we don’t have a way of knowing that a view has been activated. This is where having base classes for the view-model types makes sense, as we can add an Activated method to the ViewModel class and override it whenever we need to know that we’ve been activated.
Here’s the change to IViewModel:
// add method to IViewModel...
// base class for view-model implementations...
public interface IViewModel : INotifyPropertyChanged
{
// property to indicate whether the model is busy working...
bool IsBusy
{
get;
}
// called when the view is activated...
void Activated();
}
Here’s the new method to add to ViewModel:
// add to ViewModel...
// called when the view is activated…
public virtual void Activated()
{
}
Now we need to call it, but that’s a little more complicated.
LayoutAwarePage is given to use by Visual Studio on project inception, but we have refrained from making that understand view-models. Consider that thus far all we’ve done when we create a view based on our new StreetFooPage class is create a Model property and just set that to be whatever is returned from the view-model IoC container. We now need to change StreetFooPage so that when a page is displayed (“navigated to”), we find the view-model and call Activated. Plus, we could do with adding an extension method so that we can dereference a view-model from a page.
Here’s the code to add to PageExtender:
// Add method to PageExtender...
internal static IViewModel GetModel(this Page page)
{
return page.DataContext as IViewModel;
}
Here’s the implementation of OnNavigatedTo that needs to be added to StreetFooPage:
// Add method to StreetFooPage...
protected override void OnNavigatedTo
(Windows.UI.Xaml.Navigation.NavigationEventArgs e)
{
base.OnNavigatedTo(e);
// ok...
this.GetModel().Activated();
}
To round this off, we need to call SetValueAsync and GetValueAsync to set and get the last known user. We’ll do this in that order.
To set the last known user, we need to modify the DoLogon method in LogonPageViewModel to save the username on success logon. Here’s the code to do that:
// Add a constant to hold the name of the value...
internal const string LastUsernameKey = "LastUsername";
// Modify DoLogon method in LogonPageViewModel...
private async void DoLogon(CommandExecutionContext context)
{
// validate...
ErrorBucket errors = new ErrorBucket();
Validate(errors);
// ok?
if (!(errors.HasErrors))
{
// get a handler...
ILogonServiceProxy proxy = ServiceProxyFactory.Current.GetHandler
<ILogonServiceProxy>();
// call...
using(this.EnterBusy())
{
var result = await proxy.LogonAsync(this.Username,
this.Password);
if (!(result.HasErrors))
{
// logon... pass through the username as each user gets
// their own database...
await StreetFooRuntime.LogonAsync(this.Username,
result.Token);
// while we're here - store a setting containing the
// logon name of the user...
await SettingItem.SetValueAsync(LastUsernameKey,
this.Username);
// something happened...
await this.ShowAlertAsync("Logon OK.");
}
else
errors.CopyFrom(result);
}
}
// errors?
if (errors.HasErrors)
await this.Host.ShowAlertAsync(errors);
}
That’s the setter. The getter is just as easy. Here’s the change that uses the Activated method we built earlier:
public override async void Activated()
{
base.Activated();
// restore the setting...
this.Username = await SettingItem.GetValueAsync(LastUsernameKey);
}
You should now find that if you run the app and log on, then close the app and start it again, the username will be remembered. This shows that the whole loop is closed end to end—that is, you can create a new SQLite database, connect to it, and get data in and out of it.
Caching Data Locally
Being able to store settings is a good introduction to working with data, but the much more interesting part in this is being able to store data locally to work with, rather than being dependent on a network.
Businesses typically take the view that Internet connections are inherently unreliable and building apps that deal with this inherent unreliability is typically worth the extra investment involved in syncing an offline cache of the data. Personally, I can’t see this connection unreliability issue going away in anything but the long term—2023 or similar timescales.
The approach we’re going to use here is to have the view-model and the attendant logic work exclusively with the local cached copy. We know that the local database is always available. Separate components will deal with getting data from the network and into the cache. Ultimately, we can then extend this model to synchronizing local changes back to the store on the server. We’ll actually do this in Chapter 15.
Local Caching
On our server we have a list of problem reports, and it’s these that we need to get down onto the device. The data is not complex data—in fact, these are stored in one table and there is no related data (i.e., it’s just a flat list). We’ll create a ReportItem class to store reports, and structurally it won’t be much more complicated than the SettingItem class that we just worked with.
The only difference is that whereas in SettingItem we created the entity and control its lifetime and values locally, for ReportItem the master copy of the data will reside on the server.
The server is going to return the reports as JSON, so we’ll need to convert the JSON data returned into ReportItem instances. We’re going to use a process called mapping to do this. It’s a very straightforward idea: you nominate fields in your domain objects and tell them which values in the JSON they map to.
In the .NET world, the best framework to use for JSON mapping is JSON.NET. Microsoft’s engineers themselves even recommend using this library. To install JSON.NET, right-click on the UI-agnostic StreetFoo.Client project in Solution Explorer and select Manage NuGet Packages. Search the NuGet official package source for JSON.NET. (This is essentially the same process as when we installed sqlite-net previously.)
Mapping JSON to Database Entities
The JSON that we’re dealing with (i.e., the JSON describing an individual report) will look something like this:
{
"ownerUserId":"4fb28003e7044a90803a3168",
"title":"Remove damaged light",
"description":"In malesuada vulputate ipsum sed posuere.",
"latitude":0,
"longitude":0,
"apiKey":"4f41463a-dfc7-45dd-8d95-bf339f040933",
"_id":"4fb2a0e1e7044a92bc693ac5"
}
We want to turn it into an object that looks like this:
public class ReportItem
{
// key field...
[AutoIncrement(), PrimaryKey()]
public int Id { get; set; }
// other fields...
[Unique]
public string NativeId { get; set; }
public string Title { get; set; }
public string Description { get; set; }
public decimal Latitude { get; set; }
public decimal Longitude { get; set; }
}
The advantage of not having a particularly sophisticated entity/domain model is it’s really obvious to see what we need to do here. The description value in the JSON, for example, has to map to the Description field in the ReportItem class. The only strange one is NativeId, which has to map to the _id value in the JSON.
The server is using Mongo as its backing database, and _id is used as the unique object ID within Mongo. Overall, what we’re trying to build here is a local cache of the remote data. It’s a standard rule when doing this that you maintain your own IDs in the local cache, but maintain references to the real IDs on the server. (Maintaining your own local IDs allows the local database to do the heavy lifting for you and generally reduces brittleness.) Having the real IDs allows you to go back to the database to issue instructions for specific items.
In theory, then, we can further decorate our ReportItem class such that we know that properties are mapped to values in the fields, as follows. Because the convention with JSON is to camel-case the names, and in .NET we’re supposed to Pascal-case the names, we need to provide that name mapping explicitly. Also, JSON.NET will map all of the properties that it finds, so we need to explicitly ignore the Id property using the JsonIgnore attribute.
public class ReportItem
{
// key field...
[AutoIncrement, PrimaryKey, JsonIgnore]
public int Id { get; set; }
// other fields...
[Unique, JsonProperty("_id")]
public string NativeId { get; set; }
[JsonProperty("title")]
public string Title { get; set; }
[JsonProperty("description")]
public string Description { get; set; }
[JsonProperty("latitude")]
public decimal Latitude { get; set; }
[JsonProperty("longitude")]
public decimal Longitude { get; set; }
}
Creating Test Reports
The StreetFoo server has a feature whereby you can ask it to create test data for you, rather than your having to key in test data. You’ll need to do this in order to run the rest of the project; otherwise, you won’t have any data to store in your local cache, and therefore no data to put on the screen.
To do this:
1. Go to http://streetfoo.apphb.com/.
2. Click on Create Sample Data.
3. Enter your API key and the name of a user that you have already registered.
4. Click Ensure Sample Data.
The server will look to see if an account on that API key has any reports stored against it. If it does not, it will create 50 random reports for you.
Setting Up the User Database
At the beginning of this chapter, we discussed having separate system and user databases, the idea being that we’d store system settings in one and user-specific data in the other. The reports are an obvious example of user-specific data; hence, the first thing that we need to do is get that database configured.
We’re going to configure the user database when the user logs on. (This makes sense, as it’s the first place that we know we have a valid user.)
The first thing that we need to do is modify LogonPageViewModel so that it sets up the database. As this operation to set up the database is a deep, application-level function, my proposal is that we build a method in StreetFooRuntime that handles a logon operation. One of the things that we’re going to do is keep track of the logon token returned by the server, and it makes more sense to keep this global. We’ll need to use this logon token when we ask for reports; otherwise, the server won’t know which account the report is for.
We’ve already seen how to set up a database when we worked with SettingItem. This is essentially the same operation, just with a different POCO class.
NOTE
Again, a POCO class is a plain ol’ CLR object, meaning a class that has nothing special about it in terms of integrating with an ORM (i.e., no special base class, interface implementations, etc.).
Here’s the revised implementation of StreetFooRuntime, with some of the less relevant code omitted:
public static class StreetFooRuntime
{
// holds a reference to how we started...
public static string Module { get; private set; }
// holds a reference to the logon token...
internal static string LogonToken { get; private set; }
// holds a refrence to the database connections...
internal const string SystemDatabaseConnectionString =
"StreetFoo-system.db";
internal static string UserDatabaseConnectionString = null;
// starts the application/sets up state...
public static async void Start(string module)
{
// omitted...
}
internal static bool HasLogonToken
{
get
{
return !(string.IsNullOrEmpty(LogonToken));
}
}
internal static async Task LogonAsync(string username, string token)
{
// set the database to be a user specific one... (assumes the
//username doesn't have evil chars in it
// —for production you may prefer to use a hash)...
UserDatabaseConnectionString = string.Format(
"StreetFoo-user-{0}.db", username);
// store the logon token...
LogonToken = token;
// initialize the database—has to be done async...
var conn = GetUserDatabase();
await conn.CreateTableAsync<ReportItem>();
}
internal static SQLiteAsyncConnection GetSystemDatabase()
{
return new SQLiteAsyncConnection(SystemDatabaseConnectionString);
}
internal static SQLiteAsyncConnection GetUserDatabase()
{
return new SQLiteAsyncConnection(UserDatabaseConnectionString);
}
}
Of course, that won’t work unless we actually call the LogonAsync method from within LogonPageViewModel. Here’s the change:
// modify DoLogon within LogonPageViewModel...
private async void DoLogon(CommandExecutionContext context)
{
// validate...
ErrorBucket errors = new ErrorBucket();
Validate(errors);
// ok?
if (!(errors.HasErrors))
{
// get a handler...
ILogonServiceProxy proxy = ServiceProxyFactory.Current.GetHandler
<ILogonServiceProxy>();
// call...
using(this.EnterBusy())
{
var result = await proxy.LogonAsync(this.Username,
this.Password);
if (!(result.HasErrors))
{
// logon... pass through the username as each user gets
// their own database...
await StreetFooRuntime.LogonAsync(this.Username,
result.Token);
// while we're here, store a setting containing the
// logon name of the user...
await SettingItem.SetValueAsync(LastUsernameKey,
this.Username);
// something happened...
await this.ShowAlertAsync("Logon OK.");
}
else
errors.CopyFrom(result);
}
}
// errors?
if (errors.HasErrors)
await this.Host.ShowAlertAsync(errors);
}
We now have everything configured in terms of the database. Now we can turn to populating the local cache. Well, first we need a view to show the user.
Creating ReportsPage
Visual Studio comes with lots of page templates that we can use in our project. The most relevant one to use here is the Items Page. This contains a scrolling grid of items where the scrolling runs off the right side of the page, as dictated by the Modern UI design language. Figure 3-6illustrates where this template is in the Visual Studio Add New Item list.

Figure 3-6. The Items Page template
Add one of these to your project, now called ReportsPage, and you can get going.
As you can probably imagine, the objective of this page is to get a list of reports to display and then use data binding to present it. By default, you’ll get some data binding directions, as per this automatically created one for ReportsPage:
<Page.Resources>
<!-- Collection of items displayed by this page -->
<CollectionViewSource
x:Name="itemsViewSource"
Source="{Binding Items}"/>
</Page.Resources>
One job we need to do is to get an Items property in the view-model that we’ll build in a moment. (At this point, we just have a page and no attendant view-model.)
Before we do that, it’s worth looking at the template that we are given along with the XAML.
Using Templates
This book is based on Visual Studio 2013 and Windows 8.1, however the way this was done with Visual Studio 2012 and Windows 8 was slightly more refined. In Visual Studio 2012, each project was given a huge set of standard styles and templates to use. When Microsoft upgraded to Visual Studio 2013, they took these out. What happens in vanilla Visual Studio 2013 is each time you create a grid, inline with the grid’s markup you get a template that defines how each item looks. In Visual Studio 2012, each grid would be created with a reference to a shared, standard style. What I’m going to do throughout of work is create a shared library of styles and keep reusing it as we go. This library is just a XAML file. To use it, we eventually need to alter App.xaml to reference that shared library. To start, create a new file in the Common folder called StandardStyles.xaml. Then add this markup:
<ResourceDictionary
xmlns="http://schemas.microsoft.com/winfx/2006/xaml/presentation"
xmlns:x="http://schemas.microsoft.com/winfx/2006/xaml">
<Style x:Key="BasicTextStyle" TargetType="TextBlock">
<Setter Property="Foreground" Value="{StaticResource
ApplicationForegroundThemeBrush}"/>
<Setter Property="FontSize" Value="{StaticResource
ControlContentThemeFontSize}"/>
<Setter Property="FontFamily" Value="{StaticResource
ContentControlThemeFontFamily}"/>
<Setter Property="TextTrimming" Value="WordEllipsis"/>
<Setter Property="TextWrapping" Value="Wrap"/>
<Setter Property="Typography.StylisticSet20" Value="True"/>
<Setter Property="Typography.DiscretionaryLigatures" Value="True"/>
<Setter Property="Typography.CaseSensitiveForms" Value="True"/>
</Style>
<Style x:Key="BaselineTextStyle" TargetType="TextBlock" BasedOn=
"{StaticResource BasicTextStyle}">
<Setter Property="LineHeight" Value="20"/>
<Setter Property="LineStackingStrategy" Value="BlockLineHeight"/>
<!-- Properly align text along its baseline -->
<Setter Property="RenderTransform">
<Setter.Value>
<TranslateTransform X="-1" Y="4"/>
</Setter.Value>
</Setter>
</Style>
<Style x:Key="TitleTextStyle" TargetType="TextBlock" BasedOn="
{StaticResource BaselineTextStyle}">
<Setter Property="FontWeight" Value="SemiBold"/>
</Style>
<Style x:Key="CaptionTextStyle" TargetType="TextBlock" BasedOn=
"{StaticResource BaselineTextStyle}">
<Setter Property="FontSize" Value="12"/>
<Setter Property="Foreground" Value="{StaticResource
ApplicationSecondaryForegroundThemeBrush}"/>
</Style>
<DataTemplate x:Key="ReportItem250x250Template">
<Grid HorizontalAlignment="Left" Width="250" Height="250">
<Border Background="{StaticResource
ListViewItemPlaceholderBackgroundThemeBrush}">
<Image Source="{Binding ImageUri}" Stretch="UniformToFill"/>
</Border>
<StackPanel VerticalAlignment="Bottom"
Background="{StaticResource ListViewItemOverlayBackgroundThemeBrush}">
<TextBlock Text="{Binding Title}" Foreground="
{StaticResource ListViewItemOverlayForegroundThemeBrush}" Style="{StaticResource
TitleTextStyle}" Height="60" Margin="15,0,15,0"/>
<TextBlock Text="{Binding Description}" Foreground=
"{StaticResource ListViewItemOverlaySecondaryForegroundThemeBrush}"
Style="{StaticResource CaptionTextStyle}" TextWrapping="NoWrap"
Margin="15,0,15,10"/>
</StackPanel>
</Grid>
</DataTemplate>
</ResourceDictionary>
The template that we’re interested in is that last one—Standard250×250ItemTemplate. We’ll use that in our grid shortly. To reference our new bundle of styles, edit App.xaml and add this markup:
<Application
x:Class="StreetFoo.Client.UI.App"
xmlns="http://schemas.microsoft.com/winfx/2006/xaml/presentation"
xmlns:x="http://schemas.microsoft.com/winfx/2006/xaml"
xmlns:local="using:StreetFoo.Client.UI">
<Application.Resources>
<ResourceDictionary>
<!-- TODO: Delete this line if the key AppName is declared
in App.xaml -->
<local:BooleanNegationConverter x:Key="BooleanNegationConverter"/>
<local:BooleanToVisibilityConverter x:Key=
"BooleanToVisibilityConverter"/>
<!-- shared styles... -->
<ResourceDictionary.MergedDictionaries>
<ResourceDictionary Source="Common/StandardStyles.xaml"/>
</ResourceDictionary.MergedDictionaries>
</ResourceDictionary>
</Application.Resources>
</Application>
The activity surrounding the templates you are about to see happens a lot in WinRT. You ask some subsystem for a template, which is returned as XML. You’ll then fill it in with your own data. (We’ll see this specifically when we look at notifications in Chapter 4.)
Find the GridView that you were given when the page was created, remove the DataTemplate element, then add this ItemTemplate attribute that references our common style:
<!-- Horizontal scrolling grid used in most view states -->
<GridView
x:Name="itemGridView"
AutomationProperties.AutomationId="ItemsGridView"
AutomationProperties.Name="Items"
TabIndex="1"
Grid.Row="1"
Margin="0,-4,0,0"
Padding="116,0,116,46"
ItemsSource="{Binding Source={StaticResource itemsViewSource}}"
ItemTemplate="{StaticResource ReportItem250×250ItemTemplate}"/>
In terms of the actual XAML, we’re done. This is really the point where Microsoft is driving the tooling for Windows Store apps. The Modern UI design language promotes an almost reductionist approach. As a result, the UIs are very easy to build.
It would be great to actually get some data on the page, so let’s do that now.
Building a Local Cache
We know that we have a user database that can store ReportItem instances once they have been created from the JSON returned from the server; the question is, how do we fill up the database?
Moreover, the question is, what sort of experience do we want for the user?
§ If the user is logging in for the first time, the user’s database will be empty. In this instance, we want to present the Reports page as blank, but update the cache in the background. When the cache update is finished, we want to update the UI.
§ If the user is not logging in for the first time, we don’t know how fresh the cached data is. However, the user will want to see a working UI as quickly as possible, so we’ll present whatever data we have and still update the cache in the background. Again, when the cache update is finished, we want to update the UI.
Those distinctions are subtle, but important: get users to a point where they think that something is happening, while in the background actually do the work that needs to be done.
In actuality, this is pretty easy, given that async/await does all the heavy lifting for us with regards to the multithreading. We can structure our code as normal synchronous code and allow async/await to “streamline” it for multithreaded use. We can still drive the UI in a responsive fashion, despite the fact that we have to check local databases, drag data back from the network, update local databases, and so on.
This is reasonably complex to build, so let’s enumerate the components:
§ We’ll need a new view-model called ReportsPageViewModel and its attendant IReportsPageViewModel.
§ We’ll need a service proxy that can return data from the server. This will be called GetReportsByUserServiceProxy.
§ We’ll then need some sort of cache manager. We’ll have to make a decision about where to put that, but it will need to be able to indicate whether the cache is empty, fetch fresh data from the server, update its local store, and return its contents.
The first two are similar to things that we have built before, so when we do that I’ll go through it quite quickly. The last part—the cache manager—is the novel part, so we’ll take more time there.
So, the first decision we have to make about a cache manager is whether we roll it into its own class, or whether we simply put methods in ReportItem that manage the cache. My view on this is that if we were in a position where we were managing a lot of separate caches, creating a generic concept of a “cache manager” and then specializing it would make sense. I don’t think we’re in that place, though, so I’m going to invoke the idea of YAGNI and propose a simpler solution of putting cache management methods in ReportItem.
NOTE
YAGNI is short for “you ain’t gonna need it.” It alludes to the fact that developers are sometimes tempted to build overly complex systems containing features that aren’t ultimately of value.
The first thing we’ll tackle is the indicator of whether the cache is empty.
This is the first place where we see the subtleties of working with an “async-capable” database. We actually used this before, but didn’t go into detail—so let’s do that now.
The original version of sqlite-net (the access library we use for talking to SQLite databases) didn’t have support for asynchronous access. However, asynchronous access is absolutely required if we want to create a good experience for the users of our app, and one of the beautiful things about our industry is the fact that we can all contribute to open source in order to fix things. Hence, sqlite-net now does have asynchronous support.
In the original library, you can create queries on the database using the Table<T> method. This method returns a TableQuery<T> instance and has a custom Where method. The regular Where extension method added to IEnumerable<T> in System.Linq walks objects that are already loaded in memory. The specific Where method on TableQuery<T> actually changes the query that will ultimately be issued to the database. Here’s an example of using Where in the synchronous sqlite-net API and the query that it maps to:
var query = GetConnection().Table<Foo>().Where(v => v.Bar == 27);
// issues to SQLite → SELECT * FROM FOO WHERE BAR=27
On the sqlite-net asynchronous API, exactly the same thing happens, but I’m laboring this point because of the confusion between the Linq methods and the specific methods added to sqlite-net.
System.Linq will give you methods like First, Any, and so on, but these methods will run synchronously. When you run Table<T> on the asynchronous API you will get an instance of AsyncTableQuery<T> back, which happens to implement IEnumerable<T>; therefore, you gain access to everything that Linq can do. However, if you use any of the underlying Linq methods, because Linq knows nothing about the asynchronous nature of the API those methods will run synchronously. Therefore, it’s important that you use the special asynchronous methods inAsyncTableQuery<T>. Those methods specifically are FirstAsync, FirstOrDefaultAsync, ElementAtAsync, CountAsync, and ToListAsync. Whether the original Linq methods will remain accessible in AsyncTableQuery<T> remains to be seen, but as of the time of writing they are there.
All of that is a longwinded way of saying that this method, which needs to be added to ReportItem, is correctly built to accommodate the asynchronous nature of the API:
// add to ReportItem...
internal static async Task<bool> IsCacheEmpty()
{
var conn = StreetFooRuntime.GetUserDatabase();
return (await conn.Table<ReportItem>().FirstOrDefaultAsync())
== null;
}
The Table<ReportItem>() method will run on the entry thread for the method (which may or may not be the UI thread—it depends what you’ve been called by). FirstOrDefaultAsync will definitely run on a worker thread.
Similarly, we can create GetAllFromCacheAsync, which returns everything from the cache using a worker thread:
// add to ReportItem...
// reads the local cache and populates a collection...
internal static async Task<IEnumerable<ReportItem>>
GetAllFromCacheAsync()
{
var conn = StreetFooRuntime.GetUserDatabase();
return await conn.Table<ReportItem>().ToListAsync();
}
Updating the Cache
We’ll do this next part backward—what we want to do is update the local cache, assuming that we have some class that can return ReportItem instances from the server. (We’ll build that class in a moment, and it’ll use JSON.NET to map the JSON to the POCO.)
When we update the local cache, we want to walk each item that we get and see whether we have an item with the given NativeId value in the database. If we do, then we have two options: we can either delete the item on the assumption that we’ll insert it again, or we can update the item. In this instance I’m proposing deleting it. The upshot of this is that by the time we’ve run through everything, the local cache will be as per the set of data returned from the server. (In production software, you normally aim for more sophistication than “delete and recreate” in every instance.)
Here is the method that will get the reports from the server and update the local cache accordingly:
// add to ReportItem...
// updates the local cache of the reports...
public static async Task UpdateCacheFromServerAsync()
{
// create a service proxy to call up to the server...
var proxy = TinyIoCContainer.Current.Resolve
<IGetReportsByUserServiceProxy>();
var result = await proxy.GetReportsByUserAsync();
// did it actually work?
result.AssertNoErrors();
// update...
var conn = StreetFooRuntime.GetUserDatabase();
foreach (var report in result.Reports)
{
// load the existing one, deleting it if we find it...
var existing = await conn.Table<ReportItem>().Where(v =>
v.NativeId == report.NativeId).FirstOrDefaultAsync();
if (existing != null)
await conn.DeleteAsync(existing);
// create...
await conn.InsertAsync(report);
}
}
I hope you can see that working with the database is quite easy and that, in particular, async/await makes working with asynchronous code straightforward.
Returning Reports from the Server
We’ve made server calls a couple of times already, so I’ll do this quickly. The only interesting part is using JSON.NET to do the mapping. In previous examples, whenever we called the server we didn’t do any automated JSON mapping on the results. As discussed, the server will give us back an array of reports as a string. We can use JSON.NET to transform that string into ReportItem instances.
One thing we need to cover first, though, is that we need to send the logon token up to the server so that the server knows who we are. We do this within the ServiceProxy class. We already passed up the API key; now we need to also pass up the LogonToken if we have one. TheConfigureInputArgs method was used previously to do this. Here’s the change:
// Modify method in ServiceProxy class...
protected void ConfigureInputArgs(JsonObject data)
{
// all the requests need an API key...
data.Add("apiKey", ApiKey);
// are we logged on?
if (StreetFooRuntime.HasLogonToken)
data.Add("logonToken", StreetFooRuntime.LogonToken);
}
Finally, we can look at the actual service call. Here’s the implementation of GetReportsByUserAsync. This is where we use the core class of JSON.NET—the JsonConvert class. All we have to do to use this is just tell it what type of object we think the JSON string contains.JsonConvert will then sort this all out for us. (It’s really this that makes JSON.NET so appealing. Not only is it fast—and it is very fast—but also the usage pattern is significantly straightforward to make it almost magical. Give it the merest hint of what you want, and it seems to work it all out.)
// Add method to GetReportsByUserServiceProxy...
public async Task<GetReportsByUserResult> GetReportsByUserAsync()
{
var input = new JsonObject();
var executeResult = await this.Execute(input);
// did it work?
if (!(executeResult.HasErrors))
{
// get the reports...
string asString = executeResult.Output.GetNamedString(
"reports");
// use JSON.NET to create the reports...
var reports = JsonConvert.DeserializeObject<List<ReportItem>>
(asString);
// return...
return new GetReportsByUserResult(reports);
}
else
return new GetReportsByUserResult(executeResult);
}
GetReportsByUserResult will hold a list of reports. This will also extend ErrorBucket so that we can return any errors back to the caller. Here’s the code:
public class GetReportsByUserResult : ErrorBucket
{
internal List<ReportItem> Reports { get; set; }
internal GetReportsByUserResult(IEnumerable<ReportItem> items)
{
this.Reports = new List<ReportItem>();
this.Reports.AddRange(items);
}
internal GetReportsByUserResult(ErrorBucket bucket)
: base(bucket)
{
}
}
We’re almost there—we just need to define the interface and enroll the service proxy into the service IoC container. Here’s the interface:
public interface IGetReportsByUserServiceProxy : IServiceProxy
{
Task<GetReportsByUserResult> GetReportsByUserAsync();
}
We’re actually now very close to getting this working. The only remaining step is to get the view-model to expose a list of items.
The Items Property
The only slightly odd thing that we have to do is that in order to update the grid, we need to use a special type of collection that will signal to the XAML data binding subsystem whenever data in the list changes. A normal List<T> won’t work, as this doesn’t have any events that can be subscribed to. What we need to use instead is ObservableCollection<T>, which does.
The way this works is that we have our model expose an ObservableCollection<ReportItem> called Items. From time to time, we’ll load ReportItem instances from the cache and manipulate this collection.
To make this more manageable, we’ll attack the problem in smaller chunks. The first step is to create a fake report and see if we can get it on the screen.
Here’s the code for ReportsPageViewModel to put up a fake report:
public class ReportsPageViewModel : ViewModel, IReportsPageViewModel
{
public ObservableCollection<ReportItem> Items { get; private set; }
public ReportsPageViewModel(IViewModelHost host)
: base(host)
{
// setup...
this.Items = new ObservableCollection<ReportItem>();
// add a fake report...
this.Items.Add(new ReportItem()
{
Title = "Foobar",
Description = "Hello, world."
});
}
}
If you run that code and log on, you’ll see something like Figure 3-7.

Figure 3-7. Our fake report
Replacing the fake reports with real reports is relatively straightforward. All we have to do is override the Activated method on ViewModel and then update or load the cache. Because we’re using async/await, the user interface will present itself and update the Items list while this is going on. This should create an impression of responsiveness, even if users don’t actually have access to the data that they’re looking for in the first few seconds of operation.
To close the loop and put this together, we need to build a mechanism to refresh the user interface. In the version of the code that you can download, you will find a specific Refresh button; however, we won’t build the actual button here. (All the button does is call the DoRefresh method that we’re about to build.)
That DoRefresh method will look to see if the cache is empty or if a flag is set. If either of those is true, it will defer to the cache management method in ReportItem called UpdateCacheFromServerAsync, which we built earlier. After the cache has been updated (or if it does not need updating), we’ll load the items from the cache and update the collection referenced via our Items property. The standard XAML data binding subsystem, together with the functionality in ObservableCollection<T>, will result in the UI being updated.
Here are the three methods to add to ReportsPageViewModel:
// add methods to ReportsPageViewModel...
private async Task DoRefresh(bool force)
{
// run...
using (this.EnterBusy())
{
// update the local cache...
if (force || await ReportItem.IsCacheEmpty())
await ReportItem.UpdateCacheFromServerAsync();
// reload the items...
await this.ReloadReportsFromCacheAsync();
}
}
private async Task ReloadReportsFromCacheAsync()
{
// set up a load operation to populate the collection
// from the cache...
using (this.EnterBusy())
{
var reports = await ReportItem.GetAllFromCacheAsync();
// update the model...
this.Items.Clear();
foreach (ReportItem report in reports)
this.Items.Add(report);
}
}
public override async void Activated()
{
await DoRefresh(false);
}
Now if you do that, the whole lot will work end to end—specifically, we’ll grab the data from the server, update the local cache, and then update the screen. Figure 3-8 illustrates.
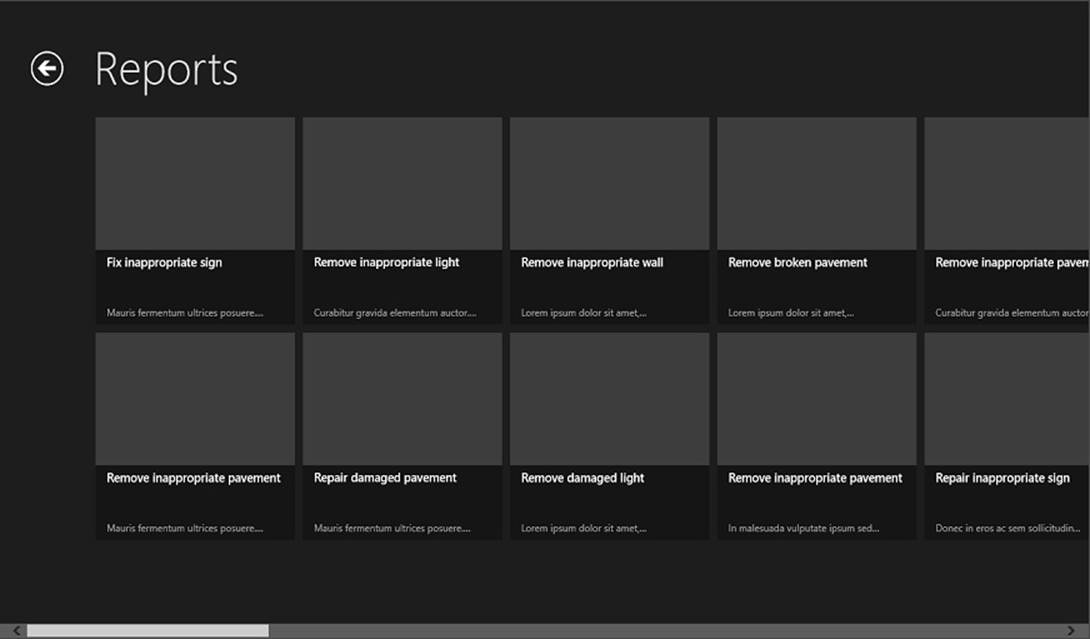
Figure 3-8. Report sample data shown on the grid
All materials on the site are licensed Creative Commons Attribution-Sharealike 3.0 Unported CC BY-SA 3.0 & GNU Free Documentation License (GFDL)
If you are the copyright holder of any material contained on our site and intend to remove it, please contact our site administrator for approval.
© 2016-2025 All site design rights belong to S.Y.A.