Programming Windows Store Apps with C# (2014)
Chapter 8. Searching
Searching is a core Windows Store app UX feature. Because most apps have a search function, Microsoft decided that in Windows Store apps it would be best for search to be implemented in two common ways.
If the user wants to find something in your app, he or she will either swipe in the charms, access the Search feature, type in the keywords, and touch the search button, or use the SearchBox control, which will let the user search from within the application. It’s your responsibility to present to the user the results and any UI elements needed to refine the search. (These refinement UI elements are called filters.)
What we’re going to do in this chapter is add search through the charms bar, and then take a look at the SearchBox. The guidelines for search recommend strongly that you use only one of the two. The hardest part of the implementation is rendering the search results and this is done the same way for both solutions. While we have chosen the charm search, replacing it with the SearchBox won’t require a lot of work, as you will see later. Since this is one area that has undergone a lot of change, I would keep my eye on the documentation and the guidelines in case one of the two methods becomes the preferred one. When the user wants to search, we’ll present a user interface that will use the MyGridView control that we built previously, together with a custom item template designed to render ReportViewItem instances in search results mode. If you remember we built MyGridView in Chapter 4 to support the selection mode required for the app bar. This class extends the regular XAML GridView control to add extra functionality that’s helpful when working in an MVVM mode. As part of the work in this chapter, we’ll add a command that is raised when an item is selected. This is, of course, a normal aspect of a search function—when you can see the item that you want, you need to select it.
One important element of all this is that the search results page that gets created by Visual Studio doesn’t fit into our proper MVVM pattern. We’ll reconfigure the one supplied with one that does fit our MVVM pattern.
In the final part of the chapter, we’ll run through a couple of additional best-practice features that apply when working with search.
Implementing Search
The first thing we are going to do is add a SearchResultsPage. Whether you choose to use the charm search or the search control, you will need this page to render the search results. When using the charm search, we need to add a search contract, and this is done in the app manifest under declarations.
Creating the Search Results Page
Right-click on the project within Solution Explorer, open up Add New Item, and add a new search contract called SearchResultsPage.
This page, like all the standard pages, has a region at the top containing the caption. It also contains a label showing what we’re going to call the query narrative—that is, an explanation of what was searched for. (In Figure 8-1, the query narrative reads “Results for ‘broken.’”) Underneath this will be a list of filters (“all (19), wall (1),” and so on), and underneath that will be the list of items. The filters in our implementation will work by aggregating the last word that appears in the set of found titles. (Given the nature of the test data provided by the server, these all happen to be nouns. However, this approach is a bit ropey for a production implementation.) As well as creating this page, when we add a search contract, Visual Studio will also alter the app manifest to include a reference to the contract.
Figure 8-1 shows what we’re ultimately aiming for.
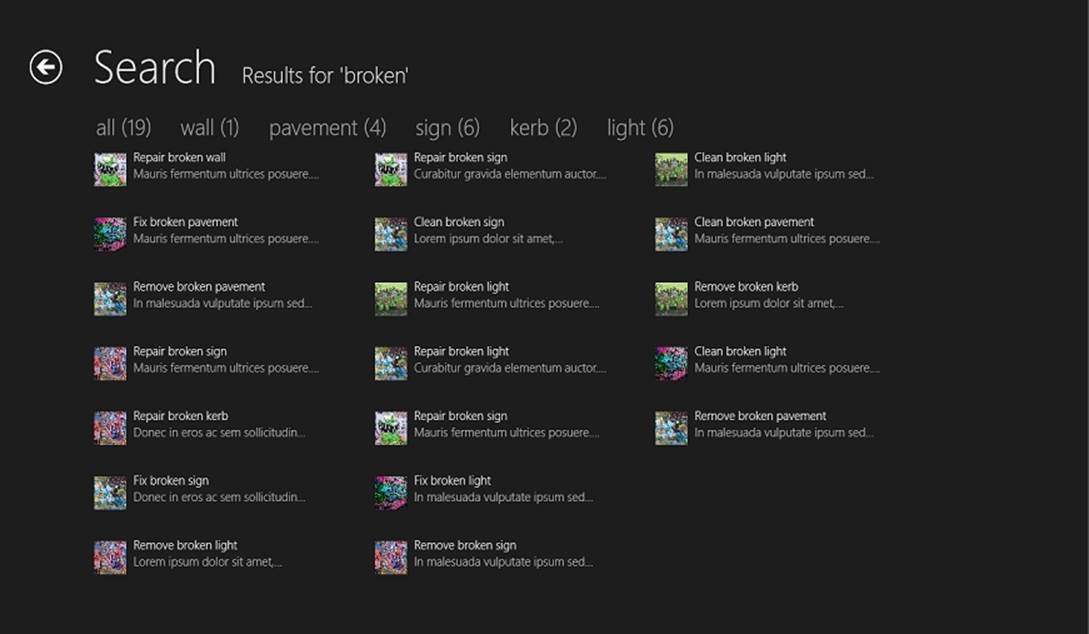
Figure 8-1. What we’re aiming for
Creating SearchResultsPageViewModel
The easy part of all this is setting up the SearchResultPageViewModel class and ISearchResultsPageViewModel.
When we are told to perform a search, we will be told via the SearchPane class. We need to create a subscription to search notifications via an event on this class. The most important thing that we are told here is the query text—this being the string that the user entered into the search charm. We will make it so that this string will ultimately find its way through to the Activated method in our ViewModel class.
The search process will work like this:
§ From within SearchResultPageViewModel, we’ll take the query text and use a regular expression to split it into words.
§ If we have any words to look for, we’ll ask ReportItem to query SQLite and return ReportItem instances containing those words.
§ If we don’t have any words (i.e., the user didn’t key anything in), we’ll ask ReportItem to return everything from the cache. (We’ll talk about the rationale for this later.)
§ We’ll store that master set of items in a property called MasterItems. However, we’ll expose the list of items to display through a property called Results. Results will use ObservableCollection<ReportViewItem> because we need to bind to it. MasterItems will useList<ReportViewItem> because we do not want to bind to it.
§ We have a master list and a display list because of the filtering. Once the master list has been used, we’ll walk the items and build up a list of distinct nouns—the rule being that the last word in the report item’s title will be the noun. We’ll create a new class called SearchFilter to represent filters. We’ll extend this new class from ModelItem because we want to use all of the property notification goodness that this class has. We’ll store our filters in a property called Filters, and again because this is bindable we’ll use anObservableCollection<SearchFilter> instance for storage.
§ The filter set will be built only when the search text changes, and this can only happen by the user reopening the search charm and keying in new data. When the user clicks a filter, the Results collection will be cleared, and a new collection built by taking each item in the master set and seeing if it passes the filter. Ultimately, in your own production apps, you’ll need to decide on the best way to do your searching and filtering. What I’m presenting here is just one way of doing it.
Our view will end up binding two sets of data—the actual results using a MyGridView, and the filters using RadioButton controls hosted within an ItemsControl. In your apps, you may find a list of radio buttons too restrictive. You should feel free to design a (touch-friendly) implementation of your own.
In terms of the view-model members exposed off of the ISearchResultsPageViewModel, we’ll need:
§ QueryText, which will be the actual text that the user enters into the search charm.
§ QueryNarrative, which will be the message presented at the top of the view. If the user doesn’t enter anything, this will be a blank string; otherwise, it will display “Results for <queryText>.”
§ Results and Filters, which we’ve already discussed.
§ HasResults will be a Boolean value that indicates whether there are any items. This will be used to hide the grid and filter views and to show a message to indicate that there are no items.
All that gives us an implementation of ISearchResultsPageViewModel that looks like this:
public interface ISearchResultsPageViewModel : IViewModel
{
string QueryText { get; }
string QueryNarrative { get; }
ObservableCollection<ReportViewItem> Results { get; }
ObservableCollection<SearchFilter> Filters { get; }
bool HasResults { get; }
ICommand SelectionCommand { get; }
}
The base implementation of SearchResultsPageViewModel looks like this:
public class SearchResultsPageViewModel : ViewModel,
ISearchResultsPageViewModel
{
// the master list and filtered list...
private List<ReportViewItem> MasterItems { get; set; }
public ObservableCollection<ReportViewItem> Results { get;
private set; }
// filter options...
public ObservableCollection<SearchFilter> Filters { get;
private set; }
// issued when an item is selected...
public ICommand SelectionCommand { get; private set; }
// track whether we've done a search...
private bool SearchDone { get; set; }
public SearchResultsPageViewModel(IViewModelHost host)
: base(host)
{
this.MasterItems = new List<ReportViewItem>();
this.Results = new ObservableCollection<ReportViewItem>();
this.Filters = new ObservableCollection<SearchFilter>();
}
public string QueryText { get { return this.GetValue<string>(); }
private set { this.SetValue(value); } }
public string QueryNarrative { get { return this.GetValue<string>(); }
private set { this.SetValue(value); } }
public bool HasResults
{
get
{
// if we haven't done a search—be optimistic or otherwise
// we'll flicker...
if (!(this.SearchDone))
return true;
// ok...
return this.Results.Any();
}
}
}
A quick note on that HasResults option: because of the way the view will launch, HasResults will be called before the view-model has finished setting up. If we return false initially, the “no results” message will display and then be replaced by the grid. What we want to do is be more optimistic and assume that we do have results before we actually check whether we do or not. If we don’t do this (i.e., if we’re not optimistic), we’ll get an ugly flicker as we go from “no data” to “some data.”
At this point we should compile OK, but so that we know it works I propose adding an Activated method that will display the query text in a MessageDialog instance. This will let us track whether the basics work. (And remember the “basics” in this case is the code created by Visual Studio that will activate our view and pass in the query text.) Here’s the implementation of Activated:
SearchResultsPageViewModel public override async void Activated
(object args)
{
base.Activated(args);
// show the query text...
await this.Host.ShowAlertAsync((string)args);
}
In order to run the operation, we need to wire up the view in SearchResultsPageViewModel. We’ve done this a few times, but just for clarity:
public sealed partial class SearchResultsPage : StreetFooPage
{
private UIElement _previousContent;
private ApplicationExecutionState _previousExecutionState;
private ISearchResultsPageViewModel ViewModel { get; set; }
public SearchResultsPage()
{
this.InitializeComponent();
this.InitializeViewModel();
}
// code omitted for brevity...
}
To make this work, we need to subscribe to the event on the WinRT-provided SearchView class. We’ll dereference the current frame (creating one if necessary), and then pass the search instruction over to the page. Here’s the code:
// Modify App.xaml.cs:
protected override async void OnLaunched(LaunchActivatedEventArgs e)
{
// start up our runtime...
await StreetFooRuntime.Start("Client");
// code omitted for brevity...
// Ensure the current window is active
Window.Current.Activate();
// register for data transfer...
var manager = DataTransferManager.GetForCurrentView();
manager.DataRequested += manager_DataRequested;
// search...
var search = SearchPane.GetForCurrentView();
search.PlaceholderText = "Report title";
search.QuerySubmitted += search_QuerySubmitted;
}
Now you can run the code and try searching from the Reports page. You’ll see something like Figure 8-2 if you type the text some search terms that I entered into the search charm. Part of how Windows 8.1 works is that you need to direct the search to the StreetFoo app. Make sure StreetFoo.UI.Client is selected in the search charm, otherwise you’ll just be searching your machine for any instances of the string you entered rather than the app.

Figure 8-2. The search terms displayed by SearchResultsPageViewModel
Implementing the Search Operation
What we’re going to do in the remainder of this chapter is actually make the search operation do something. We know at this point that Windows will pass in search requests. Toward the end of this chapter, we’re going to look at refining the basic operation so that it’s a bit slicker.
Searching SQLite
The basic search operation involves issuing a statement to SQLite that issues a WHERE clause based on the keywords that we type in. What we’re going to do with the keywords is use a simple regex to split up the string and force an AND between each one. Thus, if the user enters “broken light,” we’ll issue:
SELECT * FROM ReportItem WHERE TITLE LIKE '%BROKEN%' AND TITLE LIKE '%LIGHT%'
Obviously, because it’s not the late 1990s and we understand about SQL injection attacks, we’ll use a parameterized query. In SQLite, parameters are simply presented as question marks in ordinal order, like so:
SELECT * FROM ReportItem WHERE TITLE LIKE ? AND TITLE LIKE ?
Since introducing the SQLite functionality in Chapter 3, we haven’t done much with it. This is where we go slightly outside of the micro-ORM functionality provided by sqlite-net and build up a SQL string ourselves. (Generally, the idea of an ORM of any type is that you don’t build up SQL yourself but instead rely on the library to do the heavy lifting for you.) This presupposes that we know the name of the table. It’s certainly possible to ask sqlite-net to tell you the details of the table using the GetMapping method in the synchronous SQLiteConnection class. However, for expedience, I’m proposing just hardcoding the name of the table into our method. And yes, that query does contain an inefficient SELECT * statement. However, sqlite-net issues these statements all the time, just to keep the construction of the library lightweight. This isn’t a massive database hammered by thousands of users—it’s just keeping a local cache of a small set of data on a relatively well-powered device. My view is that this is a workable approach.
There are two more things to note about the behavior of the basic search routine. First, if no keywords are passed in, it will return all items. This works on the assumption that if the user keys nothing in the UI and presses the search button, he or she actually wants to see all items and refine from there. (This is a more “Windows 8” way of doing things—don’t put up cryptic messages that require users to think. Instead, just get information to them so that they can keep moving.) Secondly, it assumes that the cache is up-to-date. All searching is done locally and no attempt is made to get data from the server.
With that, here’s the code for SearchCacheAsync to be added to ReportItem:
// Add method to ReportItem...
internal static async Task<IEnumerable<ReportItem>> SearchCacheAsync
(string queryText)
{
// run a regex to extract out the words...
var words = new List<string>();
var regex = new Regex(@"\b\w+\b", RegexOptions.Singleline |
RegexOptions.IgnoreCase);
foreach(Match match in regex.Matches(queryText))
{
var word = match.Value.ToLower();
if(!(words.Contains(word)))
words.Add(word);
}
// do we have anything to find?
if(words.Count > 0)
{
// build up some sql...
var sql = new StringBuilder();
var parameters = new List<object>();
sql.Append("select * from reportitem where ");
bool first = true;
foreach(var word in words)
{
if(first)
first = false;
else
sql.Append(" and ");
// add...
sql.Append("title like ?");
parameters.Add("%" + word + "%");
}
// run...
var conn = StreetFooRuntime.GetUserDatabase();
return await conn.QueryAsync<ReportItem>(sql.ToString(),
parameters.ToArray());
}
else
{
// return the lot...
return await GetAllFromCacheAsync();
}
}
NOTE
For those of you who are not familiar with regular expressions, don’t worry too much about the regex at the top of this method. All it does is select groups of at least one alphanumeric character delineated by word boundaries.
Now that we can search the SQLite database, let’s go back and think about our search routine.
The search routine proper
As mentioned previously, our full search routine in the view-model has some complexity.
When the user keys in new search terms, we’ll go out to SQLite and get back all the ReportItem instances that match using the SearchCacheAsync method that we just built. We’ll then build up a list of filters from those search results and present them to the user. By default, the user will have the All filter selected, which means “apply no filter.” The master set of items returned from SQLite will be held in the MasterItems collection. The set presented to the user will be held in the Results collection.
If the user selects a filter, we’ll take the values in the MasterItems collection, run them through the filter, and update the Results collection. The magic of XAML data binding will result in the view being updated automatically.
The filters will be held as a collection of SearchFilter instances owned by the SearchResultPageViewModel. The SearchFilter class will have an Active property so that we know which one has been selected. To handle the selection, we’ll have to implement a command that gets executed when the user clicks on one of the checkboxes.
We’ll look at SearchFilter first. This will extend ModelItem because we want the data-binding-capable property notifications. When we create a SearchFilter we’ll need a description, the number of items, the bound keyword, and an indicator as to whether it’s active. The All filter will have a description but no keyword, which is why we break those two out.
Juggling the operation of listening for the user touching a filter and having our view-model react is reasonably complex. Each filter will be bound to exactly one checkbox. (They won’t look like checkbox controls, but they are.) MVVM tells us that we’re supposed to use commands to get actions on the UI “felt” in the view-model. Thus, to the SearchFilter class we’ll add a command called SelectionCommand. When we build SearchFilter instances from within SearchResultsPageViewModel, we’ll set this command to invoke a method that changes the filter.
When it comes to actually matching the keyword, if we don’t have a keyword (i.e., we’re using the All filter), we’ll always return true. If not, we’ll look for our keyword at the end of the string. (This isn’t strictly accurate, as really we need to use a regex to match a word boundary before the keyword string, but this is good enough for our purposes.)
Here’s the code:
public class SearchFilter : ModelItem
{
// holds the keyword that we're bound to...
internal string Keyword { get; private set; }
// command to raise when we're selected...
public ICommand SelectionCommand { get; internal set; }
public SearchFilter(string description, int numItems, string keyword,
bool active = false)
{
this.Description = string.Format("{0} ({1})", description, numItems);
this.Keyword = keyword;
this.Active = active;
}
// holds the description...
public string Description { get { return this.GetValue<string>(); }
private set { this.SetValue(value); } }
// holds a flag to indicate that we were active...
public bool Active { get { return this.GetValue<bool>(); }
internal set { this.SetValue(value); } }
internal bool MatchKeyword(ReportViewItem item)
{
// if we have a keyword, match it, otherwise assume it's ok...
if (!(string.IsNullOrEmpty(this.Keyword)))
return item.Title.ToLower().EndsWith(this.Keyword);
else
return true;
}
}
}
Now we’ll move on to the SearchResultsPageViewModel implementation.
The first thing we need to change on the view-model is the Activated method, which will be called when the search results page is shown. This will replace the one that thus far shows a message box:
// Modify method in SearchResultsPageViewModel...
public override async void Activated(object args)
{
base.Activated(args);
// do the search...
await SearchAsync((string)args);
}
Let’s look at the SearchAsync method. The first thing this does is set the internal flag so that we know at least one search has happened. (Before, I mentioned that this was to stop the “No results” message from appearing prematurely.) We’ll also set the query text, as well as the narrative.
// Add method to SearchResultsPageViewModel...
private async Task SearchAsync(string queryText)
{
// flag...
this.SearchDone = true;
// set...
this.QueryText = queryText;
// set the narrative...
if (string.IsNullOrEmpty(queryText))
this.QueryNarrative = string.Empty;
else
this.QueryNarrative = string.Format("Results for '{0}'",
queryText);
The next move is to update the MasterItems collection from the results drawn from SQLite.
// load...
var reports = await ReportItem.SearchCacheAsync(queryText);
this.MasterItems.Clear();
foreach (var report in reports)
this.MasterItems.Add(new ReportViewItem(report));
Once we have the master items, we need to build the filters. As mentioned, this will pull the last word off of the title of each report and add each to a distinct list of nouns. First, though, we need to add the All filter. Note here how the SelectionCommand property is set to a lambda expression that defers to HandleFilterActivated. We’ll create this handler method in a moment.
// do we have anything?
this.Filters.Clear();
if (this.MasterItems.Any())
{
// all filter...
var allFilter = new SearchFilter("all", this.MasterItems.Count,
null, false);
allFilter.SelectionCommand = new DelegateCommand((args) =>
HandleFilterActivated(allFilter));
this.Filters.Add(allFilter);
To build the list of nouns, we use a regex and Dictionary<string, int>. This dictionary keeps track of the hit count for each noun.
var nouns = new Dictionary<string, int>();
var regex = new Regex(@"\b\w+$", RegexOptions.Singleline |
RegexOptions.IgnoreCase);
foreach (var report in reports)
{
var match = regex.Match(report.Title);
// word...
string noun = match.Value.ToLower();
if (!(nouns.ContainsKey(noun)))
nouns[noun] = 0;
nouns[noun]++;
}
Finally, as far as the filters are concerned, we create exactly one filter per discovered noun.
// add the filters...
foreach (var noun in nouns.Keys)
{
var filter = new SearchFilter(noun, nouns[noun], noun);
filter.SelectionCommand = new DelegateCommand((args) =>
HandleFilterActivated(filter));
this.Filters.Add(filter);
}
And finally, as far as the operation is concerned, we return to the ReportImageCacheManager that we built in Chapter 7 and initialize the images.
// update...
var manager = new ReportImageCacheManager();
foreach (var report in this.MasterItems)
await report.InitializeAsync(manager);
That completes the branch where we actually got some items back. In either case, whether we did or didn’t get items back, we need to apply the selected filter. Here is that call, and then we’ll move on to building that method.
// apply the filter...
this.ApplyFilter();
}
To find the active filter, we just walk the list of filters and return the one that’s marked as active. Here’s the code for the ActiveFilter property:
// Add property to SearchResultsPageViewModel...
private SearchFilter ActiveFilter
{
get
{
return this.Filters.Where(v => v.Active).FirstOrDefault();
}
}
Next, remember how in our SelectionCommand handler on the filter we called the HandleFilterActivated method? The job of this handler is to mark all the filters as inactive, apart from the one we clicked on. Once it’s done that, it calls HandleFilterActivated to update the user interface. Here’s the code:
// Add method to SearchResultsPageViewModel...
private void HandleFilterActivated(object args)
{
// walk...
foreach (var filter in this.Filters)
{
if (filter == args)
filter.Active = true;
else
filter.Active = false;
}
// update...
this.ApplyFilter();
}
At this point, we can look at the method that ties it all together. ApplyFilter will take the master set of items held in MasterItems, mash it together with a filter, and update the Results property. After it’s done all that, it’ll ask the ModelItem base implementation to raise a change notification against the HasResults property. Here’s the code:
private void ApplyFilter()
{
// reset...
this.Results.Clear();
// do we have a filter?
var filter = this.ActiveFilter;
if (filter != null)
{
// match...
foreach (var report in this.MasterItems.Where(v =>
filter.MatchKeyword(v)))
this.Results.Add(report);
}
else
{
// copy in every thing...
foreach (var report in this.MasterItems)
this.Results.Add(report);
}
// update...
this.OnPropertyChanged("HasResults");
}
At this point, the view-model will work, but if you run the app it won’t work because we need to make some minor changes to the default XAML provided by Visual Studio. Let’s do that now.
Adjusting the presentation
The work to change the default supplied page layout to one that works with our view-model will make you wonder why we don’t just create a layout from scratch! I haven’t done this because the grid layouts are fiddly to organize, plus we want to grab the default “snapped” view. (We’ll talk more about snapped view in Chapter 12.)
Recall how in Chapter 3 when we first started looking at the GridView we created a specific template for the view. We need to do this again here. Visual Studio will give us a view based on a template called StandardSmallIcon300x70ItemTemplate. What we’re going to do first is create ReportItem300x70ItemTemplate. This continues the approach that we’ve taken thus far (i.e., creating distinct-yet-reusable templates for each type of view-model data).
CAUTION
The first thing you need to do is go through and remove the template code that Visual Studio has added to SearchResultsPage.xaml.cs. By default, you get a bunch of default view-model logic and other display logic in here that you don’t need. You can comment all of this out, apart from the constructor that we changed earlier to call our InitializeViewModel method. The reason we have to do this is that we want Visual Studio to give us the basic XAML for the page, but the logic that it creates to support a default implementation doesn’t fit into how we’ve architected the app.
The first thing you need to do is remove the template code that Visual Studio has added to SearchResultsPage.xaml.cs. By default, you get a bunch of default view-model logic and other display logic in here that you don’t need. You can comment all of this out, apart from the constructor that we changed earlier to call our InitializeViewModel method. The reason we have to do this is so Visual Studio will give us the basic XAML for the page, but the logic it creates to support a default implementation doesn’t fit into how we’ve architected the app. Within theStandardStyles.xaml file, add this XAML. This will display a thumbnail image together with the title and description fields on the bound item:
<DataTemplate x:Key="ReportItem300x70ItemTemplate">
<Grid Width="294" Margin="6">
<Grid.ColumnDefinitions>
<ColumnDefinition Width="Auto"/>
<ColumnDefinition Width="*"/>
</Grid.ColumnDefinitions>
<Border Background="{StaticResource
ListViewItemPlaceholderBackgroundThemeBrush}" Margin="0,0,0,10" Width="40"
Height="40">
<Image Source="{Binding ImageUri}" Stretch="UniformToFill"/>
</Border>
<StackPanel Grid.Column="1" Margin="10,-10,0,0">
<TextBlock Text="{Binding Title}" Style="{StaticResource
BodyTextStyle}" TextWrapping="NoWrap"/>
<TextBlock Text="{Binding Description}" Style="
{StaticResource BodyTextStyle}" Foreground="{StaticResource
ApplicationSecondaryForegroundThemeBrush}" TextWrapping="NoWrap"/>
</StackPanel>
</Grid>
</DataTemplate>
To use this template, locate the GridView declaration within SearchResultsPage and change its template. Remove any existing inline template references as well. Here’s the change:
<GridView
x:Name="resultsGridView"
AutomationProperties.AutomationId="ResultsGridView"
AutomationProperties.Name="Search Results"
TabIndex="1"
Grid.Row="1"
Margin="0,2,0,0"
Padding="110,0,110,46"
SelectionMode="None"
IsItemClickEnabled="True"
ItemsSource="{Binding Source={StaticResource
resultsViewSource}}"
ItemTemplate="{StaticResource ReportItem300x70ItemTemplate}">
<GridView.ItemContainerStyle>
<Style TargetType="Control">
<Setter Property="Height" Value="70"/>
<Setter Property="Margin" Value="0,0,38,8"/>
</Style>
</GridView.ItemContainerStyle>
</GridView>
The good news is that at this point we can run the project and perform a search. Before we do that though, we need to change the header. As we’ve seen, all of the pages provided by Visual Studio have My Application as the header. Change this, and change the queryText control’s binding to QueryNarrative. Here’s the revised XAML:
<Button x:Name="backButton" Grid.Column="0" Click="GoBack" Style=
"{StaticResource BackButtonStyle}"/>
<TextBlock x:Name="pageTitle" Grid.Column="1" Text="Search" Style=
"{StaticResource PageHeaderTextStyle}" />
<TextBlock x:Name="queryText" Grid.Column="3" Text="{Binding
QueryNarrative}" Style="{StaticResource PageSubheaderTextStyle}"/>
Run the code now, access the search function, and type some keywords. You’ll see something like Figure 8-3.
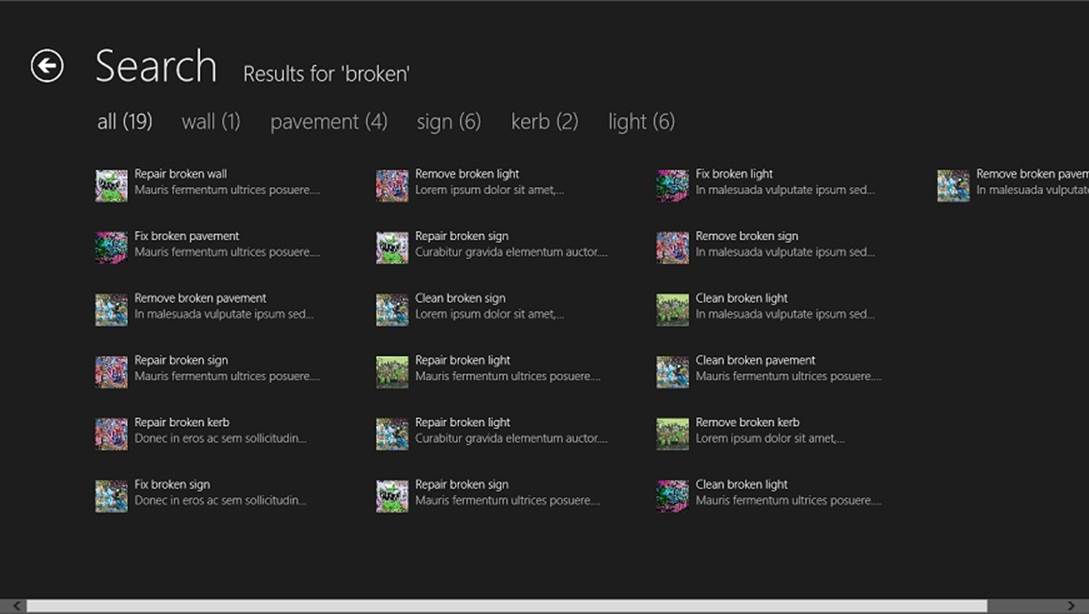
Figure 8-3. Search results
Now we know that everything hangs together and that the search function works. Next we need to get the filters working and remove the codebehind implementation provided by the Visual Studio template.
To do this, our main task is to wire up the Command property of the checkbox control to hook into our SelectionCommand exposed by the SearchFilter class, and remove the supplied event binding to Filter_Checked. (This Filter_Checked method was provided by Visual Studio so that we could do a codebehind handler to change the active filter.) We also have to change the IsChecked binding from a two-way to a one-way binding. (The two-way binding was provided by Visual Studio before we did our own implementation of this feature.) You’ll find the definition of the checkbox within an ItemsControl instance called filtersItemsControl. Here’s the revised XAML:
<ItemsControl.ItemTemplate>
<DataTemplate>
<RadioButton
Content="{Binding Description}"
GroupName="Filters"
IsChecked="{Binding Active}"
Command="{Binding SelectionCommand}"
Style="{StaticResource TextRadioButtonStyle}"/>
</DataTemplate>
</ItemsControl.ItemTemplate>
Now if you run the app, you’ll find that the filter selection works and the view will be updated. To test this properly, enter an adjective rather than a noun (e.g., broken). Also, test that the SQLite selection works by entering multiple words in different order (e.g., “pavement broken” should yield results for “broken pavement.” Figure 8-4 illustrates filter selection.

Figure 8-4. Filter selection in action
To round off this basic section, and before we start looking at refinements to the search operation, we’ll add the functionality to react when the user actually selects an item. We don’t do anything particularly sophisticated here—if we had a singleton view that displayed the details for a single report, we could navigate to that. (We’ll build this in Chapter 11.) For now, we’ll just put up a message box.
Handling item clicks on the grid
Reacting to a selection borrows from the work we did in Chapter 4. If you recall, we created a new control called MyGridView that extended GridView. This established a command called SelectionCommand. (For reference, the command that we added to SearchFilter was also calledSelectionCommand. I chose this name specifically to match the one in MyGridView.)
Selections on GridView controls are supposed to be reserved for situations where you select something, and then do something (for example, selecting a command from the app bar). Where you want to react to a click, you need a different command. On the stock GridView control, you get an IsItemClickEnabled property that “arms” an event called ItemClick. To reprise the work we did in Chapter 4, we need to convert this event into a command so that it can be used with the MVVM pattern. We’ll do this now.
The first thing we need to do is modify MyGridView so that it supports a new command called ItemClickedCommand. Like the SelectionCommand from before, we should do this using a dependency property. (Recall that a dependency property is a special property that’s held in a “bucket” of values and can be updated by styles and other runtime operations.) Here’s the change to MyGridView to incorporate the new property (I’ve removed quite a lot of code from MyGridView for brevity):
public class MyGridView : GridView
{
public static readonly DependencyProperty SelectionCommandProperty =
DependencyProperty.Register("SelectionCommand", typeof(ICommand),
typeof(MyGridView), new PropertyMetadata(null));
public static readonly DependencyProperty ItemClickedCommandProperty =
DependencyProperty.Register("ItemClickedCommand", typeof(ICommand),
typeof(MyGridView), new PropertyMetadata(null));
public static readonly DependencyProperty
OpenAppBarsOnMultipleSelectionProperty =
DependencyProperty.Register("OpenAppBarsOnMultipleSelection",
typeof(bool), typeof(MyGridView), new PropertyMetadata(true));
public static readonly DependencyProperty
OpenAppBarsOnRightClickProperty =
DependencyProperty.Register("OpenAppBarsOnRightClick",
typeof(bool), typeof(MyGridView), new PropertyMetadata(true));
public MyGridView()
{
// wire up the event to command mapping...
this.SelectionChanged += MyGridView_SelectionChanged;
this.ItemClick += MyGridView_ItemClick;
}
// code omitted...
void MyGridView_ItemClick(object sender, ItemClickEventArgs e)
{
if (this.ItemClickedCommand == null)
return;
// ok...
var clicked = e.ClickedItem;
if (this.ItemClickedCommand.CanExecute(clicked))
this.ItemClickedCommand.Execute(clicked);
}
}
With that done, all we have to do now is change the XAML. This is a matter of changing the type of the grid to local:MyGridView and adding the command binding. Here are the changes:
<local:MyGridView
x:Name="resultsGridView"
AutomationProperties.AutomationId="ResultsGridView"
AutomationProperties.Name="Search Results"
TabIndex="1"
Grid.Row="1"
Margin="0,2,0,0"
Padding="110,0,110,46"
SelectionMode="None"
IsItemClickEnabled="True"
ItemClickedCommand="{Binding SelectionCommand}"
ItemsSource="{Binding Source={StaticResource
resultsViewSource}}"
ItemTemplate="{StaticResource ReportItem300x70ItemTemplate}">
<GridView.ItemContainerStyle>
<Style TargetType="Control">
<Setter Property="Height" Value="70"/>
<Setter Property="Margin" Value="0,0,38,8"/>
</Style>
</GridView.ItemContainerStyle>
</local:MyGridView>
The final step, then, is to rig up a command handler in the view-model. Modify the constructor of SearchResultsPageViewModel to show a message, and you’re done:
// Modify constructor of SearchResultsPageViewModel...
public SearchResultsPageViewModel(IViewModelHost host)
: base(host)
{
this.MasterItems = new List<ReportViewItem>();
this.Results = new ObservableCollection<ReportViewItem>();
this.Filters = new ObservableCollection<SearchFilter>();
// command...
this.SelectionCommand = new DelegateCommand(async (args) =>
{
await this.Host.ShowAlertAsync("Selected: " +
((ReportViewItem)args).Title);
});
}
Run the code and you should be able to select items. Figure 8-5 illustrates.

Figure 8-5. Handling a selection on the search results page
And that’s it! The basic search operation is done. We’ve looked at a lot here. We’ve implemented the actual search routine to get information from the local database. We then looked at building on some of the UI work that we’d done in previous chapters to make it more flexible and deal with search data.
Now all we need to do is look at the extra features that Windows gives us that can improve the search experience.
Refining Search
There are four refinements that we need to make to our search function to bring it in line with the Windows Store app UX guidelines. These are:
Placeholder text
This displays a message in the search chart to indicate what the user is supposed to be able to type in.
Query and result suggestions
These are intended to make it easier to enter queries and find results.
Hit highlighting
This is where items in the search results are displayed such that you can see where the queried text appears in each item.
Remembering where we were
This is where when we reenter the search function, we keep context with where we last were.
Placeholder Text
Placeholder text is the easiest refinement to make. All we have to do is get hold of a SearchPane instance for our view and then set the PlaceholderText property. We can do this within the OnLaunched method of our App class. Here’s the code. (I’ve omitted a lot of this method for brevity. I’ve also added a stub implementation for returning search suggestions. We’ll need this in a moment.)
protected override async void OnLaunched(LaunchActivatedEventArgs args)
{
// Do not repeat app initialization when already running, just
// ensure that the window is active
if (args.PreviousExecutionState == ApplicationExecutionState.Running)
{
Window.Current.Activate();
return;
}
// code omitted...
// search...
var search = SearchPane.GetForCurrentView();
search.PlaceholderText = "Report title";
search.SuggestionsRequested += search_SuggestionsRequested;
}
void search_SuggestionsRequested(SearchPane sender,
SearchPaneSuggestionsRequestedEventArgs args)
{
// TBD...
}
Run the app now, and you’ll see the placeholder text in the query window. This is helpful in that it avoids doubt as to what the user can type in. For example, in a LOB app this could be something like “Customer name or code.” Figure 8-6 illustrates the effect in StreetFoo.

Figure 8-6. Placeholder text in the search charm
You’ll notice that you get some other behavior here too. Requesting the SearchPane switches on the suggestion behavior—you’ll see suggestions appear underneath the text box. We’ll look at implementing this properly now.
Suggestions
There are two kinds of suggestions: query suggestions and query recommendations. Query suggestions are the classic autocomplete approach, where you start typing and the app will present guesstimates of what you’re ultimately trying to enter. With a real keyboard, this is a convenience, but with an on-screen keyboard this is an absolute requirement. Query recommendations—well, “query recommendation” singular really—is where you can identify a single hit in the results ahead of time and want to present that in the search pane.
Within the search pane, according to Microsoft’s UX guidelines, you are allowed five “lines” to present your findings. You can present five query suggestions, or you could present three query suggestions, one separator, and one recommendation. Although in this example we’re going to go back to our SQLite database to find the suggestions, in practical apps you can go out to disk, or a network—or anywhere, really—to get the information that you need. Figure 8-7 illustrates.
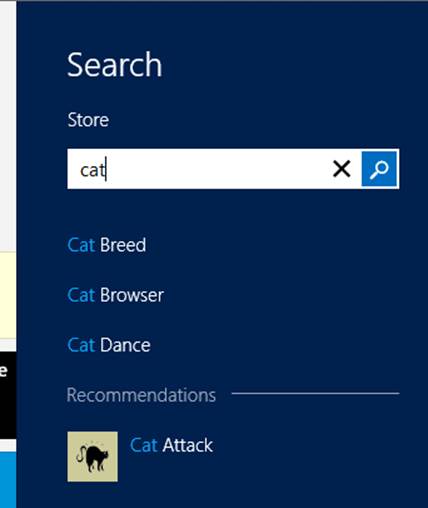
Figure 8-7. Three suggestions, one separator, and a recommendation shown when searching the Store app
Finding suggestions
The first thing we’ll look at is how to do the suggestions.
You’re going to have to feel your way through for your own apps. While querying the database to get the suggestions is easy enough, actually tuning it to get the right suggestions is trickier. There’s a reason why the suggestions on Google feel like magic—the developers have put massive amounts of engineering time and thought into it.
In our app, all we’re going to do is take the query text and then find all of the report items in the cache that start with that value. We’ll then return a distinct list of titles that are “stemmed” from the query text. We’ll return the results as a Dictionary<string, IEnumerable<ReportItem>>. Although it seems logical to return just the strings, when we get to doing the recommendations we’ll need to be able to dereference a suggestion string that surfaces a single item. (This will become clearer in the next section when we actually do this.)
Because we have a database, it makes sense to get it to do the heavy lifting for us in terms of returning the items. We’ll use the QueryAsync method to do this. This method is a little blunt in that it requires us to provide SQL through, and as I mentioned before, when using an ORM it’s better to get it to do the construction of the SQL. However, the only other method in sqlite-net that could do this (Table) won’t build a CONTAINS query properly as of the time of writing.
Here’s the method to return the search suggestions:
// Add method to ReportItem...
public static async Task<Dictionary<string, List<ReportItem>>>
GetSearchSuggestionsAsync(string queryText)
{
// get everything and sort by the title...
var conn = StreetFooRuntime.GetUserDatabase();
var reports = await conn.QueryAsync<ReportItem>("select * from
ReportItem where title like ? order by title",
new object[] { queryText + "%" });
// walk and build a distinct list of matches...
var results = new Dictionary<string, List<ReportItem>>(StringComparer
.CurrentCultureIgnoreCase);
foreach (var report in reports)
{
// if we don't have a result with that title...
if (!(results.ContainsKey(report.Title)))
results[report.Title] = new List<ReportItem>();
// add...
results[report.Title].Add(report);
}
// return...
return results;
}
Back when we looked at sharing in Chapter 7, you’ll recall that we needed to use a deferral to tell Windows that it was going to take us a while to come up with the results. This needs to happen whenever you use async/await, so we’ll need to use that same approach here. Once we have the deferral, we get our suggestions and pass them back through the object supplied as the event argument.
To answer the question of where we put this code, I propose that we create a new class called SearchInteractionHelper that we add to the UI-agnostic StreetFoo.Client project. The alternative is that we whack all of this code in the App class in the Windows Store app−specific project. This codebehind approach would make our MVVM abstraction harder to manage, thus my proposal of putting it in a new class.
Within the App class, I’m proposing that we do enough to set up the deferral and then pass it over to SearchInteractionHelper. My rationale for doing the deferral here is that the deferral is actually a Windows Store app−specific thing and hence more rightly lives in that project. Here’s the code (you’ll also need to change this method to be async):
async void search_SuggestionsRequested(SearchPane sender,
SearchPaneSuggestionsRequestedEventArgs args)
{
var deferral = args.Request.GetDeferral();
try
{
await SearchInteractionHelper.PopulateSuggestionsAsync
(args.QueryText, args.Request.SearchSuggestionCollection);
}
finally
{
deferral.Complete();
}
}
Now we can turn our attention to the PopulateSuggestionsAsync method. Here’s the code:
// Add method to SearchInteractionHelper...
public static async Task PopulateSuggestionsAsync(string queryText,
SearchSuggestionCollection results)
{
// if we don't have at least three characters to work with,
// do nothing...
if(queryText.Length < 3)
return;
// how many?
int maxSuggestions = 5;
// get the list...
var suggestions = await ReportItem.GetSearchSuggestionsAsync
(queryText);
// sort the suggestions...
var titles = new List<string>();
foreach (var title in suggestions.Keys)
titles.Add(title);
titles.Sort();
// add the suggestions...
foreach (var title in titles)
{
results.AppendQuerySuggestion(title);
// enough?
if (results.Size == maxSuggestions)
break;
}
}
Run the code now, and when you type into the search box you’ll see some results. Figure 8-8 illustrates.

Figure 8-8. Search suggestions appearing in search charm
Finding recommendations
The idea of recommendations is that if it’s at all possible, if the user has entered enough of a search term to key into a single item, we should present that as a recommendation directly in the search pane. When the user clicks this recommendation, we need to take him or her directly to the item, circumventing the search page entirely. In a LOB app, you could rig this (for example) such that if the user keyed in a customer ID code you could present a link to the customer directly in the pane.
We’ve got most of the pieces that we need for this already. All we have to do is dig through our suggestion results and find the first one that only has one item. We’ll then present that as the recommendation. If we display a recommendation, we’re not allowed to display five search suggestions. We have to display three suggestions, one separator, and one recommendation (the idea being that we display only five “rows” in the UI).
The wrinkle to this is that recommendations have to have an image. Thus, when we find a recommendation we’ll need to wrap it up in a ReportViewItem and pass it over to the ReportImageCacheManager class to get an image. (We first did this in Chapter 7.) Here’s the modified version of PopulateSuggestionsAsync:
public static async Task PopulateSuggestionsAsync(string queryText,
SearchSuggestionCollection results)
{
// if we don't have at least three characters to work with, do nothing...
if(queryText.Length < 3)
return;
// how many?
int maxSuggestions = 5;
// get the list...
var suggestions = await ReportItem.GetSearchSuggestionsAsync
(queryText);
// sort the suggestions...
var titles = new List<string>();
foreach (var title in suggestions.Keys)
titles.Add(title);
titles.Sort();
// do we have one that we can use as a recommendation?
ReportItem recommendation = null;
foreach (var title in titles)
{
if (suggestions[title].Count == 1)
{
recommendation = suggestions[title][0];
break;
}
}
// if we have a recommendation only show three suggestions...
if (recommendation != null)
maxSuggestions -= 2;
// add the suggestions...
foreach (var title in titles)
{
results.AppendQuerySuggestion(title);
// enough?
if (results.Size == maxSuggestions)
break;
}
// add the recommendation...
if (recommendation != null)
{
// we need an image...
var viewItem = new ReportViewItem(recommendation);
var imageUri = await new ReportImageCacheManager().
GetLocalImageUriAsync(viewItem);
// add the suggestion...
results.AppendSearchSeparator("Recommendation");
results.AppendResultSuggestion(recommendation.Title,
recommendation.Description, recommendation.Id.ToString(),
RandomAccessStreamReference.CreateFromUri(
new Uri(imageUri)), recommendation.Title);
}
}
Run the code, and you’ll be able to surface a recommendation (as shown in Figure 8-9).
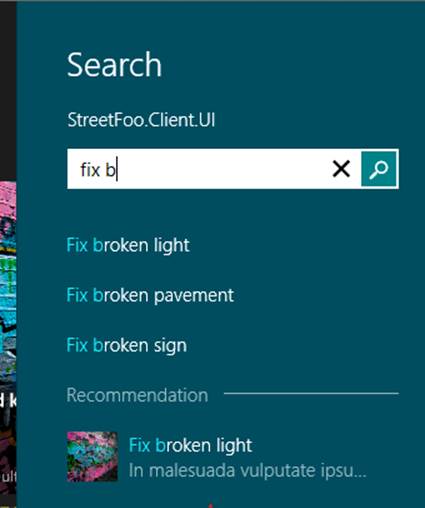
Figure 8-9. Showing a recommendation in the search charm
The only thing that’s missing is that if you click on the recommendation, nothing happens. To fix this, we need to respond to the ResultSuggestionChosen event.
Much like on the search results proper, if we had a singleton page with the item details that we could navigate the user to, we’d do that here. However, for now, just to prove it works, we’ll display a message box. Add a binding for the ResultSuggestionChosen event in the OnLaunchedmethod of App and configure it to call this handler:
// Add method to App...
async void search_ResultSuggestionChosen(SearchPane sender,
SearchPaneResultSuggestionChosenEventArgs args)
{
var dialog = new MessageDialog("Chosen: " + args.Tag);
await dialog.ShowAsync();
}
Run the search again, and you’ll be able to click the recommendation. A message box will appear showing the ID of the report.
Remembering Where We Were
The last thing we need to clean up relates to the situation where the user “reenters” the search function.
You can try this now. Access the StreetFoo search feature, search for something, and select a filter. From the charm, select another app (it doesn’t matter which one). Then, reselect the StreetFoo app from the charm. The search will rerun, but the filter will be forgotten.
With the basic filters as per our implementation, this isn’t much of a killer problem. However, in your own apps, which may have more complex filtering, this could be very frustrating. To that end, we’ll build out this capability now.
There is a way to do this where we watch for suspension and resumption of the app and manage dumping our state to and from disk. However, given that we have a local SQLite database and a SettingItem class that lets us store persistent settings, we might as well (and it’s easier to) use that. How this will work is that when we select a filter, we’ll save the keyword of that filter into the settings. When we run a query, we’ll look to see if the query text has changed. If it hasn’t, we’ll find the last used filter and select it, provided that it’s still available. If the text has changed, we’ll keep the All filter selected. We’ll always revert to All when the text changes because it’s confusing to have filter selections that survive the “mental switching” the user does when coming back to the search function. When the user comes back to search for something else, he or she is expecting a “blank sheet of paper” as opposed to something that’s affected by choices made minutes, hours, or days ago.
To track those items, we’ll need two constants to provide keys into the settings. Add these contacts to SearchResultsPageViewModel. (I’ve omitted code from this class for brevity.)
// Add constants to SearchResultsPageViewModel...
public class SearchResultsPageViewModel : ViewModel,
ISearchResultsPageViewModel
{
// code omitted...
// tracks the last used values...
private const string LastQueryKey = "LastQuery";
private const string LastFilterKey = "LastFilter";
As you know, the settings-in-SQLite functionality is all asynchronous, meaning that we need to modify our HandleFilterActivated method such that it becomes async and returns a Task instance. We’ll also rename it so that we know it’s supposed to be async. Here’s the changed method:
// Modify method in SearchResultsPageViewModel...
private async Task HandleFilterActivatedAsync(object args)
{
// walk...
SearchFilter selected = null;
foreach (var filter in this.Filters)
{
if (filter == args)
{
filter.Active = true;
selected = filter;
}
else
filter.Active = false;
}
// update...
this.ApplyFilter();
// save...
if (selected != null)
await SettingItem.SetValueAsync(LastFilterKey,
selected.Keyword);
else
await SettingItem.SetValueAsync(LastFilterKey, null);
}
When it’s time to select a filter programmatically, we’ll use the ActivateFilter method. This takes a keyword. Because there’s a chance that a filter we supply isn’t found, we’ll rig the method to call back into itself with null in order to select the All filter. Here’s the code:
// Add method to SearchResultsPageViewModel...
private void ActivateFilter(string keyword)
{
// walk and set...
bool found = false;
foreach (var filter in this.Filters)
{
if (filter.Keyword == keyword)
{
filter.Active = true;
found = true;
}
else
filter.Active = false;
}
// did we do it? if not, activate the default one...
if (keyword != null && !(found))
this.ActivateFilter(null);
}
Finally, we can then go back and look at the SearchAsync method. To recap, this needs to check to see if the query text has changed, and if it hasn’t, reselect the filter that we used last time if it’s still there. I’ve removed chunks of code from SearchAsync for brevity.
private async Task SearchAsync(string queryText)
{
// flag...
this.SearchDone = true;
// set...
this.QueryText = queryText;
// code omitted...
// do we have anything?
this.Filters.Clear();
if (this.MasterItems.Any())
{
// code omitted...
}
// do we need to select the filter?
var lastQuery = await SettingItem.GetValueAsync(LastQueryKey);
if (lastQuery == queryText)
{
// select the filter...
var lastFilterName = await SettingItem.GetValueAsync
(LastFilterKey);
if (!(string.IsNullOrEmpty(lastFilterName)))
ActivateFilter(lastFilterName);
}
else
{
// update...
await SettingItem.SetValueAsync(LastQueryKey, queryText);
}
// apply the filter...
this.ApplyFilter();
}
Run the app now, and you’ll be able to flip in and out of the search results and have the filter selection preserved. Again, in this example our filters are very basic. In more complex arrangements—particularly with drop-down lists, which are fussy to use with touch—this approach becomes much more important.
Now that we have that, we can create our own converter:
public sealed class SearchArgsConverter:IValueConverter
{
public object Convert(object value, Type targetType, object parameter,
string language)
{
var args = (SearchBoxSuggestionsRequestedEventArgs)value;
var displayHistory = (bool) parameter;
if (args == null) return value;
ISuggestionQuery item = new SuggestionQuery(args.Request,
args.QueryText)
{
DisplayHistory = displayHistory
};
return item;
}
public object ConvertBack(object value, Type targetType,
object parameter, string language)
{
return value;
}
}
In theory, we could just create the command in the view-model, but to avoid passing mysterious “object” parameters into our commands, we will create a generic delegate command so we can have a strongly typed command and know what sort of item we can expect:
public class DelegateCommand<T> : ICommand
{
private readonly Predicate<object> _canExecute;
private Action<T> _handler { get; set; }
public event EventHandler CanExecuteChanged;
public DelegateCommand(Action<T> handler, Predicate<object> canExecute)
{
this._handler = handler;
_canExecute = canExecute;
}
public void RaiseCanExecuteChanged()
{
if (CanExecuteChanged != null)
CanExecuteChanged(this, EventArgs.Empty);
}
public bool CanExecute(object parameter)
{
return _canExecute == null || _canExecute(parameter);
}
public void Execute(object parameter)
{
_handler((T)parameter);
}
}
And now we can create our command in the view-model and append the suggestions. This code is just to give you an idea; you would want to abstract this further like we have done in the rest of the application (see Figures 8-10 and 8-11):
public DelegateCommand<ISuggestionQuery> SuggestionRequest { get; set; }
public ViewModel()
{
SuggestionRequest = new DelegateCommand<ISuggestionQuery>
(SuggestionRequestFor, o => true);
}
private void SuggestionRequestFor(ISuggestionQuery query)
{
IEnumerable<string> filteredQuery = _data
.Where(suggestion => suggestion.StartsWith(query.QueryText,
StringComparison.CurrentCultureIgnoreCase));
query.Request.SearchSuggestionCollection.AppendQuerySuggestions
(filteredQuery);
}
private readonly string[] _data = { "Banana", "Apple", "Meat", "Ham" };
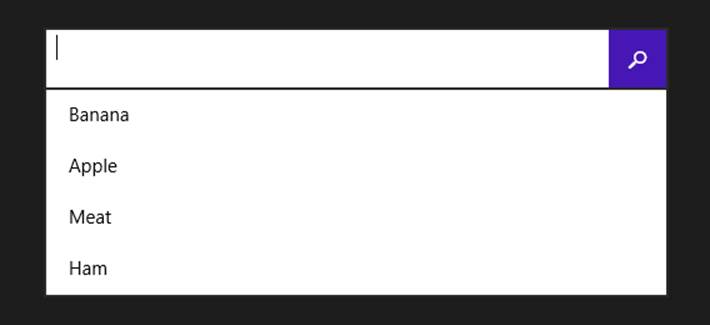
Figure 8-10. All of the possible search suggestions
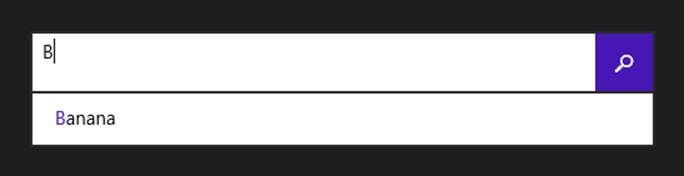
Figure 8-11. The typeahead search suggestions
Using the SearchBox
The SearchBox was added in Windows 8.1 as it was a feature requested by many developers. The SearchBox allows the user to search from within the application and can be constrained to just one or several pages. The control itself isn’t MVVM-friendly as is, as it relies heavily on events that can’t be abstracted away. We need to access the event arguments to pass in, for example, search suggestions to the SearchSuggestionCollection, which is a property on the SearchSuggestionRequest object. Let’s take a look at an MVVM implementation.
The first thing you would do is add the control to the page where you want to use it, or to a user control if you want to use the same control in several places:
<SearchBox SearchHistoryEnabled="False" x:Name="SearchBox" Width="500"
Height="50">
</SearchBox>
The control has several events that give us access to the submitted query text (which can also be accessed through the QueryText property on the control) events to append suggestions and so on. The obvious problem for our MVVM purity is the reliance on events. We want to use commands. You can wire events to commands by using dependency properties or by creating custom behaviors, called attached behaviors. Behaviors were introduced with Blend 3—XAML (and now also HTML and CSS in Windows Store apps) software that helps you with design, design time data, animations and storyboards, and behaviors.
Blend comes with Visual Studio as of Visual Studio 2012. Behaviors let you extend controls by adding behaviors to them. They let you encapsulate interaction in a reusable way, which then can be connected from the UI component to the code. In this case, we want to call a command when a certain event is triggered and access the event argument. To use behaviors you need to add a reference to the Blend SDK (see Figure 8-12).
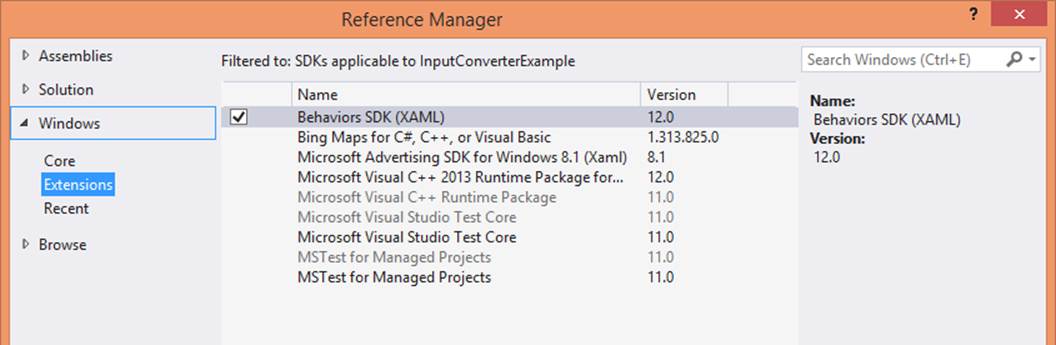
Figure 8-12. Adding the behaviors SDK
Once you’ve done that, you can go ahead with some behaviors that are already defined in the SDK. In this example, we’ll look at wiring events to commands and accessing the event arguments. To show results, you use the OnSearchSubmitted event, bind it to a command, and from that command, you proceed as with the search charm. You can simply pass in the QueryText as a CommandParameter if you don’t need to access the event arguments, and skip the converter. To make sure you don’t get stuck, we’ll cover how you access the event arguments, which you need to do when working with the collection of suggestions, for example:
<SearchBox SearchHistoryEnabled="False" x:Name="SearchBox" Width="500"
Height="50">
<SearchBox.Resources>
<local:SearchArgsConverter x:Name="ArgsConverter"/>
</SearchBox.Resources>
<interactivity:Interaction.Behaviors>
<core:EventTriggerBehavior EventName="SuggestionsRequested">
<core:InvokeCommandAction
Command="{Binding SuggestionRequest}"
InputConverter="{StaticResource ArgsConverter}"
InputConverterLanguage="en-US"
InputConverterParameter="{Binding ElementName=SearchBox,
Path=SearchHistoryEnabled}"/>
</core:EventTriggerBehavior>
</interactivity:Interaction.Behaviors>
</SearchBox>
As you can see, we’re listening for the SuggestionRequested event, and invoking a command when that event is triggered. In the following code, you’ll see some input attributes. These are new to Windows Store apps, and are WinRT only. They let us access the event arguments through a converter and pass in language and a parameter as well.
InputConverter
This gets or sets the converter used for the command. The command has to be of type ICommand, and the converter of the type IValueConverter.
InputConverterLanguage
This gets or sets the language that is passed into the converter as a string.
InputConverterParameter
This gets or sets the parameter passed into the converter. Notice that it’s passed to the converter and not the command. Use this when you need to convert the parameter. Otherwise, use CommandParameter.
Because we don’t want to pass in the event arguments as is to the view-model (this creates a coupling), we will create and interface a class so we can pass our own custom object instead. Here is an example of the interface and the class:
public interface ISuggestionQuery
{
SearchSuggestionsRequest Request { get; }
string QueryText { get; }
bool DisplayHistory { get; set; }
}
public class SuggestionQuery : ISuggestionQuery
{
public SuggestionQuery(SearchSuggestionsRequest request, string
queryText)
{
Request = request;
QueryText = queryText;
}
public SearchSuggestionsRequest Request { get; private set; }
public string QueryText { get; private set; }
public bool DisplayHistory { get; set; }
}
Other Best-Practice Notes
Microsoft publishes a number of recommendations for best practice within search, specifically around user experience. We’ve looked at most of them in this section. There are a couple of others.
One recommendation that comes up is hit highlighting. The idea here is that on the results page the part of the rendered result that matches the query text is highlighted. (For example, consider a search for broken—if a result says, “Fix broken light,” the word broken is highlighted.) I did want to include this feature, but it’s very difficult to implement in XAML. In fact, despite it being a recommendation from Microsoft, none of the built-in apps actually implement this feature! As a result, I’ve left it out. Search highlighting is helpful, however, so hopefully an easier way to implement it will come to the fore.
Other recommendations relate to appropriateness of use. One of them is to make sure that search is implemented via the charm, as opposed to via an option on the app bar. (Personally, I can see that in LOB apps, where data is more complex, actually being able to initiate an “advanced search” from the app bar is arguably helpful.) Another is not to confuse the operation of a global “find me stuff” option from the charm with “find me stuff within this thing I’m already looking at.” The example Microsoft calls out in its best-practice documentation relates to a “find on page” function. That sort of thing should not be done using the charm.
All materials on the site are licensed Creative Commons Attribution-Sharealike 3.0 Unported CC BY-SA 3.0 & GNU Free Documentation License (GFDL)
If you are the copyright holder of any material contained on our site and intend to remove it, please contact our site administrator for approval.
© 2016-2026 All site design rights belong to S.Y.A.