Build Windows® 8 Apps with Microsoft® Visual C#® and Visual Basic® Step by Step (2013)
Chapter 3. My first Windows 8 app
After completing this chapter, you will be able to
§ Install and use the Microsoft Visual Studio 2012 tools to develop a Windows 8 app.
§ Understand and use the Project template.
§ Create a simple application using C# and Visual Basic (VB).
§ Test the application.
§ Use the Windows 8 Runtime (WinRT) APIs from a Windows 8 application.
The preceding chapters showed you how Microsoft Windows 8 provides a new user interface, a completely new user experience, and exposes a new set of application programming interfaces (APIs) called Windows Runtime APIs (WinRT). The new user interface and experience is based around the Windows 8 UI style you just learned about in Chapter 2.
This chapter translates what you saw into practice. You will start by creating a simple Windows 8 app from scratch using one of the templates provided by Visual Studio 2012. Then you will deploy it to the local machine. Finally, you will implement a simple call to some WinRT APIs.
Software installation
To start developing Windows 8 applications, you need Visual Studio 2012. This new version of Visual Studio can be installed to run side by side with an existing Visual Studio 2010 installation and contains the .NET Framework version 4.5. The .NET Framework 4.5 is not a major release but it does contain some important features that enable the use of WinRT APIs. Even though you can develop applications using other versions of Windows and deploy them to a Windows 8 box or test it in the provided emulator, we suggest you install the development environment directly on a machine with Windows 8. This will speed up the development and testing processes on hardware-related components: for instance, if your apps use the accelerometer, the inclinometer, the camera, or any other sensor, the testing and debugging phase will be more accurate and quicker.
To download Windows 8, go to http://msdn.microsoft.com/windows/apps—the home page for the Windows 8 app development. From this page, it is easy to reach all the downloads for Windows 8. In the Getting Started section, you can find useful information for the download and installation process.
NOTE
Because URLs and component packaging may vary over time, start looking for Windows 8 and Visual Studio 2012 on the Windows 8 home page (http://msdn.microsoft.com/windows/apps) or search for it on Bing (http://www.bing.com).
As you saw in Chapter 1, Visual Studio 2012 Express for Windows 8 is a free version of Visual Studio tailored to contain just what you need to develop a Windows 8 app. You can also use the full version of Visual Studio 2012 by installing it on top of the Express edition or you can keep it as a separate installation.
To summarize, the components you need to start developing a Windows 8 app are the following:
§ Visual Studio 2012 Express edition for Windows 8. On top of this version, you can install a more advanced edition of Visual Studio 2012 (for instance the Ultimate edition).
§ The Windows 8 SDK. To obtain the templates and the integration with the Windows 8 environment, this component is packaged together with Visual Studio 2012 Express for Windows 8.
§ Windows 8. You’ll need this to test the application in the real environment.
§ A developer license. The integrated development environment (IDE) handles this requirement automatically and all you need to do is select Yes when the dialog box pops up.
Windows Store project templates
The easiest way to start developing a Windows 8 application is to use one of the out-of-the-box project templates that are available. Visual Studio 2012 provides a group of templates called “Windows Store” templates to develop an application for the Windows Store. These templates create all the files you need in the project to start developing, testing, and deploying the application on your local machine and the emulator, and they include a procedure to create an application package suitable for the Windows Store.
Each supplied template provides a solid starting point so that you can begin developing different kinds of Windows Store applications. The following list summarizes the characteristics of the various templates:
§ Blank App (XAML). This template provides a minimal skeleton using Windows Store frameworks.
§ Grid App (XAML). This template provides a multipage project for navigating multiple layers of content. The item details can be reached by tapping or clicking on the item itself and are displayed on a dedicated page.
§ Split App (XAML). This template is a good starting point to create a master details list of items using a list on the left of the page and the details directly shown in the right of the same page.
§ Class Library (Windows Store apps). The resulting project is the classic class library that can be used to centralize the code for Windows Store applications. This template can also be used to create a Windows Runtime component.
§ Windows Runtime Component. This allows the development of a component that can be used by Windows Store applications, regardless of the programming languages in which the app is written.
§ Unit Test Library (Windows Store apps). The goal for this template is to create a project that contains unit tests to be used with Windows Store apps, Windows Runtime components, or class libraries for Windows Store apps.
In the following procedure, you’ll create a project.
Create the project
As you may remember from Chapter 1, the SDK setup process installed some new templates and wizards to facilitate the creation of a Windows Store project. In the graphic that follows step 3, under the C# or VB project types, you can see a new section, named Windows Store, which represents the entry point for this new kind of project. This section exposes all the templates that are tailored to Windows 8.
1. Create a new Application project. To do that, open Visual Studio 2012, and from the File menu, select New Project (the sequence can be File | New | Project for full-featured versions of Visual Studio). Choose Visual C# in the Templates tree and Windows Store from the list of installed templates. Then choose Blank App (XAML) from the list of available projects.
2. Select version 4.5 as the target .NET Framework version for your new project (this step is not necessary in Visual Studio Express edition).
3. Name the new project MyFirstApp. Then choose a location on your file system as well as a solution name. When you’re finished, click OK.
If you use a source control system, you can select the Add To Source Control check box.
The following graphic shows the first step of the New Project wizard: both the project and the solution will be assigned the name MyFirstApp.

At this stage, Visual Studio 2012 normally creates the solution folder, the project folder, and a project related to the chosen template.
Because you selected the Blank App project template, Visual Studio uses the simplest project structure to create your new application. Figure 3-1 shows the result of the procedure you just completed.
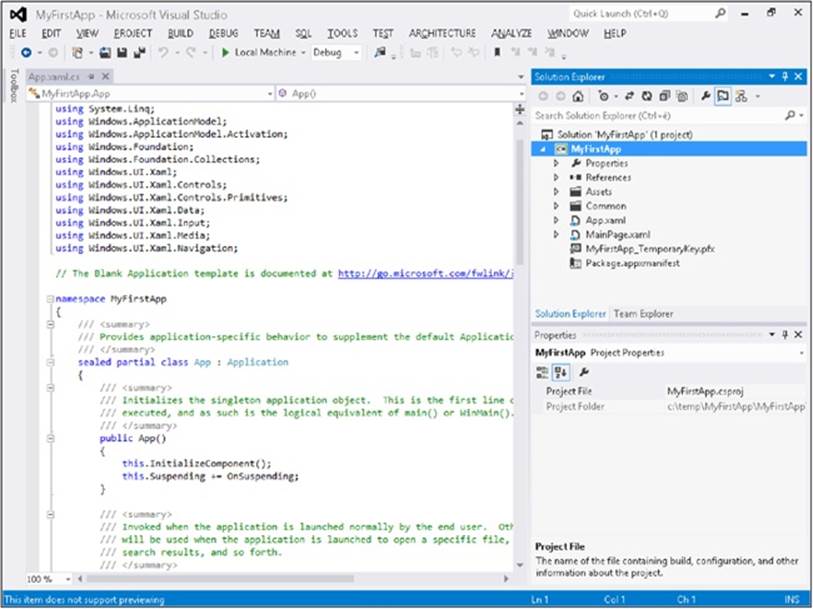
Figure 3-1. A blank Windows Store app in Solution Explorer.
In fact, you can easily find a file called App.xaml and one named MainPage.xaml, as well as a folder named Properties, that contains the classic AssemblyInfo.cs file. The file list is similar to the one you would get if you had created a Windows Presentation Foundation Browser application (or even a Windows Presentation Foundation application); however, there are some differences.
The first difference from a Windows Presentation Foundation (WPF) application is the absence of the app.config file. This means that, as in a Microsoft Silverlight or Windows Presentation Foundation Browser application, you cannot use the classic .NET configuration mechanism. In fact, the runtime system is somewhat sandboxed as in a Silverlight or WPF Browser application: specifically, the users cannot navigate to the file system where the application will be installed and change application files because Windows Store apps are usually downloaded and installed from the Windows Store. The exception to this rule is when you’re working in the development environment, where Visual Studio 2012 (or you using a command-line tool) can install the application for testing purposes.
The second difference from Silverlight and WPF Browser applications is the presence of the Package.appxmanifest file. This file contains a description of the application (its icon and synergy with the operating system) and the operating system features that the application uses, called “application capabilities and declarations.” From this perspective, the project is similar to one targeting Windows Phone 7.x, where the WMAppManifest.xml file informs the operating system of the capabilities the application requires to run.
Figure 3-2 shows the Package.appxmanifest designer that Visual Studio provides to simplify the application definition. As you can see, the Application UI tab lets you choose the Display Name of the application—that is, the name for the Start screen—the application description, three logos for the application, and so on.
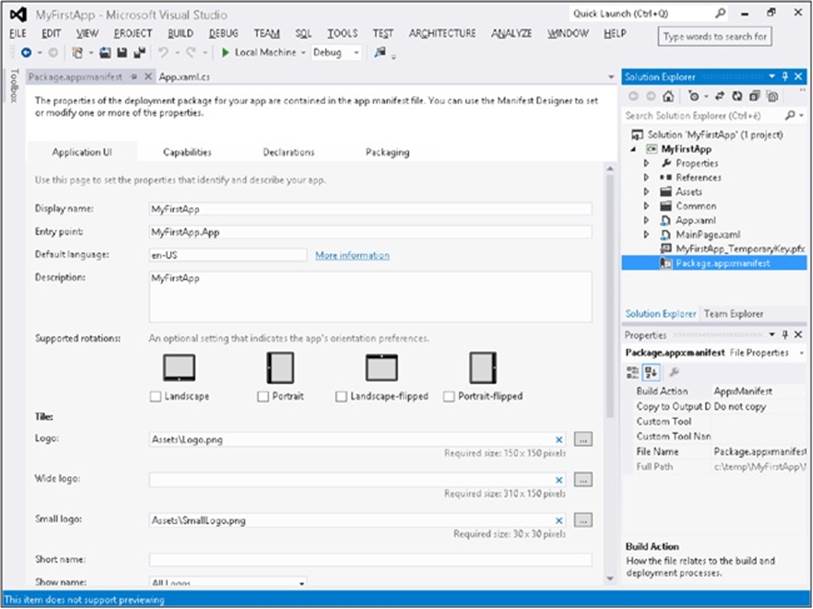
Figure 3-2. Visual Studio application manifest designer.
Another similarity with a Windows Phone project is the presence of some default images in the project. These images are available in the Assets folder and are referenced from the Package.appxmanifest file. The default template uses an application logo image for the default application tile (Logo.png), an image for the initial splash screen (SplashScreen.png), a small logo image displayed in the application’s tile—used if the application changes the tile size from code (SmallLogo.png)—and last but not least, the image used by the Windows Store to represent the application (StoreLogo.png). As you can see from Figure 3-2, there is no default wide logo, nor is this image referenced by the Package.appxmanifest.
If you run the application now, leaving all the default files and manifest settings intact, you will experience a short delay while Visual Studio deploys the application to the developer system, and then you will see the splash screen, followed by a completely blank screen that represents the application. This may seem strange—because Visual Studio has traditionally added some sample text to all its templates—but as you will discover in the following procedure, many things happened during application deployment.
Explore the deployed app on the system
First, note the absence of the classic window frame with the “X,” minimize, and maximize buttons. In fact, this is the first version of Windows without windows.
Follow these steps to explore what Visual Studio has asked Windows 8 to do during the deployment of the application.
1. Click the Start button of your tablet or keyboard, or go to the left-bottom corner of the screen using your mouse and click Start to return to the Start screen.
2. Scroll to the right using your finger, the mouse wheel, or the bottom scroll bar until you reach the rightmost end of the application Tiles on the Start screen.
At the very end of the application tiles, you’ll see your first deployed Windows 8 app, which has a tile with the name “MyFirstApp.”
3. Click on the app’s tile to reopen the application.
4. Return to Visual Studio and stop the debugging session by clicking Stop Debugging or pressing Shift+F5.
5. Repeat steps 1 and 2 and now tap and hold your finger (or right-click). The command bar will ask if you want to uninstall or simply unpin the application; “unpin” means deleting the application tile from the start menu, while leaving the application on the system.
6. Unpin the application by clicking Unpin.
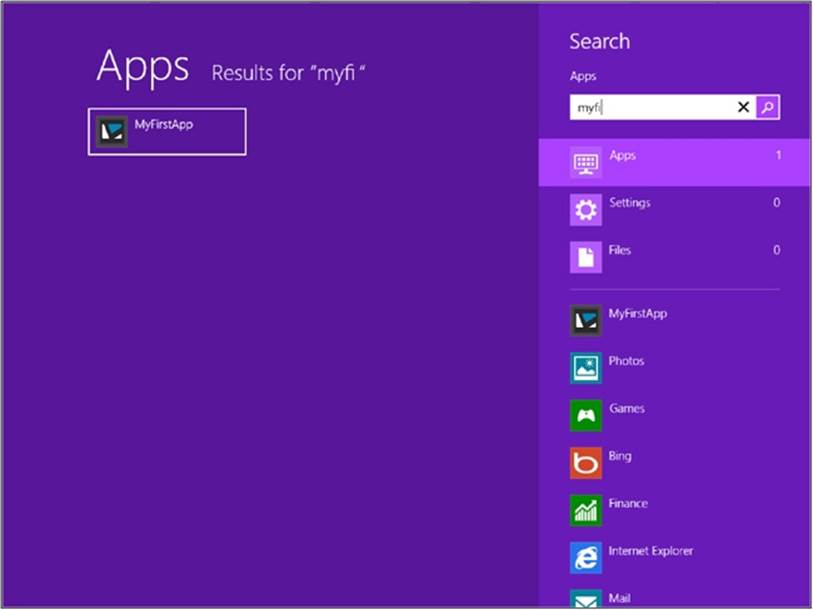
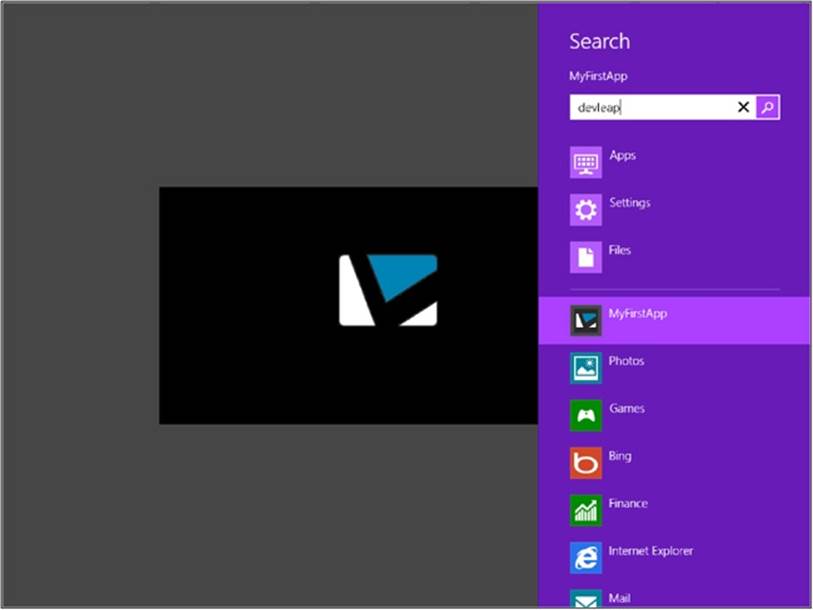
7. Move your mouse to the bottom-right corner of the screen to view the Charms, and then choose Search, or press Windows+Q on the keyboard. The Search pane will appear at the right of the screen.
8. Type the first few letters of the name of the application and choose Apps from the list of places where Windows should search. Your application will appear in the left pane.
9. You can launch the application by either tapping or clicking the application’s name—but don’t do that now. Instead, tap and hold (or right-click) the application to open the command bar.
10.Pin the application using the Pin button. The application is now listed in the Start screen using the default tile. You can verify the tile’s presence by repeating steps 1 and 2 of this procedure.
Note that you can search for files or settings within the same Search pane, as well as perform a search inside the listed applications. These applications have declared the Search capability in their Package.appxmanifest. Next, you’ll add the Search capability declaration to the simple application you are developing in this chapter.
Before proceeding, if you launched the application from the Search pane or the Start screen—that is, if you launched the application from outside of Visual Studio—you need to close it before you can deploy it again. If you use Visual Studio to launch an application, the first operation that the IDE requests from the operating system is package deployment. When deployment is complete, Visual Studio starts the application and attaches the debugger to it. If you stop the debugging session from Visual Studio, the Windows process is terminated; the same termination occurs if the application crashes. If the application is launched outside of Visual Studio using the default template, you do not have any close button—as you saw in the previous examples. The application occupies the entire screen and you will need to manually stop (kill is a better word) the process from running indefinitely. You can do this through the Windows Task Manager, or by pressing Alt-F4, or using the application close gesture to close the application in a more graceful way. (The application close gesture closes an application when you quickly swipe your finger from the top-center of the screen to the bottom-center.)
You will learn the details of the application lifecycle in Chapter 4, but for now it is important to understand that Windows 8 has a completely new way of managing the lifecycle of applications. An application is in the running state when the user uses it (the user has chosen the application as the foreground application); when the user leaves the application in any manner—by clicking Start, going back to the previous application, or starting a new search, and so on—the system may suspend the application or terminate it if the system needs more memory. This behavior is in some ways similar to the application lifecycle management in Windows Phone 7.x, as well as other modern operating systems.
As mentioned, Task Manager provides another way to stop a running application. Task Manager has been modified in Windows 8 so you can also see an application’s status under the advanced options of the View menu. If you cannot see the View menu, click More Details in Task Manager.Figure 3-3 shows MyFirstApp in the suspended state within Task Manager. Save the Planet, a real application ported from Windows Phone 7 to Windows 8, is not in the suspended state—meaning that it is still running.
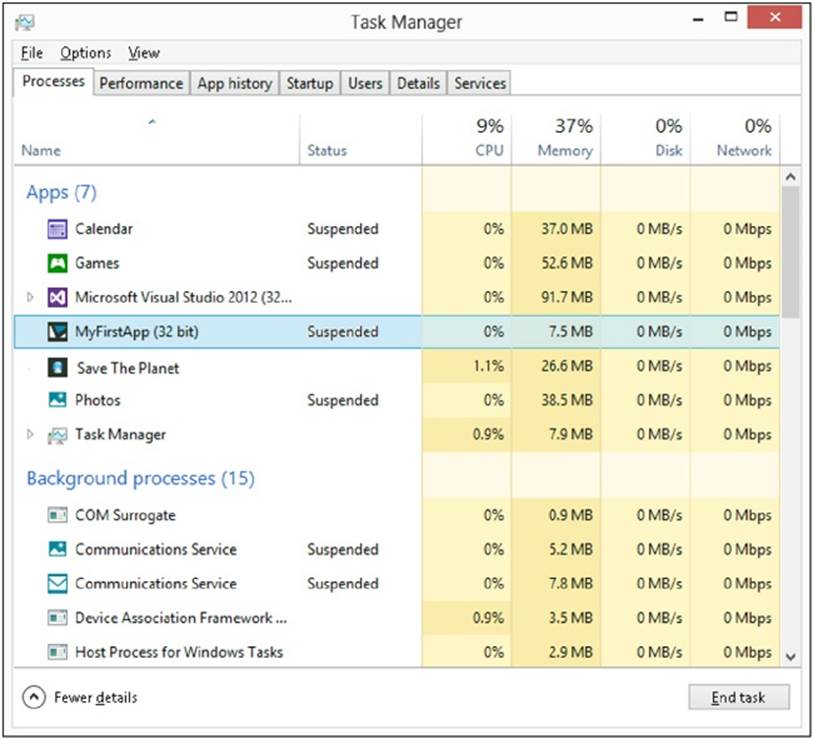
Figure 3-3. Task Manager showing the suspended/running state for a Windows Store app.
This mechanism applies only to Windows Store applications and not to classic .NET or Win32 applications. In fact, the two instances of Visual Studio, Paint (used to take the screenshots for this book) and many other Win32 applications are in the running state.
Adding the Search Declaration to the application manifest
In this procedure, you will add the Search Declaration to the application manifest to let the user search for text “inside” this sample application. Follow these simple steps inside the Visual Studio 2012 project you are building.
1. Double-click the Package.appxmanifest file inside the MyFirstApp application to open the designer.
2. Click the Declarations tab to manage the declarations for this application.
3. Choose Search from the Available Declaration listbox, and then click Add. As stated in the Description section, the Search declaration “...registers the application as providing search functionality. Users will be able to search the application from anywhere in the system.” The phrase “search the application” means passing the search text entered by the user to the application so it can search inside the application.
4. Before testing the application, click the Application UI tab and make sure that All Logos is selected in the Show Name drop-down list.
5. To change the default logo, copy the .png files you can find in the Chapter 3 Demo Files in the Logos folder to the Assets folder of the project. The files have the default names so you do not need to modify the Package.appxmanifest.
6. Right-click the project item in the solution (MyFirstApp) and choose Deploy. This operation deploys the application to Windows 8 without launching a debugging session.
7. Open the Start screen by using the Start button and scroll to the right to verify that the name and the new logo appear on the application tile.
8. Press Windows+F or Windows+Q to activate one of the Windows Search interfaces (the first opens the search page to search for files; the second to search for applications), and type some text in the textbox. Scroll the resulting list of applications to verify that your application is shown in the list. You can click an application to open it (the sample application does nothing right now); you will add the code to implement the search in the last part of this chapter.
Adding UI elements
In this section, you will analyze the remaining project items that the template created and add some code to build a list of people and bind it to the user interface.
NOTE
It is beyond the scope of this chapter to analyze the various binding techniques, as well as the user interface patterns such as MVVM (Model View ViewModel) or MVC (Model View Controller).
Let’s start by analyzing the code proposed by the Visual Studio 2012 template. You have explored the meaning and functionality of the application manifest and the image folder. Example 3-1 shows the XAML source code for the main page, which has been modified to contain a ListViewstandard user control that will display the FullName property of a list of bound elements.
Example 3-1. Modified MainPage.xaml page
<Page
x:Class="MyFirstApp.MainPage"
xmlns="http://schemas.microsoft.com/winfx/2006/xaml/presentation"
xmlns:x="http://schemas.microsoft.com/winfx/2006/xaml"
xmlns:local="using:MyFirstApp"
xmlns:d="http://schemas.microsoft.com/expression/blend/2008"
xmlns:mc="http://schemas.openxmlformats.org/markup-compatibility/2006"
mc:Ignorable="d">
<Grid Background="{StaticResource ApplicationPageBackgroundThemeBrush}">
<ListView x:Name="list" DisplayMemberPath="FullName" />
</Grid>
</Page>
The page includes the classic XAML definition for a page control represented by the MyFirstApp.MainPage class. The user control references four XML namespaces—just like a Silverlight project, a WPF app, or a Windows Phone 7.x application.
By default, the template uses a Grid for the layout, but you will change this in a later procedure, where you will add some styling to change the look and feel of this simple application.
You will also modify the code behind for the MainPage.xaml page, as shown in Example 3-2, so that it calls a fake “business layer” that returns a list of people represented by the Person class you will also implement shortly.
Example 3-2. Modified MainPage.xaml.cs code
using System;
using System.Collections.Generic;
using System.IO;
using System.Linq;
using Windows.Foundation;
using Windows.Foundation.Collections;
using Windows.UI.Xaml;
using Windows.UI.Xaml.Controls;
using Windows.UI.Xaml.Controls.Primitives;
using Windows.UI.Xaml.Data;
using Windows.UI.Xaml.Input;
using Windows.UI.Xaml.Media;
using Windows.UI.Xaml.Navigation;
// The Blank Page item template is documented at http://go.microsoft.com/fwlink/?LinkId=234238
namespace MyFirstApp
{
/// <summary>
/// An empty page that can be used on its own or navigated to within a Frame.
/// </summary>
public sealed partial class MainPage : Page
{
public MainPage()
{
this.InitializeComponent();
// Fill the ListView
var biz = new Biz();
list.ItemsSource = biz.GetPeople();
}
/// <summary>
/// Invoked when this page is about to be displayed in a Frame.
/// </summary>
/// <param name="e">Event data that describes how this page was reached. The Parameter
/// property is typically used to configure the page.</param>
protected override void OnNavigatedTo(NavigationEventArgs e)
{
}
}
}
Modify and test the application
1. Modify the MainPage.xaml file so that its contents are identical to Example 3-1.
2. Open the code-behind file (MainPage.xaml.cs) and insert the bold lines in Example 3-2.
3. Add a new class file to the project to implement the Biz class by right-clicking the term Biz in the code behind. Then choose Generate | Class.
4. Generate a method stub for the GetPeople method by using the same technique: right-click the GetPeople method, choose Generate | Method Stub. Use the following code to replace the code of the Biz.cs file.
5. using System;
6. using System.Collections.Generic;
7. using System.Linq;
8. using System.Text;
9.
10.namespace MyFirstApp
11.{
12. public class Biz
13. {
14. public List<Person> GetPeople()
15. {
16. return new List<Person>()
17. {
18. new Person() { FullName = "Roberto Brunetti" },
19. new Person() { FullName = "Paolo Pialorsi" },
20. new Person() { FullName = "Marco Russo" },
21. new Person() { FullName = "Luca Regnicoli" },
22. new Person() { FullName = "Vanni Boncinelli" },
23. new Person() { FullName = "Guido Zambarda" },
24. new Person() { FullName = "Jessica Faustinelli" },
25. new Person() { FullName = "Katia Egiziano" }
26. };
27. }
28. }
29.
30. public class Person
31. {
32. public string FullName { get; set; }
33. }
}
34.Run the application.
The code in the Biz class simply returns a list of people represented by the Person class. For the sake of simplicity, this class has just one property, FullName.
When you run the app, the result will look similar to Figure 3-4. You should be able to select a person from the list.

Figure 3-4. Main page of the application presenting the listbox of names.
It is time to forget the developer inside you and put on your designer hat to transform the plain vanilla list into something more appealing. Stop the debugging session and return to Visual Studio 2012.
Before refining the appearance of the list, you need to add some more user interface elements to the page—such as a TextBlock control to display the application’s title—and make your first app appear more integrated with the Windows 8 environment.
To add a title, you need to modify the XAML source in the MainPage.xaml file, as shown in Example 3-3:
Example 3-3. MainPage.xaml with a GridView control
<Page
x:Class="MyFirstApp.MainPage"
xmlns="http://schemas.microsoft.com/winfx/2006/xaml/presentation"
xmlns:x="http://schemas.microsoft.com/winfx/2006/xaml"
xmlns:local="using:MyFirstApp"
xmlns:d="http://schemas.m icrosoft.com/expression/blend/2008"
xmlns:mc="http://schemas.openxmlformats.org/markup-compatibility/2006"
mc:Ignorable="d">
<Grid Background="{StaticResource ApplicationPageBackgroundThemeBrush}">
<Grid.RowDefinitions>
<RowDefinition Height="140"/>
<RowDefinition Height="*"/>
</Grid.RowDefinitions>
<!-- page title -->
<Grid Grid.Row="0" Grid.Column="0">
<Grid.ColumnDefinitions>
<ColumnDefinition Width="120"/>
<ColumnDefinition Width="*"/>
</Grid.ColumnDefinitions>
<TextBlock x:Name="pageTitle" Grid.Column="1" Text="My First Windows 8 App"
Style="{StaticResource PageHeaderTextStyle}"/>
</Grid>
<ListView x:Name="list" DisplayMemberPath="FullName" Grid.Row="1" Grid.Column="0"
Margin="116,0,0,46"/>
</Grid>
</Page>
Now, if you press F5 in Visual Studio, your page should look similar to the one shown in Figure 3-5.
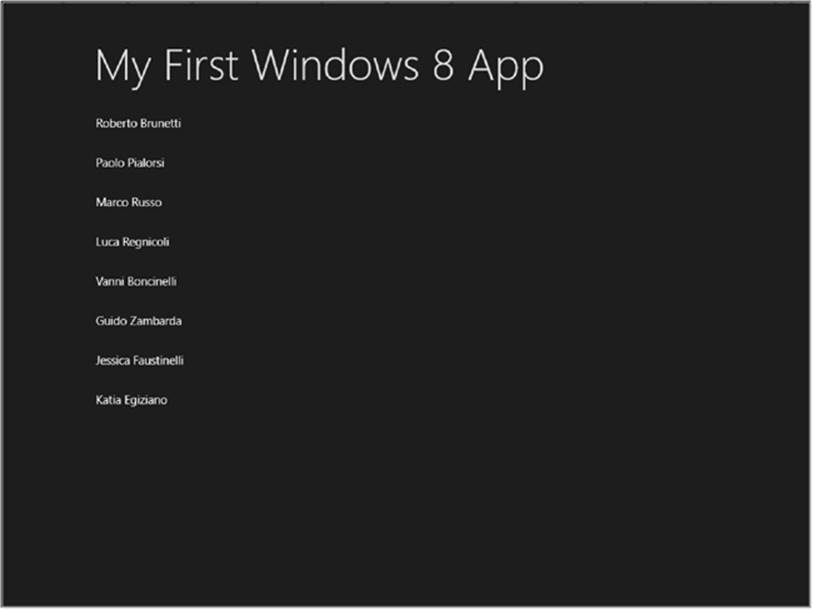
Figure 3-5. The main page with the title.
Example 3-3 used a Grid element as the root element of the page. In XAML, the Grid panel allows you to place child elements in rows and columns, as well as define in advance the number and the properties of each row and column by leveraging the RowDefinitions and ColumnDefinitionsproperties of the Grid control.
In the example, the main grid was split into two rows. But now it is time to return to the code for a deeper explanation. The first four lines of the Grid control definition are as follows.
<Grid Background="{StaticResource ApplicationPageBackgroundThemeBrush}">
<Grid.RowDefinitions>
<RowDefinition Height="140"/>
<RowDefinition Height="*"/>
</Grid.RowDefinitions>
To define rows and columns of the main Grid control, we used the Grid.RowDefinitions property. This syntax (in the form classtype.propertyname, also known as extended property syntax) represents a standard way to set complex properties using the XAML markup language. Within theRowDefinitions property you’ll find two instances of RowDefinition: the first sets the height equal to 140 pixels, whereas the second uses the “*” (star) character to define an unknown-at-design-time value that can fill the remaining space on the screen. Keep in mind that it is very important to design a user interface that can adapt to the user’s screen resolution; tablets and devices are available with widely varying screen resolutions and orientations. Using relative rather than absolute sizing helps a great deal in achieving the goal of an adaptive interface.
Assigning each graphic element to a cell of the grid suffices to set the Grid.Row and Grid.Column properties of the element itself. These properties are also called attached properties because they don’t belong to the object model of the target element, but are instead “attached” to the control itself. This scenario includes two child elements in the main grid.
§ First, a secondary Grid control that will contain the title page elements. This Grid control has two attached properties: Grid.Row, with a value of 0, and Grid.Column, also with a value of 0. This will place it in the first row and first column of the main grid.
§ Next, there is a ListView control, with the properties Grid.Row = “1” and Grid.Column = “0,” that place it in the second row of the first column.
Here are some other useful tidbits of information about how to use the Grid control.
§ You can omit the Grid.Row and/or Grid.Column properties if their value is 0.
§ If a Grid control does not explicitly set the RowDefinitions property, it is treated as having a single RowDefinition definition whose Height property is set to “*”.
§ If a Grid control does not explicitly set the ColumnDefinitions property, it is treated as having a single ColumnDefinition definition whose Width property is set to “*”.
§ You can set the RowDefinition’s Height property to “Auto,” in which case its size is defined at runtime by the height of the controls it contains.
§ You can set the ColumnDefinition’s Width property to “Auto,” in which case its size is defined at runtime by the width of the controls it contains.
Continuing the analysis of the XAML code, you’ll find a secondary Grid control, further divided into two columns, whose only child is a TextBlock control.
<TextBlock x:Name="pageTitle" Grid.Column="1" Text="My First Windows 8 App"
Style="{StaticResource PageHeaderTextStyle}"/>
The property setting Grid.Column = “1” means that the TextBlock control will be positioned in the second column of the parent Grid control, whereas the Style property references a style called PageHeaderTextStyle using the special {StaticResource} syntax (you will explore the basic concepts underlying such styles in later chapters). For now, just remember that a style is simply a container for property settings—a shared object that can be reused in different scenarios.
The property Grid.Row = “1” has been added to the ListView control so that it will occupy the entire second row of the main grid, and the property Margin = “116,0,0,46” places the ListView control a few pixels away from the edges of the cell. The Margin property is set using four numbers separated by commas. The first number identifies the distance from the left edge and then continuing clockwise; in our example, the ListView control is placed 116 pixels away from the left edge, 0 from the top and right edges, and 46 pixels from the bottom edge.
Now try to add some photos to the project. To do that, simply drag the folder called Photos (included in the Demo Files for this chapter) into Visual Studio, and drop it when your cursor is on the project root called MyFirstApp. As a result of this operation, Visual Studio will create a directory called Photos in the project’s root (at the same level as the Assets and Common folders) containing some .jpg files.
The next step is to modify the Person class to add a custom property called Photo, and define the business component to set that property.
Example 3-4 shows the code for the modified Biz.cs file. Copy Example 3-4 into the Biz.cs file.
Example 3-4. Modified Biz.cs code.
using System;
using System.Collections.Generic;
using System.Linq;
using System.Text;
namespace MyFirstApp
{
public class Biz
{
public List<Person> GetPeople()
{
return new List<Person>()
{
new Person() { FullName = "Roberto Brunetti", Photo = "Photos/01.jpg" },
new Person() { FullName = "Paolo Pialorsi", Photo = "Photos/02.jpg" },
new Person() { FullName = "Marco Russo", Photo = "Photos/03.jpg" },
new Person() { FullName = "Luca Regnicoli", Photo = "Photos/04.jpg" },
new Person() { FullName = "Vanni Boncinelli", Photo = "Photos/05.jpg" },
new Person() { FullName = "Guido Zambarda", Photo = "Photos/06.jpg" },
new Person() { FullName = "Jessica Faustinelli", Photo = "Photos/07.jpg" },
new Person() { FullName = "Katia Egiziano", Photo = "Photos/08.jpg" }
};
}
}
public class Person
{
public string FullName { get; set; }
public string Photo { get; set; }
}
}
To make the view of the people contained in the ListView control more appealing, you must modify the control’s ItemTemplate property. It is important to understand that in XAML, a template object is equivalent to the concept of “structure,” and the ItemTemplate property represents the structure of the individual items in the ListView control.
You start by editing the XAML source code of the MainPage.xaml page to make some tweaks to the ListView control.
Replace the ListView definition in the MainPage.xaml:
<ListView x:Name="list" DisplayMemberPath="FullName" Grid.Row="1"
Grid.Column="0" Margin="116,0,0,46"/>
with this markup code:
<ListView Grid.Row="1" Grid.Column="0" x:Name="list" Margin="116,0,0,46">
<ListView.ItemTemplate>
<DataTemplate>
<TextBlock Text="{Binding FullName}" FontSize="10" />
</DataTemplate>
</ListView.ItemTemplate>
</ListView>
The second example removes the DisplayMemberPath property, which displayed only simple strings connected to the FullName property of the bound objects, and replaces it with the ItemTemplate property that accepts objects of type DataTemplate. In this scenario, the DataTemplate consists of a simple label (a TextBlock) with its Text property connected to the FullName property of the bound object; if you now run the application, you will see the list of people displayed in a smaller font. This is not a huge graphical improvement over the previous version, but these steps function as the basis for subsequent activities you will perform.
In the next step, you will try to change the DataTemplate of each item to display both the name and the photo. Replace the DataTemplate definition of the ListView.
<DataTemplate>
<TextBlock Text="{Binding FullName}" FontSize="10" />
</DataTemplate>
with this code:
<DataTemplate>
<StackPanel Width="200" Height="200">
<TextBlock Text="{Binding FullName}" />
<Image Source="{Binding Photo}" />
</StackPanel>
</DataTemplate>
Compared to the previous step, this uses a new panel called StackPanel, which places child items arranged vertically, one under the other, or—if the Orientation property is set to Horizontal—side by side. In this scenario, each item in the ListView will be displayed using a StackPanel that will render the person’s name and photo by binding, respectively, the FullName property with the Text property of a TextBlock and the Photo property with the Source property of an Image control.
Until now we have used the ListView control, which can display a series of vertical elements; now, let’s try to replace the previous ListView definition:
<ListView Grid.Row="1" Grid.Column="0" x:Name="list" Margin="116,0,0,46">
<ListView.ItemTemplate>
<DataTemplate>
<StackPanel Width="200" Height="200">
<TextBlock Text="{Binding FullName}" />
<Image Source="{Binding Photo}" />
</StackPanel>
</DataTemplate>
</ListView.ItemTemplate>
</ListView>
with this new markup code that uses a GridView control:
<GridView Grid.Row="1" Grid.Column="0" x:Name="list" Margin="116,0,0,46">
<GridView.ItemTemplate>
<DataTemplate>
<StackPanel Width="200" Height="200">
<TextBlock Text="{Binding FullName}" />
<Image Source="{Binding Photo}" />
</StackPanel>
</DataTemplate>
</GridView.ItemTemplate>
</GridView>
The GridView control, as the name suggests, is able to display its items in a tabular form, or grid.
If you press F5 in Visual Studio, you will see the result shown in Figure 3-6.
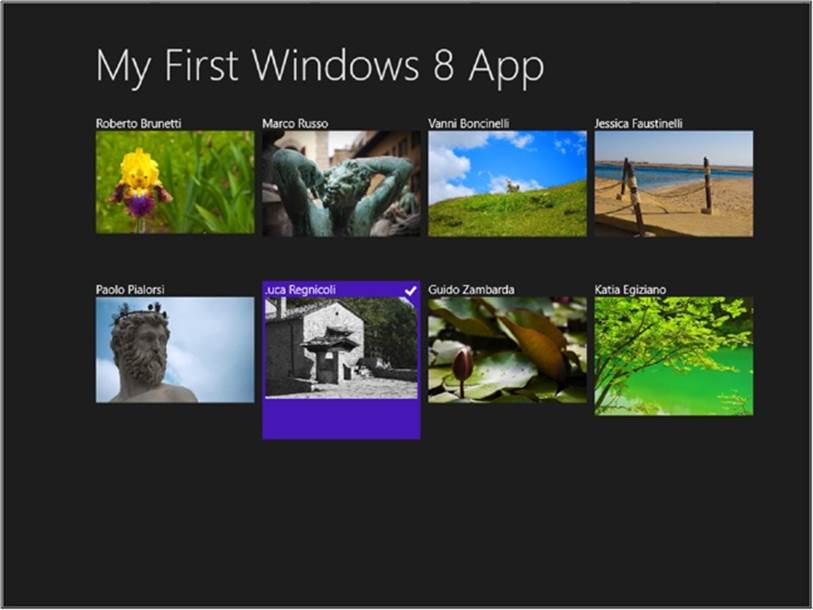
Figure 3-6. Element selected in the customized GridView control.
This outcome is acceptable, but you can do even better using just a bit of creativity and a few lines of XAML code within the DataTemplate. The next listing shows the entire MainPage.xaml page with the code changed in the previous step highlighted in bold.
Replace the entire code of the MainPage.xaml with the following.
<Page
x:Class="MyFirstApp.MainPage"
xmlns="http://schemas.microsoft.com/winfx/2006/xaml/presentation"
xmlns:x="http://schemas.microsoft.com/winfx/2006/xaml"
xmlns:local="using:MyFirstApp"
xmlns:d="http://schemas.microsoft.com/expression/blend/2008"
xmlns:mc="http://schemas.openxmlformats.org/markup-compatibility/2006"
mc:Ignorable="d">
<Grid Background="{StaticResource ApplicationPageBackgroundThemeBrush}">
<Grid.RowDefinitions>
<RowDefinition Height="140"/>
<RowDefinition Height="*"/>
</Grid.RowDefinitions>
<!-- Back button and page title -->
<Grid Grid.Row="0" Grid.Column="0">
<Grid.ColumnDefinitions>
<ColumnDefinition Width="120"/>
<ColumnDefinition Width="*"/>
</Grid.ColumnDefinitions>
<TextBlock x:Name="pageTitle" Grid.Column="1"
Text="My First Windows 8 App" Style="{StaticResource PageHeaderTextStyle}"/>
</Grid>
<GridView Grid.Row="1" Grid.Column="0" x:Name="list" Margin="116,0,0,46">
<GridView.ItemTemplate>
<DataTemplate>
<Grid>
<Image Source="{Binding Photo}" Width="200" Height="130"
Stretch="UniformToFill" />
<Border Background="#A5000000" Height="45" VerticalAlignment="Bottom">
<StackPanel Margin="10,-2,-2,-2">
<TextBlock Text="{Binding FullName}" Margin="0,20,0,0"
Foreground="#7CFFFFFF" HorizontalAlignment="Left" />
</StackPanel>
</Border>
</Grid>
</DataTemplate>
</GridView.ItemTemplate>
</GridView>
</Grid>
</Page>
The new DataTemplate uses a Grid as the root element, with two elements nested within it: an Image and a Border. Because the Grid has neither RowDefinitions nor ColumnDefinitions, it will render as a single cell containing the two child elements, following the order defined in the markup—that is, the first child element rendered by the runtime will be the Image control, then the Border control (with all its children) will be rendered in overlay. Beyond those changes, the XAML markup adds only one new thing: the Background property of the Border control that contains the following string “#A5000000.” It is worth noting the first two characters after the #: they represent the alpha channel, or transparency, of the color defined by the subsequent six characters (black, in this case). In fact, in this example, the Border does not have a full and “opaque” color as background, but rather uses a semi-transparent black for graphical purposes.
The result is quite in line with the Windows 8 ecosystem and visually pleasing, as you can see in Figure 3-7.
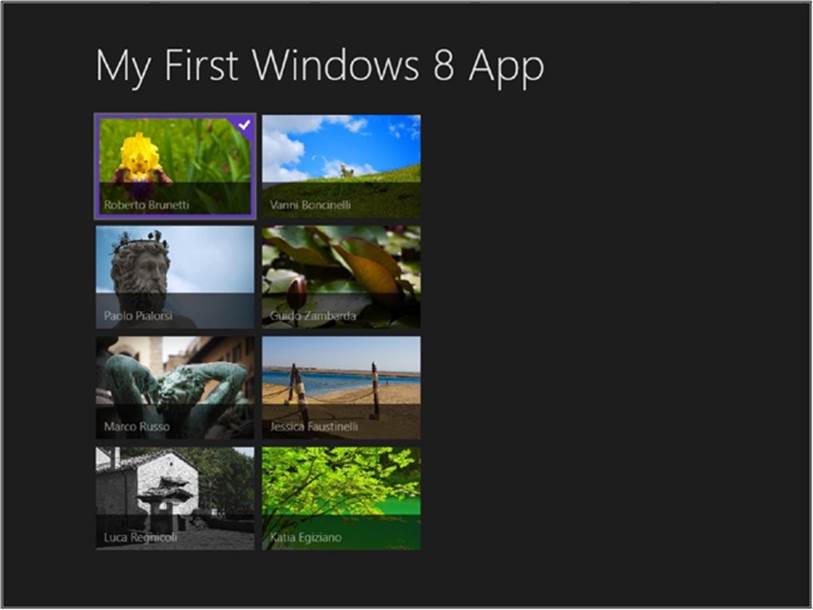
Figure 3-7. A different customization of the GridView control.
It is worth noting that the controls provided by the framework support all types of input, such as mouse, keyboard, touch screen, and pen for free—in other words, you don’t have to write code to make the controls respond to normal input.
Adding search functionality
In this section, you will add the code that enables the searching capability inside the application.
One thing you may notice in a Windows Store application project is the absence of direct references; if you open the References element in the project tree you will not find the classic System. Something assembly. Instead, there is just a .NET for Windows Store apps reference and a Windows reference. These contain all the Windows Runtime classes you need to develop Windows Store apps.
You can add the complete implementation of the search feature inside the application without adding any references; you need only to add a reference if you create your own class library, for which you would need to add a reference to the corresponding assembly. You can find more information about developing custom class libraries in Chapter 5.
In a previous procedure, you added the Search Declaration to the application, letting the operating system include the application in the Search pane. The declaration in the manifest tells the Windows 8 runtime: “I’m a searchable application.” In other words, the system will present theapplication as a possible target for a search inside the application itself. A search target is the scope for the user’s search, which may be a file in the file system, an installed application, a setting in the control panel, or some text inside a searchable application.
When the user selects the application as the target for his or her search, the application is activated for the search and the search string typed by the user is passed to the application. The idea is simple: the application is the only component that can correctly show the search result; no other component, nor the operating system itself, knows about the data inside the application. The way the application presents the data is tailored to the specific application data. In Chapter 6, you will learn more about search integration as well as about other WinRT APIs, such as Share, Webcam, FilePicker, and so on.
The search feature is implemented by a contract, called a search contract, that regulates the search interaction between an application and the operating system. The search contract states the following:
§ The application needs a registration. This registration is based on the manifest declaration.
§ The declaration can include the executable name, that is, the application .exe file name—the entry point for the application that the system will call when the user chooses the application as the search target.
§ The application will present the data in the appropriate format using a page.
§ The application will receive the search text entered by the user in the entry point. It is the responsibility of the application to present the page with some feedback to the user; the feedback can be the list of items found or a message (in case of search failure). The failure can be a “Not Found” text or graphics, or “Data not available, try again later.” Be as specific as you can with the message.
§ Windows manages the Search History for the user.
§ The application can provide suggestions for the text entered by the user.
Add the search contract
There is a Visual Studio template that provides a simple implementation of a contract that covers all the search points in the preceding list—except for the last one. The first step you will perform in this procedure is to remove the Search Declaration you added in a preceding procedure to explore the default implementation. Then follow the remaining steps to add the search functionality.
1. Remove the Search Declaration from the manifest opening the Package.appxmanifest. Go to the Declarations tab, look for “Search” in the Supported Declaration list, select it, and click Remove. Save the manifest.
2. Add a new Search Contract item by right-clicking the project in the Solution Explorer and choosing Add | New Item.
3. In the Add New Item dialog, select Search Contract and name it SearchPeople.xaml.
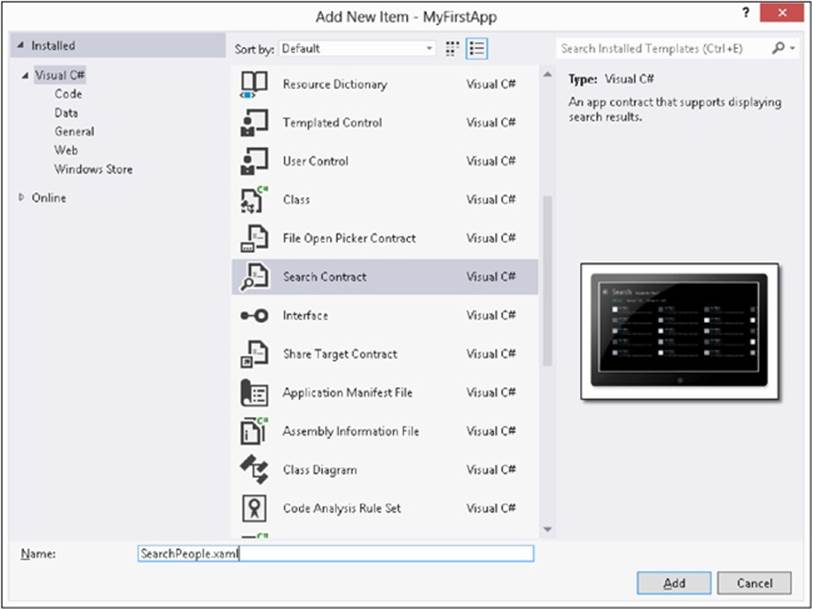
Click OK.
4. In the dialog that asks you to add all the files you need to implement the contract, click Yes.
Test the default search component
Before doing anything else, you can test the application immediately to fully understand the complete flow. You will implement the people search in the procedure after this one.
1. Deploy the application from Visual Studio by right-clicking the project element in the Solution Explorer and choosing Deploy.
2. Press Windows+Q to activate the Search pane.
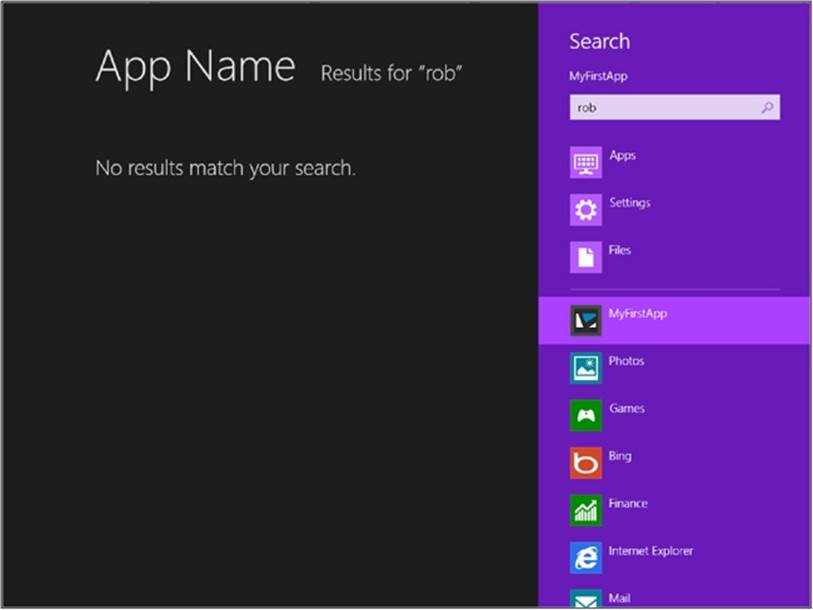
3. Type the text you want in the search box and choose MyFirstApp from the application list. The operating system will launch the application (which was not running yet because you just deployed it), and activate the search inside the application using a call to the search contract entry point. The application shows the SearchPeople.xaml page that, obviously, presents no results yet.
4. Close the application using Alt+F4 or Task Manager.
5. Start the application from the Start screen.
6. Press Windows+Q again to start a new search.
7. Type some text in the search box and choose MyFirstApp in the application list. The result page is identical to the previous one, but the Back button is now enabled because the search target (your application) was already running when you activated the search.
8. Click the Back button and note that the application is in the same state.
9. Go to the Start screen and open another application (Mail works fine). Repeat steps 6 through 8. The result will be always a blank page. However, if you click the Back button, you can see the page that shows the previous search; this demonstrates that the application was put into the suspended state and resumed when the search target was activated.
10.Press Alt+Tab (yes, that key combination still works in Windows 8) to select another application for the foreground.
11.Go to the Start screen and launch your application. The application presents the search result because Windows 8 suspends the application and restores it if the user comes back.
Now that you have explored the search flow, it’s time to implement the Search Contract template. The template adds the Search Declaration to the Package.appxmanifest, as you can verify by double-clicking the file and selecting the Declarations tab.
This template also modifies the project—among other things, it adds a new page to display the search results (SearchPeople.xaml or whatever name you used in the Add New Item dialog) that you saw in the previous procedure when you chose MyFirstApp as the search target.
This new page is shown when a search is activated. The contract defines the entry point for the “search call” that, by default, is the App class.
The Search Contract Visual Studio Template also modified the App.xaml.cs file to override the OnSearchActivated method of the base class so that it shows the search result page. Example 3-5 shows the complete code for the App.xaml.cs file.
Example 3-5. Code-behind file for the App class: App.xaml.cs
using System;
using System.Collections.Generic;
using System.IO;
using System.Linq;
using Windows.ApplicationModel;
using Windows.ApplicationModel.Activation;
using Windows.Foundation;
using Windows.Foundation.Collections;
using Windows.UI.Xaml;
using Windows.UI.Xaml.Controls;
using Windows.UI.Xaml.Controls.Primitives;
using Windows.UI.Xaml.Data;
using Windows.UI.Xaml.Input;
using Windows.UI.Xaml.Media;
using Windows.UI.Xaml.Navigation;
// The Blank Application template is documented at http://go.microsoft.com/fwlink/?LinkId=234227
namespace MyFirstApp
{
/// <summary>
/// Provides application-specific behavior to supplement the default Application class.
/// </summary>
sealed partial class App : Application
{
/// <summary>
/// Initializes the singleton application object.
/// This is the first line of authored code
/// executed, and as such is the logical equivalent of main() or WinMain().
/// </summary>
public App()
{
this.InitializeComponent();
this.Suspending += OnSuspending;
}
/// <summary>
/// Invoked when the application is launched normally by the end user.
/// Other entry points will be used when the application is launched to open
/// a specific file, to display, search results, and so forth.
/// </summary>
/// <param name="args">Details about the launch request and process.</param>
protected override void OnLaunched(LaunchActivatedEventArgs args)
{
Frame rootFrame = Window.Current.Content as Frame;
// Do not repeat app initialization when the Window already has content,
// just ensure that the window is active
if (rootFrame == null)
{
// Create a Frame to act as the navigation context and navigate
// to the first page
rootFrame = new Frame();
if (args.PreviousExecutionState == ApplicationExecutionState.Terminated)
{
//TODO: Load state from previously suspended application
}
// Place the frame in the current Window
Window.Current.Content = rootFrame;
}
if (rootFrame.Content == null)
{
// When the navigation stack isn't restored navigate to the first page,
// configuring the new page by passing required information as a navigation
// parameter
if (!rootFrame.Navigate(typeof(MainPage), args.Arguments))
{
throw new Exception("Failed to create initial page");
}
}
// Ensure the current window is active
Window.Current.Activate();
}
/// <summary>
/// Invoked when application execution is being suspended. Application state is saved
/// without knowing whether the application will be terminated or
/// resumed with the contents
/// of memory still intact.
/// </summary>
/// <param name="sender">The source of the suspend request.</param>
/// <param name="e">Details about the suspend request.</param>
private void OnSuspending(object sender, SuspendingEventArgs e)
{
var deferral = e.SuspendingOperation.GetDeferral();
//TODO: Save application state and stop any background activity
deferral.Complete();
}
/// <summary>
/// Invoked when the application is activated to display search results.
/// </summary>
/// <param name="args">Details about the activation request.</param>
protected async override void OnSearchActivated(Windows.ApplicationModel.Activation.
SearchActivatedEventArgs args)
{
// TODO: Register the Windows.ApplicationModel.Search.SearchPane.
GetForCurrentView().QuerySubmitted
// event in OnWindowCreated to speed up searches once the application is already
running
// If the Window isn't already using Frame navigation, insert our own Frame
var previousContent = Window.Current.Content;
var frame = previousContent as Frame;
// If the app does not contain a top-level frame, it is possible that this
// is the initial launch of the app. Typically this method and OnLaunched
// in App.xaml.cs can call a common method.
if (frame == null)
{
// Create a Frame to act as the navigation context and associate it with
// a SuspensionManager key
frame = new Frame();
MyFirstApp.Common.SuspensionManager.RegisterFrame(frame, "AppFrame");
if (args.PreviousExecutionState == ApplicationExecutionState.Terminated)
{
// Restore the saved session state only when appropriate
try
{
await MyFirstApp.Common.SuspensionManager.RestoreAsync();
}
catch (MyFirstApp.Common.SuspensionManagerException)
{
//Something went wrong restoring state.
//Assume there is no state and continue
}
}
}
frame.Navigate(typeof(SearchPeople), args.QueryText);
Window.Current.Content = frame;
// Ensure the current window is active
Window.Current.Activate();
}
}
}
The OnLaunched method is the standard code suggested by the Windows Store Application template and is needed to activate the main page when the user launches the application. An application is “launched” when its state is not running.
The OnSearchActivated method is the code for the Search Contract default implementation. The code instantiates the designated page and calls the Activate custom method to pass the received arguments.
The SearchActivatedEventArgs used by the OnSearchActivated method and the LaunchActivated EventArgs used by the OnLaunched methods both implement the IActivatedEventArgs interface.
The first property of the interface is Kind, and it can be one of the values defined in the Activation-Kind enumeration. This property lets the developer ask for the kind of activation during launching; for instance, if the application is launched by the user, this property will beActivationKind.Launch. However, if the application is launched by the system when the user designates it as search target, the property will be ActivationKind.Search. If the application is activated to receive something from other applications using a Share Contract, the property will beActivationKind.ShareTarget.
The QueryText property of the SearchActivatedEventArgs contains the text entered by the user in the Search pane. This property is used in the default OnSearchActivated method during the navigation to the search page, as you can see in the following excerpt.
frame.Navigate(typeof(SearchPeople), args.QueryText);
Window.Current.Content = frame;
// Ensure the current window is active
Window.Current.Activate();
As you can see, the search terms are received in the navigationParameter parameter of the LoadState method of the SearchPeople.xaml.cs page and used to build the QueryText property of the user interface in the DefaultViewModel property of the page. Example 3-6 shows the code for this method.
Example 3-6. Extract of SearchPeople.xaml.cs code behind
protected override void LoadState(Object navigationParameter, Dictionary<String, Object> pageState)
{
var queryText = navigationParameter as String;
// TODO: Application-specific searching logic. The search process is responsible for
// creating a list of user-selectable result categories:
//
// filterList.Add(new Filter("<filter name>", <result count>));
//
// Only the first filter, typically "All", should pass true as a third argument in
// order to start in an active state. Results for the active filter are provided
// in Filter_SelectionChanged below.
var filterList = new List<Filter>();
filterList.Add(new Filter("All", 0, true));
// Communicate results through the view model
this.DefaultViewModel["QueryText"] = '\u201c' + queryText + '\u201d';
this.DefaultViewModel["Filters"] = filterList;
this.DefaultViewModel["ShowFilters"] = filterList.Count > 1;
}
The code in Example 3-6 is relatively simple. The first line defines a local variable called queryText to host the text entered by the user in the search box. This text is passed in the search contract as the QueryText property of the SearchActivatedEventArgs.
The placeholder lets you choose the business logic to look for the text in your data and represents the most important part of this code.
The last three lines of code are useful if you decide to use the default layout to display the search results. The code assigns the text for the query, the filters list and a Boolean to indicate whether to show the filters list in the bindable dictionary (IObservableMap in fact derives fromIDictionary). Let’s try to implement the search by reusing the business layer you saw at the beginning of this chapter.
Implement the search logic
In the following procedure, you will implement the logic for retrieving the list of people. Although you can implement the logic using a LINQ (Language Integrated Query) query on the results from the business logic component List method, consider passing the search parameter to the business logic component to perform the search in lower layers. Generally speaking, it is a bad idea to filter the entire set of data in memory in the user interface layer. For the sake of simplicity, this sample application has no persistence layer. Thus, you will implement the search in memory inside the business layer.
1. Add a method to the business logic component (Biz.cs) to filter the data source using the following code:
2. public List<Person> GetPeople(String search)
3. {
4. var list = this.GetPeople();
5. return list.Where(p => p.FullName.Contains(search)).ToList();
}
6. Add a call to the new GetPeople method from the SearchPeople.xaml.cs LoadState method and assign the result to the DefaultViewModel property. Use the following code as a reference (the lines to add are in bold).
7. protected override void LoadState(Object navigationParameter,
8. Dictionary<String, Object> pageState)
9. {
10. var queryText = navigationParameter as String;
11.
12. // TODO: Application-specific searching logic. The search process is
13. // responsible for
14. // creating a list of user-selectable result categories:
15. //
16. // filterList.Add(new Filter("<filter name>", <result count>));
17. //
18. // Only the first filter, typically "All", should pass true as a third
19. // argument
20. // in order to start in an active state. Results for the active filter
21. // are provided in Filter_SelectionChanged below.
22.
23. var biz = new Biz();
24. var people = biz.GetPeople(queryText);
25. this.DefaultViewModel["Results"] = people;
26. var filterList = new List<Filter>();
27. filterList.Add(new Filter("All", 0, true));
28.
29. // Communicate results through the view model
30. this.DefaultViewModel["QueryText"] = '\u201c' + queryText + '\u201d';
31. this.DefaultViewModel["Filters"] = filterList;
32. this.DefaultViewModel["ShowFilters"] = filterList.Count > 1;
}
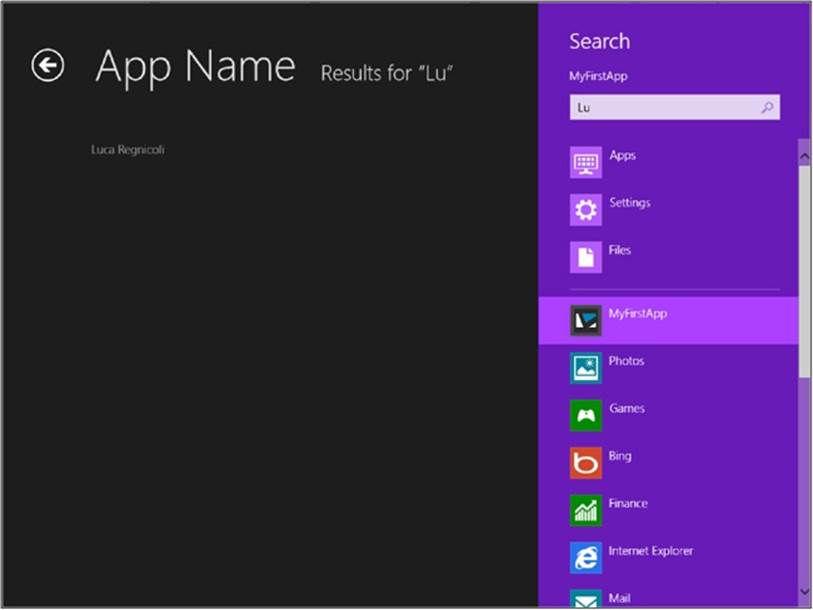
33.Open SearchPeople.xaml and find the GridView control named resultGridView. Remove the ItemTemplate default definition and define a new one to show the person name for each result. The following code shows the complete control’s definition:
34.<GridView
35. x:Name="resultsGridView"
36. AutomationProperties.AutomationId="ResultsGridView"
37. AutomationProperties.Name="Search Results"
38. TabIndex="1"
39. Grid.Row="1"
40. Margin="0,-238,0,0"
41. Padding="110,240,110,46"
42. SelectionMode="None"
43. IsSwipeEnabled="false"
44. IsItemClickEnabled="True"
45. ItemsSource="{Binding Source={StaticResource resultsViewSource}}">
46. <GridView.ItemTemplate>
47. <DataTemplate>
48. <TextBlock Text="{Binding FullName}" Margin="0,20,0,0"
49. Foreground="#7CFFFFFF" HorizontalAlignment="Left" />
50. </DataTemplate>
51. </GridView.ItemTemplate>
52. <GridView.ItemContainerStyle>
53. <Style TargetType="Control">
54. <Setter Property="Height" Value="70"/>
55. <Setter Property="Margin" Value="0,0,38,8"/>
56. </Style>
57. </GridView.ItemContainerStyle>
</GridView>
58.Deploy the application and test a search from the Search pane, as you learned in the “Test the Default Search Component” procedure.
The last thing you need to do to complete the sample application is to change the DefaultViewModel property value to display the actual number of people retrieved by the search.
Modify the View Model properties
In this procedure, you will modify the code to show the actual number of people retrieved by the search. The procedure is very straightforward.
1. Modify the LoadState method as follows. The lines in bold represent the updated ones.
2. protected override void LoadState(Object navigationParameter,
3. Dictionary<String, Object> pageState)
4. {
5. var queryText = navigationParameter as String;
6.
7. // TODO: Application-specific searching logic. The search process is responsible for
8. // creating a list of user-selectable result categories:
9. //
10.// filterList.Add(new Filter("<filter name>", <result count>));
11.//
12.// Only the first filter, typically "All", should pass true as a third argument
13.// in order to start in an active state. Results for the active filter are
14.// provided in Filter_SelectionChanged below.
15.
16.var biz = new Biz();
17.var people = biz.GetPeople(queryText);
18.this.DefaultViewModel["Results"] = people;
19.
20.var filterList = new List<Filter>();
21.filterList.Add(new Filter("All", people.Count, true));
22.
23.// Communicate results through the view model
24.this.DefaultViewModel["QueryText"] = '\u201c' + queryText + '\u201d';
25.this.DefaultViewModel["Filters"] = filterList;
26.this.DefaultViewModel["ShowFilters"] = filterList.Count >= 1;
}
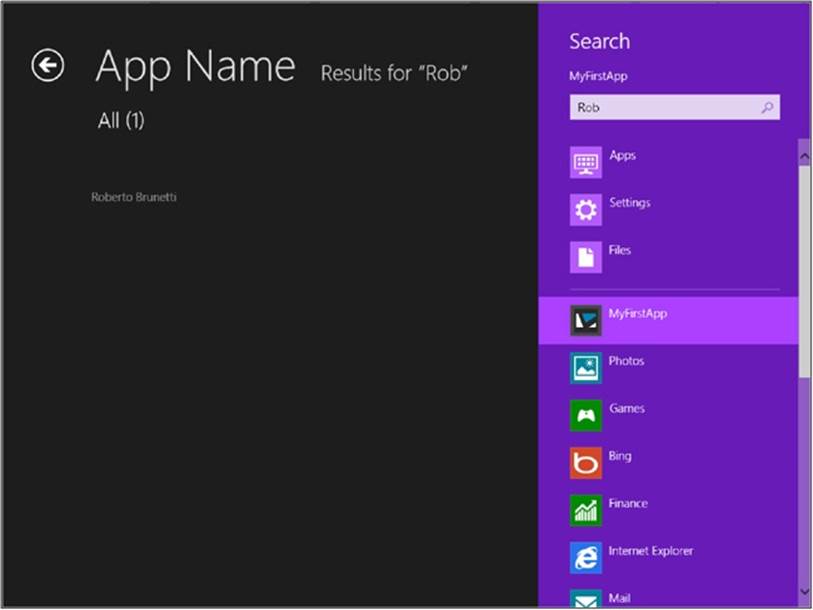
In practice, the first filter that shows the “All” keyword will contain the actual number of retrieved results and the ShowFilters boolean property indicates whether to show the various filters to the user. Obviously, you have to implement the various filters and the corresponding code.
27.Kill the application using the Task Manager because the process is probably already running from the previous procedure.
28.Deploy the application and test it again using the Search pane.
Summary
In this chapter, you saw the complete cycle for creating, testing, and deploying a simple Windows 8 application. You learned about the available templates and how to describe the application using the manifest. Finally, you added the code to implement the search contract using a provided template.
The next chapter is dedicated to application life cycle management. You will learn the details of the application manifest: how to package, test, and deploy an application, and how Windows 8 manages the launch, suspension, and termination of an application.
Quick reference
|
To |
Do This |
|
Arrange controls inside a flexible grid area |
Use the Grid control. |
|
Arrange child elements into a single line that can be oriented horizontally or vertically |
Use the StackPanel control. |
|
Deploy a Windows Store application |
Use the deployment feature of Visual Studio 2012. |
|
Deploy and test the application |
In Visual Studio, press F5. |
|
Implement the Search Contract |
Use the SDK template called Search Contract that adds the search result page, the manifest declaration, and some sample code to the solution. |
|
Define application features |
Use the Visual Studio IDE Designer and open the Package. appxmanifest file. |
|
Close an application |
Stop the debugger, in case you are debugging it; or press Alt+F4; use the closing gesture; or use the new Task Manager to terminate the process. |
All materials on the site are licensed Creative Commons Attribution-Sharealike 3.0 Unported CC BY-SA 3.0 & GNU Free Documentation License (GFDL)
If you are the copyright holder of any material contained on our site and intend to remove it, please contact our site administrator for approval.
© 2016-2026 All site design rights belong to S.Y.A.