Build Windows® 8 Apps with Microsoft® Visual C#® and Visual Basic® Step by Step (2013)
Chapter 9. Rethinking the UI for Windows 8 apps
After completing this chapter, you will be able to:
§ Use controls that are specific to Windows 8 apps
§ Design flexible layouts
§ Use Tiles and Toasts
In Chapter 7, you analyzed some common XAML controls—controls that you can also find in other presentation technologies, such as Windows Presentation Foundation (WPF), Microsoft Silverlight, and Windows Phone. In this chapter, you will become acquainted with objects of the XAML platform specific to Windows 8, and you will see how to define appropriate application layouts for each Windows 8 UI view state, including portrait, landscape, snapped, fill, and full-screen views. The last part of the chapter is dedicated to Tiles and Toasts, which are important ways to communicate with your application’s users directly from the Windows Start screen. This chapter is dedicated to the user interface and the user experience, so we want to focus your attention on specific features and the use of specific controls.
Use Windows 8 UI-specific controls
This section discusses how to use some of the user interface controls that are specific to Windows 8 apps, such as AppBar, WebView, ListView, GridView, FlipView, and SemanticZoom.
Use the Application Bar control
The Application Bar, typically known as the App Bar, is a container for custom commands and for options specific to the user’s current context. You can create up to two App Bar controls for a Windows Store app: usually the bottom App Bar is used to manage tasks related to the current context, while typically the top App Bar presents navigation aids to the user. In this procedure, you will add an App Bar control to a Windows Store app.
1. Create a new Application project. To do that, open Visual Studio 2012, and from the File menu, select New Project (the sequence can be File | New | Project for full-featured versions of Visual Studio). Choose Visual C# in the Templates tree and then Windows Store from the list of installed templates. Finally, choose the Blank App (XAML) project type from the list of available projects. Select version 4.5 as the .NET Framework target version for your new project (this step is not necessary in the Visual Studio Express edition).
2. Name the new project AppBar, and then choose a location on your file system without changing the default solution name. When you’re finished, click OK.
As you saw in Chapter 3, the Windows Store Application template provides a default page (MainPage.xaml), an application entry point to the App class (App.xaml.cs), a default application descriptionand a declaration in the Package.appxmanifest, as well as four default images representing logos and a splash screen.
3. In the Solution Explorer window, expand the Common directory and double-click the StandardStyle.xaml file. Uncomment the following styles: HomeAppBarButtonStyle, RefreshAppBarButtonStyle, and SaveAppBarButtonStyle. To uncomment, simply cut the entire style definition of the style and paste it above the green code area.
NOTE
See Chapter 7 for more details about the Style object.
4. On the File menu, select Save All.
5. In Solution Explorer, double-click MainPage.xaml to open the designer.
6. Click the Document Outline tab. If you can’t see the Document Outline tab, select View | Other Windows | Document Outline.
NOTE
To keep the Document Outline always visible, click the Auto Hide button in the right-hand side of the title bar.
7. Expand the Page node, if it’s not already expanded. Click the BottomAppBar node, and then right-click it to open the context menu.
8. Select Pin Active Container.
By doing this, you have transformed the BottomAppBar node into the active container; this way, any object you drag from or draw using the Toolbox tab will become a child of that container. Note that the BottomAppBar node is boxed in yellow, which represents it as the active container.
9. Click the Toolbox tab. Expand the All XAML Controls section. Double-click the AppBar control.
The AppBar control represents an application toolbar for displaying buttons and other controls.
10.Click the Document Outline tab. Expand the BottomAppBar node, if it is not already expanded.
11.Expand the child nodes of the BottomAppBar node; you will see that Visual Studio 2012 has created an AppBar control, which in turn contains a Grid element. The latter is divided into two columns of the same width, and each column contains a StackPanel control.
NOTE
See Chapter 7 for more details about the Grid and StackPanel controls.
12.In the Document Outline tab, click the first StackPanel control to select it. Right-click the first StackPanel to open the context menu.
13.Select Pin Active Container.
14.Click the Toolbox tab. Expand the Common XAML Controls section. Double-click the Button control.
Note that the Button control you just created has become a child of the first StackPanel control (the control you just selected as the active container).
Repeat this step two more times, until you have created three Button controls inside the StackPanel control.
15.In Design View, click the first Button control and right-click to open the context menu. From that menu, select Edit Template | Apply Resource | HomeAppBarButtonStyle.
16.In the Properties window, expand the Common section.
In the context menu for the Local button of the Content property, select the Reset option.
17.In Design View, click the second Button control and right-click to open its context menu. From the menu, select Edit Template | Apply Resource | RefreshAppBarButtonStyle.
18.In the Properties window, expand the Common section.
In the context menu for the Local button of the Content property, select Reset.
19.In the Design View, click the third Button control and right-click to open the context menu. From the menu, select Edit Template | Apply Resource | SaveAppBarButtonStyle.
20.In the Properties window, expand the Common section.
In the context menu of the Local button of the Content property, select Reset.
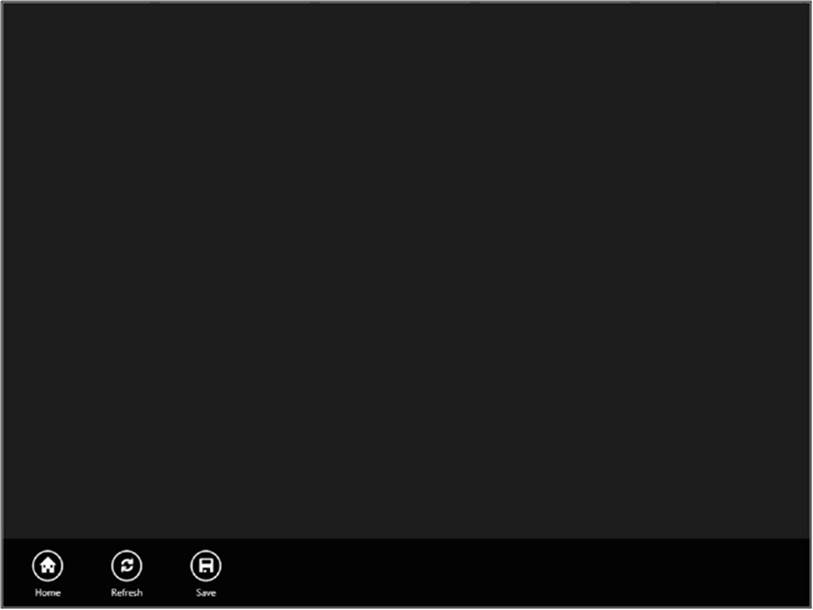
21.On the Debug menu, click Start Debugging.
Right-click to display the application bar, making it possible to interact with the buttons created earlier.
NOTE
The controls of the platform have been designed to support different types of input natively; therefore it is possible to show the application bar through digital pen, mouse, keyboard, and touch gestures (in the latter case using a swipe gesture from bottom to top).
22.Return to Visual Studio 2012 by pressing ALT+TAB, and on the Debug menu, click Stop Debugging.
Use the WebView control
The WebView control allows you to visualize HTML content within the application. In this procedure, you will create a simple Windows Store app that includes a WebView control.
1. Create a new Application project. To do that, open Visual Studio 2012 and from the File menu select New Project. Choose Windows Store from the list of installed templates, and then choose Blank App (XAML) from the list of available projects. Select version 4.5 as the .NET Framework version for your new project.
2. Name the new project WebView, and then choose a location on your file system and a solution name. When you’re finished, click OK.
3. In the Solution Explorer, double-click MainPage.xaml.
4. Click the Toolbox tab that appears in the left-hand side of the form in the Design View window.
5. Expand the All XAML Controls section.
6. Click the WebView control and drag it within the form.
7. In the Design View, click the WebView control and right-click to open the context menu. Select Reset Layout and click All. The WebView control will fill the whole parent element.
8. In the Properties window, in the Name field, type WebViewControl.
9. Make sure that in the XAML View, the code of the WebView control is as follows:
<WebView x:Name="WebViewControl"/>
10.In the Solution Explorer, double-click MainPage.xaml.cs.
11.Replace the following lines of code:
12.protected override void OnNavigatedTo(NavigationEventArgs e)
13.{
}
with:
protected override void OnNavigatedTo(NavigationEventArgs e)
{
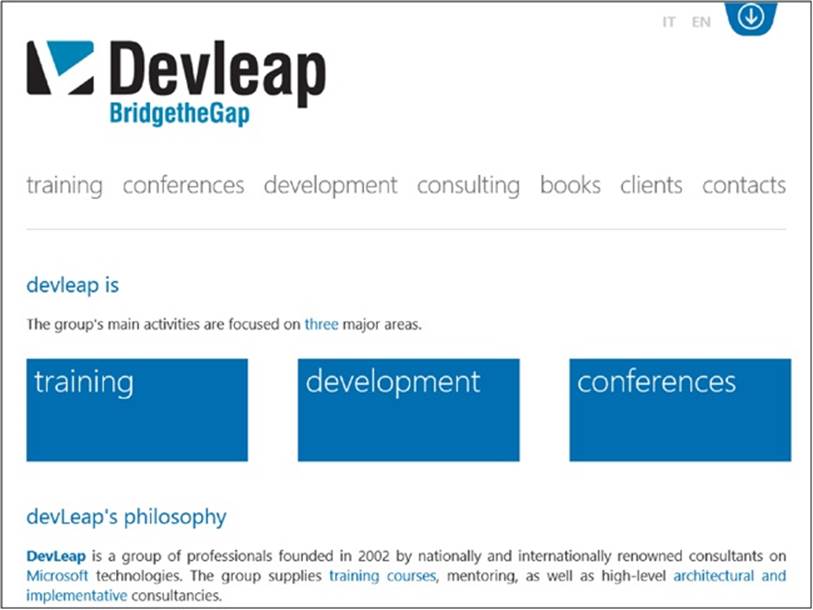
WebViewControl.Navigate(new Uri("http://www.devleap.com"));
}
14.On the Debug menu, click Start Debugging.
Click the EN link to see the English language version of the website.
15.Return to Visual Studio 2012. On the Debug menu, click Stop Debugging.
Use the ListView control
The purpose of the ListView control is to represent a collection of data items within a vertical list. In this procedure, you will understand how to bind the ListView control to the list of a custom entity.
1. Create a new Application project. To do that, open Visual Studio 2012 and from the File menu select New Project. Choose Windows Store from the list of installed templates, and then choose Blank App (XAML) from the list of available projects. Select version 4.5 as the .NET Framework version for your new project.
2. Name the new project ListView, and then choose a location on your file system and a solution name. When you’re finished, click OK.
3. In the Solution Explorer, click the project name node (ListView, in this case), and then right-click to open the context menu. Select Add | Existing Item.
Select the Chapter 9 Demo Files directory, and then click the Code directory. Open the ListView directory and select the DataSource.cs file. Click Add.
4. On the Build menu, click Build Solution. This is useful in the following steps to let Visual Studio fetch the list of the compiled class and present it in the designer.
5. In the Solution Explorer, double-click MainPage.xaml. In the Document Outline tab, select the [Page] node.
In the Properties window, expand the Common section and click New, beside the DataContext property.
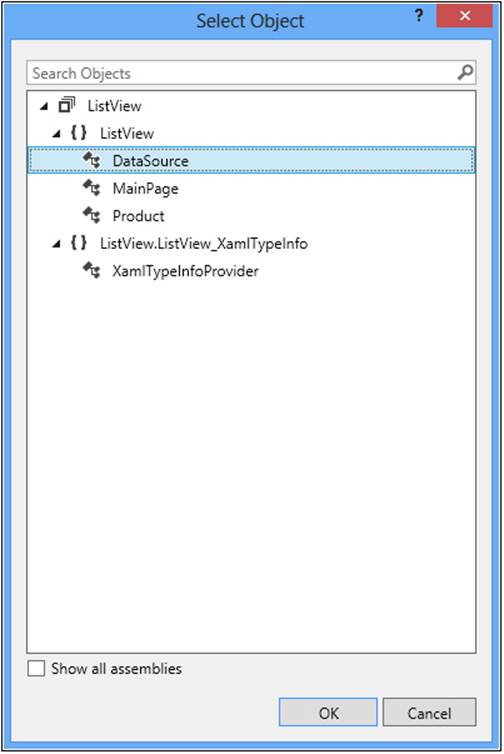
6. In the Select Object dialog, select the DataSource class of your ListView project and click OK.
7. In the XAML View, take a look at the code produced by the former operation:
8. <Page.DataContext>
9. <local:DataSource/>
</Page.DataContext>
Because the DataContext property of a control represents the data associated with that control, it is important to understand that such data are visible and usable, not only by the control that you set the DataContext property on (in this case, the page), but also by its logical descendant elements (in this case, all the child controls of the Page element will be able to see and use the custom object DataSource).
10.Click the Toolbox tab. Expand the Common XAML Controls section.
Click the ListView control and drag it within the form.
11.In the Design View, right-click the ListView control to open the context menu, and then select Reset Layout and click All—the ListView control will fill the whole parent element.
12.In the Properties window, expand the Common property. Click the Default button next to the ItemsSource property.
The ItemsSource property represents a collection of objects that will be used to generate the elements of a ListView.
13.From the context menu, select Create Data Binding to open the Create Data Binding For [ListView].ItemsSource modal window.

Select the Products node and click OK.
By doing this, you have bound the ItemsSource property of the ListView control to the Products property of the DataSource custom object.
14.Take a look at the ListView control in the Design View: you will see a series of strings with the text ListView.Product. Because the class currently in binding does not derive from Windows.UI.Xaml.UIElement, the XAML platform is forced to use the ToString method of the Productclass for the rendering. In the following steps, you will customize the rendering of the Product object in binding by using DataTemplate elements.
15.In the Design View, right-click the ListView control to open the context menu. To open the Create DataTemplate Resource modal window, select Edit Additional Templates | Edit Generated Items (ItemTemplate) | Create empty.
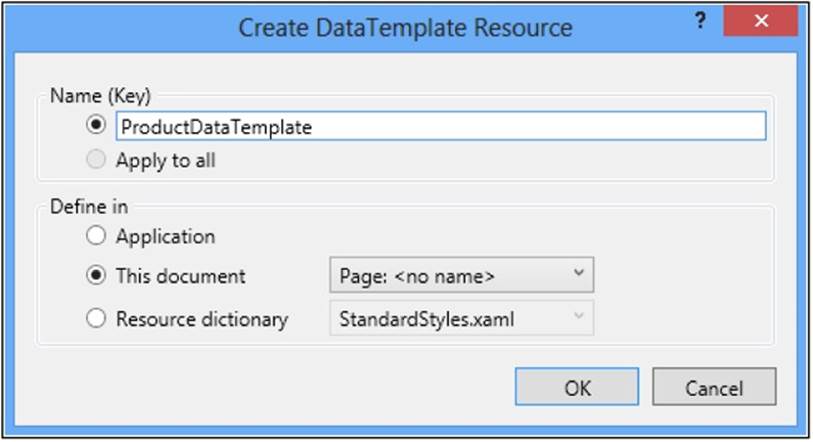
16.In the Name textbox, type ProductDataTemplate. In the Define In Radio button, make sure This Document is selected. Click OK.
Visual Studio 2012 will enter the editing mode of the DataTemplate.
A DataTemplate is a fragment of XAML code capable of representing the visual structure of an arbitrary data object.
17.Click the Document Outline tab.
Notice the default structure of a DataTemplate: Visual Studio 2012 has inserted a Grid control as the root element of the template.
18.Click the [Grid] node. In the Properties window, expand the Layout property and set the Width property to 400, the Height property to 100, the Left Margin property to 10, and the Top Margin property to 10.
19.Click the Toolbox tab. Expand the Common XAML Controls section. Double-click the TextBlock control.
20.In the Design View, right-click the TextBlock control to open the context menu, and then select Edit Style | Apply Resource | SubheaderTextStyle.
21.In the Properties window, expand the Common section. Click Local (next to the Text property) and select Create Data Binding to open the Create Data Binding for [TextBlock].Text modal window.
22.In the Path tree view, select the Description node and click OK.
The Description property of the Product custom object is now bound with the Text property of the TextBlock visual object.
23.Click the Toolbox tab. Expand the Common XAML Controls section and double-click the TextBlock control.
24.In the Design View, drag the new TextBlock control under the already existing TextBlock control.
Click the TextBlock control and right-click to open the context menu. Select Edit Style | Apply Resource | CaptionTextStyle.
25.In the Properties window, expand the Common section, click the Local button next to the Text property, and select Create Data Binding to open the Create Data Binding for [TextBlock].Text modal window.
26.In the Path tree view, select the Price node and click OK.
In the Design View, you can move around the two TextBlock controls as you wish.
27.On the Debug menu, click Start Debugging. The result is shown in the following graphic.
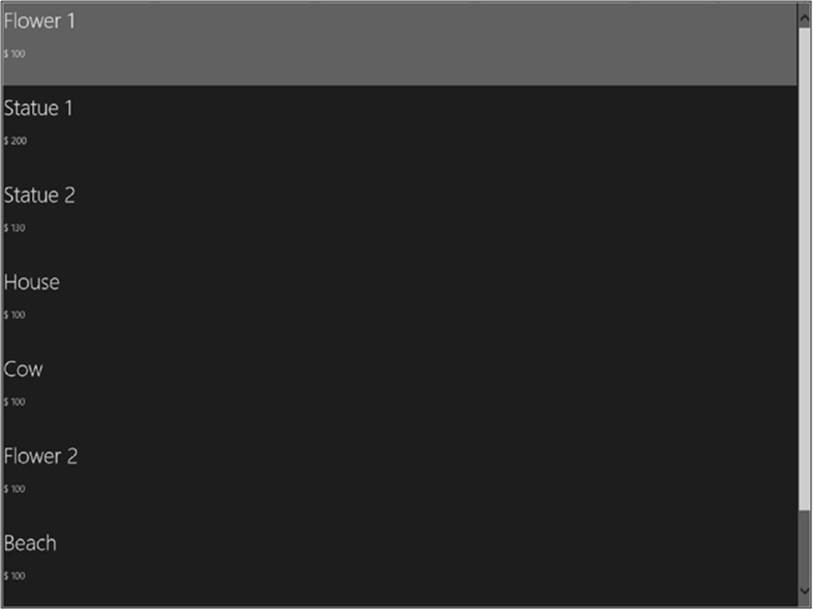
28.Return to Visual Studio 2012 and, on the Debug menu, click Stop Debugging.
Use the GridView control
The purpose of the GridView control is to represent a collection of data items within grid visualization. In this procedure, you will bind a list of custom objects to a GridView control.
1. Create a new Application project. To do that, open Visual Studio 2012 and from the File menu select New Project. Choose Windows Store from the list of installed templates, and then choose Blank App (XAML) from the list of available projects. Select version 4.5 as the .NET Framework version for your new project.
2. Name the new project GridView, then choose a location on your file system and a solution name. When you’re finished, click OK.
3. In the Solution Explorer, right-click the project name node (in this case GridView) to open the context menu. Select Add | Existing Item.
Select the Chapter 9 Demo Files directory, click the directory named Code, open the GridView directory, select the DataSource.cs file, and click Add.
4. Drag the Photos folder included in the Chapter 9 Demo Files directory into Visual Studio 2012. Point the cursor on the project name and then release the mouse button.
Visual Studio 2012 will create a directory called Photos in the project’s root (at the same level of the Assets and Common folders) containing some .jpg files.
If you want to use your own personal photos, it is enough to name them as the demo files (01.jpg, 02.jpg, and so on). On the Build menu, click Build Solution.
5. In the Solution Explorer, double-click MainPage.xaml. In the Document Outline tab, select the [Page] page.
6. In the Properties window, expand the Common section, and then click New beside the DataContext property.
In the Select Object dialog window, select the DataSource class of your GridView project and click OK.
7. Click the Toolbox tab. Expand the Common XAML Controls section. Click the GridView control and drag it within the form.
8. In the Design View, right-click the GridView control to open the context menu. Select Reset Layout and click All—the GridView control will fill the whole parent element.
9. In the Properties window, expand the Common section. Click Default next to the ItemsSource property.
The ItemsSource property consists of a collection of objects that will be used to generate the elements of the GridView.
10.To open the Create Data Binding for [GridView].ItemsSource modal window, select Create Data Binding from the context menu.
11.Select the Products node and click OK.
The ItemsSource property of the ListView control is now bound to the Products property of the DataSource custom object.
12.In the Design View, right-click the GridView control to open the context menu. To open the Create DataTemplate Resource modal window. Select Edit Additional Templates | Edit Generated Items (ItemTemplate) | Create Empty.
13.In the Name textbox, type ProductDataTemplate. In Define In, select This Document, and then click OK.
Visual Studio 2012 will enter the editing mode of the DataTemplate.
14.Click the Document Outline tab. Click the [Grid] node.
15.In the Properties window, expand the Layout property and set the Width property to 300, the Height property to 300, and the Left Margin property to 10.
16.Click the Toolbox tab. Expand the Common XAML Controls section. Double-click the Image control.
17.In the Document Outline View, select the [Image] node and right-click to open the context menu. Select Reset Layout and click All. The Image control will fill the whole parent element.
18.In the Properties window, expand the Common section. Click the Local button next to the Source property. To open the Create Data Binding for [Image].Source modal window, select Create Data Binding.
19.In the Path tree view, select the Photo node and click OK.
The Photo property of the Product custom object is now bound with the Source property of the Image visual object.
20.Click the Toolbox tab. Expand the Common XAML Controls section. Double-click the TextBlock control.
21.In the Design View, drag the new TextBlock control under the Image control.
Select the TextBlock control and right-click. From the menu, select Edit Style | Apply Resource | SubheaderTextStyle.
22.In the Properties window, expand the Common section. Click the Local button next to the Text property. To open the Create Data Binding for [TextBlock].Text modal window, select Create Data Binding.
23.In the Path tree view, select the Description node and click OK.
24.In the Design View, you can move the TextBlock control as you prefer.
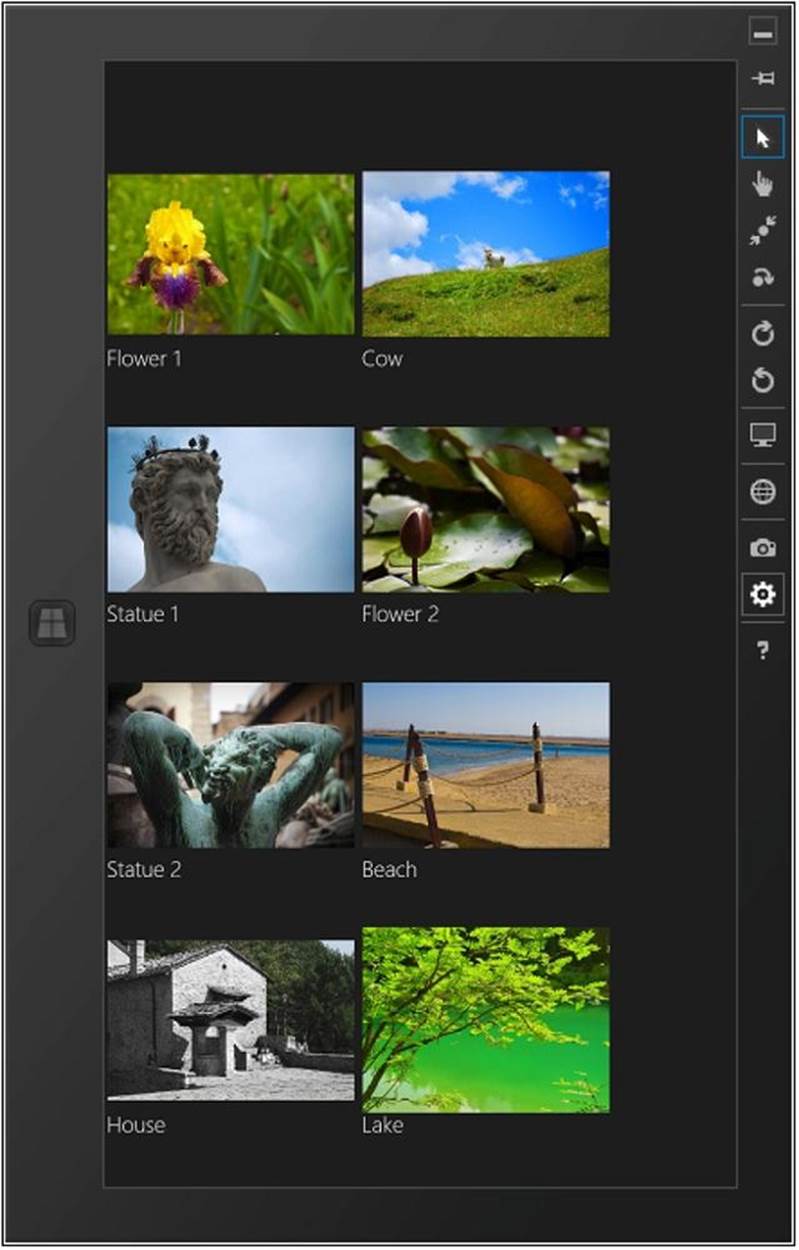
On the Debug menu, click Start Debugging. The result is shown in the following graphic.
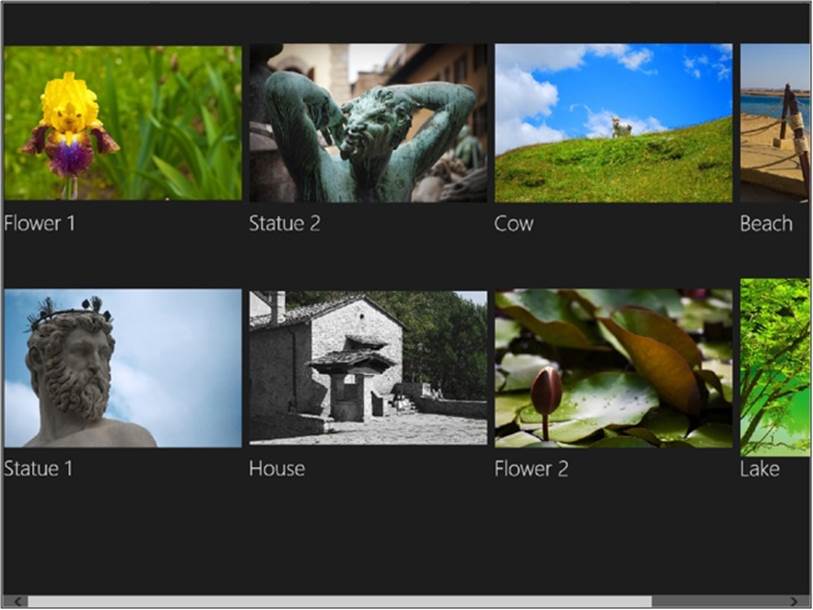
25.Return to Visual Studio 2012 and, on the Debug menu, click Stop Debugging.
Use the FlipView control
A FlipView control allows visualizing a collection of data items, one item at a time. In this procedure, you will learn how to bind a list of a custom entity to a FlipView control.
1. Create a new Application project. To do that, open Visual Studio 2012 and from the File menu select New Project. Choose Windows Store from the list of installed templates, and then choose Blank App (XAML) from the list of available projects. Select version 4.5 as the .NET Framework version for your new project.
2. Name the new project FlipView, and then choose a location on your file system and a solution name. When you’re finished, click OK.
3. In the Solution Explorer, right-click the project name node (in this case FlipView) to open the context menu. Select Add | Existing Item.
Select the Chapter 9 Demo Files directory. Click the Code directory, open the FlipView directory, and select DataSource.cs. Click Add.
4. Drag the Photos folder included in the Chapter 9 Demo Files into Visual Studio 2012, and then point the cursor on the project name.
Visual Studio 2012 will create a directory called Photos in the project’s root (at the same level of the Assets and Common folders) containing some .jpg files.
On the Build menu, click Build Solution.
5. In the Solution Explorer, double-click MainPage.xaml. In the Document Outline tab, select the [Page] node.
In the Properties window, expand the Common section. Click the New button beside the DataContext property.
6. In the Select Object dialog, select the DataSource class of your FlipView project and click OK.
7. Click the Toolbox tab. Expand the Common XAML Controls section. Select the FlipView control and drag it within the form.
8. In the Document Outline tab, select the [FlipView] node and right-click to open the context menu. Select Reset Layout and click All—the FlipView control will fill the whole parent element.
9. In the Properties window, expand the Common section. Click the Default button next to the ItemsSource property.
The ItemsSource property represents a collection of objects that will be used to generate the elements of FlipView.
10.To open the Create Data Binding for [FlipView].ItemsSource modal window, select Create Data Binding. Select the Products node and click OK.
The ItemsSource property of the FlipView control is now bound to the Products property of the DataSource custom object.
11.In the Design View, select the FlipView control and right-click to open the context menu. To open the Create DataTemplate Resource modal window, select Edit Additional Templates | Edit Generated Items (ItemTemplate) | Create Empty.
12.In the Name textbox, type ProductDataTemplate. In Define In, select This Document. Click OK.
Visual Studio 2012 will enter the editing mode of the DataTemplate.
13.Click the Document Outline tab. Click the [Grid] node.
14.In the Properties window, expand the Layout section (in case it’s not expanded already) and make sure that the Width property is set to Auto. If it is not, click Set To Auto next to the Width property.
15.Click the Toolbox tab. Expand the Common XAML Controls section. Double-click the Image control.
16.In the Document Outline View, select the [Image] node and right-click to open the context menu. Select Reset Layout and click All—the Image control will fill the whole parent element.
17.In the Properties window, expand the Common section. To open the Create Data Binding for [Image].Source modal window, click the Local button next to the Source property and select Create Data Binding.
18.In the Path tree view, select the Photo node and click OK.
The Photo property of the Product custom object is now bound with the Source property of the Image visual object.
Set the Stretch property to UniformToFill.
19.Click the Toolbox tab. Expand the Common XAML Controls section. Double-click the TextBlock control.
20.In the Design View, drag the new TextBlock control on top of the Image control.
Select the TextBlock control and right-click to open the context menu. Select Edit Style | Apply Resource | SubheaderTextStyle.
21.In the Properties window, expand the Common section. To open the Create Data Binding for [TextBlock].Text modal window, click the Local button next to the Text property, and select Create Data Binding.
22.In the Path tree view, select the Description node and click OK.
In the Design View, you can move the TextBlock control as you prefer.
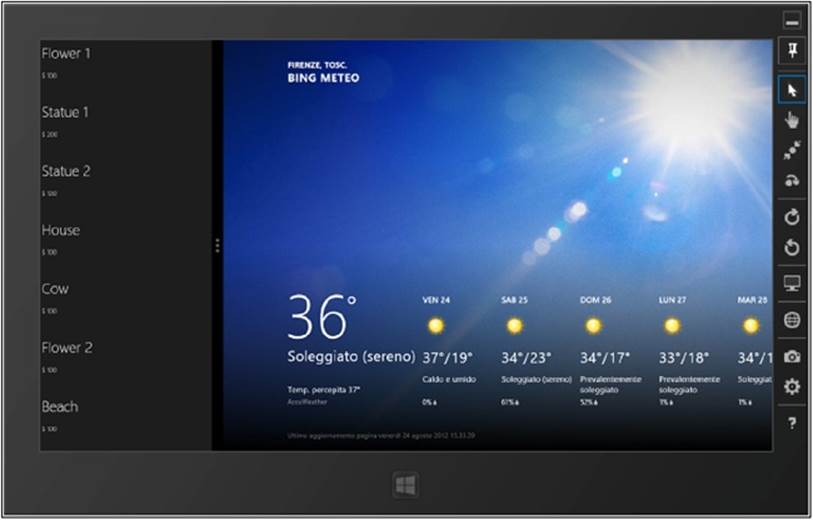
23.On the Debug menu, click Start Debugging. Click the arrow on the right side of the display.
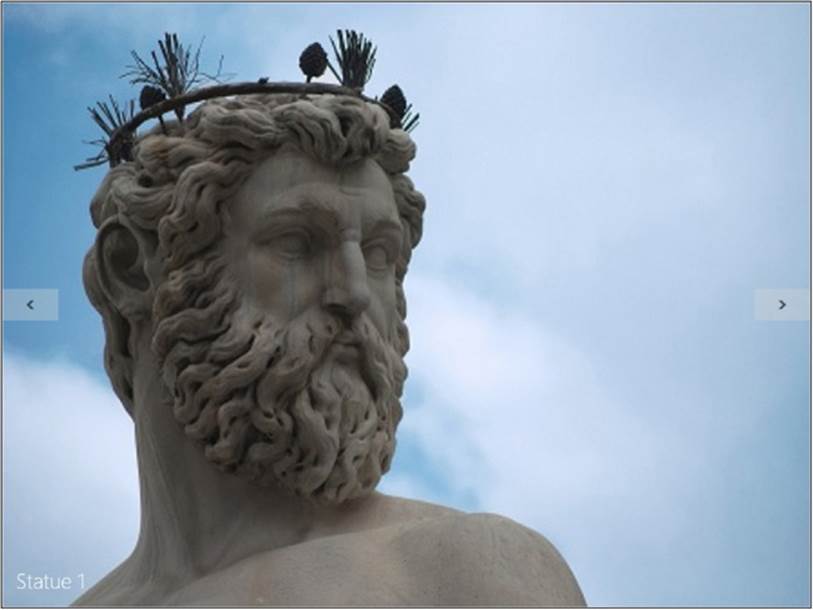
24.Click the arrows to navigate among the different elements of the collection.
NOTE
The controls of the platform have been designed to support different types of input natively; therefore it is possible to navigate among the different elements using a digital pen, mouse, keyboard, and touch gestures (in the latter case using a swipe gesture from left to right or vice versa).
25.Return to Visual Studio 2012. On the Debug menu, click Stop Debugging.
Use the SemanticZoom control
Semantic zoom is a touch-optimized technique used by Windows 8 apps for presenting and navigating large sets of related data or content within a single view (such as a photo album, app list, or address book).
The page that displays all the Windows 8 applications installed on your machine offers an example of semantic zoom. The default view is displayed as “zoomed in,” that is, it presents a complete list of applications; with a simple gesture of pinch and stretch or by scrolling the mouse wheel while pressing Ctrl, you can activate the “zoomed out” view that, in this case, will display a series of tiles with the initials of the existing applications.
The SemanticZoom control can be used to add the semantic zoom concept into a Windows 8 app. In this procedure, you will learn how to bind a SemanticZoom control to a list of custom data objects.
1. Create a new Application project. To do that, open Visual Studio 2012 and from the File menu select New Project. Choose Windows Store from the list of installed templates, and then choose Blank App (XAML) from the list of available projects. Select version 4.5 as the .NET Framework version for your new project.
2. Name the new project SemanticZoom, and then choose a location on your file system and a solution name. When you’re finished, click OK.
3. In the Solution Explorer, click the project name node (in this case, SemanticZoom) and right-click to open the context menu. Select Add | Existing Item.
4. Select the directory named Chapter 9 Demo Files. Click the Code directory, open the SemanticZoom directory, and select DataSource.cs. Click Add.
5. Drag the Photos folder included in the Chapter 9 Demo Files directory into Visual Studio 2012, and point the cursor on the project name.
Visual Studio 2012 will create a directory called Photos in the project’s root (at the same level of the Assets and Common folders) containing some .jpg files.
6. On the Build menu, click Build Solution.
7. In the Solution Explorer, double-click MainPage.xaml.
8. Click the Toolbox tab.
9. Expand the Common XAML Controls section.
10.Click the SemanticZoom control and drag it within the form.
11.In the Document Outline tab, select the [SemanticZoom] node and right-click the mouse button to open the context menu. Select Reset Layout and click All. The SemanticZoom control will fill the whole parent element.
12.In the XAML view, take a look at the XAML code of the SemanticZoom control.
13.<SemanticZoom>
14. <SemanticZoom.ZoomedInView>
15. <GridView
16. ScrollViewer.IsHorizontalScrollChainingEnabled="False"
17. ScrollViewer.IsVerticalScrollChainingEnabled="False"/>
18. </SemanticZoom.ZoomedInView>
19. <SemanticZoom.ZoomedOutView>
20. <GridView
21. ScrollViewer.IsHorizontalScrollChainingEnabled="False"
22. ScrollViewer.IsVerticalScrollChainingEnabled="False"/>
23. </SemanticZoom.ZoomedOutView>
</SemanticZoom>
The SemanticZoom control exposes two properties, ZoomedInView and ZoomedOutView, which represent as many views of the same set of information.
24.Replace the whole source code of the MainPage.xaml.cs page with the following code:
25.<Page
26. x:Class="SemanticZoom.MainPage"
27. xmlns="http://schemas.microsoft.com/winfx/2006/xaml/presentation"
28. xmlns:x="http://schemas.microsoft.com/winfx/2006/xaml"
29. xmlns:local="using:SemanticZoom"
30. xmlns:d="http://schemas.microsoft.com/expression/blend/2008"
31. xmlns:mc="http://schemas.openxmlformats.org/markup-compatibility/2006"
32. mc:Ignorable="d">
33. <Page.Resources>
34. <CollectionViewSource x:Name="Data" IsSourceGrouped="True" />
35. </Page.Resources>
36. <Grid Background="{StaticResource ApplicationPageBackgroundThemeBrush}">
37. <SemanticZoom>
38. <SemanticZoom.ZoomedInView>
39. <GridView ItemsSource="{Binding Source={StaticResource Data}}"
40. SelectionMode="None">
41. <GridView.ItemTemplate>
42. <DataTemplate>
43. <Grid Width="300" Height="300">
44. <Image Source="{Binding Photo}"/>
45. <TextBlock HorizontalAlignment="Left" TextWrapping="Wrap"
46. Text="{Binding Description}" VerticalAlignment="Top"
47. Margin="0,256,0,0"
48. Style="{StaticResource SubheaderTextStyle}"/>
49. </Grid>
50. </DataTemplate>
51. </GridView.ItemTemplate>
52. </GridView>
53. </SemanticZoom.ZoomedInView>
54. <SemanticZoom.ZoomedOutView>
55. <GridView
56. ItemsSource="{Binding CollectionGroups, Source={StaticResource Data}}" >
57. <GridView.ItemTemplate>
58. <DataTemplate>
59. <Border Background="#FF26A0DA" Width="230" Height="230">
60. <TextBlock Text="{Binding Group.Key}" FontSize="30"
61. VerticalAlignment="Bottom" Margin="10,0,0,10" />
62. </Border>
63. </DataTemplate>
64. </GridView.ItemTemplate>
65. </GridView>
66. </SemanticZoom.ZoomedOutView>
67. </SemanticZoom>
68. </Grid>
</Page>
In this example, you used a GridView control for both views, but you could have used a ListView control instead. Both the GridView controls leverage the same concepts illustrated in the “Use the GridView Control” procedure: the ItemsSource property binds the collection and theItemTemplate property defines the visual representation of the single item in binding. For the GridView control nested within the ZoomedInView property, you have reused the code presented in the previous procedure to define the ItemTemplate property.
For the ZoomedInView property, the ItemsSource property of the GridView has been bound to the complete data collection. While in the case of the ZoomedOutView property, the ItemsSource will use the CollectionGroups property for the same dataset to show the initials in the photo captions.
69.In the Solution Explorer, double-click MainPage.xaml.cs.
70.Replace the following code:
71.protected override void OnNavigatedTo(NavigationEventArgs e)
72.{
}
With this one:
protected override void OnNavigatedTo(NavigationEventArgs e)
{
Data.Source = new DataSource().Groups;
}
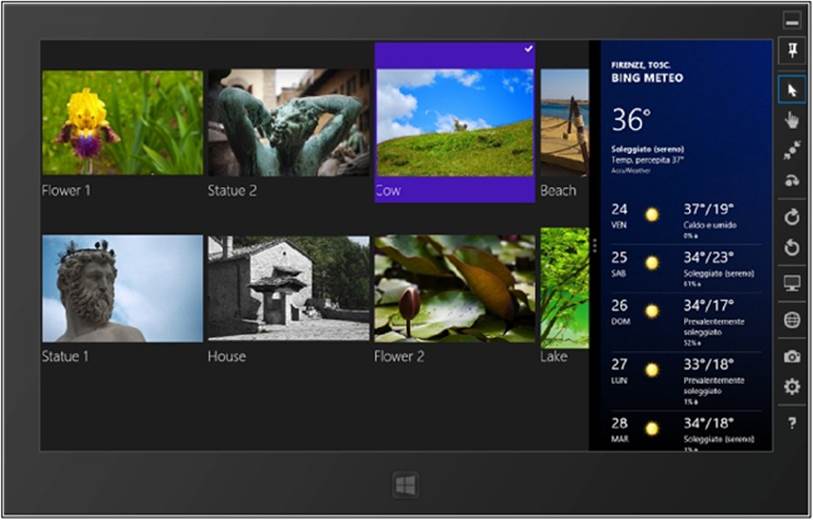
73.On the Debug menu, click Start Debugging. The result is shown in the following graphic.
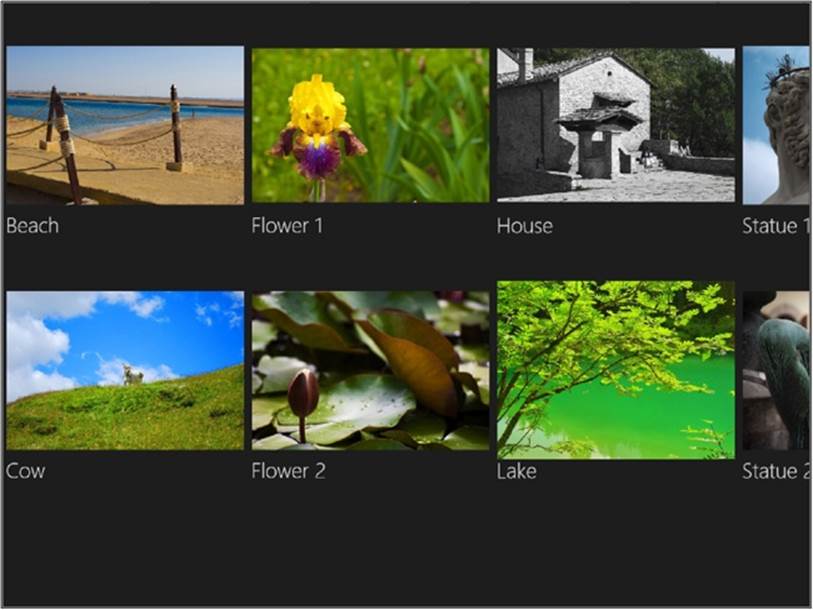
74.Hold the Ctrl key down while scrolling to switch between the two views offered by the SemanticZoom control. You can also click the minus (-) icon that appears in the lower-right corner to obtain the overview display. Clicking the display area zooms the display again.
NOTE
The controls of the platform have been designed to support different types of input natively; therefore it is possible to navigate between the two views using a digital pen, mouse, keyboard, and touch gestures (in the latter case using a pinch and stretch gesture).

75.Return to Visual Studio 2012. On the Debug menu, click Stop Debugging.
Designing flexible layouts
The way that the content of your user interface adapts to how the app is manipulated by a user is call a view. View state refers to the three ways a user can choose to display your Windows 8 app: full screen, snap, and fill. The first—full—screen is the default state for all apps. When a user drags another window onto the screen, he has the option of having it become the current running app, snapping the new app to the side, or running it filled. Users can rotate and flip their devices, so ensure that your app can handle both landscape and portrait orientations.
Designing flexible layouts
1. Create a new Application project. To do that, open Visual Studio 2012 and from the File menu select New Project. Choose Windows Store from the list of installed templates, and then choose Blank App (XAML) from the list of available projects. Select version 4.5 as the .NET Framework version for your new project.
2. Name the new project ViewState, and then choose a location on your file system and a solution name. When you’re finished, click OK.
3. In the Solution Explorer, click the project name node (ViewState, in this case) and right-click to open the context menu. Select Add | Existing Item.
4. Select the directory named Chapter 9 Demo Files, click the Code directory, open the ViewState directory, and select DataSource.cs. Click Add.
5. Drag the Photos folder included in the Chapter 9 Demo Files directory into Visual Studio 2012, and point the cursor on the project name.
Visual Studio 2012 will create a directory called Photos in the project’s root (at the same level of the Assets and Common folders) containing some .jpg files.
On the Build menu, click Build Solution.
6. In the Solution Explorer, double-click MainPage.xaml. Replace the whole source code with the following:
7. <Page
8. x:Class="ViewState.MainPage"
9. xmlns="http://schemas.microsoft.com/winfx/2006/xaml/presentation"
10. xmlns:x="http://schemas.microsoft.com/winfx/2006/xaml"
11. xmlns:local="using:ViewState"
12. xmlns:d="http://schemas.microsoft.com/expression/blend/2008"
13. xmlns:mc="http://schemas.openxmlformats.org/markup-compatibility/2006"
14. mc:Ignorable="d">
15. <Page.Resources>
16. <DataTemplate x:Key="ProductGridDataTemplate">
17. <Grid Width="300" Height="300">
18. <Image Source="{Binding Photo}"/>
19. <TextBlock HorizontalAlignment="Left" TextWrapping="Wrap"
20. Text="{Binding Description}" VerticalAlignment="Top"
21. Margin="0,256,0,0" Style="{StaticResource SubheaderTextStyle}"/>
22. </Grid>
23. </DataTemplate>
24. <DataTemplate x:Key="ProductListDataTemplate">
25. <Grid Width="400" Height="100">
26. <TextBlock HorizontalAlignment="Left" TextWrapping="Wrap"
27. Text="{Binding Description}" VerticalAlignment="Top"
28. Style="{StaticResource SubheaderTextStyle}"/>
29. <TextBlock HorizontalAlignment="Left" TextWrapping="Wrap"
30. Text="{Binding Price}" VerticalAlignment="Top"
31. Margin="0,47,0,0" Style="{StaticResource CaptionTextStyle}"/>
32. </Grid>
33. </DataTemplate>
34. </Page.Resources>
35. <Page.DataContext>
36. <local:DataSource/>
37. </Page.DataContext>
38.
39. <Grid Background="{StaticResource ApplicationPageBackgroundThemeBrush}">
40. <GridView x:Name="GridViewControl" ItemsSource="{Binding Products}"
41. ItemTemplate="{StaticResource ProductGridDataTemplate}"/>
42. <ListView x:Name="ListViewControl" ItemsSource="{Binding Products}"
43. ItemTemplate="{StaticResource ProductListDataTemplate}" Visibility="Collapsed"/>
44.
45. <VisualStateManager.VisualStateGroups>
46. <VisualStateGroup x:Name="ApplicationViewStates">
47. <VisualState x:Name="FullScreenLandscape"/>
48. <VisualState x:Name="FullScreenPortrait" />
49. <VisualState x:Name="Filled"/>
50. <VisualState x:Name="Snapped" />
51. </VisualStateGroup>
52. </VisualStateManager.VisualStateGroups>
53. </Grid>
</Page>
In this listing, you can see two DataTemplate items already used in the former procedures “Use the ListView Control” and “Use the GridView Control.” Inside the main Grid control, there is a GridView control, which will be used in both the full-screen and filled views (you will soon understand the difference between the two views) and a ListView control that will be displayed in the snapped view.
The VisualStateManager object manages states and the transitions between states for controls.
54.In the Solution Explorer, double-click MainPage.xaml.cs. Replace the whole source code with the following:
55.using System;
56.using System.Collections.Generic;
57.using System.IO;
58.using System.Linq;
59.using Windows.Foundation;
60.using Windows.Foundation.Collections;
61.using Windows.UI.Xaml;
62.using Windows.UI.Xaml.Controls;
63.using Windows.UI.Xaml.Controls.Primitives;
64.using Windows.UI.Xaml.Data;
65.using Windows.UI.Xaml.Input;
66.using Windows.UI.Xaml.Media;
67.using Windows.UI.Xaml.Navigation;
68.
69.namespace ViewState
70.{
71. public sealed partial class MainPage : Page
72. {
73. public MainPage()
74. {
75. this.InitializeComponent();
76. Window.Current.SizeChanged += OnSizeChanged;
77. }
78.
79. public void OnSizeChanged(object sender,
80. Windows.UI.Core.WindowSizeChangedEventArgs args)
81. {
82. switch (Windows.UI.ViewManagement.ApplicationView.Value)
83. {
84. case Windows.UI.ViewManagement.ApplicationViewState.FullScreenLandscape:
85. VisualStateManager.GoToState(this, "FullScreenLandscape", false);
86. break;
87. case Windows.UI.ViewManagement.ApplicationViewState.FullScreenPortrait:
88. VisualStateManager.GoToState(this, "FullScreenPortrait", false);
89. break;
90. case Windows.UI.ViewManagement.ApplicationViewState.Snapped:
91. VisualStateManager.GoToState(this, "Snapped", false);
92. break;
93. case Windows.UI.ViewManagement.ApplicationViewState.Filled:
94. VisualStateManager.GoToState(this, "Filled", false);
95. break;
96. default:
97. break;
98. }
99. }
100. }
}
In the Window.Current.SizeChanged event handler, the GoToState method of the VisualStateManager is called to set the page state. The state will have the same name for the Value property of the Windows.UI.ViewManagement.ApplicationView object.
The next step consists of defining a “shape” for each state of the page.
101. In the Solution Explorer, double-click MainPage.xaml. Click the Device tab.
NOTE
If you want to keep the Device always visible, click the Auto Hide button positioned to the right of the title bar.
102. In the View property, click Snapped.
The snapped state is one of the possible application view states. Snapping an app resizes the app to 320 pixels wide, which allows it to share the screen with another app.
Visual Studio 2012 will display the area available for that state in the Design View.
103. In the Visual State property, select Enable State Recording.
Visual Studio 2012 will enter into recording mode, marked by a red border around the Design View. Any control property that is set through the Properties window will be recorded within the state (in this case, into the snapped state).
104. In the Document Outline tab, click the ListViewControl node.
In the Properties window, expand the Appearance property and set the Visibility property to Visible.
105. In the Document Outline tab, click the GridViewControl node.
In the Properties window, expand the Appearance property and set the Visibility property to Collapsed.
106. In the Device tab, click Portrait in the View property.
Visual Studio 2012 will display the change in the orientation in the Design View.
107. In the Visual State property, select Enable State Recording.
108. In the Document Outline tab, click the GridViewControl node.
In the Properties window, expand the Layout property and set the Margin top property to 80.
109. In the Device tab, click Landscape in the View property.
110. In the Visual Studio 2012 toolbar, click the drop-down list by the Local Machine button to open the menu. Select the Simulator. Click the green play icon labeled Simulator.
Visual Studio 2012 will start the Windows 8 Simulator and then will run the application. In the Simulator, click Rotate clockwise (90 degrees).
The simulator shows the application in portrait view; note that the margins of the GridView control are different from the landscape view.
111. In the simulator, click Change Resolution and select the first entry: “10.6 1024 × 768.”
Note that the scrollbar is visible, which allows the use of the entire content.
NOTE
Always be sure to try different resolutions and different orientations for your application.
112. In the Simulator, click Rotate Counterclockwise (90 degrees) to switch back to the original landscape position.
In the Simulator, click Change Resolution and select the second entry: “10.6 1366 × 768.”
Click the Windows button of the Simulator to go back to the Windows 8 Start screen.
113. Launch the Weather App.
114. Place the cursor in the top-left corner of the Simulator to open the thumbnail of the previous active application, that is, your application.
Drag the thumbnail to the center of the Simulator and, once the snapped area is defined, release the mouse button.
Your application is currently in the snapped state and the GridView control has stepped aside to leave its place to the ListView control—more suitable for the current state.
115. Move the delimiter of the snapped area to the right and release the mouse button at around two-thirds of the overall screen size (of the Simulator).
The application is now in the filled state. In this example, you did not customize the user interface of this state. However, now you understand how to use the Visual State Manager to perform this task.
116. Return to Visual Studio 2012. On the Debug menu, click Stop Debugging.
To shut down the Windows 8 Simulator, go to the Windows 8 desktop, right-click the Simulator icon in the Windows 8 taskbar, and select Close.
Using tiles and toasts
In this section, you will learn how to modify an application tile to display the application logo in the Windows 8 Start screen from the application manifest, and then how you can modify it from code to create a Live Tile.
A tile represents the application in the Start screen, so it has to be both graphically good-looking and interesting for the user. In fact, the Start screen can be very full of tiles and your application can be confused or simply very difficult to reach if you do not carefully create your tile.
A tile can be considered an application icon. In fact, it represents the application in the ocean of apps that a user can see in her Start screen. In previous versions of Windows, the Start menu helped the user to organize the applications in groups and subgroups. Think for a moment about the Microsoft Office suite: it is composed of 10 different applications but they are grouped together in the Microsoft Office menu item. In Windows 8, every application is listed in the Start screen using its tile: the user can keep applications together by creating group of tiles, but she cannot create a tile representing a group of applications.
A user can also look for applications using Windows+Q or activating the Search charm; in this case, applications are listed using the application logo and application name, not their tile.
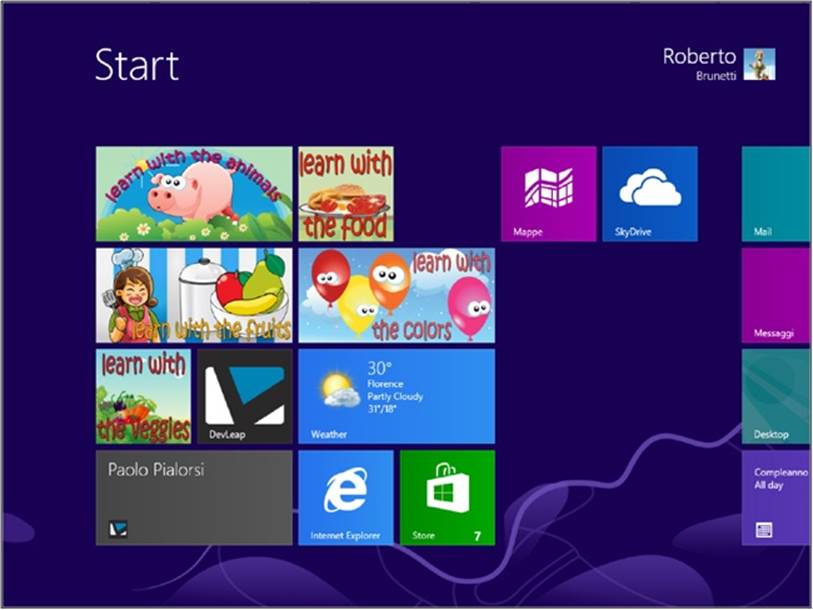
Figure 9-1 shows some application tiles.
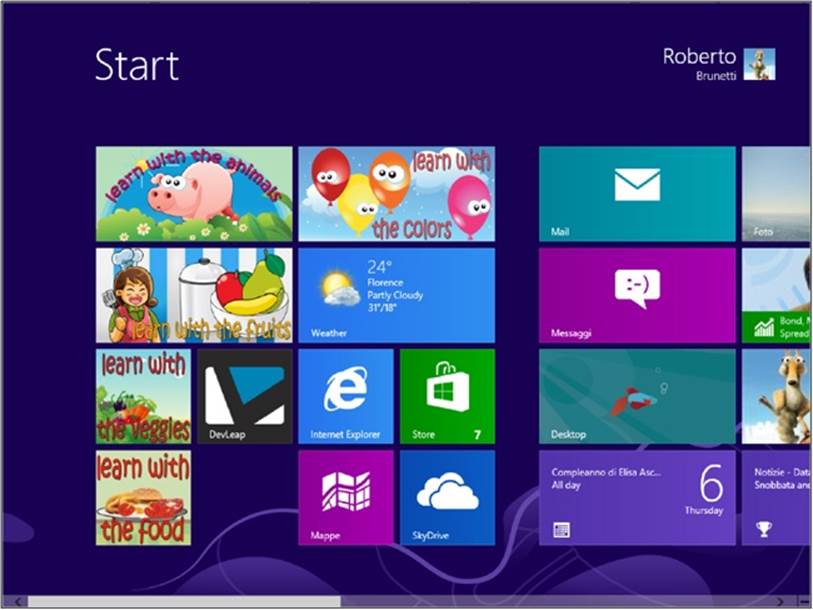
Figure 9-1. Windows 8 Start screen with square and rectangular tiles grouped by the user.
As you can see, there are some applications in the section on the left of the Start screen. Some of them have a wide tile (Learn with the Animals, Learn with the Fruits, and Learn with the Colors), some of them a square tile (Internet Explorer, Learn with the Food, DevLeap, and so on), and one of them (Weather) is wide and presents the temperature of Florence. The latter is a live tile that will be explained in the following procedures.
In Chapter 3, you changed the default tile logo for your first application simply by copying some .png files on the Assets directory of the project. In the following procedures, you will learn how to define the square and the wide tile images, how to change default tile behavior, and then how to change the tile from code.
Define the appearance on the Start screen
The information that Windows 8 uses to deploy an application to the system is defined in the application manifest. This file defines the images that will represent the application tiles, the colors of the UI elements in the Start screen (and in the Windows Store), and some properties that are useful to change the default behavior.
In this procedure, you will learn how to change the static definition for tiles.
1. Create a new Application project. To do that, open Visual Studio 2012, and from the File menu, select New Project. Choose Windows Store from the list of installed templates, and then choose Blank App (XAML) from the list of available projects. Select version 4.5 as the target .NET Framework version for your new project.
2. Name the new project Tile_Toast, and then choose a location on your file system, as well as a solution name. When you’re finished, click OK.
3. Copy the .png files found in the Chapter 9 Demo Files in the Logos folder to the Assets folder of the project. The files have the default names so you do not need to modify their names in the Package.appxmanifest.
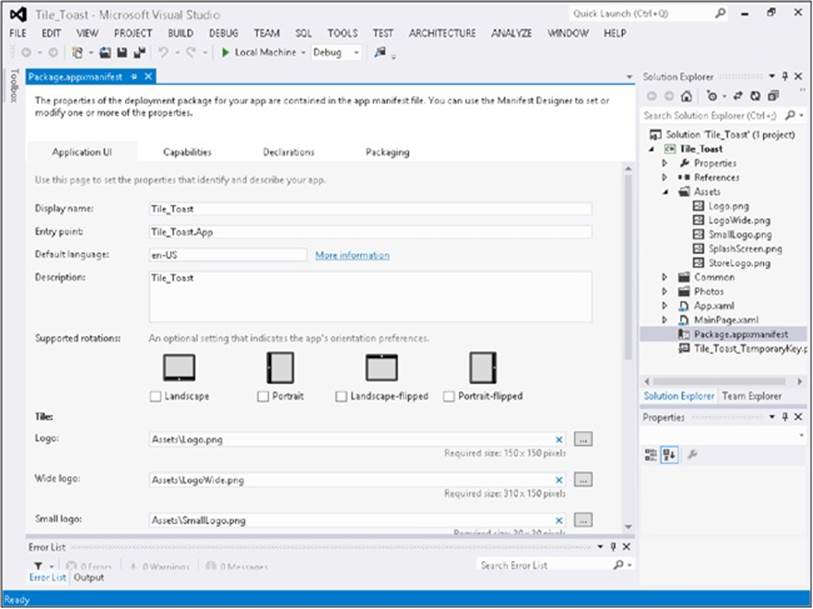
4. Open the manifest designer by double-clicking package.appxmanifest in the Solution Explorer.
Change the Wide Logo definition to point to the LogoWide.png file in the Asset folder by clicking the button with the ellipses or typing Assets\LogoWide.png in the related textbox.
5. Right-click the project in the Solution Explorer and choose Deploy.
6. Go to the Start screen, move to the right until you find the new application. Right-click the application and select Larger from the App Bar. Windows will use the wide logo to represent the application tile.
7. Right-click the application again, and select Smaller from the lower toolbar. The tile will return squared.
Define a live tile
As you saw in the previous figure for the Weather App, an application can modify its tile to present information to the user. In fact, tiles are considered an external view of the application that can present useful information to the user without needing to open the application itself.
The native weather application, for instance, after you configure it to display the forecast for a particular city, presents the most important information in the tile as the temperature, the city, and the image of the current weather. A game application can present the latest score or the record or both to the user in the tile.
The application you will implement in this procedure is very similar to the one you implemented in Chapter 3, with the addition of a live tile that displays the name of the person selected by the user.
1. Modify the MainPage.xaml file of the application you implemented in the previous procedure to present a list of names. Use the following code to replace the existing Grid control.
2. <Grid Background="{StaticResource ApplicationPageBackgroundThemeBrush}">
3. <ListView x:Name="list" DisplayMemberPath="FullName" />
</Grid>
4. Modify the related code behind to build and bind the people list using the following code:
5. using System;
6. using System.Collections.Generic;
7. using System.IO;
8. using System.Linq;
9. using Windows.Foundation;
10.using Windows.Foundation.Collections;
11.using Windows.UI.Xaml;
12.using Windows.UI.Xaml.Controls;
13.using Windows.UI.Xaml.Controls.Primitives;
14.using Windows.UI.Xaml.Data;
15.using Windows.UI.Xaml.Input;
16.using Windows.UI.Xaml.Media;
17.using Windows.UI.Xaml.Navigation;
18.
19.
20.
21.namespace Tile_Toast
22.{
23. /// <summary>
24. /// An empty page that can be used on its own or navigated to within a Frame.
25. /// </summary>
26. public sealed partial class MainPage : Page
27. {
28. public MainPage()
29. {
30. this.InitializeComponent();
31.
32. list.ItemsSource = this.GetPeople();
33. }
34.
35. public List<Person> GetPeople()
36. {
37. return new List<Person>()
38. {
39. new Person() { FullName = "Roberto Brunetti" },
40. new Person() { FullName = "Paolo Pialorsi" },
41. new Person() { FullName = "Marco Russo" },
42. new Person() { FullName = "Luca Regnicoli" },
43. new Person() { FullName = "Vanni Boncinelli" },
44. new Person() { FullName = "Guido Zambarda" },
45. new Person() { FullName = "Jessica Faustinelli" },
46. new Person() { FullName = "Katia Egiziano" }
47. };
48. }
49. }
50.
51. public class Person
52. {
53. public string FullName { get; set; }
54. }
55.
}
56.Press F5 to test the application. It will present the list of names. Verify that you can select a name. You will use the SelectionChanged event handler to modify the application tile displaying the name of the person selected.
57.Go to the MainPage.xaml page and add a SelectionChanged event to the ListView control, as shown in bold in the following code:
58.<ListView x:Name="list" DisplayMemberPath="FullName"
SelectionChanged="list_SelectionChanged" />
59.Add the event handler in the code behind for this event.
60.private void list_SelectionChanged(object sender, SelectionChangedEventArgs e)
61.{
62. var person = list.SelectedItem as Person;
}
This line of code takes the item selected in the ListView control and assigns it to the local variable named person. You will use it in the next steps to create the live tile.
A tile is represented internally by an XML fragment that contains its definition. Windows 8 presents different templates to create many different visual tiles. For instance, there is a simple text-based template that can be used to display a single line of text in the tile, or a more sophisticated one that is suitable to display three lines of text and an image in the tile.
63.Create an .xml fragment as a string in the SelectionChanged event by using the following code right after the first line:
64.string tileXmlString = "<tile>"
65. + "<visual>"
66. + "<binding template='TileWideText03'>"
67. + "<text id='1'>" + person.FullName + "</text>"
68. + "</binding>"
69. + "<binding template='TileSquareText04'>"
70. + "<text id='1'>" + person.FullName + "</text>"
71. + "</binding>"
72. + "</visual>"
+ "</tile>";
The code is very simple. The visual element of the tile uses the template TileWideText03 (the third template for a wide tile) to display the full name of the selected person in the first line of text. It also defines the text for the square tile to display the same name using a different template. As is now apparent, the two tiles can display completely different things. For instance, the wide tile can display the photo of the person and the square one can display only the name.
73.Add the following four lines of code after the string definition to create the XML representation of the string. Then create a new tile definition to update the current tile.
74.var tileXml = new Windows.Data.Xml.Dom.XmlDocument();
75.tileXml.LoadXml(tileXmlString);
76.
77.var tile = new Windows.UI.Notifications.TileNotification(tileXml);
78.
79.Windows.UI.Notifications.TileUpdateManager.CreateTileUpdaterForApplication()
.Update(tile);
80.Run the code by pressing F5.
81.Select Paolo Pialorsi from the list.
82.Click the Start button to go to the Windows 8 Start screen, and scroll until you find the tile that presents “Paolo Pialorsi.”
83.Right-click to open the lower toolbar and select Smaller to reveal the square tile that will present the same text.
84.Right-click to open the lower toolbar and select Turn Live Tile Off. As you can see, the application will display the default square tile with the DevLeap logo.
85.Right-click another time to open the lower toolbar again and select Turn Live Tile On. As you can see, the application will display the name you selected again.
With some practice you will learn how the different tile templates work, how to change the tile foreground and background color, and how to add images (stored in the package or downloaded directly from the web) to the tile to achieve the sorts of results shown by the applications in the previous image. At the time of this writing, the complete reference for the Tile Template type is available at http://msdn.microsoft.com/library/windows/apps/windows.ui.notifications.tiletemplatetype.
For instance, this code creates a tile with text and an image using the simplest template for this kind of tile.
string tileXmlString = "<tile>"
+ "<visual>"
+ "<binding template='TileWideImageAndText01'>"
+ "<text id='1'>Tile with image</text>"
+ "<image id='1' src='ms-appx:///dir/x.png' alt='Red image'/>"
+ "</binding>"
+ "</visual>"
+ "</tile>";
You can also create a secondary tile for an application to display different kinds of information and to provide a “callback” to the application passing a parameter of your choice. For example, a weather application can create a secondary tile for a different city the user chooses in the application. This way, the Start screen presents two different tiles for the same application—one displaying the information for the main city and the other for the secondary city. When the code creates the secondary tile, it can pass an argument that will be received during the application launch so that the code can present the forecast of the secondary city directly instead of on the main page.
The application can also request the system to display a badge on the application tile with some predefined glyphs and/or a number. For instance, you can enable multiselection (SelectionMode=“Multiple”) on the ListView control you used in the previous examples and provide the code to display the number of selected people in the badge by using the following code.
string badgeXmlString = "<badge value='" + list.SelectedItems.Count + "'/>";
var badgeXml= new Windows.Data.Xml.Dom.XmlDocument();
badgeXml.LoadXml(badgeXmlString);
var badge = new Windows.UI.Notifications.BadgeNotification(badgeXml);
Windows.UI.Notifications.BadgeUpdateManager.CreateBadgeUpdaterForApplication()
.Update(badge);
As a sample, Microsoft provides a library that facilitates the use of the template that hides all the XML details and provides some simple classes to create tiles and badges. You can find the library in the “App tiles and badges sample” of the Windows 8 samples. You can download it from MSDN in the Windows 8 Dev Center at http://code.msdn.microsoft.com/windowsapps/.
With this library, the code to create the tile can be as easy as this:
var tileContent = TileContentFactory.CreateTileWideText03();
tileContent.TextHeadingWrap.Text = person.Fullname;
Create and schedule a toast
An application can provide alerts to the user using Toasts. A toast can be simple text or an image or a combination of the two. In this procedure, you will create a simple toast to remind the user to change the selected person. Let’s consider the simple application you wrote in the previous section, a shift workers’ application that manages the shift change. When the user selects the current worker, the application can remind the user to change the worker every, let’s say, 10 seconds (likely and luckily to be more in real applications).
1. Add the following lines at the end of the SelectionChanged event handler you created in the previous section.
2. toastXmlString = "<toast>"
3. + "<visual version='1'>"
4. + "<binding template='ToastText01'>"
5. + "<text id='1'>" + person.FullName + " is tired!</text>"
6. + "</binding>"
7. + "</visual>"
8. + "</toast>";
9. var toastXml = new Windows.Data.Xml.Dom.XmlDocument();
10.toastXml.LoadXml(toastXmlString);
11.
12.var toastNotification =
13. new Windows.UI.Notifications.ScheduledToastNotification(toastXml,
14. DateTime.Now.AddSeconds(10));
15.
16.var toastNotifier = Windows.UI.Notifications.ToastNotificationManager.
17. CreateToastNotifier();
toastNotifier.AddToSchedule(toastNotification);
The first line of code builds the toast string definition and the two subsequent lines transform it into an XML document. Then the code creates a notification for the toast in 10 seconds and the last two lines of code ask the ToastNotificationManager class to add the notification to the system toast schedule.
18.Before you run the sample, you have to define the application as toast capable. To do that, open the Package.appxmanifest and set Toast Capable (in the Notification section) to Yes using the drop-down list.
19.Run the sample, select a name, click the Start button to leave the application, and go to the Start screen.
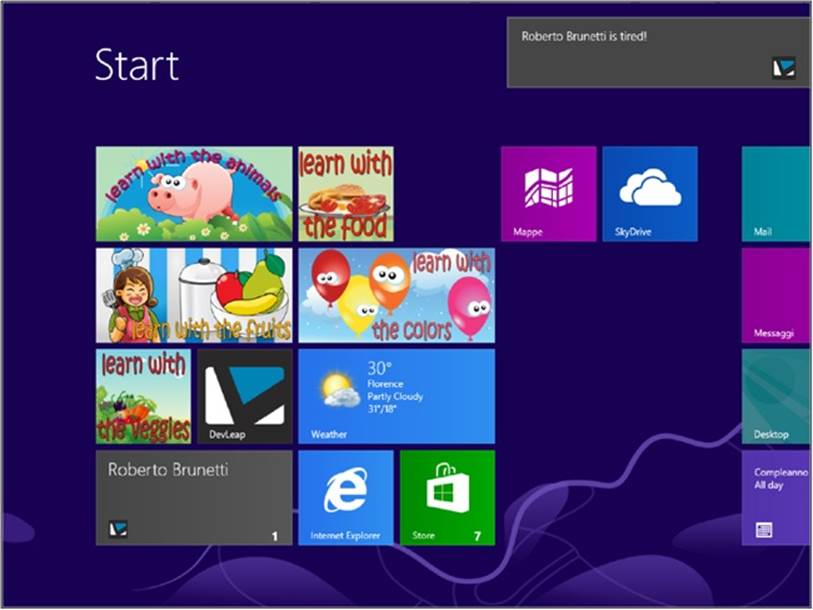
You can also use local images (provided with the package) or images coming from the web, change the default sound to reflect the toast type, create a long duration toast, and receive an event in the application when the user clicks the toast. You can even change the snooze interval and maximum snooze count to tailor the toast for your needs.
Microsoft provides a sample library for manipulating toasts. To be more precise, the library is the same one cited before for tiles, and it lets you code against toasts, tiles, badges, and related features.
A toast can be sent from the cloud using the Windows Notification Service (WNS). The application can ask the service for a unique channel that a remote service can use to send toasts to the Windows 8 box from anywhere.
For information on the service, use “Windows Notification Service” as keywords in the MSDN Developer Center to find documentation and samples.
Summary
In this chapter, you have learned how to use the advanced controls of the XAML platform for a Windows 8 application (Application Bar, WebView, ListView, GridView, FlipView, and SemanticZoom), as well as how to customize their appearance by using DataTemplate objects. You have also learned how to use the VisualStateManager element and the Window.Current.SizeChanged event to support different view states, including portrait, landscape, snapped, fill, and full screen.
Additionally, you now know how to enhance the user experience using tiles, live tiles, badges, and toasts.
Quick reference
|
To |
Do this |
|
Add a ListView control to the layout |
Click the Toolbox tab, expand the All XAML Controls, click the ListView control, and drag it within the form. |
|
Add a GridView control to the layout |
Click the Toolbox tab, expand the All XAML Controls, click the GridView control, and drag it within the form. |
|
Add a WebView control to the layout |
Click the Toolbox tab, expand the All XAML Controls, click the WebView control, and drag it within the form. |
|
Handle different view states and orientations |
Use the VisualStateManger element and the Window. Current.SizeChanged event handler. |
|
Run your Windows 8 app in the Windows Simulator |
In the Visual Studio 2012 toolbar, click the drop-down list by the Local Machine button to open the menu and select the Simulator. Click the green play icon labeled Simulator. |
|
Create a tile |
To create a tile, use one of the provided templates for passing the .xml definition to the WinRT classes. |
|
Create a toast |
To create a toast, use one of the provided templates for passing the .xml definition to the WinRT classes. |
Chapter 10. Architecting a Windows 8 app
After completing this chapter, you will be able to
§ Understand the general architecture of an application.
§ Define the architecture of a Windows 8 app.
§ Consume a remote service from a Windows 8 app.
This chapter provides some useful information about the architecture of software solutions, with particular focus on those solutions that include a Windows 8 app as one of the available presentation layers.
Application architecture in general
Any software solution, even the smallest one, should be implemented starting with the overall architecture definition. In fact, every single time you develop a software solution you should take care of how to organize code and logical partitioning in order to satisfy function, usability, maintainability, and performance requirements.
In recent decades, the software development world has moved toward what are called N-tier solutions, which are solutions defined to satisfy maintainability, scalability, security, and the capability to consume remote services in a secure, safe, and fast manner.
A multitier solution is a software project that usually targets many concurrent users. It is divided into n layers—generally at least two or three layers. Applications that use a two-tier scenario are also referred to as client-server software. One layer is the back-end server infrastructure, which is generally made up of a database persistence layer. The other layer, the client, includes all the required code to connect to the back-end database and display the user interface. Generally, in two-tier scenarios the business logic and domain knowledge required for the solution is implemented within the client software. Sometimes such solutions also include database logic, such as intelligent stored procedures, triggers, and so on.
Software is scalable when its performance remains constant and independent, regardless of the number of users. Scalable software is not necessarily fast—it simply has a fixed performance score regardless of the number of customers served, unless you expand the hardware infrastructure when the number of customers increases, without any changes to the code of the software. The very nature of a client-server solution prevents scalability—specifically, an increase in the number of users can have a huge impact on the back-end database layer.
Although client-server architecture is suitable for implementing solutions that will have a relatively small number of users, this book does not cover it in detail because, aside from its scalability limitations, you should not create a Windows 8 app that consumes a database directly. On the contrary, you should implement Windows 8 apps that consume remote services, which eventually can provide indirect access to data stored in a database.
Over the past several years, partly for scalability reasons, architectures with at least three tiers have become more common. Many modern software solutions are available on a network and the Internet, and serve a large (and unpredictable) number of concurrent users. Three-tier solutions have a data access layer, a business layer, and a presentation layer. The data access layer (DAL) represents the set of code and data structures used to implement information persistence. The business layer (BIZ) defines business logic, business workflows, and rules that drive the behavior of the application. The presentation layer, or user interface (UI) layer, delivers the information to users. The presentation layer, in particular, has become more complex, because it can (and often must) be implemented in many different ways—one for each kind of consumer and/or device (for example the web, a desktop PC with Microsoft Windows, a tablet, or a smartphone device). In general, DAL and BIZ are deployed on specific and dedicated application servers, whereas the UI can be deployed on both consumer devices (desktop PC, tablet, smartphone, and so on) or delivered to browsers from specific publishing application servers (web applications on front-end web servers).
Technologies such as Simple Object Access Protocol (SOAP) services, REST (Representational State Transfer), smart clients, smartphones, or workflow services have influenced many software architects to add other layers. The now-common definition of n-tier solution architecture is one in which n designates a value greater than or at least equal to three. In general, as you can see from Figure 10-1, these n layers are targeted to meet specific application requirements, such as security, workflow definition, management and governance, or communication.
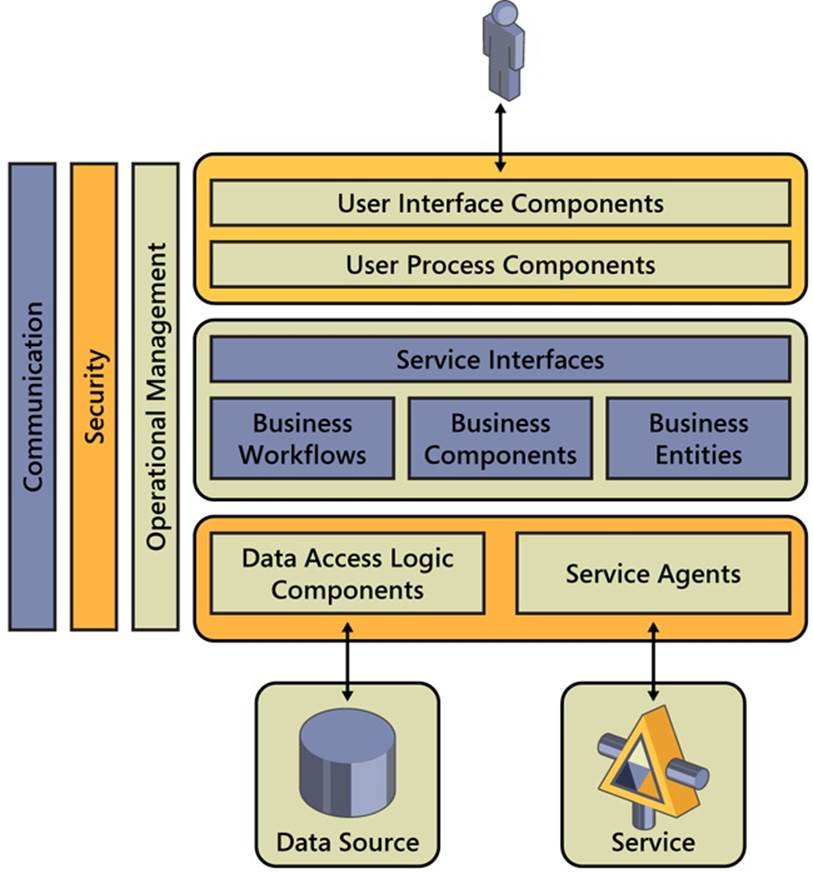
Figure 10-1. A schema of the architecture of an n-tier software solution.
The main reasons for dividing a software solution’s architecture into layers are to improve maintainability, availability, security, and deployment.
Maintainability results from the ability to change and maintain small portions (for example, single layers) of an application without needing to touch the other layers. By working this way, you reduce maintenance time and can also more accurately assess the cost of a fix or a feature change because you can focus your attention only on the layers involved in the change. Client-server software is more costly to maintain because any code modifications must be deployed to each client. Well-defined multitier solutions are also available to users more often because critical or highly stressed layers can be deployed in a redundant infrastructure.
From a security perspective, a layered solution can make use of different security modules—each one tightly aligned with a particular software layer to make the solution stronger. Last but not least, multitier software is usually deployed with more ease because each layer can be configured and sized somewhat independently from other layers.
Architectures for Windows 8 apps
Generally speaking, from a Windows 8 app perspective, a two-tier architecture solution is not a good solution because you should not access databases directly from the app. There are many reasons that support this perspective. First of all, due to the .NET portable and restricted profile you learned about in Chapter 5, you don’t have the types of System.Data.* namespaces available in a Windows 8 app. Thus, you simply cannot use a SqlConnection or an OleDbCommand to consume data. Of course, you could evaluate third-party solutions to work around these limitations and to consume databases directly from a Windows 8 app. However, you would implement a solution that goes against the suggested usability guidelines provided by Microsoft.
In fact, a Windows 8 app should be capable of working online (connected to the network) and eventually offline, leveraging some data caching features. Moreover, it should be capable of supporting a user while working on multiple devices (desktop PC, laptop, tablet, and so on), keeping the same configurations and contexts. In order to support this last scenario, Microsoft introduced the capability of sharing the user profile configuration and the user application data through the cloud and the Windows Live profile. The final goal of this approach should be to have a user with her own data, regardless of the device she uses, simply determined by her Windows Live ID.
Starting with these considerations, you can argue that a Windows 8 app that stores data locally on a single device is not a smart idea, because you would be able to consume that data only on that specific device. On the contrary, a Windows 8 app that consumes data from a remote site—through a SOAP or REST service—eventually published in the cloud (for example on Windows Azure) absolutely is a better option.
Nevertheless, there are areas in software development that require working with tons of data records, and that may need to have local data repositories for usability and performance reasons. Think about an app for a sales force, where a user needs to be able to insert customers’ orders even if there is no network connectivity. You would probably need to have an offline copy of the products catalog, or a subset of it, as well as an offline copy of the customers that every single seller should meet during a specific work day. Moreover, it would probably be smart to keep a client-side copy of all those reference data that are useful for inserting a new customer or a new order, for example, and that you should not have to download from the network every single time. Think about the list of countries, states, products’ categories, and so on. In order to give a suitable answer to all these needs, a Windows 8 app can leverage the local storage and a set of XML files consumed using the LINQ to XML API, which is available in the .NET profile for Windows 8 apps.
The security infrastructure is yet another topic that can be affected by the new development model introduced by Windows 8 apps. In fact, in a standard Windows application it could suffice to leverage Windows integrated security. On the contrary, a Windows 8 app installed on a mobile device could benefit from using a cross-platform authentication method, like Windows Live ID, Facebook, or something similar. In general, a Windows 8 app will probably need to support multiple authentication techniques and protocols. Thus, technologies like claims-based authentication, Open Authentication (OAuth), and identity federation are fundamental in such architectures.
In the following sections of this chapter, you will inspect all the layers of a distributed architecture that are fundamental and specific to a Windows 8 app. Moreover, for the sake of simplicity there will be many areas where software architecture layers will be discussed from a logical view point. Nevertheless, for the sake of brevity some merging of layers from a code and assembly fragmentation perspective will occur in the examples. However, in a real solution you will probably need to introduce more abstraction and code fragmentation.
Implementing the data layer
One of the fundamental layers of a distributed architecture is the data layer. In fact, even if generally speaking, the data layer can be really easy to implement and can be automated mainly using object relational mapping (ORM) technologies, nevertheless the efficiency, the scalability, and the versatility of software architectures depends on the data layer.
Since 2008, the official enterprise-level ORM in Microsoft .NET has been the ADO.NET Entity Framework. In .NET 4.5 and Microsoft Visual Studio 2012 you can leverage the Entity Framework 5, which is a mature and complete ORM framework.
The goal of an ORM in software architectures is to convert data, which are stored into an external and physical repository, into entities describing the domain model of the software from a business perspective. Moreover, an ORM provides all the facilities to query, manage, and transfer data back and forth from external repositories. Generally speaking, in modern software the external repository is a relational database management system (DBMS) like Microsoft SQL Server. Nevertheless, from the ORM viewpoint the external repository could be anything else.
In this section, you will create a data layer based on Entity Framework 5 that is useful to model the Customer domain model entity that, for the sake of simplicity, will be consumed from the generally well-known and famous Northwind sample database.
Implementing a data layer in C# with Entity Framework 5
In this procedure, you will create a data layer using C# and Entity Framework 5. Later, this data layer will be published by a Windows Communication Foundation (WCF) service layer and will be consumed by a sample Windows 8 app implemented using CLR and C#. Later in the chapter, the same data layer will be published through an Open Data Protocol (OData) service.
1. Download the Northwind sample database from the Microsoft website (http://www.microsoft.com/download/details.aspx?id=23654) and install it. Double-click the SQL script under the folder SQL Server 2000 Sample Databases. The script will open in Visual Studio 2012. From there, you can execute it against your local SQL Server database, which eventually could be SQL Server Express, in case you installed it during the installation of Visual Studio 2012.
2. Create a new Application project. To do that, open Visual Studio 2012, and from the File menu, select New Project. Choose Other Project Types and then Visual Studio Solutions. Choose Blank Solution as the target template.
3. Select version 4.5 as the Microsoft .NET Framework target version for your new project.
4. Name the new solution NorthwindSolution, and then choose a location on your file system. When you have finished, click OK.
5. Add a new Project to the solution you have just created. Right-click the solution item in the Solution Explorer and select Add | New Project. Choose Windows from the list of installed templates in the Visual C# group, and then select Class Library. Keep version 4.5 as the Microsoft .NET Framework target version.
6. Name the class library project NorthwindSolution.DataLayer, and then choose a location on your file system. When you have finished, click OK.
7. Delete Class1.cs, which was created in the project automatically.
8. Right-click the class library project in the Solution Explorer and select Add | New Item. In the Add New Item window, select the ADO.NET Entity Data Model item template. Give the new file the name NorthwindModel.edmx.
9. You will be prompted with a wizard. In the first step, Choose Model Contents, select Generate From Database. Click Next.
10.In the second step, Choose Your Data Connection, add a New Connection, configure a connection to the Northwind database in your target SQL Server instance, and click Next.
11.In the third step, Choose Your Database Objects and Settings, expand the Tables node. Under dbo, select Customers and any other data table you want to map to an entity. In order to complete the exercises for this chapter, it will suffice to map the Customers table. Select Pluralize or Singularize Generated Object Names. Click Finish.
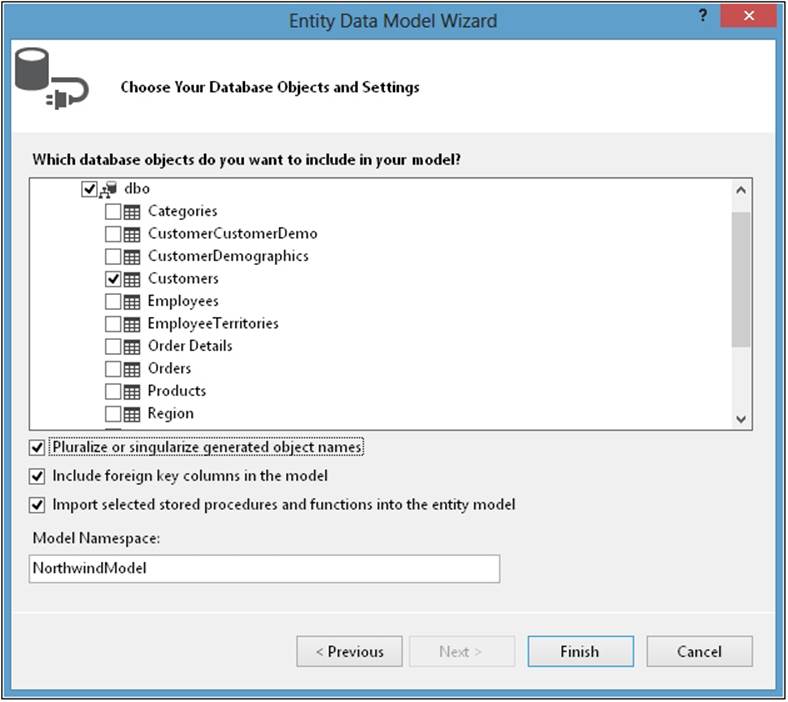
If Visual Studio 2012 prompts you with a Security Warning, trust it, and click OK.
The wizard you have just followed creates an .EDMX file, as well as a set of .TT (Text Template) code-generation files, and a bunch of .CS files with auto-generated code. The whole result of this procedure is a class library with the definition of a NorthwindEntities class, providing an entry point to access a collection of Customers defined with an auto-generated Customer type.
Explaining the Entity Framework and the inner workings of its engine is beyond the scope of this book. Nevertheless, in case you need more information, you should read Programming Microsoft LINQ in Microsoft .NET Framework 4 (Microsoft Press) by Paolo Pialorsi and Marco Russo.
Implementing the communication layer using a SOAP service
Without a shadow of a doubt, the communication layer is one of the fundamental layers of a distributed architecture. Any Windows 8 app that consumes external data or interacts with external services needs to be based on a solid communication infrastructure.
Communication is based on various technologies and protocols. For example, you can use SOAP services transferred across HTTP channels, or you can leverage REST services transmitting either POX (Plain Old XML) messages, or RSS (Rich Site Summary, often also called Really Simple Syndication), or JSON (JavaScript Object Notation) serialized objects. You may also like to use the OData service (www.odata.org), which is going to become an OASIS international open standard.
Depending on the development platform, any of the previously mentioned protocols and technologies can be appropriate. For example, if you are developing a website or a Windows 8 app built with HTML5/WinJS, the best choices would be probably REST with JSON object serialization, or POX/RSS. Meanwhile, a SOAP service could be a little bit difficult to consume from JavaScript.
On the contrary, if you are developing a Windows 8 app built with CLR (C# or VB), then SOAP or OData provide the best solutions. Even using REST could be okay—but the SOAP and OData are simpler to define and easier to share across multiple devices and platforms.
Implementing a SOAP service to consume from C#
In this procedure, you will create a SOAP service based on WCF and publish the data layer defined previously that provides a list of customers to consume.
1. Open the NorthwindSolution you created in the previous exercise, when you implemented the data layer with Entity Framework 5.
2. Right-click the solution item in the Solution Explorer and select Add | New Project. Choose Windows from the list of installed templates in the Visual C# group, and select Class Library. Keep version 4.5 as the Microsoft .NET Framework target version.
3. Name the class library project NorthwindSolution.Contracts, and then choose a location on your file system. When you have finished, click OK.
4. In the Solution Explorer, right-click the class library project item you just created and select Add Reference. In the Assemblies group of the references, select the following assemblies: System.ServiceModel and System.Runtime.Serialization.
5. In the Solution Explorer, right-click the class library project item you just created and select Add Reference. In the Solution group of the references, select the NorthwindSolution.DataLayer project.
6. Remove Class1.cs and add a new interface definition item. In order to add the new interface definition, right-click the class library project in the Solution Explorer and select Add | New Item. In the Add New Item window, select the Interface code template. Name the new fileICustomersService.cs.
7. Replace the interface code with the following code:
8. using NorthwindSolution.DataLayer;
9. using System;
10.using System.Collections.Generic;
11.using System.Linq;
12.using System.ServiceModel;
13.using System.Text;
14.using System.Threading.Tasks;
15.
16.namespace NorthwindSolution.Contracts {
17. [ServiceContract(Namespace = "http://services.devleap.com/Northwind/Customers")]
18. public interface ICustomersService {
19. [OperationContract(Action =
20. "http://services.devleap.com/Northwind/Customers/GetCustomer")]
21. Customer GetCustomer(String customerId);
22.
23. [OperationContract(Action =
24. "http://services.devleap.com/Northwind/Customers/ListCustomers")]
25. List<Customer> ListCustomers();
26. }
}
In the previous procedure about leveraging Entity Framework 5 in the Data Layer, you defined the Customer type.
The ServiceContract and OperationContract attributes declare that the interface defines a new service interface, whereas the methods are the operations of the service interface.
In case you are not familiar with WCF, you can read the book Learning WCF, written by Michele Leroux Bustamante and published by O’Reilly Media.
27.Now add a new class library project to the solution like you did in steps 2 through 5. Name this new project NorthwindSolution.Services.
28.In the Solution Explorer, right-click the class library project item you just created and select Add Reference. In the Solution group of references, add the NorthwindSolution.Contracts project.
29.In the Solution Explorer, right-click the NorthwindSolution.Services project item you just created and select Manage NuGet Packages.
30.In the next window, select EntityFramework (version 5.0.0) under the group NuGet Official Package Source in the Online group. Click Install and then click Close.
31.In the Solution Explorer, right-click Class1.cs, defined in the project you’ve just created, and select Rename. Provide the new name CustomersService.cs. When prompted by Visual Studio, confirm that you also want to rename the class. Open CustomersService.cs and replace its code with the following:
32.using NorthwindSolution.DataLayer;
33.using NorthwindSolution.Contracts;
34.using System;
35.using System.Collections.Generic;
36.using System.Linq;
37.using System.Text;
38.using System.Threading.Tasks;
39.
40.namespace NorthwindSolution.Services {
41. public class CustomersService : ICustomersService {
42.
43. public Customer GetCustomer(string customerId) {
44. NorthwindEntities nw = new NorthwindEntities();
45. return (nw.Customers.FirstOrDefault(c => c.CustomerID == customerId));
46. }
47.
48. public List<Customer> ListCustomers() {
49. NorthwindEntities nw = new NorthwindEntities();
50. return (nw.Customers.ToList());
51. }
52. }
}
Again, the Customer type is the same one you defined in the previous procedure about leveraging Entity Framework 5 in the Data Layer. As you can see, the service implementation simply invokes the data layer in the back end.
Notice that in a real solution you will probably have a business layer in the middle, between the data layer and the service definition, in order to infer custom business logic, security, validation, and other aspects needed in modern software architectures. For the sake of simplicity, in this example there is a short circuit between the service implementation and the underlying data layer.
53.Right-click the solution item in the Solution Explorer and select Add | New Web Project. Choose ASP.NET Empty Web Site from the list of installed templates in Visual C# group. Keep version 4.5 as the Microsoft .NET Framework target version.
54.Name the website project NorthwindSolution.WebHost, and then choose a location on your file system. When you have finished, click OK. If Visual Studio 2012 asks you if you want to create the target folder, select Yes.
55.In the Solution Explorer, right-click the website project item you just created and select Add Reference. In the Assemblies group of references, select the following assemblies: System.ServiceModel and System.Runtime.Serialization.
56.In the Solution Explorer, right-click the website project item you just created and select Add Reference. In the Solution group of references, select NorthwindSolution.DataLayer, NorthwindSolution.Contracts, and NorthwindSolution.Services.
57.In the Solution Explorer, right-click the website project item you just created and select Manage NuGet Packages. In the next window, select EntityFramework (version 5.0.0) under the group NuGet Official Package Source in the Online group set. Click Install | Close.
58.Right-click the website project in the Solution Explorer and select Add | Add New Item. In the Add New Item window, select the WCF Service code template. Give the new file the name CustomersService.svc.
59.Remove the files created under the App_Code folder of the website project, and keep only CustomersService.svc.
It is better to keep contracts, implementations, and endpoints separated into different assemblies, rather than mixing all of them into a unique website project. Thus, the exercise asks you to remove the code auto-generated by Visual Studio 2012 and to create a well-layered and organized solution.
60.Double-click on CustomersService.svc to open the file and replace its code with the following:
<%@ ServiceHost Language="C#" Debug="true" Service="NorthwindSolution.Services.CustomersService" %>
The CodeBehind attribute has been removed, because the code of the service in this exercise is not behind the .svc file but it is compiled in the NorthwindSolution.Services assembly. The value of the Service attribute has been changed, providing the full name of the CustomersServiceclass created in step 12.
61.Rebuild the entire solution (Ctrl+Shift+B) and then right-click CustomersService.svc in the Solution Explorer. Select View In Browser. You will see, in your default browser, the welcome page of the WCF service you’ve just created.
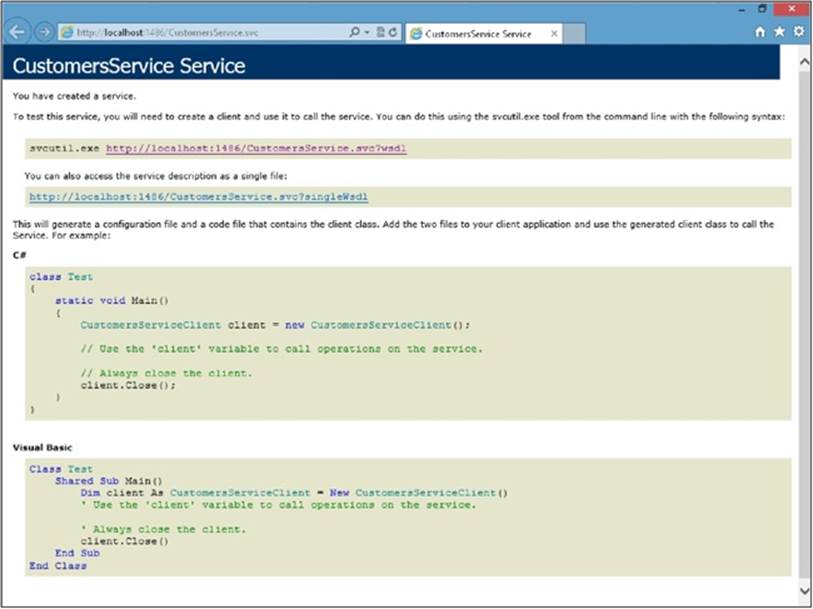
Later in this chapter you will consume this service from a Windows 8 app.
Implementing the communication layer using an OData service
In this section, you will learn how to implement a simple OData service—functionally equivalent to the SOAP service you created in the previous procedure. You should consider that an OData service still uses WCF in its infrastructure, and simply leverages a specific set of communication contracts and behaviors.
Implementing an OData service to consume from C#
In this procedure, you will create an OData service for publishing the previously defined data layer.
1. Open the NorthwindSolution you created in the previous procedure, when you implemented the data layer with Entity Framework 5.
2. Right-click the website project NorthwindSolution.WebHost in the Solution Explorer and select Add | Add New Item. In the Add New Item window, select the WCF Data Service code template. Name the new file CustomersDataService.svc.
3. Under the App_Code folder of the website project, open CustomersDataService.cs and replace the class declaration with the following line of code:
4. public class CustomersDataService : DataService<NorthwindSolution.DataLayer.
NorthwindEntities>
The DataService<T> base class that the CustomerDataService type inherits from is part of the .NET Framework and provides all the basic infrastructure to publish an OData service based on a generic type T—which has to be a class publishing one or more collections of entities implementing a specific interface named IQueryable. The NorthwindEntities class created while defining the data layer adheres to these requirements and can be used to publish the collection of entities of type Customer directly.
5. Replace the whole source code of the CustomerDataService class with the following code:
6. public class CustomersDataService : DataService<NorthwindSolution.DataLayer.NorthwindEntities> {
7. public static void InitializeService(DataServiceConfiguration config) {
8. config.SetEntitySetAccessRule("Customers", EntitySetRights.AllRead);
9. config.DataServiceBehavior.MaxProtocolVersion = DataServiceProtocolVersion.V3;
10. }
}
The first line of code inside the InitializeService method declares that the Customer entity provided by the NorthwindEntities model will be read-only accessible by everybody. In Table 10-1, you can see all of the available values for the EntitySetRights enumeration. The second line of code, still in the InitializeService method, defines that the OData service will be capable of talking with external consumers using version 1, 2, or 3 of the protocol.
Table 10-1. The list of permissions available for configuring entity set rights
|
Value |
Description |
|
None |
Denies all rights to access data. |
|
ReadSingle |
Authorization to read single data items. |
|
ReadMultiple |
Authorization to read sets of data. |
|
AllRead |
Authorization to read data. |
|
WriteAppend |
Authorization to create new data items in data sets. |
|
WriteReplace |
Authorization to replace data. |
|
WriteDelete |
Authorization to delete data items from data sets. |
|
WriteMerge |
Authorization to merge data. |
|
AllWrite |
Authorization to write data. |
|
All |
Authorization to create, read, update, and delete data. |
11.Open the web.config file of the website project and configure the connection string to the SQL Server database under the cover of the NorthwindEntities model. You can copy the connection string configuration from the App.config file available in the NorthwindSolution.DataLayer project. Copy the following code from the App.config file and paste it in the web.config file.
12.<connectionStrings>
13. <add name="NorthwindEntities" connectionString="metadata=res://*/NorthwindModel.
14. csdl|res://*/NorthwindModel.ssdl|res://*/NorthwindModel.msl;provider=System.
15. Data.SqlClient;provider connection string="data source=.;initial
16. catalog=Northwind;integrated security=True;MultipleActiveResultSets=True;
17. App=EntityFramework"" providerName="System.Data.EntityClient" />
</connectionStrings>
18.Rebuild the entire solution (Ctrl+Shift+B) and then right-click CustomersDataService.svc in the Solution Explorer. Select View In Browser. As in the previous procedure, in your default browser you will see the welcome page of the OData service you’ve just created. In this case, the welcome page will be an XML document declaring the entities published by the service. The XML document will look like the following code excerpt:
19.<?xml version="1.0" encoding="utf-8"?>
20.<service xml:base="http://localhost:1486/CustomersDataService.svc/"
21. xmlns="http://www.w3.org/2007/app" xmlns:atom="http://www.w3.org/2005/Atom">
22. <workspace>
23. <atom:title>Default</atom:title>
24. <collection href="Customers">
25. <atom:title>Customers</atom:title>
26. </collection>
27. </workspace>
</service>
28.Try to navigate to the service URL—http://localhost:1486/CustomersDataService.svc/—by adding Customers at the end of the URL. The URL to navigate in our example would be http://localhost:1486/CustomersDataService.svc/Customers. As you can see, the result looks like an RSS feed.
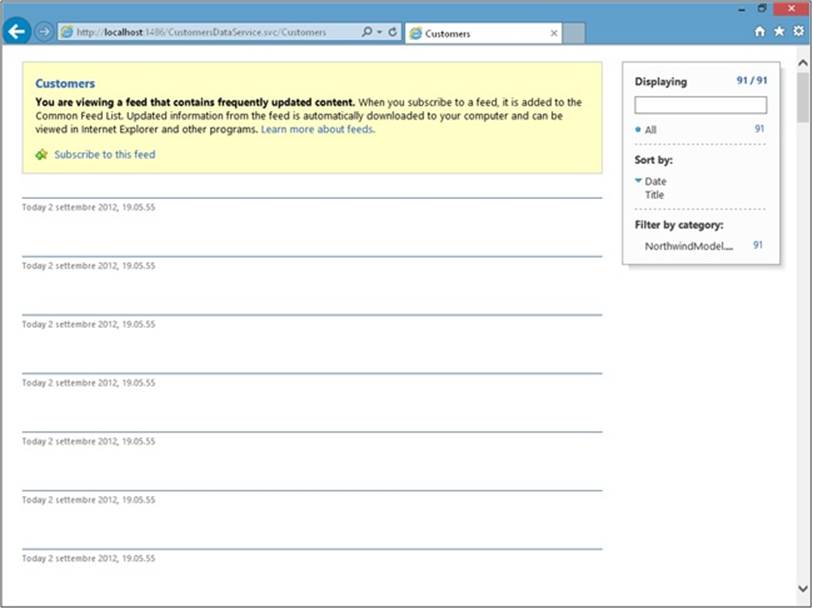
29.In order to have a look at the XML under the covers, you can change the default configuration of Internet Explorer. Select Tools | Internet Options. Select the Content tab of the Internet Options window. Click Settings under Feed And Web Slices. Deselect Turn On Feed Reading View when you are prompted.
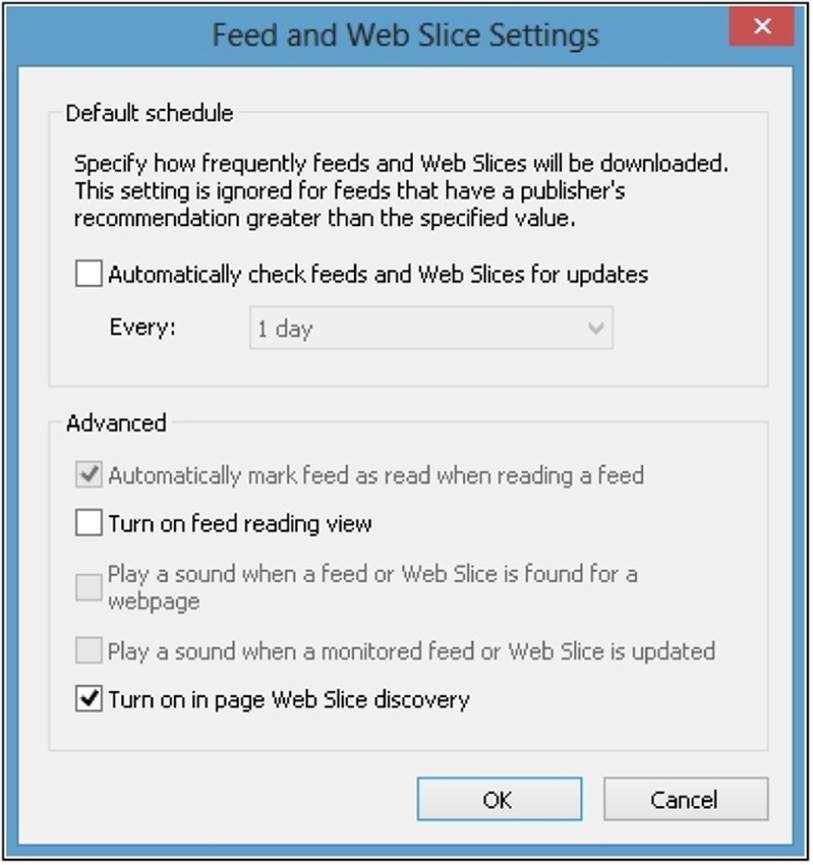
Click OK, and click OK again. Now, go back in the web browser and request the page at the previously determined URL.

As you can see, the result is an RSS feed with an entry item for each customer entity in the collection of Customers published by the OData service. In case you want to access a specific customer instance, you can use a direct access URL providing the CustomerID as a selection key in the URL. In the XML shown in the browser, you can see that every entry element has an id child element that contains a URL. Copy the URL of any Customer entry into the address bar of the browser and you will see XML that defines the single customer instance. The result should be something like the following code.
<?xml version="1.0" encoding="utf-8" ?>
<entry xml:base="http://localhost:1486/CustomersDataService.svc/" xmlns="http://www.w3.org/2005/
Atom" xmlns:d="http://schemas.microsoft.com/ado/2007/08/dataservices" xmlns:m="http://schemas.
microsoft.com/ado/2007/08/dataservices/metadata">
<id>http://localhost:1486/CustomersDataService.svc/Customers('ALFKI')</id>
<category term="NorthwindModel.Customer"
scheme="http://schemas.microsoft.com/ado/2007/08/dataservices/scheme" />
<link rel="edit" title="Customer" href="Customers('ALFKI')" />
<title />
<updated>2012-09-02T17:20:50Z</updated>
<author>
<name />
</author>
<content type="application/xml">
<m:properties>
<d:CustomerID>ALFKI</d:CustomerID>
<d:CompanyName>Alfreds Futterkiste</d:CompanyName>
<d:ContactName>Maria Anders</d:ContactName>
<d:ContactTitle>Sales Representative</d:ContactTitle>
<d:Address>Obere Str. 57</d:Address>
<d:City>Berlin</d:City>
<d:Region m:null="true" />
<d:PostalCode>12209</d:PostalCode>
<d:Country>Germany</d:Country>
<d:Phone>030-0074321</d:Phone>
<d:Fax>030-0076545</d:Fax>
</m:properties>
</content>
</entry>
Under the m:properties element, you can see the list of data properties of the current customer. Later in this chapter, you will consume this data from a Windows 8 app.
Consuming data from a Windows 8 app
Now you are ready to consume the already implemented services from a Windows 8 app. First of all, you need to create the app by completing the following procedure.
Implementing a Windows 8 app to consume the SOAP service
1. Open the NorthwindSolution you created in the previous procedure, when you implemented the data layer with Entity Framework 5.
2. Right-click the solution item in the Solution Explorer and select Add | New Project. Choose Windows Store from the list of installed templates in the Visual C# group, and then select Grid App (XAML). Keep version 4.5 as the Microsoft .NET Framework target version.
3. Name the class library project NorthwindSolution.SOAPClientApp, and then choose a location on your file system. When you have finished, click OK.
4. In the Solution Explorer, right-click the NorthwindSolution.SOAPClientApp project item you just created and select Add Service Reference. In the Add Service Reference window, insert the URL of the CustomersService.svc service file you created in the procedure “Implementing a SOAP Service to Consume from C#.” In this case, the URL is http://localhost:1486/CustomersService.svc. Click Go. You will see the definition of the CustomersService. In the lower side of the window, provide a value of CustomersServiceReference for the Namespace property and click OK.
5. Double-click the package.appxmanifest file of the new app. Select the Packaging tab and provide a suitable value for the Package Name property. For example, you might use the value NorthwindSoapApp.
6. Right-click the NorthwindSolution.SOAPClientApp project and select Debug | Start New Instance. The app will start and you will see a grid of fake items, arranged into multiple fake groups. Close the app by pressing ALT+F4 or stopping the debugger in Visual Studio 2012.
7. Expand the DataModel folder of the NorthwindSolution.SOAPClientApp project and rename the SampleDataSource.cs file with the name NorthwindDataSource.cs. Now rename the SampleDataSource type with name NorthwindDataSource, both in code and text. To complete that task, right-click the class name and select Refactor | Rename. Provide the new name and select Search In Strings. At the preview window, click Apply.
This code file contains all the client-side logic to manage the data model behind the scenes of a Windows 8 app. The SampleDataSource class represents the entry point for the data source. The SampleDataCommon type is the base class for every data item. The SampleDataItem type defines a single data item. Lastly, the SampleDataGroup type declares the groups of items.
8. Using the same approach as step 7, rename the SampleDataItem type with CustomerDataItem; the SampleDataCommon type with NorthwindDataCommon; and the SampleDataGroup type with CustomersDataGroup.
9. Insert the following code, just after the default constructor of the NorthwindDataSource type.
10.private String[] shadowedFaces = new String[] {
11. "shadow-black-face",
12. "shadow-blue-face",
13. "shadow-orange-face",
14. "shadow-red-face",
15.};
16.
17.private async void populateDataSource() {
18. CustomersServiceReference.CustomersServiceClient nw =
19. new CustomersServiceReference.CustomersServiceClient();
20.
21. var customers = await nw.ListCustomersAsync();
22.
23. String fakeCustomerContent = "Lorem ipsum dolor sit amet, consectetur adipiscing
24.elit. Vivamus tempor scelerisque lorem in vehicula. Aliquam tincidunt, lacus ut sagittis
25.tristique, turpis massa volutpat augue, eu rutrum ligula ante a ante";
26. String previousCountry = String.Empty;
27. CustomersDataGroup group = null;
28.
29. // Create a random number generator
30. Random rnd = new Random(DateTime.Now.Second);
31.
32. foreach (var c in customers.OrderBy(c => c.Country)) {
33. // Check if I need to create a new group
34. if (previousCountry != c.Country) {
35.
36. // Add the previous group
37. if (group != null) this.AllGroups.Add(group);
38.
39. // Create the new group
40. group = new CustomersDataGroup(c.Country,
41. c.Country,
42. String.Format("Customers from: {0}", c.Country),
43. "Assets/LightGray.png",
44. String.Empty);
45. }
46.
47. // Add the current customer to the current group
48. group.Items.Add(new CustomerDataItem(c.CustomerID,
49. c.ContactName,
50. c.CompanyName,
51. String.Format("Assets/{0}.png", shadowedFaces[rnd.Next() % 4]),
52. String.Format("{0} {1} working at {2}", c.ContactTitle,
53. c.ContactName, c.CompanyName),
54. fakeCustomerContent,
55. group));
56.
57. // Set the previous country
58. previousCountry = c.Country;
59. }
}
This new code will download the list of customers asynchronously from the external SOAP service and will put them into a collection of CustomerDataItem, grouped by country, where groups will be based on the CustomersDataGroup type. In order to better understand the asynchronous behavior, you can read Chapter 8.
60.Replace the default constructor code of the NorthwindDataSource type with the following code.
61.public NorthwindDataSource() {
62. populateDataSource();
}
63.Add the following files, available in the book code samples under the Ch10 folder, into the Assets folder of the Windows 8 app project: shadow-black-face.png, shadow-blue-face.png, shadow-orange-face.png, shadow-red-face.png.
64.Rebuild the entire solution (Ctrl+Shift+B) and then execute the app.
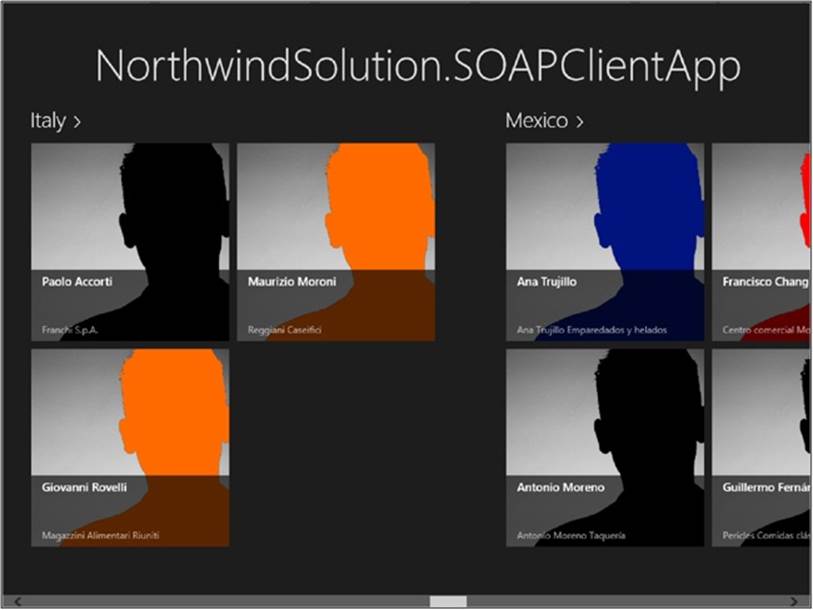
Now you can play with your new Windows 8 app, navigating back and forward through the countries and customers, consuming data from the SOAP external service.
Moreover, you can also create a similar app to consume the OData service. In order to consume an OData service from a Windows 8 app, you need to download and install the “OData Client Tools for Windows Store Apps” from http://msdn.microsoft.com/jj658961.
Implementing a Windows 8 app to consume the OData service
1. Open the NorthwindSolution you created in the previous procedure, when you implemented the data layer with Entity Framework 5.
2. Right-click the solution item in the Solution Explorer and select Add | New Project. Choose Windows Store from the list of installed templates in Visual C# group, and then select Grid App (XAML). Keep version 4.5 as the Microsoft .NET Framework target version.
3. Name the class library project NorthwindSolution.ODataClientApp, and then choose a location on your file system. When you have finished, click OK.
4. In the Solution Explorer, right-click the NorthwindSolution.ODataClientApp project you just created and select Add Service Reference. In the Add Service Reference window, insert the URL of the CustomersDataService.svc service file you created in the exercise “Implementing an OData Service to Consume from C#.” In this case, the URL is http://localhost:1486/CustomersDataService.svc. Click Go. You will see the definition of the CustomersDataService. In the lower side of the window, provide a value of CustomersDataServiceReference for theNamespace property and click OK. Note that the previously mentioned installation of the “OData Client Tools for Windows Store Apps” is mandatory in order to complete this step.
5. Double-click the package.appxmanifest file of the app project. Select the Packaging tab and provide a suitable value for the Package Name property. For example, you might use the value NorthwindODataApp.
6. Right-click the NorthwindSolution.ODataClientApp project and select Debug | Start New Instance. The app will start and you will see a grid of fake items, arranged into multiple fake groups. Close the app by pressing ALT+F4 or stopping the debugger in Visual Studio 2012.
7. Expand the DataModel folder of the NorthwindSolution.ODataClientApp project and rename the SampleDataSource.cs file with the name NorthwindDataSource.cs. Now rename the SampleDataSource type with name NorthwindDataSource, both in code and text. To complete that task, right-click the class name and select Refactor | Rename. Provide the new name and select Search In Strings. At the preview window click Apply.
This code file contains all the client-side logic to manage the data model behind the scenes of the Windows 8 app. The SampleDataSource class represents the entry point for the data source. The SampleDataCommon type is the base class for every data item. The SampleDataItem type defines a single data item. Lastly, the SampleDataGroup type declares the groups of items.
8. Using the same approach as step 7, rename the SampleDataItem type with CustomerDataItem; the SampleDataCommon type with NorthwindDataCommon; and the SampleDataGroup type with CustomersDataGroup.
9. Insert the following code, just after the default constructor of the NorthwindDataSource type.
10.private String[] shadowedFaces = new String[] {
11. "shadow-black-face",
12. "shadow-blue-face",
13. "shadow-orange-face",
14. "shadow-red-face",
15.};
16.
17.private DataServiceCollection<Customer> customers = null;
18.
19.private void populateDataSource() {
20. CustomersDataServiceReference.NorthwindEntities nw =
21. new CustomersDataServiceReference.NorthwindEntities(
22. new Uri("http://localhost:1486/CustomersDataService.svc/"));
23.
24. customers = new DataServiceCollection<Customer>(nw);
25. customers.LoadCompleted += customers_LoadCompleted;
26. customers.LoadAsync(
27. from c in nw.Customers
28. orderby c.Country
29. select c);
30.}
31.
32.async void customers_LoadCompleted(object sender, LoadCompletedEventArgs e) {
33.
34. if (e.Error != null) {
35. MessageDialog errorDialog = new MessageDialog(
36. e.Error.Message, "An error occorred!");
37. await errorDialog.ShowAsync();
38. }
39.
40. String fakeCustomerContent = "Lorem ipsum dolor sit amet, consectetur adipiscing
41.elit. Vivamus tempor scelerisque lorem in vehicula. Aliquam tincidunt, lacus ut sagittis
42.tristique, turpis massa volutpat augue, eu rutrum ligula ante a ante";
43. String previousCountry = String.Empty;
44. CustomersDataGroup group = null;
45.
46. // Create a random number generator
47. Random rnd = new Random(DateTime.Now.Second);
48.
49. foreach (Customer c in customers) {
50.
51. // Check if I need to create a new group
52. if (previousCountry != c.Country) {
53. // Add the previous group
54. if (group != null) this.AllGroups.Add(group);
55.
56. // Create the new group
57. group = new CustomersDataGroup(c.Country,
58. c.Country,
59. String.Format("Customers from: {0}", c.Country),
60. "Assets/LightGray.png",
61. String.Empty);
62. }
63.
64. // Add the current customer to the current group
65. group.Items.Add(new CustomerDataItem(c.CustomerID,
66. c.ContactName,
67. c.CompanyName,
68. String.Format("Assets/{0}.png", shadowedFaces[rnd.Next() % 4]),
69. String.Format("{0} {1} working at {2}", c.ContactTitle,
70. c.ContactName, c.CompanyName),
71. fakeCustomerContent,
72. group));
73.
74. // Set the previous country
75. previousCountry = c.Country;
76. }
}
This new code will download the list of customers asynchronously from the external OData service. Take note of the variable of type DataServiceCollection<T>, which will hold the results of the query executed by the external OData service. Also notice the error handling in thecustomers_LoadCompleted method implementation. In case of any communication exception, the app will show a dialog with the error message that occurred through a MessageDialog type instance.
77.Replace the default constructor code of the NorthwindDataSource type with the following.
78.public NorthwindDataSource() {
79. populateDataSource();
}
80.Add the following files, available in the book code samples under the Ch10 folder, into the Assets folder of the Windows 8 app project: shadow-black-face.png, shadow-blue-face.png, shadow-orange-face.png, shadow-red-face.png.
81.Rebuild the entire solution (Ctrl+Shift+B) and then execute the app. The result will be almost identical to the one shown in the previous graphic.
Implementing an app storage/cache
In the previous sections, you saw how to publish and consume data from a Windows 8 app. However, as already stated at the beginning of this chapter, there are many cases where you also need to manage temporary data and lookup and reference data. Also, many cases require working while offline with some kind of offline cache. For example, imagine that you want to cache the whole list of customers locally, in order to navigate through them even if offline. In a real solution, you should carefully consider caching such data because a list of customers could be very large and consume many resources. In a real solution, it might be best to cache only active customers, or customers in target for the current user. Nevertheless, and for the sake of simplicity, in this section you will cache the entire list of customers.
First, you need to understand the tools available to cache data locally in a Windows 8 app. The Windows Runtime (WinRT) provides a Windows.Storage WinMD library and a corresponding namespace, which contains a bunch of types for managing local, remote, and temporary storage. All these storage types work the same way and share the same behavior by implementing the same basic types. For example, in case you want to save a setting locally from a Windows 8 app, you can use a code excerpt like the following:
Windows.Storage.ApplicationData.Current
.LocalSettings.Values["LastExecutionDateTime"] = DateTime.Now.ToString();
Under the cover, this simple line of code will save a variable locally with name LastExecutionDateTime and a value corresponding to the current DateTime.
However, in case you want to read the value you saved previously, you can use the following code excerpt:
Object lastExecutionDateTimeValue;
if (Windows.Storage.ApplicationData.Current
.LocalSettings.Values.TryGetValue("LastExecutionDateTime",
out lastExecutionDateTimeValue)) {
String lastExecutionDateTime = lastExecutionDateTimeValue.ToString();
}
Notice that the name of each setting can be at most 255 characters in length. Each setting can be up to 8 KB in size, and each composite setting can be up to 64 KB in size.
Moreover, in case you want to save the same settings on remote storage, based on a roaming profile linked to the Windows LiveID account of the current user, you can replace the LocalSettings property of the current ApplicationData class with the RoamingSettings property. Again, in the following code excerpt you can see how to save a value into the roaming profile, for sharing across multiple machines based on the same Microsoft LiveID user account.
Windows.Storage.ApplicationData.Current
.RoamingSettings.Values["LastExecutionDateTime"] = DateTime.Now.ToString();
In the following code excerpt, you can see how to retrieve its value from the roaming profile:
Object lastExecutionDateTimeValue;
if (Windows.Storage.ApplicationData.Current
.RoamingSettings.Values.TryGetValue("LastExecutionDateTime",
out lastExecutionDateTimeValue)) {
String lastExecutionDateTime = lastExecutionDateTimeValue.ToString();
}
Also, when using a roaming profile, the same limitations in size and property naming do apply as those of the LocalSettings storage.
Due to the size limitations you have in saving values, you cannot rely on this feature to persist a large set of data. However, the ApplicationData class also provides access to a virtual file system, which is almost like the isolated storage you had prior to the Windows 8 apps era.
In fact, the ApplicationData class provides a LocalFolder property that gets the root folder of a local app data store. It also provides a RoamingFolder property, which corresponds to the root folder of a roaming app data store. In order to create a file in these folders, you simply need to leverage the available WinRT API. In fact, both the LocalFolder and the RoamingFolder are implementations of the StorageFolder type. Through this type, you can open, create, update, rename, or delete a file or a subfolder, with up to 32 nesting levels for folders.
For example, in the following code excerpt you can see the code behind the click event of a button, which creates an XML file with an empty element inside.
private async void WriteLocalStorageFile_Click(object sender, RoutedEventArgs e) {
var file = await Windows.Storage.ApplicationData.Current
.LocalFolder.CreateFileAsync("SampleFile.xml",
Windows.Storage.CreationCollisionOption.ReplaceExisting);
using (var stream = await file.OpenStreamForWriteAsync()) {
XElement x = new XElement("EmptyLocalXmlFile");
x.Save(stream);
await stream.FlushAsync();
}
}
In the following code example, you can see how to retrieve that file and how to read its content.
private async void ReadLocalStorageFile_Click(object sender, RoutedEventArgs e) {
var file = await Windows.Storage.ApplicationData.Current
.LocalFolder.GetFileAsync("SampleFile.xml");
using (var stream = await file.OpenStreamForReadAsync()) {
XElement x = XElement.Load(stream);
OutputText.Text = x.ToString();
}
}
Roaming storage has a storage quota of 100 KB for each app, as you can see by checking the ApplicationData.RoamingStorageQuota property. If your roaming data exceeds that quota, it won’t roam until its size is less than the quota again. Also notice that roaming application data is not intended for simultaneous use by applications on more than one device at a time. In case of concurrency conflict, the system will always favor the value that was written last.
One last option you have is a TemporaryFolder, which is again available through the ApplicationData class and behaves exactly like the LocalFolder and RoamingFolder properties, because it inherits from the same type (StorageFolder). However, the TemporaryFolder can be deleted at any time by the WinRT and should not be used to store critical data. Lastly, consider that the storage options available for a Windows 8 app are tied to the lifetime of the app. Therefore, if you remove an app, the local, roaming, and temporary data also will be removed. In case you want to keep contents and files out of any app lifetime, you should rely on user’s libraries (Documents, Pictures, and so on) or Microsoft SkyDrive.
Caching data in a Windows 8 app
1. Open the NorthwindSolution you used in the previous exercises.
2. Open the NorthwindSolution.SOAPClientApp project and edit the code of the NorthwindDataSource.cs file, under the DataModel folder.
3. At the very top of the file, add the following, using statements:
4. using Windows.Networking.Connectivity;
5. using System.IO;
using System.Runtime.Serialization;
6. Replace the first two lines of code in the populateDataSource method implementation with the following code:
7. private async void populateDataSource() {
8. ObservableCollection<CustomersServiceReference.Customer> customers = null;
9.
10. ConnectionProfile internetProfile = NetworkInformation.GetInternetConnectionProfile();
11.
12.
13. // In case there is no internet connectivity
14. if (internetProfile == null || internetProfile.GetNetworkConnectivityLevel() ==
15.NetworkConnectivityLevel.None) {
16.
17. // Load the customers from an XML file saved in the local app storage
18. var customersXmlFile = await Windows.Storage.ApplicationData.Current
19. .LocalFolder.GetFileAsync("Customers.xml");
20.
21. using (var stream = await customersXmlFile.OpenStreamForReadAsync()) {
22. DataContractSerializer dcs = new DataContractSerializer(typeof(
23. ObservableCollection<CustomersServiceReference.Customer>));
24.
25. customers = dcs.ReadObject(stream) as
26. ObservableCollection<CustomersServiceReference.Customer>;
27. }
28. }
29. else {
30.
31. // Otherwise load the customers from the remote SOAP service
32. CustomersServiceReference.CustomersServiceClient nw =
33. new CustomersServiceReference.CustomersServiceClient();
34.
35. customers = await nw.ListCustomersAsync();
36.
37. // Save the customers into an XML file
38. var customersXmlFile = await Windows.Storage.ApplicationData.Current
39. .LocalFolder.CreateFileAsync("Customers.xml",
40. Windows.Storage.CreationCollisionOption.ReplaceExisting);
41.
42. using (var stream = await customersXmlFile.OpenStreamForWriteAsync()) {
43. DataContractSerializer dcs = new DataContractSerializer(typeof(
44. ObservableCollection<CustomersServiceReference.Customer>));
45. dcs.WriteObject(stream, customers);
46. }
47. }
48.
49. // Code omitted for the sake of brevity ...
}
As you can see, the code checks if there is an Internet connection and if it is active by using the NetworkInformation type. If there is connectivity, the code will invoke the remote SOAP service. Otherwise, in case of no Internet connectivity, it will try to use an XML file saved in the local app storage. For the sake of simplicity, the code illustrated in this exercise does not handle any kind of exception and does not check if the file exists prior to accessing it.
50.Rebuild the entire solution (Ctrl+Shift+B) and then execute the project NorthwindSolution .SOAPClientApp—first with network connectivity enabled and then with network connectivity disabled. In order to check the behavior of the local app storage cache, insert a breakpoint at the very beginning of the populateDataSource method.
SOAP security infrastructure
One last fundamental layer to implement in a solid and reliable architecture is the security infrastructure. You should manage both authentication and authorization tasks through this layer. The authorization topic is out of the scope of this chapter, because the authorization infrastructure should be implemented on the service/server-side. However, authentication is a key topic for the app you are implementing. In fact, regardless of the authorization policies you will apply on the service-side, the user of your app will have to authenticate while using the app.
Let’s start by considering the SOAP service. Depending on the target deployment and the target users of your Windows 8 app, you will have multiple authentication options. For example, if your app targets users of a Windows 8 domain, you could leverage the integrated Windows Authentication for free. You simply need to change the configuration of the binding for publishing the SOAP service.
From a WCF perspective, the binding is the set of transport, encoding, security, and infrastructural layers involved in the communication pipeline that receives or sends messages across the wire. By default, a WCF service published through an ASP.NET website over HTTP will use a binding called basicHttpBinding, which leverages a set of configurations compliant with the Web Services Interoperability Organization (WS-I) Basic Profile specification.
By default, the basicHttpBinding relies on transport-level security, which means HTTPS, to satisfy confidentiality and integrity requirements. Optionally, you can also leverage HTTP authentication (Basic, Digest, NTLM, Windows, and Certificate) at the transport level. Another available option, while working with basicHttpBinding, is to configure the TransportWithMessageCredentials configuration, which means using HTTPS for confidentiality and integrity together with a WS-Security authentication SOAP header for handling client’s authentication. In that case, the authentication can be based on a set of usernames and passwords. Exploring all the available security configurations available on the service-side is out of the scope of this book. The most useful and the most frequently used authentication options, from a Windows 8 app perspective, will be covered here. For further details about all the available bindings and security options available while developing a WCF service, you can read the following article on MSDN: http://msdn.microsoft.com/ms732362.aspx.
From a service-side viewpoint, you could also leverage many other bindings—even those that are more secure and affordable and still HTTP-based like wsHttpBinding, wsFederationHttpBinding, and so on. Nevertheless, the WinRT client profile allows you to use only basicHttpBinding as the HTTP-based binding. As an alternative option, you can publish your service using the netTcpBinding binding over a custom WCF-specific TCP protocol. However, in that case you will need to open communication between your Windows 8 app and the service layer across TCP ports that are not guaranteed to be open on every network and through every firewall.
In order to configure the binding of the service to support authentication, you simply need to change the web.config of the website publishing the service. Also, eventually you will need to refresh the service reference on the consumer side, depending on the configuration changes you will make.
Enabling basicHttpBinding with TransportWithMessageCredentials
1. Open the NorthwindSolution you used in the previous procedures.
2. Open the NorthwindSolution.WebHost website project and edit the content of the web.config file by adding the following XML excerpt as a child of the system.serviceModel element.
3. <bindings>
4. <basicHttpBinding>
5. <binding>
6. <security mode="TransportWithMessageCredential">
7. <message clientCredentialType="UserName" />
8. </security>
9. </binding>
10. </basicHttpBinding>
</bindings>
This custom configuration instructs WCF to enforce transport-level security (HTTPS) with the username and password transferred within a SOAP header, for the default binding based on basicHttpBinding.
11.Click the NorthwindSolution.WebHost website project and change the value of SSL Enabled to a value of True in the project property grid. In fact, you cannot publish a WCF service declaring that you want transport-level security unless you effectively publish it through HTTPS.
12.Right-click CustomersService.svc in the Solution Explorer and select View In Browser. You will see, in your default browser, the welcome page of the WCF service. By clicking the link to the WSDL file, you will see that the WSDL of the service is now more complex than before. The augmented complexity is derived from the presence of a bunch of new XML elements describing the WS-SecurityPolicy aspects.
Consuming the SOAP service with username and password authentication
1. Open the NorthwindSolution you used in the previous procedures.
2. Open the NorthwindSolution.SOAPClientApp project and right-click CustomersServiceReference, available under the Service References folder. Select Update Service Reference. Through this action, Visual Studio 2012 will reload the WSDL and will update the auto-generated code of the service consumer.
3. Open the DataModel folder of the NorthwindSolution.SOAPClientApp project and edit the NorthwindDataSource.cs file by adding the following lines of code in the populateDataSource method, just after the code that creates a new instance of the CustomerServiceClient class.
4. CustomersServiceReference.CustomersServiceClient nw =
5. new CustomersServiceReference.CustomersServiceClient();
6.
7. nw.ClientCredentials.UserName.UserName = "Paolo.Pialorsi";
nw.ClientCredentials.UserName.Password = "Pass@word1!";
As you can see, the code simply configures the username and the password that will be used by the SOAP client to authenticate against the service. In your testing environment, you will need to provide the username and the password of an existing user, defined either in the local development machine or in the active directory domain. Of course, in a real software solution, you should ask for the username and password through a specific user interface, instead of storing them in the code of the app.
8. Rebuild the entire solution (Ctrl+Shift+B) and then execute NorthwindSolution.SOAPClientApp. You will see an exception because the IIS Express that is used under the cover of the website project is using a self-issued SSL certificate—which is not trusted by your Windows 8 app. You also can experience the issue by using Internet Explorer to browse the URL of the service, using the SSL endpoint. By default, IIS Express uses the 44300 port to publish over SSL. In order to fix this issue, you will need to publish your service under IIS—using a trusted SSL certificate—or you can replace the self-issued certificate used by IIS Express with a trusted certificate. The final option you have is to trust the self-publisher used by IIS Express to emit the self-issued certificate.
9. Launch the Microsoft Management Console tool by pressing Windows+Q and typing MMC in the search box. Right-click the mmc.exe application that is returned by the search and select Run As Administrator. Click Yes at the security question. Under the File menu of the MMC console, select Add/Remove Snap-in. In the dialog box, select Certificates on the left and click Add. In the next step of the wizard, select Computer Account | Local Computer. Click Finish and then click OK.
10.Under the Personal Certificates folder, you will find a certificate named localhost. Double-click it. On the Certification Path tab, check that this is the certificate self-issued by IIS Express. Click OK.
11.Right-click the localhost certificate and select All Tasks | Export. In the wizard, select to not export the private key. Then, select to export a DER certificate file with .CER extension. In the last step, provide a filename for the exported file. Click Next and then Finish.
12.Select the Trusted Root Certification Authorities certificates folder. Right-click and select Import. Click Next and provide the filename and path you have just used for saving the localhost certificate. Choose to place the certificate in the Trusted Root Certification Authorities store. Click Next and then click Finish.
13.Use Internet Explorer to browse to the service URL published under the SSL. You will see that the service URL is trusted by the browser.
14.Place a breakpoint in the ListCustomers method of the service implementation, which is inside of the CustomersService.cs file in the NorthwindSolution.Services class library project. Restart your client app in debug mode, debugging the web host project. To debug the host project, in the Debug menu of Visual Studio 2012, use Attach To Process to attach the IISExpress.exe process. As soon as you invoke the service, the debugger will hit the breakpoint. By pressing SHIFT+F9 you will be able to inspect the contents of theSystem.Threading.Thread.CurrentPrincipal property. You will see that the Identity.Name property of CurrentPrincipal will assume a value equal to the username you provided for authentication.
Execute the next procedure in order to provide the current username and authentication method to the calling client app by using a fake customer with a ContactName equal to the Identity.Name of the calling CurrentPrincipal, and a CompanyName property with a value corresponding to theAuthenticationType used while securing the communication.
Validating and checking the customer authentication through the SOAP service
1. Open the code of the CustomersService.cs file, defined in the NorthwindSolution.Services class library project.
2. Replace the code of the ListCustomers method with the following code excerpt:
3. public List<Customer> ListCustomers() {
4. NorthwindEntities nw = new NorthwindEntities();
5.
6. List<Customer> result = nw.Customers.ToList();
7. if (System.Threading.Thread.CurrentPrincipal != null &&
8. System.Threading.Thread.CurrentPrincipal.Identity != null) {
9. result.Add(new Customer {
10. Country = "A Fake Country",
11. CustomerID = "FAKE",
12. ContactName = System.Threading.Thread.CurrentPrincipal.Identity.Name,
13. CompanyName = System.Threading.Thread.CurrentPrincipal.Identity.
14. AuthenticationType,
15. });
16. }
17. return (result);
}
The code highlighted in bold inserts a fake customer at the very top of the list of customers, ordered by country. The fake customer will hold some useful information, like the currently called username and the authentication method used to authenticate the caller.
18.Rebuild the entire solution (Ctrl+Shift+B), and then execute NorthwindSolution.SOAPClientApp. The following screenshot shows a new and fake customer at the very top of the customers list.
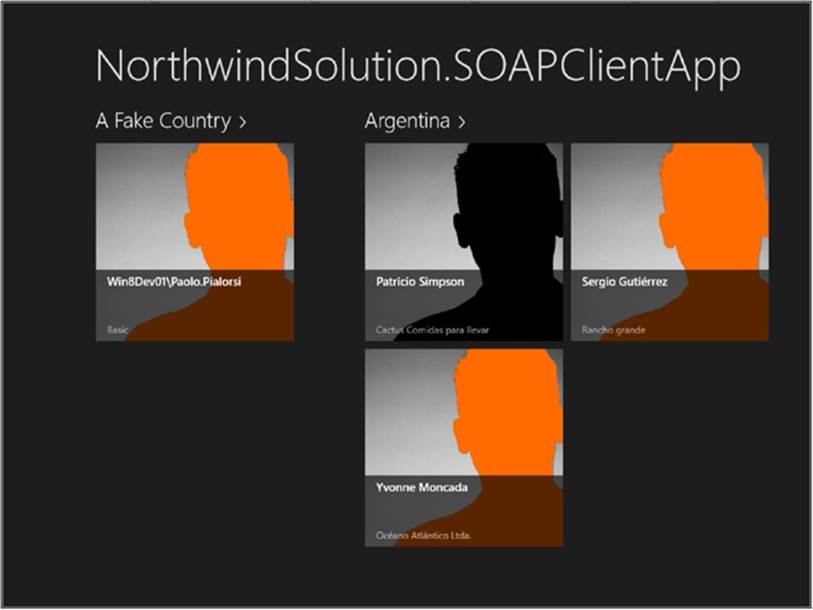
The username and password credentials provided by the client application can be validated, not only against a Windows directory service, but also by using a custom username and password validator. For example, you could use a custom database with a table of users and passwords, or you could even use the standard ASP.NET membership API and a classic ASPNETDB to authenticate users.
OData security infrastructure
In this last section, you will see how to enforce authentication while calling an OData service.
From a security viewpoint, an OData service is just another service channel published over HTTP/HTTPS, as is a SOAP channel. Thus, one option to secure an OData channel is to leverage the standard HTTP/HTTPS authentication techniques. For example, you could configure the web host application to use HTTP Windows Authentication. To do that in your development environment, you simply need to change the configuration of the web host application. Click the project in the Solution Explorer and change Windows Authentication from Disabled to Enabled in the project property grid. Furthermore, you also need to disable Anonymous Authentication, in order to force clients to provide credentials while consuming your services. Figure 10-2 shows a screenshot of the proper configuration for your service host.
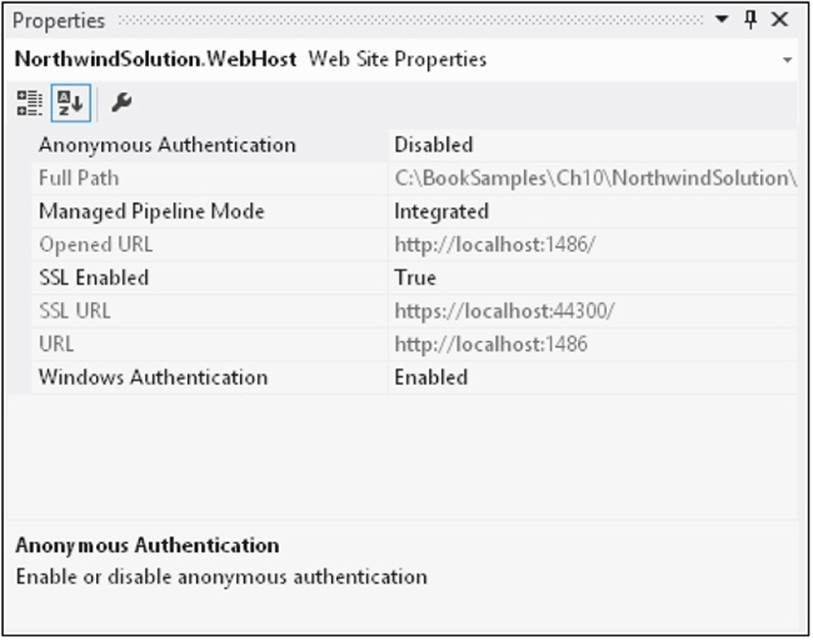
Figure 10-2. The property grid panel for configuring the IISExpress bindings of the current web service app.
From a Windows 8 app consumer perspective, you will only need to configure the Credentials property to a suitable set of credentials—which can be the current user credentials taken from the CredentialCache object of .NET, or a specific set of credentials defined using a dedicated instance of the System.Net.NetworkCredential type. In the following lines of code, you can see both the alternative options:
nw.Credentials = System.Net.CredentialCache.DefaultCredentials;
nw.Credentials = new System.Net.NetworkCredentials(
"Paolo.Pialorsi", "Pass@word1!", "WIN8DEV1");
As shown in the previous examples, you will need to change the credentials and the machine or domain name with those in your own environment. Nevertheless, in the world of Windows 8 apps, you probably will not always have an Active Directory available for users’ authentication. For instance, think about a Windows 8 app that you are offering to the world. It probably would be a better choice to allow users to authenticate using their LiveID, Facebook, or Twitter account. All these identity management systems provide support for the OAuth (Open Authentication—www.oauth.net) specification.
Windows 8 apps support authentication through OAuth, or any other web-based authentication technique, by leveraging the WebAuthenticationBroker class. This class renders a dialog box containing the web sign-in page of the authentication platform you choose to use.
Imagine that you have a Windows 8 app that you want to use for authenticating users with their Facebook account. The following code excerpt shows how to implement a click event of a button, which will prompt the users of your app for their Facebook account information.
private async void ShowLoginPage_Click(object sender, RoutedEventArgs e) {
try {
String FacebookURL = "https://www.facebook.com/dialog/oauth?client_id=" +
FacebookClientID.Text + "&redirect_uri=" +
Uri.EscapeUriString(FacebookCallbackUrl.Text) +
"&scope=" + FacebookPermissions.Text +
"&display=popup&response_type=token";
System.Uri StartUri = new Uri(FacebookURL);
System.Uri EndUri = new Uri(FacebookCallbackUrl.Text);
WebAuthenticationResult WebAuthenticationResult =
await WebAuthenticationBroker.AuthenticateAsync(
WebAuthenticationOptions.None,
StartUri,
EndUri);
if (WebAuthenticationResult.ResponseStatus == WebAuthenticationStatus.Success) {
OutputToken(WebAuthenticationResult.ResponseData.ToString());
}
else if (WebAuthenticationResult.ResponseStatus == WebAuthenticationStatus.ErrorHttp) {
OutputToken("HTTP Error returned by AuthenticateAsync() : " +
WebAuthenticationResult.ResponseErrorDetail.ToString());
}
else {
OutputToken("Error returned by AuthenticateAsync() : " +
WebAuthenticationResult.ResponseStatus.ToString());
}
}
catch (Exception ex) {
MessageDialog errorDialog = new MessageDialog(
e.Error.Message, "An error occorred!");
await errorDialog.ShowAsync();
}
}
As you can see, the code creates a URL string (FacebookURL variable) corresponding to the OAuth authentication URL of Facebook. The URL requires having some query string parameters in it, that are used to declare the ClientId of the Facebook App that will be associated with your Windows 8 app, as well as the callback URL to route the customer back to after a valid authentication and the list of permissions required by the app.
You can find more details about the OAuth support provided by Facebook at http://developers.facebook.com/docs/reference/dialogs/oauth/. You can also create a ClientID and configure the callback URL by going to https://developers.facebook.com/apps. After authenticating with your Facebook account, create a new app integration. Note that the Facebook side of this story is out of the scope of this chapter.
Additionally, the code invokes the static method AuthenticateAsync of the WebAuthenticationBroker class to start the authentication process. In Figure 10-3, you can see the output that will be prompted for the user.
As soon as the user provides a valid set of credentials, the identity management system (Facebook, in our example) will prompt the user in order to ask for consent allowing the Windows 8 app to access his profile information. Depending on the type of integration you will need, you will have the capability to request various information like published posts, email, friends, or pictures.
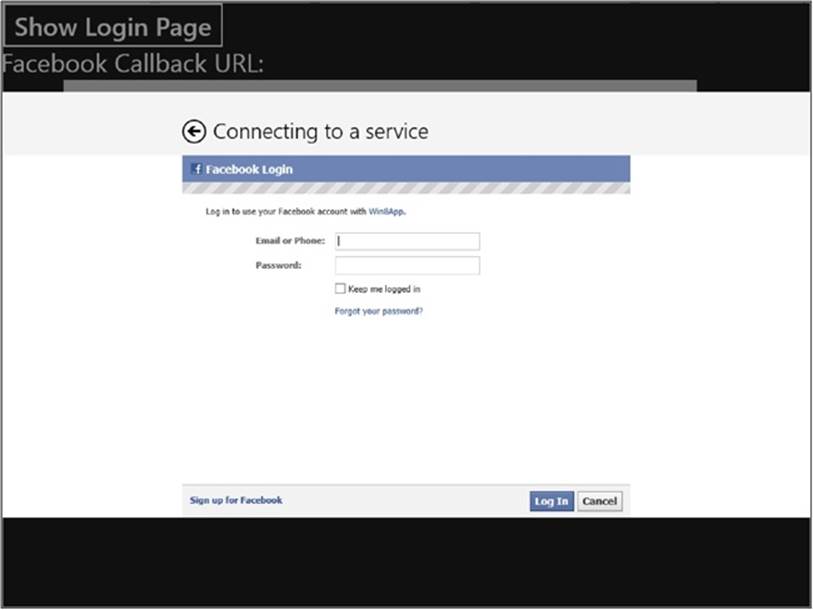
Figure 10-3. The login page of Facebook within the WebAuthenticationBroker.
The result of the authentication process will be a variable of type WebAuthenticationResult that contains the property WebAuthenticationStatus, which can assume one of the following values:
§ ErrorHttp. An HTTP occurred.
§ Success. The authentication process completed correctly.
§ UserCancel. The user cancelled the authentication process.
In case of an exception, you will find details in the ResponseErrorDetail property of the Web AuthenticationResult instance. In case of a successful login, you will find the result in the ResponseData property.
In the case of Facebook authentication, you will get back a URL that is the callback URL you originally provided with an access token (access_token) parameter appended to the end of the URL, together with an expiration timeout (expires_in) for the token. You can see a sample of the resulting URL:
http://www.devleap.com/#access_token=AAADp1Ykd5hwBAM3r0VDE9ZC9wuj9BnUdvfBdHwxz84YZCx5X8mw0v8Xwfx
IJFUMv4ZAi3mls5ZARRbwpvQ67FyzrDSUcFwl5d7rnhQzpugZDZD&expires_in=6624
Within your code, you should extract the value of the access_token parameter and use it to talk with Facebook proprietary APIs, for example the Facebook Graph API. Nevertheless, exploring the Facebook APIs is out of the scope of this book.
Using the WebAuthenticationBroker class to authenticate against any other authentication platform, such as Microsoft Windows Azure Access Control Service (ACS), is within the scope of this chapter. In fact, ACS is a Windows Azure service that provides an easy way of authenticating users who need to access your web applications and services, without having to factor complex authentication logic into your code. You can use ACS to manage identity authentication for any of your services, either SOAP or OData. Furthermore, the ACS can redirect the authentication process to any external and largely adopted identity provider like Windows Live ID, Facebook, Google, and so on.
Because ACS supports OAuth 2.0, you can use it to authenticate access to your services—almost the same way you used it in the previous sample while authenticating against Facebook.
Summary
In this chapter, you learned the basic information about contemporary software architectures, and you saw how those apply to a Windows 8 app. Moreover, you saw how to implement a very basic data layer based on ADO.NET Entity Framework 5. You published the data layer through a SOAP service, as well as through an OData service. Then, you consumed these services with a Windows 8 app, which leverages local storage for local data caching. Lastly, you learned how to make secure calls to a service—whether it is SOAP based or OData based—using an OAuth authentication platform like Facebook or Microsoft Windows Azure ACS.
Quick reference
|
To |
Do This |
|
Consume data from a Windows 8 app |
Create a service reference to a SOAP service or to an OData service. |
|
Publish a dataset via OData |
Create a web application and define a WCF Data Service item, for example, publishing a model created with ADO.NET Entity Framework 5. |
|
Cache some local data in a Windows 8 app |
Use the Windows.Storage namespace of WinRT leveraging the local app storage. |
|
Sharing some settings/preferences across multiple devices for a single Windows Live ID account |
Use the Windows.Storage namespace of WinRT leveraging the roaming app storage. |
|
Authenticate against an external web-based sign-in platform like Facebook or ACS |
Use the WebAuthenticationBroker class. |
All materials on the site are licensed Creative Commons Attribution-Sharealike 3.0 Unported CC BY-SA 3.0 & GNU Free Documentation License (GFDL)
If you are the copyright holder of any material contained on our site and intend to remove it, please contact our site administrator for approval.
© 2016-2026 All site design rights belong to S.Y.A.