Sams Teach Yourself C# 5.0 in 24 Hours (2013)
Part III: Working with Data
Hour 14. Using Files and Streams
What You’ll Learn in This Hour
• Files and directories
• Reading and writing data
In Hour 10, “Working with Arrays and Collections,” and Hour 13, “Understanding Query Expressions,” you learned how applications could work with data stored in collections and how to query and manipulate that data. Although these are common activities, many applications need to store or retrieve data from files on a disk.
The .NET Framework treats files as a stream of data. A stream is a sequential flow of packets of data, represented as bytes. Data streams have an underlying storage medium, typically called a backing store, which provides a source for the stream. Fortunately, the .NET Framework makes working with files and directories easier by the File, Directory, and Path classes provided by the .NET Framework.
The System.IO namespace contains all the classes you need to work with both buffered and unbuffered streams. Buffered streams enable the operating system to create its own internal buffer that it uses to read and write data in whatever increments are most efficient.
In this hour, you learn how to work with files, using the File, Directory, and Path classes to explore and manage the file system and for reading and writing files. You also learn how you can use the Stream class, or any of its derived classes, to perform more complex read and write operations.
Files and Directories
You can think of a file as a sequence of bytes having a well-defined name and a persistent backing store. Files are manipulated through directory paths, disk storage, and file and directory names. The .NET Framework provides several classes in the System.IO namespace that make working with files easy.
Working with Paths
A path is a string that provides the location of a file or directory, and can contain either absolute or relative location information. An absolute path fully specifies a location, whereas a relative path specifies a partial location. When using relative paths, the current location is the starting point when locating the file specified.
Note: Current Location
Every process has a processwide “current location,” which is usually, but not always, the location where the process executable was loaded.
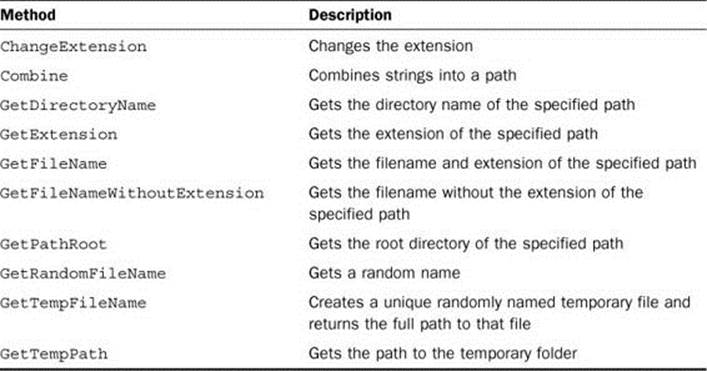
The Path class provides static methods that perform operations on path strings in a cross-platform manner. Although most Path class members don’t interact with the file system, they do validate that the specified path string contains valid characters. Table 14.1 shows the commonly used methods.
Table 14.1. Commonly Used Methods of the Path Class
Interacting with the Windows Special Directories
The Windows operating system includes many “special” folders frequently used by applications. Typically, the operating system sets these folders; however, a user can also explicitly set them when installing a version of Windows. As a result, many might not have the same location or name on any given machine.
These special directories are listed in the Environment.SpecialFolder enumeration. Some of the common folders are shown in Table 14.2.
Table 14.2. Common Environment.SpecialFolder Values
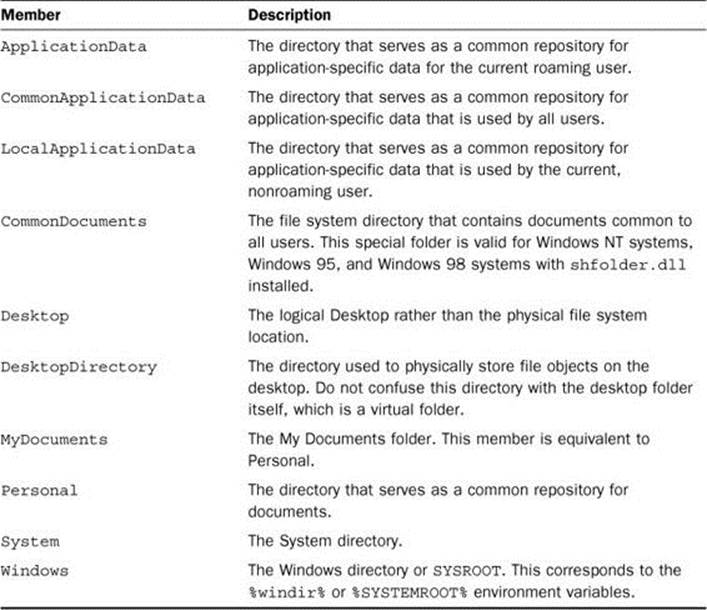
The enumeration simply provides a consistent way to reference these folders; to get the actual folder path for a given folder you should use the Environment.GetFolderPath method. For example, to find the path to the user’s Documents directory, use the following code:
string path = Environment.GetFolderPath(Environment.SpecialFolder.MyDocuments);
The DirectoryInfo and FileInfo Classes
The DirectoryInfo and FileInfo classes both derive from the FileSystemInfo class, which contains the methods common to file and directory manipulation and can represent either a file or a directory. When a FileSystemInfo is instantiated, the directory or file information is cached, so you must refresh it using the Refresh method to ensure current information.
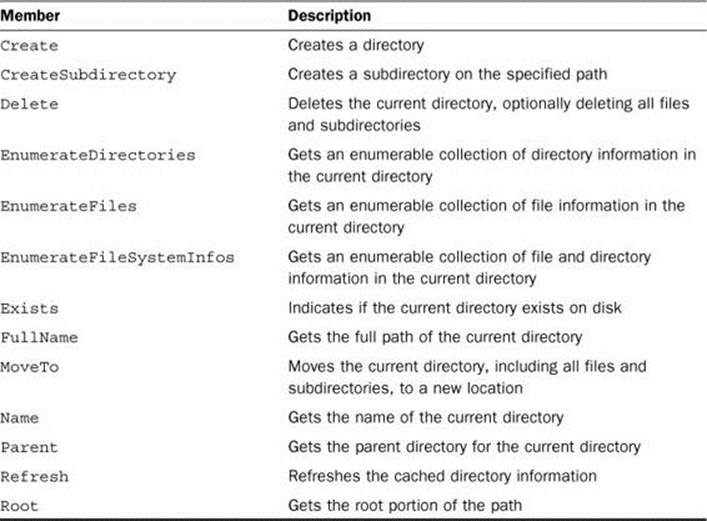
The DirectoryInfo class contains instance members that provide a number of properties and methods for performing common operations such as copying, moving, creating, and enumerating directories. The commonly used methods and properties of the DirectoryInfo class are listed in Table 14.3.
Table 14.3. Commonly Used DirectoryInfo Members
Listing 14.1 shows how the DirectoryInfo class might perform some common operations.
Listing 14.1. Using the DirectoryInfo Class
public class DirectoryInfoExample
{
public static void Main()
{
string tempPath = Path.GetTempFileName();
DirectoryInfo directoryInfo = new DirectoryInfo(tempPath);
try
{
if (directoryInfo.Exists)
{
Console.WriteLine("The directory already exists.");
}
else
{
directoryInfo.Create();
Console.WriteLine("The directory was successfully created.");
directoryInfo.Delete();
Console.WriteLine("The directory was deleted.");
}
}
catch (IOException e)
{
Console.WriteLine("An error occurred: {0}", e.Message);
}
}
}
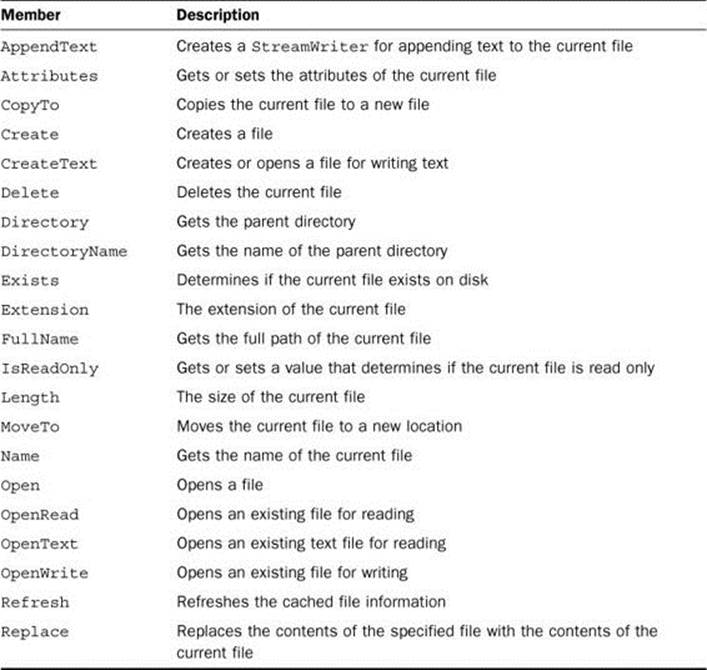
The FileInfo class contains instance members that provide a number of properties and methods for performing common file operations such as copying, moving, creating, and opening files. The commonly used methods and properties are listed in Table 14.4.
Table 14.4. Commonly Used FileInfo Members
Listing 14.2 shows how the FileInfo class might perform some common operations.
Listing 14.2. Using the FileInfo Class
public class FileInfoExample
{
public static void Main()
{
string tempFile = Path.GetTempFileName();
FileInfo fileInfo = new FileInfo(tempFile);
try
{
if (!fileInfo.Exists)
{
using (StreamWriter writer = fileInfo.CreateText())
{
writer.WriteLine("Line 1");
writer.WriteLine("Line 2");
}
}
fileInfo.CopyTo(Path.GetTempFileName());
fileInfo.Delete();
}
catch (IOException e)
{
Console.WriteLine("An error occurred: {0}", e.Message);
}
}
}
Note: Streams Are Disposable
You should be sure to dispose of the stream when you finish using it by calling the Close method. You can also wrap the streams in a using statement, which is the preferred way to ensure the stream is closed correctly.
Try It Yourself: Working with the DirectoryInfo and FileInfo Classes
To see how the DirectoryInfo and FileInfo classes can be used, follow these steps. Keep Visual Studio open at the end of this exercise because you will use this application later.
1. Create a new console application.
2. In the Main method of the Program.cs file, create a new variable of type string named path whose value is the result of the following code:
Path.Combine(
Environment.GetFolderPath(Environment.SpecialFolder.Windows),
"Web",
"Wallpaper")
3. Create a new DirectoryInfo instance over the path variable you just declared.
4. In a try-catch statement, enumerate the directories using the EnumerateDirectories method and display the full name of each directory using a foreach statement only if the directory exists. The catch handler should catch an UnauthorizedAccessException and print the Message of the exception.
5. Run the application using Ctrl+F5. The output should look similar to what is shown in Figure 14.1. (This is what you should see if you run on Windows 8. Earlier versions of Windows might provide different results.)
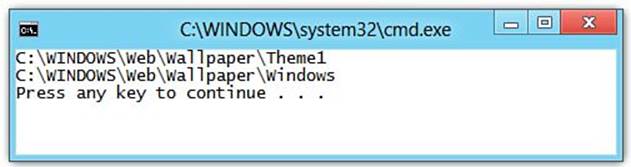
Figure 14.1. Results of working with DirectoryInfo.
6. Modify the foreach statement from step 4 to enumerate all the files matching the pattern “*.jpg” and print both the filename and the creation date using a nested foreach statement. The completed foreach statement should look like:
foreach (var d in directoryInfo.EnumerateDirectories())
{
Console.WriteLine(d.FullName);
foreach (var f in d.EnumerateFiles("*.jpg",SearchOption.AllDirectories))
{
Console.WriteLine("{0} {1}", f.Name, f.CreationTime);
}
}
7. Run the application again using Ctrl+F5. The output should look similar to what is shown in Figure 14.2. (Again, this is what you should see if you run Windows 8. Earlier versions of Windows might provide different results.)
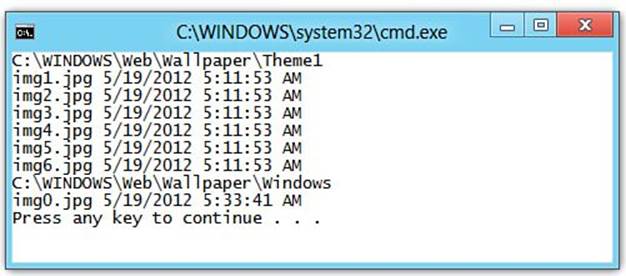
Figure 14.2. Results of working with FileInfo.
The Directory and File Classes
If you don’t want to create an instance of a DirectoryInfo or FileInfo class, you can use the Directory or File class instead. These classes provide only static methods for performing the same directory and file operations provided by the DirectoryInfo and FileInfo classes.
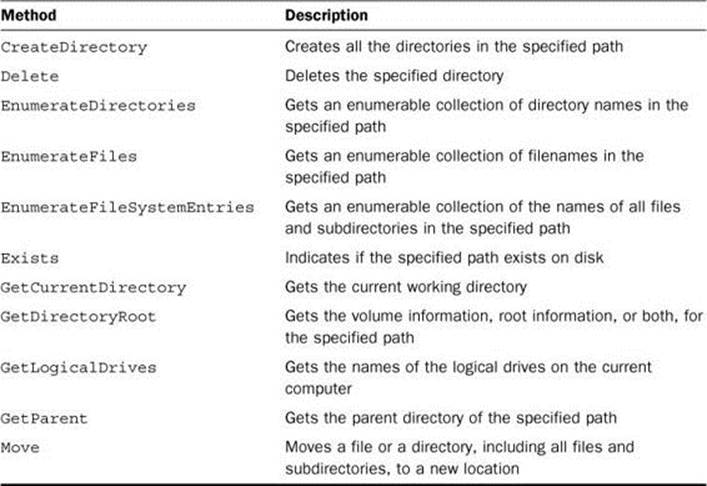
The commonly used methods of the Directory class are shown in Table 14.5.
Table 14.5. Commonly Used Methods of the Directory Class
Listing 14.3 shows the same operations from Listing 14.1, but using the Directory class instead of the DirectoryInfo class.
Listing 14.3. Using the Directory Class
public class DirectoryInfoExample
{
public static void Main()
{
string tempPath = Path.GetTempFileName();
try
{
if (Directory.Exists(tempPath))
{
Console.WriteLine("The directory already exists.");
}
else
{
Directory.CreateDirectory(path);
Console.WriteLine("The directory was successfully created.");
Directory.Delete(path);
Console.WriteLine("The directory was deleted.");
}
}
catch (IOException e)
{
Console.WriteLine("An error occurred: {0}", e.Message);
}
}
}
One significant difference between the Directory and DirectoryInfo classes is the EnumerateFiles, EnumerateDirectories, and EnumerateFileSystemEntries methods. In the Directory class, these methods return an IEnumerable<string> of just directory and filenames, whereas in theDirectoryInfo class, they return IEnumerable<FileInfo>, IEnumerable<DirectoryInfo>, and IEnumerable<FileSystemInfo>, respectively.
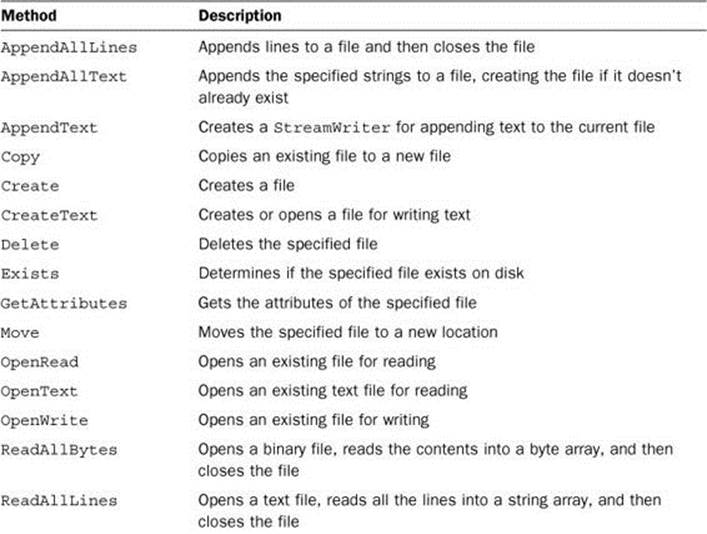
The commonly used methods of the File class are shown in Table 14.6, and Listing 14.4 shows the same operations used in Listing 14.2, but using the File class instead of the FileInfo class.
Table 14.6. Commonly Used Methods of the File Class
Listing 14.4. Using the File Class
public class FileExample
{
public static void Main()
{
string tempFile = Path.GetTempFileName();
try
{
if (!File.Exists(tempFile))
{
using (StreamWriter writer = File.CreateText(tempFile))
{
writer.WriteLine("Line 1");
writer.WriteLine("Line 2");
}
}
File.Copy(tempFile, Path.GetTempFileName());
File.Delete(tempFile);
}
catch (IOException e)
{
Console.WriteLine("An error occurred: {0}", e.Message);
}
}
}
Try It Yourself: Working with the Directory and File Classes
By following these steps, you learn how to work with the Directory and File classes. If you closed Visual Studio, repeat the previous exercise first. Be sure to keep Visual Studio open at the end of this exercise because you will use this application later.
1. Modify the code so that it calls the Exists and EnumerateDirectories methods on Directory rather than using the methods of the DirectoryInfo instance.
2. Modify the nested foreach statement to call Directory.EnumerateFiles. Because this returns a path string rather than a FileInfo, you also need to modify the statement that prints the filename and creation time to get the filename from the resulting path string and use the appropriate static method on the File class to retrieve the creation date and time.
3. Run the application using Ctrl+F5. The output should match the output generated from step 6 of the previous exercise.
Reading and Writing Data
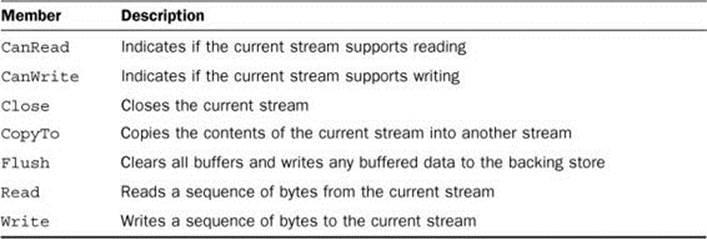
Working with the data contained in files (by either reading or writing) uses streams, represented by the Stream class. All stream-based classes provided by the .NET Framework derive from this class. The commonly used members of the Stream class are shown in Table 14.7.
Table 14.7. Commonly Used Members of the Stream Class
Binary Files
When you aren’t certain about the content of a file, it is usually best to treat it as a binary file, which is simply a stream of bytes. To read data from a binary file, you use the static OpenRead method of the File class, which returns a FileStream:
FileStream input = File.OpenRead(Path.GetTempFileName());
You can then use the Read method on the resulting FileStream to read data into a buffer that you provide. A buffer is simply an array of bytes that holds the data returned by the Read method. You pass the buffer, the number of bytes to read, and an offset into the buffer at which data then will be stored. The Read method reads the number of bytes specified from the backing store into the buffer and returns the total number of bytes actually read:
byte[] buffer = new byte[1024];
int bytesRead = input.Read(buffer, 0, 1024);
Of course, reading from a stream isn’t the only operation you can perform. Writing binary data to a stream is also a common activity and is accomplished in a similar manner. You first open a binary file for writing using the OpenWrite method of the File class and then use the Write method on the resulting FileStream to write a buffer of data to the backing store. The Write method is passed the buffer containing the data to write, the offset into the buffer at which to start reading, and the number of bytes to write:
FileStream output = File.OpenWrite(Path.GetTempFileName());
output.Write(buffer, 0, bytesRead);
Listing 14.5 shows a complete example of reading data from one binary file and writing it to another. This example continues to read and write bytes until the Read method indicates that it has read no more bytes by returning 0.
Listing 14.5. Binary Reads and Writes
public class BinaryReaderWriter
{
const int BufferSize = 1024;
public static void Main()
{
string tempPath = Path.GetTempFileName();
string tempPath2 = Path.GetTempFileName();
if (File.Exists(tempPath))
{
using (FileStream input = File.OpenRead(tempPath))
{
byte[] buffer = new byte[BufferSize];
int bytesRead;
using (FileStream output = File.OpenWrite(tempPath2))
{
while ((bytesRead = input.Read(buffer, 0, BufferSize)) > 0)
{
output.Write(buffer, 0, bytesRead);
}
}
}
}
}
}
Try It Yourself: Binary Reads and Writes
To perform binary reads and writes using the File and FileStream classes, follow these steps.
1. Open the BinaryReadWrite project in Visual Studio.
2. Open Program.cs by double-clicking the file.
3. The Main method already contains some code, including an if statement similar to the one shown in Listing 14.5. Modify the statement block of the if statement to read from the file indicated in the fileName field and write to a temporary file. Use the code shown in Listing 14.5as a guide.
4. Modify the while statement to increment the bufferCounter field after each Write.
5. Run the application using Ctrl+F5. The output should look similar to what is shown in Figure 14.3.
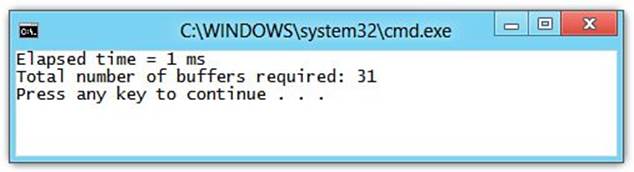
Figure 14.3. Results of performing binary reads and writes.
6. Modify the value of BufferSize and run the application again using Ctrl+F5. Observe how different values of BufferSize change the total number of buffers required.
Buffered Streams
Using the basic FileStream from the previous example, you needed to provide the buffer used for reading and the size of that buffer. In many cases, it might be more efficient for you to let the operating system determine the number of bytes to read.
The BufferedStream class enables the operating system to create its own internal buffer and fill it using whatever increments it thinks are most efficient. It still fills a buffer you provide in the increment you provide, but that buffer is filled from the internal buffer not directly from the backing store. To create a buffered stream, you construct a new BufferedStream instance from another Stream, as shown in Listing 14.6, which shows the code from the previous example using BufferedStream instances for the input and output streams.
Listing 14.6. Buffered Reads and Writes
public class BufferedReaderWriter
{
const int BufferSize = 1024;
public static void Main()
{
string tempPath = Path.GetTempFileName();
string tempPath2 = Path.GetTempFileName();
if (File.Exists(tempPath))
{
using (BufferedStream input = new
BufferedStream(File.OpenRead(tempPath)))
{
byte[] buffer = new byte[BufferSize];
int bytesRead;
using (BufferedStream output = new
BufferedStream(File.OpenWrite(tempPath2)))
{
while ((bytesRead = input.Read(buffer, 0, BufferSize)) > 0)
{
output.Write(buffer, 0, bytesRead);
}
}
}
}
}
}
Text Files
Using the Read and Write methods on the Stream class works not only for binary files but also for text files, which are files containing nothing but text data. The problem is that you read and write a byte array rather than strings, which isn’t convenient. To make working with text files easier, the .NET Framework provides the StreamReader and StreamWriter classes.
Although StreamReader provides a Read method that reads one character at a time from the backing store, it also provides a ReadLine method that reads a line of characters as a string. A line is defined as a sequence of characters followed by a line feed (“\n”), a carriage return (“\r”), or a carriage return-line feed (“\r\n”). If the end of the input stream is reached, ReadLine returns null; otherwise, it returns the line of characters, excluding the terminating characters. To write text data, you can use the WriteLine method of the StreamWriter class.
Listing 14.7 shows an example of reading and writing text data.
Listing 14.7. Reading and Writing Text Data
public class TextReaderWriter
{
public static void Main()
{
string tempPath = Path.GetTempFileName();
string tempPath2 = Path.GetTempFileName();
if (File.Exists(tempPath))
{
using (StreamReader reader = File.OpenText(tempPath))
{
string buffer = null;
using (StreamWriter writer = new StreamWriter(tempPath2))
{
while ((buffer = reader.ReadLine()) != null)
{
writer.WriteLine(buffer);
}
}
}
}
}
}
Try It Yourself: Buffered Reads and Writes
To perform text reads and writes using the File, StreamReader, and StreamWriter classes, follow these steps:
1. Open the TextReadWrite project in Visual Studio.
2. Open Program.cs by double-clicking the file.
3. The Main method already contains some code, including an if statement similar to the one shown in Listing 14.3. Modify the statement block of the if statement to read and write to the file indicated in the fileName field. Use the code shown in Listing 14.7 as a guide.
4. Modify the while statement to increment the bufferCounter field after each Write.
5. Run the application using Ctrl+F5. The output should look similar to what is shown in Figure 14.4.

Figure 14.4. Results of performing buffered reads and writes.
Reading and Writing Data Using the File Class
Because reading and writing data, whether it is text or binary, from files is a common task, the File class provides several methods that make this even more convenient than working directly with streams.
To read or write binary data, you can use the ReadAllBytes and WriteAllBytes methods, respectively. These methods open the file, read or write the bytes, and then close the file. The code shown in Listing 14.8 performs the same actions as Listing 14.5 using the ReadAllBytes andWriteAllBytes methods.
Listing 14.8. Binary Reads and Writes Using the File Class
public class BinaryReaderWriterFile
{
public static void Main()
{
string tempPath = Path.GetTempFileName();
string tempPath2 = Path.GetTempFileName();
if (File.Exists(tempPath))
{
byte[] data = File.ReadAllBytes(tempPath);
File.WriteAllBytes(tempPath2, data);
}
}
}
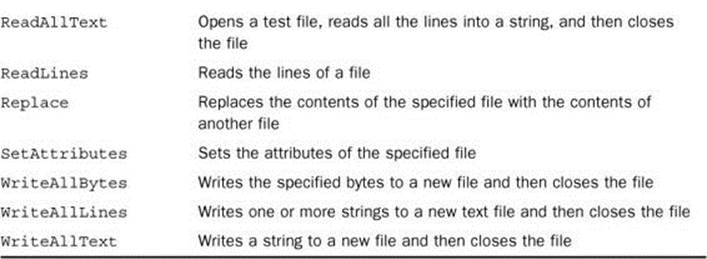
Reading and writing text data is just as easy using the ReadAllLines and ReadAllText methods for reading and the WriteAllLines and WriteAllText methods for writing. The ReadAllLines method reads all the lines from the file into a string array, where each line is a new element in the array, whereas the ReadAllText reads all the lines into a single string.
The WriteAllLines method writes each element of a string array to a file, whereas the WriteAllText method writes the contents of a string to the file. Both of these create a new file or overwrite the file if it already exists. To append text to an existing file, you can use the AppendAllLines orAppendAllText methods. If you need to open a stream, you can use the AppendText method.
The code shown in Listing 14.9 performs the same actions as Listing 14.7 using the ReadAllLines and WriteAllLines methods.
Listing 14.9. Text Reads and Writes Using ReadAllLines and WriteAllLines
public class TextReaderWriterFile
{
public static void Main()
{
string tempPath = Path.GetTempFileName();
string tempPath2 = Path.GetTempFileName();
if (File.Exists(tempPath))
{
string[] data = File.ReadAllLines(tempPath);
File.WriteAllLines(tempPath2, data);
}
}
}
The one drawback to using ReadAllLines, or even ReadAllText, is that the entire file must first be read into memory. To resolve this issue and return an IEnumerable<string> collection, you can use the ReadLines method. Because this method returns an IEnumerable<string>, you can start to enumerate the returned collection immediately, before the whole collection is returned. The code shown in Listing 14.10 performs the same actions as Listing 14.9 using the File.ReadLines method.
Listing 14.10. Text Reads and Writes Using WriteAllLines and ReadLines
public class TextReaderWriterFile
{
public static void Main()
{
string tempPath = Path.GetTempFileName();
string tempPath2 = Path.GetTempFileName();
if (File.Exists(tempPath))
{
File.WriteAllLines(tempPath, File.ReadLines(tempPath2));
}
}
}
Summary
In this hour, you learned how to work with streams to read and write text and binary files. Although you focused only on using the FileStream and StreamWriter classes, the mechanisms used for reading and writing using FileStream is essentially the same for any Stream derived class.
You also learned how the .NET Framework makes working with files, directories, and string paths simple through the File, Directory, FileInfo, DirectoryInfo, and Path classes.
Q&A
Q. What is a stream?
A. A stream is a sequential flow of packets of data represented as bytes. Data streams have an underlying storage medium, typically called a backing store, which provides a source for the stream.
Q. What is the difference between a relative path and an absolute path?
A. An absolute path fully specifies a location, whereas a relative path specifies a partial location. When using relative paths, the current location is the starting point when locating the file specified.
Q. What is the FileSystemInfo class used for?
A. The FileSystemInfo class contains methods common to file and directory manipulation and can represent either a file or directory. It is the base class for the DirectoryInfo and FileInfo classes.
Q. How is the Directory class different from the DirectoryInfo class?
A. The Directory class provides only static methods, whereas the DirectoryInfo class provides only instance methods and caches the information retrieved for the specified directory.
Q. What is the difference between a binary file and a text file?
A. A binary file is simply a stream of bytes, whereas a text file is known to contain only text data.
Workshop
Quiz
1. How do the Path class members interact directly with the file system?
2. What method should be used on a FileSystemInfo instance to update the cached information it contains?
3. What is the difference between the EnumerateDirectories method on the DirectoryInfo and Directory classes?
4. What is the return type of the File.OpenRead method?
5. What is the return type of the File.OpenText method?
6. What is the difference between the File.ReadAllLines method and the File.ReadLines method?
Answers
1. Most Path class members don’t interact with the file system; they do, however, validate that the specified path string contains valid characters.
2. The FileSystemInfo class contains a Refresh method that should be used to update the cached file or directory information.
3. The DirectoryInfo.EnumerateDirectories returns an IEnumerable<DirectoryInfo>, whereas Directory.EnumerateDirectories returns an IEnumerable<string>.
4. The File.OpenRead method returns a FileStream opened to the specified file for reading only.
5. The File.OpenText method returns a StreamReader opened to the specified text file.
6. File.ReadAllLines must read the entire file into memory and returns a string array containing the lines whereas File.ReadLines returns an IEnumerable<string> enabling you to start enumerating the collection before the entire file is read.
Exercises
1. Modify the PhotoCollection class of the PhotoViewer project by changing the data type of the path field to be a DirectoryInfo. Change the Path property so that the get accessor returns the value of the FullName property and the set accessor creates a new DirectoryInfo instance fromvalue after validating that value is not null or an empty string. Also change the constructor so that it uses the set accessor rather than setting the backing field directly.
2. Add a private method named Update to the PhotoCollection class and call it from the constructor right after the Path property is set. This method should perform the following actions:
a. Clear the collection.
b. If path.Exists is true, enumerate over all files in the directory whose extension is “.jpg” and add a new Photo instance to the collection. This code should be in a try-catch block that catches a DirectoryNotFoundException. The catch handler should contain the following code:
System.Windows.MessageBox.Show("No Such Directory");
All materials on the site are licensed Creative Commons Attribution-Sharealike 3.0 Unported CC BY-SA 3.0 & GNU Free Documentation License (GFDL)
If you are the copyright holder of any material contained on our site and intend to remove it, please contact our site administrator for approval.
© 2016-2026 All site design rights belong to S.Y.A.