Sams Teach Yourself C# 5.0 in 24 Hours (2013)
Part IV: Building an Application Using Visual Studio
Hour 18. Using Data Binding and Validation
What You’ll Learn in This Hour
• Understanding data binding
• Converting data
• Validating data
• Working with data templates
In the previous hour, you learned how to create a Windows Presentation Foundation (WPF) application and saw how WPF enables you to cleanly separate the user interface portion of an application from the business logic. You learned how to handle events raised by the user interface so that your application does something other than look nice. Although controlling user input can be accomplished through careful user interface design, it is also common to validate that input to ensure the information entered is correct. In addition to accepting and validating user input, applications typically need to display data to the user—for either informational purposes or so the user can modify the data. In WPF applications, this is most easily accomplished using data binding.
In this hour, you learn more about how to use the data-binding capabilities of WPF and how to validate user-entered data to ensure it matches the business rules specified by the application requirements.
Understanding Data Binding
The data-binding capabilities in WPF enable applications to present and interact with data in a simple and consistent manner. You can bind elements to data from a variety of sources, including common language runtime (CLR) objects and Extensible Markup Language (XML). Data binding enables you to establish a connection between user interface controls and business logic. If the data provides the necessary notifications and the binding has the necessary settings, when the data changes the user interface elements bound to it will automatically reflect those changes. In addition, data binding also enables the underlying data source to be automatically updated to reflect changes made to it through the user interface.
As shown in Figure 18.1, you can think of data binding as the bridge between a binding target and a binding source. Most bindings have the following four components:
• Binding target object
• Target property
• Binding source object
• Path to the value in the binding source object to use
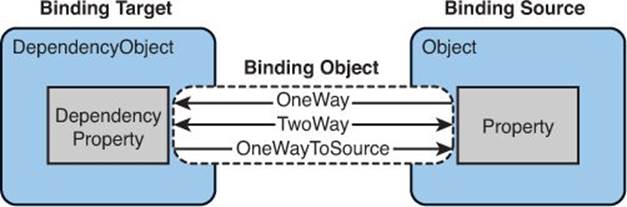
Figure 18.1. Data binding conceptual diagram.
The binding target must always be a DependencyObject, which represents an object that participates in the dependency property system. All the user interface objects provided by WPF are derived from UIElement, which, in turn, is derived from DependencyObject. The target property must also be a dependency property, which is a property backed by a DependencyProperty object. Fortunately, most UIElement properties are dependency properties and, other than read-only ones, support data binding by default.
Looking again at Figure 18.1, you can see that a binding can go from the source to the target (OneWay), the target to the source (OneWayToSource), or both (TwoWay):
• In OneWay binding, changes to the source property automatically update the target and are typically used when the control bound is implicitly read-only.
• In TwoWay binding, changes to either the source or the target property update the other and are typically used in editable forms or other fully interactive interfaces. Most properties default to OneWay binding; however, some (such as properties of user-editable controls, such as the Textproperty of a TextBox) default to TwoWay binding.
• In OneWayToSource, changes to the target property automatically update the source. You can think of this as the reverse of OneWay binding.
• There is also a OneTime binding mode, which causes the source property only to initialize the target. When this occurs, subsequent changes do not update the target.
For bindings that are TwoWay or OneWaytoSource to update the source property, they listen for changes in the target property. To know when the source should be updated, bindings use the UpdateSourceTrigger property. When the UpdateSourceTrigger value is PropertyChanged, the source property is updated as soon as the target property changes. If the value is LostFocus, the source property is updated only when the target property loses focus in the user interface. For most dependency properties, the default value for the UpdateSourceTrigger property is PropertyChanged. Some, such as the Text property of a TextBox, default to LostFocus.
Creating a Binding
In the previous hour, you wrote a photo viewer application that didn’t display any information, which isn’t actually useful. Clearly, more work is needed. If you look again at the Extensible Application Markup Language (XAML) from Listing 17.6, you will notice a group of TextBlockcontrols that don’t display any text. You could programmatically respond to the SelectionChanged event of the ListBox and set the Text property of each TextBlock, but that would be a lot of boilerplate code. A better option would to use the data-binding capabilities of WPF so that eachTextBlock can be “told” in the XAML declaration what data to display. This is done by adding a binding for the Text property, as shown:
{Binding Path=Source}
The Path property of the binding identifies the property of the source object to be displayed. Go ahead and add the appropriate bindings to each of the TextBlock controls, as shown in Listing 18.1.
Listing 18.1. Creating a Binding
<TextBlock Grid.Row="0" Grid.Column="1" Text="{Binding Path=Source}" />
<TextBlock Grid.Row="1" Grid.Column="1" Text="{Binding Path=DateTaken}" />
<TextBlock Grid.Row="2" Grid.Column="1" Text="{Binding Path=EquipmentManufacturer}" />
<TextBlock Grid.Row="3" Grid.Column="1" Text="{Binding Path=CameraModel}" />
<TextBlock Grid.Row="4" Grid.Column="1" Text="{Binding Path=CreationSoftware}" />
<TextBlock Grid.Row="5" Grid.Column="1" Text="{Binding Path=LensAperature}" />
<TextBlock Grid.Row="6" Grid.Column="1" Text="{Binding Path=FocalLength}" />
<TextBlock Grid.Row="7" Grid.Column="1" Text="{Binding Path=IsoSpeed}" />
<TextBlock Grid.Row="8" Grid.Column="1" Text="{Binding Path=ExposureTime}" />
<TextBlock Grid.Row="9" Grid.Column="1" Text="{Binding Path=ExposureMode}" />
<TextBlock Grid.Row="10" Grid.Column="1" Text="{Binding Path=ExposureCompensation}" />
<TextBlock Grid.Row="11" Grid.Column="1" Text="{Binding Path=LightSource}" />
<TextBlock Grid.Row="12" Grid.Column="1" Text="{Binding Path=ColorRepresentation}" />
<TextBlock Grid.Row="13" Grid.Column="1" Text="{Binding Path=FlashMode}" />
Up until now, you have been working with bindings to single objects. Typically, you would use an ItemsControl (such as a ListBox, ListView, or TreeView) to display collections, binding the ItemsSource property to the collection instance. By default, the ItemsSource property supports OneWaybinding. In the PhotoViewer application, you are using a ListBox that needs to show the instance of the PhotoCollection you created in the MainWindow class in Hour 10, “Working with Arrays and Collections.”
Listing 18.2 shows the XAML you could use to bind the ItemsSource property of the ListBox control and uses the empty binding syntax {Binding}, meaning that the source object has not been specified. Because this is one of the four required components of a binding, how does this work? When the binding engine encounters a binding that has not specified a source, it looks upward through the hierarchy of visual elements looking for a DataContext. When it finds a DataContext, it uses that as the binding source.
Listing 18.2. Binding the ItemsSource Property of an ItemsControl
<ListBox Name="photosListBox"
SelectionMode="Extended" SelectedIndex="0" IsSynchronizedWithCurrentItem="True"
ItemsSource="{Binding}" />
Although it appears as if you are binding the ListBox control to a collection, you are actually binding it to an implicit CollectionViewSource instance that WPF creates for you. This default view is shared by all bindings to the same collection. If you need access in the code-behind file to the default view, you can use the static CollectionViewSource.GetDefaultView() method.
Note: Creating a CollectionViewSource
You can also create a view directly in XAML using the CollectionViewSource, which is an XAML proxy of a class that inherits from CollectionView, as shown here:
<Window.Resources>
<CollectionViewSource x:Key="view"
Source="{Binding Source={x:Static Application.Current},
Path=Contacts}" />
</Window.Resources>.
This creates a new resource named view, which is bound to the Contacts property of the current application object.
A collection view is a layer over the binding source collection and enables you to navigate and display data based on sort, filter, or group queries without changing the underlying collection. Because views don’t change the underlying collection, you can create multiple views that refer to the same source, enabling you to display the same data in different ways.
The default views created for the different source collection types are shown in Table 18.1.
Table 18.1. Default Views

Caution: The Default Collection View for IEnumerable
The default collection view created when the source collection type is an IEnumerable does not support grouping items.
The code in Listing 18.3 shows how to add sorting to a collection view.
Listing 18.3. Changing the Sort Order on a View
// Clear any existing SortDescriptions that may have been added. You only need to
// do this if you are changing the sorting.
view.SortDescriptions.Clear();
// Add a new sort which will sort the LastName property ascending.
var sortDescription = new SortDescription("LastName", ListSortDirection.Ascending);
view.SortDescriptions.Add(sortDescription);
Note: The SortDescription Structure
The propertyName parameter of the SortDescription structure supports referencing nested properties through a “dot” notation. For example, to create a SortDescription for a Contact.PhoneNumber.Extension property, you would use the string PhoneNumber.Extension for thepropertyName parameter value.
When you are sorting on a property whose data type is an enumeration, the order of the items is the same as in the enumeration declaration.
All collection views, except for the internal class used for viewing IEnumerable collections, support grouping capabilities, enabling the user to partition the data into logical groups. Groups can be explicit, in which case they are determined by the user, or implicit, in which case they aregenerated dynamically based on the data. The code in Listing 18.4 shows how to add grouping to a collection view.
Listing 18.4. Adding Grouping to a View
// Clear any existing GroupDescriptions that may have been added.
view.GroupDescriptions.Clear();
var groupDescription = new PropertyGroupDescription("LastName");
view.GroupDescriptions.Add(groupDescription);
Filtering changes the data displayed by the view without changing the underlying collection. Think of filtering as generating subsets of data. Filtering involves the use of a delegate to perform the actual filtering. For example, the delegate needed to filter a collection of Contact instances to display only those contacts whose last name starts with the letter D is shown in Listing 18.5.
Listing 18.5. Method Used for Filtering
private void NameFilter(object sender, FilterEventArgs e)
{
Contact contact = e.Item as Contact;
if (contact != null)
{
e.Accepted = contact.LastName.StartsWith("D");
}
else
{
e.Accepted = false;
}
}
If you use one of the CollectionView classes directly, you would set the callback using the Filter property. However, if you use a CollectionViewSource, you need to add the event handler, as shown here:
view.Filter += new FilterEventHandler(NameFilter);
Note: Implementing Collections
If you want a collection to be usable by the data-binding engine so that insertions or deletions automatically update the UI elements, the collection must implement the System.Collections.Specialized.INotifyCollectionChanged interface. This interface defines theCollectionChanged event that should be raised whenever the collection changes.
To fully support transferring values, each object in the collection that supports bindable properties must also implement the INotifyPropertyChanged interface, which defines a single public event: the PropertyChanged event. Any property that should notify when its value has changed would raise the OnPropertyChanged method.
The .NET Framework provides the ObservableCollection<T> class, which already implements both the INotifyCollectionChanged and the INotifyPropertyChanged interfaces. Unless you have an advanced scenario and want to implement your own collection for use in data binding, you should consider using ObservableCollection<T>.
At this point, you have created bindings for all of the TextBlock controls to display the selected image’s information, but you still need to provide a binding that will set the DataContext of the metadataPanel Grid. To do this, you need to modify the Grid definition so that it looks like the following:
<Grid x:Name="metadataPanel" DataContext="{Binding Items.CurrentItem,
ElementName=photosListBox, Mode=OneWay}">
If you haven’t already added the binding shown in Listing 18.2, go ahead and add it now. Because this binding uses the empty binding syntax, you will need to programmatically set DataContext to an object that has already been instantiated. You can do this by modifying the App.xaml file so that it looks like the code shown in Listing 18.6.
Listing 18.6. Application XAML
<Application x:Class="PhotoViewer.App"
xmlns="http://schemas.microsoft.com/winfx/2006/xaml/presentation"
xmlns:x="http://schemas.microsoft.com/winfx/2006/xaml"
Startup="OnApplicationStartup">
<Application.Resources>
</Application.Resources>
</Application>
Then, in the App.xaml.cs, add the event handler method, as shown in Listing 18.7.
Listing 18.7. The OnApplicationStartup Event Handler
void OnApplicationStartup(object sender, StartupEventArgs args)
{
MainWindow mainWindow = new MainWindow();
mainWindow.Show();
this.MainWindow.DataContext = mainWindow.Photos;
}
Note: Current Item Pointers
Because WPF always binds to a collection using a view, all bindings to collections have a current item pointer. This is true whether you use the collection’s default view or you specify your own view. Sorting operations preserve the current item pointer on the last item selected, but the collection view is restructured around it.
For example, if the selected item were at the beginning of the list before sorting, it might be somewhere in the middle of the list afterward. If a filter is applied and the selected item remains in the view after the filtering has occurred, it continues to be the selected item; otherwise, the first item of the filtered view becomes the current item. The slash (/) character in a Path value indicates the current item of the view. Some sample bindings, which assume the data context is a collection view, are shown here:
<!-- Bind to the entire collection. -->
<Label Content="{Binding}" />
<!-- Bind to the current item. -->
<Label Content="{Binding Path=/}" />
<!-- Bind to the LastName property of the current item. -->
<Label Content="{Binding Path=/LastName}" />
When elements, such as a Label, that do not support an ItemsSource property are bound to a collection view, they automatically bind to the current item of that view. CollectionViewSource objects automatically synchronize the currently selected item, but if the ItemsControlwere not bound to a CollectionViewSource, you would need to set the IsSynchronizedWithCurrentItem property to true for this to work.
As you might imagine, the current item pointer is also useful for creating master-detail style bindings in which one section of the user interface shows the entire collection, perhaps in a summary or condensed manner, and another shows the full details of the current item.
Converting Data
If you run the application, you may notice that some of the photo details do not look as user friendly as they could. For example, the exposure time displays as a decimal value and any of the metadata details backed by enumerations simply show the named value. The data-binding capabilities in WPF enable you to change, or convert, the value from one side of the binding to something the other side of the binding can accept. Figure 18.2 shows how data conversion fits into the binding picture.
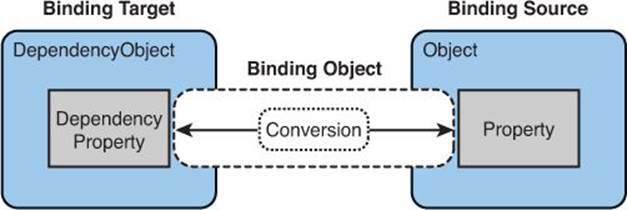
Figure 18.2. Data conversion conceptual diagram.
Although WPF provides many standard default converters (for example, to convert between a Color and a Brush), there are times when it is necessary to create your own converter:
• The data needs to be displayed differently based on culture, such as currency or calendar date/time values.
• The data needs to be displayed differently than it is stored to make it more readable, such as displaying decimal values as fractions.
• The data is bound to multiple controls or multiple properties of controls and each needs to display the data in a different way.
• The data used is intended to change some other value, such as an image source or text style.
To create your own converter, you implement the IValueConverter interface. The Convert method performs data conversion from source to target, whereas the ConvertBack method performs data conversion from target to source.
Listing 18.8 shows a custom converter for the exposure time that converts between a decimal value and a string value showing the decimal represented as a fraction.
Listing 18.8. Exposure Time Converter
public class ExposureTimeConverter : IValueConverter
{
public object Convert(object value, Type targetType, object parameter,
CultureInfo culture)
{
object result = DependencyProperty.UnsetValue;
if (value != null)
{
decimal exposure = (decimal)value;
if (exposure > 0)
{
exposure = Math.Round(1 / exposure);
result = String.Format("1/{0} sec.", exposure.ToString());
}
}
return result;
}
public object ConvertBack(object value, Type targetTypes, object parameter,
CultureInfo culture)
{
object result = DependencyProperty.UnsetValue;
if (value != null)
{
string temp = ((string)value).Substring(2);
decimal exposure = Decimal.Parse(temp);
if (exposure > 0)
{
result = (1 / exposure);
}
}
return result;
}
}
When you have created the converter, you can add it as a resource in the XAML file, as shown here. This assumes an XML namespace local that maps to the CLR namespace in which ExposureTimeConverter is defined:
<local:ExposureTimeConverter x:Key="exposureTimeConverter" />
Finally, you can use the converter in your own bindings by adding it to the binding in the XAML. The following shows the binding for the exposure time Label using the new converter:
{Binding Path=ExposureTime, Converter={StaticResource exposureTimeConverter }}
A converter that implements IValueConverter can convert only a single value. Although this is sufficient for many converters, it is sometimes necessary to produce a final value from multiple source properties, or even multiple source objects. For example, if you wanted to display the x and y coordinates of a point in the standard mathematical representation of (x, y) you would need to use a multivalue converter. Listing 18.9 shows an example of a multivalue converter. In a production application, you should ensure that the conversions are robust in the face of exceptions. To keep the example simple, this exception handling code has been omitted.
Listing 18.9. Size Multivalue Converter
public class CoordinatesConverter : IMultiValueConverter
{
public object Convert(object[] values, Type targetType, object parameter,
CultureInfo culture)
{
if (values[0] == null || values[1] == null)
{
return String.Empty;
}
else if (values[0] == DependencyProperty.UnsetValue ||
values[1] == DependencyProperty.UnsetValue)
{
return String.Empty;
}
else
{
return String.Format("({0},{1})", values[0], values[1]);
}
}
public object[] ConvertBack(object value, Type[] targetTypes, object parameter,
CultureInfo culture)
{
string temp = value as String;
if (String.IsNullOrWhiteSpace(temp))
{
return new object[2];
}
else
{
temp = temp.Replace("(", "").Replace(")", "");
string[] sSize = new string[2];
sSize = ((string)value).Split(',');
object[] size = new object[2];
size[0] = UInt32.Parse(sSize[0]);
size[1] = UInt32.Parse(sSize[1]);
return size;
}
}
}
Adding a multivalue converter as a resource in XAML is done the same way as for a single-value converter; however, using it as part of a binding is different. Rather than using a simple binding, as you have been doing, you need to use a MultiBinding instead. A MultiBinding enables you to bind a property of the target to a list of source properties and get back a single value. Because a MultiBinding is made up of individual Binding elements, each binding can have its own converters if necessary.
Listing 18.10 shows how to use the CoordinatesConverter in XAML.
Listing 18.10. Using a Multivalue Converter
<TextBlock>
<TextBlock.Text>
<MultiBinding Converter="{StaticResource coordinatesConverter}">
<Binding Path="xValue"/>
<Binding Path="yValue"/>
</MultiBinding>
</TextBlock.Text>
</TextBlock>
The order in which the individual Binding elements appear in the MultiBinding is the order those values are stored in the array passed to the Convert method.
Converters, whether they are single or multivalue, are culture aware. The Convert and ConvertBack methods both have a culture parameter that can be used to change the conversion based on cultural information.
The Convert and ConvertBack methods also have a parameter named parameter, which can be used to change the conversion. This parameter enables the flexibility of using a single converter that can produce different formats based on the value of the converter parameter argument.
Caution: The ConverterParameter Property
The ConverterParameter property of a MultiBinding is not a DependencyProperty, so you can’t bind it. If you need an IMultiValueConverter to behave differently based on the value of some other source property, you need to find an alternative way of providing that value. One simple option is to include that value as the last binding element in the list.
Validating Data
If your application accepts user input, and most do, you probably have a need to validate that input against business rules to ensure the user entered the expected information. These validation checks can be based on type, range, format, or some other application-specific requirements and are part of the data-binding engine.
To add validation checks, you need to add one or more validation rules to the ValidationRules collection of the Binding, as shown in Listing 18.11.
Listing 18.11. Associating ValidationRules with a Binding
<TextBox Name="PhoneNumber">
<TextBox.Text>
<Binding Path="LastName" UpdateSourceTrigger="PropertyChanged">
<Binding.ValidationRules>
<ExceptionValidationRule />
</Binding.ValidationRules>
</Binding>
</TextBox.Text>
</TextBox>
As you can see, the ValidationRules property takes a collection of ValidationRule objects. The ExceptionValidationRule is a built-in validation rule that checks for exceptions thrown during the update of the binding source. If the source object implements the IDataError interface, you can use the built-in DataErrorValidationRule to check for errors raised by the IDataError implementation.
Note: ValidatesOnException and ValidatesOnDataErrors
As an alternative to explicitly including the ExceptionValidationRule, you can set the ValidatesOnExceptions property to true. Similarly, you can set the ValidatesOnDataErrors property to true rather than explicitly including the DataErrorValidationRule.
To provide your own application-specific validation rules, you derive a new class from the ValidationRule class and implement the Validate method. Listing 18.12 shows a validation rule for the AddressBook application that can validate phone numbers.
Listing 18.12. A Custom ValidationRule
class PhoneNumberValidationRule : ValidationRule
{
public override ValidationResult Validate(object value, CultureInfo cultureInfo)
{
string stringValue = value.ToString();
string pattern = @"^[2-9]\d{2}-\d{3}-\d{4}$";
if (String.IsNullOrWhiteSpace(stringValue) ||
Regex.IsMatch(stringValue, pattern))
{
return ValidationResult.ValidResult;
}
else
{
return new ValidationResult(false, "Value is not a valid phone number.");
}
}
}
Caution: The UpdateSourceTrigger Property
When the UpdateSourceTrigger value is PropertyChanged, as it is in Listing 18.12, the binding engine updates the source value on every keystroke. This also means that every rule in the ValidationRules collection will be checked on every keystroke.
Although determining that the user has entered an invalid value is the primary use for data validation, you can also provide visual feedback that the value is invalid. To do this, you should first define a ControlTemplate, which defines the visual and structural appearance of the control. For example, Listing 18.13 defines a ControlTemplate that places a reddish-colored asterisk symbol in front of the control containing the error.
Listing 18.13. A Custom ControlTemplate
<ControlTemplate x:Key="validationTemplate">
<DockPanel>
<TextBlock Foreground="FireBrick" FontSize="18">*</TextBlock>
<AdornedElementPlaceholder />
</DockPanel>
</ControlTemplate>
The AdornedElementPlaceholder element indicates where the actual control containing the error will be placed.
To use this ControlTemplate, you set the Validation.ErrorTemplate property of the UIElement to a custom ControlTemplate, as shown in Listing 18.14.
Listing 18.14. Setting the Validation.ErrorTemplate Property
<TextBox Name="PhoneNumber"
Validation.ErrorTemplate="{StaticResource validationTemplate}">
<TextBox.Text>
<Binding Path="PhoneNumber"
UpdateSourceTrigger="PropertyChanged">
<Binding.ValidationRules>
<ExceptionValidationRule />
<local:PhoneNumberValidationRule />
</Binding.ValidationRules>
</Binding>
</TextBox.Text>
</TextBox>
If you don’t specify an ErrorTemplate, a default template will be used. This default template defines a red border around the adorned control.
Working with Data Templates
At the end of the last hour, you learned how to style your application by completely changing how a control looks. These visual styles change only the appearance of the control; they do not specify how that control visualizes data. To change how data is visualized by a control, you use aDataTemplate. This is particularly useful when binding an ItemsControl, such as a ListBox, to a collection.
Without a DataTemplate, the ItemsControl calls ToString when trying to display the objects in the collection. Although you could override ToString to provide a meaningful string representation, that isn’t always the best approach (or might not be possible). The solution is to define aDataTemplate, which enables you to change the visual structure used by the ItemsControl to display the data.
Listing 18.15 shows the DataTemplate used by the PhotoViewer application so that the ListBox control displays a thumbnail of the image instead of the filename.
Listing 18.15. Defining a DataTemplate
<DataTemplate DataType="{x:Type local:Photo}">
<Grid Width="190" Height="130">
<Border Width="190" Height="130">
<Image Source="{Binding Image}" Stretch="None" Width="190" Height="130" />
</Border>
</Grid>
</DataTemplate>
In this case, the DataTemplate specified a value for the DataType property. This is similar to the TargetType property of a Style and indicates that the DataTemplate should be used by any control displaying an object of that type.
You could also have specified the x:Key property, in which case you would need to explicitly associate the template with the control. Listing 18.16 shows such an association, assuming the DataTemplate has an x:Key property whose value is photoTemplate.
Listing 18.16. Associating a DataTemplate
<ListBox
ItemsSource="{Binding}"
ItemTemplate="{StaticResource photoTemplate}" />
Summary
In this hour, you learned about data binding in WPF and added bindings to the PhotoViewer application to make it more complete. As part of this, you learned how collection views enable you to sort, group, or filter your data without affecting the underlying collection. From there, you learned how data converters can change the value from one side of the binding to something the other side of the binding will accept. You learned how validation works with data binding by using a custom validation rule. Finally, you learned that data templates enable you to change the structural representation of how a control displays data, which is particularly useful when binding to collections.
Q&A
Q. What are the four components of a binding?
A. A binding is made up of a binding target object, a target property, a binding source object, and a path to the value in the binding source object.
Q. What is a OneWayToSource binding?
A. A OneWayToSource binding changes the source property automatically whenever the target property changes.
Q. What is a data converter?
A. A data converter is a class that implements either IValueConverter or IMultiValueConverter and enables you to convert a value between different values going in either direction through a binding.
Q. Why are collection views useful?
A. Collection views enable you to create multiple independent views over the same source collection, which can be filtered, grouped, or sorted without affecting the underlying collection.
Q. What is a data template used for?
A. A data template enables you to change how data is displayed by a control.
Q. Does WPF provide any built-in validation rules?
A. Yes, WPF provides the ExceptionValidationRule, which checks for exceptions thrown during the update of the binding source, and the DataErrorValidationRule to check for errors raised by a control that implements the IDataError interface.
Workshop
Quiz
1. What happens when the binding engine encounters a binding that has not specified a source?
2. Can the ConverterParameter property of a MultiBinding get its value from another binding?
3. Does WPF bind directly to collections?
4. What class do you inherit from to provide custom validation rules?
5. What is the AdornedElementPlaceholder element in a control template?
Answers
1. When the binding engine encounters a binding that has not specified a source, it looks upward through the hierarchy of visual elements looking for a DataContext. When it finds a DataContext, it uses that as the binding source.
2. Because the ConverterParameter property of a MultiBinding is not a DependencyProperty, you can’t bind it.
3. Even though you might specify a binding directly to a collection, WPF actually binds to the default CollectionView for that collection.
4. To provide a custom validation rule, you must derive from ValidationRule.
5. The AdornedElementPlaceholder element in a control template indicates where the control being adorned will be placed.
Exercises
1. Modify the bindings for the lens aperture, focal length, exposure time, and exposure mode to include the appropriate converters. To do this, you will need to add the converters as resources to the Resources.xaml file and then update the bindings appropriately. If you haven’t already added the other bindings shown in Listing 18.1, do so now as well. In addition, if you haven’t already done so, modify the ListBox control to include the binding shown in Listing 18.2, add a binding to set the DataContext of the metadataPanel Grid, and implement theOnApplicationStartup event, as shown in Listings 18.6 and 18.7. Finally, add the data template shown in Listing 18.15 to the Resources.xaml file.
2. Create a new WPF application and add a class that implements the custom validation rule shown in Listing 18.12. Modify the MainWindow.xaml to replace the Grid control with the following StackPanel control:
<StackPanel>
<TextBlock Text="Enter a phone number:" />
<TextBox x:Name="phoneNumber">
<TextBox.Text>
<Binding Path="PhoneNumber" UpdateSourceTrigger="PropertyChanged">
<Binding.ValidationRules>
<local:PhoneNumberValidationRule />
</Binding.ValidationRules>
</Binding>
</TextBox.Text>
</TextBox>
</StackPanel>
Add a new class named DataSource that implements a simple string auto property named PhoneNumber and assign an instance of that class to the DataContext of the MainWindow. You can do this in the MainWindow constructor with the following code:
this.DataContext = new DataSource();
All materials on the site are licensed Creative Commons Attribution-Sharealike 3.0 Unported CC BY-SA 3.0 & GNU Free Documentation License (GFDL)
If you are the copyright holder of any material contained on our site and intend to remove it, please contact our site administrator for approval.
© 2016-2026 All site design rights belong to S.Y.A.