Sams Teach Yourself C# 5.0 in 24 Hours (2013)
Part IV: Building an Application Using Visual Studio
Hour 19. Building Windows Store Apps
What You’ll Learn in This Hour
• Understanding the Windows Runtime
• What’s a Windows Store app?
• Working asynchronously
• Building an app
Similar to Windows Phone, apps are at the center of the Windows 8 user experience. Although Windows 8 can run traditional desktop style applications (like the one you developed in Hour 17, “Building a Windows Application”), the real app potential lies in the new Windows Store apps. These apps immerse the user in a full-screen experience where they can concentrate on the content rather than on the operating system.
Visual Studio 2012 allows you to use your existing development skills to create Windows Store apps. If you prefer web development, you can continue to use your HTML5, CSS3, and JavaScript skills. For desktop developers who are familiar with the .NET Framework or Silverlight, you can continue to use your Extensible Application Markup Language (XAML), C#, and Visual Basic skills. You can also leverage the power of DirectX 11 for games and other graphics-intensive apps.
Caution: Visual Studio Express for Windows 8
If you use Visual Studio Express for Windows Desktop or Visual Studio Express for Web, you cannot build Windows Store apps. Instead, you need to install Visual Studio Express for Windows 8. If you use one of the paid editions of Visual Studio, you already have everything you need to build Windows Store apps.
In this hour, you learn what a Windows Store app is and how to build a basic app using XAML and C#. As part of this, you will be introduced to the Windows Runtime and the async pattern available in C#.
Understanding the Windows Runtime
The Windows Runtime is a set of application programming interfaces (APIs) used to build Windows Store apps and is available to all of the supported programming languages. To build a Windows Store app, you can only use the Windows Runtime APIs; however, if you are building a traditional desktop application, you can access a subset of the Windows Runtime API in addition to the standard Win32 and .NET APIs.
Even though the .NET Framework is already a sandboxed API, you can think of Windows Runtime as being an even smaller sandbox. The APIs were designed specifically to help you create Windows Store apps that focus on content rather than chrome; they are power conscious because most Windows Store apps will be running on a laptop, slate, or tablet. To support these considerations, Windows Runtime presents a simple programming model and only provides access to certain parts of the underlying operating system. In addition to the sandboxing provided by Windows Runtime, all of the APIs are designed to be asynchronous. This was done to help ensure that an app isn’t able to drain battery power by waiting for a long-running task to complete and that the app always stays responsive to user input.
It is important to understand that Windows Runtime and the .NET Framework are not synonymous with each other and one is not replacing the other. When you build a Windows Store app using C# and the .NET Framework, you are using a subset of managed types called .NET for Windows Store apps. This subset allows you to create Windows Store apps in C# without needing to jump through a lot of hoops to get the job done. Any of the .NET Framework types that aren’t related to developing a Windows Store app are not exposed as part of that subset. Because the .NET APIs for Windows Store apps was designed with the sole focus of developing Windows Store apps, the following are not exposed:
• Types and members that aren’t related to developing Windows Store apps (such as the Console class and the ASP.NET types)
• Obsolete and legacy types
• Types that overlap with those provided by the Windows Runtime
• Types and members that wrap operating system capabilities (such as System.Diagnostics.EventLog)
• Members that tend to be confusing
Ordinarily you shouldn’t notice any difference when using a .NET Framework type or a Windows Runtime type except for the namespace. The .NET Framework types are in namespaces that all start with System, whereas the Windows Runtime types are in namespaces that start with Windows. The Windows Runtime together with .NET for Windows Store apps provide the complete set of types and members required for developing Windows Store apps.
What’s a Windows Store App?
Put simply, a Windows Store app has a single chromeless window that fills the entire screen, as seen in Figure 19.1. Although these types of apps are common on mobile devices (just look at any Windows Phone), they are new for Windows. By keeping the user’s focus on the content, there are no distractions for the user.
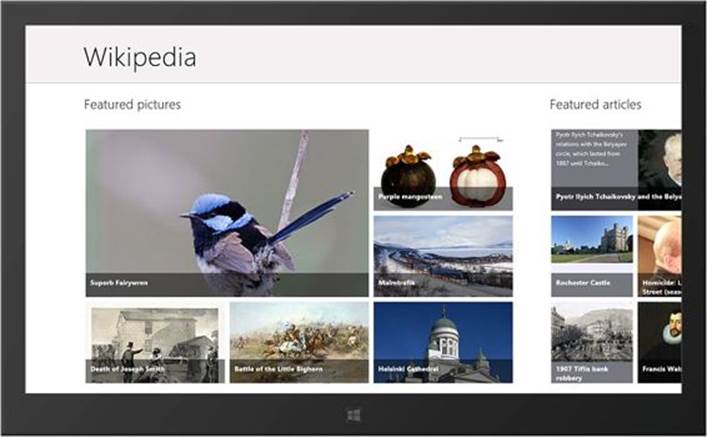
Figure 19.1. A Windows Store app.
Windows Store apps can also support either Portrait or Landscape views as well as a smaller “Snap” view, as shown in Figure 19.2.
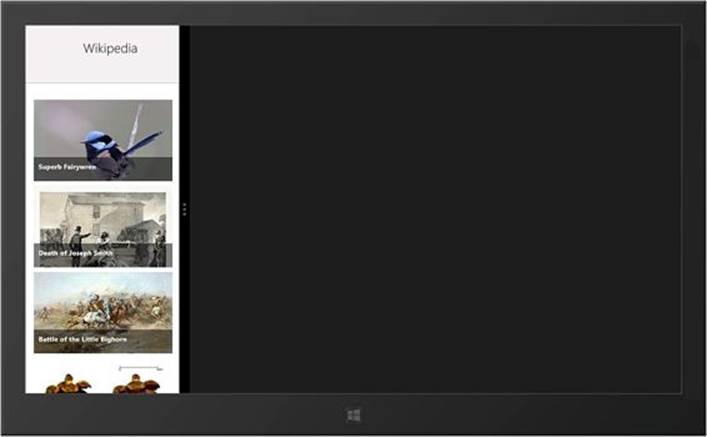
Figure 19.2. A Windows Store app in Snap view.
These apps are designed to work with touch, pen, mouse, and keyboard input and the Windows Runtime provides a single set of events that works for all of the different input sources.
To help make it easier to create a great user experience, Windows Store apps provide several new controls, including the app bar and charms, as shown in Figure 19.3. The app bar provides the primary command area for your app and can be used to present navigation, commands, and tools to the user. Normally hidden, it appears when the user swipes a finger from the top or bottom edge of the screen. Charms provide a consistent set of buttons available in every app that allows the user to do the following:
• Search in your app or in another app, including the ability to search your app’s content from another app.
• Share content from your app.
• Go to the Start screen.
• Connect to devices to send content, stream media, and print.
• Access settings to configure your app.
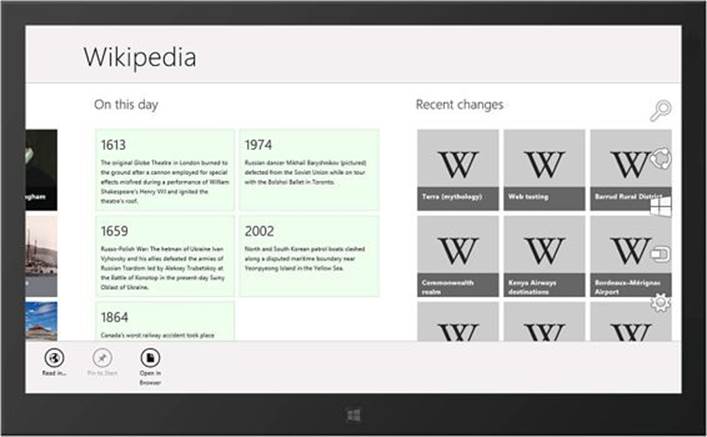
Figure 19.3. The app bar and charms.
Searching and sharing make use of app contracts, allowing you to not worry (or know anything) about the target app other than its support for the target contract.
Unlike traditional desktop applications that can be obtained from virtually anywhere, Windows Store apps can only be obtained through the Windows Store. This means that any Windows Store app you create must be submitted to the Store where it is reviewed and certified by Microsoft before being made available.
Note: Enterprise Access to Windows Store
To fully support enterprises, it is possible to control access to the Windows Store and allow applications to be deployed directly to the computers they manage without going through the Windows Store infrastructure. This process is commonly called sideloading.
This model is similar to the Marketplace used by Windows Phone. By limiting distribution to the Windows Store, users have a single, trusted location to find apps and Microsoft certifies that those apps will run both on Intel-based Windows 8 Pro devices and ARM-based Windows RT devices.
Tip: Write Once, Run on Multiple Devices?
At the time this book went to press, Windows Store apps were only able to run on Windows 8 Pro and Windows RT devices. However, the next release of Windows Phone will share the same operating system kernel as Windows 8. This means that it is likely that apps written using the Windows Runtime will be easily ported to Windows Phone 8. If you want an app that can reach the broadest possible audience on the most number of devices, you should consider building it as a Windows Store app.
Working Asynchronously
You learned earlier that all of the APIs in the Windows Runtime were designed to be used asynchronously, but what does that really mean? Asynchrony is a natural occurrence in humans and is what allows us to process input from multiple sources simultaneously while still being responsive to the world around us. As a result, we expect apps to behave the same way. Using asynchronous programming, you can indicate areas of your code where potentially long-running tasks are suspended while other parts of your program continue, thereby avoiding potential bottlenecks and enhancing the overall responsiveness of your application.
This ability is important for activities such as accessing the web. If such an activity is blocked within a synchronous process, the entire program is blocked; however, in an asynchronous process, the program can continue making progress in other areas while waiting for the blocking task to finish. It is even more important for providing a fast and fluid user interface. Typically, all user interface-related activity shares a single thread; if one process is blocked, all are blocked and your user interface will appear to “freeze.”
Tip: Asynchrony and Threads
Asynchronous methods are intended to be nonblocking operations, meaning that they don’t block the current thread while it is running. Because an asynchronous method doesn’t run on its own thread, it doesn’t require multithreading. Instead, the method runs on the current synchronization context, using time on the thread only when it’s active.
Although asynchronous programming has always been possible, it has been difficult to get right and, as a result, was typically avoided. The code shown in Listing 19.1 is very straightforward. The logic and intent are clear: This is a method that downloads a set of uniform resource locators (URLs) to total their size and displays progress messages as it works.
Listing 19.1. A Simple Synchronous Method
private int TotalPageSizes(IList<Uri> collection)
{
int total = 0;
foreach(var uri in collection)
{
statusText.Text = String.Format("Found {0} bytes ...", total);
using (var content = new MemoryStream())
{
var request = WebRequest.CreateHttp(uri);
using (var response = request.GetResponse())
{
response.GetResponseStream().CopyTo(content);
}
total += content.ToArray().Length;
}
}
statusText.Text = String.Format("Found {0} total bytes.", total);
return total;
}
To make this code asynchronous using traditional methods, you would need code that looks similar to that shown in Listing 19.2.
Listing 19.2. A Traditional Asynchronous Method
private void TotalPageSizesAsync(IList<Uri> collection,
Action<int, Exception> callback)
{
TotalPageSizeAsyncHelper(collection.GetEnumerator(), 0, callback);
}
private void TotalPageSizeAsyncHelper(IEnumerator<Uri> enumerator, int total,
Action<int, Exception> callback)
{
try
{
if (enumerator.MoveNext())
{
statusText.Text = String.Format("Found {0} bytes ...", total);
using (var content = new MemoryStream())
{
var request = WebRequest.CreateHttp(enumerator.Current);
using (var response = request.GetResponse())
{
response.GetResponseStream().CopyTo(content);
}
total += content.ToArray().Length;
}
}
else
{
statusText.Text = String.Format("Found {0} total bytes.", total);
enumerator.Dispose();
callback(total, null);
}
}
catch (Exception ex)
{
enumerator.Dispose();
callback(0, ex);
}
}
Although the code shown in Listing 19.2 is functionally equivalent to that of Listing 19.1, it required a lot of changes to expand the foreach statement and propagate all of the exception. In fact, it’s unlikely that we got everything correct and we have lost the ability to quickly look at the code and easily understand what it does.
Note: The Async Pattern Isn’t Just for Windows Store Apps
Although the async pattern will be most frequently used in Windows Store apps, it is actually defined in the C# language and supported by the compiler. This means that you can, and should, also use this pattern in your traditional desktop applications to ensure that they are responsive as well.
To help simplify the task of creating and consuming asynchronous methods, a new, simplified approach was introduced using the async and await keywords. This approach makes it easier to write, understand, and maintain asynchronous code. The difficult work (that you used to do) is now done by the compiler. You can now write asynchronous code in much the same way as you would write synchronous code.
The async modifier lets the compiler know that the method, lambda expression, or anonymous method it modifies is asynchronous and that suspension (or await) points can be designated with the await operator. To suspend execution of the method (commonly called an async method), you apply an await operator to a particular task. Execution control is then returned to the caller of the async method while the task completes its work. This is accomplished without exiting from the async method, which also means that no finally blocks are executed. Although async methods typically contain one or more await operators, they don’t have to. In such a case, the method operates as if it were a synchronous method, although the compiler will issue a warning.
Note: Asynchronous Naming Convention
Numerous asynchronous methods are available in the .NET Framework and the Windows Runtime. By convention, the suffix "Async" is added to the names of these methods to distinguish them from their synchronous counterparts (if available) but to make it clear that it is an asynchronous method.
If an event, base class, or interface suggests a different name, you can make exceptions to this naming convention. For example, renaming an event handler for a button click wouldn’t necessarily make sense.
The async version of this method is shown in Listing 19.3 and is almost identical to the original synchronous method.
Listing 19.3. A Simple Async Method
private async Task<int> TotalPageSizesAsync(IList<Uri> collection)
{
int total = 0;
foreach (var uri in collection)
{
statusText.Text = String.Format("Found {0} bytes ...", total);
using (var content = new MemoryStream())
{
var request = WebRequest.CreateHttp(uri);
using (var response = await request.GetResponseAsync())
{
await response.GetResponseStream().CopyToAsync(content);
}
total += content.ToArray().Length;
}
}
statusText.Text = String.Format("Found {0} total bytes.", total);
return total;
}
In fact, the changes are simple enough to list:
• Add the async modifier to the method signature and change the return type to Task<int>.
• Add the "Async" suffix to the method name.
• Replace the call to GetResponse with GetResponseAsync and apply the await operator.
• Replace the call to CopyTo with CopyToAsync and apply the await operator.
Probably the most significant change made was to the return type. An async method always has a return type of void, Task, or Task<T>. A void return type is primarily used to define event handlers and such a method cannot be awaited. Similarly, if no meaningful value is returned when the method completes, you should use Task as the return type. In effect, you are saying that the method returns a Task, but when that task is completed, any awaiting expression evaluates to void. If the return type is Task<T>, you should think of this as indicating that the method is promising to return a type T when any awaiting expressions are evaluated.
Building an App
Although the concepts presented in Hour 17 focused on building a traditional desktop application using Windows Presentation Foundation (WPF), almost everything you learned about working with markup and code-behind, how the WPF layout system works, and how to create data-bound applications, also applies to a Windows Store app. In fact, even though Windows Store apps don’t use WPF, they do still use XAML for the user interface definition. This allows you to use many of the same UI types; those types are located in the Windows.UI.Xaml namespaces instead of theSystem.Windows namespaces. In the rest of this hour, you create a Windows Store photo viewer application that is similar to the one you created in Hour 17.
Just as for Hour 17, a Visual Studio project is provided in the book downloads that will serve as the starting point for the Windows Store photo viewer application. However, if you want to create a new Windows Store project, you would use the New Project dialog box, as shown in Figure 19.4.
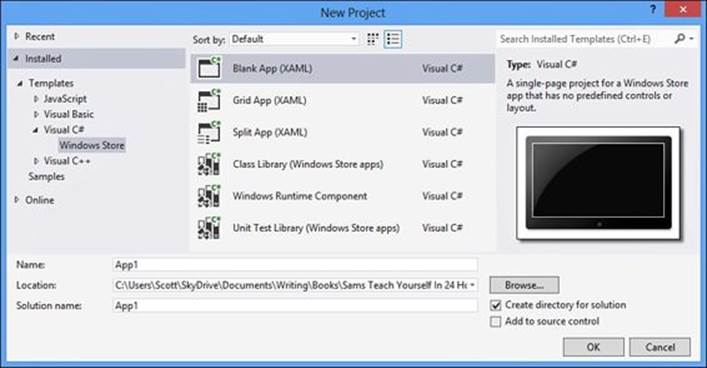
Figure 19.4. New Project dialog box.
If you compare the initial code for the MainPage.xaml.cs for this project with that of the starting project for Hour 17, you will see that there are only minor differences.
Creating the Layout
You are now ready to start creating the layout for the photo viewer application. Although Windows applications and Windows Store applications both use XAML, there are some differences in the user interface controls available to you. These differences alone will most likely prevent you from simply reusing the XAML from a WPF application. Even if you were able to reuse the XAML, you may want to consider changing the user interface interactions because Windows Store apps are designed to be touchcentric and many actions the user would perform in a desktop application may not make sense (or be very cumbersome) in a touchcentric tablet.
Note: User Interface Considerations for Windows Store Apps
Developing a Windows Store app is actually very similar to developing a Windows Phone app, and not just because they both use the Windows 8 design language. The same usability concerns that need to be addressed when developing a Windows Phone app should also be addressed when developing a Windows Store app.
The completed Windows Store photo viewer app is shown in Figure 19.5. As you can see, the majority of the layout between the desktop application and the Windows Store application is the same. Because the desktop application UI controls were chosen so that much of the XAML would be reusable, it can serve as a starting point for the Windows Store app as well.
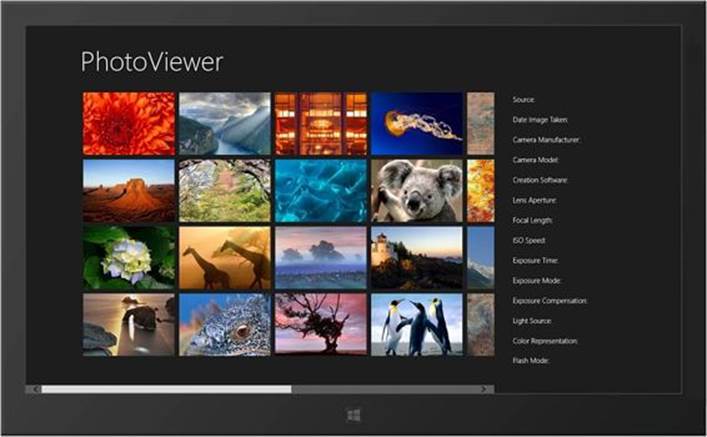
Figure 19.5. The Windows Store Photo Viewer app.
Caution: Porting a Desktop Application to a Windows Store App
Although an XAML-based desktop application and a Windows Store app can share much of the same XAML definitions for the user interface components, due to the differences between the .NET Framework and .NET for Windows Store apps it will not always be possible to reuse the same back-end code for the business logic.
To start creating the Windows Store photo viewer app, copy the Grid content from the MainPage.xaml file in the desktop project and paste it as the Grid content for the Windows 8 project’s MainPage.xaml. Although a lot of the XAML can be reused, there are still a few changes to make before the layout is complete and the project will compile:
1. Add a new RowDefinition whose Height is 140. Make sure this new row is the first row of the Grid.
2. Add a new TextBlock control using the following XAML:
<TextBlock x:Name="pageTitle" Grid.Row="0" Grid.Column="0" Grid.ColumnSpan="2"
Text="{StaticResource AppName}"
Style="{StaticResource PageHeaderTextStyle}"
Margin="0,-4,0,0" Padding="116,0,40,46"/>
3. Because DockPanel and GridSplitter are not supported by the Windows Runtime, you will need to replace them with the following GridView control:
<GridView
x:Name="itemGridView"
AutomationProperties.AutomationId="ItemGridView"
AutomationProperties.Name="Items"
Grid.Row="1"
Grid.Column="0"
Margin="0,-4,40,0"
Padding="116,0,40,46"
ItemTemplate="{Binding Source={StaticResource FileTemplate}}"
ItemsSource="{Binding Source={StaticResource itemsViewSource}}"
SelectionMode="None"/>
Now you are ready to write the code necessary to display pictures from your Pictures library. Add the code shown in Listing 19.4 to the MainPage class in MainPage.xaml.cs file and add a call to it in the OnNavigatedTo method.
Listing 19.4. The PopulatePicturesGrid Method
private void PopulatePicturesGrid()
{
var folder = Windows.Storage.KnownFolders.PicturesLibrary;
var queryOptions = new Windows.Storage.Search.QueryOptions()
{
FolderDepth = Windows.Storage.Search.FolderDepth.Deep,
IndexerOption = Windows.Storage.Search.IndexerOption.UseIndexerWhenAvailable
};
var fileQuery = folder.CreateFileQueryWithOptions(queryOptions);
var fif = new Windows.Storage.BulkAccess.FileInformationFactory(
fileQuery,
Windows.Storage.FileProperties.ThumbnailMode.PicturesView,
190,
Windows.Storage.FileProperties.ThumbnailOptions.UseCurrentScale,
false
);
this.itemsViewSource.Source = fif.GetVirtualizedFilesVector();
}
The first line of the method shown Listing 19.4 creates a StorageFolder variable that points to the Pictures Library. A StorageFolder is a Windows Runtime class that provides information about a folder and allows you to manipulate that folder and its contents; however, it isn’t something that can be bound to the UI. To bind the results of a file system query to a UI, you need to use the GetVirtualizedFilesVector method of a FileInformationFactory instance.
Now that the app is displaying pictures, you need to respond to the user selecting a picture. To do this, add an event handler for the Tapped event on the GridView, which looks like the code shown in Listing 19.5.
Listing 19.5. The GridView.Tapped Event Handler
private async void itemGridView_Tapped(object sender, TappedRoutedEventArgs e)
{
var item = e.OriginalSource as Image;
if (item != null)
{
var fileInformation = item.DataContext as FileInformation;
if (fileInformation != null)
{
var photo = await ExifMetadata.Create(fileInformation);
this.metadataPanel.DataContext = photo;
}
}
}
If you were to run the app now, it would throw an exception, as shown in Figure 19.6.
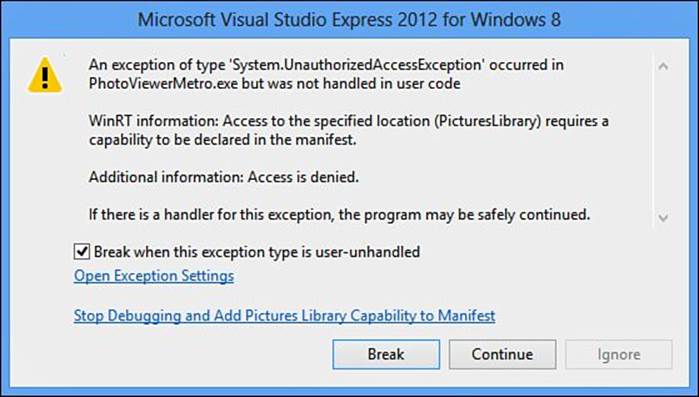
Figure 19.6. Exception from incorrect capabilities.
To display the pictures from your Pictures library, you must first enable the Pictures Library Access capability. Capabilities define the system features or devices your app can use; without being set correctly, your app may not function and will not pass Store certification. To enable the correct capability, double-click on the Package.appxmanifest file in the Solution Explorer to display the App Manifest Designer, as shown in Figure 19.7. Click the Capabilities tab, select Pictures Library Access, and save the file.
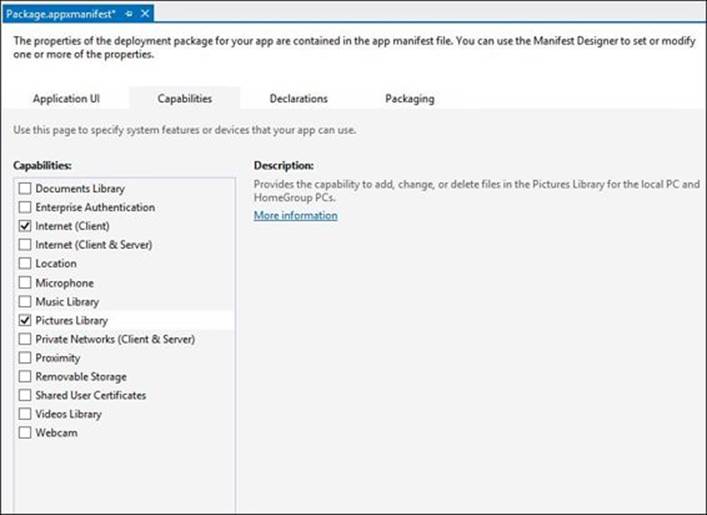
Figure 19.7. The App Manifest Designer.
If you run the application, it should look similar to Figure 19.5. Tapping (or clicking) on an image should display the image details.
Summary
In this hour, you had a quick overview of a Windows Store app and what it enables you to do. You created a simple Windows Store app by reusing some of the layout and logic contained in a desktop app.
Q&A
Q. What is a Windows Store app?
A. A Windows Store app has a single chromeless window that fills the entire screen.
Q. What is the Windows Runtime?
A. The Windows Runtime is a set of APIs used to build Windows Store apps and is available to all of the supported programming languages.
Q. Can the async pattern be used with desktop applications?
A. Because this pattern is actually defined in the C# language and supported by the compiler, it can be used in desktop applications just as easily as it can be used for Windows Store apps.
Workshop
Quiz
1. What namespaces are used for the UI types for Windows Store apps?
2. What are app capabilities?
Answers
1. All of the UI types used by Windows Store apps are found in the Windows.UI.Xaml namespaces.
2. Capabilities define the system features or devices your app can use; without being set correctly, your app may not function and will not pass Store certification.
Exercises
There are no exercises for this hour.
All materials on the site are licensed Creative Commons Attribution-Sharealike 3.0 Unported CC BY-SA 3.0 & GNU Free Documentation License (GFDL)
If you are the copyright holder of any material contained on our site and intend to remove it, please contact our site administrator for approval.
© 2016-2026 All site design rights belong to S.Y.A.