Sams Teach Yourself C# 5.0 in 24 Hours (2013)
Part I: C# Fundamentals
Hour 4. Understanding Classes and Objects the C# Way
What You’ll Learn in This Hour
• Object-oriented programming
• Component-oriented programming
• Classes in C#
• Scope and declaration space
• Nested classes
• Partial classes
• Static classes
• Object initializers
A class is the fundamental programming concept in C#, defining both representation and behavior in a single unit. Classes provide the language support required for object-oriented and component-oriented programming and are the primary mechanism you use to create user-defined types. Traditionally, object-oriented programming languages have used the term type to refer to behavior, whereas value-oriented programming languages have used it to refer to data representation. In C#, it is used to mean both data representation and behavior. This is the basis of the common type system and means two types are assignment-compatible if, and only if, they have compatible representations and behaviors.
In this hour, you learn the basics of both object-oriented and component-oriented programming. When you understand these concepts, you move on to creating a class in C# and examining how it fulfills the goals of object-oriented and component-oriented programming. You learn about the different accessibility models, how to create and use properties and methods, and about optional and named parameters.
Object-Oriented Programming
Before we start talking about classes in detail, you need to understand the benefits of object-oriented programming and understand how it relates to C#. Object-oriented programming helps you think about the problem you want to solve and gives you a way to represent, or model, that problem in your code. If you do a good job modeling the problem, you end up with code that’s easy to maintain, easy to understand, and easy to extend.
As previously mentioned, classes are the fundamental programming concept in C#, defining both representation and behavior in a single unit. Put another way, a class is a data structure that combines data storage with methods for manipulating that data. Classes are simply another data type that becomes available to you in much the same way any of the predefined types are available to you. Classes provide the primary mechanism you use to create user-defined types.
Note: Maintainable Code
There is, of course, more to creating code that’s easy to maintain, understand, and extend than just getting the model correct. The implementation also has to be correct, readable, and correctly organized.
The four primary concepts of object-oriented programming are encapsulation, abstraction, inheritance, and polymorphism. In this hour, you learn about encapsulation and abstraction. In the next hour, you learn about inheritance and polymorphism.
Encapsulation and Abstraction
Encapsulation enables a class to hide the internal implementation details and to protect itself from unwanted changes that would result in an invalid or inconsistent internal state. For that reason, encapsulation is also sometimes referred to as data hiding.
As an example of encapsulation at work, think about your car. You start your car in the morning by inserting a key and turning it (or simply pushing a button, in some cases). The details of what happens when you turn the key (or push the button) that actually causes the engine to start running are hidden from you. You don’t need to know about them to start the car. It also means you can’t influence or change the internal state of the engine except by turning the ignition key.
By hiding the internal details and data, you create a public interface or abstraction representing the external details of a class. This abstraction describes what actions the class can perform and what information the class makes publicly available. As long as the public interface does notchange, the internal details can change in any way required without having an adverse effect on other classes or code that depends on it.
By keeping the public interface of a class small and by providing a high degree of fidelity between your class and the real-world object it represents, you help ensure that your class will be familiar to other programmers who need to use it.
Let’s look at our car example again. By encapsulating the details of what happens when you start your car and providing an action, StartCar, and information, such as IsCarStarted, we have defined a public interface, thereby creating an abstraction (or at least a partial abstraction, because cars do much more than just start) of a car.
Component-Oriented Programming
Component-oriented programming is a technique of developing software applications by combining preexisting and new components, much the same way automobiles are built from other components. Software components are self-contained, self-describing packages of functionality containing definitions of types that expose both behavior and data.
C# supports component-oriented programming through the concepts of properties, methods, events, and attributes (or metadata), allowing self-contained and self-describing components of functionality called assemblies.
Classes in C#
Now that you have a basic understanding of object-oriented and component-oriented programming, it is time to see how C# enables these concepts to become reality by using classes. You have actually already used classes in the examples and exercises from the previous two hours.
Classes in C# are reference types that implicitly derive from object. To define a class, you use the class keyword. Look at the application you built at the end of Hour 2, “Introducing Visual Studio.” Everything you did was inside a class named Program.
The body of the class, defined by the opening and closing braces, is where you define the data and behavior for the class.
Scope and Declaration Space
We briefly mentioned scope and declaration space in Hour 1, “The .NET Framework and C#,” saying that scope defines where you can use a name, whereas declaration space focuses on where that name is unique. Scope and declaration space are closely related, but there are a few subtle differences.
A more formal definition is that scope is an enclosing context or region that defines where a name can be used without qualification.
In C#, both scope and declaration space is defined by a statement block enclosed by braces. That means namespaces, classes, methods, and properties all define both a scope and a declaration space. As a result, scopes can be nested and overlap each other.
If scope defines the visibility of a name and scopes are allowed to overlap, any name defined in an outer scope is visible to an inner scope, but not the other way around.
In the code shown in Listing 4.1, the field age is in scope throughout the entire body of Contact, including within the body of F and G. In F, the use of age refers to the field named age.
Listing 4.1. Scope and Declaration Space
class Contact
{
public int age;
public void F()
{
age = 18;
}
public void G()
{
int age;
age = 21;
}
}
However, in G, the scopes overlap because there is also a local variable named age that is in scope throughout the body of G. Within the scope of G, when you refer to age, you are actually referring to the locally scoped entity named age and not the one in the outer scope. When this happens, the name declared in the outer scope is hidden by the inner scope.
Figure 4.1 shows the same code with the scope boundaries indicated by the dotted and dashed rectangles.
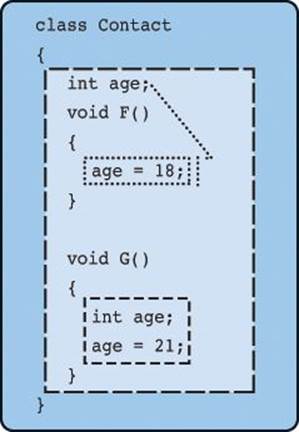
Figure 4.1. Nested scopes and hiding.
Declaration space, on the other hand, is an enclosing context or region in which no two entities are allowed to have the same name. In the Contact class, for example, you are not allowed to have anything else named age in the body of the class, excluding the bodies of F and G. Likewise, inside the body of G, when you redeclare age, you aren’t allowed to have anything else named age inside the declaration space of G.
You learn about method overloading a bit later in this hour, but methods are treated a little differently when it comes to declaration spaces. If you consider the set of all overloaded methods with the same name as a single entity, the rule of having a unique name inside a declaration space is still satisfied.
Try It Yourself: Working with Scope
To explore the differences between scope and declaration space, follow these steps. Keep Visual Studio open at the end of this exercise because you will use this application later.
1. Create a new console application.
2. Add a new class file named Contact.cs that looks like Listing 4.1.
3. In G, add a Console.WriteLine statement at the end of the method that prints the value of age.
4. In the Main method of the Program.cs file, enter the following code to create a new instance of the Contact class and print the current value of age:
Contact c = new Contact();
Console.WriteLine(c.age);
c.F();
Console.WriteLine(c.age);
c.G();
Console.WriteLine(c.age);
5. Run the application using Ctrl+F5 and observe that the output matches what is shown in Figure 4.2.
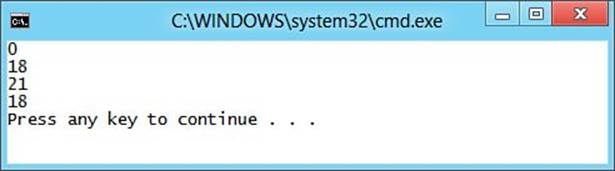
Figure 4.2. Working with scope.
Accessibility
Accessibility enables you to control the visibility, or accessibility, of an entity outside of its containing scope. C# provides this through access modifiers, which specify constraints on how members can be accessed outside the boundary of the class and, in some cases, even constrain inheritance. A particular class member is accessible when access to that member has been allowed; conversely, the member is inaccessible when access has been disallowed.
These access modifiers follow a simple set of contextual rules that determine when certain types of accessibility are permitted:
• Namespaces are not allowed to have any access modifiers and are always public.
• Classes default to internal accessibility but are allowed to have either public or internal declared accessibility. A nested class, which is a class defined inside of another class, defaults to private accessibility but can have any of the five kinds of declared accessibility.
• Class members default to private accessibility but can have any of the five kinds of declared accessibility.
These rules also define the default accessibility, which occurs when a member does not include any access modifiers.
Note: Explicitly Declaring Accessibility
Although C# provides reasonable default access modifiers, you should always explicitly declare the accessibility of your class members. This prevents unintended ambiguity, indicates that the choice was a conscious decision, and is self-documenting.
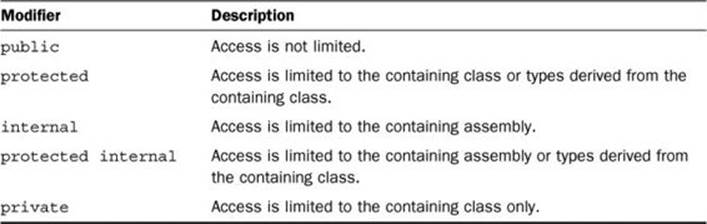
The access modifiers supported by C# are shown in Table 4.1.
Table 4.1. Access Modifiers
Caution: Protected Internal
Be careful when using protected internal accessibility because it is effectively protected or internal. C# does not provide a concept of protected and internal.
Fields and Constants
Fields are variables that represent data associated with a class. In other words, a field is simply a variable defined in the outermost scope of a class. If you recall from Hour 1, a field can be either an instance field or a static field, and for both types of field, you can specify any of the five access modifiers. Typically, fields are private, which is the default.
If a field, no matter whether it is an instance or static field, is not given an initial value when it is declared, it is assigned the default value appropriate for its type.
Similar to fields, constants can be declared with the same access modifiers. Because a constant must have a value that can be computed at compile time, it must be assigned a value as part of its declaration. One benefit of requiring a value that can be computed at compile time is that a constant can depend on other constants. A constant is usually a value type or a string literal because the only way to create a non-null value of a reference type other than string is to use the new operator, which is not permitted.
Note: Constants Should Be Constant
When creating constants, you should be sure that the value is something that is logically constant forever. Good constants are things that never change, such as the value of Pi, the year Elvis was born, or the number of items in a mol.
If you need to create a field that has constant-like behavior but uses a type not allowed in a constant declaration, you can use a static read-only field instead by specifying both the static and readonly modifiers. A read-only field can be initialized only as part of its declaration or in a constructor.
Try It Yourself: Working with Fields
By following these steps, you explore how to create a class containing data and how to provide access to that data. If you closed Visual Studio, repeat the previous exercise first. Keep Visual Studio open at the end of this exercise because you will use this application later.
1. Create a new console application.
2. Add a new class file named Contact.cs. Inside the body of the class, declare three private fields named firstName, lastName, and dateOfBirth of type string, string, and DateTime, respectively.
3. Add the following method to the class. You learn more about methods later in this hour and more about the StringBuilder class in Hour 9, “Using Strings and Regular Expressions”:
public override string ToString()
{
StringBuilder stringBuilder = new StringBuilder();
stringBuilder.AppendFormat("Name: {0} {1}\r\n", this.firstName,
this.lastName);
stringBuilder.AppendFormat("Date of Birth: {0}\r\n", this.dateOfBirth);
return stringBuilder.ToString();
}
4. In the Main method of the Program.cs file, enter the following:
Contact c = new Contact();
Console.WriteLine(c.ToString());
5. Run the application using Ctrl+F5 and observe that the output matches what is shown in Figure 4.3.
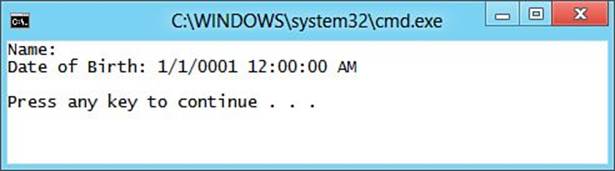
Figure 4.3. Working with fields.
Properties
If fields represent state and data but are typically private, there must be a mechanism that enables the class to provide that information publicly. Knowing the different accessibility options allowed, it would be tempting to simply declare the class fields to have public accessibility.
This would allow us to satisfy the rules of abstraction, but this would then violate the rules of encapsulation because the fields could be directly manipulated. How, then, is it possible to satisfy both the rules of encapsulation and abstraction? What is needed is something accessed using the same syntax as a field but that can define different accessibility than the field itself. Properties enable us to do exactly that. A property provides a simple way to access a field, called the backing field, which can be publicly available while still allowing the internal details of that field to be hidden. Just as fields can be static, properties can also be static and are not associated with an instance of the class.
Although fields declare variables, which require storage in memory, properties do not. Instead, properties are declared with accessors that enable you to control whether a value can be read or written and what should occur when doing so. The get accessor enables the property value to be read, whereas the set accessor enables the value to be written.
Listing 4.2 shows the simplest way to declare a property. When using this syntax, known as automatic properties, you omit the backing field declaration and must always include both the get and set accessor without a declared implementation, which the compiler provides.
Listing 4.2. Declaring an Automatic Property
class Contact
{
public string FirstName
{
get;
set;
}
}
In fact, the compiler transforms the code shown in Listing 4.2 into code that looks roughly like that shown in Listing 4.3.
Listing 4.3. Declaring a Property
class Contact
{
private string firstName;
public string FirstName
{
get
{
return this.firstName;
}
set
{
this.firstName = value;
}
}
}
Caution: Automatic Properties
Automatic properties are convenient, especially when you implement a large number of properties. This convenience does come at a slight cost, however.
Because you don’t provide a body for the accessors, you can’t specify any logic that executes as part of that accessor, and both accessors must be declared using the automatic property syntax. As a result, if at some point later you realize that you need to provide logic for either of the accessors, you need to add a backing field and the appropriate logic to both accessors.
Fortunately, this change doesn’t affect the public interface of your class, so it is safe to make, although it might be a bit tedious.
The get accessor uses a return statement, which simply instructs the accessor to return the value indicated. In the set accessor of the code in Listing 4.3, the class field firstName is set equal to value, but where does value come from? From Table 1.3, you know that value is a contextual keyword. When used in a property set accessor, the value keyword always means “the value that was provided by the caller” and is always typed to be the same as the property type.
Note: Read-Only and Write-Only Properties
For explicitly declared properties, you are allowed to omit either accessor. By including only the get accessor, you create a read-only property. To create the equivalent of a read-only property using automatic properties, you would declare the set accessor to be private.
By including only the set accessor, or declaring the get accessor to be private, you create a write-only property. In practice, you should avoid write-only properties.
By default, the property accessors inherit the accessibility declared on the property definition itself. You can, however, declare a more restrictive accessibility for either the get or the set accessor.
You can also create calculated properties that are read-only and do not have a backing field. These calculated properties are excellent ways to provide data derived from other information.
Listing 4.4 shows a calculated FullName property that combines the firstName and lastName fields.
Listing 4.4. Declaring a Calculated Property
class Contact
{
private string firstName;
private string lastName;
public string FullName
{
get
{
return firstName + " " + lastName;
}
}
}
Because properties are accessed as if they were fields, the operations performed in the accessors should be as simple as possible. If you need to perform more complex operations or perform an operation that could be time consuming or expensive (resource consuming), it might be better to use a method rather than a property.
Caution: Properties with Side Effects
The debugger automatically calls property get accessors to display results, so properties with side effects can cause unwanted behavior during debugging. In fact, the debugger assumes that property getters follow the best practices, which means they are as follows:
1. Fast
2. Side-effect free
3. Never throw exceptions
Try It Yourself: Working with Properties
To modify the Contact class to allow access to the private data using properties, and to use automatic and calculated properties, follow these steps. If you closed Visual Studio, repeat the previous exercise first. Be sure to keep Visual Studio open at the end of this exercise because you will use this application later.
1. Open the Contact.cs file.
2. Add a new public property named DateOfBirth that enables reading and writing to the dateOfBirth field.
3. Remove the firstName and lastName fields and create a FirstName and LastName property as automatic properties.
4. Add a calculated property named FullName, which combines the values of the FirstName and LastName properties. This should be similar to the calculated property shown in Listing 4.4.
5. Modify the ToString method to make use of the new FullName property instead of performing the string concatenation directly.
6. In the Main method of the Program.cs file, enter the following code after the Console.WriteLine statement:
c.FirstName = "Jim";
c.LastName = "Morrison";
c.DateOfBirth = new DateTime(1943, 12, 8);
Console.WriteLine(c.ToString());
7. Run the application using Ctrl+F5, and observe that the output matches what is shown in Figure 4.4.
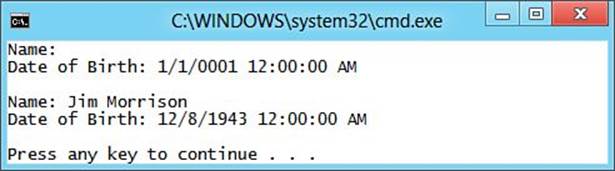
Figure 4.4. Working with properties.
Methods
If fields and properties define and implement data, methods, which are also called functions, define and implement a behavior or action that can be performed. The WriteLine action of the Console class you have been using in the examples and exercises so far is an example of a method.
Listing 4.5 shows how to add a method to the Contact class that verifies an email address. In this case, the VerifyEmailAddress method specifies void as the return type, meaning that it does not return a value.
Listing 4.5. Declaring a Method
class Contact
{
public void VerifyEmailAddress(string emailAddress)
{
}
}
Listing 4.6 shows the same method declared to have a bool as the return type.
Listing 4.6. Declaring a Method That Returns a Value
class Contact
{
public bool VerifyEmailAddress(string emailAddress)
{
return true;
}
}
A method declaration can specify any of the five access modifiers. In addition to the access modifiers, a method can also include the static modifier. Just as static properties and fields are not associated with an instance of the class, neither are static methods. The WriteLine method is actually a static method on the Console class.
Methods can accept zero or more parameters, or input, declared by the formal parameter list, which consists of one or more comma-separated parameters. Each parameter must include both its type and an identifier. If a method accepts no parameters, an empty parameter list must be specified.
Parameters are divided into three categories:
• Value parameters—The most common. When a method is called, a local variable is implicitly created for each value parameter and assigned the value of the corresponding argument in the argument list.
• Reference parameters—Do not create a new storage location but represent the same storage location as the corresponding argument in the argument list. Reference parameters are declared using the ref keyword, which must be present both in the parameter list and the argument list.
• Output parameters—Similar to reference parameters but require the out keyword to be present in both the parameter and invocation lists. Unlike reference parameters, they must be given a definite value before the method returns.
Note: Parameter Arrays
Parameter arrays, declared with the params keyword, can be thought of as a special case of value parameters and declare a single parameter that can contain zero or more arguments of the given type in the argument list.
A method’s formal parameter list can include only a single parameter array, in which case it must be the last parameter in the list. A parameter array can also be the only parameter.
For a method to actually perform its desired action on the object, it must be invoked, or called. If the method requires input parameters, those values must be provided in an argument list, and if the method provides an output value, that value can also be stored in a variable.
The argument list is normally a one-to-one relationship with the parameter list, meaning that for each parameter, you must provide a value of the appropriate type in the same order when you call the method.
Note: Methods as Input
Methods that return a value and properties can also be used as input to other methods, as long as the return value type is compatible with the parameter type. This capability greatly increases the usefulness of both methods and properties, allowing you to chain method or property calls to form behaviors that are more complex.
Looking at the VerifyEmailAddress method that has a void return type from the earlier examples, you would call the method like this:
Contact c = new Contact();
c.VerifyEmailAddress("joe@example.com");
However, for the VerifyEmailAddress method defined to return a bool, you would call the method like this:
Contact c = new Contact();
bool result = c.VerifyEmailAddress("joe@example.com");
Just as you do with the parameter list, if a method invocation requires no arguments, you must still specify an empty list.
Method Overloading
Ordinarily, two entities cannot have the same name within a declaration space, except for overloaded methods. When two or more methods have the same name in a declaration space but have different method signatures, they are overloaded.
The method signature is made up of the method name and the number, types, and modifiers of the formal parameters and must be different from all other method signatures declared in the same class; the method name must be different from all other nonmethods declared in the class.
Caution: Method Signatures
The return type is not part of the method signature, so methods cannot differ only in return type.
Although the formal parameter list is part of the method signature, methods cannot differ based on a parameter being a ref or out parameter. When determining uniqueness for the purposes of method overload resolution, the ref or out attribute of the parameter is not considered.
Overloaded methods can vary only by signature. More appropriately, they can vary only by the number and types of parameters. Consider the Console.WriteLine method you have already used; there are 19 different overloads from which you can choose.
Overloading methods is common in the .NET Framework and enables you to give the users of your class a single method with which they interact and provide different input. Based on that input, the compiler figures out which method should actually be used.
Caution: Overloads with Different Return Types
Because method signatures do not include the return type, it is possible for overloaded methods to have different return types. Even though this might be legal C# code, you should avoid it to minimize the possibility for confusion.
Method overloading is useful when you want to provide several different possibilities for initiating an action, but method overloading can become unwieldy when there are many options. An example of method overloading is shown in Listing 4.7.
Listing 4.7. Method Overloading
public void Search(float latitude, float longitude)
{
Search(latitude, longitude, 10, "en-US");
}
public void Search(float latitude, float longitude, int distance)
{
Search(latitude, longitude, distance, "en-US");
}
public void Search(float latitude, float longitude, int distance, string culture)
{
}
Try It Yourself: Working with Methods
Continuing to expand the Contact class, add the VerifyEmailAddress and Search methods by following these steps. If you closed Visual Studio, repeat the previous exercises first. Be sure to keep Visual Studio open at the end of this exercise because you will use this application later.
1. Open the Contact.cs file.
2. Add the VerifyEmailAddress method shown in Listing 4.6 so that it returns true if the email address entered is “joe@example.com”.
3. Add the overloaded methods shown in Listing 4.7.
4. In the last overloaded Search method, enter a Console.WriteLine call that prints the values of the parameters.
5. In the Main method of the Program.cs file, enter the following code after the last Console.WriteLine statement:
c.Search(37.479444f, -122.450278f);
c.Search(37.479444f, -122.450278f, 50);
c.Search(37.479444f, -122.450278f, 50, "en");
Console.WriteLine(c.VerifyEmailAddress("joe@example.com"));
Console.WriteLine(c.VerifyEmailAddress("jim@example.com"));
6. Run the application using Ctrl+F5 and observe that the output matches what is shown in Figure 4.5.
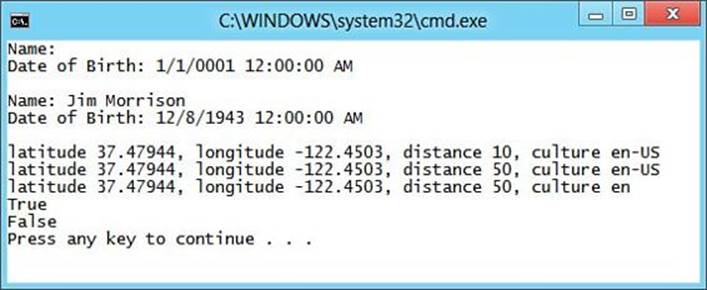
Figure 4.5. Working with methods.
Optional Parameters and Named Arguments
Optional parameters enable you to omit that argument in the invocation list when calling a method. Only value parameters can be optional, and all optional parameters must appear after required parameters, but before a parameter array.
To declare a parameter as optional, you simply provide a default value for it. The modified Search method using optional parameters is shown here:
public void Search(float latitude, float longitude, int distance = 10, string
culture = "en-US");
The latitude and longitude parameters are required, whereas distance and culture are both optional. The default values used are the same values provided by the first overloaded Search method.
Looking at the Search method overloads from the previous section, it should become clear that the more parameters you have the more overloads you need to provide. In this case, there are only a few overloads, but that is still more than providing a single method with optional parameters. Although overloads are the only option in some cases, particularly those that don’t imply a reasonable default for a parameter, often you can achieve the same result using optional parameters.
Note: Optional and Required Parameters
A parameter with a default argument is an optional parameter, whereas a parameter without a default argument is a required parameter.
Optional parameters are also particularly useful when integrating with unmanaged programming interfaces, such as the Office automation application programming interfaces (APIs), which were written specifically with optional parameters in mind. In these cases, the original API call might require a large number of arguments (sometimes as many as 30), most of which have reasonable default values.
A method that contains optional parameters can be invoked without explicitly passing arguments for those parameters, allowing the default arguments to be used instead. If, however, the method is invoked and provides an argument for an optional parameter, that argument is used instead of the default.
Listing 4.8 shows an example of calling the Search method, allowing the default values to be used.
Listing 4.8. Using Optional Parameters
Search(27.966667f, 82.533333f, 3);
Search(27.966667f, 82.533333f, 3, "en-GB");
Search(27.966667f, 82.533333f);
Although optional parameters allow you the flexibility to omit arguments, you can’t skip one that is “in the middle.” In other words, you cannot omit arguments between the commas, meaning you could not call the Search method like this:
Search(27.966667f, 82.533333f, , "en-GB");
To resolve this situation, C# enables any argument to be passed by name, whereby you are explicitly indicating the relationship between the argument and its corresponding parameter. Using named arguments, the different method calls in Listing 4.8 and the illegal call just shown could be written as shown in Listing 4.9.
Listing 4.9. Using Named Arguments
Search(latitude: 27.966667f, longitude: 82.533333f, distance: 3);
Search(latitude: 27.966667f, longitude: 82.533333f, distance: 3, culture: "en-GB");
Search(latitude: 27.966667f, longitude: 82.533333f);
Search(27.966667f, 82.533333f, culture: "en-GB");
Search(latitude: 27.966667f, longitude: 82.533333f, culture: "en-GB");
All these calls are equivalent. The first three calls are the same as the calls in Listing 4.8 except that each parameter is explicitly named. The last two calls show how we can omit an argument in the middle of the parameter list and are also the same, although one uses a mixture of named and positional arguments.
Note: Named and Positional Arguments
Arguments that are not passed by name are called positional arguments. Positional arguments are the most common.
Named arguments are most often used with optional parameters, but they can be used without them as well. Unlike optional parameters, named arguments can be used with value, reference, and output parameters. You can also use named arguments with parameter arrays, but you must explicitly declare a new array to contain the values, as shown here:
Console.WriteLine(String.Concat(values: new string[] { "a", "b", "c" }));
As you can see from the Search method, by enabling you to explicitly indicate the name of an argument, C# provides an additional (and powerful) way to help write fully describing and self-documenting code.
Tip: Changing the Order of Arguments
Arguments are always evaluated in the order they are specified. Although not generally needed, named arguments enable you to change the order an argument appears in the invocation list:
Search(longitude: 82.533333f, latitude: 27.966667f);
Search(latitude: 27.966667f, longitude: 82.533333f);
Try It Yourself: Working with Optional Parameters and Named Arguments
To modify the Search methods previously defined to use optional parameters rather than overloads, follow these steps. If you closed Visual Studio, repeat the previous exercises first. Be sure to keep Visual Studio open at the end of this exercise because you will use this application later.
1. Open the Contact.cs file.
2. Remove the first two Search methods, leaving only the method containing all four parameters, and modify that method so that distance and culture are optional, using 10 and "en-US" as the default values.
3. Run the application using Ctrl+F5 and observe that the output matches what is shown in Figure 4.6.
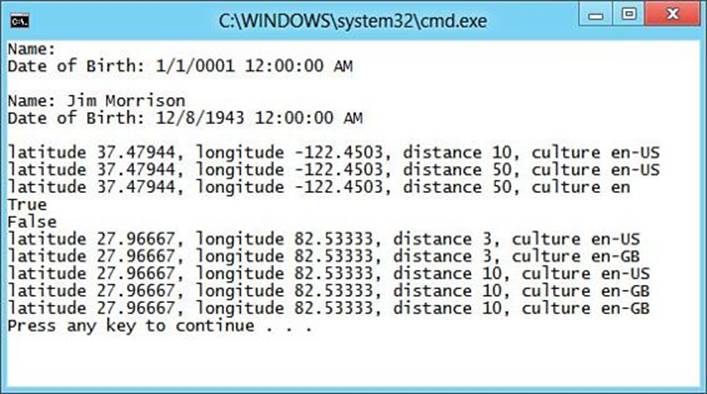
Figure 4.6. Working with optional parameters and named arguments.
4. In the Main method of the Program.cs file, change the calls to the Search method to use different combinations of named parameters and observe the output after each change.
Instantiating a Class
Unlike the predefined value types in which you could simply declare a variable and assign it a value, to use a class in your own programs, you must create an instance of that class.
Remember, even though you create new objects directly using the new keyword, the virtual execution system is responsible for actually allocating the memory required, and the garbage collector is responsible for deallocating that memory.
Instantiating a class is accomplished using the new keyword, like this:
Contact c = new Contact();
A newly created object must be given an initial state, which means any fields declared must be given an initial value either by explicitly providing one or accepting the default values (see Table 3.12 from Hour 3, “Understanding C# Types”).
Sometimes this level of initialization is sufficient, but often it won’t be. To provide additional actions that occur during initialization, C# provides an instance constructor (sometimes just called a constructor), which is a special method executed automatically when you create the instance.
A constructor has the same name as the class but it cannot return a value, which is different from a method that returns void. If the constructor has no parameters, it is the default constructor.
Note: Default Constructors
Every class must have a constructor, but you don’t always have to write one. If you don’t include any constructors, the C# compiler creates a default constructor for you. This constructor won’t actually do anything, but it will be there.
Because the compiler only generates the default constructor if you don’t provide any additional constructors, it is easy to break the public interface of your class by adding an additional constructor that has parameters and forgetting to also explicitly add the default constructor. As a result, it is a good idea to always provide a default constructor rather than letting the compiler generate it for you.
The default constructor (or any constructor) can have any of the accessibility modifiers, so it is entirely possible to create a private default constructor. This is useful if you want to allow your class to be created but want to ensure that certain information is always provided when the object is instantiated.
Listing 4.10 shows the default constructor for the Contact class.
Listing 4.10. Declaring a Default Constructor
public class Contact
{
public Contact()
{
}
}
Just as it is possible to overload regular methods, it is also possible to overload constructors. The signature for a constructor is the same as it is for a regular method, so the set of overloaded constructors must also vary by signature.
Some reasons for providing specialized constructors follow:
• There is no reasonable initial state without parameters.
• Providing an initial state is convenient and reasonable for the type.
• Constructing the object can be expensive, so you want to ensure that the object has the correct initial state when it is created.
• A nonpublic constructor restricts who can create objects using it.
Looking at the Contact class you have been using, it would certainly be useful if you provided values for the firstName, lastName, and dateOfBirth fields when creating a new instance. To do that, you would declare an overloaded constructor like the one shown in Listing 4.11.
Listing 4.11. Declaring a Constructor Overload
public class Contact
{
public Contact(string firstName, string lastName, DateTime dateOfBirth)
{
this.firstName = firstName;
this.lastName = lastName;
this.dateOfBirth = dateOfBirth;
}
}
In the constructor overload from Listing 4.11, you assigned the value of the parameter to its corresponding private field.
Typically, although not always, when a class contains multiple constructors, those constructors are chained together. To chain constructors together, you use a special syntax that uses the this keyword.
Note: The this Keyword
The this keyword refers to the current instance of the class. It is similar to the Me keyword in Visual Basic, a self identifier in F#, the __self__ attribute in Python, and self in Ruby.
The common uses of this follow:
• To qualify members hidden by similar names
• To pass an object as a parameter to other methods
• To specify which constructor should be called from another constructor overload
• To indicate the extended type in an extension method
Because static members exist at the class level and are not associated with an instance, you can’t use the this keyword.
In Listing 4.11, the this keyword is used to distinguish between the class field and the parameter because both have the same name.
Listing 4.12 shows the Contact class with both constructors from Listing 4.10 and Listing 4.11 using constructor chaining.
Listing 4.12. Constructor Chaining
public class Contact
{
public Contact()
{
}
public Contact(string firstName, string lastName, DateTime dateOfBirth)
: this()
{
this.firstName = firstName;
this.lastName = lastName;
this.dateOfBirth = dateOfBirth;
}
}
One benefit of constructor chaining is that you can chain in any constructor provided by the class, not just the default constructor. When you use constructor chaining, it is important to understand the order in which the constructors execute. The constructor chain is followed until it reaches the last chained constructor, and then constructors will be executed in order going back out of the chain. Listing 4.13 shows a class, C, with three constructors, each chained through to the default constructor.
Listing 4.13. Chained Constructor Order of Execution
public class C
{
string c1;
string c2;
int c3;
public C()
{
Console.WriteLine("Default constructor");
}
public C(int i, string p1) : this(p1)
{
Console.WriteLine(i);
}
public C(string p1) : this()
{
Console.WriteLine(p1);
}
}
Figure 4.7 shows the sequence in which each constructor would execute when instantiated using the second constructor (the one that takes an int and a string as input).
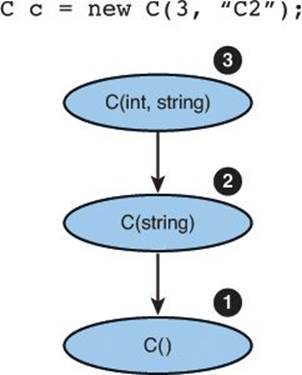
Figure 4.7. Constructor chaining sequence.
Static Construction
Instance constructors, like you have just seen, implement the actions required to initialize instances of the class. In some cases, a class might require specific initialization actions to occur at most once and before any instance members are accessed.
To accomplish this, C# provides a static constructor, which has the same form as the default constructor with the addition of the static modifier instead of one of the access modifiers. Because static constructors initialize the class, you cannot directly call a static constructor.
A static constructor executes at most once and will be executed the first time an instance is created or the first time any of the static class members are referenced.
Nested Classes
A nested class is one that is fully enclosed, or nested, inside another class declaration. Nested classes are a convenient way to allow an outer class to create and use objects without making them accessible outside of that class. Although nested classes can be convenient, they are also easy to overuse, which can make your class more difficult to work with.
Nested classes implicitly have at least the same access level as the containing class. For example, if the nested class is public but the containing class is internal, the nested class is implicitly internal as well, and only members of that assembly can access the nested class. However, if the containing class is public, the nested class follows the same accessibility rules as a non-nested class.
You should consider implementing a class as a nested class if it has no standalone significance and can be logically contained by another class or members of the class need to access private data of the containing class. Nested classes should generally not be public because they are for the internal use of the containing class.
Partial Classes
Partial classes enable you to split the declaration of a class into multiple parts, typically across multiple files. Partial classes are implemented in exactly the same way as normal classes but contain the keyword partial just before the class keyword. When working with partial classes, all the parts must be available during compilation and have the same accessibility to form the complete class.
Code-generation tools, such as the visual designers in Visual Studio, which generate a class for you representing the visual control being designed, use partial classes extensively. The machine-generated code is added to one part of the partial class, allowing you to modify the other part of the partial class without concern that your changes will be lost when the machine-generated portion is regenerated.
Partial classes can also be used in other scenarios that don’t involve machine-generated code. Large class declarations can benefit from using partial classes; however, this can sometimes mean that your class is trying to do too much and would be better split into multiple classes.
Tip: Nested Classes with Partial Classes
Even though C# does not require a single class per file, like Java, it is often helpful to follow that structure. When using nested classes, this isn’t possible unless the containing class is a partial class.
Static Classes
So far, you have seen the static modifier applied to constructors, fields, methods, and properties. You can also apply the static modifier to a class, which defines a static class. A static class can have only a static constructor, and as a result, it is not possible to create an instance of a static class. For that reason, static classes most commonly contain utility or helper methods that do not require a class instance to work.
Static classes can contain only static members, but those members are not automatically static. You must explicitly include the static modifier; however, you can declare any static member as public, private, or internal.
Caution: Implicit Static Members
Static classes can contain only static members, but those members are not automatically static. You must explicitly include the static modifier; however, you can declare any static member as public, private, or internal.
Extension Methods
Extension methods are regular static methods, but the first parameter includes the this modifier and represents the type instance being extended, typically called the type extension parameter. Extension methods must be declared in a non-nested, nongeneric static class.
When the namespace containing an extension class is in scope through a using directive, the extension methods appear as if they were native instance methods on the extended type. This allows them to be called in a natural and intuitive manner.
Because an extension method is nothing more than a specially marked static method, it does not have any special access to the type being extended and can work only with the public interface of the extended type. It also enables you to call the extension method in the more traditional way by referring to its fully qualified name.
Note: Access to Internals
An extension method defined in the same assembly as the type being extended also has access to internal members of that type.
Go To
HOUR 12, “UNDERSTANDING GENERICS,” for more information on generic classes.
Although an extension method matching the signature of an actual method on the type can be defined, it will not be visible. The compiler ensures that during method resolution, any actual class methods take precedence over extension methods. This ensures that an extension method cannot change the behavior of a standard class method, which would cause unpredictable, or at least unexpected, behavior.
Try It Yourself: Working with Extension Methods
By following these steps, you add an extension method on the DateTime class and modify the Contact class to use this new extension method. If you closed Visual Studio, repeat the previous exercises first.
1. Create a new file named Extensions.cs in the BusinessLogic project.
2. Make the Extensions class static and create a new extension method named GetFullName that extends Contact and uses the same logic as you used for the FullName property.
3. Remove the FullName property in the Contact class and modify the ToString method to use this new extension method.
4. Run the application using Ctrl+F5 and observe that the output matches what is shown in Figure 4.8.

Figure 4.8. Results of working with extension methods.
Object Initializers
You have seen how to create constructors for your class that provide a convenient way to set the initial state. However, as with method overloading, the more fields you require to be set, the more overloaded constructors you might need to provide. Although constructors support optional parameters, sometimes you want to set properties when you create the object instance.
Classes provide an object initialization syntax that enables you to assign values to any publicly accessible fields or properties as part of the constructor call. This allows a great deal of flexibility and can significantly reduce the number of overloaded constructors you need to provide.
Listing 4.14 shows code similar to what you wrote in the “Working with Properties” Try It Yourself exercise, followed by code using an object initializer. The code generated by the compiler in both cases is almost the same.
Listing 4.14. Object Initializers
Contact c1 = new Contact();
c1.FirstName = "Jim";
c1.LastName = "Morrison";
c1.DateOfBirth = new DateTime(1943, 12, 8);
Console.WriteLine(c1.ToString());
Contact c2 = new Contact
{
FirstName = "Jim",
LastName = "Morrison",
DateOfBirth = new DateTime(1943, 12, 8)
};
Console.WriteLine(c2.ToString());
As long as there are no dependencies between fields or properties, object initializers are an easy and concise way to instantiate and initialize an object at the same time.
Summary
At this point, you should have a good understanding of how classes in C# provide a language implementation for object-oriented programming. You learned how scope affects the visibility of members in a class and how you can change accessibility using the different access modifiers. From there, you built a class and instantiated an instance of that class. You then learned about methods and properties, including method overloading, optional, and named parameters. Finally, you learned about nested and partial classes.
Departing from the simple examples you worked with in the previous hours, the samples and exercises in this hour focused on building more real-world classes.
Q&A
Q. What are the four primary principles of object-oriented programming?
A. The four primary principles of object-oriented programming are encapsulation, abstraction, inheritance, and polymorphism.
Q. Why are encapsulation and abstraction important?
A. By using encapsulation and abstraction, you can change internal implementation details without affecting already-written code that uses that class.
Q. What is method overloading?
A. Method overloading is creating more than one method of the same name in a given type. Overloaded methods must have different signatures.
Q. How do properties enable a class to meet the goals of encapsulation?
A. A property provides a simple way to access a field that can be publicly available while still allowing the internal details of that field to be hidden.
Q. What are partial classes?
A. A partial class contains the keyword partial on all class declarations and is typically split across multiple source code files.
Q. What is the benefit of using extension methods?
A. Using extension methods enables additional functionality to be added to an existing type without requiring the use of inheritance. This additional functionality can then be used in a natural and intuitive way.
Workshop
Quiz
1. What are the five access modifiers available in C#?
2. What is the default accessibility for a class?
3. What is a constructor?
4. Can the default constructor of a class have parameters?
5. Using the code shown in Listing 4.13, what is the output of the following statement?
C c = new C(3, "C2");
6. When can a read-only field be assigned?
7. What is method overloading?
8. Are there limitations when using automatic properties?
9. What is a nested class?
10. Can extension methods access private members of the type being extended?
11. What happens when the new operator is executed?
Answers
1. The five access modifiers available in C# are public, protected, internal, protected internal, and private.
2. Classes default to internal accessibility but are allowed to have either public or internal declared accessibility. Nested classes default to private accessibility but are allowed to have any accessibility.
3. A constructor is a special method that is executed automatically when you create an object to provide additional initialization actions.
4. No, the default constructor of a class must always have no parameters.
5. The output of the statement is
Default Constructor
C2
3
6. A read-only field can be initialized only as part of its declaration or in a constructor.
7. Method overloading is creating more than one method of the same name that differs only by the number and type of parameters.
8. Automatic properties do not provide a way to access the implicit backing field, do not enable you to specify additional statements that execute as part of the get or set accessor, and do not enable a mixture of regular and automatic syntax.
9. A nested class is one that is fully enclosed inside another class declaration.
10. Because extension methods are simply static methods, they do not have any special access to the type they extend. However, an extension method defined in the same assembly as the type being extended also has access to internal members of that type.
11. The two primary actions that occur when the new operator is executed are (1) memory is allocated from the heap and (2) the constructor for the class is executed to initialize the allocated memory.
Exercises
1. Add a class to the PhotoViewer project provided as part of the book downloads. This class should be named Photo and be in the PhotoViewer namespace. The class should have the following private fields and a read-only property to retrieve the value of those fields:

Add the following constructor:
public Photo(Uri path)
{
if (path.IsFile)
{
this.source = path;
}
}
All materials on the site are licensed Creative Commons Attribution-Sharealike 3.0 Unported CC BY-SA 3.0 & GNU Free Documentation License (GFDL)
If you are the copyright holder of any material contained on our site and intend to remove it, please contact our site administrator for approval.
© 2016-2026 All site design rights belong to S.Y.A.