Administering ArcGIS for Server (2014)
Chapter 2. Authoring Web Services
Web services are the medium by which ArcGIS for Server communicates. They are the cogs that drive Server and feed your end users. ArcGIS for Server supports many types of web services. Each of these types implement an international standard, which is supported by various clients. Before we go through these standards or protocols, we will first define what a web service is. Then, you will create your first web service using the classic Active Server Pages (ASP). This exercise will cement the idea of web services and will let you further understand how they work. It will also prepare you for the second part of this chapter where you will learn how to author web services specifically for Server. The services that you will be publishing on Server are a little different from the classical web services. They have a geographic flavor to it. This is why throughout this chapter, we will refer to web services published on Server as GIS services.
The classical web service
In a nutshell, a web service is a method that can be called by a client to perform a particular task and return some results. Such results can be in plain text, as links, or media that can be interpreted by browsers. What makes it different from any regular method is that this method is a cross platform, which means you can call it from practically anywhere and get the output in a convenient and native format. For example, you spend countless hours to develop an algorithm on C# that performs a certain task. Your boss is happy, and she/he asks you to deploy it on your Unix database server. However, there is a slight problem here. C# code uses the Microsoft .NET Framework that happens to run only on the Microsoft Windows operating system; therefore, it is a challenging task to port this algorithm to Unix. One solution will be to rewrite the algorithm to run on Unix, which will lead to two versions of the code scattered on multiple locations. However, this will introduce more maintenance work, which is not very efficient. Another solution is to deploy this algorithm as a web service, since web services use HTTP. You will be able to call this algorithm not only from Unix but also from practically any other platform.
It is a de facto that a web service should follow a known standard or protocol so clients can easily communicate with it and consume it. For instance, HTTP follows certain code for communicating between a client and server. You can choose to adopt this protocol and therefore all the clients who use HTTP can consume your service. There are cases where you want to create your own protocol. For instance, your web service contains sensitive data and supporting HTTP might compromise it. So your new protocol, let's call itX encrypts communications, so only clients who support protocol X can read this web service. I usually explain web service protocols by comparing it with the languages we speak. For example, I have chosen to write this book in the English language in favor of Arabic because English is a universal language and thus more readers would acquire this book. I can also write another edition of this book in Arabic, thus supporting two languages and increase my reader base.
Creating a classical web service
There are a number of protocols developed for web services. Before you go through these protocols, it is a good practice to know how classical web services work without a protocol. To tackle that, you will be creating your own raw web service from scratch. This way you will truly be able to grasp the idea behind web services' standards and then comfortably work with one without wondering about its mechanics. We will need a machine that runs IIS to do the following task. The machine WEB-SERVER01 that we created in the previous chapter will do fine.
Random numbers are used in so many applications. They are used during encryptions and for generating a passcode. In this exercise, we will create a sample web service that will return a random number.
Note
ASP is a Microsoft server-side scripting language that is used to create dynamic content web pages.
Enabling ASP on IIS
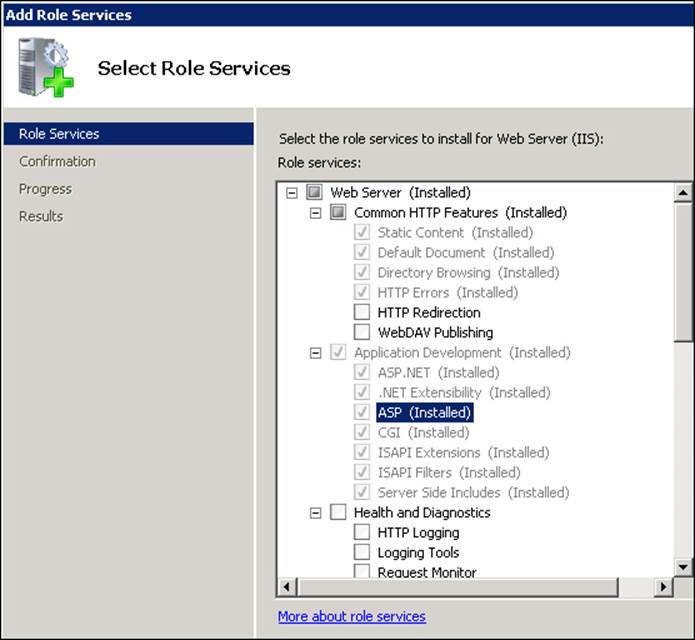
In some cases, ASP might be turned off on the Web server, so we will make sure it is on. From the Server Manager window, select Roles and then Web Server (IIS). From the window on the right pane, scroll down and click on Add Roles Services. A new form will be displayed under the Application Development tree node; check the ASP box. Click on Next and then Install to install the required options for ASP.
Writing the web service using ASP
Now we will start writing the web service. To do that, we will need to write some code. An artist needs a canvas to paint, and the canvas for programmers is the notepad. You may also use Notepad ++, Sublime Text, or your favorite editor. Click on Start and then type Notepad. In the open Notepad, type the following code:
<%
Response.Write ("Hello, World!")
%>
The <% and %> tags indicate the opening and closing of the ASP code segment, Response.Write is a function that will output a value to whoever is calling the service, and "Hello, World!" is the string we want to output. This is just to test the service; we will change this later. Let's save this file at C:\inetpub\wwwroot as genrand.asp. Now open Chrome or any browser you have and type the following:
http://WEB-SERVER01/genrand.asp
This will output "Hello, World!" in the browser. Remember that you just called this service from the browser, so you will get the output there. If you called it from within a C++ application, Python script, or a terminal, you will get the result there. Let's refine the code, open our file again in Notepad, erase everything, and write the following code instead:
<%
Dim r
r = Rnd()
r = r * 100
r = Round(r)
Response.Write(r)
%>
Tip
Downloading the example code
You can download the example code files for all Packt books you have purchased from your account at http://www. packtpub.com. If you purchased this book elsewhere, you can visit http://www.packtpub.com/support and register to have the files e-mailed directly to you.
Save the file and run it again. You will get a random number. I got 71, and yours might be different. Try running the service again; you will get the exact same number. Why is that? The problem with generating random numbers with computers is that computers are predicable. They are machines that we program. Computers cannot just think of a number. It should come from somewhere, either from a time stamp or from an external value such as the weather temperature. If I asked you to think of a number, you will give me a different number every time. This is why hackers with experience can predict what the computer will do next if they could understand how the random generator algorithm is coded. The reason you are getting the same number is that every time you call this service, you initiate a new process that is not associated with the previous call. It happens that the first random number in my case is always 71. This is why you keep getting the same number every time you refresh the page, not so random. To create a real random number, we should seed it with something slightly unpredictable, and nothing is more unpredictable than nature. You could read different information on the weather such as wind velocity, temperature, and so on, and toss this data to create a random number. However, for the sake of this exercise, we will seed it with less predictable data, the time.
Let's open our file again and add the highlighted code shown as follows:
<%
Dim r
Randomize (Timer)
r = Rnd()
r = r * 100
r = Round(r)
Response.Write(r)
%>
Open your service again. Now you will start getting some different numbers. You can start adding more complexity to this service to generate even more random or even more unique numbers.
You might say this seems like a normal web page and that is true. However, instead of returning HTML content, this page returns a single number. So we computer scientists decided to give it another name, a web service, to differentiate it from the classical web page. For instance, consider the Extensible Markup Language (XML) and HTML languages. Both of them are markup languages at their cores. The difference is that HTML is a special case of XML with special tags that follow a standard. The Geographic Markup Language (GML) falls in the same category, a markup language with special geography tags. You can say that a web page is a special case of a web service that returns, well, a page.
Now that you know how a web service works, consider Twitter API, Facebook API, or ArcGIS API; all of these are web services exposed in the same way you just did. The only difference is that they follow a set of standards that make them universal and easier to consume.
Note
Extensible Markup Language (XML) is a markup language that allows the use of tags to describe a document so it can be easily readable by both humans and machines.
A web page is a web service that uses HTTP as a medium and returns HTML content that the browser renders into visualized elements.
Web services' protocols
You may have noticed from the service you authored that it is up to you how you want to format the result. Imagine if each developer used his own format, it would be really difficult for other parties to consume your service without knowing its parameters. Therefore, a set of protocols were compiled and widely provided. We will talk about the importance of using a standard format and how much time it can save during integration.
The importance of a standard format
With the magnitude of flexibility in this age of information, we started to create so many diverse works. Isaac Newton started an excellent standard by which he could aggregate his work and present it properly to the world. He created Calculus, which is a unified language for the entire world; mathematicians adopted his approach of doing math because it was simple and effective. They came up with interesting theories based on that adaptation. Calculus was a standard, a protocol that has succeeded. Einstein wouldn't have invented the theory of relativity if it weren't for Newton. There are big companies creating standards in technology as well as organizations creating open standards so others can use them to invent something new, their next relativity theory. However, instead of following an existing standard, companies kept creating new standards, which led to duplicated rules and ways of doing work. This results in what I call "Standard Abundance", the reason why an application in iOS has to be completely rewritten for Android, Blackberry, and Windows Mobile in order to work. If the three smartphone makers were following one standard, we could have downloaded the same application from any smartphone, and any update on the application will be pushed to all smartphones. HTML is a great standard that thrived and succeeded. Although browsers tend to render HTML differently sometimes, it is still quite impressive that they all display a page that is relatively the same. If browsers were to follow their own standard, a dedicated website would need to be written for each browser; you may notice how the IE6 browser can demolish a website's look and feel because it doesn't support some of the new HTML standards, let alone a completely new standard.
The same problem applies to web plugins such as Adobe Flash and Microsoft Silverlight. 10 years ago, HTML was not equipped to be a multimedia platform. In fact, multimedia wasn't designed to be a part of the whole web ecosystem. So they created their own standard with their own programming languages as a browser plugin to do more on the Web. Flash entered the web market, and developers saw how easy it was to build a multimedia application and how user-friendly the applications looked. Companies liked flash so they used it in their websites, and action script developers, the scripting language for Adobe Flash, grew. Adobe Flash became de facto for a lot of websites on the Internet. Installing this web plugin was worth it to get all these rich features. Everything was quite rosy for Adobe until the introduction of HTML5 that supports basic multimedia features. Along the way, hackers managed to find flaws in Flash that made systems vulnerable. Companies started being skeptical about the use of Flash. With the introduction of the iPad and Steve Jobs' decision to not support Flash, things changed as if he somehow triggered an evolution, a tipping point, or the moment of critical mass as Malcolm Gladwell calls it. JavaScript, CSS3, and HTML5 developers started doing more. jQuery and Dojo libraries came into the picture, which allowed developers to perform more functionalities with fewer lines of code. Today HTML5 is getting better and better and the full standard will be released in 2014.
SOAP
SOAP is the first standard developed as a uniformed medium for web services; it uses XML as the communication protocol. Think of SOAP as a standard to format messages for both requests and responses transferred through web services. For instance, take our random number generator web service; we can make a small modification to comply with the SOAP standard by adding the following elements in the table:
|
Element |
Description |
Required? |
|
Envelope |
Identifies the XML document as a SOAP message. |
Yes |
|
Header |
Contains header information. |
No |
|
Body |
Contains call and response information. |
Yes |
|
Fault |
Provides information about errors that occurred while processing the message. |
No |
So instead of returning just a number, you can return the random number with more useful information, which is the standard information that other applications can read, understand, and process uniformly. Here is a sample SOAP message for our random generator:
POST /InStock HTTP/1.1
Host: www.mywebsite.org
Content-Type: application/soap+xml; charset=utf-8
Content-Length: 299
SOAPAction: http://www.w3.org/2003/05/soap-envelope
<?xml version="1.0"?>
<soap:Envelope xmlns:soap="http://www.w3.org/2003/05/soap-envelope">
<soap:Header>
</soap:Header>
<soap:Body>
<m:GetRandomNumber xmlns:m="http://www.mywebsite.org/random">
<m:Value>71</m:Value>
</m:GetRandomNumber>
</soap:Body>
</soap:Envelope>
Notice that the only value you will be using from that message is 71, and you will probably discard the entire message. However, it is a good practice to include it in this format for future use. Let's say you want to modify your web service to return the time stamp along with the random number. In our first example, you would probably add a separator next to the random number; however, using SOAP, you can just add another XML element and give it a proper name like <m:TimeStamp>31-May-2013 12:00AM</m:TimeStamp> that looks better than 71|31-May-2013 12:00AM. Or maybe instead of returning a single random number, if you want to return five random numbers, you can simply add five other <m:GetRandomNumber> elements as shown in the following code:
POST /InStock HTTP/1.1
Host: www.mywebsite.org
Content-Type: application/soap+xml; charset=utf-8
Content-Length: 299
SOAPAction: http://www.w3.org/2003/05/soap-envelope
<?xml version="1.0"?>
<soap:Envelope xmlns:soap="http://www.w3.org/2003/05/soap-envelope">
<soap:Header>
</soap:Header>
<soap:Body>
<m:TimeStamp>
31-May-2013 12:00AM
</m:TimeStamp>
<m:GetRandomNumber xmlns:m="http://www.mywebsite.org/random">
<m:Value>71</m:Value>
</m:GetRandomNumber>
<m:GetRandomNumber xmlns:m="http://www.mywebsite.org/random">
<m:Value>22</m:Value>
</m:GetRandomNumber>
<m:GetRandomNumber xmlns:m="http://www.mywebsite.org/random">
<m:Value>41</m:Value>
</m:GetRandomNumber>
<m:GetRandomNumber xmlns:m="http://www.mywebsite.org/random">
<m:Value>12</m:Value>
</m:GetRandomNumber>
<m:GetRandomNumber xmlns:m="http://www.mywebsite.org/random">
<m:Value>88</m:Value>
</m:GetRandomNumber>
</soap:Body>
</soap:Envelope>
ArcGIS for desktop communicates with the server using SOAP over Transmission Control Protocol (TCP). SOAP could work over other transfer protocols such as HTTP and Simple Mail Transfer Protocol (SMTP) as well; in our example, we have implemented it over HTTP. For additional security, you can implement it over the Hyper Text Transfer Protocol Secure (HTTPS) or on TCP for additional control.
REST
Although SOAP and REST usually are mentioned in the same context, they are completely different. Comparing SOAP to REST is like comparing a Dodge Challenger to a HEMI engine. A HEMI engine is a standard engine that can be used with almost any sports car. However, Challenger is a family of automobiles that includes many standardized parts, including an engine, which is not necessarily a HEMI engine. So in a nutshell, we could define Representation State Transfer (REST) as a complete architecture style (Challenger) that benchmarks the entire communication platform between a client and a server, including a standard format message (the engine), which can be anything, not necessarily XML as SOAP dictates.
Following are the elements that build up REST:
|
Element |
Description |
|
Client/server |
Provides decoupled interfaces between the client and server, meaning client (regardless of what programming language is used) should implement an interface and the server should implement a different interface. This means when I change the client configuration such as changing its operating system or installing a service pack, it should not affect the server and vice versa. |
|
Stateless |
A state remembers some client variables, which can be used by the server to perform an action; for example, the Undo operation is a state-full action, and the server should save the previous state so it can roll back to that state. REST should be completely stateless, which means the server should not remember any state for the client because this makes the server dependent on the client. |
|
Cacheable |
Caching helps optimizing the communication by storing server responses on the client side and retrieving them locally instead of requesting them again. The server responses should be labeled as cacheable or not so the client knows when to cache a response and when to request new data. |
|
Layered system |
The client shouldn't explicitly know which server to connect to, which enables communication with an intermediate server, thus allowing room for load balancing. |
|
Uniform interface |
This is a uniform interface on both the client and server. This interface should carry a message with complete details on how to consume and process a request; for instance, the message should have enough information to tell the server how to parse the message. |
An architecture that complies with all the five elements can be called a RESTful architecture. Clients consuming web services implemented on a proper RESTful environment can enjoy the privilege of scalability, and the server could be upgraded easily without the need for the client to worry about it. A good example is my experience with the Twitter REST API back in 2009 when Twitter was just establishing their API. I started building a lot of applications using the Twitter API, adding some geographical flavor to Twitter. One such application was EarthTwit where a user could sign into Twitter from Google Earth and retrieve all his followers and friends, geocode their location using Google Geocoder, then project them onto Google Earth. A user could tweet from EarthTwit, and she/he could also share a location from Google Earth to Twitter. One day, my users started to complain that EarthTwit was not working; the followers were not displayed on Google Earth. After some time, I discovered that Twitter had upgraded their API to a newer version and all my applications, including EarthTwit, were bugged.
I had to change the entire code to make it work with the new API. If Twitter had used a RESTful paradigm, my applications would have worked after the upgrade. Fortunately, ArcGIS for Server is a RESTful architecture, and it also supports the SOAP standard.
The Web server
A web service is hosted on a Web server, which is a solution that serves clients over the Web. There is a lot of Web server software available in the market that is free, open source, and commercial. These range from lightweight home use that supports a few requests to those designed to support millions of requests.
GIS services
Now that we know how web services work, it is time to get back to the Server. A GIS service is a web service, which has a geographic element. Many standards for GIS service were developed and are widely implemented; in this chapter, we will discuss and authorEsri map services and some of the Open Geospatial Consortium (OGC) services.
Map services
In GIS, we usually deal with maps. Esri map services are GIS services that handle operations on a geographical map. You can publish a map as a map service and consume this service from any client that supports this type of service. Map services are widely used and are famous for their simplicity and portability. The map services authoring tool for Server is ArcGIS for Desktop; hereafter, it is called Desktop. You cannot create a map service without this product, Desktop doesn't have to be installed on the same machine as your Server—as long as they are on the same network, you are good.
Connecting to the Server site
To publish our map, we first need to connect to the Server site we created in the previous chapter. Whether you followed the Express or Advanced installation track, you should have a Server site with one or more machines and perhaps a Web server. If you remember, in the previous chapter, we discussed how the Server site is hosted on a Web server. We also said that with each GIS server, Esri installs a hidden built-in Web server running on port 6080. We created a dedicated Web server in the Production track to host the Server site. We also illustrated how the server site could be accessed by either the built-in Web Server or the dedicated Web server.
To access the Server site, we can access the built-in web servers in GIS servers by connecting to it. To do so, I have GIS-SERVER01 and GIS-SERVER02, so any of the two URLs http://GIS-SERVER01:6080/ or http://GIS-SERVER02:6080/ will work fine. If you have set up a dedicated Web server with the Production Track, you may use it for the connection as well, thus giving you high availability. Mind that you should use a web adaptor with administrator access enabled. We have created the waadmin credential on WEB-SERVER01 in the previous chapter that allows us to do that. The URL to establish the connection will look like http://WEB-SERVER01/waadmin/.
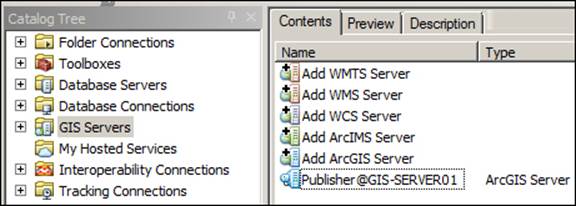
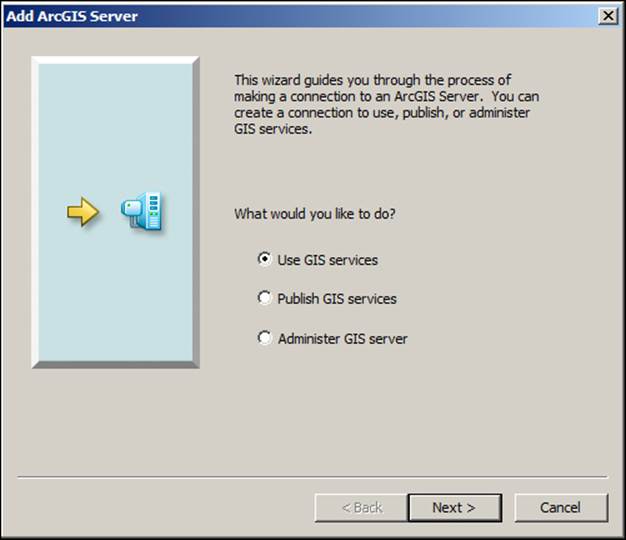
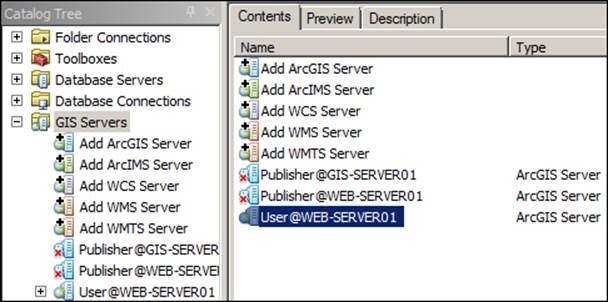
Let us create a connection so we can start publishing map services; this task requires ArcGIS for Desktop. Log into a machine with a Desktop installation and open ArcCatalog. We will call this machine the Publisher machine; you may install Desktop on one of your GIS servers if you want to. From the Catalog Tree, expand the GIS Servers node and double-click on Add ArcGIS Server. In the Add ArcGIS Server form, you will have three options. The first one uses GIS services, which is a read-only connection. You probably want to create this connection for your public users to only consume the services. The third option, Administer GIS server, is a connection that allows you to manage the Server site, so you can create and delete services using this option. This is similar to the ArcGIS Server Manager Web interface that can be accessed from http://GIS-SERVER01:6080/arcgis/manager. The second option, Publish GIS services, is the one we will be selecting is a connection that will allow you to publish services. Since this involves changing the site configuration, we will need to enter the primary administrator's username and password to create this connection. The following table gives us the reference list of the Server site connections that you can establish. Click on Next.
Note
If you are using ArcGIS 10, you will get two options instead of three. In this case, you may choose the Manage GIS Services option.
|
Connection type |
Description |
|
User |
A connection that allows a basic read-only access to site services. This doesn't require credentials unless the Server site is set up with security. |
|
Publisher |
A connection that allows for publishing a service. This requires credentials to create the connection. |
|
Admin |
A connection with elevated privileges, which allows for managing the services in the Site. |
In the next form, we will enter the parameters required to create the publisher connection. In the Server URL field, type the Server site URL. As discussed earlier, it could be one of your GIS-Servers running on port 6080 or your dedicated Web server. If you have installed a Web Adaptor, you can use GIS-SERVER01. So it will be http://GIS-SERVER01:6080/arcgis/. The default Server Type should be ArcGIS Server; there is another option for Spatial Data Server, an older version that Esri will retire soon. We will not be using this option in this book. Enter the site's primary administrator account authentication in the User Name and Password fields and then click on Finish to create your connection.
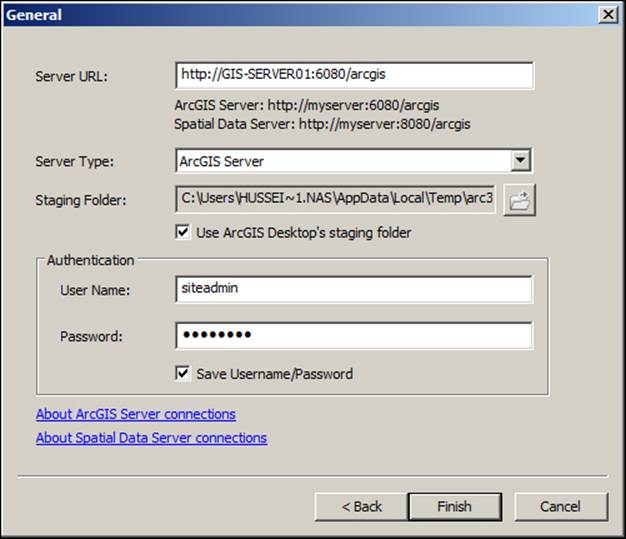
Rename the connection to Publisher@GIS-Server01. This connection you just created will be used to publish web services for which we will require ArcMap to author. Note that if GIS-SERVER01 is down for any reason, be it maintenance or a temporary restart, you will not be able to establish the Server site connection. Even if your Server site has other GIS servers, they will not take over this connection because we have physically hard wired the connection to one of them only.
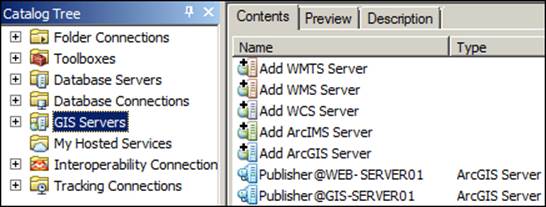
To establish a secure and more managed Server site connection, you can use a dedicated Web server. In the General form, enter http://WEB-SERVER01/waadmin/ in the server URL field and the primary site administrator credentials in the User Name and Passwordfields. Then click on Finish and rename the connection to Publisher@WEB-SERVER01.
Tip
Best practice
Avoid establishing Server site connections through GIS servers; instead, use a dedicated Web server whenever applicable to maintain a highly available connection.
Tip
TO-DO
Create the following two connections: Admin@WEB-SERVER01 that has administration privileges and User@WEB-SERVER01 that is a read-only connection. Mind that a user connection does not require credentials.
Disabling automatic data copying
ArcGIS for Server, by default, tries to copy the service data when the data source is not registered. This can cause problems with large data in Version 10.1, so Esri added the option to disable automatic data copying in Version 10.2. It is recommended that you disable the automatic data copying configuration from your Server site. To log in to the ArcGIS Server Manager and go to Site, from the left pane click on Data Store, click on Setting and uncheck Allow data to be copied to the site when publishing services, and then click on Save.
Authoring map services with file geodatabase
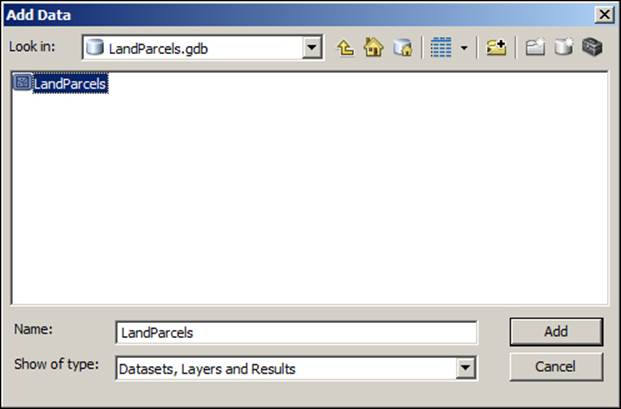
Now that we have created a publisher connection, we will use it to send our map to the Server site in order to create a map service. Any map service requires connecting to a geodatabase, which stores the map data. In this chapter, we will author our first Map Service with a sample data, which is located locally on the Server on a file geodatabase. You can download the LandParcels.gdb geodatabase from the book's project page at www.packtpub.com and extract it to the C: drive.
The geodatabase in this example includes a LandParcels feature class. To author map services, we will need ArcGIS for Desktop, specifically ArcMap. In the previous chapter, we installed the Server successfully, so I will be using the same machine names for demonstration purposes.
Log in to your publisher machine again and launch ArcMap; once ArcMap is started, click on Add Data to open the Add Data dialog. Browse to C:\AGSA\Data\LandParcels.gdb, double-click on the geodatabase to open it, and then double click on the LandParcels feature class to add it to the map.
There is a lot of work to be done in ArcMap in order to author a good presentable map and eventually publish it as a map service. There are plenty of tips and best practices to author an efficient map to result in an optimized map service, which will be explained inChapter 5, Optimizing GIS Services. The result of adding the LandParcels feature class doesn't look as attractive as you might want, so we will add some basic symbology and labeling work to create a good map. Your skills in ArcMap will come in handy now.
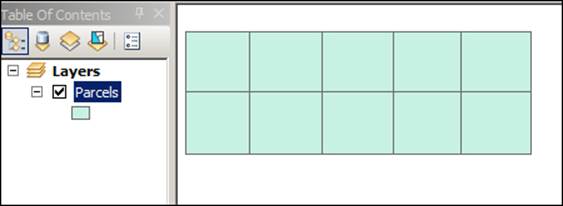
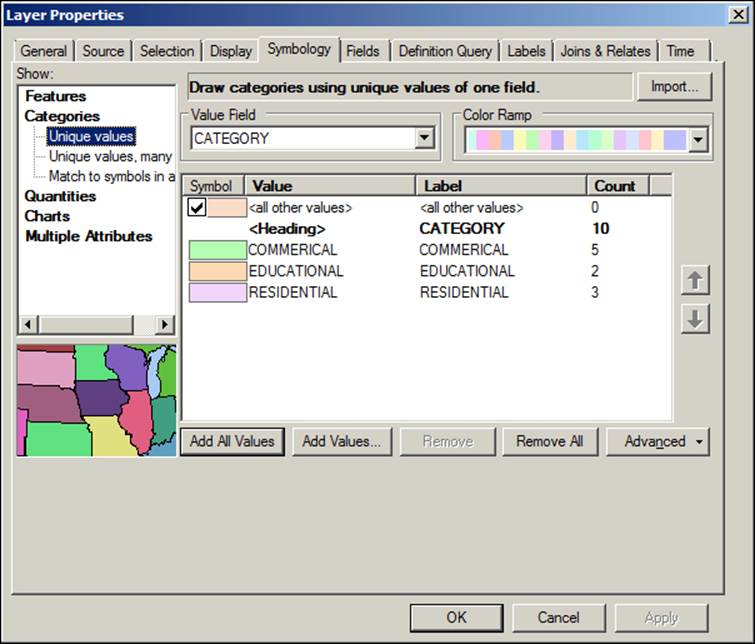
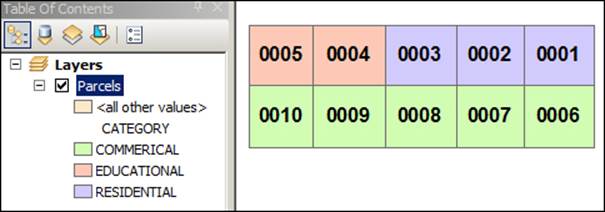
Double click on the layer Parcels and select the Symbology tab. Click on Categories and then from the Value Field drop-down list, select CATEGORY and click on Add All Values to add all the categories of symbology to the layer.
Click on the Labels tab. Check the Label features in this layer option and then from the Label Field, select PARCELNO and click on OK.
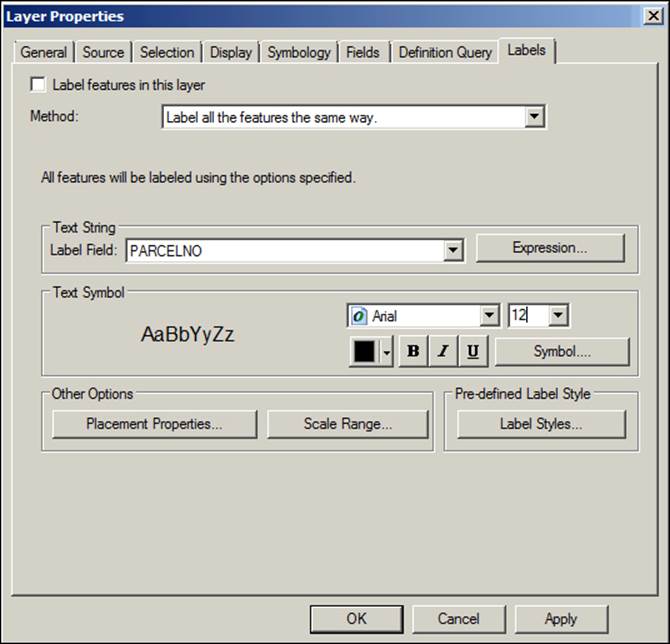
You should now see your parcels colored and labeled on the map as shown in the following screenshot:
Now that the map is complete, it is ready to be published; however, first we need to save this document. Click on Save, select C:\AGSA\Documents, and name it Parcels_FGDB.mxd. To publish the service, perform the following steps:
1. From the File menu, point to Share As and then click on Service.
2. From the new form that has popped up, select the Publish a Service option and click on Next.
3. From the drop-down list, select the Publisher@GIS-SERVER01 connection, which is the Server site connection we created earlier, and wait until a connection is established. Note that the server GIS-SERVER01 should be up and running for the connection to get established.
4. In the Service Name field type Parcels_FGDB so we know that this service is using a file geodatabase. Then click on Next.
5. ArcGIS for Server allows you to group your services into folders so they become easily manageable. You also get extra benefit by adding extra security at the folder level as well. For now, just choose the default root folder and click on Continue.
6. Here is where the fun begins. There are a lot of different settings and configurations that you can apply to your map service; however, we will just publish the map service as is for now without changing any parameters. Don't worry, in the upcoming chapters, you will understand and will start tweaking all these options as you see fit. At one point, you will even create a template of your preferred configuration and import them to any newly created map service.
7. Click on Analyse. This will run some analysis on your map. There are warnings that we will ignore for now and fix later. There is one warning however that I want you to pay attention to, which is shown in the following table:
|
Severity |
Status |
Code |
Description |
Name |
Type |
Data frame |
|
High |
Unresolved |
24011 |
Layer's data source is not registered with the server and data will be copied to the server. |
Parcels |
Layer |
Layers |
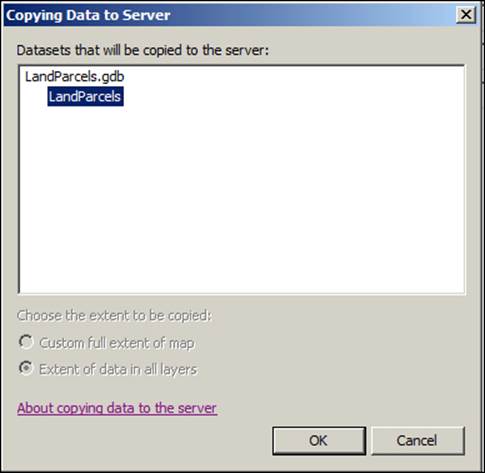
To explain this message, we should first understand how the Server works. In an ideal world, a client requests a map service. Let's say the clients wants to zoom in to a particular extent of a map. There is a Web server that accepts the client's request and forwards it to the GIS server, subject to availability and load. The target GIS server then connects to the map service's data source, calculates the new extent, and returns the data in that extent. At this stage, the data source should be accessible by the GIS server; as a matter of fact, all GIS servers should have access to the data source. In our case, the data source is a local file geodatabase located on GIS-SERVER01. By default, GIS-SERVER01 has access to it because it is located on the same machine. But what happens if you add another GIS server to your Server site? Then, GIS-SERVER02 will not be able to connect to the data source because it is not available locally or remotely. Server gives you a quick solution to that by copying the entire geodatabase to each GIS server and gives pop-up messages as a warning. The downside is that the process takes a lot of time in publishing and might cause ArcMap to crash. Moreover, if you constantly update your geodatabase, you will have inconsistent data. To solve that, we need to register the data source with the Server site so all GIS servers point to one data source instead of copies. This will be covered in the coming pages. However, for now, we will just publish the map service with the default configuration as is. We will allow the data to be copied to the GIS server. The LandParcels feature class has only few features, hence the copying process shouldn't take long. Click on Publish to upload the data and publish the map service.
Note
During the process of copying a data source to the server process, ArcMap might crash as it runs out of memory. In this case, simply restart the publishing process.
Registering the data source
Copying data source to the GIS servers makes sense when your ArcGIS for Server is running on the cloud. Since it is inefficient for the cloud GIS servers to connect to your local data source, sending a copy to the cloud is more effective so that the cloud GIS servers to crunch it up locally. Otherwise, if all your Server setup is on a local network, you are better off registering the data source.
Tip
Best practice
Always register any new data source if your Server site is on the same network as the geodatabase.
Registering a folder
Registering a folder that contains a personal or file geodatabase will make it available for all GIS servers on the Server site. Therefore, instead of copying the data source to all GIS servers, Server will simply connect to the registered folder. To do that, we first need to share our geodatabase so it could be accessible from multiple locations. Our database should be in a location that is highly available, a data server perhaps or a NAS box. For this exercise, we will use the WEB-SERVER01 as the geodatabase repository as we have done with the Production Installation Track when we used it as a configuration store.
Note
If you have followed the Testing Installation Track, you may skip this topic.
Go ahead and copy the LandParcels geodatabase to the WEB-SERVER01 on the C:\AGSA\Data\ and create the folder if it is not there. Next, we need to share the C:\AGSA\Data\ folder, right-click on the Data folder and click on Properties. Activate the Share tab and click on Share type in the ArcGIS for Server user account that you used for installing GIS\arcgis.server or agsServer, depending on your configuration. Click on Add, this will give you access to GIS servers that will have access to this folder. Remember, if you use a dedicated publisher machine, you need to login to that machine using the GIS\arcgis.server domain name. Click on Share. Now, you should be able to access the following geodatabase folder \\WEB-SERVER01\Data.
Tip
Best practice
If you are planning to use a file or personal geodatabase, it is recommended to have it hosted on a Network Array Storage or a dedicated data server.
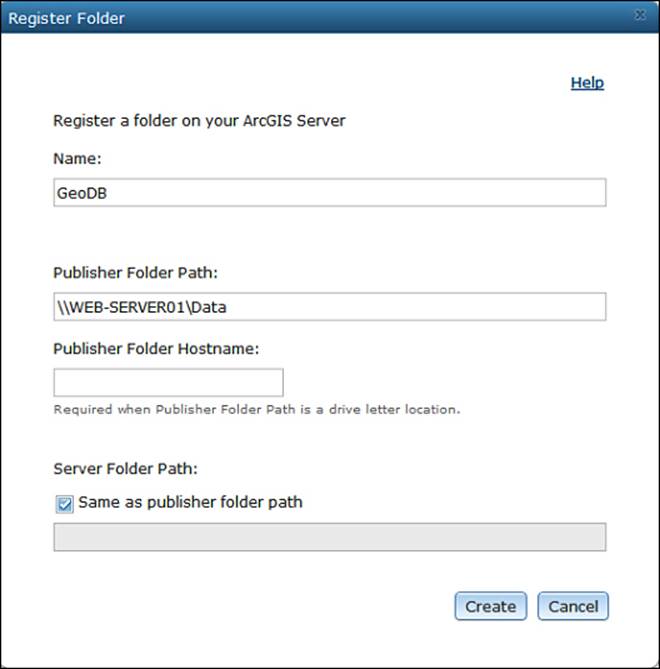
Now, log in to the ArcGIS Server Manager from Chrome using the URL http://GIS-SERVER01:6080/arcgis/manger or http://WEB-SERVER01/waadmin if you have installed the Web Adaptor, as discussed in the previous chapter. We also bookmarked the page so you can go back to it easily from Chrome. Enter the primary administrator account credentials to log in and and click on Site. From the left pane, select Data Store and then click on the Register Folder button. From the Register Folder form, type GeoDB in the Name field. ThePublisher Folder Path is the path where your geodatabase is located; mine is \\WEB-SERVER01\Data\. Optionally, you can specify the publisher hostname, which is the machine you are publishing the map from. I'm using one of the GIS servers as a publisher machine. This saves time, but of course, you might want to dedicate a separate machine for publishing if you are planning to fit in a workflow. Click on Create.
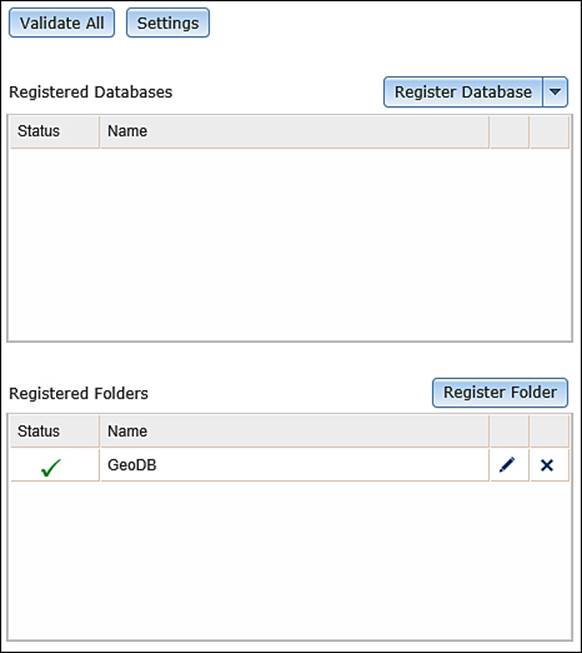
If you get an error that means the ArcGIS Server account cannot access that folder, make sure the right privileges are set accordingly. Click on Validate All to validate all the data stores. You should see your folder added and validated.
To publish a map with a registered geodatabase, you need to add the geodatabase from the ArcMap by connecting to the shared folder using the UNC path, \\WEB-SERVER01\Data\. This is the only way you will be able to register the database. Let us publish a second map service this time with a registered data source:
1. Open ArcMap and click on Add Data.
2. Click on the Connect to Folder icon and type in \\WEB-SERVER01\Data\.
3. In the folder field, browse to your LandParcels feature class and click on Add.
4. Follow the same steps for the symbology as well as labeling and publishing the map service. Name the service Parcels_FGDB_R.
Note that the warning for registering the database has disappeared. This design might work fine for small read-only geodatabases. However, as your database gets larger and more editing is performed on this shared geodatabase, your performance will start to slow down. There have also been incidents where users get inconsistent results when editing file geodatabases on shared folders. That is why it is recommended to move to an enterprise geodatabase that can handle sophisticated networking and large number of edits.
Registering with an enterprise geodatabase
An enterprise geodatabase or Esri Spatial Database Engine (SDE) was designed to allow clients the ability to provide high-speed access to the geodatabase through sophisticated networking. That is the beauty of SDE. Place your database on a powerful server and let users access it. There is a catch here though, for clients to be able to connect successfully to the enterprise server hosting the database, the connecting machine (in our case, this is usually the GIS server) should have the necessary client database binary that permits this connection, and this binary should match ArcGIS for Server architecture. For instance, Server cannot use a 32-bit Oracle database client to connect to the geodatabase because Server is a 64-bit software. So, you need to install a 64-bit Oracle database client on the GIS servers. Not only do you need to install the right database client on all your GIS servers, but you also have to make sure they all use the same connection parameters, same database server name, IP address, port, credentials, and SDE version. Only when all these are identical and duplicated on all GIS servers will you be able to register your enterprise geodatabase.
If you have a working SDE, you should follow this step before authoring your SDE map service. My SDE runs SQL Server Express 2008 R2 64 bit on a workstation named SDE-SERVER01. I have also installed the client SQL Server Express 64 bit on my GIS servers: GIS-SERVER01 and GIS-SERVER02. So, they can use it to establish the connection. I suggest you do the same with your database client, install the same client on all your GIS servers. After you complete the installation, let us create an SDE connection to SDE-SERVER01. The configuration of that connection will be saved in a .sde file, which we will use to register the SDE database. Open ArcCatalog and go to Database Connections and double-click on Add Database Connection. From the Database Platform drop-down list, select SQL Server type in the instance; mine is SDESQLExpress. Click on Connect. Rename the connection in this format: User@CONNECTION-VERSION. Hence, mine will look like SDE@SDESQLExpress-DEFAULT, which indicates that it is connecting to the SQL server connection using SDE as the user and SDE.DEFAULT as the default version. Double-click on the connection to make sure you can connect successfully; if that worked, you will find the connection file on your local settings because connection files are available per user. You will find them in the following path: C:\Users\username\AppData\Roaming\ESRI\Desktop10.x\ArcCatalog. Make a copy of that file on C:\AGSA\Connections . We are now ready to register the data source.
Note
Depending on your enterprise database, these steps may differ slightly. But all will lead to the connection file that we will use to register the data source.
From the same machine, you configured your SDE connection. Fire up Chrome and launch ArcGIS for Server Manager, then perform the following:
1. Go to the Site.
2. From the left pane, select Data Store and then click on the Register Database button.
3. Click on Browse to select your .sde connection file that you created earlier on C:\AGSA\Connections.
4. Make sure the Match Publisher connection is checked so that we use the same connection parameters.
5. Click on Register.
This will verify that this SDE connection can be established from all your GIS servers. If this succeeded, it means your GIS servers can successfully connect to this data source. If, however, you are prompted with an error, one of your GIS servers have failed to connect to this database using these parameters. So, you can go to each GIS server to make sure the database client is installed and you can connect to your database. In my case, it is SQL Server Express 2008 R2 64 bit. It should be 64 bit though, because Server is built on a 64-bit architecture.
Note
It is not required to install ArcGIS for Desktop on your GIS servers to establish an SDE connection. The database client is the most important element. The rest of the necessary drivers to establish an SDE connection is installed by ArcGIS for Server.
Authoring map service with enterprise geodatabase
Having an enterprise geodatabase running behind is the most stable approach for authoring map services. If you are planning to serve many users you should consider using SDE map services, and you don't necessarily require a commercial DBMS product if you don't have the budget for one. You can go with PostgreSQL or SQL Server Express as ArcGIS for Server supports both.
Tip
Best practice
It is recommended to register your enterprise geodatabase as a data source before continuing with this exercise. Avoid the use of the copy to Server option when you have an enterprise geodatabase.
In registering an enterprise geodatabase topic, we created an enterprise connection. Now, we will use that connection to add data to ArcMap from the database, do some work on the map, and publish the map as a map service. We will also save this document so we can update it later if required. From the same machine that you created the SDE connection, launch ArcMap and follow the given steps:
1. Click on Add Data.
2. Go to database connection, select SDE@SDESQLExpress-DEFAULT, select the LandParcels feature class, and follow the same steps to do the symbology work, as we did in the previous topic.
3. Finally, save the map document to C:\AGSA\Documents\Parcels_SDE.mxd.
Note
The steps to publish the service are generic and independent of the database.
4. From the File menu, point to Share As, click on Service, select the Publish a Service option, and click on Next.
5. From the drop-down list, select either Publisher@GIS-SERVER01 or Publisher@WEB-SERVER01 connection and wait until a connection is established.
6. In the Service Name field, type Parcels_SDE so we know that this service is using an enterprise geodatabase.
7. Click on Next.
8. Then click on Analyse to analyze the map.
You might receive a warning, but the key point is to make sure that your SDE connection is registered so the server doesn't have to copy the data to GIS servers. You have completed authoring an SDE map service. You might not be comfortable with users connecting as the SDE user. After all, the SDE user has full control over the geodatabase and it is not good practice to give end users this privilege. It might be a good idea to create a dedicated user in your DBMS, let's call it AGSSERVER, with read-only privileges on the data you are using. This way, you will be able to monitor connections coming from Server by filtering it for AGSSERVER. In that case, you have to create a new SDE connection AGSSERVER@SDESQLExpress-DEFAULT from ArcCatalog. Since this is a new connection, you have to register a new database on Server. You can do that by taking the .sde connection file and registering and adding it to the data source from the Manager as explained earlier.
Note
SDE connections are tricky. You must register a new data source for every connection parameter that differs. For instance, if you want to create another SDE connection that points to another version or connects using another user, you should create a new connection and register that particular connection .sde file separately.
Offline authoring and publishing
There will be cases in which your publishers and map authors do not have direct access to the server—perhaps they are just in another office, a firewall option prevents them from connecting, or maybe the network is down. ArcGIS for Server gives you the ability to author a map offline, save it into a service definition .sd file, and publish the service using this file. The file can be sent in an e-mail or transferred in a USB thumb drive. So, let us see how we could do this:
1. Open your Parcels document, point to File, then Share As, and then select Service.
2. From the Share As service form, select the Save a service definition file and then click on Next.
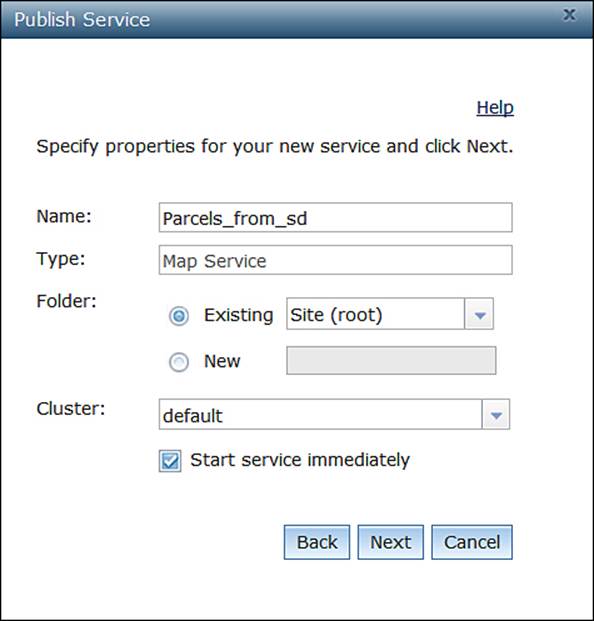
3. From the Save a Service Definition form, select the No available connection option.
4. Check the Include data in the sd file option so the data will be fused in the file, type Parcels_from_sd into the Service Name field, click on Next, and then select where you want to save your file.
5. Let us save it in C:\AGSA\ServiceDefinitions. Click on Continue and then click the Stage button to save the .sd file.
Now we have to publish the map service using this file. Go and log in to one of your GIS servers. Log in to the ArcGIS Server Manager and you will see a Publish Service button. Click on it and browse for your .sd file, making sure you have copied it from the publisher machine. It shouldn't be that big; in our case, it is less than 1 MB. After you select the file, click on Next. Leave everything to the default settings and just click on Next and then Publish.
Protocols enabled for map services
ArcGIS for Server enables both SOAP and REST for any published map service. Not only does the server permit you to use both protocols on the same map service, but it also gives you the luxury to enable Open Geospatial Consortium (OGC) standards. Up until now, no product could give you all these functionalities. It shows that Esri is investing well into this technology and draws a clear strategic path that it is planning to support Server for years to come. Later in this chapter, we will briefly explain how to consume SOAP, REST, and WMS services from different clients; however, Chapter 3, Consuming GIS Services, will discuss richly how to consume different types of map services from different clients.
Note
By default, ArcGIS for Server enables both REST and SOAP access for any published map service.
OGC services
Map services are Web services standardized by Esri, and not all clients know how to consume them. So, if you published your services as Esri map services, you will limit your users to this standard. There are, however, other standards for Web services that serve GIS content and luckily, ArcGIS for Server allows you to enable these standards on your services easily. Among them are OGC standards. These standards have been designed to support different needs for each Web service. As we have discussed in The importance of a standard format section, standards were created to make things blend within a big homogenous ecosystem. There are many OGC web services and the following table explains some of the widely used ones. In this chapter, we will discuss how to publish a Web map service.
|
OGC service |
Description |
|
WMS |
Web map service (WMS) is a basic service that returns images only. No information is included with the image. |
|
WFS |
Web feature service (WFS) is a rich service that returns full XML data of each element in the map. |
|
WPS |
Web processing service (WPS) is a geoprocessing service that permits executing a geocode command and returns the result. |
Authoring WMS services
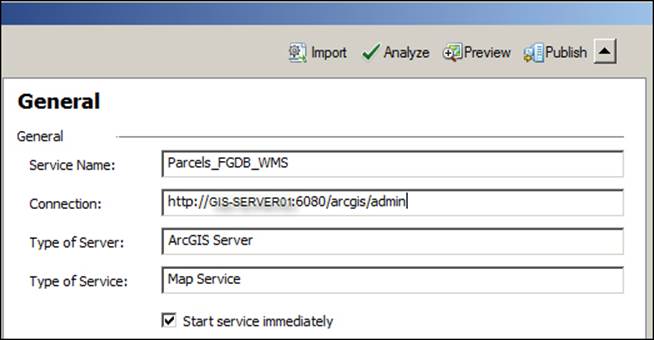
ArcGIS for Server supports publishing a WMS service along with other OGC services. In fact, the thing that made Server one of the popular map publishing solutions is its ability to adhere to open standards, which makes it one of the top used solutions for organizations. WMS is a good option if you want to give your client a flavor of your maps, but without them querying and poking around its attributes, you want them only to see a base image map. To publish a WMS service, we just have to enable the WMS capability while publishing the map from ArcMap. Let us open one of the map documents that we saved in the previous exercises in the C:\AGSA\Documents folder. You can either choose Parcels_FGDB.mxd or Parcels_SDE.mxd, and either will work. I will select the SDE as it is the most stable one because it uses an enterprise geodatabase, which can handle the incoming connections from the WMS. After ArcMap opens, go to File | Share As, then click on Service then select the Publish a Service option, and click on Next. From the drop-down list, select the Publisher@GIS-SERVER01 connection and wait until a connection is established. In the Service Name field type Parcels_SDE_WMS; if you have selected FGDB, type Parcels_FGDB_WMS instead, so you know that this service is using a file geodatabase and it is published as a WMS service. Click on Next.
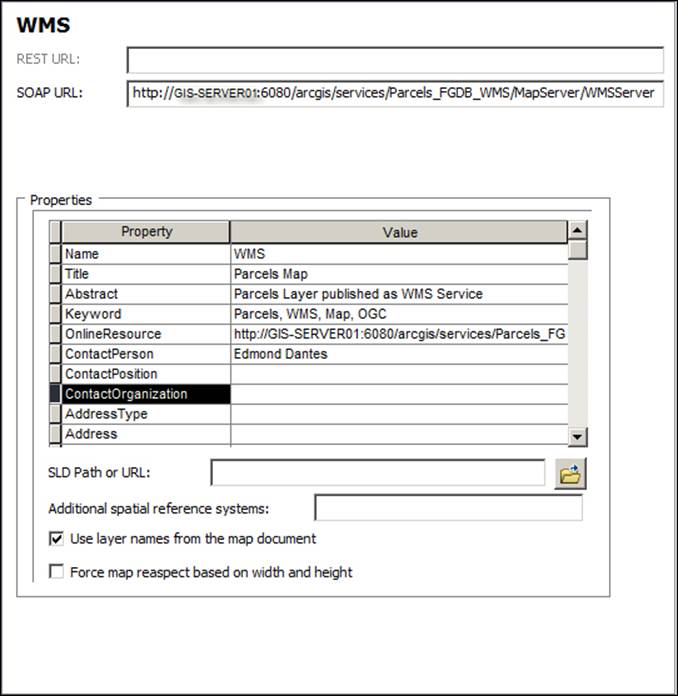
From the left pane, click on Capabilities. You will see all the different standards that you can enable on your service. Check WMS. After that, a new item will be added under Capabilities. Select WMS. Note that REST URL is disabled; this is because WMS only supports SOAP and it was not designed for large architecture like REST. Make sure the Enter service properties below option is selected and enter the metadata for the WMS service so clients can utilize this information when consuming your service. Finally, enable Use layer names from the map document so the service inherits the same layer naming conventions as your map document. Click on Publish to finally publish your map service.
Authoring WFS services
WMS is a 15 year old standard, yet it is still used by many clients for its simplicity. However, with the recent information explosion, the raw image returned by the WMS is not enough for analysis. The result should carry information and metadata that helps define its components and permits users to spatially analyze its elements. That is why OGC came up with a better standard, WFS. Instead of returning an image, the map is broken down into overlaid features that are then drawn by the client. There is also an option that allows the map service to be published as transactions, WFS (WFS-T). This option permits adding, deleting, and updating features on the service. ArcGIS has long used the concept of features in its software to support this new standard. To publish a WFS service, follow the same steps as mentioned in the Authoring WMS Services section. Give your service the name Parcels_SDE_WFS, or if you have selected FGDB, type Parcels_FGDB_WFS. Activate the WFS capability and expand the WFS option. Fill in the metadata of the service. We will not enable editing on the service for the time being, so make sure Enable transactions is unchecked. Click on Publish.
Note that we have created two dedicated services for each OGC standard, one for WMS and another for WFS. We could also create one map service with the two capabilities; this will save us time by maintaining only one service instead of two. However, you will find instances where you need to create multiple map services because you want to control what users can access and set up security for each service. Assume that you enabled WMS and WFS-T on a map service, you shared the WMS SOAP link to a user (Alice) who is supposed to only consume the images. You sent the WFS SOAP link to another user (Bob) who is a publisher. Although Alice has only the WMS link, she can easily construct the WFS link as it is essentially the same service with the same name. Moreover, any security privileges given to Alice have been given to Bob so both can access the service. This means that Alice will gain access to the WFS-T link, giving her elevated privileges to edit the data. On the other hand, if we created two map services, we could assign Bob to the WFS-T service and Alice to the WMS service. This way, Alice cannot access Bob's service. We will discuss this in detail in Chapter 4, Planning and Designing GIS Services, and Chapter 7, Securing ArcGIS for Server.
Tip
Best practice
Multiple capabilities can be enabled for a given map service. However, these have to be planned and carefully selected to avoid a flaw.
Geoprocessing services
Geoprocessing operation is an operation that works on spatial data. For example, buffering geoprocessing service takes a point and returns all features within a specified radius. Before geoprocessing, developers used to write customized tools to do simple tasks such as buffering, updating mass attribute, and clipping an area. When Esri created the model builder, users were able to mash up built-in tools to create models. These models can be used again as a submodel in an even bigger model. This remained the strategy until the release of ArcGIS for Server in 2006, which gave power to do that processing over services. Clients were able to call geoprocessing services right from their thin clients and return the results. Since then Esri has been moving its entire native functions into models, which can be eventually moved into services. Esri geoprocessing services can also be published as the WPS OGC standard to open up room for more clients to consume geoprocessing services created by Server. Esri began moving ArcGIS native operations into geoprocessing tools. This made it easier for end users to tap into the power of ArcGIS and reuse these tools to their advantage.
Testing the GIS services
We have learned how to author services in ArcGIS for Server. However, we still do not know how to consume these services. There are plenty of ways to use these ripe services in clients for visualization, analysis, and editing. We will discuss this thoroughly in the next chapter. Meanwhile we will test if our services work by using ArcMap. First, we need to create a user connection. This is a good chance to check if you did your TO-DO exercise right. The reason we are using a user connection is that end users should consume services at read-only privileges. If you connect to a map service using a publisher or an admin connection, the users will be prompted with a credential box. You have not only prevented them from consuming the service but also exposed your Server site for a potential brute force attack. A chain is only as strong as its weakest link.
Tip
Best practice
If you are planning to test a map service or want to use it for analysis or visualization, or perhaps share it with other users, you should always connect using a user connection that is set to use the GIS service only.
Open ArcCatalog and from the Catalog Tree, expand GIS Servers. Double-click on Add ArcGIS Server and select the Use GIS services option, and click on Next. In the Server URL field, type in your Server site URL. If you are using a dedicated Web server, as we set up one in the previous chapter, it is better to use that. If you don't have one, you can use one of the built-in Web servers in any of your GIS servers at http://GIS-SERVER01:6080/arcgis. However, you have to take into consideration that accessing this needs an access to port 6080. So, if the user is behind a firewall, you need to enable it. You won't have this problem with a dedicated Web server because you will be running on the default port 80. I will use the Web server at the URL http://WEB-SERVER01/wa/. Note that I have used the wa adaptor instead of the waadmin. We do not want our users to have access to the administrators' panel through an elevated web adaptor. Next, leave the Authentication boxes empty as we have not yet set up the security on our services, and click onFinish.
You will see your connection created; rename the connection to User@WEB-SERVER01 or User@GIS-SERVER01, depending on which server you are connected to.
Double-click on your connection. You should start seeing the services you have authored listed. Click on one of them and select the Preview tab to see its content. This is one of the easiest ways to see if your services are working. However, we want to test it from ArcMap, so let us create a layer file. From ArcCatalog, right-click on the service Parcles_FGDB and select Create Layer. Save the layer file to C:\AGSA\Layers and name it Parcels_FGDB.lyr. This will create a layer file with the necessary parameters to consume this service from any ArcGIS for Desktop client in the local area network, which has the Web server or the GIS server in it. Close ArcCatalog. Fire up ArcMap, click on Add Data, navigate to the folder C:\AGSA\Layers, and select the layer file you just saved. Note that ArcMap tries to connect using the user connection stored in the layer file and then projects the data automatically. A good thing to note here is that when a map service is added to ArcMap, some of the options are locked, which restricts the user from changing it, thus giving the publisher the control over how a particular service should look. For example, if you double-click on the layer, you will see most of the options are grayed out, locking the layer from modification.
I remember one of my clients had an interesting requirement that made use of this particular feature in ArcGIS for Server. The client has a feature class that contained land information of the country. The users were using this feature class to zoom in to the particular land in order to work on a project. However, the client did not want this feature class exposed to users for exporting, clipping, or even printing on large scales, especially because this includes some sensitive information. So, I suggested revoking all users' read/write privileges on that feature class and allowing read-only access to the ArcGIS for Server user. I then asked them to create a map document, add the feature class, and set the scale to 2,000, on which the users usually work. The users shouldn't peek into the data above the scale of 2,000. So, we published the new map service, created a user connection to Server, created a layer file from the map service, and shared it with all the users. The users were able to search and zoom in to the project and work with the land information only at a scale of 2,000. They could not change this scale because it was set by the publisher, and they can't export or clip the data; nevertheless, they still satisfied the client's requirement.
Summary
In this chapter, you learned the concept behind a Web service. You managed to author your own service from scratch. That was necessary to understand the Web services protocols. Once you got the idea of Web services, we dived into the GIS services, which were basically Web services with a geographic dimension. You learned how to author and publish GIS services while enabling the widely available standards so that they can be consumed by various GIS clients. In the next chapter, we will discuss how to consume the GIS services for visualization, analysis, and editing.
All materials on the site are licensed Creative Commons Attribution-Sharealike 3.0 Unported CC BY-SA 3.0 & GNU Free Documentation License (GFDL)
If you are the copyright holder of any material contained on our site and intend to remove it, please contact our site administrator for approval.
© 2016-2026 All site design rights belong to S.Y.A.