Learning Ceph (2015)
Chapter 9. Integrating Ceph with OpenStack
Every cloud platform requires a robust, reliable, scalable, and all-in-one storage solution that suffices all their workload requirements. Ceph has been emerging amazingly fast as a cloud storage solution, which seamlessly integrates with OpenStack and other cloud platforms. Ceph's unique, unified, and distributed architecture makes it the right choice for being a cloud storage backend.
In this chapter, we will cover the following topics:
· Introduction to OpenStack
· Ceph – the best match for OpenStack
· Creating OpenStack environments
· Integrating Ceph and OpenStack
Introduction to OpenStack
OpenStack is a free and open source software platform for building and managing public and private cloud computing platforms. It is governed by an independent, nonprofit foundation known as OpenStack foundation. It has the largest and most active community backed by technology giants such as HP, Red Hat, Dell, Cisco, IBM, Rackspace, and many more. OpenStack's idea for cloud is that it should be simple to implement and massively scalable.
OpenStack is considered as the cloud operating system that allows users to instantly deploy hundreds of virtual machines in an automated way. It also provides an efficient, hassle-free management of these machines. OpenStack is known for its dynamic scale up, scale out, and distributed architecture capabilities, making your cloud environment robust and future ready.
OpenStack provides the enterprise class Infrastructure-as-a-service (IaaS) platform for all your cloud needs. The following is the architecture of OpenStack:
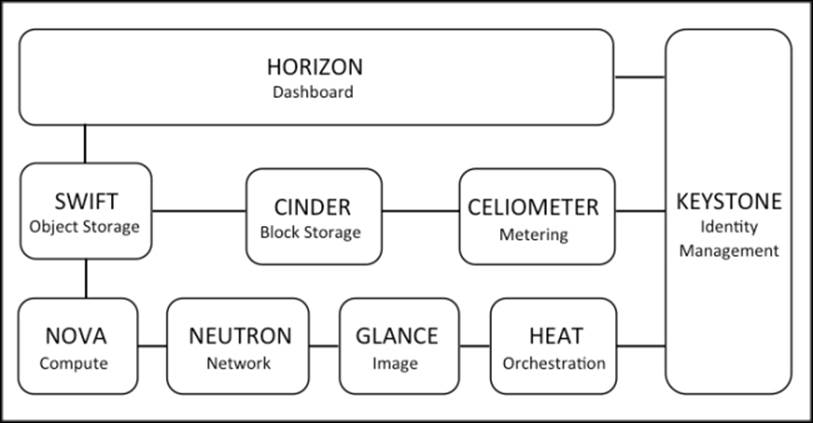
OpenStack is made up of several different software components that work together to provide cloud services. The OpenStack community has identified nine key components that make the core part of OpenStack:
· Nova: This is the compute part that is designed to manage and automate pools of computer resources and can work with a variety of virtualization technologies such as QEMU/KVM, Xen, Hyper-VMware, bare metal, and Linux containers.
· Swift: This provides object storage facility to OpenStack.
· Cinder: This is the block storage component providing persistent volumes to OpenStack instances.
· Glance: This is the image service for OpenStack, which makes virtual machine deployment easy and quick.
· Neutron: This is the network component of OpenStack.
· Horizon: This is the dashboard for managing OpenStack.
· Keystone: This provides identity services to OpenStack and manages authentication for OpenStack.
· Ceilometer: This provides the telemetry service and allows cloud providers with billing and autoscaling services.
· Heat: This is the orchestration component of OpenStack.
Note
For more information on OpenStack, visit http://www.openstack.org/.
Ceph – the best match for OpenStack
In the last few years, OpenStack has been getting amazingly popular as it's based on software-defined everything, whether it's compute, networking, or even storage. When you talk about storage for OpenStack, Ceph will get all the attraction. Ceph provides a robust, reliable storage backend that OpenStack was looking for. It's a seamless integration with OpenStack components such as Cinder, Glance, Nova, and keystone, which provides all-in-one cloud storage backend for OpenStack. Here are some key benefits that make Ceph the best match for OpenStack:
· Ceph provides enterprise-grade, feature-rich storage backend at a very low cost per gigabyte, which helps to keep the OpenStack cloud deployment price down.
· Ceph is a unified storage solution of block, file, or object storage for OpenStack, allowing applications to use storage as they need.
· Ceph provides advance block storage capabilities for OpenStack clouds that include easy-and-quick spin up, backup, and cloning of VMs.
· It provides default persistent volumes for OpenStack instances that can work like traditional servers, where data will not flush on rebooting the VMs.
· Ceph supports OpenStack for being host independent by supporting VM migrations and scaling up storage components without affecting VMs.
· It provides the snapshot feature to OpenStack volumes that can be used as a means of backup as well.
· Ceph's copy-on-write cloning feature provides OpenStack to spin up several instances at once, which helps the provisioning mechanism big time.
· Ceph supports rich APIs for both Swift and S3 object storage interfaces.
Ceph and OpenStack communities are working closely since last few years to make integration more seamless and use new features as they are landed. In future, we can expect OpenStack and Ceph to be more close to each other due to Red Hat's acquisition of Inktank, the company behind Ceph, as Red Hat is one of the major contributors of the OpenStack project.
Creating an OpenStack test environment
In this section, we will deploy a single-node test OpenStack environment that will be used to integrate with Ceph later in this chapter. For OpenStack deployment, we will use the Red Hat distribution of OpenStack known as RDO, which is Red Hat's open source community version of OpenStack. For more information on RDO OpenStack, visit http://openstack.redhat.com/.
Setting up an OpenStack machine
To perform single-node OpenStack installation, we will create a new virtual machine named os-node1. We need to install an OS on this new VM. In our case, we will install CentOS 6.4; you can also choose any other RHEL-based OS instead of CentOS if you like. Proceed with the following steps:
1. Create a new VirtualBox virtual machine for OpenStack installation:
2. # VboxManage createvm --name os-node1 --ostype RedHat_64 --register
3. # VBoxManage modifyvm os-node1 --memory 4096 --nic1 nat --nic2 hostonly --hostonlyadapter2 vboxnet1
4.
5. # VBoxManage storagectl os-node1 --name "IDE Controller" --add ide --controller PIIX4 --hostiocache on --bootable on
6. # VBoxManage storageattach os-node1 --storagectl "IDE Controller" --type dvddrive --port 0 --device 0 --medium CentOS-6.4-x86_64-bin-DVD1.iso
Note
You must provide the correct absolute path of CentOS ISO file with --medium option for the previous command.
# VBoxManage storagectl os-node1 --name "SATA Controller" --add sata --controller IntelAHCI --hostiocache on --bootable on
# VBoxManage createhd --filename OS-os-node1.vdi --size 10240
# VBoxManage storageattach os-node1 --storagectl "SATA Controller" --port 0 --device 0 --type hdd --medium OS-os-node1.vdi
# VBoxManage startvm os-node1 --type gui
7. Once the virtual machine is created and started, install the CentOS operating system by following the OS installation documentation available at https://access.redhat.com/site/documentation/en-US/Red_Hat_Enterprise_Linux/6/html/Installation_Guide/index.html. During the installation process, provide the hostname as os-node1.
8. Once you have successfully installed the operating system, edit the network configuration of the machine. Make sure you edit the correct network device filename; in our case, the network devices are eth2 and eth3 (there are chances that the device names might change in your environment, but it should not create problems). Once the network device configuration files are updated, restart the network services. Proceed with the following steps to edit the network configuration:
· Edit the /etc/sysconfig/network-scripts/ifcfg-eth2 file and add:
· ONBOOT=yes
BOOTPROTO=dhcp
· Edit the /etc/sysconfig/network-scripts/ifcfg-eth3 file and add:
· ONBOOT=yes
· BOOTPROTO=static
· IPADDR=192.168.57.201
NETMASK=255.255.255.0
· Edit the /etc/hosts file and add:
· 192.168.57.101 ceph-node1
· 192.168.57.102 ceph-node2
· 192.168.57.103 ceph-node3
· 192.168.57.200 ceph-client1
192.168.57.201 os-node1
9. Make sure the new node, os-node1, can communicate with the Ceph cluster nodes:
10.# ping ceph-node1
11.# ping ceph-node2
12.# ping ceph-node3
13. Since this is a test setup, you should disable firewall and set selinux to permissive to avoid complexity:
14.# setenforce 0
15.# service iptables stop
Installing OpenStack
In this section, we will give you step-by-step instructions to install the Icehouse release of OpenStack RDO. If you are curious to learn about RDO OpenStack installation, visit http://openstack.redhat.com/Quickstart.
1. Update the current OS packages to avoid any warnings/errors due to package version incompatibility:
2. # yum update -y
3. Install RDO packages:
4. # yum install -y https://repos.fedorapeople.org/repos/openstack/openstack-icehouse/rdo-release-icehouse-4.noarch.rpm
5. Install OpenStack packsack packages:
6. # yum install -y openstack-packstack
7. Finally, start the installation of OpenStack components using packstack, which performs absolute hands-free installation of OpenStack:
8. # packstack --allinone
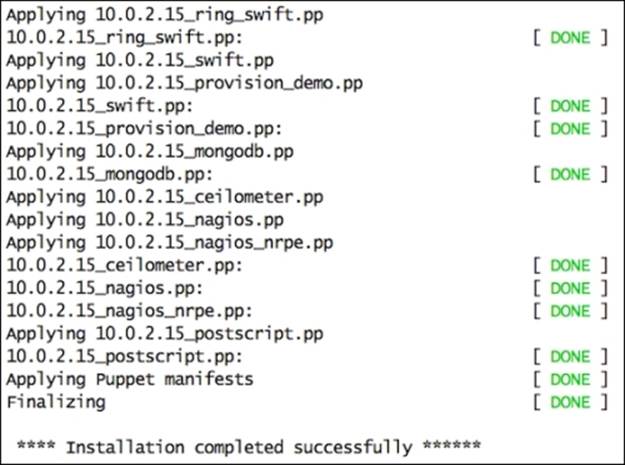
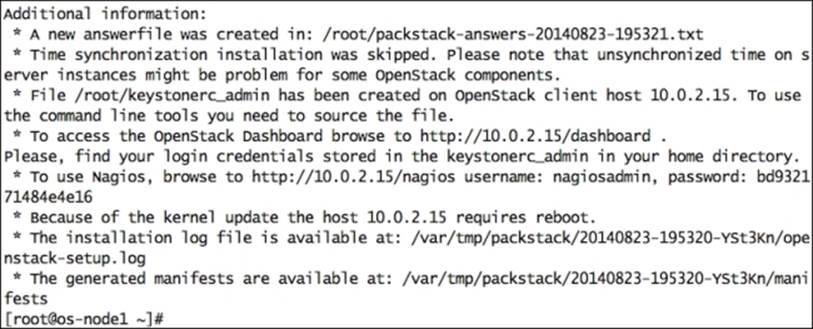
9. Once packstack completes the installation, it will display some additional information, including the OpenStack Horizon dashboard URL and credentials that will be used to operate OpenStack:
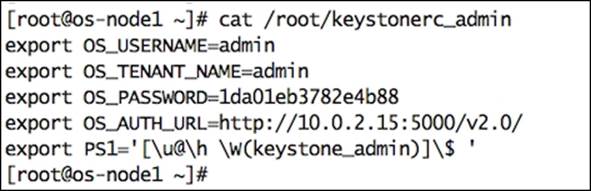
10. The login credentials for an admin account will be stored under the /root/keystone_rc file:
11. Finally, open the web browser, navigate to the OpenStack Horizon dashboard URL, and supply the credentials of the admin user:
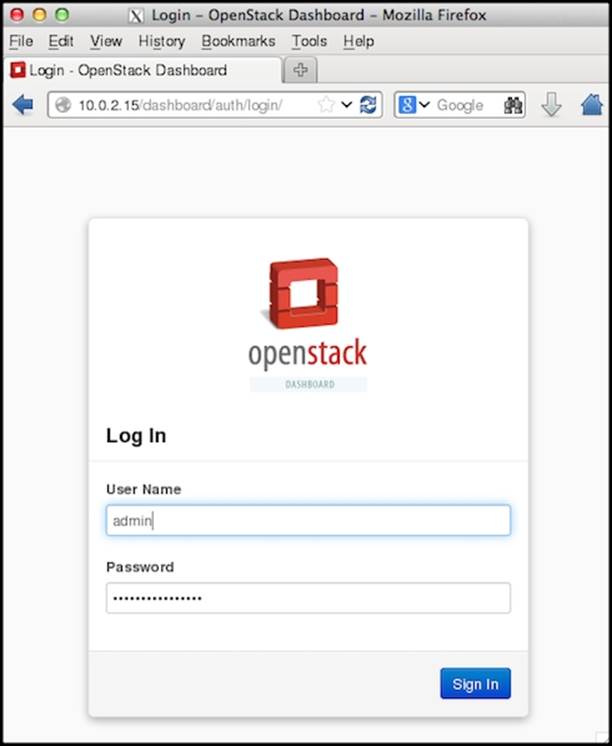
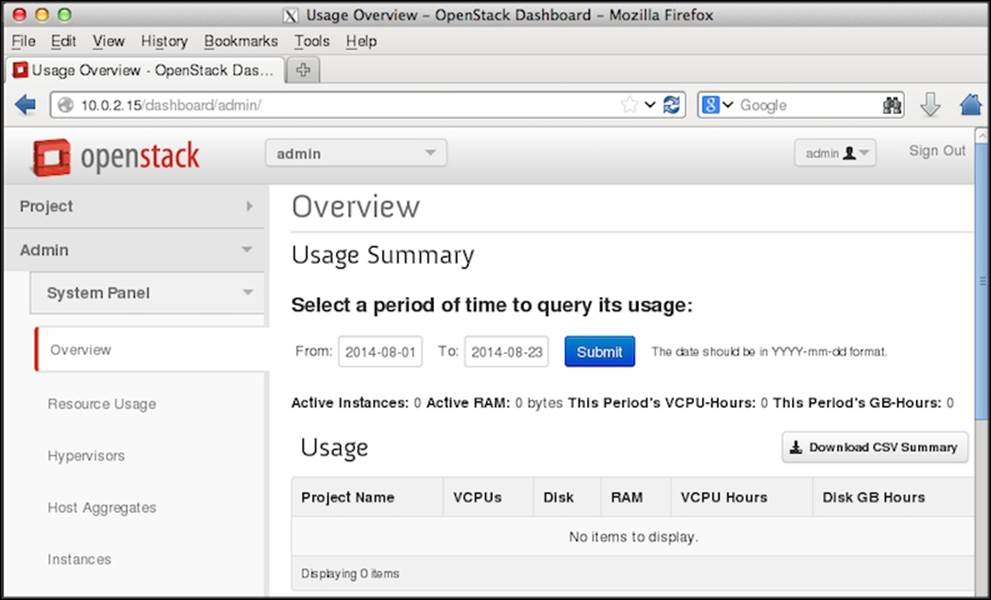
12. Now, you have successfully deployed a single node OpenStack environment that is ready for Ceph integration. You will be presented with the following screen:
Ceph with OpenStack
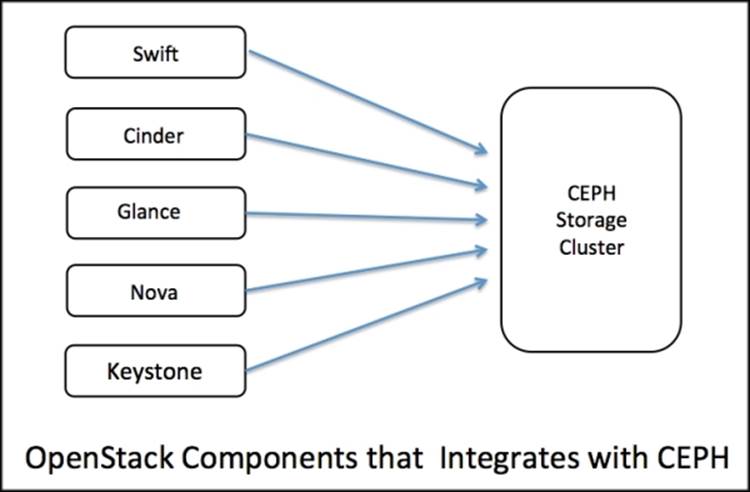
OpenStack is a modular system, which has unique components for a specific set of tasks. There are several components that require a reliable storage backend such as Ceph and extend full integration to it, as shown in the following diagram. Each of these components uses Ceph in its own way to store block devices and objects. A majority of the cloud deployment based on OpenStack and Ceph uses Cinder, Glance, and Swift integration with Ceph. Keystone integration is used when you need S3-compatible object storage on Ceph backend. Nova integration allows booting from Ceph volume capabilities to your OpenStack cloud.
Installing Ceph on an OpenStack node
OpenStack nodes should be Ceph clients in order to be able to access a Ceph cluster. For this, install Ceph packages on OpenStack nodes and make sure they can access Ceph clusters:
1. To install Ceph packages on OpenStack nodes, use the ceph-deploy utility from any of the Ceph monitor nodes. In our case, we will use ceph-node1 to install Ceph packages using the ceph-deploy tool:
2. # ceph-deploy install os-node1
3. Use ceph-deploy to copy Ceph client admin keyrings to OpenStack nodes:
4. # ceph-deploy admin os-node1
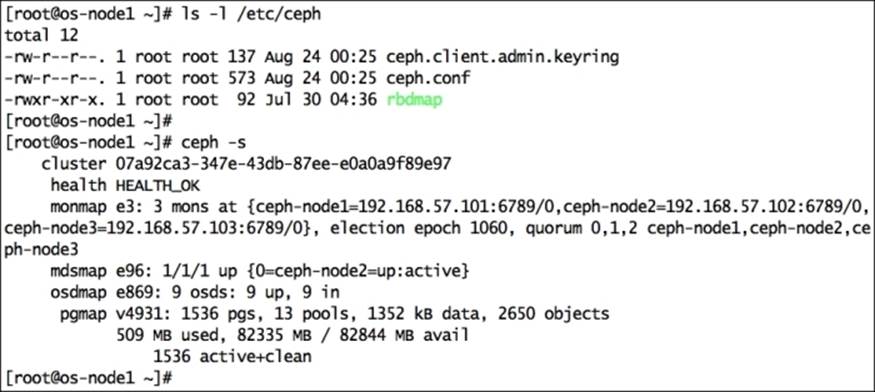
5. Verify the Ceph keyring and configuration file under /etc/ceph of the OpenStack node, and try to connect to cluster:
Configuring Ceph for OpenStack
At this point, your OpenStack node, os-node1, can connect to your Ceph cluster. We will next configure Ceph for OpenStack. To do this, execute the following commands from os-node1, unless otherwise specified:
1. Create dedicated Ceph pools for OpenStack Cinder and Glance. Make sure to use an appropriate number of PGs for your environment:
2. # ceph osd pool create volumes 128
3. # ceph osd pool create images 128
4. Create new users for Cinder and Glance to use the cephx authentication:
5. # ceph auth get-or-create client.cinder mon 'allow r' osd 'allow class-read object_prefix rbd_children, allow rwx pool=volumes,allow rx pool=images'
6. # ceph auth get-or-create client.glance mon 'allow r' osd 'allow class-read object_prefix rbd_children, allow rwx pool=images'
7. Create keyring files for newly created users client.cinder and client.glance, and allow them to be accessible by Cinder and Glance OpenStack users:
8. # ceph auth get-or-create client.cinder | tee /etc/ceph/ceph.client.cinder.keyring
9. # chown cinder:cinder /etc/ceph/ceph.client.cinder.keyring
10.# ceph auth get-or-create client.glance | tee /etc/ceph/ceph.client.glance.keyring
11.# chown glance:glance /etc/ceph/ceph.client.glance.keyring
Note
Make sure that the /etc/ceph/ceph.conf file has read permission for Cinder users. Usually, it should have permission of 644.
12. The libvirt process requires accessing a Ceph cluster while attaching or detaching a block device from Cinder and creating a temporary copy of the client.cinder key that will be added to libvirt in the next step:
13.# ceph auth get-key client.cinder | tee /tmp/client.cinder.key
14. Add the secret key to libvirt and remove the temporary copy of the client.cinder key:
1. Generate a UUID:
2. # uuidgen
3. Create a secret file with the following content, and make sure you use the unique UUID that you generated in the last step:
4. cat > secret.xml <<EOF
5. <secret ephemeral='no' private='no'>
6. <uuid>63b033bb-3305-479d-854b-cf3d0cb6a50c</uuid>
7. <usage type='ceph'>
8. <name>client.cinder secret</name>
9. </usage>
10.</secret>
EOF
11. Define the secret and keep the generated secret value safe. We will require this secret value in the further steps:
12.# virsh secret-define --file secret.xml
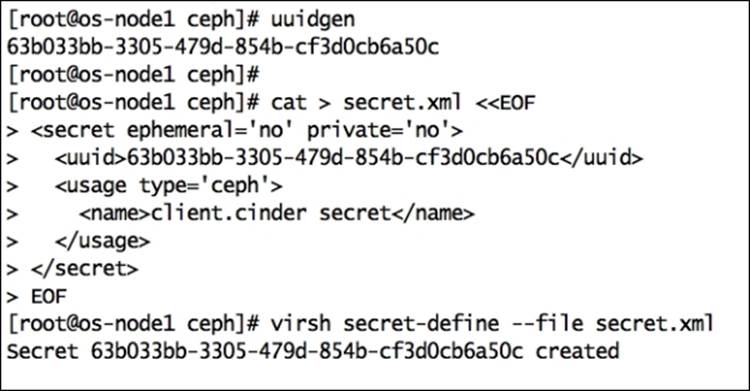
Note
The secret key generated in this step is usually similar to the UUID.
13. Set the secret value and delete temporary files. Deleting the files is optional; it is just to keep the system clean:
14.# virsh secret-set-value --secret 63b033bb-3305-479d-854b-cf3d0cb6a50c --base64 $(cat /tmp/client.cinder.key) && rm /tmp/client.cinder.key secret.xml

Configuring OpenStack Cinder
At this point, we have covered configuration from Ceph's point of view. Next, we will configure the OpenStack components Cinder, Glance, and Nova to use Ceph. Cinder supports multiple backends. To configure Cinder to use Ceph, edit the Cinder configuration file and define the RBD driver that OpenStack Cinder should use.
To do this, you must also specify the pool name that we created for Cinder volumes previously. On your OpenStack node, edit /etc/cinder/cinder.conf and perform the following changes:
1. Navigate to the Options defined in cinder.volume.manager section of the /etc/cinder/cinder.conf file and add an RBD driver for Cinder:
volume_driver=cinder.volume.drivers.rbd.RBDDriver
2. Navigate to the Options defined in cinder.volume.drivers.rbd section of the /etc/cinder/cinder.conf file and add (replace the secret UUID with your environment's value) the following:
3. rbd_pool=volumes
4. rbd_user=cinder
5. rbd_ceph_conf=/etc/ceph/ceph.conf
6. rbd_flatten_volume_from_snapshot=false
7. rbd_secret_uuid=63b033bb-3305-479d-854b-cf3d0cb6a50c
rbd_max_clone_depth=5
8. Navigate to the Options defined in cinder.common.config section of the /etc/cinder/cinder.conf file and add:
9. glance_api_version=2
Note
If you are using multiple backends, this option should be placed in the [default] section of the /etc/cinder/cinder.conf file.
10. Save the Cinder configuration file and exit the editor.
Configuring OpenStack Nova
To boot OpenStack instances directly into Ceph, that is, to boot from volume feature, you must configure the ephemeral backend for Nova. To achieve this, edit /etc/nova/nova.conf:
1. Navigate to the Options defined in nova.virt.libvirt.imagebackend section and add:
2. images_type=rbd
3. images_rbd_pool=rbd
images_rbd_ceph_conf=/etc/ceph/ceph.conf
4. Navigate to the Options defined in nova.virt.libvirt.volume section and add (replace the secret UUID with your environment's value):
5. rbd_user=cinder
rbd_secret_uuid=63b033bb-3305-479d-854b-cf3d0cb6a50c
Configuring OpenStack Glance
OpenStack Glance is capable of supporting multiple storage backends. In this section, we will learn to configure OpenStack Glance to use Ceph to store Glance images:
1. To use Ceph block devices to store Glance images, edit the /etc/glance/glance-api.conf file and add:
· The default_store=rbd statement to the default section of the glance-api.conf file
· Navigate to the RBD Store Options section of the glance-api.conf file and add:
· rbd_store_user=glance
rbd_store_pool=images
· If you want copy-on-write cloning of images, then set show_image_direct_url=True
2. Save the Glance configuration file and exit the editor.
Restarting OpenStack services
To bring all the changes into effect, you must restart OpenStack services using the following commands:
# service openstack-glance-api restart
# service openstack-nova-compute restart
# service openstack-cinder-volume restart
Testing OpenStack Cinder
You can operate Cinder from either CLI or GUI. We will now test Cinder from each of these interfaces.
Using Cinder CLI
Perform the following steps:
1. Source the OpenStack RDO keystonerc_admin file that will be autocreated post OpenStack installation:
2. # source /root/keystonerc_admin
3. Create your first Cinder volume of 10 GB, which should be created on your default Ceph storage backend:
4. # cinder create --display-name ceph-volume01 --display-description "Cinder volume on CEPH storage" 10
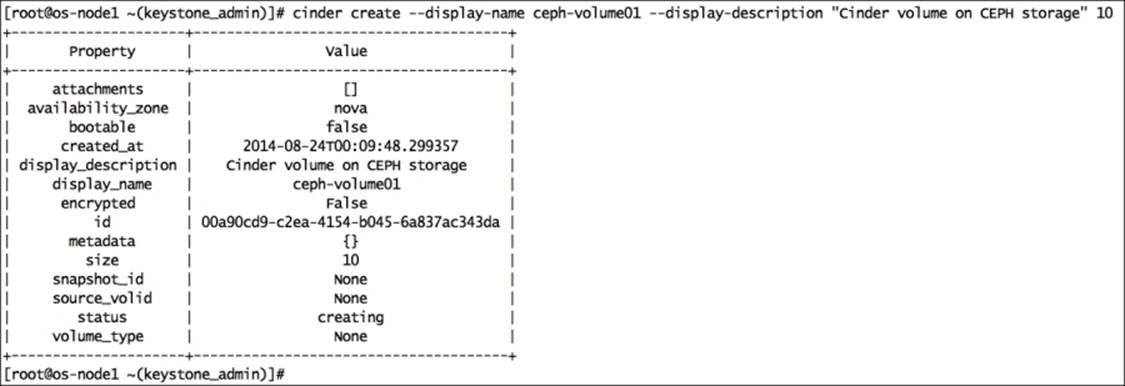
5. While OpenStack Cinder is creating your volume, you can monitor your Ceph cluster using #ceph -s, where you observe cluster write operations.
6. Finally, check the status of your Cinder volume; make sure you have the status of your Cinder volume as available:
7. # cinder list

Using Horizon GUI
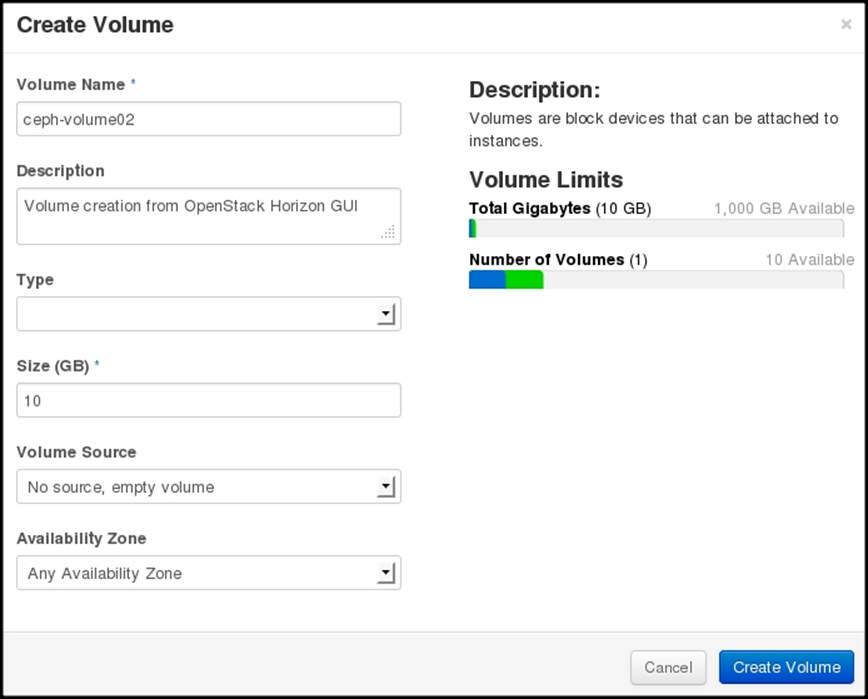
You can also create and manage your Cinder volumes from the OpenStack Horizon dashboard. Open the web interface of OpenStack Horizon and navigate to the volume section:
1. Click on Create volume and provide the volume details.
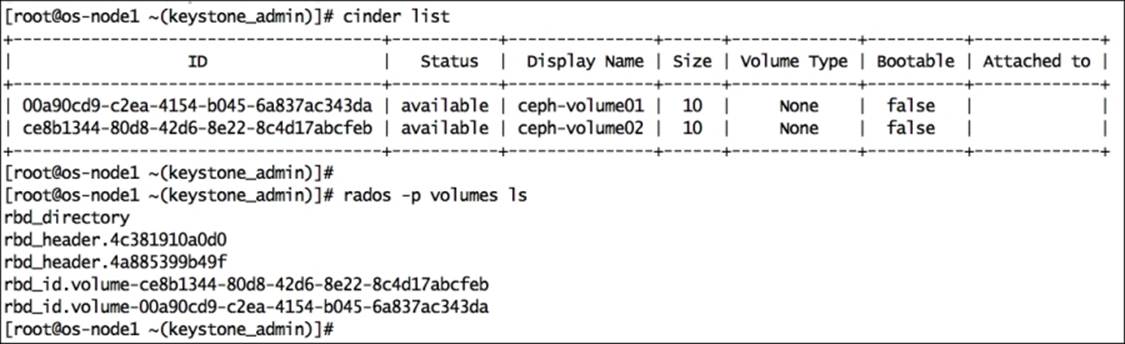
2. Once you create the volume from Horizon GUI, it will display the status of all your volumes:
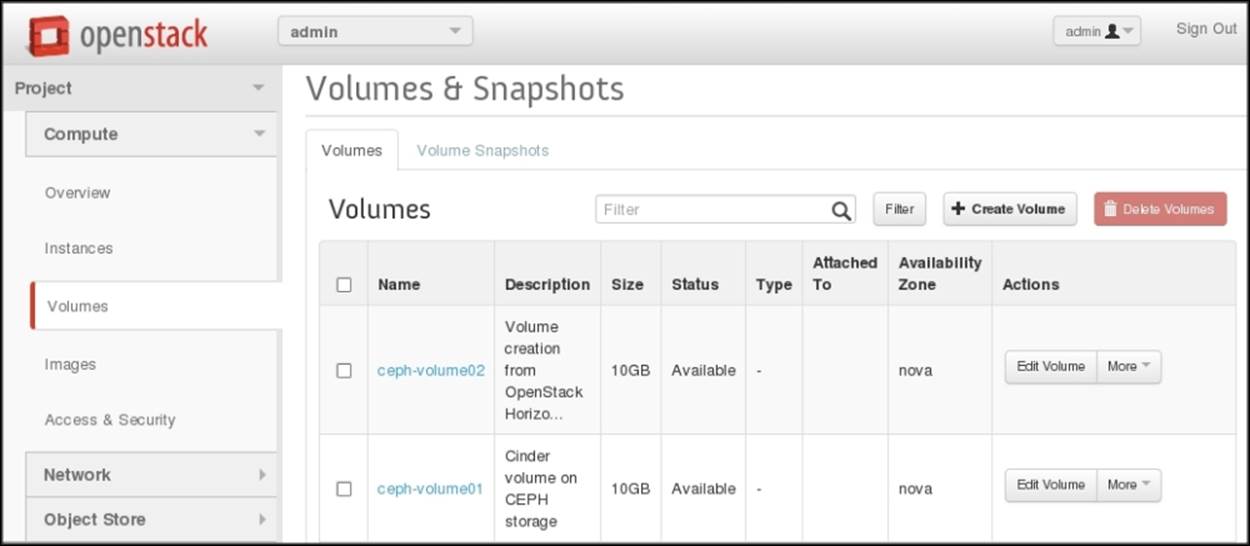
3. Finally, check your Ceph volumes pool; you will find objects in your Ceph pool containing the volume ID. For instance, you can identify the object name, which is rbd_id.volume-00a90cd9-c2ea-4154-b045-6a837ac343da, for the Cinder volume named ceph-volume01having the ID 00a90cd9-c2ea-4154-b045-6a837ac343da in Ceph volume pools:
4. You can attach these volumes to OpenStack VM instances as block storage and access them based on your requirements.
Testing OpenStack Glance
You can use OpenStack Glance to store operating system images for instances. These images will eventually be stored on storage backed by Ceph.
Perform the following steps to test OpenStack Glance:
1. Before adding a Glance image, check the Ceph images pool. Since we have not imported any image, the Ceph pool should be empty:
2. # rados -p images ls
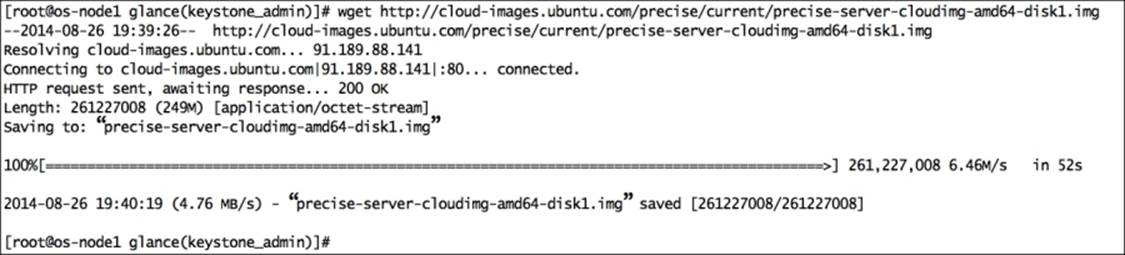
3. Download images that can be used with OpenStack from the Internet:
4. # wget http://cloud-images.ubuntu.com/precise/current/precise-server-cloudimg-amd64-disk1.img
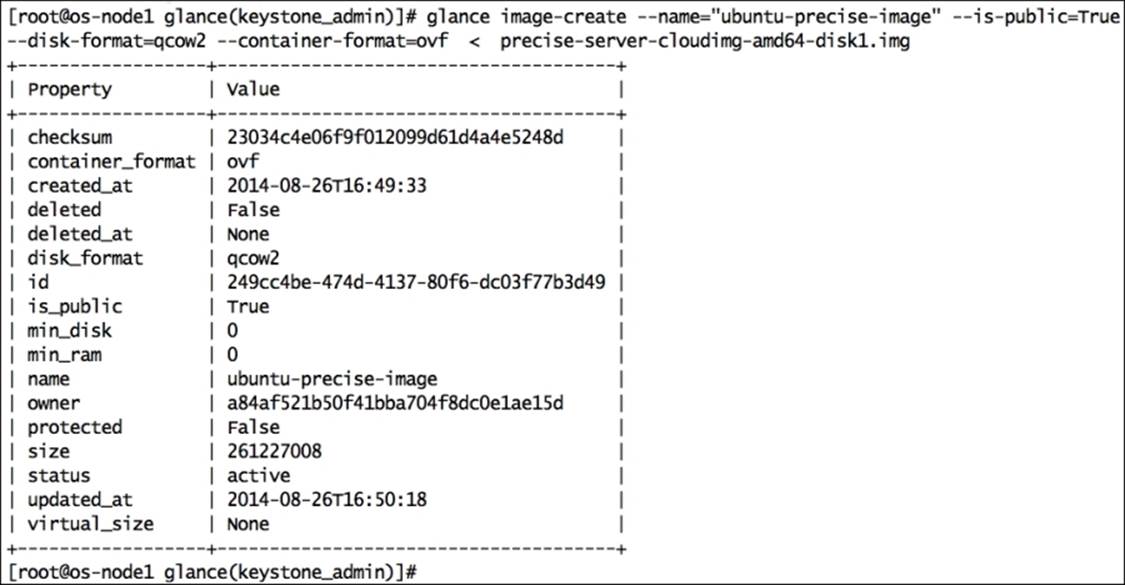
5. Create a Glance image:
6. # glance image-create --name="ubuntu-precise-image" --is-public=True --disk-format=qcow2 --container-format=ovf < precise-server-cloudimg-amd64-disk1.img
7. Check the Glance image list as well as query your Ceph image pool for the Glance image ID:
8. # glance image-list
9. # rados -p images ls | grep -i 249cc4be-474d-4137-80f6-dc03f77b3d49
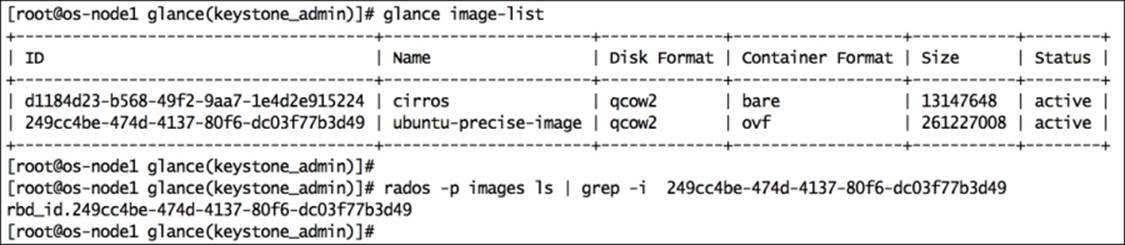
10. The output of the preceding commands confirms that we have imported an Ubuntu image into OpenStack Glance, which has been stored on Ceph image volumes.
Summary
In this chapter, we discussed OpenStack and its components and how seamlessly they integrate with Ceph. The demonstration section would have helped you to learn the step-by-step integration of OpenStack followed by testing each OpenStack component. In the next chapter, we will focus on some general performance-tuning tricks for your Ceph cluster as well as benchmarking your cluster.
All materials on the site are licensed Creative Commons Attribution-Sharealike 3.0 Unported CC BY-SA 3.0 & GNU Free Documentation License (GFDL)
If you are the copyright holder of any material contained on our site and intend to remove it, please contact our site administrator for approval.
© 2016-2026 All site design rights belong to S.Y.A.