Learning Ceph (2015)
Chapter 4. Ceph Internals
In this chapter, we will cover the following points:
· Ceph objects
· The CRUSH algorithm
· Placement groups
· Ceph pools
· Ceph data management
Ceph under the hood
You are now very well versed in the architecture of Ceph and its core components; next, we will focus on how Ceph does its magic in the background. There are a few elements that work undercover and form the basis of a Ceph cluster. Let's get to know about these in detail.
Object
An object typically comprises data and metadata components that are bundled together and provided with a globally unique identifier. The unique identifier makes sure that there is no other object with the same object ID in the entire storage cluster, and thus guarantees object uniqueness.
Unlike file-based storage, where files are limited by size, objects can be of enormous size along with variable-sized metadata. In an object, data is stored with rich metadata, storing information about context and content of data. The metadata of object storage allows users to properly manage and access unstructured data. Consider the following example of storing a patient record as an object:
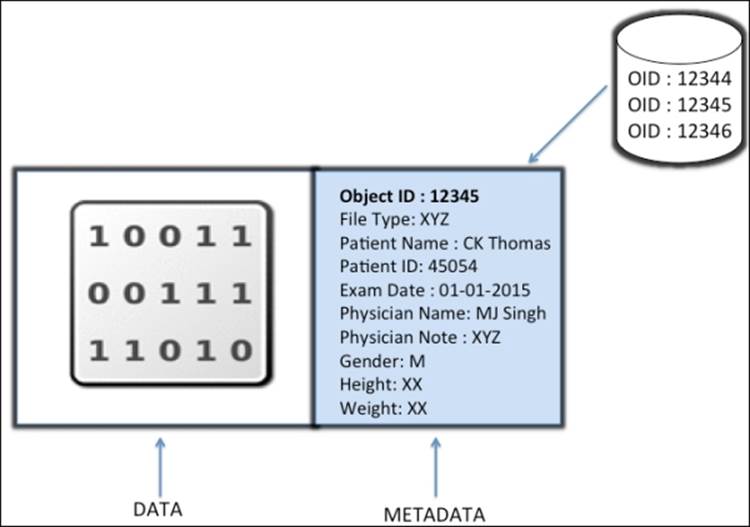
An object is not limited to any type or amount of metadata; it gives you the flexibility to add a custom type in metadata, and thus gives you full ownership of your data. It does not use a directory hierarchy or a tree structure for storage; rather, it is stored in a flat address space containing billions of objects without any complexity. Objects can be stored locally, or they can be geographically separated in a flat-address space, that is, in a contiguous storage space. This storing mechanism helps objects to uniquely represent themselves in the entire cluster. Any application can retrieve data from an object based on its object ID through the use of RESTful API calls. In the same way that URLs work on the Internet, an object ID serves as a unique pointer to its object. These objects are stored in Object-based Storage Device (OSDs) in a replicated fashion, which provide high availability. When the Ceph storage cluster receives data-write requests from clients, it stores the data as objects. The OSD daemon then writes the data to a file in the OSD filesystem.
Locating objects
Every unit of data in Ceph is stored in the form of objects inside a pool. A Ceph pool is a logical partition to store objects that provides an organized way of storage. We will learn about pools in detail later in this chapter. Now, let's discover objects, which are the smallest unit of data storage in Ceph. Once a Ceph cluster is deployed, it creates some default storage pools as data, metadata, and RBD pools. After MDS deployment on one of the Ceph nodes, it creates objects inside the metadata pool, which are required by CephFS to function properly. Since we deployed a Ceph cluster earlier in this book, let's examine these objects:
Tip
Starting from the Ceph Giant release, which is the next release after Firefly, metadata and data pools will not be created by default until you configure MDS for your Ceph cluster. The only default pool is the RBD pool.
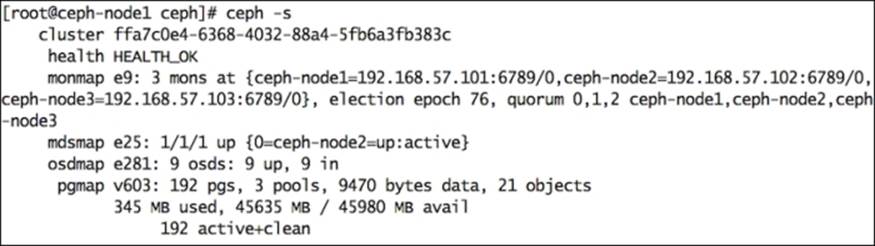
1. Check the status of your Ceph cluster using the following command in pgmap. You will find three pools and some objects:
2. # ceph -s
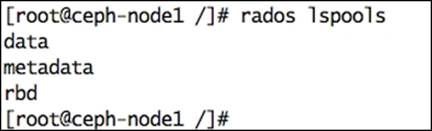
3. List the pool names of your Ceph cluster using the following command. It will show you the default pools, since we did not create any pool. Three pools will be listed here.
4. # rados lspools
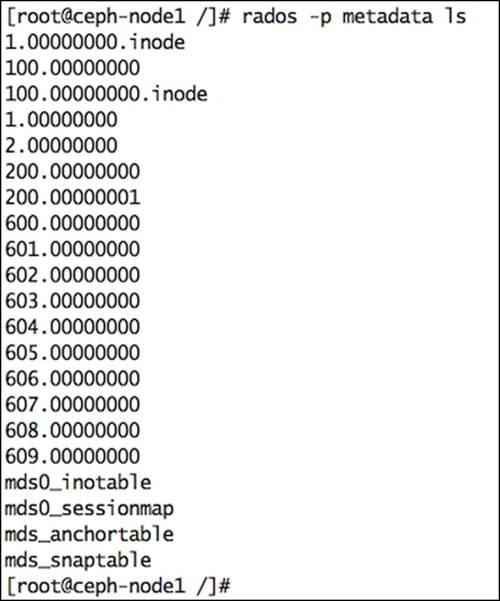
5. Finally, list the object names from the metadata pool. You will find system-generated objects in this pool:
6. # rados -p metadata ls
CRUSH
For the last three decades, storage mechanisms have involved storing data and its metadata. The metadata, which is the data about data, stores information such as where the data is actually stored in a series of storage nodes and disk arrays. Each time new data is added to the storage system, its metadata is first updated with the physical location where the data will be stored, after which the actual data is stored. This process has been proven to work well when we have a low storage size on the scale of gigabytes to a few terabytes of data, but what about storing petabyte- or exabyte-level data? This mechanism will definitely not be suitable for storage in the future. Moreover, it creates a single point of failure for your storage system. Unfortunately, if you lose your storage metadata, you lose all your data. So, it's of utmost importance to keep central metadata safe from disasters by any means, either by keeping multiple copies on a single node or replicating the entire data and metadata for a higher degree of fault tolerance. Such complex management of metadata is a bottleneck in a storage system's scalability, high availability, and performance.
Ceph is revolutionary when it comes to data storage and management. It uses the Controlled Replication Under Scalable Hashing (CRUSH) algorithm, the intelligent data distribution mechanism of Ceph. The CRUSH algorithm is one of the jewels in Ceph's crown; it is the core of the entire data storage mechanism of Ceph. Unlike traditional systems that rely on storing and managing a central metadata / index table, Ceph uses the CRUSH algorithm to deterministically compute where the data should be written to or read from. Instead of storing metadata, CRUSH computes metadata on demand, thus removing all the limitations encountered in storing metadata in a traditional way.
The CRUSH lookup
The CRUSH mechanism works in such a way that the metadata computation workload is distributed and performed only when needed. The metadata computation process is also known as a CRUSH lookup, and today's computer hardware is powerful enough to perform CRUSH lookup operations quickly and efficiently. The unique thing about a CRUSH lookup is that it's not system dependent. Ceph provides enough flexibility to clients to perform on-demand metadata computation, that is, perform a CRUSH lookup with their own system resources, thus eliminating central lookups.
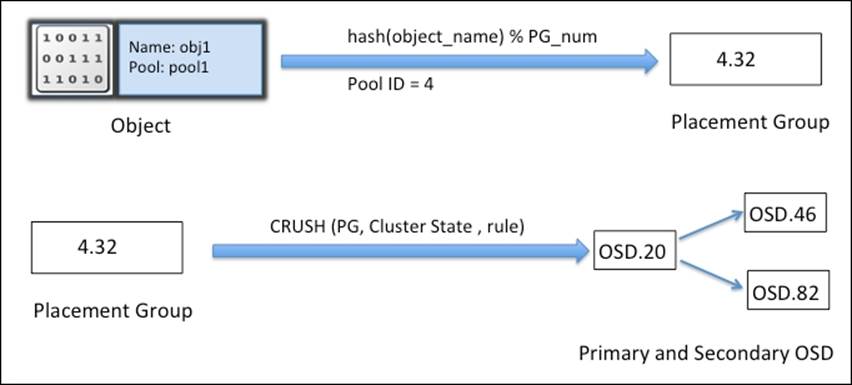
For a read-and-write operation to Ceph clusters, clients first contact a Ceph monitor and retrieve a copy of the cluster map. The cluster map helps clients know the state and configuration of the Ceph cluster. The data is converted to objects with object and pool names/IDs. The object is then hashed with the number of placement groups to generate a final placement group within the required Ceph pool. The calculated placement group then goes through a CRUSH lookup to determine the primary OSD location to store or retrieve data. After computing the exact OSD ID, the client contacts this OSD directly and stores the data. All these compute operations are performed by the clients, hence it does not impact cluster performance. Once the data is written to the primary OSD, the same node performs a CRUSH lookup operation and computes the location for secondary placement groups and OSDs so that the data is replicated across clusters for high availability. Consider the following example for a CRUSH lookup and object placement to OSD.
First of all, the object name and cluster placement group number are applied with the hash function and based on pool IDs; a placement group ID, PGID, is generated. Next, a CRUSH lookup is performed on this PGID to find out the primary and secondary OSD to write data.
The CRUSH hierarchy
CRUSH is fully infrastructure aware and absolutely user configurable; it maintains a nested hierarchy for all components of your infrastructure. The CRUSH device list usually includes disk, node, rack, row, switch, power circuit, room, data center, and so on. These components are known as failure zones or CRUSH buckets. The CRUSH map contains a list of available buckets to aggregate devices into physical locations. It also includes a list of rules that tells CRUSH how to replicate data for different Ceph pools. The following diagram will give you an overview of how CRUSH looks at your physical infrastructure:
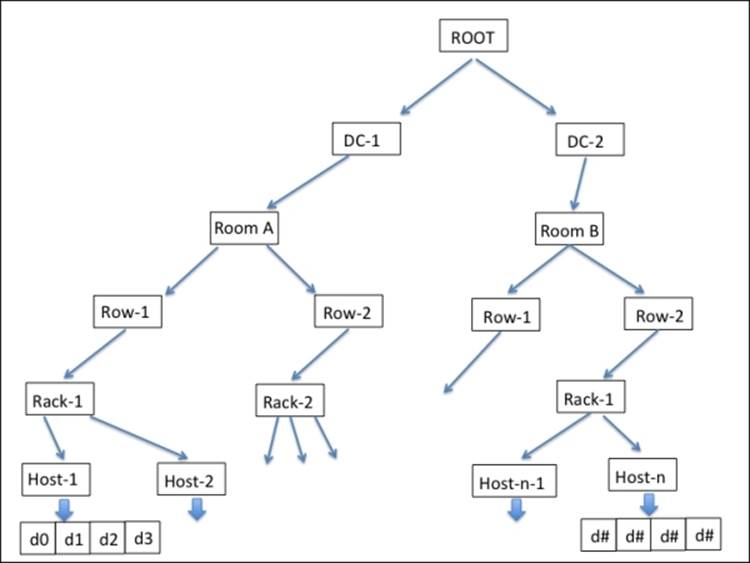
Depending on your infrastructure, CRUSH spreads data and its replica across these failure zones such that it should be safe and available even if some components fail. This is how CRUSH removes single points of failure problems from your storage infrastructure, which is made up of commodity hardware, and yet guarantees high availability. CRUSH writes data evenly across the cluster disks, which improves performance and reliability, and forces all the disks to participate in the cluster. It makes sure that all cluster disks are equally utilized, irrespective of their capacity. To do so, CRUSH allocates weights to each OSD. The higher the weight of an OSD, the more physical storage capacity it will have, and CRUSH will write more data to such OSDs. Hence, on average, OSDs with a lower weight are equally filled as compared to OSDs with a higher weight.
Recovery and rebalancing
In an event of failure of any component from the failure zone, Ceph waits for 300 seconds, by default, before it marks the OSD down and out and initiates the recovery operation. This setting can be controlled using the mon osd down out interval parameter under a Ceph cluster configuration file. During the recovery operation, Ceph starts regenerating the affected data that was hosted on the node that failed.
Since CRUSH replicates data to several disks, these replicated copies of data are used at the time of recovery. CRUSH tries to move a minimum amount of data during recovery operations and develops a new cluster layout, making Ceph fault tolerant even after the failure of some components.
When a new host or disk is added to a Ceph cluster, CRUSH starts a rebalancing operation, under which it moves the data from existing hosts/disks to a new host/disk. Rebalancing is performed to keep all disks equally utilized, which improves the cluster performance and keeps it healthy. For example, if a Ceph cluster contains 2000 OSDs, and a new system is added with 20 new OSDs, only 1 percent of data will be moved during the rebalancing operation, and all the existing OSDs will work in parallel to move the data, helping the operation to complete quickly. However, for Ceph clusters that are highly utilized, it is recommended to add new OSDs with weight 0 and gradually increase their weight to a higher number based on their size. In this way, the new OSD will exert less rebalancing load on Ceph clusters and avoid performance degradation.
Editing a CRUSH map
When we deploy Ceph with ceph-deploy, it generates a default CRUSH map for our configuration. The default CRUSH map is idle in the testing and sandbox environment, but if you plan to deploy a Ceph cluster in a large production environment, you should consider developing a custom CRUSH map for your environment. The following process will help you to compile a new CRUSH map:
1. Extract your existing CRUSH map. With -o, Ceph will output a compiled CRUSH map to the file you specify:
2. # ceph osd getcrushmap -o crushmap.txt
3. Decompile your CRUSH map. With -d, Ceph will decompile the CRUSH map to the file specified by -o:
4. # crushtool -d crushmap.txt -o crushmap-decompile
5. Edit the CRUSH map with any editor:
6. # vi crushmap-decompile
7. Recompile the new CRUSH map:
8. # crushtool -c crushmap-decompile -o crushmap-compiled
9. Set the new CRUSH map into the Ceph cluster:
10.# ceph osd setcrushmap -i crushmap-compiled
Customizing a cluster layout
Customizing a cluster layout is one of the most important steps towards building a robust and reliable Ceph storage cluster. It's equally important to install cluster hardware in a fault tolerant zone and include it in a high-available layout from the Ceph software perspective. The default Ceph deployment is not aware of noninteractive components such as rack, row, and data center. After initial deployment, we need to customize the layout as per our requirements. For example, if you execute the ceph osd tree command, you will notice that it will only have hosts and OSDs listed under root, which is the default. Let's try to allocate these hosts to racks:
1. Execute ceph osd tree to get the current cluster layout:

2. Add a few racks in your Ceph cluster layout:
3. # ceph osd crush add-bucket rack01 rack
4. # ceph osd crush add-bucket rack02 rack
5. # ceph osd crush add-bucket rack03 rack
6. Move each host under specific racks:
7. # ceph osd crush move ceph-node1 rack=rack01
8. # ceph osd crush move ceph-node2 rack=rack02
9. # ceph osd crush move ceph-node3 rack=rack03
10. Now, move each rack under the default root:
11.# ceph osd crush move rack03 root=default
12.# ceph osd crush move rack02 root=default
13.# ceph osd crush move rack01 root=default
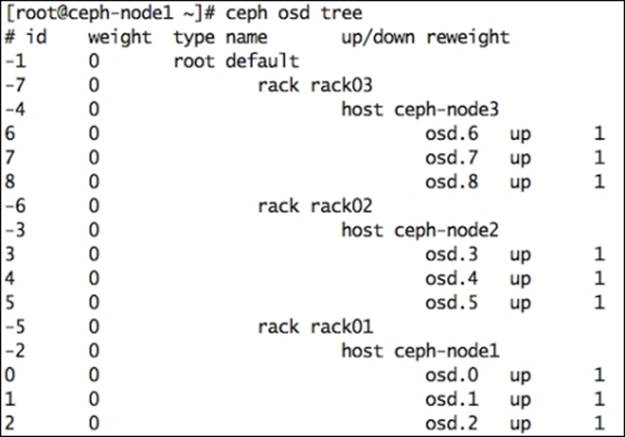
14. Check your new layout. You will notice that all your hosts have now been moved under specific racks. In this way, you can customize your CRUSH layouts to complement your physically installed layout:
Placement groups
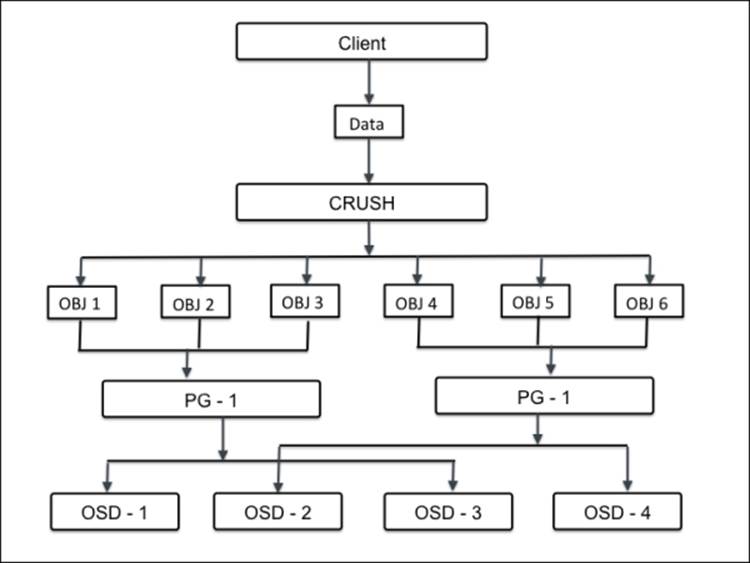
When a Ceph cluster receives requests for data storage, it splits into sections known as placement groups (PG). However, CRUSH data is first broken down into a set of objects, and based on the hash operation on object names, replication levels and total number of placement groups in the system, placement group IDs are generated. A placement group is a logical collection of objects that are replicated on OSDs to provide reliability in a storage system. Depending on the replication level of your Ceph pool, each placement group is replicated and distributed on more than one OSD of a Ceph cluster. You can consider a placement group as a logical container holding multiple objects such that this logical container is mapped to multiple OSDs. The placement groups are essential for the scalability and performance of a Ceph storage system.
Without placement groups, it will be difficult to manage and track tens of millions of objects that are replicated and spread over hundreds of OSDs. The management of these objects without a placement group will also result in a computational penalty. Instead of managing every object individually, a system has to manage placement groups with numerous objects. This makes Ceph a more manageable and less complex function. Each placement group requires some amount of system resources, CPU, and memory since every placement group has to manage multiple objects. The number of placement groups in a cluster should be meticulously calculated. Usually, increasing the number of placement groups in your cluster reduces the per OSD load, but the increment should always be done in a regulated way. 50 to 100 placement groups per OSD is recommended. This is to avoid high resource utilization from an OSD node. As your data needs to increase, you will need to scale your cluster up by adjusting placement group counts. When devices are added or removed from a cluster, most of the placement groups remain in position; CRUSH manages the relocation of placement groups across clusters.
Note
PGP is the total number of placement groups for placement purposes. This should be equal to the total number of placement groups.
Calculating PG numbers
Deciding the correct number of placement groups is an essential step in building enterprise class Ceph storage clusters. Placement groups can improve or affect storage performance to a certain extent.
The formula to calculate the total number of placement groups for a Ceph cluster is:
Total PGs = (Total_number_of_OSD * 100) / max_replication_count
This result must be rounded up to the nearest power of 2. For example, if a Ceph cluster has 160 OSDs and the replication count is 3, the total number of placement groups will come as 5333.3, and rounding up this value to the nearest power of 2 will give the final value as 8192 PGs.
We should also make a calculation to find out the total number of PGs per pool in the Ceph cluster. The formula for this is as follows:
Total PGs = ((Total_number_of_OSD * 100) / max_replication_count) / pool count
We will consider the same example that we used earlier. The total number of OSDs is 160, the replication level is 3, and the total number of pools is three. Based on this assumption, the formula will generate 1777.7. Finally, rounding it up to the power of 2 will give 2048 PGs per pool.
It's important to balance the number of PGs per pool with the number of PGs per OSD in order to reduce the variance per OSD and avoid the recovery process, which is slow.
Modifying PG and PGP
If you manage a Ceph storage cluster, you might need to change the PG and PGP count for your pool at some point. Before proceeding towards PG and PGP modification, let's understand what PGP is.
PGP is Placement Group for Placement purpose, which should be kept equal to the total number of placement groups (pg_num). For a Ceph pool, if you increase the number of placement groups, that is, pg_num, you should also increase pgp_num to the same integer value as pg_num so that the cluster can start rebalancing. The undercover rebalancing mechanism can be understood in the following way.
The pg_num value defines the number of placement groups, which are mapped to OSDs. When pg_num is increased for any pool, every PG of this pool splits into half, but they all remain mapped to their parent OSD. Until this time, Ceph does not start rebalancing. Now, when you increase the pgp_num value for the same pool, PGs start to migrate from the parent to some other OSD, and cluster rebalancing starts. In this way, PGP plays an important role in cluster rebalancing. Now, let's learn how to change pg_num and pgp_num:
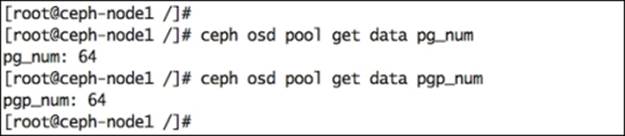
1. Check the existing PG and PGP numbers:
2. # ceph osd pool get data pg_num
3. # ceph osd pool get data pgp_num
4. Check the pool replication level by executing the following command, and look for the rep size value:
5. # ceph osd dump | grep size

6. Calculate the new placement group count for our setup using the following formula:
Total OSD = 9, Replication pool level (rep size) = 2, pool count = 3
Based on the preceding formula, the placement group count for each pool comes to 150, rounding it up to the next power of 2 gives us 256.
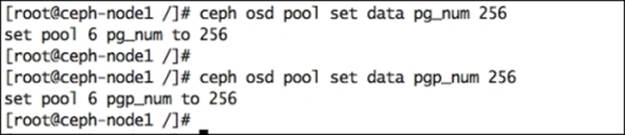
7. Modify the PG and PGP for the pool:
8. # ceph osd pool set data pg_num 256
9. # ceph osd pool set data pgp_num 256
10. Similarly, modify the PG and PGP numbers for metadata and RBD pools:

PG peering, up and acting sets
A Ceph OSD daemon performs the peering operation for the state of all objects and their metadata for particular PGs, which involves the agreement between OSDs storing a placement group. A Ceph storage cluster stores multiple copies of any object on multiple PGs, which are then stored on multiple OSDs. These OSDs are referred to as primary, secondary, tertiary, and so on. An acting set refers to a group of OSDs responsible for PGs. The primary OSD is known as the first OSD from the acting set and is responsible for the peering operation for each PG with its secondary/tertiary OSD. The primary OSD is the only OSD that entertains write operations from clients. The OSD, which is up, remains in the acting set. Once the primary OSD is down, it is first removed from the up set; the secondary OSD is then promoted to the primary OSD. Ceph recovers PGs of the failed OSD on to the new OSD and adds it to the up and acting sets to ensure high availability.
In a Ceph cluster, an OSD can be the primary OSD for some PGs, while at the same time, it's the secondary or tertiary OSD for other PGs.
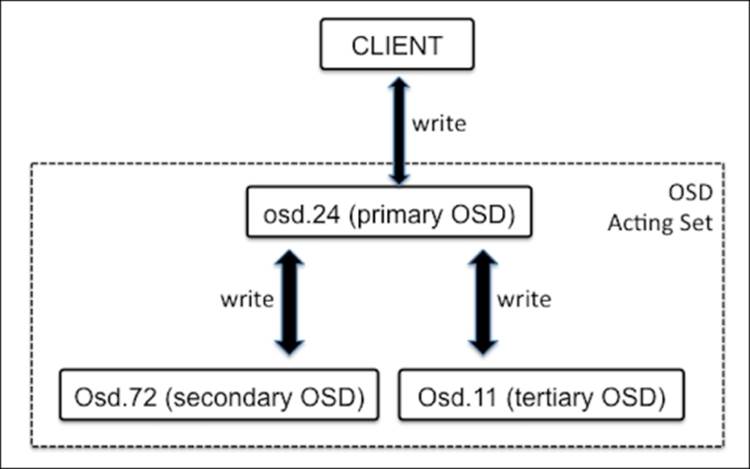
In the preceding example, the acting set contains three OSDs (osd.24, osd.72, and osd.11). Out of these, osd.24 is the primary OSD, and osd.72 and osd.11 are the secondary and tertiary OSDs, respectively. Since osd.24 is the primary OSD, it takes care of the peering operation for all the PGs that are on these three OSDs. In this way, Ceph makes sure PGs are always available and consistent.
Ceph pools
The concept of a pool is not new in storage systems. Enterprise storage systems are managed by creating several pools; Ceph also provides easy storage management by means of storage pools. A Ceph pool is a logical partition to store objects. Each pool in Ceph holds a number of placement groups, which in turn holds a number of objects that are mapped to OSDs across clusters. Hence, every single pool is distributed across cluster nodes, and thus this provides resilience. The initial Ceph deployment creates a default pool based on your requirement; it is recommended that you should create pools other than the default one.
A pool ensures data availability by creating the desired number of object copies, that is, replicas or erasure codes. The erasure coding (EC) feature has been recently added to Ceph, starting with the Ceph Firefly release. Erasure coding is a method of data protection in which data is broken into fragments, encoded, and then stored in a distributed manner. Ceph, being distributed in nature, makes use of EC amazingly well.
At the time of pool creation, we can define the replica size; the default replica size is 2. The pool replication level is very flexible; at any point in time, we can change it. We can also define the erasure code ruleset at the time of pool creation, which provides the same level of reliability but less amount of space as compared to the replication method.
Note
A pool can be created with either replication or erasure coding, but not both at the same time.
A Ceph pool is mapped with a CRUSH ruleset when data is written to a pool; it is identified by the CRUSH ruleset for the placement of objects and its replica inside the cluster. The CRUSH ruleset provides new capabilities to Ceph pools. For example, we can create a faster pool, also known as cache pool, out of SSD disk drives, or a hybrid pool out of SSD and SAS or SATA disk drivers.
A Ceph pool also supports snapshot features. We can use the ceph osd pool mksnap command to take snapshots of a particular pool, and we can restore these when necessary. In addition to this, a Ceph pool allows us to set ownership and access to objects. A user ID can be assigned as the owner of a pool. This is very useful in several scenarios where we need to provide restrictive access to a pool.
Pool operations
Performing Ceph pool operations is one of the day-to-day jobs for a Ceph admin. Ceph provides the rich cli tools for pool creation and management. We will learn about Ceph pool operation in the following section.
Creating and listing pools
Creating a Ceph pool requires a pool name, PG and PGP numbers, and a pool type which is either replicated or erasure. The default is replicated. Let's start creating a pool:
1. Create a pool, web-services, with 128 PG and PGP numbers. This will create a replicated pool as it's the default option.
2. # ceph osd pool create web-services 128 128
3. The listing of pools can be done in two ways. However, the output of the third command will provide us more information such as the pool ID, replication size, CRUSH ruleset, and PG and PGP numbers:
4. # ceph osd lspools
5. # rados lspools
6. # ceph osd dump | grep -i pool

7. The default replication size for a Ceph pool created with Ceph Emperor or an earlier release is 2; we can change the replication size using the following command:
8. # ceph osd pool set web-services size 3
9. # ceph osd dump | grep -i pool

Note
For Ceph Emperor and earlier releases, the default replication size for a pool was 2; this default replication size has been changed to 3 starting from Ceph Firefly.
10. Rename a pool, as follows:
11.# ceph osd pool rename web-services frontend-services
12.# ceph osd lspools
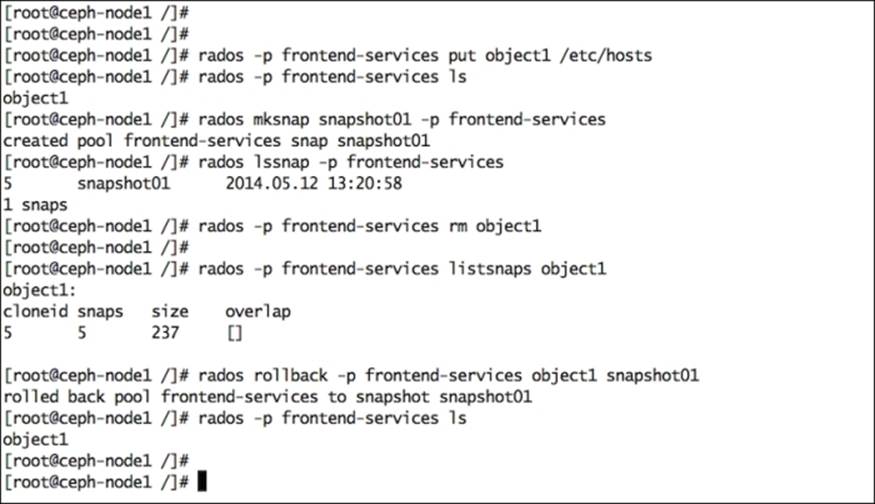
13. Ceph pools support snapshots; we can restore objects from a snapshot in the event of a failure. In the following example, we will create an object in a pool and then take pool snapshots. After this, we will intentionally remove the object from the pool and try to restore the object from its snapshot:
14.# rados –p frontend-services put object1 /etc/hosts
15.# rados –p frontend-services ls
16.# rados mksnap snapshot01 -p frontend-services
17.# rados lssnap -p frontend-services
18.# rados -p frontend-services rm object1
19.# rados -p frontend-services listsnaps object1
20.# rados rollback -p frontend-services object1 snapshot01
21.# rados -p frontend-services ls
22. Removing a pool will also remove all its snapshots. After removing a pool, you should delete CRUSH rulesets if you created them manually. If you created users with permissions strictly for a pool that no longer exists, you should consider deleting these users too:
23.# ceph osd pool delete frontend-services frontend-services --yes-i-really-really-mean-it
Ceph data management
The data management inside a Ceph cluster involves all the components that we have discussed so far. The coordination between these components gives power to Ceph to provide a reliable and robust storage system. Data management starts as soon as a client writes data to a Ceph pool. Once the client writes data to a Ceph pool, data is first written to a primary OSD based on the pool replication size. The primary OSD replicates the same data to its secondary and tertiary OSDs and waits for their acknowledgement. As soon as the secondary and tertiary OSDs complete data writing, they send an acknowledgement signal to the primary OSD, and finally, the primary OSD returns an acknowledgement to the client confirming the write operation completion.
In this way, Ceph consistently stores each client write operation and provides data availability from its replicas in the event of failures. Let's now see how data is stored in a Ceph cluster:
1. We will first create a test file, a Ceph pool, and set the pool replication to 3 copies:
2. # echo "Hello Ceph, You are Awesome like MJ" > /tmp/helloceph
3. # ceph osd pool create HPC_Pool 128 128
4. # ceph osd pool set HPC_Pool size 3
5. Put some data in this pool and verify its contents:
6. # rados -p HPC_Pool put object1 /tmp/helloceph
7. # rados -p HPC_Pool ls
8. The file has now been stored in a Ceph pool. As you know, everything in Ceph gets stored in the form of objects, which belong to a placement group, and these placement groups belong to multiple OSDs. Now, let's see this concept practically:
9. # ceph osd map HPC_Pool object1
This command will show you OSD maps for object1, which is inside HPC_Pool:

Let's discuss the output of this command:
· osdmap e566: This is the OSD map version ID or OSD epoch 556.
· pool 'HPC_Pool' (10): This is a Ceph pool name and pool ID.
· object 'object1': This is an object name.
· pg 10.bac5debc (10.3c): This is the placement group number, that is, object1, which belongs to PG 10.3c.
· up [0,6,3]: This is the OSD up set that contains osd.0, osd.6, and osd.3. Since the pool has a replication level set to 3, each PG will be stored in three OSDs. This also means that all the OSDs holding PG 10.3c are up. It is the ordered list of OSDs that is responsible for a particular OSD at a particular epoch as per the CRUSH map. This is usually the same as the acting set.
· acting [0,6,3]: osd.0, osd.6, and osd.3 are in the acting set where osd.0 is the primary OSD, osd.6 is the secondary OSD, and osd.3 is the tertiary OSD. The acting set is the ordered list of OSD, which is responsible for a particular OSD.
10. Check the physical location of each of these OSDs. You will find OSDs 0, 6, and 3 are physically separated on ceph-node1, ceph-node3, and ceph-node2 hosts, respectively.
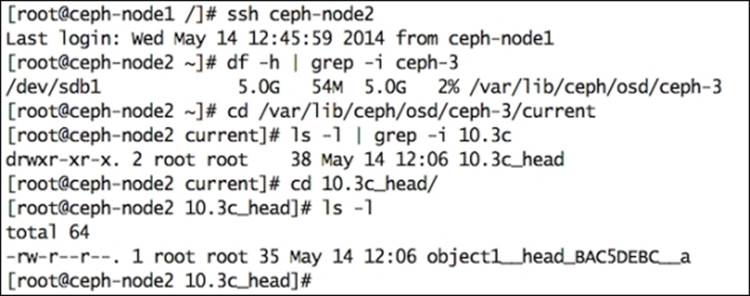
11. Now, log in to any of these nodes to check where the real data resides on OSD. You will observe that object1 is stored at PG 10.3c of ceph-node2 , on partition sdb1 which is osd.3; note that these PG ID and OSD ID might differ with your setup:
12.# ssh ceph-node2
13.# df -h | grep -i ceph-3
14.# cd /var/lib/ceph/osd/ceph-3/current
15.# ls -l | grep -i 10.3c
16.# cd 10.3c_head/
17.# ls -l
In this way, Ceph stores each data object in a replicated manner over different failure domains. This intelligence mechanism is the core of Ceph's data management.
Summary
In this chapter, we learned about Ceph's internal components, including objects, the CRUSH algorithm, placement groups, and pools, and how they interact with each other to provide a highly reliable and scalable storage cluster. This chapter is based on the practical approach for these components so that you can understand each bit of it. We also demonstrated how data is stored in the cluster, right from the point when it enters as a write request to a Ceph pool until it reaches the correct OSD filesystem and is stored in the form of an object. We recommend you repeat these practical examples on your test cluster; this will give you a broader view of how Ceph stores your data in a highly replicated, readily available form. If you are a system admin, you should focus more on discovering Ceph pools and CRUSH maps as mentioned in this chapter. This is something that is expected from a system admin both before and after cluster provisioning. In the next chapter, we will learn about Ceph cluster hardware planning and its various installation methods, followed by upgrading the Ceph cluster version and scaling it up.
All materials on the site are licensed Creative Commons Attribution-Sharealike 3.0 Unported CC BY-SA 3.0 & GNU Free Documentation License (GFDL)
If you are the copyright holder of any material contained on our site and intend to remove it, please contact our site administrator for approval.
© 2016-2026 All site design rights belong to S.Y.A.