Learning Ceph (2015)
Chapter 5. Deploying Ceph - the Way You Should Know
By this time, you must have learned enough about Ceph, including some hands-on practice. In this chapter, we will learn the following interesting stuff around Ceph:
· Ceph cluster hardware planning
· Preparing your Ceph installation
· Ceph cluster manual deployment
· Scaling up your cluster
· Ceph cluster deployment using the ceph-deploy tool
· Upgrading your Ceph cluster
Hardware planning for a Ceph cluster
Ceph is a software-based storage system that is designed to run on generally available commodity hardware. This ability of Ceph makes it an economic, scalable, and vendor-free storage solution.
Cluster hardware configuration requires planning based on your storage needs. The type of hardware as well as the cluster design are the factors that should be considered during the initial phase of project. Meticulous planning at an early stage can go a long way to avoid performance bottlenecks and helps in better cluster reliability. Hardware selection depends on various factors such as budget, whether the system needs to focus on performance or capacity or both, fault tolerance level, and the final use case. In this chapter, we will discuss general considerations with respect to hardware and cluster design.
Note
For more information on hardware recommendation, you can refer to Ceph's official documentation at http://ceph.com/docs/master/start/hardware-recommendations/.
Monitor requirements
A Ceph monitor takes care of the health of an entire cluster by maintaining cluster maps. They do not participate in storing cluster data. Hence they are not CPU and memory intensive and have fairly low system resource requirements. A low-cost, entry-level server with a single core CPU with a few gigabytes of memory is good enough in most cases for being a monitor node.
If you have an existing server with a fair amount of available system resources, you can choose that node to handle the additional responsibility of running Ceph monitors. In this case, you should make sure that the other services running on that node leave sufficient resources for Ceph monitor daemons. In a nonproduction environment where you have budget or hardware constraints, you can think of running Ceph monitors on physically separated virtual machines. However, the production practice is to run Ceph monitor on low-cost, low-configuration physical machines.
If you have configured your cluster to store logs on local monitor node, make sure you have a sufficient amount of local disk space on the monitor node to store the logs. For a healthy cluster, logs can grow as much as few gigabytes, but for an unhealthy cluster, when the debugging level is more, it could easily reach to several gigabytes. Please make sure that the cluster does not remain unhealthy for a long time with any space for logs. For a production environment, you should allocate a large enough partition for logs and develop a log rotation policy to keep up the free space.
The network for a monitor node should be redundant, since the monitor does not participate in cluster recovery. A redundant NIC with 1 Gbps is sufficient. Redundancy at the network level is important as the monitor forms quorum with other monitors, and failure of more than 50 percent of the monitor nodes would create a problem while connecting to a cluster. For a nonproduction environment, you can manage with a single NIC monitor node, but for a production setup, redundancy at the network level is a big factor.
OSD requirements
A typical Ceph cluster deployment creates one OSD for each physical disk in a cluster node, which is a recommended practice. However, OSD supports flexible deployment of one OSD per disk or one OSD per RAID volume. The majority of Ceph cluster deployment in a JBOD environment uses one OSD per physical disk. A Ceph OSD needs:
· CPU and memory
· An OSD journal (block device or a file)
· An underlying filesystem (XFS, ext4, and Btrfs)
· A separate OSD or cluster redundant network (recommended)
The recommended CPU and memory configuration that you should have is 1 GHz of CPU and 2 GB of RAM per OSD. This should be suitable for most of the cluster environments; however, it is crucial to note that in the event of a disaster, the recovery process requires more system resource than usual.
Tip
It is usually cost-effective to overallocate CPU and memory at an earlier stage of your cluster planning as we can anytime add more physical disks in a JBOD style to the same host if it has enough system resources, rather than purchasing an entirely new node, which is a bit costly.
The OSD is the main storage unit in Ceph; you should have plenty of hard disks as per your need for storage capacity. For a disk drive, it's usually the higher the capacity, the lower the price in terms of cost per gigabyte. You should take the cost-per-gigabyte advantage and use fairly large-sized OSDs. However, it's worth keeping in mind that the higher the size of a disk, the more memory it needs to operate.
From a performance point of view, you should consider separate journal disks for an OSD. Performance improvements have been seen when OSD journals are created on SSD disk partition and OSD data on a separate spinning disk. When SSD disks are used as journals, it improves cluster performance and manages workload quickly and efficiently. However, the downside of an SSD is that it increases storage cost per gigabyte for your cluster. The efficient way to invest in an SSD is to designate a single SSD disk as journals for more than one OSDs. The trade-off here is that if you lose the SSD journal disk, which is common for multiple OSDs, you will lose your data on those OSD disks, so try to avoid overloading the SSD with journals. A decent journal count should be two to four journals per SSD.
Network requirements
With respect to networking configuration, it's recommended that your cluster should have at least two separate networks, one for front-side data network or public networks and the other for the backside data network or clustered network. Two different physical networks are recommended so as to keep client data and Ceph cluster traffic separate. Most of the time, Ceph cluster traffic is more as compared to client data traffic as Ceph uses a cluster network to perform replication of each object as well as recovery in case of failure. If you keep both the networks physically the same, you might encounter some performance problems. Again, it is recommended to have two separate networks but you can always run your Ceph cluster with one physical network. These separate networks should have a bandwidth of a minimum of 1 Gbps. However, it's always good to have a 10 Gbps network based on your workload or performance needs. If you are designing a Ceph cluster that is going to scale up in the near future and might be responsible for a good amount of workload, starting with 10 Gbps physically separated networks for both data and cluster will be a wise choice as long as ROI and performance are concerned.
It is also advisable to have redundancy at each layer of your network configuration such as network controllers, ports, switches, and routers. The front-side data network or the public network provides interconnection between clients and the Ceph cluster. Every I/O operation between clients and the Ceph cluster will traverse from this interconnect. You should make sure that you have enough bandwidth per client. The second interconnect, which is your backend cluster network, is used internally by the Ceph OSD nodes. Since Ceph possesses distributed architecture, for every client write operation, data is replicated N times and stored across cluster. So for a single write operation, the Ceph cluster has to write N* the amount of one operation. All of this replicated data travels to peer nodes through cluster interconnect network. In addition to initial write replication, cluster network is also used for data rebalancing and recovery. Hence it plays a vital role for deciding your cluster performance.
Considering your business needs, workload, and overall performance, you should always rethink your network configuration and can opt for a 40 Gbps separate interconnect for both public as well as cluster network. This can make significant improvements for extra large Ceph clusters of hundreds of terabytes in size. Most of the cluster deployment relies on Ethernet networks; however, InfiniBand is also gaining popularity as high-speed Ceph frontend and backend networks. As an optional case, based on your budget, you can even consider a separate network for management as well as an emergency network to provide additional layer of network redundancy to your production cluster.
MDS requirements
As compared to the Ceph monitor (MON) and OSD, Ceph MDS is a bit more resource hungry. They require significantly high CPU processing powers with quad core or more. Ceph MDS depends a lot on data caching; as they need to serve data quickly, they would require plenty of RAM. The higher the RAM for Ceph MDS, the better the performance of CephFS will be. If you have a high amount of workload with CephFS, you should keep Ceph MDS on dedicated physical machines with relatively more physical CPU cores and memory. A redundant network interface with 1 GB or more speed will work for most cases for Ceph MDS.
Tip
It is recommended that you use separate disks for operating system configured under RAID for MON, OSDs, and MDS. You should not use an operating system disk/partition for cluster data.
Setting up your VirtualBox environment – again
In Chapter 2, Ceph Instant Deployment, we created three VirtualBox virtual machines, which we used for deploying your first instant Ceph cluster. You should now destroy that Ceph cluster and uninstall Ceph packages or destroy those virtual machines. In this chapter, we will be installing Ceph again but in a different way. You should follow the Creating a sandbox environment with VirtualBox section in Chapter 2, Ceph Instant Deployment to recreate virtual machines that we will be using throughout this chapter.
Preparing your Ceph installation
Earlier in this chapter, we discussed some traits of selecting the right hardware depending on your needs and use case. You should make the necessary arrangements for your cluster hardware including networking components. The cluster hardware should be mounted, cabled, powered on, and should have valid networking between its nodes. Once you are ready with the hardware, the next task is to perform software arrangements for your cluster.
Ceph is a software-defined storage system, which runs on top of a Linux-based operating system. All the cluster nodes should be installed with Ceph-supported operating system. As of now, the valid operating system choice for running a Ceph cluster is RHEL, CentOS, Fedora, Ubuntu, Debian, and OpenSuse. You can check out more information for supported platforms on http://ceph.com/docs/master/start/os-recommendations/.
Note
It is recommended that you use the same OS distribution, release, and kernel version across all Ceph cluster nodes.
Getting the software
Ceph is an open source project; there are several ways to get its software from the Internet.
Getting packages
Getting packages over the Internet is one of the most used options for getting Ceph. There are again two different ways to get these packages:
· The first method is manually downloading Ceph and its related packages in the desired format. This would be a feasible option for you if due to security reasons, you do not have Internet access to your Ceph nodes. You can download Ceph and its dependencies on any of the machines in your network and copy them to each node and proceed with the Ceph installation.
You can visit http://ceph.com/rpm-<ceph-release-name> for RPM-based packages and http://ceph.com/debian-<ceph-release-name> for Debian-based packages. The valid Ceph release names are Argonaut, Bobtail, Cuttlefish, Dumpling, Emperor, Firefly, and Giant.
In addition to this, you will also require third-party libraries, which needs to be installed before Ceph packages. You can check out the list of additional binaries on Ceph documentation at http://ceph.com/docs/master/install/get-packages/#download-packages.
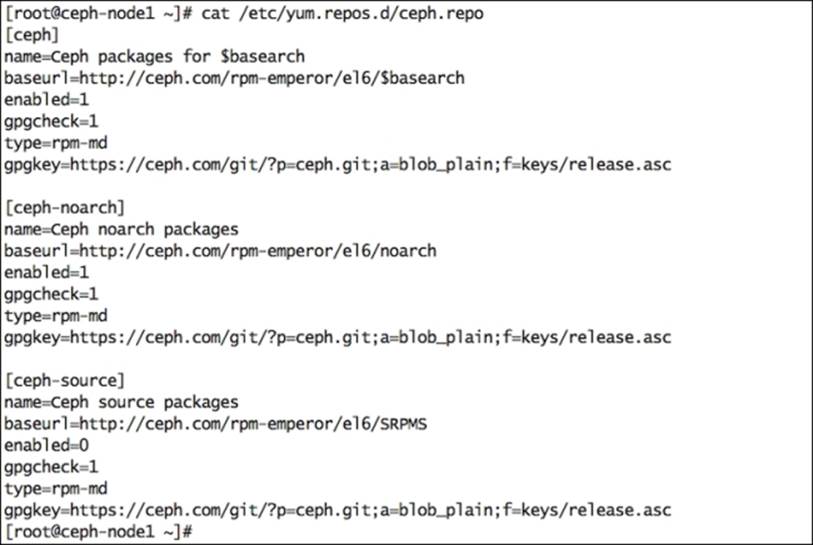
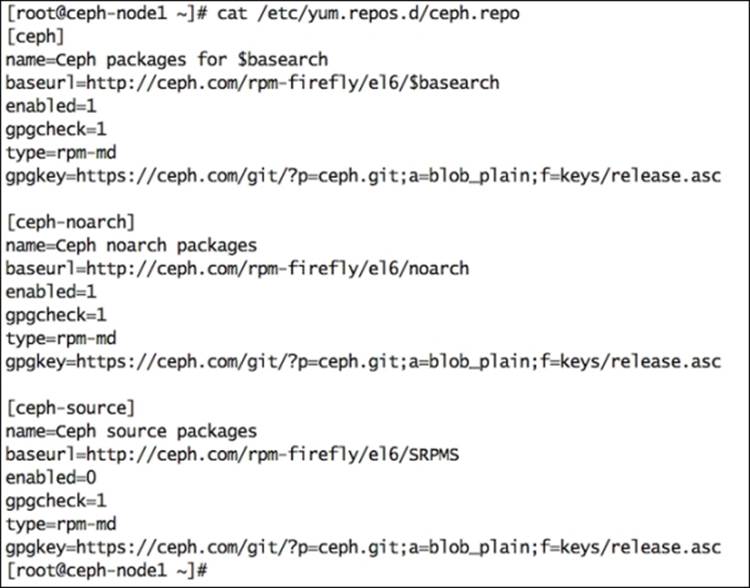
· The second method is using package management tools by adding Ceph package repositories to either Advanced Package Tool (APT) for Debian-based Linux distributions or Yellowdog Updater Modifier (YUM) for RHEL-based Linux distributions. For RPM packages, you should create a new repository file as /etc/yum.repos.d/ceph.repo. Add the following code in this file; replace {ceph-release} with valid Ceph release names and {distro} with Linux distribution such as el6 and rhel6. For more information on getting Ceph packages, check out http://ceph.com/docs/master/install/get-packages/.
· [ceph]
· name=Ceph packages for $basearch
· baseurl=http://ceph.com/rpm-{ceph-release}/{distro}/$basearch
· enabled=1
· gpgcheck=1
· type=rpm-md
· gpgkey=https://ceph.com/git/?p=ceph.git;a=blob_plain;f=keys/release.asc
·
· [ceph-noarch]
· name=Ceph noarch packages
· baseurl=http://ceph.com/rpm-{ceph-release}/{distro}/noarch
· enabled=1
· gpgcheck=1
· type=rpm-md
· gpgkey=https://ceph.com/git/?p=ceph.git;a=blob_plain;f=keys/release.asc
· [ceph-source]
· name=Ceph source packages
· baseurl=http://ceph.com/rpm-{ceph-release}/{distro}/SRPMS
· enabled=0
· gpgcheck=1
· type=rpm-md
gpgkey=https://ceph.com/git/?p=ceph.git;a=blob_plain;f=keys/release.asc
Getting Ceph tarballs
You can download Ceph source code from http://ceph.com/download/ and can compile and build a Ceph version from source.
Getting Ceph from GitHub
You can clone Ceph master branch source code from the online GitHub Ceph repository. To do this, you will require Git toolkit installed on your local machine. If you are a developer, this will be quite helpful for you to build Ceph and contribute to the open source project. If you need the latest development version of Ceph or a bug fix for a stable release, you can clone and build specific bug fixes before they are released officially.
Ceph cluster manual deployment
We can install Ceph either by using the ceph-deploy tool or manual deployment method. In this section, we will learn about the manual process of deploying Ceph.
Installing perquisites
Ceph requires additional third-party libraries. For RHEL-based Linux distributions, you can get additional packages from the EPEL repository. Perform the following steps to install Ceph:
1. Install the EPEL repository. Make sure the baserul parameter is enabled under the /etc/yum.repos.d/epel.repo file. The baseurl parameter defines the URL for extra Linux packages. Also make sure the mirrorlist parameter must be disabled (commented) under this file. Problems been observed during installation if the mirrorlist parameter is enabled under epel.repo file. Perform this step on all the three nodes.
2. # rpm -Uvh http://dl.fedoraproject.org/pub/epel/6/x86_64/epel-release-6-8.noarch.rpm
3. Install third-party binaries required by Ceph:
4. # yum install -y snappy leveldb gdisk python-argparse gperftools-libs
5. Create a Ceph repository file for Emperor release as shown in the following screenshot:
6. Install Ceph packages:
7. yum install ceph -y --disablerepo=epel
In this command, we are adding an option --disablerepo=epel, because we do not want to install Ceph packages provided by EPEL as EPEL installs the latest version of Ceph, which is Firefly. We want to install Emperor, hence we will disable epel repo so that Ceph should be installed using ceph.repo file.
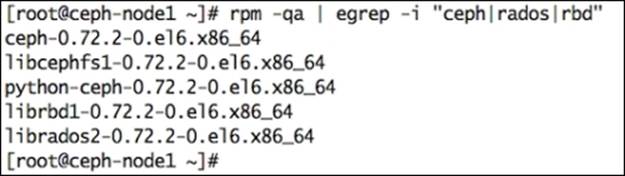
8. Once the packages are installed, verify whether they installed or not (optional):
9. # rpm -qa | egrep -i "ceph|rados|rbd"
The preceding command will give you an output similar to the one shown in the following screenshot:
10. Repeat steps 1 to 5 for other two Ceph nodes, that is, ceph-node2 and ceph-node3.
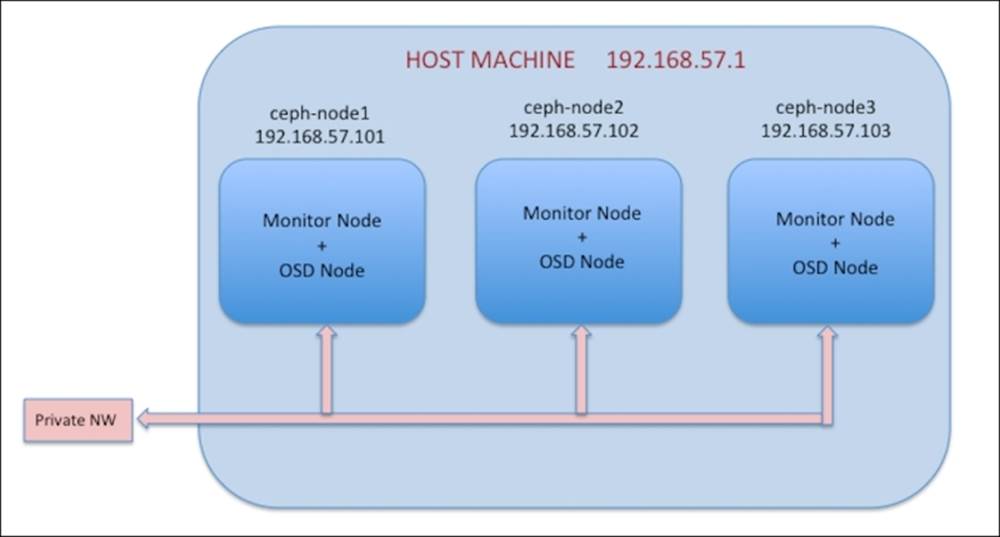
Deploying the Ceph cluster
We have now installed Ceph packages on all the nodes and are good to go with Ceph manual deployment. The manual deployment process is mainly for developers who are involved in developing Ceph deployment scripts for configuration management tools such as Ansible, Chef, and Puppet to know the deployment flow. As an administrator, you might hardly use manual deployment process, but it's an add-on to your Ceph expertise. Most of the production deployment of Ceph is based on ceph-deploy tool. Our current deployment setup looks like this:
Deploying monitors
A Ceph storage cluster requires at least one monitor node to operate. However, it's always recommended that you have an odd number of monitor nodes more than one. In this section, we will learn to deploy Ceph monitor nodes:
1. Create a directory for Ceph and create your Ceph cluster configuration file:
2. # mkdir /etc/ceph
3. # touch /etc/ceph/ceph.conf
4. Generate a FSID for your Ceph cluster:
5. # uuidgen
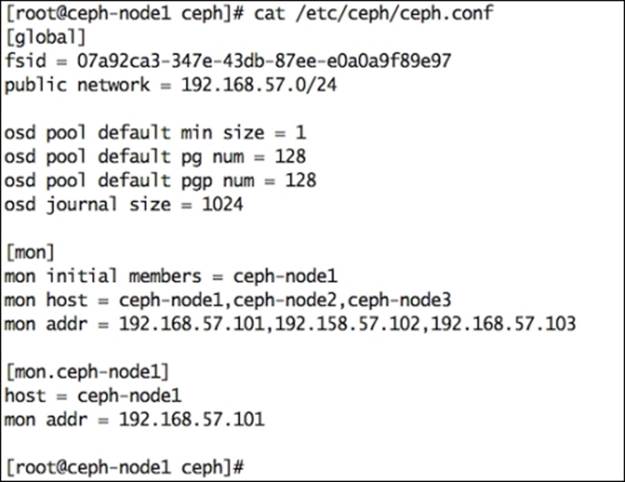
6. Create your cluster configuration file; by default the cluster name will be ceph. The configuration file name will be /etc/ceph/ceph.conf. You should use the output of the uuidgen command from the preceding step as an fsid parameter in the configuration file.
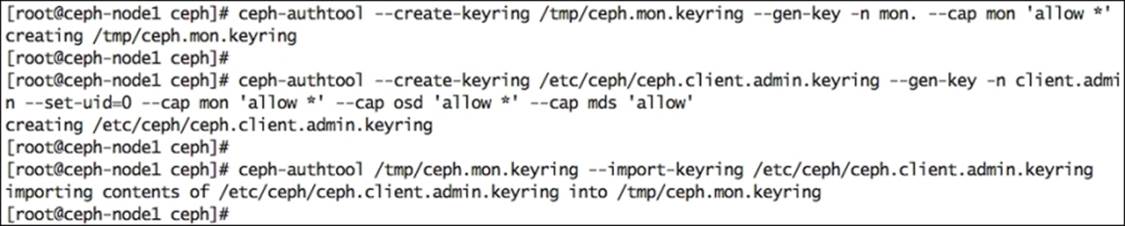
7. Create a keyring for your cluster and generate a monitor secret key as follows:
8. # ceph-authtool --create-keyring /tmp/ceph.mon.keyring --gen-key -n mon. --cap mon 'allow *'
9. Create a client.admin user and add the user to the keyring:
10.# ceph-authtool --create-keyring /etc/ceph/ceph.client.admin.keyring --gen-key -n client.admin --set-uid=0 --cap mon 'allow *' --cap osd 'allow *' --cap mds 'allow'
11. Add the client.admin key to ceph.mon.keyring:
12.# ceph-authtool /tmp/ceph.mon.keyring --import-keyring /etc/ceph/ceph.client.admin.keyring
The following screenshot shows these preceding commands in action:
13. Generate a monitor map for your first monitor with the following syntax:
monmaptool --create --add {hostname} {ip-address} --fsid {uuid} /tmp/monmap
Have a look at the following example:
# monmaptool --create --add ceph-node1 192.168.57.101 --fsid 07a92ca3-347e-43db-87ee-e0a0a9f89e97 /tmp/monmap

14. Create directories for the monitor as /path/cluster_name-monitor_node:
15.# mkdir /var/lib/ceph/mon/ceph-ceph-node1
16. Populate the first monitor daemon:
17.# ceph-mon --mkfs -i ceph-node1 --monmap /tmp/monmap --keyring /tmp/ceph.mon.keyring
18. Start monitor service as shown in the following screenshot:

19. Check your cluster status and check for default pools:
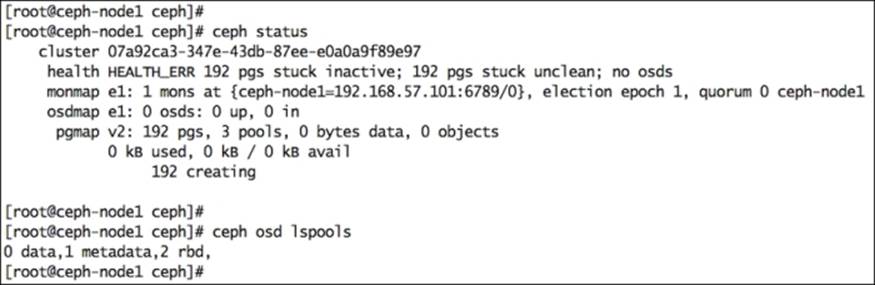
You should check for monitor map. You will find that your first node is configured correctly as a monitor node. Do not worry about cluster health at this time. We will need to add a few OSDs to make your cluster healthy.
Creating OSDs
Once you have set up your initial monitor, you should add some OSDs to your cluster. The following are the steps to do so:
1. Check available disks for your system. In our test setup, each virtual machine has three disks (ideally, sdb, sdc, and sdd):
2. # ceph-disk list
3. Ceph OSD works on GUID Partition Table (GPT). If the OSD is not already labeled with GPT, you should change the partition label from any other type to GPT:
4. # parted /dev/sdb mklabel GPT

5. Perform GPT type partition labeling for other disks as well:
6. # parted /dev/sdc mklabel GPT
7. # parted /dev/sdd mklabel GPT
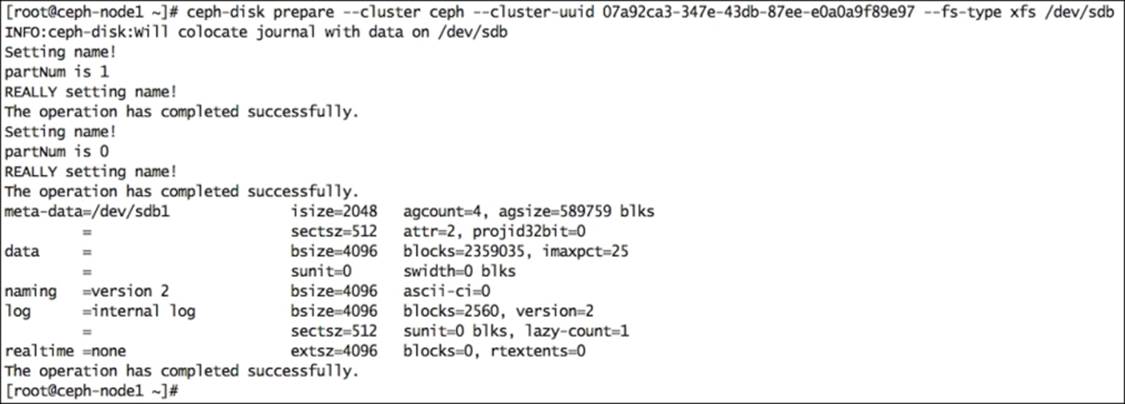
8. Prepare the OSD disk by providing cluster and filesystem information; use the following syntax:
ceph-disk prepare --cluster {cluster-name} --cluster-uuid {fsid} --fs-type {ext4|xfs|btrfs} {data-path} [{journal-path}]
Have a look at the following example:
# ceph-disk prepare --cluster ceph --cluster-uuid 07a92ca3-347e-43db-87ee-e0a0a9f89e97 --fs-type xfs /dev/sdb
The following screenshot shows the output of the previous command:
9. Prepare the rest of the disks as follows:
10.# ceph-disk prepare --cluster ceph --cluster-uuid 07a92ca3-347e-43db-87ee-e0a0a9f89e97 --fs-type xfs /dev/sdc
11.# ceph-disk prepare --cluster ceph --cluster-uuid 07a92ca3-347e-43db-87ee-e0a0a9f89e97 --fs-type xfs /dev/sdd
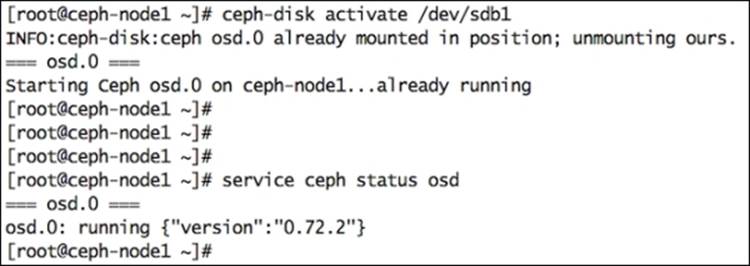
12. Finally, activate the OSD:
13.# ceph-disk activate /dev/sdb1
Have look at the following screenshot:
14. Activate the rest of the disks:
15.# ceph-disk activate /dev/sdc1
16.# ceph-disk activate /dev/sdd1
17. Check the status of your cluster. You will see three OSDs in UP and IN states:

18. Copy the ceph.conf and ceph.client.admin.keyring files from ceph-node1 to ceph-node2 and ceph node3 using the following commands; this will allow ceph-node2 and ceph-node3 to issue cluster commands:
19.# scp /etc/ceph/ceph.* ceph-node2:/etc/ceph
20.# scp /etc/ceph/ceph.* ceph-node3:/etc/ceph
21. Even after copying ceph.conf and ceph.client.admin.keyring to ceph-node2 and ceph-node3, if you are not able to issue cluster commands from ceph-node2 and ceph-node3 and are getting an error such as Error connecting to cluster, you should adjust the firewall rules for the ceph-monitor daemons on all three nodes or disable the firewall on all three nodes.
Scaling up your cluster
Scaling up the Ceph cluster is one of the important tasks for the Ceph administrator. This includes adding more monitor and OSD nodes to your cluster. We recommend that you use an odd number of monitor nodes for high availability and quorum maintenance; however, this is not mandatory. Scaling up and scaling down operation for monitor and OSD nodes are absolute online operations and does not cost downtime. In our test deployment, we have a single node, ceph-node1, which acts as monitor and OSD nodes. Let's now add two more monitors to our Ceph cluster.
Adding monitors
Proceed with the following steps:
1. Log in to ceph-node2 and create directories:
2. # mkdir -p /var/lib/ceph/mon/ceph-ceph-node2 /tmp/ceph-node2
3. Edit the /etc/ceph/ceph.conf file and add the new monitor information under [mon] section:
4. [mon.ceph-node2]
5. mon_addr = 192.168.57.102:6789
6. host = ceph-node2
7. Extract keyring information from the Ceph cluster:
8. # ceph auth get mon. -o /tmp/ceph-node2/monkeyring

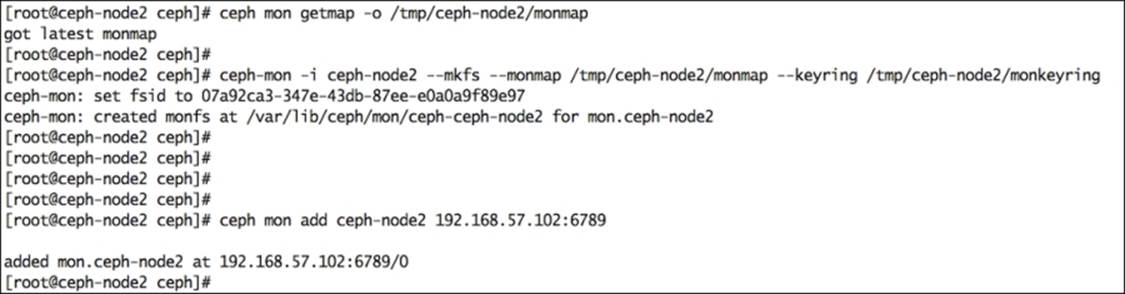
9. Retrieve the monitor map from the Ceph cluster:
10.# ceph mon getmap -o /tmp/ceph-node2/monmap
11. Build a fresh monitor, fs, using key and existing monmap:
12.# ceph-mon -i ceph-node2 --mkfs --monmap /tmp/ceph-node2/monmap --keyring /tmp/ceph-node2/monkeyring
13. Add the new monitor to the cluster:
14.# ceph mon add ceph-node2 192.168.57.102:6789
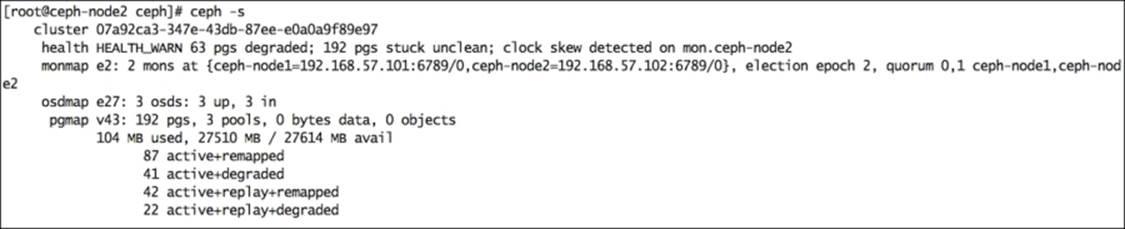
15. Once the monitor is added, check the cluster status. You will notice that we now have two monitors in our Ceph cluster. You can ignore the clock skew warning as of now, or you can configure NTP on all your nodes so that they can be synced. We have already discussed NTP configuration in the Scaling up your Ceph cluster – monitor and OSD addition section of Chapter 2, Ceph Instant Deployment.
16. Repeat the same steps for adding ceph-node3 as your third monitor. Once you add your third monitor, check your cluster status and you will notice the third monitor in the Ceph cluster:

Adding OSDs
It is easy to scale up your cluster by adding OSDs on the fly. Earlier in this chapter, we learned to create OSD; this process is similar to scaling up your cluster for adding more OSDs. Log in to the node, which needs its disks to be added to cluster and perform the following operations:
1. List the available disks:
2. # ceph-disk list
3. Label the disk with GPT:
4. # parted /dev/sdb mklabel GPT
5. # parted /dev/sdc mklabel GPT
6. # parted /dev/sdd mklabel GPT
7. Prepare the disk with the required filesystem and instruct it to connect to the cluster by providing the cluster uuid:
8. # ceph-disk prepare --cluster ceph --cluster-uuid 07a92ca3-347e-43db-87ee-e0a0a9f89e97 --fs-type xfs /dev/sdb
9. # ceph-disk prepare --cluster ceph --cluster-uuid 07a92ca3-347e-43db-87ee-e0a0a9f89e97 --fs-type xfs /dev/sdc
10.# ceph-disk prepare --cluster ceph --cluster-uuid 07a92ca3-347e-43db-87ee-e0a0a9f89e97 --fs-type xfs /dev/sdd
11. Activate the disk so that Ceph can start OSD services and help OSD to join the cluster:
12.# ceph-disk activate /dev/sdb1
13.# ceph-disk activate /dev/sdc1
14.# ceph-disk activate /dev/sdd1
15. Repeat these steps for all other nodes for which you want to add their disk to cluster. Finally, check your cluster status; you will notice the disks will be in UP and IN states:

16. Check your cluster OSD tree; this will give you information about OSD and its physical node:

Ceph cluster deployment using the ceph-deploy tool
Ceph comes with a vey powerful deployment tool known as ceph-deploy. The ceph-deploy tool relies on SSH for deploying Ceph software on cluster nodes, so it has the basic requirement that node should be installed with OS and it should be reachable on the network. The ceph-deploy tool does not demand additional system resources and it can perform well on a regular workstation machine that should have access to cluster nodes.
You can also consider using any of your monitor nodes as a ceph-deploy node. The ceph-deploy tool makes Ceph deployment easy with initial default configuration that can be modified later based on your use case. The ceph-deploy tool provides features such as installing Ceph packages, cluster creation, monitor and OSD addition, Ceph key management, MDS creation, configuring admin hosts, and tearing down the Ceph cluster.
Earlier in this book, in Chapter 2, Ceph Instant Deployment, we have seen how to deploy a Ceph cluster using the ceph-deploy tool. We will now briefly go through steps for deploying the Ceph cluster using ceph-deploy:
1. Set up an SSH-based login to all your ceph nodes. If possible, make them passwordless logins. You should always follow security practices of your environments while setting up passwordless SSH logins.
2. Set up the Ceph software repository file for your Linux package manager. This repository file should be present on all nodes in the cluster.
3. Install ceph-deploy on any one-cluster node. This is typically an admin node that you should use for Ceph management.
4. Create a new cluster, the default cluster name would be ceph:
5. # ceph-deploy new ceph-node1
6. Install Ceph software on cluster nodes:
7. # ceph-deploy install ceph-node1 ceph-node2 ceph-node3
Note
By default, ceph-deploy will install the latest release of Ceph, if you want to install any specific release of Ceph, use the --release {Ceph-release-name} option with ceph-deploy.
8. Create initial monitors and gather the keys:
9. # ceph-deploy mon create ceph-node1
10.# ceph-deploy gatherkeys ceph-node1
Starting from ceph-deploy Version 1.1.3, you no longer require multiple commands for creating initial monitors and gathering keys. This can be achieved in one step using the following command. Before running this command, initial monitors should be configured in your ceph.conf file.
# ceph-deploy mon create-initial
11. For a high availability, set up more monitor machines. An odd number of monitors are recommended. Make sure you add firewall rules for monitor ports 6789 so that they can connect to each other. If you are performing this just for testing, you can consider disabling firewall.
12.# ceph-deploy mon create ceph-node2
13.# ceph-deploy mon create ceph-node3
14. If you are using disks that have old filesystem, clear the partitions so that it can be used with Ceph. This operation will destroy all the data on disk.
15.# ceph-deploy disk zap ceph-node1:sdb ceph-node1:sdc ceph-node1:sdd
Create OSDs for your Ceph cluster. Repeat the step to add more OSDs. To achieve a clean state for your Ceph cluster, you should add OSDs on machines that are physically separated.
# ceph-deploy osd create ceph-node1:sdb ceph-node1:sdc ceph-node1:sdd
16. Finally, check the status of your Ceph cluster. It should be healthy.
The ceph-deploy tool is a stable and amazing tool for easy Ceph cluster deployment. It is rapidly getting developed with new features and bug fixes. Now, most of the Ceph clusters are getting deployments using the ceph-deploy tool.
Upgrading your Ceph cluster
Upgrading your Ceph cluster software version is relatively simple. You just need to update the Ceph package followed by a service restart and you are done. The upgradation process is sequential and usually does not require any downtime for your storage services if you have configured your cluster in high availability, that is, with multiple OSDs, monitors, MDS, and RADOSGW. As a general practice, you should plan your cluster upgradation during nonpeak hours. The upgradation process upgrades each Ceph daemon one by one. The recommended upgradation sequence for a Ceph cluster is as follows:
1. Monitor
2. OSD
3. Metadata Server (MDS)
4. RADOS gateway
You should upgrade all daemons of a specific type and then proceed for upgradation of the next type. For example, if your cluster contains three monitor nodes, 100 OSDS, 2 MDS, and a RADOSGW. You should first upgrade all your monitor nodes one by one, followed by upgrading all OSD nodes one by one, then MDS, and then RADOSGW. This is to keep all specific types of daemons on the same release level.
Tip
Before proceeding with upgradation of Ceph daemons, please read the release notes and any other upgradation-related information on Ceph official documentation. Once you upgrade a daemon, you cannot downgrade it.
Note
Warning
Before upgradation, you should always check the Ceph client requirements such as the kernel version or any other relevant components.
Upgrading a monitor
Proceed with the following steps to upgrade a monitor:
1. Check the current version of your Ceph daemons:
Since our test cluster setup has MON and OSD daemons running on the same machine, upgrading Ceph software binaries to the Firefly release (0.80) will result in upgrading MON and OSD daemons in one step. However, in the production deployment of Ceph, upgradation should take place one by one. Otherwise, you might face problems.
2. Upgrade your Ceph repositories to the targeted Firefly repositories. Usually, you just need to update your new Ceph release name in the /etc/yum.repos.d/ceph.repo file that is already present:
3. Update your Ceph software:
4. # yum update ceph
5. Once the Ceph software binaries are updated, you should restart the Ceph monitor daemons to have the changes take effect:
6. # service ceph restart mon
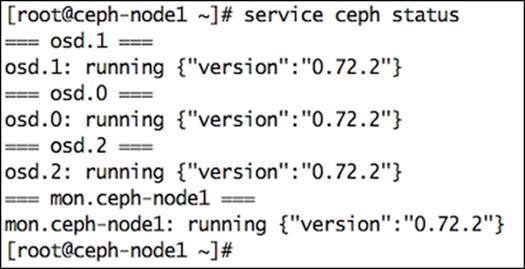
7. Check the monitor daemon version; it should be updated:
8. # service ceph status mon
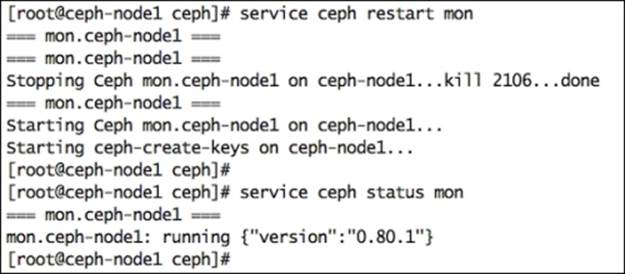
9. Check the monitor stats:
10.# ceph mon stat
11. Repeat these steps for other monitor nodes in your cluster. Make sure all the monitor nodes are on the same Ceph release before proceeding to OSD, MDS, or RGW upgradation.
Upgrading OSDs
Proceed with the following steps to upgrade OSDs:
1. Similar to the monitor upgradation process, upgrade your Ceph repositories to the targeted Firefly repositories.
2. Perform the Ceph software upgradation:
3. # yum update ceph
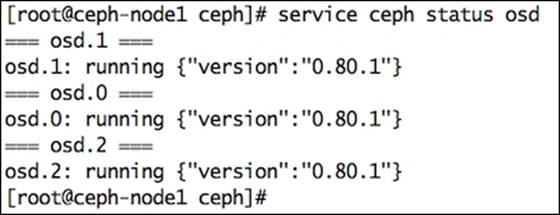
4. Once the Ceph software is successfully updated, restart the OSD daemons:
5. # service ceph restart osd
6. Check the OSD status; you should discover the updated OSD version:
7. # service ceph status osd
8. Repeat these steps for other OSD nodes in your cluster. Make sure all OSDs of your cluster are on the same Ceph release.
Summary
Planning your storage needs is extremely important for your Ceph cluster. The planning phase is something that defines your Ceph clusters capacity, performance, and fault tolerance level. You know your requirements, storage needs, and workload better than anyone else does; so, you should decide your own Ceph hardware and software configuration, keeping your needs in mind. From the deployment context, Ceph provides both the manual and automated ways of deployment. The manual deployment procedure is mostly used by configuration management tools such as Puppet, Ansible, and Chef.
The manual deployment process helps these tools to implement a number of checks during deployment, thus improving flexibility. The automated deployment method is to use ceph-deploy tool, which is relatively simple and provides easy-to-use command sets for various cluster-related activities. The Ceph storage cluster can scale up on the fly; also, upgradation from one release to another is extremely simple with no services getting impacted.
All materials on the site are licensed Creative Commons Attribution-Sharealike 3.0 Unported CC BY-SA 3.0 & GNU Free Documentation License (GFDL)
If you are the copyright holder of any material contained on our site and intend to remove it, please contact our site administrator for approval.
© 2016-2026 All site design rights belong to S.Y.A.