Learning Ceph (2015)
Chapter 6. Storage Provisioning with Ceph
In this chapter, we will cover the following topics:
· Setting up a Ceph block device
· Setting up the Ceph filesystem
· Setting up Ceph object storage using a RADOS gateway
· Configuring S3 and Swift with a Ceph RADOS gateway
Storage provisioning is the primary and most important task of a storage system administrator. It is the process of assigning storage space or capacity to both physical and virtual servers in the form of blocks, files, or objects. A typical computer system and servers come with a limited local storage capacity that is not enough for your data storage needs. Storage solutions such as Ceph provide virtually unlimited storage capacity to these servers, making them capable to store all your data and making sure you do not run out of space.
In addition to providing extra storage, there are numerous benefits of having a centralized storage system.
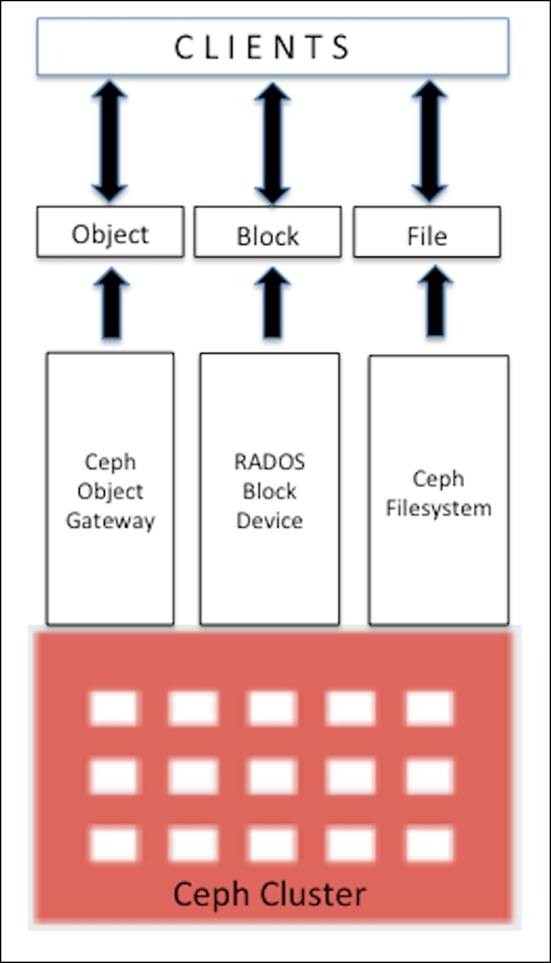
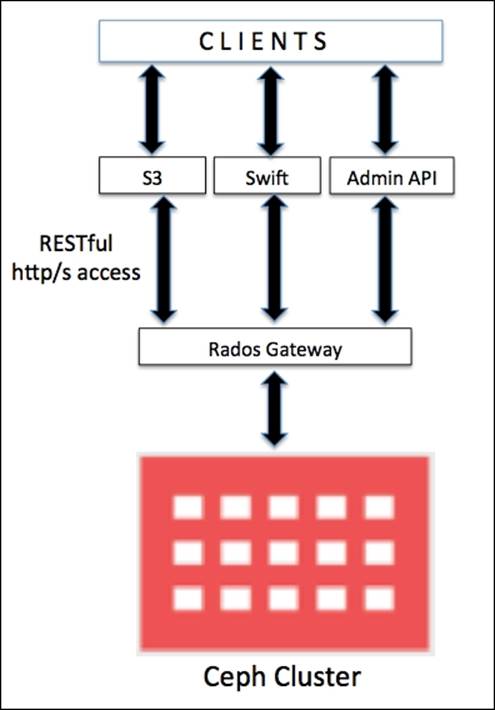
Ceph can provision storage capacity in a unified way, which includes block storage, filesystem, and object storage. Depending on your use case, you can select one or more storage solutions as shown in the following diagram. Now, let's discuss these storage types in detail and implement them on our test cluster.
The RADOS block device
The RADOS block device (RBD)—formerly known as the Ceph block device—provides block-based persistent storage to Ceph clients, which they use as an additional disk. The client has the flexibility to use the disk as they require, either as a raw device or by formatting it with a filesystem followed by mounting it. A RADOS block device makes use of the librbd library and stores blocks of data in a sequential form striped over multiple OSDs in a Ceph cluster. RBD is backed by the RADOS layer of Ceph, and thus, every block device is spread over multiple Ceph nodes, delivering high performance and excellent reliability. RBD is rich with enterprise features such as thin provisioning, dynamically resizable, snapshots, copy-on-write, and caching, among others. The RBD protocol is fully supported with Linux as a mainline kernel driver; it also supports various virtualization platforms such as KVM, Qemu, and libvirt, allowing virtual machines to take advantage of a Ceph block device. All these features make RBD an ideal candidate for cloud platforms such as OpenStack and CloudStack. We will now learn how to create a Ceph block device and make use of it:
1. To create a Ceph block device, log in to any of the Ceph monitor nodes, or to an admin host that has admin access to a Ceph cluster. You can also create Ceph RBD from any client node that is configured as a Ceph client. For security reasons, you should not store Ceph admin keys on multiple nodes other than Ceph nodes and admin hosts.
2. The following command will create a RADOS block device named ceph-client1-rbd1 of size 10240 MB:
3. # rbd create ceph-client1-rbd1 --size 10240
4. To list rbd images, issue the following command:
5. # rbd ls
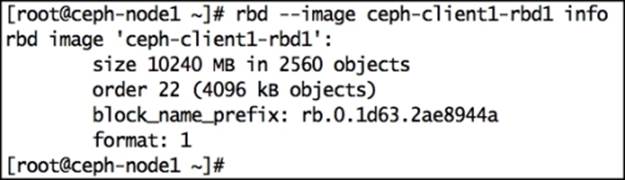
6. To check details of an rbd image, use the following command:
7. # rbd --image ceph-client1-rbd1 info
Have a look at the following screenshot to see the preceding command in action:
8. By default, RBD images are created under the rbd pool of the Ceph cluster. You can specify other pools by using the -p parameter with the rbd command. The following command will give you the same output as the last command, but we manually specify the pool name using the -p parameter here. Similarly, you can create RBD images on other pools using the -p parameter:
9. # rbd --image ceph-client1-rbd1 info -p rbd
Setting up your first Ceph client
Ceph is a storage system; to store your data on a Ceph cluster, you will require a client machine. Once storage space is provisioned from the Ceph cluster, the client maps or mounts a Ceph block or filesystem and allows us to store data on to the Ceph cluster. For object storage, clients have HTTP access to Ceph clusters to store data. A typical production-class Ceph cluster consists of two different networks, frontend network and backend network, also known as public network and cluster network, respectively.
The frontend network is the client network by which Ceph serves data to its clients. All Ceph clients interact with clusters using the frontend network. Clients do not have access to the backend network, and Ceph mainly uses the backend network for its replication and recovery .We will now set up our first Ceph client virtual machine that we will use throughout this book. During the setup process, we will create a new client virtual machine as we did in Chapter 2, Ceph Instant Deployment:
1. Create a new VirtualBox virtual machine for the Ceph client:
2. # VboxManage createvm --name ceph-client1 --ostype RedHat_64 --register
3. # VBoxManage modifyvm ceph-client1 --memory 1024 --nic1 nat --nic2 hostonly --hostonlyadapter2 vboxnet1
4.
5. # VBoxManage storagectl ceph-client1 --name "IDE Controller" --add ide --controller PIIX4 --hostiocache on --bootable on
6. # VBoxManage storageattach ceph-client1 --storagectl "IDE Controller" --type dvddrive --port 0 --device 0 --medium /downloads/CentOS-6.4-x86_64-bin-DVD1.iso
7. # VBoxManage storagectl ceph-client1 --name "SATA Controller" --add sata --controller IntelAHCI --hostiocache on --bootable on
8. # VBoxManage createhd --filename OS-ceph-client1.vdi --size 10240
9. # VBoxManage storageattach ceph-client1 --storagectl "SATA Controller" --port 0 --device 0 --type hdd --medium OS-ceph-client1.vdi
10.# VBoxManage startvm ceph-client1 --type gui
11. Once the virtual machine is created and started, install the CentOS operating system by following the OS installation documentation at https://access.redhat.com/site/documentation/en-US/Red_Hat_Enterprise_Linux/6/html/Installation_Guide/index.html. During the installation process, provide the hostname as ceph-client1.
12. Once you have successfully installed the operating system, edit the network configuration of the machine as stated in the following steps and restart network services:
· Edit the /etc/sysconfig/network-scripts/ifcfg-eth0 file and add the following:
· ONBOOT=yes
BOOTPROTO=dhcp
· Edit the /etc/sysconfig/network-scripts/ifcfg-eth1 file and add the following:
· ONBOOT=yes
· BOOTPROTO=static
· IPADDR=192.168.57.200
NETMASK=255.255.255.0
· Edit the /etc/hosts file and add the following:
· 192.168.57.101 ceph-node1
· 192.168.57.102 ceph-node2
· 192.168.57.103 ceph-node3
192.168.57.200 ceph-client1
Mapping the RADOS block device
Earlier in this chapter, we created an RBD image on a Ceph cluster; in order to use this block device image, we need to map it to the client machine. Let's see how the mapping operation works.
Ceph support has been added to Linux kernel from Version 2.6.32. For client machines that need native access to Ceph block devices and filesystems, it is recommended that they use Linux kernel release 2.6.34 and later.
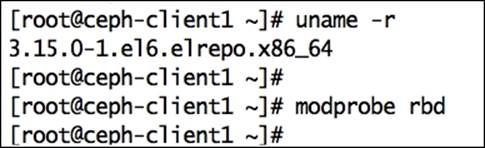
Check the Linux kernel version and RBD support using the modprobe command. Since this client runs on an older release of Linux kernel, it does not support Ceph natively.
# uname –r
# modprobe rbd
Have a look at the following screenshot:

In order to add support for Ceph, we need to upgrade the Linux kernel version.
Note
Note that this kernel's upgradation is just for demonstration purpose required only for this chapter. In your production environment, you should plan prior to the kernel upgrade. Please take the decision wisely before performing these steps to your production environment.
1. Install ELRepo rpm as follows:
2. # rpm -Uvh http://www.elrepo.org/elrepo-release-6-6.el6.elrepo.noarch.rpm
3. Install a new kernel using the following command:
4. # yum --enablerepo=elrepo-kernel install kernel-ml
5. Edit /etc/grub.conf, update default = 0, and then gracefully reboot the machine.
Once the machine is rebooted, check the Linux kernel version and its RBD support, as we did earlier:
To grant clients' permission to access the Ceph cluster, we need to add the keyring and Ceph configuration file to them. Client and Ceph cluster authentication will be based on the keyring. The admin user of Ceph has full access to the Ceph cluster, so for security reasons, you should not unnecessarily distribute the admin keyrings to other hosts if they do not need it. As per best practice, you should create separate users with limited capabilities to access the Ceph cluster, and use these keyrings to access RBD. In the upcoming chapters, we will discuss more on Ceph users and keyrings. As of now, we will make use of the admin user keyring.
Install Ceph binaries on ceph-node1 and push ceph.conf and ceph.admin.keyring to it:
# ceph-deploy install ceph-client1
# ceph-deploy admin ceph-client1
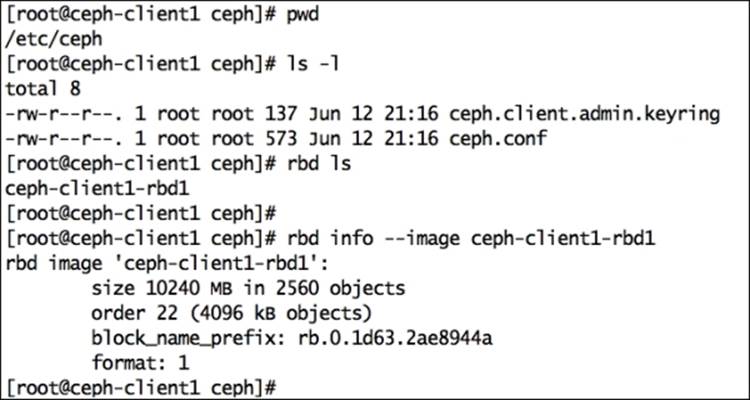
Once the Ceph configuration file and admin keyring are placed in ceph-client1 node, you can query the Ceph cluster for RBD images:
Map the RBD image ceph-client1-rbd1 to a ceph-client1 machine. Since RBD is now natively supported by Linux kernel, you can execute the following command from the ceph-client1 machine to map RBD:
# rbd map --image ceph-client1-rbd1
Alternatively, you can use the following command to specify the pool name of the RBD image and can achieve the same results. In our case, the pool name is rbd, as explained earlier in this chapter:
# rbd map rbd/ceph-client1-rbd1
You can find out the operating system device name used for this mapping, as follows:
# rbd showmapped
The following screenshot shows this command in action:

Once RBD is mapped to OS, we should develop a filesystem on it to make it usable. It will now be used as an additional disk or as a block device:
# fdisk -l /dev/rbd0
# mkfs.xfs /dev/rbd0
# mkdir /mnt/ceph-vol1
# mount /dev/rbd0 /mnt/ceph-vol1
Have a look at the following screenshot:
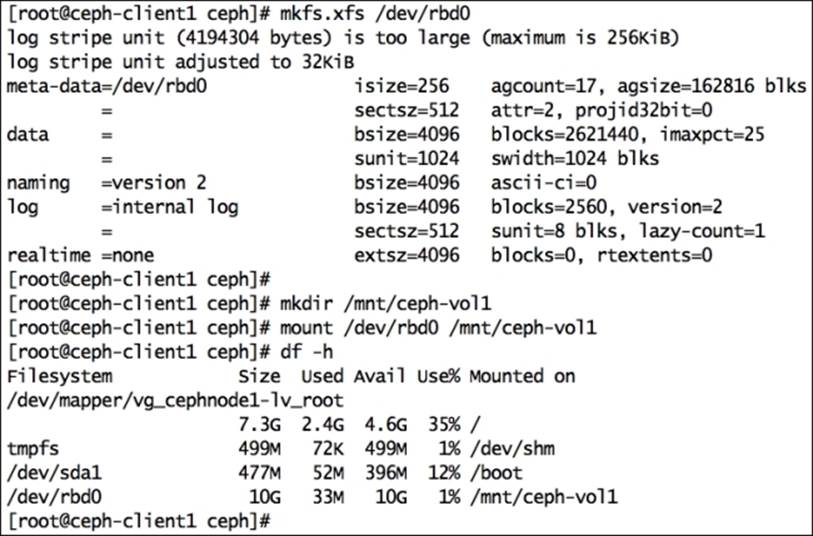
Put some data on Ceph RBD:
# dd if=/dev/zero of=/mnt/ceph-vol1/file1 count=100 bs=1M

Resizing Ceph RBD
Ceph supports thin-provisioned block devices, that is, the physical storage space will not get occupied until you really begin storing data to the block device. Ceph RADOS block devices are very flexible; you can increase or decrease the size of RBD on the fly from the Ceph storage end. However, the underlying filesystem should support resizing. Advance filesystems such as XFS, Btrfs, EXT, and ZFS support filesystem resizing to a certain extent. Follow filesystem-specific documentation to know more on resizing.
To increase or decrease the Ceph RBD image size, use the --size <New_Size_in_MB> parameter with the rbd resize command; this will set the new size for an RBD image. The original size of the RBD image ceph-client1-rbd1 was 10 GB; the following command will increase its size to 20 GB:
# rbd resize rbd/ceph-client1-rbd1 --size 20480

Now that the Ceph RBD image has been resized, you should check if the new size is being accepted by the kernel as well by executing the following command:
# xfs_growfs -d /mnt/ceph-vol1
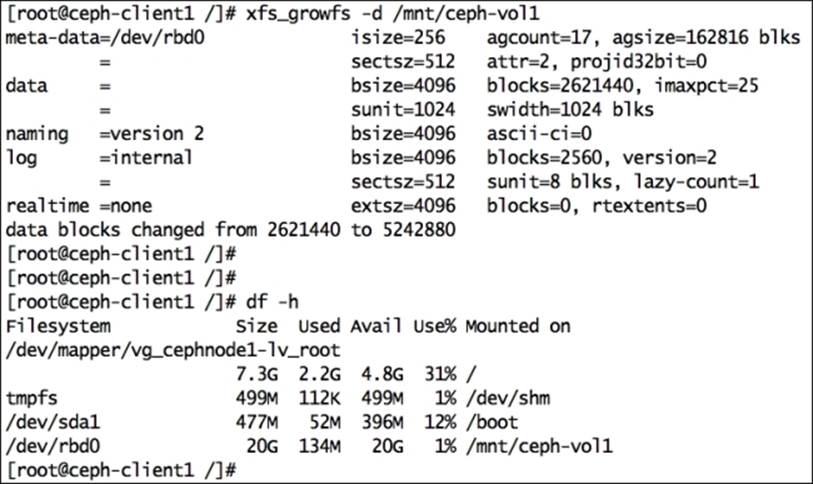
From the client machine, grow the filesystem so that it can make use of increased storage space. From the client perspective, capacity resize is a feature of an OS filesystem; you should read the filesystem documentation before resizing any partition. An XFS filesystem supports online resizing.
Ceph RBD snapshots
Ceph extends full support to snapshots, which are point-in-time, read-only copies of an RBD image. You can preserve the state of a Ceph RBD image by creating snapshots and restoring them to get the original data.
To test the snapshot functionality of Ceph RBD, let's create a file on RBD:
# echo "Hello Ceph This is snapshot test" > /mnt/ceph-vol1/snaptest_file

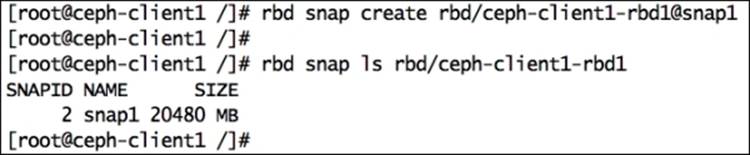
Now our filesystem has two files. Let's create a snapshot of Ceph RBD using the rbd snap create <pool-name>/<image-name>@<snap-name>syntax, as follows:
# rbd snap create rbd/ceph-client1-rbd1@snap1
To list a snapshot of an image, use the rbd snap ls <pool-name>/<image-name> syntax, as follows:
# rbd snap ls rbd/ceph-client1-rbd1
To test the snapshot restore functionality of Ceph RBD, let's delete files from the filesystem:
# cd /mnt/ceph-vol1
# rm -f file1 snaptest_file

We will now restore Ceph RBD snapshots to get the files that we deleted in the last step back.
Note
The rollback operation will overwrite the current version of an RBD image and its data with the snapshot version. You should perform this operation carefully.
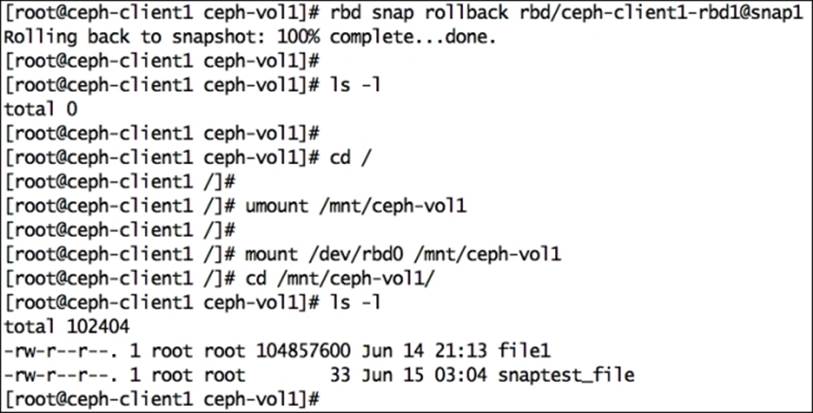
The syntax for this is rbd snap rollback <pool-name>/<image-name>@<snap-name>. The following is the command:
# rbd snap rollback rbd/ceph-client1-rbd1@snap1
Once the snapshot rollback operation is completed, remount the Ceph RBD filesystem to refresh the state of the filesystem. You should able to get your deleted files back.
# umount /mnt/ceph-vol1
# mount /dev/rbd0 /mnt/ceph-vol1
When you no longer need snapshots, you can remove a specific snapshot using the rbd snap rm <pool-name>/<image-name>@<snap-name> syntax. Deleting the snapshot will not delete your current data on the Ceph RBD image:
# rbd snap rm rbd/ceph-client1-rbd1@snap1
If you have multiple snapshots of an RBD image and you wish to delete all the snapshots in a single command, you can make use of the purge subcommand.
The syntax for it is rbd snap purge <pool-name>/<image-name>. The following is the command to delete all snapshots with a single command:
# rbd snap purge rbd/ceph-client1-rbd1
The rbd rm <RBD_image_name> -p <Image_pool_name> syntax is used to remove an RBD image, as follows:
# rbd rm ceph-client1-rbd1 -p rbd
Ceph RBD clones
The Ceph storage cluster is capable of creating Copy-on-write (COW) clones from RBD snapshots. This is also known as snapshot layering in Ceph. This layering feature of Ceph allows clients to create multiple instant clones of Ceph RBD. This feature is extremely useful for Cloud and virtualization platforms such as OpenStack, CloudStack, and Qemu/KVM. These platforms usually protect Ceph RBD images containing OS/VM images in the form of a snapshot. Later, this snapshot is cloned multiple times to spin new virtual machines/instances. Snapshots are read only, but COW clones are fully writable; this feature of Ceph provides a greater flexibility and is extremely useful for cloud platforms. The following diagram shows relationship between RADOS block device, RBD snapshot, and COW snapshot clone. In the upcoming chapters of this book, we will discover more on COW clones to spawn OpenStack instances.

Every cloned image (child image) stores references of its parent snapshot to read image data. Hence, the parent snapshot should be protected before it can be used for cloning. At the time of data writing on COW-cloned images, it stores new data references to itself. COW-cloned images are as good as RBD.
They are quite flexible, similar to RBD, that is, they are writable, resizable, can create new snapshots, and can be cloned further.
The type of the RBD image defines the feature it supports. In Ceph, an RBD image is of two types: format-1 and format-2. The RBD snapshot feature is available on both format-1 and format-2 RBD images. However, the layering feature, that is, the COW cloning feature is available only for RBD images with format-2. Format-1 is the default RBD image format.
For demonstration purposes, we will first create a format-2 RBD image, create its snapshot, protect its snapshot, and finally, create COW clones out of it:
1. Create a format-2 RBD image:
2. # rbd create ceph-client1-rbd2 --size 10240 --image-format 2
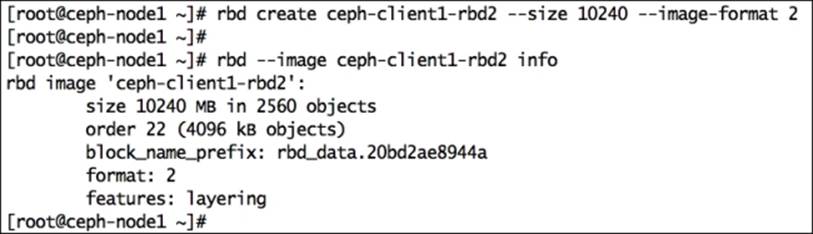
3. Create a snapshot of this RBD image:
4. # rbd snap create rbd/ceph-client1-rbd2@snapshot_for_clone
5. To create a COW clone, protect the snapshot. This is an important step; we should protect the snapshot because if the snapshot gets deleted, all the attached COW clones will be destroyed:
6. # rbd snap protect rbd/ceph-client1-rbd2@snapshot_for_clone
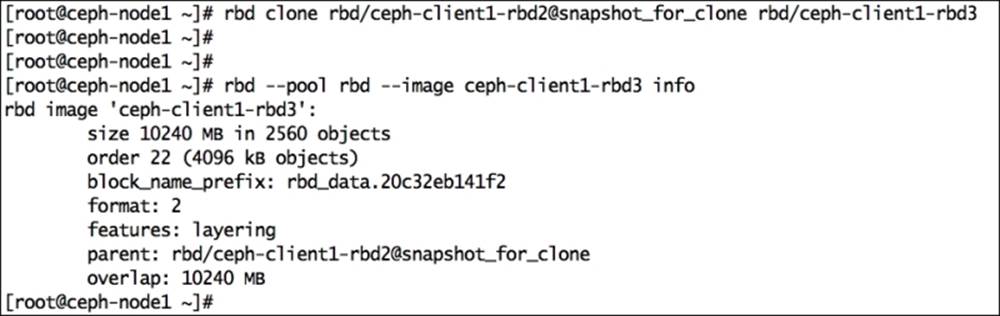
7. Cloning the snapshot requires the parent pool, RBD image, and snapshot names. For a child, it requires the pool and RBD image names.
The syntax for this is rbd clone <pool-name>/<parent-image>@<snap-name> <pool-name>/<child-image-name>. The command to be used is as follows:
# rbd clone rbd/ceph-client1-rbd2@snapshot_for_clone rbd/ceph-client1-rbd3
8. Creating a clone is a quick process. Once it's completed, check the new image information. You will notice that its parent pool, image, and snapshot information are displayed.
9. # rbd --pool rbd --image ceph-client1-rbd3 info
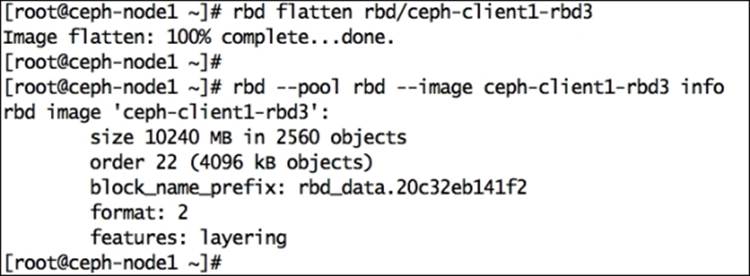
At this point, you have a cloned RBD image, which is dependent upon its parent image snapshot. To make the cloned RBD image independent of its parent, we need to flatten the image, which involves copying the data from a parent snapshot to a child image. The time it takes to complete the flattening process depends upon the size of data present in the parent snapshot. Once the flattening process is completed, there is no dependency between the cloned RBD image and its parent snapshot. Let's perform this flattening process practically:
1. To initiate the flattening process, use the following command:
2. # rbd flatten rbd/ceph-client1-rbd3
After the completion of the flattening process, if you check the image information, you will notice that the parent image/snapshot name is released, which makes the clone image independent.
3. You can also remove the parent image snapshot if you no longer require it. Before removing the snapshot, you first have to unprotect it using the following command:
4. # rbd snap unprotect rbd/ceph-client1-rbd2@snapshot_for_clone
5. Once the snapshot is unprotected, you can remove it using the following command:
6. # rbd snap rm rbd/ceph-client1-rbd2@snapshot_for_clone
The Ceph filesystem
The Ceph filesystem is also known as CephFS; it is a POSIX-compliant distributed filesystem that uses Ceph RADOS to store its data. To implement the Ceph filesystem, you need a running Ceph storage cluster and at least one Ceph Metadata Server (MDS). For demonstration purposes, we will use the same metadata server that we deployed in Chapter 3, Ceph Architecture and Components. We can use the Ceph filesystem in two ways: by mounting CephFS using a native kernel driver and by using Ceph FUSE. We will see both these methods one by one.
Mounting CephFS with a kernel driver
Linux kernel 2.6.34 and later natively support Ceph. To use CephFS with kernel level support, clients should use Linux kernel 2.6.34 and above. The following steps will guide you through mounting CephFS with a kernel driver:
1. Check your client's Linux kernel version:
2. # uname -r
3. Create a mount point directory:
4. # mkdir /mnt/kernel_cephfs
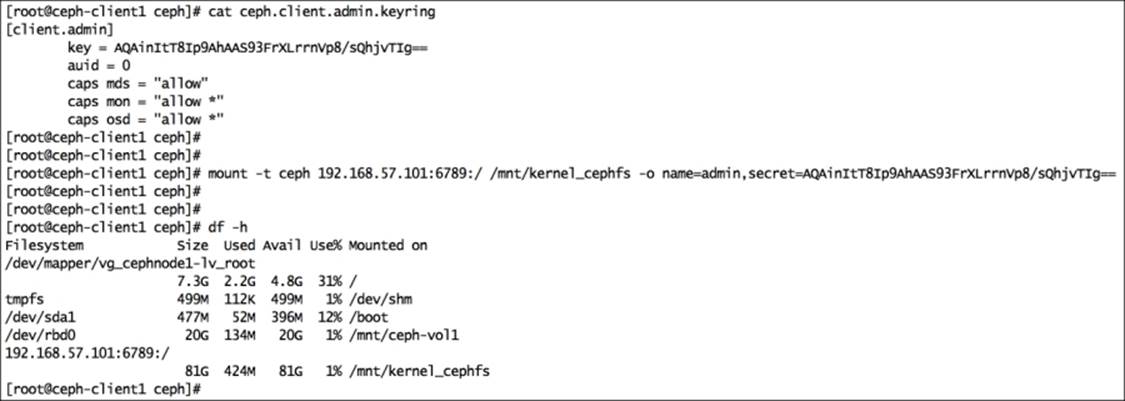
5. Make a note of the admin secret key:
6. # cat /etc/ceph/ceph.client.admin.keyring
7. Mount CephFS using a native Linux mount call. The syntax for this is mount -t ceph <Monitor_IP>:<Monitor_port>:/ <mount_point_name> -o name=admin,secret=<admin_secret_key>.
8. # mount -t ceph 192.168.57.101:6789:/ /mnt/kernel_cephfs -o name=admin,secret=AQAinItT8Ip9AhAAS93FrXLrrnVp8/sQhjvTIg==
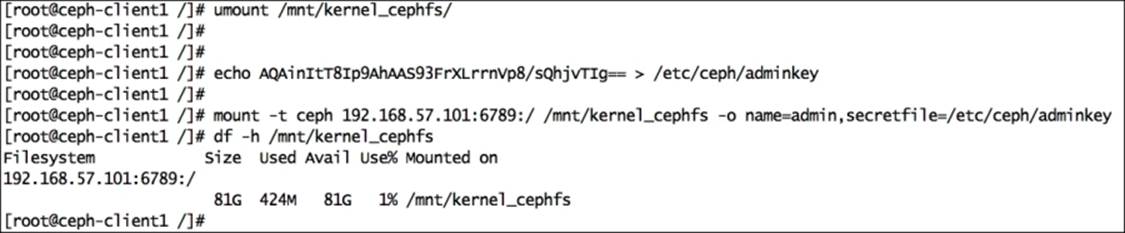
9. To mount CephFS more securely, avoid the admin secret key to be visible in the bash history. Store the admin keyring as a plain text in a separate file and use this new file as a mount option for the secret key. Use the following command:
10.# echo AQAinItT8Ip9AhAAS93FrXLrrnVp8/sQhjvTIg== > /etc/ceph/adminkey
11.# mount -t ceph 192.168.57.101:6789:/ /mnt/kernel_cephfs -o name=admin,secretfile=/etc/ceph/adminkey
12. To mount CephFS in your filesystem table, add the following lines in the /etc/fstab file on the client. The syntax for this is <Mon_ipaddress>:<monitor_port>:/ <mount_point> <filesystem-name> [name=username,secret=secretkey|secretfile=/path/to/secretfile],[{mount.options}]. The following is the command:
13.192.168.57.101:6789:/ /mnt/kernel_ceph ceph name=admin,secretfile=/etc/ceph/adminkey,noatime 0 2
14. Unmount and mount CephFS again:
15.# umount /mnt/kernel_cephfs
16.# mount /mnt/kernel_cephfs

Mounting CephFS as FUSE
The Ceph filesystem is natively supported by Linux kernel starting from Version 2.6.34 and above. If your host is running on a lower kernel version, you can use the FUSE (Filesystem in User Space) client for Ceph to mount the Ceph filesystem:
1. Since we have already added Ceph yum repositories earlier in this chapter, let's install Ceph FUSE on the client machine:
2. # yum install ceph-fuse
3. Ensure that the client has the Ceph configuration and keyring file before performing mounting. Create a directory for mounting:
4. # mkdir /mnt/cephfs
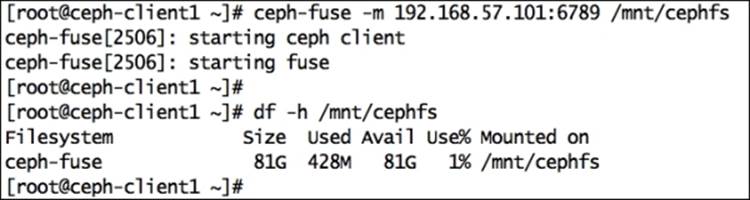
5. Mount CephFS using the Ceph FUSE client. The syntax for this is ceph-fuse -m <Monitor_IP:Monitor_Port_Number> <mount_point_name>. Use the following command:
6. # ceph-fuse -m 192.168.57.101:6789 /mnt/cephfs
7. To mount CephFS in your filesystem table so that CephFS will automatically mount at startup, add the following lines in the /etc/fstab file on client:
8. #Ceph ID #mountpoint #Type #Options
9. id=admin /mnt/cephfs fuse.ceph defaults 0 0
10. Unmount and mount CephFS again:
11.# umount /mnt/cephfs
12.# mount /mnt/cephfs
Object storage using the Ceph RADOS gateway
Object storage, as the name suggests, manages data in the form of objects. Each object stores data, metadata, and a unique identifier. Object storage cannot be directly accessed by operating systems as a local or remote filesystem. It can only be accessed via API at application level. Ceph provides an object storage interface known as the RADOS gateway, which has been built on top of the Ceph RADOS layer. The RADOS gateway provides applications with RESTful S3- or Swift-compatible API interfaces to store data in the form of objects into a Ceph cluster.
In a production environment, if you have a huge workload for Ceph object storage, you should configure the RADOS gateway on a physical dedicated machine, else you can consider using any of the monitor nodes as the RADOS gateway. We will now perform a basic RADOS gateway configuration to use Ceph storage cluster as object storage.
Setting up a virtual machine
In a usual Ceph-based setup, the RADOS gateway is configured on a machine other than MON and OSD. However, if you have limited hardware, you can use MON machines to configure RGW. In this demonstration, we will create a separate virtual machine for Ceph RGW:
1. Create a new VirtualBox virtual machine for the RADOS gateway:
2. # VboxManage createvm --name ceph-rgw --ostype RedHat_64 --register
3. # VBoxManage modifyvm ceph-rgw --memory 1024 --nic1 nat --nic2 hostonly --hostonlyadapter2 vboxnet1
4.
5. # VBoxManage storagectl ceph-rgw --name "IDE Controller" --add ide --controller PIIX4 --hostiocache on --bootable on
6. # VBoxManage storageattach ceph-rgw --storagectl "IDE Controller" --type dvddrive --port 0 --device 0 --medium /downloads/CentOS-6.4-x86_64-bin-DVD1.iso
7. # VBoxManage storagectl ceph-rgw --name "SATA Controller" --add sata --controller IntelAHCI --hostiocache on --bootable on
8. # VBoxManage createhd --filename OS-ceph-rgw.vdi --size 10240
9. # VBoxManage storageattach ceph-rgw --storagectl "SATA Controller" --port 0 --device 0 --type hdd --medium OS-ceph-rgw.vdi
10.# VBoxManage startvm ceph-rgw --type gui
11. Once the virtual machine is created and started, install the CentOS operating system by following the OS installation documentation available at https://access.redhat.com/site/documentation/en-US/Red_Hat_Enterprise_Linux/6/html/Installation_Guide/index.html. During the installation process, provide the hostname as ceph-client1.
12. Once you have successfully installed the operating system, edit the network configuration of the machine and restart network services:
· Edit the /etc/sysconfig/network-scripts/ifcfg-eth0 file and add:
· ONBOOT=yes
BOOTPROTO=dhcp
· Edit the /etc/sysconfig/network-scripts/ifcfg-eth1 file and add:
· ONBOOT=yes
· BOOTPROTO=static
· IPADDR=192.168.57.110
NETMASK=255.255.255.0
· Edit the /etc/hosts file and add:
· 192.168.57.101 ceph-node1
· 192.168.57.102 ceph-node2
· 192.168.57.103 ceph-node3
· 192.168.57.200 ceph-client1
192.168.57.110 ceph-rgw
Installing the RADOS gateway
The last section was about setting up a virtual machine for RGW. In this section, we will learn to install and configure RGW:
1. Ceph object storage requires Apache and FastCGI; it is recommended to install 100-continue optimized versions for Apache and FastCGI provided by the Ceph community.
Execute the following commands on the RADOS gateway node ceph-rgw, unless otherwise specified. Create a ceph-apache repository file, ceph-apache.repo, for YUM under the /etc/yum.repos.d directory:
# vim /etc/yum.repos.d/ceph-apache.repo
## replace {distro} with OS distribution type , ex centos6 , rhel6 etc. You can grab this code at publishers website.
[apache2-ceph-noarch]
name=Apache noarch packages for Ceph
baseurl=http://gitbuilder.ceph.com/apache2-rpm-{distro}-x86_64-basic/ref/master
enabled=1
priority=2
gpgcheck=1
type=rpm-md
gpgkey=https://ceph.com/git/?p=ceph.git;a=blob_plain;f=keys/autobuild.asc
[apache2-ceph-source]
name=Apache source packages for Ceph
baseurl=http://gitbuilder.ceph.com/apache2-rpm-{distro}-x86_64-basic/ref/master
enabled=0
priority=2
gpgcheck=1
type=rpm-md
gpgkey=https://ceph.com/git/?p=ceph.git;a=blob_plain;f=keys/autobuild.asc

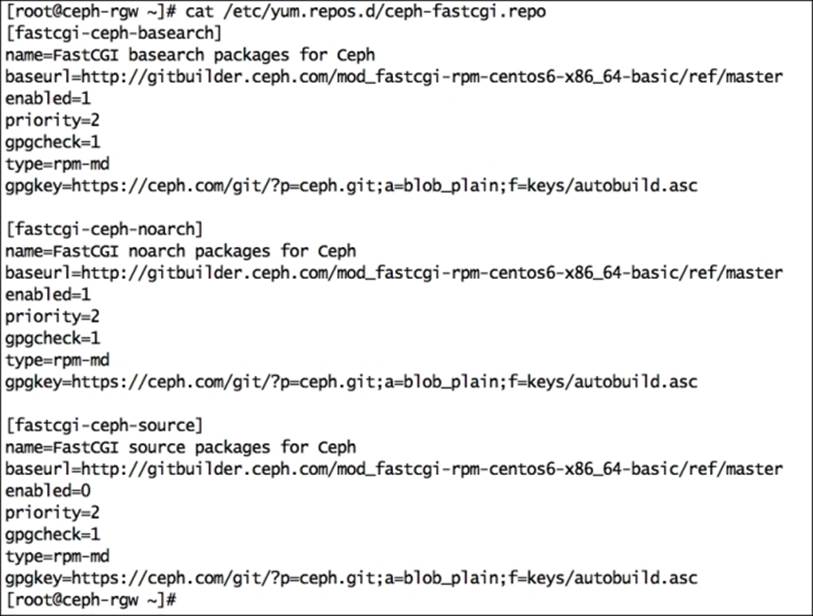
2. Create the ceph-fastcgi.repo file under the /etc/yum.repos.d directory:
3. # vim /etc/yum.repos.d/ceph-fastcgi.repo
4. ## replace {distro}with OS distribution type , ex centos6 , rhel6 etc. You can grab this code at publishers website.
5.
6. [fastcgi-ceph-basearch]
7. name=FastCGI basearch packages for Ceph
8. baseurl=http://gitbuilder.ceph.com/mod_fastcgi-rpm-{distro}-x86_64-basic/ref/master
9. enabled=1
10.priority=2
11.gpgcheck=1
12.type=rpm-md
13.gpgkey=https://ceph.com/git/?p=ceph.git;a=blob_plain;f=keys/autobuild.asc
14.
15.[fastcgi-ceph-noarch]
16.name=FastCGI noarch packages for Ceph
17.baseurl=http://gitbuilder.ceph.com/mod_fastcgi-rpm-{distro}-x86_64-basic/ref/master
18.enabled=1
19.priority=2
20.gpgcheck=1
21.type=rpm-md
22.gpgkey=https://ceph.com/git/?p=ceph.git;a=blob_plain;f=keys/autobuild.asc
23.
24.[fastcgi-ceph-source]
25.name=FastCGI source packages for Ceph
26.baseurl=http://gitbuilder.ceph.com/mod_fastcgi-rpm-{distro}-x86_64-basic/ref/master
27.enabled=0
28.priority=2
29.gpgcheck=1
30.type=rpm-md
31.gpgkey=https://ceph.com/git/?p=ceph.git;a=blob_plain;f=keys/autobuild.asc
32. Create the ceph.repo file under the /etc/yum.repos.d directory:
33.# vim /etc/yum.repos.d/ceph.repo
34.## You can grab this code at publishers website.
35.[Ceph]
36.name=Ceph packages for $basearch
37.baseurl=http://ceph.com/rpm-firefly/el6/$basearch
38.enabled=1
39.gpgcheck=1
40.type=rpm-md
41.gpgkey=https://ceph.com/git/?p=ceph.git;a=blob_plain;f=keys/release.asc
42.
43.[Ceph-noarch]
44.name=Ceph noarch packages
45.baseurl=http://ceph.com/rpm-firefly/el6/noarch
46.enabled=1
47.gpgcheck=1
48.type=rpm-md
49.gpgkey=https://ceph.com/git/?p=ceph.git;a=blob_plain;f=keys/release.asc
50.
51.[ceph-source]
52.name=Ceph source packages
53.baseurl=http://ceph.com/rpm-firefly/el6/SRPMS
54.enabled=1
55.gpgcheck=1
56.type=rpm-md
57.gpgkey=https://ceph.com/git/?p=ceph.git;a=blob_plain;f=keys/release.asc
58. Install yum-plugin-priorities:
59.# yum install yum-plugin-priorities
60. Install the apache (httpd), fastcgi (mod_fastcgi), ceph-radosgw, and ceph packages:
61.# yum install httpd mod_fastcgi ceph-radosgw ceph
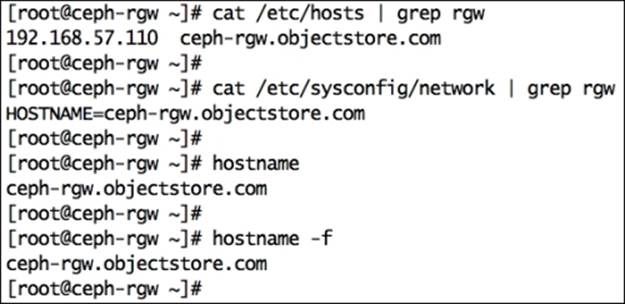
62. Set FQDN for ceph-rgw host:
· Edit /etc/hosts and add IP, FQDN, and hostname in the # <rgw_ip_addr> <FQDN> <Hostname> format:
192.168.57.110 ceph-rgw.objectstore.com ceph-rgw
· Edit /etc/sysconfig/network and set HOSTNAME as FQDN:
HOSTNAME=ceph-rgw.objectstore.com
· Check hostname and FQDN:
· # hostname
· # hostname -f
Configuring the RADOS gateway
The configuration of the RADOS gateway includes Apache and FastCGI configuration and Ceph key generation. Perform the following steps:
1. Configure Apache by editing /etc/httpd/conf/httpd.conf:
· Set ServerName <FQDN>
· Ensure the following line is present and uncommented:
LoadModule rewrite_module modules/mod_rewrite.so
2. 
3. Configure FastCGI by editing /etc/httpd/conf.d/fastcgi.conf:
· Ensure that the FastCGI modules are enabled:
LoadModule fastcgi_module modules/mod_fastcgi.so
· Turn off FastCgiWrapper

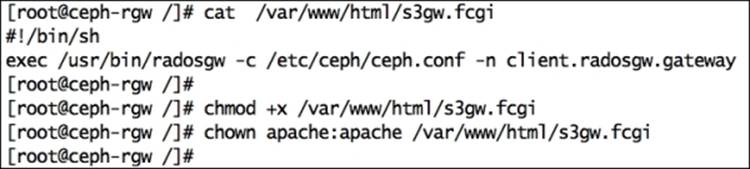
4. Create a Ceph object gateway script with the following content, change ownership, and allow executable permission. You can match the changes from the author's version of the s3gw.fcgi file provided with this book:
5. # vim /var/www/html/s3gw.fcgi
6. #!/bin/sh
7. exec /usr/bin/radosgw -c /etc/ceph/ceph.conf -n client.radosgw.gateway
8.
9. # chmod +x /var/www/html/s3gw.fcgi
10.# chown apache:apache /var/www/html/s3gw.fcgi
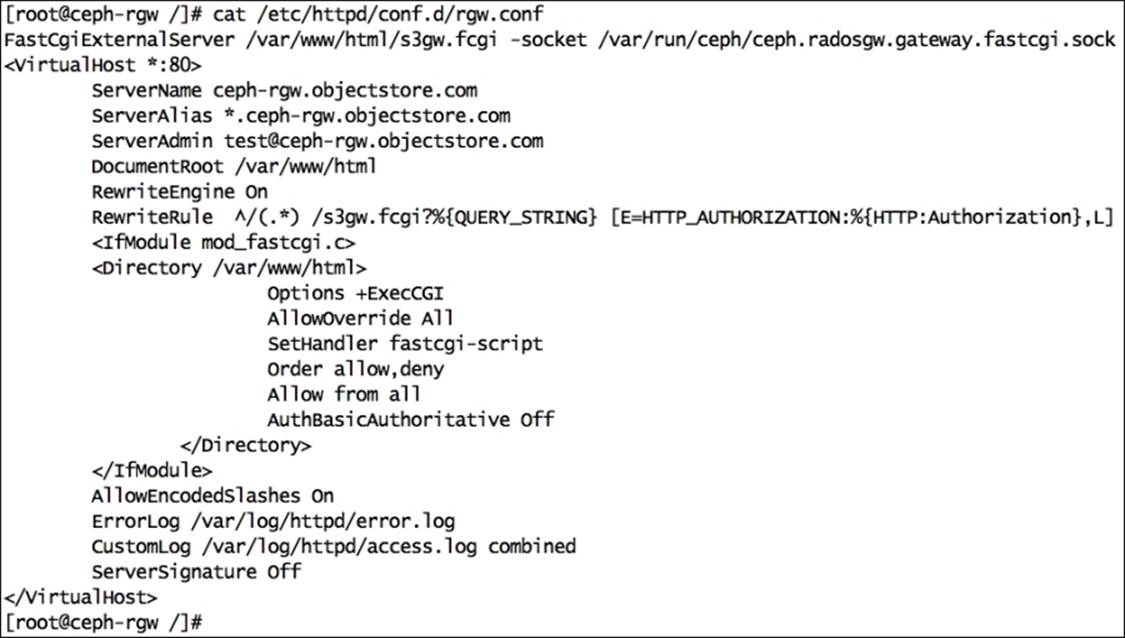
11. Create the gateway configuration file rgw.conf under /etc/httpd/conf.d with the following contents. Replace {fqdn} with servers fqdn (hostname -f) and {email.address} with the e-mail address of the server administrator. You can match the changes from the author's version of the rgw.conf file provided with this book:
12.FastCgiExternalServer /var/www/html/s3gw.fcgi -socket /var/run/ceph/ceph.radosgw.gateway.fastcgi.sock
13.<VirtualHost *:80>
14. ServerName {fqdn}
15. <!--Remove the comment. Add a server alias with *.{fqdn} for S3 subdomains-->
16. <!--ServerAlias *.{fqdn}-->
17. ServerAdmin {email.address}
18. DocumentRoot /var/www/html
19. RewriteEngine On
20. RewriteRule ^/(.*) /s3gw.fcgi?%{QUERY_STRING} [E=HTTP_AUTHORIZATION:%{HTTP:Authorization},L]
21. <IfModule mod_fastcgi.c>
22. <Directory /var/www/html>
23. Options +ExecCGI
24. AllowOverride All
25. SetHandler fastcgi-script
26. Order allow,deny
27. Allow from all
28. AuthBasicAuthoritative Off
29. </Directory>
30. </IfModule>
31. AllowEncodedSlashes On
32. ErrorLog /var/log/httpd/error.log
33. CustomLog /var/log/httpd/access.log combined
34. ServerSignature Off
35. </VirtualHost>
36.# vim /etc/httpd/conf.d/rgw.conf
37. Create the RADOS gateway user and keyring for Ceph, log in to any of the Ceph monitor nodes, and execute the following:
· Create the keyring:
· # ceph-authtool --create-keyring /etc/ceph/ceph.client.radosgw.keyring
· # chmod +r /etc/ceph/ceph.client.radosgw.keyring
· Generate the gateway user and key for the RADOS gateway instance; our RADOS gateway instance name is gateway:
· # ceph-authtool /etc/ceph/ceph.client.radosgw.keyring -n client.radosgw.gateway --gen-key
· Add capabilities to the key:
· # ceph-authtool -n client.radosgw.gateway --cap osd 'allow rwx' --cap mon 'allow rw' /etc/ceph/ceph.client.radosgw.keyring
· Add the key to the Ceph cluster:
· # ceph -k /etc/ceph/ceph.client.admin.keyring auth add client.radosgw.gateway -i /etc/ceph/ceph.client.radosgw.keyring
· Distribute the key to the Ceph RADOS gateway node:
· # scp /etc/ceph/ceph.client.radosgw.keyring ceph-rgw:/etc/ceph/ceph.client.radosgw.keyring
· Create a pool for the RADOS gateway
· # ceph osd pool create .rgw 128 128

38. Create the Ceph RADOS gateway data directory:
39.# mkdir -p /var/lib/ceph/radosgw/ceph-radosgw.gateway
40. Add a gateway configuration to Ceph, add the following configuration to Ceph monitor's ceph.conf file, and move this ceph.conf file to the RADOS gateway node. Make sure that the hostname is the RADOS gateway hostname, and not FQDN:
41.[client.radosgw.gateway]
42.host = ceph-rgw
43.keyring = /etc/ceph/ceph.client.radosgw.keyring
44.rgw socket path = /var/run/ceph/ceph.radosgw.gateway.fastcgi.sock
45.log file = /var/log/ceph/client.radosgw.gateway.log
46.rgw dns name = ceph-rgw.objectstore.com ## This would be used for S3 API
47.rgw print continue = false
48.# scp /etc/ceph/ceph.conf ceph-rgw:/etc/ceph/ceph.conf

49. Adjust the ownership and permission on the RADOS gateway node for /var/log/httpd, /var/run/ceph, and /var/log/ceph. Set SELinux to Permissive:
50.# chown apache:apache /var/log/httpd
51.# chown apache:apache /var/run/ceph
52.# chown apache:apache /var/log/ceph
53.# setenforce 0
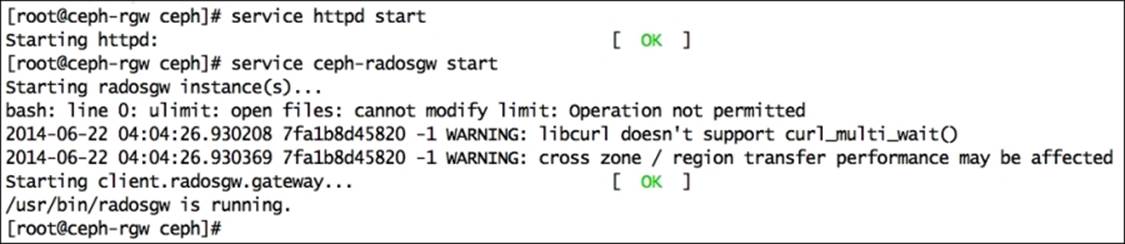
54. Start the Apache and Ceph RADOS gateway services. If you encounter any warning, you can ignore them at this point:
· Start the Apache service:
· # service httpd start
· Start the ceph-radosgw service:
· # service ceph-radosgw start
55. Verify the configuration:
· Perform an HTTP GET request on radosgw FQDN using curl:
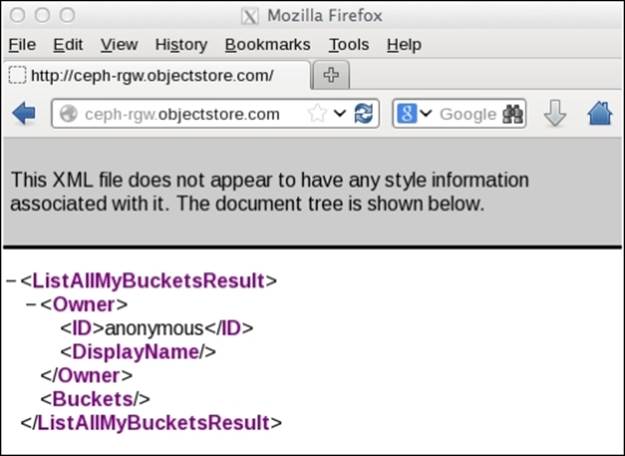
· # curl http://ceph-rgw.objectstore.com
· You should get a response similar to the one shown in the following snippet. It shows that your configuration is correct:
· <?xml version="1.0" encoding="UTF-8"?>
· <ListAllMyBucketsResult xmlns="http://s3.amazonaws.com/doc/2006-03-01/">
· <Owner>
· <ID>anonymous</ID>
· <DisplayName></DisplayName>
· </Owner><Buckets></Buckets>
· </ListAllMyBucketsResult>
56. Submitting an HTTP request to the browser of an radosgw node can also do the verification.
Creating a radosgw user
To use the Ceph object storage, we need to create users for the RADOS gateway. These user accounts will be identified by access and secret keys, which can be used by clients to perform operations on the Ceph object storage.
Now, let's create a RADOS gateway user and access object storage:
1. Make sure the RADOS gateway machine (ceph-rgw) is able to access a Ceph cluster. Copy the Ceph keyring to the RADOS gateway machine from the monitor node:
2. # scp ceph.client.admin.keyring ceph-rgw:/etc/ceph
3. Execute Ceph cluster commands from ceph-rgw to ensure cluster accessibility:
4. # ceph -s
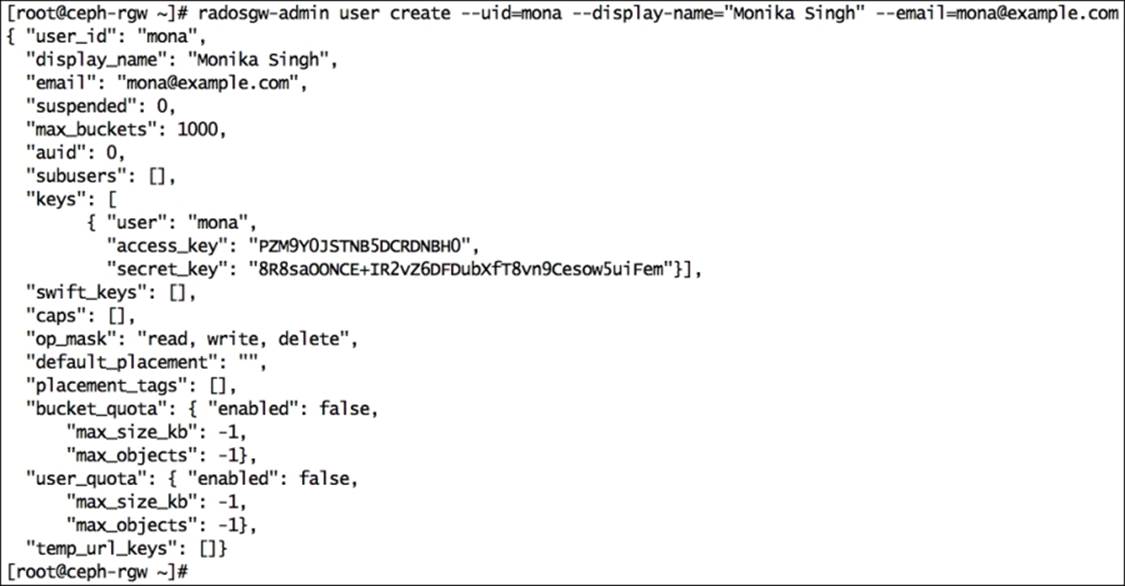
5. Create a RADOS gateway user. This will also create an access_key and secret_key for the user, which will be required to access the Ceph object storage:
6. # radosgw-admin user create --uid=mona --display-name="Monika Singh" --email=mona@example.com
Accessing the Ceph object storage
The Ceph object storage supports S3- and Swift-compatible APIs; to make use of object storage capabilities of Ceph, we need to configure S3 or Swift interfaces. We will now perform a basic configuration for these interfaces one by one. For advanced configurations, check their respective documentations.
S3 API-compatible Ceph object storage
Amazon offers Simple Storage Service (S3) to provide storage through web interfaces such as REST. Ceph extends its compatibility with S3 through RESTful API. S3 client applications can access the Ceph object storage based on access and secret keys. Let's now see how to configure this. Perform the following commands on the ceph-rgw node until otherwise specified:
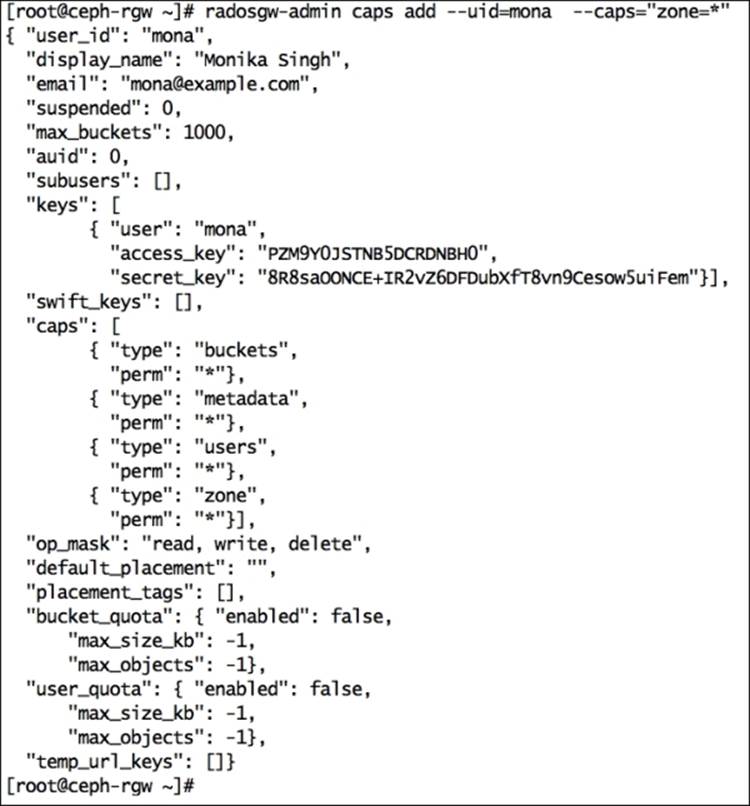
1. Radosgw users should have enough capabilities to allow S3 requests. Add the required capabilities to the radosgw user ID (mona):
2. # radosgw-admin caps add --uid=mona --caps="users=*"
3. # radosgw-admin caps add --uid=mona --caps="buckets=*"
4. # radosgw-admin caps add --uid=mona --caps="metadata=*"
5. radosgw-admin caps add --uid=mona --caps="zone=*"
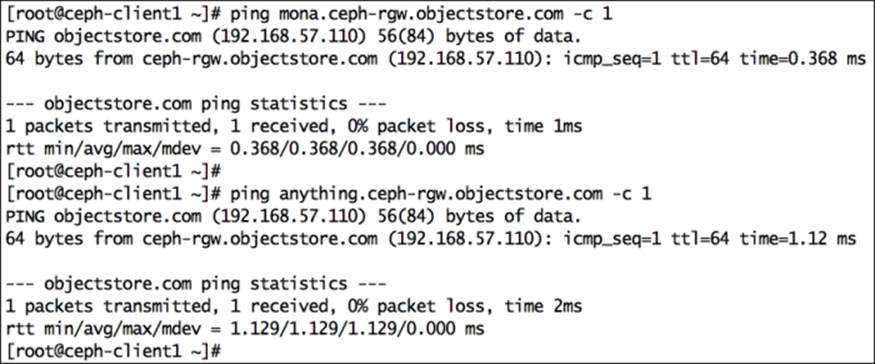
6. S3 also requires a DNS service in place as it uses the virtual host bucket naming convention <object_name>.<RGW_Fqdn>. For example, if you have a bucket named jupiter, it will be accessible over HTTP via the URL http://jupiter.ceph-rgw.objectstore.com.
Perform the following steps to configure DNS on the ceph-rgw node. If you have an existing DNS server, you can use it with slight modifications.
1. Install bind packages on the ceph-rgw node:
2. # yum install bind* -y
3. Edit /etc/named.conf, the IP address, and the IP range and zone as mentioned in the following code. You can match the changes from the author's version of the named.conf file provided with this book's code bundle:
4. listen-on port 53 { 127.0.0.1;192.168.57.110; }; ### Add DNS IP ###
5.
6. allow-query { localhost;192.168.57.0/24; }; ### Add IP Range ###
7.
8. ### Add new zone for domain objectstore.com before EOF ###
9. zone "objectstore.com" IN {
10.type master;
11.file "db.objectstore.com";
12.allow-update { none; };
};
13. Save and exit your editor from /etc/named.conf.
14. Create the zone file /var/named/db.objectstore.com with the following content. You can match the changes from the author's version of the db.objectstore.com file provided with this book:
15.@ 86400 IN SOA objectstore.com. root.objectstore.com. (
16. 20091028 ; serial yyyy-mm-dd
17. 10800 ; refresh every 15 min
18. 3600 ; retry every hour
19. 3600000 ; expire after 1 month +
20. 86400 ); min ttl of 1 day
21.@ 86400 IN NS objectstore.com.
22.@ 86400 IN A 192.168.57.110
* 86400 IN CNAME @
23. Disable the firewall, or you can allow DNS rules from the firewall:
24.# service iptables stop
25. Edit /etc/resolve.conf and add the following content:
26.search objectstore.com
nameserver 192.168.57.110
27. Start the named service:
28.# service named start
29. Test DNS configuration files for any syntax errors:
30.# named-checkconf /etc/named.conf
31.# named-checkzone objectstore.com /var/named/db.objectstore.com
32. Test the DNS server:
33.# dig ceph-rgw.objectstore.com
34.# nslookup ceph-rgw.objectstore.com
35. Apply the same DNS settings to ceph-client1, which will be our S3 client machine. Edit /etc/resolve.conf on ceph-client1 and add the following content:
36.search objectstore.com
nameserver 192.168.57.110
37. Test the DNS settings on ceph-client1:
38.# dig ceph-rgw.objectstore.com
39.# nslookup ceph-rgw.objectstore.com
40. The ceph-client1 machine should be able to resolve all the subdomains for ceph-rgw.objectstore.com.
7. Configure the S3 client (s3cmd) on ceph-client1:
1. Install s3cmd:
2. # yum install s3cmd
3. Configuring s3cmd will require an access _key and secret_key for a user; in our case, the user ID is mona that we created in the first step:
4. # s3cmd --configure

5. The s3cmd configure command will create the .s3cfg file under /root; edit this file for the RADOS gateway host details. Modify host_base and host_bucket, as shown in the following snippet. Make sure these lines do not have trailing spaces at the end:
6. host_base = ceph-rgw.objectstore.com
host_bucket = %(bucket)s.ceph-rgw.objectstore.com
8. You can match the changes from the author's version of the .s3cfg file provided with this book.
9. 
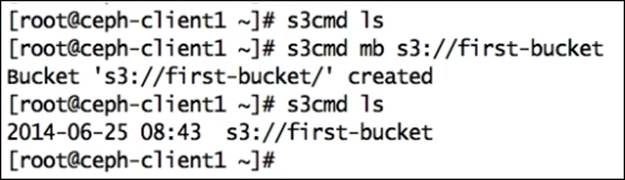
10. Finally, we will create S3 buckets and put objects into it:
11.# s3cmd ls
12.# s3cmd mb s3://first-bucket
13.# s3cmd put /etc/hosts s3://first-bucket
Swift API-compatible Ceph object storage
Ceph supports a RESTful API that is compatible with the basic data access model of the Swift API. To use Ceph object storage using the Swift API, we need to create a Swift subuser on the Ceph RADOS gateway, which will allow the Swift API to access Ceph object storage:
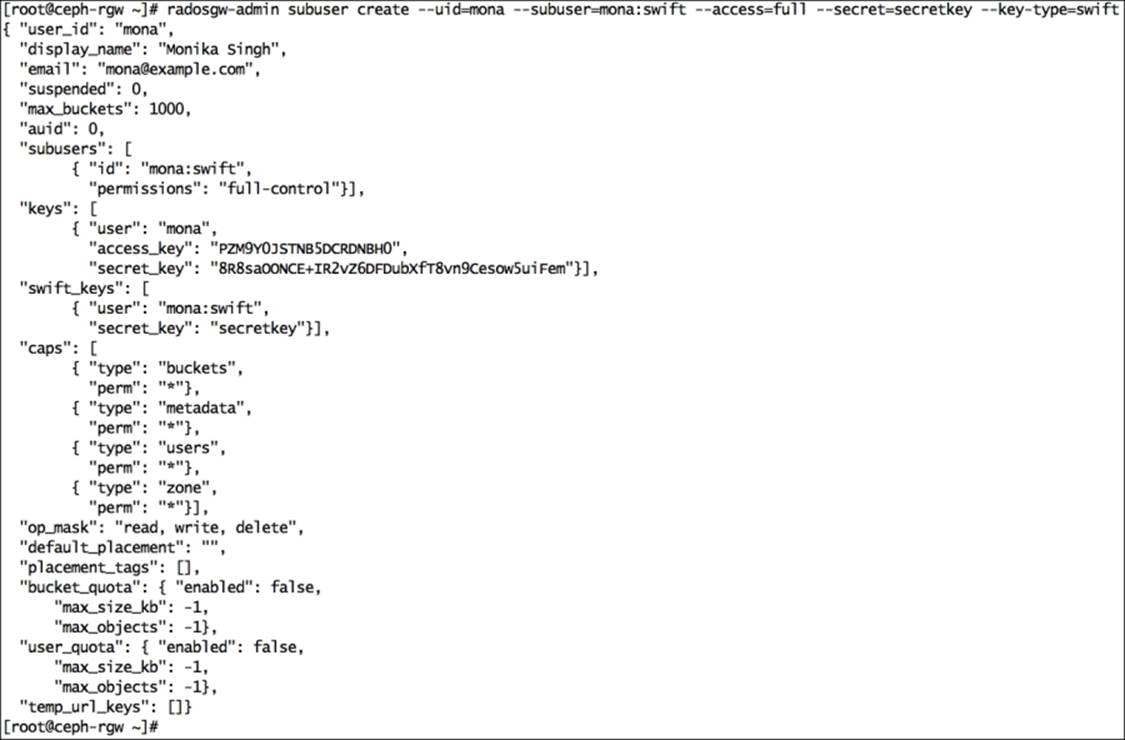
1. Log in to ceph-rgw and create a subuser for Swift access. The subuser will have its own secret key:
2. # radosgw-admin subuser create --uid=mona --subuser=mona:swift --access=full --secret=secretkey --key-type=swift
3. Install a swift client on the ceph-client1 node:
4. # yum install python-setuptools
5. # easy_install pip
6. # pip install --upgrade setuptools
7. # pip install python-swiftclient
8. Finally, create and list buckets using the swift client:
9. # swift -V 1.0 -A http://ceph-rgw.objectstore.com/auth -U mona:swift -K secretkey post example-bucket
10.# swift -V 1.0 -A http://ceph-rgw.objectstore.com/auth -U mona:swift -K secretkey list
Summary
Storage provisioning is the most frequent operation a storage administration has to perform. As compared to traditional enterprise storage systems, you no longer need to procure and manage multiple storage systems for different storage types. Ceph uniquely delivers object, block, and file storage from a single unified system. In this chapter, we learned how to configure and provision RADOS block devices, Ceph filesystems, and the Ceph object storage. It's been more than two decades that the block device and filesystem storage types exist; however, object storage is fairly new is gaining momentum now due to Amazon S3 and Swift. Ceph extends its support to S3 and Swift APIs. In this chapter, we also learned the configuration of S3 and Swift separately, followed by their usage. In the next chapter, we will learn about Ceph service management and the Ceph cluster.
All materials on the site are licensed Creative Commons Attribution-Sharealike 3.0 Unported CC BY-SA 3.0 & GNU Free Documentation License (GFDL)
If you are the copyright holder of any material contained on our site and intend to remove it, please contact our site administrator for approval.
© 2016-2026 All site design rights belong to S.Y.A.