Learning Ceph (2015)
Chapter 7. Ceph Operations and Maintenance
As a Ceph storage administrator, it will be quite useful for you to manage your enterprise Ceph cluster effectively. In this chapter, we will cover the following topics:
· Ceph service management
· Scaling out a Ceph cluster
· Scaling down a Ceph cluster
· Replacing a failed drive
· Managing a CRUSH map
Ceph service management
As soon as you have your first Ceph cluster set up, you will need to manage it. As a Ceph storage administrator, one should know about Ceph services and how to use them. On Red Hat-based distributions, Ceph daemons can be managed in two ways, as a traditional sysvinit or as a service. Now, let's learn more about these methods of service management.
Running Ceph with sysvinit
sysvinit is a traditional, yet still recommended, method of managing Ceph daemons on RedHat-based systems as well as some older Debian/Ubuntu-based distributions. The general syntax to manage Ceph daemons using sysvinit is as follows:
/etc/init.d/ceph [options] [command] [daemons]
The Ceph options include:
· --verbose (-v): Used for verbose logging
· --allhosts (-a): Executes on all nodes mentioned in ceph.conf, otherwise on localhost
· --conf (-c): Uses alternate configuration file
The Ceph commands include:
· status: Shows the status of the daemon
· start: Starts the daemon
· stop: Stops the daemon
· restart: Stops, and then starts the daemon
· forcestop: Forces the daemon to stop; this is similar to kill -9
The Ceph daemons include:
· mon
· osd
· mds
· ceph-radosgw
Starting daemons by type
During your cluster administration, you might require to manage Ceph services by their types. In this section, we will learn how to start daemons by their types.
To start Ceph monitor daemons on localhost, execute Ceph with the start command:
# /etc/init.d/ceph start mon
To start all of the Ceph monitor daemons on local as well as remote hosts, execute Ceph with the start command and the -a option:
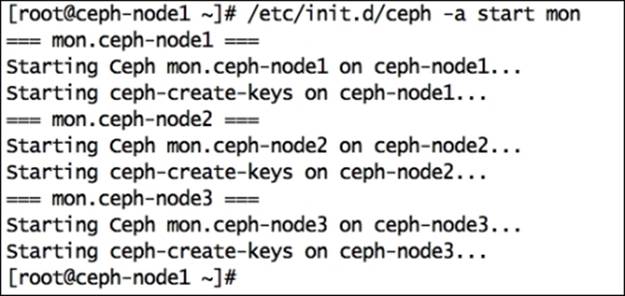
# /etc/init.d/ceph -a start mon
The -a option will perform the requested operation on all the nodes mentioned in the ceph.conf file. Have a look at the following screenshot:
Similarly, you can start daemons of other types, such as mon and mds:
# /etc/init.d/ceph start osd
# /etc/init.d/ceph start mds
Note
If you are using the -a option while starting services of any type, make sure your ceph.conf file has all your Ceph hosts defined there. If the -a option is not used, the command will only be executed on localhost.
Stopping daemons by type
In this section, we will learn about stopping Ceph daemons by their types.
To stop Ceph monitor daemons on localhost, execute Ceph with the stop command:
# /etc/init.d/ceph stop mon
To stop Ceph monitor daemons on all hosts, execute Ceph with the stop command and the -a option:
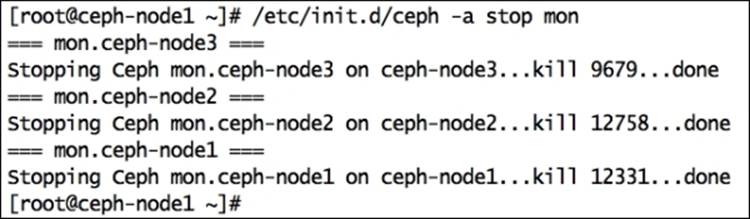
# /etc/init.d/ceph -a stop mon
The -a option will perform the requested operation on all the nodes mentioned in the ceph.conf file. The following screenshot shows these commands in action:
Similarly, you can stop daemons of other types, such as mon and mds:
# /etc/init.d/ceph stop osd
# /etc/init.d/ceph stop mds
Tip
If you are using the -a option while starting services of any type, make sure your ceph.conf file has all your Ceph hosts defined there. If hosts are not defined in the ceph.conf file, the command will only be executed on localhost.
Starting and stopping all daemons
To start your Ceph cluster, execute Ceph with the start command. This command will start all Ceph services that you have deployed for all the hosts mentioned in the ceph.conf file:
# /etc/init.d/ceph -a start
To stop your Ceph cluster, execute Ceph with the stop command. This command will stop all Ceph services that you have deployed for all the hosts mentioned in the ceph.conf file:
# /etc/init.d/ceph -a stop
Starting and stopping a specific daemon
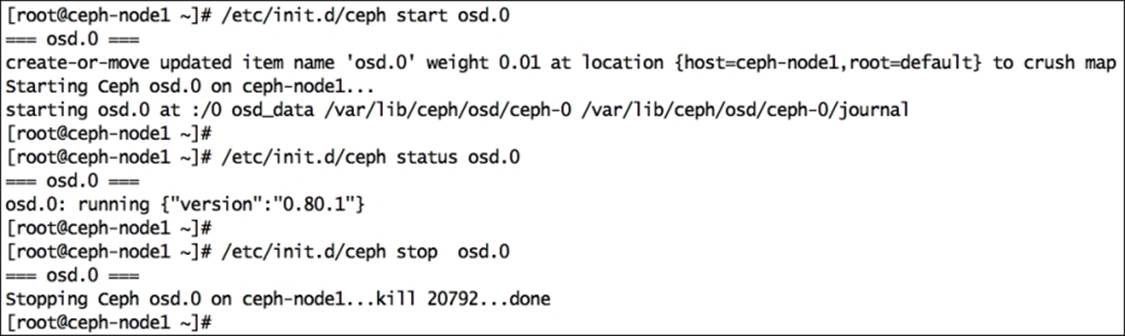
To start a specific daemon for your Ceph cluster, execute Ceph with the start command and daemon ID:
# /etc/init.d/ceph start osd.0
To check the status of a specific daemon for your Ceph cluster, execute Ceph with the status command and daemon ID:
# /etc/init.d/ceph status osd.0
To stop a specific daemon for your Ceph cluster, execute Ceph with the stop command and daemon ID:
# /etc/init.d/ceph stop osd.0
This screenshot shows the output of the preceding commands:
Similarly, you can manage specific daemons for the monitor and mds of your Ceph cluster.
Running Ceph as a service
Depending on your Linux working style, you can choose to manage your Ceph services either by sysvinit or by the Linux service command. Starting from Ceph Argonaut and Bobtail, you can mange Ceph daemons using the Linux service command:
service ceph [options] [command] [daemons]
The Ceph options include:
· --verbose (-v): Used for verbose logging
· --allhosts (-a): Executes on all nodes that are mentioned in ceph.conf, otherwise on localhost
· --conf (-c): Uses and alternates configuration files
The Ceph commands include:
· status: Shows the status of the daemon
· start: Starts the daemon
· stop: Stops the daemon
· restart: Stops, and then starts the daemon
· forcestop: Forces the daemon to stop; this is similar to kill -9
The Ceph daemons include:
· mon
· osd
· mds
· ceph-radosgw
Starting and stopping all daemons
To start your Ceph cluster, execute Ceph with the start command. This command will start all Ceph services that you have deployed for all the hosts mentioned in the ceph.conf file:
# service ceph -a start
To stop your Ceph cluster, execute Ceph with the stop command. This command will stop all Ceph services that you have deployed for all the hosts mentioned in the ceph.conf file:
# service ceph -a stop
Starting and stopping a specific daemon
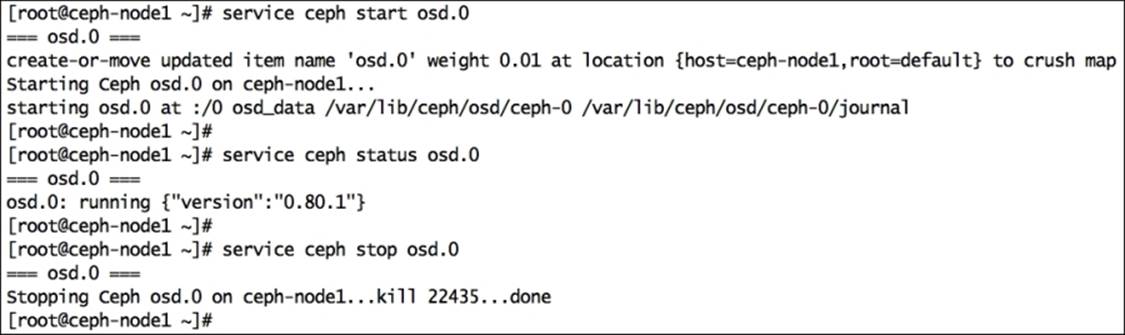
To start a specific daemon for your Ceph cluster, execute Ceph with the start command and daemon ID:
# service ceph start osd.0
To check the status of a specific daemon for your Ceph cluster, execute Ceph with the status command and daemon ID:
# service ceph status osd.0
To stop a specific daemon for your Ceph cluster, execute Ceph with the stop command and daemon ID:
# service ceph stop osd.0
The following is the screenshot showing the command outputs:
Scaling out a Ceph cluster
When you are building a storage solution, scalability is one of the most important design aspects. Your storage solution should be scalable to accommodate your future data needs. Usually, a storage system starts with small to medium capacity and grows gradually over a period of time. Traditional storage systems are based on scale-up designs and are bound to a certain capacity. If you try to expand your storage system over a certain limit, you might need to compromise with performance and reliability. The scale-up design methodology for storage involves adding disk resources to the existing device, which becomes a bottleneck for performance, capacity, and manageability when it reaches a certain level.
On the other hand, scale-out designs focus on adding entire new node, including disk, CPU, and memory, to the existing cluster. In this type of design, you will not end up with limited storage; rather, you will get benefited by the performance and robustness. Have a look at the following architecture:
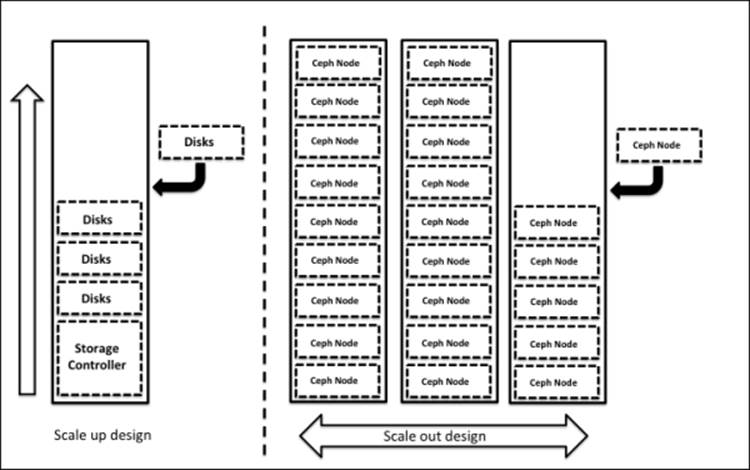
Ceph is a seamless scalable storage system based on the scale-out design, where you can add any off-the-shelf server node to a Ceph cluster and extend your storage system beyond the limits of a traditional system. Ceph allows on-the-fly addition of monitor and OSD nodes to an existing Ceph cluster. Now, let's see how to add nodes to a Ceph cluster.
Adding OSD nodes to a Ceph cluster
Adding an OSD node to a Ceph cluster is an online process. To demonstrate this, we require a new virtual machine named ceph-node4 with three disks; we will add this node to our existing Ceph cluster.
Create a new node ceph-node4 with three disks (OSDs). You can follow the process of creating a new virtual machine with disks, OS configuration, and Ceph installation as mentioned in Chapter 2, Ceph Instant Deployment, and Chapter 5, Deploying Ceph – the Way You Should Know.
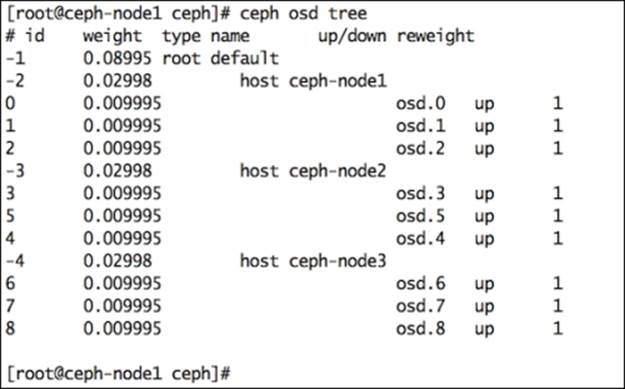
Once you have the new node ready for addition to a Ceph cluster, check the current Ceph OSD details:
# ceph osd tree
This is what you will get once this command is run:
Expanding a Ceph cluster is an online process, and to demonstrate this, we will perform some operations on our Ceph cluster; we will also expand the cluster in parallel. In Chapter 5, Deploying Ceph – the Way You Should Know, we deployed the Ceph RADOS block device on a ceph-client1 machine. We will use the same machine to generate traffic to our Ceph cluster. Make sure that ceph-client1 has mounted RBD:
# df -h /mnt/ceph-vol1

Log in on ceph-node1 from a separate cli terminal and list the disks available to add as OSDs for ceph-node4. The ceph-node4 machine should have Ceph installed and the ceph.conf file copied to it. You will notice three disks, sdb, sdc, and sdd, listed when you execute the following command:
# ceph-deploy disk list ceph-node4
As mentioned earlier, scaling up a Ceph cluster is a seamless and online process. To demonstrate this, we will generate some load to the cluster and perform the scaling-up operation simultaneously. Note that this is an optional step.
Make sure the host running the VirtualBox environment has adequate disk space as we will write data to the Ceph cluster. Open the ceph-client1 cli terminal and generate some write traffic to the Ceph cluster. As soon as you start generating traffic to the cluster, start expanding it by performing next steps.
# dd if=/dev/zero of=/mnt/ceph-vol1/file1 count=10240 bs=1M
Switch to the ceph-node1 cli terminal and expand the Ceph cluster by adding ceph-node4 disks as new Ceph OSDs:
# ceph-deploy disk zap ceph-node4:sdb ceph-node4:sdc ceph-node4:sdd
# ceph-deploy osd create ceph-node4:sdb ceph-node4:sdc ceph-node4:sdd
By the time OSD addition is under progress, you should monitor your Ceph cluster status from a separate terminal window. You will notice that the Ceph cluster performs the write operation while simultaneously scaling out its capacity:
# watch ceph status
Finally, once ceph-node4 disk addition is complete; you can check your Ceph cluster status using the preceding command. The following is what you will see after running this command:
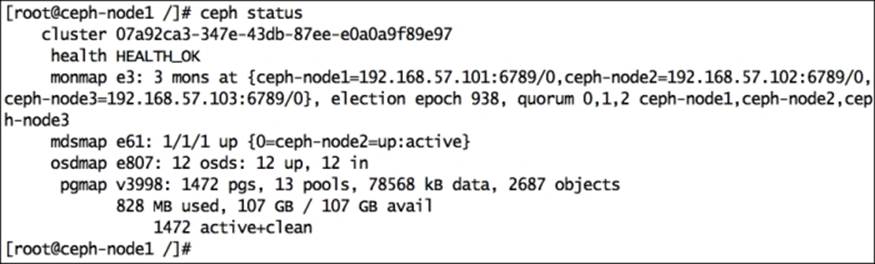
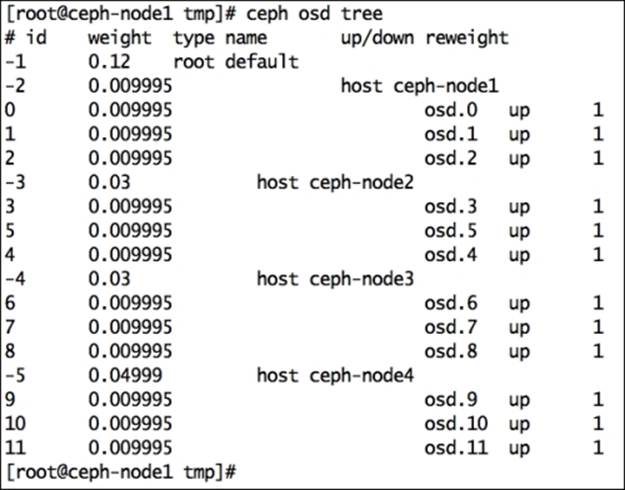
At this point, if you list out all OSDs, it will give you a better understanding:
# ceph osd tree
This command outputs some valuable information related to OSD, such as OSD weight, which the Ceph node hosts. The OSD, status of OSD (up/down), and OSD IN/OUT status are represented by 1 or 0. Have a look at the following screenshot:
Scaling down a Ceph cluster
A storage solution is rated on the basis of its flexibility; a good storage solution should be flexible enough to support its expansion and reduction without causing any downtime to the services. Traditional storage systems are very limited when it comes to flexibility; they do support storage capacity addition, but to a very small extent, and there's no support for online capacity reduction. You are locked with storage capacity and cannot perform changes as per your needs.
Ceph is an absolute, flexible storage system providing online and on-the-fly changes to storage capacity either by expansion or reduction. In the last section, we saw how easy the scale-out operation with Ceph is. We added a new node, ceph-node4, with three OSDs to the Ceph cluster. Now, we will demonstrate the scaling-down operation on a Ceph cluster, without any impact on its accessibility, by removing ceph-node4 out of the Ceph cluster.
Bringing an OSD out and down from a Ceph cluster
Before proceeding with a cluster's size reduction or scaling it down, make sure the cluster has enough free space to accommodate all the data present on the node you are moving out. The cluster should not be at its near-to-full ratio.
From the ceph-client1 node, generate some load on the Ceph cluster. This is an optional step to demonstration on-the-fly scale-down operations of a Ceph cluster. Make sure the host running the VirtualBox environment has adequate disk space since we will write data to a Ceph cluster.
# dd if=/dev/zero of=/mnt/ceph-vol1/file1 count=3000 bs=1M
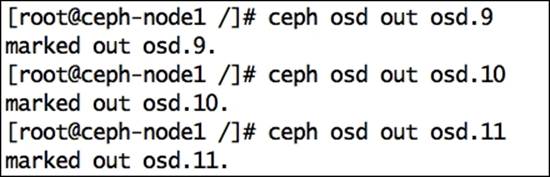
As we need to scale down the cluster, we will remove ceph-node4 and all of its associated OSDs out of the cluster. Ceph OSDs should be set out so that Ceph can perform data recovery. From any of the Ceph nodes, take the OSDs out of the cluster:
# ceph osd out osd.9
# ceph osd out osd.10
# ceph osd out osd.11
As soon as you mark OSDs out of the cluster, Ceph will start rebalancing the cluster by migrating the placement groups out of the OSDs that were made out to other OSDs inside the cluster. Your cluster state will become unhealthy for some time, but it will be good to serve data to clients. Based on the number of OSDs removed, there might be some drop in cluster performance till the time recovery is completed. Once the cluster is healthy again, it should perform as usual. Have a look at the following screenshot:
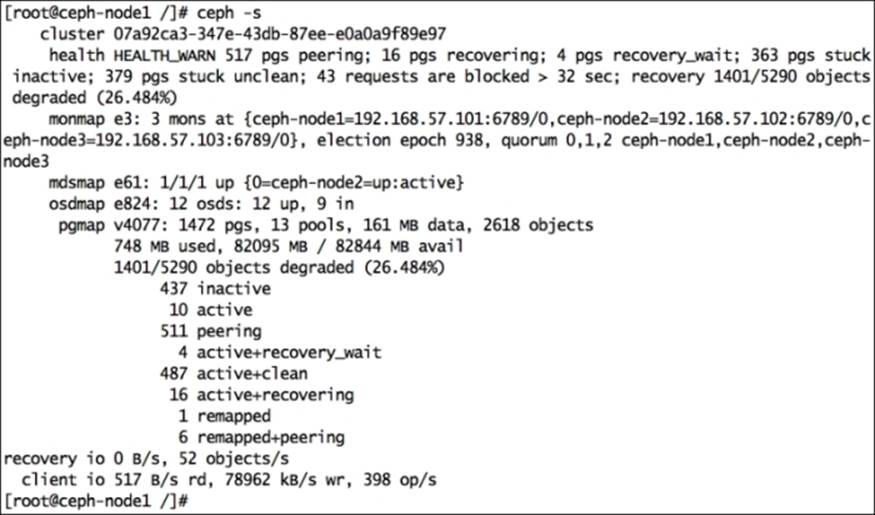
In the preceding screenshot, you can see that the cluster is under a recovery mode while also serving data to clients at the same time. You can observe the recovery process using the following command:
# ceph -w
As we marked osd.9, osd.10, and osd.11 out of the cluster, they are not a member of the cluster, but their services still run. Next, log in on a ceph-node4 machine and stop the OSD services:
# service ceph stop osd.9
# service ceph stop osd.10
# service ceph stop osd.11
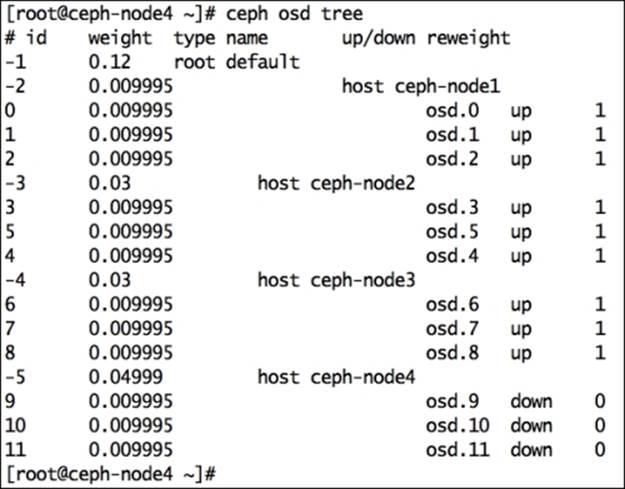
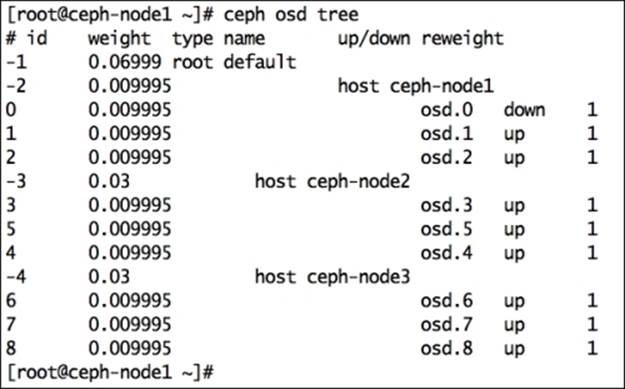
Once OSDs are down, check the OSD tree, as shown in the following screenshot. You will observe that the OSDs are down and out:
Removing the OSD from a Ceph cluster
The process of removing OSDs from a Ceph cluster involves removing all the entries of these OSDs from cluster maps.
Remove the OSDs from the CRUSH map. For this, log in to any of the cluster nodes and perform the following commands:
# ceph osd crush remove osd.9
# ceph osd crush remove osd.10
# ceph osd crush remove osd.11
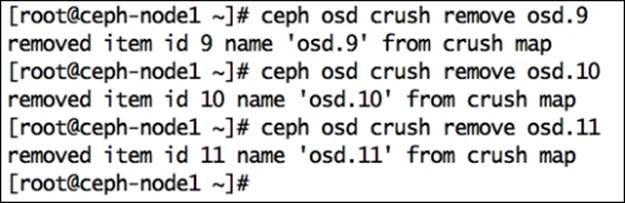
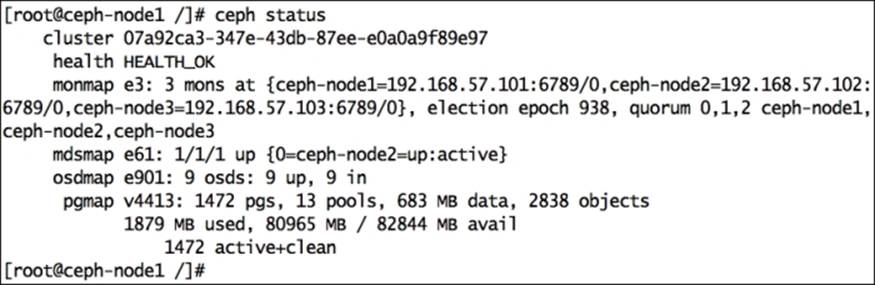
As soon as OSDs are removed from the CRUSH map, the Ceph cluster becomes healthy. You should also observe the OSD map; since we have not removed the OSDs, it will show as 12 OSD, 9 UP, 9 IN:
Remove the OSD authentication key:
# ceph auth del osd.9
# ceph auth del osd.10
# ceph auth del osd.11
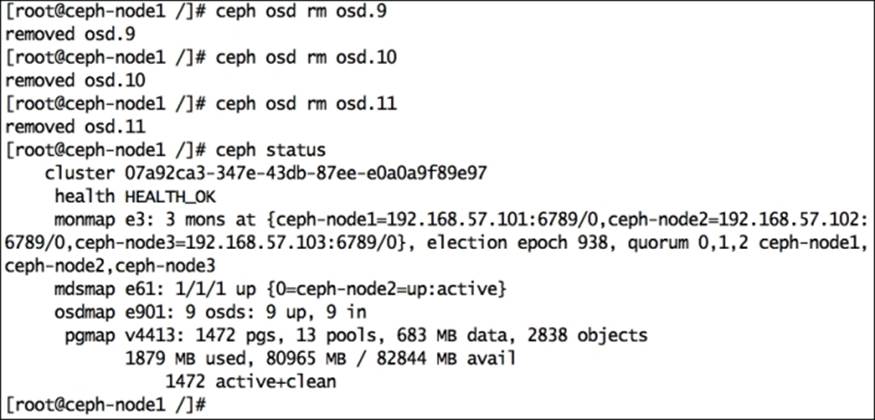
Finally, remove the OSD and check your cluster status. You should see 9 OSD, 9 UP, 9 IN, and the cluster health should be OK:
To keep your cluster clean, perform some housekeeping. As we have removed all the OSDs from the CRUSH map, ceph-node4 does not hold any item. Remove ceph-node4 from the CRUSH map to remove all traces of this node from the Ceph cluster:
# ceph osd crush remove ceph-node4
Replacing a failed disk drive
Being a Ceph storage admin, you will need to manage Ceph clusters with multiple physical disks. As the physical disk count increases for your Ceph cluster, the frequency of disk failures might also increase. Hence, replacing a failed disk drive might become a repetitive task for a Ceph storage administrator. There is generally no need to worry if one or more disks fail in your Ceph cluster as Ceph will take care of the data by its replication and high availability feature. The process of removing OSDs from a Ceph cluster relies on Ceph's data replication and removing all the entries of failed OSDs from CRUSH cluster maps. We will now see the failed disk replacement process on ceph-node1 and osd.0.
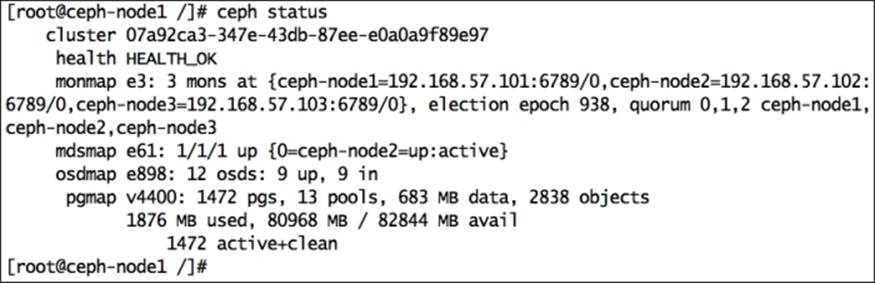
Firstly, check the status of your Ceph cluster. Since this cluster does not have any failed disk, the status will be HEALTH_OK:
# ceph status
Since we are demonstrating this exercise on virtual machines, we need to forcefully fail a disk by bringing ceph-node1 down, detaching a disk and powering up the VM:
# VBoxManage controlvm ceph-node1 poweroff
# VBoxManage storageattach ceph-node1 --storagectl "SATA Controller" --port 1 --device 0 --type hdd --medium none
# VBoxManage startvm ceph-node1
In the following screenshot, you will notice that ceph-node1 contains a failed osd.0 that should be replaced:
Once the OSD is down, Ceph will mark this OSD out of the cluster in some time; by default, it is after 300 seconds. If not, you can make it out manually:
# ceph osd out osd.0
Remove the failed OSD from the CRUSH map:
# ceph osd crush rm osd.0
Delete Ceph authentication keys for the OSD:
# ceph auth del osd.0
Finally, remove the OSD from the Ceph cluster:
# ceph osd rm osd.0

Since one of your OSDs is unavailable, the cluster health will not be OK, and it will perform recovery; there is nothing to worry about, this is a normal Ceph operation.
Now, you should physically replace the failed disk with the new disk on your Ceph node. These days, almost all the server hardware and operating systems support disk hot swapping, so you will not require any downtime for disk replacement. Since we are using a virtual machine, we need to power off the VM, add a new disk, and restart the VM. Once the disk is inserted, make a note of its OS device ID:
# VBoxManage controlvm ceph-node1 poweroff
# VBoxManage storageattach ceph-node1 --storagectl "SATA Controller" --port 1 --device 0 --type hdd --medium ceph-node1-osd1.vdi
# VBoxManage startvm ceph-node1
Perform the following commands to list disks; the new disk generally does not have any partition:
# ceph-deploy disk list ceph-node1
Before adding the disk to the Ceph cluster, perform disk zap:
# ceph-deploy disk zap ceph-node1:sdb
Finally, create an OSD on the disk, and Ceph will add it as osd.0:
# ceph-deploy --overwrite-conf osd create ceph-node1:sdb
Once an OSD is created, Ceph will perform a recovery operation and start moving placement groups from secondary OSDs to the new OSD. The recovery operation might take a while, after which your Ceph cluster will be HEALTHY_OK again:
Manipulating CRUSH maps
We already covered Ceph CRUSH maps in Chapter 4, Ceph Internals. In this section, we will dive into the details of CRUSH maps, including their layouts, as well as defining custom CRUSH maps. When you deploy a Ceph cluster using the procedure mentioned in this book, it will create a default CRUSH map for your Ceph cluster. This default CRUSH map is good to go for sandbox and testing environments. However, if you run Ceph clusters in production or at a large scale, consider developing a custom CRUSH map for your environment to ensure better performance, reliability, and data security.
Identifying CRUSH locations
A CRUSH location is the location of an OSD in a CRUSH map. For instance, an organization named mona-labs.com has a Ceph cluster with the CRUSH location of osd.156, which belongs to the host ceph-node15. This host is physically present in chassis-3, which is installed in rack-16, which is a part of room-2 and datacentre-1-north-FI.
This osd.156 will be a part of a CRUSH map, as shown in the following diagram:
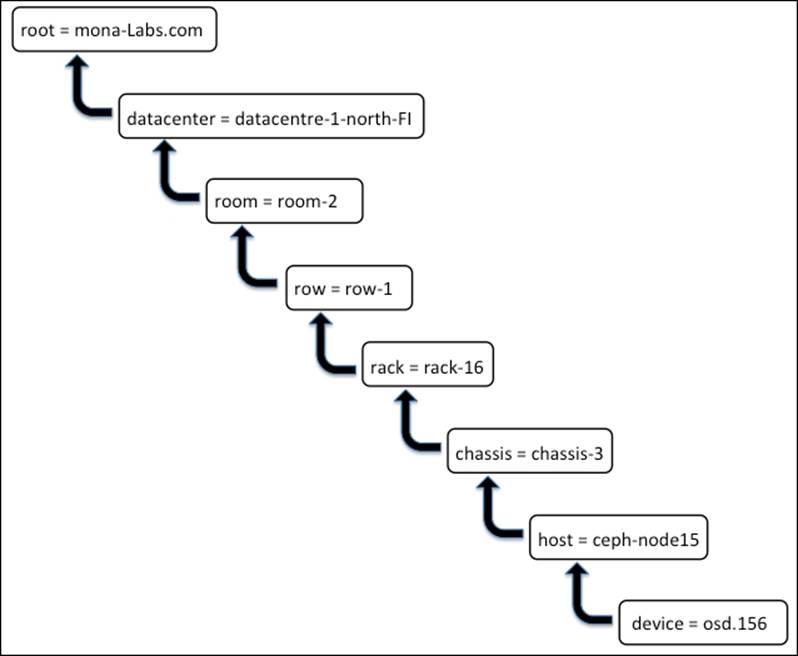
In the preceding diagram, keys are shown on the left-hand side of =; these are also known as CRUSH types. The default CRUSH map includes root, datacentre, room, row, pod, pdu, rack, chassis, and host. It is not mandatory to use all the CRUSH types while defining a CRUSH map, but the used CRUSH type must be valid, else you might get compilation errors. CRUSH is quite flexible; you can even define your custom CRUSH types and use it across the CRUSH map in your own way.
CRUSH map internals
To know what's inside a CRUSH map, we need to extract it and decompile it to convert it into a human-readable form and for easy editing. We can perform all the necessary changes to a CRUSH map at this stage, and to make the changes take effect, we should compile and inject it back to the Ceph cluster. The change to Ceph clusters by the new CRUSH map is dynamic, that is, once the new CRUSH map is injected into the Ceph cluster, the change will come into effect immediately on the fly. We will now take a look at the CRUSH map of our Ceph cluster that we deployed in this book.
Extract the CRUSH map from any of the monitor nodes:
# ceph osd getcrushmap -o crushmap_compiled_file
Once you have the CRUSH map, decompile it to make it human readable and editable:
# crushtool -d crushmap_compiled_file -o crushmap_decompiled_file
At this point, the output file, crushmap_decompiled_file, can be viewed/edited in your favorite editor.
In the next section, we will learn how to perform changes to a CRUSH map.
Once the changes are done, you should compile the changes with -c command option:
# crushtool -c crushmap_decompiled_file -o newcrushmap
Finally, inject the new compiled CURSH map into the Ceph cluster with -i command option:
# ceph osd setcrushmap -i newcrushmap
A CRUSH map file contains four sections; they are as follows:
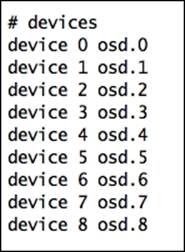
· Crush map devices: The device section contains a list of all the OSDs present in a Ceph cluster. Whenever any new OSD is added or removed from a Ceph cluster, the CRUSH map's devices section is updated automatically. Usually, you do not require changing this section; Ceph takes care of this. However, if you need to add a new device, add a new line at the end of the device section with a unique device number followed by the OSD. The following screenshot shows the devices section of a CRUSH map from our sandbox Ceph cluster:
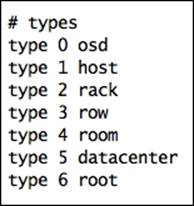
· Crush map bucket types: This section defines the types of buckets that can be used in a CRUSH map. The default CRUSH map contains several bucket types, which is usually enough for most of the Ceph clusters. However, based on your requirement, you can add or remove bucket types from this section. To add a bucket type, add a new line in the bucket type section of the CRUSH map file, enter the type, and type the ID (next numeric number) followed by the bucket name. The default bucket list from our sandbox Ceph cluster looks like the following:
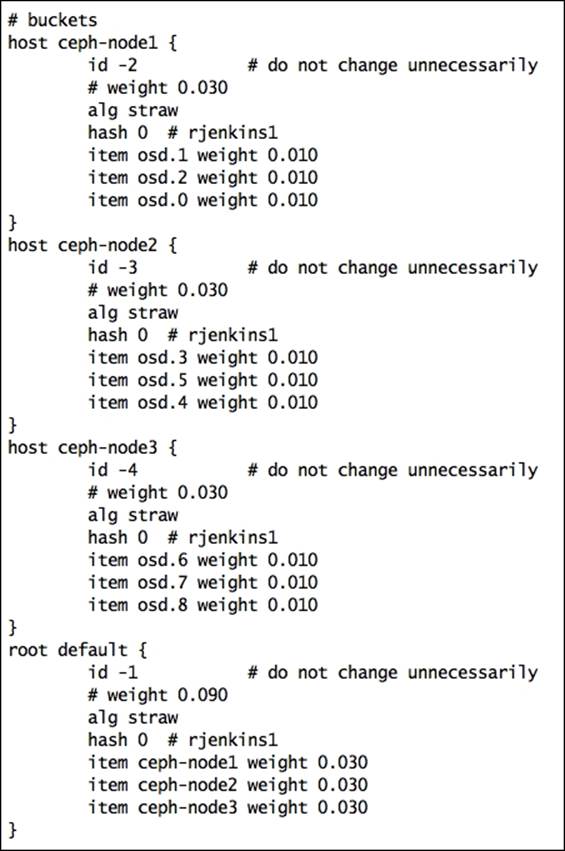
· Crush map bucket definition: Once the bucket type is declared, it is defined for hosts and other failure domains. In this section, you can do hierarchical changes to your Ceph cluster architecture, for example, defining hosts, row, racks, chassis, room, and datacenter. You can also define what type of algorithm the bucket should use. The bucket definition contains several parameters; you can use the following syntax to create a bucket definition:
· [bucket-type] [bucket-name] {
· id [a unique negative numeric ID]
· weight [the relative capacity/capability of the item(s)]
· alg [the bucket type: uniform | list | tree | straw ]
· hash [the hash type: 0 by default]
· item [item-name] weight [weight]
}
The following is the bucket definition section from our sandbox Ceph cluster:
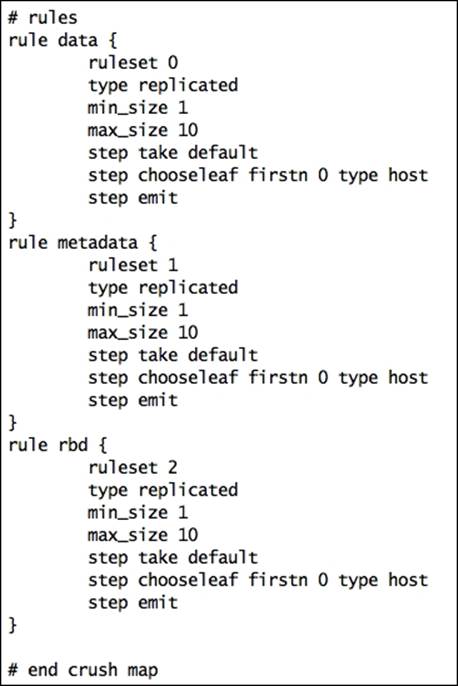
· Crush map rules: It defines the way to select an appropriate bucket for data placement in pools. For a larger Ceph cluster, there might be multiple pools, and each pool will have its one CRUSH ruleset. CRUSH map rules require several parameters; you can use the following syntax to create a CRUSH ruleset:
· rule <rulename> {
· ruleset <ruleset>
· type [ replicated | raid4 ]
· min_size <min-size>
· max_size <max-size>
· step take <bucket-type>
· step [choose|chooseleaf] [firstn|indep] <N> <bucket-type>
· step emit
}
Different pools on different OSDs
Ceph seamlessly runs on heterogeneous commodity hardware. There are possibilities that you can use for your existing hardware systems for Ceph and develop a storage cluster of different hardware types. As a Ceph storage administrator, your use case might require creating multiple Ceph pools on multiple types of drives. The most common use case is to provide a fast storage pool based on SSD disk types where you can get high performance out of your storage cluster. The data, which do not require higher I/O is usually stored on pools backed by slower magnetic drives.
Our next hands-on demonstration will focus on creating two Ceph pools, ssd-pools backed by faster SSD disks, and sata-pools backed by slower SATA disks. To achieve this, we will edit CRUSH maps and do the necessary configurations.
The sandbox Ceph cluster that we deployed in the earlier chapters is hosted on virtual machines and does not have real SSD disks backing it. Hence, we will be considering a few disks as SSD disks for learning purposes. If you perform this exercise on real SSD disk-based Ceph clusters, there will be no changes in the steps we will perform. You should be able to use the same steps without any modifications.
In the following demonstration, we assume that ceph-node1 is our SSD node hosting three SSDs. The ceph-node2 and ceph-node3 nodes host SATA disks. We will modify the default CRUSH map and create two pools, namely SSD and SATA. The SSD pool's primary copy will be hosed on ceph-node1, while the secondary and tertiary copies will be on other nodes. Similarly, SATA pool's primary copy will be on either ceph-node2 or ceph-node3 as we have two nodes backing the SATA pool. At any step of this demonstration, you can refer to the updated CRUSH map file provided with this book on the Packt Publishing website.
Extract the CRUSH map from any of the monitor nodes and compile it:
# ceph osd getcrushmap -o crushmap-extract
# crushtool -d crushmap-extract -o crushmap-decompiled

Use your favorite editor to edit the default CRUSH map:
# vi crushmap-decompiled
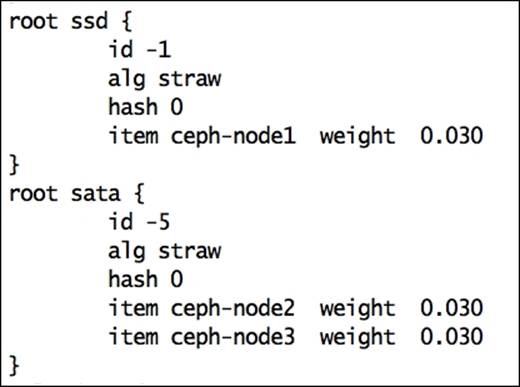
Replace the root default bucket with the root ssd and root sata buckets. Here, the root ssd bucket contains one item, ceph-node1. Similarly, the root sata bucket has two hosts defined. Have a look at the following screenshot:
Adjust the existing rules to work with new buckets. For this, change step take default to step take sata for data, metadata, and RBD rules. This will instruct these rules to use the sata root bucket instead of the default root bucket as we removed it in the previous step.
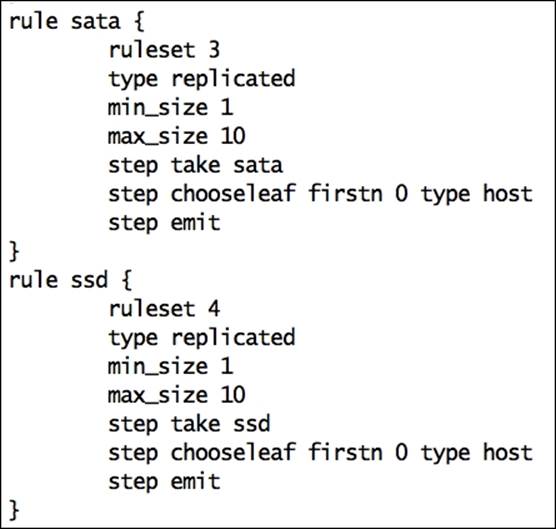
Finally, add new rules for the ssd and sata pools, as shown in the following screenshot:
Once the changes are done, compile the CRUSH file and inject it back to the Ceph cluster:
# crushtool -c crushmap-decompiled -o crushmap-compiled
# ceph osd setcrushmap -i crushmap-compiled
As soon as you inject the new CRUSH map to the Ceph cluster, the cluster will undergo data reshuffling and data recovery, but it should attain the HEALTH_OK status soon. Check the status of your cluster as follows:

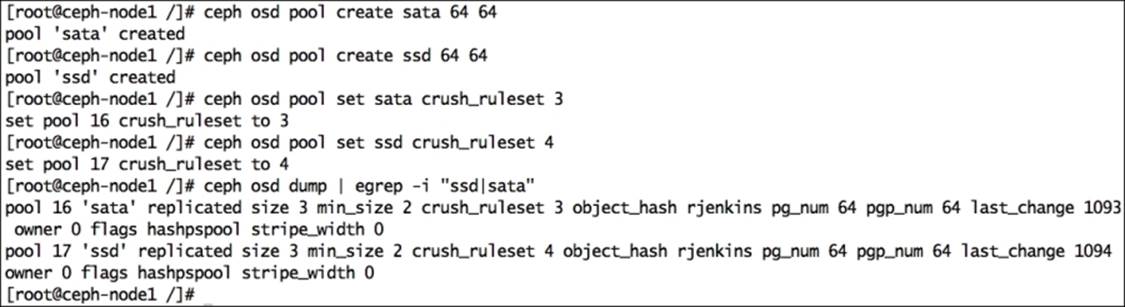
Once your cluster is healthy, create two pools for ssd and sata:
# ceph osd pool create sata 64 64
# ceph osd pool create ssd 64 64
Assign crush_ruleset for the sata and ssd rules, as defined in the CRUSH map:
# ceph osd pool set sata crush_ruleset 3
# ceph osd pool set ssd crush_ruleset 4
# ceph osd dump | egrep -i "ssd|sata"
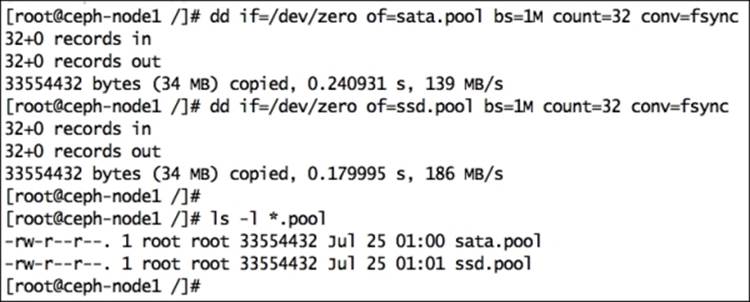
To test these newly created pools, we will put some data on them and verify which OSD the data gets stored on. Create some data files:
# dd if=/dev/zero of=sata.pool bs=1M count=32 conv=fsync
# dd if=/dev/zero of=ssd.pool bs=1M count=32 conv=fsync
Put these files to Ceph storage on respective pools:
# rados -p ssd put ssd.pool.object ssd.pool
# rados -p sata put sata.pool.object sata.pool
Finally check the OSD map for pool objects
# ceph osd map ssd ssd.pool.object
# ceph osd map sata sata.pool.object

Let's diagnose the preceding output; the first output for the SSD pool represents the object's primary copy that is located on osd.2; the other copies are located on osd.5 and osd.6. This is because of the way we configured our CRUSH map. We defined an SSD pool to use ceph-node1, which contains osd.0, osd.1, and osd.2.
This is just a basic demonstration for custom CRUSH maps. You can do a lot of things with CRUSH. There are a lot of possibilities for effectively and efficiently managing all the data of your Ceph cluster using custom CRUSH maps.
Summary
In this chapter, we covered operations and maintenance tasks that need to be performed on a Ceph cluster. This chapter gives us an understanding of Ceph service management, scaling out, and scaling down a running Ceph cluster. The latter part of this chapter deals with failed disk drive replacement procedure for your Ceph cluster, which is something quite common for a medium to large cluster. Finally, you learned about powerful CRUSH maps and how to customize a CRUSH map. CRUSH map modification and tuning is quite an interesting and important part of Ceph; with it comes an enterprise-grade production storage solution. You can always get more information related to Ceph CRUSH maps at http://ceph.com/docs/master/rados/operations/crush-map/.
In the next chapter, we will learn about Ceph monitoring as well as logging and debugging your Ceph cluster with some troubleshooting tips.
All materials on the site are licensed Creative Commons Attribution-Sharealike 3.0 Unported CC BY-SA 3.0 & GNU Free Documentation License (GFDL)
If you are the copyright holder of any material contained on our site and intend to remove it, please contact our site administrator for approval.
© 2016-2026 All site design rights belong to S.Y.A.