Django Design Patterns and Best Practices (2015)
Chapter 9. Testing and Debugging
In this chapter, we will discuss the following topics:
· Test-driven development
· Dos and don'ts of writing tests
· Mocking
· Debugging
· Logging
Every programmer must have, at least, considered skipping writing tests. In Django, the default app layout has a tests.py module with some placeholder content. It is a reminder that tests are needed. However, we are often tempted to skip it.
In Django, writing tests is quite similar to writing code. In fact, it is practically code. So, the process of writing tests might seem like doubling (or even more) the effort of coding. Sometimes, we are under so much time pressure that it might seem ridiculous to spend time writing tests when we are just trying to make things work.
However, eventually, it is pointless to skip tests if you ever want anyone else to use your code. Imagine that you invented an electric razor and tried to sell it to your friend saying that it worked well for you, but you haven't tested it properly. Being a good friend of yours he or she might agree, but imagine the horror if you told this to a stranger.
Why write tests?
Tests in a software check whether it works as expected. Without tests, you might be able to say that your code works, but you will have no way to prove that it works correctly.
Additionally, it is important to remember that it can be dangerous to omit unit testing in Python because of its duck-typing nature. Unlike languages such as Haskell, type checking cannot be strictly enforced at compile time. Unit tests, being run at runtime (although in a separate execution), are essential in Python development.
Writing tests can be a humbling experience. The tests will point out your mistakes and you will get a chance to make an early course correction. In fact, there are some who advocate writing tests before the code itself.
Test-driven development
Test-driven development (TDD) is a form of software development where you first write the test, run the test (which would fail first), and then write the minimum code needed to make the test pass. This might sound counter-intuitive. Why do we need to write tests when we know that we have not written any code and we are certain that it will fail because of that?
However, look again. We do eventually write the code that merely satisfies these tests. This means that these tests are not ordinary tests, they are more like specifications. They tell you what to expect. These tests or specifications will directly come from your client's user stories. You are writing just enough code to make it work.
The process of test-driven development has many similarities to the scientific method, which is the basis of modern science. In the scientific method, it is important to frame the hypothesis first, gather data, and then conduct experiments that are repeatable and verifiable to prove or disprove your hypothesis.
My recommendation would be to try TDD once you are comfortable writing tests for your projects. Beginners might find it difficult to frame a test case that checks how the code should behave. For the same reasons, I wouldn't suggest TDD for exploratory programming.
Writing a test case
There are different kinds of tests. However, at the minimum, a programmers need to know unit tests since they have to be able to write them. Unit testing checks the smallest testable part of an application. Integration testing checks whether these parts work well with each other.
The word unit is the key term here. Just test one unit at a time. Let's take a look at a simple example of a test case:
# tests.py
from django.test import TestCase
from django.core.urlresolvers import resolve
from .views import HomeView
class HomePageOpenTestCase(TestCase):
def test_home_page_resolves(self):
view = resolve('/')
self.assertEqual(view.func.__name__,
HomeView.as_view().__name__)
This is a simple test that checks whether, when a user visits the root of our website's domain, they are correctly taken to the home page view. Like most good tests, it has a long and self-descriptive name. The test simply uses Django's resolve() function to match the view callable mapped to the "/" root location to the known view function by their names.
It is more important to note what is not done in this test. We have not tried to retrieve the HTML contents of the page or check its status code. We have restricted ourselves to test just one unit, that is, the resolve() function, which maps the URL paths to view functions.
Assuming that this test resides in, say, app1 of your project, the test can be run with the following command:
$ ./manage.py test app1
Creating test database for alias 'default'...
.
-----------------------------------------------------------------
Ran 1 test in 0.088s
OK
Destroying test database for alias 'default'...
This command runs all the tests in the app1 application or package. The default test runner will look for tests in all modules in this package matching the pattern test*.py.
Django now uses the standard unittest module provided by Python rather than bundling its own. You can write a testcase class by subclassing from django.test.TestCase. This class typically has methods with the following naming convention:
· test*: Any method whose name starts with test will be executed as a test method. It takes no parameters and returns no values. Tests will be run in an alphabetical order.
· setUp (optional): This method will be run before each test method. It can be used to create common objects or perform other initialization tasks that bring your test case to a known state.
· tearDown (optional): This method will be run after a test method, irrespective of whether the test passed or not. Clean-up tasks are usually performed here.
A test case is a way to logically group test methods, all of which test a scenario. When all the test methods pass (that is, do not raise any exception), then the test case is considered passed. If any of them fail, then the test case fails.
The assert method
Each test method usually invokes an assert*() method to check some expected outcome of the test. In our first example, we used assertEqual() to check whether the function name matches with the expected function.
Similar to assertEqual(), the Python 3 unittest library provides more than 32 assert methods. It is further extended by Django by more than 19 framework-specific assert methods. You must choose the most appropriate method based on the end outcome that you are expecting so that you will get the most helpful error message.
Let's see why by looking at an example testcase that has the following setUp() method:
def setUp(self):
self.l1 = [1, 2]
self.l2 = [1, 0]
Our test is to assert that l1 and l2 are equal (and it should fail, given their values). Let's take a look at several equivalent ways to accomplish this:
|
Test Assertion Statement |
What Test Output Looks Like (unimportant lines omitted) |
|
assert self.l1 == self.l2 |
assert self.l1 == self.l2 AssertionError |
|
self.assertEqual(self.l1, self.l2) |
AssertionError: Lists differ: [1, 2] != [1, 0] First differing element 1: 2 0 |
|
self.assertListEqual( self.l1, self.l2) |
AssertionError: Lists differ: [1, 2] != [1, 0] First differing element 1: 2 0 |
|
self.assertListEqual(self.l1, None) |
AssertionError: Second sequence is not a list: None |
The first statement uses Python's built- in assert keyword. Notice that it throws the least helpful error. You cannot infer what values or types are in the self.l1 and self.l2 variables. This is primarily the reason why we need to use the assert*() methods.
Next, the exception thrown by assertEqual() very helpfully tells you that you are comparing two lists and even tells you at which position they begin to differ. This is exactly similar to the exception thrown by the more specialized assertListEqual() function. This is because, as the documentation would tell you, if assertEqual() is given two lists for comparison, then it hands it over to assertListEqual().
Despite this, as the last example proves, it is always better to use the most specific assert* method for your tests. Since the second argument is not a list, the error clearly tells you that a list was expected.
Tip
Use the most specific assert* method in your tests.
Therefore, you need to familiarize yourself with all the assert methods, and choose the most specific one to evaluate the result you expect. This also applies to when you are checking whether your application does not do things it is not supposed to do, that is, a negative test case. You can check for exceptions or warnings using assertRaises and assertWarns respectively.
Writing better test cases
We have already seen that the best test cases test a small unit of code at a time. They also need to be fast. A programmer needs to run tests at least once before every commit to the source control. Even a delay of a few seconds can tempt a programmer to skip running tests (which is not a good thing).
Here are some qualities of a good test case (which is a subjective term, of course) in the form of an easy-to-remember mnemonic "F.I.R.S.T. class test case":
1. Fast: the faster the tests, the more often they are run. Ideally, your tests should complete in a few seconds.
2. Independent: Each test case must be independent of others and can be run in any order.
3. Repeatable: The results must be the same every time a test is run. Ideally, all random and varying factors must be controlled or set to known values before a test is run.
4. Small: Test cases must be as short as possible for speed and ease of understanding.
5. Transparent: Avoid tricky implementations or ambiguous test cases.
Additionally, make sure that your tests are automatic. Eliminate any manual steps, no matter how small. Automated tests are more likely to be a part of your team's workflow and easier to use for tooling purposes.
Perhaps, even more important are the don'ts to remember while writing test cases:
· Do not (re)test the framework: Django is well tested. Don't check for URL lookup, template rendering, and other framework-related functionality.
· Do not test implementation details: Test the interface and leave the minor implementation details. It makes it easier to refactor this later without breaking the tests.
· Test models most, templates least: Templates should have the least business logic, and they change more often.
· Avoid HTML output validation: Test views use their context variable's output rather than its HTML-rendered output.
· Avoid using the web test client in unit tests: Web test clients invoke several components and are therefore, better suited for integration tests.
· Avoid interacting with external systems: Mock them if possible. Database is an exception since test database is in-memory and quite fast.
Of course, you can (and should) break the rules where you have a good reason to (just like I did in my first example). Ultimately, the more creative you are at writing tests, the earlier you can catch bugs, and the better your application will be.
Mocking
Most real-life projects have various interdependencies between components. While testing one component, the result must not be affected by the behavior of other components. For example, your application might call an external web service that might be unreliable in terms of network connection or slow to respond.
Mock objects imitate such dependencies by having the same interface, but they respond to method calls with canned responses. After using a mock object in a test, you can assert whether a certain method was called and verify that the expected interaction took place.
Take the example of the SuperHero profile eligibility test mentioned in Pattern: Service objects (see Chapter 3, Models). We are going to mock the call to the service object method in a test using the Python 3 unittest.mock library:
# profiles/tests.py
from django.test import TestCase
from unittest.mock import patch
from django.contrib.auth.models import User
class TestSuperHeroCheck(TestCase):
def test_checks_superhero_service_obj(self):
with patch("profiles.models.SuperHeroWebAPI") as ws:
ws.is_hero.return_value = True
u = User.objects.create_user(username="t")
r = u.profile.is_superhero()
ws.is_hero.assert_called_with('t')
self.assertTrue(r)
Here, we are using patch() as a context manager in a with statement. Since the profile model's is_superhero() method will call the SuperHeroWebAPI.is_hero() class method, we need to mock it inside the models module. We are also hard-coding the return value of this method to be True.
The last two assertions check whether the method was called with the correct arguments and if is_hero() returned True, respectively. Since all methods of SuperHeroWebAPI class have been mocked, both the assertions will pass.
Mock objects come from a family called Test Doubles, which includes stubs, fakes, and so on. Like movie doubles who stand in for real actors, these test doubles are used in place of real objects while testing. While there are no clear lines drawn between them, Mock objects are objects that can test the behavior, and stubs are simply placeholder implementations.
Pattern – test fixtures and factories
Problem: Testing a component requires the creation of various prerequisite objects before the test. Creating them explicitly in each test method gets repetitive.
Solution: Utilize factories or fixtures to create the test data objects.
Problem details
Before running each test, Django resets the database to its initial state, as it would be after running migrations. Most tests will need the creation of some initial objects to set the state. Rather than creating different initial objects for different scenarios, a common set of initial objects are usually created.
This can quickly get unmanageable in a large test suite. The sheer variety of such initial objects can be hard to read and later understand. This leads to hard-to-find bugs in the test data itself!
Being such a common problem, there are several means to reduce the clutter and write clearer test cases.
Solution details
The first solution we will take a look at is what is given in the Django documentation itself—test fixtures. Here, a test fixture is a file that contains a set of data that can be imported into your database to bring it to a known state. Typically, they are YAML or JSON files previously exported from the same database when it had some data.
For example, consider the following test case, which uses a test fixture:
from django.test import TestCase
class PostTestCase(TestCase):
fixtures = ['posts']
def setUp(self):
# Create additional common objects
pass
def test_some_post_functionality(self):
# By now fixtures and setUp() objects are loaded
pass
Before setUp() gets called in each test case, the specified fixture, posts gets loaded. Roughly speaking, the fixture would be searched for in the fixtures directory with certain known extensions, for example, app/fixtures/posts.json.
However, there are a number of problems with fixtures. Fixtures are static snapshots of the database. They are schema-dependent and have to be changed each time your models change. They also might need to be updated when your test-case assertions change. Updating a large fixture file manually, with multiple related objects, is no joke.
For all these reasons, many consider using fixtures as an anti-pattern. It is recommended that you use factories instead. A factory class creates objects of a particular class that can be used in tests. It is a DRY way of creating initial test objects.
Let's use a model's objects.create method to create a simple factory:
from django.test import TestCase
from .models import Post
class PostFactory:
def make_post(self):
return Post.objects.create(message="")
class PostTestCase(TestCase):
def setUp(self):
self.blank_message = PostFactory().makePost()
def test_some_post_functionality(self):
pass
Compared to using fixtures, the initial object creation and the test cases are all in one place. Fixtures load static data as is into the database without calling model-defined save() methods. Since factory objects are dynamically generated, they are more likely to run through your application's custom validations.
However, there is a lot of boilerplate in writing such factory classes yourself. The factory_boy package, based on thoughtbot's factory_girl, provides a declarative syntax for creating object factories.
Rewriting the previous code to use factory_boy, we get the following result:
import factory
from django.test import TestCase
from .models import Post
class PostFactory(factory.Factory):
class Meta:
model = Post
message = ""
class PostTestCase(TestCase):
def setUp(self):
self.blank_message = PostFactory.create()
self.silly_message = PostFactory.create(message="silly")
def test_post_title_was_set(self):
self.assertEqual(self.blank_message.message, "")
self.assertEqual(self.silly_message.message, "silly")
Notice how clear the factory class becomes when written in a declarative fashion. The attribute's values do not have to be static. You can have sequential, random, or computed attribute values. If you prefer to have more realistic placeholder data such as US addresses, then use the django-faker package.
In conclusion, I would recommend factories, especially factory_boy, for most projects that need initial test objects. One might still want to use fixtures for static data, such as lists of countries or t-shirt sizes, since they would rarely change.
Note
Dire Predictions
After the announcement of the impossible deadline, the entire team seemed to be suddenly out of time. They went from 4-week scrum sprints to 1-week sprints. Steve wiped every meeting off their calendars except "today's 30-minute catch-up with Steve." He preferred to have a one-on-one discussion if he needed to talk to someone at their desk.
At Madam O's insistence, the 30-minute meetings were held at a sound proof hall 20 levels below the S.H.I.M. headquarters. On Monday, the team stood around a large circular table with a gray metallic surface like the rest of the room. Steve stood awkwardly in front of it and made a stiff waving gesture with an open palm.
Even though everyone had seen the holographs come alive before, it never failed to amaze them each time. The disc almost segmented itself into hundreds of metallic squares and rose like miniature skyscrapers in a futuristic model city. It took them a second to realize that they were looking at a 3D bar chart.
"Our burn-down chart seems to be showing signs of slowing down. I am guessing it is the outcome of our recent user tests, which is a good thing. But…" Steve's face seemed to show the strain of trying to stifle a sneeze. He gingerly flicked his forefinger upwards in the air and the chart smoothly extended to the right.
"At this rate, projections indicate that we will miss the go-live by several days, at best. I did a bit of analysis and found several critical bugs late in our development. We can save a lot of time and effort if we can catch them early. I want to put your heads together and come up with some i..."
Steve clasped his mouth and let out a loud sneeze. The holograph interpreted this as a sign to zoom into a particularly uninteresting part of the graph. Steve cursed under his breath and turned it off. He borrowed a napkin and started noting down everyone's suggestions with an ordinary pen.
One of the suggestions that Steve liked most was a coding checklist listing the most common bugs, such as forgetting to apply migrations. He also liked the idea of involving users earlier in the development process for feedback. He also noted down some unusual ideas, such as a Twitter handle for tweeting the status of the continuous integration server.
At the close of the meeting, Steve noticed that Evan was missing. "Where is Evan?" he asked. "No idea," said Brad looking confused, "he was here a minute ago."
Learning more about testing
Django's default test runner has improved a lot over the years. However, test runners such as py.test and nose are still superior in terms of functionality. They make your tests easier to write and run. Even better, they are compatible with your existing test cases.
You might also be interested in knowing what percentage of your code is covered by tests. This is called Code coverage and coverage.py is a very popular tool for finding this out.
Most projects today tend to use a lot of JavaScript functionality. Writing tests for them usually require a browser-like environment for execution. Selenium is a great browser automation tool for executing such tests.
While a detailed treatment of testing in Django is outside the scope of this book, I would strongly recommend that you learn more about it.
If nothing else, the two main takeaways I wanted to convey through this section are first, write tests, and second, once you are confident at writing them, practice TDD.
Debugging
Despite the most rigorous testing, the sad reality is, we still have to deal with bugs. Django tries its best to be as helpful as possible while reporting an error to help you in debugging. However, it takes a lot of skill to identify the root cause of the problem.
Thankfully, with the right set of tools and techniques, we can not only identify the bugs but also gain great insight into the runtime behavior of your code. Let's take a look at some of these tools.
Django debug page
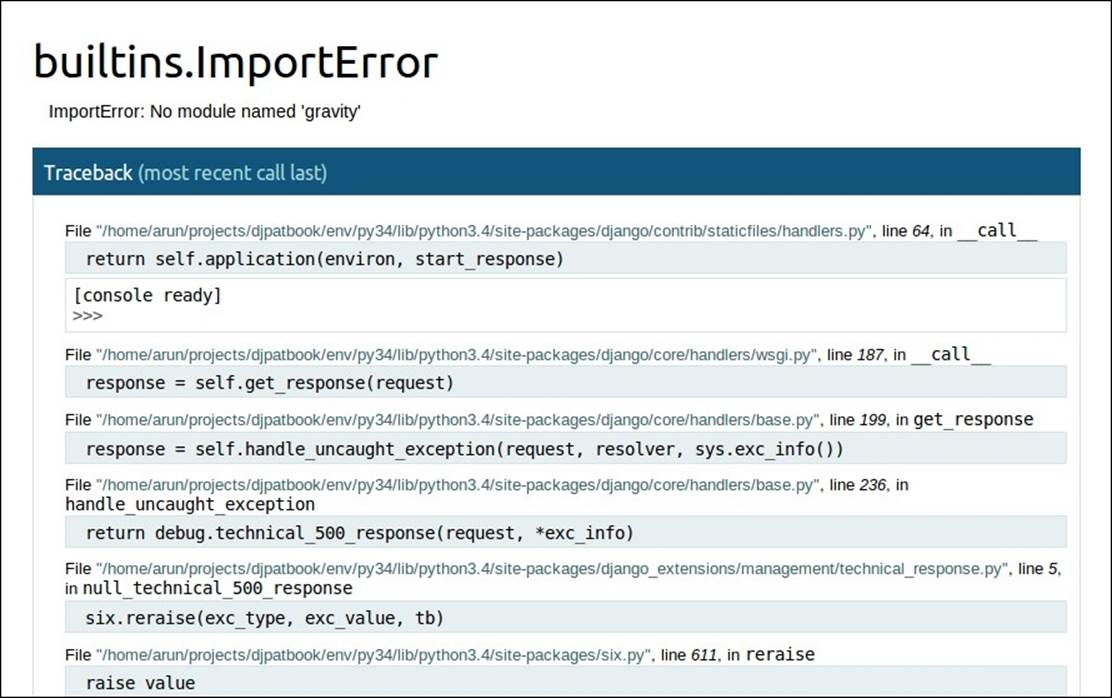
If you have encountered any exception in development, that is, when DEBUG=True, then you would have already seen an error page similar to the following screenshot:

Since it comes up so frequently, most developers tend to miss the wealth of information in this page. Here are some places to take a look at:
· Exception details: Obviously, you need to read what the exception tells you very carefully.
· Exception location: This is where Python thinks where the error has occurred. In Django, this may or may not be where the root cause of the bug is.
· Traceback: This was the call stack when the error occurred. The line that caused the error will be at the end. The nested calls that led to it will be above it. Don't forget to click on the 'Local vars' arrow to inspect the values of the variables at the time of the exception.
· Request information: This is a table (not shown in the screenshot) that shows context variables, meta information, and project settings. Check for malformed input in the requests here.
A better debug page
Often, you may wish for more interactivity in the default Django error page. The django-extensions package ships with the fantastic Werkzeug debugger that provides exactly this feature. In the following screenshot of the same exception, notice a fully interactive Python interpreter available at each level of the call stack:
To enable this, in addition to adding django_extensions to your INSTALLED_APPS, you will need to run your test server as follows:
$ python manage.py runserver_plus
Despite the reduced debugging information, I find the Werkzeug debugger to be more useful than the default error page.
The print function
Sprinkling print() functions all over the code for debugging might sound primitive, but it has been the preferred technique for many programmers.
Typically, the print() functions are added before the line where the exception has occurred. It can be used to print the state of variables in various lines leading to the exception. You can trace the execution path by printing something when a certain line is reached.
In development, the print output usually appears in the console window where the test server is running. Whereas in production, these print outputs might end up in your server log file where they would add a runtime overhead.
In any case, it is not a good debugging technique to use in production. Even if you do, the print functions that are added for debugging should be removed from being committed to your source control.
Logging
The main reason for including the previous section was to say—You should replace the print() functions with calls to logging functions in Python's logging module. Logging has several advantages over printing: it has a timestamp, a clearly marked level of urgency (for example, INFO, DEBUG), and you don't have to remove them from your code later.
Logging is fundamental to professional web development. Several applications in your production stack, like web servers and databases, already use logs. Debugging might take you to all these logs to retrace the events that lead to a bug. It is only appropriate that your application follows the same best practice and adopts logging for errors, warnings, and informational messages.
Unlike the common perception, using a logger does not involve too much work. Sure, the setup is slightly involved but it is merely a one-time effort for your entire project. Even more, most project templates (for example, the edge template) already do this for you.
Once you have configured the LOGGING variable in settings.py, adding a logger to your existing code is quite easy, as shown here:
# views.py
import logging
logger = logging.getLogger(__name__)
def complicated_view():
logger.debug("Entered the complicated_view()!")
The logging module provides various levels of logged messages so that you can easily filter out less urgent messages. The log output can be also formatted in various ways and routed to many places, such as standard output or log files. Read the documentation of Python's logging module to learn more.
The Django Debug Toolbar
The Django Debug Toolbar is an indispensable tool not just for debugging but also for tracking detailed information about each request and response. Rather than appearing only during exceptions, the toolbar is always present in your rendered page.
Initially, it appears as a clickable graphic on the right-hand side of your browser window. On clicking, a toolbar appears as a dark semi-transparent sidebar with several headers:

Each header is filled with detailed information about the page from the number of SQL queries executed to the templates that we use to render the page. Since the toolbar disappears when DEBUG is set to False, it is pretty much restricted to being a development tool.
The Python debugger pdb
While debugging, you might need to stop a Django application in the middle of execution to examine its state. A simple way to achieve this is to raise an exception with a simple assert False line in the required place.
What if you wanted to continue the execution step by step from that line? This is possible with the use of an interactive debugger such as Python's pdb. Simply insert the following line wherever you want the execution to stop and switch to pdb:
import pdb; pdb.set_trace()
Once you enter pdb, you will see a command-line interface in your console window with a (Pdb) prompt. At the same time, your browser window will not display anything as the request has not finished processing.
The pdb command-line interface is extremely powerful. It allows you to go through the code line by line, examine the variables by printing them, or execute arbitrary code that can even change the running state. The interface is quite similar to GDB, the GNU debugger.
Other debuggers
There are several drop-in replacements for pdb. They usually have a better interface. Some of the console-based debuggers are as follows:
· ipdb: Like IPython, this has autocomplete, syntax-colored code, and so on.
· pudb: Like old Turbo C IDEs, this shows the code and variables side by side.
· IPython: This is not a debugger. You can get a full IPython shell anywhere in your code by adding the from IPython import embed; embed()line.
PuDB is my preferred replacement for pdb. It is so intuitive that even beginners can easily use this interface. Like pdb, just insert the following code to break the execution of the program:
import pudb; pudb.set_trace()
When this line is executed, a full-screen debugger is launched, as shown here:
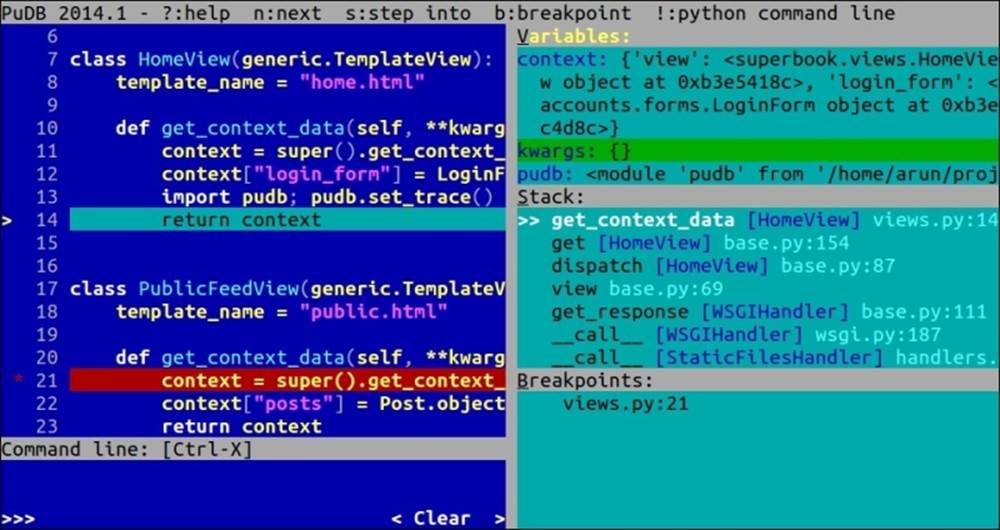
Press the ? key to get help on the complete list of keys that you can use.
Additionally, there are several graphical debuggers, some of which are standalone, such as winpdb and others, which are integrated to the IDE, such as PyCharm, PyDev, and Komodo. I would recommend that you try several of them until you find the one that suits your workflow.
Debugging Django templates
Projects can have very complicated logic in their templates. Subtle bugs while creating a template can lead to hard-to-find bugs. We need to set TEMPLATE_DEBUG to True (in addition to DEBUG) in settings.py so that Django shows a better error page when there is an error in your templates.
There are several crude ways to debug templates, such as inserting the variable of interest, such as {{ variable }}, or if you want to dump all the variables, use the built-in debug tag like this (inside a conveniently clickable text area):
<textarea onclick="this.focus();this.select()" style="width: 100%;">
{% filter force_escape %}
{% debug %}
{% endfilter %}
</textarea>
A better option is use the Django Debug Toolbar mentioned earlier. It not only tells you the values of the context variables but also shows the inheritance tree of your templates.
However, you might want to pause in the middle of a template to inspect the state (say, inside a loop). A debugger would be perfect for such cases. In fact, it is possible to use any one of the aforementioned Python debuggers for your templates using custom template tags.
Here is a simple implementation of such a template tag. Create the following file inside a templatetag package directory:
# templatetags/debug.py
import pudb as dbg # Change to any *db
from django.template import Library, Node
register = Library()
class PdbNode(Node):
def render(self, context):
dbg.set_trace() # Debugger will stop here
return ''
@register.tag
def pdb(parser, token):
return PdbNode()
In your template, load the template tag library, insert the pdb tag wherever you need the execution to pause, and enter the debugger:
{% load debug %}
{% for item in items %}
{# Some place you want to break #}
{% pdb %}
{% endfor %}
Within the debugger, you can examine anything, including the context variables using the context dictionary:
>>> print(context["item"])
Item0
If you need more such template tags for debugging and introspection, then I would recommend that you check out the django-template-debug package.
Summary
In this chapter, we looked at the motivations and concepts behind testing in Django. We also found the various best practices to be followed while writing a test case. In the section on debugging, we got familiar with the various debugging tools and techniques to find bugs in Django code and templates.
In the next chapter, we will get one step closer to production code by understanding the various security issues and how to reduce threats from various kinds of malicious attacks.
All materials on the site are licensed Creative Commons Attribution-Sharealike 3.0 Unported CC BY-SA 3.0 & GNU Free Documentation License (GFDL)
If you are the copyright holder of any material contained on our site and intend to remove it, please contact our site administrator for approval.
© 2016-2026 All site design rights belong to S.Y.A.