Django Design Patterns and Best Practices (2015)
Chapter 5. Templates
In this chapter, we will discuss the following topics:
· Features of Django's template language
· Organizing templates
· Bootstrap
· Template inheritance tree pattern
· Active link pattern
Understanding Django's template language features
It is time to talk about the third musketeer in the MTV trio—templates. Your team might have designers who take care of designing templates. Or you might be designing them yourself. Either way, you need to be very familiar with them. They are, after all, directly facing your users.
Let's start with a quick primer of Django's template language features.
Variables
Each template gets a set of context variables. Similar to Python's string format() method's single curly brace {variable} syntax, Django uses the double curly brace {{ variable }} syntax. Let's see how they compare:
· In Pure Python the syntax is <h1>{title}</h1>. For example:
· >>> "<h1>{title}</h1>".format(title="SuperBook")
· '<h1>SuperBook</h1>'
· The syntax equivalent in a Django template is <h1>{{ title }}</h1>.
· Rendering with the same context will produce the same output as follows:
· >>> from django.template import Template, Context
· >>> Template("<h1>{{ title }}</h1>").render(Context({"title": "SuperBook"}))
· '<h1>SuperBook</h1>'
Attributes
Dot is a multipurpose operator in Django templates. There are three different kinds of operations—attribute lookup, dictionary lookup, or list-index lookup (in that order).
· In Python, first, let's define the context variables and classes:
· >>> class DrOct:
· arms = 4
· def speak(self):
· return "You have a train to catch."
· >>> mydict = {"key":"value"}
· >>> mylist = [10, 20, 30]
Let's take a look at Python's syntax for the three kinds of lookups:
>>> "Dr. Oct has {0} arms and says: {1}".format(DrOct().arms, DrOct().speak())
'Dr. Oct has 4 arms and says: You have a train to catch.'
>>> mydict["key"]
'value'
>>> mylist[1]
20
· In Django's template equivalent, it is as follows:
· Dr. Oct has {{ s.arms }} arms and says: {{ s.speak }}
· {{ mydict.key }}
· {{ mylist.1 }}
Note
Notice how speak, a method that takes no arguments except self, is treated like an attribute here.
Filters
Sometimes, variables need to be modified. Essentially, you would like to call functions on these variables. Instead of chaining function calls, such as var.method1().method2(arg), Django uses the pipe syntax {{ var|method1|method2:"arg" }}, which is similar to Unix filters. However, this syntax only works for built-in or custom-defined filters.
Another limitation is that filters cannot access the template context. It only works with the data passed into it and its arguments. Hence, it is primarily used to alter the variables in the template context.
· Run the following command in Python:
· >>> title="SuperBook"
· >>> title.upper()[:5]
· 'SUPER'
· Its Django template equivalent:
· {{ title|upper|slice:':5' }}"
Tags
Programming languages can do more than just display variables. Django's template language has many familiar syntactic forms, such as if and for. They should be written in the tag syntax such as {% if %}. Several template-specific forms, such as include andblock are also written in the tag syntax.
· Run the following command in Python:
· >>> if 1==1:
· ... print(" Date is {0} ".format(time.strftime("%d-%m-%Y")))
· Date is 31-08-2014
· Its corresponding Django template form:
· {% if 1 == 1 %} Date is {% now 'd-m-Y' %} {% endif %}
Philosophy – don't invent a programming language
A common question among beginners is how to perform numeric computations such as finding percentages in templates. As a design philosophy, the template system does not intentionally allow the following:
· Assignment to variables
· Advanced logic
This decision was made to prevent you from adding business logic in templates. From our experience with PHP or ASP-like languages, mixing logic with presentation can be a maintenance nightmare. However, you can write custom template tags (which will be covered shortly) to perform any computation, especially if it is presentation-related.
Tip
Best Practice
Keep business logic out of your templates.
Organizing templates
The default project layout created by the startproject command does not define a location for your templates. This is very easy to fix. Create a directory named templates in your project's root directory. Add the TEMPLATE_DIRS variable in your settings.py:
BASE_DIR = os.path.dirname(os.path.dirname(__file__))
TEMPLATE_DIRS = [os.path.join(BASE_DIR, 'templates')]
That's all. For example, you can add a template called about.html and refer to it in the urls.py file as follows:
urlpatterns = patterns(
'',
url(r'^about/$', TemplateView.as_view(template_name='about.html'),
name='about'),
Your templates can also reside within your apps. Creating a templates directory inside your app directory is ideal to store your app-specific templates.
Here are some good practices to organize your templates:
· Keep all app-specific templates inside the app's template directory within a separate directory, for example, projroot/app/templates/app/template.html—notice how app appears twice in the path
· Use the .html extension for your templates
· Prefix an underscore for templates, which are snippets to be included, for example, _navbar.html
Support for other template languages
From Django 1.8 onward, multiple template engines will be supported. There will be built-in support for the Django template language (the standard template language discussed earlier) and Jinja2. In many benchmarks, Jinja2 is quite faster than Django templates.
It is expected that there will be an additional TEMPLATES setting for specifying the template engine and all template-related settings. The TEMPLATE_DIRS setting will be soon deprecated.
Note
Madame O
For the first time in weeks, Steve's office corner was bustling with frenetic activity. With more recruits, the now five-member team comprised of Brad, Evan, Jacob, Sue, and Steve. Like a superhero team, their abilities were deep and amazingly well-balanced.
Brad and Evan were the coding gurus. While Evan was obsessed over details, Brad was the big-picture guy. Jacob's talent in finding corner cases made him perfect for testing. Sue was in charge of marketing and design.
In fact, the entire design was supposed to be done by an avant-garde design agency. It took them a month to produce an abstract, vivid, color-splashed concept loved by the management. It took them another two weeks to produce an HTML-ready version from their Photoshop mockups. However, it was eventually discarded as it proved to be sluggish and awkward on mobile devices.
Disappointed by the failure of what was now widely dubbed as the "unicorn vomit" design, Steve felt stuck. Hart had phoned him quite concerned about the lack of any visible progress to show management. In a grim tone, he reminded Steve, "We have already eaten up the project's buffer time. We cannot afford any last-minute surprises."
It was then that Sue, who had been unusually quiet since she joined, mentioned that she had been working on a mockup using Twitter's Bootstrap. Sue was the growth hacker in the team—a keen coder and a creative marketer.
She admitted having just rudimentary HTML skills. However, her mockup was surprisingly thorough and looked familiar to users of other contemporary social networks. Most importantly, it was responsive and worked perfectly on every device from tablets to mobiles.
The management unanimously agreed on Sue's design, except for someone named Madame O. One Friday afternoon, she stormed into Sue's cabin and began questioning everything from the background color to the size of the mouse cursor. Sue tried to explain to her with surprising poise and calm.
An hour later, when Steve decided to intervene, Madame O was arguing why the profile pictures must be in a circle rather than square. "But a site-wide change like that will never get over in time," he said. Madame O shifted her gaze to him and gave him a slysmile. Suddenly, Steve felt a wave of happiness and hope surge within him. It felt immensely reliving and stimulating. He heard himself happily agreeing to all she wanted.
Later, Steve learnt that Madame Optimism was a minor mentalist who could influence prone minds. His team loved to bring up the latter fact on the slightest occasion.
Using Bootstrap
Hardly anyone starts an entire website from scratch these days. CSS frameworks such as Twitter's Bootstrap or Zurb's Foundation are easy starting points with grid systems, great typography, and preset styles. Most of them use responsive web design, making your site mobile friendly.
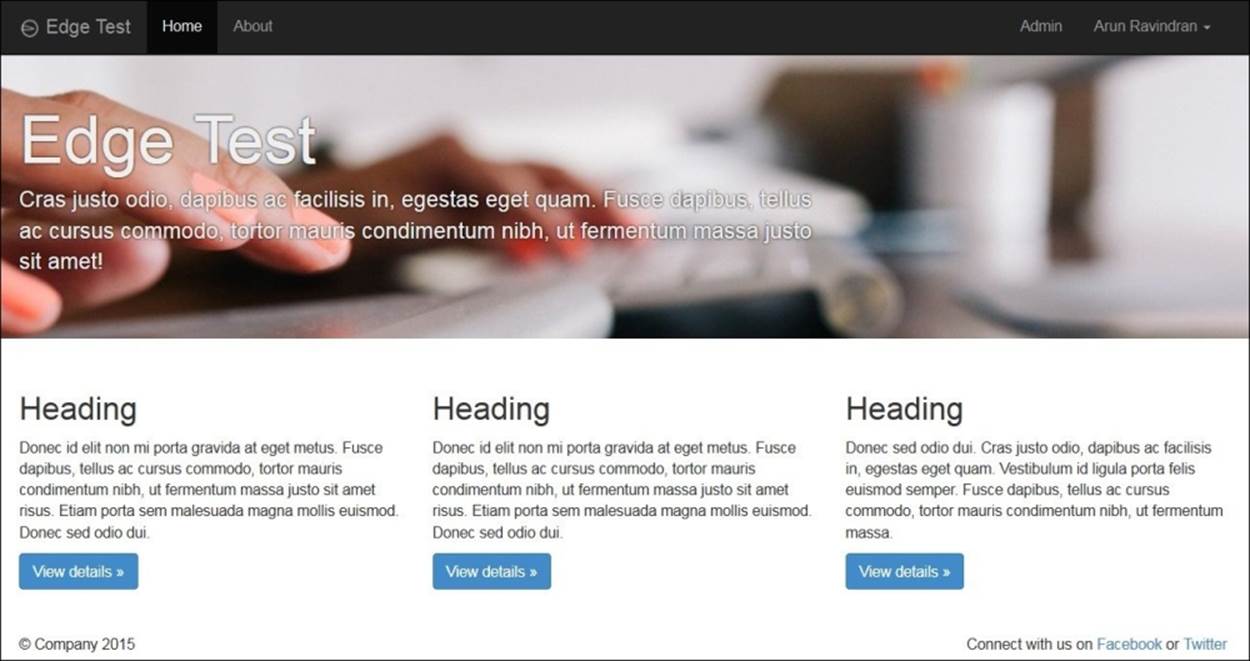
A website using vanilla Bootstrap Version 3.0.2 built using the Edge project skeleton
We will be using Bootstrap, but the steps will be similar for other CSS frameworks. There are three ways to include Bootstrap in your website:
· Find a project skeleton: If you have not yet started your project, then finding a project skeleton that already has Bootstrap is a great option. A project skeleton such as edge (created by yours truly) can be used as the initial structure while running startprojectas follows:
· $ django-admin.py startproject --template=https://github.com/arocks/edge/archive/master.zip --extension=py,md,html myproj
Alternatively, you can use one of the cookiecutter templates with support for Bootstrap.
· Use a package: The easiest option if you have already started your project is to use a package, such as django-frontend-skeleton or django-bootstrap-toolkit.
· Manually copy: None of the preceding options guarantees that their version of Bootstrap is the latest one. Bootstrap releases are so frequent that package authors have a hard time keeping their files up to date. So, if you would like to work with the latest version of Bootstrap, the best option is to download it from http://getbootstrap.com yourself. Be sure to read the release notes to check whether your templates need to be changed due to backward incompatibility.
Copy the dist directory that contains the css, js, and fonts directories into your project root under the static directory. Ensure that this path is set for STATICFILES_DIRS in your settings.py:
STATICFILES_DIRS = [os.path.join(BASE_DIR, "static")]
Now you can include the Bootstrap assets in your templates, as follows:
{% load staticfiles %}
<head>
<link href="{% static 'css/bootstrap.min.css' %}" rel="stylesheet">
But they all look the same!
Bootstrap might be a great way to get started quickly. However, sometimes, developers get lazy and do not bother to change the default look. This leaves a poor impression on your users who might find your site's appearance a little too familiar and uninteresting.
Bootstrap comes with plenty of options to improve its visual appeal. There is a file called variables.less that contains several variables from the primary brand color to the default font, as follows:
@brand-primary: #428bca;
@brand-success: #5cb85c;
@brand-info: #5bc0de;
@brand-warning: #f0ad4e;
@brand-danger: #d9534f;
@font-family-sans-serif: "Helvetica Neue", Helvetica, Arial, sans-serif;
@font-family-serif: Georgia, "Times New Roman", Times, serif;
@font-family-monospace: Menlo, Monaco, Consolas, "Courier New", monospace;
@font-family-base: @font-family-sans-serif;
Bootstrap documentation explains how you can set up the build system (including the LESS compiler) to compile these files down to the style sheets. Or quite conveniently, you can visit the 'Customize' area of the Bootstrap site to generate your customized style sheet online.
Thanks to the huge community around Bootstrap, there are also several sites, such as bootswatch.com, which have themed style sheets, that are drop-in replacements for your bootstrap.min.css.
Another approach is to override the Bootstrap styles. This is recommended if you find upgrading your customized Bootstrap style sheet between Bootstrap versions to be quite tedious. In this approach, you can add your site-wide styles in a separate CSS (or LESS) file and include it after the standard Bootstrap style sheet. Thus, you can simply upgrade the Bootstrap file with minimal changes to your site-wide style sheet.
Last but not the least, you can make your CSS classes more meaningful by replacing structural names, such as 'row' or 'column-md-4', with 'wrapper' or 'sidebar'. You can do this with a few lines of LESS code, as follows:
.wrapper {
.make-row();
}
.sidebar {
.make-md-column(4);
}
This is possible due to a feature called mixins (sounds familiar?). With the Less source files, Bootstrap can be completely customized to your needs.
Template patterns
Django's template language is quite simple. However, you can save a lot of time by following some elegant template design patterns. Let's take a look at some of them.
Pattern – template inheritance tree
Problem: Templates have lots of repeated content in several pages.
Solution: Use template inheritance wherever possible and include snippets elsewhere.
Problem details
Users expect pages of a website to follow a consistent structure. Certain interface elements, such as navigation menu, headers, and footers are seen in most web applications. However, it is cumbersome to repeat them in every template.
Most templating languages have an include mechanism. The contents of another file, possibly a template, can be included at the position where it is invoked. This can get tedious in a large project.
The sequence of the snippets to be included in every template would be mostly the same. The ordering is important and hard to check for mistakes. Ideally, we should be able to create a 'base' structure. New pages ought to extend this base to specify only the changes or make extensions to the base content.
Solution details
Django templates have a powerful extension mechanism. Similar to classes in programming, a template can be extended through inheritance. However, for that to work, the base itself must be structured into blocks as follows:
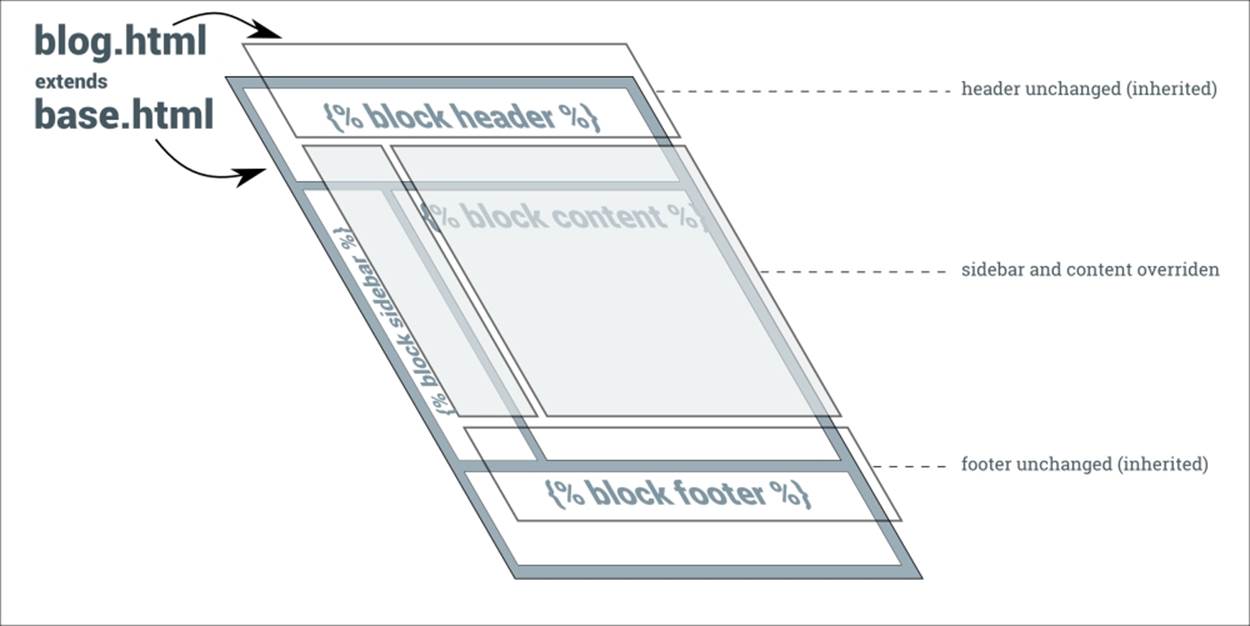
The base.html template is, by convention, the base structure for the entire site. This template will usually be well-formed HTML (that is, with a preamble and matching closing tags) that has several placeholders marked with the {% block tags %} tag. For example, a minimal base.html file looks like the following:
<html>
<body>
<h1>{% block heading %}Untitled{% endblock %}</h1>
{% block content %}
{% endblock %}
</body>
</html>
There are two blocks here, heading and content, that can be overridden. You can extend the base to create specific pages that can override these blocks. For example, here is an about page:
{% extends "base.html" %}
{% block content %}
<p> This is a simple About page </p>
{% endblock %}
{% block heading %}About{% endblock %}
Notice that we do not have to repeat the structure. We can also mention the blocks in any order. The rendered result will have the right blocks in the right places as defined in base.html.
If the inheriting template does not override a block, then its parent's contents are used. In the preceding example, if the about template does not have a heading, then it will have the default heading of 'Untitled'.
The inheriting template can be further inherited forming an inheritance chain. This pattern can be used to create a common derived base for pages with a certain layout, for example, single-column layout. A common base template can also be created for a section of the site, for example, blog pages.
Usually, all inheritance chains can be traced back to a common root, base.html; hence, the pattern's name—Template inheritance tree. Of course, this need not be strictly followed. The error pages 404.html and 500.html are usually not inherited and stripped bare of most tags to prevent further errors.
Pattern – the active link
Problem: The navigation bar is a common component in most pages. However, the active link needs to reflect the current page the user is on.
Solution: Conditionally, change the active link markup by setting context variables or based on the request path.
Problem details
The naïve way to implement the active link in a navigation bar is to manually set it in every page. However, this is neither DRY nor foolproof.
Solution details
There are several solutions to determine the active link. Excluding JavaScript-based approaches, they can be mainly grouped into template-only and custom tag-based solutions.
A template-only solution
By mentioning an active_link variable while including the snippet of the navigation template, this solution is both simple and easy to implement.
In every template, you will need to include the following line (or inherit it):
{% include "_navbar.html" with active_link='link2' %}
The _navbar.html file contains the navigation menu with a set of checks for the active link variable:
{# _navbar.html #}
<ul class="nav nav-pills">
<li{% if active_link == "link1" %} class="active"{% endif %}><a href="{% url 'link1' %}">Link 1</a></li>
<li{% if active_link == "link2" %} class="active"{% endif %}><a href="{% url 'link2' %}">Link 2</a></li>
<li{% if active_link == "link3" %} class="active"{% endif %}><a href="{% url 'link3' %}">Link 3</a></li>
</ul>
Custom tags
Django templates offer a versatile set of built-in tags. It is quite easy to create your own custom tag. Since custom tags live inside an app, create a templatetags directory inside an app. This directory must be a package, so it should have an (empty) __init__.py file.
Next, write your custom template in an appropriately named Python file. For example, for this active link pattern, we can create a file called nav.py with the following contents:
# app/templatetags/nav.py
from django.core.urlresolvers import resolve
from django.template import Library
register = Library()
@register.simple_tag
def active_nav(request, url):
url_name = resolve(request.path).url_name
if url_name == url:
return "active"
return ""
This file defines a custom tag named active_nav. It retrieves the URL's path component from the request argument (say, /about/—see Chapter 4, Views and URLs, for a detailed explanation of the URL path). Then, the resolve() function is used to lookup the URL pattern's name (as defined in urls.py) from the path. Finally, it returns the string "active" only when the pattern's name matches the expected pattern name.
The syntax for calling this custom tag in a template is {% active_nav request 'pattern_name' %}. Notice that the request needs to be passed in every page this tag is used.
Including a variable in several views can get cumbersome. Instead, we add a built-in context processor to TEMPLATE_CONTEXT_PROCESSORS in settings.py so that the request will be present in a request variable across the site, as follows:
# settings.py
from django.conf import global_settings
TEMPLATE_CONTEXT_PROCESSORS = \
global_settings.TEMPLATE_CONTEXT_PROCESSORS + (
'django.core.context_processors.request',
)
Now, all that remains is to use this custom tag in your template to set the active attribute:
{# base.html #}
{% load nav %}
<ul class="nav nav-pills">
<li class={% active_nav request 'active1' %}><a href="{% url 'active1' %}">Active 1</a></li>
<li class={% active_nav request 'active2' %}><a href="{% url 'active2' %}">Active 2</a></li>
<li class={% active_nav request 'active3' %}><a href="{% url 'active3' %}">Active 3</a></li>
</ul>
Summary
In this chapter, we looked at the features of Django's template language. Since it is easy to change the templating language in Django, many people might consider replacing it. However, it is important to learn the design philosophy of the built-in template language before we seek alternatives.
In the next chapter, we will look into one of the killer features of Django, that is, the admin interface, and how we can customize it.
All materials on the site are licensed Creative Commons Attribution-Sharealike 3.0 Unported CC BY-SA 3.0 & GNU Free Documentation License (GFDL)
If you are the copyright holder of any material contained on our site and intend to remove it, please contact our site administrator for approval.
© 2016-2026 All site design rights belong to S.Y.A.