Django Design Patterns and Best Practices (2015)
Chapter 6. Admin Interface
In this chapter, we will discuss the following topics:
· Customizing admin
· Enhancing models for the admin
· Admin best practices
· Feature flags
Django's much discussed admin interface makes it stand apart from the competition. It is a built-in app that automatically generates a user interface to add and modify a site's content. For many, the admin is Django's killer app, automating the boring task of creating admin interfaces for the models in your project.
Admin enables your team to add content and continue development at the same time. Once your models are ready and migrations have been applied, you just need to add a line or two to create its admin interface. Let's see how.
Using the admin interface
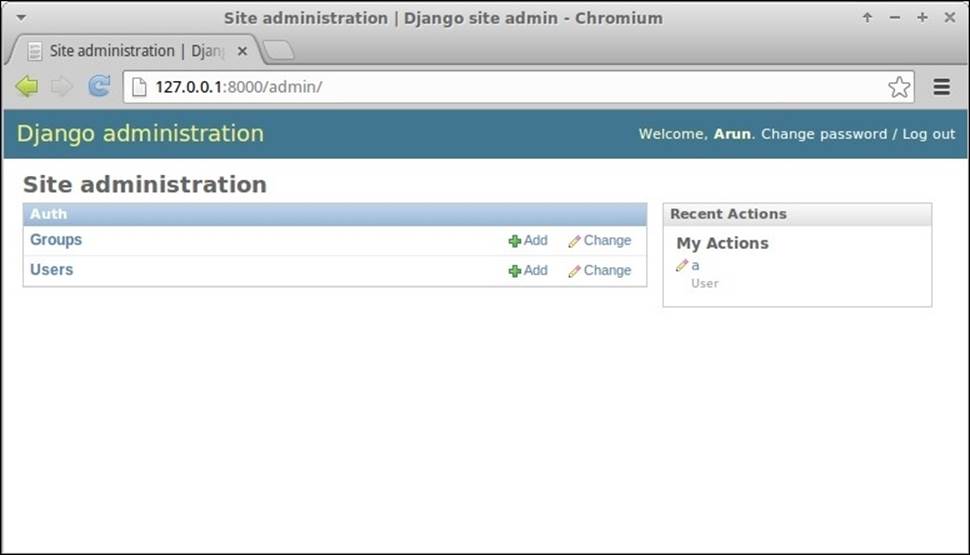
In Django 1.7, the admin interface is enabled by default. After creating your project, you will be able to see a login page when you navigate to http://127.0.0.1:8000/admin/.
If you enter the superuser credentials (or credentials of any staff user), you will be logged into the admin interface, as shown in the following screenshot:
However, your models will not be visible here, unless you define a corresponding ModelAdmin class. This is usually defined in your app's admin.py as follows:
from django.contrib import admin
from . import models
admin.site.register(models.SuperHero)
Here, the second argument to register, a ModelAdmin class, has been omitted. Hence, we will get a default admin interface for the Post model. Let's see how to create and customize this ModelAdmin class.
Note
The Beacon
"Having coffee?" asked a voice from the corner of the pantry. Sue almost spilled her coffee. A tall man wearing a tight red and blue colored costume stood smiling with hands on his hips. The logo emblazoned on his chest said in large type—Captain Obvious.
"Oh, my god," said Sue as she wiped the coffee stain with a napkin. "Sorry, I think I scared you," said Captain Obvious "What is the emergency?"
"Isn't it obvious that she doesn't know?" said a calm feminine voice from above. Sue looked up to find a shadowy figure slowly descend from the open hall. Her face was partially obscured by her dark matted hair that had a few grey streaks. "Hi Hexa!" said the Captain "But then, what was the message on SuperBook about?"
Soon, they were all at Steve's office staring at his screen. "See, I told you there is no beacon on the front page," said Evan. "We are still developing that feature." "Wait," said Steve. "Let me login through a non-staff account."
In a few seconds, the page refreshed and an animated red beacon prominently appeared at the top. "That's the beacon I was talking about!" exclaimed Captain Obvious. "Hang on a minute," said Steve. He pulled up the source files for the new features deployed earlier that day. A glance at the beacon feature branch code made it clear what went wrong:
if switch_is_active(request, 'beacon') and not request.user.is_staff():
# Display the beacon
"Sorry everyone," said Steve. "There has been a logic error. Instead of turning this feature on only for staff, we inadvertently turned it on for everyone but staff. It is turned off now. Apologies for any confusion."
"So, there was no emergency?" said Captain with a disappointed look. Hexa put an arm on his shoulder and said "I am afraid not, Captain." Suddenly, there was a loud crash and everyone ran to the hallway. A man had apparently landed in the office through one of the floor-to-ceiling glass walls. Shaking off shards of broken glass, he stood up. "Sorry, I came as fast as I could," he said, "Am I late to the party?" Hexa laughed. "No, Blitz. Been waiting for you to join," she said.
Enhancing models for the admin
The admin app is clever enough to figure out a lot of things from your model automatically. However, sometimes the inferred information can be improved. This usually involves adding an attribute or a method to the model itself (rather than at the ModelAdmin class).
Let's first take a look at an example that enhances the model for better presentation, including the admin interface:
# models.py
class SuperHero(models.Model):
name = models.CharField(max_length=100)
added_on = models.DateTimeField(auto_now_add=True)
def __str__(self):
return "{0} - {1:%Y-%m-%d %H:%M:%S}".format(self.name,
self.added_on)
def get_absolute_url(self):
return reverse('superhero.views.details', args=[self.id])
class Meta:
ordering = ["-added_on"]
verbose_name = "superhero"
verbose_name_plural = "superheroes"
Let's take a look at how admin uses all these non-field attributes:
· __str__(): Without this, the list of superhero entries would look extremely boring. Every entry would be plainly shown as <SuperHero: SuperHero object>. Try to include the object's unique information in its str representation (or unicode representation, in the case of Python 2.x code), such as its name or version. Anything that helps the admin to recognize the object unambiguously would help.
· get_absolute_url(): This attribute is handy if you like to switch between the admin view and the object's detail view on your website. If this method is defined, then a button labelled "View on site" will appear in the top right-hand side of the object's edit page in its admin page.
· ordering: Without this meta option, your entries can appear in any order as returned from the database. As you can imagine, this is no fun for the admins if you have a large number of objects. Fresh entries are usually preferred to be seen first, so sorting by date in the reverse chronological order is common.
· verbose_name: If you omit this attribute, your model's name would be converted from CamelCase into camel case. In this case, "super hero" would look awkward, so it is better to be explicit about how you would like the user-readable name to appear in the admin interface.
· verbose_name_plural: Again, omitting this option can leave you with funny results. Since Django simply prepends an 's' to the word, the plural of a superhero would be shown as "superheros" (on the admin front page, no less). So, it is better to define it correctly here.
It is recommended that you define the previous Meta attributes and methods, not just for the admin interface, but also for better representation in the shell, log files, and so on.
Of course, a further improved representation within the admin is possible by creating a ModelAdmin class as follows:
# admin.py
class SuperHeroAdmin(admin.ModelAdmin):
list_display = ('name', 'added_on')
search_fields = ["name"]
ordering = ["name"]
admin.site.register(models.SuperHero, SuperHeroAdmin)
Let's take a look at these options more closely:
· list_display: This option shows the model instances in a tabular form. Instead of using the model's __str__ representation, it shows each field mentioned as a separate sortable column. This is ideal if you like to see more than one attribute of your model.
· search_fields: This option shows a search box above the list. Any search term entered would be searched against the mentioned fields. Hence, only text fields such as CharField or TextField can be mentioned here.
· ordering: This option takes precedence over your model's default ordering. It is useful if you prefer a different ordering in your admin screen.
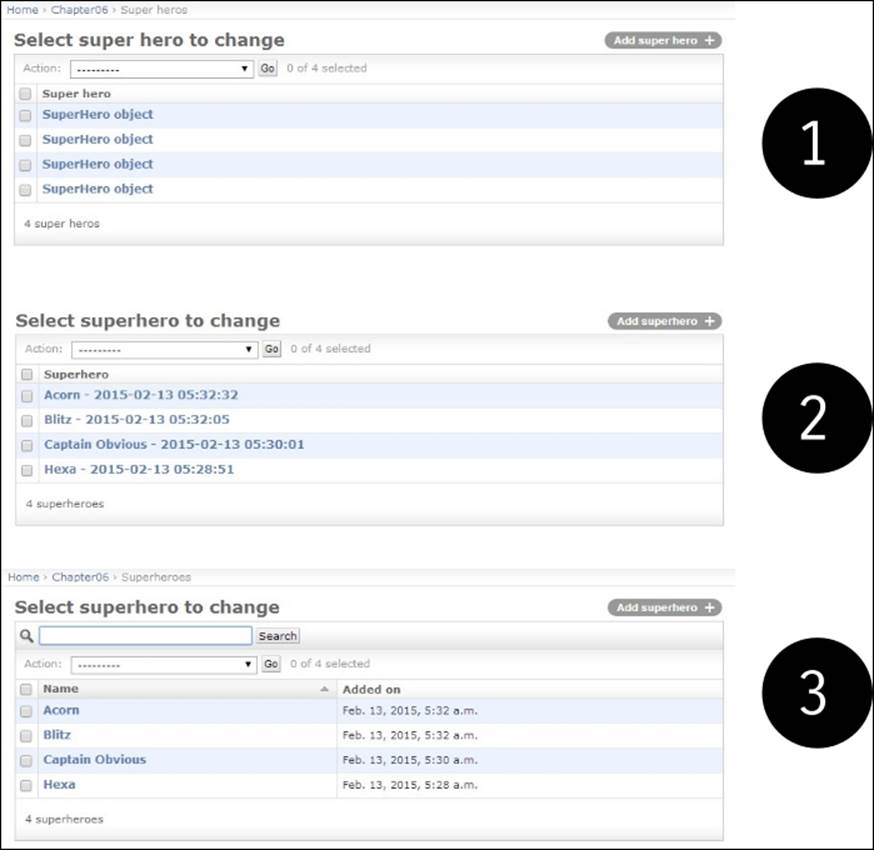
Enhancing a model's admin page
The preceding screenshot shows the following insets:
· Inset 1: Without str or Meta attributes
· Inset 2: With enhanced model meta attributes
· Inset 3: With customized ModelAdmin
Here, we have only mentioned a subset of commonly used admin options. Certain kinds of sites use the admin interface heavily. In such cases, it is highly recommended that you go through and understand the admin part of the Django documentation.
Not everyone should be an admin
Since admin interfaces are so easy to create, people tend to misuse them. Some give early users admin access by merely turning on their 'staff' flag. Soon such users begin making feature requests, mistaking the admin interface to be the actual application interface.
Unfortunately, this is not what the admin interface is for. As the flag suggests, it is an internal tool for the staff to enter content. It is production-ready but not really intended for the end users of your website.
It is best to use admin for simple data entry. For example, in a project I had reviewed, every teacher was made an admin for a Django application managing university courses. This was a poor decision since the admin interface confused the teachers.
The workflow for scheduling a class involves checking the schedules of other teachers and students. Using the admin interface gives them a direct view of the database. There is very little control over how the data gets modified by the admin.
So, keep the set of people with admin access as small as possible. Make changes via admin sparingly, unless it is simple data entry such as adding an article's content.
Tip
Best Practice
Don't give admin access to end users.
Ensure that all your admins understand the data inconsistencies that can arise from making changes through the admin. If possible, record manually or use apps, such as django-audit-loglog that can keep a log of admin changes made for future reference.
In the case of the university example, we created a separate interface for teachers, such as a course builder. These tools will be visible and accessible only if the user has a teacher profile.
Essentially, rectifying most misuses of the admin interface involves creating more powerful tools for certain sets of users. However, don't take the easy (and wrong) path of granting them admin access.
Admin interface customizations
The out-of-box admin interface is quite useful to get started. Unfortunately, most people assume that it is quite hard to change the Django admin and leave it as it is. In fact, the admin is extremely customizable and its appearance can be drastically changed with minimal effort.
Changing the heading
Many users of the admin interface might be stumped by the heading—Django administration. It might be more helpful to change this to something customized such as MySite admin or something cool such as SuperBook Secret Area.
It is quite easy to make this change. Simply add this line to your site's urls.py:
admin.site.site_header = "SuperBook Secret Area"
Changing the base and stylesheets
Almost every admin page is extended from a common base template named admin/base_site.html. This means that with a little knowledge of HTML and CSS, you can make all sorts of customizations to change the look and feel of the admin interface.
Simply create a directory called admin in any templates directory. Then, copy the base_site.html file from the Django source directory and alter it according to your needs. If you don't know where the templates are located, just run the following commands within the Django shell:
>>> from os.path import join
>>> from django.contrib import admin
>>> print(join(admin.__path__[0], "templates", "admin"))
/home/arun/env/sbenv/lib/python3.4/site-packages/django/contrib/admin/templates/admin
The last line is the location of all your admin templates. You can override or extend any of these templates. Please refer to the next section for an example of extending the template.
For an example of customizing the admin base template, you can change the font of the entire admin interface to "Special Elite" from Google Fonts, which is great for giving a mock-serious look. You will need to add an admin/base_site.html file in one of your template's directories with the following contents:
{% extends "admin/base.html" %}
{% block extrastyle %}
<link href='http://fonts.googleapis.com/css?family=Special+Elite' rel='stylesheet' type='text/css'>
<style type="text/css">
body, td, th, input {
font-family: 'Special Elite', cursive;
}
</style>
{% endblock %}
This adds an extra stylesheet for overriding the font-related styles and will be applied to every admin page.
Adding a Rich Text Editor for WYSIWYG editing
Sometimes, you will need to include JavaScript code in the admin interface. A common requirement is to use an HTML editor such as CKEditor for your TextField.
There are several ways to implement this in Django, for example, using a Media inner class on your ModelAdmin class. However, I find extending the admin change_form template to be the most convenient approach.
For example, if you have an app called Posts, then you will need to create a file called change_form.html within the templates/admin/posts/ directory. If you need to show CKEditor (could be any JavaScript editor for that matter, but this one is the one I prefer) for themessage field of any model in this app, then the contents of the file can be as follows:
{% extends "admin/change_form.html" %}
{% block footer %}
{{ block.super }}
<script src="//cdn.ckeditor.com/4.4.4/standard/ckeditor.js"></script>
<script>
CKEDITOR.replace("id_message", {
toolbar: [
[ 'Bold', 'Italic', '-', 'NumberedList', 'BulletedList'],],
width: 600,
});
</script>
<style type="text/css">
.cke { clear: both; }
</style>
{% endblock %}
The highlighted part is the automatically created ID for the form element we wish to enhance from a normal textbox to a Rich Text Editor. These scripts and styles have been added to the footer block so that the form elements would be created in the DOM before they are changed.
Bootstrap-themed admin
Overall, the admin interface is quite well designed. However, it was designed in 2006 and, for the most part, looks that way too. It doesn't have a mobile UI or other niceties that have become standard today.
Unsurprisingly, the most common request for admin customization is whether it can be integrated with Bootstrap. There are several packages that can do this, such as django-admin-bootstrapped or djangosuit.
Rather than overriding all the admin templates yourself, these packages provide ready-to-use Bootstrap-themed templates. They are easy to install and deploy. Being based on Bootstrap, they are responsive and come with a variety of widgets and components.
Complete overhauls
There have been attempts made to completely reimagine the admin interface too. Grappelli is a very popular skin that extends the Django admin with new features, such as autocomplete lookups and collapsible inlines. With django-admin-tools, you get a customizable dashboard and menu bar.
There have been attempts made to completely rewrite the admin, such as django-admin2 and nexus, which did not gain any significant adoption. There is even an official proposal called AdminNext to revamp the entire admin app. Considering the size, complexity, and popularity of the existing admin, any such effort is expected to take a significant amount of time.
Protecting the admin
The admin interface of your site gives access to almost every piece of data stored. So, don't leave the metaphorical gate lightly guarded. In fact, one of the only telltale signs that someone runs Django is that, when you navigate to http://example.com/admin/, you will be greeted by the blue login screen.
In production, it is recommended that you change this location to something less obvious. It is as simple as changing this line in your root urls.py:
url(r'^secretarea/', include(admin.site.urls)),
A slightly more sophisticated approach is to use a dummy admin site at the default location or a honeypot (see the django-admin-honeypot package). However, the best option is to use HTTPS for your admin area since normal HTTP will send all the data in plaintext over the network.
Check your web server documentation on how to set up HTTPS for admin requests. On Nginx, it is quite easy to set this up and involves specifying the SSL certificate locations. Finally, redirect all HTTP requests for admin pages to HTTPS, and you can sleep more peacefully.
The following pattern is not strictly limited to the admin interface but it is nonetheless included in this chapter, as it is often controlled in the admin.
Pattern – feature flags
Problem: Publishing of new features to users and deployment of the corresponding code in production should be independent.
Solution: Use feature flags to selectively enable or disable features after deployment.
Problem details
Rolling out frequent bug fixes and new features to production is common today. Many of these changes are unnoticed by users. However, new features that have significant impact in terms of usability or performance ought to be rolled out in a phased manner. In other words, deployment should be decoupled from a release.
Simplistic release processes activate new features as soon as they are deployed. This can potentially have catastrophic results ranging from user issues (swamping your support resources) to performance issues (causing downtime).
Hence, in large sites it is important to decouple deployment of new features in production and activate them. Even if they are activated, they are sometimes seen only by a select group of users. This select group can be staff or a sample set of customers for trial purposes.
Solution details
Many sites control the activation of new features using Feature Flags. A feature flag is a switch in your code that determines whether a feature should be made available to certain customers.
Several Django packages provide feature flags such as gargoyle and django-waffle. These packages store feature flags of a site in the database. They can be activated or deactivated through the admin interface or through management commands. Hence, every environment (production, testing, development, and so on) can have its own set of activated features.
Feature flags were originally documented, as used in Flickr (See http://code.flickr.net/2009/12/02/flipping-out/). They managed a code repository without any branches, that is, everything was checked into the mainline. They also deployed this code into production several times a day. If they found out that a new feature broke anything in production or increased load on the database, then they simply disabled it by turning that feature flag off.
Feature flags can be used for various other situations (the following examples use django-waffle):
· Trials: A feature flag can also be conditionally active for certain users. These can be your own staff or certain early adopters than you may be targeting as follows:
· def my_view(request):
· if flag_is_active(request, 'flag_name'):
# Behavior if flag is active.
Sites can run several such trials in parallel, so different sets of users might actually have different user experiences. Metrics and feedback are collected from such controlled tests before wider deployment.
· A/B testing: This is quite similar to trials except that users are selected randomly within a controlled experiment. This is quite common in web design to identify which changes can increase the conversion rates. This is how such a view can be written:
· def my_view(request):
· if sample_is_active(request, 'design_name'):
# Behavior for test sample.
· Performance testing: Sometimes, it is hard to measure the impact of a feature on server performance. In such cases, it is best to activate the flag only for a small percentage of users first. The percentage of activations can be gradually increased if the performance is within the expected limits.
· Limit externalities: We can also use feature flags as a site-wide feature switch that reflects the availability of its services. For example, downtime in external services such as Amazon S3 can result in users facing error messages while they perform actions, such as uploading photos.
When the external service is down for extended periods, a feature flag can be deactivated that would disable the upload button and/or show a more helpful message about the downtime. This simple feature saves the user's time and provides a better user experience:
def my_view(request):
if switch_is_active('s3_down'):
# Disable uploads and show it is downtime
The main disadvantage of this approach is that the code gets littered with conditional checks. However, this can be controlled by periodic code cleanups that remove checks for fully accepted features and prune out permanently deactivated features.
Summary
In this chapter, we explored Django's built-in admin app. We found that it is not only quite useful out of the box, but that various customizations can also be done to improve its appearance and functionality.
In the next chapter, we will take a look at how to use forms more effectively in Django by considering various patterns and common use cases.
All materials on the site are licensed Creative Commons Attribution-Sharealike 3.0 Unported CC BY-SA 3.0 & GNU Free Documentation License (GFDL)
If you are the copyright holder of any material contained on our site and intend to remove it, please contact our site administrator for approval.
© 2016-2026 All site design rights belong to S.Y.A.