Elasticsearch: The Definitive Guide (2015)
Part I. Getting Started
Chapter 11. Inside a Shard
In Chapter 2, we introduced the shard, and described it as a low-level worker unit. But what exactly is a shard and how does it work? In this chapter, we answer these questions:
§ Why is search near real-time?
§ Why are document CRUD (create-read-update-delete) operations real-time?
§ How does Elasticsearch ensure that the changes you make are durable, that they won’t be lost if there is a power failure?
§ Why does deleting documents not free up space immediately?
§ What do the refresh, flush, and optimize APIs do, and when should you use them?
The easiest way to understand how a shard functions today is to start with a history lesson. We will look at the problems that needed to be solved in order to provide a distributed durable data store with near real-time search and analytics.
CONTENT WARNING
The information presented in this chapter is for your interest. You are not required to understand and remember all the detail in order to use Elasticsearch. Read this chapter to gain a taste for how things work, and to know where the information is in case you need to refer to it in the future, but don’t be overwhelmed by the detail.
Making Text Searchable
The first challenge that had to be solved was how to make text searchable. Traditional databases store a single value per field, but this is insufficient for full-text search. Every word in a text field needs to be searchable, which means that the database needs to be able to index multiple values—words, in this case—in a single field.
The data structure that best supports the multiple-values-per-field requirement is the inverted index, which we introduced in “Inverted Index”. The inverted index contains a sorted list of all of the unique values, or terms, that occur in any document and, for each term, a list of all the documents that contain it.
Term | Doc 1 | Doc 2 | Doc 3 | ...
------------------------------------
brown | X | | X | ...
fox | X | X | X | ...
quick | X | X | | ...
the | X | | X | ...
NOTE
When discussing inverted indices, we talk about indexing documents because, historically, an inverted index was used to index whole unstructured text documents. A document in Elasticsearch is a structured JSON document with fields and values. In reality, every indexed field in a JSON document has its own inverted index.
The inverted index may hold a lot more information than the list of documents that contain a particular term. It may store a count of the number of documents that contain each term, the number of times a term appears in a particular document, the order of terms in each document, the length of each document, the average length of all documents, and more. These statistics allow Elasticsearch to determine which terms are more important than others, and which documents are more important than others, as described in “What Is Relevance?”.
The important thing to realize is that the inverted index needs to know about all documents in the collection in order for it to function as intended.
In the early days of full-text search, one big inverted index was built for the entire document collection and written to disk. As soon as the new index was ready, it replaced the old index, and recent changes became searchable.
Immutability
The inverted index that is written to disk is immutable: it doesn’t change. Ever. This immutability has important benefits:
§ There is no need for locking. If you never have to update the index, you never have to worry about multiple processes trying to make changes at the same time.
§ Once the index has been read into the kernel’s filesystem cache, it stays there, because it never changes. As long as there is enough space in the filesystem cache, most reads will come from memory instead of having to hit disk. This provides a big performance boost.
§ Any other caches (like the filter cache) remain valid for the life of the index. They don’t need to be rebuilt every time the data changes, because the data doesn’t change.
§ Writing a single large inverted index allows the data to be compressed, reducing costly disk I/O and the amount of RAM needed to cache the index.
Of course, an immutable index has its downsides too, primarily the fact that it is immutable! You can’t change it. If you want to make new documents searchable, you have to rebuild the entire index. This places a significant limitation either on the amount of data that an index can contain, or the frequency with which the index can be updated.
Dynamically Updatable Indices
The next problem that needed to be solved was how to make an inverted index updatable without losing the benefits of immutability? The answer turned out to be: use more than one index.
Instead of rewriting the whole inverted index, add new supplementary indices to reflect more-recent changes. Each inverted index can be queried in turn—starting with the oldest—and the results combined.
Lucene, the Java libraries on which Elasticsearch is based, introduced the concept of per-segment search. A segment is an inverted index in its own right, but now the word index in Lucene came to mean a collection of segments plus a commit point—a file that lists all known segments, as depicted in Figure 11-1. New documents are first added to an in-memory indexing buffer, as shown in Figure 11-2, before being written to an on-disk segment, as in Figure 11-3
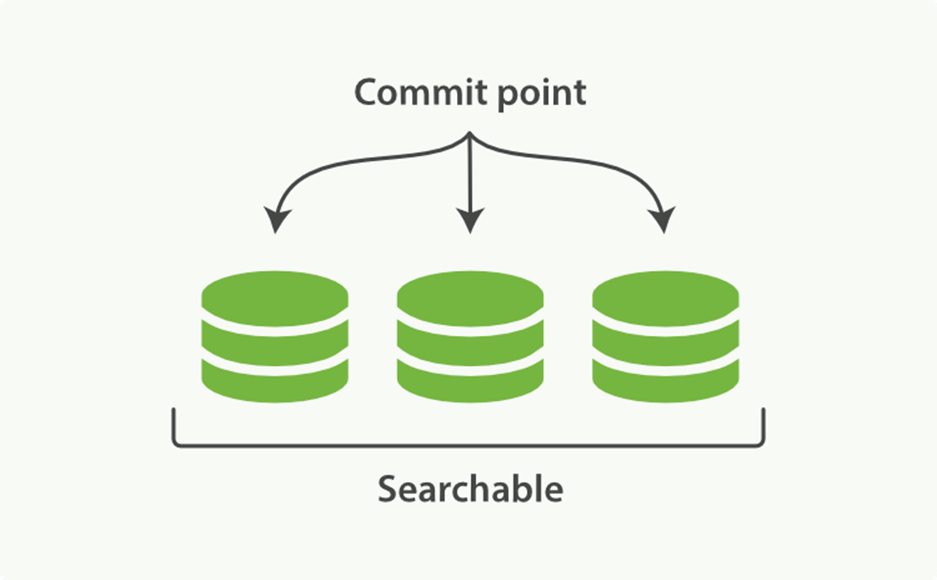
Figure 11-1. A Lucene index with a commit point and three segments
INDEX VERSUS SHARD
To add to the confusion, a Lucene index is what we call a shard in Elasticsearch, while an index in Elasticsearch is a collection of shards. When Elasticsearch searches an index, it sends the query out to a copy of every shard (Lucene index) that belongs to the index, and then reduces the per-shards results to a global result set, as described in Chapter 9.
A per-segment search works as follows:
1. New documents are collected in an in-memory indexing buffer. See Figure 11-2.
2. Every so often, the buffer is commited:
o A new segment—a supplementary inverted index—is written to disk.
o A new commit point is written to disk, which includes the name of the new segment.
o The disk is fsync’ed—all writes waiting in the filesystem cache are flushed to disk, to ensure that they have been physically written.
3. The new segment is opened, making the documents it contains visible to search.
4. The in-memory buffer is cleared, and is ready to accept new documents.

Figure 11-2. A Lucene index with new documents in the in-memory buffer, ready to commit
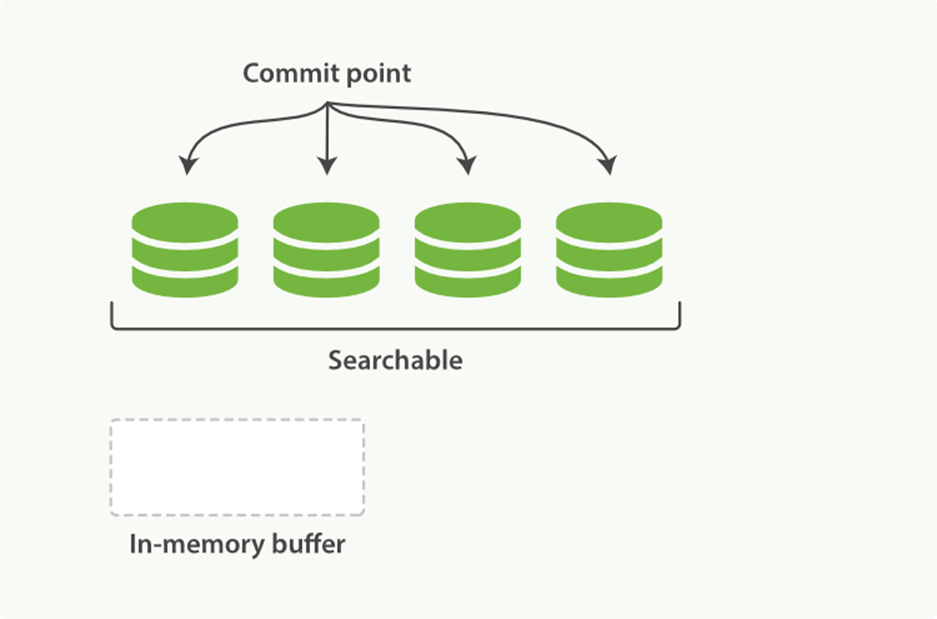
Figure 11-3. After a commit, a new segment is added to the commit point and the buffer is cleared
When a query is issued, all known segments are queried in turn. Term statistics are aggregated across all segments to ensure that the relevance of each term and each document is calculated accurately. In this way, new documents can be added to the index relatively cheaply.
Deletes and Updates
Segments are immutable, so documents cannot be removed from older segments, nor can older segments be updated to reflect a newer version of a document. Instead, every commit point includes a .del file that lists which documents in which segments have been deleted.
When a document is “deleted,” it is actually just marked as deleted in the .del file. A document that has been marked as deleted can still match a query, but it is removed from the results list before the final query results are returned.
Document updates work in a similar way: when a document is updated, the old version of the document is marked as deleted, and the new version of the document is indexed in a new segment. Perhaps both versions of the document will match a query, but the older deleted version is removed before the query results are returned.
In “Segment Merging”, we show how deleted documents are purged from the filesystem.
Near Real-Time Search
With the development of per-segment search, the delay between indexing a document and making it visible to search dropped dramatically. New documents could be made searchable within minutes, but that still isn’t fast enough.
The bottleneck is the disk. Commiting a new segment to disk requires an fsync to ensure that the segment is physically written to disk and that data will not be lost if there is a power failure. But an fsync is costly; it cannot be performed every time a document is indexed without a big performance hit.
What was needed was a more lightweight way to make new documents visible to search, which meant removing fsync from the equation.
Sitting between Elasticsearch and the disk is the filesystem cache. As before, documents in the in-memory indexing buffer (Figure 11-4) are written to a new segment (Figure 11-5). But the new segment is written to the filesystem cache first—which is cheap—and only later is it flushed to disk—which is expensive. But once a file is in the cache, it can be opened and read, just like any other file.
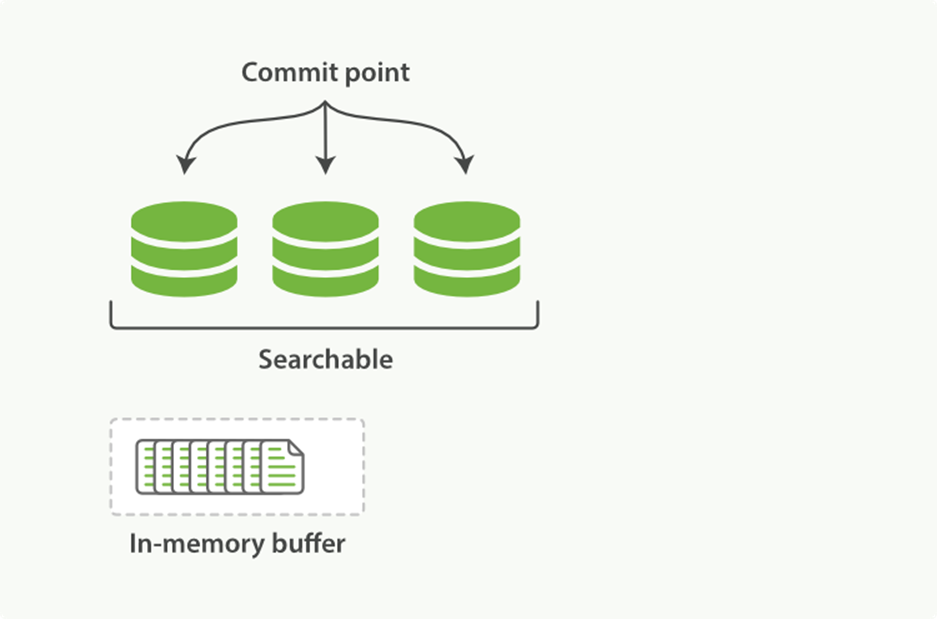
Figure 11-4. A Lucene index with new documents in the in-memory buffer
Lucene allows new segments to be written and opened—making the documents they contain visible to search—without performing a full commit. This is a much lighter process than a commit, and can be done frequently without ruining performance.
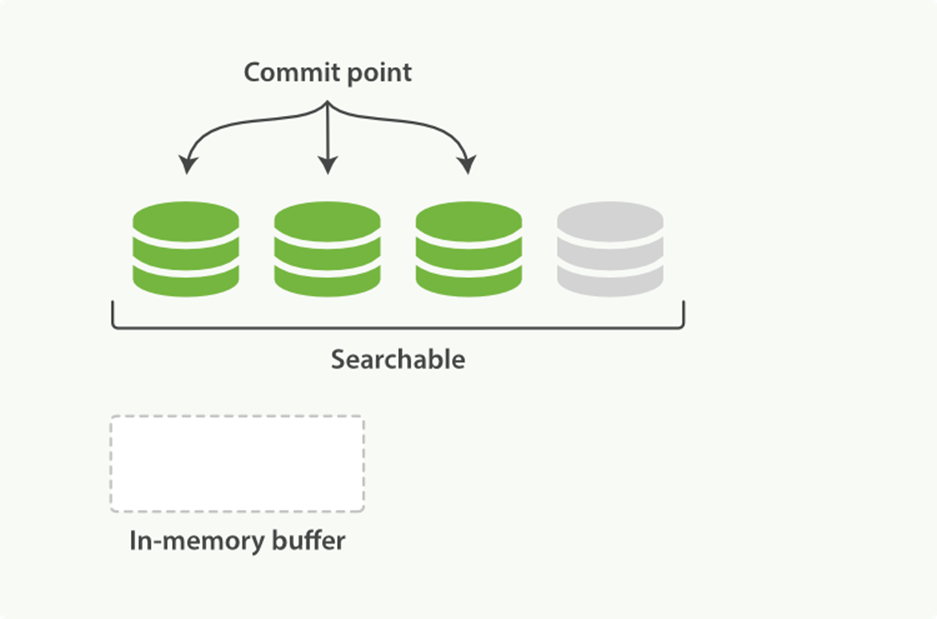
Figure 11-5. The buffer contents have been written to a segment, which is searchable, but is not yet commited
refresh API
In Elasticsearch, this lightweight process of writing and opening a new segment is called a refresh. By default, every shard is refreshed automatically once every second. This is why we say that Elasticsearch has near real-time search: document changes are not visible to search immediately, but will become visible within 1 second.
This can be confusing for new users: they index a document and try to search for it, and it just isn’t there. The way around this is to perform a manual refresh, with the refresh API:
POST /_refresh ![]()
POST /blogs/_refresh ![]()
![]()
Refresh all indices.
![]()
Refresh just the blogs index.
TIP
While a refresh is much lighter than a commit, it still has a performance cost. A manual refresh can be useful when writing tests, but don’t do a manual refresh every time you index a document in production; it will hurt your performance. Instead, your application needs to be aware of the near real-time nature of Elasticsearch and make allowances for it.
Not all use cases require a refresh every second. Perhaps you are using Elasticsearch to index millions of log files, and you would prefer to optimize for index speed rather than near real-time search. You can reduce the frequency of refreshes on a per-index basis by setting therefresh_interval:
PUT /my_logs
{
"settings": {
"refresh_interval": "30s" ![]()
}
}
![]()
Refresh the my_logs index every 30 seconds.
The refresh_interval can be updated dynamically on an existing index. You can turn off automatic refreshes while you are building a big new index, and then turn them back on when you start using the index in production:
POST /my_logs/_settings
{ "refresh_interval": -1 } ![]()
POST /my_logs/_settings
{ "refresh_interval": "1s" } ![]()
![]()
Disable automatic refreshes.
![]()
Refresh automatically every second.
Caution
The refresh_interval expects a duration such as 1s (1 second) or 2m (2 minutes). An absolute number like 1 means 1 millisecond--a sure way to bring your cluster to its knees.
Making Changes Persistent
Without an fsync to flush data in the filesystem cache to disk, we cannot be sure that the data will still be there after a power failure, or even after exiting the application normally. For Elasticsearch to be reliable, it needs to ensure that changes are persisted to disk.
In “Dynamically Updatable Indices”, we said that a full commit flushes segments to disk and writes a commit point, which lists all known segments. Elasticsearch uses this commit point during startup or when reopening an index to decide which segments belong to the current shard.
While we refresh once every second to achieve near real-time search, we still need to do full commits regularly to make sure that we can recover from failure. But what about the document changes that happen between commits? We don’t want to lose those either.
Elasticsearch added a translog, or transaction log, which records every operation in Elasticsearch as it happens. With the translog, the process now looks like this:
1. When a document is indexed, it is added to the in-memory buffer and appended to the translog, as shown in Figure 11-6.

Figure 11-6. New documents are added to the in-memory buffer and appended to the transaction log
2. The refresh leaves the shard in the state depicted in Figure 11-7. Once every second, the shard is refreshed:
o The docs in the in-memory buffer are written to a new segment, without an fsync.
o The segment is opened to make it visible to search.
o The in-memory buffer is cleared.
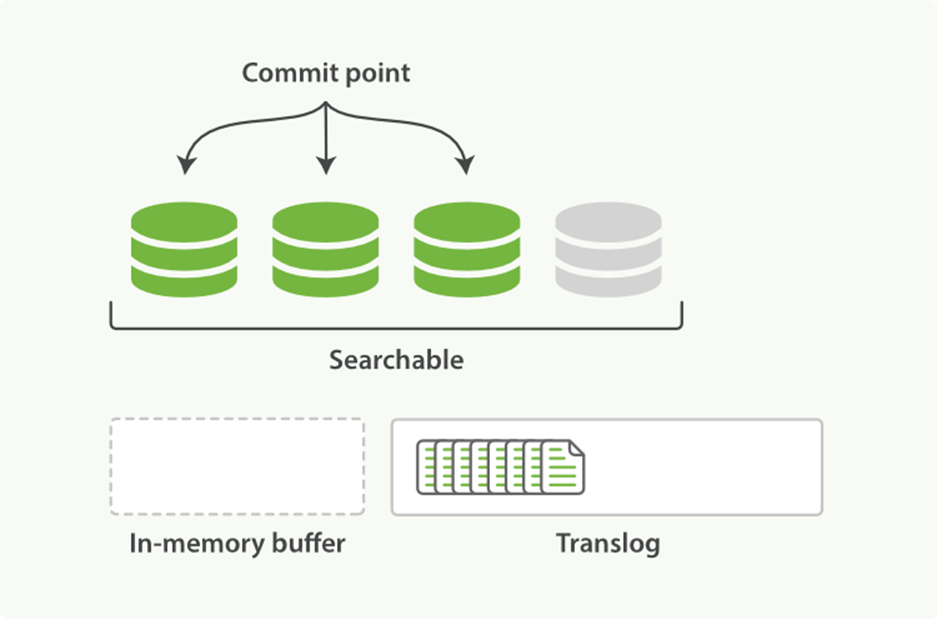
Figure 11-7. After a refresh, the buffer is cleared but the transaction log is not
3. This process continues with more documents being added to the in-memory buffer and appended to the transaction log (see Figure 11-8).
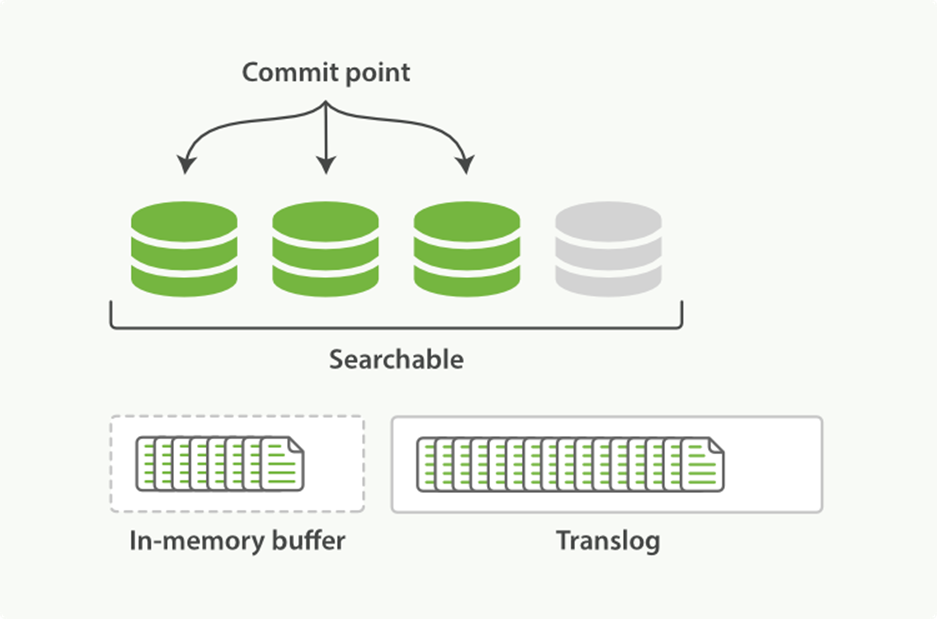
Figure 11-8. The transaction log keeps accumulating documents
4. Every so often—such as when the translog is getting too big—the index is flushed; a new translog is created, and a full commit is performed (see Figure 11-9):
o Any docs in the in-memory buffer are written to a new segment.
o The buffer is cleared.
o A commit point is written to disk.
o The filesystem cache is flushed with an fsync.
o The old translog is deleted.
The translog provides a persistent record of all operations that have not yet been flushed to disk. When starting up, Elasticsearch will use the last commit point to recover known segments from disk, and will then replay all operations in the translog to add the changes that happened after the last commit.
The translog is also used to provide real-time CRUD. When you try to retrieve, update, or delete a document by ID, it first checks the translog for any recent changes before trying to retrieve the document from the relevant segment. This means that it always has access to the latest known version of the document, in real-time.
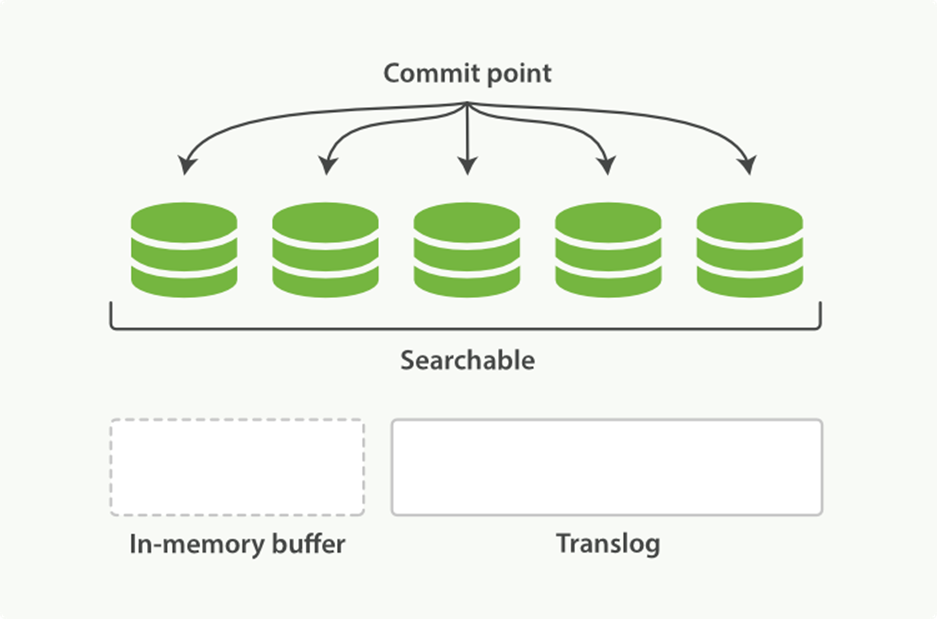
Figure 11-9. After a flush, the segments are fully commited and the transaction log is cleared
flush API
The action of performing a commit and truncating the translog is known in Elasticsearch as a flush. Shards are flushed automatically every 30 minutes, or when the translog becomes too big. See the translog documentation for settings that can be used to control these thresholds:
The flush API can be used to perform a manual flush:
POST /blogs/_flush ![]()
POST /_flush?wait_for_ongoing ![]()
![]()
Flush the blogs index.
![]()
Flush all indices and wait until all flushes have completed before returning.
You seldom need to issue a manual flush yourself; usually, automatic flushing is all that is required.
That said, it is beneficial to flush your indices before restarting a node or closing an index. When Elasticsearch tries to recover or reopen an index, it has to replay all of the operations in the translog, so the shorter the log, the faster the recovery.
HOW SAFE IS THE TRANSLOG?
The purpose of the translog is to ensure that operations are not lost. This begs the question: how safe is the translog?
Writes to a file will not survive a reboot until the file has been fsync‘ed to disk. By default, the translog is fsync‘ed every 5 seconds. Potentially, we could lose 5 seconds worth of data—if the translog were the only mechanism that we had for dealing with failure.
Fortunately, the translog is only part of a much bigger system. Remember that an indexing request is considered successful only after it has completed on both the primary shard and all replica shards. Even if the node holding the primary shard were to suffer catastrophic failure, it would be unlikely to affect the nodes holding the replica shards at the same time.
While we could force the translog to fsync more frequently (at the cost of indexing performance), it is unlikely to provide more reliability.
Segment Merging
With the automatic refresh process creating a new segment every second, it doesn’t take long for the number of segments to explode. Having too many segments is a problem. Each segment consumes file handles, memory, and CPU cycles. More important, every search request has to check every segment in turn; the more segments there are, the slower the search will be.
Elasticsearch solves this problem by merging segments in the background. Small segments are merged into bigger segments, which, in turn, are merged into even bigger segments.
This is the moment when those old deleted documents are purged from the filesystem. Deleted documents (or old versions of updated documents) are not copied over to the new bigger segment.
There is nothing you need to do to enable merging. It happens automatically while you are indexing and searching. The process works like as depicted in Figure 11-10:
1. While indexing, the refresh process creates new segments and opens them for search.
2. The merge process selects a few segments of similar size and merges them into a new bigger segment in the background. This does not interrupt indexing and searching.

Figure 11-10. Two commited segments and one uncommited segment in the process of being merged into a bigger segment
3. Figure 11-11 illustrates activity as the merge completes:
o The new segment is flushed to disk.
o A new commit point is written that includes the new segment and excludes the old, smaller segments.
o The new segment is opened for search.
o The old segments are deleted.
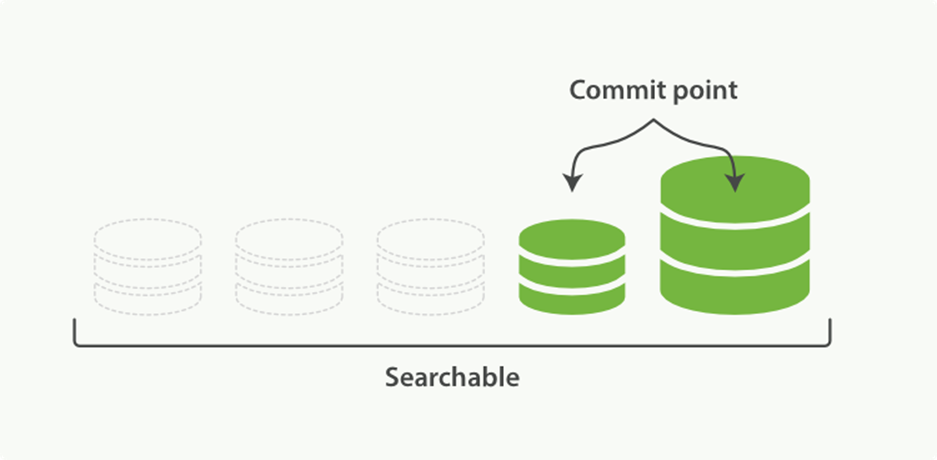
Figure 11-11. Once merging has finished, the old segments are deleted
The merging of big segments can use a lot of I/O and CPU, which can hurt search performance if left unchecked. By default, Elasticsearch throttles the merge process so that search still has enough resources available to perform well.
TIP
See “Segments and Merging” for advice about tuning merging for your use case.
optimize API
The optimize API is best described as the forced merge API. It forces a shard to be merged down to the number of segments specified in the max_num_segments parameter. The intention is to reduce the number of segments (usually to one) in order to speed up search performance.
WARNING
The optimize API should not be used on a dynamic index—an index that is being actively updated. The background merge process does a very good job, and optimizing will hinder the process. Don’t interfere!
In certain specific circumstances, the optimize API can be beneficial. The typical use case is for logging, where logs are stored in an index per day, week, or month. Older indices are essentially read-only; they are unlikely to change.
In this case, it can be useful to optimize the shards of an old index down to a single segment each; it will use fewer resources and searches will be quicker:
POST /logstash-2014-10/_optimize?max_num_segments=1 ![]()
![]()
Merges each shard in the index down to a single segment
WARNING
Be aware that merges triggered by the optimize API are not throttled at all. They can consume all of the I/O on your nodes, leaving nothing for search and potentially making your cluster unresponsive. If you plan on optimizing an index, you should use shard allocation (see “Migrate Old Indices”) to first move the index to a node where it is safe to run.
All materials on the site are licensed Creative Commons Attribution-Sharealike 3.0 Unported CC BY-SA 3.0 & GNU Free Documentation License (GFDL)
If you are the copyright holder of any material contained on our site and intend to remove it, please contact our site administrator for approval.
© 2016-2026 All site design rights belong to S.Y.A.