ElasticSearch Cookbook, Second Edition (2015)
Chapter 2. Downloading and Setting Up
In this chapter, we will cover the following topics:
· Downloading and installing ElasticSearch
· Setting up networking
· Setting up a node
· Setting up for Linux systems
· Setting up different node types
· Installing plugins in ElasticSearch
· Installing a plugin manually
· Removing a plugin
· Changing logging settings
Introduction
This chapter explains how to install and configure ElasticSearch, from a single developer machine to a big cluster, giving you hints on how to improve performance and skip misconfiguration errors.
There are different options to install ElasticSearch and set up a working environment for development and production.
When testing out ElasticSearch for a development cluster, the configuration tool does not require any configurations to be set in it. However, when moving to production, it is important to properly configure the cluster based on your data and use cases. The setup step is very important because a bad configuration can lead to bad results and poor performances, and it can even kill your server.
In this chapter, the management of ElasticSearch plugins is also discussed: installing, configuring, updating, and removing.
Downloading and installing ElasticSearch
ElasticSearch has an active community and the release cycles are very fast.
Because ElasticSearch depends on many common Java libraries (Lucene, Guice, and Jackson are the most famous), the ElasticSearch community tries to keep them updated and fixes bugs that are discovered in them and the ElasticSearch core. The large user base is also a source of new ideas and features to improve ElasticSearch use cases.
For these reasons, if it's possible, best practice is to use the latest available release (usually, the most stable release and with the least bugs).
Getting ready
You need an ElasticSearch supported operating system (Linux / Mac OS X / Windows) with JVM 1.7 or above installed. A web browser is required to download the ElasticSearch binary release.
How to do it…
In order to download and install an ElasticSearch server, we will perform the following steps:
1. Download ElasticSearch from the web. The latest version is always downloadable at http://www.elasticsearch.org/download/. Different versions are available for different operating systems:
· elasticsearch-{version-number}.zip: This is used for both Linux (or Mac OS X) and Windows operating systems
· elasticsearch-{version-number}.tar.gz: This is used for Linux and Mac operating systems
· elasticsearch-{version-number}.deb: This is used for a Debian-based Linux distribution (this also covers the Ubuntu family). It can be installed with the Debian command dpkg –i elasticsearch-*.deb.
· elasticsearch-{version-number}.rpm: This is used for Red Hat-based Linux distributions (this also covers the CentOS family). You can install this version with the command rpm –i elasticsearch-{version number}.rpm.
Note
These packages contain everything to start using ElasticSearch. At the time of writing this book, the latest and most stable version of ElasticSearch is 1.4.0. To check whether this is the latest available version, please visithttp://www.elasticsearch.org/download/.
2. Extract the binary content:
· After downloading the correct release for your platform, the installation consists of extracting the archive to a working directory.
Note
Choose a working directory that is safe for charset problems and does not have a long path name (path name) in order to prevent problems when ElasticSearch creates its directories to store index data.
· For the Windows platform, a good directory can be c:\es, while on Unix and Mac OS X, you can use /opt/es.
· To run ElasticSearch, you need a Java Virtual Machine version 1.7 or above installed. For better performance, I suggest that you use the latest Sun/Oracle 1.7 version.
· If you are a Mac OS X user and you have installed Homebrew (http://brew.sh/), the first and second step is automatically managed by the brew install elasticsearch command.
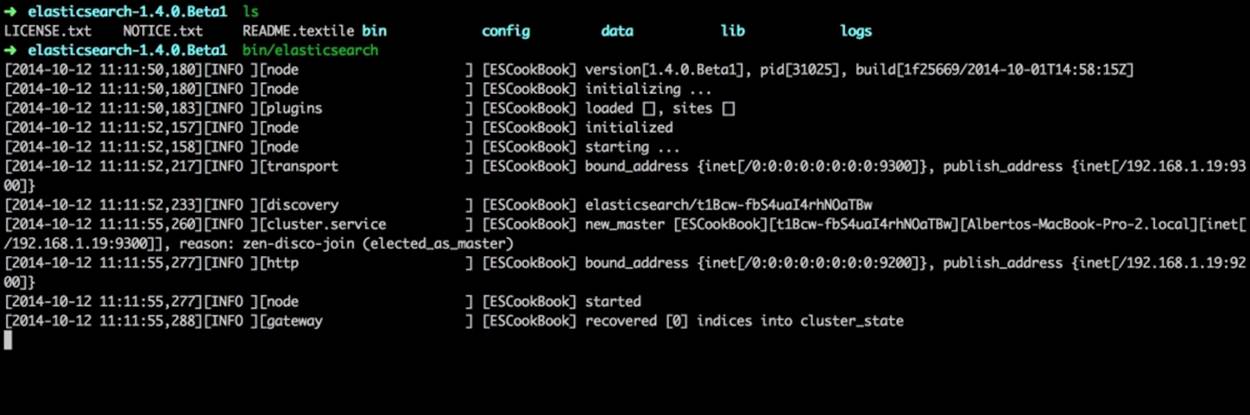
3. Now, start the ElasticSearch executable to check whether everything is working. To start your ElasticSearch server, just navigate to the installation directory and type either of the following command lines depending on your platform:
· For Linux and Mac OS X:
· # bin/elasticsearch
· For Windows:
· # bin\elasticserch.bat
4. Your server should now start, as shown in the following screenshot:
How it works...
The ElasticSearch package generally contains three directories:
· bin: This contains the script to start and manage ElasticSearch. The most important scripts are:
· elasticsearch(.bat): This is the main script file to start the ElasticSearch server
· plugin(.bat): This is a script to manage plugins
· config: This contains the ElasticSearch configurations. The most important files are:
· elasticsearch.yml: This is the main configuration file for ElasticSearch
· logging.yml: This is the logging configuration file
· lib: This contains all the libraries required to run ElasticSearch
Another directory that will be present in the future is the plugins directory. It's the one that stores the plugin code.
There's more...
During the ElasticSearch startup, there are a lot of events that occur:
· A node name is chosen automatically (such as Robert Kelly) if it is not provided in elasticsearch.yml. The name is randomly taken from an in-code embedded ElasticSearch text file (src/main/resources/config/names.txt).
· A node name hash is generated for this node (such as, whqVp_4zQGCgMvJ1CXhcWQ).
· If there are plugins (native or site), they are loaded. In this example, there are no plugins.
· If it is not configured automatically, ElasticSearch binds to all the network addresses, using two ports:
· Port 9300 is used for internal intranode communication
· Port 9200 is used for the HTTP REST API
· After the startup, if indices are available, they are restored.
If the given port numbers are already bound, ElasticSearch automatically increments the port number and tries to bind to them until a port is available (such as 9201, 9202, and so on). This feature is very useful when you want to fire up several nodes on the same machine for testing.
Many events are fired during ElasticSearch startup; we'll see them in detail in the upcoming recipes.
Setting up networking
Correctly setting up networking is very important for your nodes and cluster.
There are a lot of different installation scenarios and networking issues; we will cover two kinds of networking setups in this recipe:
· A standard installation with an autodiscovery working configuration
· A forced IP configuration, used if it is not possible to use autodiscovery
Getting ready
You need a working ElasticSearch installation, and you must know your current networking configuration (such as your IP addresses).
How to do it...
In order to configure networking, we will perform the following steps:
1. With your favorite text editor application, open the ElasticSearch configuration file. Using the standard ElasticSearch configuration file (config/elasticsearch.yml), your node is configured to bind to all your machine interfaces and does an autodiscovery of the broadcasting events, which means that it sends signals to every machine in the current LAN and waits for a response. If a node responds to this, it can join and be a part of a cluster. If another node is available in the same LAN, it can join the cluster too.
Note
Only nodes that run the same ElasticSearch version and cluster name (the cluster.name option in elasticsearch.yml) can join each other.
2. To customize the network preferences, you need to change some parameters in the elasticsearch.yml file, such as:
3. cluster.name: elasticsearch
4. node.name: "My wonderful server"
5. network.host: 192.168.0.1
discovery.zen.ping.unicast.hosts: ["192.168.0.2","192.168.0.3[9300-9400]"]
This configuration sets the cluster name to ElasticSearch, the node name, and the network address, it then tries to bind the node to the address given in the discovery section.
We can check the configuration when the node is being loaded. Now, start the server and check whether the networking is configured. The following code shows how it looks:
[...][INFO ][node ] [ESCookBook] version[1.4.0.beta1], pid[74304], build[f1585f0/2014-10-16T14:27:12Z]
[...][INFO ][node ] [ESCookBook] initializing ...
[...][INFO ][plugins ] [ESCookBook] loaded [transport-thrift, river-twitter, mapper-attachments, lang-python, lang-javascript], sites [head, HQ]
[...][INFO ][node ] [ESCookBook] initialized
[...][INFO ][node ] [ESCookBook] starting ...
[...][INFO ][thrift ] [ESCookBook] bound on port [9500]
[...][INFO ][transport ] [ESCookBook] bound_address {inet[/0:0:0:0:0:0:0:0:9300]}, publish_address {inet[/192.168.1.19:9300]}
[...][INFO ][cluster.service ] [ESCookBook] new_master [ESCookBook][YDYjr0XRQeyQIWGcLzRiVQ][MBPlocal][inet[/192.168.1.19:9300]], reason: zen-disco-join (elected_as_master)
[...][INFO ][discovery ] [ESCookBook] elasticsearch-cookbook/YDYjr0XRQeyQIWGcLzRiVQ
[...][INFO ][http ] [ESCookBook] bound_address {inet[/0:0:0:0:0:0:0:0:9200]}, publish_address {inet[/192.168.1.19:9200]}
[...][INFO ][gateway ] [ESCookBook] recovered [0] indices into cluster_state
[...][INFO ][node ] [ESCookBook] started
In this case, we see that:
· The transport layer binds to 0:0:0:0:0:0:0:0:9300 and 192.168.1.19:9300
· The REST HTTP interface binds to 0:0:0:0:0:0:0:0:9200 and 192.168.1.19:9200
How it works...
The following parameters are crucial for the node to start working:
· cluster.name: This sets up the name of the cluster. Only nodes with the same name can join together.
· node.name: If this field is not defined, it is automatically assigned by ElasticSearch. It allows you to define a name for the node. If you have a lot of nodes on different machines, it is useful to set this name to something meaningful in order to easily locate them. Using a valid name is easier to remember than a system-generated name, such as whqVp_4zQGCgMvJ1CXhcWQ. You must always set up a name for the node.name parameter if you need to monitor your server.
· network.host: This defines the IP address of the machine used to bind the node. If your server is on different LANs or you want to limit the bind to only a LAN, you must set this value to your server's IP address.
· discovery.zen.ping.unicast.hosts (this is optional if multicast is possible): This allows you to define a list of hosts (with ports or port ranges) to be used in order to discover other nodes to join the cluster. This setting allows you to use the node in a LAN where broadcasting is not allowed or autodiscovery is not working (such as packet-filtering routers). The referred port is the transport port, usually 9300. The addresses of the host list can be a mix of:
· The hostname (such as, myhost1)
· The IP address (such as, 192.168.1.2)
· The IP address or host name with the port, such as myhost1:9300, 192.168.168.1.2:9300
· The IP address or host name with a range of ports (such as, myhost1:[9300-9400], 192.168.168.1.2:[9300-9400])
Defining unicast hosts is generally required only if discovery is not working. The default configuration of ElasticSearch has autodiscovery on nodes in a LAN.
See also
· The Setting up different node types recipe in this chapter
Setting up a node
ElasticSearch allows you to customize several parameters in an installation. In this recipe, we'll see the most-used ones in order to define where to store data and improve performance in general.
Getting ready
You need a working ElasticSearch installation.
How to do it...
Perform the following steps to set up a simple node:
1. Open the config/elasticsearch.yml file with an editor of your choice.
2. Set up the directories that store your server data:
· For Linux or Mac OS X:
· path.conf: /opt/data/es/conf
· path.data: /opt/data/es/data1,/opt2/data/data2
· path.work: /opt/data/work
· path.logs: /opt/data/logs
path.plugins: /opt/data/plugins
· For Windows:
· path.conf: c:\Elasticsearch\conf
· path.data: c:\Elasticsearch\data
· path.work: c:\Elasticsearch\work
· path.logs: c:\Elasticsearch\logs
path.plugins: c:\Elasticsearch\plugins
3. Set up parameters to control the standard index creation. These parameters are:
4. index.number_of_shards: 5
index.number_of_replicas: 1
How it works...
The path.conf parameter defines the directory that contains your configuration: mainly elasticsearch.yml and logging.yml. This is the default $ES_HOME/config parameter with the ES_HOME directory you installed ElasticSearch in.
Note
It's useful to set up the config directory outside your application directory, so you don't need to copy configuration files every time you update the version or change the ElasticSearch installation directory.
The path.data parameter is the most important, as it allows you to define one or more directories where you can store your index data. When you define more than one directory, they are managed in a similar way as RAID 0, favoring locations with the most free space.
The path.work parameter is a location where ElasticSearch puts temporary files.
The path.log parameter is where logfiles are put. Logging is controlled in logging.yml.
The path.plugins parameter allows you to override the plugins path (the default is $ES_HOME/plugins). It's useful to use system wide plugins.
The main parameters used to control index and shards are index.number_of_shards, which controls the standard number of shards for a new created index, and index.number_of_replicas, which controls the initial number of replicas.
There's more...
There are a lot of other parameters that can be used to customize your ElasticSearch installation, and new ones are added with new releases. The most important parameters are described in this recipe and the Setting up Linux systems recipe in this chapter.
See also
· The Setting up Linux systems recipe in this chapter
· The official ElasticSearch documentation at http://www.elasticsearch.org/guide/en/elasticsearch/reference/current/setup-configuration.html
Setting up for Linux systems
If you are using a Linux system, you need to manage extra setup steps to improve performance or to resolve production problems with many indices.
This recipe covers two common errors that occur in production:
· Too many open files, which can corrupt your indices and data
· Slow performance when searching and indexing due to the garbage collector
Note
Other possible troubles arise when you run out of disk space. In this scenario, some files can get corrupted. To prevent your indices from corruption and possible data loss, a best practice is to monitor the storage space available.
Getting ready
You need a working ElasticSearch installation.
How to do it...
In order to improve performance on Linux systems, perform the following steps:
1. First, you need to change the current limit of the users that runs the ElasticSearch server. In our examples, we will call it elasticsearch.
2. To allow ElasticSearch to manage a large number of files, you need to increment the number of file descriptors (the number of files) that a user can manage. To do this, you must edit your /etc/security/limits.conf file and add these lines at the end, then a machine restart is required to ensure that changes are incorporated:
3. elasticsearch - nofile 299999
elasticsearch - memlock unlimited
4. In order to control memory swapping, you need to set up this parameter in elasticsearch.yml:
bootstrap.mlockall: true
5. To fix the memory usage size of the ElasticSearch server, you need to set up the ES_MIN_MEM and ES_MAX_MEM parameters to the same values as in $ES_HOME/bin/ elasticsearch.in.sh file. Otherwise, you can set up ES_HEAP_SIZE which automatically initializes the min and max values to the same.
How it works...
The standard limit of file descriptors (the maximum number of open files for a user) is typically 1,024. When you store a lot of records in several indices, you run out of file descriptors very quickly, so your ElasticSearch server becomes unresponsive and your indices might become corrupted, leading to a loss of data. If you change the limit to a very high number, your ElasticSearch server doesn't hit the maximum number of open files.
The other settings for memory restriction in ElasticSearch prevent memory swapping and give a performance boost in a production environment. This is required because during indexing and searching ElasticSearch creates and destroys a lot of objects in the memory. This large number of create/destroy actions fragments the memory, reducing performance: the memory becomes full of holes, and when the system needs to allocate more memory, it suffers an overhead to find compacted memory. If you don't setbootstrap.mlockall: true, then ElasticSearch dumps the memory onto a disk and defragments it back in the memory, which freezes the system. With this setting, the defragmentation step is done in the memory itself, providing a huge performance boost.
Setting up different node types
ElasticSearch is natively designed for the Cloud, so when you need to release a production environment with a huge number of records, and you need high availability and good performances, you need to aggregate more nodes in a cluster.
ElasticSearch allows you to define different type of node to balance and improve overall performance.
Getting ready
You need a working ElasticSearch installation.
How to do it...
For the advanced setup of a cluster, there are some parameters that must be configured to define different node types.
These parameters are in config/elasticsearch.yml and can be set by performing these steps:
1. Set up whether or not the node can be a master node:
node.master: true
2. Set up whether or not a node must contain data:
node.data: true
How it works...
The node.master parameter defines whether the node can become a master for the Cloud. The default value for this parameter is true.
A master node is an arbiter for the Cloud: it takes decisions about shard management, it keeps the cluster's status, and it's the main controller of every index action.
The optimal number of master nodes is given by the following equation:
![]()
node.data allows you to store data in the node. The default value for this parameter is true. This node will be a worker that indexes and searches data.
By mixing these two parameters, it's possible to have different node types:
|
node.master |
node.data |
Node description |
|
true |
true |
This is the default node. It can be a master node and can contain data. |
|
false |
true |
This node never becomes a master node, it only holds data. It can be defined as the workhorse of your cluster. |
|
true |
false |
This node only serves as a master node, that is, it does not store any data and has free resources. This will be the coordinator of your cluster. |
|
false |
false |
This node acts as a search load balancer (fetches data from nodes, aggregates results, and so on). |
The most frequently used node type is the first one, but if you have a very big cluster or special needs, then you can differentiate the scope of your nodes to better serve searches and aggregations.
Installing plugins in ElasticSearch
One of the main features of ElasticSearch is the possibility to extend it with plugins. Plugins extend ElasticSearch features and functionality in several ways. There are two kinds of plugins:
· Site plugins: These are used to serve static content at their entry points. They are mainly used to create a management application for the monitoring and administration of a cluster. The most common site plugins are:
· ElasticSearch head (http://mobz.github.io/elasticsearch-head/)
· Elastic HQ (http://www.elastichq.org/)
· Bigdesk (http://bigdesk.org)
· Native plugins: These are the .jar files that contain the application code. They are used for:
· Rivers (plugins that allow you to import data from DBMS or other sources)
· Scripting Language Engines (JavaScript, Python, Scala, and Ruby)
· Custom analyzers, tokenizers, and scoring
· REST entry points
· Supporting new protocols (Thrift, memcache, and so on)
· Supporting new storages (Hadoop)
Getting ready
You need a working ElasticSearch server installed.
How to do it...
ElasticSearch provides a script to automatically download and install plugins in the bin/ directory called plugin.
The following steps are required to install a plugin:
1. Call the plugin and install it using the ElasticSearch command with the plugin name reference. To install an administrative interface for ElasticSearch, simply type the following command:
· Linux / MacOSX:
· plugin -install mobz/elasticsearch-head
· Windows:
· plugin.bat -install mobz/elasticsearch-head
2. Start the node and check whether the plugin is correctly loaded.
The following screenshot shows the installation and the beginning of the ElasticSearch server with the installed plugin:
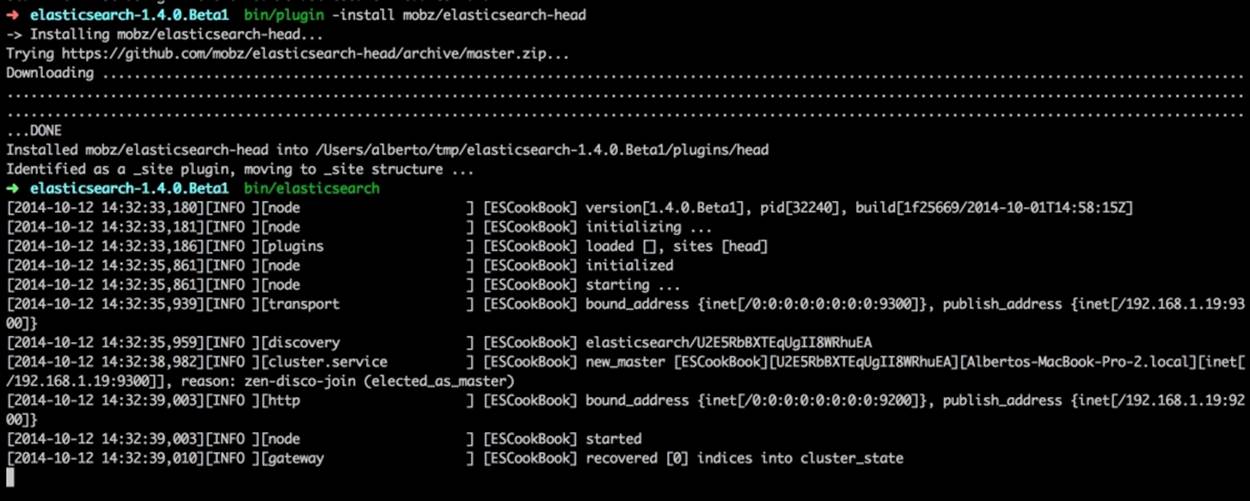
Note
Remember that a plugin installation requires an ElasticSearch server restart. For a site plugin, the restart is not mandatory.
How it works...
The plugin (.bat) script is a wrapper for ElasticSearch Plugin Manager. It can be used to install or remove a plugin with the –remove option.
To install a plugin, there are two methods:
· Passing the URL of the plugin (the .zip archive) with the -url parameter:
· bin/plugin –url http://mywoderfulserve.com/plugins/awesome-plugin.zip
· Using the –install parameter with the GitHub repository of the plugin
The install parameter, which must be provided, is formatted in this way:
<username>/<repo>[/<version>]
In the previous example the parameter settings were:
· <username> parameter as mobz
· <repo> parameter as elasticsearch-head
· <version> was not given, so the master/trunk was used
During the installation process, ElasticSearch Plugin Manager is able to do the following activities:
· Download the plugin
· Create a plugins directory in ES_HOME if it's missing
· Unzip the plugin's content in the plugin directory
· Remove temporary files
The installation process is completely automatic, and no further actions are required. The user must only pay attention to the fact that the process ends with an Installed message to be sure that the install process is completed correctly.
A server restart is always required to ensure that the plugin is correctly loaded by ElasticSearch.
There's more...
If your current ElasticSearch application depends on one or more plugins, a node can be configured to fire up only if these plugins are installed and available. To achieve this behavior, you can provide the plugin.mandatory directive in the elasticsearch.ymlconfiguration file.
In the previous example (elasticsearch-head), this configuration line needs to be added:
plugin.mandatory: head
There are some points that you need to remember when installing plugins. The first and most important point is that the plugin must be certified for your current ElasticSearch version: some releases can break your plugins. Typically, the ElasticSearch versions supported by the plugin will be listed on the plugin developer page.
For example, if you take a look at the Python language plugin page (https://github.com/elasticsearch/elasticsearch-lang-python), you'll see a reference table similar to that shown in the following screenshot:
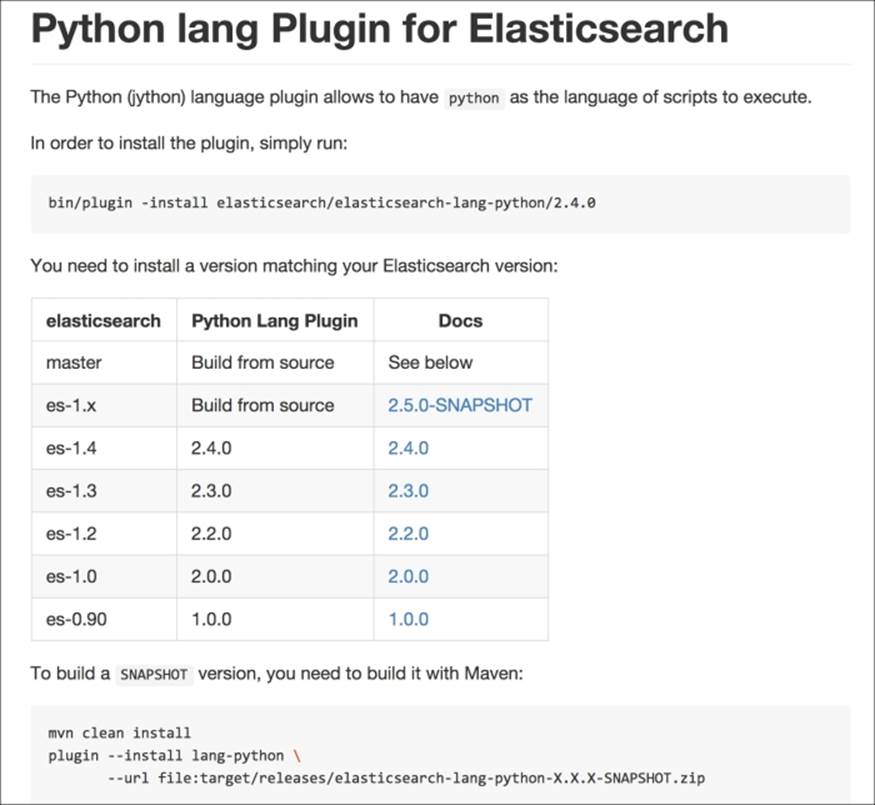
You must choose the version that works with your current ElasticSearch version.
Updating some plugins in a node environment can bring about malfunctions due to different plugin versions at different nodes. If you have a big cluster, for safety, it's better to check updates in a separate environment to prevent problems.
Note
Pay attention to the fact that updating an ElasticSearch server can also break your custom binary plugins due to some internal API changes.
See also
· On the ElasticSearch website, there is an updated list of the available plugins (http://www.elasticsearch.org/guide/en/elasticsearch/reference/current/modules-plugins.html#_plugins)
· The Installing a plugin manually recipe in this chapter to manually install a plugin
Installing a plugin manually
Sometimes, your plugin is not available online, or a standard installation fails, so you need to install your plugin manually.
Getting ready
You need an ElasticSearch server installed.
How to do it...
We assume that your plugin is named awesome and it's packed in a file called awesome.zip.
Perform the following steps to execute a manual installation:
1. Copy your ZIP file to the plugins directory of your ElasticSearch home installation.
2. If the directory named plugins doesn't exist, create it.
3. Unzip the contents of the plugin to the plugins directory.
4. Remove the zip archive to clean up unused files.
How it works...
Every ElasticSearch plugin is contained in a directory (usually, named as the plugin's name). If it is of the site plugin type, the plugin should contain a directory called _site, which contains the static files that must be served by the server. If the plugin is a binary one, the plugin directory should be filled with one or more .jar files.
When ElasticSearch starts, it scans the plugins directory and loads the plugins.
Note
If a plugin is corrupted or broken, the server won't start.
Removing a plugin
You have installed some plugins and now you need to remove a plugin because it's not required. Removing an ElasticSearch plugin is easy if everything goes right; otherwise you need to manually remove it.
This recipe covers both cases.
Getting ready
You need a working ElasticSearch Server installed, with an installed plugin, and you need to stop the ElasticSearch server in order to safely remove the plugin.
How to do it...
Perform the following steps to remove a plugin:
1. Stop your running node in order to prevent exceptions due to file removal.
2. Using the ElasticSearch Plugin Manager, which comes with its script wrapper (plugin), call the following commands:
· For Linux/Mac OS X, call this:
· plugin -remove mobz/elasticsearch-head
You can also use this command:
plugin -remove head
· On Windows, call the following:
· plugin.bat -remove mobz/elasticsearch-head
You can also use the command shown here:
plugin.bat –remove head
3. Restart the server.
How it works...
The Plugin Manager's –remove command tries to detect the correct name of the plugin and remove the directory of the installed plugin.
If there are undeletable files in your plugin directory (or a strange astronomical event that affects your server), the plugin script might fail; therefore, to manually remove a plugin, you need to follow these steps:
1. Go to the plugins directory.
2. Remove the directory with your plugin name.
Changing logging settings
Standard logging settings work very well for general usage.
Changing the log level can be useful when checking for bugs, or to understand malfunctions due to a bad configuration or strange plugin behavior. A verbose log can be used from the ElasticSearch community to cover problems.
If you need to debug your ElasticSearch server or change how the logging works (such as remotely sending events), you need to change the logging.yml parameters.
Getting ready
You need a working ElasticSearch Server installed.
How to do it...
In the config directory of your ElasticSearch installation directory, there is a logging.yml file that controls the work settings.
You need to perform the following steps to change the logging settings:
1. Omit every kind of logging that ElasticSearch has. Take for example the root level logging here:
rootLogger: INFO, console, file
Now, change the root level logging using this:
rootLogger: DEBUG, console, file
2. Now, if you start ElasticSearch from the command line (with bin/elasticsearch –f), you should see a lot of garbage text that looks as follows:
3. […][INFO ][node] [ESCookBook] version[1.4.0.Beta1],pid[32363], build[1f25669/2014-10-01T14:58:15Z]
4. […][INFO ][node] [ESCookBook] initializing …
5. […][DEBUG][node] [ESCookBook] using home [/opt/elasticsearch-1.4.0.Beta1], config [/opt/elasticsearch-1.4.0.Beta1/config], data [[/opt/elasticsearch-1.4.0.Beta1/data]], logs [/opt/elasticsearch-1.4.0.Beta1/logs], work [/opt/elasticsearch-1.4.0.Beta1/work], plugins [/opt/elasticsearch-1.4.0.Beta1/plugins]
6. […][INFO ][plugins ] [ESCookBook] loaded [], sites [head]
7. […][DEBUG][common.compress.lzf] using encoder [VanillaChunkDecoder] and decoder[{}]
8. […][DEBUG][env ] [ESCookBook] using node location [[/opt/elasticsearch-1.4.0.Beta1/data/elasticsearch/nodes/0]], local_node_id [0]
9. […][DEBUG][threadpool] [ESCookBook] creating thread_pool [generic], type [cached], keep_alive [30s]
10.[…][DEBUG][threadpool] [ESCookBook] creating thread_pool [index], type [fixed], size [8], queue_size [200]
11.[…][DEBUG][threadpool] [ESCookBook] creating thread_pool [bulk], type [fixed], size [8], queue_size [50]
12.… (truncated)…
How it works...
The ElasticSearch logging system is based on the Log4j library (http://logging.apache.org/log4j/). Log4j is a powerful library that manages logging, so covering all the functionalities of this library is outside the scope of this book. If a user needs advanced usage, there are a lot of books and articles available on the Internet.
All materials on the site are licensed Creative Commons Attribution-Sharealike 3.0 Unported CC BY-SA 3.0 & GNU Free Documentation License (GFDL)
If you are the copyright holder of any material contained on our site and intend to remove it, please contact our site administrator for approval.
© 2016-2026 All site design rights belong to S.Y.A.