eXist: A NoSQL Document Database and Application Platform (2015)
Chapter 13. Integration
eXist provides many APIs, each of which allow you to integrate or interact with eXist in a different manner. Multiple APIs are provided in the hope that at least one of them is already supported fin the system or application that the developer or user wishes to integrate with eXist.
eXist provides two classes of API:
Local APIs
These are intended for when a developer wishes to embed eXist as a library within his own application running on the JVM.
Remote APIs
These are intended for when eXist is run as a server and a user or application wishes to make requests to eXist. All of the remote APIs are developed as layers atop HTTP. There is nothing to stop you from using a remote API from the same machine that eXist is running on.
We have found that the majority of eXist users are interested in the remote class of API, as they wish to use eXist as a database server and/or a web application server, so we will focus on the remote APIs first.
Choosing an API
As you are about to see, eXist offers many options for integration with existing systems and programming languages. Choosing the right one can be confusing, so we have produced the flowchart in Figure 13-1 to help you with your decision.
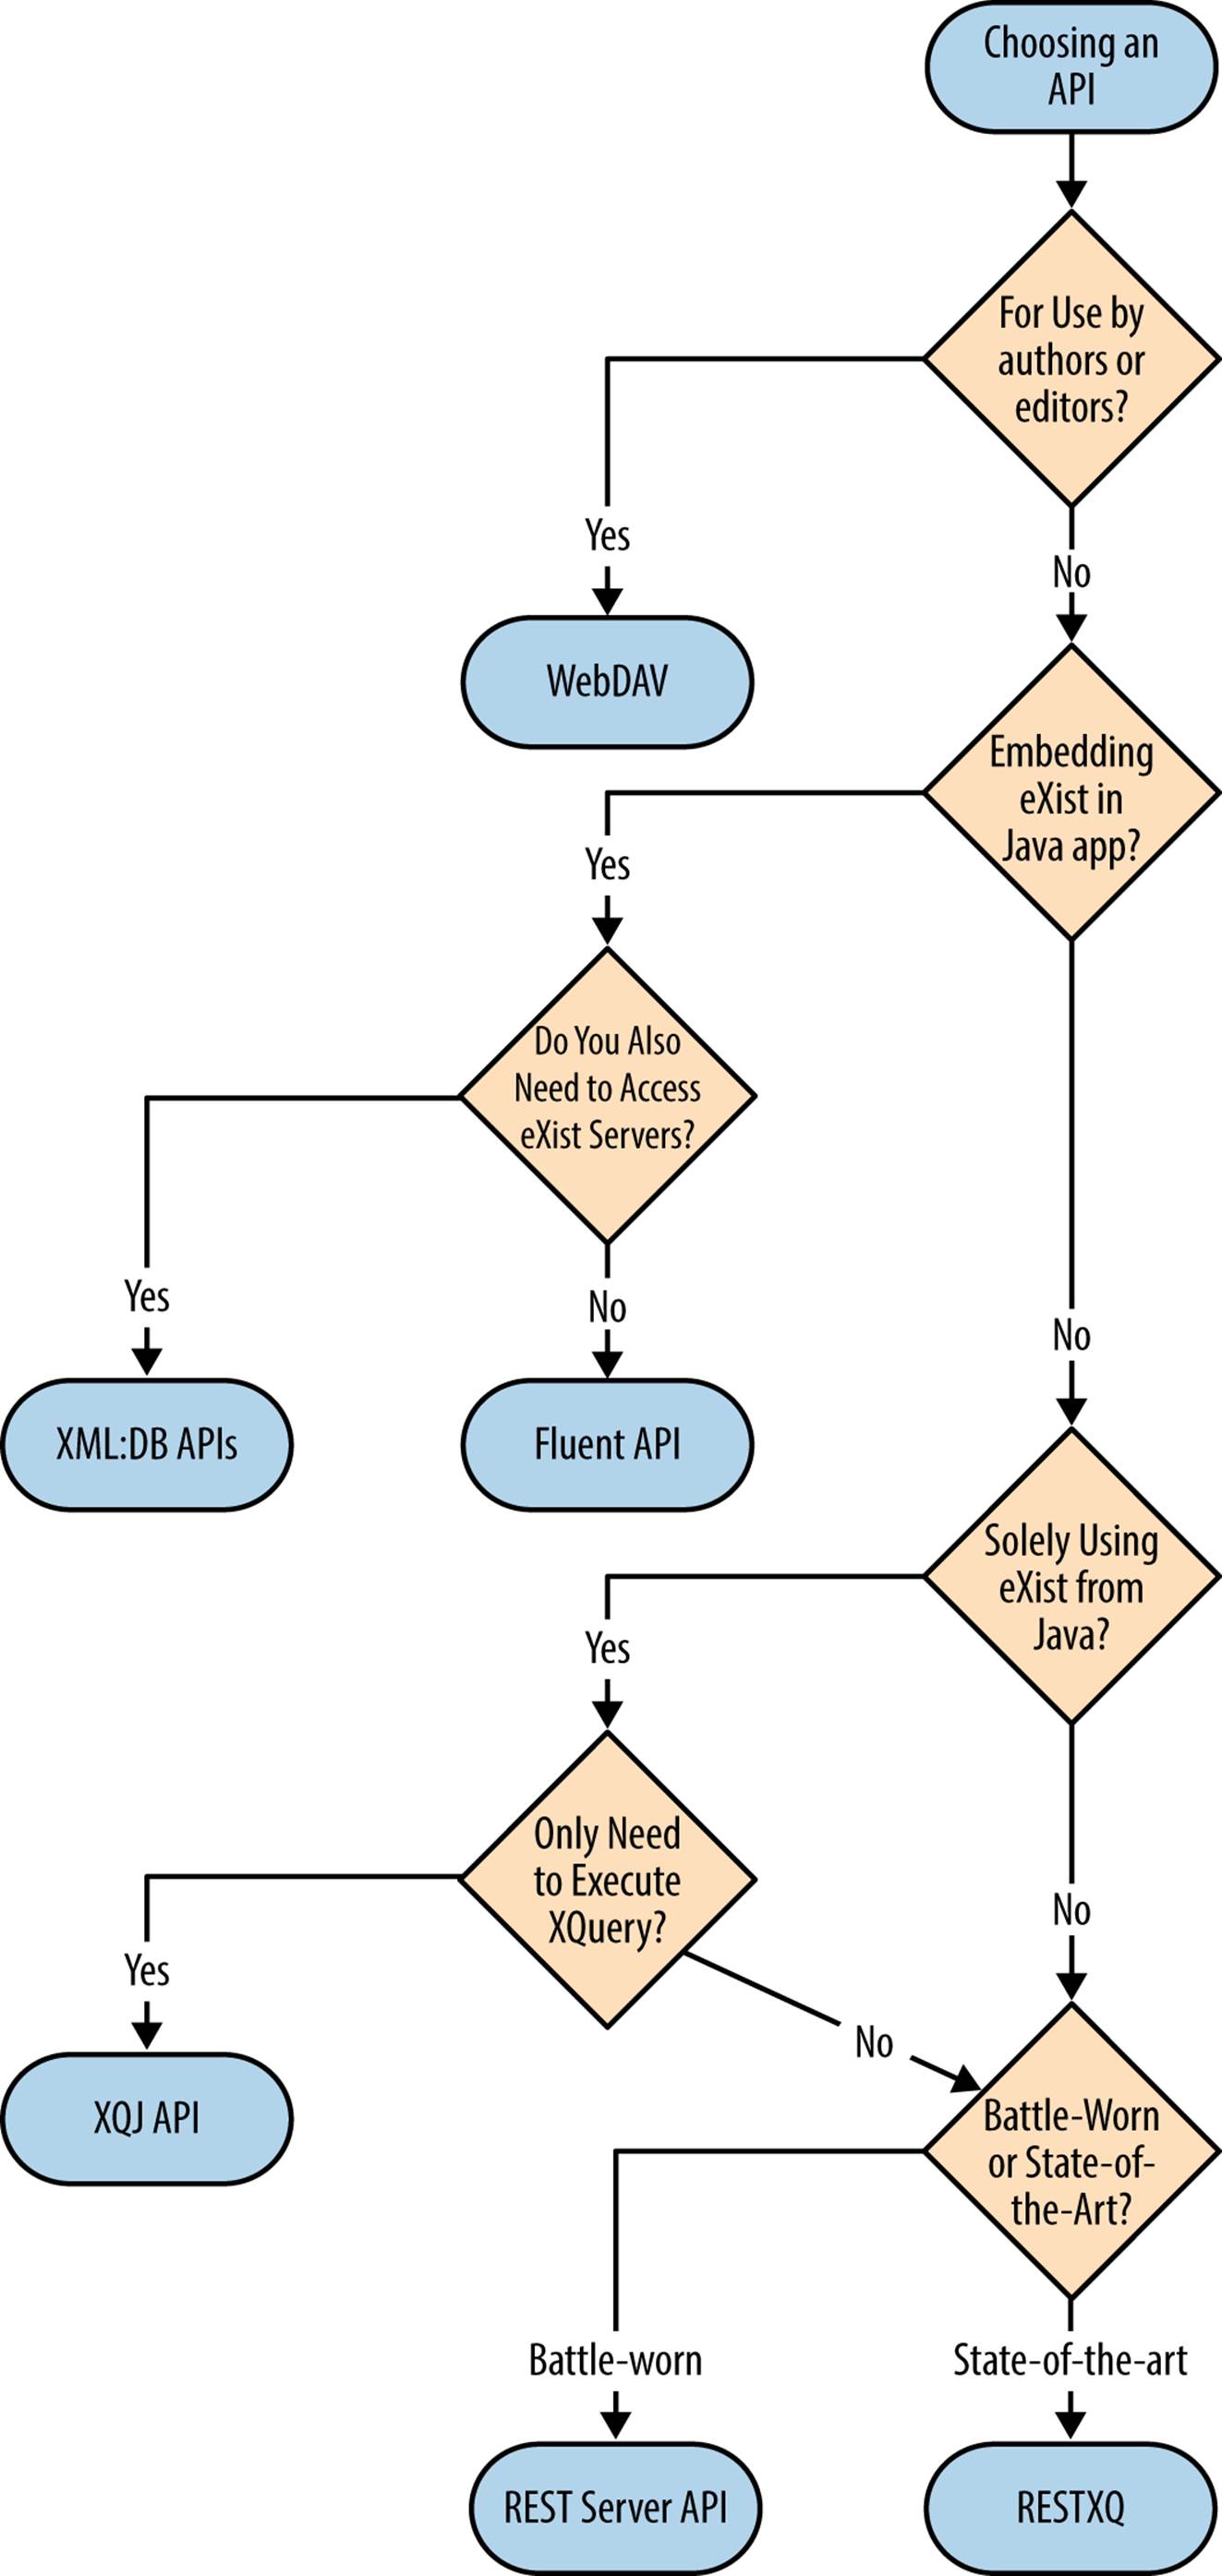
Figure 13-1. Flowchart to help you choose an API for integration
The last choice in this flowchart—battle-worn or state-of-the-art?—may need some clarification. By way of explanation, the REST Server API is stable and has been around for some years, with many organizations frequently using it. So, if you have a short-term project in mind that needs to be delivered immediately on a solid technology base, this is probably the correct choice for you. Conversely, the RESTXQ framework is relatively new and easier to use, but while there are several organizations already using it, it is still very much under development. Many believe that RESTXQ will eventually replace the REST Server API, as it offers a superset of that functionality.
Remote APIs
There are many remote APIs available for eXist, and in addition it is possible to develop your own RESTful HTTP APIs using XQuery with either the REST Server API (see “REST Server API”) or RESTXQ (see “RESTXQ”).
Which API you should use depends on many factors, but if your concern is users manipulating documents we would recommend the WebDAV API (see the next section) for its simplicity and ease of use. Likewise, if you want to quickly build a simple REST API, RESTXQ (see“RESTXQ”) could be a good candidate. If you are serious about building a stable bridge with eXist, you should study each option available to you in this chapter before making a decision, as each has its advantages and disadvantages.
WebDAV
Web Distributed Authoring and Versioning (WebDAV) is an IETF standard (RFC 4918) that focuses predominantly on the distributed authoring of documents. The name can be somewhat confusing, because while versioning was initially a consideration, it was perceived as too complicated and shelved. Versioning was later added as an extension to WebDAV in IETF standard RFC 3253. However, versioning with WebDAV does not seem to have been widely adopted and is not yet supported in eXist.
While eXist has had WebDAV support for several years, its interoperability with some WebDAV clients was less than perfect. eXist 2.0 added a complete rewrite of the WebDAV server based on the excellent Milton Java WebDAV Server Library. Milton does a great job of ensuring compatibility with almost all WebDAV clients. For a list of compatible WebDAV clients, see http://milton.io/guide/m2/docs/compat.html.
WebDAV is most useful for those who wish to work at the document level (for example, content authors). It is very simple to create and edit documents, and also to manage them by organizing them into folders (collections in eXist) or removing old documents. Many operating systems and other tools have WebDAV support built in, so making use of WebDAV in eXist will come naturally to many—the client is the same as the file manager on your computer (e.g., Microsoft Windows Explorer, Mac OS X Finder, and Gnome Nautilus on Linux).
NOTE
Connecting to eXist using WebDAV with the oXygen XML Editor is covered in “Connecting with oXygen Using WebDAV”.
The base URI of the WebDAV Server in eXist on a default installation is http://localhost:8080/exist/webdav/db/, or for secure access, https://localhost:8443/exist/webdav/db/.
Using WebDAV from Microsoft Windows
Microsoft Windows has had WebDAV support built in since Windows 98 was released. Here we will show you how to use WebDAV from Windows 7 with eXist 2.1.
WARNING
Windows 7 has some mandatory security restrictions around WebDAV access. This means that Windows 7 will not work with eXist by default, as basic authentication is disabled. However, you can re-enable basic authentication for WebDAV in Windows 7 by modifying a registry setting; you do so from the command prompt (you must have Administrator rights) by executing the following:
reg add HKEY_LOCAL_MACHINE\SYSTEM\CurrentControlSet
\Services\WebClient\Parameters /v BasicAuthLevel
/t REG_DWORD /d 2
When prompted to overwrite the existing value, type yes and press Return. You may have to restart your PC for the changes to take effect.
Further details can be found in the Microsoft Knowledge Base article 841215.
Follow these steps to map a drive to eXist WebDAV from Windows Explorer:
1. First open Windows Explorer, and then press the Alt key on the keyboard once to reveal the menu. Choose Tools→“Map network drive” as shown in Figure 13-2.

Figure 13-2. Windows Explorer: select the “Map network drive” menu item
2. Next, you need to choose a Windows drive letter to map to the eXist database. You then also need to add in the URI of the eXist server and its WebDAV API. Typically, this takes the form http://<myserver>:8080/exist/webdav/db/. If you are running eXist on your own Windows PC, you can replace <myserver> with localhost. Ensure that the checkbox “Connect using different credentials” is checked, and if you wish the connection to be available after restarting or shutting down your PC, ensure that the “Reconnect at logon” checkbox is checked. Finally, click Finish. See Figure 13-3.
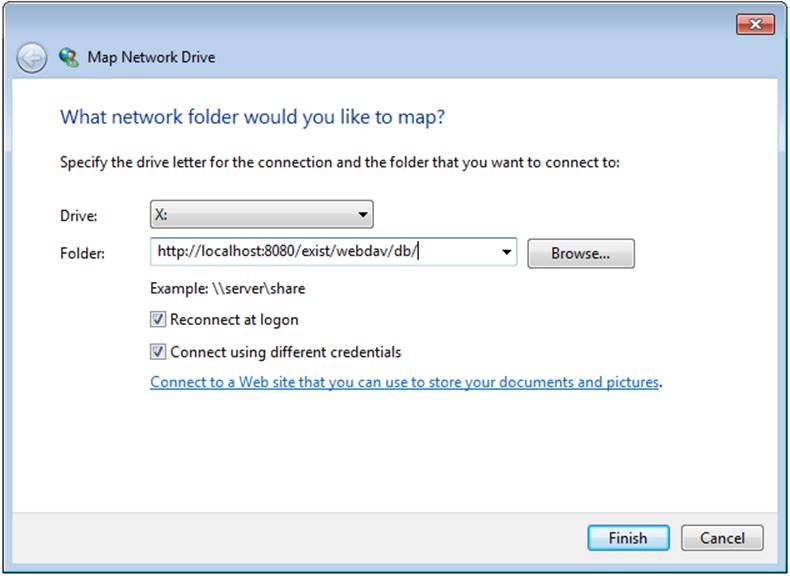
Figure 13-3. Windows Explorer Map Network Drive dialog
3. Finally, you need to provide the username and password of your eXist user account. If you have just set up eXist or will be the only user, you can use the default built-in admin user and the password that you set during the installation of eXist. See Figure 13-4.
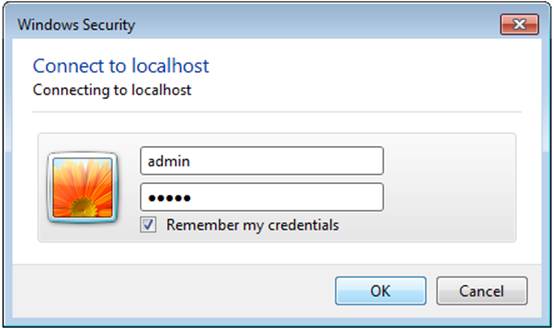
Figure 13-4. Connect using your eXist WebDAV username and password
4. You can now access the eXist database via the Windows drive letter that you chose in step 2. As far as Windows is concerned, eXist is just another filesystem, and you can use any Windows application to read and write documents in eXist. You can also create/move/delete collections in this manner, as they appear to Windows Explorer as regular folders. See Figure 13-5.
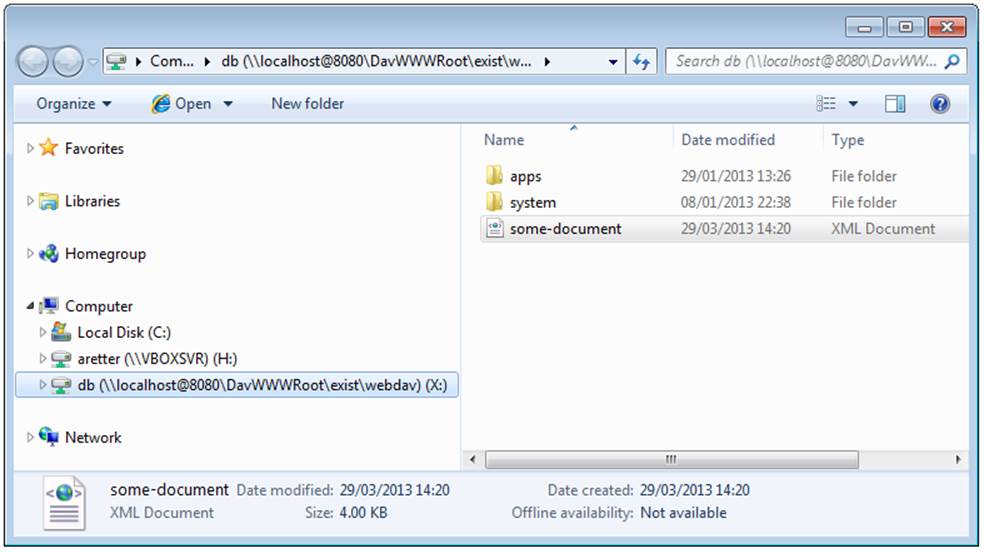
Figure 13-5. Windows Explorer with WebDAV connection to eXist
Using WebDAV from Mac OS X
Apple’s Mac OS X has always had WebDAV support built in. Here we will show you how to use WebDAV from Mac OS X (in our example, we used OS X Mountain Lion [10.8.3]) with eXist 2.1.
Follow these steps to mount eXist WebDAV from the Finder:
1. Open the Finder, and, from the Go menu, select the menu item “Connect to Server” (or press Command-K). See Figure 13-6.
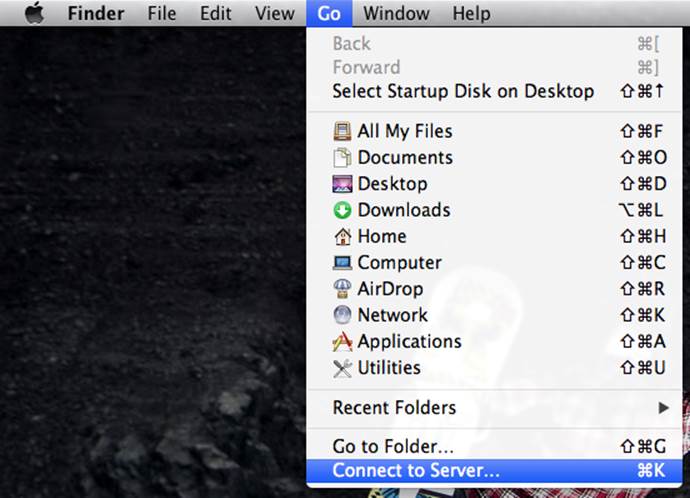
Figure 13-6. Mac OS X Finder: select the “Connect to Server” menu item
2. Next, you need to enter the URI of the eXist server and its WebDAV API. Typically this takes the form http://<myserver>:8080/exist/webdav/db/. If you are running eXist on your own Mac, you can replace <myserver> with localhost. Finally, click Connect. See Figure 13-7.
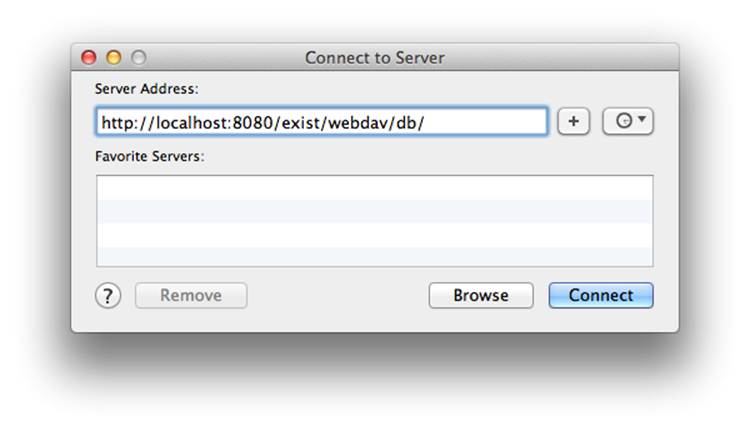
Figure 13-7. Mac OS X Finder “Connect to Server” dialog
3. Finally, you need to provide the username and password of your eXist user account. If you have just set up eXist or will be the only user, you can use the default built-in admin user and the password that you set during the installation of eXist. See Figure 13-8.
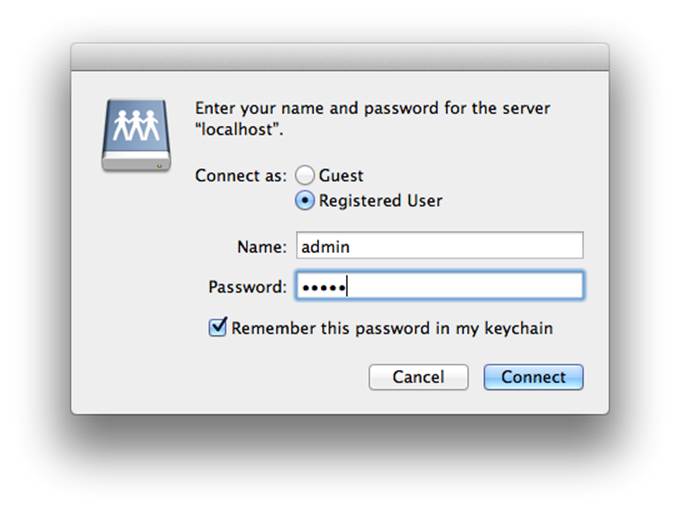
Figure 13-8. Connect using your eXist WebDAV username and password
4. You can now access the eXist database from the Finder and your other Mac applications just as if it were a networked filesystem. It appears in the Finder panel as localhost (or the name of your server) under the Shared items. You can now use any Mac application to read and write documents in eXist. You can also create/move/delete collections in this manner, as they appear to the Finder as regular folders. See Figure 13-9.
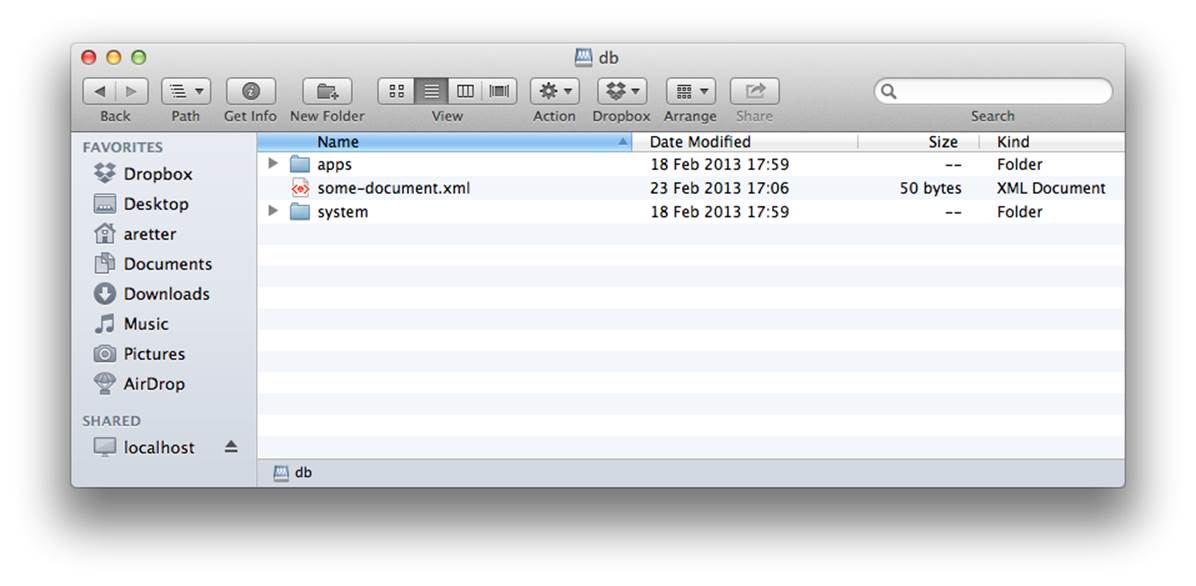
Figure 13-9. Finder with WebDAV connection to eXist
Using WebDAV from Linux
There are many different distributions of Linux available, some of which have GUI desktop environments and some of which do not. As covering them all would probably take a book in itself, we will cover just two approaches here that are suitable for a large proportion of users.
Using WebDAV from GNOME Nautilus
If you are using a GNOME 2– or GNOME 3–based Linux desktop environment such as CentOS, RHEL, Linux Mint, or Ubuntu, then you most likely have Nautilus or a derivative of it available to you. Nautilus, like Windows Explorer and the Mac OS X Finder, provides an easy mechanism for mounting WebDAV folders.
Follow these steps to mount eXist WebDAV from Nautilus:
1. First, locate the “Connect to Server” menu item in Nautilus (under the Places menu, as shown in Figure 13-10) and click it. In CentOS and RHEL (for our examples, we used CentOS 6.5), there is also a shortcut from the desktop menu.
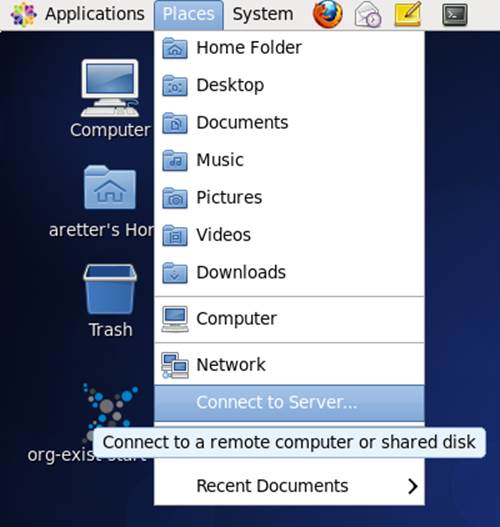
Figure 13-10. CentOS 6: select the “Connect to Server” menu item
2. Next, you need to enter the URI of the eXist server and its WebDAV API. Typically, this takes the form http://<myserver>:8080/exist/webdav/db/. If you are running eXist on your Linux PC, you can replace <myserver> with localhost. You will also need to provide a username. If you have just set up eXist or will be the only user, you can use the default built-in admin user. Finally, click Connect (see Figure 13-11).
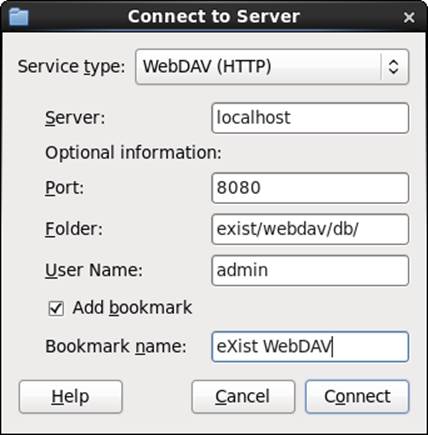
Figure 13-11. CentOS 6 “Connect to Server” dialog
NOTE
You can also add a bookmark for the WebDAV connection if you wish; this will enable to you to reconnect easily in the future from your bookmarks.
3. Finally, you need to provide the password of your eXist user account. If you are using the built-in admin user and have just set up eXist, the password will be the same as the one that you set during the installation of eXist. See Figure 13-12.
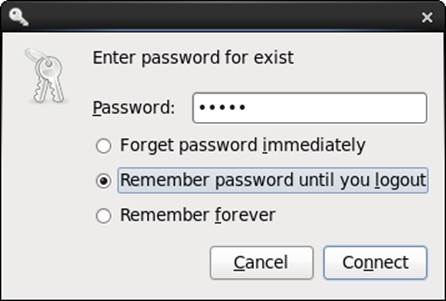
Figure 13-12. Connect using your eXist WebDAV password
4. You can now access the eXist database from Nautilus and your other GNOME applications just as if it were a networked filesystem. It appears in the Nautilus panel as WebDAV on localhost (or the name of your server) under the Places items. If you have a Places menu on your desktop, it will also appear there. You can now use any GNOME application to read and write documents in eXist. You can also create/move/delete collections in this manner, as they appear to Nautilus as regular folders. See Figure 13-13.
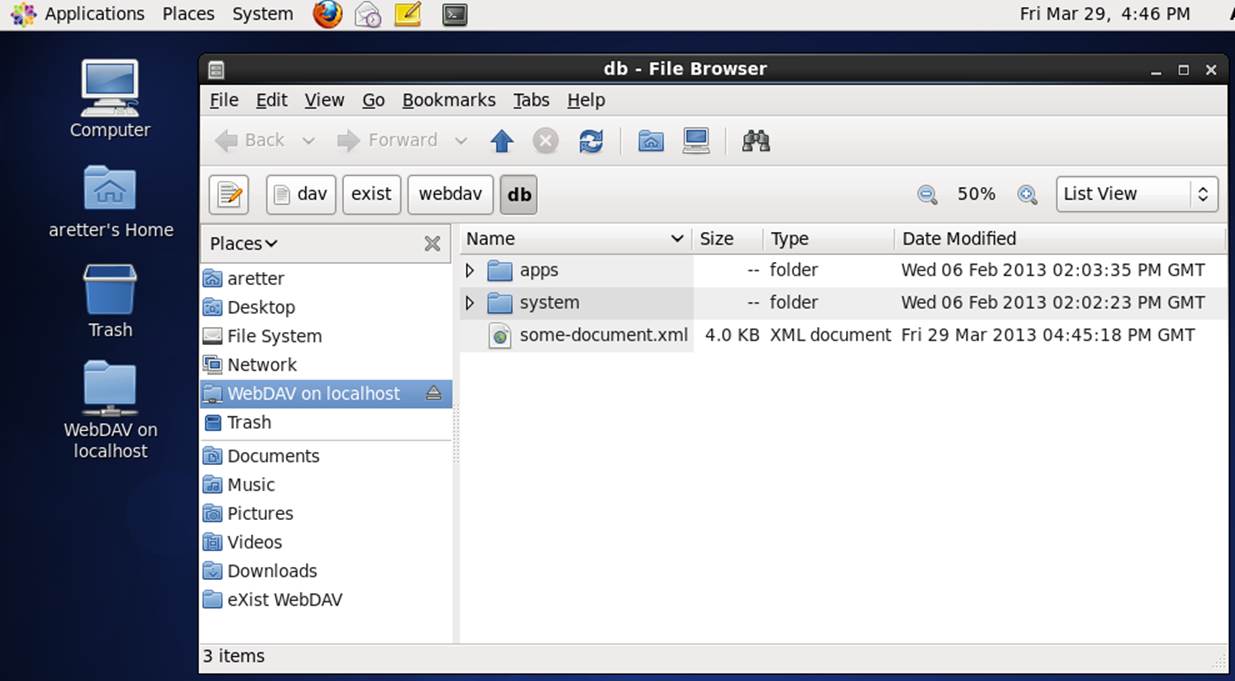
Figure 13-13. CentOS 6: Nautilus with WebDAV connection to eXist
Using WebDAV with FUSE
If you do not have a GNOME desktop environment or want to be able to use eXist via WebDAV from non-GNOME applications, then another option is to use FUSE and davfs2 together. FUSE is typically installed already in most modern Linux distributions.
You can install davfs2 in Debian-based distributions (e.g., Ubuntu and Mint) by running the following from a terminal:
sudo apt-get install davfs2
Likewise, you can install davfs2 in distributions with RPM package managers (e.g., RHEL, CentOS, SLES and openSUSE) via RPMForge by running the following from a terminal:
sudo rpm -Uhv
http://pkgs.repoforge.org/rpmforge-release/
rpmforge-release-0.5.3-1.el6.rf.x86_64.rpm
sudo yum install fuse-davfs2
NOTE
The RPMForge release used here is for RHEL/CentOS 6 x64; you can find details of the correct RPMForge for your distribution at http://repoforge.org/use/.
Once you have davfs2 installed, you can mount the eXist WebDAV folder (as shown in Figure 13-14):
sudo mount -t davfs -ousername=admin
http://localhost:8080/exist/webdav/db/ /mnt/eXist
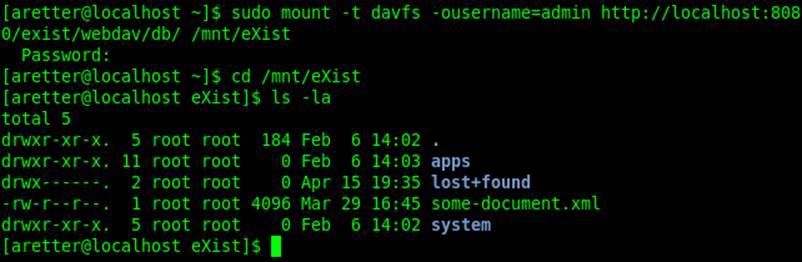
Figure 13-14. Linux davfs2 FUSE mount to eXist WebDAV
NOTE
If the folder /mnt/eXist does not exist on your system, you need to either create it or choose another empty folder to which you have access to act as the mount point.
You can now access the eXist database from any Linux application just as if it were a networked filesystem. You can use any Linux application to read and write documents in eXist. You can also create/move/delete collections in the same way as you would any other folder, as they appear to Linux as regular folders on a filesystem.
WARNING
This is a very simple example, and you should be aware that davfs2 maintains a cache of file changes that is periodically flushed. In particular, the cache is flushed when the filesystem is unmounted, so you should aim to unmount the filesystem before shutting down the eXist server. davfs2 has many configuration options, so it’s a good idea to consult the manpage (man davfs2.conf) if you plan on making serious use of this tool.
Using WebDAV from Java
There are many ways in which you could connect to eXist using WebDAV from Java, but unless you really want to spend all your time building a WebDAV client it is perhaps more pragmatic to use an existing library to assist you. There are several available libraries for Java that offerWebDAV client features, but here we’ll look briefly at using the Milton client library to talk to eXist from Java. At the time of writing the latest version of Milton was version 2.4.2.5, and the version of Java used was 1.6.
There are just three main objects that you need to understand in the Milton client library to make WebDAV requests to eXist: Hosts, Resources, and Paths.
Host
In Milton, the Host object holds all of the details needed to make connections to the WebDAV server. To access eXist, at minimum you will need to provide:
Server
The hostname or IP address of the eXist server that you wish to connect to. If you are running your WebDAV client on the same machine as eXist, then you may use either localhost or 127.0.0.1.
Port
The TCP port that the eXist server you wish to connect to is listening on. If you have not reconfigured this setting in eXist, it will be 8080 by default.
RootPath
The path on the eXist server to the WebDAV server endpoint. If you have not reconfigured this setting in eXist, it will be exist/webdav/db by default.
Username
The username of a valid user account in eXist that you wish to connect to eXist as. If you have a newly installed eXist, you may use the admin account.
Password
The password that accompanies the aforementioned username. If you are using the admin account of a newly installed eXist, the password will be whatever you defined during the installation, or otherwise the empty string.
Milton provides a convenient HostBuilder class to help you construct your host (see Example 13-1).
Example 13-1. Constructing a suitable Milton Host object for eXist
HostBuilder builder = new HostBuilder();
builder.setServer("localhost");
builder.setPort(8080);
builder.setRootPath("exist/webdav/db");
builder.setUser("admin");
builder.setPassword("my-admin-password ");
Host host = builder.buildHost();
Resource
In Milton, the Resource object represents a resource on the WebDAV server. In Milton terms, this is one of the following:
Folder
A folder resource in Milton is equivalent to a collection in eXist.
File
A file resource in Milton is equivalent to a resource in eXist. Milton does not differentiate between XML files and binary files in eXist; to Milton they are all just files.
From a host we can retrieve resources, and we can use those resources to find subresources (see Example 13-2).
Example 13-2. Retrieving a resource from eXist using Milton
final Resource resource = host.child("my-collection");
if(resource != null) {
if(resource instanceof Folder) {
//resource is a Folder, i.e. collection in eXist
final Folder folder = ((Folder)resource);
//TODO you do something with the Folder here
} else if(resource instanceof File) {
//resource is a File, i.e. resource in eXist
final File file = ((File)resource);
//TODO you do something with the File here
}
}
Path
In Milton, the Path object encapsulates a path to a resource. The path may be either absolute from the root path, or relative to an existing resource.
We can construct paths that are relative to other paths and then execute operations relating to those paths (see Example 13-3).
Example 13-3. Creating the collection /db/my-collection/apples/pears in eXist with Milton
Path rootPath = host.path();
Path pathPears = Path.path(rootPath, "my-collection/apples/pears");
Folder pears = host.getOrCreateFolder(pathPears, true);
Examples
The source code of two small complete examples of using Milton from Java to store a file and retrieve a file is included in the folder chapters/integration/webdav-client of the book-code Git repository (see “Getting the Source Code”).
To compile the examples, enter the webdav-client folder and run mvn package.
You can then execute the StoreApp example like so:
java -jar webdav-client-store/target/webdav-client-store-1.0-example.jar
This shows the available arguments for using the StoreApp.
A complete example of using the application might look like the following, which would upload the file /tmp/large.xml to the collection /db/my-new-collection in eXist:
java -jar webdav-client-store/target/webdav-client-store-1.0-example.jar
localhost 8080 /tmp/large.xml /db/my-new-collection admin
You can execute the RetrieveApp example like so:
java -jar webdav-client-retrieve/target/webdav-client-store-1.0-example.jar
This shows the available arguments for using the RetrieveApp.
A complete example of using the application might look like the following, which would download the resource /db/some-document.xml to the file in the current directory named some-document.xml:
java -jar webdav-client-retrieve/target/webdav-client-retrieve-1.0-example.jar
localhost 8080 /db/some-document.xml admin > some-document.xml
REST Server API
The REST Server in eXist offers a REST-like API that enables you to both manipulate the contents of the database and also send queries to be executed against the contents of the database. This section looks at the REST Server API in detail and also provides information for programmers who may like to integrate with eXist. If you are looking to get started with the REST Server, then you should first read “Querying the Database Using REST”.
In addition, and perhaps more interestingly, the REST Server API allows you to pre-store XQuery (and XProc) resources into the database and then execute them by calling them by URI. The entire HTTP request and response are made available to your XQuery, enabling you to determine processing dynamically in your XQuery based on parameters of the HTTP request and create your own HTTP response. This mechanism allows you to build complete and versatile web applications in XQuery; see “Executing stored queries” and Chapter 9 for further details. For a complete illustration of the operations provided by the REST Server, see Appendix B.
There are many tools, programming languages, and libraries that allow you to interact with a REST API (including web browsers, to a limited extent), but in these examples we will show you how to use cURL. We’ll also provide some simple examples in Java in “Using the REST Server API from Java”.
Retrieving collections and documents
The base URI of the REST Server in eXist on a default installation is http://localhost:8080/exist/rest/db.
The /db on the end of the URI indicates the root collection in the database. When the REST Server receives an HTTP GET request (e.g., a typical request from a web browser such as Firefox or Chrome) for a collection URI in the database, it will by default produce a listing of the resources and subcollections in that collection in XML, as seen in Figure 13-15.
TIP
You can disable the collection listing provided by the REST Server; see “Disabling direct access to the REST Server”.
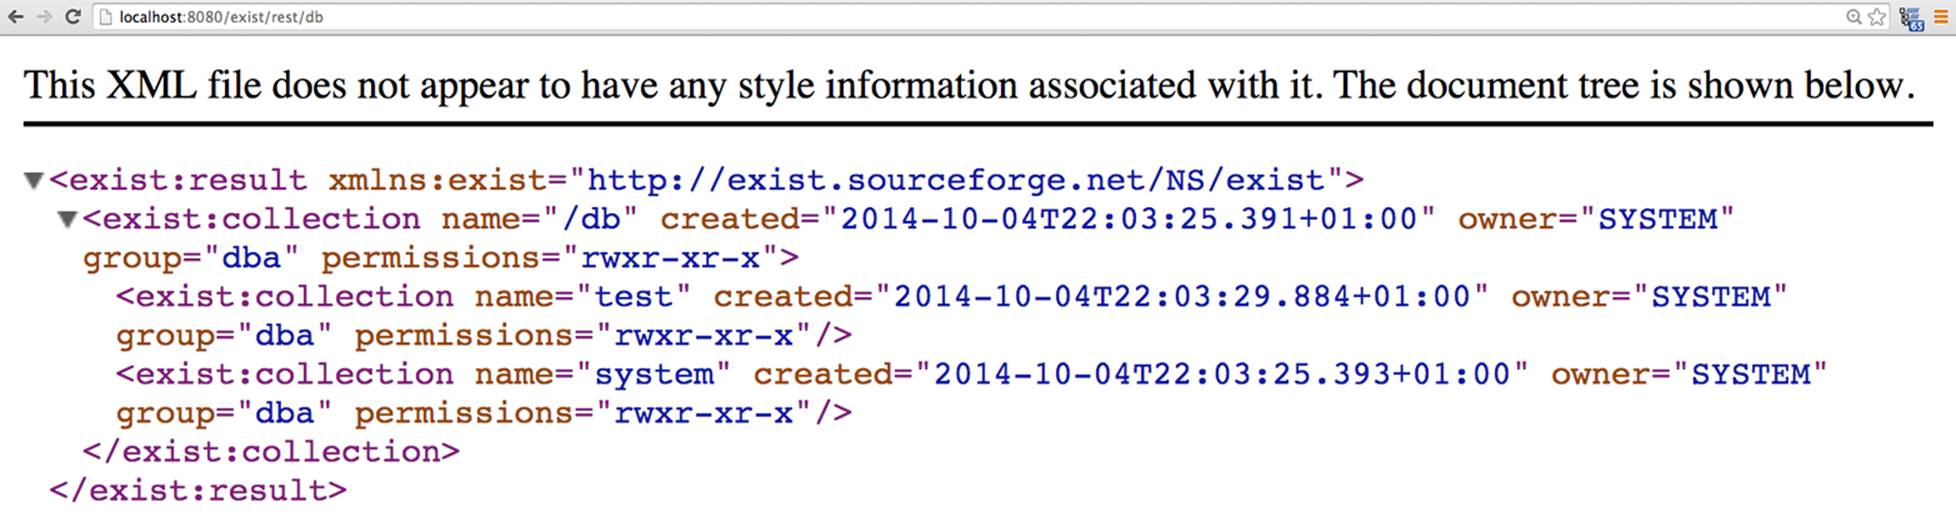
Figure 13-15. Browsing the REST Server API with the Chrome web browser
When accessing a collection from the REST Server, rather than listing the collection contents, you can present a document (or anything, really) instead by executing an XQuery known as a default document. You can enable default documents by adding mappings in $EXIST_HOME/descriptor.xml and then restarting eXist.
For example, if you wanted to remove the default collection listing response provided by the REST Server when accessing the collection /db/products, you could add the following mapping to the maps section of $EXIST_HOME/descriptor.xml:
<map path="/db/products" view="/db/products/default.xq"/>
then, instead of the collection listing, the result of executing the XQuery /db/products/default.xq would be returned.
Of course, manipulating the descriptor.xml configuration file is not the only solution available, but it is simple. If you require something more complex, you can make use of the full power of eXist’s XQuery URL rewriting (see “URL Mapping Using URL Rewriting”).
You can use cURL to make a GET request to eXist, by specifying -X GET to the curl command and then the URI. For example, the following cURL command would return a listing of the /db/apps collection in the database, as shown in Figure 13-16:
curl -X GET http://localhost:8080/exist/rest/db/apps
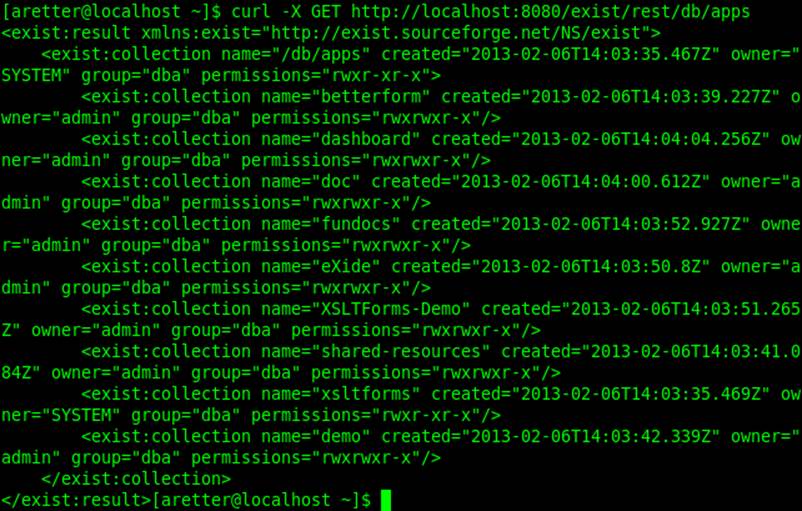
Figure 13-16. Browsing the REST Server API with cURL
TIP
The default HTTP request method in cURL is GET, so you can actually omit the -X GET parameter for conciseness if you wish.
Just as with retrieving a collection, you can retrieve the content of a resource in the database by appending its name to the collection in the request URI. For example, the following cURL command retrieves the resource some-document.xml from the collection /db:
curl http://localhost:8080/exist/rest/db/some-document.xml
TIP
If you wish to redirect the output from cURL to a file, you can use the -o argument (e.g., -o myfile.xml). Also, if you wish to see the HTTP request and response details as well as the content of the response, you may also provide the -v argument to cURL for verbose output.
XSL transformation
The serializer used by the REST Server also processes any XSL processing instructions declared in an XML document before returning the result to you. You can control this behavior by appending the _xsl parameter in the query part of the URL. You can also exploit this parameter to specify your own stylesheet at call time, as Table 13-1 shows.
|
XSL parameter value |
Explanation |
|
no |
Disables the processing of XSL processing instructions. |
|
yes |
Enables the processing of XSL processing instructions. |
|
uri |
You may provide a URI to an XSL stylesheet that you wish to apply. The URI can be a database URI (e.g., /db/my-stylesheet.xslt). |
|
Table 13-1. _xsl query parameters |
|
TIP
The default behavior of whether XSL processing instructions are processed or not by the serializer is configurable in $EXIST_HOME/conf.xml at the attribute indicated by the XPath /exist/serializer/@enable-xsl.
For example, to apply the XSL transformation at /db/my-stylesheet.xslt when retrieving /db/some-document.xml, you could use the following cURL command:
curl http://localhost:8080/exist/rest/db/some-document.xml
?_xsl=/db/my-stylesheet.xslt
TIP
If you just want to know the size of a document, or when a document or collection was last modified, you can use the HEAD method instead of GET. This returns just some basic metadata in the HTTP response headers instead of the resource content or collection listing.
Storing a document
You may store an XML or binary document into a collection in eXist via the REST Server API, by submitting the content of the document you wish to store as the body of a PUT request. You should also specify the Internet media type in the HTTP Content-Type header of your request. If the collection you are PUTing the document into does not allow execute and write access by other users, then you will also need to provide a username and password for an account that does have such access.
For example, the following cURL command will store the XML document /tmp/my-doc.xml into the collection /db/docs/personal:
curl -i -X PUT
-H 'Content-Type: application/xml'
--data-binary @/tmp/my-doc.xml
http://aretter:12345@localhost:8080/exist/rest/db/docs/personal/my-doc.xml
Its parameters are explained in Table 13-2 and its output illustrated in Figure 13-17.
|
cURL parameters |
Explanation |
|
-i |
PUTing a document into eXist does not return any content. You will know if the PUT succeeds by examining the HTTP response code; success is indicated by the code 201 Created. The -i parameter causes cURL to show the HTTP response headers (including the HTTP response code). |
|
-X PUT |
The -X parameter allows you to specify the HTTP request method. In this example the method of the request is PUT, as we want to PUT the new resource in the database. |
|
-H 'Content-Type: application/xml' |
eXist needs to know the Internet media type of the resource you are PUTing so it can store it correctly. The -H parameter allows you to specify an HTTP request header. We can inform eXist of the Internet media type by setting the Content-Type header. In this example, we use the Internet media type for an XML document. |
|
--data-binary @/tmp/my-doc.xml |
This parameter allows you to send binary data in the body of the request. In this example we want to send an XML document; the @ indicates that the data should be read from the file /tmp/my-doc.xml. |
|
http://aretter:12345@localhost:8080/exist/rest/db/docs/personal/my-doc.xml |
The final parameter is always the target URI of the request. In this instance, we are making the request on the /db/docs/personal collection, where we want to store the data into a resource named my-doc.xml. We also specify the username aretter and password 12345 of an account in eXist that has execute and write access to store the document.a |
|
Table 13-2. cURL parameters for storing a document |
|
aIf you do not have execute and write access to store the resource indicated by the URI of the request, you will receive an HTTP response code of 401 Unauthorized.
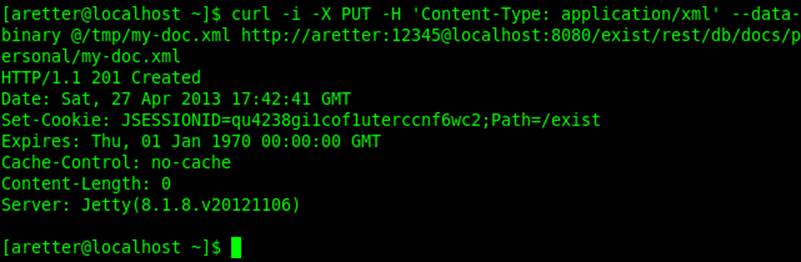
Figure 13-17. Storing a document via the REST Server API with cURL
TIP
If you specify a collection that does not exist, eXist will automatically create the necessary collection hierarchy for you.
Once the document is stored, you can retrieve it by doing an HTTP GET on the resource URI; for example:
curl http://localhost:8080/exist/rest/db/docs/personal/my-doc.xml
Likewise, if you wish to see it listed in its collection, you can retrieve the collection’s contents by doing an HTTP GET on the collection URI; for example:
curl http://localhost:8080/exist/rest/db/docs/personal
Deleting collections and documents
You may delete collections and documents in eXist via the REST Server API, by submitting DELETE requests whose URIs indicate the collections or documents you wish to remove. If the parent collection of the document or collection you are DELETEing does not allow execute and write access by other users, then you will also need to provide a username and password for an account that does have execute and write access.
For example, the following cURL command will delete the XML document my-doc.xml from the collection /db/docs/personal:
curl -i -X DELETE
http://aretter:12345@localhost:8080/exist/rest/db/docs/personal/my-doc.xml
Its parameters are explained in Table 13-3 and its output illustrated in Figure 13-18.
|
cURL parameters |
Explanation |
|
-i |
DELETEing a document from eXist does not return any content. You will know if the DELETE succeeds by examining the HTTP response code; success is indicated by the code 200 OK. The -i parameter causes cURL to show the HTTP response headers (including the HTTP response code). |
|
-X DELETE |
The -X parameter allows you to specify the HTTP request method. In this example, the method of the request is DELETE, as we want to DELETE the resource or collection from the database. |
|
http://aretter:12345@localhost:8080/exist/rest/db/docs/personal/my-doc.xml |
The final parameter is always the URI of the request. In this instance, we are making the request on the /db/docs/personal collection, where we want to delete the resource named my-doc.xml. We also specify the username (aretter) and password (12345) of an account in eXist that has execute and write access on the collection, so we are able to delete the document. |
|
Table 13-3. cURL parameters for deleting a document |
|
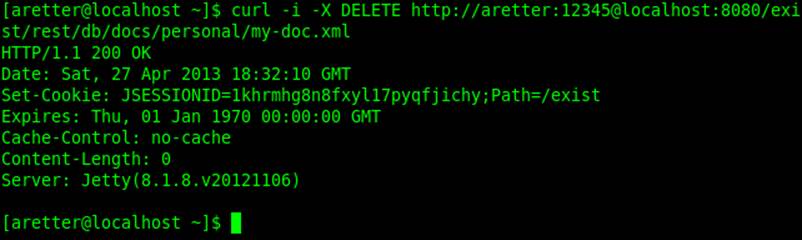
Figure 13-18. Deleting a document via the REST Server API with cURL
The mechanism for deleting a collection is exactly the same as that for deleting a document, except the URI should indicate the collection path in the database and not the document path. For example, the following cURL command will delete the collection personal from the parent collection /db/docs:
curl -i -X DELETE http://aretter:12345@localhost:8080/exist/rest/db/docs/personal
WARNING
If you delete a collection, you remove the collection and all documents within it.
Querying the database
There are two approaches for sending XQueries to the REST Server API to be executed against the database: HTTP GET and HTTP POST. Both approaches offer very similar functionality and results; however:
§ HTTP GET is most suitable for small and short XQuery or XPath expressions. You may send these expressions in the query part of the URL using the _query parameter. The path part of the URI indicates the context upon which to query the database (i.e., a collection or document), unless the context is set manually in XQuery through the fn:doc or fn:collection functions.
§ HTTP POST is suitable for XQuery main modules. You may send the main module inside an XML document that describes the query in the body of the request.
Imagine that you have a collection of XML documents (/db/people) in eXist that contain details about people. Each document in the collection represents a single person, and among other things contains that person’s name and date of birth (see Example 13-4).
Example 13-4. XML document for a person
<?xml version="1.0" encoding="UTF-8"?>
<person>
<name>
<first-name>John</first-name>
<family-name>Smith</family-name>
</name>
<born>
<date>1974-05-16</date>
<location>
<settlement>Tiverton</settlement>
<country>United Kingdom</country>
</location>
</born>
<residence>
<location>
<address-line>123 High Street</address-line>
<settlement>Cullompton</settlement>
<county>Devon</county>
<country>United Kindom</country>
</location>
</residence>
<contact>
<telephone type="mobile">+44 7777 123456</telephone>
<email>john.smith@johnsmith.com</email>
</contact>
</person>
Let’s look at how we would send an XQuery to the REST Server API to retrieve the names of all the people in the collection. Our XQuery might look like Example 13-5.
Example 13-5. XQuery to retrieve names of all people in the collection
xquery version "1.0";
/person/name
HTTP GET queries
To send the XQuery in Example 13-5 to the REST Server API using the simple HTTP GET approach, we can ignore the XQuery version declaration, as eXist will default to XQuery 1.0. However, as we are going to place the XQuery into the _query parameter in the URL, we should first URL-encode the XQuery to escape any URL-sensitive characters. If you are doing these operations from a programming language, there is most likely a library function already available for URL encoding; otherwise, if you are using cURL or sending the queries manually, you can use a simple URL encoder like URL Encode/Decode.
Our URL-encoded XQuery becomes:
%2Fperson%2Fname
We can now send this XQuery to the REST Server API using the following cURL command:
curl "http://localhost:8080/exist/rest/db/people?_query=%2Fperson%2Fname"
which could result in a response similar to:
<exist:result xmlns:exist="http://exist.sourceforge.net/NS/exist"
exist:hits="3" exist:start="1" exist:count="3">
<name>
<first-name>John</first-name>
<family-name>Smith</family-name>
</name>
<name>
<first-name>George</first-name>
<family-name>Baker</family-name>
</name>
<name>
<first-name>Barbara</first-name>
<family-name>Jones</family-name>
</name>
</exist:result>
By default the REST Server API wraps the result of our XQuery in an exist:result element; this provides us with a container for our data and some metadata about the number of results found by the query (exist:hits) and the number of results immediately returned (exist:start and exist:count). In this case, we can see that the query found 3 hits in total, and returned the results starting from index 1 and counting up to index 3. The use of start and count should become clearer when we look at paging shortly. The format of the XML result wrapper is documented in “wrap XML grammar”.
If you do not want eXist to return your data in an exist:result element, you can turn off wrapping using _wrap=no, as in the following cURL command:
curl "http://localhost:8080/exist/rest/db/people
?_wrap=no&_query=%2Fperson%2Fname"
However, you should note that the XQuery we wrote will return a sequence of name elements, so the result of the call to the REST Server API will not be a valid XML document if you turn off wrapping. To resolve this, you could introduce a wrapper element in your own XQuery, as in:
xquery version "1.0";
<names>{
/person/name
}</names>
After URL encoding, we can now send this XQuery to the REST Server API using the following cURL command:
curl "http://localhost:8080/exist/rest/db/people
?_wrap=no&_query=%3Cnames%3E%7B%0A++++%2Fperson%2Fname%0A%7D%3C%2Fnames%3E"
which could result in a response similar to:
<names>
<name>
<first-name>John</first-name>
<family-name>Smith</family-name>
</name>
<name>
<first-name>George</first-name>
<family-name>Baker</family-name>
</name>
<name>
<first-name>Barbara</first-name>
<family-name>Jones</family-name>
</name>
</names>
So far, we have just sent very simple queries to the REST Server. While placing the XQuery in the query parameter of the URL sent to the REST Server API works for small XQueries, it does not scale particularly well because:
§ We have to URL-encode the XQuery that we wish to send, which makes it unreadable.
§ The URL string becomes longer as the XQuery becomes longer, and URL encoding compounds this problem. Some HTTP clients and servers have limitations on the length of the URLs they can handle!
A better approach than using HTTP GET queries for anything more than the simplest XQueries is to use HTTP POST queries instead. The main advantage of HTTP GET queries is that you can easily send them from any web browser’s address bar, and this advantage is negated as the queries get more complex. That said, there are plug-ins for several browsers that enable you to send more complex requests, such as Postman for Google Chrome and HttpRequester for Mozilla Firefox.
HTTP POST queries
When sending XQueries via HTTP POST to the REST Server API, we need to place them in an XML document that contains the XQuery and any parameters for the REST Server or XQuery itself. Let’s look at how we would send our simple query using HTTP POST:
<query xmlns="http://exist.sourceforge.net/NS/exist">
<text>
<![CDATA[
xquery version "1.0";
/person/name
]]>
</text>
</query>
We place the XQuery itself inside a CDATA section so as to avoid having to escape any XML-sensitive characters in our XQuery. We can now POST the XML document containing the XQuery to the REST Server API using the following cURL command:
curl -X POST -H 'Content-Type: application/xml'
--data-binary @/tmp/person-name.xml
http://localhost:8080/exist/rest/db/people
The result of this query is exactly the same as that of the equivalent HTTP GET example earlier, but it is much easier to send larger queries using HTTP POST. Table 13-4 explains the cURL parameters used here.
|
cURL parameters |
Explanation |
|
-X POST |
The -X parameter allows you to specify the HTTP request method. In this example the method of the request is POST, as we want to POST the XML document containing the XQuery to the REST Server. |
|
-H 'Content-Type: application/xml' |
eXist needs to know the Internet media type of the resource you are POSTing so it can decide how to process it. The -H parameter allows you to specify an HTTP request header, and we can inform eXist of the Internet media type by setting the Content-Type header. In this example, because the XQuery is embedded in an XML document, we use the Internet media type for an XML document. |
|
--data-binary @/tmp/person-name.xml |
The --data-binary parameter allows you to send binary data in the body of the request. In this example we want to send an XML document; the @ indicates that the data should be read from the file /tmp/person-name.xml. |
|
http://localhost:8080/exist/rest/db/people |
The final parameter is always the URI of the request. In this instance, we are setting the context of the XQuery as the collection /db/people. |
|
Table 13-4. cURL parameters for sample HTTP POST query |
|
Now, let’s also look at how we would construct a version of our simple query where the results are not wrapped by the REST Server using HTTP POST. To achieve this, we simply add the same wrap parameter as before, but this time implemented as an attribute to the query element:
<query xmlns="http://exist.sourceforge.net/NS/exist" wrap="no">
<text>
<![CDATA[
xquery version "1.0";
<names>{
/person/name
}</names>
]]>
</text>
</query>
REST Server parameters and paging results
So far we have looked at just the query and wrap parameters available in the REST Server API for queries sent via either HTTP GET or HTTP POST. There are several other parameters available—which are all documented in “REST Server Parameters”—but a common use case is to be able to break the results of your query into smaller pages of results, so we will examine how to achieve that here.
The REST Server provides a mechanism whereby you can send it an XQuery and have it cache the results of that query. It will provide you with a session identifier, which you can then use in subsequent requests to pull back subsets of those results (i.e., pages).
For this example, let’s imagine that we have added many more documents about people to our /db/people collection, and that this time we wish to find the average age of people in each settlement. We know that there will be lots of results as our people live all over the world, so we want to return the results ordered by age ascending; more importantly, however, so as not to overwhelm the end user we want to present the results in pages of 10 results at a time.
Let’s consider the XQuery that we might wish to POST to the REST Server API to achieve this. Apart from it being a more complex XQuery, note that the cache="yes", start="1", and max="10" attributes are set on the query element. The cache attribute instructs the REST Server to return a session identifier for the result set generated by the query. In addition, start instructs the REST Server to return results from the cached set starting at position 1, and max instructs the server to return up to a maximum of 10 results from the cached set:
<?xml version="1.0" encoding="UTF-8"?>
<query xmlns="http://exist.sourceforge.net/NS/exist"
cache="yes" start="1" max="10">
<text>
<![CDATA[
xquery version "1.0";
for $settlement in distinct-values(/person/residence/location/settlement)
let $average-age := avg(
/person[residence/location/settlement eq $settlement]/born/(year-from-date(
current-date()) - year-from-date(xs:date(./date)))) order by $average-age ascending
return
<settlement>
<name>{$settlement}</name>
<average-age>{$average-age}</average-age>
</settlement>
]]>
</text>
</query>
We send our more complex query to the REST Server API in exactly the same way as our simpler query, using this cURL command:
curl -X POST -H 'Content-Type: application/xml'
--data-binary @/tmp/settlement-average-name.xml
http://localhost:8080/exist/rest/db/people
which could result in a response that starts with the element:
<exist:result xmlns:exist="http://exist.sourceforge.net/NS/exist"
exist:hits="567" exist:start="1" exist:count="10" exist:session="23">
We have omitted the entire response body for brevity, but the important thing to note here is that the REST Server has executed our POSTed XQuery and found 567 results (hits attribute), and it is returning the first 10 results (indicated by the start and count attributes). In addition, the results have been cached and will be accessible in the future using the session identifier 23 (session attribute).
So, we have returned our first page of 10 results, but how do we get our second page of results? We send almost the same request as before, but this time on the query element we want to set the session attribute to the session identifier that we were given by the response of the first request and increase the value of the start attribute, so we end up with the following request:
<?xml version="1.0" encoding="UTF-8"?>
<query xmlns="http://exist.sourceforge.net/NS/exist"
session="23" cache="yes" start="11" max="10">
<text>
<![CDATA[
xquery version "1.0";
for $settlement in distinct-values(/person/residence/location/settlement)
let $average-age := avg(
/person[residence/location/settlement eq $settlement]/born/(year-from-date(
current-date()) - year-from-date(xs:date(./date)))) order by $average-age ascending
return
<settlement>
<name>{$settlement}</name>
<average-age>{$average-age}</average-age>
</settlement>
]]>
</text>
</query>
which we send to the REST Server by:
curl -X POST -H 'Content-Type: application/xml' --data-binary
@/tmp/settlement-average-name.page2.xml
http://localhost:8080/exist/rest/db/people
This results in a response that starts with the element:
<exist:result xmlns:exist="http://exist.sourceforge.net/NS/exist"
exist:hits="567" exist:start="11" exist:count="10" exist:session="23">
Again, we have omitted the entire response body for brevity, but the important thing to note here is that the REST Server is now returning the second page of results—that is, 10 results (count attribute) starting from position 11 (start attribute) in the cached result set.
NOTE
We include the actual query in each request we send, in case the cached query result set has expired and the query has to be recomputed. This way, we know that we will always get the response, whether it’s served from the cache or calculated. To retrieve further pages, simply repeat the second query, adjusting the start attribute each time.
Updating the database
You may update nodes within documents in eXist via the REST Server API, by POSTing XUpdate documents to the URI that indicates the collection or document context within the database to update. In addition, you may manually specify individual operations against other documents or collections in your XUpdate documents by using the XQuery fn:doc or fn:collection functions. If the document you are updating does not allow write access by other users, then you will also need to provide a username and password for an account that does have write access.
Let’s look at how we would apply an XUpdate document to the document /db/some-document.xml in eXist via the REST Server API:
<hello/>
This XUpdate document will insert an element called name with the text Adam into each hello element that it finds:
<?xml version="1.0" encoding="UTF-8"?>
<xupdate:modifications version="1.0"
xmlns:xupdate="http://www.xmldb.org/xupdate">
<xupdate:append select="/hello">
<name>Adam</name>
</xupdate:append>
</xupdate:modifications>
The following cURL command would apply the XUpdate document stored at /tmp/add-name.xupdate to the XML document /db/some-document.xml in eXist:
curl -X POST -H 'Content-Type: application/xml'
--data-binary @/tmp/add-name.xupdate
http://aretter:12345@localhost:8080/exist/rest/db/some-document.xml
Its parameters are explained in Table 13-5, and Figures 13-19 and 13-20 show how to perform and confirm the action, respectively.
|
cURL parameters |
Explanation |
|
-X POST |
The -X parameter allows you to specify the HTTP request method. In this example the method of the request is POST, as we want to POST the XUpdate document to the REST Server. |
|
-H 'Content-Type: application/xml' |
eXist needs to know the Internet media type of the resource you are POSTing so it can decide how to process it. The -H parameter allows you to specify an HTTP request header, and we can inform eXist of the Internet media type by setting the Content-Type header. In this example, because XUpdate is XML, we use the Internet media type for an XML document. |
|
--data-binary @/tmp/add-name.xupdate |
The --data-binary parameter allows you to send binary data in the body of the request. In this example we want to send an XUpdate document; the @ indicates that the data should be read from the file /tmp/add-name.xupdate. |
|
http://aretter:12345@localhost:8080/exist/rest/db/some-document.xml |
The final parameter is always the URI of the request. In this instance, we are processing the XUpdate against the document /db/some-document.xml. We also specify the username (aretter) and password (12345) of an account in eXist that has write access to modify the document. |
|
Table 13-5. cURL parameters for HTTP POST XUpdate |
|

Figure 13-19. XUpdating a document via the REST Server API with cURL

Figure 13-20. Retrieving a document after XUpdate via the REST Server API with cURL
For further information about XUpdate, see the XUpdate 1.0 Specification and “XUpdate”.
NOTE
XUpdate is just one mechanism for updating documents in eXist. As an alternative, you can make use of the XQuery update extension in your XQueries (see “eXist’s XQuery Update Extension”), which of course may be sent to the REST Server or invoked by the REST Server as stored queries, as described next.
Executing stored queries
Perhaps the most interesting and flexible feature of the REST Server API is that it allows you to invoke stored XQuery and XProc by making HTTP requests. This means that you can potentially write complex XQueries split across several main and library modules, store them into the database, and have them react to requests made to the REST Server API. This facility, coupled with eXist’s extensions for XQuery, enables you to easily build your own HTTP/REST APIs in XQuery, or even entire web applications.
When working with stored queries and the REST Server API, it is very likely that you will want to use at least the request and response XQuery extension modules in your XQueries to work with the HTTP request and response. You can find more details on these in “The request Extension Module” and “The response Extension Module”, respectively. Building web applications using this approach (among others) is discussed in Chapter 9, but for the purposes of integration we will demonstrate a simple example here.
Supplied alongside this chapter is the XQuery file chapters/integration/rest-stored-query/image-api.xq in the book-code Git repository (see “Getting the Source Code”) that, when stored into the database and subsequently called via the REST Server API, will deliver a simple custom REST API for manipulating images. To use the XQuery as well as store it into the database (for example, in the /db collection), you also need to ensure: 1) that the image-api.xq file has execute access within the database by the calling user so that it may be executed; 2) that the collection /db/images exists and is writable by the calling user; and 3) that the image XQuery extension module is enabled in $EXIST_HOME/conf.xml. The custom REST API provides the following three image manipulation functions:
§ Store a JPEG image received over HTTP into the database.
§ Retrieve a stored image from the database.
§ Retrieve a thumbnail representation of an image from the database.
Let’s now look at the XQuery code in detail, and how it performs each of these functions.
Store a JPEG image received over HTTP into the database
The API provided by the image-api.xq file allows you to send an HTTP POST to it via the REST Server API to store a JPEG image. In your HTTP request, if you set the Content-Type to image/jpeg and include the content of a JPEG image in the body of the request, it will be stored into the database and image-api.xq will return a Location and identifier in the HTTP response for the image.
When you make the following request with cURL:
curl -i -X POST -H 'Content-Type: image/jpeg' –data-binary @/tmp/cats.jpg
http://localhost:8080/exist/rest/db/image-api.xq
the code in our image-api.xq stored query handles it as follows:
if(request:get-method() eq"POST")then ![]()
if(request:get-header("Content-Type") eq"image/jpeg")then ![]()
let $db-path := local:store-image(request:get-data()) ![]() ,
,
$uri-to-resource := concat(
request:get-uri(),
substring-after($db-path, $local:image-collection)) ![]()
return
(
response:set-status-code($response:CREATED) ![]() ,
,
response:set-header("Location", $uri-to-resource) ![]() ,
,
<identifier>{
substring-after($db-path, concat($local:image-collection, "/"))
}</identifier> ![]()
)
else
response:set-status-code($response:BAD-REQUEST) ![]()
![]()
We examine the request to see if it is an HTTP POST request, using the request:get-method function.
![]()
We check that the Content-Type header was set to image/jpeg, as we only want to work with JPEG images in this example; if not, skip to ![]() .
.
![]()
We call the function local:store-image on the body of the POST request, which we obtained using the request:get-data function. This function has been omitted for brevity, but all you need to know right now is that it stores the image into the database, and returns a path to the image in the database.
![]()
We create a URI for our newly stored image, based on the current URI of our API, which we can find by using request:get-uri and some substring of the path to the image in the database.
![]()
We want to be good REST citizens, so we set the response status to 201 Created, as we have just created the resource given to us in the database.
![]()
When creating a resource, REST calls for the Location header in the response to be set with a URI to the new resource, so we do that.
![]()
As an added bonus, we also return an identifier for the created resource in the body of the response; this identifier may then be used in subsequent requests to the API.
![]()
If the Content-Type of the request was not image/jpeg, we do not wish to process the request, so we set the response status to 400 Bad Request.
Retrieve a stored image from the database
The API provided by the image-api.xq file allows you to send an HTTP GET to it via the REST Server API to get a previously stored image. In your HTTP request, if the URI includes an identifier of an image previously stored by the API, then it will return the content of that image.
When you make the following request with cURL (28068cd4-4817-4f81-ae19-5ad2c945186a.jpg is the identifier of the image returned by the API when we stored it in the previous section):
curl http://localhost:8080/exist/rest/db/image-api.xq
/28068cd4-4817-4f81-ae19-5ad2c945186a.jpg
the code in our image-api.xq stored query handles it like so:
else if(request:get-method() eq"GET")then ![]()
(: NOTE: thumbnail part is dealt with in the next section! :)
else if(matches(
request:get-uri(),
concat(".*/", $local:uuidv4-pattern, "\.jpg$")
))then ![]()
let $image-name := tokenize(request:get-uri(), "/")[last()] ![]() ,
,
$image := local:get-image($image-name) ![]()
return
if(not(empty($image)))then ![]()
response:stream-binary($image, "image/jpeg", $image-name) ![]()
else
(
response:set-status-code($response:NOT-FOUND), ![]()
<image-not-found>{$image-name}</image-not-found>
)
![]()
We examine the request to see if it is an HTTP GET request, using the request:get-method function.
![]()
We examine the URI after calling request:get-uri to see if it contains the identifier of an image.
![]()
We extract the identifier of the image from the URI.
![]()
We call the function local:get-image with the identifier of the image ($image-name). This function has been omitted for brevity, but all you need to know right now is that it retrieves an image previously stored into the database; otherwise (i.e., if there is no image with that identifier in the database), it returns an empty sequence.
![]()
We test if we have an image from the database for the identifier.
![]()
We have an image, so we return it in the HTTP response by calling the response:stream-binary function.
![]()
Otherwise, there was no image in the database matching the identifier, so we set the response status to 404 Not Found and return an explanation in the body of the response.
Retrieve a thumbnail representation of an image from the database
The API provided by the image-api.xq file allows you to send an HTTP GET to it via the REST Server API to get a thumbnail of a previously stored image. If the URI in your HTTP request includes an identifier of an image previously stored by the API prefixed by thumbnail/, it will return a thumbnail representation of that image. The image-api.xq file will generate the thumbnail on the fly, store it into the database, and return it; if the same thumbnail is requested a second time, the API serves it from the database rather than regenerating it.
To see this in action, make the following request with cURL:
curl http://localhost:8080/exist/rest/db/image-api.xq/
thumbnail/28068cd4-4817-4f81-ae19-5ad2c945186a.jpg
NOTE
The thumbnail/ URI segment has been inserted before the identifier of the image—compare this to the URI used in the previous section.
The code in our image-api.xq file for handling this request is actually very similar to that for retrieving an image, except for a few minor changes. Therefore, we will only really examine the differences:
else if(request:get-method() eq"GET")then
if(matches(
request:get-uri(),
concat(".*/thumbnail/", $local:uuidv4-pattern, "\.jpg$") ![]()
))then
let $image-name := tokenize(request:get-uri(), "/")[last()],
$image := local:get-or-create-thumbnail($image-name) ![]()
return
if(not(empty($image)))then
response:stream-binary(
$image,
"image/jpeg",
concat("thumbnail-", $image-name)
)
else
(
response:set-status-code($response:NOT-FOUND),
<image-not-found>{$image-name}</image-not-found>
)
![]()
This is similar to retrieving an image, except as well getting as the identifier of the image we also check the request URI for the prefix thumbnail/.
![]()
This is similar to retrieving an image, except we now call the function local:get-or-create-thumbnail instead of the function local:get-image.
While the rest-stored-query/image-api.xq example shows how you can simply construct your own APIs atop the REST Server API, there is a great deal more that you can achieve, such as URL rewriting and directly producing web pages in HTML. For further details, see Chapter 9.
Using the REST Server API from Java
There are several good HTTP client libraries available for Java, including java.net.URLConnection in the standard Java library, but unfortunately for us, most of them take a somewhat low-level approach to HTTP, which means that you often need to build abstractions on top of them when using REST over HTTP. So instead, we will look at the Jersey client library, which is specifically designed for talking to REST Servers over HTTP—where the central abstraction is a resource. Jersey is an implementation of JAX-RS that enables you to easily construct REST services using Java annotations. However, it also has a client library that is very simple and elegant, and is well suited for communicating with the eXist REST Server API. At the time of writing, the latest Jersey version was 1.17.1.
There are just a few concepts that you need to understand in the Jersey client library beyond existing REST principles (such as GET, PUT, POST, and DELETE). In Jersey, we work with three kinds of objects:
Client
The Client object manages the underlying connection to the HTTP Server and any configuration required for that connection. The Client also allows you to construct WebResource objects. As it is mostly likely that we will want to authenticate with eXist when we manipulate resources via the REST Server API, we will actually make use of the Apache HTTP client integration for Jersey, as this allows us to provide authentication credentials. See Example 13-6.
Example 13-6. Constructing a suitable Client object for communicating with eXist using Jersey
//set up authentication
final CredentialsProvider credentialsProvider = new BasicCredentialsProvider();
credentialsProvider.setCredentials(AuthScope.ANY,
new UsernamePasswordCredentials("admin", "my-admin-password"));
final DefaultApacheHttpClient4Config config =
new DefaultApacheHttpClient4Config();
config.getProperties().put(
ApacheHttpClient4Config.PROPERTY_CREDENTIALS_PROVIDER, credentialsProvider);
//construct the client
final Client client = ApacheHttpClient4.create(config);
WebResource
A WebResource object indicates a resource on the REST Server (although it may not exist yet) that is addressable by a URI. You may construct as many WebResource objects as you wish from a single client; you then perform actions on these resources, such as PUT or GET. SeeExample 13-7.
Example 13-7. Constructing a Jersey WebResource object for communicating with eXist
final String uri = "http://localhost:8080/exist/rest/db/some-document.xml";
final WebResource resource = client.resource(uri);
ClientResponse
Once you have a WebResource object, you can make a request to the server. Jersey offers some easy-to-use facilities to allow you to serialize/deserialize Java objects for the request/response as XML using JAXB. However, to keep things simple, we will just consider the raw response object that Jersey can provide from any request: the ClientResponse. The ClientResponse object allows you access to all of the HTTP responses sent from the REST Server, including all headers and bodies. See Example 13-8.
Example 13-8. Performing an HTTP header request against eXist with Jersey
final ClientResponse response = resource.head(ClientResponse.class);
final Status responseStatus = response.getClientResponseStatus();
if(responseStatus == Status.OK) {
System.out.println(uri + “ exists on the server.”);
} else {
System.err.println(uri + “ does not exist on the server!”);
}
Examples
The source code of four small complete examples of using Jersey from Java—to store a file, retrieve a file, query the database, and remove a file—is included in the folder chapters/integration/restserver-client of the book-code Git repository (see “Getting the Source Code”).
To compile the examples, enter the restserver-client folder and run mvn package.
Store example
You can then execute the StoreApp example using this command:
java -jar restserver-client-store/target/restserver-client-store-1.0-example.jar
This shows the available arguments for using the StoreApp.
A complete example of using the application might look like the following, which would upload the file /tmp/large.xml to the collection /db/my-new-collection in eXist:
java -jar restserver-client-store/target/restserver-client-store-1.0-example.jar
localhost 8080 /tmp/large.xml /db/my-new-collection admin
Retrieve example
You can execute the RetrieveApp example like so:
java -jarrestserver-client-retrieve/target/
restserver-client-retrieve-1.0-example.jar
This shows the available arguments for using the RetrieveApp.
A complete example of using the application might look like the following, which would download the resource /db/my-new-collection/large.xml to the file in the current directory named large.xml:
java -jar restserver-client-retrieve/target/
restserver-client-retrieve-1.0-example.jar localhost 8080
/db/my-new-collection/large.xml admin > large.xml
Query example
You can execute the QueryApp example like so:
java -jar restserver-client-query/target/restserver-client-query-1.0-example.jar
This shows the available arguments for using the QueryApp.
A complete example of using the application might look like the following, which would find the family names of all of the people in all of the documents in the collection /db/my-new-collection in the database:
java -jar restserver-client-query/target/
restserver-client-query-1.0-example.jar localhost 8080
"for \$person in //person return \$person/family" /db/my-new-collection admin
WARNING
On non-Windows platforms, you must escape the $ character used in XQuery for variables when sending the query in a command line from the terminal by prefixing with a \ character. If you do not escape this symbol, the shell interpreter will try to interpret them as environment variables, which will result in an invalid XQuery and therefore an HTTP 400 Bad Request response from the REST Server API.
Remove example
You can execute the RemoveApp example like so:
java -jar restserver-client-remove/target/
restserver-client-remove-1.0-example.jar
This shows the available arguments for using the RemoveApp.
A complete example of using the application might look like the following, which would remove the collection /db/my-new-collection from the database:
java -jar restserver-client-remove/target/
restserver-client-remove-1.0-example.jar localhost 8080
/db/my-new-collection admin
XML-RPC API
RPC (Remote Procedure Call) allows you to call API functions in eXist from other processes; these calls are performed over HTTP. The XML aspect of the XML-RPC protocol indicates that the RPCs and their responses are encoded into XML documents, and it is these documents that are sent back and forth between eXist and the third-party process.
XML-RPC is a standardized protocol, with the XML documents used in requests and responses being well defined and documented by the XML-RPC specifications. However, the definitions of the functions available from eXist that you use in your RPC calls, their parameters, and their return types naturally differ from those in any other XML-RPC implementation. The base URI of the XML-RPC server in eXist on a default installation is http://localhost:8080/exist/xmlrpc.
There is nothing to stop you from using eXist’s XML-RPC API from any application (such as cURL) that can, at a minimum, HTTP POST XML documents to eXist and process the XML document responses. However, eXist’s XML-RPC API was never really designed to be used in this way. Thus, the contents of the XML documents for performing XML-RPC operations with eXist are not well documented. As it is a simple protocol of just XML over HTTP, though, if you are so inclined you can reverse-engineer it by reading the XML-RPC specification and studying the interface for eXist’s XML-RPC API functions (in the org.exist.xmlrpc.RpcApi Java class, and the associated RpcApi JavaDoc). In fact, that is exactly the aim of this chapter. Rather than try to explain the entirety of eXist’s XML-RPC API, in which there are over 122 available functions, we explain the methodology and tools needed to make use of this API.
Another option available to you is to use a network sniffing tool such as Wireshark to examine XML-RPC network traffic sent to and from eXist. For example, let’s take a look at the first XML-RPC request made by eXist’s Java Admin Client after you click Login. This traffic was captured using Wireshark:
POST /exist/xmlrpc HTTP/1.1 ![]()
Content-Type: text/xml ![]()
User-Agent: Apache XML RPC 3.1.3 (Sun HTTP Transport)
Authorization: Basic YWRtaW46 ![]()
Cache-Control: no-cache
Pragma: no-cache
Host: localhost:8080 ![]()
Accept: text/html, image/gif, image/jpeg, *; q=.2, */*; q=.2
Connection: keep-alive
Content-Length: 273
<?xml version="1.0" encoding="UTF-8"?>
<methodCall xmlns:ex="http://ws.apache.org/xmlrpc/namespaces/extensions">
<methodName>existsAndCanOpenCollection</methodName> ![]()
<params>
<param>
<value>/db</value> ![]()
</param>
</params>
</methodCall>
![]()
Shows that this is just an HTTP POST to /exist/xmlrpc
![]()
Shows that we are just sending XML in the body of the request, which is exactly what we would expect for XML-RPC
![]()
Shows that we are authenticating with the server using basic authentication (e.g., our encoded admin username and password)
![]()
Shows the server we are HTTP POSTing to—that is, localhost port 8080
![]()
Shows the name of the Java function in eXist that we are calling—that is, existsAndCanOpenCollection
![]()
Shows that we are sending a single parameter value to the function—that is, /db
From the preceding Wireshark output we can infer that we are calling a function (also known as a method) in eXist using XML-RPC. That function will check for the existence of the collection /db in the database and verify that the authenticated user has permission to open that collection.
Let’s now look at the response to that request sent back to the client from eXist:
HTTP/1.1 200 OK ![]()
Date: Wed, 08 May 2013 10:31:16 GMT
Set-Cookie: JSESSIONID=omg0pkl0xdvf1i26iv33z86r1;Path=/exist
Expires: Thu, 01 Jan 1970 00:00:00 GMT
Content-Length: 287
Content-Type: text/xml ![]()
Server: Jetty(8.1.9.v20130131)
<?xml version="1.0" encoding="UTF-8"?>
<methodResponse xmlns:ex="http://ws.apache.org/xmlrpc/namespaces/extensions">
<params>
<param>
<value>
<boolean>1</boolean> ![]()
</value>
</param>
</params>
</methodResponse>
![]()
Shows that our request was successful (200 OK)
![]()
Shows that we are receiving just XML in the body of the response, which is exactly what we would expect for XML-RPC
![]()
Shows that the function we called returned a single parameter whose Boolean value is 1—that is, true
From the preceding Wireshark output we can infer both that our function call was successful and that our function returned a positive result for the parameters provided to it. In this case, that means that the /db collection does indeed exist and that our authenticated user has permission to read that collection.
Let’s compare this to the Java definition of the existsAndCanOpenCollection function in eXist’s XML-RPC API that was just called by our XML-RPC request:
/**
* Determines whether a Collection exists in the database
* and whether the user may open the collection
*
* @param collectionUri The URI of the collection of interest
*
* @return true if the collection exists and the user can open it,
* false if the collection does not exist
*
* @throws PermissionDeniedException
* If the user does not have permission to open the collection
*/
boolean existsAndCanOpenCollection(final String collectionUri)
throws EXistException, PermissionDeniedException;
The definition of the Java function existsAndCanOpenCollection should come as no surprise after seeing the XML-RPC dumps produced by Wireshark. We can clearly see that the method name, parameters, and method response in the XML-RPC documents match the Java definition. This means you can look at any Java function defined in eXist’s XML-RPC API and with relative ease infer what the XML-RPC document to call it and the response that you will get back should look like.
But wait—as previously mentioned, the XML-RPC API in eXist was not designed with the idea in mind that developers would directly send and receive XML documents to and from it. Rather, as XML-RPC is a standardized protocol, it was intended to allow any developer to use anXML-RPC client library from her programming language of choice to talk to eXist. An XML-RPC client library makes life much easier for developers, as they can simply make standard function calls in their programming language, and the XML-RPC client will take care of serializing these to XML, sending them to the XML-RPC server API (i.e., eXist) over HTTP, receiving the responses, deserializing the XML back into the various primitives and objects defined in their programming language, and returning these results as those of the function calls they initially made.
So, you may be wondering why we briefly studied the raw wire protocol of XML-RPC if there are client libraries that we can use to avoid this. Well, in practice there are many XML-RPC libraries available for many different programming languages, but they are in various states of maturity. Understanding the underlying XML-RPC protocol itself (which is relatively simple) gives us a great tool for gaining insight when debugging communication problems with eXist using XML-RPC. For reference, the Linux Documentation Project has an excellent page onusing XML-RPC from various programming languages, complete with practical examples.
Using the XML-RPC client API from Java
There are several options available for XML-RPC libraries in Java. eXist itself makes use of the Apache XML-RPC library, both for its XML-RPC server and as its underlying client in the Java Admin Client for remote connections. Here, though, we will look at the Redstone XML-RPC library, as it is much smaller, simpler, and in many ways easier to use than the Apache library. At the time of writing, the latest version was 1.1.1.
The Redstone XML-RPC library offers two methods of use to a client (as does the Apache library):
Classic XML-RPC client API (Example 13-9)
Basically, you tell the client about the server method and the parameters that you wish to send, and then make a call to that method with the client against the server. The client returns an object, which you then interrogate and cast to get your result.
Example 13-9. Redstone classic XML-RPC client
final URL url = new URL("http://localhost:8080/exist/xmlrpc");
final XmlRpcClient rpc = new XmlRpcClient(url, true);
final Object result = rpc.invoke(
"existsAndCanOpenCollection", new Object[] { "/db" });
Dynamic proxy XML-RPC client API (Example 13-10)
This is a much more modern approach than the classic one and much easier to use. Basically, your server defines a Java interface (i.e., the interface org.exist.xmlrpc.RpcAPI for eXist), and you make a copy of that interface to your client application. You then ask the XML-RPC library to create a proxy to the server using that interface. The client gives you a standard Java object, which implements the interface. You can then use this Java object just like any other, and all the client/server communication is hidden from you. When you call a function on the object, the client takes care of all of the communication with the server and returns the result.
Example 13-10. Redstone dynamic proxy XML-RPC client
final URL url = new URL("http://localhost:8080/exist/xmlrpc");
final RpcAPI rpc = (RpcAPI)XmlRpcProxy.createProxy(
url, "Default", new Class[] { RpcAPI.class }, true);
final Boolean result = rpc.existsAndCanOpenCollection("/db");
NOTE
In the dynamic proxy approach, calling the RPC method is much simpler because the interface forms the code contract as opposed to naming the method (with a string), providing an arbitrary number of arguments in an array, and receiving an untyped result in the nonproxy approach. As the functions, the number of arguments, their types, and the type of the result are known statically at compile time, it’s much harder to make mistakes when you call the API—any mistake will prevent your client program from compiling.
The only serious advantage of the classic XML-RPC approach over a dynamic proxy approach from Java is that with the classic approach, you do not need to copy the Java interface (and any of its dependencies) from the server to the client application.
Examples
The source code of two small complete examples of using the Redstone XML-RPC library from Java (to store a file and retrieve a file) is included in the folder chapters/integration/xmlrpc-client of the book-code Git repository (see “Getting the Source Code”). One example demonstrates the classic XML-RPC approach, while the other demonstrates the dynamic proxy approach.
To compile the examples, enter the xmlrpc-client folder and run mvn package.
Classic store example
You can then execute the StoreApp example like so:
java -jar xmlrpc-client-store/target/xmlrpc-client-store-1.0-example.jar
This shows the available arguments for using the StoreApp.
A complete example of using the application might look like the following, which would upload the file /tmp/large.xml to the collection /db/my-new-collection in eXist:
java -jar xmlrpc-client-store/target/xmlrpc-client-store-1.0-example.jar
localhost 8080 /tmp/large.xml application/xml /db/my-new-collection admin
NOTE
The XML-RPC StoreApp example takes an extra parameter compared to the StoreApp examples for other APIs, as specifying the Internet media type of the resource is mandatory for uploading files via eXist’s XML-RPC API. You may use application/xml for XML documents; for anything else, if you do not know the Internet media type it is recommended that you use application/octet-stream, which will store the document into eXist as an untyped binary resource.
Proxy store example
The proxy store example is externally exactly the same as the classic store example; its implementation just varies as described previously.
You can execute the ProxyStoreApp example like so:
java -jar xmlrpc-proxy-client-store/target/
xmlrpc-proxy-client-store-1.0-example.jar
This shows the available arguments for using the ProxyStoreApp.
A complete example of using the application might look like the following, which would upload the file /tmp/large.xml to the collection /db/my-new-collection in eXist:
java -jar xmlrpc-proxy-client-store/target/
xmlrpc-proxy-client-store-1.0-example.jar localhost 8080
/tmp/large.xml application/xml
/db/my-new-collection admin
Using the XML-RPC client API from Python
As XML-RPC is such a prevalent and well-supported protocol, we felt that a simple example for a non-Java programming language might be beneficial to those of you who are not familiar with Java. We have created a direct port of the dynamic proxy XML-RPC example into Python, the source code of which is included in the file chapters/integration/xmlrpc-client/StoreApp.py of the book-code Git repository.
Python has a built-in XML-RPC library called xmlrpclib, which is very simple to use (see Example 13-11). It works on the principle of dynamic proxies, but as Python is more relaxed in its compilation here than Java, you will not see compile-time errors if you try to call an RPCmethod that does not exist. This is because Python has no knowledge at compile time of the RPC methods made available by eXist, as you have not needed to provide it an interface like you do with Java. The version of Python used was 2.7.2.
Example 13-11. Python dynamic proxy XML-RPC client
import xmlrpclib
rpc = xmlrpclib.ServerProxy("http://localhost:8080/exist/xmlrpc")
result = rpc.existsAndCanOpenCollection("/db")
print "Collection exists and we can open it: %s" % result
Python XML-RPC proxy store example
The source code of a small example of using XML-RPC from Python to store a file is included in the folder chapters/integration/xmlrpc-client of the book-code Git repository (see “Getting the Source Code”).
The Python store example is externally exactly the same as the Java dynamic proxy example, and can be found in the StoreApp.py file. You can execute the Python StoreApp example like so:
python StoreApp.py
A complete example of using the application might look like the following, which would upload the file /tmp/large.xml to the collection /db/my-new-collection in eXist:
python StoreApp.py localhost 8080
/tmp/large.xml application/xml
/db/my-new-collection admin
XML:DB Remote API
The XML:DB API was developed by the XML:DB Initiative in the early 2000s with the goal of creating a common standardized API for communicating with XML databases. While the API is no longer actively developed, it arguably fulfilled its goal and gained adoption from several XML database vendors. The XML:DB API is really just a set of Java interfaces that a vendor must implement. eXist either implements these as function calls on its internal API for local embedded use (see “XML:DB Local API”), or—more interestingly here for its remote use—uses its XML-RPC implementation (see “XML-RPC API”) for network communication.
The main advantage of the XML:DB API is that it provides a complete Java client library that you can use seamlessly from your Java applications without concern for how the network communication with the eXist server is achieved. In practice there is not much of a semantic difference between this and using a dynamic proxied XML-RPC client approach. Whether you should use the XML:DB API or an XML-RPC dynamic proxied client API really comes down to a matter of choice with regard to the style of code that you wish to write. We feel that using the XML-RPC approach offers greater flexibility, as you have full access to the API underlying the XML:DB API; also the XML:DB API is becoming more limited due to its stagnation.
The downside of the XML:DB API is that it is only easily usable from Java, unless you are willing to reverse-engineer the XML-RPC messages sent by the XML:DB API and produce your own client library for a different programming language.
NOTE
The base URI of the XML:DB Remote API server in eXist on a default installation is xmldb:exist://localhost:8080/exist/xmlrpc. Even though the URI scheme is xmldb, the URI points to eXist’s XML-RPC server, and the XML-RPC server itself uses HTTP. Thus, XML:DB (as far as eXist is concerned) is really just more XML-RPC performed over HTTP.
Using the XML:DB Remote API from Java
eXist provides a remote client library implementation of the XML:DB API, which can be used from your own Java applications. If you wish to use it from your own applications, you need to make sure the libraries listed in Table 13-6 are available on your classpath.
|
Library |
Description |
|
$EXIST_HOME/lib/core/xmldb.jar |
XML:DB API library. |
|
$EXIST_HOME/exist.jar |
eXist core. Contains the eXist XML:DB client library implementation. |
|
$EXIST_HOME/lib/core/xmlrpc-client-3.1.3.jar |
Apache XML-RPC Client library. Dependency of eXist’s XML:DB client library. |
|
$EXIST_HOME/lib/core/xmlrpc-common-3.1.3.jar |
Apache XML-RPC common code. Dependency of the Apache XML-RPC client library. |
|
$EXIST_HOME/lib/core/commons-io-2.4.jar |
Apache Commons I/O library. Dependency of eXist’s XML:DB client library. |
|
Table 13-6. Dependencies for eXist remote XML:DB Java applications |
|
There are just four main concepts that you need to understand in the XML:DB API to make XML:DB requests to eXist:
Drivers
The XML:DB API makes use of drivers so that the same API can be used by different vendors, and each vendor just needs to provide a driver. eXist provides the Driver class org.exist.xmldb.DatabaseImpl (see Example 13-12).
Example 13-12. Registering eXist’s XML:DB driver
final Class<Database> dbClass =
(Class<Database>) Class.forName("org.exist.xmldb.DatabaseImpl");
final Database database = dbClass.newInstance();
database.setProperty("create-database", "true");
DatabaseManager.registerDatabase(database);
Collections
A Collection in the XML:DB API maps onto a collection in the eXist database. Collections are the primary means for interacting with the XML:DB API. Accessing a Collection requires authentication, after which all subsequent operations on that collection and any subresources or subcollections of that Collection use the same credentials. Administrative and query services can also be retrieved from a Collection. See Example 13-13.
Example 13-13. Accessing a remote XML:DB collection
Collection collection =
DatabaseManager.getCollection(
"xmldb:exist://localhost:8080/exist/xmlrpc/db",
"admin", "");
Resources
A Resource in the XML:DB API maps onto a document in the eXist database. eXist’s implementation of the XML:DB API allows you to work with both its XML and binary documents. See Example 13-14.
Example 13-14. Retrieving a Resource from an XML:DB remote collection
Resource resource = collection.getResource("some-document.xml");
Services
A Service in the XML:DB API allows you to perform extended operations against the database. The XML:DB API provides services for collection management, XPath/XQuery, and XUpdate services. In addition, eXist provides some eXist-specific XML:DB services for user management, database instance management, and index queries. You retrieve a Service from a connection to a Collection by specifying its name and version. See Example 13-15 and Table 13-7.
Example 13-15. Obtaining a query service from an XML:DB remote collection
XPathQueryService queryService =
collection.getService("XPathQueryService", "1.0");
|
Service name(s) |
Java class (org.exist.xmldb) |
Description |
|
XPathQueryService XQueryService |
RemoteXPathQueryService |
XML:DB XPath Service. In eXist, XQuery is also offered. |
|
CollectionManagementService CollectionManager |
RemoteCollectionManagementService |
XML:DB Collection Management Service. |
|
XUpdateQueryService |
RemoteXUpdateQueryService |
XML:DB XUpdate Service. |
|
UserManagementService |
RemoteUserManagementService |
eXist User Management Service extension for XML:DB. |
|
DatabaseInstanceManager |
RemoteDatabaseInstanceManager |
eXist Database Instance Management Service extension for XML:DB. |
|
IndexQueryService |
RemoteIndexQueryService |
eXist Index Query Service extension for XML:DB. |
|
Table 13-7. eXist XML:DB services |
||
WARNING
With the XML:DB API in eXist, you are responsible for cleaning up after yourself!
That is to say, if you open a collection, you must close the collection when you are finished with it; likewise, if you open a resource, you must free that resource when you are finished with it.
You can close a collection by calling its close method, and you can free a resource by casting it to an org.exist.xmldb.EXistResource and calling its freeResources method.
Examples
The source code of four small complete examples of using the XML:DB Remote API from Java—to store a file, retrieve a file, query the database, and remove a file—are included in the folder chapters/integration/xmldb-client of the book-code Git repository (see “Getting the Source Code”).
To compile the examples, enter the xmldb-client folder and run mvn package.
Store example
You can then execute the StoreApp example like so:
java -jar xmldb-client-store/target/xmldb-client-store-1.0-example.jar
This shows the available arguments for using the StoreApp.
A complete example of using the application might look like the following, which would upload the file /tmp/large.xml to the collection /db/my-new-collection in eXist:
java -jar xmldb-client-store/target/xmldb-client-store-1.0-example.jar
localhost 8080 /tmp/large.xml true /db/my-new-collection admin
NOTE
The XML:DB StoreApp example takes an extra parameter compared to the StoreApp examples for other APIs, as the API requires you to know if you are storing an XML or binary document. You may use true for XML documents, and false for binary documents.
Retrieve example
You can execute the RetrieveApp example like so:
java -jar xmldb-client-retrieve/target/xmldb-client-retrieve-1.0-example.jar
This shows the available arguments for using the RetrieveApp.
A complete example of using the application might look like the following, which would download the resource db/my-new-collection/large.xml to the file in the current directory named large.xml:
java -jar xmldb-client-retrieve/target/xmldb-client-retrieve-1.0-example.jar
localhost 8080 /db/my-new-collection/large.xml admin > large.xml
Query example
You can execute the QueryApp example like so:
java -jar xmldb-client-query/target/xmldb-client-query-1.0-example.jar
This shows the available arguments for using the QueryApp.
A complete example of using the application might look like the following, which would find the family names of all of the people in all of the documents in the collection /db/my-new-collection in the database:
java -jar xmldb-client-query/target/xmldb-client-query-1.0-example.jar
localhost 8080 "for \$person in //person return \$person/family"
/db/my-new-collection admin
WARNING
On non-Windows platforms, you must escape the $ character used in XQuery for variables when sending the query in a command line from the terminal by prefixing with a \ character. If you do not escape this symbol, the shell interpreter will try to interpret them as environment variables, which will result in an invalid XQuery and therefore anorg.exist.xmldb.XMLDBException response from the XML:DB server API.
Remove example
You can execute the RemoveApp example like so:
java -jar xmldb-client-remove/target/xmldb-client-remove-1.0-example.jar
This shows the available arguments for using the RemoveApp.
A complete example of using the application might look like the following, which would remove the collection /db/my-new-collection from the database:
java -jar xmldb-client-remove/target/xmldb-client-remove-1.0-example.jar
localhost 8080 /db/my-new-collection admin
RESTXQ
RESTXQ itself is not an API; rather, it is a framework that enables you to build your own APIs. The beauty of this is that you can construct small and elegant application-specific APIs for the Web or internal purposes using REST over HTTP.
“Building Applications with RESTXQ” covers the specifics of building REST APIs with RESTXQ, so we will not repeat those here. For the purposes of integrating your custom RESTXQ REST APIs with other applications or processes, the main requirement is a decent HTTP client, for which we refer you back to the information in “REST Server API”.
With RESTXQ the developer declares a series of HTTP request constraints against an XQuery function by use of XQuery 3.0 annotations; the function with constraints is then known as a resource function. When eXist receives an incoming HTTP request it checks all of the known resource functions to see if the HTTP request could be serviced by one of them; if so, the function is executed, and parameters from the HTTP request may be extracted and injected into the function call as parameters to that function. The resource function is then (apart from user-defined processing) responsible for constructing an appropriate HTTP response.
For comparison with the REST Server API, we include with this chapter the XQuery file restxq-stored-query/image-api.xqm, which is a port of the rest-stored-query/image-api.xq file, discussed in “Executing stored queries”. We hope that this will aid you in recognizing the different coding styles for using RESTXQ and stored queries with the REST Server API.
To use the RESTXQ version of image-api.xq, you simply need to store it into any collection in the database for which RESTXQ is enabled (by default, this is all database collections apart from those of specific applications in subcollections of /db/apps that have chosen to disable RESTXQ). Also, you need to ensure that: 1) the calling user has execute access within the database to the image-api.xqm file, so that it may be executed; 2) the collection /db/images exists and is writable by the calling user; and 3) the Image XQuery extension module is enabled in$EXIST_HOME/conf.xml.
Recall from “Executing stored queries” that the custom image-api REST API performs these three functions:
§ Stores a JPEG image received over HTTP into the database
§ Retrieves a stored image from the database
§ Retrieves a thumbnail representation of an image from the database
Let’s now look at the XQuery code in detail, and how it performs each of these functions.
Store a JPEG image received over HTTP into the database
The API provided by the image-api.xqm file allows you to send an HTTP POST to it via the RESTXQ API to store a JPEG image. In your HTTP request, if you set the Content-Type to image/jpeg and include the content of a JPEG image in the body of the request, it will be stored into the database and image-api.xqm will return a Location and identifier in the HTTP response for the image.
Consider the following example, where we use cURL to make a request to a RESTXQ resource function that stores a JPEG image into the database:
curl -i -X POST -H 'Content-Type: image/jpeg' --data-binary @/tmp/cats.jpg
http://localhost:8080/exist/restxq/image
Let’s look at how the code in our image-api.xqm stored query handles this request:
declare
%rest:POST![]() ("{$image-data}")
("{$image-data}") ![]()
%rest:path("/image") ![]()
%rest:consumes("image/jpeg") ![]()
function ii:store-image($image-data) { ![]()
let $image-name := util:uuid() || ".jpg"
let $db-path :=
xmldb:store($ii:image-collection, $image-name, $image-data,
"image/jpeg") ![]()
let $uri-to-resource := rest:uri() || "/" || $image-name ![]()
return
(
<rest:response> ![]()
<http:response status="{$ii:HTTP-CREATED}"> ![]()
<http:header name="Location" value="{$uri-to-resource}"/>
</http:response>
</rest:response>
,
<identifier>{$image-name}</identifier> ![]()
)
};
![]()
We declare that we are only interested in processing HTTP POST requests.
![]()
We request to have the body of the POST request extracted into the function parameter $image-data.
![]()
We declare that we are only interested in processing HTTP requests that have a URI (relative to the RESTXQ API) of /image.
![]()
We declare that we are only interested in consuming HTTP requests that have a Content-Type of image/jpeg.
![]()
The $image-data will receive the body of the HTTP POST when the function is executed, as we declared in ![]() .
.
![]()
We call the function xmldb:store on the body of the POST request. This function stores the image into the database, and returns a path to the image in the database.
![]()
We construct a public, dereferenceable URI to the stored image. Of particular interest here is the call to rest:uri, which gives us the absolute URI of the executing resource function.
![]()
The response of the function will be a sequence, where the first item will instruct RESTXQ about the HTTP response and the second item will be the body of the HTTP response.
![]()
We instruct RESTXQ to set the HTTP response code to 201 Created and add an HTTP header declaring a URI to the location of the stored image.
![]()
As an added bonus, we also return an identifier for the created resource in the body of the response; this identifier may then be used in subsequent requests to the API.
Retrieve a stored image from the database
The API provided by the image-api.xqm file allows you to send an HTTP GET to it via the RESTXQ API to get a previously stored image. If the URI in your HTTP request includes an identifier of an image previously stored by the API, then it will return the content of that image.
Consider the following example, where we use cURL to make a request to a RESTXQ resource function that returns an image from the database:
curl http://localhost:8080/exist/rest/db/image/
24a85a52-5031-4bac-8843-4c7e7701905b.jpg
NOTE
24a85a52-5031-4bac-8843-4c7e7701905b.jpg is the identifier of the image returned by the API when we stored it in the previous section.
Let’s look at how the code in our image-api.xqm stored query handles this request:
declare
%rest:GET ![]()
%rest:path("/image/{$image-name}") ![]()
%rest:produces("image/jpeg") ![]()
%output:method("binary") ![]()
function ii:get-image-rest($image-name) { ![]()
let $image := ii:get-image($image-name) ![]()
return
if(not(empty($image)))then
$image ![]()
else
<rest:response>
<http:response status="{$ii:HTTP-NOT-FOUND}"> ![]()
<http:header name="Content-Type" value="application/xml"/>
</http:response>
</rest:response>
};
![]()
We declare that we are only interested in processing HTTP GET requests.
![]()
We declare that we are only interested in processing HTTP requests that have a URI (relative to the RESTXQ API) starting with /image and followed by any path segment, which should be extracted into the function parameter $image-name.
![]()
We declare that we are only interested in consuming HTTP requests that can accept a response with Content-Type image/jpeg.
![]()
We declare that we would like any body returned by our resource function to be serialized to the HTTP response as binary.
![]()
The $image-name will receive the value of a path segment from the URI when the function is executed, as we declared in ![]() .
.
![]()
We call the function ii:get-image with the identifier of the image ($image-name). This function has been omitted for brevity, but all you need to know right now is that it retrieves an image previously stored into the database; otherwise (i.e., if there is no image with that identifier in the database), it returns an empty sequence.
![]()
We have an image, so we return it from the resource function to be serialized to the HTTP response.
![]()
Alternatively, if there was no image in the database matching the identifier, we set the response status to 404 Not Found.
Retrieve a thumbnail representation of an image from the database
The API provided by the image-api.xqm file allows you to send an HTTP GET to it via the RESTXQ API to get a thumbnail of a previously stored image. If the URI in your HTTP request includes an identifier of an image previously stored by the API prefixed by thumbnail/, it will return a thumbnail representation of that image. The image-api.xqm file will generate the thumbnail on the fly, store it into the database, and return it; if the same thumbnail is requested a second time, the API serves it from the database rather than regenerating it.
Consider the following example, where we use cURL to make a request to a RESTXQ resource function to return an image thumbnail:
curl http://localhost:8080/exist/restxq/image/thumbnail/
24a85a52-5031-4bac-8843-4c7e7701905b.jpg
NOTE
Observe the thumbnail/ before the identifier of the image, in comparison to the URI used in “Retrieve a stored image from the database”.
The code in our image-api.xqm file for handling this request is actually very similar to that for retrieving an image, except for a few minor changes. Therefore, we will only really examine the differences here:
declare
%rest:GET
%rest:path("/image/thumbnail/{$image-name}") ![]()
%rest:produces("image/jpeg")
%output:method("binary")
function ii:get-or-create-thumbnail($image-name) {
let $thumbnail-image-name := "thumbnail-" || $image-name, ![]()
$thumbnail-db-path := $ii:image-collection || "/" || $thumbnail-image-name
return
(: does the thumbnail already exist in the database? :)
if(util:binary-doc-available($thumbnail-db-path))then
(: yes, return the thumbnail :)
ii:get-image($thumbnail-image-name)
else
(: no, does the original image of which we want a
thumbnail exist in the database? :)
let $image := ii:get-image($image-name)
return
if(not(empty($image)))then
(: yes, create the thumbnail :)
let $thumbnail :=
image:scale($image, (400, 200), "image/jpeg"),
$thumbnail-db-path :=
xmldb:store(
$ii:image-collection,
$thumbnail-image-name,
$thumbnail,
"image/jpeg")
return
$thumbnail
else
<rest:response>
<http:response status="{$ii:HTTP-NOT-FOUND}">
<http:header name="Content-Type"
value="application/xml"/>
</http:response>
</rest:response>
};
![]()
This is similar to our code for retrieving an image, except as well as the identifier of the image we declare that we are only interested in URI paths that also have a /thumbnail segment.
![]()
Instead of retrieving an image, we now create or retrieve a thumbnail. The details of this are out of scope here, and the code is not too difficult to understand; the main point of interest is the call to the extension image:scale, which will actually generate the thumbnail image.
Hopefully, you will agree that the RESTXQ version is simpler and easier to understand than the REST Server API version. For example, in this specific example we have not had to handle unwanted requests and return an HTTP 400 Bad Request or HTTP 406 Method Not Allowed, as the RESTXQ API takes care of that for us.
XQJ
XQJ is a standardized Java API developed by the JCP (Java Community Process) as JSR-225. A JSR (Java Specification Request) is centered solely on Java, and thus the API is not really suitable for direct use in other programming languages. The implementation of the XQJ server in eXist is really just a few extensions to eXist’s REST Server, with any XQJ client expected to communicate using HTTP via the REST Server API. If you like the XQJ API but do not like Java, then theoretically there is nothing to stop you from implementing an XQJ-like client in any language, and it should not be too difficult providing you understand the REST Server API.
XQJ JSR-225 focuses solely on XQuery: it allows you to send an XQuery to the server, have it executed, and receive the results. It also allows you to prepare XQuery expressions that can be parameterized and executed later (similar to prepared statements in JDBC). While XQJ doesnot directly provide any facilities for managing documents or the database, it is possible to achieve similar functionality by using eXist’s XQuery xmldb extension module (see the entry for xmldb in Appendix A).
eXist has chosen only to implement a server API for use by XQJ; it does not provide an XQJ client implementation. This is mainly because there is an excellent and freely available XQJ client implementation from Charles Foster at http://www.xqj.net, which you may use in your own Java programs.
There are just four main concepts that you need to understand in the XQJ API to make requests to eXist—data sources, connections, expressions, and result sequences:
XQDataSource
The data source provides the main driver of XQJ and defines how you connect to the server. With the net.xqj.exist.ExistXQDataSource implementation from xqj.net, you need to set two properties to be able to connect to eXist (see Example 13-16):
serverName
This is the hostname or IP address of the eXist server that you wish to connect to. If you are running your XQJ client on the same machine as eXist, you may use either localhost or 127.0.0.1.
port
This is the TCP port that the eXist server you wish to connect to is listening on. If you have not reconfigured this setting in eXist, it will be 8080 by default.
Example 13-16. Setting up the XQDataSource for connecting to eXist
final XQDataSource xqs = new ExistXQDataSource();
xqs.setProperty("serverName", "localhost");
xqs.setProperty("port", "8080");
XQConnection
The connection represents an XQJ-connected session with the server and is obtained from the data source. When requesting the connection from the data source, you should provide your username and password for accessing eXist. The eXist XQJ implementation uses REST, so there is no persistent connection; rather, HTTP calls are made as needed by the XQConnection object. However, you should always call close on the XQConnection object to clean up any retained objects. See Example 13-17.
Example 13-17. Opening an authenticated XQConnection to eXist
XQConnection connection = dataSource.getConnection("admin", "mypassword");
XQExpression
The expression represents an XQuery expression that may be sent to the server and executed. It is also possible to use XQPreparedExpression if you wish to execute the same expression multiple times with different parameters (e.g., external variable bindings).
XQResultSequence
As a result of executing an XQExpression or XQPreparedExpression, a result sequence is generated that may be iterated over to retrieve results from the server.
Examples
The source code of a simple example of using the xqj.net XQJ API from Java to query the database is included in the folder chapters/integration/xqj-client of the book-code Git repository (see “Getting the Source Code”).
To compile the example, enter the xqj-client folder and run mvn package.
Query example
You can then execute the QueryApp example like so:
java -jar xqj-client-query/target/xqj-client-query-1.0-example.jar
This shows the available arguments for using the QueryApp.
A complete example of using the application might look like the following, which would find the family names of all of the people in all of the documents in the collection /db/my-new-collection in the database:
java -jar xqj-client-query/target/xqj-client-query-1.0-example.jar localhost 8080
"for \$person in //person return \$person/family" /db/my-new-collection admin
WARNING
On non-Windows platforms, you must escape the $ character used in XQuery for variables when sending the query in a command line from the terminal by prefixing with a \ character. If you do not escape this symbol, the shell interpreter will try to interpret them as environment variables, which will result in an invalid XQuery and therefore an XQJException:XQJQS001 - Invalid XQuery syntax response from the XQJ API.
Deprecated Remote APIs
From eXist 2.0 onward, several APIs that were available in previous versions are now deprecated. These APIs have been deprecated either because the eXist developers felt that they were infrequently used by the community, because they had been replaced by more modern APIs, or because the contributors of these APIs no longer supported them. We’ll look at a few of them here.
Atom Servlet
The Atom Servlet in eXist provides an implementation of the IETF Atom syndication format and publishing protocol. The Atom Servlet was originally written in Java, but its developers felt that a newer implementation written in XQuery would not only offer better support, but also be easier to maintain.
Currently the Atom Servlet is still present in eXist, but if you are not already using it, we would advise you not to start! An Atom API implemented in XQuery is already under development and should hopefully be released in the near future as a replacement for the Atom Servlet.
SOAP API
Since eXist 0.8, the Axis and Admin Servlets have provided a rudimentary SOAP API for eXist. The Axis Servlet provides retrieval and query services, while the Admin Servlet provides services for storing and removing documents and collections. Both Servlets are implemented with what is now quite an old version of Apache Axis, and use the RPC-encoded form of SOAP. Around late 2006 it was widely expected that the SOAP API written in Java would be replaced by XQuery web services implemented for the SOAP Server (see “SOAP Server”), but unfortunately that work was never completed.
The use of SOAP today is often considered bloated and convoluted, and hence is often much discouraged in favor of REST. The SOAP API in eXist was deprecated with the release of eXist 2.0. Instead, it is recommended to use either the RESTXQ API, the REST Server API, or the XML-RPC API. If enough interest in SOAP appears again from the community, it is most likely that a new SOAP implementation will be developed based on XQuery 3.0 annotations influenced by JAX-WS, in a similar fashion to RESTXQ (see “RESTXQ”).
TIP
For Microsoft .NET developers there is still something of an advantage in using the SOAP API because of the wizard-driven web service client proxy generation tools offered by Microsoft Visual Studio. While we would suggest using the REST API if you are investing in eXist-db in the medium to long term, the SOAP API can be the easiest and fastest route to a working application for .NET developers in the short term.
SOAP Server
The SOAP Server was developed in 2006 as a mechanism for transparently wiring SOAP requests and responses to XQuery functions. The SOAP Server automatically generates WSDL (Web Services Description Language) for an XQuery library module and marshals and demarshals the function parameters and results from and into a SOAP envelope. The SOAP Server attempted to deliver both RPC and Document Literal forms of SOAP web services transparently.
The SOAP Server was a useful experiment in enabling XQuery to deliver enterprise-style web services, but it was always underdeveloped and never lived up to its potential to replace the SOAP API (discussed in the previous section). The SOAP Server is still available in eXist 2.0, but it has been deprecated for some time and it is not recommended for production use. If you wish to provide SOAP web services from XQuery, it is recommended that you either build on top of RESTXQ (see “RESTXQ”) and manage the SOAP envelopes and WSDL generation yourself, or collaborate with the eXist community to build a successor.
Remote API Libraries for Other Languages
While many of the APIs discussed in this chapter are programming language–agnostic, the majority of our examples are provided in Java. There are also various other APIs, libraries, and bindings to make working with eXist from languages other than Java easier.
Please note that these are third-party, open source community offerings, and as such they are not maintained by the eXist project, nor have we personally assessed the quality of these offerings. Rather, we include a list of them for completeness and to act as signposts for you.
Community APIs for eXist by programming language
§ JavaScript
existdb-node by Wolfgang Meier
Connects to eXist via its REST API
§ Perl
XML-ExistDB by Mark Overmeer
Connects to eXist via its XML-RPC API
PheXist by Oscar Celma
Connects to eXist via its SOAP API. Also available for PHP
§ Python
pyexist by Samuel Abels
Connects to eXist via its REST API
EULexistdb by the Digital Programs and Systems Software Team of Emory University Libraries
Connects to eXist via its XML-RPC API. Can also be used in conjunction with Django
zopyx.existdb for Plone by Andreas Jung
Connects to eXist via its REST API. An eXist plug-in for Plone CMS
§ PHP
php-eXist-db-Client by CuAnnan
Connects to eXist via its XML-RPC API
PheXist by Oscar Celma
Connects to eXist via its SOAP API. Also available for PHP
§ Ruby
eXist API by Jenda Sirl
Connects to eXist via its XML-RPC API
rb_exist by Miquel Sabaté Solà
Connects to eXist via its REST API. It was inspired by pyexist
§ Scala
XQuery for Scala by Dino Fancellu
Connects to eXist via its XQJ API
Local APIs
A local API enables you to embed eXist into your own Java application by placing the eXist libraries and configuration files in the classpath of your application and making function calls to eXist via one of its local APIs. When eXist is embedded in your application, both your own application’s code and eXist’s application code run within the same JVM process.
While there is nothing to stop you from calling eXist’s own classes and functions directly, this is strongly discouraged and not officially supported by the eXist development team. Rather, you are advised to use one of the two available local APIs, described in “XML:DB Local API”and “Fluent API”.
So, which local API should you use? There are a few factors to consider:
§ Do you want to be able to switch your application between local and remote eXist instances? If so, then use the XML:DB API, as it is a single API to learn that supports either local or remote eXist servers.
§ If you will only ever use eXist locally in embedded operations, then the Fluent API provides a more modern and simpler API for working with eXist.
WARNING
When you embed eXist into your own application, because eXist shares the same JVM process and memory space as your application, should your application exhaust the memory available to the JVM or crash, this can affect the integrity of your eXist database. Take care when creating and freeing resources within your application and when exiting the JVM.
Whichever local API you choose, one challenge when embedding eXist into your own application is ensuring that you have all of the dependencies and configuration files that eXist relies on bundled with your application and available on the classpath. To a certain extent, the libraries bundled with eXist that you will also need to bundle with your application will depend on which features of eXist you wish to use, but at an absolute minimum you will need the runtime dependencies listed in Table 13-8.
|
Library |
Description |
|
$EXIST_HOME/exist.jar |
Contains the eXist core implementation. |
|
$EXIST_HOME/start.jar |
Contains the eXist startup helpers. Dependency of eXist core. |
|
$EXIST_HOME/lib/core/xmldb.jar |
XML:DB API library. |
|
$EXIST_HOME/lib/core/commons-io-2.4.jar |
Apache Commons I/O library. Dependency of eXist’s XML:DB client library and eXist core. |
|
$EXIST_HOME/lib/core/pkg-repo.jar |
EXPath PKG Repository library. Dependency of eXist core. |
|
$EXIST_HOME/lib/core/commons-pool-1.6.jar |
Apache Commons Pool library. Dependency of eXist’s XML:DB client library. |
|
$EXIST_HOME/lib/core/quartz-2.1.6.jar |
Quartz Scheduler library. Dependency of eXist core. |
|
$EXIST_HOME/lib/core/gnu-crypto-2.0.1-min.jar |
GNU Crypto minimum library. Dependency of eXist core. |
|
$EXIST_HOME/lib/core/commons-codec-1.7.1.jar |
Apache Commons Codec library. Dependency of eXist core. |
|
$EXIST_HOME/lib/core/antlr-2.7.7.jar |
Antlr Parser Generator library. Dependency of eXist core. |
|
$EXIST_HOME/lib/core/log4j-1.2.17.jar |
Log4J logging library. Dependency of eXist core. |
|
$EXIST_HOME/lib/endorsed/xercesImpl-2.11.0.jar |
Apache Xerces2 XML Parser library. Dependency of eXist core. |
|
$EXIST_HOME/lib/endorsed/xml-resolver-1.2.jar |
Apache XML Commons Resolver library. Dependency of eXist core. |
|
$EXIST_HOME/tools/aspectj/lib/aspectrt-1.7.1.jar |
AspectJ AOP library. Dependency of eXist core. |
|
$EXIST_HOME/lib/optional/servlet-api-3.0.jar |
Java Servlet API. Dependencya of eXist core. |
|
$EXIST_HOME/conf.xml |
eXist’s configuration file. |
|
$EXIST_HOME/log4j.xml |
eXist’s log4j logging configuration file. |
|
Table 13-8. Minimum dependencies for embedding eXist 2.1 in your own application |
|
aAn accidental requirement of eXist 2.0 and 2.1, which will no longer be needed as a dependency for embedded operation in future versions.
XML:DB Local API
Unlike the XML:DB Remote API, which sends data back and forth across the network to eXist using the XML-RPC protocol, the Local API instead talks directly to eXist’s internal Java API through function calls within the same JVM process. It is relatively trivial to switch your code between the local and remote modes of operation of the XML:DB API, so if you want to learn a single API and are unsure of which to choose or wish to use both local and remote modes, it can be a good choice. In addition, as the XML:DB API is standardized, you could potentially use it to talk to other XML document systems as well as eXist.
In addition to the runtime dependencies set out in Table 13-8, you will also need the one in Table 13-9.
|
Library |
Description |
Scope |
|
$EXIST_HOME/lib/core/xmlrpc-client-3.1.3.jar |
Apache XML-RPC client library. Dependency of eXist’s XML:DB API, even when using XML:DB local mode! |
Runtime |
|
Table 13-9. Additional dependency for using the XML:DB Local API |
||
The XML:DB Local API is almost identical to the XML:DB Remote API (see “XML:DB Remote API”), so we will only discuss where it differs from the Remote API. Therefore, reading “XML:DB Remote API” first should be considered a requirement for understanding the Local API. Differences you need to be aware of are:
Collections
Conceptually, collections in the Local API are exactly the same as in the Remote API; the only difference is the URI format that you use to access them. As the database is running in the same JVM there is no remote server, so you need not provide the server name, port, or endpoint in the URI. Instead, you just need the collection path. See Example 13-18.
Example 13-18. Opening an XML:DB local collection to eXist
Collection collection =
DatabaseManager.getCollection("xmldb:exist://db", "admin", "");
Database shutdown
When you first access an embedded database collection, an eXist embedded database is automatically started for you. To maintain database consistency, you are responsible for cleanly shutting down the eXist database either before your application terminates or when you have finished with the database inside your application. See Example 13-19.
Example 13-19. Shutting down eXist with the XML:DB Local API
final DatabaseInstanceManager manager =
(DatabaseInstanceManager) coll.getService("DatabaseInstanceManager", "1.0");
try {
coll.close();
} finally {
manager.shutdown();
}
TIP
Here’s a tip: to ensure that the database is always shut down during normal operation of your application, it is recommended that you set up and tear down the database using a try/finally block. That is to say, all of your database interaction should take place inside an encapsulating try block, and your final collection close and subsequent Database InstanceManager shutdown call should both happen inside the same finally block that corresponds to the initial try block. See Example 13-20.
Example 13-20. Ensuring clean shutdown when using the XML:DB Local API
Collection coll = null;
try {
coll =
DatabaseManager.getCollection("xmldb:exist:///db" username, password);
//TODO all of your database interaction code is called from here
} finally {
if(coll != null) {
final DatabaseInstanceManager manager =
(DatabaseInstanceManager) coll.getService(
"DatabaseInstanceManager", "1.0");
try {
coll.close();
} finally {
manager.shutdown();
}
}
}
Example
The source code of a small example of using the XML:DB Local API from Java to store a file, query the database, and remove a file is included in the folder chapters/integration/xmldb-embedded of the book-code Git repository (see “Getting the Source Code”).
To compile the example, enter the xmldb-embedded folder and run mvn package.
XML:DB local example
You can then execute the ExampleApp example like so:
java -jar xmldb-embedded-example/target/xmldb-embedded-example-1.0-example.jar
This shows the available arguments for using the ExampleApp.
A complete example of using the application might look like the following:
java -jar xmldb-embedded-example/target/xmldb-embedded-example-1.0-example.jar
/db/my-new-collection /tmp/test.xml "//thing" admin
Given the preceding arguments, the example application would perform the following steps:
1. Start up the embedded eXist database.
2. Get a reference to the collection /db/my-new-collection in eXist (the collection will be created if it does not already exist).
3. Upload the file /tmp/test.xml to the collection /db/my-new-collection in eXist (again, the collection will be created if it does not already exist).
4. Execute the query //thing against the /db/my-new-collection collection, and print the results.
5. Remove the /db/my-new-collection/test.xml file.
6. Shut down the eXist database.
Fluent API
The Fluent API was developed by PiotrKaminski and contributed to the eXist project in 2007. The Fluent API has the goal of making it much simpler to use eXist from within your own Java applications as an embedded database. It follows the design principle of a Fluent interface, which should make Java code interacting with eXist more readable. The current best source of Fluent API documentation is within the Fluent API JavaDocs.
The Fluent API, just like the XML:DB Local API, talks directly to eXist’s internal Java API through function calls within the same JVM process.
In addition to the runtime dependencies set out in Table 13-8, you will also need the one listed in Table 13-10.
|
Library |
Description |
Scope |
|
$EXIST_HOME/lib/extensions/exist-fluent.jar |
Fluent API Library |
Compile |
|
Table 13-10. Additional dependency for using the Fluent API |
||
There are just four main concepts that you need to understand in the Fluent API to interact with eXist:
Databases
The Fluent API makes use of Database to represent a distinct connection by a user to an embedded eXist instance. Connecting to a database requires authentication, after which all subsequent operations on that database and its folders or documents use the same credentials. Typically, you will work with a single Database instance. See Example 13-21.
Example 13-21. Starting an eXist embedded instance with the Fluent API
Database.startup(new File("conf.xml"));
Database db = Database.login("admin", "");
Folders
A Folder in the Fluent API maps onto a collection in the eXist database. Folders are the primary means for interacting with the Fluent API. From a folder you may manage subfolders and documents. See Example 13-22.
Example 13-22. Getting a Folder reference from the Fluent API
Folder folder = db.getFolder("/db");
Documents
A Document in the Fluent API maps onto a document in the eXist database. The Fluent API allows you to work with both eXist’s XML and binary documents. Binary documents will be of type org.exist.fluent.Document, and XML documents are of a subtype of that,org.exist.fluent.XMLDocument. See Example 13-23.
Example 13-23. Retrieving a Document from the Fluent API
Document doc = folder.documents().get("some-document.xml");
QueryServices
A QueryService in the Fluent API allows you to execute XQueries against folders or documents in the database. A QueryService may be retrieved from a database, a folder, or a document object (if you want finer-grained control over the query context). The result of executing a query with the QueryService is an instance of org.exist.fluent.ItemList, which you may iterate over to obtain individual org.exist.fluent.Item instances, from which you may then retrieve a result value. See Example 13-24.
Example 13-24. Querying a folder with the Fluent API
ItemList results = folder.query.all("//my-node");
for(Item result : results) {
System.out.println(result.value);
}
Example
The source code of a small example of using the Fluent API from Java to store a file, query the database, and remove a file is included in the folder chapters/integration/fluent-embedded of the book-code Git repository (see “Getting the Source Code”).
This example is a direct port of the XML:DB Local API example from the previous section, and hopefully will allow you to easily compare the code of the two approaches and decide which you prefer.
To compile the example, enter the fluent-embedded folder and run mvn package.
Fluent API example
You can then execute the ExampleApp example like so:
java -jar fluent-embedded-example/target/fluent-embedded-example-1.0-example.jar
This shows the available arguments for using the ExampleApp.
A complete example of using the application might look like the following:
java -jar fluent-embedded-example/target/fluent-embedded-example-1.0-example.jar
/db/my-new-collection /tmp/test.xml "//thing" admin
Given the preceding arguments, the example application would perform the following steps:
1. Start up the embedded eXist database.
2. Get a reference to the folder (collection) /db/my-new-collection in eXist (the folder will be created if it does not already exist).
3. Upload the file /tmp/test.xml to the folder /db/my-new-collection in eXist (again, the folder will be created if it does not already exist).
4. Execute the query //thing against the /db/my-new-collection folder, and print the results.
5. Remove the /db/my-new-collection/test.xml file.
6. Shut down the eXist database.