HDInsight Essentials, Second Edition (2015)
Chapter 3. HDInsight Service on Azure
Microsoft Azure is a flexible cloud platform that enables enterprises of any size to quickly rent resources on demand to build, deploy, and manage a wide range of IT applications. HDInsight is a 100 percent Apache Hadoop-based cloud service that leverages the Azure platform.
In this chapter, we will discuss how to build your Data Lake using the HDInsight service on the Azure cloud, which can scale to petabytes on demand. We will cover the following topics:
· Registering for an Azure account
· Provisioning an HDInsight cluster
· HDInsight Management dashboard
· Exploring a cluster using the remote desktop
· Deleting the HDInsight cluster
· HDInsight Emulator for development
Registering for an Azure account
The first step to access the HDInsight cloud service is to open an account with Microsoft Azure.
From the Microsoft Azure management portal, you can get information about the features, pricing, documentation, and support on various services provided by Azure. HDInsight is one of these services grouped under data management services.
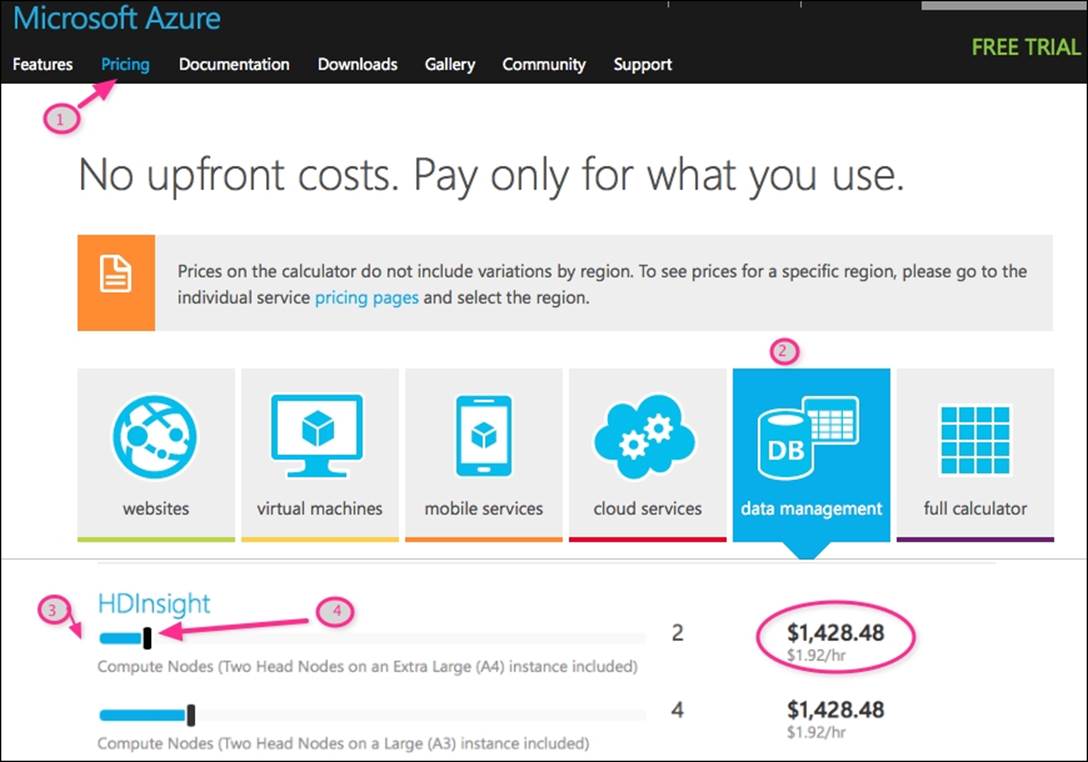
The following steps show you how to estimate the monthly pricing for an HDInsight cluster:
1. Click on Pricing.
2. Next, click on the data management icon.
3. Next, you can select the desired configuration Two Head Nodes on an Extra Large (A4) instance included or Two Head Nodes on a Large (A3) instance included. The head nodes will host the master Hadoop services that include HDFS NameNode, YARN ResourceManager, and other central services.
4. Next, you can slide the bar, as shown in the following screenshot, to change the number of compute nodes. The compute nodes are the worker nodes and will host the data nodes and YARN NodeManager services.
5. In the following screenshot, I have selected extra large head nodes and 2 compute nodes. The price you see is the average monthly cost, which is $1,428.48 based on $1.92/hour and assuming 31 days and each day has 24 hours.
Azure storage
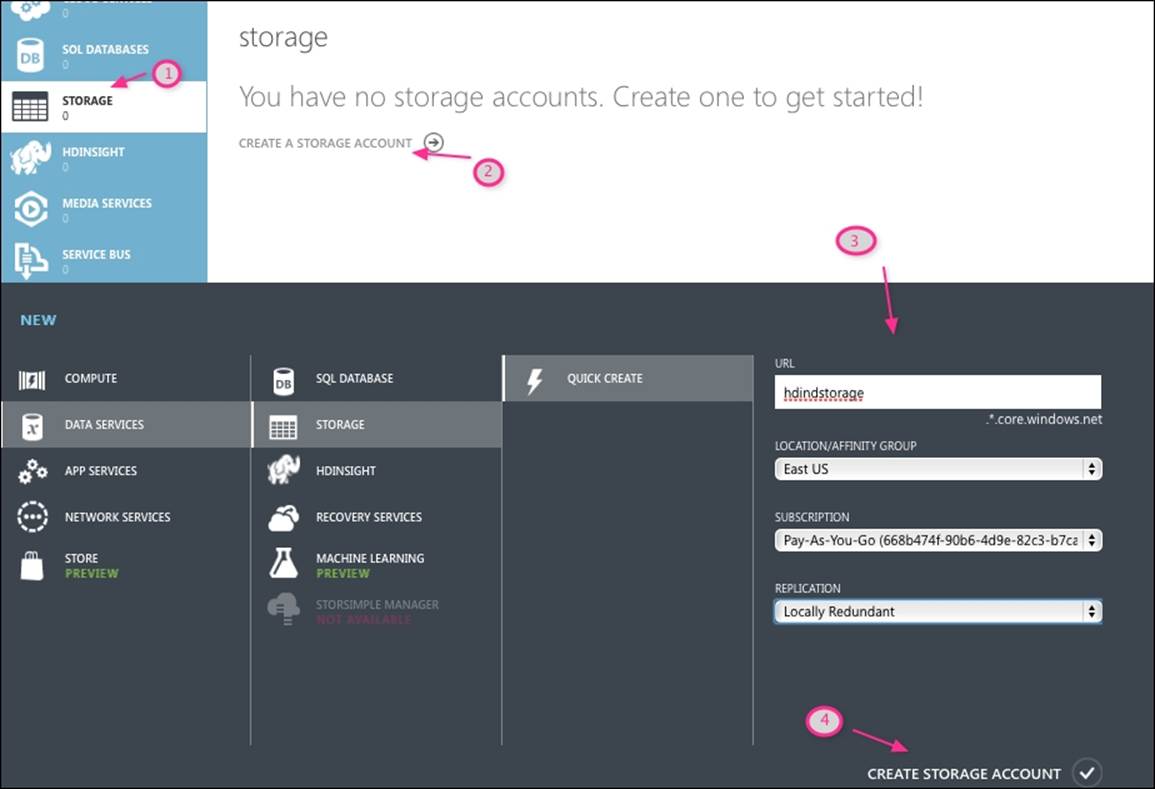
Before you provision a new HDInsight cluster, it is required that you create a storage account in Azure. To create a new storage account, first login to the Microsoft Azure management portal and then follow the given steps, as shown in the following screenshot:
1. Click on STORAGE on the left-hand side menu.
2. Click on CREATE STORAGE ACCOUNT.
3. Select your preferences, which are as follows:
· URL must be a unique name
· Location should be ideally geographically closer to your data center to reduce network latency
· Replication mode, where you can select from one of the following four options:
· Locally Redundant Storage (LRS) where data is replicated in three different nodes within the same region.
· Geo-Redundant Storage (GRS), which is similar to LRS, replicates data three times within the local region; however, the transactions also get queued to a remote secondary region that is hundreds of miles away from the primary site.
· Read Access Geo-Redundant Storage (RA-GRS), which is an improved version of GRS, allows read-only access to the storage data in the secondary region.
· Zone Redundant Storage (ZRS), which fits between LRS and GRS in terms of durability and price. ZRS stores three replicas of data across two or three facilities but typically in the same region.
· For the test cluster, I have selected the Locally Redundant option.
4. Click on CREATE STORAGE ACCOUNT to finally create it:
Provisioning an HDInsight cluster
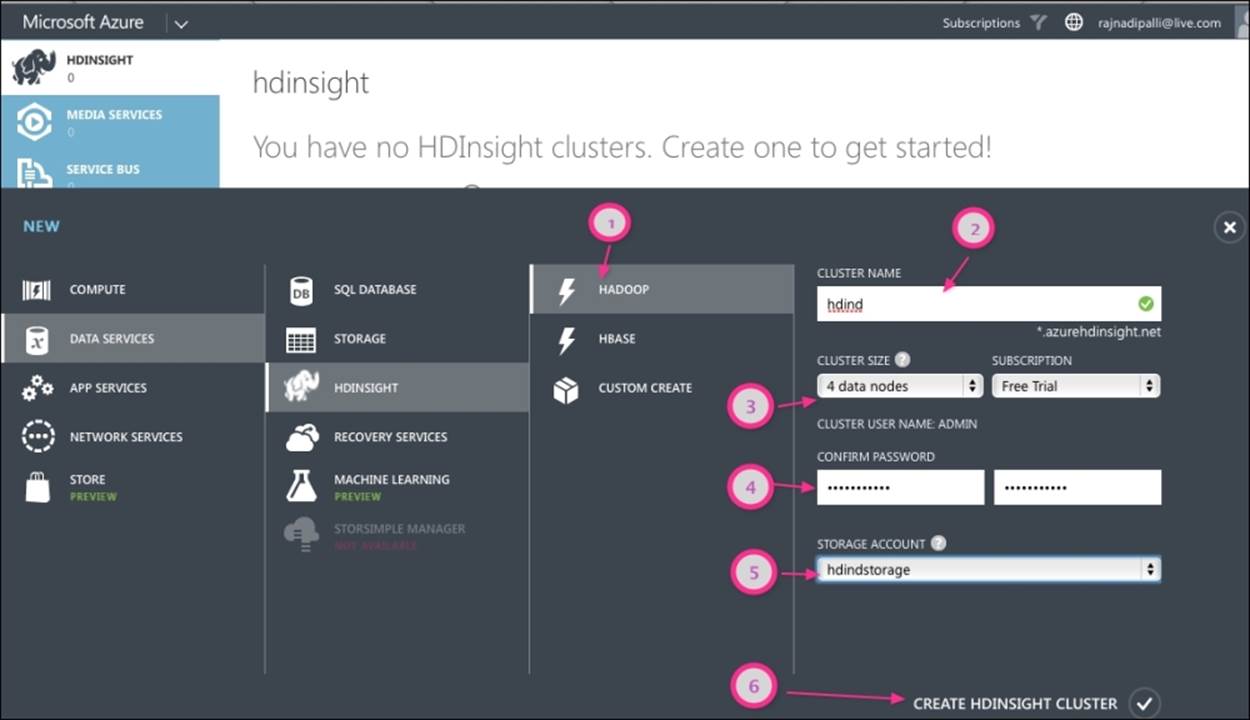
After the storage is successfully created online, we can create an HDInsight cluster. From the Azure Management Portal, select HDInsight and click on CREATE HDINSIGHT CLUSTER. Perform the following detailed steps, which are shown in the following screenshot:
1. Click on the Hadoop Menu option, which is used for quick creation. If you need customized settings, then you can use CUSTOM CREATE.
Note
HDInsight does have additional options for HBase and Storm, which we will review in Chapter 8, HDInsight 3.1 New Features.
2. Select a unique cluster name that should be a word between 3 and 63 characters and can support letters, numbers, and hyphens only. I have selected hdind and the complete URL is hdind.azurehdinsight.net.
3. Select the desired number of data nodes in the cluster. Currently, Azure supports 1, 2, 4, 8, 16, and 32 nodes.
4. Next, select a password for the cluster. The password must be at least 10 characters, including one uppercase letter, one lowercase letter, one number, and one special character. The default administration user for accessing the cluster is Admin.
5. Next, select the storage. I have selected the hdindstorage that was created in the previous section.
6. Next, click on CREATE HDINSIGHT CLUSTER at the bottom right-hand corner.
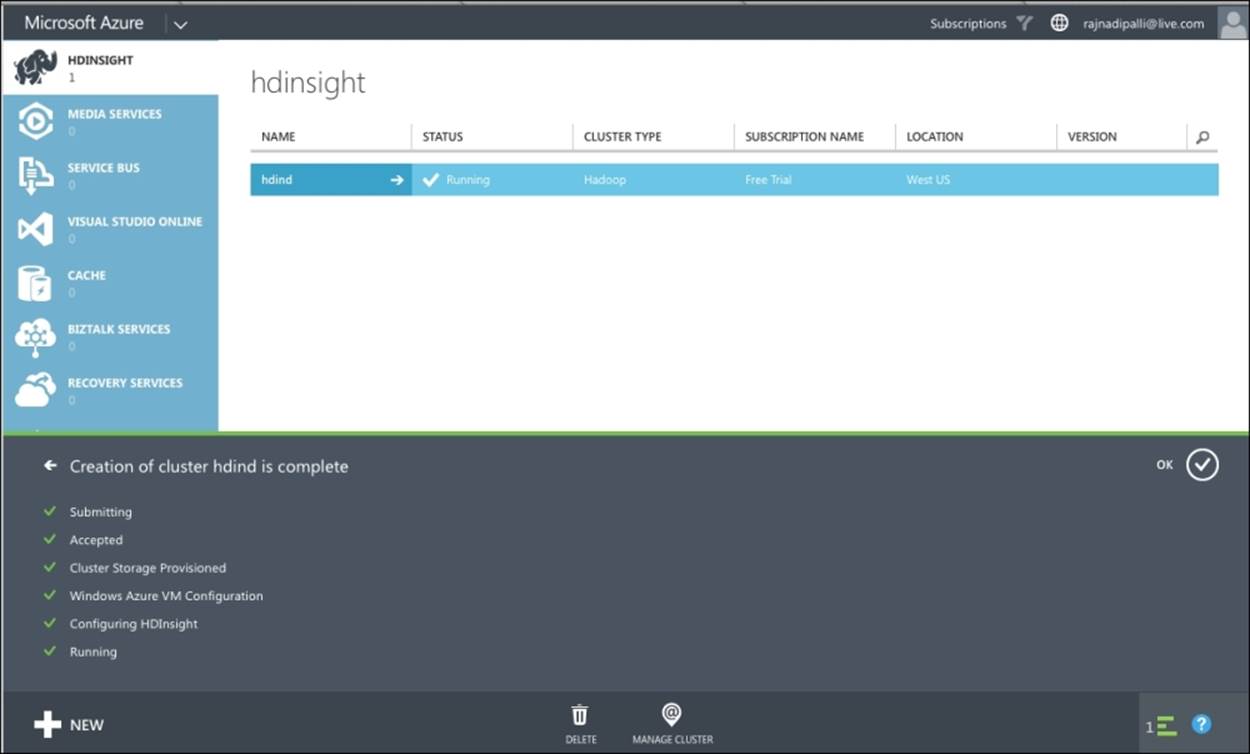
Next, you need to wait for Azure to provision the cluster; this step will take 10 minutes, after which you will see a message that the cluster is up and running, as shown in the following screenshot:
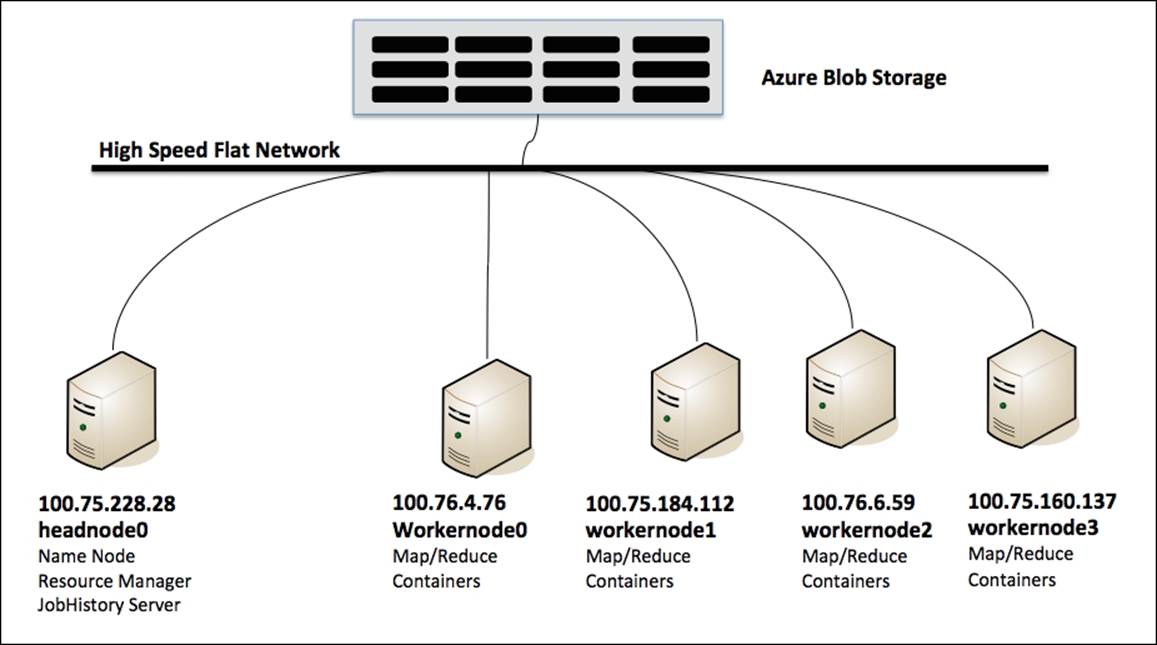
Cluster topology
With the default four-node configuration, HDInsight will assign four virtual machines for worker nodes and two machines for head nodes (second one for High Availability). The head node handles the critical services, which are Hadoop NameNode and Yarn ResourceManager. Worker nodes handle the data node and YARN application containers.
HDInsight differs from the traditional Hadoop model, where storage and compute are intertwined. In HDInsight, you can add more storage via Azure Blob storage with the same compute capacity or increase the compute worker nodes with the same Azure storage.
The high-speed flat network in the Azure data center provides fast access between the nodes and the Azure Blob storage so the data movement is very efficient. The Azure team has conducted tests that show that the performance of the read operation to Blob storage is identical to HDFS with local storage and the writes to Azure Blob is generally better than HDFS with local storage (for more information, visit http://msdn.microsoft.com/en-us/library/dn749864.aspx).
Note
HDInsight comes, by default, with two head nodes. The second head node is added to increase the availability of the service for High Availability. The switch to HA doesn't change the cluster pricing.
The following figure shows you the topology of the four-node cluster:
Provisioning using Azure PowerShell
Azure PowerShell is a scripting environment that can be used to provision a new HDInsight cluster. In this section, we will review how to create a new storage container and provision a new HDInsight cluster.
You can download and install this component on any Windows machine using the link http://go.microsoft.com/fwlink/p/?LinkID=320376.
After the installation is complete, launch the Azure PowerShell application and then perform the following steps to create the storage container and the cluster.
Creating a storage container
HDInsight uses an Azure Blob storage container as the default filesystem. Use the following commands to create a new container:
# Get PublishSettingsFile, this opens a browser window
Get-AzurePublishSettingsFile
# Import PublishSettingsFile that was saved from last step
Import-AzurePublishSettingsFile "C:\Users\Administrator\Downloads\Pay-As-You-Go-Free Trial-11-21-2014-credentials.publishsettings"
# Set Subscription Name and Current Storage
Set-AzureSubscription -SubscriptionName "Pay-As-You-Go" -CurrentStorageAccount "hdindstorage"
# Set the storage variables
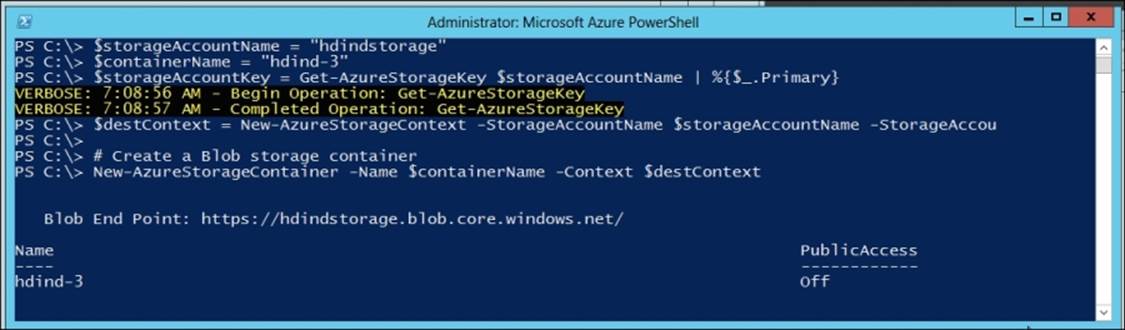
$storageAccountName = "hdindstorage"
$containerName = "hdind-3"
$destContext = New-AzureStorageContext -StorageAccountName $storageAccountName -StorageAccountKey $storageAccountKey
# Create a Blob storage container
New-AzureStorageContainer -Name $containerName -Context $destContext
The preceding set of commands will create the new storage container hdind-3, as shown in the following screenshot:
Provisioning a new HDInsight cluster
The next step is to provision the cluster. The following commands will help you create a new HDInsight cluster:
#Get the storage account key
$storageAccountKey = Get-AzureStorageKey $storageAccountName | %{$_.Primary}
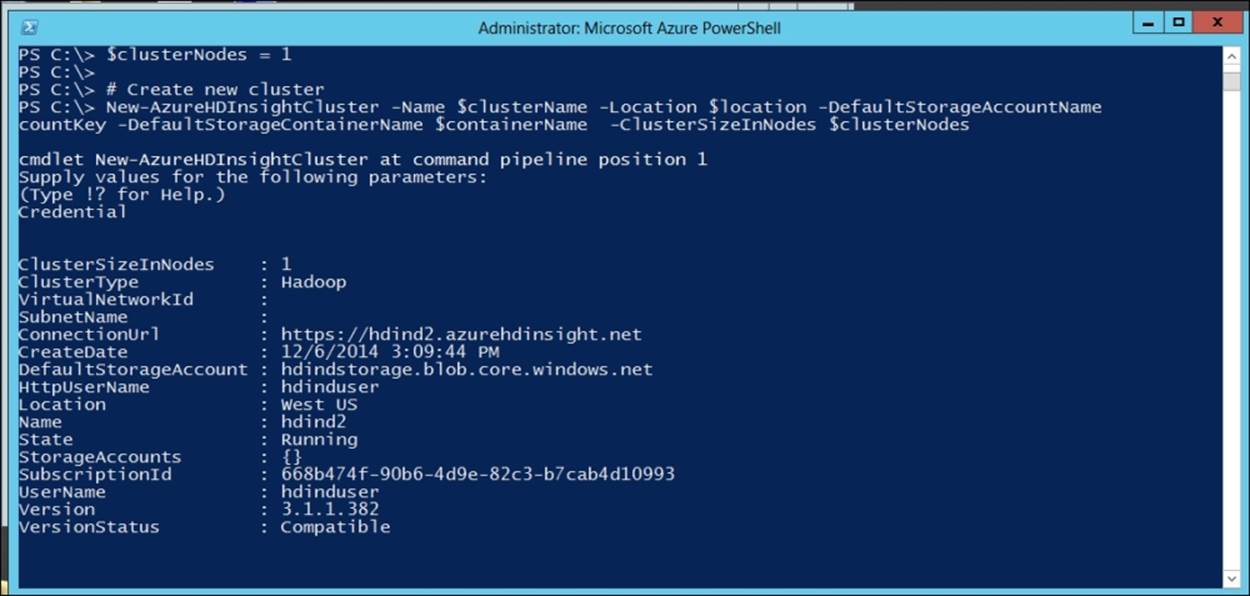
# Set New cluster properties
$clusterName = "hdind2"
$location = "West US"
$clusterNodes = 1
# Create new cluster
New-AzureHDInsightCluster -Name $clusterName -Location $location -DefaultStorageAccountName "$storageAccountName.blob.core.windows.net" -DefaultStorageAccountKey $storageAccountKey -DefaultStorageContainerName $containerName -ClusterSizeInNodes $clusterNodes
The preceding commands will provision the hdind2 cluster, as shown in the following screenshot:
HDInsight management dashboard
Once the cluster is created, we can view the dashboard by clicking on the cluster name hdind in our case. This has three major areas: dashboard, monitor, and configuration.
Dashboard
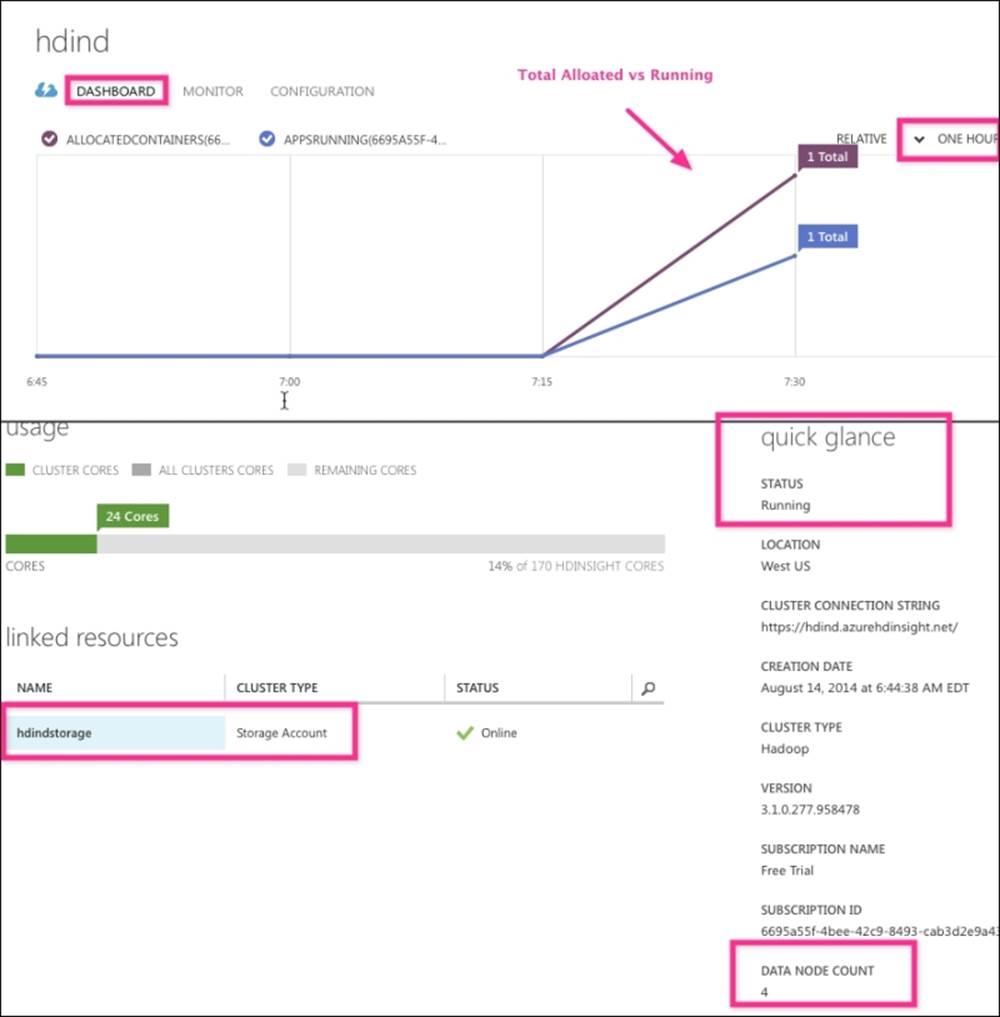
The DASHBOARD page displays a summary of the cluster, current usage, and linked storage information, as shown in the following screenshot. The notable mentions on the DASHBOARD page are as follows:
· The graph shows you two trend lines: one in brown for YARN applications and another in blue for containers used by the application. For each line, you will see the total and actual number in use. The time frame of this graph can be changed from the default 1 hour to 4 hours or day relative or absolute.
· The quick glance section shows you the cluster location, cluster URL, version, and data node count.
· The linked resources section identifies the underlying Azure storage.
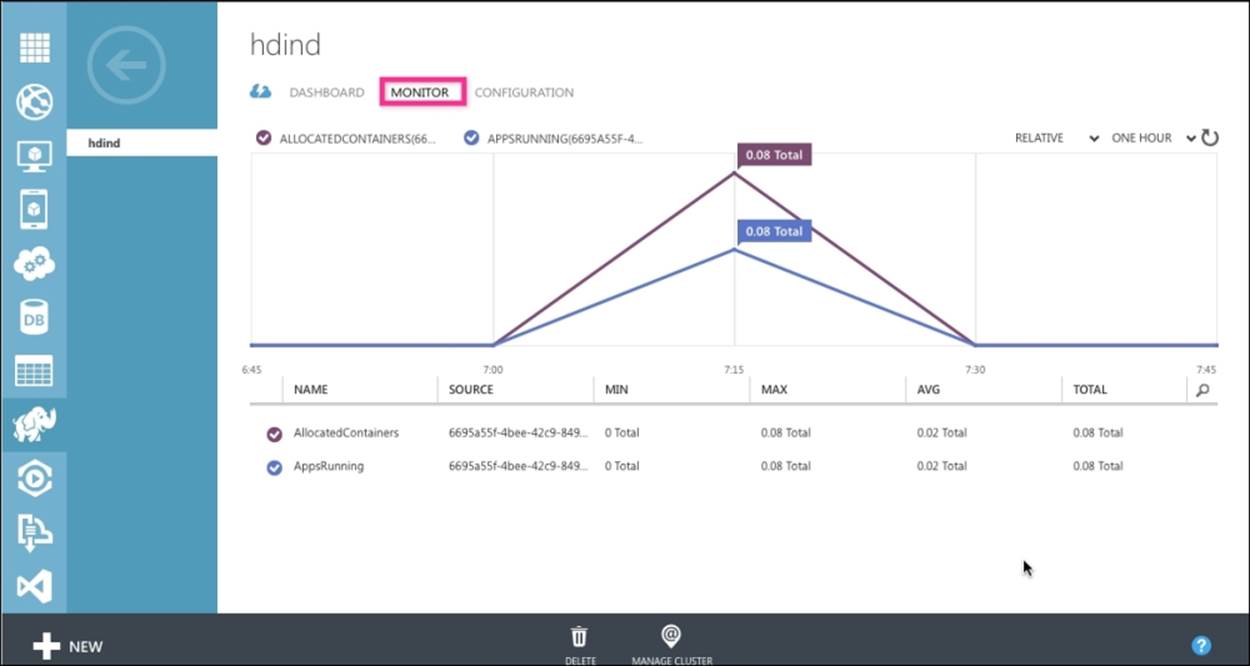
Monitor
The MONITOR tab is the second tab of the HDInsight management dashboard that currently shows the running applications along with stats of max, min, and average times. The following screenshot shows you the monitoring page:
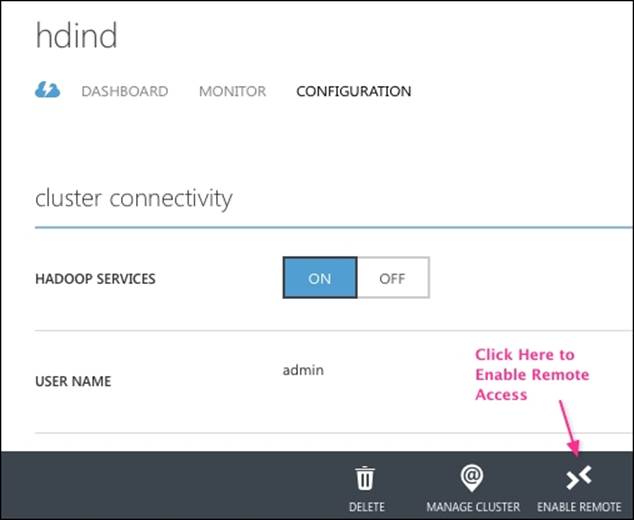
Configuration
The third tab in the HDInsight management dashboard is CONFIGURATION and is shown in the following screenshot. HDInsight clusters with the following HTTP web services can be turned on/off using the configuration page: ODBC, JDBC, Ambari, Oozie, and Templeton. You can use this page to turn the HADOOP SERVICES option off by clicking on the OFF button and then clicking on Save.
Another useful button on this page is ENABLE REMOTE, which can be used to connect to the cluster remotely using a remote desktop connection to the head node:
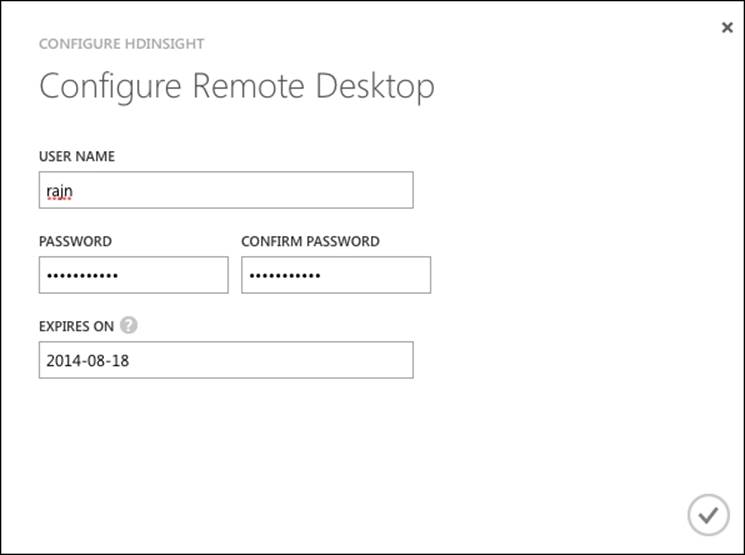
After you click on the ENABLE REMOTE button, you will be prompted to enter a username that does not already exist on the head node server and assign a password and then to set an expiration date, which must be seven days or less from today. You need to save your settings to preserve the configuration. The following screenshot shows you the Configure Remote Desktop pop-up menu:
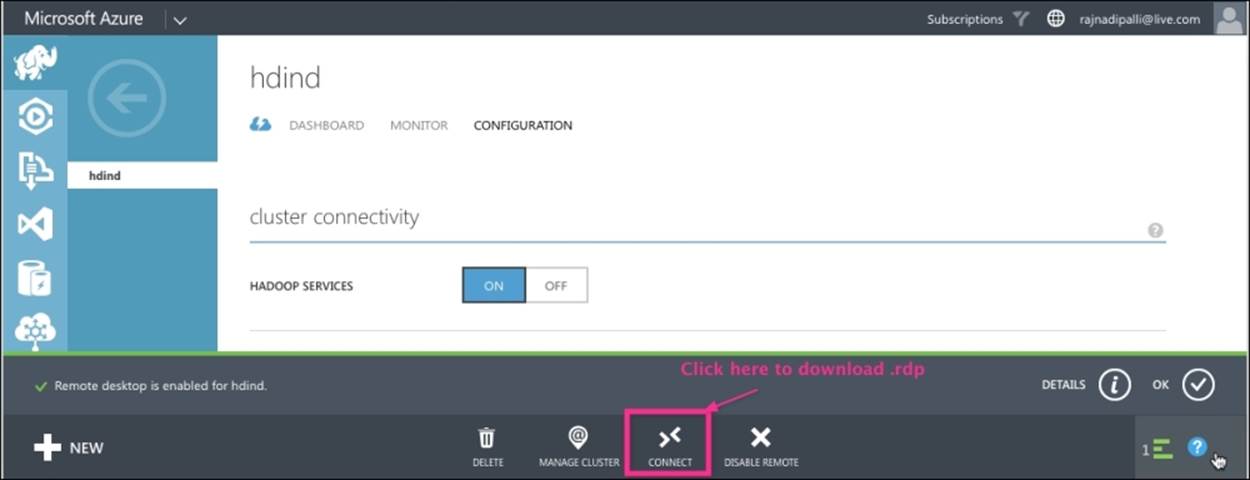
Exploring clusters using the remote desktop
Once the cluster is up and running, the best way to explore it is via the remote desktop. This section discusses how to check the cluster status using Hadoop commands in detail. From the HDInsight CONFIGURATION page, you can download the RDP file by clicking on CONNECT, as shown in the following screenshot. This RDP file allows one to connect to the active head node remotely.
The next step is to launch the remote desktop to the head node by opening the .rdp file with a remote desktop connection application. On launching the application, it will prompt you for a username and password, which you entered in the remote desktop connection configuration.
Once you get connected, you will see the familiar Windows desktop, as shown in the following screenshot:

Running a sample MapReduce
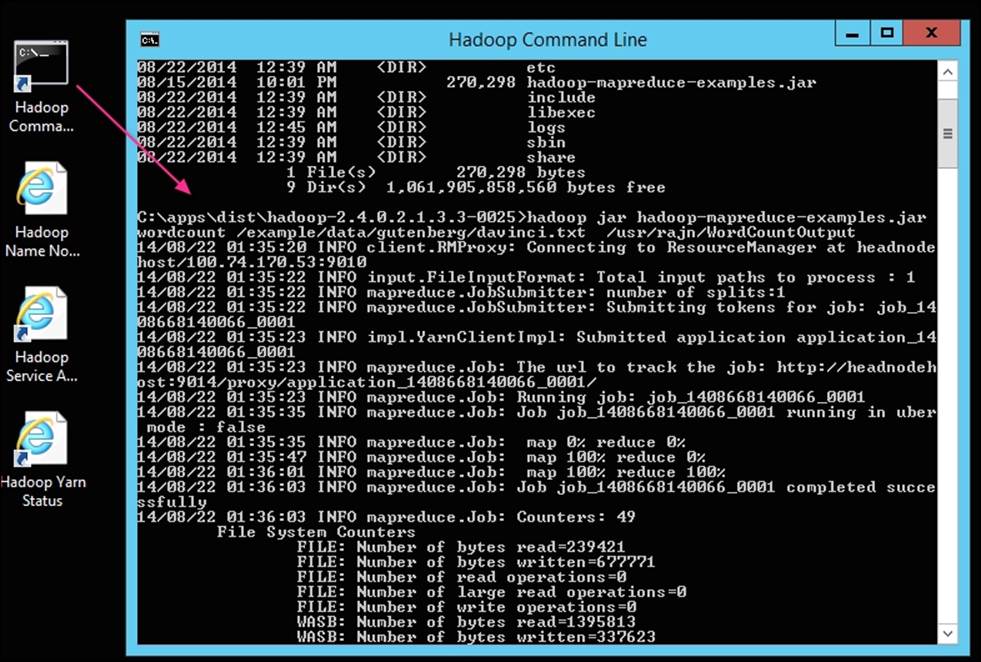
Using the Hadoop Command Line interface, we can verify the cluster by running a sample program provided by HDInsight. Let's take a look at the steps to run the famous Hadoop Wordcount MapReduce program that counts the word occurrences in a text file:
1. First, launch the Hadoop Command Line using the shortcut on the desktop.
2. Next, to run Wordcount, we will use the sample text file as the input /example/data/gutenberg/davinci.txt. Once the MapReduce job completes, the output file is created in Hadoop as per the last argument, which is shown in the following example as/usr/rajn/WordCountOutput/part-r-00000.
The following commands show you the execution of the Wordcount MapReduce job:
C:\apps\dist\hadoop-2.4.0.2.1.3.3-0025>hadoop jar hadoop-mapreduce-examples.jar wordcount /example/data/gutenberg/davinci.txt/usr/rajn/WordCountOutput
14/08/22 01:35:20 INFO client.RMProxy: Connecting to ResourceManager at headnode
host/100.74.170.53:9010
14/08/22 01:35:22 INFO input.FileInputFormat: Total input paths to process : 1
14/08/22 01:35:22 INFO mapreduce.JobSubmitter: number of splits:1
14/08/22 01:35:22 INFO mapreduce.JobSubmitter: Submitting tokens for job: job_1408668140066_0001
14/08/22 01:35:23 INFO impl.YarnClientImpl: Submitted application application_1408668140066_0001
14/08/22 01:35:23 INFO mapreduce.Job: The url to track the job: http://headnodehost:9014/proxy/application_1408668140066_0001/
14/08/22 01:35:23 INFO mapreduce.Job: Running job: job_1408668140066_0001
14/08/22 01:35:35 INFO mapreduce.Job: Job job_1408668140066_0001 running in ubermode : false
14/08/22 01:35:35 INFO mapreduce.Job: map 0% reduce 0%
14/08/22 01:35:47 INFO mapreduce.Job: map 100% reduce 0%
14/08/22 01:36:01 INFO mapreduce.Job: map 100% reduce 100%
14/08/22 01:36:03 INFO mapreduce.Job: Job job_1408668140066_0001 completed successfully
The following commands show you the output of the Wordcount MapReduce job:
C:\apps\dist\hadoop-2.4.0.2.1.3.3-0025>hadoop fs -ls /usr/rajn/WordCountOutput
Found 2 items
-rw-r--r-- 1 rajn supergroup 0 2014-08-22 01:35 /usr/rajn/WordC
ountOutput/_SUCCESS
-rw-r--r-- 1 rajn supergroup 337623 2014-08-22 01:35 /usr/rajn/WordC
ountOutput/part-r-00000
C:\apps\dist\hadoop-2.4.0.2.1.3.3-0025>hadoop fs -cat /usr/rajn/WordCountOutput/
part-r-00000 | more
"(Lo)cra" 1
"1490 1
"1498," 1
"35" 1
"40," 1
"AS-IS". 1
"A_ 1
"Absoluti 1
"Alack! 1
"Alack!" 1
"Alla 1
"Allegorical 1
"Alpine-glow" 1
"And 2
"Antoni 1
"At 1
"B_ 1
The following screenshot shows you the execution of the MapReduce job from the Hadoop Command Line window:
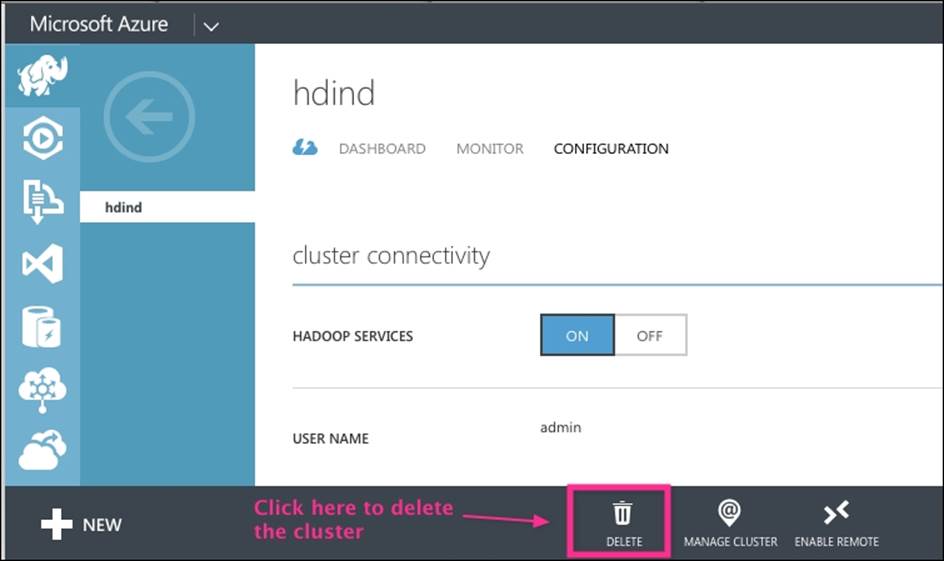
Deleting the cluster
An HDInsight cluster is charged per hour of usage; hence, it is recommended that you delete your cluster if you are not using those resources. One great feature of Azure is that your data is still preserved on Azure Blob storage even after the cluster is deleted, and this storage can be used later to restore back your cluster. If you really want to delete all the data of your cluster, you need to delete the related Azure storage.
The following screenshot shows you the location of the DELETE icon for the cluster:
HDInsight Emulator for the development
HDInsight Emulator is the development edition of Azure HDInsight that runs locally on the Windows desktop and servers. It is essentially a single node Hadoop cluster where storage and compute reside on the same machine unlike the Azure cloud HDInsight service, where a cluster consists of multiple nodes and storage is on Azure Blob storage.
HDInsight Emulator is supported by the following 64-bit operating systems: Windows 7 Service Pack 1, Windows Server 2008 R2 Service Pack1, Windows 8, or Windows Server 2012.
Installing HDInsight Emulator
To install HDInsight Emulator, open a browser and enter the URL http://www.microsoft.com/web/gallery/install.aspx?appid=HDINSIGHT.
The installation is a wizard driven by Microsoft Web Platform Installer (WebPI) and will install and configure the required dependencies. The complete installation process will take several minutes depending on your Internet connection and your system resources. After the completion, you might be asked to restart your computer.
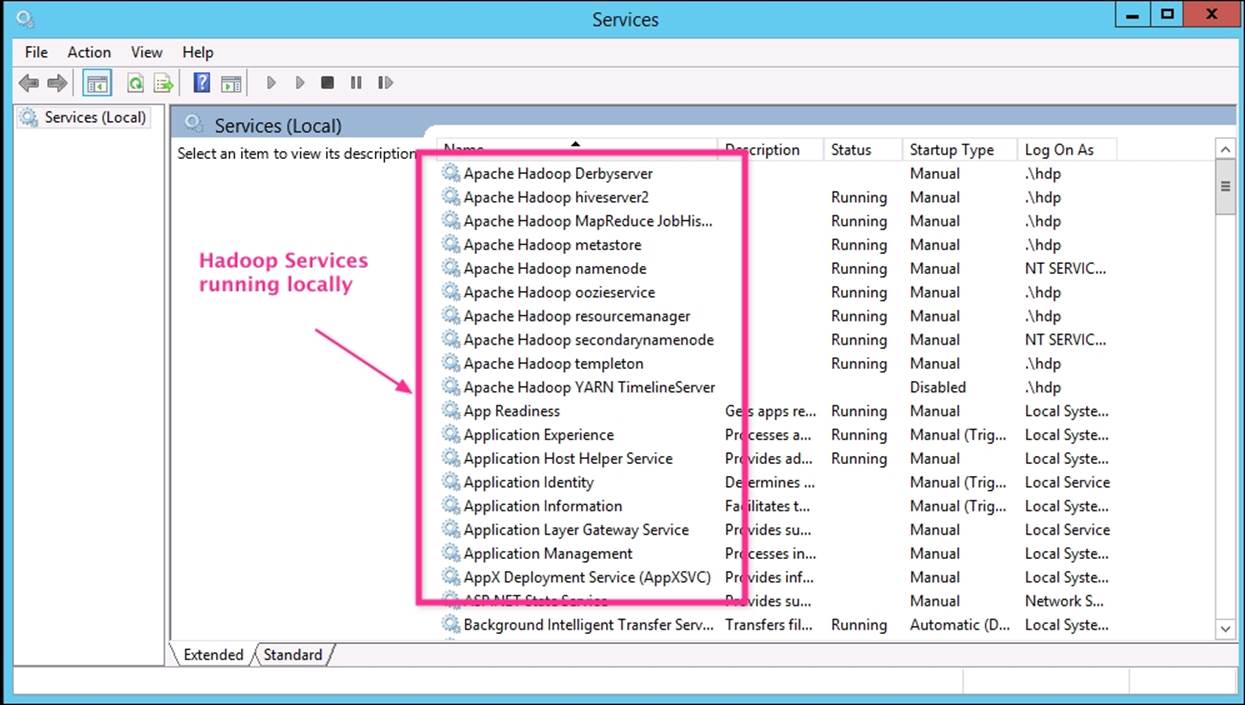
Installation verification
Once HDInsight Emulator is installed, the services are registered with Windows System like other services and can be stopped and started through Control Panel | System and Security | Administrative Tools | Services, as shown in the following screenshot:
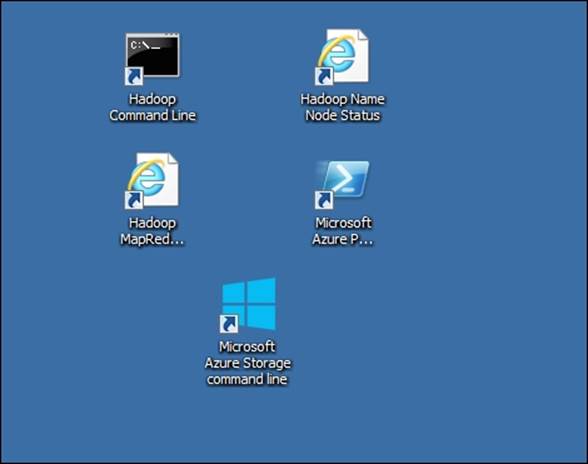
Using HDInsight Emulator
To use an HDInsight single node cluster, you can use the familiar Hadoop Command Line, Hadoop Name Node Status, and Hadoop YARN Status; similar to the one seen in the Azure cloud HDInsight service. The following screenshot shows you the shortcuts on the HDInsight single node install:
Note
Downloading the example code
You can download the example code files from your account at http://www.packtpub.com for all the Packt Publishing books you have purchased. If you purchased this book elsewhere, you can visit http://www.packtpub.com/support and register to have the files e-mailed directly to you.
Summary
In this chapter, we looked at how to open a new Microsoft Azure account, create a new HDInsight service, and run sample jobs on the HDInsight cluster in the cloud. Next, we looked at how an HDInsight Hadoop cluster allows scaling of storage and compute independently, making the solution flexible and cost effective. Lastly, we looked at a single node HDInsight Emulator, which is great for development and can be installed on the local desktop.
Now that the cluster is up and running, we will look at how to administer and monitor it in the next chapter.
All materials on the site are licensed Creative Commons Attribution-Sharealike 3.0 Unported CC BY-SA 3.0 & GNU Free Documentation License (GFDL)
If you are the copyright holder of any material contained on our site and intend to remove it, please contact our site administrator for approval.
© 2016-2026 All site design rights belong to S.Y.A.