HDInsight Essentials, Second Edition (2015)
Chapter 4. Administering Your HDInsight Cluster
In the previous chapter, we looked at how to manage an HDInsight cluster using the Azure management portal. In this chapter, we will review how to access and manage the cluster using a remote desktop connection. We will cover the following topics:
· Monitoring cluster health
· Name Node status
· Yarn application status
· Azure storage management
· Azure PowerShell
Monitoring cluster health
To ensure that development has a stable Hadoop environment, the operations team should have visibility of the cluster status, including the health of various services in a programmatic manner. This section discusses how to monitor an HDInsight cluster using remote connection to the head node in detail. From the HDInsight CONFIGURATION page, you can download the RDP file to connect to the head node remotely.
Once connected, you will see the familiar Windows desktop, as shown in the following screenshot:

There are four key shortcuts on the remote desktop that help you monitor and manage the cluster. The following table lists the different shortcuts and their purpose:
|
Link name |
URL |
Purpose |
|
Hadoop Command Line |
None |
This is a Windows command line shortcut to run any Hadoop command such as listing of files or calling MapReduce program |
|
Hadoop Name Node Status |
http://headnodehost:30070 |
This lists the Hadoop Name Node status and summary statistics |
|
Hadoop Service Availability Status |
http://headnodehost/ServiceAvailability |
This lists all the Hadoop services |
|
Hadoop Yarn Status |
http://headnodehost:9014/cluster |
This lists the Hadoop Yarn application status, including MapReduce jobs |
The first shortcut from the remote desktop is the Hadoop Command Line. This shortcut will launch the familiar Windows Command Prompt ready for any Hadoop command to interact with the distributed filesystem (HDFS). The following is the list of all the HDFS commands:
appendToFile, cat, chgrp, chmod, chown, copyFromLocal, copyToLocal, count, cp, du. dus, expunge, get, getfacl, getfattr, getmerge, ls, lsr, mkdir, moveFromLocal, moveToLocal, mv, put, rm, rmr, setfacl, setfattr, setrep, stat, tail, test, text, touchz
Let's take a look at the following example:
hadoop fs -mkdir /user/guest/newdirectory
In the next few sections, we will review the other shortcuts in detail.
Name Node status
The second shortcut from the remote desktop is Hadoop Name Node Status, which gives you the details of the NameNode. This URL can be accessed from any node of the cluster using the address http://headnodehost:30070.
The Name Node status web page has the following key menu items:
· Name Node overview
· Datanode status
· Utilities and logs
The other menu items include snapshots and startup progress. Let's take a look at the key menu items in detail.
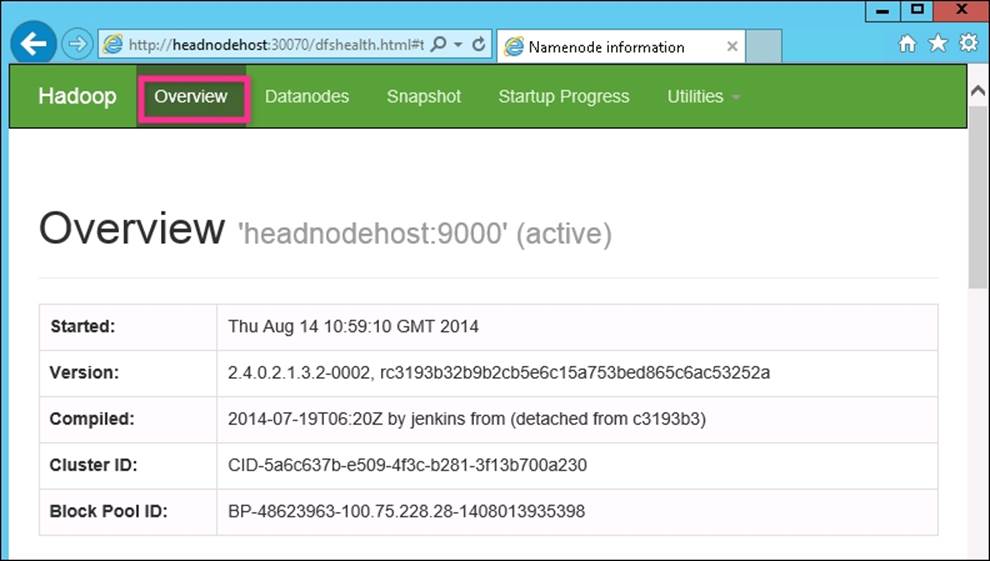
The Name Node Overview page
The Name Node Overview page gives us the following important information:
· The cluster identifier, Hadoop version, and the date when it was started
· The total storage capacity, percentage used, and available storage
· The total number of nodes alive and decommissioned
· The location of Name Node metadata, which includes the journal entries for files, blocks, and their replicas
The following screenshot shows you the first section of the Overview tab where the key information is the cluster ID and the start date and time:
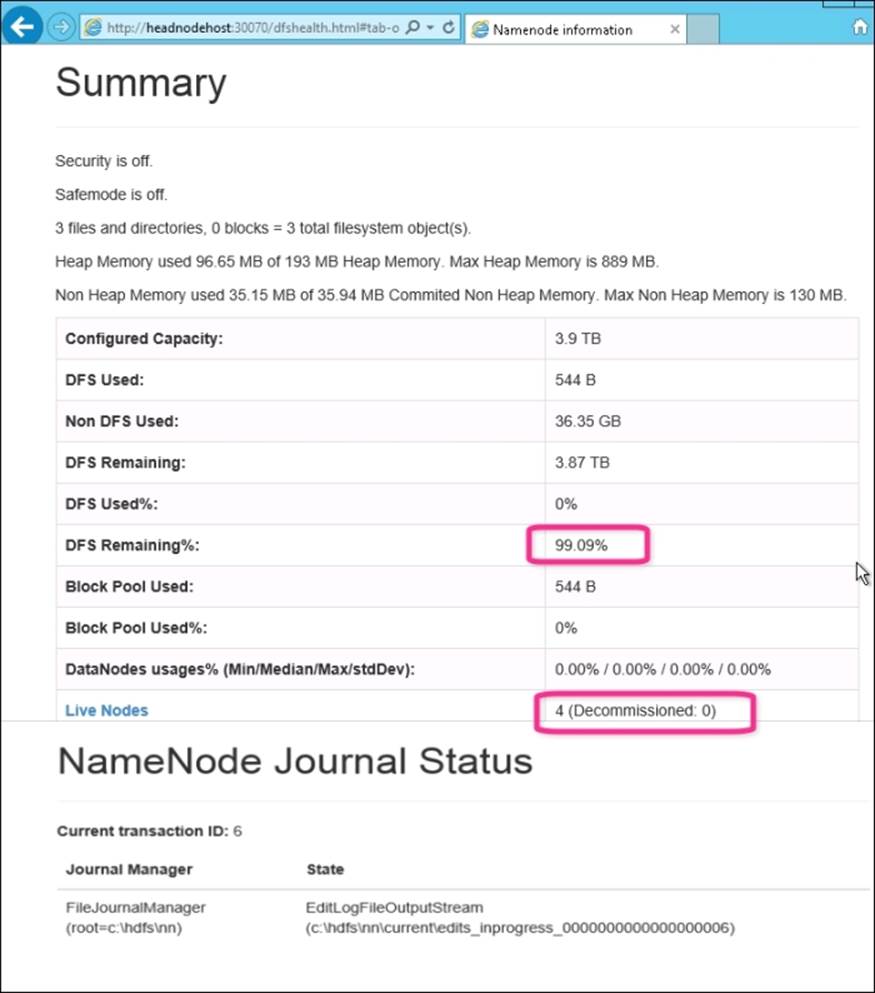
The next section of the Overview page reports the following key information: DFS (distributed file system) total space, DFS percent used, and number of active nodes:
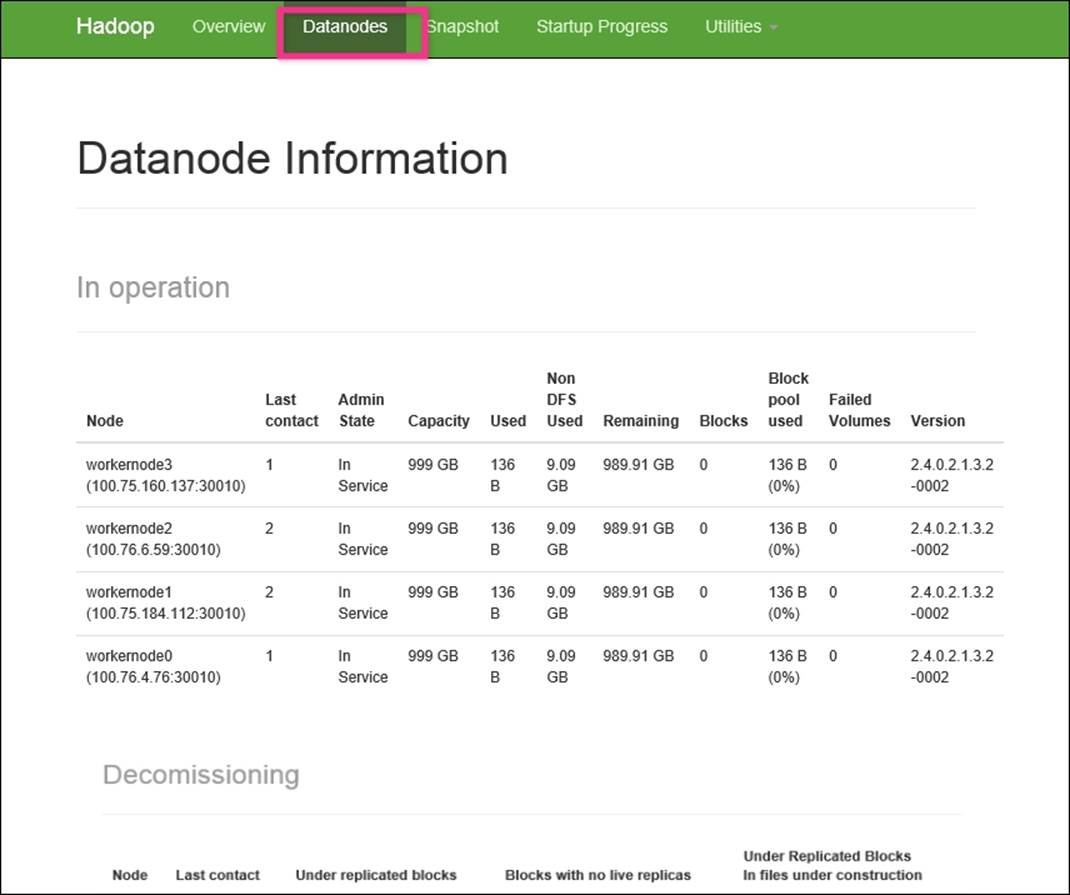
Datanode Status
Datanodes is the next tab on the Name Node status web page. From this page, we can get the following key information:
· Listing of each active worker node along with its IP address, total capacity, and available storage
· Listing of decommissioned worker nodes
In the following screenshot, you can see a Name Node status web page:
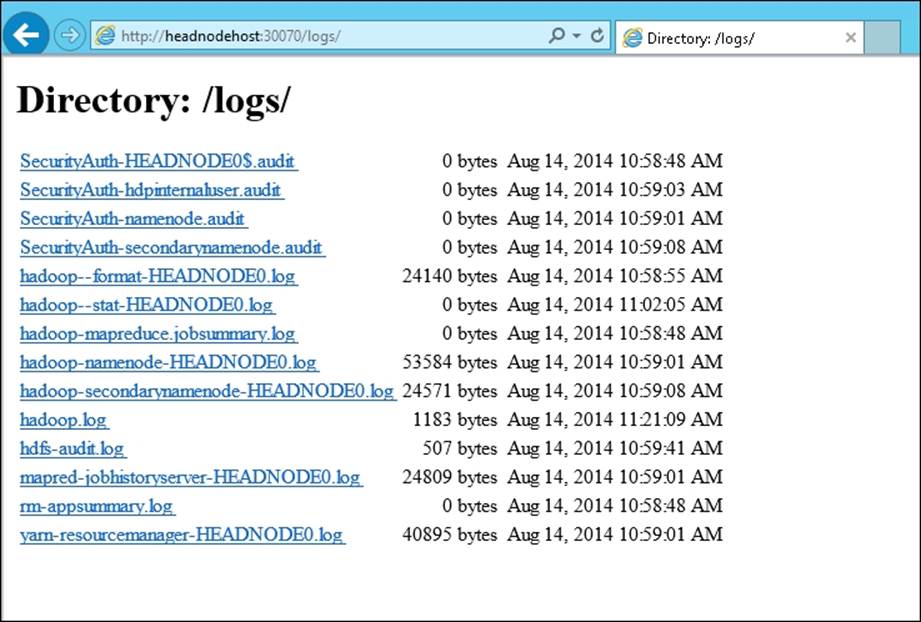
Utilities and logs
Another key menu option on the Name Node status web page is called Utilities, as shown in the following screenshot. From this menu, you can browse the filesystem and see the logs.
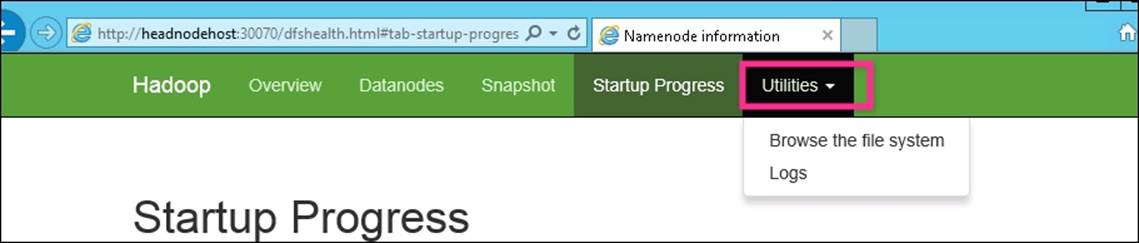
The following screenshot shows you the list of logs accessible from the Logs submenu:
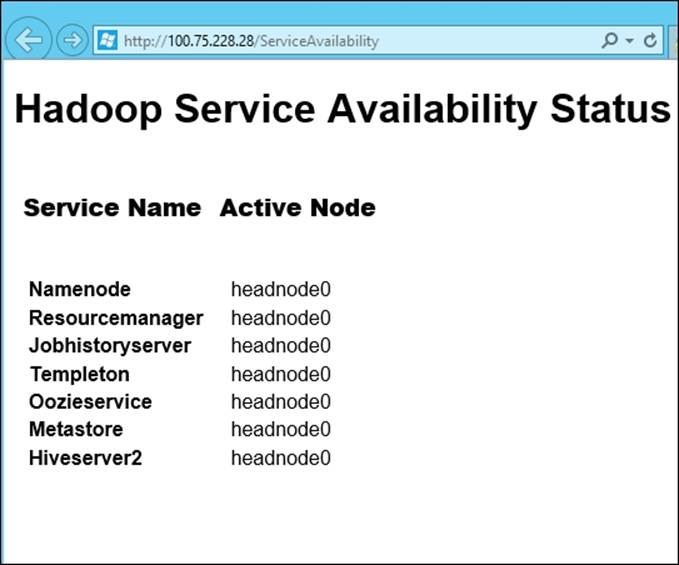
Hadoop Service Availability
The third shortcut from the remote desktop is Hadoop Service Availability, which gives you a list of all the key services and where each one is running. The following screenshot shows you the content of the web page:
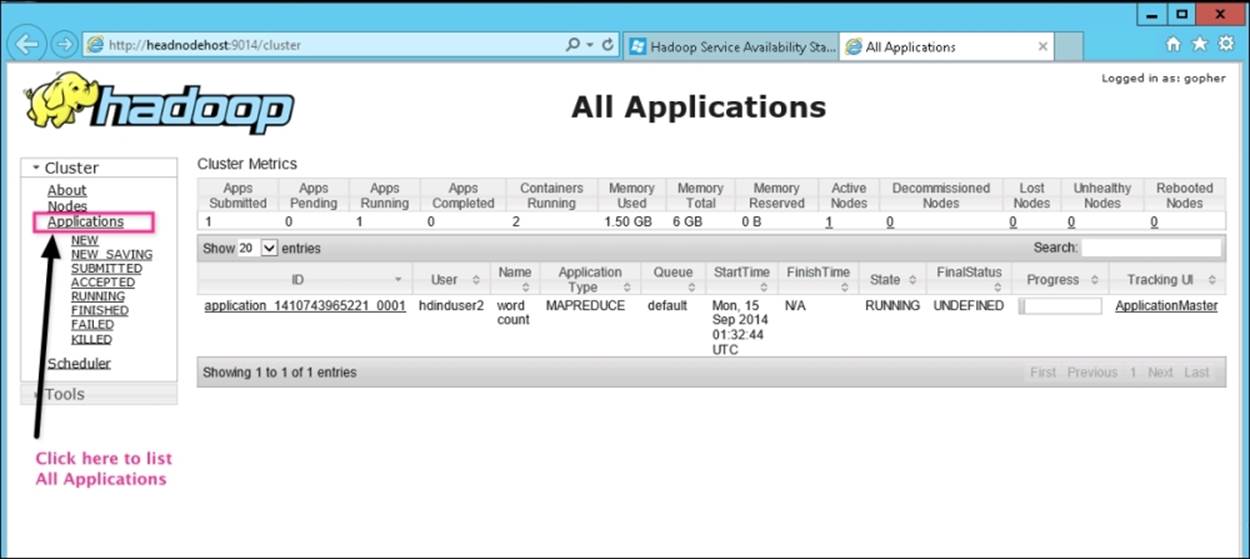
YARN Application Status
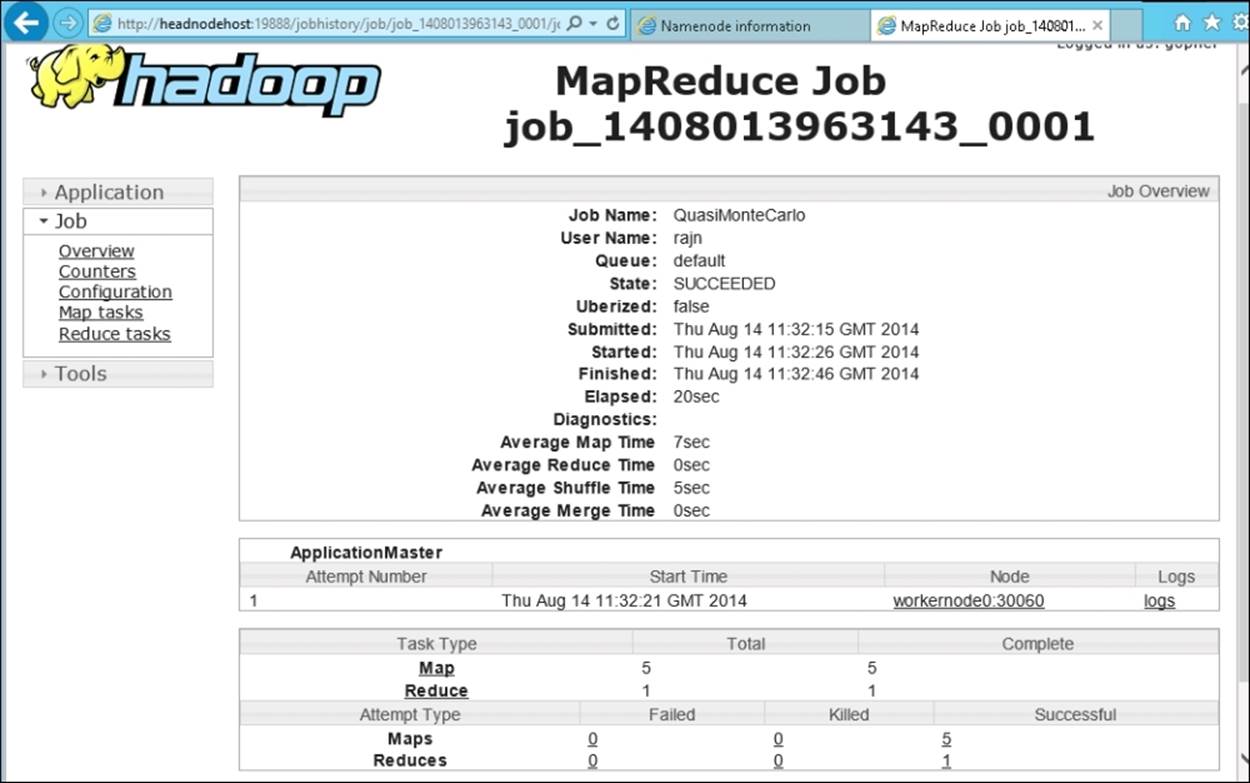
The fourth shortcut from the remote desktop is the YARN application status, which provides you with details on all applications that are submitted, running, and completed. The following screenshot shows you the YARN status web page, which is available athttp://headnodehost:9014/cluster:
To get the details of any particular application such as a MapReduce job, you can click on the History link, as shown in the following screenshot:
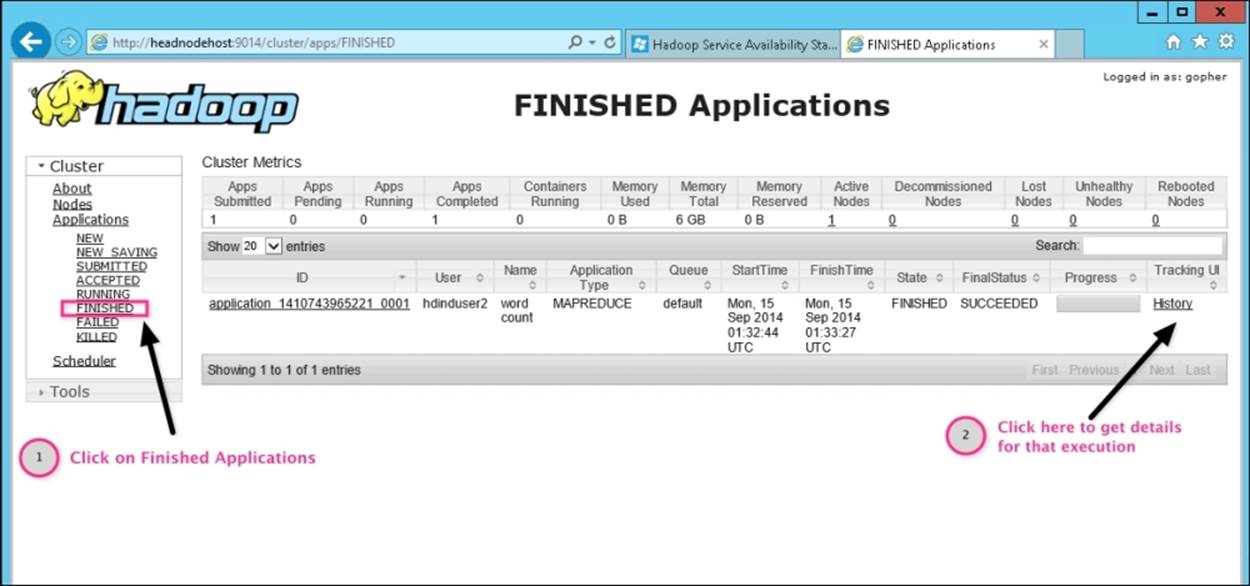
The following screenshot shows you the details of a MapReduce job, which includes status, start time, end time, number of map containers, and number of reduce containers:
Azure storage management
Windows Azure storage is a cloud storage solution that abstracts physical storage and allows end users to build scalable applications. The Windows HDInsight service leverages Azure Blob storage but still provides all the HDFS command line and other programming interfaces.
Azure storage has the following characteristics:
· Cost effective, as you only have to pay for what you use
· Scalable and flexible, as you can scale up or down your application based on your business needs
· Replicated based on your requirements either locally or geo-replicated at another distant data center
· Highly available, as multiple replicas provide fault tolerance
· Accessible via REST API
Let's take a look at how to manage and monitor your Azure storage.
Configuring your storage account
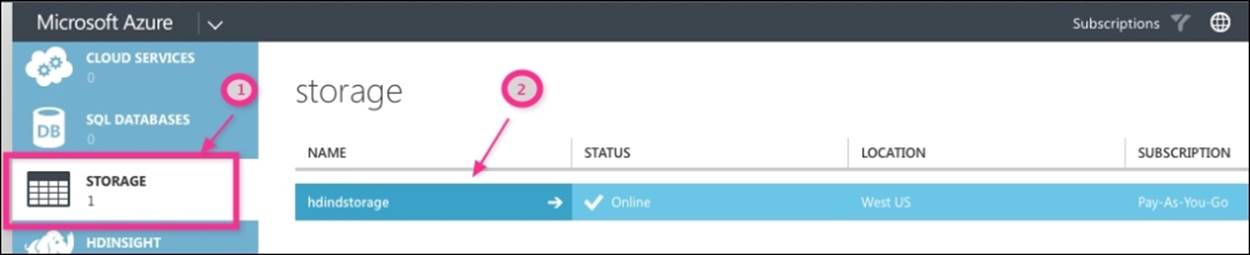
To configure your storage account, first go to the Azure management portal and then click on the STORAGE icon from the left-hand menu and next, click on the storage hdindstorage, as shown in the following screenshot:
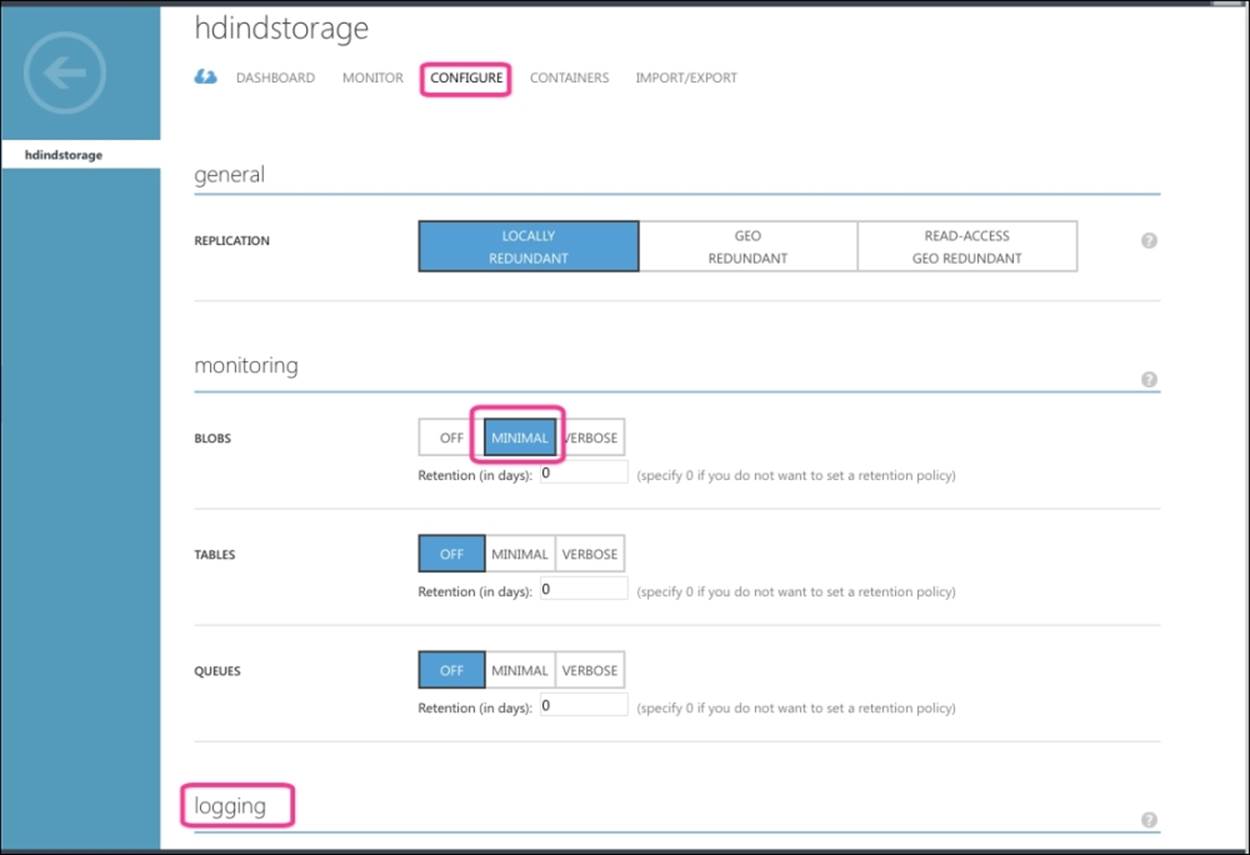
You will then see the storage management dashboard page. Click on the CONFIGURE link, as shown in the following screenshot. From this page, you can configure the following for the selected storage:
· Replication: You can choose from LRS, where replication is within the same region; GRS, which is similar to LRS, in addition, the transactions also get queued to a remote secondary region; or RA-GRS, which is an improved version of GRS, and it allows read access to a secondary region.
· Monitoring: Using the configuration page, you can change the level of monitoring. As HDInsight only uses Blobs, I have updated the level to minimal, as shown in the following screenshot.
· Logging: Additionally, you can change the logging levels for Blobs, using the configuration page, as shown in the following screenshot:
Monitoring your storage account
To monitor the storage account, click on the MONITOR tab, which is to the left of the CONFIGURE tab, as shown in the following screenshot:
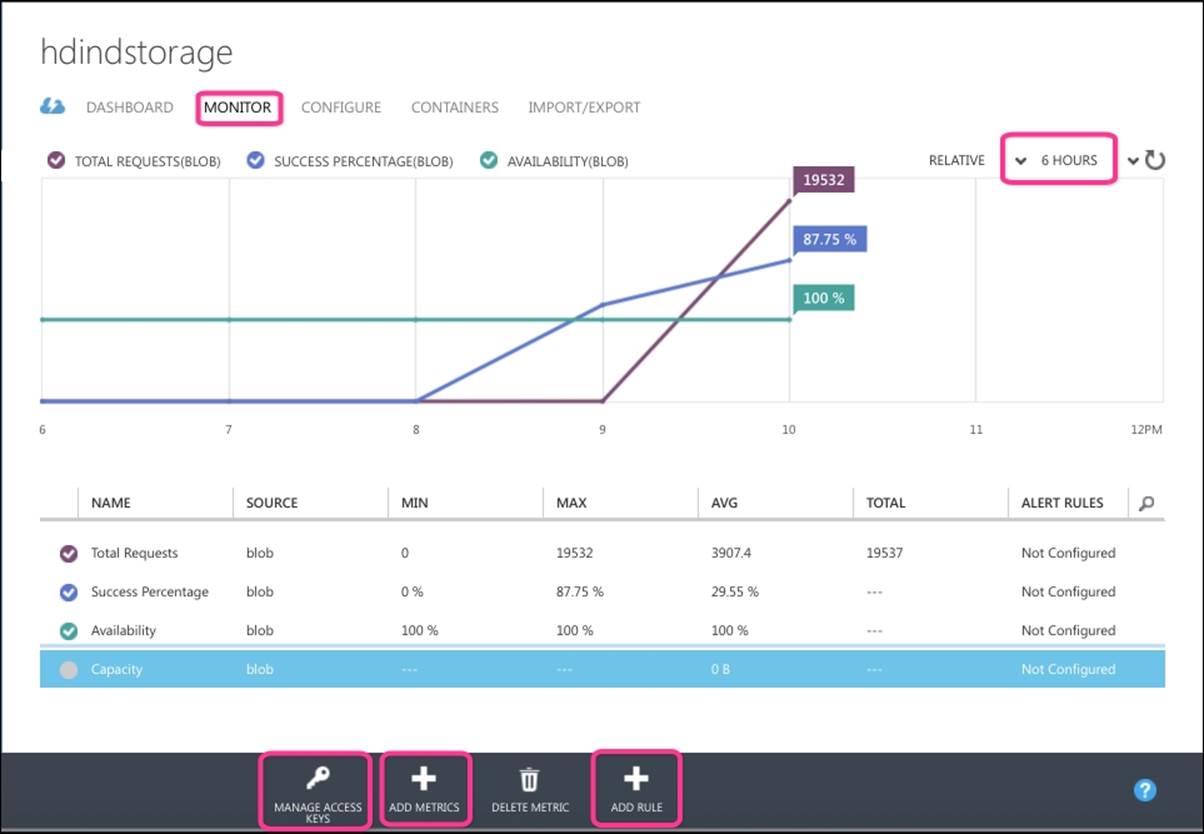
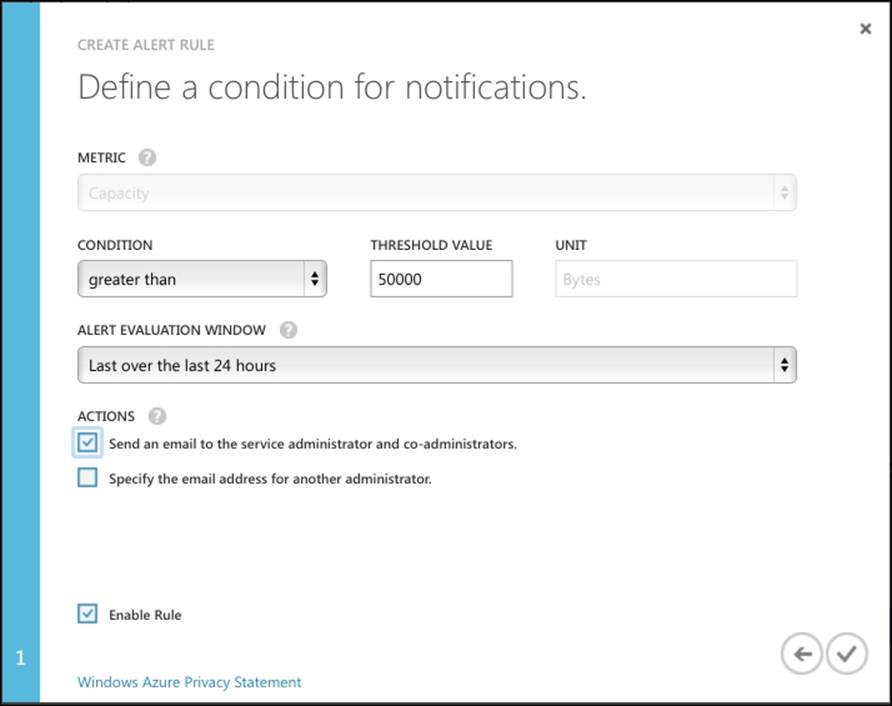
You can add additional metrics such as Capacity and also add alert rules on top of a metric such as its capacity is greater than a threshold, as shown in the following screenshot:
Managing access keys
Azure storage can be accessed by several open source and commercial software such as Azure Storage Explorer (https://azurestorageexplorer.codeplex.com/).
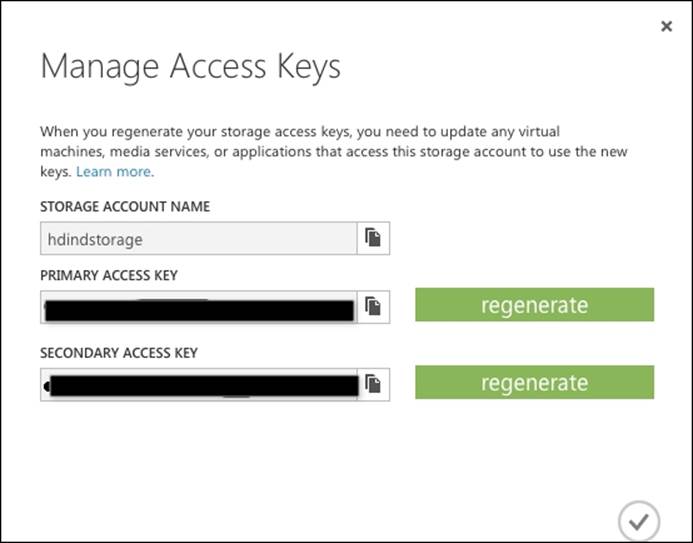
To access it, you need the account information and keys that can be set from the Manage Access Keys icon found in the footer of the Monitor/Configure page.
This will open the pop-up screen that contains the storage name, and primary and secondary keys, as shown in the following screenshot. Using this pop-up menu, you can regenerate the keys if required.
Deleting your storage account
To remove a storage account, click on the DELETE icon, which is in the footer of the CONFIGURATION page. This will delete the entire storage account, including all of the Blobs, tables, and queues in the account.
Tip
There is no way to restore the storage once it is deleted, so backup the data before you delete it.
Azure PowerShell
Azure PowerShell is a scripting environment that can be used to automate the deployment and management of your workloads in Azure from a remote machine such as your laptop. You can download and install this component on any Windows machine, using the link http://go.microsoft.com/fwlink/p/?LinkID=320376.
Tip
The HDInsight Emulator installation includes the Azure PowerShell component.
Access Azure Blob storage using Azure PowerShell
In this section, we will use Azure PowerShell from the local Windows laptop to the Azure cloud subscription. Perform the following the steps to access Azure Blob storage using Azure PowerShell:
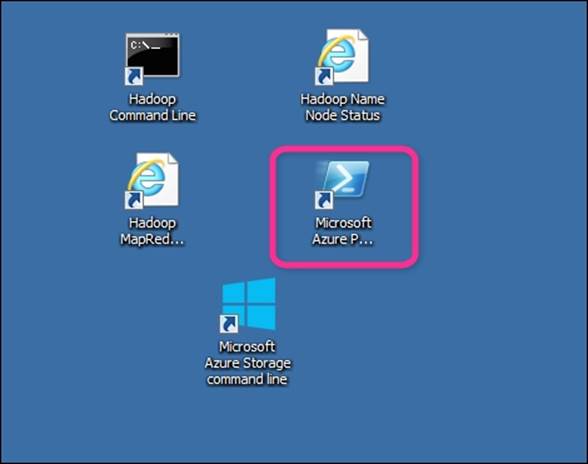
1. Using the Windows Emulator machine, launch the Microsoft Azure PowerShell using the desktop shortcut, as shown in the following screenshot:
2. In the new Azure PowerShell prompt, type in the following command:
3. Get-AzurePublishSettingsFile
This will launch your browser and prompt you to log in to your Azure account and then will automatically download a management certificate for all your subscriptions. Make a note of the location and filename of the file.
4. Next, type in the following command in the Azure PowerShell prompt to import the publish settings file:
5. Import-AzurePublishSettingsFile "C:\Users\Username\Downloads\Pay-As-You-Go-credentials.publishsettings"
6. If you have multiple Azure subscriptions, you will need to use the Set-AzureSubscription command to the context of PowerShell:
7. Set-AzureSubscription -SubscriptionName "Pay-As-You-Go" -CurrentStorageAccount "hdindstorage"
8. Next, get the storage account key using the Get-AzureStorageKey command and set the storage context:
9. $storageAccountKey = Get-AzureStorageKey $storageAccountName | %{$_.Primary}
10.$storageContext = New-AzureStorageContext -StorageAccountName $storageAccountName -StorageAccountKey $storageAccountKey
11. Next, set the container name and blobprefix:
12.$containerName = "hdind-1"
13.$blobPrefix = "example/data/"
14. Next, to get a file listing for a directory, use the Get-AzureStorageBlob command:
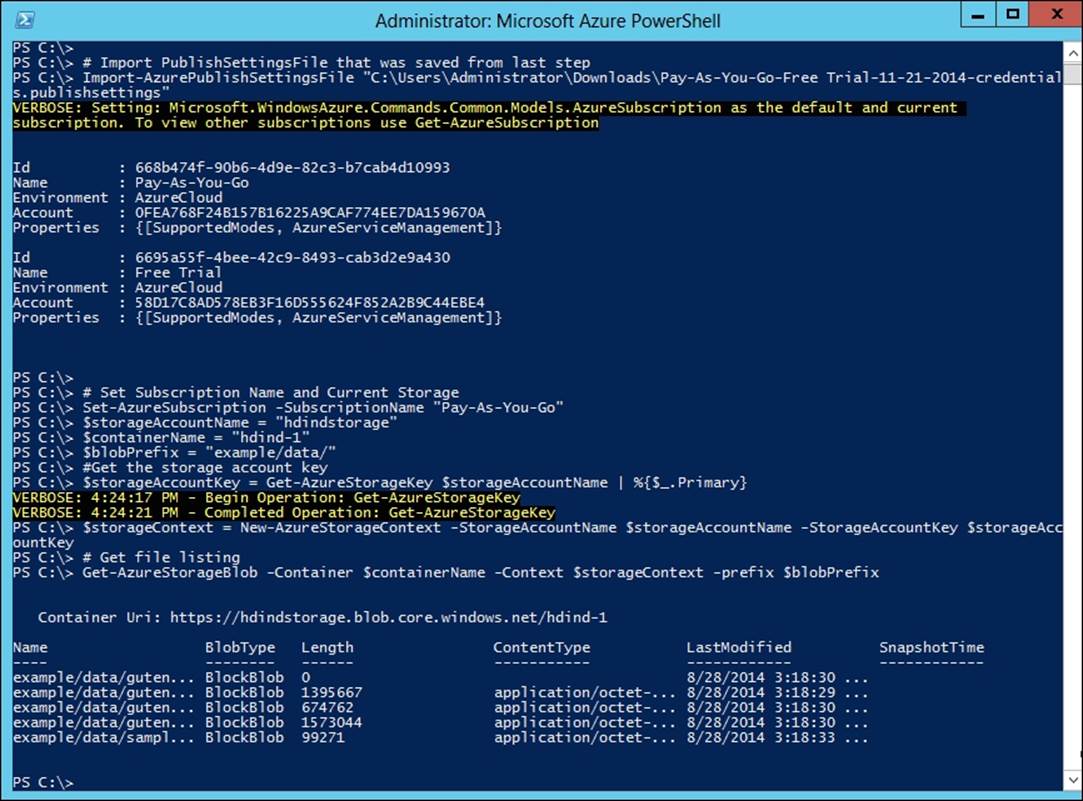
15.Get-AzureStorageBlob -Container $containerName -Context $storageContext -prefix $blobPrefix
The following screenshot shows you the commands in action:
Note
HDInsight provides you with the ability to access data stored in the Blob storage, using the following syntax:
wasb[s]://<containername>@<accountname>.blob.core.windows.net/<path>
Summary
For a healthy HDInsight cluster, the operations team needs to routinely review the cluster Name Node status, YARN application status, and Azure storage. The best way to monitor it is by remotely connecting to the head node. Azure PowerShell provides you additional capability to script and automate monitoring from any Windows machine. In the next chapter, we will look at how to ingest data to the newly created cluster.
All materials on the site are licensed Creative Commons Attribution-Sharealike 3.0 Unported CC BY-SA 3.0 & GNU Free Documentation License (GFDL)
If you are the copyright holder of any material contained on our site and intend to remove it, please contact our site administrator for approval.
© 2016-2026 All site design rights belong to S.Y.A.