HDInsight Essentials, Second Edition (2015)
Chapter 5. Ingest and Organize Data Lake
In this chapter, we will look at how to ingest and organize data to the newly created Data Lake to make it effective and useful. The topics covered in this chapter are as follows:
· End-to-end Data Lake solution
· Ingest data using HDFS commands
· Ingest data to Azure Blob using Azure PowerShell
· Ingest data using CloudXplorer
· Using Sqoop to move data from RDBMS to cluster
· Organizing your data in HDFS
· Managing metadata using HCatalog
End-to-end Data Lake solution
In the next few chapters, we will build an end-to-end Data Lake solution using HDInsight. As discussed in Chapter 2, Enterprise Data Lake using HDInsight, the three key components required for a Data Lake are:
· Ingest and organize
· Transform
· Access, analyze, and report
To understand these concepts, we will use real flight on-time performance data from the RITA website with the URL http://www.transtats.bts.gov/DL_SelectFields.asp?Table_ID=236.
In this chapter, we will focus on ingest and organize components:

Ingesting to Data Lake using HDFS command
The simplest way to upload files is to use Hadoop command line. The following are the steps to load data into Data Lake.
Connecting to a Hadoop client
You can connect to the Hadoop cluster via a remote desktop connection to the active head node. After establishing the remote connection, launch the Hadoop command-line application that can be found as a shortcut on the desktop.
Getting your files on the local storage
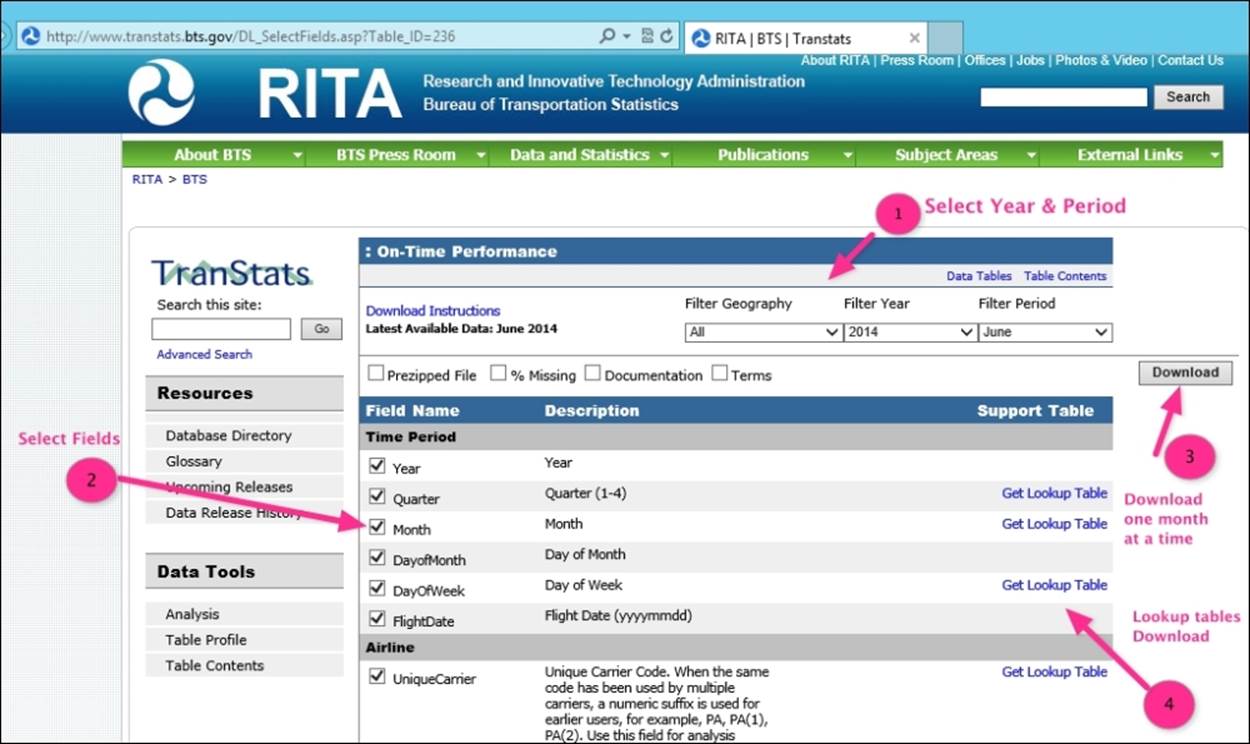
Get your files on the edge node, either via web download, SCP or SFTP. The following figure shows you the steps to download the on-time performance data from the website. The steps are selecting the year, month, and other similar fields and then clicking onDownload. The fields that we need for the project are listed as follows:
YEAR, QUARTER, MONTH, DAY_OF_MONTH, DAY_OF_WEEK, FL_DATE, UNIQUE_CARRIER, AIRLINE_ID, FL_NUM, ORIGIN_AIRPORT_ID, ORIGIN_AIRPORT_SEQ_ID, ORIGIN_CITY_MARKET_ID, ORIGIN, ORIGIN_STATE_ABR, DEST_AIRPORT_ID, DEST_AIRPORT_SEQ_ID, DEST_CITY_MARKET_ID, DEST, DEST_STATE_ABR, DEP_TIME,DEP_DELAY, ARR_TIME, ARR_DELAY, CANCELLED, CANCELLATION_CODE, DIVERTED, AIR_TIME, DISTANCE, CARRIER_DELAY, WEATHER_DELAY, NAS_DELAY, SECURITY_DELAY, and LATE_AIRCRAFT_DELAY.
Additionally, we will download the lookup files.
This website downloads the files to your local directory. Rename the files to the following format T_ONTIME_YYYYMMDD.csv. The following table shows you the files required for the mini project:
|
File name/s |
Description |
|
/otp/stage/rawotp/T_ONTIME_201301.csv /otp/stage/rawotp/T_ONTIME_201406.csv |
These files are the detailed on-time performance flight data for every flight organized by one file per year and month. |
|
/otp/stage/lookup/airportcode.csv |
This is a lookup file that has a full name for each airport abbreviation. |
|
/otp/stage/lookup/cancellationcode.csv |
This file has a full description of the cancellation abbreviation. |
|
/otp/stage/lookup/dayofweek.csv |
This file has a full description of the day of week. |
Transferring to HDFS
Launch the Hadoop command line and use the following commands to upload the complete directory to HDFS:
C:\>hadoop fs -mkdir -p /otp/stage/rawotp
c:\> hadoop fs -put D:\Users\hdinduser2\Downloads\OTPData\stage\rawotp\ /otp/stage/rawotp/
C:\>hadoop fs -mkdir -p /otp/stage/lookup
c:\>hadoop fs -put D:\Users\hdinduser2\Downloads\OTPData\stage\lookup\ /otp/stage/lookup/
Loading data to Azure Blob storage using Azure PowerShell
Azure HDInsight provides 100 percent HDFS functionality using Azure Blob storage under the covers. So, to load data to the cluster, we can load data straight to Azure Blob storage without the need of the HDInsight cluster, thereby, making this more cost effective. In this section, we will see how to load data to Azure Blob using Azure PowerShell.
To load the data to Azure Blob storage from a local filesystem, we will perform the following steps:
1. Open Azure PowerShell using the shortcut on your desktop and type in the Get-AzurePublishSettingsFile command. This will open the manage.windowsazure.com web page and download a .publishsettings file.
2. Next, type in the Import-AzurePublishSettingsFile command with the publishsettings file to import the management certificate.
3. If you have multiple Azure subscriptions, you will need to use the Set-AzureSubscription command to the context of PowerShell:
4. Set-AzureSubscription -SubscriptionName "Pay-As-You-Go"
5. Next, set the storage account name, container name, get the storage key, and set the storage context:
6. $storageAccountName = "hdindstorage"
7. $containerName = "hdind"
8. $storageAccountKey = Get-AzureStorageKey $storageAccountName | %{$_.Primary}
9. $storageContext = New-AzureStorageContext -StorageAccountName $storageAccountName -StorageAccountKey $storageAccountKey
Note
Make sure that the container already exists; otherwise you will get an error.
10. Next, set the variables for the local filename and Blob location in Azure:
11.$fileName = "Z:\HDInsightver2\OTPData\otp\stage\rawotp\T_ONTIME_201201.csv"
12.$blobName = "otp/stage/rawotp/T_ONTIME_201201.csv"
13. Finally, upload the file using the Set-AzureStorageBlobContent command, as follows:
14.Set-AzureStorageBlobContent -File $fileName -Container $containerName -Blob $blobName -context $storageContext
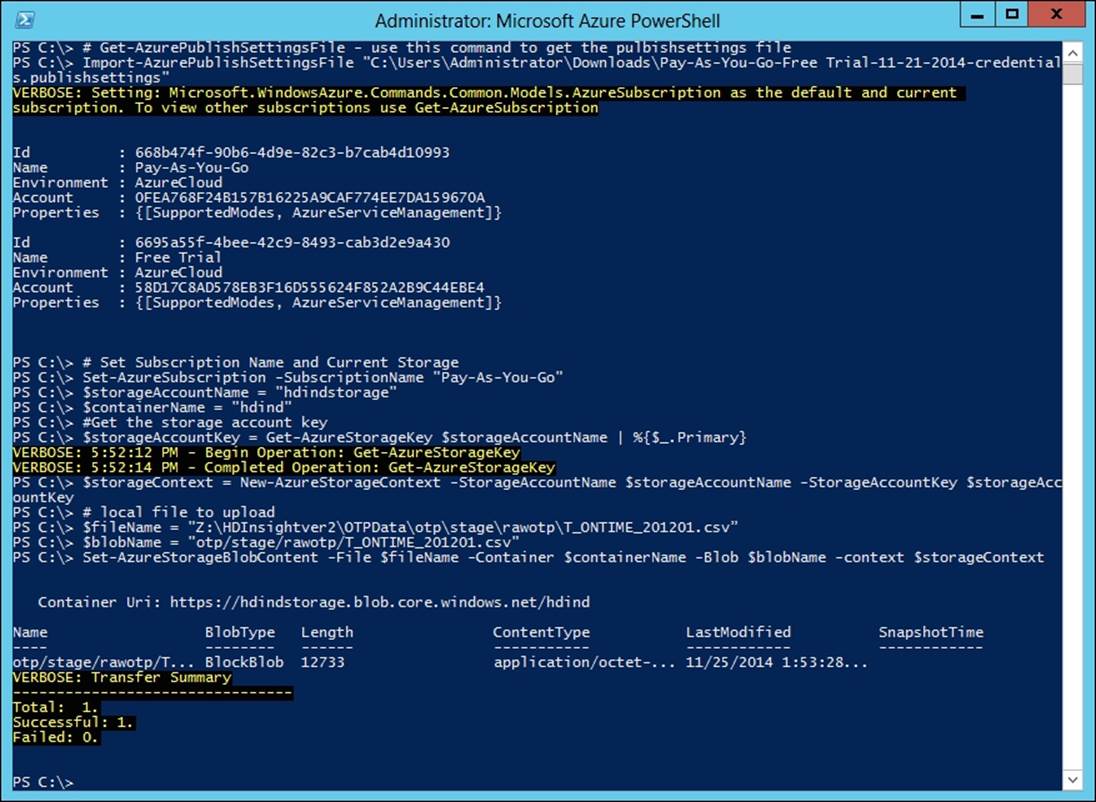
With the preceding steps, we have successfully loaded the local file Z:\HDInsightver2\OTPData\otp\stage\rawotp\T_ONTIME_201201.csv to the Azure Blob otp/stage/rawotp/T_ONTIME_201201.csv in the hdind container.
The following screenshot shows you the results of the preceding commands:
Note
The preceding script can be tailored to automate the ingestion of data on a regular basis to the Data Lake.
Loading files to Data Lake using GUI tools
In this section, we will see how to load data to the cluster using graphical user interface tools.
Storage access keys
To use any of the Azure Blob storage explorer tools, you will need your storage access keys. For instructions, you can refer to Chapter 4, Administering Your HDInsight Cluster.
Storage tools
There are several tools that you can use to load data to the Azure Storage; some of them are freeware. I have listed the popular ones here and will show you CloudXplorer in detail:
· CloudXplorer: http://clumsyleaf.com/products/cloudxplorer
· Azure Storage Explorer: http://azurestorageexplorer.codeplex.com/
· Azure Management Studio: http://www.cerebrata.com/products/azure-management-studio/introduction
· CloudBerry Explorer: http://www.cloudberrylab.com/microsoft-azure-explorer-pro.aspx
CloudXplorer
CloudXplorer is a simple GUI tool that allows you to browse, upload, and delete blobs in Azure Storage. It has a simple Windows Explorer-like interface and supports multiple Windows Azure storage accounts.
Key benefits
The following are the key benefits of using a tool such as CloudXplorer:
· CloudXplorer user interface is very intuitive and easy to use Windows File Explorer
· It supports upload of multiple files and directories with the option to run parallel threads
· It supports restart of failed uploads
· It supports copy and move operations between folders, containers, and even accounts
Let's explore this in detail. First, download and install software from http://clumsyleaf.com/products/cloudxplorer.
Registering your storage account
After installation, you will need to register the Azure storage account used for HDInsight with CloudXplorer. Perform the following steps:
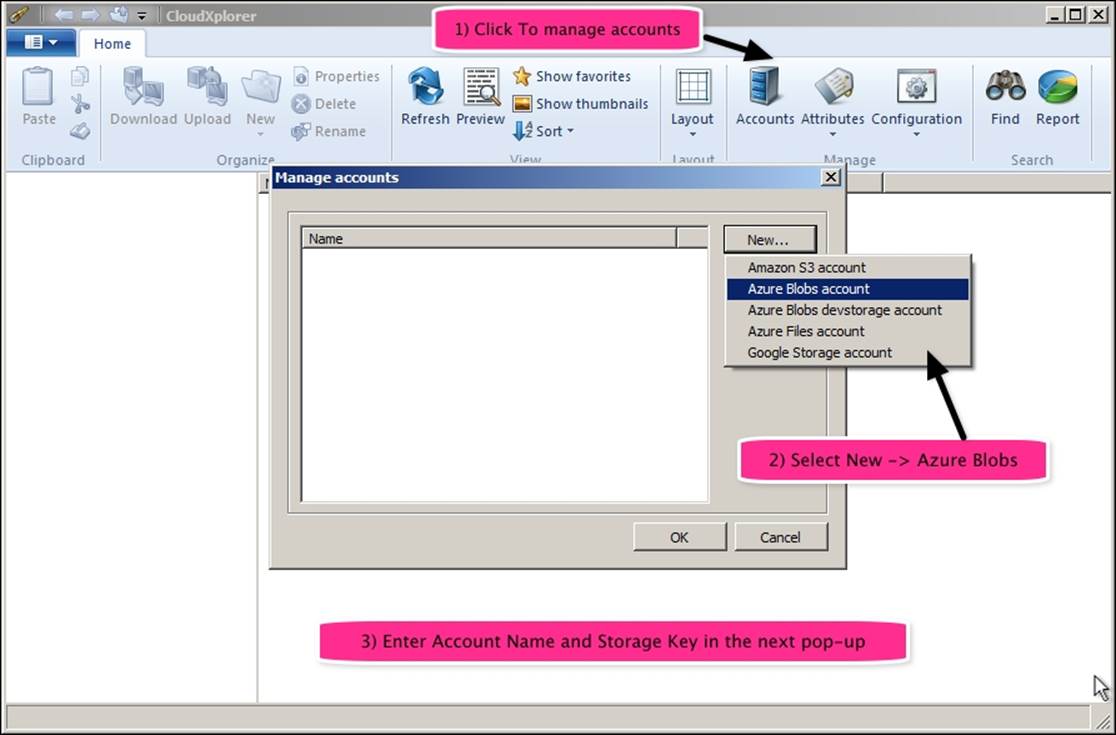
1. Click on Manage Accounts.
2. Select Azure Blobs account.
3. Enter a storage name and the storage key, as obtained from the Azure portal.
The following screenshot shows you the preceding steps:
Uploading files to your Blob storage
Next, perform the following steps to upload local files as Azure blobs:
1. Browse to the desired storage container and directory.(You can also add new directories by clicking on the New icon next to Upload.)
2. Click on the Upload icon on the menu bar.
3. Select the file/s you want to be uploaded and click on Open.
4. This will start the upload to the Azure storage in the cloud.
5. Optionally, you can change the preferences to run multiple upload threads in parallel.
6. Once the upload is complete, you can verify the files by viewing the list in the directory that you uploaded.
The following screenshot shows you the preceding steps:
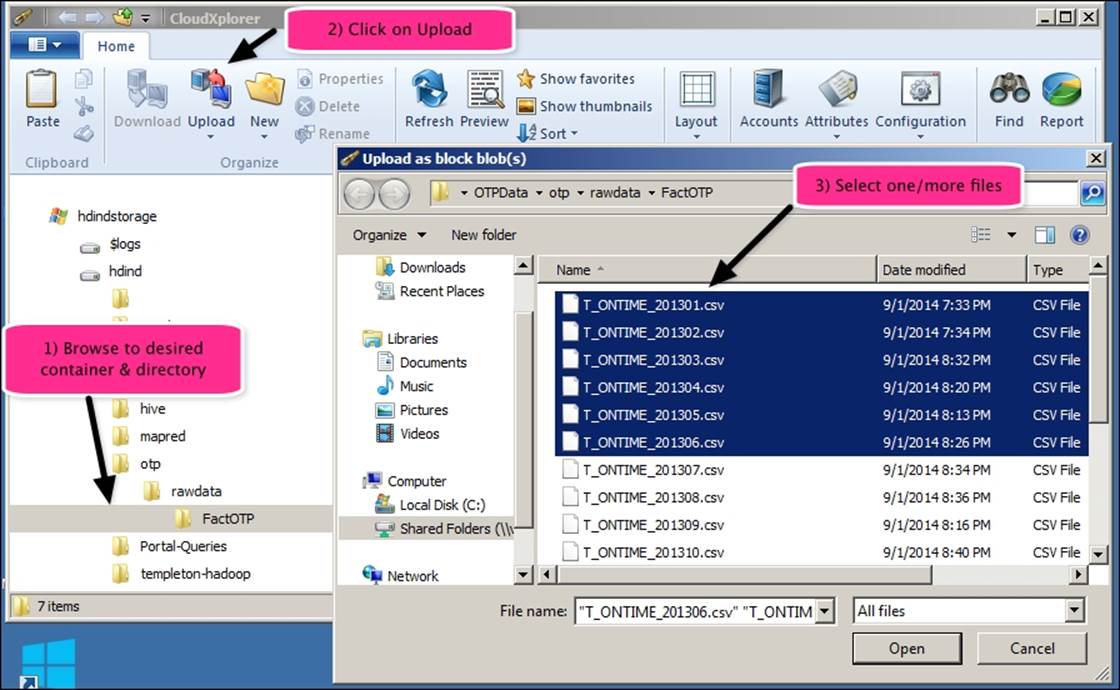
With the preceding steps, we have uploaded the six .csv files to Azure Blob storage using CloudXplorer.
Using Sqoop to move data from RDBMS to Data Lake
Sqoop enables us to transfer data between any relational database and Hadoop. You can import data from any relational database that has a JDBC adaptor such as SQL Server, MySQL, Oracle, Teradata, and others, to HDInsight.
Key benefits
The major benefits of using Sqoop to move data are as follows:
· Leverages RDBMS metadata to get the column data types
· It is simple to script and uses SQL
· It can be used to handle change data capture by importing daily transactional data to HDInsight
· It uses MapReduce for export and import that enables parallel and efficient data movement
Two modes of using Sqoop
Sqoop can be used to get data into and out of Hadoop; it has two modes of operation:
· Sqoop import: Data moves from RDBMS to HDInsight
· Sqoop export: Data moves from HDInsight to RDBMS
The following screenshot shows you two modes of using Sqoop:

Using Sqoop to import data (SQL to Hadoop)
The following is the setup for a Sqoop import demonstration:
· Source database: Teradata
· Server: 10.11.12.6
· SQL username: dbc
· SQL Password: dbc123
· Table: airline_otp (has 509,519 rows)
· Target: /user/rajn/TDStage2
The following are the steps to import data using Sqoop:
1. Ensure that you have necessary JDBC drivers. Copy them to the Sqoop lib folder. In my installation, it was C:\Hadoop\sqoop-1.4.2\lib. I copied terajdbc4.jar and tdgssconfig.jar.
Note
A prerequisite for Sqoop to work is that connectivity to the SQL database should be available that requires proper ports and firewall settings so that the HDInsight cluster can communicate with the database server.
2. Use Windows PowerShell and run the Sqoop import command:
3. C:\Hadoop\sqoop-1.4.2\bin> .\sqoop import --connect "jdbc:teradata://10.11.12.6" --username dbc --password dbc123 --table "airline_otp" --driver com.teradata.jdbc.TeraDriver --target-dir /user/rajn/TDStage2 -m 1
Note
-m 1 ensures that there is only one map task and hence one file that has a complete dataset.
4. Verify the data in HDFS using a tail command:
5. c:\Hadoop\sqoop-1.4.2\lib>hadoop fs -tail /user/rajn/TDStage2/part-m-00000
6. You can optionally filter the data using a where clause. For the preceding dataset, let's filter for flights where carrier is AA (American Airlines):
7. C:\Hadoop\sqoop-1.4.2\bin> .\sqoop import --connect "jdbc:teradata://10.11.12.6" --username dbc --password dbc --table "airline_otp" --driver com.teradata.jdbc.TeraDriver --target-dir /user/rajn/TDStage3 --where " uniquecarrier='AA' " –m 1
Sqoop can also be used to export data out from Hadoop and send it to RDBMS. For details, refer to the Sqoop User Guide. The link to the user guide is available at http://sqoop.apache.org/docs/1.4.4/SqoopUserGuide.html#_literal_sqoop_export_literal.
Organizing your Data Lake in HDFS
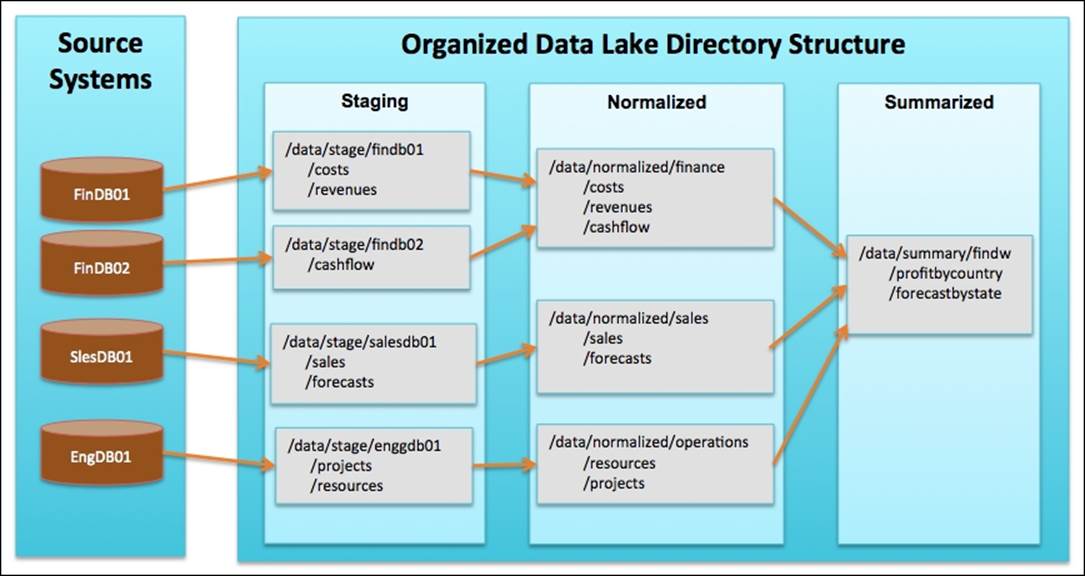
As you load files to your Data Lake, it is important to have this process managed for data consumers in order to find the right data. Organization of data requires planning, coordination, and governance. One proposed model that I have seen used by several clients is to have three main directories:
· Staging: This directory will host all the original source files, as they get ingested to the Data Lake. Each source should have its own directory. For example, let's consider that an organization has two financial databases, findb01 and findb02. A proposed directory structure in Data Lake can be /data/stage/findb01 and /data/stage/findb02.
· Cleansed: The data in staging should go through basic audit and data quality checks to ensure that it meets the organization standards. For example, if sales data is being ingested to Data Lake, the state and country code in the sales records should be valid. The cleansed data should be grouped by subject area, for example, finance and sales. A proposed directory structure for the cleansed data is data/cleansed/finance.
· Summarized: Data that is often used by reports should be precomputed for performance and this is called summarized data. For example, a regular report required for an enterprise is quarterly profitability and forecast by country, region, and state, which requires data from sales and finance to be summarized. A proposed directory structure for summarized data is data/summary/findw.
To keep a track of which file is in which directory, it is recommended that you index all this information into a search index such as Elastic search or SOLR. The following is the recommended information for such an index: date of ingestion, filename, source information, destination, file size, and additional attributes that is known about the file. This can be accomplished by a scheduled Oozie workflow that scans the data files in HDFS and builds or updates the SOLR index.
The following figure shows you the data flow and the various directories in a managed Data Lake:
Managing file metadata using HCatalog
Organizing data in specific directories based on the content and source does provide the foundation for a well-managed Data Lake. In addition to file location, a managed Data Lake should capture key attributes and structure information of the file; for example, for the sales table being ingested to Data Lake in data/stage/salesdb01/sales, the attributes will be as follows:
· Structure of the file: For example, fixed length, delimited, XML, JSON, sequence, and columnar (RC)
· Fields/columns in the data file: For example, fiscal quarter, $amount
· Data types of the fields: For example, integer, string, double, and string
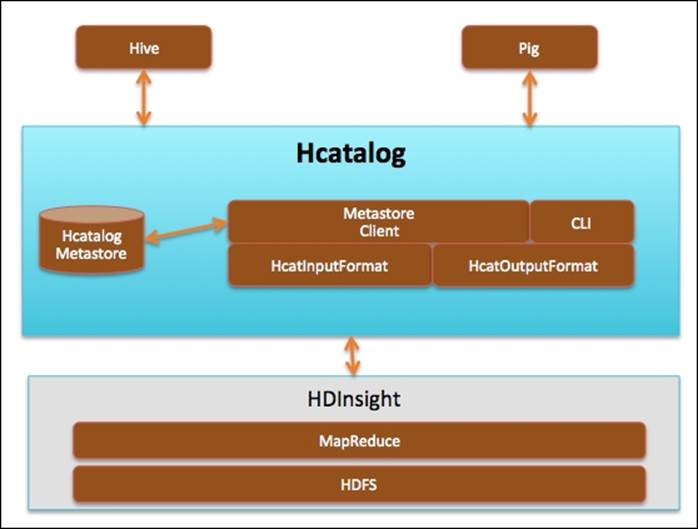
Apache HCatalog provides a table management system for the HDFS based filesystem. It provides the equivalent of information_schema tables of SQL Server. HCatalog will store the format/structure information.
Key benefits
The following are the key benefits of using HCatalog:
· Stores structural metadata of HDFS files in a shared metastore
· Provides interface to metastore for various Hadoop tools such as Pig, Hive, and MapReduce
· Provides table abstraction so that users don't have to worry about where and how data is stored in the Data Lake
· Provides APIs and command-line tools to interact with HCatalog metadata
The following figure shows the architecture of HCatalog and Hadoop ecosystem tools:
Using HCatalog Command Line to create tables
HCatalog Command Line is a convenient way to register metadata with HCatalog. Let's review how this can be done for our OTP datasets that we ingested to Hadoop.
First, we will build an HCatalog script that has four create table commands for the OTP data and the lookups. We will create these tables as external tables, which means that the data files are retained in their original directory and HCatalog only references the location.
Let's review the create table commands that you can save as a otpcreatetable.sql.txt file:
-- Create Database
create database otpdw;
use otpdw;
-- Create stage table for OTP data
CREATE EXTERNAL TABLE airline_otp_stage (
flightyear SMALLINT, -- Year
flightquarter SMALLINT, -- Quarter
flightmonth SMALLINT, -- Month
flightdayofmonth SMALLINT, -- Day of Month
flightdayofweek SMALLINT, -- Day of week
flightdate STRING, -- Flight Date (yyyy-mm-dd)
uniquecarrier STRING, -- Unique Carrier Code.
airlineid INT, -- Identification number carrier
flightnum STRING, -- Flight Number
originairportid INT, -- Origin Airport,
originaiportseqid INT, -- Airport Seq ID
origincitymarketid INT, -- CityMarketID
originairportabr STRING, -- Origin airport ABR
origincityname STRING, -- Origin city name
originstateabr STRING, -- Origin State ABR
destairportid INT, -- Origin Airport,
destaiportseqid INT, -- Airport Seq ID
destcitymarketid INT, -- CityMarketID
destairportabr STRING, -- Origin airport ABR
destcityname STRING, -- Origin city name
deststateabr STRING, -- Origin State ABR
deptime STRING, -- Actual Departure Time (hhmm)
depdelay STRING, -- Difference in minutes
arrtime STRING, -- Actual Arrival Time (hhmm)
arrdelay STRING, -- Difference in minutes
cancelled STRING, -- (1=Yes) -> true/false 0.00
cancelcode STRING, -- Cancelation code null
diverted STRING, -- (1=Yes) -> true/false
airtime DOUBLE, -- Airtime in minutes
distance DOUBLE, -- Distance in miles
carrierdelay STRING, -- delay due to carrier
weatherdelay STRING, -- delay due to weather
nasdelay STRING, -- delay due to nas
securitydelay STRING, -- delay due to security
lateaircraftdelay STRING -- delay due to late aircraft
)
row format DELIMITED
fields terminated by ','
LOCATION '/otp/stage/rawotp';
-- airport code
CREATE EXTERNAL TABLE airport_code_stage (
aiportcode STRING, -- Origin airport abr "DFW"
airportdescription STRING -- description of airport
)
row format DELIMITED
fields terminated by ','
LOCATION '/otp/stage/lookup/airportcode';
-- cancellation code
CREATE EXTERNAL TABLE cancellation_code_stage (
cancellationcode STRING, -- Cancel code like A
cancellationdescription STRING -- description like Carrier
)
row format DELIMITED
fields terminated by ','
LOCATION '/otp/stage/lookup/cancellationcode';
-- Dayofweek code
CREATE EXTERNAL TABLE dayofweek_code_stage (
dayofweekcode STRING, -- Cancel code like A
dayofweekcodedescription STRING -- description like Carrier
)
row format DELIMITED
fields terminated by ','
LOCATION '/otp/stage/lookup/dayofweekcode';
Next, we will call the script via the HCatalog command-line interface. Let's perform the following steps to do so:
1. Log in to the head node of the HDInsight cluster using the remote desktop.
2. Launch the Hadoop Command Line executable.
3. Perform the following commands that will call HCatalog and run the create table commands:
4. c:\> cd C:\apps\dist\hive-0.13.0.2.1.5.0-2057\hcatalog\bin
5.
6. C:\apps\dist\hive-0.13.0.2.1.5.0-2057\hcatalog\bin>hcat.py -f D:\Users\hdinduser2\Downloads\otpcreatetable.sql
After the preceding command is run, the four tables are registered and visible in HCatalog and Hive.
Summary
An Enterprise Data Lake journey starts first with getting valuable data into the lake. There are several mechanisms to ingest data into a Data Lake powered by HDInsight primarily: HDFS transfer, Azure PowerShell, Azure tools with a user interface, and Sqoop. In order to make a Data Lake easy to consume, it is important to have a managed ingestion process with governance and structure of the various directories.
HCatalog provides a shared metastore that can be used by various tools in Hadoop, namely, Hive, Pig, and MapReduce. This ensures that the structural information is defined once and leveraged by these tools. In the next chapter, we will look into the transformation of the data that we just ingested.
All materials on the site are licensed Creative Commons Attribution-Sharealike 3.0 Unported CC BY-SA 3.0 & GNU Free Documentation License (GFDL)
If you are the copyright holder of any material contained on our site and intend to remove it, please contact our site administrator for approval.
© 2016-2026 All site design rights belong to S.Y.A.