HDInsight Essentials, Second Edition (2015)
Chapter 6. Transform Data in the Data Lake
In the previous chapter, we ingested the source data into the Data Lake. To make sense of the vast amount of raw data, a transformation procedure is required to convert it into information that can further be used by decision makers. In this chapter, we will discuss how to transform data.
The topics covered in this chapter are as follows:
· Transformation overview
· Tools for transforming data in a Data Lake, such as HCatalog, Hive, Pig, and MapReduce
· Transformation of the airline on-time performance (OTP) raw data into an aggregate
· Review results of transformation
Transformation overview
Once you get data into the cluster, the next step in a typical project is to get data ready for future consumption. This typically involves data cleaning, data quality, and aggregation; for example, checking phone number format, valid date of birth, and aggregate sales by region.
In our mini project case, we are in step two of the data pipeline to the Data Lake.

Tools for transforming data in Data Lake
In this section, we will review the various tools that enable the transformation of data in the Data Lake. We will review HCatalog, Hive, and Pig in detail, which are the popular methods to transform data in Data Lake. Next, we will look at how Azure PowerShell enables easy assembly of these scripts into a single procedure.
HCatalog
Apache HCatalog manages metadata of the structure of files in Hadoop. In Chapter 5, Ingest and Organize Data Lake, we registered stage tables with HCatalog, and in this chapter, we will leverage that information for transformation.
Persisting HCatalog metastore in a SQL database
With Azure HDInsight, the metastore can be hosted in an embedded mode in Apache Derby, which comes with the standard Hadoop. However, one issue with this approach is that every time you shut down HDInsight, the metastore information is lost. An alternative is to store HCatalog information in a separately managed SQL database. Perform the following steps for this:
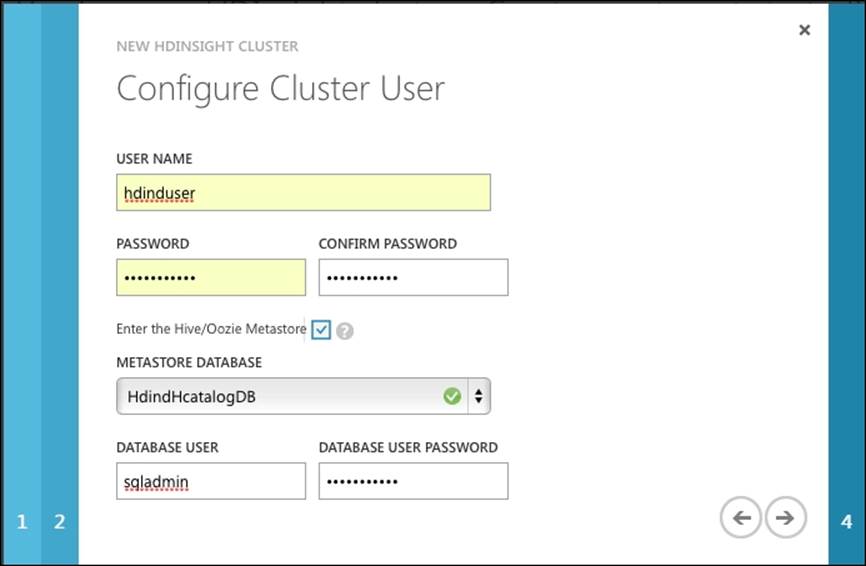
1. Create a new Azure SQL database using the Azure management page. For the demo project, I have selected the following database settings:
· NAME: HdindHcatalogDB
· SERVICE TIERS: Basic
· MAXIMUM SIZE: 2 GB
· REGION: West US (same as the HDInsight cluster)
2. When you bring up the HDInsight cluster, check the Enter the Hive/Oozie Metastore option, and select the newly created metastore database HdindHcatalogDB:
Apache Hive
Apache Hive is a data warehouse infrastructure built on top of Hadoop and provides easy querying, summarization, and analysis. Facebook engineers initially developed Hive to help their business users to be effective in accessing the Data Lake without the need of complex programming skills. Hive comes with HiveQL, which is a simple SQL-like language, that allows queries to be compiled to MapReduce and then runs on the cluster.
Hive architecture
A high-level Hive architecture is shown in the following figure:
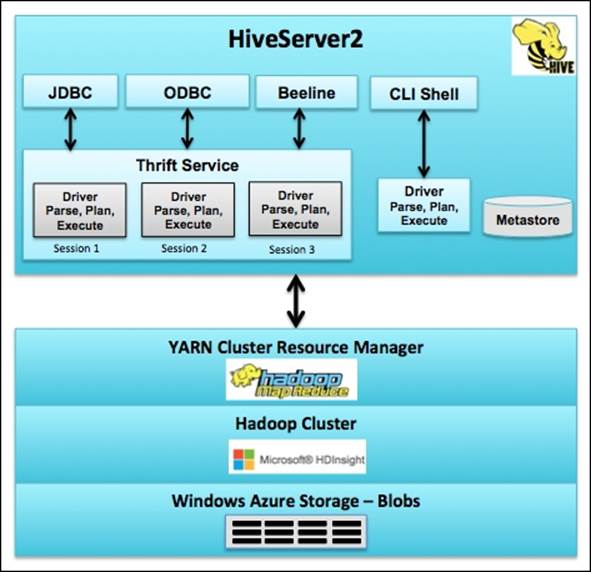
Let's view the architecture from top to bottom:
· Hive can be accessed via JDBC, ODBC, Beeline, and a command-line interface (CLI).
· CLI communicates directly with a driver that will parse, plan, and execute the queries provided by the user. CLI requires Hadoop and Hive client.
· A modern way to connect to Hive is using Beeline, which is lightweight and requires only a JDBC driver. JDBC, Beeline, and ODBC all communicate with the Thrift service, which has a session manager, and can execute multiple Hive commands at the same time using separate drivers.
· Hive driver converts the HiveQL to a MapReduce task and submits it to the Hadoop cluster.
· Metastore is typically a relational database and has the structure information of the files.
Note
Since Hive is based on Hadoop, it will not support update, delete, and row-level insert statements.
Starting Hive in HDInsight
To launch Hive, perform the following steps:
1. Connect to your head node and then click on the Hadoop Command Line icon on your desktop.
2. Next, change the directory to Hive home and then type the word hive.
3. Once you get Command Prompt, just type hive. This will start the Hive session ready for Hive commands. It is recommended that you first create a separate database for each application.
The following code snippet shows you the commands to start a Hive session:
C:\> cd C:\apps\dist\hive-0.13.0.2.1.5.0-2057\bin
C:\apps\dist\hive-0.13.0.2.1.5.0-2057\bin> hive
Basic Hive commands
The following table shows you the commonly used Hive commands with examples:
|
Syntax |
Description |
|
hive –f C:\Downloads\emp.sql |
This command launches Hive with a filename emp.sql. |
|
create database otpdw; |
This command creates a database named otpdw. |
|
CREATE TABLE employees (name STRING, salary FLOAT, subordinates ARRAY<STRING>, address STRING ) PARTITIONED BY (deptno STRING) ROW FORMAT DELIMITED FIELDS TERMINATED BY '\t' STORED AS TEXTFILE; |
This command creates the employees table with four columns partitioned by department and is stored as a text file. |
|
Describe employees; |
This command describes the structure of the employees table. |
|
LOAD DATA LOCAL INPATH '/training/demo/data' OVERWRITE INTO TABLE demo; |
This command loads data into a table demo from data in HDFS. |
|
INSERT OVERWRITE TABLE demonames PARTITION(place='US') select firstname, lastname from demo where country='US'; |
This command inserts into table demonames with select operation on another table called demo. |
|
Drop table employees; |
This command drops the employees table. |
|
SELECT e.name, e.joinyear, d.dname FROM employees e LEFT OUTER JOIN department d ON (e.deptno = d.deptid); |
This command selects employees and department tables with a join. |
|
INSERT OVERWRITE LOCAL DIRECTORY '/usr/rajn/employeesafter2000' select id, name, salary from employees where id > 2000; |
This command exports data into the local filesystem from the employees table with a filter on the employees with ID greater than 2000. |
Apache Pig
Apache Pig is another high-level language for processing data in Hadoop and was developed by the Yahoo engineering team. It provides a simple scripting language that is similar to Python and simplifies joining data and chaining sets of operations. Pig scripts are converted to MapReduce and submitted to the cluster.
The key features of Pig are as follows:
· Pig allows rapid prototyping of algorithms
· Iterative processing of data (chaining)
· Joins are easy using Pig to correlate datasets
· Data can be verified on screen or saved back to HDFS
Pig architecture
The following figure shows you the Pig architecture:
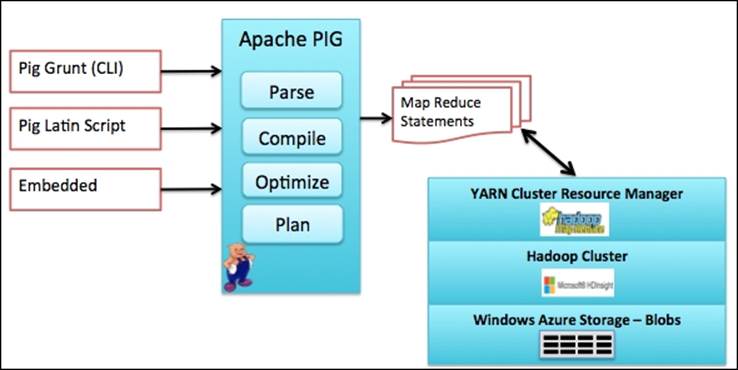
Let's view the architecture from left to right:
· Access to Pig can be via a CLI called Grunt, Pig script, or an embedded program such as Java
· Pig parses, compiles, optimizes, and fires MapReduce statements
· MapReduce accesses HDFS and returns the results
Starting Pig in HDInsight node
To launch Pig, perform the following steps:
1. Connect to your head node and then click on the Hadoop Command Line icon on your desktop.
2. Next, change the directory to Pig home and then type the word pig.
3. Now, this takes you to the Pig grunt command line that is ready to take in Pig commands.
The following snippet shows you the commands to start a Pig grunt session:
C:\> cd C:\apps\dist\pig-0.12.1.2.1.5.0-2057\bin
C:\apps\dist\pig-0.12.1.2.1.5.0-2057\bin>pig
Basic Pig commands
The following table shows you the commonly used Pig commands with examples:
|
Syntax |
Description |
|
pig -useHCatalog D:\Downloads\Cleanotpraw.pig.txt |
This command launches Pig with HCatalog integration. |
|
users = LOAD '/u01/c01/users' USING PigStorage('\t') AS (name:chararray, id:int, email:chararray); |
This command selects all users from a file. |
|
userswithnewids = FILTER users BY id > 20; |
This command filters users whose ID is greater than 20. |
|
names = FOREACH users GENERATE name; distinctnames = DISTINCT names; |
This command gets distinct user names. |
|
EMPDEPT = JOIN EMP BY $0, DEPT BY $1; |
This command join results from EMP and DEPT to create a combined EMPDEPT dataset. |
|
DUMP names; |
This command dumps results on the standard output. |
|
STORE names INTO '/pigoutput/employees'; |
This command stores results to a file in HDFS. |
Note
DUMP and STORE are trigger words for Pig; only after these words, will Pig start the execution of all the statements preceding that line.
Pig or Hive
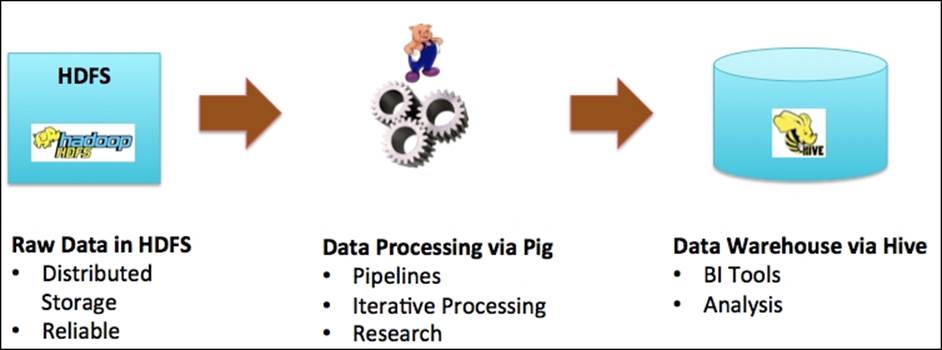
If you have a question whether to use Pig or Hive, think of a pipeline of ETL operations from raw data in HDFS to a BI analytical user. Pig can be used for doing core ETL where the algorithms are known and Hive can be used for ad hoc queries.
The following figure shows you a recommended data pipeline from ingestion to HDFS to query using Hive:
MapReduce
MapReduce is another option for batch data transformation and requires Java programming skills. In this section, we will look at the basic wordcount problem solution using MapReduce. The goal of this code is to count the unique words in a text file.
Note
This wordcount is a common MapReduce example and is also explained in the Azure webpage at http://azure.microsoft.com/en-us/documentation/articles/hdinsight-use-mapreduce/.
The mapper code
The following is the mapper side of the code that reads every line of the text file and outputs a key value for every word in the line where key is the word and value is set to "1". For example, if the line is "This is my first line in this file", the mapper will emit the following output:
This:1 is:1 my:1 first:1 line:1
in:1 this:1 file:1
The content of WordCountMapper.java is as follows:
public class WordCountMapper extends Mapper<Object, Text, Text, IntWritable> {
private Text word = new Text();
private final static IntWritable ONE = new IntWritable(1);
public void map(Object key, Text value, Context context)
throws IOException, InterruptedException {
// Break line into words for processing
StringTokenizer wordList = new StringTokenizer(value.toString());
while (wordList.hasMoreTokens()) {
word.set(wordList.nextToken());
context.write(word, ONE);
}
}
}
The reducer code
The following is the reducer side of the code that gets the input from the mapper and aggregates the words. In our example, the reducer will emit the following output:
This:2 is:1 my:1 first:1 line:1 in:1 file:1
The content of WordCountReducer.java is as follows:
public class WordCountReducer extends Reducer<Text, IntWritable, Text, IntWritable> {
private IntWritable totalWordCount = new IntWritable();
public void reduce(Text key, Iterable<IntWritable> values, Context context)
throws IOException, InterruptedException {
int wordCount = 0;
for (IntWritable val : values) {
wordCount += val.get();
}
totalWordCount.set(wordCount);
context.write(key, totalWordCount);
}
}
The driver code
To execute the mapper and reducer, we need a driver, which is as shown in the following snippet.
The content of the WordCount.java snippet is as follows:
public class WordCount {
public static void main(String[] args) throws Exception {
if (args.length != 2) {
System.out.println("Usage: WordCount <input dir> <output dir>");
System.exit(-1);
}
Job job = new Job();
job.setJarByClass(WordCount.class);
job.setJobName("WordCount");
FileInputFormat.addInputPath(job, new Path(args[0]));
FileOutputFormat.setOutputPath(job, new Path(args[1]));
job.setMapperClass(WordCountMapper.class);
job.setReducerClass(WordCountReducer.class);
job.setOutputKeyClass(Text.class);
job.setOutputValueClass(IntWritable.class);
System.exit(job.waitForCompletion(true) ? 0 : 1);
}
}
Executing MapReduce on HDInsight
Now, we are ready to use the MapReduce code to get the frequency of words in the data file. Let's perform the following steps:
1. Connect to your head node and then click on the Hadoop Command Line icon on your desktop.
2. Next, you can invoke the MapReduce code using the following command:
3. hadoop jar hadoop-mapreduce.jar wordcount input output
Here, the hadoop-mapreduce.jar is a sample MapReduce.jar provided by HDInsight. There are two arguments for the MapReduce job, first is the source filename and second is the output file path.
4. Once the MapReduce job is complete, the output file/s will be created in the location as specified. The default name for the output file for a MapReduce job is part-r-00000. If the result has more than one reducer, additional files will be created and named part-r-00001, part-r-00002, and so on.
5. You can view the contents of the file using the hadoop fs –cat outputfilename command.
The following command performs the word count for a text file called Nasa_Human_Spaceflight_Report and creates an output file in the directory NasaWordCountOutput:
C:\Users\rajn\SampleCode\WordCount>hadoop jar hadoop-mapreduce.jar wordcount /user/hadoop/wcount/Nasa_Human_Spaceflight_Report.txt /user/hadoop/wcount/NasaWordCountOutput
Azure PowerShell for execution of Hadoop jobs
Azure PowerShell is a powerful scripting environment that allows one to submit Hive, Pig, MapReduce, and Sqoop jobs to the HDInsight cluster. The following script shows you how to execute a Hive query using Azure PowerShell. The script can be extended to call a Pig or MapReduce code as well:
#Import azure credentials
Get-AzurePublishSettingsFile
Import-AzurePublishSettingsFile "C:\Users\Rajesh Nadipalli\Downloads\Pay-As-You-Go-Free Trial-9-15-2014-credentials.publishsettings"
#Set Subscription
Select-AzureSubscription "Pay-As-You-Go"
# Define Hive Query
$queryString = "CREATE TABLE demo_table (id int, name string);; "
# Use the HDInsight cmdlet to create a HDInsight job definition, with the HiveQL
$hiveJobDefinition = New-AzureHDInsightHiveJobDefinition -Query $queryString
# Start the HDInsight job using the Hive job definition
$hiveJob = Start-AzureHDInsightJob -Cluster $clusterName -JobDefinition $ hiveJobDefinition
Transformation for the OTP project
Let's take a look at a practical example of a transformation using our Airline Ontime Performance (OTP) project. Let's say that our transformation task is to get from a source stage table that we created in Chapter 5, Ingest and Organize Data Lake, (which is on the left-hand side) to aggregated (which is on the right-hand side) summary data by airline carrier, year, and month.
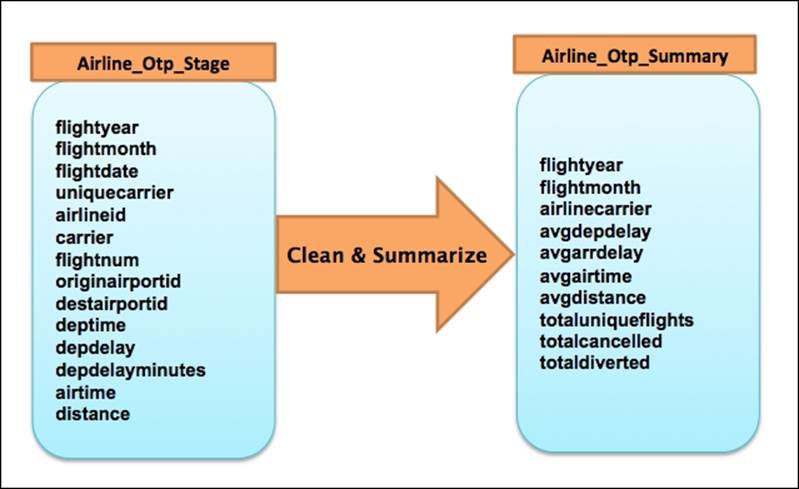
To achieve the preceding transformation, we need to perform the following key steps:
1. Clean the header line in each file that has the field names.
2. Update the flight month from the current "MM" to "YYYYMM" format.
3. Create an intermediate table with the refined data from the previous two steps.
4. Aggregate the data from the refined data to a summary table at flight year, flight month, and carrier levels.
We will use Pig to do a cleanup and then use Hive to preserve the results as shown in the following figure:
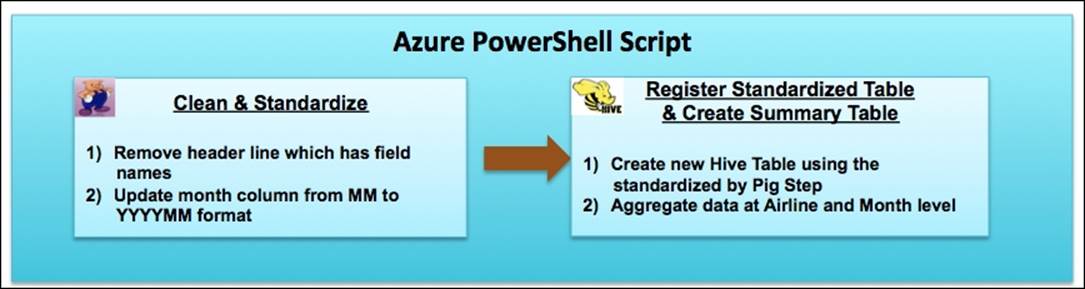
Cleaning data using Pig
The following is a Pig script (saved as Cleanotpraw.pig.txt) that will perform the following steps:
1. Read structure information from HCatalog.
2. Remove the header line.
3. Change the flight date to YYYMM format.
Note
The following is a code snippet of the Pig code, the complete code is available for download from the publisher's website.
-- Load using Hcatalog table name
fileAllRows = LOAD 'otpdw.airline_otp_stage' USING org.apache.hcatalog.pig.HCatLoader();
-- remove the header lines
fileDataRows = FILTER fileAllRows BY NOT(originairportabr MATCHES '.*ORIGIN.*');
-- concat YYYYMM to form the new flightmonth
fileDataStandardized = FOREACH fileDataRows GENERATE flightyear, flightquarter, CONCAT(SUBSTRING(flightdate, 0, 4),SUBSTRING(flightdate, 5, 7)) as flightmonth…
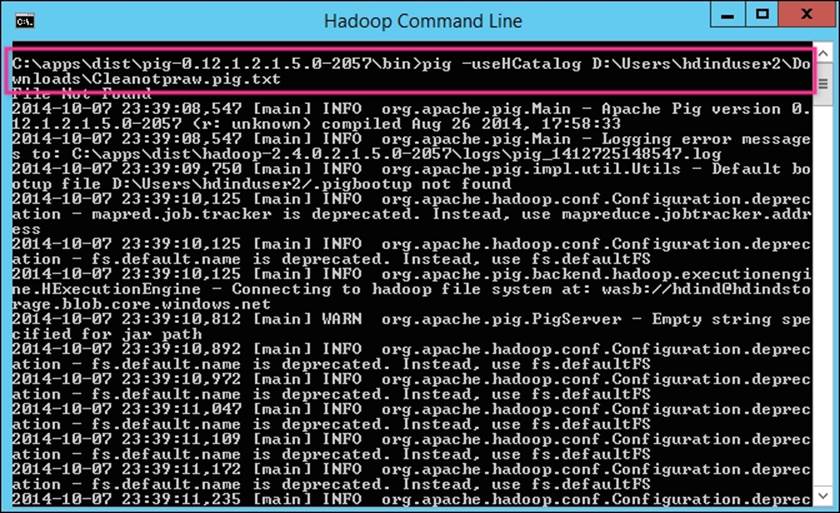
Executing Pig script
To execute the Pig script, connect to your head node and then click on the Hadoop Command Line icon on your desktop and type the command highlighted in the following screenshot:
Registering a refined and aggregate table using Hive
After Pig standardizes the data, the following Hive script will first create a Hive table on top of the refined data and then create an aggregate table with the desired results.
The following are the key steps in the Hive scripts:
1. Create an external hive table airline_otp_refined on top of the data produced by the previous Pig script.
Note
An external table in Hive can point to any location in HDFS rather than the regular table that is stored in the directory, as specified in the Hive configuration file (hive.metastore.warehouse.dir).
2. Create a new summary table airline_otp_summary.
3. Insert into airline_otp_summary using data from airline_otp_refined.
The following is the Hive script that will create the airline_otp_summary table using the data refined by Pig in the previous step:
use otpdw;
CREATE EXTERNAL TABLE airline_otp_refined (
flightyear SMALLINT, -- Year
flightquarter SMALLINT, -- Quarter
flightmonth STRING, -- Month in YYYYMM format
flightdayofmonth SMALLINT, -- Day of Month
flightdayofweek SMALLINT, -- Day of week
flightdate STRING, -- Flight Date (yyyy-mm-dd)
uniquecarrier STRING, -- Unique Carrier Code. "9E"
airlineid INT, -- Identification number for carrier
flightnum STRING, -- Flight Number 3324
originairportid INT, -- Origin Airport, 11298
originaiportseqid INT, -- Airport Seq ID 1129803
origincitymarketid INT, -- CityMarketID 30194
originairportabr STRING, -- Origin airport abr "DFW"
originstateabr STRING, -- Origin State ABR "TX"
destairportid INT, -- Origin Airport, 12478
destaiportseqid INT, -- Airport Seq ID 1247802
destcitymarketid INT, -- CityMarketID 31703
destairportabr STRING, -- Origin airport abr "JFK"
deststateabr STRING, -- Origin State ABR "NY"
deptime STRING, -- Actual Departure Time (hhmm) 1038
depdelay STRING, -- Difference in minutes (minus is early)
arrtime STRING, -- Actual Arrival Time (hhmm) 1451
arrdelay STRING, -- Difference in minutes
cancelled STRING, -- (1=Yes) -> true/false 0.00
cancelcode STRING, -- Cancelation code null
diverted STRING, -- (1=Yes) -> true/false 0.00
airtime DOUBLE, -- Airtime in minutes 175.00
distance DOUBLE, -- Distance in miles 1391.00
carrierdelay STRING, -- delay in minutes due to carrier
weatherdelay STRING, -- delay in minutes due to weather
nasdelay STRING, -- delay in minutes due to nas
securitydelay STRING, -- delay in minutes due to security
lateaircraftdelay STRING -- delay in min dueto late aircraft)
row format DELIMITED
fields terminated by ','
LOCATION '/otp/stage/refinedotp';
-- Now Aggregated table for summary
dfs -mkdir -p /otp/summary/airlinesumm;
create external table airline_otp_summary (
flightyear SMALLINT, -- Year
flightquarter SMALLINT, -- Quarter
flightmonth STRING, -- Month in YYYYMM format
airlinecarrier STRING, -- Unique Carrier Code."9E"
avgdepdelay DOUBLE,
avgarrdelay DOUBLE,
totaluniqueflights DOUBLE,
totalcancelled DOUBLE,
totaldiverted DOUBLE,
avgairtime DOUBLE,
avgdistance DOUBLE)
row format DELIMITED
fields terminated by ','
LOCATION '/otp/summary/airlinesumm';
INSERT INTO TABLE airline_otp_summary
select flightyear, flightquarter, flightmonth ,
regexp_replace(uniquecarrier,"\"","") as airlinecarrier,
avg(depdelay) as avgdepdelay,
avg(arrdelay) as avgarrdelay,
count(distinct flightnum) as totaluniqueflights,
sum(cancelled) as totalcancelled,
sum(diverted) as totaldiverted,
avg(airtime) as avgairtime,
avg(distance) as avgdistance
from airline_otp_refined
group by flightyear, flightquarter, flightmonth ,
regexp_replace(uniquecarrier,"\"","");
Executing Hive script
To execute the Hive script, connect to your head node and then click on the Hadoop Command Line icon on your desktop and type the command highlighted in the following screenshot:

Reviewing results
Let's review the results from the transformation scripts that we created. The easiest way is to query the summary table in Hive as shown in the following command:
hive> select * from airline_otp_summary where flightmonth=201402;
Other tools used for transformation
The following are the other tools that should be considered when designing a transformation solution for HDInsight based on Data Lake.
Oozie
Oozie allows creation and scheduling of workflows in order to manage and orchestrate Apache Hadoop workloads such as Pig, MapReduce, and Hive programs. Workflows are defined in XML and submitted to the Oozie orchestration engine, which executes on the HDInsight cluster. Oozie workflows can be monitored using the command line, web interface, or PowerShell.
Spark
Spark is an open source processing engine for Hadoop data and designed for speed, ease of use, and sophisticated analytics. It claims to run Hadoop MapReduce 100 times faster in memory and 10 times faster even when running on disk. It is gaining momentum in the Hadoop ecosystem due to the performance and flexibility. Spark applications can be written in Java, Scala or Python, or using Spark SQL, which is compatible with HiveQL. Spark can run as a YARN application there by leveraging the power of the HDInsight cluster for the actual execution.
Note
As of December 2014, HDInsight does not support Spark but it is expected to be available in near future.
Summary
With every Data Lake initiative, over 50 percent of the project time is spent in transforming the data from its raw format to something that can be consumed by the decision makers. In this chapter, we looked at the key tools available for data transformation; Hive and Pig both provide a layer of abstraction over MapReduce and are easy for business users to adopt. Pig has a scripting interface and Hive has a SQL interface. Azure PowerShell provides the capability to orchestrate these various jobs in a sequence. In the next chapter, we will review how to utilize and visualize the data generated by this transformed process.
All materials on the site are licensed Creative Commons Attribution-Sharealike 3.0 Unported CC BY-SA 3.0 & GNU Free Documentation License (GFDL)
If you are the copyright holder of any material contained on our site and intend to remove it, please contact our site administrator for approval.
© 2016-2026 All site design rights belong to S.Y.A.