High Performance MySQL (2012)
Chapter 15. Backup and Recovery
If you don’t plan for backups up front, you might later find that you’ve ruled out some of the best options. For example, you might set up a server and then wish for LVM so that you can take filesystem snapshots—but it’s too late. You also might not notice some important performance impacts of configuring your systems for backups. And if you don’t plan for and practice recovery, it won’t go smoothly when you need to do it.
In contrast to the first and second editions of this book, we now assume most readers are using primarily InnoDB instead of MyISAM. We won’t cover all parts of a well-designed backup and recovery solution in this chapter—just the parts that are relevant to MySQL. Here are some points we decided not to include:
§ Security (access to the backup, privileges to restore data, whether the files need to be encrypted)
§ Where to store the backups, including how far away from the source they should be (on a different disk, a different server, or offsite), and how to move the data from the source to the destination
§ Retention policies, auditing, legal requirements, and related subjects
§ Storage solutions and media, compression, and incremental backups
§ Storage formats
§ Monitoring and reporting on your backups
§ Backup capabilities built into storage layers, or particular devices such as prefabricated file servers
These topics are covered in books such as W. Curtis Preston’s Backup & Recovery (O’Reilly).
Before we begin, let’s clarify some key terms. First, you’ll often hear about so-called hot, warm, and cold backups. People generally use these terms to denote a backup’s impact: “hot” backups aren’t supposed to require any server downtime, for example. The problem is that these terms don’t mean the same things to everyone. Some tools even use the word “hot” in their names, but definitely don’t perform what we consider to be hot backups. We try to avoid these terms and instead tell you how much a specific technique or tool interrupts your server.
Two other confusing words are restore and recover. We use them in specific ways in this chapter. Restoring means retrieving data from a backup and either loading it into MySQL or placing the files where MySQL expects them to be. Recovery generally means the entire process of rescuing a system, or part of a system, after something has gone wrong. This includes restoring data from backups as well as all the steps necessary to make a server fully functional again, such as restarting MySQL, changing the configuration, warming up the server’s caches, and so on.
To many people, recovery just means fixing corrupted tables after a crash. This is not the same as recovering an entire server. A storage engine’s crash recovery reconciles its data and log files. It makes sure the data files contain only the modifications made by committed transactions, and it replays transactions from the log files that have not yet been applied to the data files. This might be part of the overall recovery process, or even part of making backups. However, it’s not the same as the recovery you might need to do after an accidental DROP TABLE, for example.
Why Backups?
Here are a few reasons that backups are important:
Disaster recovery
Disaster recovery is what you do when hardware fails, a nasty bug corrupts your data, or your server and its data become unavailable or unusable for some other reason. You need to be ready for everything from someone accidentally connecting to the wrong server doing an ALTER TABLE,[211] to the building burning down, to a malicious attacker or a MySQL bug. Although the odds of any particular disaster striking are fairly low, taken together they add up.
People changing their minds
You’d be surprised how often people intentionally delete data and then want it back.
Auditing
Sometimes you need to know what your data or schema looked like at some point in the past. You might be involved in a lawsuit, for example, or you might discover a bug in your application and need to see what the code used to do (sometimes just having your code in version control isn’t enough).
Testing
One of the easiest ways to test on realistic data is to periodically refresh a test server with the latest production data. If you’re making backups, it’s easy; just restore the backup to the test server.
Check your assumptions. For example, do you assume your shared hosting provider is backing up the MySQL server provided with your account? Many hosting providers don’t back up MySQL servers all, and others just do a file copy while the server is running, which probably creates a corrupt backup that’s useless.
[211] Baron still remembers his first job after college, where he dropped two columns from the production server’s invoice table at an ecommerce site.
Defining Recovery Requirements
If all goes well, you’ll never need to think about recovery. But when you do, the best backup system in the world won’t help. Instead, you’ll need a great recovery system.
Unfortunately, it’s easier to make your backup systems work smoothly than it is to build good recovery processes and tools. Here’s why:
§ Backups come first. You can’t recover unless you’ve first backed up, so your attention naturally focuses on backups when building a system.
§ Backups are automated with scripts and jobs. It’s easy to spend time fine-tuning the backup process, often without thinking of it. Five-minute tweaks to your backup process might not seem important, but are you applying the same attention to recovery, day in and day out?
§ Backups are routine, but recovery is usually a crisis situation.
§ Security gets in the way. If you’re doing offsite backups, you’re probably encrypting the backup data or taking other measures to protect it. You know how damaging it would be for your data to be compromised, but how damaging is it when nobody can unlock your encrypted volume to recover your data, or when you need to extract a single file from a monolithic encrypted file?
§ One person can plan, design, and implement backups. That person might not be available when disaster strikes. You need to train several people and plan for coverage, so you’re not asking an unqualified person to recover your data.
Here’s an example we’ve seen in the real world: a customer reported that backups became lightning fast when the -d option was added to mysqldump, and wanted to know why no one had mentioned how much that option could speed up the backup process. If this customer had tried to restore the backups, it would have been hard to miss the reason: the -d option dumps no data! The customer was focused on backups, not recovery, and was therefore completely unaware of this problem.
There are two Big Important Requirements that are helpful to consider when you’re planning your backup and recovery strategy. These are the recovery point objective (RPO) and the recovery time objective (RTO). They define how much data you’re comfortable losing, and how long you’re comfortable waiting to get it back. Try to answer the following types of questions when defining your RPO and RTO:
§ How much data can you lose without serious consequences? Do you need point-in-time recovery, or is it acceptable to lose whatever work has happened since your last regular backup? Are there legal requirements?
§ How fast does recovery have to be? What kind of downtime is acceptable? What impacts (e.g., partial unavailability) can your application and users accept, and how will you build in the capability to continue functioning when those scenarios happen?
§ What do you need to recover? Common requirements are to recover a whole server, a single database, a single table, or just specific transactions or statements.
It’s a good idea to document the answers to these questions, and indeed your entire backup policy, as well as the backup procedures.
BACKUP MYTH #1: “MY REPLICA IS MY BACKUP”
This is a mistake we see quite often. A replica is not a backup. Neither is a RAID array. To see why, consider this: will they help you get back all your data if you accidentally execute DROP DATABASE on your production database? RAID and replication don’t pass even this simple test. Not only are they not backups, they’re not a substitute for backups. Nothing but backups fill the need for backups.
Designing a MySQL Backup Solution
Backing up MySQL is harder than it looks. At its most basic, a backup is just a copy of the data, but your application’s needs, MySQL’s storage engine architecture, and your system configuration can make it difficult to make a copy of your data.
Before we go into great detail on all of the available options, here are our recommendations:
§ Raw backups are practically a must-have for large databases: logical backups are simply too slow and resource-intensive, and recovery from a logical backup takes way too long. Snapshot-based backups, Percona XtraBackup, and MySQL Enterprise Backup are the best options. For small databases, logical backups can work nicely.
§ Keep several backup generations.
§ Extract logical backups (probably from the raw backups) periodically.
§ Keep binary logs for point-in-time recovery. Set expire_logs_days long enough to recover from at least two generations of raw backups, so that you can create a replica and start it from the running master without applying any binary logs to it. Back up your binary logs independently of the expiry setting, and keep them in the backup long enough to recover from at least the most recent logical backup.
§ Monitor your backups and backup processes independently from the backup tools themselves. You need external verification that they’re OK.
§ Test your backups and recovery process by going through the entire recovery process. Measure the resources needed for recovery (CPU, disk space, wall-clock time, network bandwidth, etc.).
§ Think hard about security. What happens if someone compromises your server—can he then get access to the backup server too, or vice versa?
Knowing your RPO and RTO will guide your backup strategy. Do you need point-in-time recovery capability, or is it enough to recover to last night’s backup and lose whatever work has been done since then? If you need point-in-time recovery, you can probably make a regular backup and make sure the binary log is enabled, so you can restore that backup and recover to the desired point by replaying the binary log.
Generally, the more you can afford to lose, the easier it is to do backups. If you have very strict requirements, it’s harder to ensure you can recover everything. There are also different flavors of point-in-time recovery. A “soft” point-in-time recovery requirement means you’d like to be able to recreate your data so that it’s “close enough” to where it was when the problem happened. A “hard” requirement means you can never tolerate the loss of a committed transaction, even if something terrible happens (such as the server catching fire). This requires special techniques, such as keeping your binary log on a separate SAN volume or using DRBD disk replication.
Online or Offline Backups?
If you can get away with it, shutting down MySQL to make a backup is the easiest, safest, and overall best way to get a consistent copy of the data with minimal risk of corruption or inconsistency. If you shut down MySQL, you can copy the data without any complications from things such as dirty buffers in the InnoDB buffer pool or other caches. You don’t need to worry about your data being modified while you’re trying to back it up, and because the server isn’t under load from the application, you can make the backup more quickly.
However, taking a server offline is more expensive than it might seem. Even if you can minimize the downtime, shutting down and restarting MySQL can take a long time under demanding loads and high data volumes, as discussed in Chapter 8. We showed some techniques for minimizing this impact, but it can’t be reduced to zero. As a result, you’ll almost certainly need to design your backups so that they don’t require the production server to be taken offline. Depending on your consistency requirements, though, making a backup while the server is online can still mean interrupting service significantly.
One of the biggest problems with many backup methods is their use of FLUSH TABLES WITH READ LOCK. This tells MySQL to close and lock all tables, flushes MyISAM’s data files to disk (but not InnoDB’s!), and flushes the query cache. That can take a very long time to complete. Exactly how long is unpredictable; it will be even longer if the global read lock has to wait for a long-running statement to finish, or if you have many tables. Until the lock is released, you can’t change any data on the server, and everything will block and queue.[212] FLUSH TABLES WITH READ LOCK is not as expensive as shutting down, because most of your caches are still in memory and the server is still “warm,” but it’s very disruptive. Anyone who tells you it’s fast probably is trying to sell you something and has never worked on a real MySQL server in production.
The best way to avoid any use of FLUSH TABLES WITH READ LOCK is to use only InnoDB tables. You can’t avoid using MyISAM tables for privileges and other system information, but if that data changes rarely (which is the norm) you can flush and lock only those tables without causing trouble.
Here are some performance-related factors to consider when you’re planning backups:
Lock time
How long do you need to hold locks, such as the global FLUSH TABLES WITH READ LOCK, while backing up?
Backup time
How long does it take to copy the backup to the destination?
Backup load
How much does it impact the server’s performance to copy the backup to the destination?
Recovery time
How long does it take to copy your backup image from its storage location to the MySQL server, replay binary logs, and so on?
The biggest trade-off is backup time versus backup load. You can often improve one at the other’s expense; for example, you can prioritize the backup at the expense of causing more performance degradation on the server.
You can also design your backups to take advantage of load patterns. For instance, if your server is only 50% loaded for 8 hours during the night, you can try to design your backups to load the server less than 50% and still complete within 8 hours. You can accomplish this in many ways: for example, you can use ionice and nice to prioritize the copy or compression operations, use different compression levels, or compress the data on the backup server instead of the MySQL server. You can also use lzo or pigz for faster compression. You can use O_DIRECT or fadvise() to bypass the operating system’s cache for the copy operations, so they don’t pollute the server’s caches. Tools such as Percona XtraBackup and MySQL Enterprise Backup also have throttling options, and you can use pv with the --rate-limit option to limit the throughput of scripts you write yourself.
Logical or Raw Backups?
There are two major ways to back up MySQL’s data: with a logical backup (also called a “dump”), and by copying the raw files. A logical backup contains the data in a form that MySQL can interpret either as SQL or as delimited text.[213] The raw files are the files as they exist on disk.
Each type of backup has advantages and disadvantages.
Logical backups
Logical backups have the following advantages:
§ They’re normal files you can manipulate and inspect with editors and command-line tools such as grep and sed. This can be very helpful when restoring data, or when you just want to inspect the data without restoring.
§ They’re simple to restore. You can just pipe them into mysql or use mysqlimport.
§ You can back up and restore across the network—that is, on a different machine from the MySQL host.
§ They can work for systems such as Amazon RDS, where you have no access to the underlying filesystem.
§ They can be very flexible, because mysqldump—the tool most people prefer to use to make them—can accept lots of options, such as a WHERE clause to restrict what rows are backed up.
§ They’re storage engine–independent. Because you create them by extracting data from the MySQL server, they abstract away differences in the underlying data storage. Thus, you can back up from InnoDB tables and restore to MyISAM tables with very little work. You can’t do this with raw file copies.
§ They can help avoid data corruption. If your disk drives are failing and you copy the raw files, you’ll get an error and/or make a partial or corrupt backup, and unless you check the backup, you won’t notice it and it’ll be unusable later. If the data MySQL has in memory is not corrupt, you can sometimes get a trustworthy logical backup when you can’t get a good raw file copy.
Logical backups have their shortcomings, though:
§ The server has to do the work of generating them, so they use more CPU cycles.
§ Logical backups can be bigger than the underlying files in some cases.[214] The ASCII representation of the data isn’t always as efficient as the way the storage engine stores the data. For example, an integer requires 4 bytes to store, but when written in ASCII, it can require up to 12 characters. You can often compress the files effectively and get a smaller backup, but this uses more CPU resources. (Logical backups are typically smaller than raw backups if there are a lot of indexes.)
§ Dumping and restoring your data isn’t always guaranteed to result in the same data. Floating-point representation problems, bugs, and so on can cause trouble, though this is rare.
§ Restoring from a logical backup requires MySQL to load and interpret the statements, convert them to the storage format, and rebuild indexes, all of which is very slow.
The biggest disadvantages are really the cost of dumping the data from MySQL and the cost of loading data back in via SQL statements. If you use logical backups, it is essential to test the time required for restoring the data.
The mysqldump included with Percona Server can help when you’re working with InnoDB tables, because it formats the output so that it will take advantage of InnoDB’s fast index creation code upon reloading it. Our testing shows that this can reduce the restore time by two-thirds or more. The more indexes there are, the more beneficial it is.
Raw backups
Raw backups have the following benefits:
§ Raw file backups simply require you to copy the desired files somewhere else for backup. The raw files don’t require any extra work to generate.
§ Restoring raw backups can be simpler, depending on the storage engine. For MyISAM, it can be as easy as just copying the files into their destinations. InnoDB, however, requires you to stop the server and possibly take other steps as well.
§ Raw backups of InnoDB and MyISAM data are very portable across platforms, operating systems, and MySQL versions. (Logical dumps are, too. We’re simply pointing this out to alleviate any concerns you might have.)
§ It can be faster to restore raw backups, because the MySQL server doesn’t have to execute any SQL or build indexes. If you have InnoDB tables that don’t fit entirely in the server’s memory, it can be much faster to restore raw files—an order of magnitude or more. In fact, one of the scariest things about logical backups is their unpredictable restore time.
Here are some disadvantages of raw backups:
§ InnoDB’s raw files are often far larger than the corresponding logical backups. The InnoDB tablespace typically has lots of unused space. Quite a bit of space is also used for purposes other than storing table data (the insert buffer, the rollback segment, and so on).
§ Raw backups are not always portable across platforms, operating systems, and MySQL versions. Filename case sensitivity and floating-point formats are places where you might encounter trouble. You might not be able to move files to a system whose floating-point format is different (however, the vast majority of processors use the IEEE floating-point format).
Raw backups are generally easier and much more efficient.[215] You should not rely on raw backups for long-term retention or legal requirements, though; you must make logical backups at least periodically.
Don’t consider a backup (especially a raw backup) to be good until you’ve tested it. For InnoDB, that means starting a MySQL instance and letting InnoDB recovery run, then running CHECK TABLES. You can skip this, or just run innochecksum on the files, but we don’t recommend it. For MyISAM, you should run CHECK TABLES or use myisamchk. You can run CHECK TABLES on all tables with the mysqlcheck command.
We suggest a blend of the two approaches: make raw copies, then start a MySQL server instance with the resulting data and run mysqlcheck. Then, at least periodically, dump the data with mysqldump to get a logical backup. This gives you the advantages of both approaches, without unduly burdening the production server during the dump. It’s especially convenient if you have the ability to take filesystem snapshots—you can take a snapshot, copy the snapshot to another server and release it, then test the raw files and perform a logical backup.
What to Back Up
Your recovery requirements will dictate what you need to back up. The simplest strategy is to just back up your data and table definitions, but this is a bare-minimum approach. You generally need a lot more to recover a server for use in production. Here are some things you might consider including with your MySQL backups:
Nonobvious data
Don’t forget data that’s easy to overlook: your binary logs and InnoDB transaction logs, for example.
Code
A modern MySQL server can store a lot of code, such as triggers and stored procedures. If you back up the mysql database, you’ll back up much of this code, but then it will be hard to restore a single database in its entirety, because some of the “data” in that database, such as stored procedures, will actually be stored in the mysql database.
Replication configuration
If you are recovering to a server that is involved in replication, you should include in your backups whatever replication files you’ll need for that—e.g., binary logs, relay logs, log index files, and the .info files. At a minimum, you should include the output of SHOW MASTER STATUSand/or SHOW SLAVE STATUS. It’s also helpful to issue FLUSH LOGS so MySQL starts a new binary log. It’s easier to do point-in-time recovery from the beginning of a log file than the middle.
Server configuration
If you have to recover from a real disaster—say, if you’re building a server from scratch in a new data center after an earthquake—you’ll appreciate having the server’s configuration files included in the backup.
Selected operating system files
As with the server configuration, it’s important to back up any external configuration that is essential to a production server. On a Unix server, this might include your cron jobs, user and group configurations, administrative scripts, and sudo rules.
These recommendations quickly translate into “back up everything” in many scenarios. If you have a lot of data, however, this can get expensive, and you might have to be smarter about how you do your backups. In particular, you might want to back up different data into different backups. For example, you can back up data, binary logs, and operating system and system configuration files separately.
Incremental and differential backups
A common strategy for dealing with too much data is to do regular incremental or differential backups. The difference might be a little confusing, so let’s clarify the terms: a differential backup is a backup of everything that has changed since the last full backup, whereas an incremental backup contains everything that has changed since the last backup of any type.
For example, suppose that you do a full backup every Sunday. On Monday, you do a differential backup of everything that has changed since Sunday. On Tuesday, you have two choices: you can back up everything that’s changed since Sunday (differential), or you can back up only the data that has changed since Monday’s backup (incremental).
Both differential and incremental backups are partial backups: they generally don’t contain a full dataset, because some data almost certainly hasn’t changed. Partial backups are often desirable for their savings in overhead on the server, backup time, and backup space. Some partial backups don’t really reduce the overhead on the server, though. Percona XtraBackup and MySQL Enterprise Backup, for example, still scan every block of data on the server, though, so they don’t save a lot of overhead, although they do save a bit of wall-clock time, lots of CPU time for compression, and of course disk space.[216]
You can get pretty fancy with advanced backup techniques, but the more complex your solution is, the more risky it’s likely to be. Beware of hidden dangers, such as multiple generations of backups that are tightly coupled to one another, because if one generation contains corruption, it can invalidate all of the others, too.
Here are some ideas:
§ Use the incremental backup features of Percona XtraBackup or MySQL Enterprise Backup.
§ Back up your binary logs. You can also use FLUSH LOGS to begin a new binary log after each backup, then back up only new binary logs.
§ Don’t back up tables that haven’t changed. Some storage engines, such as MyISAM, record the last time each table was modified. You can see these times by inspecting the files on disk or by running SHOW TABLE STATUS. If you use InnoDB, a trigger can help you keep track of the last changes by recording the change times in a small “last changed time” table. You need to do this only on tables that change infrequently, so the cost should be minimal. A custom backup script can easily determine which tables have changed.
If you have “lookup” tables that contain data such as lists of month names in various languages or abbreviations for states or regions, it can be a good idea to place them into a separate database, so you don’t have to back them up all the time.
§ Don’t back up rows that haven’t changed. If a table is INSERT-only, such as a table that logs hits to a web page, you can add a TIMESTAMP column and back up only rows that have been inserted since the last backup.
§ Don’t back up some data at all. Sometimes this makes a lot of sense—for example, if you have a data warehouse that’s built from other data and is technically redundant, you can merely back up the data you used to build the warehouse, instead of the data warehouse itself. This can be a good idea even if it’s very slow to “recover” by rebuilding the warehouse from the original files. Avoiding the backups can add up over time to much greater savings than the potentially faster recovery time you’ll gain by having a full backup. You can also opt not to back up some temporary data, such as tables that hold website session data.
§ Back up everything, but send it to a destination that has data deduplication features, such as a ZFS filer.
The drawbacks of incremental backups include increased recovery complexity, increased risk, and a longer recovery time. If you can do full backups, we suggest that you do so for simplicity’s sake.
Regardless, you definitely need to do full backups occasionally—we suggest at least weekly. You can’t expect to recover from a month’s worth of incremental backups. Even a week is a lot of work and risk.
Storage Engines and Consistency
MySQL’s choice of storage engines can make backups significantly more complicated. The issue is how to get a consistent backup with any given storage engine.
There are actually two kinds of consistency to think about: data consistency and file consistency.
Data consistency
When you do backups, you must consider whether you need the data to be point in time–consistent. For example, in an ecommerce database, you probably need to make sure your invoices and payments are consistent with each other. Recovering a payment without its corresponding invoice, or vice versa, is bound to cause trouble!
If you’re making online backups (from a running server), you probably need a consistent backup of all related tables. That means you can’t just lock and back up tables one at a time—which in turn means your backups might be more intrusive than you’d like. If you’re not using a transactional storage engine, you have no choice but to use LOCK TABLES on all the tables you want to back up together, and release the lock only when all the related tables have been backed up.
InnoDB’s MVCC capabilities can help. You can begin a transaction, dump a group of related tables, and commit the transaction. (You should not use LOCK TABLES if you’re using a transaction to get a consistent backup, because it commits your transaction implicitly—see the MySQL manual for details.) As long as you’re using the REPEATABLE READ transaction isolation level and you don’t have any DDL on the server, this will give you a perfectly consistent, point-in-time snapshot of the data that doesn’t block further work from happening on your server while the backup is being made.
However, this approach doesn’t protect you from poorly designed application logic. Suppose your ecommerce store inserts a payment, commits the transaction, and then inserts the invoice in a different transaction. Your backup process might start between those two operations, backing up the payment and not the invoice. This is why you have to design transactions carefully to group related operations together.
You can also get a consistent logical backup of InnoDB tables with mysqldump, which supports a --single-transaction option that does what we just described. However, this can cause a very long transaction, which might have an unacceptably high overhead on some workloads.
File consistency
It’s also important that each file is internally consistent—e.g., that the backup doesn’t reflect a file’s state partway through a big UPDATE statement—and that all the files you’re backing up are consistent with each other. If you don’t get internally consistent files, you’ll have a nasty surprise when you try to restore them (they’ll probably be corrupt). And if you copy related files at different times, they won’t be consistent with each other. MyISAM’s .MYD and .MYI files are an example. InnoDB will log errors or even crash the server intentionally if it detects inconsistency or corruption.
With a nontransactional storage engine such as MyISAM, your only option is to lock and flush the tables. That means using either a combination of LOCK TABLES and FLUSH TABLES, so the server flushes its in-memory changes to disk, or FLUSH TABLES WITH READ LOCK. Once the flush is complete, you can safely do a raw copy of MyISAM’s files.
With InnoDB, it’s harder to ensure the files are consistent on disk. Even if you do a FLUSH TABLES WITH READ LOCK, InnoDB keeps working in the background: its insert buffer, log, and write threads continue to merge changes to its log and tablespace files. These threads are asynchronous by design—doing this work in background threads is what helps InnoDB achieve high concurrency—so they are independent of LOCK TABLES. Thus, you need to make sure not only that each file is internally consistent, but that you copy the log and tablespace files at the same instant. If you make a backup while a thread is changing a file, or back up the log files at a different point in time from the tablespace files, you can again end up with a corrupt system after recovery. You can avoid this problem in a few ways:
§ Wait until InnoDB’s purge and insert buffer merge threads are done. You can watch the output of SHOW INNODB STATUS and copy the files when there are no more dirty buffers or pending writes. However, this approach might take a long time; it also involves too much guesswork and might not be safe, because of InnoDB’s background threads. Consequently, we don’t recommend it.
§ Take a consistent snapshot of the data and log files with a system such as LVM. You must snapshot the data and log files consistently with respect to each other; it’s no good to snapshot them separately. We discuss LVM snapshots later in this chapter.
§ Send a STOP signal to MySQL, make the backup, and then send a CONT signal to wake MySQL up again. This might seem like an odd recommendation, but it’s worth considering if the only alternative is to shut down the server during the backup. At least this technique won’t require you to warm the server up after restarting it.
After you have copied the files elsewhere, you can release the locks and let the MySQL server run normally again.
Replication
The biggest advantage to backing up from a replica is that it doesn’t interrupt the master or place extra load on it. This is a good reason to set up a replica server, even if you don’t need it for load balancing or high availability. If money is a concern, you can always use the backup replica for other purposes too, such as reporting—as long as you don’t write to it and thus change the data you’re trying to back up. The replica doesn’t have to be dedicated to backups; it just has to be able to catch up to the master in time to make your next backup in the event that its other roles make it fall behind in replication at times.
When you make a backup from a replica, save all the information about the replication processes, such as the replica’s position relative to the master. This is useful for cloning new replicas, reapplying binary logs to the master to get point-in-time recovery, promoting the replica to a master, and more. Also be sure that no temporary tables are open if you stop your replica, because they might keep you from restarting replication.
Intentionally delaying replication on one of your replicas can be very useful for recovering from some disaster scenarios. Suppose you delay replication by an hour. If an unwanted statement runs on the master, you have an hour to notice it and stop the replica before it repeats the event from its relay log. You can then promote the replica to master and replay some relatively small number of log events, skipping the bad statements. This can be much faster than the point-in-time recovery technique we discuss later. The pt-slave-delay tool from Percona Toolkit can help with this.
WARNING
The replica might not have the same data as the master. Many people assume replicas are exact copies of their masters, but in our experience, data mismatches on replicas are common, and MySQL has no way to detect this problem. The only way to detect the problem is with a tool such as Percona Toolkit’s pt-table-checksum.
Having a replicated copy of your data might help protect you from problems such as disk meltdowns on the master, but there’s no guarantee. Replication is not a backup.
[212] Yes, even SELECT queries will get blocked, because there’s bound to be a query that tries to modify some data, and as soon as it starts waiting for a write lock on a table, all of the queries trying to get read locks will have to wait, too.
[213] Logical backups produced by mysqldump are not always text files. SQL dumps can contain many different character sets, and can even include binary data that’s not valid character data at all. Lines can be too long for many editors, too. Still, many such files will contain data a text editor can open and read, especially if you run mysqldump with the —hex-blob option.
[214] In our experience, logical backups are generally smaller than raw backups, but they aren’t always.
[215] It’s worth mentioning that raw backups can be more error-prone; it’s hard to beat the simplicity of mysqldump.
[216] A “true” incremental backup feature for Percona XtraBackup is in progress. It will be able to back up the blocks that have changed, without needing to scan every block.
Managing and Backing Up Binary Logs
Your server’s binary logs are one of the most important things you can back up. They are necessary for point-in-time recovery, and because they’re usually smaller than your data, they’re easier to back up frequently. If you have a backup of your data at some point and all the binary logs since then, you can replay the binary logs and “roll forward” changes made since the last full backup.
MySQL uses the binary log for replication, too. That means that your backup and recovery policy often interacts with your replication configuration.
Binary logs are “special.” If you lose your data, you really don’t want to lose the binary logs as well. To minimize the chances of this happening, you can keep them on a separate volume. It’s OK to do this even if you want to snapshot the binary logs with LVM. For extra safety, you can keep them on a SAN or replicate them to another device with DRBD.
It’s a good idea to back up binary logs frequently. If you can’t afford to lose more than 30 minutes’ worth of data, back them up at least every 30 minutes. You can also use a read-only replica with --log_slave_updates, for an extra degree of safety. The log positions won’t match the master’s, but it’s usually not hard to find the right positions for recovery. Finally, MySQL 5.6’s version of mysqlbinlog has a very handy feature to connect to a server and mirror its binary logs in real time, which is simpler and more lightweight than running an instance of mysqld. It’s backward-compatible with older server versions.
See Chapter 8 and Chapter 10 for our recommended server configuration for binary logging.
The Binary Log Format
The binary log consists of a sequence of events. Each event has a fixed-size header that contains a variety of information, such as the current timestamp and default database. You can use the mysqlbinlog tool to inspect a binary log’s contents, and it prints out some of the header information. Here’s an example of the output:
1 # at 277
2 #071030 10:47:21 server id 3 end_log_pos 369 Query thread_id=13 exec_time=0
error_code=0
3 SET TIMESTAMP=1193755641/*!*/;
4 insert into test(a) values(2)/*!*/;
Line 1 contains the byte offset within the log file (in this case, 277).
Line 2 contains the following items:
§ The date and time of the event, which MySQL also uses to generate the SET TIMESTAMP statement.
§ The server ID of the originating server, which is necessary to prevent endless loops in replication and other problems.
§ The end_log_pos, which is the byte offset of the next event. This value is incorrect for most of the events in a multistatement transaction. MySQL copies the events into a buffer on the master during such transactions, but it doesn’t know the next log event’s position when it does so.
§ The event type. Our sample’s type is Query, but there are many different types.
§ The thread ID of the thread that executed the event on the originating server, which is important for auditing as well as for executing the CONNECTION_ID() function.
§ The exec_time, which is the difference between the statement’s timestamp and the time at which it was written to the binary log. It’s a good idea not to rely on this value, because it can be very wrong on replicas that have fallen behind in replication.
§ Any error code the event raised on the originating server. If the event causes a different error when replayed on a replica, then replication will fail as a safety precaution.
Any further lines contain the data needed to replay the modification. User-defined variables and any other special settings, such as the timestamp in effect when the statement executed, also appear here.
NOTE
If you’re using the row-based logging available in MySQL 5.1, the event won’t be SQL. Instead, it’s a non-human-readable “image” of the modifications the statement made to the table.
Purging Old Binary Logs Safely
You’ll need to decide on a log expiration policy to keep MySQL from filling your disk with binary logs. How large your logs grow depends on your workload and the logging format (row-based logging results in larger log entries). We suggest you keep logs as long as they’re useful, if possible. Keeping them is helpful for setting up replicas, analyzing your server’s workload, auditing, and point-in-time recovery from your last full backup. Consider all of these needs when you decide how long you want to keep your logs.
A common setup is to use the expire_logs_days variable to tell MySQL to purge logs after a while. This variable wasn’t available until MySQL 4.1; prior to this version, you had to purge binary logs manually. Thus, you might see advice to remove old binary logs with a cron entry such as the following:
0 0 * * * /usr/bin/find /var/log/mysql -mtime +N -name "mysql-bin.[0-9]*" | xargs rm
Although this was the only way to purge the logs prior to MySQL 4.1, don’t do this in newer server versions! Removing the logs with rm can cause the mysql-bin.index status file to become out of sync with the files on disk, and some statements, such as SHOW MASTER LOGS, can begin failing silently. Changing the mysql-bin.index file by hand might not fix the problem, either. Instead, use a cron command such as the following:
0 0 * * * /usr/bin/mysql -e "PURGE MASTER LOGS BEFORE CURRENT_DATE - INTERVAL N DAY"
The expire_logs_days setting takes effect upon server startup or when MySQL rotates the binary log, so if your binary log never fills up and rotates, the server will not purge older entries. It decides which files to purge by looking at their modification times, not their contents.
Backing Up Data
As with most things, there are better and worse ways to actually make a backup—and the obvious ways are sometimes not so good. The trick is to maximize your network, disk, and CPU capacity to make backups as fast as possible. This is a balancing act, and you’ll have to experiment to find the “sweet spot.”
Making a Logical Backup
The first thing to realize about logical backups is that they are not all created equal. There are actually two kinds of logical backups: SQL dumps and delimited files.
SQL dumps
SQL dumps are what most people are familiar with, because they’re what mysqldump creates by default. For example, dumping a small table with the default options will produce the following (abridged) output:
$ mysqldump test t1
-- [Version and host comments]
/*!40101 SET @OLD_CHARACTER_SET_CLIENT=@@CHARACTER_SET_CLIENT */;
-- [More version-specific comments to save options for restore]
--
-- Table structure for table `t1`
--
DROP TABLE IF EXISTS `t1`;
CREATE TABLE `t1` (
`a` int(11) NOT NULL,
PRIMARY KEY (`a`)
) ENGINE=MyISAM DEFAULT CHARSET=latin1;
--
-- Dumping data for table `t1`
--
LOCK TABLES `t1` WRITE;
/*!40000 ALTER TABLE `t1` DISABLE KEYS */;
INSERT INTO `t1` VALUES (1);
/*!40000 ALTER TABLE `t1` ENABLE KEYS */;
UNLOCK TABLES;
/*!40103 SET TIME_ZONE=@OLD_TIME_ZONE */;
/*!40101 SET SQL_MODE=@OLD_SQL_MODE */;
-- [More option restoration]
The dump file contains both the table structure and the data, all written out as valid SQL commands. The file begins with comments that set various MySQL options. These are present either to make the restore work more efficiently or for compatibility and correctness. Next you can see the table’s structure, and then its data. Finally, the script resets the options it changed at the beginning of the dump.
The dump’s output is executable for a restore operation. This is convenient, but mysqldump’s default options aren’t great for making a huge backup (we delve into mysqldump’s options in more detail later).
mysqldump is not the only tool that can make SQL logical backups. You can also create them with mydumper or phpMyAdmin, for example.[217] What we’d really like to point out here is not so much problems with any particular tool, but rather the shortcomings of doing monolithic SQL logical backups in the first place. Here are the main problem areas:
Schema and data stored together
Although this is convenient if you want to restore from a single file, it makes things difficult if you need to restore only one table or want to restore only the data. You can alleviate this concern by dumping twice—once for data, once for schema—but you’ll still have the next problem.
Huge SQL statements
It’s a lot of work for the server to parse and execute all of the SQL statements. This is a very slow way to load data.
A single huge file
Most text editors can’t edit large files or files with very long lines. Although you can sometimes use command-line stream editors—such as sed or grep—to pull out the data you need, it’s preferable to keep the files small.
Logical backups are expensive
There are more efficient ways to get data out of MySQL than fetching it from the storage engine and sending it over the client/server protocol as a result set.
These limitations mean that SQL dumps quickly become unusable as tables get large. There’s another option, though: export data to delimited files.
Delimited file backups
You can use the SELECT INTO OUTFILE SQL command to create a logical backup of your data in a delimited file format. (You can dump to delimited files with mysqldump’s --tab option, which runs the SQL command for you.) Delimited files contain the raw data represented in ASCII, without SQL, comments, and column names. Here’s an example that dumps into comma-separated values (CSV) format, which is a good lingua franca for tabular data:
mysql> SELECT * INTO OUTFILE '/tmp/t1.txt'
-> FIELDS TERMINATED BY ',' OPTIONALLY ENCLOSED BY '"'
-> LINES TERMINATED BY '\n'
-> FROM test.t1;
The resulting file is more compact and easier to manipulate with command-line tools than a SQL dump file, but the biggest advantage of this approach is the speed of backing up and restoring. You can load the data back into the table with LOAD DATA INFILE, with the same options used to dump it:
mysql> LOAD DATA INFILE '/tmp/t1.txt'
-> INTO TABLE test.t1
-> FIELDS TERMINATED BY ',' OPTIONALLY ENCLOSED BY '"'
-> LINES TERMINATED BY '\n';
Here’s an informal test we did to demonstrate the backup and restore speed difference between SQL files and delimited files. We adapted some production data for this test. The table we’re dumping from looks like the following:
CREATE TABLE load_test (
col1 date NOT NULL,
col2 int NOT NULL,
col3 smallint unsigned NOT NULL,
col4 mediumint NOT NULL,
col5 mediumint NOT NULL,
col6 mediumint NOT NULL,
col7 decimal(3,1) default NULL,
col8 varchar(10) NOT NULL default '',
col9 int NOT NULL,
PRIMARY KEY (col1, col2)
) ENGINE=InnoDB;
The table has 15 million rows and uses about 700 MB on disk. Table 15-1 compares the performance of the two backup and restore methods. You can see there’s a large speed difference in the restore times for the test.
Table 15-1. Backup and restore times for SQL and delimited dumps
|
Method |
Dump size |
Dump time |
Restore time |
|
SQL dump |
727 MB |
102 sec |
600 sec |
|
Delimited dump |
669 MB |
86 sec |
301 sec |
The SELECT INTO OUTFILE method has some limitations, though:
§ You can back up only to a file on the machine on which the MySQL server is running. (You can roll your own SELECT INTO OUTFILE by writing a program that reads a SELECT result and writes it to disk, which is an approach we’ve seen some people take.)
§ MySQL must have permission to write to the directory where the file is written, because the MySQL server—not the user running the SQL command—is what writes the file.
§ For security reasons, you can’t overwrite an existing file, no matter what the file’s permissions are.
§ You can’t dump directly to a compressed file.
§ Some things, such as nonstandard character sets, are hard to get right in either the export or the import step.
Filesystem Snapshots
Filesystem snapshots are a great way to make online backups. Snapshot-capable filesystems can create a consistent image of their contents at an instant in time, which you can then use to make a backup. Snapshot-capable filesystems and appliances include FreeBSD’s filesystem, the ZFS filesystem, GNU/Linux’s Logical Volume Manager (LVM), and many SAN systems and file-storage solutions, such as NetApp storage appliances.
Don’t confuse a snapshot with a backup. Taking a snapshot is simply a way of reducing the time for which locks must be held; after releasing the locks, you must copy the files to the backup. In fact, you can optionally take snapshots on InnoDB without even acquiring locks. We’ll show you two ways to use LVM to make backups of an all-InnoDB system, with your choice of minimal or zero locking.
A snapshot can be a great way to make a backup for specific uses. One example is as a fallback in case of a problem during an upgrade. You can take a snapshot, upgrade, and, if there’s a problem, just roll back to the snapshot. You can do the same thing for any operation that’s uncertain and risky, such as altering a huge table (which will take an unknown amount of time).
How LVM snapshots work
LVM uses copy-on-write technology to create a snapshot—i.e., a logical copy of an entire volume at an instant in time. It’s a little like MVCC in a database, except it keeps only one old version of the data.
Notice we didn’t say a physical copy. A logical copy appears to contain all the same data as the volume you snapshotted, but initially it contains no data. Instead of copying the data to the snapshot, LVM simply notes the time at which you created the snapshot, then it reads the data from the original volume when you request it from the snapshot. So, the initial copy is basically an instantaneous operation, no matter how large a volume you’re snapshotting.
When something changes the data in the original volume, LVM copies the affected blocks to an area reserved for the snapshot before it writes any changes to them. LVM doesn’t keep multiple “old versions” of the data, so additional writes to blocks that are changed in the original volume don’t require any further work for the snapshot. In other words, only the first write to each block causes a copy-on-write to the reserved area.
Now, when you request these blocks in the snapshot, LVM reads the data from the copied blocks instead of from the original volume. This lets you continue to see the same data in the snapshot without blocking anything on the original volume. Figure 15-1 depicts this arrangement.
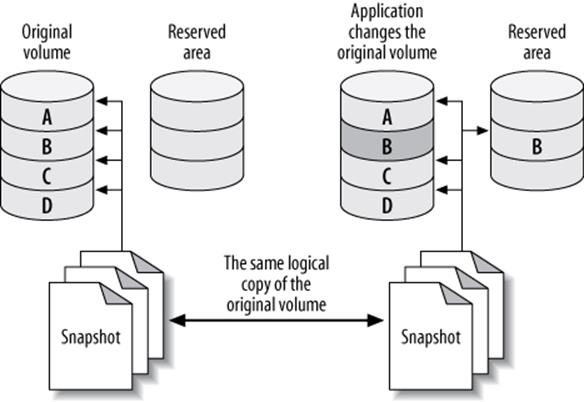
Figure 15-1. How copy-on-write technology reduces the size needed for a volume snapshot
The snapshot creates a new logical device in the /dev directory, and you can mount this device just as you would mount any other.
You can theoretically snapshot an enormous volume and consume very little physical space with this technique. However, you need to set aside enough space to hold all the blocks you expect to be updated in the original volume while you hold the snapshot open. If you don’t reserve enough copy-on-write space, the snapshot will run out of space, and the device will become unavailable. The effect is like unplugging an external drive: any backup job that’s reading from the device will fail with an I/O error.
Prerequisites and configuration
It’s almost trivial to create a snapshot, but you need to ensure that your system is configured in such a way that you can get a consistent copy of all the files you want to back up at a single instant in time. First, make sure your system meets these conditions:
§ All InnoDB files (InnoDB tablespace files and InnoDB transaction logs) must be on a single logical volume (partition). You need absolute point-in-time consistency, and LVM can’t take consistent snapshots of more than one volume at a time. (This is an LVM limitation; some other systems do not have this problem.)
§ If you need to back up the table definitions too, the MySQL data directory must be in the same logical volume. If you use another method to back up table definitions, such as a schema-only backup into your version control system, you might not need to worry about this.
§ You must have enough free space in the volume group to create the snapshot. How much you need will depend on your workload. When you set up your system, leave some unallocated space so that you’ll have room for snapshots later.
LVM has the concept of a volume group, which contains one or more logical volumes. You can see the volume groups on your system as follows:
# vgs
VG #PV #LV #SN Attr VSize VFree
vg 1 4 0 wz--n- 534.18G 249.18G
This output shows a volume group that has four logical volumes distributed across one physical volume, with about 250 GB free. The vgdisplay command gives more detail if you need it. Now let’s take a look at the logical volumes on the system:
# lvs
LV VG Attr LSize Origin Snap% Move Log Copy%
home vg -wi-ao 40.00G
mysql vg -wi-ao 225.00G
tmp vg -wi-ao 10.00G
var vg -wi-ao 10.00G
The output shows that the mysql volume has 225 GB of space. The device name is /dev/vg/mysql. This is just a name, even though it looks like a filesystem path. To add to the confusion, there’s a symbolic link from the file of the same name to the real device node at /dev/mapper/vg-mysql, which you can see with the ls and mount commands:
# ls -l /dev/vg/mysql
lrwxrwxrwx 1 root root 20 Sep 19 13:08 /dev/vg/mysql -> /dev/mapper/vg-mysql
# mount | grep mysql
/dev/mapper/vg-mysql on /var/lib/mysql
Armed with this information, you’re ready to create a filesystem snapshot.
Creating, mounting, and removing an LVM snapshot
You can create the snapshot with a single command. You just need to decide where to put it and how much space to allocate for copy-on-write. Don’t hesitate to use more space than you think you’ll need. LVM doesn’t use the space you specify right away; it just reserves it for future use, so there’s no harm in reserving lots of space, unless you need to leave space for other snapshots at the same time.
Let’s create a snapshot just for practice. We’ll give it 16 GB of space for copy-on-write, and we’ll call it backup_mysql:
# lvcreate --size 16G --snapshot --name backup_mysql /dev/vg/mysql
Logical volume "backup_mysql" created
NOTE
We deliberately called the volume backup_mysql instead of mysql_backup so that tab completion would be unambiguous. This helps avoid the possibility of tab completion causing you to accidentally delete the mysql volume group.
Now let’s see the newly created volume’s status:
# lvs
LV VG Attr LSize Origin Snap% Move Log Copy%
backup_mysql vg swi-a- 16.00G mysql 0.01
home vg -wi-ao 40.00G
mysql vg owi-ao 225.00G
tmp vg -wi-ao 10.00G
var vg -wi-ao 10.00G
Notice that the snapshot’s attributes are different from the original device’s, and that the display shows a little extra information: its origin and how much of the allocated 16 GB is currently being used for copy-on-write. It’s a good idea to monitor this as you make your backup, so you can see if the device is getting full and is about to fail. You can monitor your device’s status interactively, or with a monitoring system such as Nagios:
# watch 'lvs | grep backup'
As you saw from the output of mount earlier, the mysql volume contains a filesystem. That means the snapshot volume does too, and you can mount and use it just like any other filesystem:
# mkdir /tmp/backup
# mount /dev/mapper/vg-backup_mysql /tmp/backup
# ls -l /tmp/backup/mysql
total 5336
-rw-r----- 1 mysql mysql 0 Nov 17 2006 columns_priv.MYD
-rw-r----- 1 mysql mysql 1024 Mar 24 2007 columns_priv.MYI
-rw-r----- 1 mysql mysql 8820 Mar 24 2007 columns_priv.frm
-rw-r----- 1 mysql mysql 10512 Jul 12 10:26 db.MYD
-rw-r----- 1 mysql mysql 4096 Jul 12 10:29 db.MYI
-rw-r----- 1 mysql mysql 9494 Mar 24 2007 db.frm
... omitted ...
This is just for practice, so we’ll unmount and remove the snapshot now with the lvremove command:
# umount /tmp/backup
# rmdir /tmp/backup
# lvremove --force /dev/vg/backup_mysql
Logical volume "backup_mysql" successfully removed
LVM snapshots for online backups
Now that you’ve seen how to create, mount, and remove snapshots, you can use them to make backups. First, let’s look at how to back up an InnoDB database without stopping the MySQL server, but with a global read lock. Connect to the MySQL server and flush the tables to disk with a global read lock, then get the binary log coordinates:
mysql> FLUSH TABLES WITH READ LOCK; SHOW MASTER STATUS;
Record the output from SHOW MASTER STATUS, and make sure you keep the connection to MySQL open so the lock doesn’t get released. You can then take the LVM snapshot and immediately release the read lock, either with UNLOCK TABLES or by closing the connection. Finally, mount the snapshot and copy the files to the backup location.
The major problem with this approach is that it might take a while to get the read lock, especially if there are long-running queries. All queries will be blocked while the connection waits for the global read lock, and it’s impossible to predict how long this will take.
FILESYSTEM SNAPSHOTS AND INNODB
InnoDB’s background threads continue to work even if you’ve locked all tables, so it is probably still writing to its files even as you take the snapshot. Also, because InnoDB hasn’t performed its shutdown sequence, the snapshot’s InnoDB files will look the way these files would have looked if the server had lost power unexpectedly.
This is not a problem, because InnoDB is an ACID system. At any instant (such as the instant you take the snapshot), every committed transaction is either in the InnoDB data files or in the log files. When you start MySQL after restoring the snapshot, InnoDB will run its recovery process, just as though the server had lost power. It will look in the transaction log for any committed transactions that haven’t yet been applied to the data files and apply them, so you won’t lose any transactions. This is why it’s mandatory to snapshot the InnoDB data and log files together.
This is also why you should test your backups when you make them. Start an instance of MySQL, point it at the new backup, let InnoDB’s recovery run, and check all the tables. This way you won’t back up corrupted data without knowing it (the files could be corrupt for any number of reasons). Another benefit to this practice is that restoring from the backup will be faster in the future, because you’ve already run the recovery process.
You can optionally run this process on the snapshot before even copying it to the backup, but that can add quite a bit of overhead. Just be sure you plan for it. (More on this later.)
Lock-free InnoDB backups with LVM snapshots
Lock-free backups are only a little different. The distinction is that you don’t do a FLUSH TABLES WITH READ LOCK. This means there won’t be any guarantee that your MyISAM files will be consistent on disk, but if you use only InnoDB, that’s probably not an issue. You’ll still have some MyISAM tables in the mysql system database, but if your workload is typical, they’re unlikely to be changing at the moment you take the snapshot.
If you think the mysql system tables might be changing, you can lock and then flush them. You shouldn’t have any long-running queries on these tables, so this will normally be very fast:
mysql> LOCK TABLES mysql.user READ, mysql.db READ, ...;
mysql> FLUSH TABLES mysql.user, mysql.db, ...;
You’re not getting a global read lock, so you won’t be able to get anything useful from SHOW MASTER STATUS. However, when you start MySQL on the snapshot (to verify your backup’s integrity), you’ll see something like the following in the log file:
InnoDB: Doing recovery: scanned up to log sequence number 0 40817239
InnoDB: Starting an apply batch of log records to the database...
InnoDB: Progress in percents: 3 4 5 6 ...[omitted]... 97 98 99
InnoDB: Apply batch completed
InnoDB: Last MySQL binlog file position 0 3304937, file name
/var/log/mysql/mysql-bin.000001
070928 14:08:42 InnoDB: Started; log sequence number 0 40817239
InnoDB logs the MySQL binary log position corresponding to the point to which it has recovered. This is the binary log position you can use for point-in-time recovery.
This approach to lock-free backups with snapshots has a twist in MySQL 5.0 and newer. These MySQL versions use XA to coordinate transactions between InnoDB and the binary log. If you restore the backup to a server with a different server_id from the one on which the backup was made, the server might find prepared transactions from a server whose ID doesn’t match its own. In this case, the server can become confused, and it’s possible for transactions to become stuck in PREPARED status upon recovery. This rarely happens, but it is possible. This is why you should always verify your backup before you consider it a success. It might not be recoverable!
If you’re taking the snapshot from a replica, InnoDB recovery will also print some lines that look like these:
InnoDB: In a MySQL replica the last master binlog file
InnoDB: position 0 115, file name mysql-bin.001717
This output shows you the master’s binary log coordinates (as opposed to the replica’s binary log coordinates) at the point to which InnoDB has recovered, which can be very useful for making backups from replicas or cloning replicas from other replicas.
Planning for LVM backups
LVM snapshot backups aren’t free. The more your server writes to the original volume, the more overhead they cause. When the server modifies many distinct blocks in random order, the disk head has to seek back and forth to the copy-on-write space and write the old version of the data there. Reading from the snapshot also has overhead, because LVM really reads most of the data from the original volume. It reads from the copy-on-write space only as needed; thus, a logically sequential read from the snapshot actually causes the disk head to move back and forth.
You should plan for this to happen. What it really means is that both the original volume and the snapshot will perform worse than usual for both reads and writes—possibly much worse if you use a lot of copy-on-write space. This can slow down both your MySQL server and the process of copying the files for the backup. We benchmarked and found that the overhead of an LVM snapshot is much greater than it ought to be—we found that performance could be as much as five times slower, depending on the workload and the filesystem. Keep this in mind when you’re planning your backups.
The other important thing to plan for is allocating enough space for the snapshot. We take the following approach:
§ Remember that LVM needs to copy each modified block to the snapshot only once. When MySQL writes a block in the original volume, it copies the block to the snapshot, then makes a note of the copied block in its exception table. Future writes to this block will not cause any further copies to the snapshot.
§ If you use only InnoDB, consider how InnoDB writes data. Because it writes all data twice, at least half of InnoDB’s write I/O goes to the doublewrite buffer, log files, and other relatively small areas on disk. These reuse the same disk blocks over and over, so they’ll have an initial impact on the snapshot, but after that they’ll stop causing writes to the snapshot.
§ Next, estimate how much of your I/O will be writing to blocks that haven’t yet been copied to the snapshot, as opposed to modifying the same data again and again. Be generous with your estimate.
§ Use vmstat or iostat to gather statistics on how many blocks your server writes per second.
§ Measure (or estimate) how long it will take to copy your backup to another location: in other words, how long you need to keep the LVM snapshot open.
Let’s suppose you’ve estimated that half of your writes will cause writes to the snapshot’s copy-on-write space, and your server writes 10 MB per second. If it takes an hour (3,600 seconds) to copy the snapshot to another server, you will need 1/2 × 10 MB × 3,600, or 18 GB of space for the snapshot. Err on the side of caution, and add some extra space as well.
Sometimes it’s easy to calculate how much data will change while you keep the snapshot open. Let’s look at an example. The BoardReader forum search engine has about 1 TB of InnoDB tables per storage node. However, we know the biggest cost is loading new data. About 10 GB of new data is added per day, so 50 GB should be plenty of space for the snapshot. This estimate doesn’t always work, though. At one point, we had a long-running ALTER TABLE that changed each shard one after the other, which modified much more than 50 GB of data; while this was running, we weren’t able to make the backup. To avoid problems such as this, you can wait a while after creating the snapshot, because the added load is the highest right after creating the snapshot.
BACKUP MYTH #2: “MY SNAPSHOT IS MY BACKUP”
A snapshot, whether it’s an LVM snapshot, a ZFS snapshot, or a SAN snapshot, isn’t a real backup because it doesn’t contain a full copy of your data. Because snapshots are copy-on-write, they contain only the differences between the live copy of the data and the data at the point in time when the snapshot happened. If an unmodified block becomes corrupt in the live copy of the data, there’s no good copy of that block that you can use for recovery, and every snapshot sees the same corrupted block that the live volume does. Use snapshots to “freeze” your data while you take a backup, but don’t rely on the snapshot itself as a backup.
Other uses and alternatives
You can use snapshots for more than just backups. For example, as mentioned previously, they can be a useful way to take a “checkpoint” just before a potentially dangerous action. Some systems let you promote the snapshot to the original filesystem. This makes it easy to roll back to the point at which you took the snapshot.
Filesystem snapshots aren’t the only way to get an instantaneous copy of your data, either. Another option is a RAID split: if you have a three-disk software RAID mirror, for example, you can remove one disk from the mirror and mount it separately. There’s no copy-on-write penalty, and it’s easy to promote this kind of “snapshot” to be the master copy if necessary. After adding the disk back to the RAID set, however, it will have to be resynced. There’s no free lunch, sadly.
[217] Please do not use Maatkit’s mk-parallel-dump and mk-parallel-restore tools. They are not safe.
Recovering from a Backup
How you recover your data depends on how you backed it up. You might need to take some or all of the following steps:
§ Stop the MySQL server.
§ Take notes on the server’s configuration and file permissions.
§ Move the data from the backup into the MySQL data directory.
§ Make configuration changes.
§ Change file permissions.
§ Restart the server with limited access, and wait for it to start fully.
§ Reload logical backup files.
§ Examine and replay binary logs.
§ Verify what you’ve restored.
§ Restart the server with full access.
We demonstrate how to do each of these steps as needed in the following sections. We also add notes specific to certain backup methods or tools in sections about those methods or tools later in this chapter.
WARNING
If there’s a chance you’ll need the current versions of your files, don’t replace them with the files from the backup. For example, if your backup includes the binary logs, and you need to replay binary logs for point-in-time recovery, don’t overwrite the current binary logs with older copies from the backup. Rename them or move them elsewhere if necessary.
During recovery, it’s often important to make MySQL inaccessible to everything except the recovery process. We like to start MySQL with the --skip-networking and --socket=/tmp/mysql_recover.sock options to ensure that it is unavailable to existing applications until we’ve checked it and brought it back online. This is especially important for logical backups, which are loaded in pieces.
Restoring Raw Files
Restoring raw files tends to be pretty straightforward—which is another way of saying there aren’t many options. This can be a good or a bad thing, depending on your recovery requirements. The usual procedure is simply to copy the files into place.
Whether you need to shut down MySQL depends on the storage engine. MyISAM’s files are generally independent from one another, and simply copying each table’s .frm, .MYI, and .MYD files works well, even if the server is running. The server will find the table as soon as anyone queries it or otherwise makes the server look for it (for example, by executing SHOW TABLES). If the table is open when you copy in these files, it’ll probably cause trouble, so before doing so you should either drop or rename the table, or use LOCK TABLES and FLUSH TABLES to close it.
InnoDB is another matter. If you’re restoring a traditional InnoDB setup, where all tables are stored in a single tablespace, you’ll have to shut down MySQL, copy or move the files into place, and then restart. You also need to ensure that InnoDB’s transaction log files match its tablespace files. If the files don’t match—for example, if you replace the tablespace files but not the transaction log files—InnoDB will refuse to start. This is one reason it’s crucial to back up the transaction log along with the data files.
If you’re using the InnoDB file-per-table feature (innodb_file_per_table), InnoDB stores the data and indexes for each table in a .ibd file, which is like a combination of MyISAM’s .MYI and .MYD files. You can back up and restore individual tables by copying these files, and you can do it while the server is running, but it’s not as simple as with MyISAM. The individual files are not independent from InnoDB as a whole. Each .ibd file has internal information that tells InnoDB how the file is related to the main (shared) tablespace. When you restore such a file, you have to tell InnoDB to “import” the file.
There are many restrictions on this process, which you can read about in the MySQL manual section on using per-table tablespaces. The biggest is that you can only restore a table to the server from which you backed it up. It’s not impossible to back up and restore tables in this configuration, but it’s trickier than you might think.
NOTE
Percona Server and Percona XtraBackup have some enhancements that lift some of the restrictions on this process, such as the same-server restriction.
All this complexity means that restoring raw files can be very tedious, and it’s easy to get it wrong. A good rule of thumb is that the harder and more complex your recovery procedure becomes, the more you need to protect yourself with logical backups as well. It’s always a good idea to have a logical backup, in case something goes wrong and you can’t convince MySQL to use your raw backups.
Starting MySQL after restoring raw files
There are a few things you’ll need to do before you start the MySQL server you’re recovering.
The first and most important thing, and one of the easiest to forget, is to check your server’s configuration and make sure the restored files have the correct owner and permissions, before you try to start the MySQL server. These attributes must be exactly right, or MySQL might not start. The attributes vary from system to system, so check your notes to see exactly what you’ll need to set. You typically want the mysql user and group to own the files and directories, which you want to be readable and writable by that user and group but no others.
We also suggest watching the MySQL error log while the server starts. On a Unix-style system, you can watch the file like this:
$ tail -f /var/log/mysql/mysql.err
The exact location of the error log will vary. Once you’re monitoring the file, you can start the MySQL server and watch for errors. If all goes well, you’ll have a nicely recovered server once MySQL starts.
Watching the error log is even more important in newer MySQL versions. Older versions wouldn’t start if InnoDB had an error, but in newer versions the server will start anyway and just disable InnoDB. Even if the server seems to start without trouble, you should run SHOW TABLE STATUSin each database, then check the error log again.
Restoring Logical Backups
If you’re restoring logical backups instead of raw files, you need to use the MySQL server itself to load the data back into the tables, as opposed to using the operating system to simply copy files into place.
Before you load that dump file, however, take a moment to consider how large it is, how long it’ll take to load, and anything you might want to do before you start, such as notifying your users or disabling part of your application. Disabling binary logging might be a good idea, unless you need to replicate the restoration to a replica: a huge dump file is hard enough for the server to load, and writing it to the binary log adds even more (possibly unnecessary) overhead. Loading huge files also has consequences for some storage engines. For example, it’s not a good idea to load 100 GB of data into InnoDB in a single transaction, because of the huge rollback segment that will result. You should load in manageable chunks and commit the transaction after each chunk.
There are two kinds of restoration you might do, which correspond to the two kinds of logical backups you can make.
Loading SQL files
If you have a SQL dump, the file will contain executable SQL. All you need to do is run it. Assuming you backed up the Sakila sample database and schema into a single file, the following is a typical command you might use to restore it:
$ mysql < sakila-backup.sql
You can also load the file from within the mysql command-line client with the SOURCE command. Although this is mostly a different way of doing the same thing, it makes some things easier. For example, if you’re an administrative user in MySQL, you can turn off binary logging of the statements you’ll execute from within your client connection, and then load the file without needing to restart the MySQL server:
mysql> SET SQL_LOG_BIN = 0;
mysql> SOURCE sakila-backup.sql;
mysql> SET SQL_LOG_BIN = 1;
If you use SOURCE, be aware that an error won’t abort a batch of statements, as it will by default when you redirect the file into mysql.
If you compressed the backup, don’t separately decompress and load it. Instead, decompress and load it in a single operation. This is much faster:
$ gunzip -c sakila-backup.sql.gz | mysql
If you want to load a compressed file with the SOURCE command, see the discussion of named pipes in the next section.
What if you want to restore only a single table (for example, the actor table)? If your data has no line breaks, it’s not hard to restore the data if the schema is already in place:
$ grep 'INSERT INTO `actor`' sakila-backup.sql | mysql sakila
Or, if the file is compressed:
$ gunzip -c sakila-backup.sql.gz | grep 'INSERT INTO `actor`'| mysql sakila
If you need to create the table as well as restore the data, and you have the entire database in a single file, you’ll have to edit the file. This is why some people like to dump each table into its own file. Most editors can’t deal with huge files, especially if they’re compressed. Besides, you don’t want to actually edit the file itself—you just want to extract the relevant lines—so you’ll probably have to do some command-line work. It’s easy to use grep to pull out only the INSERT statements for a given table, as we did in the previous commands, but it’s harder to get the CREATE TABLE statement. Here’s a sed script that extracts the paragraph you need:
$ sed -e '/./{H;$!d;}' -e 'x;/CREATE TABLE `actor`/!d;q' sakila-backup.sql
That’s pretty cryptic, we admit. If you have to do this kind of work to restore data, your backups are poorly designed. With a little planning, it’s possible to prevent a situation in which you’re panicked and trying to figure out how sed works. Just back up each table into its own file, or, better yet, back up the data and schema separately.
Loading delimited files
If you dumped the data via SELECT INTO OUTFILE, you’ll have to use LOAD DATA INFILE with the same parameters to restore it. You can also use mysqlimport, which is a wrapper around LOAD DATA INFILE. It relies on naming conventions to determine where to load a file’s data.
We hope you dumped your schema, not just your data. If so, it’s a SQL dump, and you can use the techniques outlined in the previous section to load it.
There’s a great optimization you can use with LOAD DATA INFILE. It must read directly from a file, so you might think you have to decompress the file before loading it, which is very slow and disk-intensive. However, there’s a way around that, at least on systems that support FIFO “named pipe” files, such as GNU/Linux. First, create a named pipe and stream the decompressed data into it:
$ mkfifo /tmp/backup/default/sakila/payment.fifo
$ chmod 666 /tmp/backup/default/sakila/payment.fifo
$ gunzip -c /tmp/backup/default/sakila/payment.txt.gz
> /tmp/backup/default/sakila/payment.fifo
Notice we’re using a greater-than character (>) to redirect the decompressed output into the payment.fifo file—not a pipe symbol, which creates anonymous pipes between programs. The payment.fifo file is a named pipe, so there’s no need for an anonymous one.
The pipe will wait until some program opens it for reading from the other end. Here’s the neat part: the MySQL server can read the decompressed data from the pipe, just like any other file. Don’t forget to disable binary logging if appropriate:
mysql> SET SQL_LOG_BIN = 0; -- Optional
-> LOAD DATA INFILE '/tmp/backup/default/sakila/payment.fifo'
-> INTO TABLE sakila.payment;
Query OK, 16049 rows affected (2.29 sec)
Records: 16049 Deleted: 0 Skipped: 0 Warnings: 0
Once MySQL is done loading the data, gunzip will exit, and you can delete the named pipe. You can use this same technique to load compressed files from within the MySQL command-line client with the SOURCE command. The pt-fifo-split program in Percona Toolkit can help you load large files in chunks, rather than one large transaction, which can be a lot more efficient.
YOU CAN’T GET THERE FROM HERE
One of the authors once changed a column from DATETIME to TIMESTAMP to save space and make processing faster, as recommended in Chapter 3. The resulting table definition looked like the following:
CREATE TABLE tbl (
col1 timestamp NOT NULL,
col2 timestamp NOT NULL default CURRENT_TIMESTAMP
on update CURRENT_TIMESTAMP,
... more columns ...
);
This table definition causes a syntax error on MySQL 5.0.40, the server version from which it was created. You can dump it, but you can’t reload it. Odd, unforeseen errors such as this one are among the reasons why it’s important to test your backups. You never know what will prevent you from restoring your data!
Point-in-Time Recovery
The most common way to do point-in-time recovery with MySQL is to restore your last full backup and then replay the binary log from that time forward (sometimes called “roll-forward recovery”). As long as you have the binary log, you can recover to any point you wish. You can even recover a single database without too much trouble.
The main drawback is that binary log replay can potentially be a slow process. It’s essentially equivalent to replication. If you have a replica, and you have measured how heavily utilized the SQL thread is, you’ll have a good gauge of how quickly you can replay binary logs. For example, if your SQL thread is about 50% utilized, recovering a week’s worth of binary logs is probably going to take between three and four days.
A common scenario is undoing the effects of a harmful statement, such as a DROP TABLE. Let’s look at a simplified example of how to do that, using only MyISAM tables. Suppose that at midnight, the backup job ran the equivalent of the following statements, which copied the database elsewhere on the same server:
mysql> FLUSH TABLES WITH READ LOCK;
-> server1# cp -a /var/lib/mysql/sakila /backup/sakila;
mysql> FLUSH LOGS;
-> server1# mysql -e "SHOW MASTER STATUS" --vertical > /backup/master.info;
mysql> UNLOCK TABLES;
Then, later in the day, suppose someone ran the following statement:
mysql> USE sakila;
mysql> DROP TABLE sakila.payment;
For the sake of illustration, we assume that we can recover this database in isolation (that is, that no tables in this database were involved in cross-database queries). We also assume that we didn’t notice the offending statement until some time later. The goal is to recover everything that’s happened to the database, except for that statement. That is, we must also preserve all the modifications that have been made to other tables, including after that statement was run.
This isn’t all that hard to do. First, we stop MySQL to prevent further modifications and restore just the sakila database from the backup:
server1# /etc/init.d/mysql stop
server1# mv /var/lib/mysql/sakila /var/lib/mysql/sakila.tmp
server1# cp -a /backup/sakila /var/lib/mysql
We disable normal connections by adding the following to the server’s my.cnf file while we work:
skip-networking
socket=/tmp/mysql_recover.sock
Now it’s safe to start the server:
server1# /etc/init.d/mysql start
The next task is to find which statements in the binary log we want to replay, and which we want to skip. As it happens, the server has created only one binary log since the backup at midnight. We can examine this file with grep and find the offending statement:
server1# mysqlbinlog --database=sakila /var/log/mysql/mysql-bin.000215
| grep -B3 -i 'drop table sakila.payment'
# at 352
#070919 16:11:23 server id 1 end_log_pos 429 Query thread_id=16 exec_time=0
error_code=0
SET TIMESTAMP=1190232683/*!*/;
DROP TABLE sakila.payment/*!*/;
The statement we want to skip is at position 352 in the log file, and the next statement is at position 429. We can replay the log up to position 352, and then from 429 on, with the following commands:
server1# mysqlbinlog --database=sakila /var/log/mysql/mysql-bin.000215
--stop-position=352 | mysql -uroot -p
server1# mysqlbinlog --database=sakila /var/log/mysql/mysql-bin.000215
--start-position=429 | mysql -uroot -p
Now all we have to do is check the data just to be sure, stop the server and undo the changes to my.cnf, and restart the server.
More Advanced Recovery Techniques
Replication and point-in-time recovery use the same mechanism: the server’s binary log. This means replication can be a helpful tool during recovery, in some not-so-obvious ways. We show you some of the possibilities in this section. This isn’t an exhaustive list, but it should give you some ideas about how to design recovery processes for your needs. Remember to script and rehearse anything you think you’ll need to do during recovery.
Delayed replication for fast recovery
As we mentioned earlier in this chapter, having a delayed replica can make point-in-time recovery much faster and easier if you notice the accident before the replica executes the offending statement.
The procedure is a little different from that outlined in the preceding section, but the idea is the same. You stop the replica, then use START SLAVE UNTIL to replay events until just before the statement you want to skip. Next, you execute SET GLOBAL SQL_SLAVE_SKIP_COUNTER=1 to skip the bad statement. Set it to a value higher than 1 if you want to skip several events (or simply use CHANGE MASTER TO to advance the replica’s position in the log).
All you have to do then is execute START SLAVE and let the replica run until it is finished executing its relay logs. Your replica has done all the tedious work of point-in-time recovery for you. Now you can promote the replica to master, and you’ve recovered with very little interruption.
Even if you don’t have a delayed replica to speed recovery, replicas can be useful because they fetch the master’s binary logs onto another machine. If your master’s disk fails, a replica’s relay logs might be the only place you’ll have a reasonably up-to-date copy of the master’s binary logs.
Recovering with a log server
There’s another way to use replication for recovery: set up a log server. We feel that replication is more trustworthy than mysqlbinlog, which might have odd bugs or edge cases that cause unexpected behavior. A log server is also more flexible and easier to use for recovery than mysqlbinlog, not only because of the START SLAVE UNTIL option, but also because of the replication rules you can apply (such as replicate-do-table). With a log server, you can do much more complex filtering than you’d be able to do otherwise.
For example, a log server lets you recover a single table easily. This is a lot harder to do correctly with mysqlbinlog and command-line tools—in fact, it’s hard enough that we advise you not to try.
Let’s suppose our careless developer dropped the same table as before, and we want to recover it without reverting the whole server to last night’s backup. Here’s how to do this with a log server:
1. Let the server you need to recover be called server1.
2. Recover last night’s backup to another server, called server2. Run the recovery process on this server to avoid the risk of making things worse if you make a mistake in recovery.
3. Set up a log server to serve server1’s binary logs, following the directions in Chapter 10. (It might be a good idea to copy the logs away to another server and set up the log server there, just to be extra careful.)
4. Change server2’s configuration file to include the following:
replicate-do-table=sakila.payment
5. Restart server2, then make it a replica of the log server with CHANGE MASTER TO. Configure it to read from the binary log coordinates of last night’s backup. Don’t run START SLAVE yet.
6. Examine the output of SHOW SLAVE STATUS on server2 and verify that everything is correct. Measure twice, cut once!
7. Find the binary log position of the offending statement, and execute START SLAVE UNTIL to replay events until just before that position on server2.
8. Stop the replica process on server2 with STOP SLAVE. It should now have the table as it existed just before it was dropped.
9. Copy the table from server2 to server1.
This process is possible only if the table isn’t the target of any multitable UPDATE, DELETE, or INSERT statements. Any such statements will execute against a different database state than the one that existed when the binary log events were logged, so the table will probably end up containing different data than it should. (This applies only if you’re using statement-based binary logging; if you use row-based logging, the replay process won’t be prone to this error.)
InnoDB Crash Recovery
InnoDB checks its data and log files every time it starts to see whether it needs to perform its recovery process. However, InnoDB’s recovery isn’t the same thing we’ve been talking about in the context of this chapter. It’s not recovering backed-up data; instead, it’s applying transactions from the logs to the data files and rolling back uncommitted modifications to the data files.
Exactly how InnoDB recovery works is a little too complicated to describe here. We focus instead on how to actually perform recovery when InnoDB has a serious problem.
Most of the time InnoDB is very good at fixing problems. Unless there is a bug in MySQL or your hardware is faulty, you shouldn’t have to do anything out of the ordinary, even if your server loses power. InnoDB will just perform its normal recovery upon startup, and all will be well. In the log file, you’ll see messages like the following:
InnoDB: Doing recovery: scanned up to log sequence number 0 40817239
InnoDB: Starting an apply batch of log records to the database...
InnoDB prints progress messages in percents into the log file. Some people report not seeing these until the whole process is done. Be patient; there is no way to hurry the process. Killing and restarting will just make it take longer.
If there’s a severe problem with your hardware, such as memory or disk corruption, or if you run into a bug in MySQL or InnoDB, you might have to intervene and either force recovery or prevent the normal recovery from happening.
Causes of InnoDB corruption
InnoDB is very robust. It is built to be reliable, and it has a lot of built-in sanity checks to prevent, find, and fix corrupted data—much more so than other MySQL storage engines, and even more than some other databases. However, it can’t protect itself against everything.
At a minimum, InnoDB relies on unbuffered I/O calls and fsync() calls not returning until the data is safely written to physical media. If your hardware doesn’t guarantee this behavior, InnoDB can’t protect your data, and a crash can cause corruption.
Many InnoDB corruption problems are hardware-related (e.g., corrupted page writes caused by power failures or bad memory). However, misconfigured hardware is a much bigger source of problems in our experience. Common misconfigurations include enabling the writeback cache on a RAID card that doesn’t have a battery backup unit, or enabling the writeback cache on hard drives themselves. These mistakes will cause the controller or drive to lie and say the fsync() completed, when the data is in fact only in the writeback cache, not on disk. In other words, the hardware doesn’t provide the guarantees InnoDB needs to keep your data safe.
Sometimes machines are configured this way by default, because it gives better performance—which might be fine for some purposes, but not for a transactional database server.
You can also get corruption if you run InnoDB on network-attached storage (NAS), because completing an fsync() to such a device might just mean the device received the data. The data is safe if InnoDB crashes, but not necessarily if the NAS device crashes.
Sometimes the corruption is worse than other times. Severe corruption can crash InnoDB or MySQL, but less severe corruption might just mean some transactions are lost because the log files weren’t really synced to disk.
How to recover corrupted InnoDB data
There are three major types of InnoDB corruption, and each requires a different level of effort to recover the data:
Secondary index corruption
You can often fix a corrupt secondary index with OPTIMIZE TABLE; alternatively, you can use SELECT INTO OUTFILE, drop and recreate the table, then use LOAD DATA INFILE. (You can also alter the table to MyISAM and back.) These processes fix the corruption by building a new table, and hence rebuilding the affected index.
Clustered index corruption
In the event of clustered index corruption, you might need to use the innodb_force_recovery settings to dump the table (more on this later). Sometimes the dump process crashes InnoDB; if this happens, you might need to dump ranges of rows to skip the corrupted pages that are causing the crash. A corrupt clustered index is a more severe problem than a corrupt secondary index because it affects the data rows themselves, but it’s still possible to fix just the affected tables in many cases.
Corrupt system structures
System structures include the InnoDB transaction log, the undo log area of the tablespace, and the data dictionary. This type of corruption is likely to require a complete dump and restore, because much of InnoDB’s inner workings might be affected.
You can usually repair a corrupted secondary index without losing any data. However, the other two scenarios often involve at least some data loss. If you have a backup, you’re probably better off restoring that backup rather than trying to extract data from corrupt files.
If you must try to extract the data from the corrupted files, the general process is to try to get InnoDB up and running, then use SELECT INTO OUTFILE to dump the data. If your server has already crashed and you can’t even start InnoDB without crashing it, you can configure it to prevent the normal recovery and background processes from running. This might let you start the server and make a logical backup with reduced or no integrity checking.
The innodb_force_recovery parameter controls which kinds of operations InnoDB will do at startup and during normal operation. The normal value is 0, and you can increase it up to 6. The MySQL manual documents the exact behavior of each option; we won’t duplicate that information here, but we will note that you can increase the value to as high as 4 with little danger. At this setting, you might lose some data on pages that have corruption; if you go higher, you might extract bad data from corrupted pages, or increase the risk of a crash during the SELECT INTO OUTFILE. In other words, levels up to 4 do no harm to your data, but they might miss opportunities to fix problems; levels 5 and 6 are more aggressive at fixing problems but risk doing harm.
When you set innodb_force_recovery to a value greater than 0, InnoDB is essentially read-only, but you can still create and drop tables. This prevents further corruption, and it makes InnoDB relax some of its normal checks so it doesn’t intentionally crash when it finds bad data. In normal operations, this is a safeguard, but you don’t want it when you’re recovering. If you need to force InnoDB recovery, it’s a good idea to configure MySQL not to allow normal connection requests until you’re finished.
If InnoDB’s data is so corrupt that you can’t start MySQL at all, you can use Percona’s InnoDB Recovery Toolkit to extract data directly from the files. These tools are freely available at http://www.percona.com/software/. Percona Server also has an option that allows the server to run even when some tables are corrupted, rather than the default MySQL behavior of hard-crashing the entire server when a single corrupt page is detected.
Backup and Recovery Tools
A variety of good and not-so-good backup tools are available. Our favorites are mylvmbackup for LVM snapshot backups, and Percona XtraBackup (open source) or MySQL Enterprise Backup (proprietary) for hot InnoDB backups. We don’t recommend mysqldump for backing up any significant amount of data, due to the impact on the server and the unpredictably long restore times.
There are a few backup tools that should have disappeared over the years, but unfortunately they’ve stayed around. The most obvious example is Maatkit’s mk-parallel-dump, which never worked right, even though it was redesigned several times. Another is mysqlhotcopy, which sort of worked for MyISAM tables in the olden days. Neither tool is safe to trust with your data in the general case, and can lead you to believe that data is backed up when it isn’t. For example, mysqlhotcopy will copy your .ibd files if you use InnoDB with innodb_file_per_table, which has fooled some people into thinking their InnoDB data was backed up. Both tools can have an adverse impact on a running server in some circumstances.
If you were watching MySQL’s roadmap around 2008 or 2009, you probably heard about MySQL online backup. This was a feature that let you initiate backups and restores from the server, with SQL commands. It was originally planned for MySQL 5.2, then rescheduled for MySQL 6.0, then canceled forever as far as we know.
MySQL Enterprise Backup
This tool, formerly known as InnoDB Hot Backup or ibbackup, is part of a MySQL Enterprise subscription from Oracle. Using it does not require stopping MySQL, setting locks, or interrupting normal database activity (though it will cause some extra load on your server). It supports features such as compressed backups, incremental backups, and streaming backups to another server. It is the “official” backup tool for MySQL.
Percona XtraBackup
Percona XtraBackup is quite similar to MySQL Enterprise Backup in many ways, but it’s open source and free. In addition to the core backup tool, there is also a wrapper script written in Perl that enhances its functionality for more advanced tasks. It supports features such as streaming, incremental, compressed, and multithreaded (parallel) backup operations. It also has a variety of special features to reduce the impact of backups on heavily loaded systems.
Percona XtraBackup works by “tailing” the InnoDB log files in a background thread, then copying the InnoDB data files. This is a slightly involved process, with special checks to ensure that data is copied consistently. When all the data files are copied, the log-copying thread finishes, too. The result is a copy of all the data, but at different points in time. The logs can now be applied to the data files, using InnoDB’s crash recovery routines, to bring all of the data files into a consistent state. This is referred to as the prepare process. Once prepared, the backup is fully consistent and contains all committed transactions as of the ending point of the file copy process. All of this happens completely externally to MySQL, so it doesn’t need to connect to or access MySQL in any way.
The wrapper script adds the ability to recover a backup by copying it back to its original location. There’s also Lachlan Mulcahy’s XtraBackup Manager project for even more functionality; see http://code.google.com/p/xtrabackup-manager/ for more information.
mylvmbackup
Lenz Grimmer’s mylvmbackup (http://lenz.homelinux.org/mylvmbackup/) is a Perl script to help automate MySQL backups via LVM snapshots. It gets a global read lock, creates a snapshot, and releases the lock. It then compresses the data with tar and removes the snapshot. It names the tarball according to the timestamp at which the backup was made. It has a few more advanced options, but in general it’s a straightforward tool for performing LVM backups.
Zmanda Recovery Manager
Zmanda Recovery Manager for MySQL, or ZRM (http://www.zmanda.com), comes in both free (GPL) and commercial versions. The enterprise edition comes with a management console that provides a graphical web-based interface for configuration, backup, verification, recovery, reporting, and scheduling. The open source edition is not crippled in any way, but it doesn’t include some of the extra niceties, such as the web-based console.
True to its name, ZRM is actually a backup and recovery manager, not just a single tool. It wraps its own functionality around standard tools and techniques, such as mysqldump, LVM snapshots, and Percona XtraBackup. It automates much of the tedious work of backups and recovery.
mydumper
Several current and former MySQL engineers created mydumper as a replacement for mysqldump, based on their years of experience. It is a multithreaded (parallel) backup and restore toolset for MySQL and Drizzle with a lot of nice features. Many people will probably find the speed of multithreaded backups and restores to be this tool’s most attractive feature. Although we know of some people using it in production, we don’t have any production experience with it ourselves. You can find out more at http://www.mydumper.org.
mysqldump
Most people use the programs that ship with MySQL, so despite its shortcomings, the most common choice for creating logical backups of data and schemas is mysqldump. It’s a general-purpose tool that can be used for many tasks, such as copying a table from one server to another:
$ mysqldump --host=server1 test t1 | mysql --host=server2 test
We’ve shown several examples of how to create logical backups with mysqldump throughout this chapter. By default, it outputs a script containing all the commands needed to create a table and fill it with data; there are also options to output views, stored routines, and triggers. Here are some more examples of typical usage:
§ To make a logical backup of everything on a server to a single file, with all tables in each database backed up at the same logical point in time:
$ mysqldump --all-databases > dump.sql
§ To make a logical backup of only the Sakila sample database:
$ mysqldump --databases sakila > dump.sql
§ To make a logical backup of only the sakila.actor table:
$ mysqldump sakila actor > dump.sql
You can use the --result-file option to specify an output file, which can help prevent newline conversion on Windows:
$ mysqldump sakila actor --result-file=dump.sql
The default options for mysqldump aren’t good for most backup purposes. You’ll probably want to specify some options explicitly to change the output. Here are options we use frequently to make mysqldump more efficient and make its output easier to use:
--opt
Enables a group of options that disable buffering (which could make your server run out of memory), write more data into fewer SQL statements in the dump so they’ll load more efficiently, and do some other useful things. Read your version’s help for the details. If you disable this group of options, mysqldump will store each table you dump in its memory before writing it to the disk, which is impractical for large tables.
--allow-keywords, --quote-names
Make it possible to dump and restore tables that use reserved words as names.
--complete-insert
Makes it possible to move data between tables that don’t have identical columns.
--tz-utc
Makes it possible to move data between servers in different time zones.
--lock-all-tables
Uses FLUSH TABLES WITH READ LOCK to get a globally consistent backup.
--tab
Dumps files with SELECT INTO OUTFILE.
--skip-extended-insert
Causes each row of data to have its own INSERT statement. This can help you selectively restore certain rows if necessary. The cost is larger files that are more expensive to import into MySQL; you should enable this only if you need it.
If you use the --databases or --all-databases options to mysqldump, the resulting dump’s data will be consistent within each database, because mysqldump will lock and dump all tables a database at a time. However, tables from different databases might not be consistent with each other. Using the --lock-all-tables option solves this problem.
For InnoDB backups, you should add the --single-transaction option, which uses InnoDB’s MVCC features to create a consistent backup at a single point in time, instead of using LOCK TABLES. If you add the --master-data option, the backup will also contain the server’s binary log coordinates at the moment of the backup, which is very helpful for point-in-time recovery and setting up replicas. However, be aware that it will use FLUSH TABLES WITH READ LOCK to freeze the server so it can get the coordinates.
Scripting Backups
It’s pretty standard to need to write some scripts for backups. Rather than showing you a sample program, which would necessarily have a lot of scaffolding that just takes up space on the page, we list the ingredients that go into a typical backup script and show you code snippets for a Perl script. You can view these as building blocks that you can snap together to create your own script. We show them in roughly the order you’ll need to use them:
Sanity checking
Make life easier on yourself and your teammates—turn on strict error checking and use English variable names:
use strict;
use warnings FATAL => 'all';
use English qw(-no_match_vars);
If you script in Bash, you can enable stricter variable checking, too. The following will raise an error when there’s an undefined variable in a substitution or when a program exits with an error:
set -u;
set -e;
Command-line arguments
The best way to add command-line option processing is with the standard libraries, which are included with every Perl installation:
use Getopt::Long;
Getopt::Long::Configure('no_ignore_case', 'bundling');
GetOptions( .... );
Connecting to MySQL
The standard Perl DBI library is nearly ubiquitous, and it provides a lot of power and flexibility. Read the Perldoc (available online at http://search.cpan.org) for details on how to use it. You can connect to MySQL using DBI as follows:
use DBI;
$dbh = DBI->connect(
'DBI:mysql:;host=localhost', 'user', 'p4ssw0rd', {RaiseError => 1 });
For command-line scripting, read the --help text for the standard mysql program. It has a lot of options to make it friendly for scripting. For example, here’s how to iterate over a list of databases in Bash:
mysql -ss -e 'SHOW DATABASES' | while read DB; do
echo "${DB}"
done
Stopping and starting MySQL
The best way to stop and start MySQL is to use your operating system’s preferred method, such as running the /etc/init.d/mysql init script or the service control (on Windows). It’s not the only way, though. You can shut down the database from Perl, with an existing database connection:
$dbh->func("shutdown", 'admin');
You shouldn’t rely on MySQL being shut down when this command completes—it might only be in the process of shutting down. You can also stop MySQL from the command line:
$ mysqladmin shutdown
Getting lists of databases and tables
Every backup script asks MySQL for a list of databases and tables. Beware of entries that aren’t really databases, such as the lost+found directory in some journaling filesystems and the INFORMATION_SCHEMA. Make sure your script is ready to deal with views, too, and be aware thatSHOW TABLE STATUS can take a really long time when you have lots of data in InnoDB:
mysql> SHOW DATABASES;
mysql> SHOW /*!50002 FULL*/ TABLES FROM<database>;
mysql> SHOW TABLE STATUS FROM<database>;
Locking, flushing, and unlocking tables
You’re bound to need to lock and/or flush one or more tables. You can either lock the desired tables by naming them all, or just lock everything globally:
mysql> LOCK TABLES<database.table>READ [, ...];
mysql> FLUSH TABLES;
mysql> FLUSH TABLES<database.table>[, ...];
mysql> FLUSH TABLES WITH READ LOCK;
mysql> UNLOCK TABLES;
Be very careful about race conditions when getting lists of tables and locking them. New tables could be created, or tables could be dropped or renamed. If you lock and back them up one at a time, you won’t get consistent backups.
Flushing binary logs
It’s handy to ask the server to begin a new binary log (do this after locking the tables, but before taking a backup):
mysql> FLUSH LOGS;
It makes recovery and incremental backups easier if you don’t have to think about starting in the middle of a log file. This does have some side effects with regard to flushing and reopening error logs and potentially destroying old log entries, so be careful you’re not throwing away data you need.
Getting binary log positions
Your script should get and record both the master and replica status—even if the server is just a master or just a replica:
mysql> SHOW MASTER STATUS\G
mysql> SHOW SLAVE STATUS\G
Issue both statements and ignore any errors you get, so your script gets all the information possible.
Dumping data
Your best options are to use mysqldump, mydumper, or SELECT INTO OUTFILE.
Copying data
Use one of the methods we showed throughout the chapter.
These are the building blocks of any backup script. The hard part is to script the management and recovery tasks. If you want inspiration for how to do this, you can take a look at the source code for ZRM.
Summary
Everyone knows that they need backups, but not everyone realizes that they need recoverable backups. There are many ways to design backups that contradict your recovery requirements. To help avoid this problem, we suggest that you define and document your recovery point objective and your recovery time objective, and use those requirements when choosing a backup system.
It’s also important to test recovery on a routine basis and ensure that it works. It’s easy to set up mysqldump and let it run every night, without realizing that your data has grown over time to the point where it might take days or weeks to import again. The worst time to find out how long your recovery will take is when you actually need it. A backup that completes in hours can literally take weeks to restore, depending on your hardware, schema, indexes, and data.
Don’t fall into the trap of thinking that a replica is a backup. It’s a less intrusive source for taking a backup, but it’s not a backup. The same is true of your RAID volume, your SAN, and filesystem snapshots. Make sure that your backups can pass the DROP TABLE test (or the “I got hacked” test), as well as the test of losing your datacenter. And if you take backups from a replica, be sure that you verify replication integrity with pt-table-checksum.
Our two favorite ways to take backups are to copy the data from a filesystem or SAN snapshot, or to use Percona XtraBackup. Both techniques let you take nonintrusive binary (raw) backups of your data, which you can then verify by starting a mysqld instance and checking the tables. Sometimes you can even kill two birds with one stone: test recovery every single day by restoring the backup to your development or staging server. You can also dump the data from that instance to create a logical backup. We also like to back up binary logs, and to keep enough generations of backups and binary logs that we can perform recovery or set up a new replica even if the most recent backup is unusable.
There are good commercial backup tools in addition to the open source ones we’ve mentioned, foremost among them MySQL Enterprise Backup. Be careful with “backup” tools that are included with GUI SQL editors, server management tools, and the like. Likewise, be careful with “MySQL backup plugins” from companies who make one-size-fits-all backup tools that claim to support MySQL. You really need a first-class backup tool that’s designed primarily for MySQL, not one that just happens to support MySQL as well as a hundred other things. A lot of backup tool vendors don’t know or acknowledge the impact of practices such as using FLUSH TABLES WITH READ LOCK. The use of this SQL command automatically disqualifies a solution as a “hot” backup in our opinion. If you use only InnoDB tables, you usually don’t need it.
All materials on the site are licensed Creative Commons Attribution-Sharealike 3.0 Unported CC BY-SA 3.0 & GNU Free Documentation License (GFDL)
If you are the copyright holder of any material contained on our site and intend to remove it, please contact our site administrator for approval.
© 2016-2026 All site design rights belong to S.Y.A.