JMP Essentials: An Illustrated Guide for New Users, Second Edition (2014)
Appendix A. Integrating with SAS
When you use JMP, you are using one in a family of SAS products. JMP is designed as a nimble and fast desktop data discovery tool for use by a broad audience. At the beginning, SAS software was created to provide analytics on mainframe computers when few other options were available. Over the years, as problem sizes grew, so did SAS software. 91 of the top 100 companies on the 2013 FORTUNE Global 500® list use SAS software on every size and type of problem.
For many years, JMP has been an integrated client to SAS, not just a stand-alone product as described in this book. This means that as your problem size grows or extends beyond that which is suitable for JMP alone, you can migrate smoothly from desktop JMP to other tools from SAS. When analyzing SAS data with JMP, you first need to import that data into JMP, which we will describe in the next section.
A.1 Working with SAS Data
SAS data files can be stored either on your local machine or on a network drive. You open them using the File menu.
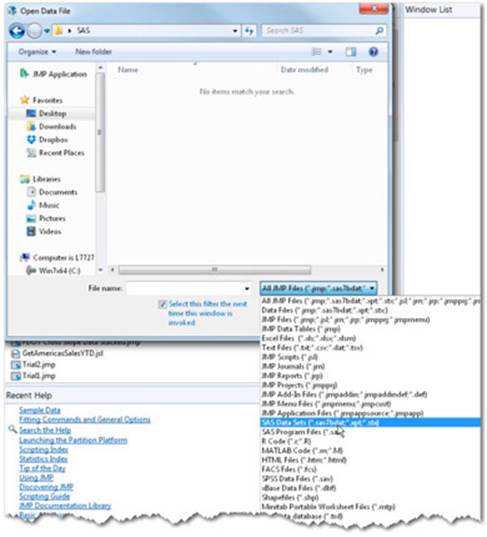
Select File ▶ Open. Select All JMP Files to disclose the file types. You see that JMP can read a variety of SAS data and file types (see Figure A.1). Locate the SAS file and select Open.
Figure A.1 Select SAS Data Sets
Many organizations connect different data sources using SAS to automate and streamline data integration. If you have an individual copy of SAS or if your organization has a SAS Metadata Server, then JMP can connect to data in these SAS frameworks.
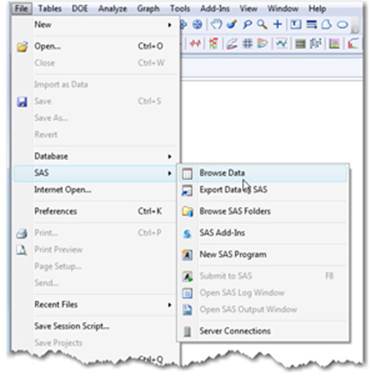
If you have a metadata sever or you have SAS installed locally, you can select File ▶ SAS ▶ Browse Data (see Figure A.2).
Figure A.2 Browse SAS Data
You are prompted to log into the SAS Metadata server (see Figure A.3). This is a powerful feature of SAS that provides a permission and security framework to keep data safe.
Figure A.3 Create SAS Profile
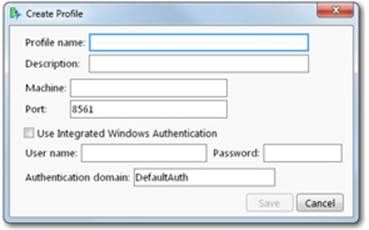
Type your user name and password and click OK.
There is a convenient data import window that has many useful features (see Figure A.4).
Figure A.4 Data Import Window
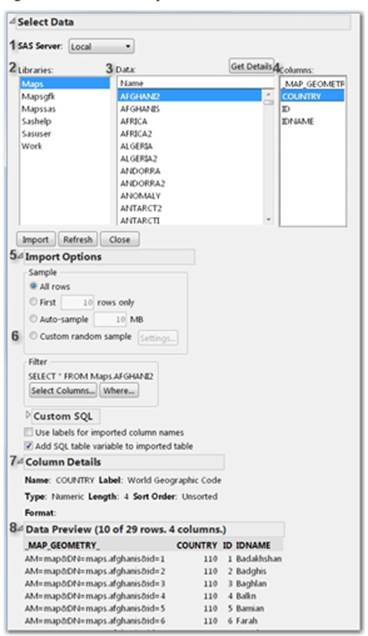
1. Local and network SAS Servers are shown in the SAS Server column.
2. SAS Libraries that you have permission to access are shown.
3. Data Tables within those libraries that you have permission to access are shown.
4. Columns within those data tables that you have permission to access are shown.
5. An interactive Import Options panel allows writing of SQL queries that can be run on the data. This is supported under the Custom SQL report tab.
6. A Custom Random Sample panel allows random sampling against the data. This is a critical feature when you are importing and managing large data sizes in JMP.
7. The Column Details panel shows details about the column(s).
8. A Data Preview panel details the file size in rows and columns before it is imported to JMP. This is also valuable when accessing especially large data sources that might be too large to fit on your desktop computer.
A SAS Metadata Server also provides tools to prepare and report data using server resources that JMP can leverage. We describe a few highlights in the next section.
A.2 Working with SAS Programs
SAS supports its own programming language that provides a rich set of tools, scaling to large and complex problems and bigger computer hardware.
When JMP has access to SAS, JMP can leverage these tools to extend its capabilities in several ways.
Opening a SAS Program
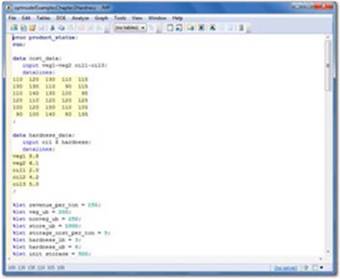
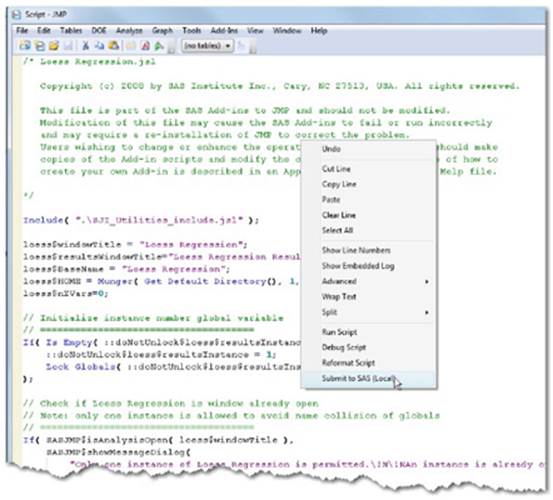
You may open an existing SAS program just as you would open any data file. Use File ▶ Open and then specify SAS Program in the file of type submenu (Figure A.5). Locate the program and then select Open. This will open the program within a SAS Program Editor window where you may further edit the program or simply submit the program to SAS (Figure A.6).
Figure A.5 Open a SAS Program
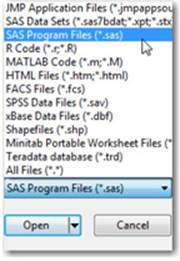
Figure A.6 SAS Program Editor
To submit to SAS, right-click within the window and select Submit to SAS.
SAS Add-ins
SAS Add-ins are SAS Programs that are packaged in a user-friendly JMP dialog window. SAS Add-ins allow you to take advantage of SAS’ advanced analytics or custom applications conveniently and accessibly without needing to program in SAS. In this way, JMP can work as an easy-to-use client to SAS, assuming SAS is installed and connected.
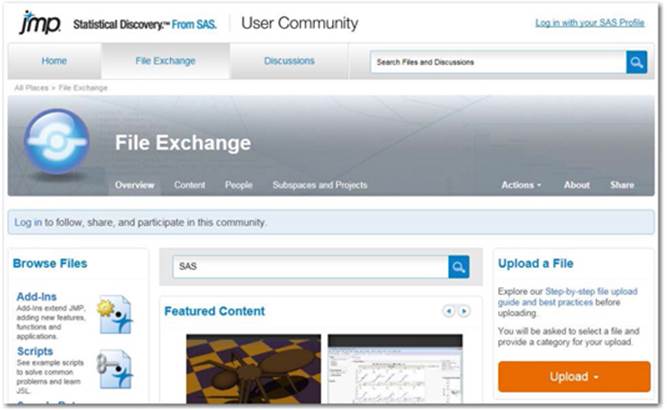
A variety of SAS Add-ins are available for download from the File Exchange located at the JMP User Community (Figure A.7). Go to Help ▶ JMP User Community and click the File Exchange Tab.
Figure A.7 JMP File Exchange
Note: You can create your own SAS Add-ins, which can be real time savers, but we recommend that you consult with a SAS expert.
Writing a SAS Program
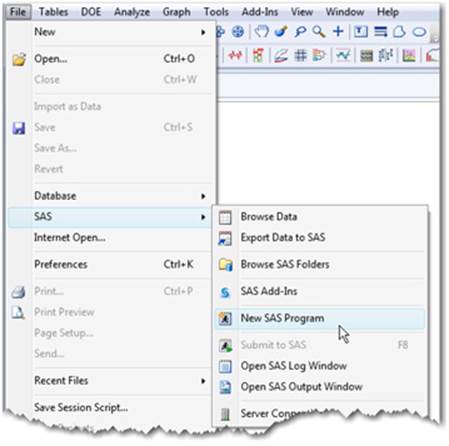
SAS programs can be written in JMP and submitted to SAS. In JMP, select File ▶ SAS ▶ New SAS Program (see Figure A.8).
Figure A.8 Write a SAS Program
A blank coding window appears. Type your program in the window. To submit the program to SAS, right-click in the coding window and select Submit to SAS. See Figure A.9, which contains a sample SAS program for illustration.
Figure A.9 Sample SAS Program
If you want to begin learning about SAS programming, we recommend The Little SAS Book: A Primer by Lora Delwiche and Susan Slaughter or SAS for Dummies by Stephen McDaniel and Chris Hemedinger.
Automatically Generating a SAS Program
Some limited support for automatically generating a SAS program within JMP is available. Within the Fit Model platform (and ARIMA in Time series) in JMP, SAS program code can be automatically generated and then submitted by JMP. Let’s try it out:
Select Help ▶ Sample Data, then select Examples for Teaching ▶ Big Class.
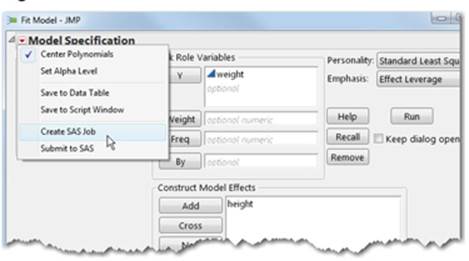
Within JMP, select Analyze ▶ Fit Model. Select weight for the Y role, select height, and click Add. Then, select the red triangle/hot spot in the upper left of the launch window and select Create SAS Job (see Figure A.10).
Figure A.10 Create a SAS Job from Fit Model
This creates the SAS program in a separate window for the model you specified (see Figure A.11).
Figure A.11 SAS Code
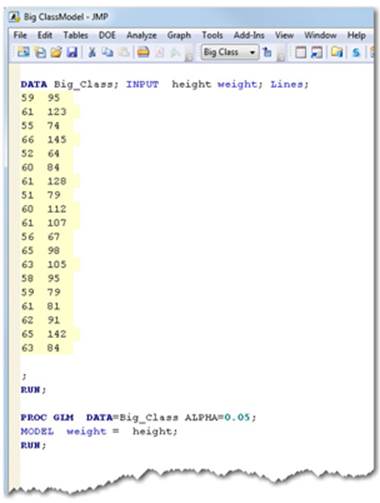
This SAS program can now be submitted to SAS by right-clicking in the window and selecting Submit to SAS.
The program runs in SAS and returns the results to JMP (see Figure A.12).
Figure A.12 SAS Report in JMP Report Window
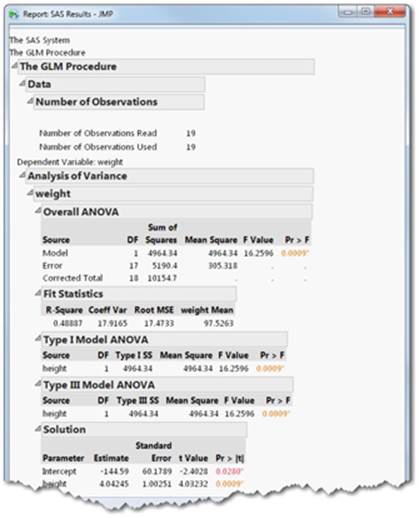
Of course, in this simple model, JMP could easily generate the results, but when you want to run a very large or complex model, SAS can provide more options and will provide more detailed results.
Note: JMP and JMP Pro also provide a technique using Partition to generate SAS scoring code that can be utilized by SAS predictive modeling products. The idea is that a candidate predictive model can be developed with JMP, then scaled up and enhanced for production purposes using enterprise SAS products.
Using the Big Class dataset above, select Analyze ▶ Modeling ▶ Partition. Select weight for the Y role and select age, sex and height for the X, Factor role and click OK. Then select Split (or Go if using validation) until the desired model is found. Then select the red triangle for Partition of weight and choose Save Columns ▶ Make SAS DATA Step.
Why SAS? Why JMP?
SAS is a highly scalable analytics and data management environment that can handle very small problems up to massive ones. JMP is designed to be easy to use and fast, but your data tables need to fit within the memory (or RAM) available on the desktop when you are using it. As noted in Chapter 2, JMP 11 can handle data table sizes up to half the size of your available RAM. When problem sizes exceed these limits, SAS provides a convenient alternative and hosts a robust set of capabilities to handle truly big data. SAS can process any data size into the terabytes and beyond.
SAS is also a very rich and robust environment for analytics and data management. When larger-sized problems appear, or if you are thinking about production-type data management, security, and reporting, SAS provides the tools and means to handle these needs seamlessly.
All materials on the site are licensed Creative Commons Attribution-Sharealike 3.0 Unported CC BY-SA 3.0 & GNU Free Documentation License (GFDL)
If you are the copyright holder of any material contained on our site and intend to remove it, please contact our site administrator for approval.
© 2016-2026 All site design rights belong to S.Y.A.