Using JMP 12 (2015)
Chapter 11. Personalize JMP
Customize Menus, Toolbars, and Add New Features
This chapter describes how to customize JMP menus and toolbars to show only the commands that you need. For example, you might remove the SAS option in the File menu if you do not use SAS. Or you might assign a shortcut key to the Run Script command.
Customizing JMP also lets you set up JMP for groups with special interests. If one group does not design experiments, you could remove DOE from the JMP menu.
Another way to customize JMP is to write add-ins to extend JMP’s functionality. An add-in can be any scriptable option. For example, you could add a Graph menu option that opens two data tables included in the add-in and runs a script to produce a bubble plot.
Contents
Personalize Toolbars and Menus on Windows
Create Toolbars
Create Main Menus
Create Menu Items and Toolbar Buttons
Rearrange Toolbars
Copy and Paste Menus, Menu Items, Toolbars, and Buttons
Rearrange Custom Menus, Menu Items, and Buttons
Delete Custom Items
Show and Hide Items
Import Customizations
Remove Customizations
Personalize Toolbars on Macintosh
Personalize Menu Items on Macintosh
JMP Add-Ins
Personalize Toolbars and Menus on Windows
Toolbars consist of buttons that execute commands and dividers that help you organize the buttons. In Windows, there are many ways to personalize toolbars. For example, you can create, rename, hide, and modify toolbars or buttons. You can also rearrange or delete toolbars and buttons that you create.
Menus consist of commands, submenus, and separators. As with toolbars and buttons, you can create, rename, hide, and modify menus. You can also rearrange or delete menus and menu items that you create.
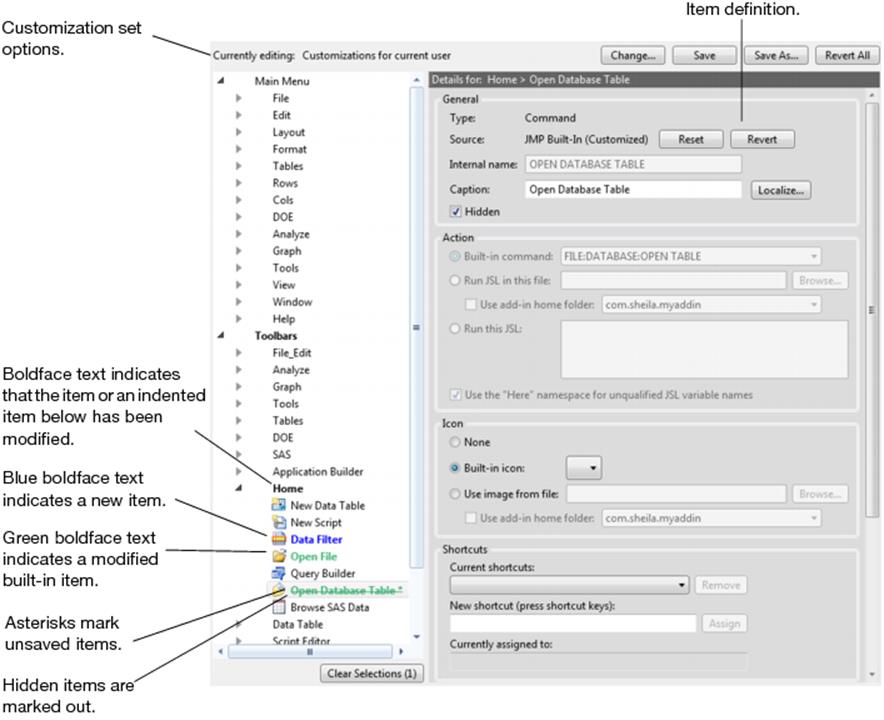
You personalize toolbars and menus in the Menu Editor. The names of modified items are formatted to indicate which items were created, modified, or hidden, and which items are unsaved, as shown in Figure 11.1.
Figure 11.1 Menu Editor Options
Change Customization Sets
JMP gives you the flexibility to specify which users see your customized toolbars and buttons. Your changes are saved in a text file with the .jmpcust extension called a customization set. By default, your customizations are shown only to the current user; other users who log on to the computer and open JMP do not see your personal toolbars and menus.
All customization sets include the built-in JMP buttons and menus. You can also base customization sets on other customization sets. For example, you might create a new customization set that shows the JMP add-in menus and toolbars along with your modifications.
When you modify the Current user customization set, JMP creates a backup file of the set. The file is located in your Windows Users folder within the JMP, JMPPro, or JMPSW folder.
C:\Users\<user name>\AppData\Roaming\SAS\JMP\<version number>\
When you modify the All users customization set, JMP creates a backup file of the set. The file is located in the Windows All Users folder within the JMP, JMPPro, or JMPSW folder.
C:\Users\All Users\SAS\JMP\<version number>\
The All Users folder does not appear when you try to browse for it, so you must type the path into the Windows Explorer address field.
Note: To find the customization set files in Windows Explorer, show all hidden files in the Windows Explorer Folder Options. See your operating system documentation for details.
To change the customization set
1.Select View > Customize > Menus and Toolbars.
The Menu Editor appears.
2.ClickChange.
When you try to change the customization set, and changes to the selected set are not saved, you are prompted to save the changes. Click Save Changes.
3.Select the customization set in theCustomization Set to Modifyarea. (By default, changes apply only to theCurrent usercustomization set.)Table 11.1describes the options.
4.(Optional) To change the set on which the selected customization set is based, select the set in theStarting Setarea. (Not available for theAll userscustomization set.)Table 11.1describes the options.
5.ClickOK.
|
Table 11.1 Customization Set Options |
|
|
Customization Set to Modify |
|
|
Current User |
Only you see the changes. The customization file is called usercust.jmpcust. Modifying this file manually might cause unexpected results. |
|
All users |
All users who open JMP on the computer see the changes. The customization file is called admincust.jmpcust. |
|
JMP Add-In |
Those who use the selected JMP Add-in, and select JMP Add-In customizations as the Starting Set, see the changes. When you modify the customization set for a disabled add-in, those changes do not appear until you enable the add-in. |
|
Other file |
Changes appear when the selected .jmpcust file is chosen as the customization set. You create this file in a text editor. |
|
New |
Changes appear when this new customization is selected. (After you make your changes, click Save to name the new file in the selected folder.) |
|
Starting Set |
|
|
JMP built-in items |
The selected customization set is based on the default JMP toolbars and menus. (Applies to all customization sets and cannot be deselected.) |
|
All Users customizations |
The selected customization set is based on the All users customization set. (Available for the Other file or New customization sets. Cannot be deselected from the Current user customization set.) |
|
JMP Add-In customizations |
The selected customization set is based on the JMP Add-In customizations. The add-in customizations are typically installed with the add-in. (Available for all customization sets except for All users.) |
|
Current User customizations |
The selected customization set is based on the Current user customization set. (Available only for Other file and New customization sets.) |
Create Toolbars
JMP includes toolbars that you can add new buttons to, or you can create your own toolbars. By default, the JMP window type determines which bars appear. For example, the File_Edit toolbar is in all windows. In data tables, the Data Tables toolbar also appears. Table 11.2 describes the toolbars.
|
Table 11.2 JMP Toolbars |
|
|
File_Edit
|
Shows icons for commands found in the File and Edit menus. |
|
Analyze
|
Shows icons for commands found in the Analyze menu. |
|
Graph
|
Shows icons for commands found in the Graph menu. |
|
Tools
|
Shows icons of tools that you can click and use as your cursor. In some windows, the toolbar is hidden. A blue line appears instead. Place your cursor over the blue line to show the toolbar. |
|
Data Table List
|
Shows a list of open data tables. You select a data table in this list to make it the current table. Note that the current table is not necessarily the front window. To bring a table (or any window) to the front, select its name from the list in the Window menu. |
|
Tables
|
Shows icons for commands in the Tables menu. |
|
DOE
|
Shows icons for commands in the DOE menu. |
|
SAS
|
Shows icons for accessing and browsing SAS data and folders, opening SAS Query Builder, creating a new SAS program, submitting data to SAS, opening the SAS log window and output window, and viewing server connections. |
|
Home
|
Shows frequently used icons from the File menu. |
|
Application Builder
|
Shows icons for commands in Application Builder. |
|
Data Table
|
Shows icons for performing common tasks in a data table, such as opening the Data Filter, Fit Model, and Recode windows. |
|
Script Editor
|
Shows icons for running, debugging, and reformatting scripts. |
|
Report
|
Shows icons for opening the Local Data Filter, Column Switcher, and saving a script to the data table. |


Create your own toolbars for frequently used commands that are not included in the default toolbars. You assign a command to the button and can add other properties such as shortcut keys, icons, and JMP Scripting Language (JSL) scripts.
When you want to create a toolbar based on an existing toolbar, make a copy of the existing toolbar and then change settings as necessary. See “Copy and Paste Menus, Menu Items, Toolbars, and Buttons” for details.
Step 1: Create the Toolbar
1.Select View > Customize > Menus and Toolbars.
The Toolbars list appears on the left.
2.(Optional) Change the customization set to control which users see your customizations. See“Change Customization Sets”for details.
3.With the Menu Editor still opened, right-click one of the toolbars, such asFile_Edit.
Select any toolbar, because all new toolbars appear at the end of the Toolbars list.
4.SelectNew Toolbar.
The toolbar is inserted at the end of the list. The toolbar includes an untitled button, because all toolbars must have at least one button.
Step 2: Specify the Caption and Internal Name
Toolbars have several basic properties:
•The caption appears in the View > Toolbars list, which lets you show or hide the toolbar. Give each toolbar a unique name. JMP merges toolbars with the same name after you close and reopen the Menu Editor.
•The internal name, which is case insensitive. JMP identifies the location of an item by its internal name rather than its caption.
To specify these toolbar properties, follow these steps:
1.With the Menu Editor still opened, select the toolbar.
The General properties appear on the right.
2.Enter the internal name next toInternal name.
3.Enter a unique name for the toolbar or button in theCaptionbox.
4.(Optional) To specify the translation for the caption, do the following:
‒Click the Localize button for the item that you want to customize.
‒Select the language.
‒Enter the translation next to Text.
‒Click OK.
5.(Optional) ClickHiddento keep the toolbar hidden after creation.
6.Customize the untitled button as described in“Create Menu Items and Toolbar Buttons”.
7.ClickSaveto save your changes.
Create Main Menus
Add your own menu items to the main menu bar in JMP. These menus appear before or after menus such as File, Edit, and Tables. An untitled command is inserted automatically in the menu, because all menus must have at least one command.
When you want to create a main menu based on an existing menu, make a copy of the existing menu and then change settings as necessary. See “Copy and Paste Menus, Menu Items, Toolbars, and Buttons” for details.
To create a main menu
1.Select View > Customize > Menus and Toolbars.
The Main Menu list appears on the left.
2.(Optional) Change the customization set to control which users see your customizations. See“Change Customization Sets”for details.
3.Right-click the menu next to which you want to add a new menu.
4.SelectInsert BeforeorInsert After.
An untitled menu and a menu item are added to the list.
5.Complete“Step 2: Specify the Caption and Internal Name”to rename the main menu.
6.Customize the menu item as described in“Create Menu Items and Toolbar Buttons”.
7.ClickSaveto save your changes.
Create Menu Items and Toolbar Buttons
Menus consist of the following menu items:
Commands are the items that you click to execute a command (such as Data Table and Script).
Submenus are menu items that you click to reveal more menu options. An example of submenu is New inside the top-level File menu. New is also a submenu because it contains commands (such as Data Table and Script).
Separators (![]() ) are lines that divide or group commands and submenus.
) are lines that divide or group commands and submenus.
The button on a toolbar is considered a type of command, so you also complete the following steps to create new toolbar buttons.
When you want to create a menu item or button based on an existing item, make a copy of the existing item and then change settings as necessary. See “Copy and Paste Menus, Menu Items, Toolbars, and Buttons” for details.
Step 1: Create a New Menu Item or Button
1.Select View > Customize > Menus and Toolbars.
The Menu Editor appears.
2.(Optional) Change the customization set to control which users see your customizations. See“Change Customization Sets”for details.
3.Right-click where you want to add the menu item or button.
A list of possible locations appears.
4.SelectInsert BeforeorInsert After.
The Specify Type window appears.
Figure 11.2 Specify Type Window
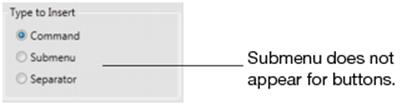
5.Do one of the following:
‒To create a button, select Command.
‒To create a menu within a menu, select Submenu. (Not available for buttons.)
‒To create divider between menu items or toolbar buttons, select Separator.
6.ClickOK.
The new untitled button, submenu, or separator is added.
Step 2: Specify the Caption, Tooltip, and Internal Name
Buttons have several basic properties:
•The caption appears in the View > Toolbars list, which lets you show or hide the toolbar. Give each toolbar a unique name. JMP merges toolbars with the same name after you close and reopen the Menu Editor.
•The tooltip appears when you place the cursor over a menu item or button.
•The internal name, which is case insensitive. JMP identifies the location of an item by its internal name rather than its caption.
Submenu items include many of the same General properties as buttons, except that submenu items do not have tooltips.
To specify these properties, follow these steps:
1.With the Menu Editor still opened, select the menu item or button.
The General properties appear on the right.
2.Enter the internal name next toInternal name.
3.Enter a unique name for the menu item or button in theCaptionbox.
4.Enter a description for button in theTipbox.
5.(Optional) To specify the translation for the caption or tip, do the following:
‒Click the Localize button for the item that you want to customize.
‒Select the language.
‒Enter the translation next to Text.
‒Click OK.
6.Customize the untitled button or menu item as described in the following procedure.
Step 3: Assign Functionality
Clicking a menu item or button either executes a predefined command or runs a JSL script. The script can be stored in a separate file, or you can enter the JSL in the Run this JSL area of the Menu Editor. If users have access to a central location, such as a network, you typically want to run the script from that location. This also simplifies giving users access to updated scripts. Otherwise, store the JSL in the menu item or button definition.
To associate a menu item or button with an add-in JSL script, you have two options:
•Select Run JSL in this file, and then browse to find the external file.
•Type the relative path to the JSL script, and select the add-in from the Use add-in home folder list. For example, the following command runs the mds_application.jsl script from the selected add-in:
$ADDIN_HOME(com.jmp.mdswithr)\mds_application.jsl
In addition, you can select Use the “Here” namespace for unqualified JSL variable names if you include namespaces in the internal or external JSL script. See the Scripting Guide book for details about namespaces.
To assign this functionality, follow these steps:
1.With the Menu Editor still opened, select the menu item or button that you want to modify.
The Action properties appear on the right.
2.Select the action that you want to execute.
3.To run an internal JSL script, delete the placeholder textprint(“Not implemented.”);in theRun this JSLarea and enter the JSL.
4.(Optional) If your internal or external JSL script includes namespaces, clickUse the “Here” namespace for unqualified JSL variable names.
5.ClickSaveto save your changes.
Step 4: Show an Icon on the Menu Item or Button (Optional)
New menu items have no icon next to the item. New buttons show up as blue squares on the toolbars. You can assign a descriptive icon to the menu item or button. The graphic can reside on your computer or in an add-in folder. .ico, .png, .jpg, and .bmp graphics are supported.
Assigning an icon to a button is particularly important. Otherwise, the user must view the button’s tooltip to see what the button does.
To show an icon on the menu item or button, follow these steps:
1.With the Menu Editor still opened, select the menu item or button.
The Icon properties appear on the right.
2.Select one of the following options:
None
Select this option to show a blue square instead of an icon.
Built-in icon
Select this option to show an icon that JMP provides, and then select the icon from the list.
Use image from file
Select this option to show an image that you created. Click Browse, select the graphic, and then click OK. You can also use an icon defined in an add-in. Select Use add-in home folder, and then select the add-in.
3.ClickSaveto save your changes.
Step 5: Assign a Shortcut Key (Optional)
A shortcut key executes an action so that you do not have to select the menu item or click the button on the toolbar. This option is also helpful when the button’s toolbar is not shown, but you still want to execute the action.
Shortcuts begin with CTRL, CTRL+SHIFT, CTRL+ALT and end with a number, letter, or symbol that appears on the keyboard. The Function keys (such as F1) are also supported. Many CTRL + letter and Function shortcuts are already assigned in JMP, but you can reassign them to your buttons if you want.
Shortcut keys appear in menus next to each menu item.
To assign a shortcut key, follow these steps:
1.With the Menu Editor still opened, select the menu item or button.
The Shortcuts properties appear on the right.
2.Do one of the following:
‒To assign a new shortcut, click in the New shortcut area and press the shortcut keys. If the keystrokes then appear in the Currently assign to box, press another combination of shortcut keys. (You do not have to delete the keystrokes before pressing the shortcut keys.)
‒To change a shortcut that you previously specified, click Remove, click in the New shortcut area and press the shortcut keys.
3.ClickAssign.
The shortcut appears in the Current shortcuts list.
4.ClickSaveto save your changes.
To remove a shortcut, select the shortcut and click Remove.
Rearrange Toolbars
On Windows, there are two ways to rearrange toolbars:
•To rearrange toolbars quickly for the current user, drag the toolbar above, below, to the left, or to the right of the adjacent toolbar.
•To specify the new location rather than drag the toolbar, right-click the toolbar and select a position from the Location menu. This method lets you move toolbars to the top or bottom of the window. You can also position the toolbars vertically on the left or right side of the window.
In some windows, the toolbar is hidden by default. Specifying a new location shows the toolbar in all windows of that type. On Windows, you can change the toolbar preferences to always show toolbars. See “Windows Specific” in the “JMP Preferences” chapter
To drag a toolbar
1.Click the left corner of the toolbar until the Move cursor appears.
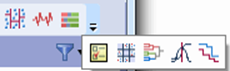
2.Drag the toolbar to the new location. When a toolbar is too wide to show completely, click the arrow to show all of the buttons, as shown inFigure 11.3.
Figure 11.3 Expanding a Toolbar
To position the toolbar
1.Right-click the toolbar that you want to move.
2.SelectLocation, and then select the new position.
Note: After you move a toolbar to the left, right, or bottom positions, you can add other toolbars to the same position. For example, you might relocate the File_Edit toolbar to the right side of the JMP window. To add other toolbars on the right side, right-click the bar and select the toolbar that you want to add.
Copy and Paste Menus, Menu Items, Toolbars, and Buttons
Copying existing items is a shortcut to creating new items in a menu or toolbar. This option lets you change only a few settings in the new item when possible.
To copy and paste menus and menu items
1.Select View > Customize > Menus and Toolbars.
The Menu Editor appears.
2.(Optional) Change the customization set to control which users see your customizations. See“Change Customization Sets”for details.
3.Right-click the menu or menu item that you want to copy and selectCopy.
4.Right-click the menu or menu item before, after, or into which the item will appear and selectPaste.
One of the following occurs:
‒A list of possible locations appears.
‒The menu or menu item appears below the selected item. Skip to step 7.
5.Select the location of the menu by doing one of the following:
‒To paste the item before the selected menu, select Paste before.
‒To paste the menu after the selected menu, select Paste after.
‒To paste the menu inside the selected menu, select Paste into. (Only available when you select a menu as the new location.)
‒To cancel the action, select Cancel.
The item appears as you indicated.
6.Modify the item.
7.ClickSaveto save your changes.
See “Create Main Menus” and “Create Menu Items and Toolbar Buttons” for details about modifying the items.
To copy and paste toolbars and buttons
1.Select View > Customize > Menus and Toolbars.
The Menu Editor appears.
2.(Optional) Change the customization set to control which users see your customizations. See“Change Customization Sets”for details.
3.Right-click the toolbar or button that you want to copy and selectCopy.
4.Do one of the following:
‒To paste a toolbar, right-click Toolbar and select Paste. The toolbar appears at the end of the list of toolbars.
‒To paste a button, right-click the button before or after which you want the new button, and select Paste. If you selected the first button on the toolbar, select the location of the button. Otherwise, the button is pasted below the selected button.
5.Modify the item.
6.ClickSaveto save your changes.
See “Create Toolbars” and “Create Menu Items and Toolbar Buttons” for details about modifying the items.
Rearrange Custom Menus, Menu Items, and Buttons
On Windows, you can rearrange the order of menus, menu items, and buttons that you create. For example, under the File > New menu, you could move your custom menu before the Data Table command.
In the item’s General properties, the Source determines whether you can move the item. You can move items if the Source is Custom Item. Built-in items cannot be moved. Items that are defined in other customization sets can be moved only in that customization set. See “Change Customization Sets” for details.
Note: The right-click menu has options for cutting and pasting items. To cut an item, you can also hold down the CTRL key and press X, or hold down the SHIFT key and press DELETE. To paste, hold down the CTRL key and press V, or hold down the SHIFT key and press INSERT.
To rearrange custom menus and menu items
1.Select View > Customize > Menus and Toolbars.
The Main Menu list appears on the left.
2.Do the following:
‒Select the item that you want to move.
‒Verify that the Source is Custom Item.
‒If the Source is All Users or JMP Add-In, select the specified customization set and verify that the Source is Custom Item.
3.Right-click the custom menu or menu item that you want to move and selectCut.
4.Right-click the new location of the cut item and selectPaste.
One of the following occurs:
‒A list appears with the possible locations of the cut item. This occurs when you select a menu (such as File or New) or the first item in a menu (such as Data Table in the File > New menu).
‒The cut menu item appears below the selected menu item. Skip to step 6.
5.Select the location of the cut item by doing one of the following:
‒To paste the cut item before the selected item, select Paste before.
‒To paste the cut item after the selected item, select Paste after.
‒To paste the cut item inside the selected menu, select Paste into. (Only available when you select a menu as the new location.)
‒To cancel the move, select Cancel.
The item appears as you indicated.
6.ClickSaveto save your changes.
To rearrange custom buttons
1.Select View > Customize > Menus and Toolbars.
The Toolbars list appears on the left.
2.Do the following:
‒Select the custom button that you want to move.
‒Verify that the Source is Custom Item.
‒If the Source is All Users or JMP Add-In, select the specified customization set and verify that the Source is Custom Item.
3.Right-click the custom button that you want to move and selectCut.
4.Right-click the new location of the cut button.
One of the following occurs:
‒A list appears with the possible locations of the cut button. This occurs when you select the first button on the toolbar (such as New Data Table in the File_Edit toolbar).
‒The button is pasted at the end of the toolbar. This occurs when you select the name of the toolbar. For example, when you select File_Edit and paste, the button appears after the last button, Run Script. Skip to step 6.
‒The cut button appears after the selected button. Skip to step 6.
5.Select the location of the cut button by doing one of the following:
‒To paste the cut button before the selected button, select Paste before.
‒To paste the cut button after the selected button, select Paste after.
6.ClickSaveto save your changes.
Delete Custom Items
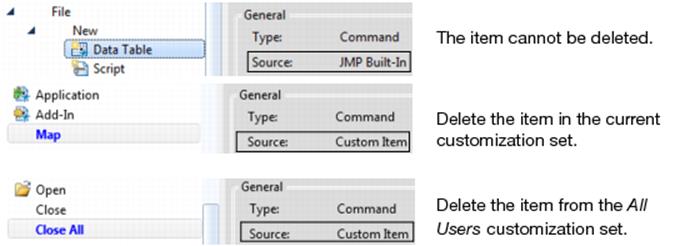
Rather than temporarily showing or hiding toolbars, buttons, menus, and menu items, you can delete items that you created to remove them permanently from JMP. The Source determines whether you can delete the item and which customization set contains the item. Figure 11.4 shows examples of customization Source types.
Figure 11.4 Examples of Customization Sources
Empty menus are not supported. When you delete the only item in a menu, the entire menu is deleted, not just the selected item.
Note: Make sure that you really want to delete custom items. They are removed immediately without confirmation.
To delete a custom item
1.Select View > Customize > Menus and Toolbars.
The Menu Editor appears.
2.Select the item that you want to delete.
3.Verify whether the item can be deleted, and change the customization set, if necessary.
4.Right-click the selected item and selectDelete.
The item is immediately deleted.
5.ClickSave.
Your changes are saved.
Show and Hide Items
In the Menu Editor, you show or hide toolbars, buttons, menus, and menu items in specific customization sets. The item’s Source determines where you show or hide the item. For example:
•When the Source is All Users, change the customization set to All users to hide the item from all users.
•When the Source is JMP Add-In, change the customization set to JMP Add-In followed by the name of the add-in. The item is shown or hidden in all sets that include the selected JMP add-in.
If you do not change the customization set, the item is shown or hidden only in the currently selected set. See “Change Customization Sets” for details about customization sets.
Note: To quickly hide or show toolbars for the current user, select or deselect them from the View > Toolbars list.
To show and hide items in a customization set
1.Select View > Customize > Menus and Toolbars.
The Menu Editor appears.
2.Select the customization set that you want to modify.
3.Select the item that you want to show or hide.
4.Select or deselectHiddenin the General properties. See“Step 2: Specify the Caption and Internal Name”for details about the General properties.
5.ClickSaveto save your changes.
Import Customizations
Changes to toolbars and menus are stored in customization sets, or plain text files. You open a customization set in JMP to import your modified toolbars and menus. The customizations are then shown in the Menu Editor. See “Change Customization Sets” for details about the menu customization files.
To import customizations
1.Select File > Open.
2.In the File name list, selectAll JMP Files(orJMP Menu Files) and then select the customization set.
3.ClickOpen.
A confirmation is displayed, stating that the customizations have been imported. The Menu Editor is also opened.
4.Display the Menu Editor and clickOKto save the changes, or clickCancelto discard them.
Remove Customizations
As you modify items, you discard unsaved changes by clicking the Menu Editor’s Cancel button and clicking Yes to confirm. After saving customizations, you can also remove all customizations and revert to the original menus and toolbars.
To remove all of the current user’s customizations
1.Select View > Customize > Revert to Factory Defaults.
2.ClickYesto remove the current user’s customizations.
When JMP finds customizations from a previous version of JMP, a confirmation appears. Do one of the following:
‒Select No to avoid adding those customizations to the current installation of JMP.
‒Select Yes to add those customizations to the current installation of JMP.
Note: Select Do not ask me again about merging my old menus for JMP to ignore customizations found in a previous JMP version every time you open JMP. However, when you revert toolbars and menus to the factory defaults, you always have the opportunity to merge old menus, whether you previously checked the merging old menus option.
To remove customizations from another customization set
1.Select View > Customize > Menus and Toolbars.
The Menu Editor appears.
2.ClickChange.
3.Select the customization set, and clickOK.
4.ClickRevert All.
A confirmation window appears.
5.ClickYesto remove your customizations.
To remove customizations from the selected item
1.Select View > Customize > Menus and Toolbars.
The Menu Editor appears.
2.(Optional) Select the customization set that contains the item.
3.Select the item that you want to modify.
4.Do one of the following:
‒To restore the previous properties of an unsaved item, click Reset.
‒To restore the original properties of a built-in item, click Revert All, and then click Yes to confirm.
5.ClickSaveto save your changes.
Personalize Toolbars on Macintosh
On the Macintosh, you can set up toolbars to display only the icons that you need. Icons are available based on the type of window. For example, in a script window, icons for options such as reformatting, encrypting, and running the script are available. Table icons are available only for data table toolbars.
You can specify whether the icon, icon and icon name, or just the name appear on the toolbar. Displaying small icons is also an option.
To add, remove, or rearrange toolbar icons
1.Open the type of window whose toolbar you want to customize.
2.SelectView > Customize Toolbar.
A window appears that shows icons relevant to the current type of window.
3.Do any of the following:
‒To add an icon to the toolbar, drag the icon from the window onto the toolbar.
‒To move an icon on the toolbar, drag the icon to its new location onto the toolbar.
‒To remove an icon from the toolbar, drag the icon from the toolbar onto the window.
Your changes are applied to the current window and all open windows of the same type.
Figure 11.5 Add, Rearrange, and Remove Toolbar Buttons on the Macintosh
4.ClickDone.
When a toolbar is too wide to display completely, click the right arrows on the toolbar to show and then select other icons. Alternatively, you can click and drag the window until the entire toolbar appears.
Note: To display the original set of toolbar icons, drag the default set from the bottom of the toolbar customization window to the toolbar.
To change the appearance of toolbar icons
1.Open the type of window whose toolbar you want to customize.
2.SelectView > Customize Toolbar.
A window containing toolbar icons appears.
3.At the bottom of the window, select one of the following options from the Show list:
‒To display only an icon, select Icon.
‒To display an icon and its name, select Icon and Text.
‒To display only the icon name, select Text.
4.To display small or standard icons, select or deselectUse small size.
Your changes are applied to the current window and all open windows of the same type.
5.ClickDone.
Personalize Menu Items on Macintosh
Customize JMP menus to quickly access files or modify existing menu items. Selecting a menu item runs a JSL script from your computer or executes the JSL commands that you specify. For example, you can create a menu item to open a frequently used script. This option is an alternative to adding the script as a favorite on the Home Window.
Features include adding and renaming menu items, hiding menu items, inserting menu item separators, and associating a menu item with JSL.
JMP customizations are stored in <username>/Library/Application Support/JMP/<version>/usercust.jmpcust.
Note: You cannot delete default JMP menus or delete submenus (which open to reveal other menu items). Default and custom submenus also cannot be renamed.
Example of Adding a Menu Item
In this example, create a menu item that runs a script.
1.Select View > Customize Menus.
2.SelectFile > Open.
3.Press Control and then selectAdd New Menu Item after.
4.TypeWhat is the Current Time?in the New Item Label box.
5.SelectRun JSL in this file:and selectLibrary/Application Support/JMP/12/Scripts/timeAnnouncer.jsl.
6.ClickAdd ItemandClose.
7.SelectFile > What is the Current Time?.
The Scheduler window appears, and the current time is spoken.
Example of Adding a Submenu Item
A submenu opens to reveal submenu items. In this example, create a submenu item that opens a data table.
1.Select View > Customize Menus.
2.In the JMP Menu Editor, selectFile > Open.
3.Press Control and selectAdd New Submenu after.
4.Type Open My Data Tables and selectJSL Commands.
Note: Selecting JSL Script lets you select a JSL script from your computer.
5.ClickAdd Item.
6.SelectOpen My Data Tables, deleteSubitem placeholderin the Menu Label box, and then type Open Exercise Log.jmp.
7.In the Run this JSL box, typeOpen("$SAMPLE_DATA/Napoleons March.jmp");.
8.ClickSave.
9.Select theFilemenu to see the new menu item.
Tip: If the new menu item appears in the menu but not the menu editor, close the menu editor window and reopen it.
To delete a custom menu or submenu item
•Delete one custom menu item by selecting the item and selecting Delete Selection from the options list.
•Delete all custom menu items by selecting Revert All from the options list.
•To delete items within a submenu, you must delete the entire submenu. Empty menus are not permitted. Select the submenu and select Delete Selection from the options list.
JMP Add-Ins
Experienced JSL script writers can create scripts that extend JMP in many ways (for example, add a custom analytical tool or a user interface to communicate with a database). The JMP add-in architecture simplifies deploying and using these complicated scripts.
You can send co-workers a suite of scripts and tell them how to run them. Another option is sending a single add-in file that any JMP user can install and then use just like any other part of JMP.
As a JMP user, you might be given add-ins to use by co-workers. You can also find add-ins on the JMP Web site at http://www.jmp.com/addins.
Note: Developing add-ins requires experience with JMP scripting, and the process is discussed at length in the Scripting Guide.
Manage JMP Add-Ins
Install Add-Ins
A JMP add-in is a file that has the .jmpaddin extension. You can install it in one of two ways:
1.Select File > Open.
2.Navigate to the.jmpaddinfile and select it.
3.ClickOpen.
Or, you can double-click the .jmpaddin file.
View Your Add-Ins
Select View > Add-Ins to see the add-ins that you have already installed.
Update Add-Ins
If you are given an update to an add-in you already have installed, you can just install the update as you did the original add-in. Doing so overwrites the old version with the new one.
Disable, Enable, and Remove Add-Ins
To temporarily disable an add-in without removing it
1.Select View > Add-Ins.
2.Select the add-in that you want to disable.
3.Deselect theEnabledcheck box.
To enable a disabled add-in
1.Select View > Add-Ins.
2.Select the add-in that you want to enable.
3.Select theEnabledcheck box.
To unregister an add-in
1.Select View > Add-Ins.
2.Select the add-in that you want to remove.
3.ClickUnregister.