Hadoop MapReduce v2 Cookbook, Second Edition (2015)
Chapter 6. Hadoop Ecosystem – Apache Hive
In this chapter, we will cover the following recipes:
· Getting started with Apache Hive
· Creating databases and tables using Hive CLI
· Simple SQL-style data querying using Apache Hive
· Creating and populating Hive tables and views using Hive query results
· Utilizing different storage formats in Hive – storing table data using ORC files
· Using Hive built-in functions
· Hive batch mode – using a query file
· Performing a join with Hive
· Creating partitioned Hive tables
· Writing Hive User-defined Functions (UDF)
· HCatalog – performing Java MapReduce computations on data mapped to Hive tables
· HCatalog – Writing data to Hive tables from Java MapReduce computations
Introduction
Hadoop has a family of projects that are either built on top of Hadoop or work very closely with Hadoop. These projects have given rise to an ecosystem that focuses on large-scale data processing, and often, users can use several of these projects in combination to solve their use cases. This chapter introduces Apache Hive, which provides data warehouse capabilities on top of the data stored in HDFS. Chapter 7, Hadoop Ecosystem II – Pig, HBase, Mahout, and Sqoop introduces a few other key projects in the Hadoop ecosystem.
Apache Hive provides an alternative high-level language layer to perform large-scale data analysis using Hadoop. Hive allows users to map the data stored in HDFS into tabular models and process them using HiveQL, the SQL-like language layer, to query very large datasets using Hadoop. HiveQL can be used to perform ad-hoc querying of datasets as well as for data summarizations and to perform data analytics. Due to its SQL-like language, Hive is a natural choice for users who are experienced with data warehousing using relational databases.
Hive translates the HiveQL queries to one or more MapReduce computations that perform the actual work. Hive allows us to define the structure on existing datasets using table schemas. However, Hive imposes this structure on the data only at the time of reading and processing the data (schema on read).
Hive is very good for analyzing very large datasets due to the large aggregate throughput it can achieve using the parallelism of the Hadoop cluster. However, Hive is not optimal for analyzing smaller datasets or for interactive queries due to the relatively high latencies of running MapReduce computations. Hive provides good scalability and fault tolerance capabilities through the use of MapReduce and HDFS underneath. Hive does not support transactions or row-level updates of data.
This chapter also introduces HCatalog, which is a component of Hive that provides a metadata abstraction layer for data stored in HDFS, making it easy for different components of the Hadoop ecosystem to process those data. HCatalog abstraction is based on a tabular model and augments structure, location, and other metadata information for the HDFS data. With HCatalog, we can use data processing tools such as Pig, Java MapReduce, and others without worrying about the structure, storage format, or the storage location of the data.
Tip
Sample code
The example code and data files for this book are available on GitHub at https://github.com/thilg/hcb-v2. The chapter6 folder of the code repository contains the sample code for this chapter.
Sample codes can be compiled and built by issuing the gradle build command in the chapter6 folder of the code repository. Project files for the Eclipse IDE can be generated by running the gradle eclipse command in the main folder of the code repository. Project files for IntelliJ IDEA IDE can be generated by running the gradle idea command in the main folder of the code repository.
In this chapter, we use the Book Crossing dataset as the sample data. This dataset is compiled by Cai-Nicolas Ziegler, and comprises a list of books, users, and ratings. The Resources folder of the source repository for this chapter contains a sample of the dataset. You can obtain the full dataset from http://www2.informatik.uni-freiburg.de/~cziegler/BX/.
Getting started with Apache Hive
In order to install Hive, we recommend that you use a freely available commercial Hadoop distribution as described in Chapter 1, Getting Started with Hadoop v2. Another alternative is to use Apache Bigtop to install Hive. Refer to the Bigtop-related recipe inChapter 1, Getting Started with Hadoop v2 for steps on installation of Hive using the Apache Bigtop distribution.
How to do it...
This section describes how to get started with Hive.
1. If you already have a working Hive installation, start the Hive Command Line Interface (CLI) by executing hive in the command prompt and skip to step 4:
2. $ hive
3. In case you don't have a working Hive and Hadoop installation, the following couple of steps will guide you on how to install Hive with the MapReduce local mode. This is recommended only for learning and testing purposes. Download and extract the latest Hive version from http://hive.apache.org/releases.html:
4. $ tar -zxvf hive-0.14.0.tar.gz
5. Start Hive by running the following commands from the extracted Hive folder:
6. $ cd hive-0.14.0
7. $ bin/hive
8. Optionally, you can set the following Hive property to enable Hive to print headers when displaying the results for the queries in Hive CLI:
9. hive> SET hive.cli.print.header=true;
10. Optionally, create a .hiverc file in your home directory. Hive CLI will load this as an initialization script whenever you start the Hive CLI. You can set any customization properties such as enabling print headers (step 4) in this file. Other common usages of this file include switching to a Hive database and to register any libraries and custom UDFs (refer to the Writing Hive User-defined Functions recipe to learn more about UDFs) that you'll be using regularly.
See also
Refer to https://cwiki.apache.org/confluence/display/Hive/Configuration+Properties for a complete list of configuration properties provided by Hive.
Creating databases and tables using Hive CLI
This recipe walks you through the commands to create Hive databases and tables using the Hive CLI. Hive tables are used to define structure (schema) and other metadata information such as the location and storage format on datasets stored in HDFS. These table definitions enable the data processing and analysis using the Hive query language. As we discussed in the introduction, Hive follows a "schema on read" approach, where it imposes this structure only when reading and processing the data.
Getting ready
For this recipe, you need a working Hive installation.
How to do it...
This section depicts how to create a Hive table and how to perform simple queries on the Hive tables:
1. Start the Hive CLI by running the following command:
2. $ hive
3. Execute the following command to create and use a Hive database for the Book-Crossing dataset mentioned in the introduction:
4. hive> CREATE DATABASE bookcrossing;
5. hive> USE bookcrossing;
6. Use the following command to view the details and the filesystem's location of the database:
7. hive> describe database bookcrossing;
8. OK
9. bookcrossing hdfs://……/user/hive/warehouse/bookcrossing.db
10. Let's create a table to map the user information data by running the following command in the Hive CLI. A table will be created inside the Book-Crossing database:
11.CREATE TABLE IF NOT EXISTS users
12. (user_id INT,
13. location STRING,
14. age INT)
15.COMMENT 'Book Crossing users cleaned'
16.ROW FORMAT DELIMITED
17.FIELDS TERMINATED BY '\073'
18.STORED AS TEXTFILE;
19. Let's use the LOAD command to load the data to the table. The LOAD command copies the file to the Hive warehouse location in HDFS. Hive does not perform any data validation or data parsing at this step. Please note that the OVERWRITE clause in the Load command will overwrite and delete any old data that is already in the table:
20.hive> LOAD DATA LOCAL INPATH 'BX-Users-prepro.txt' OVERWRITE INTO TABLE users;
21.Copying data from file:/home/tgunarathne/Downloads/BX-Users-prepro.txt
22.Copying file: file:/home/tgunarathne/Downloads/BX-Users-prepro.txt
23.Loading data to table bookcrossing.users
24.Deleted /user/hive/warehouse/bookcrossing.db/users
25.Table bookcrossing.users stats: [num_partitions: 0, num_files: 1, num_rows: 0, total_size: 10388093, raw_data_size: 0]
26.OK
27.Time taken: 1.018 seconds
28. Now, we can run a simple query to inspect the data in the created table. At this point, Hive parses the data using formats defined in the table definition and performs the processing specified by the query:
29.hive> SELECT * FROM users LIMIT 10;
30.OK
31.1 nyc, new york, usa NULL
32.2 stockton, california, usa 18
33.3 moscow, yukon territory, russia NULL
34.………
35.10 albacete, wisconsin, spain 26
36.Time taken: 0.225 seconds, Fetched: 10 row(s)
37. Use the following command to view the columns of a Hive table:
38.hive> describe users;
39.OK
40.user_id int None
41.location string None
42.age int None
43.Time taken: 0.317 seconds, Fetched: 3 row(s)
How it works...
When we run Hive, we first define a table structure and load the data from a file into the Hive table. It is worth noting that the table definition must match the structure of the input data. Any type mismatches will result in NULL values, and any undefined columns will be truncated by Hive. The LOAD command copies the files into the Hive warehouse location without any changes, and these files will be managed by Hive. Table schema will be enforced on the data only when the data is read by Hive for processing:
CREATE TABLE IF NOT EXISTS users
(user_id INT,
location STRING,
age INT)
COMMENT 'Book Crossing users cleaned'
ROW FORMAT DELIMITED
FIELDS TERMINATED BY '\073'
STORED AS TEXTFILE;
Please note that Hive table and column names are case insensitive. The preceding table will be created in the bookcrossing database as we issued the use bookcrossing command before issuing the create table command. Alternatively, you can also qualify the table name with the database name as bookcrossing.users. ROW FORMAT DELIMITED instructs Hive to use the native SerDe (Serializer and Deserializer classes, which are used by Hive to serialize and deserialize data) with delimited fields. In the dataset used for the preceding table, the fields are delimited using the ; character, which is specified using \073 because it is a reserved character in Hive. Finally, we instruct Hive that the data file is a text file. Refer to the Utilizing different storage formats in Hive - storing table data using ORC files recipe for more information on the different storage format options supported by Hive.
There's more...
In this section, we explore Hive data types, Hive External tables, collection data types, and more about the describe command.
Hive data types
A list of Hive data types that can be used to define the table columns can be found from https://cwiki.apache.org/confluence/display/Hive/LanguageManual+Types. These include simple data types such as TINYINT(1-byte signed integer), INT (4-byte signed integer), BIGINT (8-byte signed integer), DOUBLE (8-byte double precision floating point), TIMESTAMP, DATE, STRING, BOOLEAN, and several others.
Hive supports several complex collection data types such as arrays and maps as table column data types as well. Hive contains several built-in functions to manipulate the arrays and maps. One example is the explode() function, which outputs the items of an array or a map as separate rows. Refer to the Using Hive built-in functions recipe for more information on how to use Hive functions.
Hive external tables
Hive external tables allow us to map a dataset in HDFS to a Hive table without letting Hive manage the dataset. Datasets for external tables will not get moved to the Hive default warehouse location.
Also, dropping an external table will not result in the deletion of the underlying dataset, as opposed to dropping a regular Hive table, where the dataset would get deleted. This is a useful feature when you want to prevent accidental deletion of data:
1. Copy the BX-Books-prepro.txt file to a directory in the HDFS:
2. $ hdfs dfs -mkdir book-crossing
3. $ hdfs dfs -mkdir book-crossing/books
4. $ hdfs dfs -copyFromLocal BX-Books-prepro.txt book-crossing/books
5. Start the Hive CLI by running the following command and then use the Book-Crossing database:
6. $ hive
7. Hive> use bookcrossing;
8. Create an external table to map the book information data by running the following command in the Hive CLI:
9. CREATE EXTERNAL TABLE IF NOT EXISTS books
10. (isbn INT,
11. title STRING,
12. author STRING,
13. year INT,
14. publisher STRING,
15. image_s STRING,
16. image_m STRING,
17. image_l STRING)
18. COMMENT 'Book crossing books list cleaned'
19. ROW FORMAT DELIMITED
20. FIELDS TERMINATED BY '\073'
21. STORED AS TEXTFILE
22. LOCATION '/user/<username>/book-crossing/books';
23. Use the following query to inspect the data of the newly created table:
24.hive> select * from books limit 10;
25.OK
26.195153448 Classical Mythology Mark P. O. Morford 2002 Oxford University Press http://images.amazon.com/images/P/0195153448.01.THUMBZZZ.jpg http://images.amazon.com/images/P/0195153448.01.MZZZZZZZ.jpg http://images.amazon.com/images/P/0195153448.01.LZZZZZZZ.jpg
27. Drop the table using the following command:
28.hive> drop table books;
29.OK
30.Time taken: 0.213 seconds
31. Inspect the data files in HDFS using the following command. Even though the table is dropped, the data files still exist:
32.$ hdfs dfs -ls book-crossing/books
33.Found 1 items
34.-rw-r--r-- 1 tgunarathne supergroup 73402860 2014-06-19 18:49 /user/tgunarathne/book-crossing/books/BX-Books-prepro.txt
Using the describe formatted command to inspect the metadata of Hive tables
You can use the describe command to inspect the basic metadata of the Hive tables. The describe extended command will print additional metadata information including the data location, input format, created time, and the like. The describe formatted command presents this metadata information in a more user-friendly manner:
hive> describe formatted users;
OK
# col_name data_type comment
user_id int None
location string None
age int None
# Detailed Table Information
Database: bookcrossing
Owner: tgunarathne
CreateTime: Mon Jun 16 02:19:26 EDT 2014
LastAccessTime: UNKNOWN
Protect Mode: None
Retention: 0
Location: hdfs://localhost:8020/user/hive/warehouse/bookcrossing.db/users
Table Type: MANAGED_TABLE
Table Parameters:
comment Book Crossing users cleaned
numFiles 1
numPartitions 0
numRows 0
rawDataSize 0
totalSize 10388093
transient_lastDdlTime 1402900035
# Storage Information
SerDe Library: org.apache.hadoop.hive.serde2.lazy.LazySimpleSerDe
……
Time taken: 0.448 seconds, Fetched: 35 row(s)
Simple SQL-style data querying using Apache Hive
We can query the datasets that have been mapped to Hive tables using HiveQL, which is similar to SQL. These queries can be simple data-exploration operations such as counts, orderby, and group by as well as complex joins, summarizations, and analytic operations. In this recipe, we'll explore simple data exploration Hive queries. The subsequent recipes in this chapter will present some of the advanced querying use cases.
Getting ready
Install Hive and follow the earlier Creating databases and tables using Hive CLI recipe.
How to do it...
This section demonstrates how to perform a simple SQL-style query using Hive.
1. Start Hive by issuing the following command:
2. $ hive
3. Issue the following query in the Hive CLI to inspect the users aged between 18 and 34. Hive uses a MapReduce job in the background to perform this data-filtering operation:
4. hive> SELECT user_id, location, age FROM users WHERE age>18 and age <34 limit 10;
5. Total MapReduce jobs = 1
6. Launching Job 1 out of 1
7. ……
8. 10 albacete, wisconsin, spain 26
9. 13 barcelona, barcelona, spain 26
10.….
11.Time taken: 34.485 seconds, Fetched: 10 row(s)
12. Issue the following query in the Hive CLI to count the total number of users that satisfy the above conditions (that is, whose ages are between 18 and 34). Hive converts this query to a MapReduce computation to calculate the result:
13.hive> SELECT count(*) FROM users WHERE age>18 and age <34;
14.Total MapReduce jobs = 1
15.Launching Job 1 out of 1
16.…………
17.2014-06-16 22:53:07,778 Stage-1 map = 100%, reduce = 100%,
18.…………
19.Job 0: Map: 1 Reduce: 1 Cumulative CPU: 5.09 sec HDFS Read: 10388330 HDFS Write: 6 SUCCESS
20.Total MapReduce CPU Time Spent: 5 seconds 90 msec
21.OK
22.74339
23.Time taken: 53.671 seconds, Fetched: 1 row(s)
24. The following query counts the number of users grouped by their age:
25.hive> SELECT age, count(*) FROM users GROUP BY age;
26.Total MapReduce jobs = 1
27.………
28.Job 0: Map: 1 Reduce: 1 Cumulative CPU: 3.8 sec HDFS Read: 10388330 HDFS Write: 1099 SUCCESS
29.Total MapReduce CPU Time Spent: 3 seconds 800 msec
30.OK
31.….
32.10 84
33.11 121
34.12 192
35.13 885
36.14 1961
37.15 2376
38. The following query counts the number of users by their age and orders the result by the descending order of the number of users:
39.hive> SELECT age, count(*) as c FROM users GROUP BY age ORDER BY c DESC;
40.Total MapReduce jobs = 2
41.…..
42.Job 0: Map: 1 Reduce: 1 Cumulative CPU: 5.8 sec HDFS Read: 10388330 HDFS Write: 3443 SUCCESS
43.Job 1: Map: 1 Reduce: 1 Cumulative CPU: 2.15 sec HDFS Read: 3804 HDFS Write: 1099 SUCCESS
44.Total MapReduce CPU Time Spent: 7 seconds 950 msec
45.OK
46.NULL 110885
47.24 5683
48.25 5614
49.26 5547
50.23 5450
51.27 5373
52.28 5346
53.29 5289
54.32 4778
How it works...
You can use the explain command to view the execution plan of a Hive query. This is useful in identifying the bottlenecks of large-scale queries and in optimizing them. The following is the execution plan of one of the queries we used in the previous recipe. As you can see, this query resulted in a single MapReduce computation followed by a data output stage:
hive> EXPLAIN SELECT user_id, location, age FROM users WHERE age>18 and age <34 limit 10;
OK
ABSTRACT SYNTAX TREE:
…
STAGE PLANS:
Stage: Stage-1
Map Reduce
Alias -> Map Operator Tree:
users
TableScan
alias: users
Filter Operator
predicate:
expr: ((age > 18) and (age < 34))
type: boolean
Select Operator
expressions:
expr: user_id
type: int
expr: location
type: string
expr: age
type: int
outputColumnNames: _col0, _col1, _col2
Limit
File Output Operator
compressed: false
GlobalTableId: 0
table:
input format: org.apache.hadoop.mapred.TextInputFormat
output format: org.apache.hadoop.hive.ql.io.HiveIgnoreKeyTextOutputFormat
Stage: Stage-0
Fetch Operator
limit: 10
There's more...
Hive provides several operators for the ordering of query results, with subtle differences and performance trade-offs:
· ORDER BY: This guarantees the global ordering of the data using a single reducer. However, for any non-trivial amount of result data, the use of a single reducer will significantly slow down your computation.
· SORT BY: This guarantees the local ordering of data that is output by each reduce task. However, the reduce tasks would contain overlapping data ranges.
· CLUSTER BY: This distributes the data to reduce tasks, avoiding any range overlaps, and each reduce task will output the data in a sorted order. This ensures the global ordering of data, even though the result will be stored in multiple files.
Refer to http://stackoverflow.com/questions/13715044/hive-cluster-by-vs-order-by-vs-sort-by for a more detailed explanation on the differences of the above mentioned operators.
Using Apache Tez as the execution engine for Hive
Tez is a new execution framework built on top of YARN, which provides a lower-level API (directed acyclic graphs) than MapReduce. Tez is more flexible and powerful than MapReduce. Tez allows applications to improve performance by utilizing more expressive execution patterns than the MapReduce pattern. Hive supports the Tez execution engine as a substitute for the background MapReduce computations, where Hive would convert the Hive queries into Tez execution graphs, resulting in much-improved performance. You can perform the following procedures:
· You can instruct Hive to use Tez as the execution engine by setting the following hive property:
· hive> set hive.execution.engine=tez;
· You can switch back to MapReduce as the execution engine as follows:
· hive> set hive.execution.engine=mr;
See also
Refer to https://cwiki.apache.org/confluence/display/Hive/LanguageManual+Select for a list of clauses and features supported by the Hive select statement.
Creating and populating Hive tables and views using Hive query results
Hive allows us to save the output data of Hive queries by creating new Hive tables. We can also insert the resultant data of a Hive query into another existing table as well.
Getting ready
Install Hive and follow the Creating databases and tables using Hive CLI recipe.
How to do it...
The following steps show you how to store the result of a Hive query into a new Hive table:
1. Issue the following query to save the output of the query of step 3 of the preceding recipe to a table named tmp_users:
2. hive> CREATE TABLE tmp_users AS SELECT user_id, location, age FROM users WHERE age>18 and age <34;
3. …
4. Table bookcrossing.tmp_users stats: [num_partitions: 0, num_files: 1, num_rows: 0, total_size: 2778948, raw_data_size: 0]
5. 74339 Rows loaded to hdfs://localhost:8020/tmp/hive-root/hive_2014-07-08_02-57-18_301_5868823709587194356/-ext-10000
6. Inspect the data of the newly created table using the following command:
7. hive> select * from tmp_users limit 10;
8. OK
9. 10 albacete, wisconsin, spain 26
10.13 barcelona, barcelona, spain 26
11.18 rio de janeiro, rio de janeiro, brazil 25
12. Hive also allows us to insert the result of the Hive queries into an existing table as follows. Issue the following query to load the output data of the following query to the tmp_users Hive table:
13.hive> INSERT INTO TABLE tmp_users SELECT user_id, location, age FROM users WHERE age>33 and age <51;
14.Total MapReduce jobs = 3
15.Launching Job 1 out of 3
16.…….
17.Loading data to table bookcrossing.tmp_users
18.Table bookcrossing.tmp_users stats: [num_partitions: 0, num_files: 2, num_rows: 0, total_size: 4717819, raw_data_size: 0]
19.52002 Rows loaded to tmp_users
20. You can also create a view in an existing table using a query as follows. The view can function as a regular table for query purposes, but the content of the view would get computed only on demand by Hive:
21.hive> CREATE VIEW tmp_users_view AS SELECT user_id, location, age FROM users WHERE age>18 and age <34;
Utilizing different storage formats in Hive - storing table data using ORC files
In addition to the simple text files, Hive also supports several other binary storage formats that can be used to store the underlying data of the tables. These include row-based storage formats such as Hadoop SequenceFiles and Avro files as well as column-based (columnar) storage formats such as ORC files and Parquet.
Columnar storage formats store the data column-by-column, where all the values of a column will be stored together as opposed to a row-by-row manner in row-based storages. For example, if we store the users table from our previous recipe in a columnar database, all the user IDs will be stored together and all the locations will be stored together. Columnar storages provide better data compression as it's easy to compress similar data of the same type that are stored together. Columnar storages also provide several performance improvements for Hive queries as well. Columnar storages allow the processing engine to skip the loading of data from columns that are not needed for a particular computation and also make it much faster to perform column-level analytical queries (for example, calculating the maximum age of the users).
In this recipe, we store the data from the users table of the Creating databases and tables using Hive CLI recipe into a Hive table stored in the ORC file format.
Getting ready
Install Hive and follow the Creating databases and tables using Hive CLI recipe.
How to do it...
The following steps show you how to create a Hive table stored using the ORC file format:
1. Execute the following query in Hive CLI to create a user's table stored using the ORC file format:
2. hive> USE bookcrossing;
3.
4. hive> CREATE TABLE IF NOT EXISTS users_orc
5. (user_id INT,
6. location STRING,
7. age INT)
8. COMMENT 'Book Crossing users table ORC format'
9. STORED AS ORC;
10. Execute the following command to insert the data into the newly created table. We have to populate the data using our earlier created table as we can't load text files directly to the ORC file or other storage format tables:
11.hive> INSERT INTO TABLE users_orc
12. SELECT *
13. FROM users;
14. Execute the following query to inspect the data in the users_orc table:
15.Hive> select * from users_orc limit 10;
How it works...
The STORED AS ORC phrase in the following command informs Hive that the data for this table will be stored using ORC files. You can use STORED AS PARQUET to store the table data using the Parquet format, and STORED AS AVRO to store the data using Avro files:
CREATE TABLE IF NOT EXISTS users_orc
(user_id INT,
location STRING,
age INT)
STORED AS ORC;
Using Hive built-in functions
Hive provides many built-in functions to aid us in the processing and querying of data. Some of the functionalities provided by these functions include string manipulation, date manipulation, type conversion, conditional operators, mathematical functions, and many more.
Getting ready
This recipe assumes that the earlier recipe has been performed. Install Hive and follow the earlier recipe if you have not done already.
How to do it...
This section demonstrates how to use the parse_url Hive function to parse the content of a URL:
1. Start Hive CLI by running the following command:
2. $ hive
3. Issue the following command to obtain the FILE portion of the small image associated with each book:
4. hive> select isbn, parse_url(image_s, 'FILE') from books limit 10;
5. Total MapReduce jobs = 1
6. …..
7. OK
8. 0195153448 /images/P/0195153448.01.THUMBZZZ.jpg
9. 0002005018 /images/P/0002005018.01.THUMBZZZ.jpg
10.0060973129 /images/P/0060973129.01.THUMBZZZ.jpg
11.……
12.Time taken: 17.183 seconds, Fetched: 10 row(s)
How it works...
The parse_url function gets invoked for each data record selected by the preceding query:
parse_url(string urlString, string partToExtract)
The parse_url function parses the URL given by the urlString parameter and supports HOST, PATH, QUERY, REF, PROTOCOL, AUTHORITY, FILE, and USERINFO as the partToExtract parameter.
There's more...
You can issue the following command in the Hive CLI to see the list of functions supported by your Hive installation:
hive> show functions;
You can use the describe <function_name> and describe extended <function_name> commands in the Hive CLI as follows to access the help and usage for each of the functions. For example:
hive> describe function extended parse_url;
OK
parse_url(url, partToExtract[, key]) - extracts a part from a URL
Parts: HOST, PATH, QUERY, REF, PROTOCOL, AUTHORITY, FILE, USERINFO
key specifies which query to extract
Example:
> SELECT parse_url('http://facebook.com/path/p1.php?query=1', 'HOST') FROM src LIMIT 1;
'facebook.com'
> SELECT parse_url('http://facebook.com/path/p1.php?query=1', 'QUERY') FROM src LIMIT 1;
'query=1'
> SELECT parse_url('http://facebook.com/path/p1.php?query=1', 'QUERY', 'query') FROM src LIMIT 1;
'1'
See also
Hive provides many different categories of functions, including mathematical, date manipulation, string manipulation, and many more. Refer to https://cwiki.apache.org/confluence/display/Hive/LanguageManual+UDF for a complete list of functions provided by Hive.
See the Writing Hive User-defined Functions (UDF) recipe for information on writing your own function to use with Hive queries.
Hive batch mode - using a query file
In addition to the Hive interactive CLI, Hive also allows us to execute our queries in the batch mode, using a script file. In this recipe, we use a Hive script file to create books, users, and ratings tables of the Book-Crossing dataset and to load the data into the newly created tables.
How to do it...
This section demonstrates how to create tables and load data using a Hive script file. Proceed with the following steps:
1. Extract the data package provided in the source repository of this chapter:
2. $ tar –zxvf chapter6-bookcrossing-data.tar.gz
3. Locate the create-book-crossing.hql Hive query file in the Hive-scripts folder of the source repository for this chapter. Execute this Hive script file as follows by providing the location of the extracted data package for the DATA_DIR parameter. Please note that the execution of the following script file will overwrite any existing data in users, books, and ratings tables, if these exist beforehand, of the Book-Crossing database:
4. $ hive \
5. -hiveconf DATA_DIR=…/hcb-v2/chapter6/data/ \
6. -f create-book-crossing.hql
7. ……
8. Copying data from file:……/hcb-v2/chapter6/data/BX-Books-Prepro.txt
9. ……
10.Table bookcrossing.books stats: [num_partitions: 0, num_files: 1, num_rows: 0, total_size: 73402860, raw_data_size: 0]
11.OK
12.……
13.OK
14.Time taken: 0.685 seconds
15. Start the Hive CLI and issue the following commands to inspect the tables created by the preceding script:
16.$ hive
17.hive> use bookcrossing;
18.……
19.hive> show tables;
20.OK
21.books
22.ratings
23.users
24.Time taken: 0.416 seconds, Fetched: 3 row(s)
25.hive> select * from ratings limit 10;
26.OK
27.276725 034545104X 0
28.276726 0155061224 5
29.276727 0446520802 0
How it works...
The hive –f <filename> option executes the HiveQL queries contained in the given file in a batch mode. With the latest Hive versions, you can even specify a file in HDFS as the script file for this command.
The create-book-crossing.hql script contains the commands to create the Book-Crossing database and to create and load data to users, books, and ratings tables:
CREATE DATABASE IF NOT EXISTS bookcrossing;
USE bookcrossing;
CREATE TABLE IF NOT EXISTS books
(isbn STRING,
title STRING,
author STRING,
year INT,
publisher STRING,
image_s STRING,
image_m STRING,
image_l STRING)
COMMENT 'Book crossing books list cleaned'
ROW FORMAT DELIMITED
FIELDS TERMINATED BY '\073'
STORED AS TEXTFILE;
LOAD DATA LOCAL INPATH '${hiveconf:DATA_DIR}/BX-Books-Prepro.txt' OVERWRITE INTO TABLE books;
You can set properties and pass parameters to Hive script files using the –hiveconf <property-name>=<property-value> option when invoking the Hive command. You can refer to these properties inside the script using ${hiveconf:<property-name>}. Such property usages inside the Hive queries will get substituted by the value of that property before the query executes. An example of this can be seen in the current recipe where we used the DATA_DIR property to pass the location of the data files to the Hive script. Inside the scripts, we used the value of this property using ${hiveconf:DATA_DIR}.
The –hiveconf option can be used to set Hive configuration variables as well.
There's more...
You can use the hive –e '<query>' option to run a batch mode Hive query directly from the command line. The following is an example of such a usage:
$ hive -e 'select * from bookcrossing.users limit 10'
See also
Refer to https://cwiki.apache.org/confluence/display/Hive/LanguageManual+Cli for more information on the options supported by the Hive CLI.
Performing a join with Hive
This recipe will guide you on how to use Hive to perform a join across two datasets. The first dataset is the book details dataset of the Book-Crossing database and the second dataset is the reviewer ratings for those books. This recipe will use Hive to find the authors with the most number of ratings of more than 3 stars.
Getting ready
Follow the previous Hive batch mode – using a query file recipe.
How to do it...
This section demonstrates how to perform a join using Hive. Proceed with the following steps:
1. Start the Hive CLI and use the Book-Crossing database:
2. $ hive
3. hive > USE bookcrossing;
4. Create the books and book ratings tables by executing the create-book-crossing.hql Hive query file after referring to the previous Hive batch mode commands using a query file recipe. Use the following commands to verify the existence of those tables in theBook-Crossing database:
5. hive > SELECT * FROM books LIMIT 10;
6. ….
7. hive > SELECT * FROM RATINGS LIMIT 10;
8. ….
9. Now, we can join the two tables using Hive's SQL-like join command:
10.SELECT
11. b.author AS author,
12. count(*) AS count
13.FROM
14. books b
15.JOIN
16. ratings r
17.ON (b.isbn=r.isbn) and r.rating>3
18.GROUP BY b.author
19.ORDER BY count DESC
20.LIMIT 100;
21. If successful, it will print the following along with the results to the console:
22.Total MapReduce jobs = 4
23....
24.2014-07-07 08:09:53 Starting to launch local task to process map join; maximum memory = 1013645312
25....
26.Launching Job 2 out of 4
27.....
28.Launching Job 3 out of 4
29....
30.2014-07-07 20:11:02,795 Stage-2 map = 100%, reduce = 100%, Cumulative CPU 8.18 sec
31.MapReduce Total cumulative CPU time: 8 seconds 180 msec
32.Ended Job = job_1404665955853_0013
33.Launching Job 4 out of 4
34.....
35.Total MapReduce CPU Time Spent: 21 seconds 360 msec
36.OK
37.Stephen King 4564
38.Nora Roberts 2909
39.John Grisham 2505
40.James Patterson 2334
41.J. K. Rowling 1742
42....
43.Time taken: 116.424 seconds, Fetched: 100 row(s)
How it works...
When executed, Hive first converts the join command into a set of MapReduce computations. These MapReduce computations will first load and parse both the datasets according to the given schema. Then, the data will be joined using the MapReduce computation according to the given join condition.
Hive supports inner joins as well as left, right, and full outer joins. Currently, Hive only supports equality-based conditions as join conditions. Hive is capable of performing several optimizations to optimize the performance of the joins based on the nature and size of the datasets.
See also
· For more information, refer to https://cwiki.apache.org/confluence/display/Hive/LanguageManual+Joins.
· The Joining two datasets using MapReduce recipe of Chapter 5, Analytics shows how to implement a join operation using MapReduce.
Creating partitioned Hive tables
This recipe will show how to use partitioned tables to store data in Hive. Partitioned tables allow us to store datasets partitioned by one or more data columns for efficient querying. The real data will reside in separate directories, where the names of the directories will form the values of the partition column. Partitioned tables can improve the performance of some queries by reducing the amount of data that Hive has to process by reading only select partitions when using an appropriate where predicate. A common example is to store transactional datasets (or other datasets with timestamps such as web logs) partitioned by the date. When the Hive table is partitioned by the date, we can query the data that belongs to a single day or a date range, reading only the data that belongs to those dates. In a non-partitioned table, this would result in a full table scan, reading all the data in that table, which can be very inefficient when you have terabytes of data mapped to a Hive table.
Getting ready
This recipe assumes that the earlier Hive batch mode - using a query file recipe has been performed. Install Hive and follow the that recipe if you have not done already.
How to do it...
This section demonstrates how to dynamically create a partitioned table in Hive. Proceed with the following steps:
1. Start Hive CLI.
2. Run the following commands to enable the dynamic partition creation in Hive:
3. hive> set hive.exec.dynamic.partition=true;
4. hive> set hive.exec.dynamic.partition.mode=nonstrict;
5. hive> set hive.exec.max.dynamic.partitions.pernode=2000;
6. Execute the following query to create the new partitioned table using the results of the select statement. In this case, we partition the table using the published year of the books. Typically, years and dates serve as good partition columns for data that spans across time (for example, log data). When dynamically inserting data to a partitioned table, the partition column should be the last column in the insert statement:
7. hive> INSERT INTO TABLE books_partitioned
8. > partition (year)
9. > SELECT
10. > isbn,
11. > title,
12. > author,
13. > publisher,
14. > image_s,
15. > image_m,
16. > image_l,
17. > year
18. > FROM books;
19.Total MapReduce jobs = 3
20.Launching Job 1 out of 3
21.……
22.Loading data to table bookcrossing.books_partitioned partition (year=null)
23. Loading partition {year=1927}
24. Loading partition {year=1941}
25. Loading partition {year=1984}
26.…….
27.Partition bookcrossing.books_partitioned{year=1982} stats: [num_files: 1, num_rows: 0, total_size: 1067082, raw_data_size: 0]
28.…
29. Execute the following query. Due to the use of the year partition column, this query will only look at the data stored in the 1982 data partition of the Hive table. If not for the partitioning, this query would have required a MapReduce computation that processes the whole dataset:
30.hive> select * from books_partitioned where year=1982 limit 10;
31.OK
32.156047624 All the King's Men Robert Penn Warren Harvest Books http://images.amazon.com/images/P/0156047624.01.THUMBZZZ.jpg http://images.amazon.com/images/P/0156047624.01.MZZZZZZZ.jpg http://images.amazon.com/images/P/0156047624.01.LZZZZZZZ.jpg 1982
33. Exit the Hive CLI and execute the following commands in the command prompt. You can see the partition directories created by Hive:
34.$ hdfs dfs -ls /user/hive/warehouse/bookcrossing.db/books_partitioned
35.Found 116 items
36.drwxr-xr-x - root hive 0 2014-07-08 20:24 /user/hive/warehouse/bookcrossing.db/books_partitioned/year=0
37.drwxr-xr-x - root hive 0 2014-07-08 20:24 /user/hive/warehouse/bookcrossing.db/books_partitioned/year=1376
38.drwxr-xr-x - root hive 0 2014-07-08 20:24 /user/hive/warehouse/bookcrossing.db/books_partitioned/year=1378
39.….
Writing Hive User-defined Functions (UDF)
As mentioned in the Using Hive built-in functions recipe, Hive supports many built-in functions for data manipulation and analysis. Hive also allows us to write our own customized functions to be used with the Hive queries. These functions are called user-defined functions, and this recipe will show you how to write a simple User-defined Function (UDF) for Hive. Hive UDFs allow us to extend the capabilities of Hive for our customized requirements, without having to resort to implementing Java MapReduce programs from scratch.
Getting ready
This recipe assumes that the earlier recipe has been performed. Install Hive and follow the earlier recipe if you have not done already.
Make sure you have Apache Ant installed in your system.
How to do it...
This section demonstrates how to implement a simple Hive UDF. Perform the following steps:
1. Use the Gradle build file in the source repository for this chapter to build the user-defined function JAR file:
2. $ gradle build
3. Start Hive CLI:
4. $ hive
5. hive > USE bookcrossing;
6. Add the newly created JAR file to the environment using the full path of the JAR file created in step 1:
7. hive> ADD JAR /home/../ hcb-c6-samples.jar;
8. Define the new UDF inside Hive using the following command:
9. hive> CREATE TEMPORARY FUNCTION filename_from_url as 'chapter6.udf. ExtractFilenameFromURL';
10. Issue the following command to obtain the filename portion of the small image associated with each book using our newly defined UDF:
11.hive> select isbn, filename_from_url(image_s, 'FILE') from books limit 10;
How it works...
Hive UDFs should extend the UDF class of Hive and implement the evaluate method to perform the custom computation that you need to perform. The input and output parameters of the evaluate method needs to be provided using the appropriate Hadoop Writable type that corresponds to the Hive data type that you want to process and receive back from the UDF:
public class ExtractFilenameFromURL extends UDF {
public Text evaluate(Text input) throws MalformedURLException {
URL url = new URL(input.toString());
Text fileNameText = new Text(FilenameUtils.getName(url.getPath()));
return fileNameText;
}
}
We can use annotations like the following to add a description to the UDF. These would be emitted if you issue a describe command to this UDF from the Hive CLI:
@UDFType(deterministic = true)
@Description(
name = "filename_from_url",
value = "Extracts and return the filename part of a URL.",
extended = "Extracts and return the filename part of a URL. "
+ "filename_from_url('http://test.org/temp/test.jpg?key=value') returns 'test.jpg'."
)
HCatalog – performing Java MapReduce computations on data mapped to Hive tables
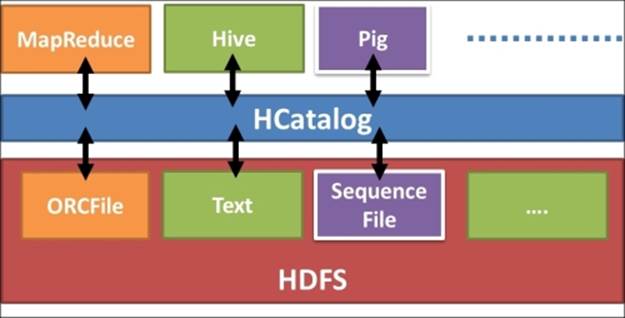
HCatalog is a meta-data abstraction layer for files stored in HDFS and makes it easy for different components to process data stored in HDFS. HCatalog abstraction is based on tabular table model and augments structure, location, storage format and other meta-data information for the data sets stored in HDFS. With HCatalog, we can use data processing tools such as Pig, Java MapReduce and others read and write data to Hive tables without worrying about the structure, storage format or the storage location of the data. HCatalog is very useful when you want to execute a Java MapReduce job or a Pig script on a data set that is stored in Hive using a binary data format such as ORCFiles. The topology can be seen as follows:
HCatalog achieves this capability by providing an interface to the Hive MetaStore enabling the other applications to utilize the Hive table metadata information. We can query the table information in HCatalog using the HCatalog Command Line Interface (CLI). HCatalog CLI is based on Hive CLI and supports Hive Data Definition Language (DDL) statements except for statements that require running a MapReduce query. HCatalog also exposes a REST API called WebHCat.
In this recipe we'll be looking at using Java MapReduce computations on top of the data stored in Hive tables by utilizing the meta-data available from HCatalog. HCatalog provides HCatInputFormat class to retrieve data from the Hive tables.
Getting ready
Make sure HCatalog is installed with Hive in your system.
How to do it...
This section demonstrates how to process Hive table data using MapReduce computations. Perform the following steps:
1. Follow the Hive batch mode commands using a query file recipe of this chapter to create and populate the bookcrossing.user Hive table that we'll be using in this recipe.
2. Compile the sample source code for this chapter by running the following gradle command from the chapter6 folder of the source repository.
$ gradle clean build uberjar
3. Run the MapReduce job using the following command. The first parameter is the database name, second parameter is the input table name and the third parameter is the output path. This job counts the number of users aged between 18 and 34 grouped by the year:
4. $ hadoop jar build/libs/hcb-c6-samples-uber.jar \
5. chapter7.hcat.HCatReadMapReduce \
6. bookcrossing users hcat_read_out
7. Inspect the results of this computation by running the following command:
8. $ hdfs dfs -cat hcat-read-out/part*
How it works...
You can find the source code for this recipe from chapter6/hcat/ HCatReadMapReduce.java file in the source folder of this chapter.
Following lines in the run() function specify the HCatalogInputFormat as the InputFormat for the computation and configures it with the input database name and table name.
// Set HCatalog as the InputFormat
job.setInputFormatClass(HCatInputFormat.class);
HCatInputFormat.setInput(job, dbName, tableName);
The map() function receives the records from the Hive table as HCatRecord values, while the map() input key does not contain any meaningful data. HCatRecord contains the data fields parsed according to the column structure of the Hive table and we can extract the fields from the HCatRecord as follows in the map function:
public void map( WritableComparable key,HCatRecord value,…)
throws IOException, InterruptedException {
HCatSchema schema = HCatBaseInputFormat.getTableSchema(context.getConfiguration());
// to avoid the "null" values in the age field
Object ageObject = value.get("age", schema);
if (ageObject instanceof Integer) {
int age = ((Integer) ageObject).intValue();
// emit age and one for count
context.write(new IntWritable(age), ONE);
}
}
}
HCatalog jars, Hive jars and their dependencies are needed in the Hadoop Classpath to execute the HCatalog MapReduce programs. We also need to supply these jars to Map and Reduce tasks by specifying the dependency libraries using the libjars parameter at the command line when invoking the Hadoop JAR command. An alternative to solve both the Hadoop Classpath and the libjars requirements is to package all the dependency jars in to a single fat-jar and use it to submit the MapReduce program.
In this sample, we use the second approach and create a fat-jar (hcb-c6-samples-uber.jar) using the Gradle build as follows:
task uberjar(type: Jar) {
archiveName = "hcb-c6-samples-uber.jar"
from files(sourceSets.main.output.classesDir)
from {configurations.compile.collect {zipTree(it)}} {
exclude "META-INF/*.SF"
exclude "META-INF/*.DSA"
exclude "META-INF/*.RSA"
}
}
HCatalog – writing data to Hive tables from Java MapReduce computations
HCatalog also allows us to write data to Hive tables from Java MapReduce computations using the HCatOutputFormat. In this recipe, we'll be looking at how to write data to a Hive table using a Java MapReduce computation. This recipe extends the computation of the previous HCatalog – performing Java MapReduce computations on data mapped to Hive tables recipe by adding table write capability.
Getting ready
Make sure HCatalog is installed with Hive in your system.
How to do it...
This section demonstrates how to write data to a Hive table using a MapReduce computation. Perform the following steps:
1. Follow the Hive batch mode – using a query file recipe of this chapter to create and populate the user Hive table that we'll be using in this recipe.
2. Compile the sample source code for this chapter by running the following gradle command from the chapter6 folder of the source repository:
3. $ gradle clean build uberjar
4. Use Hive CLI to create a hive table to store the results of the computation.
5. hive> create table hcat_out(age int, count int);
6. Run the MapReduce job using the following command. The first parameter is the database name, second parameter is the input table name and the third parameter is the output table name. This job counts the number of users aged between 18 and 34 grouped by the year and writes the results to the hcat_out table we created in step 3:
7. $ hadoop jar hcb-c6-samples-uber.jar \
8. chapter6.hcat.HCatWriteMapReduce \
9. bookcrossing users hcat_out
10. Read the results by running the following command in the hive CLI:
11.hive> select * from bookcrossing.hcat_out limit 10;
12.OK
13.hcat_out.age hcat_out.count
14.19 3941
15.20 4047
16.21 4426
17.22 4709
18.23 5450
19.24 5683
How it works...
You can find the source for the recipe from chapter6/src/chapter6/hcat/ HCatWriteMapReduce.java file.
In addition to the configurations we discussed in the previous HCatalog – performing Java MapReduce computations on data mapped to Hive tables recipe, we specify HCatalogOutputFormat as the OutputFormat for the computation in the run() function as follows. We also configure the output database and table name:
job.setOutputFormatClass(HCatOutputFormat.class);
HCatOutputFormat.setOutput(job,
OutputJobInfo.create(dbName, outTableName, null));
We have to use the DefaultHCatRecord as the job output value when writing data to a Hive table:
job.setOutputKeyClass(WritableComparable.class);
job.setOutputValueClass(DefaultHCatRecord.class);
We set the schema for the output table as follows:
HCatSchema schema = HCatOutputFormat.getTableSchema(job
.getConfiguration());
HCatOutputFormat.setSchema(job, schema);
The reduce() function outputs the data as HCatRecord values. HCatOutputFormat ignores any output keys:
public void reduce(IntWritable key, Iterable<IntWritable> values,
Context context) … {
if (key.get() < 34 & key.get() > 18) {
int count = 0;
for (IntWritable val : values) {
count += val.get();
}
HCatRecord record = new DefaultHCatRecord(2);
record.set(0, key.get());
record.set(1, count);
context.write(null, record);
}
}
All materials on the site are licensed Creative Commons Attribution-Sharealike 3.0 Unported CC BY-SA 3.0 & GNU Free Documentation License (GFDL)
If you are the copyright holder of any material contained on our site and intend to remove it, please contact our site administrator for approval.
© 2016-2026 All site design rights belong to S.Y.A.