Hadoop MapReduce v2 Cookbook, Second Edition (2015)
Chapter 7. Hadoop Ecosystem II – Pig, HBase, Mahout, and Sqoop
In this chapter, we will cover the following topics:
· Getting started with Apache Pig
· Joining two datasets using Pig
· Accessing a Hive table data in Pig using HCatalog
· Getting started with Apache HBase
· Data random access using Java client APIs
· Running MapReduce jobs on HBase
· Using Hive to insert data into HBase tables
· Getting started with Apache Mahout
· Running K-means with Mahout
· Importing data to HDFS from a relational database using Apache Sqoop
· Exporting data from HDFS to a relational database using Apache Sqoop
Introduction
Hadoop ecosystem has a family of projects that are either built on top of Hadoop or work very closely with Hadoop. These projects have given rise to an ecosystem that focuses on large-scale data processing, and often users can use several of these projects in combination to solve their big data problems.
This chapter introduces several key projects in the Hadoop ecosystem and shows how to get started with each of these projects.
We will focus on the following four projects:
· Pig: A dataflow-style data processing language for large-scale processing of data stored in HDFS
· HBase: A NoSQL-style highly scalable data store, which provides low latency, random accessible and highly scalable data storage on top of HDFS
· Mahout: A toolkit of machine-learning and data-mining tools
· Sqoop: A data movement tool for efficient bulk data transfer between Apache Hadoop ecosystem and ralational databases
Note
Some of the HBase and Mahout recipes of this chapter are based on the Chapter 5, Hadoop Ecosystem chapter of the previous edition of this book, Hadoop MapReduce Cookbook. Those recipes were originally authored by Srinath Perera.
Note
Sample code
The sample code and data files for this book are available in GitHub at https://github.com/thilg/hcb-v2. The chapter7 folder of the code repository contains the sample code for this chapter.
Sample codes can be compiled and built by issuing the gradle build command in the chapter7 folder of the code repository. Project files for Eclipse IDE and IntelliJ IDEA IDE can be generated by running the gradle eclipse and gradle idea commands respectively in the main folder of the code repository.
Some of the recipes of this chapter use the Book Crossing dataset as the sample data. This dataset is compiled by Cai-Nicolas Ziegler and comprises a list of books, list of users, and a list of ratings. The chapter6 folder of the source repository contains a cleaned sample of this dataset. You can obtain the full dataset from http://www2.informatik.uni-freiburg.de/~cziegler/BX/.
Getting started with Apache Pig
Apache Pig is a high-level language framework for Hadoop that makes it easy to analyze very large datasets stored in HDFS without having to implement complex Java MapReduce applications. The language of Pig is called Pig Latin, which is a data flow language. While the goal of both Pig and Hive frameworks is similar, the language layers of these two frameworks complement each other by providing a procedural language and a declarative language, respectively.
Pig converts Pig Latin queries in to a series of one or more MapReduce jobs in the background.
In order to install Pig, we recommend you use one of the freely available commercial Hadoop distributions as described in Chapter 1, Getting Started with Hadoop v2. Another alternative is to use Apache Bigtop to install Pig. Refer to the Bigtop-related recipe inChapter 1, Getting Started with Hadoop v2 for steps on installing Pig using the Apache Bigtop distribution.
Note
In case you don't have a working Pig and Hadoop installation, the following steps show you how to install Pig with MapReduce local mode using the local file system as the data storage. This is recommended only for learning and testing purposes.
Download and extract the latest version of Pig from http://pig.apache.org/releases.html. Add the bin directory of the extracted folder to your PATH environment variable as follows:
$ export PATH=pig-0.13.0/bin:$PATH
Use the pig command with the local flag to start the Grunt shell, as follows:
$ pig -x local
grunt>
This recipe demonstrates how to use Pig queries to process data in HDFS. We will use the BookCrossing dataset for this recipe. This recipe will use Pig to process the BookCrossing user dataset and select a list of users who are aged between 18 and 34, ordered by their age.
Getting ready
This recipe requires a working Pig installation integrated with a Hadoop YARN cluster. You can run these samples using the Pig local mode as well. However, in such cases you'll have to use the local file system instead of HDFS to load the data.
How to do it...
This section describes how to use Pig Latin queries to find users aged between 18 and 34 sorted by the age from the BookCrossing user dataset. Proceed with the following steps:
1. Copy and extract the BookCrossing sample dataset (chapter6-bookcrossing-data.tar.gz) from the chapter6 folder of the code repository.
2. Create a directory in HDFS and copy the BookCrossing user dataset into that directory, as follows:
3. $ hdfs dfs –mkdir book-crossing
4. $ hdfs dfs -copyFromLocal \
5. chapter6/data/BX-Users-Prepro.txt book-crossing
6. Start the Pig Grunt shell and issue the following Pig commands:
7. $ pig
8. grunt> A = LOAD 'book-crossing/BX-Users-Prepro.txt' USING PigStorage(';') AS (userid:int, location:chararray, age:int);
9. grunt> B = FILTER A BY age > 18 AND age < 34 ;
10.grunt> C = ORDER B BY age;
11. Print the output of the processing flow by using the DUMP operator in the same grunt shell. The queries we issued in step 3 get executed only after we issue the following command (or any other data output command). You should notice a series of MapReduce jobs after issuing the following two commands:
12.grunt> D = LIMIT C 10;
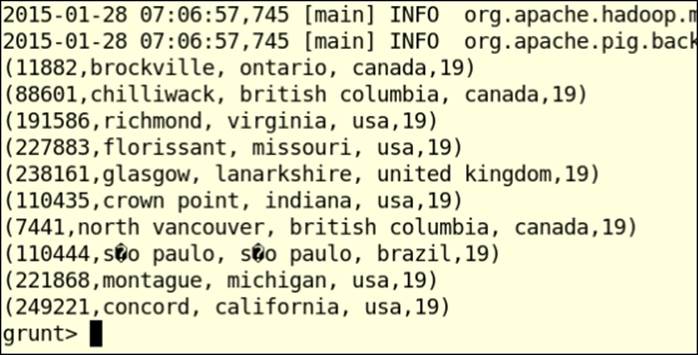
13.grunt> DUMP D;
The output of the preceding command is as follows:
14. You can also use the ILLUSTRATE operator to test your queries. The Illustrate operator retrieves a small sample of data from your input data and runs your queries on that data, giving faster turnaround times to review and test the Pig queries:
15.grunt> ILLUSTRATE B;
The output of the preceding command is as follows:
How it works...
When we issue Pig queries, Pig internally converts them to a set of MapReduce jobs and executes them in the Hadoop cluster to obtain the desired result. For almost all the data queries, Pig queries are much easier to write and manage than MapReduce applications.
The following line instructs Pig to load the data file in to a relation named A. We can provide either a single file or a directory to the load command. Using PigStorage(';') instructs Pig to load the data using the default load function with ; as the separator. When the MapReduce job is executed, Pig's load function parses the input data and assigns it to the fields of the schema described in the AS clause. Any data point that doesn't fit in to the given schema would result in an error or a NULL value at the time of execution:
grunt> A = LOAD 'book-crossing/BX-Users-Prepro.txt' USING PigStorage(';') AS (userid:int, location:chararray, age:int);
The FILTER operator selects data from the relation based on a given condition. In the following line of code, we select the data points, where the age of the user is between 18 and 34:
grunt> B = FILTER A BY age > 18 AND age < 34;
The ORDER BY operator sorts the data in a relation based on one or more data fields. In the following query, we sort the relation B by the age of the user:
grunt> C = ORDER B BY age;
The LIMIT operator limits the number of data points (tuples) in a relation using the given number. In the following query, we limit relation C to only 10 tuples. The following step makes it easy to inspect the data using the DUMP operator:
grunt> D = LIMIT C 10;
There's more...
Pig Latin also contains a large set of built-in functions providing functionalities in the areas of math, string processing, data time processing, basic statistics, data loading and storing, and several others. A list of Pig's built-in functions can be found fromhttp://pig.apache.org/docs/r0.13.0/func.html. You can also implement Pig User Defined Functions to perform any custom processing that you require.
See also
· Refer to http://pig.apache.org/docs/r0.13.0/basic.html for documentation on Pig Latin data types, operators, and other basics
· Refer to http://pig.apache.org/docs/r0.13.0/test.html for documentation on Pig Latin testing operators such as ILLUSTRATE, DUMP, and DESCRIBE
Joining two datasets using Pig
This recipe explains how to join two datasets using Pig. We will use the BookCrossing dataset for this recipe. This recipe will use Pig to join the Books dataset with the Book-Ratings dataset and find the distribution of high ratings (with rating>3) with respect to authors.
How to do it...
This section describes how to use a Pig Latin script to find author's review rating distribution by joining the Books dataset with the Ratings dataset:
1. Extract the BookCrossing sample dataset (chapter6-bookcrossing-data.tar.gz) from the chapter6 folder of the code repository.
2. Create a directory in HDFS and copy the BookCrossing Books dataset and the Book-Ratings dataset to that directory, as follows:
3. $ hdfs dfs –mkdir book-crossing
4. $ hdfs dfs -copyFromLocal \
5. chapter6/data/BX-Books-Prepro.txt book-crossing
6. $ hdfs dfs -copyFromLocal \
7. BX-Book-Ratings-Prepro.txt book-crossing
8. Review the chapter7/pig-scripts/book-ratings-join.pig script.
9. Execute the preceding Pig Latin script using the following command:
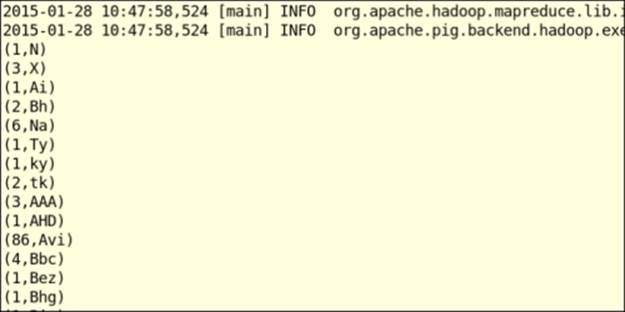
10.$ pig –f pig-scripts/book-ratings-join.pig
The output of the preceding command is as follows:
How it works...
The following Pig commands load the data to the Books and BookRatings relations. As described in the earlier recipe, PigStorage(';') instructs Pig to use ';' as the field separator:
Books = LOAD 'book-crossing/BX-Books-Prepro.txt'
USING PigStorage(';') AS (
isbn:chararray,
title:chararray,
author:chararray,
year:int,
publisher:chararray,
image_s:chararray,
image_m:chararray,
image_l:chararray);
Ratings = LOAD 'book-crossing/BX-Book-Ratings-Prepro.txt'
USING PigStorage(';') AS (
userid:int,
isbn:chararray,
ratings:int);
We select only the reviews with good ratings using the following FILTER operation:
GoodRatings = FILTER R BY ratings > 3;
Then, we join the Books and GoodRatings relations using ISBN as the common criteria. This is an inner equi join and produces a Cartesian product of all the records filtered by the join criteria. In other words, the resultant relation contains a record for each matching book and a book rating (number of matching books X number of good ratings):
J = JOIN Books BY isbn, GoodRatings by isbn;
The following statement groups the join result by the author. Each group now contains all the records belonging to an author. Assuming we have a matching book for each good rating, the number of records in a group would be the number of good reviews the author of that group has received.
JA = GROUP J BY author;
The following statement counts the number of records in each group of relation JA and output the author name and the count of good reviews for books written by that author:
JB = FORACH JA GENERATE group, COUNT(J);
OA = LIMIT JB 100;
DUMP OA;
You can manually issue the preceding commands in the Pig Grunt shell to gain a more detailed understanding of the data flow. While doing so, you can use LIMIT and DUMP operators to understand the result of each step.
There's more...
Pig supports outer joins as well. However, currently Pig only supports equi joins, where the join condition has to be based on equality.
Accessing a Hive table data in Pig using HCatalog
There can be scenarios where we want to access the same dataset from both Hive and Pig. There can also be scenarios where we want to process the results of a Hive query that's mapped to a Hive table using Pig. In such cases, we can take advantage of the HCatalog integration in Pig to access HCatalog managed Hive tables from Pig without worrying about the data definition, data storage format, or the storage location.
Getting ready
Follow the Hive batch mode - using a query file recipe from Chapter 6, Hadoop Ecosystem – Apache Hive to create the Hive table that we'll be using in this recipe.
How to do it...
This section demonstrates how to access a Hive table from Pig. Proceed with the following steps:
1. Start the Pig's Grunt shell with the -useHCatalog flag, as follows. This will load the HCatalog JARs that are necessary to access HCatalog managed tables in Hive:
2. $ pig -useHCatalog
3. Use the following command in the Grunt shell to load the users table from the bookcrossing Hive database into a Pig relation named users. HCatLoader facilitates the reading of data from HCatalog managed tables:
4. grunt> users = LOAD 'bookcrossing.users' USING org.apache.hive.hcatalog.pig.HCatLoader();
5. Use the describe operator as follows to inspect the schema of the users relation:
6. grunt> DESCRIBE users;
7. users: {user_id: int,location: chararray,age: int}
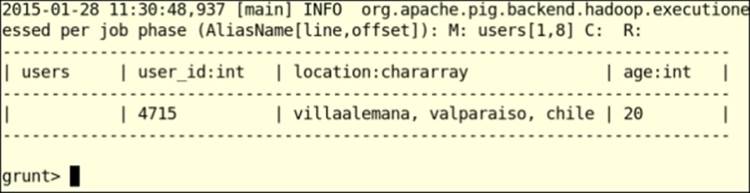
8. Inspect the data of the users relation by issuing the following command in the Pig Grunt shell. The relations loaded through Hive can be used similarly to any other relation in Pig:
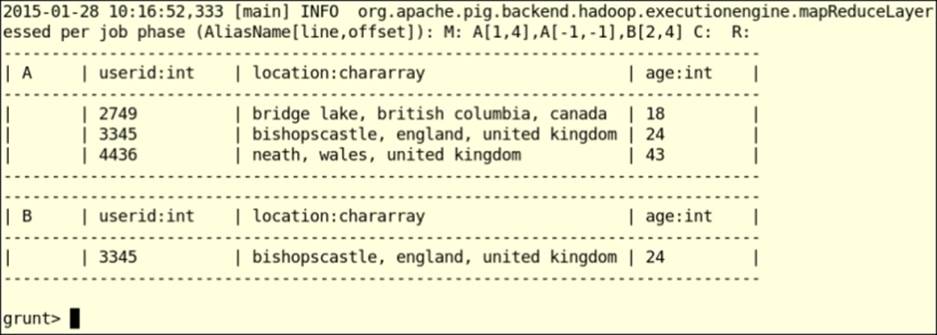
9. grunt> ILLUSTRATE users;
The output of the preceding command is as follows:
There's more...
You can also store data in Hive tables from Pig using the HCatStorer interface to write data to HCatalog managed tables, as follows:
grunt> STORE r INTO 'database.table'
USING org.apache.hcatalog.pig.HCatStorer();
See also
The HCatalog – performing Java MapReduce computations on data mapped to Hive tables and HCatalog – writing data to Hive tables from Java MapReduce computations recipes of Chapter 6, Hadoop Ecosystem – Apache Hive.
Getting started with Apache HBase
HBase is a highly scalable distributed NoSQL data store that supports columnar-style data storage. HBase is modeled after Google's Bigtable. HBase uses HDFS for data storage and allows random access of data, which is not possible in HDFS.
The HBase table data model can be visualized as a very large multi-dimensional sorted map. HBase tables consist of rows, each of which has a unique Row Key, followed by a list of columns. Each row can have any number of columns and doesn't have to adhere to a fixed schema. Each data cell (column in a particular row) can have multiple values based on timestamps, resulting in a three-dimensional table (row, column, timestamp). HBase stores all the rows and columns in a sorted order making it possible to randomly access the data.
Although the data model has some similarities with the relational data model, unlike relational tables, different rows in the HBase data model may have different columns. For instance, the second row may contain completely different name-value pairs from the first one. HBase also doesn't support transactions or atomicity across the rows. You can find more details about this data model from the Google's Bigtable paper, http://research.google.com/archive/bigtable.html.
HBase supports the storage of very large datasets and provides low-latency high-throughput reads and writes. HBase powers some of the very demanding real-time data processing systems such as online advertisement agencies; it has powered Facebook Messenger as well. The data stored in HBase can also be processed using MapReduce.
HBase cluster architecture consists of one or more master nodes and a set of region servers. HBase tables are horizontally split into regions, which are served and managed by region servers. Regions are further broken down vertically by column families and saved in HDFS as files. Column families are a logical grouping of columns in a table, which results in physical grouping of columns at the storage layer.
Obtaining the maximum performance out of HBase requires careful designing of tables, taking its distributed nature in to consideration. RowKeys play an important role in the performance as the region distribution and any querying is based on RowKeys. Recipes in this book do not focus on such optimizations.
In order to install HBase, we recommend that you use one of the freely available commercial Hadoop distributions as described in Chapter 1, Getting Started with Hadoop v2. Another alternative is to use an HBase cluster on the Amazon cloud environment as described in Chapter 2, Cloud Deployments – Using Hadoop YARN on Cloud Environments.
Getting ready
This recipe requires an Apache HBase installation integrated with a Hadoop YARN cluster. Make sure to start all the configured HBase Master and RegionServer processes before we begin.
How to do it...
This section demonstrates how to get started with Apache HBase. We are going to create a simple HBase table and insert a row of data to that table using the HBase shell. Proceed with the following steps:
1. Start the HBase shell by executing the following command:
2. $ hbase shell
3. ……
4. hbase(main):001:0>
5. Issue the following command in the HBase shell to check the version:
6. hbase(main):002:0> version
7. 0.98.4.2.2.0.0-2041-hadoop2, r18e3e58ae6ca5ef5e9c60e3129a1089a8656f91d, Wed Nov 19 15:10:28 EST 2014
8. Create an HBase table named test table. List all the tables to verify the creation of the test table, as follows:
9. hbase(main):003:0> create 'test', 'cf'
10.0 row(s) in 0.4210 seconds
11.=> Hbase::Table - test
12.
13.hbase(main):004:0> list
14.TABLE
15.SYSTEM.CATALOG
16.SYSTEM.SEQUENCE
17.SYSTEM.STATS
18.test
19.4 row(s) in 0.0360 seconds
20. Now, insert a row to the test table using the HBase put command as follows. Use row1 as the RowKey, cf:a as the column name and 10 as the value
21.hbase(main):005:0> put 'test', 'row1', 'cf:a', '10'
22.0 row(s) in 0.0080 seconds
23. Scan the test table using the following command, which prints all the data in the table:
24.hbase(main):006:0> scan 'test'
25.ROW COLUMN+CELL
26.row1column=cf:a, timestamp=1338485017447, value=10
27.1 row(s) in 0.0320 seconds
28. Retrieve the value from the table using the following command by giving test as the table name and row1 as RowKey:
29.hbase(main):007:0> get 'test', 'row1'
30.COLUMN CELL
31.cf:atimestamp=1338485017447, value=10
32.1 row(s) in 0.0130 seconds
33. Disable and drop the test table using the disable and drop commands, as follows:
34.hbase(main):014:0> disable 'test'
35.0 row(s) in 11.3290 seconds
36.
37.hbase(main):015:0> drop 'test'
38.0 row(s) in 0.4500 seconds
There's more...
In addition to the next several recipes in this chapter, the following recipes in this book also use HBase and provide more use cases for HBase:
· The Loading large datasets to an Apache HBase data store - importtsv and bulkload recipe of Chapter 10, Mass Text Data Processing
· The Creating TF and TF-IDF vectors for the text data recipe of Chapter 10, Mass Text Data Processing
· The Generating the in-links graph for crawled web pages recipe of Chapter 8, Searching and Indexing
· The Deploying an Apache HBase cluster on Amazon EC2 using EMR recipe of Chapter 2, Cloud Deployments – Using Hadoop YARN on Cloud Environments
See also
· Extensive documentation on HBase is available at http://hbase.apache.org/book.html.
Data random access using Java client APIs
The previous recipe introduced the command-line interface for HBase. This recipe demonstrates how we can use the Java API to interact with HBase.
Getting ready
This recipe requires an Apache HBase installation integrated with a Hadoop YARN cluster. Make sure to start all the configured HBase Master and RegionServer processes before we begin.
How to do it...
The following step executes an HBase Java client to store and retrieve data from an HBase table.
Run the HBaseClient Java program by running the following command from the chapter 7 folder of the sample source repository:
$ gradle execute HBaseClient
How it works...
The source code for the preceding Java program is available in the chapter7/src/chapter7/hbase/HBaseClient.java file in the source repository. The following code creates an HBase configuration object and then creates a connection to the test HBase table. This step obtains the HBase hostnames and ports using ZooKeeper. In high throughput production scenarios, it's recommended to connect to HBase tables using HConnection instances.
Configuration conf = HBaseConfiguration.create();
HTable table = new HTable(conf, "test");
The following commands will add a data row to the HBase table:
Put put = new Put("row1".getBytes());
put.add("cf".getBytes(), "b".getBytes(), "val2".getBytes());
table.put(put);
Search for data by performing a scan, as follows:
Scan s = new Scan();
s.addFamily(Bytes.toBytes("cf"));
ResultScanner results = table.getScanner(s);
Running MapReduce jobs on HBase
This recipe explains how to run a MapReduce job that reads and writes data directly to and from HBase storage.
HBase provides abstract mapper and reducer implementations that users can extend to read and write directly from HBase. This recipe explains how to write a sample MapReduce application using these mappers and reducers.
We will use the World Bank's Human Development Report (HDR) data, by country, which shows Gross National Income (GNI) per capita of each country. The dataset can be found at http://hdr.undp.org/en/statistics/data/. A sample of this dataset is available in the chapter7/resources/hdi-data.csv file in the sample source code repository. Using MapReduce, we will calculate average value of GNI per capita, by country.
Getting ready
This recipe requires an Apache HBase installation integrated with a Hadoop YARN cluster. Make sure to start all the configured HBase Master and RegionServer processes before we begin.
How to do it...
This section demonstrates how to run a MapReduce job on data stored in HBase. Proceed with the following steps:
1. Execute the gradle build command from the chapter7 folder of the source repository to compile the source code, as follows:
2. $ gradle build
3. Run the following command from the chapter7 folder to upload the sample data to HBase. This command uses the chapter7/src/chapter7/hbase/HDIDataUploader to upload the data:
4. $ gradle executeHDIDataUpload
5. Run the MapReduce job by running the following command from HADOOP_HOME:
6. $ hadoop jar hcb-c7-samples.jar \
7. chapter7.hbase.AverageGINByCountryCalcualtor
8. View the results in HBase by running the following command from the HBase shell:
9. $ hbase shell
10.hbase(main):009:0> scan 'HDIResult'
How it works...
You can find the Java HBase MapReduce sample in chapter7/src/chapter7/hbase/AverageGINByCountryCalcualtor.java. Since we are going to use HBase to read the input as well as to write the output, we use the HBase TableMapper and TableReducer helper classes to implement our MapReduce application. We configure the TableMapper and the TableReducer using the utility methods given in the TableMapReduceUtil class. The Scan object is used to specify the criteria to be used by the mapper when reading the input data from the HBase data store.
Using Hive to insert data into HBase tables
Hive-HBase integration gives us the ability to query HBase tables using the Hive Query Language (HQL). Hive-HBase integration supports mapping of existing HBase tables to Hive tables as well as the creation of new HBase tables using HQL. Both reading data from HBase tables and inserting data into HBase tables are supported through HQL, including performing joins between Hive-mapped HBase tables and traditional Hive tables.
The following recipe uses HQL to create an HBase table to store the books table of the bookcrossing dataset and populate that table using sample data.
Getting ready
Follow the Hive batch mode - using a query file recipe of Chapter 6, Hadoop Ecosystem – Apache Hive to create the Hive table that we'll be using in this recipe.
How to do it...
This section demonstrates how to access a Hive table from Pig. Proceed with the following steps:
1. Start the Hive shell with the following command:
2. $ hive
3. Issue the following command in the Hive shell to create the HBase table. The HBaseStorageHandler class takes care of the data communication with HBase. We have to specify the hbase.column.mapping property to instruct Hive on how to map the columns of the HBase table into the corresponding Hive table:
4. CREATE TABLE IF NOT EXISTS books_hbase
5. (key STRING,
6. title STRING,
7. author STRING,
8. year INT,
9. publisher STRING,
10. image_s STRING,
11. image_m STRING,
12. image_l STRING)
13.STORED BY 'org.apache.hadoop.hive.hbase.HBaseStorageHandler'
14.WITH SERDEPROPERTIES ('hbase.columns.mapping' = ':key,f:title,f:author,f:year,f:publisher,img:image_s,img:image_m,img:image_l')
15.TBLPROPERTIES ('hbase.table.name' = 'bx-books');
16. Issue the following Hive query to insert data into the newly created HBase table. RowKeys in HBase tables have to be unique. When there is more than one row with duplicate RowKeys, HBase stores only one of them and discards the others. Use the book ISBN, which is unique for each book, as the RowKey in the following example:
17.hive> insert into table books_hbase select * from bookcrossing.books;
18.….
19.Total MapReduce CPU Time Spent: 23 seconds 810 msec
20.OK
21.books.isbn books.title books.author books.year books.publisher books.image_s books.image_m books.image_l
22.Time taken: 37.817 seconds
23. Use the following command to inspect the data inserted to the Hive mapped HBase table:
24.hive> select * from books_hbase limit 10;
25. We can also perform Hive functions, such as count, on the table we just created, as follows:
26.hive> select count(*) from books_hbase;
27....
28.Total MapReduce CPU Time Spent: 22 seconds 510 msec
29.OK
30._c0
31.271379
32. Start the HBase shell and issue the list command to see the list of tables in HBase, as follows:
33.$ hbase shell
34.hbase(main):001:0> list
35.TABLE
36.……
37.SYSTEM.STATS
38.bx-books
39.……
40.8 row(s) in 1.4260 seconds
41. Inspect the data of the bx-books HBase table using the following command:
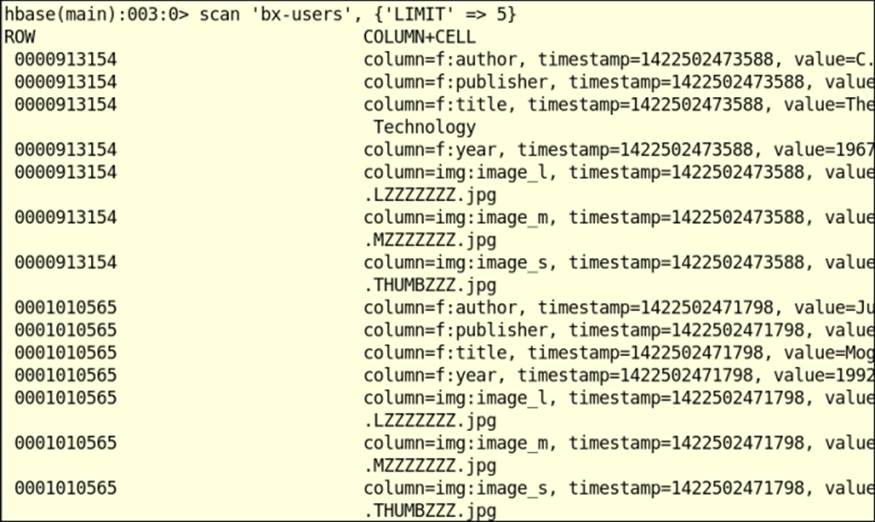
42.hbase(main):003:0> scan 'bx-books', {'LIMIT' => 5}
The output of the preceding command is as follows:
See also
· The HCatalog – performing Java MapReduce computations on data mapped to Hive tables and HCatalog – writing data to Hive tables from Java MapReduce computations recipes of Chapter 6, Hadoop Ecosystem – Apache Hive.
Getting started with Apache Mahout
Mahout is an effort to implement well-known machine learning and data mining algorithms using the Hadoop MapReduce framework. Users can use Mahout algorithm implementations in their data processing applications without going through the complexity of implementing these algorithms using Hadoop MapReduce from scratch.
This recipe explains how to get started with Mahout.
In order to install Mahout, we recommend you use one of the freely available commercial Hadoop distributions as described in Chapter 1, Getting Started with Hadoop v2. Another alternative is to use Apache Bigtop to install Mahout. Refer to the Bigtop-related recipe in Chapter 1, Getting Started with Hadoop v2 for steps on installing Mahout using the Apache Bigtop distribution.
How to do it...
This section demonstrates how to get started with Mahout by running a sample KMeans Clustering computation. You can run and verify the Mahout installation by carrying out the following steps:
1. Download the input data from http://archive.ics.uci.edu/ml/databases/synthetic_control/synthetic_control.data as follows:
2. $ wget http://archive.ics.uci.edu/ml/databases/synthetic_control/synthetic_control.data
3. Create an HDFS directory named testdata and copy the downloaded file to that directory using the following command:
4. $ hdfs dfs –mkdir testdata
5. $ hdfs dfs –copyFromLocal synthetic_control.data testdata
6. Run the K-mean sample by running the following command:
7. $ mahout org.apache.mahout.clustering.syntheticcontrol.kmeans.Job
8. If all goes well, it will process and print out the clusters:
9. 12/06/19 21:18:15 INFO kmeans.Job: Running with default arguments
10.12/06/19 21:18:15 INFO kmeans.Job: Preparing Input
11.12/06/19 21:18:15 WARN mapred.JobClient: Use GenericOptionsParser for parsing the arguments. Applications should implement Tool for the same.
12......
13.2/06/19 21:19:38 INFO clustering.ClusterDumper: Wrote 6 clusters
14.12/06/19 21:19:38 INFO driver.MahoutDriver: Program took 83559 ms (Minutes: 1.39265)
How it works...
Mahout is a collection of MapReduce jobs and you can run them using the mahout command. The preceding instructions installed and verified Mahout by running a K-means sample that comes with the Mahout distribution.
There's more...
In addition to the next recipe in this chapter, the following recipes in Chapter 10, Mass Text Data Processing of this book also use Mahout:
· The Creating TF and TF-IDF vectors for the text data recipe of Chapter 10, Mass Text Data Processing
· The Clustering text data using Apache Mahout recipe of Chapter 10, Mass Text Data Processing
· The Topic discovery using Latent Dirichlet Allocation (LDA) recipe of Chapter 10, Mass Text Data Processing
· The Document classification using Mahout Naive Bayes Classifier recipe of Chapter 10, Mass Text Data Processing
Running K-means with Mahout
K-means is a clustering algorithm. A clustering algorithm takes data points defined in an N-dimensional space and groups them into multiple clusters by considering the distance between those data points. A cluster is a set of data points such that the distance between the data points inside the cluster is much less than the distance from data points within cluster to data points outside the cluster. More details about the K-means clustering can be found from lecture 4 (http://www.youtube.com/watch?v=1ZDybXl212Q) of the Cluster computing and MapReduce lecture series by Google.
In this recipe, we will use a dataset that includes the Human Development Report (HDR) by country. The HDR describes different countries based on several human development measures. You can find the dataset at http://hdr.undp.org/en/statistics/data/. A sample of this dataset is available in the chapter7/resources/hdi-data.csv file in the sample source code repository. This recipe will use K-means to cluster countries based on HDR dimensions.
Getting ready
This recipe needs a Mahout installation. Follow the previous recipe to install Mahout, if you haven't already done so.
How to do it...
This section demonstrates how to use the Mahout K-means algorithm to process a dataset. Proceed with the following steps:
1. Use the following Gradle command to compile the sample:
2. $ gradle build
3. Copy the file, chapter7/resources/countries4Kmean.data, to the testdata directory in HDFS. Create the testdata directory.
4. Run the sample by running the following command:
5. $ gradle executeKMeans
How it works...
The preceding sample shows how you can configure and use K-means implementation from Java. You can find the source of this sample in the chapter7/src/chapter7/KMeansSample.java file. When we run the code, it initializes the K-means MapReduce job and executes it using the MapReduce framework.
Importing data to HDFS from a relational database using Apache Sqoop
Apache Sqoop is a project that enables efficient bulk transfer of data between Apache Hadoop ecosystem and relational data stores. Sqoop can be used to automate the process of importing data from or exporting data to RDBMSs such as MySQL, PostgreSQL, Oracle, and so on. Sqoop also supports database appliances such as Netezza and Teradata, as well. It supports parallel import/export of data using multiple Map tasks and also supports throttling to reduce the load on the external RDBMSs.
In this recipe, we'll be using Sqoop2 to import data from a PostgreSQL database in to HDFS. We also include instructions for Sqoop 1.4.x as well, due to the wide availability and usage of that Sqoop version in the current Hadoop distributions.
We recommend that you use one of the freely available commercial Hadoop distributions as described in Chapter 1, Getting Started with Hadoop v2, to install Apache Sqoop2 or Sqoop 1.4.x. Another alternative is to use Apache Bigtop to install Apache Sqoop2.
Getting ready
A working Hadoop2 cluster with a Sqoop2 or Sqoop 1.4.x installation is required for this recipe.
We will be using a PostgreSQL database. You can also use another RDBMS for this purpose, but certain steps of the following recipe will have to be changed accordingly.
How to do it...
This section demonstrates how to import data from a PostgreSQL database in to HDFS using SQOOP. Proceed with the following steps:
1. Download the appropriate PostgreSQL JDBC driver from http://jdbc.postgresql.org/download.html and copy it to the lib directory of the SQOOP web app using the following command and restart the SQOOP server:
2. $ cp postgresql-XXXX.jdbcX.jar \
3. /usr/lib/sqoop/webapps/sqoop/WEB-INF/lib/
Note
For Sqoop 1.4.x, copy the PostgreSQL JDBC driver jar to the lib folder of the Sqoop installation.
4. Create an user and a database in the PostgreSQL, as follows. Use your OS username as the user in the PostgreSQL database as well. For this recipe, you can use an existing PostgreSQL user and an existing database as well:
5. $ sudo su - postgres
6. $ psql
7. postgres=# CREATE USER aluck WITH PASSWORD 'xxx123';
8. CREATE ROLE
9. postgres=# CREATE DATABASE test;
10.CREATE DATABASE
11.postgres=# GRANT ALL PRIVILEGES ON DATABASE test TO aluck;
12.GRANT
13.postgres=# \q
14. Log in to the newly created database. Create a schema and a database table using the following statements in the PostgreSQL shell:
15.$ psql test
16.
17.test=> CREATE SCHEMA bookcrossing;
18.CREATE SCHEMA
19.test=> CREATE TABLE bookcrossing.ratings
20. (user_id INT,
21. isbn TEXT,
22. rating TEXT);
23.CREATE TABLE
24. Load the book-ratings.txt dataset in the chapter7 folder of the Git repository into the table we just created, using the following command:
25.test=> \COPY bookcrossing.ratings FROM '…/chapter7/book-ratings.txt' DELIMITER ';'
26.test=# select * from bookcrossing.ratings limit 10;
27.
28. user_id | isbn | rating
29.---------+------------+--------
30. 276725 | 034545104X | 0
31. 276726 | 0155061224 | 5
32. 276727 | 0446520802 | 0
33. 276729 | 052165615X | 3
34. 276729 | 0521795028 | 6
35. 276733 | 2080674722 | 0
36. 276736 | 3257224281 | 8
37. 276737 | 0600570967 | 6
38. 276744 | 038550120X | 7
39. 276745 | 342310538 | 10
40.(10 rows)
Note
Following steps (6 to 9) are for Sqoop2. Skip to step 10 for instructions on Sqoop 1.4.x.
41. Create a SQOOP connection using the following command in the SQOOP command line client and answer the prompted questions:
42.$ sqoop
43.sqoop:000> create connection --cid 1
44.Creating connection for connector with id 1
45.Please fill following values to create new connection object
46.Name: t2
47.
48.Connection configuration
49.
50.JDBC Driver Class: org.postgresql.Driver
51.JDBC Connection String: jdbc:postgresql://localhost:5432/test
52.Username: testuser
53.Password: ****
54.JDBC Connection Properties:
55.There are currently 0 values in the map:
56.…
57.New connection was successfully created with validation status FINE and persistent id 3
58. Create a SQOOP job to import data into HDFS, as follows:
59.sqoop:000> create job --xid 1 --type import
60.Creating job for connection with id 1
61.Please fill following values to create new job object
62.Name: importest
63.Database configuration
64.Schema name: bookcrossing
65.Table name: ratings
66.Table SQL statement:
67.Table column names:
68.Partition column name: user_id
69.Boundary query:
70.
71.Output configuration
72.Storage type:
73. 0 : HDFS
74.Choose: 0
75.Output format:
76. 0 : TEXT_FILE
77. 1 : SEQUENCE_FILE
78.Choose: 0
79.Output directory: /user/test/book_ratings_import
80.New job was successfully created with validation status FINE and persistent id 8
81. Submit the Sqoop job with the following command:
82.sqoop:000> submission start --jid 8
83.Submission details
84.Job id: 8
85.Status: BOOTING
86.Creation date: 2014-10-15 00:01:20 EDT
87. Monitor the job status using this command:
88.sqoop:000> submission status --jid 8
89.Submission details
90.Job id: 8
91.Status: SUCCEEDED
92.Creation date: 2014-10-15 00:01:20 EDT
93. Check the HDFS directory for the data. You can map this data to Hive tables for further querying. Next two steps are only for Sqoop 1.4.x. Skip them if you are using Sqoop 2.
94. Issue the following Sqoop command to import the data from PostgreSQL directly in to a Hive table. Substitute the PostgreSQL database IP address (or hostname), database port and database username accordingly. After the successful execution of the following command, a folder named 'ratings' containing the data imported from PostgreSQL will be created in your HDFS home directory:
95.$ sqoop import \
96.--connect jdbc:postgresql://<ip_address>:5432/test \
97.--table ratings \
98.--username aluck -P \
99.--direct -- --schema bookcrossing
100. Issue the following Sqoop command to import the data from PostgreSQL in to your HDFS home directory. Substitute the PostgreSQL database IP address (or hostname), database port and database username accordingly. After the successful execution of the following command, a Hive table named 'ratings' containing the data imported from PostgreSQL will be created in your current Hive database:
101. $ sqoop import \
102. --connect jdbc:postgresql://<ip_address>:5432/test \
103. --table ratings \
104. --username aluck -P \
105. --hive-import \
106. --direct -- --schema bookcrossing
Exporting data from HDFS to a relational database using Apache Sqoop
In this recipe, we'll be using Sqoop2 or Sqoop 1.4.x to export data from HDFS to a PostgreSQL database.
Getting ready
A working Hadoop2 cluster with a Sqoop2 or Sqoop 1.4.x installation is required for this recipe.
We will be using a PostgreSQL database. You can also use another RDBMS for this purpose as well, but the following recipe steps will have to be changed accordingly.
Follow the previous recipe, Importing data to HDFS from a relational database using Apache Sqoop.
How to do it...
This section demonstrates how to export data from HDFS to a PostgreSQL database using SQOOP. Proceed with the following steps:
1. Follow the step 1 of the previous Importing data to HDFS from a relational database using Apache Sqoop recipe to create a user and a database in the PostgreSQL database.
2. Create a database table using the following statements in the PostgreSQL shell:
3. $ psql test
4. test=> CREATE TABLE bookcrossing.ratings_copy
5. (user_id INT,
6. isbn TEXT,
7. rating TEXT);
Note
Following steps (3 to 5) are for Sqoop2. Skip to step 6 for instructions on Sqoop 1.4.x.
8. Create a SQOOP job to export data from HDFS, as follows:
9. sqoop:000> create job --xid 1 --type export
10.Creating job for connection with id 1
11.Please fill following values to create new job object
12.Name: exporttest
13.
14.Database configuration
15.Schema name: bookcrossing
16.Table name: ratings_copy
17.Table SQL statement:
18.Table column names:
19.Input configuration
20.Input directory: /user/test/book_ratings_import
21.Throttling resources
22.Extractors:
23.Loaders:
24.New job was successfully created with validation status FINE and persistent id 13
25. Submit the Sqoop job with the following command:
26.sqoop:000> submission start --jid 13
27.Submission details
28.Job id: 13
29.Status: BOOTING
30. …..
31. Monitor the job status using this command. Skip to step 7:
32.sqoop:000> submission status --jid 13
33.Submission details
34.Job id: 13
35.Status: SUCCEEDED
36. This step is only for Sqoop 1.4.x. Reexecute the step 11 of the previous Importing data to HDFS from a relational database using Apache Sqoop recipe to make sure you have the "ratings" folder with the imported data in your HDFS home directory. Issue the following Sqoop command to export the data from HDFS directly in to the PostgreSQL table. Substitute the PostgreSQL database IP address (or hostname), database port, database username, export data source directory accordingly. Execution of this step will result in a Hadoop MapReduce job:
37.$ sqoop export \
38.--connect jdbc:postgresql://<ip_address>:5432/test \
39.--table ratings_copy \
40.--username aluck -P \
41.--export-dir /user/aluck/ratings
42.--input-fields-terminated-by ','
43.--lines-terminated-by '\n'
44.-- --schema bookcrossing
45. Log in to the PostgreSQL shell and check the imported data:
46.test=# select * from bookcrossing.ratings_copy limit 10;
47. user_id | isbn | rating
48.---------+------------+--------
49. 276725 | 034545104X | 0
50. 276726 | 0155061224 | 5
51. 276727 | 0446520802 | 0
52. 276729 | 052165615X | 3
53. 276729 | 0521795028 | 6
All materials on the site are licensed Creative Commons Attribution-Sharealike 3.0 Unported CC BY-SA 3.0 & GNU Free Documentation License (GFDL)
If you are the copyright holder of any material contained on our site and intend to remove it, please contact our site administrator for approval.
© 2016-2026 All site design rights belong to S.Y.A.